UC Software 5.8.0AA For Polycom Trio Solution Administrator Guide Admin
polycom_trio_admin_guide
User Manual:
Open the PDF directly: View PDF ![]() .
.
Page Count: 498 [warning: Documents this large are best viewed by clicking the View PDF Link!]
- Contents
- Before You Begin
- Getting Started
- Supported Network Configurations
- Supported Inbound and Outbound Ports
- Manually Configuring Phones
- Provisioning Phones
- Working with Configuration Files
- Configuring Security Options
- Certificates
- Upgrading the Software
- Diagnostics and Status
- View the Phone's Status
- Test Phone Hardware
- Upload a Phone's Configuration
- Perform Network Diagnostics
- Restart the Paired Device
- Restart the Polycom Trio System and the Paired Device
- Restarting the Polycom Trio System at a Scheduled Time
- Reset the Polycom Trio System to Factory Default Settings at Power-up
- Reset the Polycom Trio System to Factory Default Settings from Home Menu
- Reset the Polycom Trio Visual+ to Factory Default Settings
- Reset the Phone and Configuration
- Access Video Transmission Diagnostics
- Status Indicators on the Polycom Trio Solution
- Monitoring the Phone's Memory Usage
- System Logs
- Troubleshooting
- Content
- Content Sharing
- Screen Mirroring
- Hardware and Power for Polycom Trio Systems
- Audio Features
- Automatic Gain Control
- Background Noise Suppression
- Comfort Noise
- Voice Activity Detection
- Comfort Noise Payload Packets
- Synthesized Call Progress Tones
- Jitter Buffer and Packet Error Concealment
- Dual-Tone Multi-Frequency Tones
- Acoustic Echo Cancellation
- Polycom NoiseBlock
- Audio Output Options
- Audio Input Options
- USB Audio Calls
- Location of Audio Alerts
- Ringtones
- Sound Effects
- Supported Audio Codecs for Polycom Trio Solution
- IEEE 802.1p/Q
- Voice Quality Monitoring (VQMon)
- Pairing with Polycom Trio Systems
- Video Features for Polycom Trio
- Phone Display and Appearances
- Administrator Menu on Polycom Trio Systems
- Polycom Trio Visual+ and Trio VisualPro Display
- Polycom Trio System Theme
- Polycom Trio System Display Name
- Polycom Trio System Status Messages
- Olson Time Zone Configuration
- Time Zone Location Description
- Time and Date
- Phone Languages
- Hide the MAC Address
- Unique Line Labels for Registration Lines
- Polycom Trio System Number Formatting
- Number or Custom Label
- Custom Icons for Contacts and Line Registrations
- Capture Your Device's Current Screen
- Directories and Contacts
- Call Controls
- Microphone Mute
- Persistent Microphone Mute
- Call Timer
- Called Party Identification
- Connected Party Identification
- Calling Party Identification
- Remote Party Caller ID from SIP Messages
- Calling Line Identification
- SIP Header Warnings
- Distinctive Call Waiting
- Do Not Disturb
- Remote Party Disconnect Alert Tone
- Call Waiting Alerts
- Missed Call Notifications
- Call Hold
- Call Transfer
- Call Forwarding
- Automatic Off-Hook Call Placement
- Multiple Line Keys Per Registration
- Multiple Call Appearances
- Bridged Line Appearance
- Voicemail
- Local Call Recording
- Local and Centralized Conference Calls on Polycom Trio
- Conference Meeting Dial-In Options
- Hybrid Line Registration
- Local Digit Map
- Enhanced 911 (E.911)
- Multilevel Precedence and Preemption (MLPP) for Assured Services - Session Initiation Protocol (AS-SIP)
- International Dialing Prefix
- Shared Lines
- User Profiles
- Network
- Two-Way Active Measurement Protocol
- System and Model Names
- Incoming Network Signaling Validation
- SIP Subscription Timers
- Enhanced IPv4 ICMP Management
- Provisional Polling of Polycom Phones
- SIP Instance Support
- IP Type-of-Service
- Static DNS Cache
- DNS SIP Server Name Resolution
- Server Redundancy
- Network Address Translation (NAT)
- Real-Time Transport Protocol (RTP) Ports
- Wireless Network Connectivity (Wi-Fi)
- Bluetooth and NFC-Assisted Bluetooth for Polycom Trio Systems
- Third-Party Servers
- BroadSoft BroadWorks Server
- Authentication with BroadWorks Xtended Service Platform (XSP) Service Interface
- Polycom BroadSoft UC-One Application
- BroadSoft UC-One Directory Parameters
- Anonymous Call Rejection
- Simultaneous Ring Personal
- Line ID Blocking
- BroadWorks Anywhere
- Remote Office
- BroadSoft UC-One Credentials
- BroadSoft Server-Based Call Forwarding
- Microsoft Exchange Integration
- BroadSoft BroadWorks Server
- Device Parameters
- Configuration Parameters
- Quick Setup Soft Key Parameters
- Per-Registration Call Parameters
- Remote Packet Capture Parameters
- Per-Registration Dial Plan Parameters
- Local Contact Directory File Size Parameters
- Feature Activation/Deactivation Parameters
- HTTPD Web Server Parameters
- Home Screen Parameters
- Feature License Parameters
- Chord Parameters
- Message Waiting Parameters
- Ethernet Interface MTU Parameters
- Presence Parameters
- Provisioning Parameters
- Configuration Request Parameters
- General Security Parameters
- User Preferences Parameters
- Upgrade Parameters
- Voice Parameters
- Session Description Protocol (SDP) Parameters
- Web Configuration Utility Parameters
- XML Streaming Protocol Parameters
- Session Headers

ADMINISTRATOR GUIDE 5.8.0AA | January 2019 | 3725-20727-012A
Polycom Trio™ Solution

Copyright© 2019, Polycom, Inc. All rights reserved. No part of this document may be reproduced,
translated into another language or format, or transmitted in any form or by any means, electronic or
mechanical, for any purpose, without the express written permission of Polycom, Inc.
6001 America Center Drive
San Jose, CA 95002
USA
Trademarks Polycom®, the Polycom logo and the names and marks associated with Polycom products
are trademarks and/or service marks of Polycom, Inc. and are registered and/or common law marks in the
United States and various other countries.
All other trademarks are property of their respective owners. No portion hereof may be reproduced or
transmitted in any form or by any means, for any purpose other than the recipient's personal use, without
the express written permission of Polycom.
End User License Agreement By installing, copying, or otherwise using this product, you acknowledge
that you have read, understand and agree to be bound by the terms and conditions of the End User
License Agreement for this product. The EULA for this product is available on the Polycom Support page
for the product.
Patent Information The accompanying product may be protected by one or more U.S. and foreign
patents and/or pending patent applications held by Polycom, Inc.
Open Source Software Used in this Product This product may contain open source software. You may
receive the open source software from Polycom up to three (3) years after the distribution date of the
applicable product or software at a charge not greater than the cost to Polycom of shipping or distributing
the software to you. To receive software information, as well as the open source software code used in
this product, contact Polycom by email at OpenSourceVideo@polycom.com (for video products) or
OpenSourceVoice@polycom.com (for voice products).
Disclaimer While Polycom uses reasonable efforts to include accurate and up-to-date information in this
document, Polycom makes no warranties or representations as to its accuracy. Polycom assumes no
liability or responsibility for any typographical or other errors or omissions in the content of this document.
Limitation of Liability Polycom and/or its respective suppliers make no representations about the
suitability of the information contained in this document for any purpose. Information is provided "as is"
without warranty of any kind and is subject to change without notice. The entire risk arising out of its use
remains with the recipient. In no event shall Polycom and/or its respective suppliers be liable for any
direct, consequential, incidental, special, punitive or other damages whatsoever (including without
limitation, damages for loss of business profits, business interruption, or loss of business information),
even if Polycom has been advised of the possibility of such damages.
Customer Feedback We are striving to improve our documentation quality and we appreciate your
feedback. Email your opinions and comments to DocumentationFeedback@polycom.com.
Polycom Support Visit the Polycom Support Center for End User License Agreements, software
downloads, product documents, product licenses, troubleshooting tips, service requests, and more.

Contents
Before You Begin............................................................................................. 14
Audience, Purpose, and Required Skills...........................................................................14
Getting Help...................................................................................................................... 14
Polycom and Partner Resources............................................................................14
Documentation Feedback...................................................................................... 15
Getting Started................................................................................................. 16
Product Overview..............................................................................................................16
Supported Phones and Accessories...................................................................... 16
Working With Polycom UC Software.................................................................................17
Configuring Polycom Phones................................................................................. 17
Record Version Information....................................................................................17
Supported Network Configurations................................................................18
Ethernet Line Rates.......................................................................................................... 18
Supported Denial of Service Filters........................................................................19
Supported 802.1x Configurations...........................................................................19
Ethernet Network Connection Methods............................................................................ 19
Virtual Local Area Networks (VLANs).................................................................... 19
Link Layer Discovery Protocol and Supported Type Length Values................................. 20
Supported TLVs..................................................................................................... 21
DHCPv6 or DHCPv4 Parameters..................................................................................... 25
IPv4 Network Parameters...................................................................................... 25
IPv6 Network Parameters...................................................................................... 26
Vendor Specific DHCP Options..............................................................................28
Parse Vendor ID Information.............................................................................................29
Supported Inbound and Outbound Ports...................................................... 30
Inbound Ports for Polycom Trio Systems..........................................................................30
Outbound Ports for Polycom Trio System.........................................................................31
Polycom Trio Visual+ Network Ports.................................................................................32
Inbound Ports for Trio VisualPro Systems........................................................................ 33
Outbound Ports for Trio VisualPro Systems..................................................................... 34
Manually Configuring Phones.........................................................................36
Configuring Phones Using the Phone Menu..................................................................... 36
Polycom, Inc. 1
Configuring Phones Using the Web Configuration Utility..................................................36
Configure a Phone Using Simple Setup.................................................................36
Configuring Phones by Importing Configuration Files............................................ 37
Reset to Default Settings........................................................................................38
Configure a Phone Using a USB Flash Drive................................................................... 38
Provisioning Phones........................................................................................40
Network Requirements for Provisioning............................................................................40
Recommended Security Settings........................................................................... 40
Dynamic Host Configuration Protocol (DHCP).......................................................41
Synchronized Time Settings...................................................................................41
DNS........................................................................................................................42
User Accounts........................................................................................................ 42
Provisioning Server Discovery Methods........................................................................... 42
Supported Provisioning Protocols.......................................................................... 42
Setting Up Your Provisioning Server.................................................................................43
Install Provisioning Tools........................................................................................43
Set Up a Single Provisioning Server...................................................................... 43
Set Up Multiple Provisioning Servers..................................................................... 44
Test the Provisioning Settings................................................................................45
Provisioning Phones......................................................................................................... 45
Provision Multiple Phones...................................................................................... 45
Provision Phones Using Variable Substitution....................................................... 46
Provision an Individual Phone................................................................................ 47
Provision a Phone Group....................................................................................... 48
Working with Configuration Files................................................................... 49
Master Configuration File.................................................................................................. 49
XML Resource Files............................................................................................... 51
Configuration Templates........................................................................................ 51
Configuring Security Options......................................................................... 54
Administrator and User Passwords...................................................................................54
Change the Default Administrator Password on the Phone................................... 55
Change the Default Passwords in the Web Configuration Utility........................... 55
Administrator and User Password Parameters...................................................... 55
Disabling External Ports and Features..............................................................................56
Disable Unused Ports and Features Parameters...................................................57
Visual Security Classification............................................................................................ 59
Visual Security Classification Parameters..............................................................59
Contents
Polycom, Inc. 2
Encryption......................................................................................................................... 60
Encrypting Configuration Files............................................................................... 60
Configuration File Encryption Parameters..............................................................61
Voice over Secure IP........................................................................................................ 62
VoSIP Parameters..................................................................................................62
Securing Phone Calls with SRTP......................................................................................63
SRTP Parameters.................................................................................................. 63
Enabling Users to Lock Phones........................................................................................ 66
Phone Lock Parameters.........................................................................................67
Locking the Basic Settings Menu...................................................................................... 68
Basic Settings Menu Lock Parameters.................................................................. 69
Secondary Port Link Status Report...................................................................................69
Secondary Port Link Status Report Parameters.................................................... 69
802.1X Authentication....................................................................................................... 70
802.1X Authentication Parameters.........................................................................71
SCEP Security Protocol.................................................................................................... 72
SCEP Parameters.................................................................................................. 72
Certificates........................................................................................................76
Using the Factory-Installed Certificate.............................................................................. 77
Check for a Device Certificate................................................................................77
Customizing Certificate Use..............................................................................................78
Determining TLS Platform Profiles or TLS Application Profiles..............................78
TLS Protocol Configuration for Supported Applications......................................... 81
TLS Parameters..................................................................................................... 86
Configurable TLS Cipher Suites.............................................................................89
Create a Certificate Signing Request................................................................................90
Download Certificates to a Polycom Phone........................................................... 91
Custom URL Location for LDAP Server CA Certificate.....................................................92
Custom URL Location for LDAP Server Certificates Parameters.......................... 92
Confirm the Installed LDAP Server Certificates on the Phone............................... 92
Online Certificate Status Protocol..................................................................................... 93
Online Certificate Status Protocol Parameters.......................................................93
Upgrading the Software...................................................................................94
Upgrade UC Software Using a USB Flash Drive.............................................................. 94
Upgrading UC Software on a Single Phone......................................................................95
User-Controlled Software Update..................................................................................... 95
User-Controlled Software Update Parameters.......................................................95
Updating Camera Firmware ............................................................................................. 96
Contents
Polycom, Inc. 3
Diagnostics and Status....................................................................................97
View the Phone's Status................................................................................................... 97
Test Phone Hardware....................................................................................................... 98
Upload a Phone's Configuration........................................................................................99
Perform Network Diagnostics............................................................................................99
Restart the Paired Device................................................................................................. 99
Restart the Polycom Trio System and the Paired Device............................................... 100
Restarting the Polycom Trio System at a Scheduled Time.............................................100
Scheduled Restart Parameters............................................................................ 100
Reset the Polycom Trio System to Factory Default Settings at Power-up...................... 101
Reset the Polycom Trio System to Factory Default Settings from Home Menu..............101
Reset the Polycom Trio Visual+ to Factory Default Settings...........................................102
Reset the Phone and Configuration................................................................................ 102
Reset to Factory Parameter................................................................................. 103
Access Video Transmission Diagnostics........................................................................ 103
Status Indicators on the Polycom Trio Solution.............................................................. 103
Monitoring the Phone's Memory Usage.......................................................................... 105
Check Memory Usage from the Phone................................................................ 105
View Memory Usage Errors in the Application Log.............................................. 105
Phone Memory Resources...................................................................................105
System Logs................................................................................................... 107
Configuring Log Files...................................................................................................... 107
Severity of Logging Event Parameters.................................................................108
Log File Collection and Storage Parameters........................................................108
Logging Levels................................................................................................................ 110
Logging Level, Change, and Render Parameters for Polycom Trio.....................111
Logging Parameters............................................................................................. 115
Upload Logs to the Provisioning Server..........................................................................116
Upload Polycom Trio System Logs................................................................................. 116
Uploading Logs to a USB Flash Drive.............................................................................117
USB Logging Parameter...................................................................................... 117
Troubleshooting............................................................................................. 118
Updater Error Messages and Possible Solutions............................................................118
Polycom UC Software Error Messages...........................................................................119
Network Authentication Failure Error Codes...................................................................120
Power and Startup Issues............................................................................................... 122
Screen and System Access Issues.................................................................................122
Contents
Polycom, Inc. 4
Calling Issues..................................................................................................................123
Display Issues................................................................................................................. 124
Software Upgrade Issues................................................................................................125
Provisioning Issues......................................................................................................... 126
Content............................................................................................................127
Content Sharing.............................................................................................................. 127
Content Sharing Parameters................................................................................127
Bluetooth Discovery on Polycom Trio with the Polycom Content Application ..... 130
Polycom People+Content IP................................................................................ 130
Polycom People+Content IP over USB................................................................132
Polycom Trio System Support for Video-based Screen Sharing (VbSS)............. 133
HDMI and VGA Content with the Paired Trio VisualPro Parameters................... 134
Screen Mirroring..............................................................................................................135
Screen Mirroring with AirPlay-Certified Devices...................................................135
Screen Mirroring with Miracast-Certified Devices................................................ 138
Hardware and Power for Polycom Trio Systems........................................ 142
Powering the Polycom Trio 8500 and 8800 Systems..................................................... 142
Powering the Polycom Trio 8800......................................................................... 142
Powering the Polycom Trio 8500......................................................................... 142
Power the Polycom Trio 8800 System with the Optional Power Injector............. 142
Powering the Polycom Trio Visual+ Solution........................................................143
Polycom Trio System Power Management..................................................................... 143
Polycom Trio 8500 System Power Management................................................. 144
USB Port Power Management............................................................................. 144
Using Power over Ethernet (POE) Class 0.......................................................... 144
Using Power Sourcing Equipment Power (PoE PSE Power)...............................144
Power-Saving on Polycom Trio.......................................................................................145
Power-Saving Parameters................................................................................... 145
Audio Features............................................................................................... 149
Automatic Gain Control................................................................................................... 149
Background Noise Suppression......................................................................................150
Comfort Noise................................................................................................................. 150
Voice Activity Detection...................................................................................................150
Voice Activity Detection Parameters.................................................................... 150
Comfort Noise Payload Packets..................................................................................... 151
Comfort Noise Payload Packets Parameters....................................................... 151
Synthesized Call Progress Tones................................................................................... 152
Contents
Polycom, Inc. 5
Jitter Buffer and Packet Error Concealment....................................................................152
Dual-Tone Multi-Frequency Tones..................................................................................152
DTMF Tone Parameters.......................................................................................152
Acoustic Echo Cancellation.............................................................................................154
Acoustic Echo Cancellation Parameters.............................................................. 154
Polycom NoiseBlock....................................................................................................... 155
Polycom NoiseBlock Parameters......................................................................... 155
Audio Output Options......................................................................................................155
Audio Output Options Parameters....................................................................... 156
Audio Input Options.........................................................................................................156
USB Audio Calls..............................................................................................................157
USB Audio Call Parameters................................................................................. 157
Location of Audio Alerts.................................................................................................. 158
Audio Alert Parameters........................................................................................ 158
Ringtones........................................................................................................................ 158
Supported Ring Classes.......................................................................................159
Ringtone Parameters........................................................................................... 159
Sound Effects..................................................................................................................160
Sampled Audio Files............................................................................................ 161
Sampled Audio File Parameters...........................................................................162
Sound Effect Patterns.......................................................................................... 162
Sound Effect Pattern Parameters.........................................................................163
Supported Audio Codecs for Polycom Trio Solution....................................................... 166
Polycom Trio Supported Audio Codec Specifications.......................................... 167
Audio Codec Parameters..................................................................................... 168
SILK Audio Codec................................................................................................ 171
IEEE 802.1p/Q................................................................................................................ 174
IEEE 802.1p/Q Parameters..................................................................................174
Voice Quality Monitoring (VQMon)..................................................................................175
VQMon Reports....................................................................................................175
VQMon Parameters..............................................................................................176
Pairing with Polycom Trio Systems............................................................. 180
Pairing Polycom EagleEye Director II Camera System with Polycom Trio..................... 180
Pair Polycom EagleEye Director II Camera System............................................ 181
Pairing the Polycom Trio Visual+ or Trio VisualPro with Polycom Trio Systems............ 182
Manually Pair with Polycom Trio Systems........................................................... 182
Polycom Trio Visual+ Pairing Parameters............................................................183
Trio VisualPro Pairing Parameters....................................................................... 185
Identify Paired Devices.........................................................................................186
Place the Polycom Trio Visual+ in Pairing Diagnostic Mode................................186
Contents
Polycom, Inc. 6
Daisy-Chaining Polycom Trio Systems........................................................................... 186
Daisy-Chaining Requirements..............................................................................187
Polycom Trio System Daisy-Chain Scenarios......................................................187
Daisy-Chain Polycom Trio Systems..................................................................... 188
Video Features for Polycom Trio.................................................................. 189
Polycom Trio Visual+ and Trio VisualPro Video Layouts................................................189
Polycom Trio Visual+ and Trio VisualPro Video Layout Parameters................... 190
Video and Camera Options on Polycom Trio..................................................................190
Video Quality Parameters.................................................................................... 191
Video and Camera Parameters............................................................................192
Supported Video Codecs with Polycom Trio...................................................................207
Video Codec Parameters for Polycom Trio.......................................................... 207
Toggling Between Audio-only or Audio-Video Calls on Polycom Trio.............................208
Audio-only or Audio-Video Call Parameters.........................................................209
I-Frames..........................................................................................................................210
Video Parameters........................................................................................................... 211
Video Codec Preference Parameters...................................................................213
Video Profile Parameters for Polycom Trio.......................................................... 214
Phone Display and Appearances..................................................................221
Administrator Menu on Polycom Trio Systems............................................................... 221
Administrator Menu Parameters...........................................................................221
Polycom Trio Visual+ and Trio VisualPro Display...........................................................222
Polycom Trio Visual+ and Trio VisualPro Display Parameters.............................222
Polycom Trio System Theme.......................................................................................... 225
Polycom Trio System Theme Parameters............................................................225
Polycom Trio System Display Name...............................................................................226
System Display Name Parameters...................................................................... 226
Polycom Trio System Status Messages..........................................................................228
Polycom Trio System Status Message Parameters............................................. 228
Olson Time Zone Configuration...................................................................................... 228
Olson Time Zone Parameters.............................................................................. 229
Set an Olson Time Zone with the Web Configuration Utility................................ 229
Set an Olson Time Zone from the Device Menu.................................................. 230
Olson Time Zone IDs........................................................................................... 230
Time Zone Location Description..................................................................................... 233
Time Zone Location Parameters.......................................................................... 234
Time and Date.................................................................................................................236
Time and Date Display Parameters..................................................................... 236
Phone Languages........................................................................................................... 242
Contents
Polycom, Inc. 7
Change the Phone Language and Keyboard Layouts......................................... 242
Phone Language Parameters.............................................................................. 243
Multilingual Parameters........................................................................................243
Access the Country of Operation Menu in Set Language.................................... 245
Add a Language for the Phone Display and Menu...............................................245
Hide the MAC Address....................................................................................................246
Hide MAC Address Parameters........................................................................... 246
Unique Line Labels for Registration Lines...................................................................... 246
Unique Line Labels for Registration Lines Parameters........................................ 247
Polycom Trio System Number Formatting...................................................................... 248
Polycom Trio System Number Formatting Parameters........................................248
Number or Custom Label................................................................................................ 249
Configure the Number or Label from the System.................................................249
Number and Label Parameters............................................................................ 249
Custom Icons for Contacts and Line Registrations......................................................... 250
Custom Icon Parameters......................................................................................251
Example: Configure an Icon for a Line Registration.............................................251
Example: Set Icons for Speed Dial Contacts....................................................... 252
Capture Your Device's Current Screen...........................................................................252
Capture Current Phone Screen Parameters........................................................ 253
Directories and Contacts...............................................................................254
Local Contact Directory...................................................................................................254
Local Contact Directory Parameters.................................................................... 254
Maximum Capacity of the Local Contact Directory.............................................. 257
Creating Per-Phone Directory Files......................................................................257
Local Contact Directory File Size Parameters......................................................258
Speed Dials.....................................................................................................................261
Speed Dial Contacts Parameters......................................................................... 262
Corporate Directory.........................................................................................................262
Corporate Directory Parameters.......................................................................... 262
Call Logs......................................................................................................................... 269
Call Log Parameters.............................................................................................269
Call Log Elements and Attributes......................................................................... 271
Resetting Contacts and Recent Calls Lists on Polycom Trio System............................. 273
Call Controls................................................................................................... 274
Microphone Mute............................................................................................................ 275
Microphone Mute Parameters.............................................................................. 275
Persistent Microphone Mute........................................................................................... 275
Persistent Microphone Mute Parameters............................................................. 276
Contents
Polycom, Inc. 8
Call Timer........................................................................................................................276
Called Party Identification............................................................................................... 276
Calling Party Identification Parameters................................................................ 276
Connected Party Identification........................................................................................ 277
Calling Party Identification...............................................................................................277
Calling Party Identification Parameters................................................................ 278
Remote Party Caller ID from SIP Messages...................................................................278
Remote Party Caller ID from SIP Messages Parameters.................................... 278
Calling Line Identification................................................................................................ 280
Calling Line Identification Parameters..................................................................280
SIP Header Warnings..................................................................................................... 281
SIP Header Warning Parameters.........................................................................281
Distinctive Call Waiting....................................................................................................282
Distinctive Call Waiting Parameters..................................................................... 282
Do Not Disturb.................................................................................................................282
Server-Based Do Not Disturb...............................................................................282
Do Not Disturb Parameters.................................................................................. 283
Remote Party Disconnect Alert Tone..............................................................................285
Remote Party Disconnect Alert Tone Parameters............................................... 285
Call Waiting Alerts...........................................................................................................285
Call Waiting Alert Parameters.............................................................................. 286
Missed Call Notifications................................................................................................. 286
Missed Call Notification Parameters.................................................................... 286
Call Hold..........................................................................................................................287
Call Hold Parameters........................................................................................... 288
Hold Implementation............................................................................................ 289
Call Transfer....................................................................................................................289
Call Transfer Parameters..................................................................................... 289
Call Forwarding............................................................................................................... 290
Call Forward on Shared Lines..............................................................................291
Call Forwarding Parameters.................................................................................291
Automatic Off-Hook Call Placement................................................................................296
Automatic Off-Hook Call Placement Parameters................................................. 296
Multiple Line Keys Per Registration................................................................................ 297
Multiple Line Keys Per Registration Parameters..................................................297
Multiple Call Appearances.............................................................................................. 297
Multiple Call Appearance Parameters..................................................................298
Bridged Line Appearance................................................................................................299
Bridged Line Appearance Signaling..................................................................... 299
Bridged Line Appearance Parameters................................................................. 300
Voicemail.........................................................................................................................301
Voicemail Parameters.......................................................................................... 301
Contents
Polycom, Inc. 9
Local Call Recording....................................................................................................... 302
Local Call Recording Parameters.........................................................................302
Local and Centralized Conference Calls on Polycom Trio..............................................303
Local and Centralized Conference Call Parameters............................................ 303
Conference Meeting Dial-In Options............................................................................... 304
Conference Meeting Dial-In Options Parameters.................................................305
Hybrid Line Registration..................................................................................................306
Hybrid Line Registration Limitations.....................................................................307
Hybrid Line Registration Parameters................................................................... 307
Configure Hybrid Line Registration using the Web Configuration Utility.............. 308
Local Digit Map............................................................................................................... 308
Local Digit Maps Parameters............................................................................... 309
Open SIP Digit Map..............................................................................................315
Generating Secondary Dial Tone with Digit Maps................................................316
Enhanced 911 (E.911).................................................................................................... 316
Enhanced 911 (E.911) Parameters......................................................................317
Multilevel Precedence and Preemption (MLPP) for Assured Services - Session
Initiation Protocol (AS-SIP)........................................................................................ 324
Preemption Behavior on Low Priority Calls.......................................................... 325
MLPP with AS-SIP Parameters............................................................................326
International Dialing Prefix.............................................................................................. 327
International Dialing Prefix Parameters................................................................327
Shared Lines...................................................................................................329
Shared Call Appearances............................................................................................... 329
Shared Call Appearances Parameters.................................................................329
Private Hold on Shared Lines......................................................................................... 349
Private Hold on Shared Lines Parameters........................................................... 349
Intercom Calls................................................................................................................. 350
Creating a Custom Intercom Soft Key..................................................................350
Intercom Calls Parameters...................................................................................350
Group Paging.................................................................................................................. 351
Group Paging Parameters....................................................................................351
User Profiles................................................................................................... 355
User Profile Parameters..................................................................................................355
Remotely Logging Out Users.......................................................................................... 357
Authentication of User Profiles........................................................................................357
Server Authentication of User Profiles................................................................. 357
Phone Authentication of User Profiles..................................................................359
Contents
Polycom, Inc. 10
Network........................................................................................................... 361
Two-Way Active Measurement Protocol......................................................................... 361
TWAMP Limitations..............................................................................................361
Two-Way Active Measurement Protocol Configuration Parameters.................... 362
System and Model Names.............................................................................................. 362
Incoming Network Signaling Validation...........................................................................363
Network Signaling Validation Parameters............................................................ 363
SIP Subscription Timers..................................................................................................364
SIP Subscription Timers Parameters................................................................... 364
Enhanced IPv4 ICMP Management................................................................................365
IPv4 Parameters...................................................................................................365
Provisional Polling of Polycom Phones...........................................................................366
Provisional Polling Parameters............................................................................ 366
SIP Instance Support...................................................................................................... 368
SIP Instance Parameters..................................................................................... 369
IP Type-of-Service.......................................................................................................... 369
IP Type-of-Service Parameters............................................................................ 369
Static DNS Cache........................................................................................................... 373
Configuring Static DNS........................................................................................ 373
Example Static DNS Cache Configuration........................................................... 383
DNS SIP Server Name Resolution..................................................................................386
Customer Phone Configuration............................................................................ 387
For Outgoing Calls (INVITE Fallback).................................................................. 387
Phone Operation for Registration.........................................................................388
Recommended Practices for Fallback Deployments............................................389
Server Redundancy........................................................................................................ 389
Server Redundancy Parameters.......................................................................... 390
Network Address Translation (NAT)............................................................................... 394
Network Address Translation Parameters............................................................394
Real-Time Transport Protocol (RTP) Ports..................................................................... 395
RTP Ports Parameters......................................................................................... 396
Wireless Network Connectivity (Wi-Fi)............................................................................398
Wi-Fi Parameters................................................................................................. 399
Enable Wi-Fi on the Polycom Trio 8800...............................................................402
Configuring Wireless Network Settings on the Polycom Trio Phones..................402
Bluetooth and NFC-Assisted Bluetooth for Polycom Trio Systems.................................403
Bluetooth and NFC-Assisted Bluetooth Parameters............................................ 403
Third-Party Servers........................................................................................ 405
BroadSoft BroadWorks Server........................................................................................405
Contents
Polycom, Inc. 11
Authentication with BroadWorks Xtended Service Platform (XSP) Service
Interface.......................................................................................................... 405
Polycom BroadSoft UC-One Application..............................................................407
BroadSoft UC-One Directory Parameters............................................................ 410
Anonymous Call Rejection................................................................................... 411
Simultaneous Ring Personal................................................................................ 412
Line ID Blocking................................................................................................... 412
BroadWorks Anywhere.........................................................................................413
Remote Office...................................................................................................... 414
BroadSoft UC-One Credentials............................................................................ 414
BroadSoft Server-Based Call Forwarding............................................................ 415
Microsoft Exchange Integration.......................................................................................416
Integrating with Microsoft Exchange.................................................................... 416
Polycom Trio Solution with Skype for Business................................................... 418
Private Meetings in Microsoft Exchange.............................................................. 418
Configuring the Microsoft Exchange Server.........................................................420
Join a Meeting with a SIP URI..............................................................................429
Microsoft Exchange Advanced Login................................................................... 431
Device Parameters......................................................................................... 433
Changing Device Parameters......................................................................................... 433
Types of Device Parameters................................................................................ 433
Device Parameters..........................................................................................................434
Configuration Parameters............................................................................. 450
Quick Setup Soft Key Parameters.................................................................................. 450
Per-Registration Call Parameters................................................................................... 451
Remote Packet Capture Parameters.............................................................................. 455
Per-Registration Dial Plan Parameters........................................................................... 456
Local Contact Directory File Size Parameters................................................................ 460
Parameter Elements for the Local Contact Directory........................................... 461
Feature Activation/Deactivation Parameters...................................................................464
HTTPD Web Server Parameters.....................................................................................465
Home Screen Parameters...............................................................................................467
Feature License Parameters...........................................................................................469
Chord Parameters...........................................................................................................470
Message Waiting Parameters......................................................................................... 471
Ethernet Interface MTU Parameters............................................................................... 472
Presence Parameters..................................................................................................... 473
Provisioning Parameters................................................................................................. 474
Configuration Request Parameters.................................................................................475
Contents
Polycom, Inc. 12
General Security Parameters..........................................................................................475
DHCP Parameters................................................................................................476
Domain Name System (DNS) Parameters...........................................................476
TCP Keep-Alive Parameters................................................................................ 477
File Transfer Parameters......................................................................................478
User Preferences Parameters.........................................................................................479
Upgrade Parameters.......................................................................................................486
Voice Parameters............................................................................................................487
Acoustic Echo Suppression (AES) Parameters................................................... 488
Comfort Noise Parameters...................................................................................488
Voice Jitter Buffer Parameters............................................................................. 490
Session Description Protocol (SDP) Parameters............................................................493
Web Configuration Utility Parameters............................................................................. 494
XML Streaming Protocol Parameters..............................................................................495
Session Headers.............................................................................................................495
Session Header Parameters................................................................................ 496
Contents
Polycom, Inc. 13

Before You Begin
Topics:
•Audience, Purpose, and Required Skills
•Getting Help
This guide describes how to administer, configure, and provision Polycom phones and accessories.
The information in this guide applies to the following Polycom devices except where noted:
• Polycom Trio™ 8500
• Polycom Trio™ 8800
• Polycom Trio™ Visual+
Note: The Polycom Trio 8800 and 8500 systems are also known as Polycom RealPresence Trio 8800
and 8500 systems.
Audience, Purpose, and Required Skills
This guide is written for a technical audience.
You must be familiar with the following concepts before beginning:
• Current telecommunications practices, protocols, and principles
• Telecommunication basics, video teleconferencing, and voice or data equipment
• Open SIP networks and VoIP endpoint environments
Getting Help
For more information about installing, configuring, and administering Polycom products, refer to the
Polycom Documentation Library or Documents & Software at Polycom Support.
Polycom and Partner Resources
In addition to this guide, the following documents and other resources provide details about Polycom UC
Software:
• To access all Polycom UC Software releases and documentation, see Polycom Voice Support.
• To access Polycom Trio system documentation and support resources, see Polycom Trio on
Polycom Support.
• You can find Request for Comments (RFC) documents by entering the RFC number at http://
www.ietf.org/rfc.html.
• For information on IP PBX and softswitch vendors, see Polycom Desktop Phone Compatibility. If
you’re using the Polycom Trio solution, see Polycom Trio and SoundStation IP Platform
Compatibility.
Polycom, Inc. 14

To find all Polycom partner solutions, see Strategic Global Partner Solutions.
Documentation Feedback
We welcome your feedback to improve the quality of Polycom documentation.
You can email Documentation Feedback for any important queries or suggestions related to this
documentation.
Before You Begin
Polycom, Inc. 15

Getting Started
Topics:
•Product Overview
•Working With Polycom UC Software
Polycom UC software is a binary file image and contains a digital signature that prevents tampering or the
loading of rogue software images.
Each release of software is a new image file.
Product Overview
Polycom UC software manages the protocol stack, the digital signal processor (DSP), the user interface,
and the network interaction on Polycom phones.
You can deploy Polycom UC software by configuring individual phones, but Polycom recommends setting
up a provisioning server on your LAN or the internet for large-scale deployments.
UC software implements the following functions and features on the phones:
• VoIP signaling for a wide range of voice and video telephony functions using SIP signaling for call
setup and control.
• SIP and H.323 signaling for video telephony. Support for H.323 varies by phone model.
• Industry-standard security techniques for ensuring that all provisioning, signaling, and media
transactions are robustly authenticated and encrypted.
• Advanced audio signal processing for handset, headset, and speakerphone communications using
a wide range of audio codecs.
• Flexible provisioning methods to support single phone, small business, and large multi-site
enterprise deployments.
Supported Phones and Accessories
The following table lists the product names, model names, and part numbers for Polycom phones and
devices that support Polycom UC Software.
Polycom Trio Product Name, Model Name, and Part Number
Product Name Model Name Part Number
Polycom Trio 8500 Polycom Trio8500 3111-66700-001
Polycom Trio 8800 Polycom Trio8500 3111-66700-001
Polycom Trio Visual+ Polycom TrioVisualPlus 3111-66420-001
Polycom, Inc. 16
Working With Polycom UC Software
Polycom phones come installed with updater software that resides in the flash memory of the phone.
When you boot up or reboot the phone, the updater automatically updates, downloads, and installs new
software versions or configuration files as needed, based on the server or phone settings.
Configuring Polycom Phones
Polycom provides several methods to configure or provision phones. The method you use depends on
the number of phones, the phone model, and how you want to apply features and settings.
You can use multiple methods concurrently to provision and configure features, but some methods have
a higher priority than others when you use multiple methods concurrently —settings you make using a
higher priority configuration method override settings made using a lower priority method. When using
multiple configuration methods, a setting you make using a lower-priority method does not apply to or
override a duplicate setting made using a higher-priority method.
The provisioning and configuration methods in order of priority:
1. Quick Setup
2. Phone menu
3. Web Configuration Utility
4. Skype for Business in-band provisioning
5. USB
6. Polycom® Resource Manager
7. Centralized provisioning
8. Default phone values
Polycom phones can boot up without the use of configuration files, and you can specify a SIP server
address and a registration address (the equivalent of a phone number) in a configuration file before or
after the phone boots up. If a phone cannot locate a provisioning server upon boot up and has not been
configured with settings from any other source, the phone operates with internally stored default values. If
the phone has been previously configured with settings from a provisioning server and cannot locate the
server when booting up, the phone operates with those previous settings.
Polycom phones support FTP, TFTP, HTTP, and HTTPS protocols and use FTP by default.
Record Version Information
In case you need to contact Polycom technical support, you should record the following information for
future reference:
• Phone models
• Updater version
• UC Software version
• Partner Platform
Getting Started
Polycom, Inc. 17

Supported Network Configurations
Topics:
•Ethernet Line Rates
•Ethernet Network Connection Methods
•Link Layer Discovery Protocol and Supported Type Length Values
•DHCPv6 or DHCPv4 Parameters
•Parse Vendor ID Information
You need the following to operate Polycom phones as SIP endpoints in large-scale deployments:
• A working IP network
• Routers configured for VoIP
• VoIP gateways configured for SIP
• An active, configured call server to receive and send SIP messages and to register and
authenticate voice endpoints.
For information on IP PBX and softswitch vendors, see Polycom Desktop Phone Compatibility. If
you are using the Polycom Trio Solution, see Polycom Trio and SoundStation IP Platform
Compatibility.
At minimum, your call server requires:
◦ A call server address that registers voice endpoints with the SIP server
◦ SIP authentication user name and password the phone uses to respond to any SIP
authentication challenges from the SIP server.
In addition to these requirements, your deployment network should work within the Polycom-supported
parameters of network settings, discovery methods such as DHCP, and supported Ethernet network
settings.
Related Links
Network on page 361
Network Requirements for Provisioning on page 40
Ethernet Line Rates
The phones automatically negotiate the Ethernet rate and no special configuration is required.
Typical network equipment supports one of the three following Ethernet line rates:
• 10 Mbps
• 100 Mbps
• 1000 Mbps
While you can change the line rates and duplex configuration, Polycom recommends keeping the default
settings.
Polycom, Inc. 18

Supported Denial of Service Filters
The phone supports two filters to prevent Denial of Service (DoS):
• Storm Filtering—This filter is enabled by default.
• VLAN Filtering—VLAN filtering cannot be disabled.
When these filters are enabled, Ethernet packets are filtered to prevent overflow caused by bad or
excessive data. Support for Storm and VLAN filtering varies by device.
Supported 802.1x Configurations
Polycom phones support the following EAP authentication methods:
• EAP-TLS (requires Device and CA certificates)
• EAP-PEAPv0/MSCHAPv2 (requires CA certificates)
• EAP-PEAPv0/GTC (requires CA certificates)
• EAP-TTLS/MSCHAPv2 (requires CA certificates)
• EAP-TTLS/GTC (requires CA certificates)
• EAP-FAST (optional Protected Access Credential (PAC) file, if not using in-band provisioning)
• EAP-MD5
For more information about EAP methods, see RFC 3748: Extensible Authentication Protocol.
Ethernet Network Connection Methods
You can connect the phone to a network using Ethernet with the following methods:
• Virtual Local Area Networks (VLANs)
• ILink Layer Discovery Protocol and Supported Type Length Values
• ILink Layer Discovery Protocol and Supported Type Length Values
Virtual Local Area Networks (VLANs)
Settings from higher priority methods override settings from lower priority methods.
If the phone receives a Virtual Local Area Network (VLAN) setting from more than one of the following
methods, the priority is as follows:
1. LLDP—Link Layer Discovery Protocol (LLDP) is a vendor-neutral Layer 2 protocol that allows a
network device to advertise its identity and capabilities on the local network.
2. CDP—Cisco Discovery Protocol (CDP) is a proprietary Data Link Layer network protocol. CDP
Compatible follows the same set of rules.
3. DVD (VLAN via DHCP)—Dynamic Host Configuration Protocol (DHCP) is an automatic
configuration protocol used in IP networks. Note that use of DHCP for assigning VLANs is not
standardized and is recommended only if the switch equipment does not support LLDP or CDP
Compatible methods.
4. Static—The VLAN ID can be manually set by entering it through the phone's menu.
Supported Network Configurations
Polycom, Inc. 19

Virtual Local Area Network (VLAN) ID Assignment Using DHCP
In deployments where it is possible or desirable to assign a Virtual Local Area Network (VLAN) using
LLDP, CDP, or Static methods, you can assign a VLAN ID to the phones by distributing the VLAN ID via
DHCP.
When using this method to assign the phone's VLAN ID, the phone first boots on the Native VLAN/Data
VLAN and then obtains its intended VLAN ID from the DHCP offer before it continues booting on the
newly obtained VLAN.
Note: If a VLAN tag is assigned by CDP or LLDP, DHCP VLAN tags are ignored.
Valid DVD String DHCP Options
The DVD string in the DHCP option must meet the following conditions to be valid:
• Must start with “VLAN-A=” (case-sensitive)
• Must contain at least one valid ID
• VLAN IDs range from 0 to 4095
• Each VLAN ID must be separated by a “+” character
• The string must be terminated by a semi colon “;”
• All characters after the semi colon “;” are ignored
• There must be no white space before the semi colon “;”
• VLAN IDs may be decimal, hex, or octal
The following DVD strings result in the phone using VLAN 10:
• VLAN-A=10;
• VLAN-A=0x0a;
• VLAN-A=012;
Assign a VLAN ID Using DHCP
When the VLAN Discovery in the DHCP menu is set to Fixed, the phone examines DHCP options
128,144, 157, and 191 in that order for a valid Digital Versatile Disk DHCP VLAN Discovery string.
When set to Custom, a value set in the VLAN ID Option is examined for a valid DVD string.
If DHCP option 128 is configured for SIP outbound proxy, do not configure VLAN Discovery option 128 to
Fixed.
Procedure
1. In the DHCP menu of the Main setup menu, set VLAN Discovery to Fixed or Custom.
Link Layer Discovery Protocol and Supported Type
Length Values
A Link Layer Discovery Protocol (LLDP) frame must contain all mandatory Type Length Values (TLVs).
Polycom phones running UC Software support LLDP frames with both mandatory and optional TLVs.
Supported Network Configurations
Polycom, Inc. 20

The phones cannot determine their physical location automatically or provision to a statically configured
location. Hence, they do not transmit location identification TLV in the LLDP frame. However, the location
information from the switch is decoded and displayed on the phone's menu.
The LLDP feature supports VLAN discovery and LLDP power management, but not power negotiation.
LLDP has a higher priority than Cisco Discovery Protocol (CDP) and DHCP VLAN discovery.
Supported TLVs
Polycom phones support the following mandatory and optional TLVs:
Mandatory:
• Chassis ID—Must be first TLV.
• Port ID—Must be second TLV.
• Time-to-live—Must be third TLV, set to 120 seconds.
• End-of-LLDPDU—Must be last TLV.
• LLDP-MED Capabilities.
• LLDP-MED Network Policy—VLAN, L2 QoS, L3 QoS.
• LLDP-MED Extended Power-Via-MDI TLV—Power Type, Power Source, Power Priority, Power
Value.
Optional:
• Port Description
• System Name—Administrator assigned name.
• System Description—Includes device type, phone number, hardware version, and software version.
• System Capabilities—Set as ‘Telephone' capability.
• MAC / PHY configuration status—Detects duplex mismatch.
• Management Address—Used for network discovery.
• LLDP-MED Location Identification—Location data formats: Co-ordinate, Civic Address, ECS ELIN.
• LLDP-MED Inventory Management —Hardware Revision, Firmware Revision, Software Revision,
Serial Number, Manufacturer's Name, Model Name, Asset ID.
The basic TLV format is as follows:
• TLV Type (7 bits) [0-6]
• TLV Length (9 bits) [7-15]
• TLV Information (0-511 bytes)
The following table lists the supported TLVs.
Name Description Typ
eLength Type
Length
Org. Unique
Code (3
bytes)
Sub
Type
Chassis-Id1
IP address of phone (4
bytes). Note that 0.0.0.0 is
not sent until the phone has
a valid IP address.
1 6 0x0206 - 5
Supported Network Configurations
Polycom, Inc. 21

Name Description Typ
eLength Type
Length
Org. Unique
Code (3
bytes)
Sub
Type
Port-Id1The MAC address of the
phone (6 bytes). 2 7 0x0407 - 3
TTL The TTL value is 120/0 sec. 3 2 0x0602 - -
Port
description Port description 1. 4 1 0x0801 - -
System
name
Refer to System and Model
Names. 5min len > 0, max
len <= 255 - - -
System
description
Manufacturer's name -
“Polycom”; Hardware
version; Application
version; BootROM version.
6min len > 0, max
len <= 255 - - -
Capabilities
System Capabilities:
Telephone and Bridge if the
phone has PC port support
and it is not disabled.
Enabled Capabilities:
Telephone and Bridge if
phone has PC port support,
it is not disabled and PC
port is connected to PC.
7 4 0x0e04 - -
Managemen
t Address
Address String Len - 5,
IPV4 subtype, IP address,
Interface subtype -
“Unknown”, Interface
number - “0”, ODI string
Len - “0”.
8 12 0x100c - -
IEEE 802.3
MAC/PHY
config/
status1
Auto-Negotiation Supported
- “1”, enabled/disabled,
Refer to PMD Advertise
and Operational MAU
127 9 0xfe09 0x00120f 1
Supported Network Configurations
Polycom, Inc. 22

Name Description Typ
eLength Type
Length
Org. Unique
Code (3
bytes)
Sub
Type
LLDP-MED
capabilities
Capabilities - 0x33 (LLDP-
Med capabilities, Network
policy, Extended Power Via
MDI-PD, Inventory) Class
Type III.
Note: After support for
configuring location
Identification information is
locally available.
Capabilities - 0x37 (LLDP-
Med capabilities, Network
policy, Location
Identification, Extended
Power Via MDI-PD,
Inventory) Class Type III.
127 7 0xfe07 0x0012bb 1
LLDP-MED
network
policy2
ApplicationType: Voice (1),
Policy: (Unknown(=1)/
Defined(=0) Unknown, if
phone is in booting stage or
if switch doesn't support
network policy TLV.
Defined, if phone is
operational stage and
Network policy TLV is
received from the switch.),
Tagged/Untagged, VlanId,
L2 priority, and DSCP.
127 8 0xfe08 0x0012bb 2
LLDP-MED
network
policy2
ApplicationType: Voice
Signaling (2), Policy:
(Unknown(=1)/Defined(=0)
Unknown, if phone is in
booting stage or if switch
doesn't support network
policy TLV. Defined, if
phone is operational stage
and Network policy TLV is
received from the switch.),
Tagged/Untagged, VlanId,
L2 priority and DSCP.
Note: Voice signaling TLV
is sent only if it contains
configuration parameters
that are different from voice
parameters.
127 8 0xfe08 0x0012bb 2
Supported Network Configurations
Polycom, Inc. 23
Name Description Typ
eLength Type
Length
Org. Unique
Code (3
bytes)
Sub
Type
LLDP-MED
network
policy2
ApplicationType: Video
Conferencing (6), Policy:
(Unknown(=1)/Defined(=0).
Unknown, if phone is in
booting stage or if switch
doesn't support network
policy TLV. Defined, if
phone is operational stage
and Network policy TLV is
received from the switch.),
Tagged/Untagged, VlanId,
L2 priority and DSCP.
127 8 0xfe08 0x0012bb 2
LLDP-MED
location
identification
3
ELIN data format: 10 digit
emergency number
configured on the switch.
Civic Address: physical
address data such as city,
street number, and building
information.
127 min len > 0, max
len <= 511 - 0x0012bb 3
Extended
power via
MDI
PowerType -PD device
PowerSource-PSE&local
Power Priority -Unknown,
PD Requested Power
Value depends on power
configuration. If PSE power
and USB charging are both
disabled then it is 13W.
Otherwise, it is 25.5W. This
TLV is sent only by the
Polycom Trio 8800 and
8500 system. The Polycom
Trio Visual+ relies on a
hardware handshake only
for power negotiations.
127 12 0xfe07 0x00120F 4
LLDP-MED
inventory
hardware
revision
Hardware part number and
revision. 127 min len > 0, max
len <= 32 - 0x0012bb 5
LLDP-MED
inventory
firmware
revision
BootROM revision. 127 min len > 0, max
len <= 32 - 0x0012bb 6
LLDP-MED
inventory
software
revision
Application (SIP) revision. 127 min len > 0, max
len <= 32 - 0x0012bb 7
Supported Network Configurations
Polycom, Inc. 24
Name Description Typ
eLength Type
Length
Org. Unique
Code (3
bytes)
Sub
Type
LLDP-MED
inventory
serial
number
MAC Address (ASCII
string). 127 min len > 0, max
len <= 32 - 0x0012bb 8
LLDP-MED
inventory
manufacture
r name
Polycom 127 11 0xfe0b 0x0012bb 9
LLDP-MED
inventory
model name
127 min len > 0, max
len <= 32 - 0x0012bb 10
LLDP-MED
inventory
asset ID
Empty (Zero length string). 127 4 0xfe08 0x0012bb 11
End of LLDP
DU 0 0 0x0000 - -
DHCPv6 or DHCPv4 Parameters
Polycom recommends using DHCP where possible to eliminate repetitive manual data entry.
After establishing network connectivity, the phone needs to acquire several IPv6 or IPv4 network settings.
These settings are typically obtained automatically from a Dynamic Host Configuration Protocol (DHCPv6
or DHCPv4) server.
You have the option to configure IPv4 or IPV6 network settings manually from the phone screen or using
device.set capability. When making the DHCP request, the phone includes information in Option 60
that can assist the DHCP server in delivering the appropriate settings to the device.
For more information on DHCP options, see RFC2131 and RFC 2132.
For more information on Using DHCP Vendor Identifying Options with Polycom Phones, see Technical
Bulletin 54041 at Polycom Engineering Advisories and Technical Notifications.
IPv4 Network Parameters
The following table lists the ways a phone can obtain IPv4 and related parameters in an IPv4 network.
11 For other subtypes, refer to IEEE 802.1AB, March 2005.
2 2 For other application types, refer to TIA Standards 1057, April 2006.
3 3 At this time, this TLV is not sent by the phone.
Supported Network Configurations
Polycom, Inc. 25
Parameter DHCPv4 Option DHCPv4
DHCPv4
INFORM
Configuration File
(application only)
Device
Settings
IPv4 address No Yes No No Yes
Subnet mask 1 Yes No No Yes
IPv4 Gateway 3 Yes No No Yes
Boot server
address
Yes Yes No Yes
SIP server
address
151
You can change this
value by changing the
device setting.
Yes No Yes Yes
SNTP server
address
Look at option 42, then
option 4.
Yes No Yes Yes
SNTP GMT offset 2 Yes No Yes Yes
Syslog Yes No No Yes
DNS server IP
address
6 Yes No Yes Yes
DNS INFORM
server IP address
6 - - - -
DNS domain 15 Yes No Yes Yes
VLAN ID Warning: Link Layer Discovery Protocol (LLDP) overrides Cisco
Discovery Protocol (CDP). CDP overrides Local FLASH which
overrides DHCP VLAN Discovery.
IPv6 Network Parameters
The following table lists the ways a phone can obtain IPv6 and related parameters in an IPv6 network.
IPv6 Network Parameters
Parameter SLAAC1
DHCPv6
Option DHCPv6
DHCPv6
INFORM
Configuration
File
(application
only)
Device
Settings
IPv6 Global
Address
Yes No Yes No No Yes
IPv6 ULA
Address
Yes No Yes No No Yes
Supported Network Configurations
Polycom, Inc. 26

Parameter SLAAC1
DHCPv6
Option DHCPv6
DHCPv6
INFORM
Configuration
File
(application
only)
Device
Settings
IPv6 Gateway Yes No No No No Yes
Boot server
IPv6 Address
No Custom2 Yes No No Yes
SIP server
IPv6 Address
No 22/21 Yes No Yes No
SNTP server
IPv6 address
No 31 Yes No Yes Yes
SNTP GMT
offset
No Custom2 Yes No Yes Yes
Syslog IPv6
Address
No Custom2 Yes No Yes Yes
DNS server
IPv6 address
No 23 Yes No Yes Yes
IPv6 DNS
domain
No 23 Yes No Yes Yes
VLAN ID Warning: Link Layer Discovery Protocol (LLDP) overrides Cisco Discovery
Protocol (CDP). CDP overrides Local FLASH which overrides DHCP VLAN
Discovery.
Example Configuration: Polycom Vendor-Specific Information Options in DHCPv6
You can obtain the CDP Compatibility value from a connected Ethernet switch if the switch supports
CDP.
In DHCPv6, there are no standard options defined for Boot Server IPv6 address, Syslog Server IPv6
Address, SNTP GMT Offset, and VLAN List. Polycom has defined subcodes for this specific information
as part of the DHCPv6 Vendor-Specific Information Option.
You can use the tcpIpApp.sntp.address.overrideDHCP parameter values for the SNTP server
address and SNTP GMT offset to override the DHCP value.
The following is an example configuration on a Linux DHCPv6 server for Polycom subcode definitions:
# Define PLCM options option space plcm code width 2 length width 2 hash size
4; option vsio.plcm code 13885 = encapsulate plcm; option plcm.boot-server
code 1 = string; option plcm.time-offset code 2 = signed integer 32; option
plcm.syslog-server code 3 = string; option plcm.vlan-list code 4 = string;
option plcm.boot-server "2620:0:1aa0:8071:d485:f47d:5de5:be04"; option
plcm.time-offset 19850; option plcm.syslog-server
"2620:0:1aa0:8071:d485:f47d:5de5:be04"; option plcm.vlan-list "VLAN-A=513;";
Supported Network Configurations
Polycom, Inc. 27

Example: DHCP Option 60 Packet Decode
The following example is a sample decode of a packet (DHCP Option 60) from the Polycom Trio 8800
system.
• Sub-option 2 (part), length, "Real PresencePolycom Trio-Polycom Trio_8800" 02 1a 52 65 61
6c 50 72 65 73 65 6e 63 65 54 72 69 6f 2d 54 72 69 6f 5f 38 38 30 30
• Sub-option 3 (part number), length, "3111-65290-001,5" 03 10 33 31 31 31 2d 36 35 32
39 30 2d 30 30 31 2c 35
• Sub-option 4 (Application version), length, "SIP/5.4.1.16972/04-Jan-16 16:05" 05 1d 53 49 50
2f 35 2e 34 2e 31 2e 31 36 39 37 32 2f 30 34 2d 4a 61 6e 2d 31 36 20 31
36 3a 30 35
The following example is a sample decode of a packet (DHCP Option 60) from a VVX 500/501:
3c 7a
• Option 60, length of Option data (part of the DHCP specification) 00 00 36 3d
• Polycom signature (always 4 octets) 75
• Length of Polycom data 01 07 50 6f 6c 79 63 6f 6d
• sub-option 1 (company), length, "Polycom" 02 0b 56 56 58 2d 56 56 58 5f 34 31 30
• sub-option 2 (part), length, "VVX-VVX_500/501" 03 10 33 31 31 31 2d 34 36 31 36 32
2d 30 30 31 2c 37
• sub-option 3 (part number), length, "3111-44500-001,7" 04 1e 53 49 50 2f 35 2e 32 2e 30
2e 58 58 58 58 2f 30 36 2d 41 75 67 2d 31 34 20 32 30 3a 35 35
• sub-option 4 (Application version), length, "SIP/5.2.0.XXXX/06-Aug-14 20:55" 05 1d 55 50 2f
35 2e 34 2e 30 2e 58 58 58 58 2f 30 36 2d 41 75 67 2d 31 34 20 32 31 3a
30 34
• sub-option 5 (Updater version), length, "UP/5.4.0.XXXX/06-Aug-14 21:04” 06 0c 64 73 6c 66
6f 72 75 6d 2e 6f 72 67
• sub-option 6 “dslforum.org”
Vendor Specific DHCP Options
DHCP Option 60 controls how the phone identifies itself to a DHCP server for Polycom-specific options
that must be returned.
If Option 60 format is set to RFC 3925, all returned values of Option 43 are ignored. If the format is set to
an ASCII string, the Option 43 would have a hexadecimal string value encapsulating sub-options that
override options received outside DHCP Option 43.
If you do not have control of your DHCP server or do not have the ability to set the DHCP options, enable
the phone to automatically discover the provisioning server address. You can do this by connecting to a
secondary DHCP server that responds to DHCP INFORM queries with a requested provisioning server
value. For more information, see RFC 3361 and RFC 3925.
The following table lists supported DHCP Option 43 individual sub-options and combination sub-options:
Option Results
Option 1- subnet mask The phone parses the value from Option 43.
Option 2 - Time offset The phone parses the value.
Supported Network Configurations
Polycom, Inc. 28

Option Results
Option 3 - Router The phone parses the value.
Option 4 - TIME/ITP server address (RFC
868)
The phone parses the value.
Option 6 - Domain Name Server The phone parses the value.
Option 7 - Domain Log server The phone parses the value.
Option 15 - Domain Name The phone parses the value.
Option 42 - Network Time Protocol server/
SNTP server address (RFC 1769)
The phone parses the value.
Option 66 - Provisioning Server Address The phone parses the value.
Option 128 - 255 Available option range for configuring a custom boot server
address when option 66 is not used.
Sub-options configured in Option 43
Options 1, 2, 3, 4, 5, 6, 7, 15, 42, and 66 The phone parses the value.
Option 128 - 255 Available option range for configuring a custom boot server
address when option 66 is not used.
Parse Vendor ID Information
As a part of configuration, the Vendor ID information must be parsed with the Polycom phone.
Polycom follows RFC 3925 which specifies use of a unique Internet Assigned Numbers Authority (IANA)
private enterprise number. The private enterprise number assigned to Polycom is 13885 (0x0000363D)
and is represented as an array of binary data.
Procedure
1. Check for the Polycom signature at the start of the option: 4 octet: 00 00 36 3d
2. Obtain the length of the entire list of sub-options: 1 octet
3. Read the field code and length of the first sub-option, 1+1 octets
4. If this is a field you want to parse, save the data.
5. Skip to the start of the next sub-option.
6. Repeat steps 3 to 5 until you have all the data or you encounter the End-of-Suboptions code
(0xFF).
Supported Network Configurations
Polycom, Inc. 29
Supported Inbound and Outbound Ports
Topics:
•Inbound Ports for Polycom Trio Systems
•Outbound Ports for Polycom Trio System
•Polycom Trio Visual+ Network Ports
▪Inbound Ports for Trio VisualPro Systems
▪Outbound Ports for Trio VisualPro Systems
You can configure the inbound and outbound ports on Polycom Trio systems and the Polycom Trio Visual
+ and Trio VisualPro system.
Inbound Ports for Polycom Trio Systems
The following table lists the inbound IP ports currently used by Polycom UC Software running on Polycom
Trio 8800 and 8500 systems.
Inbound IP Port Connections to Polycom Trio Systems
Inbound
Port Type Protocol Function Default
Configurable Port
Number?
22 Static TCP SSH Administration Off No
80 Static TCP HTTP Pull Web
interface, HTTP Push
Off Yes
443 Static TCP HTTP Pull Web
interface, HTTP Push
On Yes
1023 Static TCP Telnet Diagnostics Off No
10010 Static TLS 1.2 Synchronize Daisy-
Chained Polycom Trio
systems
On No
1024 -
65535
Dynamic TCP/UDP RTP media packets On Yes
1024 -
65535
Dynamic TCP/UDP RTCP media packets
statistics
On Yes
2222 Dynamic
(2222 - 2269)
TCP/UDP RTP media packets On Yes
tcpIpApp.port.rtp.mediaP
ortRangeStart
Polycom, Inc. 30
Inbound
Port Type Protocol Function Default
Configurable Port
Number?
2223 Dynamic
(2222 - 2269)
TCP/UDP RTCP media packets
statistics
On Yes
tcpIpApp.port.rtp.mediaP
ortRangeStart
5001 Static TCP People+Content IP On No
5060 Static TCP/UDP SIP signaling On No
5061 Static TLS SIP over TLS signaling On No
8001 Static TCP HTTPS for modular
room provisioning
On Yes
mr.deviceMgmt.port
8150 -
8153
Static TCP Airplay audio control On No
8150 -
8153
Static UDP Airplay audio data On No
Outbound Ports for Polycom Trio System
The following table lists the outbound IP ports currently used by Polycom UC Software running on
Polycom Trio 8500 and 8800 systems.
Outbound IP Port Connections to Polycom Trio Systems
Outboun
d Port Type Protocol Function Default
Configurable Port
Number
21 Static TCP FTP Provisioning, Logs On No
22 Static TCP SSH On No
53 Static UDP DNS On No
67 Static UDP DHCP Server On No
68 Static UDP DHCP Client No
69 Static UDP TFTP Provisioning,
Logs
No
80 Static TCP HTTP Provisioning,
Logs, Web Interface
No
123 Static UDP NTP time server No
389 Static TCP/UDP LDAP directory query No
Supported Inbound and Outbound Ports
Polycom, Inc. 31

Outboun
d Port Type Protocol Function Default
Configurable Port
Number
443 static TCP HTTPS Provisioning,
Logs, Web Interface
No
514 Static UDP SYSLOG No
636 Static TCP/UDP LDAP directory query No
10010 Static TLS 1.2 Synchronize Daisy-
Chained Polycom Trio
systems
On No
1024 -
65535
Dynamic TCP/UDP RTP media packets On Yes
1024 -
65535
Dynamic TCP/UDP RTCP media packets
statistics
On Yes
2222 Dynamic
(2222 - 2269)
TCP/UDP RTP media packets On Yes,
tcpIpApp.port.rtp.mediaPort
RangeStart
2223 Dynamic
(2222 - 2269)
TCP/UDP RTCP media packets
statistics
On Yes,
tcpIpApp.port.rtp.mediaPort
RangeStart
5060 TCP/UDP SIP signaling On
5061 TCP SIP over TLS signaling On
5222 Static TCP Resource Manager:
XMPP
Off No
8001 Static TCP HTTPS for modular
room provisioning
On Yes
mr.deviceMgmt.port
8150 -
8153
Static TCP Airplay audio control On No
Polycom Trio Visual+ Network Ports
The following table provides port usage information when configuring network equipment to support the
Polycom Trio Visual+ accessory.
Supported Inbound and Outbound Ports
Polycom, Inc. 32

Network Port Connections to Polycom Trio Visual+
Inbound
Port Type Protocol Function Default
Configurable Port
Number
80 static TCP HTTP Provisioning,
Logs, Web Interface
No
319 PRPv2 Synchronize Polycom
Trio Visual+ and Trio
systems
443 static TCP HTTPS Provisioning,
Logs, Web Interface
No
2000 UDP Multicast pairing
5060 TCP/UDP SIP signaling On
5061 TCP/UDP SIP over TLS signaling On
6000 -
6005
UDP
8000 static TCP HTTP/HTTPS for
modular room
communications
On No
8001 static TCP HTTP (default) or
HTTPS for modular
room provisioning
On Yes
mr.deviceMgmt.port
Inbound Ports for Trio VisualPro Systems
The following table provides inbound port usage information when configuring network equipment to
support the Trio VisualPro system.
Inbound IP Port Connections to Trio VisualPro Systems
Inbound
Port
Type Protocol Function Default Configurable Port
Number?
80 Static TCP System web interface
over HTTP
On Yes
443 Static TLS System web interface
over HTTPS
On No
1719 Static UDP H.225.0 RAS Off No
1720 Static TCP H.225.0 Call Signaling On No
Supported Inbound and Outbound Ports
Polycom, Inc. 33
Inbound
Port
Type Protocol Function Default Configurable Port
Number?
5060 Static TCP
UDP
SIP (protocol depends
on transport protocol
setting)
On No
5061 Static TLS SIP On No
49152-
65535
Dynamic TCP H.245 On Yes
16384-
32764(Def
ault)
Dynamic UDP RTP/RTCP video and
audio
On Yes
Outbound Ports for Trio VisualPro Systems
The following table provides outbound port usage information when configuring network equipment to
support the Trio VisualPro system.
Outbound IP Port Connections to Trio VisualPro Systems
Outbound
Port
Type Protocol Function Default Configurable Port
Number?
80 Static TCP Polycom Product
Registration for system
software installation
On No
123 Static UDP NTP On No
389 Static TLS LDAP Off Yes
389 Static TLS LDAP to ADS (External
Authentication)
Off No
443 Static TLS RealPresence
Resource Manager
(provisioning,
monitoring, and
software update)
Off No
443 Static TLS Microsoft Exchange
Server (calendaring)
Off No
443 Static TLS Microsoft Skype
Address Book
Off No
514 Static UDP SYSLOG Off Yes
601 Static TCP SYSLOG Off Yes
Supported Inbound and Outbound Ports
Polycom, Inc. 34

Outbound
Port
Type Protocol Function Default Configurable Port
Number?
1718 Static UDP H.225.0 Gatekeeper
Discovery
Off No
1719 Static UDP H.225.0 RAS Off Yes
1720 Static TCP H.225.0 Call Signaling On No
3601 Static TCP GDS Off No
5060 Static UDP TCP SIP On Yes
5061 Static TLS SIP On Yes
5222 Static TCP RealPresence
Resource Manager:
XMPP
Off No
6514 Static TLS SYSLOG Off Yes
49152 -
65535
Dynamic TCP H.245 On Yes
16384 -
32764
(Default)
Dynamic UDP RTP/RTCP video and
audio
On Yes
Supported Inbound and Outbound Ports
Polycom, Inc. 35

Manually Configuring Phones
Topics:
•Configuring Phones Using the Phone Menu
•Configuring Phones Using the Web Configuration Utility
•Configure a Phone Using a USB Flash Drive
Polycom offers several methods to manually configure your phone.
You can use the phone menu to configure settings or you can access phone settings using a web
interface called the Web Configuration Utility. The Web Configuration Utility enables you to download and
upload settings from one phone to another.
If you are setting up more than 20 phones, Polycom recommends using a centralized provisioning server
instead of manual configuration.
Configuring Phones Using the Phone Menu
You can use the menu system on your device as the sole configuration method or along with other
methods.
Changes you make from the phone menu override the settings you configure using other methods.
You can access the administrator configuration settings on the Advanced menu, which requires an
administrator password (the default is 456). Some setting changes require a device restart or reboot.
Menu systems and interface settings vary by device and by UC Software release. For more information
on using your device's phone menu, refer to your device's product documentation.
Configuring Phones Using the Web Configuration
Utility
The Web Configuration Utility is a web-based interface that enables you to update the software and
configure the phone's current settings.
Changes you make using the Web Configuration Utility override the settings you configure using a
centralized provisioning server (if applicable).
You can also import and export configuration files using the Web Configuration Utility to configure multiple
phones using the same settings.
For more information on using the Web Configuration Utility, see the Polycom Web Configuration Utility
User Guide at the Polycom UC Software Support Center.
Configure a Phone Using Simple Setup
You can use the Web Configuration Utility to configure the minimum settings you need for your phone to
work.
Polycom, Inc. 36
Procedure
1. Enter your phone's IP address into a web browser on your computer.
2. Select Admin as the login type, enter the admin password (the default is 456), and click Submit.
3. Click Simple Setup and configure the following settings:
•Phone Language Phone display language
•SNTP Server Server that the phone uses to calculate the display time
•Time Zone Time zone where the phone is located
•SIP Server Server address and port that the phone uses for line registrations
•SIP Outbound Proxy Outbound proxy server address and port that the phone uses to send
all SIP requests
•SIP Line Identification Information your phone needs to make calls, such as the phone
display name, line address, authentication credentials, and line label
4. Click Save.
Configuring Phones by Importing Configuration Files
After you have configured a phone, its settings are saved in its configuration file.
To save time, you can export this configuration file and import it to other phones when you want the same
configuration on multiple phones.
Export a Phone Configuration File
You can export the phone's configuration file using the Web Configuration Utility to make changes to the
phone's current settings.
You can also export the file from one phone so you can import it into another one.
Procedure
1. Enter your phone's IP address into a web browser on your computer.
2. Select Admin as the login type, enter the admin password (the default is 456), and click Submit.
3. Go to Utilities > Import & Export Configuration.
4. Choose the files to export from the Export Configuration file drop-down menu and click Export.
Import a Phone Configuration File
You can import a configuration file to your phone using the Web Configuration Utility.
Procedure
1. Enter your phone's IP address into a web browser on your computer.
2. Select Admin as the login type, enter the admin password (the default is 456), and click Submit.
3. Go to Utilities > Import & Export Configuration.
4. Click Choose File to select the configuration file from your computer to import and click Import.
Manually Configuring Phones
Polycom, Inc. 37

Reset to Default Settings
You can reset your phone settings to default using the Web Configuration Utility.
Procedure
1. Enter your phone's IP address into a web browser on your computer.
2. Select Admin as the login type, enter the admin password (the default is 456), and click Submit.
3. Click Simple Setup and then click Reset to Default.
Configure a Phone Using a USB Flash Drive
You can configure a Polycom Trio system or Polycom Trio Visual+ accessory with configuration files
stored on a USB flash drive.
If you have other USB devices attached to a Polycom Trio system, you must remove them and make sure
that the Polycom Trio system correctly recognizes the configuration USB flash drive.
Changes you make using a USB flash drive override the settings you configure using a centralized
provisioning server (if applicable). When you remove the USB flash drive, the Polycom Trio system
reverts to the provisioning server settings. However, the USB flash drive can initiate direct.set
changes in the provisioning server settings. The direct.set changes can alter parameters on the
provisioning server and change basic provisioning settings.
.
Note: Polycom Trio 8800 systems support only File Allocation Table (FAT) file systems. Polycom
recommends using FAT32.
Procedure
1. Do one of the following:
• Format a blank USB 2.0 USB flash drive using FAT32.
• Delete all files from a previously formatted USB flash drive.
2. Download the UC Software from Polycom Support.
3. Copy the configuration files you want to use to the root of the USB flash drive.
At a minimum, you must include the following configuration files:
• Master configuration file: 000000000000.cfg
• Polycom Trio 8500: 3111-66700-001.sip.ld
• Polycom Trio 8800: 3111-65290-001.sip.ld
• Polycom Trio Visual+: 3111-66420.001.sip.ld
4. Insert the USB flash drive into the Polycom Trio 8800, 8500,or Polycom Trio Visual+ USB port.
5. Enter the Administrator password.
The system detects the flash drive and starts the update within 30 seconds. The mute keys'
indicator lights begin to flash, indicating that the update has started.
Manually Configuring Phones
Polycom, Inc. 38
The system reboots several times during the update. The update is complete when the indicator
lights stop flashing and the Home screen displays.
Manually Configuring Phones
Polycom, Inc. 39
Provisioning Phones
Topics:
•Network Requirements for Provisioning
•Provisioning Server Discovery Methods
•Setting Up Your Provisioning Server
•Provisioning Phones
Polycom recommends using a centralized provisioning server when provisioning 20 or more phones.
Centralized provisioning enables you to configure phones with the same settings, create phone groups,
and customize single phones.
Network Requirements for Provisioning
Centralized provisioning requires that your phones can securely communicate with the provisioning
server and that network time settings are in sync with your phones. This section shows you how to set up
secure network communications and synchronize time settings.
Note: When you provision the Polycom Trio solution via Wi-Fi connection to the network, the Polycom
Trio solution looks for files on the provisioning server using the LAN MAC address and not the Wi-
Fi MAC address.
Related Links
Supported Network Configurations on page 18
Recommended Security Settings
Polycom recommends using the following security settings with a provisioning server.
• 802.1X
• VLAN
• File transfers using HTTPS
• SIP signaling over Transport Layer Security (TLS)
• Permissions for configuration and override files
Configure File Upload Permissions
When you modify settings from the phone menu or Web Configuration Utility, the phone attempts to
upload override files that contain phone settings to the central server.
By default, provisioned phones attempt to upload phone-specific settings in an override file to the server
and you must configure server permissions to allow these files to upload. You can permit the phone to
upload override files to the provisioning server by giving the phone write access to the provisioning
server. All other files that the phone needs to read, such as the application executable and standard
configuration files, should be read-only. You can set permissions for other configuration files as needed
for your deployment.
Polycom, Inc. 40
The default override file names are as follows:
• Phone Menu <MAC Address>-phone.cfg
• Web Configuration Utility <MAC Address>-web.cfg
Write access enables:
• User settings to survive restarts, reboots, and software upgrades that you apply to phones from the
provisioning server.
• Override files you can use to save user custom preferences and to apply specific configurations to a
single phone or phone group.
• Log files you can use to troubleshoot issues.
Ensure that the file permissions you create provide the minimum required access and that the
administrator account has no other rights on the server.
If you reformat the phone's file system, the override file is deleted from the phone.
Procedure
1. Configure the server account with read, write, and delete permissions, as needed.
2. Create a separate directory on the server for each file type and configure the permissions for each
directory.
You can set different access permissions for each directory, for example:
• Log files
• Override files
• Contact directory
• License directory
3. Edit the attributes of the master configuration file that correspond to the directories you created.
4. To allow a phone's override files to upload to the server, configure the override files with enable,
read, and write access.
Dynamic Host Configuration Protocol (DHCP)
Polycom recommends using DHCP where possible to eliminate repetitive manual data entry.
After establishing network connectivity, the phone needs to acquire several IPv6 or IPv4 network settings.
These settings are typically obtained automatically from a Dynamic Host Configuration Protocol (DHCPv6
or DHCPv4) server.
Synchronized Time Settings
It is important to use a Simple Network Time Protocol (SNTP) server in your network environment.
If SNTP settings are not available through DHCP, you may need to edit the SNTP GMT offset or SNTP
server address, especially for the default daylight savings parameters outside of North America.
Depending on your local security policy, you might need to disable the local web (HTTP) server or change
its signaling port.
Provisioning Phones
Polycom, Inc. 41

DNS
You need to set up Domain Name System (DNS).
Polycom supports the following DNS records types:
• DNS A record
• Service (SRV) record for redundancy
• Name Authority Pointer (NAPTR)
User Accounts
Each phone user must have an account on your SIP call server.
Provisioning Server Discovery Methods
After the phone has established network settings, it must discover a provisioning server to obtain software
updates and configuration settings using one of the following methods:
•Static You can manually configure the server address from the phone menu or Web Configuration
Utility, or you can provision a server address using device.prov.serverName and
corresponding device parameters.
•DHCP A DHCP option provides the address or URL between the provisioning server and phone.
•DHCP INFORM The phone makes an explicit request for a DHCP option. Note the phone request
can be answered by a server that is not the primary DHCP server. For more information, see RFC
3361and RFC 3925.
•Quick Setup This feature takes you directly to a screen to enter the provisioning server address
and information. This is simpler than navigating the phone menu to configure provisioning
parameters. For more information, see Using Quick Setup with Polycom Phones: Technical Bulletin
45460 at Polycom Engineering Advisories and Technical Notifications.
•ZTP If the phone does not discover a provisioning server address automatically using DHCP and
you are not using a static address, the phone contacts the Polycom Zero-Touch Provisioning (ZTP)
server and requests initial configuration files, including the address of the service provider or
enterprise provisioning server.
Supported Provisioning Protocols
By default, Polycom phones are shipped with FTP enabled as the provisioning protocol.
You can configure the phone using the following supported provisioning protocols:
• Trivial File Transfer Protocol (TFTP).
• File Transfer Protocol (FTP).
• Hyper Text Transfer Protocol - Secure (HTTPS).
• File Transfer Protocol - Secure (FTPS). When using FTPS as the provisioning protocol:
◦ Set the value of log.render.file.size to 512.
◦ Disable the Diffie-Hellman key exchange
Provisioning Phones
Polycom, Inc. 42
Setting Up Your Provisioning Server
You can use a single provisioning server or configure multiple provisioning servers.
Your provisioning servers should be RFC compliant.
Install Provisioning Tools
Before you begin provisioning devices with UC Software, install tools on your computer and gather some
information.
Procedure
1. If using Power over Ethernet (PoE) with the phone, obtain a PoE switch and network cable.
2. Install an XML editor, such as XML Notepad 2007, on your computer.
3. Install an FTP server application on your computer.
FileZilla and wftpd are free FTP applications for windows and vsftpd is typically available with all
standard Linux distributions.
4. Take note of the following:
•SIP server address The host name or IP address of the call server that handles VoIP
services on your network.
•SIP account information SIP account credentials and the phone's registration address.
• Although a user name and password are not required to get the phone working, Polycom
strongly recommends using them for security reasons.
•Phone MAC addresses The unique 12-digit serial number just above the phone's bar code
on the back of the phone. You need the MAC address for each phone in your deployment.
•Provisioning server IP address The IP address of the system the phones use as the
provisioning server. If you want to use your computer system as the provisioning server,
you'll need your computer's IP address.
Set Up a Single Provisioning Server
You can set up a single provisioning server for your phone deployment.
Procedure
1. Power on the phones and connect them to your VoIP network using a Power over Ethernet (PoE)
switch or external adapter and a network cable.
2. Create a root FTP directory on the provisioning computer with full read and write access to all
directories and files.
This is where you need to place configuration files.
3. In your FTP server application, create a user account for the phone to use and take note of the
user name and password.
4. Launch the FTP application.
Provisioning Phones
Polycom, Inc. 43

You must keep it running during provisioning so that the phones can communicate with the UC
software.
5. Download Polycom UC Software from Polycom Support and uncompress the files into your root
FTP directory.
You can choose the combined UC software package or the split UC software package.
• The combined version contains all files for all phone models.
• The split software package is smaller, downloads more quickly, and contains sip.ld files
for each phone model, enabling you to choose provisioning software for your phone
model(s) and maintain software versions for each model in the same root directory.
Set Up Multiple Provisioning Servers
You can configure multiple (redundant) provisioning servers—one logical server with multiple addresses.
You can set up a maximum of eight provisioning servers.
You must be able to reach all of the provisioning servers with the same protocol, and the contents on
each provisioning server must be identical.
Procedure
1. Power on the phones and connect them to your VoIP network using a Power over Ethernet (PoE)
switch or external adapter and a network cable.
2. Create a root FTP directory on the provisioning computer with full read and write access to all
directories and files.
This is where you need to place configuration files.
3. In your FTP server application, create a user account for the phone to use and take note of the
user name and password.
4. Launch the FTP application.
You must keep it running during provisioning so that the phones can communicate with the UC
software.
5. Download Polycom UC Software from Polycom Support and uncompress the files into your root
FTP directory.
You can choose the combined UC software package or the split UC software package.
• The combined version contains all files for all phone models.
• The split software package is smaller, downloads more quickly, and contains sip.ld files
for each phone model, enabling you to choose provisioning software for your phone
model(s) and maintain software versions for each model in the same root directory.
6. Map the provisioning server DNS name to a unique IP address for each server.
7. Configure the following settings:
• Number of times a file transfer tries each server
• How long to wait between each file transfer attempt
• Maximum number of servers to which you want to try to transfer files
Provisioning Phones
Polycom, Inc. 44

Test the Provisioning Settings
You can test your provisioning server setup by using the Quick Setup option on your device.
This option enables you to access the provisioning server and configure the phone for provisioning.
For more detail details on how to configure quick setup, see Technical Bulletin 45460: Using Quick Setup
with Polycom Phones.
After the initial configuration is complete, you can continue to show or hide the Quick Setup option.
Related Links
Quick Setup Soft Key Parameters on page 450
Provisioning Phones
You provision phone features and settings with the UC software configuration files that you create and
modify on your provisioning server.
You can also create and update specific phone configuration files, use variable substitution to update all
phones in your deployment simultaneously, or configure phone groups.
When provisioning phones, you can create and name configuration files as needed to support your
deployment; however, the following file names are reserved and cannot be used:
•<MACaddress>-phone.cfg
•<MACaddress>-web.cfg
•<MACaddress>-app.log
•<MACaddress>-boot.log
•<MACaddress>-license.cfg
Note: You can use a multiple key combination shortcut by simultaneously pressing 1-4-7 to
display the following provisioning information on the phone:
◦ Phone IP address
◦ Phone MAC address
◦ VLAN ID
◦ Boot server type (FTP, TFTP, HTTP, HTTPS)
Provision Multiple Phones
You need to ensure that your phones are directed to the provision server.
You need to modify the default master configuration file with the provisioning server information.
Procedure
1. Create a phone<MACaddress>.cfg file for each phone you want to deploy.
2. Add the SIP server registration information and user account information to the appropriate
parameters in the phone configuration file, such as reg.1.address, reg.1.auth.userId,
reg.1.auth.password, reg.1.label, reg.1.type .
3. Create a site<location>.cfg file for each site location.
Provisioning Phones
Polycom, Inc. 45
Include SIP server or feature parameters such as voIpProt.server.1.address and
feature.corporateDirectory.enabled .
4. Add the file name of each phone and site configuration file to the CONFIG_FILES attribute of the
master configuration file, such as a reference to phone<MACaddress>.cfg and
sipVVX500.cfg .
5. On each phone's Home screen or idle display, select Settings > Advanced > Admin Settings >
Network Configuration > Provisioning Server.
When prompted for the administrative password, enter 456.
6. Press Select.
7. Scroll down to Server Type and make sure that it is set to FTP.
8. Scroll down to Server Address and enter the IP address of your provisioning server.
Press Edit to edit the value and then press OK.
9. Scroll down to Server User and Server Password and enter the user name and password of the
account you created on your provisioning server.
10. Press Back twice.
11. Scroll down to Save & Reboot, and then press Select.
The phone reboots and the UC software modifies the APP_FILE_PATH attribute of the master
configuration file so that it references the appropriate sip.ld files.
12. Verify that the phones are provisioned:
a. On the phone, press Settings (Menu if using a VVX 1500) and go to Status > Platform >
Application > Main to see the UC software version and Status > Platform >
Configuration to see the configuration files downloaded to the phone.
b. Monitor the provisioning server event log and the uploaded event log files (if permitted).
The phone uploads two logs files to the LOG_DIRECTORY directory: <MACaddress>-
app.log and <MACaddress>-boot.log .
Provision Phones Using Variable Substitution
You can configure multiple phones in your deployment using variable substitution, which allows you to
use a single master configuration file instead of a <MACaddress>.cfg file for each phone. Polycom
recommends this method for administrators familiar with Polycom UC Software.
Variable substitution allows you to use variables such as phone model or part number to minimize the
work of maintaining or changing settings common to all phones in your deployment, specify settings for
phone groups, and add a new phone to your deployment.
Procedure
1. Create a configuration file for each phone that contains only the phone-specific information you
want to configure, such as registration information.
You must provide an identical naming format for each of these phone-specific configuration files.
For example, create phone-specific configuration files that contain registration information and
name them:
•reg-basic_0004f2000001.cfg
Provisioning Phones
Polycom, Inc. 46

•reg-basic_0003a7100076.cfg
•reg-basic_0004e5800094.cfg
2. Copy one of the configuration file names and modify its name by replacing the phone-specific
information with one of the variables shown in the following table. Be sure to include the square
brackets.
For example, change reg-basic_0004f2000001.cfg to reg-
basic_[PHONE_MAC_ADDRESS].cfg or change reg-basic_VVX500.cfg to reg-
basic_[PHONE_MODEL].cfg .
Variable Description
[PHONE_MAC_ADDRESS
]
Use to configure all phones in your deployment
[PHONE_PART_NUMBER
]
Use to configure all phones sharing a part number
[PHONE_MODEL] Use to configure a specific phone model
3. Add the new file with the variable substitution to the CONFIG_FILES attribute of the master
configuration file.
4. Save the master configuration file.
Find a Phone's MAC Address
Each phone has a unique a-f hexadecimal digit called a MAC address, also known as the serial number
(SN).
You can use the MAC address to create variables in the name of the master configuration file, or to
specify phone-specific configuration files. There are three ways to find a phone's MAC address.
Procedure
1. Do one of the following:
• Look on the label on the back of the phone.
• On the phone, press Settings (Menu if using a VVX 1500) and go to Status > Platform >
Phone > S/N:.
• Use a multi-key shortcut by simultaneously pressing 1-4-7.
Provision an Individual Phone
You can configure phones individually by creating an individual master configuration file for each phone.
This configuration method gives you a high degree of control over each phone, but for large deployments,
the file naming scheme can require additional file management as you must create and edit at least two
unique files for each phone in your deployment.
Provisioning Phones
Polycom, Inc. 47
Procedure
1. Create a copy of the master configuration file template for the phone and name it
<MACaddress>.cfg , replacing 000000000000 with the unique MAC address of the phone
you want to configure.
Note that you must use only numerals and lowercase letters in the file name.
2. Create a configuration file for the phone containing its unique information such as registration
information.
Name your files based on the file contents or purpose. You can use the template files in the UC
software download, or you can create your own configuration file using parameters from the UC
software template files.
For example, you might use parameters from the reg-basic.cfg template file to create a
registration file named reg-basic_john_doe.cfg .
3. Enter the name of the configuration files you created to the CONFIG_FILES attribute of the
phone's <MACaddress>.cfg file.
4. Save the master configuration file.
Provision a Phone Group
You can apply features and settings to a phone group by phone model name or part number.
If you create configuration files for phone groups using the part number and model name for the same
type of phone, the part number configuration file has priority over the phone model configuration file.
Procedure
1. Create a configuration file with the settings you want to apply.
Name the file using the phone group's part number or phone model name, such as
3111-44500-001.cfg or VVX500.cfg.
2. Add the file name to the CONFIG_FILES attribute of the master configuration file.
3. Save the master configuration file.
Provisioning Phones
Polycom, Inc. 48

Working with Configuration Files
Topics:
•Master Configuration File
Polycom UC Software includes a number of resource files and template configuration files that contain
parameters you can use to configure features and apply settings to phones. UC Software also includes
an XML schema file that provides examples of parameter types and permitted value types you can use in
the configuration files. To work with configuration files, you'll need to install an XML editor.
Master Configuration File
The master configuration file provides flexibility in large deployments to customize features and settings
for your phones.
You can use the master configuration file to configure features and apply settings for all the phones in
your deployment, including groups of phones, specific phone models, or a single phone.
The default name for the master configuration file is 00000000000.cfg. You can use the default name
or rename the master configuration file. The file name must contain at least five characters and end
with .cfg.
You can also specify the location of the master configuration file you want the phones to use, for
example, http://usr:pwd@server/dir/example1.cfg.
The master configuration file applies settings from the component configuration files listed in the
CONFIG_FILES XML attribute in the following ways:
• Phones read the files you enter from left to right.
• Duplicate settings are applied from the configuration file in the order you list them.
The following table describes the XML field attributes in the master configuration file and the
APPLICATION directories.
Master Configuration File XML Field Attributes
Attribute Description
APP_FILE_PATH The path name of the UC software application executable. The default value is
sip.ld. Note that the phone automatically searches for the sip.ld and
<part number>.sip.ld files. This field can have a maximum length of
255 characters.
If you want the phone to search for a sip.ld file in a location other than the
default or use a different file name, or both, modify the default. For example, you
can specify a URL with its own protocol, user name, and password: http://
usr:pwd@server/dir/sip.ld .
Polycom, Inc. 49

Attribute Description
CONFIG_FILES Enter the names of your configuration files in this attribute as a comma-separated
list. Each file name has a maximum length of 255 characters and the entire list of
file names has a maximum length of 2047 characters, including commas and
white space. If you want to use a configuration file in a different location or use a
different file name, or both, you can specify a URL with its own protocol, user
name, and password, for example ftp://usr:pwd@server/dir/
phone2034.cfg. The files names you enter to the CONFIG_FILES field write
are read from left to right. Duplicate settings are applied from the configuration
file in the order you list them.
MISC_FILES A comma-separated list of files. Use this to list volatile files that you want phones
to download, for example, background images and ringtone.wav files. The phone
downloads files you list here when booted, which can decrease access time.
LOG_FILE_DIRECTORY An alternative directory for log files. You can also specify a URL. This field is
blank by default.
CONTACTS_DIRECTORY An alternative directory for user directory files. You can also specify a URL. This
field is blank by default.
OVERRIDES_DIRECTORY An alternative directory for configuration overrides files. You can also specify a
URL. This field is blank by default.
LICENSE_DIRECTORY An alternative directory for license files. You can also specify a URL. This field is
blank by default
USER_PROFILES_DIREC
TORY
An alternative directory for the <user>.cfg files.
CALL_LISTS_DIRECTOR
Y
An alternative directory for user call lists. You can also specify a URL. This field
is blank by default.
COREFILE_DIRECTORY An alternative directory for Polycom device core files to use to debug problems.
This field is blank by default.
CAMERA_PRESETS_DIRE
CTORY
Specify a sub-directory to store the camera preset thumbnail images on the
provisioning server. By default, this field is blank and thumbnail images are
stored in the root directory of the provisioning server. However, if you set the
attribute CAMERA_PRESETS_DIRECTORY="presets", the images are
stored to an existing sub-directory called Presets.
Note: The directories labeled APPLICATION_SPIPXXX indicate phone models that are not compatible
with the latest UC software version. If you are using any of the phone models listed in these
directories, open the directory for the phone model you are deploying, and use the available fields
to provision and configure your phones.
Working with Configuration Files
Polycom, Inc. 50

XML Resource Files
The UC software download contains optional resource configuration files you can apply to the phones.
In addition, you can allow phone-specific override files containing user settings to be uploaded to the
central server. Resource and override files include:
• Language dictionaries for the phone menu and Web Configuration Utility
• Configuration override files that store settings made from the phone menu and Web Configuration
Utility
• Ringtones
• Log files
• A template contact directory 000000000000-directory~.xml
• A licensing directory
Configuration Templates
Most configuration parameters are located in only one template file, but some are included in two or more
files.
You can rearrange the parameters within the template, move parameters to new files, or create your own
configuration files from the parameters you want. This flexibility is especially useful when you want to
apply specific settings to a group of phones. You can create and name as many configuration files as you
want and your configuration files can contain any combination of parameters.
The following table lists the template directories and files included in the UC software download.
Note that techsupport.cfg is available from Polycom Customer Support for troubleshooting and
debugging.
Configuration File Templates
Name Description Deployment Scenarios
Directories
PartnerConfig Contains configuration file specific to the
following third-party servers:
• Alcatel-Lucent
• BroadSoft
• GENBAND
• Microsoft
• Sylantro
For use with third-party servers.
Config
applications.cfg For applications, browser, microbrowser,
XMP-API
Typical Hosted Service Provider
Typical IP-PBX
device.cfg Network Configuration parameters Troubleshooting
Administrative settings
Working with Configuration Files
Polycom, Inc. 51

Name Description Deployment Scenarios
features.cfg Features including corporate directory, USB
recording, presence, ACD
Typical Hosted Service Provider
Typical IP-PBX
firewall-nat.cfg Firewall parameters
lync.cfg Microsoft Skype for Business parameters Typical Microsoft Skype for Business
environment
pstn.cfg
reg-advanced.cfg Advanced call server, multi-line phones Typical Hosted Service Provider
Typical IP-PBX
reg-basic.cfg Basic registration Simple SIP device
Typical Hosted Service Provider
region.cfg Non-North American geographies Typical Hosted Service Provider
Typical IP-PBX
sip-basic.cfg Basic call server Simple SIP device
Typical Hosted Service Provider
sip-interop.cfg Advanced call server, multi-line phones Typical Hosted Service Provider
Typical IP-PBX
site.cfg Multi-site operations Typical Hosted Service Provider
Typical IP-PBX
techsupport.cfg Available by special request from Polycom
Customer Support.
Use for troubleshooting and
debugging only
video.cfg Polycom Trio 8500 or 8800 system when
connected and paired with a Polycom Trio
Visual+, Trio VisualPro, or Polycom
RealPresence Group Series system
Typical Hosted Service Provider if
using Polycom Trio 8500 or 8800
system paired with a Polycom Trio
Visual+, Trio VisualPro, or
RealPresence Group Series system
for video calls
video-
integration.cfg
Using Correct Parameter XML Schema, Value Ranges, and Special Characters
The configuration parameters available in the UC software templates use a variety of value types.
UC software includes an XML schema file ( polycomConfig.xsd ) that provides information about
parameter type, permitted values, default values, and valid enumerated type values. You can view this
template file with an XML editor.
Working with Configuration Files
Polycom, Inc. 52
Polycom configuration parameters support the following value types:
• Boolean
• Enumerated
• Integer
• String
The following rules apply to UC software parameter values:
• Boolean values are not case sensitive.
• UC software interprets Null as empty.
• The values 0, false, and off are supported and interchangeable.
• The values 1, true , and on are supported and interchangeable. This administrator guide
documents only 0 and 1 .
The following rules apply when you set a parameter with a numeric value outside of its valid range:
• If the value is greater than the allowable range, the maximum allowable value is used.
• If the value is less than the allowable range, the minimum allowable value is used.
• If you insert invalid parameter values into the configuration file, the value is ignored and the default
value is used. Examples of invalid parameter values include enumerated values that do not match
values defined in the UC software, numeric parameters set to non-numeric values, string
parameters whose value is too long or short, and null strings in numeric fields. Invalid values are
logged in the phone's log files.
You must use the appropriate XML code for special characters in a configuration file:
• & as &
• ” as "
• ' as '
• < as <
• > as >
• random numbers as &0x12;
Working with Configuration Files
Polycom, Inc. 53

Configuring Security Options
Topics:
•Administrator and User Passwords
•Disabling External Ports and Features
•Visual Security Classification
•Encryption
▪Voice over Secure IP
•Securing Phone Calls with SRTP
•Enabling Users to Lock Phones
•Locking the Basic Settings Menu
•Secondary Port Link Status Report
•802.1X Authentication
▪SCEP Security Protocol
Polycom UC Software enables you to optimize security settings.
These includes changing the passwords for the phone, enabling users to lock their phones, and blocking
administrator functions from phone users.
Administrator and User Passwords
You can change the default administrator and user passwords.
When you set the Base Profile to Skype or update your phones to UC Software 5.x.x or later, the phones
display a message prompting you to change the default administrator password (456). Polycom strongly
recommends that you change the default password. This password is not the Skype for Business user
Sign In password. The default administrator password enables administrators to access advanced
settings menu on the phone menu and to log in to a phone's Web Configuration Utility as an
administrator.
You can change the default password using any of the following methods:
• The popup prompt when the phone first registers
• Phone menu
• Web Configuration Utility
• Use the parameter reg.1.auth.password in the template configuration file
You must have a user or administrator password before you can access certain menu options on the
phone and in the Web Configuration Utility. You can use the following default passwords to access menu
options on the phone and to access the Web Configuration Utility:
• Administrative password: 456
• User password: 123
Polycom, Inc. 54
You can use an administrator password where a user password is required, and you will see all of the
user options. If the phone requires the administrator password, you can use the user password, but you
are presented with limited menu options. Note that the Web Configuration Utility displays different
features and options depending on which password is used.
Each time you connect a Polycom Trio 8500 or 8800 system with a Polycom Trio Visual+ accessory, the
Visual+ user password is reset to match the Polycom Trio system user password. You can change the
Polycom Trio Visual+ password on the Polycom Trio menu or Web Configuration Utility.
When the Polycom Trio solution Base Profile is set to SkypeUSB, you can set the keyboard entry mode
for the password in the Advanced menu on the phone.
Change the Default Administrator Password on the Phone
If you do not change the default administrative password, the phone displays a warning and a reminder
message each time the phone reboots.
If you are registering Polycom phones with Microsoft Skype for Business Server, a message displays on
the phone screen prompting you to change the default password.
Procedure
1. On the phone, navigate to Settings > Advanced, and enter the default password.
2. Select Administration Settings > Change Admin Password.
3. Enter the default password, enter a new password, and confirm the new password.
Change the Default Passwords in the Web Configuration Utility
You can change the administrator and user passwords on a per-phone basis using the Web Configuration
Utility.
If the default administrative password is in use, a warning displays in the Web Configuration Utility.
Procedure
1. In the Web Configuration Utility, select Settings > Change Password.
2. Update the passwords for the Admin and User.
Administrator and User Password Parameters
Use the parameters in the following table to set the administrator and user password and configure
password settings.
Configuring Security Options
Polycom, Inc. 55

Local Administrator and User Password Parameters
Template Parameter Permitted Values
Change Causes
Restart or Reboot
site.cfg sec.pwd.length.
admin
The minimum character length
for administrator passwords
changed using the phone. Use 0
to allow null passwords.
1 (default)
0 -32
Yes
site.cfg sec.pwd.length.
user
The minimum character length
for user passwords changed
using the phone. Use 0 to allow
null passwords.
2 (default)
0 -32
Yes
features.cfg up.echoPassword
Digits
1 (default) The phone briefly
displays password characters
before being masked by an
asterisk.
0 - The phone displays only
asterisks for the password
characters.
No
device.cfg,
site.cfg
device.auth.loc
alAdminPassword
Specify a local administrator
password.
0 - 32 characters
You must use this parameter
with
device.auth.localAdmi
nPassword.set="1"
No
device.cfg,
site.cfg
device.auth.loc
alAdminPassword
.set
0 (default) - Disables overwriting
the local admin password when
provisioning using a
configuration file.
1 - Enables overwriting the local
admin password when
provisioning using a
configuration file.
No
Disabling External Ports and Features
You can disable unused external phone ports and features to increase the security of devices in your
deployment.
Configuring Security Options
Polycom, Inc. 56
You can disable the following ports and features:
• Web Configuration Utility
• PC port
• Aux port
• USB port
• Speakerphone
• Call forwarding
• Do Not Disturb
• Push-to-Talk (PTT)
• Auto Answer
• Applications icon
• Headset
• Handset
• Host and device ports
• Bluetooth
• NFC
• Wi-Fi
Note: At least one audio port must be enabled to send and receive calls.
Disable Unused Ports and Features Parameters
Use the parameters in the following table to disable external ports or specific features.
Disable Unused Ports and Features
Template Parameter Permitted Values
Change Causes Restart
or Reboot
device.cfg device.net.etherM
odePC
0 (default) - Disable the PC port
mode that sets the network
speed over Ethernet.
1 - Enable the PC port mode
that sets the network speed
over Ethernet.
No
device.cfg device.auxPort.en
able
0 (default) - Disable the phone
auxiliary port.
1 - Enable the phone auxiliary
port.
No
Configuring Security Options
Polycom, Inc. 57

Template Parameter Permitted Values
Change Causes Restart
or Reboot
site.cfg httpd.enabled Base Profile = Generic
1 (default) - The web server is
enabled.
0 - The web server is disabled.
Base Profile = Skype
0 (default) - The web server is
disabled.
1 - The web server is enabled.
Yes
site.cfg ptt.pttMode.enabl
e
0 (default) - Disable push-to-talk
mode.
1 - Enable push-to-talk mode.
No
features.cfg feature.callRecor
ding.enabled
0 (default) - Disable the phone
USB port for local call
recording.
1 - Enable the phone USB port
for local call recording.
Yes
features.cfg up.handsfreeMode 1(default) - Enable handsfree
mode.
0 - disable handsfree mode.
No
features.cfg feature.forward.e
nable
1(default) - Enable call
forwarding.
0 - Disable call forwarding.
No
features.cfg feature.doNotDist
urb.enable
1(default) - Enable Do Not
Disturb (DND).
0 - Disable Do Not Disturb
(DND).
Yes
features.cfg homeScreen.doNotD
isturb.enable
1 (default) - Enables the display
of the DND icon on the phone's
Home screen.
0 - Disables the display of the
DND icon on the phone's Home
screen.
No
features.cfg call.autoAnswerMe
nu.enable
1 (default) - Enables the
phone's Autoanswer menu.
0 - Disables the phone's
Autoanswer menu.
No
Configuring Security Options
Polycom, Inc. 58
Visual Security Classification
The security classification of a call is determined by the lowest security classification among all
participants connected to a call.
For example, a Top Secret classification displays when all participants in a call have a Top Secret
classification level.
Note: Call classification is determined by the lowest classification among all participants in the call. You
can safely exchange information classified no higher than the call's security classification. For
example, if User A is classified as Top Secret and User B has a lower classification level of
Restricted, both User A and B are connected to the call as Restricted.
Phone users can modify their assigned security classification level to a value lower than their assigned
level during a call. When the call is over, the server resets the user's classification level to its original
state.
Visual Security Classification Parameters
To enable the visual security classification feature, you must configure settings on the BroadSoft
BroadWorks server v20 or higher and on the phones.
If a phone has multiple registered lines, administrators can assign a different security classification to
each line.
An administrator can configure security classifications as names or strings and set the priority of each on
the server in addition to the default security classification level Unclassified. The default security
classification Unclassified displays until you set classifications on the server. When a user establishes a
call to a phone not connected to this feature, the phone displays as Unclassified.
The following table lists the parameters you can use to configure visual security classification.
Configure Visual Security Classification
Template Parameter Permitted Values
Change Causes Restart
or Reboot
sip-
interop.cfg
voIpProt.SIP.serv
erFeatureControl.
securityClassific
ation
0 (default) - The visual security
classification feature for all lines
on a phone is disabled.
1 - The visual security
classification feature for all lines
on a phone is enabled.
Yes
reg-
advanced.cfg
reg.x.serverFeatu
reControl.securit
yClassification
0 (default) - The visual security
classification feature for a
specific phone line is disabled.
1 - The visual security
classification feature for a
specific phone line is enabled.
No
Configuring Security Options
Polycom, Inc. 59

Encryption
Polycom supports the use of encryption to protect configuration files, and phone calls.
Encrypting Configuration Files
Polycom phones can download encrypted files from the provisioning server and encrypt files before
uploading them to the provisioning server.
You can encrypt all configuration files except the master configuration file, contact directory files, and
configuration override files from the Web Configuration Utility and local device interface. You can also
determine whether encrypted files are the same as unencrypted files and use the SDK to facilitate key
generation. You cannot encrypt the master configuration file.
To encrypt files, you must provide the phone an encryption key. You can generate your own 32 hex-digit,
128 bit key or use the Polycom Software Development Kit (SDK) to generate a key and to encrypt and
decrypt configuration files on a UNIX or Linux server.
Note: To request the SDK and quickly install the generated key, see When Encrypting Polycom UC
Software Configuration Files: Quick Tip 67442 at Polycom Engineering Advisories and Technical
Notifications.
You can use the following parameters to set the key on the phone:
•device.set
•device.sec.configEncryption.key
•device.sec.configEncryption.key.set
If the phone doesn't have a key, you must download the key to the phone in plain text, which is a potential
security concern if you are not using HTTPS. If the phone already has a key, you can download a new
key. Polycom recommends naming each key uniquely to identify which key was used to encrypt a file.
After encrypting a configuration file, it is useful to rename the file to avoid confusing it with the original
version, for example, rename site.cfg to site.enc.
Note: If a phone downloads an encrypted file that it cannot decrypt, the action is logged, and an error
message displays. The phone continues to do this until the provisioning server provides an
encrypted file that can be read, an unencrypted file, or until the file is removed from the list in the
master configuration file.
Change the Encryption Key on the Phone and Server
To maintain secure files, you can change the encryption key on the phones and the server.
Procedure
1. Place all encrypted configuration files that you want to use the new key on the provisioning server.
The phone may reboot multiple times.
The files on the server must be updated to the new key or they must be made available in
unencrypted format. Updating to the new key requires decrypting the file with the old key, then
encrypting it with the new key.
Configuring Security Options
Polycom, Inc. 60

2. Put the new key into a configuration file that is in the list of files downloaded by the phone,
specified in 000000000000.cfg or <MACaddress>.cfg .
3. Use the device.sec.configEncryption.key parameter to specify the new key.
4. Provision the phone again so that it downloads the new key.
The phone automatically reboots a second time to use the new key.
Note that configuration files, contact directory files and configuration override files may all need to
be updated if they were already encrypted. In the case of configuration override files, they can be
deleted from the provisioning server so that the phone replaces them when it successfully boots.
Configuration File Encryption Parameters
The following table provides the parameters you can use to encrypt your configuration files.
Configuration File Encryption Parameters
Template Parameter Permitted Values
Change Causes
Restart or Reboot
device.cfg device.sec.configE
ncryption.key
Set the configuration encryption key
used to encrypt configuration files.
string
Yes
site.cfg sec.encryption.upl
oad.callLists
0 (default) - The call list is uploaded
without encryption.
1 - The call list is uploaded in encrypted
form.
Yes
site.cfg sec.encryption.upl
oad.config
0 (default) - The file is uploaded without
encryption and replaces the phone
specific configuration file on the
provisioning server.
1 - The file is uploaded in encrypted
form and replaces the existing phone
specific configuration file on the
provisioning server.
No
site.cfg sec.encryption.upl
oad.dir
0 (default) - The contact directory is
uploaded without encryption and
replaces the phone specific contact
directory on the provisioning server.
1 - The contact directory is uploaded in
encrypted form and replaces the
existing phone specific contact directory
on the provisioning server.
Yes
Configuring Security Options
Polycom, Inc. 61

Template Parameter Permitted Values
Change Causes
Restart or Reboot
site.cfg sec.encryption.upl
oad.overrides
0 (default) - The MAC address
configuration file is uploaded without
encryption and replaces the phone
specific MAC address configuration file
on the provisioning server.
1 - The MAC address configuration file
is uploaded in encrypted form and
replaces the existing phone specific
MAC address configuration file on the
provisioning server.
No
Voice over Secure IP
You can configure phones to dynamically use either Secure Real Time Protocol (SRTP) or Real Time
Protocol (RTP) depending on the media security mechanisms negotiated between phone and outbound
proxy using Voice over Secure IP (VoSIP). When you enable this feature, the voice signals are
transferred securely between endpoints without the need to introduce multiple lines in the Session
Description Protocol (SDP).
The following are advantages for Voice over Secure IP (VoSIP):
▪ The voice signals are encrypted and secure allowing a safe transmission of signals between
phones.
▪ Signaling and media to the cloud hosted product are encrypted.
VoSIP Parameters
The following table lists parameters to configure VoSIP.
Configuring Security Options
Polycom, Inc. 62
Voice over Secure IP Parameter
Template Parameter Permitted Values Change Causes Reboot
or Restart
reg-advanced.cfg reg.X.rfc3329Medi
aSec.enable
0 – Disables the media
security mechanisms
negotiated between
Phone and Outbound
proxy without the need of
multiple m-lines in the
Session Description
Protocol.
1 – Enables the media
security mechanisms
negotiated between
Phone and Outbound
proxy without the need of
multiple m-lines in the
Session Description
Protocol.
No
Securing Phone Calls with SRTP
Secure Real-Time Transport Protocol (SRTP) encrypts audio stream(s) to prevent interception and
eavesdropping on phone calls.
When this feature is enabled, the phones negotiate the type of encryption and authentication to use for
the session with the other endpoint.
SRTP authentication proves to the phone receiving the RTP/RTCP stream that the packets are from the
expected source and have not been tampered with. Encryption modifies the data in the RTP/RTCP
streams so that if the data is captured or intercepted it sounds like noise and cannot be understood. Only
the receiver knows the key to restore the data.
If the call is completely secure (RTP authentication and encryption and RTCP authentication and RTCP
encryption are enabled), a padlock symbol displays. Phone will send only one SRTP m-line for audio and
video instead of multiple m-lines when VoSIP is enabled.
Related Links
TLS Parameters on page 86
SRTP Parameters
Use the session parameters in the following table to turn on or off authentication and encryption for RTP
and RTCP streams.
You can also turn off the session parameters to reduce the phone's processor usage.
Configuring Security Options
Polycom, Inc. 63

Secure Real Time Transport Protocol Parameters
Template Parameter Permitted Values
Change Causes
Restart or Reboot
site.cfg mr.srtp.audio.requ
ire
Enable or disable a requirement for
SRTP encrypted audio media between
MR hubs and devices.
1 (default)
0
Yes
site.cfg mr.srtp.video.requ
ire
Enable or disable a requirement for
SRTP encrypted video media between
hubs and devices.
1 (default)
0
Yes
sip-
interop.cfg
sec.srtp.answerWit
hNewKey
1 (default) - Provides a new key when
answering a call.
0 - Does not provide a new key when
answering the call.
No
sip-
interop.cfg
sec.srtp.enable 1 (default) - The phone accepts the
SRTP offers.
0 - The phone declines the SRTP offers.
The defaults for SIP 3.2.0 is 0 when Null
or not defined.
Yes
sip-
interop.cfg
sec.srtp.key.lifet
ime
Specifies the lifetime of the key used for
the cryptographic parameter in SDP.
Null (default) -
0 - The master key lifetime is not set.
Positive integer minimum 1024 or power
of 2 notation - The master key lifetime is
set.
Setting this parameter to a non-zero
value may affect the performance of the
phone.
Yes
sip-
interop.cfg
sec.srtp.mki.enabl
ed
0 (default) - The phone sends two
encrypted attributes in the SDP, one
with MKI and one without MKI when the
base profile is set as Generic.
1 - The phone sends only one
encrypted value without MKI when the
base profile is set as Skype.
Yes
Configuring Security Options
Polycom, Inc. 64

Template Parameter Permitted Values
Change Causes
Restart or Reboot
sip-
interop.cfg
sec.srtp.mki.start
SessionAtOne
0 (default) - The phone uses MKI value
of 1.
1 - The MKI value increments for each
new crypto key.
No
sip-
interop.cfg
sec.srtp.offer 0 (default) - The secure media stream is
not included in SDP of an SIP invite.
1 - The phone includes secure media
stream along with the non-secure media
description in SDP of an SIP invite.
Yes
sip-
interop.cfg
sec.srtp.offer.HMA
C_SHA1_32
0 (default) - The
AES_CM_128_HMAC_SHA1_32
crypto suite in SDP is not included.
1 - The
AES_CM_128_HMAC_SHA1_32
crypto suite in SDP is included.
Yes
sip-
interop.cfg
sec.srtp.offer.HMA
C_SHA1_80
1 (default) - The
AES_CM_128_HMAC_SHA1_80
crypto suite in SDP is included.
0 - The
AES_CM_128_HMAC_SHA1_80
crypto suite in SDP is not included.
Yes
sip-
interop.cfg
sec.srtp.padRtpToF
ourByteAlignment
0 (default) - The RTP packet padding is
not required when sending or receiving
video.
1 - The RTP packet padding is required
when sending or receiving video.
Yes
sip-
interop.cfg
sec.srtp.require 0 (default) - The secure media streams
are not required.
1 - The phone is only allowed to use
secure media streams.
Yes
sip-
interop.cfg
sec.srtp.requireMa
tchingTag
1 (default) - The tag values must match
in the crypto parameter.
0 - The tag values are ignored in the
crypto parameter.
Yes
sip-
interop.cfg
sec.srtp.sessionPa
rams.noAuth.offer
0 (default) - The authentication for RTP
offer is enabled.
1 - The authentication for RTP offer is
disabled.
Yes
Configuring Security Options
Polycom, Inc. 65

Template Parameter Permitted Values
Change Causes
Restart or Reboot
sip-
interop.cfg
sec.srtp.sessionPa
rams.noAuth.requir
e
0 (default) - The RTP authentication is
required.
1 - The RTP authentication is not
required.
Yes
sip-
interop.cfg
sec.srtp.sessionPa
rams.noEncrypRTCP.
offer
0 (default) - The encryption for RTCP
offer is enabled.
1 - The encryption for RTCP offer is
disabled.
Yes
sip-
interop.cfg
sec.srtp.sessionPa
rams.noEncrypRTCP.
require
0 (default) - The RTCP encryption is
required.
1 - The RTCP encryption is not
required.
Yes
sip-
interop.cfg
sec.srtp.sessionPa
rams.noEncrypRTP.o
ffer
0 (default) - The encryption for RTP
offer is enabled.
1 - The encryption for RTP offer is
disabled.
Yes
sip-
interop.cfg
sec.srtp.sessionPa
rams.noEncrypRTP.r
equire
0 (default) - The RTP encryption is
required.
1 - The RTP encryption is not required.
Yes
sip-
interop.cfg
sec.srtp.simplifie
dBestEffort
1 (default) - The SRTP is supported with
Microsoft Description Protocol Version
2.0 Extensions.
0 - The SRTP is not supported with
Microsoft Description Protocol Version
2.0 Extensions.
No
Enabling Users to Lock Phones
This feature enables users to lock their phones to prevent access to menus or directories.
After the phone is locked, users can only place calls to emergency and authorized numbers. You can
specify which authorized numbers users can call.
If a user forgets their password, you can unlock the phone either by entering the administrator password
or by disabling and re-enabling the phone lock feature. The latter method facilitates remote unlocking and
avoids disclosing the administrator password to the user.
Note: If a locked phone has a registered shared line, calls to the shared line display on the locked
phone and the phone's user can answer the call.
Configuring Security Options
Polycom, Inc. 66
Phone Lock Parameters
Use the parameters in the following table to enable the phone lock feature, set authorized numbers for
users to call when a phone is locked, and set scenarios when the phone should be locked.
Phone Lock is different from Device Lock for Skype for Business deployments. If you enable Phone Lock
and Device Lock for Skype for Business at the same time on a phone with the Base Profile set to Skype,
the Device Lock feature takes precedence over Phone Lock.
Phone Lock Parameters
Template Parameter Permitted Values
Change Causes
Restart or Reboot
features.cf
g
phoneLock.Allow.An
swerOnLock
1(default) - The phone answers any
incoming call without asking to
UNLOCK.
0 - The phone asks to UNLOCK before
answering.
No
features.cf
g
phoneLock.authoriz
ed.x.description
The name or description of an
authorized number.
Null (default)
String
Up to five (x=1 to 5) authorized contacts
that a user can call while their phone is
locked. Each contact needs a
description to display on the screen,
and a phone number or address value
for the phone to dial.
No
features.cf
g
phoneLock.authoriz
ed.x.value
The number or address for an
authorized contact.
Null (default)
String
Up to five (x=1 to 5) authorized contacts
that a user can call while their phone is
locked. Each contact needs a
description to display on the screen,
and a phone number or address value
for the phone to dial.
No
features.cf
g
phoneLock.browserE
nabled
0 (default) - The microbrowser or
browser is not displayed while the
phone is locked.
1 - The microbrowser or browser is
displayed while the phone is locked.
No
features.cf
g
phoneLock.dndWhenL
ocked
0 (default) - The phone can receive calls
while it is locked
1 - The phone enters Do-Not-Disturb
mode while it is locked
No
Configuring Security Options
Polycom, Inc. 67

Template Parameter Permitted Values
Change Causes
Restart or Reboot
features.cf
g
phoneLock.enabled10 (default) - The phone lock feature is
disabled
1 - The phone lock feature is enabled.
No
features.cf
g
phoneLock.idleTime
out
The amount of time (in seconds) the
phone can be idle before it
automatically locks. If 0, automatic
locking is disabled.
0 (default)
0 to 65535
No
features.cf
g
phoneLock.lockStat
e
0 (default) - The phone is unlocked.
1 - The phone is locked.
The phone stores and uploads the value
each time it changes via the MAC-
phone.cfg. You can set this parameter
remotely using the Web Configuration
Utility.
No
features.cf
g
phoneLock.powerUpU
nlocked
Overrides the
phoneLock.lockState
parameter.
0 (default) - The phone retains the value
in phoneLock.lockState
parameter.
1 - You can restart, reboot, or power
cycle the phone to override the value for
phoneLock.lockState in the
MAC-phone.cfg and start the phone in
an unlocked state.
You can then lock or unlock the phone
locally. Polycom recommends that you
do not leave this parameter enabled
No
Locking the Basic Settings Menu
By default, all users can access the Basic settings menu available on the Polycom Trio 8800 system and
VVX phones.
From this menu, users can customize non-administrative features on their phone. You can choose to lock
the Basic settings menu to allow certain users access to the basic settings menu.
If enabled, you can use the default user password (123) or administrator password (456) to access the
Basic settings menu, unless the default passwords are not in use.
Configuring Security Options
Polycom, Inc. 68

Basic Settings Menu Lock Parameters
Use the parameter in the following table to lock the Basic settings menu.
Lock the Basic Settings Menu
Template Parameter Permitted Values
Change Causes
Restart or Reboot
features.cf
g
up.basicSettingsPa
sswordEnabled
Specifies that a password is required or
not required to access the Basic
Settings menu.
0 (Default) - No password is required to
access the Basic Settings menu.
1 - Password is required for access to
the Basic Settings menu.
No
Secondary Port Link Status Report
Polycom devices can detect an externally connected host connection/disconnection, informing the
authenticator switch to initiate the authentication process or drop an existing authentication.
This feature extends Cisco Discovery Protocol (CDP) to include a Second Port Status Type, Length,
Value (TLV) that informs an authenticator switch of the status of devices connected to a device's
secondary PC port.
This feature ensures the following:
• The port authenticated by the externally attached device switches to unauthenticated upon device
disconnection so that other unauthorized devices cannot use it.
• The externally attached device can move to another port in the network and start a new
authentication process.
• To reduce the frequency of CDP packets, the phone does not send link up status CDP packets
before a certain time period. The phone immediately sends all link-down indication to ensure that
the port security is not compromised.
• If the externally attached device (the host) supports 802.1X authentication, then the device can
send an EAPOL-Logoff on behalf of the device after it is disconnected from the secondary PC port.
This informs the authenticator switch to drop the authentication on the port corresponding with the
previously attached device.
Secondary Port Link Status Report Parameters
You can use the parameters in the following table to configure options for the Secondary Port Link Status
Report feature, including the required elapse or sleep time between two CDP UPs dispatching.
Configuring Security Options
Polycom, Inc. 69

Secondary Port Link Status Report Parameters
Template Parameter Permitted Values
Change Causes
Restart or Reboot
site.cfg sec.dot1x.eapollog
off.enabled
0 (default) - The phone does not send
an EAPOL Logoff message.
1 - The phone sends an EAPOL Logoff
message.
Yes
site.cfg sec.dot1x.eapollog
off.lanlinkreset
0 (default) - The phone does not reset
the LAN port link.
1 - The phone resets the LAN port link.
Yes
site.cfg sec.hostmovedetect
.cdp.enabled
0 (default) - The phone does not send a
CDP packet.
1 - The phone sends a CDP packet.
Yes
site.cfg sec.hostmovedetect
.cdp.sleepTime
Controls the frequency between two
consecutive link-up state change
reports.
1000 (default)
0 to 60000
If
sec.hostmovedetect.cdp.ena
bled is set to 1, there is an x
microsecond time interval between two
consecutive link-up state change
reports, which reduces the frequency of
dispatching CDP packets.
Yes
802.1X Authentication
Polycom phones support standard IEEE 802.
1X authentication and the following EAP authentication methods:
• EAP-TLS (requires Device and CA certificates)
• EAP-PEAPv0/MSCHAPv2 (requires CA certificates)
• EAP-PEAPv0/GTC (requires CA certificates)
• EAP-TTLS/MSCHAPv2 (requires CA certificates)
• EAP-TTLS/GTC (requires CA certificates)
• EAP-FAST (optional Protected Access Credential (PAC) file, if not using in-band provisioning)
• EAP-MD5
Configuring Security Options
Polycom, Inc. 70
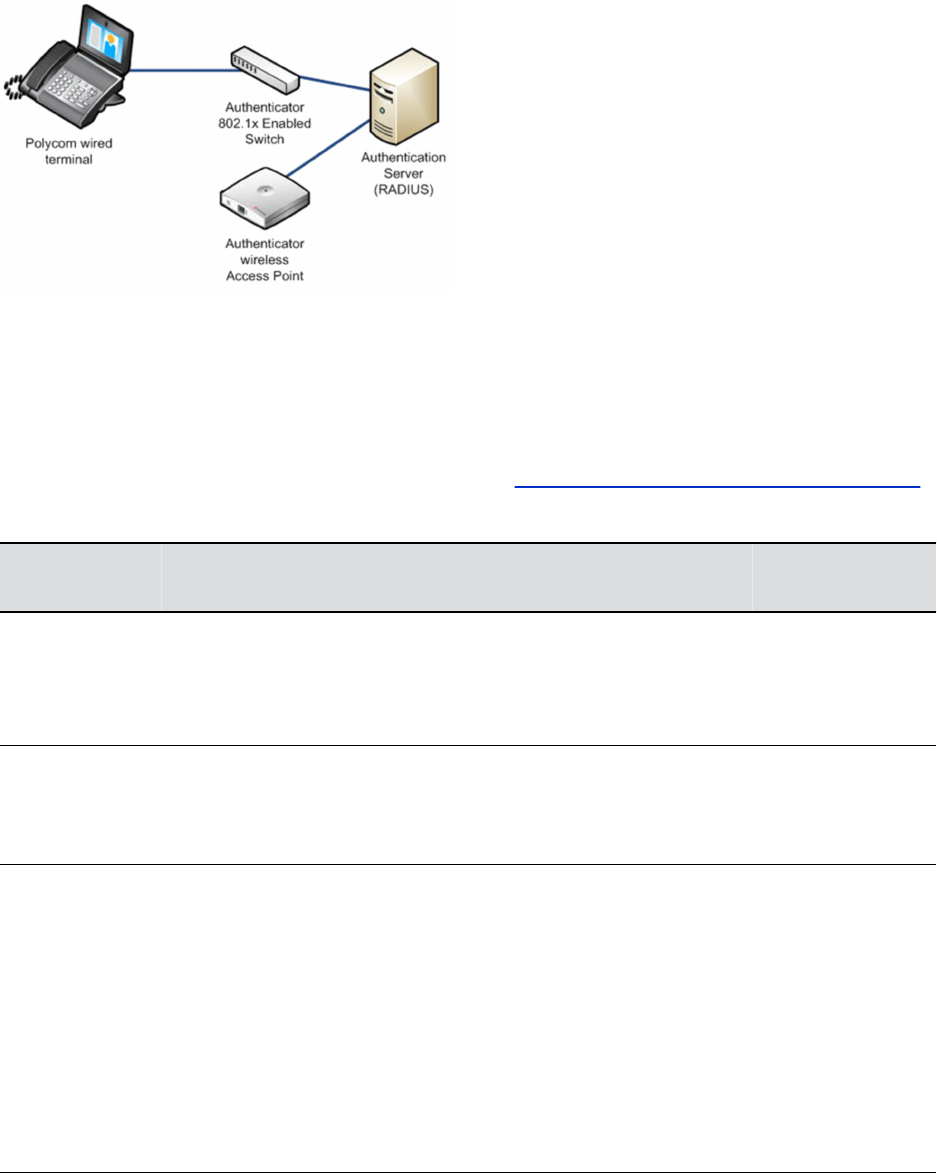
A typical 802.1X network configuration
802.1X Authentication Parameters
To set up an EAP method that requires a device or CA certificate, you need to configure TLS Platform
Profile 1 or TLS Platform Profile 2 to use with 802.
1X. You can use the parameters in the following table to configure 802.1X Authentication.
For more information on EAP authentication protocol, see RFC 3748: Extensible Authentication Protocol.
Set 802.1X Authentication Parameters
Template Parameter Permitted Values
Change Causes
Restart or Reboot
device.cfg
site.cfg
wireless.cf
g
device.net.dot1x.e
nabled
Enable or disable 802.1X
authentication.
0
1
Yes
device.cfg
site.cfg
wireless.cf
g
device.net.dot1x.i
dentity1
Set the identity (user name) for 802.1X
authentication.
String
Yes
device.cfg device.net.dot1x.m
ethod
Specify the 802.1X EAP method.
EAP-None - No authentication
EAP-TLS,
EAP-PEAPv0-MSCHAPv2,
EAP-PEAPv0-GTC,
EAP-TTLS-MSCHAPv2,
EAP-TTLS-GTC,
EAP-FAST,
EAP-MD5
No
Configuring Security Options
Polycom, Inc. 71
Template Parameter Permitted Values
Change Causes
Restart or Reboot
device.cfg
site.cfg
wireless.cf
g
device.net.dot1x.p
assword1
Set the password for 802.1X
authentication. This parameter is
required for all methods except EAP-
TLS.
String
Yes
device.cfg device.net.dot1x.e
apFastInBandProv
Enable EAP In-Band Provisioning for
EAP-FAST.
0 (default) - Disabled
1 - Unauthenticated, active only when
the EAP method is EAP-FAST.
No
device.cfg device.pacfile.dat
a
Specify a PAC file for EAP-FAST
(optional).
Null (default)
0-2048 - String length.
No
device.cfg device.pacfile.pas
sword
The optional password for the EAP-
FAST PAC file.
Null (default).
0-255 - String length.
No
SCEP Security Protocol
The Simple Certificate Enrollment Protocol (SCEP) enables you to automatically and securely provision
multiple phones with a digital device certificate.
SCEP Parameters
Use the following parameter to configure SCEP.
SCEP Parameters
Template Parameter Permitted Values Change Causes Restart
or Reboot
features.cfg SCEP.CAFingerprin
t
Configure the CA
certificate fingerprint to
confirm the authenticity of
the CA response during
enrollment.
null (default)
0 - 255 characters
No
Configuring Security Options
Polycom, Inc. 72

Template Parameter Permitted Values Change Causes Restart
or Reboot
features.cfg SCEP.certPoll.ret
ryCount
Specify the number of
times to poll the SCEP
server when the SCEP
server returns a
Certificate Enrollment
Response Message with
pkiStatus set to 'pending'.
12 (default)
1 - 24
No
features.cfg SCEP.certPoll.ret
ryInterval
Specify the number of
seconds to wait between
poll attempts when the
SCEP server returns a
Certificate Enrollment
Response Message with
pkiStatus set to 'pending'.
300 (default)
300 - 3600
No
features.cfg SCEP.certRenewalR
etryInterval
Specify the time interval
to retry certificate
renewal.
86400 minutes (default)
28800 - 259200 minutes
No
features.cfg SCEP.certRenewalT
hreshold
Specify the percentage of
the certificate validity
interval to initiate a
renewal.
80 (default)
50 - 100
No
features.cfg SCEP.challengePas
sword
Specify the challenge
password to send with the
Certificate Signing
Request (CSR) when
requesting a certificate.
null (default)
0 - 255 characters
No
features.cfg SCEP.csr.commonNa
me
Specify the common
name to use for CSR
generation.
null (default)
0 - 64
No
Configuring Security Options
Polycom, Inc. 73

Template Parameter Permitted Values Change Causes Restart
or Reboot
features.cfg SCEP.csr.country Specify the country name
to use for CSR
generation.
null (default)
0 - 2
No
features.cfg SCEP.csr.email Specify the email address
to use for CSR
generation.
null (default)
0 - 64
No
features.cfg SCEP.csr.organiza
tion
Specify the organization
name to use for CSR
generation.
null (default)
0 - 64
No
features.cfg SCEP.csr.state Specify the state name to
use for CSR generation.
null (default)
0 - 128 characters
No
features.cfg SCEP.enable 0 (default) - Disable the
SCEP feature.
1 - Enable the SCEP
feature.
No
features.cfg SCEP.enrollment.r
etryCount
Specify the number of
times to retry the
enrolment process in
case of enrolment failure.
12 (default)
1 - 24
No
features.cfg SCEP.enrollment.r
etryInterval
Specify the time interval
to retry the enrolment
process.
300 seconds (default)
300 - 3600 seconds
No
Configuring Security Options
Polycom, Inc. 74
Template Parameter Permitted Values Change Causes Restart
or Reboot
features.cfg SCEP.http.passwor
d
Specify the password that
authenticates with the
SCEP server.
null (default)
string, max 255
characters
No
features.cfg SCEP.http.usernam
e
Specify the user name
that authenticates with the
SCEP server.
null (default)
string, max 255
characters
No
features.cfg SCEP.url Specify the URL address
of the SCEP server
accepting requests to
obtain a certificate.
null (default)
0 - 255 characters
No
Configuring Security Options
Polycom, Inc. 75

Certificates
Topics:
•Using the Factory-Installed Certificate
•Customizing Certificate Use
•Create a Certificate Signing Request
•Custom URL Location for LDAP Server CA Certificate
▪Online Certificate Status Protocol
Security certificates are an important element in deploying a solution that ensures the integrity and
privacy of communications involving Polycom® UC Software devices.
Polycom phones are installed with a Polycom-authenticated “built-in” device certificate that you can use
or you can choose to customize your security by requesting additional certificates from a certificate
authority of your choice.
You can customize security configuration options to determine type of device certificate is used for each
of the secure communication options. By default, all operations will utilize the factory-installed device
certificate unless you specify otherwise.
Note: You can install custom device certificates on your Polycom phones in the same way custom CA
certificates are installed. See Technical Bulletin 17877: Using Custom Certificates With Polycom
Phones for more information.
Certificates are used in the following situations:
• Mutual TLS Authentication: Allows a server to verify that a device is truly a Polycom device (and not
a malicious endpoint or software masquerading as a Polycom device). This could be used for tasks
like provisioning, or SIP signaling using TLS signaling. For example, certain partner provisioning
systems use Mutual TLS as does Polycom® Zero Touch Provisioning (ZTP).
• Secure HTTP (https) access to the web server on the phone at https://<IP ADDRESS OF PHONE>.
The web server is used for certain configuration and troubleshooting activities.
• Secure communications utilizing the Polycom Applications API.
There are different options for utilizing device certificates on the phone:
• Two platform device certificates. These certificates are loaded onto the device by the system
administrator and can be configured to be used for any of the following purposes: 802.1X
Authentication, provisioning, syslog, SIP signaling, browser communications, presence, and LDAP.
Certificates for syslog, 802.1X, and provisioning must applied using TLS platform profiles.
• Six application device certificates. These certificates are loaded onto the device by the system
administrator and can be used for all of the operations listed above for platform certificates. You
cannot use TLS application profiles to applied certificates for 802.1X, syslog, and provisioning.
Note: For details on installing digital credentials on VVX phones, see Device Certificates on
Polycom SoundPoint IP, SoundStation IP, and VVX Phones: Technical Bulletin 37148 at
Polycom Engineering Advisories and Technical Notifications.
Polycom, Inc. 76

Using the Factory-Installed Certificate
A factory-installed device certificate is installed at the time of manufacture and is unique to a device
(based on the MAC address) and signed by the Polycom Certificate Authority (CA).
Since it is installed at the time of manufacture, it is the easiest option for out-of-box activities, especially
phone provisioning.
You can use the factory-installed certificate for all your security needs. To configure your web servers
and/or clients to trust the Polycom factory-installed certificates, you must download the Polycom Root CA
certificate, which is available at http://pki.polycom.com/pki. You may also need to download the
Intermediate CA certificates if determined by the authenticating server.
The location of the Certificate Revocation List (CRL)—a list of all expired certificates signed by the
Polycom Root CA—is part of the Polycom Root CA digital certificate. If you enable Mutual TLS, you must
have a root CA download (the Polycom Root CA certificate or your organization's CA) on the HTTPS
server.
The certificate is set to expire on March 9, 2044.
Note: For more information on using Mutual TLS with Microsoft Internet Information Services (IIS) 6.0,
see Mutual Transport Layer Security Provisioning Using Microsoft Internet Information Services
6.0: Technical Bulletin 52609 at Polycom Engineering Advisories and Technical Notifications.
Check for a Device Certificate
The certificate and associated private key are stored on the phone in its non-volatile memory as part of
the manufacturing process.
You can check if a phone has a certificate pre-installed.
Procedure
1. Navigate to Settings > Advanced > Administration Settings > TLS Security > Custom Device
Credentials.
2. Select a credential and press Info to view the certificate.
One of the following messages displays:
•Installed or Factory Installed is displayed if the certificate is available in flash memory, all
the certificate fields are valid (listed above), and the certificate has not expired.
•Not Installed is displayed if the certificate is not available in flash memory (or the flash
memory location where the device certificate is to be stored is blank).
•Invalid is displayed if the certificate is not valid.
Note: If your phone reports the device certificate as self-signed rather than Factory
Installed, return the equipment to receive a replacement.
Certificates
Polycom, Inc. 77

Customizing Certificate Use
You can add custom certificates to the phone and set up the phone to use the certificates for different
features.
For example, the phone's factory-installed certificate can be used for authentication when phone
provisioning is performed by an HTTPS server. You can use a different certificate when accessing
content through a browser.
Determining TLS Platform Profiles or TLS Application Profiles
You use TLS Platform or TLS Application profiles to customize where your installed certificates are used
for authentication.
After you install certificates on the phone, you can determine which TLS platform profiles or TLS
application profiles use these certificates. By default, TLS Platform Profile 1 uses every CA certificate and
the default device certificate. Also, each TLS application uses TLS Platform Profile 1 as the default
profile. You can quickly apply a CA certificate to all TLS applications by installing it on the phone and
keeping the default TLS profile and default TLS application values.
Alternatively, you can choose which TLS platform profile or application profile to use for each TLS
application. You can use platform profiles for any of the following purposes: phone provisioning, for
applications running on the microbrowser and browser, and for 802.1X, LDAP, and SIP authentication.
You can use application profiles for all applications except 802.1X, syslog, and provisioning.
Note: For more information on using custom certificates, see Technical Bulletin 17877: Using Custom
Certificates With Polycom Phones.
TLS Platform Profile and Application Profile Parameters
By default, all Polycom-installed profiles are associated with the default cipher suite and use trusted and
widely recognized CA certificates for authentication.
The following table shows parameters for TLS Platform Profile 1. To configure TLS Platform Profile 2, use
a 2 at the end of the parameter instead of a 1. For example, set
device.sec.TLS.profile.caCertList2 instead of .caCertList1 .
You can use the parameters in the following table to configure the following TLS Profile feature options:
• Change the cipher suite, CA certificates, and device certificates for the two platform profiles and the
six application profiles.
• Map profiles directly to the features that use certificates.
TLS Platform Profile and Application Profile Parameters
Template Parameter Permitted Values
Change Causes
Restart or Reboot
device.c
fg,
site.cfg
device.sec.TLS.customCaCer
t1
Specify a custom certificate.
Null (default)
String (maximum of 12288
characters)
No
Certificates
Polycom, Inc. 78

Template Parameter Permitted Values
Change Causes
Restart or Reboot
device.c
fg,
site.cfg
device.sec.TLS.profile.caC
ertList1
Specify which CA certificates to
use.
Null (default)
String (maximum of 1024
characters)
No
device.c
fg,
site.cfg
device.sec.TLS.profile.cip
herSuite1
Specify the cipher suite.
Null (default)
String (maximum of 1024
characters)
No
device.c
fg,
site.cfg
device.sec.TLS.profile.cip
herSuiteDefault1
Null (default)
0 - Use the custom cipher suite.
1 - Use the default cipher suite.
No
device.c
fg,
site.cfg
device.sec.TLS.profile.dev
iceCert1
Specify which device certificates
to use.
Builtin (default)
Builtin, Platform1, Platform2
No
site.cfg sec.TLS.customCaCert.x The custom certificate for TLS
Application Profile x (x= 1 to 6).
Null (default)
String
No
site.cfg sec.TLS.customDeviceKey.x The custom device certificate
private key for TLS Application
Profile x (x= 1 to 6).
Null (default)
String
No
site.cfg sec.TLS.profile.x.caCert.a
pplication1
1 (default) - Enable a CA
Certificate for TLS Application
Profile 1.
0 - Disable a CA Certificate for
TLS Application Profile 1.
No
site.cfg sec.TLS.profile.x.caCert.a
pplication2
1 (default) - Enable a CA
Certificate for TLS Application
Profile 2.
0 - Disable a CA Certificate for
TLS Application Profile 2.
No
Certificates
Polycom, Inc. 79
Template Parameter Permitted Values
Change Causes
Restart or Reboot
site.cfg sec.TLS.profile.x.caCert.a
pplication3
1 (default) - Enable a CA
Certificate for TLS Application
Profile 3.
0 - Disable a CA Certificate for
TLS Application Profile 3.
No
site.cfg sec.TLS.profile.x.caCert.a
pplication4
1 (default) - Enable a CA
Certificate for TLS Application
Profile 4.
0 - Disable a CA Certificate for
TLS Application Profile 4.
No
site.cfg sec.TLS.profile.x.caCert.a
pplication5
1 (default) - Enable a CA
Certificate for TLS Application
Profile 5.
0 - Disable a CA Certificate for
TLS Application Profile 5.
No
site.cfg sec.TLS.profile.x.caCert.a
pplication6
1 (default) - Enable a CA
Certificate for TLS Application
Profile 6.
0 - Disable a CA Certificate for
TLS Application Profile 6.
No
site.cfg sec.TLS.profile.x.caCert.a
pplication7
1 (default) - Enable a CA
Certificate for TLS Application
Profile 7.
0 - Disable a CA Certificate for
TLS Application Profile 7.
No
site.cfg sec.TLS.profile.x.caCert.d
efaultList
Specifies the list of default CA
Certificate for TLS Application
Profile x (x=1 to 7).
Null (default)
String
No
site.cfg sec.TLS.profile.x.caCert.p
latform1
1 (default) - Enable a CA
Certificate for TLS Platform
Profile 1.
0 - Disable a CA Certificate for
TLS Platform Profile 1.
No
site.cfg sec.TLS.profile.x.caCert.p
latform2
1 (default) - Enable a CA
Certificate for TLS Platform
Profile 2.
0 - Disable a CA Certificate for
TLS Platform Profile 2.
No
Certificates
Polycom, Inc. 80

Template Parameter Permitted Values
Change Causes
Restart or Reboot
site.cfg sec.TLS.profile.x.cipherSu
ite
Specifies the cipher suite for TLS
Application Profile x (x=1 to 8).
Null (default)
String
No
site.cfg sec.TLS.profile.x.cipherSu
iteDefault
1 (default) - Use the default
cipher suite for TLS Application
Profile x (x= 1 to 8).
0 - Use the custom cipher suite
for TLS Application Profile x (x=
1 to 8).
No
site.cfg sec.TLS.profile.x.deviceCe
rt
Specifies the device certificate to
use for TLS Application Profile x
(x = 1 to 7).
Polycom (default)
Platform1, Platform2,
Application1, Application2,
Application3, Application4,
Application5,
Application6,Application7
No
TLS Protocol Configuration for Supported Applications
You can configure the TLS Protocol for the following supported applications:
• LDAP
• SIP
• SOPI
• Web server
• XMPP
• Exchange services
• Syslog
• Provisioning
• 802.1x
TLS Protocol Parameters
The following table includes the parameters for the TLS protocol supported applications.
Certificates
Polycom, Inc. 81

TLS Protocol Parameters
Template Parameter Permitted Values
Change Causes
Restart or Reboot
device.cfg,
site.cfg
device.sec.TLS.pro
tocol.dot1x
Configures the lowest TLS/SSL version
to use for handshake negotiation
between phone and 802.1x
authentication. The phone handshake
starts with the highest TLS version
irrespective of the value you configure.
TLSv1_0 (default)
SSLv2v3
TLSv1_1
TLSv1_2
The permitted values for Polycom
SoundStation IP 7000 conference
phone are
TLSv1_0 (default)
No
device.cfg,
site.cfg
device.sec.TLS.pro
tocol.prov
Configures the lowest TLS/SSL version
to use for handshake negotiation
between phone and provisioning. The
phone handshake starts with the
highest TLS version irrespective of the
value you configure.
TLSv1_0 (default)
SSLv2v3
TLSv1_1
TLSv1_2
The permitted values for Polycom
SoundStation IP 7000 conference
phone are
TLSv1_0 (default)
SSLv2v3
No
Certificates
Polycom, Inc. 82

Template Parameter Permitted Values
Change Causes
Restart or Reboot
device.cfg,
site.cfg
device.sec.TLS.pro
tocol.syslog
Configures the lowest TLS/SSL version
to use for handshake negotiation
between phone and Syslog. The phone
handshake starts with the highest TLS
version irrespective of the value you
configure.
TLSv1_0 (default)
SSLv2v3
TLSv1_1
TLSv1_2
The permitted values for Polycom
SoundStation IP 7000 conference
phone are
TLSv1_0 (default)
SSLv2v3
No
device.cfg,
site.cfg
sec.TLS.protocol.e
xchangeServices
Configures the lowest TLS/SSL version
to use for handshake negotiation
between phone and Exchange services.
The phone handshake starts with the
highest TLS version irrespective of the
value you configure.
TLSv1_0 (default)
SSLv2v3
TLSv1_1
TLSv1_2
The permitted values for Polycom
SoundStation IP 7000 conference
phone are
TLSv1_0 (default)
SSLv2v3
No
Certificates
Polycom, Inc. 83

Template Parameter Permitted Values
Change Causes
Restart or Reboot
device.cfg,
site.cfg
sec.TLS.protocol.l
dap
Configure the lowest TLS/SSL version
to use for handshake negotiation
between phone and Lightweight
Directory Access Protocol (LDAP). The
phone handshake starts with the
highest TLS version irrespective of the
value you configure.
TLSv1_0 (default)
SSLv2v3
TLSv1_1
TLSv1_2
The permitted values for Polycom
SoundStation IP 7000 conference
phone are
TLSv1_0 (default)
SSLv2v3
No
device.cfg,
site.cfg
sec.TLS.protocol.s
ip
Configures the lowest TLS/SSL version
to use for handshake negotiation
between the phone and SIP signaling.
The phone handshake starts with the
highest TLS version irrespective of the
value you configure.
TLSv1_0 (default)
SSLv2v3
TLSv1_1
TLSv1_2
The permitted values for Polycom
SoundStation IP 7000 conference
phone are
TLSv1_0 (default)
SSLv2v3
No
Certificates
Polycom, Inc. 84

Template Parameter Permitted Values
Change Causes
Restart or Reboot
device.cfg,
site.cfg
sec.TLS.protocol.s
opi
Configures the lowest TLS/SSL version
to use for handshake negotiation
between phone and SOPI. The phone
handshake starts with the highest TLS
version irrespective of the value you
configure.
TLSv1_0 (default)
SSLv2v3
TLSv1_1
TLSv1_2
The permitted values for Polycom
SoundStation IP 7000 conference
phone are
TLSv1_0 (default)
SSLv2v3
No
device.cfg,
site.cfg
sec.TLS.protocol.w
ebServer
Configures the lowest TLS/SSL version
to use for handshake negotiation
between phone and web server. The
phone handshake starts with the
highest TLS version irrespective of the
value you configure.
TLSv1_0 (default)
SSLv2v3
TLSv1_1
TLSv1_2
The permitted values for Polycom
SoundStation IP 7000 conference
phone are
TLSv1_0 (default)
SSLv2v3
No
Certificates
Polycom, Inc. 85
Template Parameter Permitted Values
Change Causes
Restart or Reboot
device.cfg,
site.cfg
sec.TLS.protocol.x
mpp
Configures the lowest TLS/SSL version
to use for handshake negotiation
between phone and XMPP. The phone
handshake starts with the highest TLS
version irrespective of the value you
configure.
TLSv1_0 (default)
SSLv2v3
TLSv1_1
TLSv1_2
The permitted values for Polycom
SoundStation IP 7000 conference
phone are
TLSv1_0 (default)
SSLv2v3
No
TLS Parameters
The next table lists configurable TLS parameters.
For the list of configurable ciphers, refer to the Secure Real-Time Transport Protocol table.
TLS Parameters
Template Parameter Permitted Values
Change Causes
Restart or Reboot
site.cf
g
sec.TLS.brows
er.cipherList
The cipher list is for browser. The format
for the cipher list uses OpenSSL syntax
found at: https://www.openssl.org/docs/
man1.0.2/apps/ciphers.html.
NoCipher (default)
String
No
site.cf
g
sec.TLS.custo
mDeviceCert.x
The custom device certificate for TLS
Application Profile x (x= 1 to 6).
Null (default)
String
No
Certificates
Polycom, Inc. 86

Template Parameter Permitted Values
Change Causes
Restart or Reboot
site.cf
g
sec.TLS.LDAP.
cipherList
The cipher list for the corporate directory.
The format for the cipher list uses
OpenSSL syntax found here: https://
www.openssl.org/docs/man1.0.2/apps/
ciphers.html.
NoCipher (default)
String
No
site.cf
g
sec.TLS.profi
leSelection.S
OPI
Select the platform profile required for the
phone.
PlatformProfile1 (default)
1 - 7
No
site.cf
g
sec.TLS.profi
le.webServer.
cipherSuiteDe
fault
1 (default) - The phone uses the default
cipher suite for web server profile.
0 - The custom cipher suite is used for web
server profile.
No
site.cf
g
sec.TLS.prov.
cipherList
The cipher list for provisioning. The format
for the cipher list uses OpenSSL syntax
found here: https://www.openssl.org/docs/
man1.0.2/apps/ciphers.html.
NoCipher (default)
String
No
site.cf
g
sec.TLS.SIP.c
ipherList
The cipher list for SIP. The format for the
cipher list uses OpenSSL syntax found
here: https://www.openssl.org/docs/
man1.0.2/apps/ciphers.html.
NoCipher (default)
String
No
site.cf
g
sec.TLS.SIP.s
trictCertComm
onNameValidat
ion
1 (default) - The common name validation
is enabled for SIP.
0 - The common name validation is not
enabled for SIP.
No
site.cf
g
sec.TLS.SOPI.
cipherList
Selects a cipher key from the list of
available ciphers.
NoCipher (default)
1 - 1024 character string
No
Certificates
Polycom, Inc. 87
Template Parameter Permitted Values
Change Causes
Restart or Reboot
site.cf
g
sec.TLS.SOPI.
strictCertCom
monNameValida
tion
Controls the strict common name
validation for the URL provided by the
server.
1 (default) - The SOPI verifies the server
certificate to match commonName/
SubjectAltName against the server
hostname.
0 - The SOPI will not verify the server
certificate for commonName/
SubjectAltName against the server
hostname.
No
site.cf
g
sec.TLS.syslo
g.cipherList
The cipher list for syslog. The format for
the cipher list uses OpenSSL syntax found
here: https://www.openssl.org/docs/
man1.0.2/apps/ciphers.html
NoCipher (default)
String
No
Related Links
Securing Phone Calls with SRTP on page 63
TLS Profile Selection Parameters
You can configure the parameters listed in the next table to choose the platform profile or application
profile to use for each TLS application.
The permitted values are:
• PlatformProfile1
• PlatformProfile2
• ApplicationProfile1
• ApplicationProfile2
• ApplicationProfile3
• ApplicationProfile4
• ApplicationProfile5
• ApplicationProfile6
• ApplicationProfile7
Certificates
Polycom, Inc. 88

TLS Profile Selection Parameters
Template Parameter Permitted Values
Change Causes
Restart or Reboot
site.cf
g
sec.TLS.profi
leSelection.b
rowser
Specifies to select a TLS platform profile or
TLS application profile for the browser or a
microbrowser.
PlatformProfile1 (default)
TLS profile
No
site.cf
g
sec.TLS.profi
leSelection.L
DAP
Specifies to select a TLS platform profile or
TLS application profile for the corporate
directory.
PlatformProfile1 (default)
TLS profile
No
site.cf
g
sec.TLS.profi
leSelection.S
IP
Specifies to select a TLS platform profile or
TLS application profile for SIP operations.
PlatformProfile1 (default)
TLS profile
No
site.cf
g
sec.TLS.profi
leSelection.s
yslog
Specifies to select a TLS platform profile
for the syslog operations.
PlatformProfile1 (default)
PlatformProfile1 or PlatformProfile2
No
Configurable TLS Cipher Suites
You can configure which cipher suites to offer and accept during TLS session negotiation. The following
table lists supported cipher suites. NULL cipher is a special case that does not encrypt the signaling
traffic.
TLS Cipher Suites
Cipher Cipher Suite
ADH ADH-RC4-MD5, ADH-DES-CBC-SHA, ADH-DES-
CBC3-SHA, ADH-AES128-SHA, ADH-AES256-SHA
AES128 AES128-SHA
AES256 AES256-SHA
DES DES-CBC-SHA, DES-CBC3-SHA
DHE DHE-DSS-AES128-SHA, DHE-DSS-AES256-SHA,
DHE-RSA-AES128-SHA, DHE-RSA-AES256-SHA
Certificates
Polycom, Inc. 89
Cipher Cipher Suite
EXP EXP-RC4-MD5, EXP-DES-CBC-SH, EXP-EDH-DSS-
DES-CBC-SHA, EXP-DES-CBC-SHA, EXP-ADH-RC4-
MD5, EXP-ADH-DES-CBC-SHA, EXP-EDH-RSA-DES-
CBC-SHA
EDH EDH-RSA-DES-CBC-SHA, EDH-DSS-DES-CBC3-
SHA, EDH-DSS-CBC-SHA
NULL NULL-MD5, NULL-SHA
RC4 RC4-MD5, RC4-SHA
TLS Cipher Suite Parameters
You can use the parameters listed in the following table to configure TLS Cipher Suites.
TLS Cipher Suite Parameters
Template Parameter Permitted Values
Change Causes
Restart or Reboot
site.cfg sec.TLS.cipher
List
String (1 - 1024 characters)
RC4:@STRENGTH (default)
ALL:!aNULL:!eNULL:!DSS:!SEED
:!ECDSA:!IDEA:!MEDIUM:!LOW:!
EXP:!ADH:!ECDH:!PSK:!MD5:!
RC4:@STRENGTH
The global cipher list parameter.
The format for the cipher list uses
OpenSSL syntax found at: https://
www.openssl.org/docs/man1.0.2/
apps/ciphers.html.
No
site.cfg sec.TLS.<appli
cation>.cipher
List
Specify the cipher list for a
specific TLS Platform Profile or
TLS Application Profile.
No
Create a Certificate Signing Request
You generate a certificate signing request directly from the Polycom device.
By default, the phone requests a 2048-bit certificate with 'sha256WithRSAEncryption' as the signature
algorithm. You can use OpenSSL or another certificate signing request utility if you require a stronger
certificate.
Polycom supports the use of Subject Alternative Names (SAN) with TLS security certificates. Polycom
does not support the use of the asterisk (*) or wildcard characters in the Common Name field of a
Certificates
Polycom, Inc. 90

Certificate Authority's public certificate. If you want to enter multiple hostnames or IP addresses on the
same certificate, use the SAN field.
You must have a provisioning server in place before generating the certificate signing request.
Procedure
1. Navigate to Settings > Advanced > Admin Settings > Generate CSR.
2. When prompted, enter the administrative password and press Enter.
The default administrative password is 456.
3. From the Generate CSR Screen, fill in the Common Name field - the Organization, Email
Address, Country, and State fields are optional.
4. Press Generate.
A message “CSR generation completed” displays on the phone's screen. The MAC.csr (certificate
request) and MAC-private.pem (private key) are uploaded to the phone's provisioning server.
5. Forward the CSR to a Certificate Authority (CA) to create a certificate.
If your organization doesn't have its own CA, you need to forward the CSR to a company like
Symantec.
Download Certificates to a Polycom Phone
You can download and install up to eight CA certificates and eight device certificates on a Polycom
phone.
After installing the certificates, you can refresh the certificates when they expire or are revoked, and you
can delete any CA certificate or device certificate that you install.
You can download certificate(s) to a phone in the following ways:
• Using a configuration file
• Through the phone's user interface
• Through the Web Configurable Utility
Note: For VVX 1500 phones, the maximum certificate size on Platform CA1 is 1536KB and 4KB
for Platform CA2.
Procedure
1. Navigate to Settings > Advanced > Administrative Settings > TLS Security and select
Custom CA Certificates or Custom Device Certificates.
2. Select Install.
3. Enter the URL where the certificate is stored.
For example, http://bootserver1.polycom.com/ca.crt
The certificate is downloaded, and the certificate's MD5 fingerprint displays to verify that the
correct certificate is to be installed.
4. Select Accept.
The certificate is installed successfully.
Certificates
Polycom, Inc. 91
Custom URL Location for LDAP Server CA Certificate
You can set the URL from where Polycom phones can download a CA certificate or a chain of CA
certificates required to authenticate the LDAP server.
By default, all Polycom-installed profiles are associated with the default cipher suite and use trusted and
widely recognized CA certificates for authentication. You can download and install up to seven custom
CA certificates onto a Polycom phone. The certificates are installed in descending order starting with the
Application CA 7 slot and continues to Application CA 1 slot depending on how many certificates are in
the chain.
Note: If the custom application CA certificate slots already have CA certificates installed on your
Polycom phones, downloading LDAP server CA certificates will overwrite any existing certificates
on the phone in descending order starting with the seventh certificate.
Custom URL Location for LDAP Server Certificates Parameters
Use the parameter in the following table to configure this feature.
In addition to the parameter in the following table, you must also configure the following Corporate
Directory parameters:
•sec.TLS.proflieSelection.LDAP = ApplicationProfile1
Custom URL Location for LDAP Server Certificates Parameters
Template Parameter Permitted Values Change Causes
Reboot or
Restart
site.cfg sec.TLS.LDAP.cust
omCaCertUrl
Enter the URL location from where the
phone can download LDAP server
certificates.
String (default)
0 - Minimum
255 - Maximum
You must configure parameters
dir.corp.address and
feature.corporateDirectory.e
nabled as well to enable this parameter.
No
Confirm the Installed LDAP Server Certificates on the Phone
After you set the URL for the location where the phone can download the chain of CA certificates using
the parameter sec.TLS.LDAP.customCaCertUrl and enabled the parameters dir.corp.address
and feature.corporateDirectory.enabled as well, the certificates are automatically updated on
the phones. You can confirm that the correct certificates were downloaded and installed on the phone.
Certificates
Polycom, Inc. 92

Procedure
1. On the phone, navigate to Settings > Advanced, and enter the administrator password.
2. Select Administrative Settings > TLS Security > Custom CA Certificates > Application CA
placeholders.
3. Check that correct certificates were installed on the phone.
Online Certificate Status Protocol
The Online Certificate Status Protocol (OCSP) is used to authenticate the revocation status of an X.509
digital certificate. When a user sends a request to a server, the OCSP will retrieve the information
whether the certificate is valid or revoked.
Online Certificate Status Protocol Parameters
OCSP is an advanced protocol than the existing CRL. OCSP further offers grace period for an expired
certificate to access servers for a limited time before certificate renewal. OCSP is disabled by default.
OCSP Patemeter
Template Parameter Permitted Values Changes Causes
Restart or Reboot
site.cfg,
devices.cfg
device.sec.TLS.OC
SP.enabled
0 (default) OCSP is
disabled.
1 – OCSP is enabled
Note: Ensure that
device.set=”1”, and
device.sec.TLS.OC
SP.enabled.set="1"
to enable OCSP on VVX
phones.
Yes
Certificates
Polycom, Inc. 93

Upgrading the Software
Topics:
•Upgrade UC Software Using a USB Flash Drive
•Upgrading UC Software on a Single Phone
•User-Controlled Software Update
▪Updating Camera Firmware
You can upgrade the software that is running on the Polycom phones in your organization.
The upgrade process varies with the version of Polycom UC Software that is currently running on your
phones and with the version that you want to upgrade to.
• You can upgrade software with the user-controlled software upgrade feature.
• If you are upgrading software from UC Software 4.0.x, update the phones from your 4.0.x version.
Upgrade UC Software Using a USB Flash Drive
You can use a USB flash drive to upgrade the software on your Polycom Trio system.
Changes you make using a USB flash drive override the settings you configure using a centralized
provisioning server (if applicable). When you remove the USB flash drive, the Polycom Trio system
reverts to the provisioning server settings.
Note: Polycom Trio systems support only File Allocation Table (FAT) file systems. Polycom
recommends using FAT32.
Procedure
1. Do one of the following:
• Format a blank USB 2.0 USB flash drive using FAT32.
• Delete all files from a previously formatted USB flash drive.
2. Download the UC Software from Polycom Support.
3. Copy the configuration files you want to use to the root of the USB device.
The minimum required configuration files must be copied to the drive:
• Master configuration file: 000000000000.cfg.
• Polycom Trio 8500: 3111-66700-001.sip.ld
• Polycom Trio 8800: 3111-65290-001.sip.ld.
• Polycom Trio Visual+: 3111-66420.001.sip.ld.
4. Insert the USB flash drive into the Polycom Trio system or Polycom Trio Visual+ USB port.
5. Enter the Administrator password.
Polycom, Inc. 94

The system detects the flash drive and starts the update within 30 seconds. The mute keys'
indicator lights begin to flash, indicating that the update has started.
The system reboots several times during the update. The update is complete when the indicator
lights stop flashing and the Home screen displays.
Upgrading UC Software on a Single Phone
You can use the software upgrade tool in the Web Configuration Utility to update the software version
running on a single phone.
For instructions, see Use the Software Upgrade Tool in the Web Configuration Utility: Feature Profile
67993 at Polycom Engineering Advisories and Technical Notifications.
Configuration changes made to individual phones using the Web Configuration Utility override
configuration settings made using central provisioning.
User-Controlled Software Update
This feature enables phone users to choose when to accept software updates you send to the phones.
You can send an earlier or a later software version than the current version on the phone.
User-controlled updates apply to configuration changes and software updates you make on the server
and Web Configuration Utility. If a user postpones a software update, configuration changes and software
version updates from both the server and Web Utility are postponed. When the user chooses to update,
configuration and software version changes from both the server and Web Utility are sent to the phone.
This feature does not work if you have enabled ZTP or Skype for Business Device Update, and it is not
available with Skype for Business.
User-Controlled Software Update Parameters
You can set a polling policy and polling time period at which the phone polls the server for software
updates and displays a notification on the phone to update software.
For example, if you set the polling policy to poll every four hours, the phone polls the server for new
software every four hours and displays a notification letting the user know that a software update is
available. Users can choose to update the software or they postpone it to a maximum of three times for
up to six hours. The phone automatically updates the software after three postponements or after six
hours, whichever comes first.
The polling policy is disabled after the phone displays the software update notification.
After the software postponement ends, the phone displays the software update notification again.
Upgrading the Software
Polycom, Inc. 95

User-Controlled Software Update Parameters
Template Parameter Permitted Values
Change
Causes
Restart or
Reboot
site.c
fg
prov.usercontrol.enabled 0 (default) - The phone does not display
the software update notification and
options and the phone reboots
automatically to update the software.
1 - The phone displays the software update
notification and options and the user can
control the software download.
No
site.c
fg
prov.usercontrol.postpon
eTime
Sets the time interval for software update
notification using the HH:MM format.
02:00 (default)
00:15
01:00
02:00
04:00
06:00
No
Updating Camera Firmware
Polycom Trio systems with a paired Polycom Trio Visual+ accessory automatically update connected
Polycom USB cameras and camera systems.
Polycom Trio supports automatic firmware updates for the following Polycom USB cameras and camera
systems:
▪ Polycom® EagleEye™ IV USB camera
▪ Polycom® EagleEye™ Mini USB camera
Note: Before updating the EagleEye IV USB camera with firmware stored on a USB drive, disconnect
the camera from Polycom Trio Visual+ before connecting the USB drive and keep the camera
disconnected until the update is complete. Keep in mind that when you reconnect the camera to
Polycom Trio Visual+, the camera will automatically upgrade or downgrade to the firmware
version stored on Polycom Trio.
Upgrading the Software
Polycom, Inc. 96

Diagnostics and Status
Topics:
•View the Phone's Status
•Test Phone Hardware
•Upload a Phone's Configuration
•Perform Network Diagnostics
•Restart the Paired Device
•Restart the Polycom Trio System and the Paired Device
▪Restarting the Polycom Trio System at a Scheduled Time
•Reset the Polycom Trio System to Factory Default Settings at Power-up
▪Reset the Polycom Trio System to Factory Default Settings from Home Menu
•Reset the Polycom Trio Visual+ to Factory Default Settings
•Reset the Phone and Configuration
•Access Video Transmission Diagnostics
•Status Indicators on the Polycom Trio Solution
•Monitoring the Phone's Memory Usage
Polycom phones running Polycom UC Software provide a variety of screens and logs that allow you to
review information about the phone and its performance, help you diagnose and troubleshoot problems,
view error messages, and test the phone's hardware.
Review the latest UC Software Release Notes for your voice product on Voice on Polycom UC Software
Support Center for known problems and possible workarounds. If you don't find your problem in this
section or in the latest Release Notes, contact your Certified Polycom Reseller for support.
The phone includes a variety of information screens and tools that can help you monitor the phone and
resolve problems.
View the Phone's Status
You can troubleshoot phone issues by viewing the phone's Status menu.
Procedure
1. Select Settings > Status > Select.
2. Scroll to a Status menu item and press Select.
The following table lists available options:
Polycom, Inc. 97
Menu Item Menu Information
Platform • Phone's serial number or MAC address
• Current IP address
• Updater version
• Application version
• Name of the configuration files in use
• Address of the provisioning server
Network • TCP/IP Setting
• Ethernet port speed
• Connectivity status of the PC port (if it exists)
• Statistics on packets sent and received since last boot
• Last time the phone rebooted
• Call Statistics showing packets sent and received on the last call
Lines • Detailed status of each of the phone's configured lines
Diagnostics • Hardware tests to verify correct operation of the microphone, speaker, handset, and
third party headset, if present
• Hardware tests to verify correct operation of the microphones and speaker.
• Tests to verify proper functioning of the phone keys
• List of the functions assigned to each of the phone keys
• Real-time graphs for CPU, network, and memory use
Test Phone Hardware
You can test the phone's hardware directly from the user interface.
Procedure
1. Go to Settings > Status > Diagnostics > Warnings.
2. •Keypad Diagnostics Verify the function assigned to each keypad key.
•Display Diagnostics Test the LCD for faulty pixels.
•LED Diagnostics Test the LED lights on your phone.
•Touch Screen Diagnostics Test the touch screen response.
•Audio Diagnostics Test the speaker, microphone, handset, and a third party headset.
•Display Diagnostics Test the LCD for faulty pixels.
•Touch Screen Diagnostics Test the touch screen response.
Diagnostics and Status
Polycom, Inc. 98
Upload a Phone's Configuration
You can upload the phone's current configuration files from the phone menu to help you debug
configuration problems.
A number of files can be uploaded to the provisioning server, one for every active source as well as the
current non-default configuration set.
You can use the Web Configuration Utility to upload the files.
Procedure
1. Navigate to Settings > Advanced > Admin Settings > Upload Configuration.
2. Choose which files to upload: All Sources, Configuration Files, Local, MR, Web, or SIP.
If you use the Web Configuration Utility, you can also upload Device Settings.
3. Press Upload.
4. The phone uploads the configuration file to the location you specified in the parameter
prov.configUploadPath .
For example, if you select All Sources, a file <MACaddress>-update-all.cfg is uploaded.
Perform Network Diagnostics
You can use ping and traceroute to troubleshoot network connectivity problems.
Procedure
1. Go to Settings > Status > Diagnostics > Network.
2. Enter a URL or IP address.
3. Press Enter.
Restart the Paired Device
You can restart the Polycom Trio Visual+, Trio VisualPro, or RealPresence Group Series system that’s
paired to your Polycom Trio system.
Procedure
1. On the Polycom Trio system Home screen, go to Settings > Basic > Restart Networked
Devices.
Diagnostics and Status
Polycom, Inc. 99

Restart the Polycom Trio System and the Paired
Device
You can restart the Polycom Trio system and its paired Polycom Trio Visual+, Trio VisualPro, or
RealPresence Group Series system together.
Procedure
1. On the Polycom Trio system Home screen, go to Settings > Basic > Restart System.
Restarting the Polycom Trio System at a Scheduled
Time
You can configure Polycom Trio systems to restart at a scheduled time, period, or days. With this feature,
you can schedule a Polycom Trio system to restart daily.
Scheduled Restart Parameters
Use the parameters in the following table to configure scheduled restart for Polycom Trio systems.
Scheduled Restart Parameters
Template Parameter Permitted Values Change Causes
Restart or Reboot
site.cfg prov.scheduledReboot
.enabled
0 (default)— Disables
scheduled reboot.
1—Enables scheduled reboot.
No
site.cfg prov.scheduledReboot
.periodDays
Specify the time in days
between scheduled reboots.
1 day (default)
1–365 days
No
site.cfg prov.scheduledReboot
.time
Specify a time to reboot the
Polycom Trio system. Use the
24 hour time format (HH:mm).
03:00 (default)
No
Diagnostics and Status
Polycom, Inc. 100
Template Parameter Permitted Values Change Causes
Restart or Reboot
site.cfg prov.scheduledReboot
.timeRandomEnd
If this parameter is set to a
specific time, the scheduled
restart occurs at a random time
between the time set for
prov.scheduledReboot
.time and
prov.scheduledReboot
.timeRandomEnd. The time
is in 24-hour format.
0–5 hours
hh:mm
No
Reset the Polycom Trio System to Factory Default
Settings at Power-up
You can reset the Polycom Trio system to factory default settings at power-up.
Resetting to defaults clears the flash parameters, removes log files, user data, and cached data, and
resets the administrator password to 456.
Procedure
1. Power on the Polycom Trio system.
2. When the Polycom logo shows on the screen, press and hold the four corners of the LCD display
screen.
3. Let go when the Mute light begins flashing.
Reset the Polycom Trio System to Factory Default
Settings from Home Menu
You can reset the Polycom Trio 8500 and 8800 systems to the factory default settings from home menu.
Resetting to factory clears the flash parameters, removes log files, user data, and cached data, and
resets the administrator password to 456.
Procedure
1. On the Polycom Trio system Home screen, go to Settings > Advanced > Administration
settings > Reset to Defaults > Reset to Factory.
The Polycom Trio system reboots twice and displays the default home screen. This is the new reboot
behavior of Polycom Trio 8500 and 8800 systems running UC Software 5.7.1 or later.
Diagnostics and Status
Polycom, Inc. 101

Reset the Polycom Trio Visual+ to Factory Default
Settings
You can reset the Polycom Trio Visual+ to factory default settings from the interface at power up.
Resetting to defaults clears the flash parameters, removes log files, user data, and cached data, and
resets the administrator password to 456.
Procedure
1. Power on the Polycom Trio Visual+.
2. When the pairing button light turns on, press and hold the pair button.
3. Let go of the pair button when the light begins flashing.
Reset the Phone and Configuration
You can reset part or all of the phone and phone configuration.
Procedure
1. On the phone, go to Settings > Advanced > Administration Settings > Reset to Defaults.
The following table describes the phone reset options.
Setting Description
Reset Local
Configuration
Clears the override file generated by changes using the phone user interface.
Reset Web
Configuration
Clears the override file generated by changes using the Web Configuration Utility.
Reset Device
Settings
Resets the phone's flash file system settings that are not stored in an override file.
These are your network and provisioning server settings and include custom
certificates and encryption keys. Local, web, and other configuration files remain
intact.
Format File
System
Formats the phone's flash file system and deletes the UC Software application, log
files, configuration, and override files.
Note that if the override file is stored on the provisioning server, the phone re-
downloads the override file when you provision the phone again. Formatting the
phone's file system does not delete those device settings affecting network and
provisioning, and any certificates and encryption keys remain on the phone.
Reset to Factory Removes the Web and local override files, any stored configuration files in the
flash file system, as well as any custom certificates and encryption keys.
All network and provisioning settings are reset but the UC Software application and
updater remain intact.
Diagnostics and Status
Polycom, Inc. 102
Reset to Factory Parameter
By default, only administrators can initiate a factory reset. However, you can configure the phone using
configuration parameter to make Reset to Factory setting available to users. The following table lists the
parameter you need to configure this setting.
Reset to Factory Parameter
Template Parameter Permitted Values Change Causes
Restart or Reboot
features.c
fg
up.basicSettings.factoryResetEn
abled
0 (default) - Reset to
Factory option is not
displayed under
Basic settings menu.
1 – Reset to Factory
option is displayed
under Basic settings
menu
No
Access Video Transmission Diagnostics
You can access the Polycom Trio solution jitter statistics from the phone menu to evaluate video
transmissions.
Procedure
1. On the Polycom Trio 8800 system Home screen, go to Settings > Status > Diagnostics >
Graphs > Networked Devices Graphs.
Status Indicators on the Polycom Trio Solution
The Polycom Trio 8800 and 8500, Trio VisualPro, and Polycom Trio Visual+ systems use LED lights to
indicate the status of the solution.
Polycom Trio Status Indicators
Status Description
Off Device is in an idle state or powered off.
Green In a call with audio unmuted.
Red Microphones are muted. Device is in a call or in idle state.
Yellow Power on LED diagnostic.
Amber/Red/Green/Off Repeating Recovery in progress.
Diagnostics and Status
Polycom, Inc. 103

Trio VisualPro Status Indicators
Status Description
Steady blue Device is powered on and paired with a Polycom Trio system.
Device is in an idle state or powered off.
Flashing blue Device is not paired.
Device is powering on.
Amber Device is in a low-power, standby state.
Green In a call with audio muted or unmuted.
Alternating red and green flashes Device is indicating it is paired.
Trio VisualPro Microphone Status Indicators
Status Description
Off Device is in an idle state or powered off.
Green Microphones are unmuted.
Red Microphones are muted. Device is in a call or in idle state.
Polycom Trio Visual+ Status Indicators
Status Description
Off Device is not powered on.
Flashing red Device is booting up or pairing.
The pairing button has been pressed.
Flashing green Device update is in progress.
Steady green Device is powered on and paired with a Polycom Trio system.
Amber Device is in a low-power, standby state.
Alternating orange/red/green/off
flashes
Device is in recovery mode.
Alternating red and green flashes Device is in pairing diagnostics mode.
Diagnostics and Status
Polycom, Inc. 104

Monitoring the Phone's Memory Usage
To ensure that your phones and their configured features operate smoothly, verify that the phones have
adequate available memory resources.
If you are using a range of phone features, customized configurations, or advanced features, you might
need to manage phone memory resources.
If your deployment includes a combination of phone models, consider configuring each phone model
separately with its own features instead of applying all phone features to all phone models.
For best performance, the phone should use no more 95% of its available memory. When the phone
memory resources are low, you may notice one or more of the following symptoms:
• The phones reboot or freeze up.
• The phones do not download all ringtones, directory entries, backgrounds, or XML dictionary files.
• Applications running in the microbrowser or browser stop running or do not start.
Check Memory Usage from the Phone
You can view a graphical representation of the phone's memory usage directly on the phone.
Procedure
1. Load and configure the features and files you want to make available on the phone's interface.
2. Navigate to Settings > Status > Diagnostics > Graphs > Memory Usage.
View Memory Usage Errors in the Application Log
Each time the phone's minimum free memory goes below about 5%, the phone displays a message in the
application log that the minimum free memory has been reached.
The application log file is enabled by default. The file is uploaded to the provisioning server directory on a
schedule you can configure.
You can also upload a log file manually.
Phone Memory Resources
If you need to free memory on your phone, review the following table for the amount of memory each
customizable feature uses and consider strategies for reducing the amount of memory you need the
feature to use.
Feature
Typical Memory
Size Description
Idle Browser Varies,
depending on
number and
complexity of
application
elements.
To reduce memory resources used by the idle browser:
• Display no more than three or four application elements.
• Simplify pages that include large tables or images.
Diagnostics and Status
Polycom, Inc. 105

Feature
Typical Memory
Size Description
Custom Idle Display
Image
15 KB The average size of the Polycom display image is 15 KB. Custom
idle display image files should also be no more than 15 KB.
Main Browser Varies,
depending on
number and
complexity of
applications.
To reduce memory resources used by the main browser:
• Display no more than three or four application elements.
Simplify pages.
Local Contact Directory 42.5 KB Polycom phones are optimized to display a maximum of 250
contacts. Each contact has four attributes and requires 170 bytes.
A local contact directory of this size requires 42.5 KB.
To reduce memory resources used by the local contact directory:
• Reduce the number of contacts in the directory
Reduce the number of attributes per contact
Corporate Directory Varies by server Polycom phones are optimized to corporate directory entries with 5
- 8 contact attributes each. The size of each entry and the number
of entries in the corporate directory vary by server.
If the phone is unable to display directory search results with more
than five attributes, make additional memory resources available
by reducing memory requirements of another feature.
Ringtones 16 KB The Polycom ringtone files range in size from 30KB to 125KB. If
you use custom ringtones, Polycom recommends limiting the file
size to 16KB.
To reduce memory resources required for ringtones:
Reduce the number of available ringtones.
Background Images 8 - 32 KB Polycom phones are optimized to display background images of
50KB.
To reduce memory resources required for background images:
Reduce the number and size of available background images.
Phone Interface
Language
90 - 115 KB,
depending on
language
The language dictionary file used for the phone's user interface
ranges from 90KB to 115KB for languages that use an expanded
character set. To conserve memory resources, Polycom
recommends using XML language files for only the languages you
need.
Web Configuration
Utility Interface
250 KB - 370 KB
Diagnostics and Status
Polycom, Inc. 106

System Logs
Topics:
•Configuring Log Files
•Logging Levels
•Upload Logs to the Provisioning Server
•Upload Polycom Trio System Logs
▪Uploading Logs to a USB Flash Drive
System log files can assist when troubleshooting issues.
System log files contain information about system activities and the system configuration profile. After
setting up system logging, you can retrieve a system log file.
The detailed technical data in the system log files can help Polycom Global Services resolve problems
and provide technical support for your system. In such a situation, your support representative may ask
you to download log archives and send them to Polycom Global Services.
You must contact Polycom Customer Support to obtain the template file techsupport.cfg containing
parameters that configure log levels.
Configuring Log Files
You can configure log files using the logging parameters.
Log file names use the following format: [MAC address]_[Type of log].log . For example, if the
MAC address of your phone is 0004f2203b0 , the app log file name is 0004f2203b0-app.log .
The phone writes information into several different log files. The following table describes the type of
information in each.
When the Polycom Trio Visual+ accessory is paired with a Polycom Trio system, logging information from
both devices is written to the same log files.
With a paired Trio Visual Pro or RealPresence Group Series system, you have to download the logs
separately through that system’s web interface.
Log File Description
Boot Log Boot logs are sent to the provisioning server in a boot.log file collected from the Updater/
BootROM application each time the phone boots up. The BootROM/Updater application
boots the application firmware and updates is new firmware is available.
Application Log The application log file contains complete phone functionality including SIP signaling, call
controls and features, digital signal processor (DSP), and network components.
Syslog For more information about Syslog, see Syslog on Polycom Phones - Technical Bulletin
17124.
Polycom, Inc. 107
Severity of Logging Event Parameters
You can configure the severity of the events that are logged independently for each module of the
Polycom UC Software.
This enables you to capture lower severity events in one part of the application, and high severity events
for other components. Severity levels range from 0 to 6, where 0 is the most detailed logging and 6
captures only critical errors. Note that user passwords display in level 1 log files.
You must contact Polycom Customer Support to obtain the template file techsupport.cfg containing
parameters that configure log levels.
Severity of Events Logged
Template Parameter Permitted Values Change Causes Restart or Reboot
techsupport.
cfg
log.leve
l.change
.module_
name
Set the severity level to log
for the module name you
specify. Not all modules
are available for all phone
models.
For a list of available
module names, module
descriptions, and log level
severity, see the Web
Configuration Utility at
Settings > Logging >
Module Log Level Limits.
Log File Collection and Storage Parameters
You can configure log file collection and storage using the parameters in the following table.
You must contact Polycom Customer Support to obtain the template file techsupport.cfg containing
parameters that configure log file collection and storage.
The Polycom Trio solution uploads a system log file [MAC address]-plcmsyslog.tar.gz that contains
Android logs and diagnostics. This file can be ignored but does contain minimal data that may be useful
to investigate Android issues.
There is no way to prevent the system log file [MAC address]-plcmsyslog.tar.gz from uploading to the
server and you cannot control it using the parameters
log.render.file.upload.append.sizeLimit and
log.render.file.upload.append.limitMode . However, you can control the frequency of
uploads using log.render.file.upload.system.period .
System Logs
Polycom, Inc. 108

Log File Collection and Storage Parameters
Template Parameter Permitted Values
Change Causes
Restart or Reboot
techsupport.c
fg
log.render.level Specify the events to render to the
log files. Severity levels are
indicated in brackets.
0 SeverityDebug (7)
1 SeverityDebug (7) - default
2 SeverityInformational (6)
3 SeverityInformational (6)
4 SeverityError (3)
5 SeverityCritical (2)
6 SeverityEmergency (0)
techsupport.c
fg
log.render.file.
size
Set the maximum file size of the log
file. When the maximum size is
about to be exceeded, the phone
uploads all logs that have not yet
been uploaded and erases half of
the logs on the phone. You can use
a web browser to read logs on the
phone.
512 kb (default)
1 - 10240 kB
techsupport.c
fg
log.render.file.
upload.period
Specify the frequency in seconds
between log file uploads to the
provisioning server.
Note: The log file is not uploaded if
no new events have been logged
since the last upload.
172800 seconds (default) - 48 hours
techsupport.c
fg
log.render.file.
upload.append
1 (default) - Log files uploaded from
the phone to the server are
appended to existing files. You must
set up the server to append using
HTTP or TFTP.
0 - Log files uploaded from the
phone to the server overwrite
existing files.
Note that this parameter is not
supported by all servers.
System Logs
Polycom, Inc. 109
Template Parameter Permitted Values
Change Causes
Restart or Reboot
techsupport.c
fg
log.render.file.
upload.append.si
zeLimit
Specify the maximum size of log
files that can be stored on the
provisioning server.
512kb (default)
techsupport.c
fg
log.render.file.
upload.append.li
mitMode
Specify whether to stop or delete
logging when the server log reaches
its maximum size.
delete (default) - Delete logs and
start logging again after the file
reaches the maximum allowable size
specified by
log.render.file.upload.a
ppend.sizeLimit .
stop - Stop logging and keep the
older logs after the log file reaches
the maximum allowable size.
techsupport.c
fg
log.render.file.
upload.system.pe
riod
Specify the frequency in seconds the
Polycom Trio system uploads the
Android system log file MAC
address]-plcmsyslog.tar.gz to the
server.
86400 seconds (default)
0 - 2147483647 seconds
Logging Levels
The event logging system supports the classes of events listed in the table Logging Levels.
Two types of logging are supported:
• Level, change, and render
• Schedule
Note: Logging parameter changes can impair system operation. Do not change any logging
parameters without prior consultation with Polycom Technical Support.
Logging Levels
Logging Level Interpretation
0 Debug only
1 High detail class event
System Logs
Polycom, Inc. 110
Logging Level Interpretation
2 Moderate detail event class
3 Low detail event class
4 Minor error—graceful recovery
5 Major error—will eventually incapacitate the system
6 Fatal error
Each event in the log contains the following fields separated by the | character:
• Time or time/date stamp, in one of the following formats:
◦ 0 - milliseconds 011511.006 - 1 hour, 15 minutes, 11.006 seconds since booting
◦ 1 - absolute time with minute resolution 0210281716 - 2002 October 28, 17:16
◦ 2 - absolute time with seconds resolution 1028171642 - October 28, 17:16:42
• 1-5 character component identifier (such as “so”)
• Event class
• Cumulative log events missed due to excessive CPU load
• The event description
Logging Level, Change, and Render Parameters for Polycom Trio
The following table includes parameters for configuring logging features.
System Logs
Polycom, Inc. 111

Logging Level, Change, and Render Parameters
techsupport.cfg log.level.change.
xxx
Controls the logging detail
level for individual
components. These are
the input filters into the
internal memory-based
log system.
4 (default)
0 - 6
Possible values for xxx
are acom, ares, app1,
bluet, bdiag, brow, bsdir,
cap, cdp, cert, cfg, cipher,
clink, clist, cmp, cmr,
copy, curl, daa, dapi,
dasvc, dbs, dbuf, dhcpc,
dis, dock, dot1x, dns,
drvbt, ec, efk, ethf, flk,
fec,fecde, fecen, fur, hset,
httpa, httpd, hw, ht, ib,
key, ldap, lic, lldp, loc, log,
mb, mcu, mobil, mrci, net,
niche, ocsp, osd, pcap,
pcd, pdc, peer, pgui, pkt,
pmt, poll, pps, pres, pstn,
ptt, push, pwrsv, rdisk,
res, restapi, rtos, rtls, sec,
sig, sip, slog, so, srtp,
sshc, ssps, statc, statn,
style, sync, sys, ta, task,
tls, trace, ttrs, usb, usbio,
util, utilm, vsr, wdog,
wmgr, and xmpp.
No
techsupport.cfg log.level.change.
app
Initial logging level for the
Apps log module.
4 (default)
0 - 6
No
techsupport.cfg log.level.change.
bfcp
Initial logging level for the
BFCP content log
module.
4 (default)
0 - 6
No
techsupport.cfg log.level.change.
fec
Sets the log level for
video FEC.
4 (default)
0 - 6
No
System Logs
Polycom, Inc. 112

techsupport.cfg log.level.change.
fecde
Sets high volume log level
to decode video FEC.
4 (default)
0 - 6
No
techsupport.cfg log.level.change.
fecen
Sets high volume log level
to encode video FEC.
4 (default)
0 - 6
No
techsupport.cfg log.level.change.
flk
Sets the log level for the
FLK logs.
4 (default)
0 - 6
No
techsupport.cfg log.level.change.
mr
Initial logging level for the
Networked Devices log
module.
4 (default)
0 - 6
No
techsupport.cfg log.level.change.
mrcam
Initial logging level for the
Networked Devices
Camera log module.
4 (default)
0 - 6
No
techsupport.cfg log.level.change.
mrci
Initial logging level for the
Networked Devices
HDMI/VGA Content Input
log module.
4 (default)
0 - 6
No
techsupport.cfg log.level.change.
mrcon
Initial logging level for the
Networked Devices
Connection log module.
4 (default)
0 - 6
No
techsupport.cfg log.level.change.
mraud
Initial logging level for the
Networked Devices Audio
log module.
4 (default)
0 - 6
No
System Logs
Polycom, Inc. 113

techsupport.cfg log.level.change.
mrdis
Initial logging level for the
Networked Devices
Display log module.
4 (default)
0 - 6
No
techsupport.cfg log.level.change.
mrmgr
Initial logging level for the
Networked Devices
Manager log module.
4 (default)
0 - 6
No
techsupport.cfg log.level.change.
pec
Initial logging level for the
Polycom Experience
Cloud (PEC) log module.
4 (default)
0 - 6
No
techsupport.cfg log.level.change.
ppcip
Initial logging level for the
People+Content IP log
module.
4 (default)
0 - 6
No
techsupport.cfg log.level.change.
prox
Initial logging level for the
Proximity log module.
4 (default)
0 - 6
No
techsupport.cfg log.level.change.
ptp
Initial logging level for the
Precision Time Protocol
log module.
4 (default)
0 - 6
No
techsupport.cfg log.level.change.
usba
Sets the logging detail
level for the USB audio
log.
4 (default)
0 - 6
No
techsupport.cfg log.level.change.
usbh
Sets the logging detail
level for the USB HID log.
4 (default)
0 - 6
No
System Logs
Polycom, Inc. 114

techsupport.cfg log.render.file Polycom recommends
that you do not change
this value.
1 (default)
0
No
techsupport.cfg log.render.realti
me
Polycom recommends
that you do not change
this value.
1 (default)
0
No
techsupport.cfg log.render.stdout Polycom recommends
that you do not change
this value.
0 (default)
1
No
techsupport.cfg log.render.type Refer to the Event
Timestamp Formats table
for timestamp type.
2 (default)
0 - 2
No
Logging Parameters
The phone can be configured to schedule certain advanced logging tasks on a periodic basis.
Polycom recommends that you set the parameters listed in the next table in consultation with Polycom
Technical Support. Each scheduled log task is controlled by a unique parameter set starting with
log.sched.x where x identifies the task. A maximum of 10 schedule logs is allowed.
Logging Parameters
Template Parameter Permitted Values
Change Causes
Restart or Reboot
techsupp
ort.cfg
log.sched.x.le
vel
The event class to assign to the log
events generated by this command.
3 (default)
0 - 5
This needs to be the same or higher
than log.level.change.slog
for these events to display in the log.
No
System Logs
Polycom, Inc. 115

Template Parameter Permitted Values
Change Causes
Restart or Reboot
techsupp
ort.cfg
log.sched.x.pe
riod
Specifies the time in seconds between
each command execution.
15 (default)
positive integer
No
techsupp
ort.cfg
log.sched.x.st
artDay
When startMode is abs, specifies the
day of the week to start command
execution. 1=Sun, 2=Mon, ..., 7=Sat
7 (default)
0 - 7
No
techsupp
ort.cfg
log.sched.x.st
artMode
Starts at an absolute or relative time to
boot.
Null (default)
0 - 64
No
techsupp
ort.cfg
log.sched.x.st
artTime
Displays the start time in seconds since
boot when startMode is rel or displays
the start time in 24-hour clock format
when startMode is abs.
Null (default)
positive integer, hh:mm
No
Upload Logs to the Provisioning Server
You can manually upload logs to the provisioning server.
When you manually upload log files, the word now is inserted into the name of the file, for example,
0004f200360b-now-boot.log .
Procedure
1. Press the multiple key combination 1-5-9 on the phone.
Upload Polycom Trio System Logs
You can upload log files to your provisioning server.
Uploading log files copies the log files from the phone to the provisioning server. and creates new files
named <MACaddress>-now-xxx.log .
Procedure
1. Go to Settings > Advanced and enter the administrator password (default 456).
System Logs
Polycom, Inc. 116

2. Go to Administration Settings > Upload Configuration.
3. Select one or more sources to upload from:
• All Sources
• Configuration Files
• Local
• MR
• Web
• SIP
4. Press Upload.
Uploading Logs to a USB Flash Drive
You can configure your phones to copy application and boot logs to a USB flash drive connected to the
phone.
You can configure the phone to copy the application logs to the USB flash drive when the log file size
reaches the limit defined in the log.render.file.size parameter. Similarly, you can configure the
phone to copy application logs to the USB flash drive periodically using
log.render.file.upload.period parameter.
USB Logging Parameter
The following table lists the parameter to configure the USB logging feature.
USB Logging Parameter
Template Parameter Permitted Values Change Causes Restart
or Reboot
features.cfg feature.usbLoggin
g.enabled
0 (default) – Disables
collecting logs using a
USB flash drive.
1 – Enables collecting
logs using a USB flash
drive.
No
System Logs
Polycom, Inc. 117
Troubleshooting
Topics:
•Updater Error Messages and Possible Solutions
•Polycom UC Software Error Messages
•Network Authentication Failure Error Codes
•Power and Startup Issues
•Screen and System Access Issues
•Calling Issues
•Display Issues
•Software Upgrade Issues
•Provisioning Issues
The following sections cover some of the errors you might see, along with suggested actions.
Updater Error Messages and Possible Solutions
If a fatal error occurs, the phone does not boot up.
If the error is not fatal, the phone boots up but its configuration might be changed. Most updater errors are
logged to the phone's boot log. However, if the phone is having trouble connecting to the provisioning
server, the phone is not likely to upload the boot log.
The following table describes possible solutions to updater error messages.
Error Message Possible Solution
Failed to get boot parameters via DHCP The phone does not have an IP address and therefore
cannot boot.
• Check that all cables are connected, the DHCP
server is running, and that the phone has not been
set to a VLAN that is different from the DHCP
server.
• Check the DHCP configuration.
Application <file name> is not compatible with this
phone!
An application file was downloaded from the
provisioning server, but it cannot be installed on this
phone.
Install a compatible software image on the provisioning
server. Be aware that there are various hardware and
software dependencies.
Polycom, Inc. 118

Error Message Possible Solution
Could not contact boot server using existing
configuration
The phone cannot contact the provisioning server.
Possible causes include:
• Cabling issues
• DHCP configuration
• Provisioning server problems
The phone can recover from this error so long as it
previously downloaded a valid application BootROM
image and all of the necessary configuration files.
Error, application is not present! The phone does not have an application stored in
device settings and, because the application could not
be downloaded, the phone cannot boot.
• Download compatible Polycom UC Software to the
phone using one of the supported provisioning
protocols.
If no provisioning server is configured on the phone,
enter the provisioning server details after logging in to
the Updater menu and navigating to the Provisioning
Server menu.
Polycom UC Software Error Messages
If an error occurs in the UC Software, an error message and a warning icon displays on the phone.
The location of the Warnings menu varies by model:
• VVX 1500—Menu > Status > Diagnostics > Warnings
• VVX phones—Settings > Status > Diagnostics > Warnings
• Polycom Trio —Settings > Status > Diagnostics > Warnings.
The following table describes Polycom UC Software error messages.
Troubleshooting
Polycom, Inc. 119

Polycom UC Software Error Messages
Error Message Cause
Config file error: Files contain invalid
params: <filename1>, <filename2>,...
Config file error: <filename> contains
invalid params
The following contain pre-3.3.0 params:
<filename>
These messages display if the configuration files contain these
deprecated parameters:
• tone.chord.ringer.x.freq.x
• se.pat.callProg.x.name
• ind.anim.IP_500.x.frame.x.duration
• ind.pattern.x.step.x.state
• feature.2.name
• feature.9.name
This message also displays if any configuration file contains more
than 100 of the following errors:
• Unknown parameters
• Out-of-range values
• Invalid values.
To check that your configuration files use correct parameter values,
refer to Using Correct Parameter XML Schema, Value Ranges, and
Special Characters.
Line: Unregistered This message displays if a line fails to register with the call server.
Login credentials have failed. Please
update them if information is incorrect.
This message displays when the user enters incorrect login
credentials on the phone: Status > Basic > Login Credentials.
Missing files, config. reverted This message displays when errors in the configuration and a
failure to download the configuration files force the phone to revert
to its previous (known) condition with a complete set of
configuration files. This also displays if the files listed in the <MAC
Address>.cfg file are not present on the provisioning server.
Network link is down Indicates that the phone cannot establish a link to the network and
persists until the link problem is resolved. Call-related functions, and
phone keys are disabled when the network is down but the phone
menu works.
Network Authentication Failure Error Codes
This message displays if 802.
1X authentication with the Polycom phone fails. The error codes display on the phone when you press the
Details key. Error codes are also included in the log files.
Troubleshooting
Polycom, Inc. 120
Event Code Description Comments
1 Unknown events An unknown event by ‘1' can
include any issues listed in this
table.
2 Mismatch in EAP Method type
Authenticating server's list of EAP methods does not match
with clients'.
30xxx TLS Certificate failure
000 - Represents a generic certificate error.
The phone displays the following codes:
042 - bad cert
043 - unsupported cert
044 - cert revoked
045 - cert expired
046 - unknown cert
047 - illegal parameter
048 - unknown CA
See section 7.2 of RFC 2246 for
further TLS alert codes and error
codes.
31xxx Server Certificate failure
‘xxx' can use the following values:
•009 - Certificate not yet Valid
•010 - Certificate Expired
•011 - Certificate Revocation List
(CRL) not yet Valid
•012 - CRL Expired
4xxx Other TLS failures
‘xxx' is the TLS alert message code). For example, if the
protocol version presented by the server is not supported by
the phone, then ‘xxx' is 70, and the EAP error code is 4070.
See section 7.2 of RFC 2246 for
further TLS alert codes and error
codes.
5xxx Credential failures
5xxx - wrong user name or password
6xxx PAC failures
080 - No PAC file found
081 - PAC file password not provisioned
082 - PAC file wrong password
083 - PAC file invalid attributes
Troubleshooting
Polycom, Inc. 121
Event Code Description Comments
7xxx Generic failures
001 - dot1x can not support (user) configured EAP method
002 - dot1x can not support (user) configured security type
003 - root certificate could not be loaded
174 - EAP authentication timeout
176 - EAP Failure
185 - Disconnected
Power and Startup Issues
The following table describes possible solutions to power and startup issues.
Power or Startup Issue Possible Solutions:
The phone has power issues or
the phone has no power.
Determine whether the problem is caused by the phone, the AC outlet, or the
PoE switch. Do one of the following:
• Verify that no lights appear on the unit when it is powered up.
• Check to see if the phone is properly plugged into a functional AC outlet.
• Make sure that the phone is not plugged into an outlet controlled by a light
switch that is turned off.
• If the phone is plugged into a power strip, try plugging directly into a wall
outlet instead.
The phone does not boot. If the phone does not boot, there may be a corrupt or invalid firmware image
or configuration on the phone:
• Ensure that the provisioning server is accessible on the network and a
valid software load and valid configuration files are available.
• Ensure that the phone is configured with the correct address for the
provisioning server on the network.
Screen and System Access Issues
The following table describes possible solutions to screen and system access issues.
Troubleshooting
Polycom, Inc. 122
Issue Possible solution
There is no response from feature key presses. If your phone keys do not respond to presses:
• Press the keys more slowly.
• Check to see whether or not the key has been mapped to a
different function or disabled.
• Make a call to the phone to check for inbound call display
and ringing. If successful, try to press feature keys while a
call is active to access a directory or buddy status.
• On the phone, go to Navigate to Menu > Status > Lines to
confirm the line is actively registered to the call server.
Reboot the phone to attempt re-registration to the call server.
The display shows the message Network Link is
Down.
This message displays when the LAN cable is not properly
connected. Do one of the following:
• Check the termination at the switch or hub end of the
network LAN cable.
• Check that the switch or hub is operational (flashing link/
status lights).
• On the phone, go to Menu > Status > Network. Scroll
down to verify that the LAN is active.
• Ping the phone from a computer.
Reboot the phone to attempt re-registration to the call server.
Navigate to Menu > Settings > Advanced > Reboot Phone).
Calling Issues
The following table provides possible solutions to generic calling issues.
Issue Possible Solution
There is no dial tone. If there is no dial tone, power may not be correctly supplied to
the phone. Try one of the following:
• Check that the display is illuminated.
• Make sure the LAN cable is inserted properly at the rear of
the phone; try unplugging and re-inserting the cable.
If you are using in-line powering, check that the switch is
supplying power to the phone.
The phone does not ring. If there is no ringtone but the phone displays a visual indication
when it receives an incoming call, do the following:
• Adjust the ring level from the front panel using the volume
up/down keys.
Check the status of handset, headset (if connected), and
handsfree speakerphone.
Troubleshooting
Polycom, Inc. 123
Issue Possible Solution
The line icon shows an unregistered line icon. If the phone displays an icon indicating that a line is
unregistered, do the following:
Try to re-register the line and place a call.
Display Issues
The following table provides tips for resolving display screen issues.
Issue Possible Solution
There is no display or the display is incorrect. If there is no display, power may not be correctly supplied to
the phone. Do one of the following:
• Check that the display is illuminated.
• Make sure the power cable is inserted properly at the rear
of the phone.
• If your are using PoE powering, check that the PoE switch
is supplying power to the phone.
Use the screen capture feature to verify whether the screen
displays properly in the capture. Refer to Capture Your
Device's Current Screen.
The display is too dark or too light. The phone contrast may be set incorrectly. To adjust the
contrast, do one of the following:
• Adjust the contrast.
• Reboot the phone to obtain the default level of contrast.
The display is flickering. Certain types of older fluorescent lighting cause the display to
flicker. If your phone is in an environment lit with fluorescent
lighting, do one of the following:
Angle or move the Polycom phone away from the lights.
The time and date are flashing. If the time and date are flashing, the phone is disconnected
from the LAN or there is no SNTP time server configured. Do
one of the following:
• Reconnect the phone to the LAN.
• Configure an SNTP server.
Disable the time and date if you do not want to connect your
phone to a LAN or SNTP server.
Troubleshooting
Polycom, Inc. 124

Software Upgrade Issues
The following table describes possible solutions to issues that may occur during or after a software
upgrade.
Issue Possible Solutions
Some settings or features are not
working as expected on the phone.
The phone's configuration may be incorrect or incompatible.
Check for errors on the phone by navigating to Menu > Status >
Platform > Configuration. If there are messages stating Errors Found,
Unknown Params, or Invalid values, correct your configuration files
and restart the phone.
The phone displays a Config file error
message for five seconds after it boots
up.
You are using configuration files from a UC Software version earlier
than the UC Software image running on the phones. Configuration
parameters and values can change each release and specific
parameters may or may not be included.
• Correct the configuration files, remove the invalid parameters, and
restart the phone.
See the UC Software Administrator's Guide and Release Notes for
the UC Software version you have installed on the phones.
Troubleshooting
Polycom, Inc. 125

Issue Possible Solutions
When using the Web Configuration Utility
to upgrade phone software, the phone is
unable to connect to the Polycom Hosted
Server.
Occasionally, the phone is unable to connect to the Polycom hosted
server because of the following:
• The Polycom hosted server is temporarily unavailable.
• There is no software upgrade information for the phone to receive.
• The network configuration is preventing the phone from
connecting to the Polycom hosted server.
Note: UC Software 4.0.0 does not support internet access for
software upgrades through a web proxy.
To troubleshoot the issue:
• Try upgrading your phone later.
• Verify that new software is available for your phone using the
Polycom UC Software Release Matrix for VVX Phones.
• Verify that your network's configuration allows the phone to
connect to http://downloads.polycom.com.
If the issue persists, try manually upgrading your phone's
software.Occasionally, the phone is unable to connect to the Polycom
hosted server because of the following:
• The Polycom hosted server is temporarily unavailable.
• There is no software upgrade information for the phone to receive.
• The network configuration is preventing the phone from
connecting to the Polycom hosted server.
Note: UC Software 4.0.0 does not support internet access for
software upgrades through a web proxy.
To troubleshoot the issue:
• Try upgrading your phone later.
• Verify that new software is available for your phone using the
Polycom UC Software Release Matrix for VVX Phones.
• Verify that your network's configuration allows the phone to
connect to http://downloads.polycom.com.
If the issue persists, try manually upgrading your phone's software.
Provisioning Issues
If settings you make from the central server are not working, check first for priority settings applied from
the phone menu system or Web Configuration Utility, and second for duplicate settings in your
configuration files.
Troubleshooting
Polycom, Inc. 126

Content
Topics:
•Content Sharing
•Screen Mirroring
Polycom offers several content sharing options.
Content Sharing
You can share content in and out of calls when your Polycom Trio system is paired with a Polycom Trio
Visual+ or Trio VisualPro system.
To share content:
• The Polycom Trio Visual+ or Trio VisualPro system must be paired with the Polycom Trio 8500 or
8800 system.
• The computer and Polycom Trio solution must be able to communicate on the same IP network.
You can use the following methods to share content:
• Polycom® People+Content™ (PPCIP) technology
• Polycom Content App
• Polycom® RealPresence® Desktop for Windows® or Mac®
• Polycom® RealPresence® Mobile app
• Device connected to a paired Trio VisualPro system with an HDMI or VGA cable
You can download People+Content IP and Desktop from Polycom Support and Mobile from your mobile
application store.
For information about using PPCIP on the Polycom Trio solution registered with Skype for Business, see
the Polycom Trio - User Guide at Polycom Trio on Polycom Support.
Note: The default port used by Group Paging when enabled conflicts with the UDP port 5001 used by
Polycom® People+Content™ on the Polycom Trio system. Since the port used by People+Content
is fixed and cannot be configured, configure one of the following workarounds:
• Configure a different port for Group Paging using parameter ptt.port .
• Disable People+Content IP using parameter content.ppcipServer.enabled="0" .
Content Sharing Parameters
Use the parameters in the following table to configure content sharing options.
To enable device pairing with the Polycom Trio solution, use the smartpairing* parameters. Note that
People+Content IP does not support ultrasonic SmartPairing.
Polycom, Inc. 127

Content Sharing Parameters
Template Parameter Permitted Values
Change Causes
Restart or Reboot
features.cfg content.auto
Accept.rdp
1 (default) - Content sent via Skype for
Business Remote Desktop Protocol
(RDP) by far-end users is
automatically accepted and displayed
on a near-end Polycom Trio solution.
0 - Near-end users are prompted to
accept Skype for Business RDP
content sent to Polycom Trio solution
from a far-end user.
No
reg.cfg content.bfcp
.enabled
1 (default) - Enable content sharing by
offering or accepting the Binary Floor
Control Protocol (BFCP) in Session
Description Protocol (SDP) negotiation
during SIP calls. Does not apply to
Skype for Business calls.
0 - Disable content sharing using
BFCP.
No
features.cfg content.bfcp
.port 15000 (default)
0 - 65535
No
features.cfg content.bfcp
.transport
UDP (default)
TCP
No
features.cfg content.loca
l.bitRate
Set the default maximum bit rate for
local content, content not shared
during an active call.
8000000 (8Mb/s) - default
Range is 1000000 (1Mb/s) to
20000000 (20Mb/s).
This parameter does not apply to
content shared using Screen Mirroring
with Airplay or the Wireless Display
feature.
No
site.cfg mr.content.r
dp.tls.enabl
ed
Enable or disable TLS encryption of
Skype for Business RDP content
between hubs and devices.
1 (default)
0
No
Content
Polycom, Inc. 128

Template Parameter Permitted Values
Change Causes
Restart or Reboot
site.cfg mr.content.r
dp.tls.enabl
ed
1 (default) - Enable TLS encryption of
Skype for Business RDP content
between hubs and devices.
Disable TLS encryption of Skype for
Business RDP content.
No
site.cfg mr.contentSt
reamPortEnd
The IP port range end port used for
content input streams received from
the Polycom Trio Visual+ system.
4320 (default)
1024 – 65436
No
site.cfg mr.contentSt
reamPortStar
t
The IP port range start port used for
content input streams received from
the Polycom Trio Visual+ system.
4300 (default)
1024 – 65436
No
reg.cfg reg.x.conten
t.bfcp.enabl
ed
1 (default) - Enable Binary Floor
Control Protocol content to be shared
during calls for the line you specify.
0 - Disable Binary Floor Control
Protocol content.
No
features.cfg smartPairing
.mode
Enables users with People+Content IP
or Desktop on a computer or Mobile
on a tablet to pair with the Polycom
Trio conference phone using
SmartPairing.
Disabled (default) - Users cannot use
SmartPairing to pair with the
conference phone.
Manual - Users must enter the IP
address of the conference phone to
pair with it.
No
features.cfg smartPairing
.volume
The relative volume to use for the
SmartPairing ultrasonic beacon.
6 (default)
0 - 10
No
Content
Polycom, Inc. 129

Bluetooth Discovery on Polycom Trio with the Polycom Content
Application
You can share content through the Polycom Content App, version 1.3 or later, by connecting the Polycom
Trio system to the application.
To enable users to connect Polycom Trio to the Polycom Content application, you need to configure
Polycom Trio to advertise the system's IP address over Bluetooth using the parameter
bluetooth.beacon.ipAddress.enabled. When this parameter is set to 1, the Bluetooth radio is
automatically turned on for the system, and the IP address for the system is sent to the Polycom Content
app over Bluetooth. You can also enable Bluetooth discovery on the phone and in the Web Configuration
Utility.
The parameter bluetooth.beacon.ipAddress.enabled also replaces the parameter
content.airplayServer.discovery.bluetooth.enabled for AirPlay discovery over Bluetooth.
Content Sharing over Bluetooth Parameters
Use the following parameter to enable Bluetooth Discovery and content sharing on over Bluetooth
between Polycom Trio and the Polycom Content App.
Content App Bluetooth Discovery Parameters
Template Parameter Permitted Values Change Causes Restart
or Reboot
features.cfg bluetooth.beacon.
ipAddress.enabled
Set to send the IP
address of the system
over Bluetooth.
1 (default) - Enables
sending the system IP
address over Bluetooth.
Turns Bluetooth radio on
when
feature.bluetooth
.enabled = 1.
0 - Disables sending the
system IP address over
Bluetooth
Note: Enable the parame-
ter feature.blue-
tooth.enabled to
use this feature.
No
Polycom People+Content IP
You can share content from a computer over IP using Polycom® RealPresence® Desktop Software,
Polycom® People+Content IP (PPCIP), and Polycom® RealPresence® Mobile app.
Sharing content with Polycom People+Content IP from a computer connected over IP supports 1080p
resolution at a maximum of 30 frames per second (fps) on the connected monitor(s). The computer and
Content
Polycom, Inc. 130

Polycom Trio solution must be able to communicate on the same IP network and you must pair your
Polycom software application with the Polycom Trio system.
When Polycom Trio is registered with Skype for Business, you can use these applications to share
content only to a local monitor. You cannot share content from a Polycom Trio system over a Skype for
Business call. For instructions, see the Polycom Trio - User Guide at Polycom Trio on Polycom Support.
Polycom People+Content IP Parameters
The following table lists parameters that configure content sharing with the Polycom Trio solution.
Content Sharing with Polycom Trio Parameters
Template Parameter Permitted Values
Change Causes
Restart or Reboot
features.cfg content.ppcip.re
solutionPreferre
d
1 (default) – The Polycom Trio
system attempts to get higher
resolution content with lower
frames per second after the
SDP negotiation.
0 - Content resolution is set
based on the SDP negotiation.
No
features.cfg content.ppcipSer
ver.authType
The authentication type used
for PPCIP content sessions.
none (default) - No security
code for Polycom People
+Content IP-enabled clients is
required.
passcode - Use a security code
to authenticate Polycom People
+Content IP-enabled clients.
No
features.cfg content.ppcipSer
ver.enabled
1 (default) - Enable Polycom
People+Content IP content
server for sharing.
0 - Disable Polycom People
+Content IP content server.
No
features.cfg content.ppcipSer
ver.enabled.Trio
8500
1 (default) - Enable Polycom
People+Content IP content
server for content sharing with
Polycom Trio 8500.
0 - Disable Polycom People
+Content IP content server for
Polycom Trio 8500.
No
Content
Polycom, Inc. 131

Template Parameter Permitted Values
Change Causes
Restart or Reboot
features.cfg content.ppcipSer
ver.enabled.Trio
8800
1 (default) - Enable Polycom
People+Content IP content
server for content sharing with
Polycom Trio 8800.
0 - Disable Polycom People
+Content IP content server for
Polycom Trio 8800.
No
Polycom People+Content IP over USB
You can use Polycom® People+Content® IP (PPCIP) to share video or data from a Windows® or Mac®
computer connected by USB to the Polycom Trio system when in or out of a call.
When you install PPCIP version 1.4.2 and run it unopened in the background, the PPCIP application pops
up immediately when you connect the computer to Polycom Trio solution via USB.
Keep the following points in mind:
• You can show content with People+Content IP on a Windows or Mac computer connected by USB
to Polycom Trio to a maximum of 1080p resolution and a maximum of 30 frames per second (fps).
• Audio content is not shared.
• Content sent from People+Content is sent over USB, and no network connection is needed. This is
useful for environments where guest IP access is not allowed. You must use UC Software 5.4.3AA
or later to share your desktop at up to 1080p resolution using a Mac computer connected by USB to
the Polycom Trio solution.
Important: The default port used by Group Paging when enabled
ptt.pageMode.enable="1" conflicts with the UDP port 5001 used
by Polycom® People+Content™ on the Polycom Trio system. Since the
port used by People+Content is fixed and cannot be configured,
configure one of two workarounds:
◦ Configure a different port for Group Paging using parameter
ptt.port or
◦ Disable People+Content IP using parameter
content.ppcipServer.enabled="0" .
Polycom People+Content IP over USB Parameters
The following table lists parameters that configure the People+Content over USB feature.
Content
Polycom, Inc. 132
Polycom People+Content over USB Parameters
Template Parameter Permitted Values
Change Causes
Restart or Reboot
feature.usb
.device.con
tent
1 (default) - Enable content sharing
using the People+Content IP
application on a computer connected
by USB to Polycom Trio solution.
0 - Disable content sharing using the
People+Content IP application on a
computer connected by USB to
Polycom Trio solution.
No
Polycom Trio System Support for Video-based Screen Sharing (VbSS)
Polycom Trio 8800 and 8500 system allow you to use Video-based Screen Sharing (VbSS) with Skype
for Business clients that enables both application and desktop sharing. In previous releases, Polycom
Trio systems supported only Remote Desktop Protocol (RDP) for receiving content. Only systems
registered to Skype for Business support VbSS content sharing.
Note: Polycom Trio systems can only receive Skype for Business VbSS content. You cannot transmit
VbSS content from the Polycom Trio systems.
The advantages of VbSS content sharing over RDP are as follows:
▪ The video experience is faster, with an improvement in frames-per-second.
▪ Works better in low bandwidth conditions, even when receiving high motion content, such as 3-D
graphics.
However, if any participant in a Skype for Business conference does not support VbSS, the Skype for
Business server content switches from VbSS to Remote Desktop Protocol (RDP) content.
Video-based Screen Sharing Parameters
The following table lists the parameters for configuring Video-based Screen Sharing (VbSS) with Polycom
Trio systems.
The content.vbssPush.enable and content.vbssPushP2P.enable parameters apply only if you
have a paired Trio VisualPro system.
Content
Polycom, Inc. 133

Video-based Screen Sharing Parameters
Template Parameter Permitted Values Change Causes Restart
or Reboot
features.cfg content.vbss.enab
le
1 (default) – Enables
Polycom Trio 8800 and
8500 systems to use
VbSS for receiving Skype
for Business content.
0 – Polycom Trio 8800
and 8500 systems use
Remote Desktop Protocol
(RDP) for receiving Skype
for Business content.
No
features.cfg content.vbssPush.
enable
1 (default) - VbSS content
from the paired system is
sent in Skype for
Business conference and
point-to-point calls.
0 - VbSS content from the
paired system is not sent
in Skype for Business
conference and point-to-
point calls.
No
features.cfg content.vbssPushP
2P.enable
1 (default) - VbSS content
from the paired system is
sent in Skype for
Business point-to-point
calls.
0 - VbSS content from the
paired system is not sent
in Skype for Business
point-to-point calls.
This parameter is ignored
if
content.vbssPush.
enable=0.
No
HDMI and VGA Content with the Paired Trio VisualPro Parameters
The parameters in the following table configure HDMI and VGA content sharing with the paired Trio
VisualPro system.
Content
Polycom, Inc. 134

HDMI and VGA Content Parameters
Template Parameter Permitted Values Change Causes
Restart or Reboot
site.cfg mr.contentStrea
mPortStart
Sets where the IP port range begins
for content input streams from a
network device.
4300 (default)
1024 - 65436
Yes
site.cfg mr.contentStrea
mPortEnd
Sets where the IP port range ends for
content input streams from a network
device.
4320 (default)
1024 - 65436
Yes
Screen Mirroring
The Polycom Trio 8800 system provides screen mirroring locally from Apple® -certified devices and the
Wireless Display feature for Miracast®-certified Android™ and Windows® devices.
Screen Mirroring with AirPlay-Certified Devices
This section provides information you need to set up and configure a Polycom Trio 8800 system to work
with AirPlay-certified devices.
The following information applies to using AirPlay-certified devices with the Polycom Trio system:
• You can display local content only from your AirPlay-certified device to the Polycom Trio 8800
system monitor.
• Sharing content from direct streaming sources, such as YouTube™ or web links, is not supported.
• If you share content during a point-to-point or conference call, the content is not sent to far-end
participants.
• Audio-only content is not supported. If you only want to share audio, consider using Bluetooth or
USB connectivity.
• Apple Lossless Audio Codec (ALAC) is not supported.
Polycom Trio 8800 systems support the following AirPlay-certified devices:
• Apple ®
• iPad®
• iPad Pro™
• MacBook Pro®
The Polycom Trio 8800 system supports a maximum resolution and frame rate of 720p@60fps or
1080p@30fps. If configured for 1080p resolution, an iPad often sends 60fps video, which can result in
latency in mirroring, visual artifacts, or both.
Content
Polycom, Inc. 135
When the Polycom Trio 8800 system receives content from a Skype for Business client using the Remote
Desktop Protocol (RDP) at the same time as content from an AirPlay-certified device, the AirPlay content
takes precedence and displays. When you end AirPlay content, available Skype for Business content
displays.
Requirements for Screen Mirroring with AirPlay
You must meet the following requirements to use the screen mirroring feature on an AirPlay-certified
device with a Polycom Trio 8800 system:
• Polycom Trio collaboration kit running UC Software version 5.4.4AA or later
• The Polycom Trio system and Apple devices are on the same subnet.
The devices can be on different subnets if the devices are routable and multicast DNS (Bonjour) is
bridged between the subnets for discovery. The devices can also be on different subnets if AirPlay
Discovery over Bluetooth is enabled, the subnets are routable to each other, and the device is
within Bluetooth range.
• The screen mirroring feature uses the following ports:
◦ Discovery: UDP port 5353
◦ Sessions: TCP ports 7000, 7100, 8009, and 47000; UDP port 1900
Polycom Trio 8800 for AirPlay Parameters
Use the following parameters to configure the Polycom Trio 8800 system for AirPlay-certified devices.
Polycom Trio 8800 for AirPlay Parameters
Template Parameter Permitted Values Restart Causes
Restart or Reboot
features.cf
g
bluetooth.beacon.ipAd
dress.enabled
Set to send the IP address of the
system over Bluetooth.
1 (default) - Enables sending the
system IP address over
Bluetooth. Turns Bluetooth radio
on when
feature.bluetooth.ena
bled = 1.
0 - Disables sending the system
IP address over Bluetooth
Note: Enable the parameter
feature.bluetooth.en-
abled to use this feature.
No
features.cf
g
content.airplayServer
.authType
none (default) - No security code
for AirPlay certified devices is
required.
passcode - Use a security code
to authenticate AirPlay-certified
devices.
No
Content
Polycom, Inc. 136

Template Parameter Permitted Values Restart Causes
Restart or Reboot
features.cf
g
content.airplayServer
.enabled
0 (default) - Disable the content
sink for AirPlay-certified devices.
1 - Enable the content sink for
AirPlay-certified devices.
No
features.cf
g
content.airplayServer
.maxResolution
Set the content resolution.
720p (default)
1080p
1024x1024
960x960
480x480
No
features.cf
g
content.airplayServer
.name
Specify a system name for the
local content sink for AirPlay
certified devices. If left blank the
previously configured or default
system name is used.
NULL (default)
No
features.cf
g
content.local.authCha
ngeInterval
Set the interval in minutes
between changes to the local
content authentication
credentials.
1440 (default)
0 - 65535
0 - Do not change
No
features.cf
g
content.local.authCha
ngeMode
Specify when the security code
for content sharing with AirPlay-
certified devices changes.
session (default) - Code
changes at the end of each
content sharing session.
relativeTime - Code changes at
an interval specified by the
content.local.authCha
ngeInterval parameter.
No
Troubleshooting
This section provides solutions to common issues you may have using the Polycom Trio 8800 system
with AirPlay-certified devices.
The Polycom Trio 8800 system does not advertise on my device
The Polycom Trio may not be broadcasting for discovery, or the broadcasts are being blocked.
Content
Polycom, Inc. 137
• Ensure your Apple device is on the same subnet as the Polycom Trio 8800 system and that
Polycom Trio has screen mirroring enabled.
AirPlay Debugging Log Parameters
If you experience further issues using AirPlay-certified devices with the Polycom Trio 8800 system, you
can enable the following logging parameters on your Polycom Trio to get extended debugging data.
Screen Mirroring Debugging Parameters
Log Component Permitted Values
airp Session management and communication specifically for AirPlay certified devices.
airpl Protocol library for AirPlay-certified devices
airps Android service AirPlay-certified devices
lc Local Content (including for AirPlay-certified devices and PPCIP) session management
Screen Mirroring with Miracast-Certified Devices
The Wireless Display feature lets you display content locally from your Miracast-certified Android or
Windows device to the Polycom Trio 8800 system monitor.
Windows or Android devices can discover and connect directly with the Polycom Trio 8800 system and
do not have to be on the same network.
The Polycom Trio 8800 system supports content sharing from the following Android and Windows
devices:
• Miracast-certified devices running Windows 10
• Samsung Galaxy smartphones and tablets running Android version 4.4 or earlier
Note: Polycom cannot guarantee connectivity with all Miracast-certified devices, but connectivity
has been validated to work well with Samsung smartphones and tablets using Android
version 4.4 or later and the Microsoft Surface® 3 Pro and Surface® 4 Pro running Windows
10.
To send content from your device, you must first connect your device wirelessly to the Polycom Trio 8800
system.
The Polycom Trio 8800 system can display content to a maximum resolution and frame rate of
720p@60fps or 1080p@30fps. If the Polycom Trio 8800 system is configured to auto-negotiate the frame
rate of transmitted content, some tablets might send 1080p@60fps video, which can result in latency in
mirroring, visual artifacts, or both.
Requirements
You must meet the following requirements to use the Wireless Display feature on a Miracast-certified
device with the Polycom Trio 8800 system:
• Polycom Trio 8800 collaboration kit running UC Software version 5.4.4AA or later
If you do not allow auto-negotiation, some devices might fail to pick the best possible video stream
parameters.
Content
Polycom, Inc. 138

Polycom Trio 8800 for Miracast-Certified Devices Parameters
Use the following parameters to configure Wireless Display on the Polycom Trio 8800 system.
Wireless Display Parameters
Template Parameter Permitted Values Change
Causes Restart
or Reboot
features.c
fg
content.wirelessDisplay.sink.
authorizationType
Auto (Default) - Content is
automatically accepted and
displays on the Polycom
Trio 8800 system.
Button - Users must confirm
content acceptance on a
popup message.
No
features.c
fg
content.wirelessDisplay.sink.
bitrate
Set the content maximum
bitrate in Mbps
30 (default)
0 - 60
0 allows auto-negotiation.
No
features.c
fg
content.wirelessDisplay.sink.
enabled
0 (default) - Disable
Wireless Display.
1 - Enable Wireless
Display.
No
features.c
fg
content.wirelessDisplay.sink.
fps
Set the content frame rate
in frames per second.
30 (default)
0 - 60
0 allows auto-negotiation
No
features.c
fg
content.wirelessDisplay.sink.
height
Set the maximum content
height in pixels.
1080 (default)
0 - 1200
0 allows auto-negotiation
No
features.c
fg
content.wirelessDisplay.sink.
name
NULL - default
Specify a system name for
the local content sink for
Android or Windows
devices. If left blank the
previously configured or
default system name is
used.
No
Content
Polycom, Inc. 139

features.c
fg
content.wirelessDisplay.sink.
width
Set the maximum content
width in pixels.
1920 (Default and
Maximum)
0 allows auto-negotiation
No
Troubleshooting
This section provides solutions to common issues you may have using Wireless Display on the Polycom
Trio 8800 system.
My Polycom Trio 8800 system does not advertise on my smartphone or tablet
If the Polycom Trio 8800 system does not advertise on your smartphone or tablet device, check the
following:
• Ensure Wi-Fi is enabled on your device and the band is set to 2.4GHz or Auto. The Auto setting
allows the connecting device better access to a free wireless channel.
• Ensure the correct country of operation is set and that both bands are selected on the Polycom Trio
8800 system by configuring the following:
device.wifi.country.set="1"device.wifi.country="CA"device.wifi.radio.band
2_4GHz.enable.set="1"
device.wifi.radio.band2_4GHz.enable="1"device.wifi.radio.band5GHz.enable.
set="1"device.wifi.radio.band5GHz.enable="1"device.wifi.enabled.set="1"de
vice.wifi.enabled="0"device.net.enabled.set="1"device.net.enabled="1"
Note: The WLAN operating mode on the Polycom Trio 8800 system is mutually exclusive of the
Wireless Display feature. You can enable Wireless Display only if wired Ethernet is used for
calling and conferencing. Ensure that wired Ethernet is used for calling and conferencing by
configuring the following:
Video Quality is Poor
Incorrect image resolution can cause content delays and video artifacts.
Note that the Polycom Trio 8800 system does not accept 1080@60fps video resolution.
• To resolve video quality issues, configure the following for the Polycom Trio 8800 system:
content.wirelessDisplay.sink.width="0"content.wirelessDisplay.sink.height
="0"content.wirelessDisplay.sink.fps="0"
• In addition, you can set a limit on the live stream parameters by setting:
content.wirelessDisplay.sink.fps="30"
Wireless Display Debugging Log Parameters
If you experience further issues using Wireless Display on the Polycom Trio 8800 system, you can enable
the following logging parameters on your Polycom Trio 8800 system to get extended debugging data.
Wireless Display Debugging Parameters
Parameters Permitted Values
wdisp Wireless Display session management and communication with the Wireless Display
source
Content
Polycom, Inc. 140

apps Wireless Display support for Android
lc Local Content (including Wireless Display and PPCIP) session management
Access Diagnostic Information
If you experience issues using Wireless Display on the Polycom Trio 8800 system, you can access
diagnostic information from the Polycom Trio 8800 menu.
On the phone menu, go to one of the following settings:
•Settings > Status > Diagnostics > Local Content Media Statistics
•Settings > Status > Diagnostics > Graphs > Local Video Content Statistics
•Settings > Status > Diagnostics > Graphs > Networked Devices Graphs
•Settings > Status > Diagnostics > Networked Devices > Statistics
Content
Polycom, Inc. 141

Hardware and Power for Polycom Trio
Systems
Topics:
•Powering the Polycom Trio 8500 and 8800 Systems
•Polycom Trio System Power Management
▪Power-Saving on Polycom Trio
This section provides information on hardware and powering for the Polycom Trio system and Polycom
Trio Visual+ acccessory, as well as information on power management.
Powering the Polycom Trio 8500 and 8800 Systems
Powering requirements and options vary between the Polycom Trio 8800 and 8500 systems.
Read the powering requirements and options carefully to understand powering for your Polycom Trio
system.
Powering the Polycom Trio 8800
You can power the Polycom Trio 8800 system with Power over Ethernet (PoE) or PoE+ (IEEE 802.
3at Type 2). When the Polycom Trio 8800 system is booting up, an on-screen message indicates the
available power supply type. Note that PoE+ provides Polycom Trio systems with full functionality.
The following features are not available on Polycom Trio 8800 system when using PoE:
• The Polycom Trio 8800 system LAN OUT port out does not provide PoE+ power and cannot be
used to power the Polycom Trio Visual+.
• No USB charging is provided to devices (mobile phones, tablets) connected to the Polycom Trio
8800 system USB port.
• Maximum peak power to the loudspeaker is limited.
Powering the Polycom Trio 8500
You can power the Polycom Trio 8500 system with Power over Ethernet (PoE).
The Polycom Trio 8500 does not support:
• PoE+
• Power Sourcing Equipment (PSE)
• LAN Out / PC Port
• USB
Power the Polycom Trio 8800 System with the Optional Power Injector
If your building is not equipped with PoE+ you can use the optional power injector to provide PoE+ and
full functionality to Polycom Trio 8800 system.
Polycom, Inc. 142

Note: Place the PoE injector in a clean and dry area out of a walkway, and provide sufficient space
around the unit for good ventilation. Do not cover or block airflow to the PoE injector. Keep the
PoE injector away from heat and humidity and free from vibration and dust.
When using the power injector to power the Polycom Trio 8800 system, you must connect cables in the
following sequence:
Procedure
1. Plug the AC power cord of the power injector into the wall and use a network cable to connect the
power injector to the Polycom Trio 8800 system.
2. Connect the power injector to the network with a CAT-5E or CAT-6 Ethernet cable.
The power adapter LED is green when the Polycom Trio 8800 system is correctly powered. If the LED is
yellow, the power injector is bypassed and the Polycom Trio 8800 system is drawing PoE power from the
outlet.
Tip: If the Polycom Trio Visual+ loses power after a Polycom Trio 8800 system reboot, unplug both
devices and repeat steps 1 and 2.
If the power injector LED is yellow, turn off the PoE network port or connect the Polycom Trio
system in the following sequence:
1. Power up Polycom Trio 8800 and Visual+ using the power injector but do not plug the
devices into the network wall port.
2. Wait for the Polycom Trio 8800 and Visual+ systems to boot up.
3. Plug the devices into the network wall port.
4. Ensure the LED indicator on the power injector is green.
Powering the Polycom Trio Visual+ Solution
How you power the Polycom Trio Visual+ can depend on the power options your building is equipped
with.
Consider the following setup points:
• If you are using PoE+ or the optional power injector, you can power the Polycom Trio Visual+
directly from the Polycom Trio 8800 system using an Ethernet cable. In this scenario, you do not
need to pair the Polycom Trio system with the Polycom Trio Visual+.
• If you are using PoE, you must power the Polycom Trio Visual+ separately using an Ethernet cable
or use the optional power injector. In this scenario, you must pair the Polycom Trio system with the
Polycom Trio Visual+.
• If you use PoE+, you have the option to power the Polycom Trio 8800 system and Polycom Trio
Visual+ separately and then pair. When powering separately, you do not need to connect the
Polycom Trio system directly to Polycom Trio Visual+.
Polycom Trio System Power Management
Power available to the Polycom Trio 8800 and 8500 system is limited and you must choose how to power
the system and which features to enable or disable.
Hardware and Power for Polycom Trio Systems
Polycom, Inc. 143

Power management options vary between the Polycom Trio 8800 and 8500. Read the powering
requirements and options carefully to understand powering for your Polycom Trio system.
Polycom Trio 8500 System Power Management
The Polycom Trio 8500 supports:
• USB devices consuming < 2.5W power
• USB port over current detection
The Polycom Trio 8500 does not support:
• PoE+
• Power Sourcing Equipment (PSE)
• LAN Out / PC Port
• USB charging
USB Port Power Management
Device charging with the USB port on the Polycom Trio 8800 system is disabled by default and when
disabled the USB host port provides 100mA of power for peripheral devices.
USB charging is disabled when powering the Polycom Trio Visual+ from a LAN Out port.
To enable USB charging, you must power your Polycom Trio 8800 system with an IEEE 802.3at Power
over Ethernet Plus (PoE+) compliant power source. When USB charging is enabled, you can power and
charge USB 2.0 compliant devices having a power draw of up to 1.500mA/7.5W.
Using Power over Ethernet (POE) Class 0
Powering the Polycom Trio 8800 system from a Power over Ethernet (POE) Class 0 source provides full
core functionality and results in the following limitations:
• The LAN Out port does not provide PoE power but otherwise is fully functional.
Using Power Sourcing Equipment Power (PoE PSE Power)
You can use Power Sourcing Equipment Power (PoE PSE Power) to power a Polycom Trio Visual+
system from the LAN OUT port of the Polycom Trio 8800 system.
To use PoE PSE Power, you must power the Polycom Trio 8800 system with an IEEE 802.3at Power
over Ethernet Plus (PoE+) compliant power source.
Note: You cannot enable USB Charging of the USB host port and PSE PoE Power of LAN OUT port at
the same time. If both are enabled, the Polycom Trio 8800 system uses PSE PoE Power and
ignores the USB charging setting.
Polycom Trio System Power Management Parameters
You can use the parameters listed to manage the Polycom Trio 8800 system's power usage.
Hardware and Power for Polycom Trio Systems
Polycom, Inc. 144

Template Parameter Permitted Values Change Causes Restart or Reboot
site.cfg poe.pse.c
lass
Specify the LAN OUT PoE class.
0 (default)
0 - 3
No
site.cfg poe.pse.e
nabled
1 (default) - The Polycom Trio 8800
LAN OUT interface provides PoE
power to a connected device.
0 - PoE power is not provided by the
LAN OUT port.
No
site.cfg usb.charg
ing.enabl
ed
0 (default) - You cannot charge USB-
connected devices from the USB
charging port.
1 - Enable fast charging of devices
connected by USB port up to 7.5W
power / 1.5A current.
No
Power-Saving on Polycom Trio
The power-saving feature automatically turns off the phone's LCD display when not in use.
You can configure power-saving options for the Polycom Trio 8800 and 8500 systems including:
▪ Turn on power-saving during nonworking days and hours.
▪ Configure power-saving around working days and hours.
▪ Configure an idle inactivity time after which the phone enters power-saving mode.
When the phone is in power-saving mode, an LED light flashes at intervals to indicate power is on.
In an unused conference room where the phone is in idle mode and the display is off, the Polycom Trio
solution has the capability to wake up when a user enters the room, depending on the room lighting.
Note: By default the Polycom Trio 8800 and 8500 systems enter power-saving mode after a period of
idle time to conserve energy. However, Polycom Trio systems do not enter power-saving mode
while idle in the Bluetooth menu. To ensure the system enters power-saving mode, you must exit
the Bluetooth menu using the Home or Back key on the Bluetooth menu.
Power-Saving Parameters
Use the parameters in the following table to configure the power-saving features and feature options.
Hardware and Power for Polycom Trio Systems
Polycom, Inc. 145

Power-Saving Parameters
Templa
te Parameter Permitted Values
Change Causes Restart or
Reboot
site.
cfg
powerSaving.cecE
nable
0 (default) - The paired device
display behavior is controlled only
by the value set for
powerSaving.tvStandbyMod
e.
1 - When the Polycom Trio system
enters power-saving mode, the
paired device display switches to
standby mode and powers up when
the system exits power-saving
mode.
No
site.
cfg
powerSaving.enab
le
Enable or disable the power-saving
feature. The default value varies by
phone model.
VVX 300/301/310/311=0 (default)
VVX 400/401/410/411=0 (default)
VVX 500/501, 600/601, 1500=1
(default)
Polycom Trio=1 (default)
1 - Enable the LCD power-saving
feature.
0 - Disable The LCD power-saving
feature.
Note that when the phone is in
power-saving mode, the LED
Message Waiting Indicator (MWI)
flashes. To disable the MWI LED
when the phone is in power saving
mode, set the parameter
ind.pattern.powerSaving.
step.1.state.x to 0 where
x=your phone's model. For
example, enter the parameter as
ind.pattern.powerSaving.
step.1.state.VVX500 to
disable the MWI for your VVX 500
phone.
No
site.
cfg
powerSaving.idle
Timeout.offHours
The number of idle minutes during
off hours after which the phone
enters power saving.
1 (default)
1 - 10
No
Hardware and Power for Polycom Trio Systems
Polycom, Inc. 146

Templa
te Parameter Permitted Values
Change Causes Restart or
Reboot
site.
cfg
powerSaving.idle
Timeout.officeHo
urs
The number of idle minutes during
office hours after which the phone
enters power saving.
30 (default)
1 - 600
No
site.
cfg
powerSaving.idle
Timeout.userInpu
tExtension
The number of minutes after the
phone is last used that the phone
enters power saving.
10 (default)
1 - 20
No
site.
cfg
powerSaving.offi
ceHours.duration
.Monday
powerSaving.offi
ceHours.duration
.Tuesday
powerSaving.offi
ceHours.duration
.Wednesday
powerSaving.offi
ceHours.duration
.Thursday
powerSaving.offi
ceHours.duration
.Friday
powerSaving.offi
ceHours.duration
.Saturday
powerSaving.offi
ceHours.duration
.Sunday
Set the duration of the office
working hours by week day.
Monday - Friday = 12 (default)
Saturday - Sunday = 0
0 - 24
No
site.
cfg
powerSaving.offi
ceHours.startHou
r.x
Specify the starting hour for the
day's office working hours.
7 (default)
0 - 23
Set x to Monday, Tuesday,
Wednesday, Thursday, Friday,
Saturday, and Sunday (refer to
powerSaving.officeHours.
duration for an example).
No
Hardware and Power for Polycom Trio Systems
Polycom, Inc. 147

Templa
te Parameter Permitted Values
Change Causes Restart or
Reboot
site.
cfg
powerSaving.tvSt
andbyMode
black (default) - The paired device
displays a black screen after
entering power-saving mode.
noSignal - Power-saving mode
turns off the HDMI signal going to
the paired device monitor(s).
No
Hardware and Power for Polycom Trio Systems
Polycom, Inc. 148

Audio Features
Topics:
•Automatic Gain Control
•Background Noise Suppression
•Comfort Noise
•Voice Activity Detection
•Comfort Noise Payload Packets
•Synthesized Call Progress Tones
•Jitter Buffer and Packet Error Concealment
•Dual-Tone Multi-Frequency Tones
•Acoustic Echo Cancellation
•Polycom NoiseBlock
•Audio Output Options
▪Audio Input Options
•USB Audio Calls
•Location of Audio Alerts
•Ringtones
•Sound Effects
•Supported Audio Codecs for Polycom Trio Solution
•IEEE 802.1p/Q
•Voice Quality Monitoring (VQMon)
After you set up your Polycom phones on the network, users can send and receive calls using the default
configuration.
However, you might consider configuring modifications that optimize the audio quality of your network.
This section describes the audio sound quality features and options you can configure for your Polycom
phones. Use these features and options to optimize the conditions of your organization's phone network
system.
Automatic Gain Control
Automatic Gain Control (AGC) is available for conference phone models and is used to boost the gain of
the near-end conference participant.
Gain control helps conference participants hear your voice. This feature is enabled by default.
Polycom, Inc. 149

Background Noise Suppression
Background noise suppression is designed primarily for handsfree operation and reduces background
noise, such as from fans, projectors, or air conditioners, to enhance communication.
This feature is enabled by default.
Comfort Noise
Comfort Noise ensures a consistent background noise level to provide a natural call experience and is
enabled by default.
Comfort noise fill is unrelated to Comfort Noise packets generated if Voice Activity Detection is enabled.
Voice Activity Detection
Voice activity detection (VAD) conserves network bandwidth by detecting periods of silence in the
transmit data path so the phone doesn't have to transmit unnecessary data packets for outgoing audio.
For compression algorithms without an inherent VAD function, such as G.711, the phone uses the codec-
independent comfort noise transmission processing specified in RFC 3389. The RFC 3389 algorithm is
derived from G.711 Appendix II, which defines a comfort noise (CN) payload format (or bit stream) for G.
711 use in packet-based, multimedia communication systems.
Voice Activity Detection Parameters
The following table lists the parameters you can use to configure Voice Activity Detection.
Voice Activity Detection Parameters
Template Parameter Permitted Values
Change Causes
Restart or Reboot
site.cf
g
voice.vad.
signalAnne
xB
0—There is no change to SDP. If voice.vadEnable
is set to 0, add parameter line a=fmtp:18
annexb="no" below the a=rtpmap … parameter
line (where “18” could be replaced by another payload).
1 (default)—Annex B is used and a new line is added to
SDP depending on the setting of voice.vadEnable .
If voice.vadEnable is set to 1, add parameter line
a=fmtp:18 annexb="yes" below a=rtpmap …
parameter line (where '18' could be replaced by another
payload).
No
site.cf
g
voice.vadE
nable
0 - Disable Voice activity detection (VAD).
1 - Enable VAD.
No
Audio Features
Polycom, Inc. 150

Template Parameter Permitted Values
Change Causes
Restart or Reboot
site.cf
g
voice.vadT
hresh
The threshold for determining what is active voice and
what is background noise in dB.
25 (default)
Integer from 0 - 30
Sounds louder than this value are considered active voice,
and sounds quieter than this threshold are considered
background noise. This does not apply to G.729AB codec
operation which has its own built-in VAD function.
No
Comfort Noise Payload Packets
When enabled, the Comfort Noise payload type is negotiated in Session Description Protocol (SDP) with
the default of 13 for 8 KHz codecs, and a configurable value between 96 and 127 for 16 KHz codecs.
Comfort Noise Payload Packets Parameters
The following table includes the parameters you can use to configure Comfort Noise payload packets.
Comfort Noise Parameters
Template Parameter Permitted Values
Change Causes
Restart or Reboot
site.cfg voice.CNControl Publishes support for Comfort Noise in the SDP
body of the INVITE message and includes the
supported comfort noise payloads in the media
line for audio.
1 (default)—Either the payload type 13 for 8
KHz sample rate audio codec is sent for
Comfort Noise, or the dynamic payload type for
16 KHz audio codecs are sent in the SDP body.
0—Does not publish support or payloads for
Comfort Noise.
No
site.cfg voice.CN16KPayl
oad
Alters the dynamic payload type used for
Comfort Noise RTP packets for 16 KHz codecs.
96 to 127
122 (default)
No
Audio Features
Polycom, Inc. 151

Synthesized Call Progress Tones
Polycom phones play call signals and alerts, called call progress tones, that include busy signals,
ringback sounds, and call waiting tones.
The built-in call progress tones match standard North American tones. If you want to customize the
phone's call progress tones to match the standard tones in your region, contact Polycom Support.
Jitter Buffer and Packet Error Concealment
The phone employs a high-performance jitter buffer and packet error concealment system designed to
mitigate packet inter-arrival jitter and out-of-order, or lost or delayed (by the network) packets.
The jitter buffer is adaptive and configurable for different network environments. When packets are lost, a
concealment algorithm minimizes the resulting negative audio consequences. This feature is enabled by
default.
Dual-Tone Multi-Frequency Tones
The phone generates dual-tone multi-frequency (DTMF) tones, also called touch tones, in response to
user dialing on the dialpad.
These tones are transmitted in the real-time transport protocol (RTP) streams of connected calls.
The phone can encode the DTMF tones using the active voice codec or using RFC 2833-compatible
encoding. The coding format decision is based on the capabilities of the remote endpoint. The phone
generates RFC 2833 (DTMF only) events but does not regenerate—or otherwise use—DTMF events
received from the remote end of the call.
DTMF Tone Parameters
The following table includes the parameters you can use to set up DTMF tones.
DTMF Parameters
Template Parameter Permitted Values
Change Causes
Restart or Reboot
sip-
interop.cfg
reg.
1.telephony
1 (default) - Allows the phone to publish
its capability in an SDP offer or answer
to send and receive the DTMF tones
over RFC-2833.
0 - Disables the phone's capability to
send and receive the DTMF tones
through RFC-2833 in an SDP offer or
answer.
No
Audio Features
Polycom, Inc. 152

Template Parameter Permitted Values
Change Causes
Restart or Reboot
sip-
interop.cfg
tone.dtmf.c
hassis.mask
ing
0 (default) - DTMF tones play through
the speakerphone in handsfree mode.
1 - Set to 1 only if
tone.dtmf.viaRtp is set to 0.
DTMF tones are substituted with non-
DTMF pacifier tones when dialing in
handsfree mode to prevent tones from
broadcasting to surrounding telephony
devices or inadvertently transmitted in-
band due to local acoustic echo.
Yes
sip-
interop.cfg
tone.dtmf.l
evel
The level of the high frequency
component of the DTMF digit measured
in dBm0; the low frequency tone is two
dB lower.
-15
-33 to 3
Yes
sip-
interop.cfg
tone.dtmf.o
ffTime
When a sequence of DTMF tones is
played out automatically, specify the
length of time in milliseconds the phone
pauses between digits. This is also the
minimum inter-digit time when dialing
manually.
50 ms
Positive integer
Yes
sip-
interop.cfg
tone.dtmf.o
nTime
Set the time in milliseconds DTMF
tones play on the network when DTMF
tones play automatically.
The time you set is also the minimum
time the tone plays when manually
dialing.
50 ms (default)
1 - 65535 ms
Yes
sip-
interop.cfg
tone.dtmf.r
fc2833Contr
ol
Specify if the phone uses RFC 2833 to
encode DTMF tones.
1 (default) - The phone indicates a
preference for encoding DTMF through
RFC 2833 format in its Session
Description Protocol (SDP) offers by
showing support for the phone-event
payload type. This does not affect SDP
answers and always honor the DTMF
format present in the offer.
Yes
Audio Features
Polycom, Inc. 153

Template Parameter Permitted Values
Change Causes
Restart or Reboot
sip-
interop.cfg
tone.dtmf.r
fc2833Paylo
ad
Specify the phone-event payload
encoding in the dynamic range to be
used in SDP offers.
Skype (default) - 101
Generic (default) -127
96 to 127
Yes
sip-
interop.cfg
tone.dtmf.r
fc2833Paylo
ad_OPUS
Sets the DTMF payload required to use
Opus codec.
126 (default)
96 - 127
Yes
sip-
interop.cfg
tone.dtmf.v
iaRtp
1 (default) - Encode DTMF in the active
RTP stream. Otherwise, DTMF may be
encoded within the signaling protocol
only when the protocol offers the option.
If you set this parameter to 0, you must
set
tone.dtmf.chassis.masking
to 1.
Yes
sip-
interop.cfg
tone.localD
tmf.onTime
Set the time in milliseconds DTMF
tones play for when the phone plays out
a DTML tone sequence automatically.
50 ms (default)
1 - 65535 ms
No
Acoustic Echo Cancellation
Polycom phones use advanced acoustic echo cancellation (AEC) for handsfree operation using the
speakerphone.
The phones significantly reduce echo while permitting natural communication.
The AEC feature includes the following:
• Talk State Detector: Determines whether the near-end user, far-end user, or both are speaking.
• Linear Adaptive Filter: Adaptively estimates the loudspeaker-to-microphone echo signal and
subtracts that estimate from the microphone signal.
• Non-linear Processing: Suppresses any echo remaining after the Linear Adaptive Filter.
The phones also support headset echo cancellation.
Acoustic Echo Cancellation Parameters
The following table includes the parameters you can use to set up Acoustic Echo Cancellation.
Audio Features
Polycom, Inc. 154

Acoustic Echo Cancel (AEC) Parameters
Template Parameter Permitted Values
Change Causes
Restart or Reboot
site.cfg voice.aec.hf.e
nable
1 (default)—Enables the AEC
function for handsfree options.
0—Disables the AEC function for
handsfree options.
Polycom does not recommend
disabling this parameter.
No
site.cfg voice.aec.hs.e
nable
0—Disables the AEC function for
the handset.
1 (default)—Enables the AEC
function for the handset.
No
Polycom NoiseBlock
Polycom NoiseBlock technology automatically mutes the microphone during audio-only and audio/video
calls when a user stops speaking.
This feature silences noises that interrupt conversations such as paper shuffling, food wrappers, and
keyboard typing. When a user speaks, the microphone is automatically unmuted.
Polycom NoiseBlock Parameters
The following table includes the parameter you can use to configure the Polycom NoiseBlock feature.
Polycom NoiseBlock Parameters
Template Parameter Permitted Values
Change Causes
Restart or Reboot
voice.ns.hf.bl
ocker
1 (default) - Enable Polycom
NoiseBlock.
0 - Disable Polycom NoiseBlock.
No
Audio Output Options
By default, audio plays out of the Polycom Trio speakers.
When paired with a Polycom Trio Visual+ or Trio VisualPro system, you can play audio out of the
connected the monitor(s) and external speakers.
Using the parameter up.audio.networkedDevicePlayout, you can configure the following audio
output options:
• Polycom Trio 8500/8800 speakers only
Audio Features
Polycom, Inc. 155

• Polycom Trio Visual+ using HDMI or a connected 3.5mm analog output
• Trio VisualPro system using HDMI
Audio Output Options Parameters
The following table includes the parameters you can use to set the audio routing options for the Polycom
Trio solution.
Audio Output Options Parameters
Template Parameter Permitted Values
Change Causes Restart
or Reboot
features.cfg up.audio.netwo
rkedDevicePlay
out
PhoneOnly (default) - Use the
Polycom Trio system speakers.
TvOnly - Use the monitor speakers
and external speakers (if present).
Auto - Audio-only calls use the
Polycom Trio system speakers.
Video calls use the monitor
speakers and external speakers (if
present).
No
feature.usb.de
vice.hostOs
Specify the operating system of the
computer you are connecting by
USB when using Polycom Trio as
an audio output device.
Windows (default) - The computer
connected by USB to the Polycom
Trio uses a Windows operating
system.
Other—The operating system of the
computer connected via USB to the
Polycom Trio system is other than
Windows or Mac.
Mac—The computer connected by
USB to the Polycom Trio uses a
Mac operating system.
Confirm—The user is prompted to
confirm the computer's operating
system each time a USB cable is
used to connect to the Polycom
Trio system.
No
Audio Input Options
Your Polycom Trio system can use the following microphones in addition to its own:
▪ Polycom Trio™ Expansion Microphones
Audio Features
Polycom, Inc. 156
The expansion microphones include a 2.1 m | 7 ft cable that you can attach directly to the Polycom
Trio to broaden its audio range to a total of 70 ft.
▪ Polycom® Microphone Array and/or Polycom® Ceiling Microphone Array (when connected to a Trio
VisualPro system)
USB Audio Calls
You can enable users to use the Polycom Trio 8800 and 8500 system as an audio device for a tablet or
laptop connected to the Polycom Trio 8800 with the USB cable supplied in the box.
When a Microsoft® Windows® computer is connected to the Polycom Trio solution using a USB cable,
users can control the volume of audio and video calls from the computer or the Polycom Trio solution,
and the volume is synchronized on both devices.
The Polycom Trio 8800 and 8500 systems supports Mac computers running the following software
versions when connected by USB and used as an audio speakerphone:
• OS X 10.9.x (Mavericks)
• OS X 10.10.x (Yosemite)
• OS X 10.11.x (El Capitan)
USB Audio Call Parameters
The following table includes the parameters you can use to configure USB audio calls for connected
devices.
USB Call Parameters
Template Parameter Permitted Values
Change Causes
Restart or Reboot
device.cfg device.baseProfil
e
NULL (default)
Generic - Disables the Skype for
Business graphic interface.
Lync - Use this Base Profile for
Skype for Business deployments.
SkypeUSB - Use this Base Profile
when you want to connect Polycom
Trio to a Microsoft Room System or
a Microsoft Surface Hub.
No
feature.cfg voice.usb.holdRes
ume.enable
0 (default) - The Hold and Resume
buttons do not display during USB
calls.
1 - The Hold and Resume buttons
display during USB calls.
This parameter applies only when
Polycom Trio Base Profile is set to
‘SkypeUSB'.
No
Audio Features
Polycom, Inc. 157

Location of Audio Alerts
You can choose where all audio alerts, including incoming call alerts, are played on Polycom phones.
You can specify the audio to play from the handsfree speakerphone (default), the handset, the headset,
or the active location. If you choose the active location, audio alerts play out through the handset or
headset if they are in use. Otherwise, alerts play through the speakerphone.
Audio Alert Parameters
Use the parameters in the following table to specify where audio alerts and sound effects play.
Audio Alert and Sound Effect Parameters
Template Parameter Permitted Values
Change Causes
Restart or Reboot
techsuppo
rt.cfg
se.appLoc
alEnabled
1 (default)—Enable audio alerts and sound effects.
0—Disable audio alerts and sound effects
Yes
reg-
advanced.
cfg
se.destin
ation
Set where alerts and sound effects play out.
chassis (default) —Alerts and sound effects play out
through the phone's speakerphone.
headset (if connected)
handset active —Alerts play from the destination that is
currently in use. For example, if a user is in a call on
the handset, a new incoming call rings on the handset.
No
site.cfg se.stutte
rOnVoiceM
ail
1 (default)—A stuttered dial tone is used instead of a
normal dial tone to indicate that one or more voicemail
messages are waiting at the message center.
0—A normal tone is used to indicate that one or more
voicemail messages are waiting at the message
center.
No
Ringtones
Ringtones are used to define a simple ring class that is applied based on credentials carried within the
network protocol.
The ring class includes parameters such as call-waiting and ringer index, if appropriate.
The ring class can use one of the following types of rings:
• Ring Plays a specified ring pattern or call waiting indication.
• Visual Provides a visual indication (no audio) of an incoming call, no ringer needs to be specified.
• Answer Provides auto-answer on an incoming call.
• Ring-answer Provides auto-answer on an incoming call after a certain number of rings.
Audio Features
Polycom, Inc. 158
Note: that auto-answer for an incoming call works only when there is no other call in progress on
the phone, including no other calls in progress on shared or monitored lines. However, if a
phone initiates a call on a shared or monitored line, auto-answer works.
Supported Ring Classes
The phone supports the following ring classes:
• default
• visual
• answerMute
• autoAnswer
• ringAnswerMute
• ringAutoAnswer
• internal
• external
• emergency
• precedence
• splash
• custom<y> where y is 1 to 17.
Ringtone Parameters
The following parameters configure ringtones.
Ringtone Parameters
Template Parameter Permitted Values
Change Causes
Restart or Reboot
features.cfg se.rt.enabled 0—The ringtone feature is not
enabled.
1 (default)—The ringtone feature is
enabled.
No
reg-
advanced.cfg
se.rt.modifica
tion.enabled
Determines whether or not users
are allowed to modify the pre-
defined ringtone from the phone's
user interface.
0
1 (default)
No
Audio Features
Polycom, Inc. 159

Template Parameter Permitted Values
Change Causes
Restart or Reboot
sip-
interop.cfg
se.rt.<ringCla
ss>.callWait
The call waiting tone used for the
specified ring class. The call waiting
pattern should match the pattern
defined in Call Progress Tones.
callWaiting (default)
callWaitingLong
precedenceCallWaiting
No
sip-
interop.cfg
se.rt.<ringCla
ss>.name
The answer mode for a ringtone,
which is used for to identify the
ringtone in the user interface.
UTF-8 encoded string
No
sip-
interop.cfg
se.rt.<ringCla
ss>.ringer
The ringtone used for this ring
class. The ringer must match one
listed in Ringtones.
default
ringer1 to ringer24
ringer2 (default)
No
sip-
interop.cfg
se.rt.<ringCla
ss>.timeout
The duration of the ring in
milliseconds before the call is auto
answered, which only applies if the
type is set to ring-answer.
1 to 60000
2000 (default
No
sip-
interop.cfg
se.rt.<ringCla
ss>.type
The answer mode for a ringtone.
ring
visual
answer
ring-answer
No
Sound Effects
The phone uses built-in sampled audio files (SAF) in wave file format for some sound effects.
You can customize the audio sound effects that play for incoming calls and other alerts using synthesized
tones or sampled audio files with .wav files you download from the provisioning server or Internet.
Ringtone files are stored in volatile memory which allows a maximum size of 600 kilobytes (614400 bytes)
for all ringtones.
Audio Features
Polycom, Inc. 160

Sampled Audio Files
The phone uses built-in sampled audio files (SAF) in wave file format for some sound effects.
You can add files downloaded from the provisioning server or from the Internet. Ringtone files are stored
in volatile memory, which allows a maximum size of 600 kilobytes (614400 bytes) for all ringtones.
The phones support the following sampled audio WAVE (.wav) file formats:
• mono 8 kHz G.711 u-Law—Supported on all phones
• mono G.711 (13-bit dynamic range, 8-khz sample rate)
• G.711 A-Law—Supported on all phones
• mono L16/8000 (16-bit dynamic range, 8-kHz sample rate)—Supported on all phones
• mono 8 kHz A-law/mu-law—Supported on all phones
• L8/16000 (16-bit, 8 kHz sampling rate, mono)—Supported on all phones
• mono L16/16000 (16-bit dynamic range, 16-kHz sample rate)
• L16/16000 (16-bit, 16 kHz sampling rate, mono)—Supported on all phones
• L16/32000 (16-bit, 32 kHz sampling rate, mono)—Supported on VVX 500/501, 600/601, and 1500
• L16/44100 (16-bit, 44.1 kHz sampling rate, mono)—Supported on VVX 500/501, 600/601, and 1500
• L16/48000 (16-bit, 48 kHz sampling rate, mono)—Supported on VVX 500/501, 600/601, and 1500
Default Sample Audio Files
The following table defines the phone's default use of the sampled audio files.
Default Sample Audio File Usage
Sampled Audio File Number Default Use (Pattern Reference)
1Ringer 12 ( se.pat.misc.welcome )
Ringer 15 ( se.pat.ringer.ringer15 )
2Ringer 16 ( se.pat.ringer.ringer16 )
3Ringer 17 ( se.pat.ringer.ringer17 )
4Ringer 18 ( se.pat.ringer.ringer18 )
5Ringer 19 ( se.pat.ringer.ringer19 )
6Ringer 20 ( se.pat.ringer.ringer20 )
7Ringer 21 ( se.pat.ringer.ringer21 )
8Ringer 22 ( se.pat.ringer.ringer22 )
9Ringer 23 ( se.pat.ringer.ringer23 )
10 Ringer 24 ( se.pat.ringer.ringer24 )
11 to 24 Not Used
Audio Features
Polycom, Inc. 161

Sampled Audio File Parameters
Your custom sampled audio files must be available at the path or URL specified in the parameter saf.x
so the phone can download the files. Make sure to include the name of the file and the .wav extension in
the path.
Use the parameters in the following tables to customize this feature.
In the following table, x is the sampled audio file number.
Sample Audio File Parameter
Template Parameter Permitted Values
Change Causes
Restart or Reboot
site.cfg saf.x Specify a path or URL for the phone to download a
custom audio file.
Null (default)—The phone uses a built-in file.
Path Name —During startup, the phone attempts to
download the file at the specified path in the provisioning
server.
URL— During startup, the phone attempts to download
the file from the specified URL on the Internet. Must be a
RFC 1738-compliant URL to an HTTP, FTP, or TFTP
wave file resource.
If using TFTP, the URL must be in the following format:
tftp://<host>/[pathname]<filename> . For
example: tftp://somehost.example.com/
sounds/example.wav .
To use a welcome sound, enable the parameter
up.welcomeSoundEnabled and specify a file in
saf.x . The default UC Software welcome sound file is
Welcome.wav .
No
Sound Effect Patterns
You can specify the sound effects that play for different phone functions and specify the sound effect
patterns and the category.
Sound effects are defined by patterns: sequences of chord-sets, silence periods, and wave files. You can
also configure sound effect patterns and ringtones. The phones use both synthesized and sampled audio
sound effects.
Patterns use a simple script language that allows different chord sets or wave files to be strung together
with periods of silence. The script language uses the instructions shown in the next table.
Audio Features
Polycom, Inc. 162

Sound Effects Pattern Types
Instruction Meaning Example
sampled (n) Play sampled audio file n se.pat.misc.SAMPLED_1.inst.
1.type =”sampled” (sampled audio
file instruction type)
se.pat.misc.SAMPLED_1.inst.
1.value =”2” (specifies sampled audio
file 2)
chord (n, d) Play chord set n (d is optional and allows the
chord set ON duration to be overridden to d
milliseconds)
se.pat.callProg.busyTone.inst
.2.type = “chord” (chord set
instruction type)
se.pat.callProg.busyTone.inst
.2.value = “busyTone” (specifies
sampled audio file busyTone)
se.pat.callProg.busyTone.inst
.2.param = “2000” (override ON
duration of chord set to 2000 milliseconds)
silence (d) Play silence for d milliseconds (Rx audio is
not muted)
se.pat.callProg.bargeIn.inst.
3.type = “silence” (silence
instruction type)
se.pat.callProg.bargeIn.inst.
3.value = “300” (specifies silence is
to last 300 milliseconds)
branch (n) Advance n instructions and execute that
instruction (n must be negative and must not
branch beyond the first instruction)
se.pat.callProg.alerting.inst
.4.type = “branch” (branch
instruction type)
se.pat.callProg.alerting.inst
.4.value = “-2” (step back 2
instructions and execute that instruction)
Sound Effect Pattern Parameters
There are three categories of sound effect patterns that you can use to replace cat in the parameter
names: callProg (Call Progress Patterns), ringer (Ringer Patterns) and misc (Miscellaneous
Patterns).
Keep the following in mind when using the parameters in the following table:
• Xis the pattern name.
• Y is the instruction number.
• Both x and y need to be sequential.
•Cat is the sound effect pattern category.
Audio Features
Polycom, Inc. 163

Sound Effects Parameters
Template Parameter Permitted Values
Change Causes
Restart or Reboot
region.cfg se.pat.callProg.secondar
yDialTone.name
1-255 No
region.cfg se.pat.callProg.secondar
yDialTone.inst.1.type
0-255 No
region.cfg se.pat.callProg.secondar
yDialTone.inst.1.value
0-50 No
region.cfg se.pat.callProg.secondar
yDialTone.inst.1.atte
Sound effects name,
where cat is
callProg ,
ringer , or misc .
UTF-8 encoded string
No
region.cfg se.pat.cat.x.inst.y.type Sound effects name,
where cat is
callProg ,
ringer , or misc .
sample
chord
silence
branch
No
region.cfg se.pat.cat.x.inst.y.valu
e
The instruction:
sampled - sampled
audio file number,
chord - type of sound
effect, silence -
silence duration in ms,
branch - number of
instructions to advance.
String
No
region.cfg se.pat.callProg.stutter.
inst.1.type
chord (1-2) (default) -
type of sound effect
NULL (3-8) (default)
sampled - sampled
audio file number
silence - silence duration
in ms
branch - number of
instructions to advance
No
Audio Features
Polycom, Inc. 164
Template Parameter Permitted Values
Change Causes
Restart or Reboot
region.cfg se.pat.callProg.stutter.
inst.1.value
stutterLong (1) (default)
dialTone (2) (default)
NULL (3-8) (default)
No
Call Progress Tones
The following table lists the call progress pattern names and their descriptions.
Call Progress Tone Pattern Names
Call Progress Pattern Description
alerting Alerting
bargeIn Barge-in tone
busyTone Busy tone
callWaiting Call waiting tone
callWaitingLong Call waiting tone long (distinctive)
confirmation Confirmation tone
dialTone Dial tone
howler Howler tone (off-hook warning)
intercom Intercom announcement tone
msgWaiting Message waiting tone
precedenceCallWaiting Precedence call waiting tone
precedenceRingback Precedence ringback tone
preemption Preemption tone
precedence Precedence tone
recWarning Record warning
reorder Reorder tone
ringback Ringback tone
secondaryDialTone Secondary dial tone
stutter Stuttered dial tone
Audio Features
Polycom, Inc. 165

Miscellaneous Patterns
The following table lists the miscellaneous patterns and their descriptions.
Miscellaneous Pattern Names
Parameter Name Miscellaneous Pattern Name Description
instantmessage instant message New instant message
localHoldNotification local hold notification Local hold notification
messageWaiting message waiting New message waiting indication
negativeConfirm negative confirmation Negative confirmation
positiveConfirm positive confirmation Positive confirmation
remoteHoldNotification remote hold notification Remote hold notification
welcome welcome Welcome (boot up)
Supported Audio Codecs for Polycom Trio Solution
The following table includes the supported audio codecs and priorities for the Polycom Trio systems.
Note that the Opus codec is not compatible with G.729 and iLBC. If you set Opus to the highest priority,
G.729 and iLBC are not published; if you set G.729 and iLBC to the highest priority, Opus is not
published.
Audio Codec Priority (continued)
Device Support Supported Audio Codecs Priority
Polycom Trio 8500, 8800 G.711 µ -law 6
Polycom Trio 8500, 8800 G.711a-law 7
Polycom Trio 8500, 8800 G.722 4
Polycom Trio 8800 G.719 (64kbps) 0
Polycom Trio 8500, 8800 G.722.1 (32kbps) 5
Polycom Trio 8500, 8800 G.722.1C (48kbps) 2
Polycom Trio 8500, 8800 G.729AB 8
Polycom Trio 8500, 8800 Opus 0
Polycom Trio 8500, 8800 iLBC (13.33kbps, 15.2kbps) 0,0
Polycom Trio 8500, 8800 Siren 7 0
Audio Features
Polycom, Inc. 166
Polycom Trio 8500, 8800 SILK 0
Polycom Trio Supported Audio Codec Specifications
The following table summarizes the specifications for audio codecs supported on Polycom Trio systems.
Note: The network bandwidth necessary to send encoded voice is typically 5-10% higher than the
encoded bit rate due to packetization overhead. For example, a G.722.1C call at 48kbps for both
the receive and transmit signals consumes about 100kbps of network bandwidth (two-way audio).
Audio Codec Specifications
Device
Support
Algorithm Reference Raw Bit
Rate
Maximum
IP Bit
Rate
Sample
Rate
Default
Payload
Size
Effective
Audio
Bandwidt
h
Trio 8500, 8800 G.711 µ -
law
RFC 1890 64 Kbps 80 Kbps 8 Ksps 20 ms 3.5 KHz
Trio 8500, 8800 G.711 a-
law
RFC 1890 64 Kbps 80 Kbps 8 Ksps 20 ms 3.5 KHz
Trio 8800 G.719 RFC 5404 32 Kbps
48 Kbps
64 Kbps
48 Kbps
64 Kbps
80 Kbps
48 Ksps 20 ms 20 KHz
Trio 8500, 8800 G.711 RFC 1890 64 Kbps 80 Kbps 16 Ksps 20 ms 7 KHz
Trio 8500, 8800 G.7221RFC 3551 64 Kbps 80 Kbps 16 Ksps 20 ms 7 KHz
Trio 8500, 8800 G.722.1 RFC 3047 24 Kbps
32 Kbps
40 Kbps
48 Kbps
16 Ksps 20 ms 7 KHz
Trio 8500, 8800 G.722.1C G7221C 224 Kbps
32 Kbps
48 Kbps
40 Kbps
48 Kbps
64 Kbps
32 Ksps 20 ms 14 KHz
Trio 8500, 8800 G.729AB RFC 1890 8 Kbps 24 Kbps 8 Ksps 20 ms 3.5 KHz
Trio 8500, 8800 Opus RFC 6716 8 - 24
Kbps
24 - 40
Kbps
8 Ksps
16 Ksps
20 ms 3.5 KHz
7 KHz
Audio Features
Polycom, Inc. 167

Device
Support
Algorithm Reference Raw Bit
Rate
Maximum
IP Bit
Rate
Sample
Rate
Default
Payload
Size
Effective
Audio
Bandwidt
h
Trio 8500, 8800
(*Trio 8500
supports 3.5, 7,
and 14 KHz
and not 20 or
22 KHz)
Lin16 RFC 1890 128 Kbps
256 Kbps
512 Kbps
705.6
Kbps
768 Kbps
132 Kbps
260 Kbps
516 Kbps
709.6
Kbps
772 Kbps
8 Ksps
16 Ksps
32 Ksps
44.1 Ksps
48 Ksps
10 ms 3.5 KHz
7 KHz
14 KHz
20 KHz
22 KHz
Trio 8500, 8800 Siren 7 SIREN7 16 Kbps
24 Kbps
32 Kbps
32 Kbps
40 Kbps
48 Kbps
16 Ksps 20 ms 7 KHz
Trio 8500, 8800 Siren14 SIREN14 24 Kbps
32 Kbps
48 Kbps
40 Kbps
48 Kbps
64 Kbps
32 Ksps 20 ms 14 KHz
Trio 8800 Siren22 SIREN22 32 Kbps
48 Kbps
64 Kbps
48 Kbps
64 Kbps
80 Kbps
48 Ksps 20 ms 22 KHz
Trio 8500, 8800 iLBC RFC 3951 13.33
Kbps15.2
Kbps
31.2 Kbps
24 Kbps
8 Ksps 30 ms20
ms
3.5 KHz
Trio 8500, 8800 SILK SILK 6 - 20
Kbps
7 - 25
Kbps
8 - 30
Kbps
12 - 40
Kbps
36 Kbps
41 Kbps
46 Kbps
56 Kbps
8 ksps
12 ksps
16 ksps
24 ksps
20 ms 3.5 KHz
5.2 HKz
7 KHz
11 KHz
1 Per RFC 3551. Even though the actual sampling rate for G.722 audio is 16,000 Hz (16ksps),
the RTP clock rate advertised for the G.722 payload format is 8,000 Hz because that value was
erroneously assigned in RFC 1890 and must remain unchanged for backward compatibility.
Audio Codec Parameters
You can configure a set of codec properties to improve consistency and reduce workload on the phones.
Use the parameters in the following table to specify the priority for audio codecs on your Polycom phones.
If 0 or Null, the codec is disabled. A value of 1 is the highest priority.
Audio Features
Polycom, Inc. 168
If a phone does not support a codec, it treats the setting as if it were 0 and not offer or accept calls with
that codec. The phone ignores the unsupported codec and continues to the codec next in priority. For
example, using the default values, the VVX 310 doesn't support G.722.1C or G.719 and uses G.722.1 as
the highest-priority codec.
Audio Codec Parameters
Template Parameter Permitted Value Default
Change Causes
Restart or Reboot
site.cfg voice.codecPref.G711_A 0 to 27 7 No
site.cfg voice.codecPref.G711_Mu 0 to 27 6 No
site.cfg voice.codecPref.G719.32kbp
s
0 to 27 0 No
site.cfg voice.codecPref.G719.48kbp
s
0 to 27 0 No
site.cfg voice.codecPref.G719.64kbp
s
0 to 27 0 No
site.cfg voice.codecPref.G722 0 to 27 4 No
site.cfg voice.codecPref.G7221.24kb
ps
0 to 27 0 No
site.cfg voice.codecPref.G7221.32kb
ps
0 to 27 0 No
site.cfg voice.codecPref.G7221_C.
24kbps
0 to 27 5 No
site.cfg voice.codecPref.G7221_C.
32kbps
0 to 27 0 No
site.cfg voice.codecPref.G7221_C.
48kbps
0 to 27 2 No
site.cfg voice.codecPref.G729_AB 0 to 27 8 No
site.cfg voice.codecPref.iLBC.
13_33kbps
0 to 27 0 No
site.cfg voice.codecPref.iLBC.
15_2kbps
0 to 27 0 No
site.cfg voice.codecPref.Lin16.8ksp
s
0 to 27 0 No
Audio Features
Polycom, Inc. 169

Template Parameter Permitted Value Default
Change Causes
Restart or Reboot
site.cfg voice.codecPref.Lin16.16ks
ps
0 to 27 0 No
site.cfg voice.codecPref.Lin16.32ks
ps
0 to 27 0 No
site.cfg voice.codecPref.Lin16.44_1
ksps
0 to 27 0 No
site.cfg voice.codecPref.Lin16.48ks
ps
0 to 27 0 No
site.cfg voice.codecPref.Siren7.16k
bps
0 to 27 0 No
site.cfg voice.codecPref.Siren7.24k
bps
0 to 27 0 No
site.cfg voice.codecPref.Siren7.32k
bps
0 to 27 0 No
site.cfg voice.codecPref.Siren14.24
kbps
0 to 27 0 No
site.cfg voice.codecPref.Siren14.32
kbps
0 to 27 0 No
site.cfg voice.codecPref.Siren14.48
kbps
0 to 27 3 No
site.cfg voice.codecPref.Siren22.32
kbps
0 to 27 0 No
site.cfg voice.codecPref.Siren22.48
kbps
0 to 27 0 No
site.cfg voice.codecPref.Siren22.64
kbps
0 to 27 1 No
site.cfg voice.codecPref.SILK.8ksps 0 to 27 0 No
site.cfg voice.codecPref.SILK.
12ksps
0 to 27 0 No
site.cfg voice.codecPref.SILK.
16ksps
0 to 27 0 No
Audio Features
Polycom, Inc. 170
Template Parameter Permitted Value Default
Change Causes
Restart or Reboot
site.cfg voice.codecPref.SILK.
24ksps
0 to 27 0 No
SILK Audio Codec
Polycom VVX 501 and 601 business media phones support the SILK audio codec.
However, Polycom recommends disabling the SILK codec due to performance constraints when video is
enabled on VVX 501 and 601 business media phones.
SILK Audio Codec Parameters
Use the following parameters to configure the SILK audio codec.
SILK Audio Codec Parameters
Template Parameter Permitted Values Change Causes Restart
or Reboot
site.cfg voice.codecPref.S
ILK.8ksps
Set the SILK audio codec
preference for the
supported codec sample
rates.
0 (default)
No
site.cfg voice.codecPref.S
ILK.12ksps
Set the SILK audio codec
preference for the
supported codec sample
rates.
No
site.cfg voice.codecPref.S
ILK.16ksps
Set the SILK audio codec
preference for the
supported codec sample
rates.
0 (default)
No
site.cfg voice.codecPref.S
ILK.24ksps
Set the SILK audio codec
preference for the
supported codec sample
rates.
0 (default)
No
Audio Features
Polycom, Inc. 171

Template Parameter Permitted Values Change Causes Restart
or Reboot
site.cfg voice.audioProfil
e.SILK.
8ksps.encMaxAvgBi
trateKbps
Set the maximum
average encoder output
bitrate in kilobits per
second (kpbs/s) for the
supported SILK sample
rate.
20 kbps (default)
6 – 20 kbps
No
site.cfg voice.audioProfil
e.SILK.
12ksps.encMaxAvgB
itrateKbps
Set the maximum
average encoder output
bitrate in kilobits per
second (kpbs/s) for the
supported SILK sample
rate.
25 kbps (default)
7 – 25 kbps
No
site.cfg voice.audioProfil
e.SILK.
16ksps.encMaxAvgB
itrateKbps
Set the maximum
average encoder output
bitrate in kilobits per
second (kpbs/s) for the
supported SILK sample
rate.
30 kbps (default)
8 – 30 kbps
No
site.cfg voice.audioProfil
e.SILK.
24ksps.encMaxAvgB
itrateKbps
Set the maximum
average encoder output
bitrate in kilobits per
second (kpbs/s) for the
supported SILK sample
rate.
40 kbps (default)
12 – 40 kbps
No
site.cfg voice.audioProfil
e.SILK.encComplex
ity
Specify the SILK encoder
complexity. The higher
the number the more
complex the encoding
allowed.
2 (default)
0-2
No
Audio Features
Polycom, Inc. 172
Template Parameter Permitted Values Change Causes Restart
or Reboot
site.cfg voice.audioProfil
e.SILK.encDTXEnab
le
0 (default) – Disable
Enable Discontinuous
transmission (DTX).
1 – Enable DTX in the
SILK encoder. Note that
DTX reduces the encoder
bitrate to 0bps during
silence.
No
site.cfg voice.audioProfil
e.SILK.encExpecte
dPktLossPercent
Set the SILK encoder
expected network packet
loss percentage.
A non-zero setting allows
less inter-frame
dependency to be
encoded into the
bitstream, resulting in
increasingly larger
bitrates but with an
average bitrate less than
that configured with
voice.audioProfile.SILK.*.
0 (default)
0-100
No
site.cfg voice.audioProfil
e.SILK.encInbandF
ECEnable
0 (default) - Disable
inband Forward Error
Correction (FEC) in the
SILK encoder.
1 - Enable inband FEC in
the SILK encoder.
A non-zero value here
causes perceptually
important speech
information to be sent
twice: once in the normal
bitstream and again at a
lower bitrate in later
packets, resulting in an
increased bitrate.
No
site.cfg voice.audioProfil
e.SILK.MaxPTime
Specify the maximum
SILK packet duration in
milliseconds (ms).
20 ms
No
Audio Features
Polycom, Inc. 173
Template Parameter Permitted Values Change Causes Restart
or Reboot
site.cfg voice.audioProfil
e.SILK.MinPTime
Specify the minimum
SILK packet duration in
milliseconds (ms).
20 ms
No
site.cfg voice.audioProfil
e.SILK.pTime
The recommended
received SILK packet
duration in milliseconds
(ms).
20 ms
No
IEEE 802.1p/Q
The phone tags all Ethernet packets it transmits with an 802.
1Q VLAN header when the following occurs:
• A valid VLAN ID is specified in the phone's network configuration.
• The phone is instructed to tag packets through Cisco Discovery Protocol (CDP) running on a
connected Ethernet switch.
• A VLAN ID is obtained from DHCP or LLDP
IEEE 802.1p/Q Parameters
Use the following table to set values for IEEE 802.
1p/Q parameters. You can configure the user_priority specifically for RTP and call control packets, such
as SIP signaling packets, with default settings configurable for all other packets.
The phone tags all Ethernet packets it transmits with an 802.1Q VLAN header when the following occurs:
• A valid VLAN ID specified in the phone's network configuration.
• The phone is instructed to tag packets through Cisco Discovery Protocol (CDP) running on a
connected Ethernet switch.
• A VLAN ID is obtained from DHCP or CDP.
IEEE 802.1p/Q Parameters
Template Parameter Permitted Values
Change Causes
Restart or Reboot
site.cfg qos.ethernet.oth
er.user_priority
Set user priority for
packets without a per-
protocol setting.
2 (Default)
0 - 7
No
Audio Features
Polycom, Inc. 174
Template Parameter Permitted Values
Change Causes
Restart or Reboot
site.cfg qos.ethernet.rtp
.video.user_prio
rity
Set user-priority used for
Video RTP packets.
5 (Default)
0 - 7
No
site.cfg qos.ethernet.rtp
.user_priority
Choose the priority of voice
Real-Time Protocol (RTP)
packets.
5 (Default)
0 - 7
No
site.cfg qos.ethernet.cal
lControl.user_pr
iority
Set the user-priority used
for call control packets.
5 (Default)
0 - 7
No
Voice Quality Monitoring (VQMon)
You can configure the phones to generate various quality metrics that you can use to monitor sound and
listening quality.
These metrics can be sent between the phones in RTCP XR packets, which are compliant with RFC 3611
—RTP Control Extended Reports (RTCP XR). The packets are sent to a report collector as specified in
draft RFC Session initiation Protocol Package for Voice Quality Reporting Event. The metrics can also be
sent as SIP PUBLISH messages to a central voice quality report collector.
You can use Real Time Control Protocol Extended Report (RTCP XR) to report voice quality metrics to
remote endpoints. This feature supports RFC6035 compliance as well as draft implementation for voice
quality reporting.
You need a license key to activate the VQMon feature on the VVX 300/301, 310/311, 400/401, and
410/411 business media phones.
This feature is available for open SIP environments, but is not available with Skype for Business Server.
For more information on VQMon, contact your Certified Polycom Reseller.
VQMon Reports
You can enable three types of voice quality reports:
• Alert—Generated when the call quality degrades below a configurable threshold.
• Periodic—Generated during a call at a configurable period.
• Session—Generated at the end of a call.
You can generate a wide range of performance metrics using the parameters shown in the following
table. Some are based on current values, such as jitter buffer nominal delay and round trip delay, while
others cover the time period from the beginning of the call until the report is sent, such as network packet
Audio Features
Polycom, Inc. 175

loss. Some metrics are generated using other metrics as input, such as listening Mean Opinion Score
(MOS), conversational MOS, listening R-factor, and conversational R-factor.
VQMon Parameters
All of the parameters that configure Voice Quality Monitoring in the following table are located in the
features.cfg template.
Voice Quality Monitoring Parameters
Template Parameter Permitted Values
Change Causes
Restart or Reboot
features.cfg voice.qualityMoni
toring.collector.
alert.moslq.thres
hold.critical
Specify the threshold value of listening
MOS score (MOS-LQ) that causes the
phone to send a critical alert quality
report. Configure the desired MOS
value multiplied by 10.
For example, a value of 28
corresponds to the MOS score 2.8.
0 (default) - Critical alerts are not
generated due to MOS-LQ.
0 - 40
Yes
features.cfg voice.qualityMoni
toring.collector.
alert.moslq.thres
hold.warning
Specify the threshold value of listening
MOS score (MOS-LQ) that causes
phone to send a warning alert quality
report. Configure the desired MOS
value multiplied by 10.
For example, a configured value of 35
corresponds to the MOS score 3.5.
0 (default) - Warning alerts are not
generated due to MOS-LQ.
0 - 40
Yes
features.cfg voice.qualityMoni
toring.collector.
alert.delay.thres
hold.critical
Specify the threshold value of one
way-delay (in milliseconds) that causes
the phone to send a critical alert quality
report.
One-way delay includes both network
delay and end system delay.
0 (default) - Critical alerts are not
generated due to one-way delay.
0 - 2000 ms
Yes
Audio Features
Polycom, Inc. 176

Template Parameter Permitted Values
Change Causes
Restart or Reboot
features.cfg voice.qualityMoni
toring.collector.
alert.delay.thres
hold.warning
Specify the threshold value of one-way
delay (in milliseconds) that causes the
phone to send a critical alert quality
report.
One-way delay includes both network
delay and end system delay.
0 (default) - Warning alerts are not
generated due to one-way delay.
0 - 2000 ms
Yes
features.cfg voice.qualityMoni
toring.collector.
enable.periodic
0 (default) - Periodic quality reports are
not generated.
1 - Periodic quality reports are
generated throughout a call.
Yes
features.cfg voice.qualityMoni
toring.collector.
enable.session
0 (default) - Quality reports are not
generated at the end of each call.
1 - Reports are generated at the end of
each call.
Yes
features.cfg voice.qualityMoni
toring.collector.
enable.triggeredP
eriodic
0 (default) - Alert states do not cause
periodic reports to be generated.
1 - Periodic reports are generated if an
alert state is critical.
2 - Period reports are generated when
an alert state is either warning or
critical.
Note: This parameter is ignored when
voice.qualityMonitoring.co
llector.enable.periodic is
1, since reports are sent throughout
the duration of a call.
Yes
features.cfg voice.qualityMoni
toring.collector.
period
The time interval (in milliseconds)
between successive periodic quality
reports.
5 (default)
5 - 900 ms
Yes
Audio Features
Polycom, Inc. 177

Template Parameter Permitted Values
Change Causes
Restart or Reboot
features.cfg voice.qualityMoni
toring.collector.
server.x.address
The server address of a SIP server
(report collector) that accepts voice
quality reports contained in SIP
PUBLISH messages.
Set x to 1 as only one report collector
is supported at this time.
NULL (default)
IP address or hostname
Yes
features.cfg voice.qualityMoni
toring.collector.
server.x.outbound
Proxy.address
This parameter directs SIP messages
related to voice quality monitoring to a
separate proxy. No failover is
supported for this proxy, and voice
quality monitoring is not available for
error scenarios.
NULL (default)
IP address or FQDN
No
features.cfg voice.qualityMoni
toring.collector.
server.x.outbound
Proxy.port
Specify the port to use for the voice
quality monitoring outbound proxy
server.
0 (default)
0 to 65535
No
features.cfg voice.qualityMoni
toring.collector.
server.x.outbound
Proxy.transport
Specify the transport protocol the
phone uses to send the voice quality
monitoring SIP messages.
DNSnaptr (default)
TCPpreferred
UDPOnly
TLS
TCPOnly
No
features.cfg voice.qualityMoni
toring.collector.
server.x.port
Set the port of a SIP server (report
collector) that accepts voice quality
reports contained in SIP PUBLISH
messages.
Set x to 1 as only one report collector
is supported at this time.
5060 (default)
1 to 65535
No
Audio Features
Polycom, Inc. 178

Template Parameter Permitted Values
Change Causes
Restart or Reboot
features.cfg voice.qualityMoni
toring.failover.e
nable
1 (default) - The phone performs a
failover when voice quality SIP
PUBLISH messages are unanswered
by the collector server.
0 - No failover is performed; note,
however, that a failover is still triggered
for all other SIP messages.
This parameter is ignored if
voice.qualityMonitoring.co
llector.server.x.outboundP
roxy is enabled.
No
features.cfg voice.qualityMoni
toring.location
Specify the device location with a valid
location string. If you do not configure
a location value, you must use the
default string ‘Unknown'.
Unknown (default)
No
features.cfg voice.qualityMoni
toring.rfc6035.en
able
0 (default) - The existing draft
implementation is supported.
1 - Complies with RFC6035.
No
features.cfg voice.qualityMoni
toring.rtcpxr.ena
ble
0 (default) - RTCP-XR packets are not
generated.
1 - The packets are generated.
Yes
Audio Features
Polycom, Inc. 179

Pairing with Polycom Trio Systems
Topics:
▪Pairing Polycom EagleEye Director II Camera System with Polycom Trio
•Pairing the Polycom Trio Visual+ or Trio VisualPro with Polycom Trio Systems
▪Daisy-Chaining Polycom Trio Systems
You can pair supported cameras or a Polycom Trio Visual+, Trio VisualPro, or RealPresence Group
Series system with Polycom Trio systems to add video and content sharing.
For information on pairing with a RealPresence Group Series, see the Polycom Trio with Polycom
RealPresence Group Series Integration Guide.
Pairing Polycom EagleEye Director II Camera System
with Polycom Trio
Enable users to place video calls by pairing Polycom EagleEye Director II camera with Polycom Trio 8800
system. You can pair the EagleEye Director II camera to the system using mr.pair.uid.1 parameter or
from the Polycom Trio system menu. Make sure to pair correct device with Polycom Trio system.
Note: You cannot use EagleEye Director II camera system when Polycom Trio Visual+ system is paired
to the Polycom Trio system. Make sure to unpair Polycom Trio Visual+ system and pair EagleEye
Director II camera system.
You can connect the EagleEye Director II camera system with Polycom Trio system using Ethernet cable
directly or corporate network. The Polycom Trio connects to MSR Dock and Surface Hub using USB.
The following figure illustrates the connectivity between EagleEye Director II camera system, Polycom
Trio and MSR Dock.
Polycom, Inc. 180
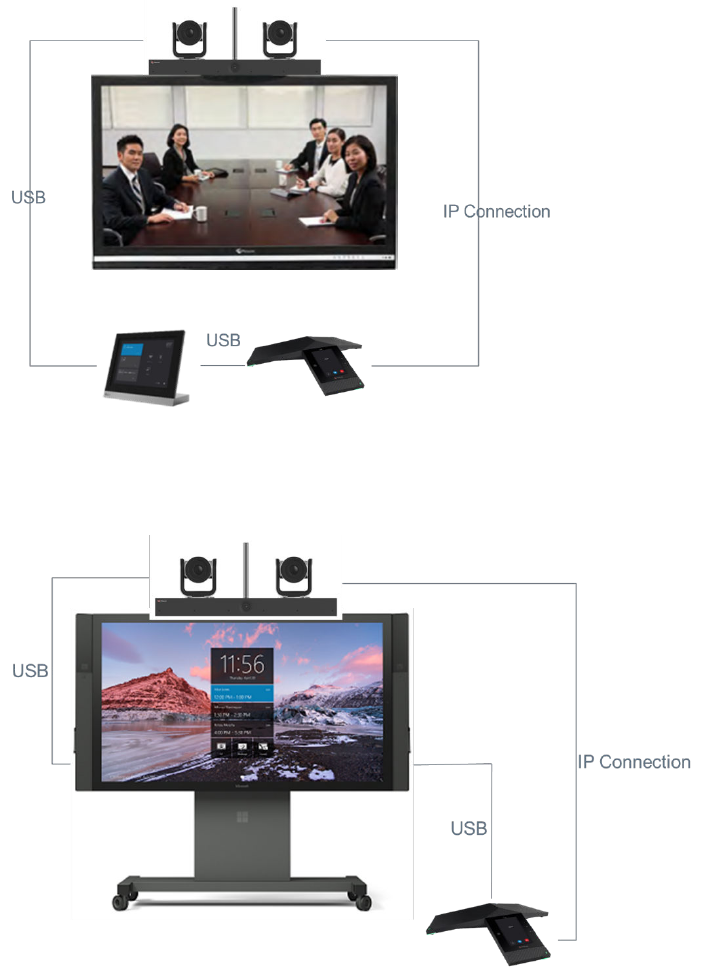
The following figure illustrates the connectivity between EagleEye Director II camera system, Polycom
Trio and Surface Hub.
Pair Polycom EagleEye Director II Camera System
If you are using a Polycom EagleEye Director II camera system with Polycom MSR Dock or Microsoft
Surface Hub, you can pair the Polycom Trio system from the local interface.
Ensure the Polycom Trio system is in Skype USB Optimized mode.
Procedure
1. Set up EagleEye Director II camera system.
Pairing with Polycom Trio Systems
Polycom, Inc. 181

2. On the Polycom Trio system, go to Settings > Advanced > Network Devices.
3. Tap the filter icon and select the checkbox for Camera.
4. Navigate to the Network Devices screen.
The EagleEye Director II camera system's last six characters of the serial number displays in the
Available Devices screen.
5. Tap the EagleEye Director II camera system's serial number in the Available Devices screen.
6. Tap Pair button in Details screen.
7. Tap Complete.
The EagleEye Director II Camera system LED blinks purple when pairing with Trio system.
For more information on EagleEye Director II Camera system LED indicators, see Polycom EagleEye
Director II Camera Administrator Guide.
Pairing the Polycom Trio Visual+ or Trio VisualPro
with Polycom Trio Systems
Pair the Polycom Trio Visual+ or Trio VisualPro system with a Polycom Trio system so users can place
video calls and share content.
You can pair only one Polycom Trio Visual+ or Trio VisualPro system to a Polycom Trio system. Polycom
recommends you plug your systems into a local gigabit switch.
You can pair the Polycom Trio Visual+ or Trio VisualPro system using configuration files or from the
Polycom Trio system menu. To pair, the systems must be connected to the same subnet and the
following network components must be unblocked:
• Multicast address 224.0.0.200
• Port 2000
Note: You cannot use the Polycom Trio Visual+ or Trio VisualPro for video calls when you
connect the Polycom Trio system to your network using Wi-Fi. The systems only pair when
the Polycom Trio system is connected over Ethernet.
Manually Pair with Polycom Trio Systems
You can manually pair a Polycom Trio Visual+ or Trio VisualPro system from the Polycom Trio 8500 or
8800 system menu.
Procedure
1. Set up the system you plan to pair with the Polycom Trio system.
For instructions, refer to that system’s Setup Sheet.
The Welcome screen displays on your monitor and indicates steps to pair with a Polycom Trio
system.
2. (Polycom Trio Visual+ only) Tap the Pair button on Polycom Trio Visual+ to broadcast discovery to
the Polycom Trio.
Pairing with Polycom Trio Systems
Polycom, Inc. 182
3. On the phone menu, go to Settings > Advanced > Networked Devices and make sure
Notification of New Devices is On.
4. Choose one of the following:
• If you have not paired the device before, tap Pair with New Device, tap the device you want
to pair from the Discovered Devices list, and in the Details screen, tap Pair. All currently
paired devices display under Paired Devices.
• If the device has been paired before, select the device from the Available Devices list and
tap Pair.
5. When you see the message prompting you to complete pairing, do one of the following:
• Tap Complete.
• (Polycom Trio Visual+ only) Tap the Pair button on the device.
If paired, a success message displays on the monitor(s) along with a self-view window. The LED light on
the device paired with your phone is also continuously green (Polycom Trio Visual+) or blue (Trio
VisualPro), and a paired icon displays on the phone. If pairing is unsuccessful, you see a message that
the devices could not pair. After successful pairing, if your devices disconnect for 60 seconds, a message
displays that the devices have temporarily lost connection.
Polycom Trio Visual+ Pairing Parameters
To pair using configuration files, enter the MAC address of your Polycom Trio Visual+ device as the value
for the parameter mr.pair.uid.1.
The MAC address can be in either of the following formats:
•00e0d::B09128D
•00E0DB09128D .
Use the following parameters to configure this feature and additional feature options.
Pairing Parameters
Template Parameter Permitted Values
Change
Causes
Restart or
Reboot
site.cfg mr.PairButton.notific
ation
1 (default) - The Polycom Trio system
displays notifications of devices available
to pair with after you press the Pair button
on the Polycom Trio Visual+.
0 - The Polycom Trio system does not
display pairing notifications.
No
mr.audio.srtp.require 1 (default) - SRTP is used to encrypt and
authenticate modular room audio signals
sent between Polycom Trio 8500 or 8800
and Polycom Trio Visual+.
0
Pairing with Polycom Trio Systems
Polycom, Inc. 183

Template Parameter Permitted Values
Change
Causes
Restart or
Reboot
site.cfg mr.pair.uid.1 Enter the MAC address of the Polycom
Trio Visual+ you want to pair with.
Null (default)
String (maximum of 64 characters)
No
site.cfg mr.pair.tls.enabled 1 (default) - Enable TLS to encrypt
communication between the Polycom Trio
and Polycom Trio Visual+ systems.
0 - Disable TLS for communication
between Polycom Trio systems and
Polycom Trio Visual+ systems.
Yes
site.cfg mr.video.camera.focus
.auto
NULL (default)
0 - Disable the camera's automatic focus.
1 - Enable the camera's automatic focus.
Yes
site.cfg mr.video.camera.focus
.range
Specify the distance to the camera's
optimally-focused target.
NULL (default)
0
0 - 255
site.cfg mr.video.iFrame.minPe
riod
Choose the minimum time in seconds
between transmitted video i-Frames or
transmitted i-Frame requests.
2 (default)
1 - 60
No
features.
cfg
smartPairing.mode Enables users with RealPresence
Desktop on a laptop or RealPresence
Mobile on a tablet to pair with the
Polycom Trio system using SmartPairing.
disabled (default)
manual
features.
cfg
smartPairing.volume The relative volume to use for the
SmartPairing ultrasonic beacon.
6 (default)
0 - 10
No
Pairing with Polycom Trio Systems
Polycom, Inc. 184

Trio VisualPro Pairing Parameters
You can pair your systems with the mr.pair.uid.1 Polycom Trio system parameter. Once paired, you
can configure some Trio VisualPro system settings (including how its software updates) with the following
parameters.
Pairing Parameters
Template Parameter Permitted Values Change Causes
Restart or Reboot
site.cfg mr.pair.uid.1 Enter the MAC address of the Polycom
Trio Visual+ you want to pair with.
Null (default)
String (maximum of 64 characters)
No
site.cfg mr.pair.tls.ena
bled
1 (default) - Enable TLS to encrypt
communication between the Polycom
Trio and Polycom Trio Visual+
systems.
0 - Disable TLS for communication
between Polycom Trio systems and
Polycom Trio Visual+ systems.
Yes
site.cfg mr.deviceMgmt.v
c2.param.softwa
reUpdateUri
Identifies the URI where the paired
peripheral gets its software updates.
String
No
site.cfg mr.deviceMgmt.v
c2.param.softwa
reUpdateProxySe
rver
Identifies the proxy server where the
paired peripheral gets its software
updates.
String
No
site.cfg mr.deviceMgmt.v
c2.param.softup
dateMaintenceWi
ndowEnabled
1 (default) - Enables the maintenance
window for updating the paired
peripheral’s software.
0 - Disables the maintenance window
for updating the paired peripheral’s
software.
No
site.cfg mr.deviceMgmt.v
c2.param.softup
dateMaintenceWi
ndowStart
Specifies when the paired peripheral’s
maintenance window begins in 24-hour
clock format (e.g., “10:30” or “15:00”).
String
No
site.cfg mr.deviceMgmt.v
c2.param.softup
dateMaintenceWi
ndowDuration
Specifies how long the paired
peripheral’s maintenance window
lasts.
Range is 1-6 hours; default is 3.
No
Pairing with Polycom Trio Systems
Polycom, Inc. 185
Template Parameter Permitted Values Change Causes
Restart or Reboot
site.cfg mr.deviceMgmt.v
c2.param.displa
yName
Sets the paired peripheral’s system
name.
String
No
site.cfg mr.deviceMgmt.v
c2.param.hostNa
me
Sets the paired peripheral’s host
name.
String
No
Identify Paired Devices
If you’re using multiple Polycom Trio systems, you can verify which one is paired with a specific Polycom
Trio Visual+ or Trio VisualPro system.
Procedure
1. On the phone menu, go to Settings > Advanced > Networked Devices, and ensure that
Notification of New Devices is On.
2. Select a device that displays under Paired Devices or Available Devices.
3. Tap Identify.
The LED of the device you selected flashes to indicate it is paired.
Place the Polycom Trio Visual+ in Pairing Diagnostic Mode
If you are using multiple Polycom Trio 8500 and 8800 systems and are not sure which Polycom Trio
Visual+ is paired with which, you can place the Polycom Trio Visual+ devices in pairing diagnostic mode
to distinguish between accessories.
Procedure
1. Power up the Polycom Trio Visual+ device.
2. Wait for the initial LED on state to turn off.
3. Press and hold the pairing button until the LED turns orange.
4. Release the pairing button.
The LED blinks.
5. Wait for the device to reboot.
The paired device's LED glows steady green.
Daisy-Chaining Polycom Trio Systems
You can daisy-chain (pair) two Polycom Trio systems for enhanced audio performance in large or
acoustically challenging rooms. When you daisy-chain Polycom Trio systems, the speakers and
microphones act as a single speaker and microphone array for superior acoustic performance.
Pairing with Polycom Trio Systems
Polycom, Inc. 186
You have the option to pair one Polycom Trio™ Visual+ system, Polycom Trio™ VisualPro system, or
Polycom® RealPresence® Group Series system with your daisy-chained Polycom Trio systems.
Daisy-Chaining Requirements
You can daisy-chain two Polycom Trio systems when you meet the following requirements. These
requirements are the same when pairing a Polycom Trio system with one Polycom Trio™ Visual+ system,
Polycom Trio™ VisualPro system, or Polycom® RealPresence® Group Series system.
▪ Polycom Trio systems must be connected to the same IP network.
▪ Polycom Trio systems must be connected to the same network subnet.
▪ The network must support multicast and multicast must be enabled.
▪ Both Polycom Trio systems are running UC Software 5.8.0AA or later.
▪ If you pair your daisy-chained Polycom Trio systems with a Polycom Trio Visual+, Polycom Trio
VisualPro, or Group Series system for video and content, set the parameter
mr.pair.maxDevices to 2.
▪ For optimal performance, follow the guidelines for setting the distance between Polycom Trio
systems:
◦ Set Polycom Trio 8800 systems about 3.0 m (10 ft) apart.
◦ Set Polycom Trio 8500 systems about 2.5 m (8 ft) apart.
When signing in to Office 365/Skype for Business Online from a Polycom Trio system daisy-chained to
another Polycom Trio system:
▪ Do not enter a domain. Leave the Domain field blank.
▪ Complete the Username field with a fully-qualified domain name, for example,
user@domain.com.
Polycom Trio System Daisy-Chain Scenarios
You can daisy-chain two Polycom Trio systems in any of the following configuration scenarios.
Scenario One
You can daisy-chain two Polycom Trio systems for enhanced audio when the Polycom Trio systems are
in Skype for Business, USB Optimized, or Generic Base Profile.
▪ Maximum of two Polycom Trio systems.
▪ You must configure Polycom Trio systems to the same Base Profile.
Scenario Two
You can daisy-chain two Polycom Trio systems for enhanced audio when pairing one Polycom Trio Visual
+ system, one Polycom Trio VisualPro system, or one RealPresence Group Series system with a
Polycom Trio system configured to Skype for Business, Generic, or USB Optimized Base Profile.
▪ Maximum of two Polycom Trio systems.
▪ You must configure Polycom Trio systems to the same Base Profile.
▪ Maximum of one Polycom Trio Visual+ system, Polycom Trio VisualPro system, or Polycom
RealPresence Group Series system.
Pairing with Polycom Trio Systems
Polycom, Inc. 187
Daisy-Chain Polycom Trio Systems
To daisy-chain Polycom Trio systems, you must configure one Polycom Trio system as the 'Hub' and the
other as the 'Device'.
Procedure
1. On the Polycom Trio system you want to set as the Hub, go to Settings > Advanced >
Networked Devices, and confirm Networked Device Role is set to Hub.
2. On the Polycom Trio system you want to set as the Device, go to Settings > Advanced >
Networked Devices, and set Networked Device Role to Device.
The Polycom Trio system you set as Device reboots.
3. After the Device system reboots, on the Hub system, go to Settings > Advanced > Networked
Devices, and under Available Devices, select the Device system.
4. Tap Pair and wait for the devices to connect.
When the two Polycom Trio systems are daisy-chained, both systems display the same user
interface.
Pairing with Polycom Trio Systems
Polycom, Inc. 188

Video Features for Polycom Trio
Topics:
▪Polycom Trio Visual+ and Trio VisualPro Video Layouts
▪Video and Camera Options on Polycom Trio
•Supported Video Codecs with Polycom Trio
▪Toggling Between Audio-only or Audio-Video Calls on Polycom Trio
•I-Frames
•Video Parameters
After you set up Polycom phones on your network with the default configuration, you can make custom
configurations to optimize video calling for Polycom phones, if supported.
The Polycom Trio 8500 or 8800 system with a paired Polycom Trio Visual+ supports transmission and
reception of high-quality video images with the following supported cameras:
▪ Polycom® EagleEye™ IV USB camera
▪ Polycom® EagleEye™ Mini USB camera
▪ Polycom® EagleEye™ Director II camera (Polycom Trio 8800 only)
▪ Logitech C930e webcam
The Polycom Trio 8500 or 8800 system with a paired Trio VisualPro or RealPresence Group Series
system supports transmission and reception of high-quality video images with the following supported
cameras:
▪ Polycom® EagleEye™ IV camera
▪ Polycom® EagleEye™ Director II camera
▪ Polycom® EagleEye™ Producer camera
▪ Polycom® EagleEye™ Acoustic camera
Polycom Open SIP video is compatible with the following RFCs:
▪ RFC 3984 - RTP Payload Format for H.264 video
▪ RFC 5168 - XML Schema for Media Control
Polycom Trio Visual+ and Trio VisualPro Video
Layouts
When a Polycom Trio Visual+ or Trio VisualPro system is paired with a Polycom Trio system, you can set
how participants and content display during video calls.
Gallery View layout is supported for video and content during video calls in standard H.264 video
meetings or point-to-point calls.
Polycom, Inc. 189
Polycom Trio Visual+ and Trio VisualPro Video Layout Parameters
The following parameters configure video layouts when using a paired Polycom Trio Visual+ or Trio
VisualPro system.
Video Layout Parameters
Template Parameter Permitted Values
Change Causes
Restart or Reboot
video.cfg video.conf.displayL
ayout.PIP.peopleMod
e
Choose what the PIP screen
displays.
selfView (default) - Display your
own video.
recentTalker - Display video from
the current or most recent talker.
No
video.cfg video.conf.displayL
ayout.gallery.allow
Content
1 (default) - Enable Gallery View
layout for video and content.
Content is scaled to fit into the
720p window of a gallery window.
0 - Disable Galley View layout.
Content displays in a full screen
window.
No
video.cfg video.conf.galleryV
iew.overlayTimeout
Set the timer for the participant
name overlay on the Polycom Trio
Visual+ monitor when using the
Gallery View.
0 (default) - The overlay does not
time out.
0 - 60000 ms
No
video.cfg video.conf.displayL
ayout.autoPreferenc
e
The system automatically chooses
the best layout mode for video call.
Gallery (default)
PIP
FullScreen
No
Video and Camera Options on Polycom Trio
By default, at the start of a video call, the Polycom Trio solution with a connected USB camera transmits
an RTP encapsulated video stream from the local camera.
Users can stop and start video by pressing the Stop My Video and Start My Video buttons. When users
stop video during a video call, video is reset and displays again at the start of the next video call.
You can use the parameters in the following sections to configure video transmission, the video and local
camera view, and video camera options.
Video Features for Polycom Trio
Polycom, Inc. 190

Video Quality Parameters
Use the parameters in the following table to configure video transmission.
Video Transmission Parameters
Template Parameter Permitted Values
Change
Causes
Restart or
Reboot
video.cfg video.quality The optimal quality for video that is sent in a
call or a conference.
Motion (default) — for VVX 500 and 600 series
business media phones.
Sharpness (default) — for VVX 1500 business
media phone.
Motion - for outgoing video that has motion or
movement.
Sharpness - for outgoing video that has little or
no movement.
Note: If motion is not selected, moderate to
heavy motion can cause some frames to be
dropped.
No
video.cfg video.autoFullScreen 0 (default) — Video calls only use the full
screen layout if it is explicitly selected by the
user.
1 — Video calls use the full screen layout by
default, such as when a video call is first
created or when an audio call transitions to a
video call
No
video.cfg video.callRate The default call rate (in kbps) to use when
initially negotiating bandwidth for a video call.
512 (default) - The overlay does not time out.
128 - 2048
No
video.cfg video.forceRtcpVideo
CodecControl
0 (default) — RTCP feedback messages
depend on a successful SDP negotiation of
a=rtcp-fb and are not used if that negotiation is
missing.
1 — The phone is forced to send RTCP
feedback messages to request fast I-frame
updates along with SIP INFO messages for all
video calls irrespective of a successful SDP
negotiation of a=rtcp-fb.
For an account of all parameter dependencies
when setting I-frame requests, refer to the
section I-Frames.
No
Video Features for Polycom Trio
Polycom, Inc. 191
Template Parameter Permitted Values
Change
Causes
Restart or
Reboot
video.cfg video.maxCallRate Sets the maximum call rate that the users can
select. The value set on the phone cannot
exceed this value. If video.callRate
exceeds this value, this parameter overrides
video.callRate and this value is used
as the maximum.
768 (default)
128 - 2048
No
Video and Camera Parameters
You can use configuration parameters to configure the video and camera options for supported cameras.
Using the parameter video.camera.x.type, you can configure parameters differently for the following
cameras supported with Polycom Trio 8500 and 8800 systems paired with Polycom Trio Visual+:
▪ Polycom® EagleEye™ IV USB camera
▪ Polycom® EagleEye™ Mini USB camera
▪ Polycom® EagleEye™ Director II camera (Polycom Trio 8800 only)
▪ Logitech C930e webcam
Below is an example of per-camera configurations for the Polycom EagleEye IV USB camera and
Polycom EagleEye Mini USB camera.
Example Per-Camera Configuration
Camera Type Configuration Per-Camera Configuration
video.camera.1.type = EagleEyeIVUSB video.camera.1.focus.auto=1
video.camera.1.orientation=Inverted
video.camera.2.type=EagleEyeMini video.camera.2.focus.auto=0
video.camera.2.focus.range=150
You also can use the parameter video.camera.x.type to configure the following cameras that are
supported with a paired Trio VisualPro system:
▪ Polycom® EagleEye™ IV camera
▪ Polycom® EagleEye™ Director II camera
▪ Polycom® EagleEye™ Producer camera
▪ Polycom® EagleEye™ Acoustic camera
For information about camera parameters with a paired RealPresence Group Series system, see the
Polycom Trio with Polycom RealPresence Group Series Integration Guide.
Video Features for Polycom Trio
Polycom, Inc. 192

Video and Camera Parameters
Template Parameter Permitted Values
Change Causes
Restart or Reboot
site.cfg call.singleKeyPre
ssCameraControls
1 (default) - Tapping
Camera in the call view
directly shows the
Camera Controls menu
for Polycom EagleEye IV
USB camera.
0 - Tapping Camera in the
call view shows a menu
with camera preferences,
presets, and camera
controls menu items for
Polycom EagleEye IV
USB camera.
No
features.cfg feature.fecc.allo
wLocalCameraFarEn
dControl
1 (default) – Allow the far-
end user to control the
local near-end camera
controls, such as pan, tilt,
and zoom, for the
Polycom EagleEye IV
USB camera.
0 - The far-end user
cannot control the local
near-end camera.
features.cfg feature.fecc.enab
led
1 (default) – Enable far-
end camera control.
0 – Disable far-end
camera control.
Yes
sip-interop.cfg feature.fecc.payl
oad
Set the RTP payload
used to receive far-end
camera control data.
124 (default)
100 - 127
No
features.cfg homeScreen.camera
.enable
Applies to Polycom USB
cameras supported with
Polycom Trio systems.
0 (default) - A Camera
menu item is shown on
the main menu.
1 - A Camera menu item
displays on the Home
Screen allowing users to
pan, tilt or zoom.
No
Video Features for Polycom Trio
Polycom, Inc. 193

Template Parameter Permitted Values
Change Causes
Restart or Reboot
reg-advanced.cfg reg.x.fecc.enable
d
1 (default) – Enable far-
end camera control for
the line you specify with x.
0 - Disable far-end
camera control for the
line.
No
features.cfg up.arrow.repeatDe
lay
Choose the milliseconds
(ms) an arrow button
must be held before the
arrow starts repeating in
the Camera Controls
menu for supported
Polycom USB cameras.
500 ms (default)
100 – 5000 ms
No
features.cfg up.arrow.repeatRa
te
Choose the milliseconds
(ms) between repeated
simulated presses while
an arrow button is being
held down. This applies to
the arrows in the Camera
Controls menu for
supported Polycom USB
cameras.
80 ms (default)
50 – 2000 ms
No
video.cfg video.camera.back
lightCompensation
NULL (default)
0 - 1000
No
video.cfg video.camera.x.au
toWhiteBalance
Set for per-camera
configuration when you
specify the camera type
using the
video.camera.x.ty
pe parameter.
1 – Enable auto white
balance. This overrides
the
video.camera.whit
eBalance parameter.
0 – Disable auto white
balance.
No
Video Features for Polycom Trio
Polycom, Inc. 194

Template Parameter Permitted Values
Change Causes
Restart or Reboot
video.cfg video.camera.x.ba
cklightCompensati
on
Set for per-camera
configuration when you
specify the camera type
using the
video.camera.x.ty
pe parameter.
Set the backlight
compensation of the
video stream.
NULL (default)
0 - 1000
This overrides the
video.camera.back
lightCompensation
parameter.
No
video.cfg video.camera.x.br
ightness
Set for per-camera
configuration when you
specify the camera type
using the
video.camera.x.ty
pe parameter.
Sets the brightness level
of the video stream. The
value range is from 0
(dimmest) to 1000
(brightest).
NULL (default)
3
0 - 1000
This overrides the
video.camera.brig
htness parameter.
No
Video Features for Polycom Trio
Polycom, Inc. 195

Template Parameter Permitted Values
Change Causes
Restart or Reboot
video.cfg video.camera.x.co
ntrast
Set for per-camera
configuration when you
specify the camera type
using the
video.camera.x.ty
pe parameter.
Sets the contrast level of
the video stream. The
value range is from 0 (no
contrast increase) to 3
(most contrast increase),
and 4 (noise reduction
contrast).
NULL (default)
0 - 1000
This overrides the
video.camera.cont
rast parameter.
No
video.cfg video.camera.x.fl
ickerAvoidance
Set for per-camera
configuration when you
specify the camera type
using the
video.camera.x.ty
pe parameter.
NULL (default)
0 - Flicker avoidance is
automatic.
1 - 50hz AC power
frequency flicker
avoidance (Europe/Asia).
2 - 60hz AC power
frequency flicker
avoidance (North
America).
This parameter overrides
video.camera.flic
kerAvoidance .
No
Video Features for Polycom Trio
Polycom, Inc. 196

Template Parameter Permitted Values
Change Causes
Restart or Reboot
video.cfg video.camera.x.fo
cus.auto
Set for per-camera
configuration when you
specify the camera type
using the
video.camera.x.ty
pe parameter.
NULL (default)
0 - Disable the camera's
automatic focus.
1 - Enable the camera's
automatic focus. This
overrides
thevideo.camera.fo
cus.auto parameter.
Yes
video.cfg video.camera.x.fo
cus.range
Set for per-camera
configuration when you
specify the camera type
using the
video.camera.x.ty
pe parameter.
Specify the distance to
the camera's optimally-
focused target.
NULL (default)
0
255
This overrides the
video.camera.focu
s.range parameter.
No
Video Features for Polycom Trio
Polycom, Inc. 197

Template Parameter Permitted Values
Change Causes
Restart or Reboot
video.cfg video.camera.x.ga
mma
Set for per-camera
configuration when you
specify the camera type
using the
video.camera.x.ty
pe parameter.
Set the factor to use for
gamma correction applied
to each frame of video
captured. You can use
this setting to correct
video that appears too
dark or too light.
NULL (default)
0
1000
This parameter overrides
video.camera.gamm
a.
No
video.cfg video.camera.x.hu
e
Set for per-camera
configuration when you
specify the camera type
using the
video.camera.x.ty
pe parameter.
Use to correct the color of
video captured.
NULL (default)
500
1000
This parameter overrides
video.camera.hue.
No
features.cfg video.camera.x.or
ientation
Specify the camera
mounting orientation for
EagleEye IV USB
cameras: Normal or
Inverted (upside down)
Normal (default)
Inverted
This parameter overrides
video.camera.orie
ntation.
Video Features for Polycom Trio
Polycom, Inc. 198

Template Parameter Permitted Values
Change Causes
Restart or Reboot
video.cfg video.camera.x.sa
turation
Set for per-camera
configuration when you
specify the camera type
using the
video.camera.x.ty
pe parameter.
Sets the saturation level
of video captured by any
supported USB camera.
NULL (default)
0 - 1000
This parameter overrides
video.camera.satu
ration .
No
video.cfg video.camera.x.sh
arpness
Set for per-camera
configuration when you
specify the camera type
using the
video.camera.x.ty
pe parameter.
Sets the sharpness level
of video captured.
NULL (default)
0 - 1000
This parameter overrides
video.camera.shar
pness.
No
video.cfg video.camera.x.tr
ackingEnabled
For the EagleEye Director
II or EagleEye Producer
camera:
1 (default) - Enables
automatic camera
tracking. You can then set
the tracking type, speed,
and size.
0 - Disables camera
tracking.
No
Video Features for Polycom Trio
Polycom, Inc. 199

Template Parameter Permitted Values
Change Causes
Restart or Reboot
video.cfg video.camera.x.tr
ackingFramingMode
For the EagleEye Director
II or EagleEye Producer
camera:
0 (default) - Frame
Speaker: Frames the
active speaker.
1 - Frame Group: Frames
the participants in the
room (camera movement
is seen on the far end).
2 - Frame Group with
Transition (EagleEye
Producer only): Frames
the participants in the
room (camera movement
is seen on the far end).
No
video.cfg video.camera.x.tr
ackingSpeed
For the EagleEye Director
II or EagleEye Producer
camera:
1 (default) - Normal:
Tracks transitions at a
medium rate.
0 - Slow: Tracks
transitions slowly.
2 - Fast: Tracks
transitions quickly.
No
video.cfg video.camera.x.tr
ackingFramingSize
For the EagleEye Director
II or EagleEye Producer
camera:
1 - Medium (default):
Average-sized frame.
0 - Wide: Most expansive
frame.
2 - Tight: Close-up frame.
No
video.cfg video.camera.x.tr
ackingPipEnabled
For the EagleEye Director
II or EagleEye Producer
camera:
1 (default) - Enables
People in Picture (PIP),
which displays a group or
room view to far-end
participants.
0 - Disables PIP.
No
Video Features for Polycom Trio
Polycom, Inc. 200

Template Parameter Permitted Values
Change Causes
Restart or Reboot
video.cfg video.camera.x.ty
pe
Choose a camera type
that corresponds to x,
where x = 1 to 3. The
value set for x in this
parameter and related
parameters determines
the configuration settings
for the camera type you
specify.
NULL (default)
EagleEyeIVUSB
EagleEyeMini
EagleEyeDirectorII
LogitechC930e
No
video.cfg video.camera.x.wh
iteBalance
Set for per-camera
configuration when you
specify the camera type
using the
video.camera.x.ty
pe parameter.
Use to correct the white
balance tint of video
captured.
NULL (default)
0 - 1000
This parameter overrides
video.camera.whit
eBalance.
No
video.vc4Decode.o
verrunTolerance
Set the overrun errors per
second for video decoder
tolerance. If the decoder
generates more overrun
errors than the number
you set, the Polycom Trio
system drops SVC video
layer 1 to reduce the
decoder load.
0 (default) – Disable
tolerance for decoder
overrun errors.
0 – 100 overrun errors per
second
No
Video Features for Polycom Trio
Polycom, Inc. 201

Template Parameter Permitted Values
Change Causes
Restart or Reboot
site.cfg mr.video.camera.f
ocus.auto
NULL (default)
0 - Disable the camera's
automatic focus.
1 - Enable the camera's
automatic focus.
Yes
site.cfg mr.video.camera.f
ocus.range
Specify the distance to
the camera's optimally-
focused target.
NULL (default)
0
0 - 255
video.cfg video.camera.auto
WhiteBalance
0 – Auto white balance is
disabled.
1– Auto white balance is
enabled and the value.
No
video.cfg video.camera.brig
htness
Sets the brightness level
of the video stream. The
value range is from 0
(dimmest) to 1000
(brightest).
NULL (default)
0 - 1000
No
video.cfg video.camera.cont
rast
Sets the contrast level of
the video stream for all
supported USB cameras.
The value range is from 0
(no contrast increase) to 3
(most contrast increase),
and 4 (noise reduction
contrast).
NULL (default)
0 - 1000
No
features.cfg video.camera.cont
rolStyle
Controls whether pan and
tilt supported Polycom
USB cameras is
controlled by directional
arrow buttons or separate
pan/tilt sliders.
Default (default)
Alternate
No
Video Features for Polycom Trio
Polycom, Inc. 202

Template Parameter Permitted Values
Change Causes
Restart or Reboot
video.cfg video.camera.flic
kerAvoidance
Sets the flicker avoidance
for all supported USB
cameras.
NULL (default)
0 - Flicker avoidance is
automatic.
1 - 50hz AC power
frequency flicker
avoidance (Europe/Asia).
2 - 60hz AC power
frequency flicker
avoidance (North
America).
No
video.cfg video.camera.focu
s.auto
NULL (default)
0 - Disable the camera's
automatic focus.
1 - Enable the camera's
automatic focus.
Yes
video.cfg video.camera.focu
s.range
Specify the distance to
the camera's optimally-
focused target.
NULL (default)
0 - 255
No
video.cfg video.camera.fram
eRate
Sets the target frame rate
(frames per second) for
all supported USB
cameras. Values indicate
a fixed frame rate from 5
(least smooth) to 30 (most
smooth).
25 (default)
5 - 30
If
video.camera.fram
eRate is set to a
decimal number, the
value 25 is used instead.
No
Video Features for Polycom Trio
Polycom, Inc. 203
Template Parameter Permitted Values
Change Causes
Restart or Reboot
video.cfg video.camera.gamm
a
Set the factor to use for
gamma correction applied
to each frame of video
captured by the Polycom
EagleEye IV USB
cameras. You can use
this setting to correct for
video that appears too
dark or too light.
NULL (default)
0 -1000
No
video.cfg video.camera.hue Use to correct the color of
video captured by the
Polycom EagleEye IV
USB cameras.
NULL (default)
0 - 1000
No
video.cfg video.camera.inve
rtPanControl
Invert the direction of the
pan control for the
Polycom EagleEye IV
USB camera.
0 (default)
No
features.cfg video.camera.menu
Location
Specify if camera settings
display under the
Advanced menu for
administrators or the
Basic menu for users.
Basic (default)
Advanced
No
features.cfg video.camera.pres
et.home.pan
Set the pan coordinate for
a camera home preset.
Default values are set by
and depend on the
camera you are using.
0 – 1000
No
features.cfg video.camera.pres
et.home.tilt
Set the tilt coordinate for
a camera home preset.
Default values are set by
and depend on the
camera you are using.
0 - 1000
No
Video Features for Polycom Trio
Polycom, Inc. 204

Template Parameter Permitted Values
Change Causes
Restart or Reboot
video.cfg video.camera.pres
et.home.uponIdle.
delay
Set the number of
minutes after the idle
timeout expires to move
the camera to the home
preset.
0 (default)
0 - 3600
No
video.cfg video.camera.pres
et.home.uponIdle.
enabled
0 (default) – Do not move
the camera to the home
preset when the Trio
system is idle.
1 - Move the camera to
the home preset when the
Trio system is idle.
No
features.cfg video.camera.pres
et.home.zoom
Set the zoom coordinate
for a camera home
preset.
Default values are set by
and depend on the
camera you are using.
0 - 1000
No
video.cfg video.camera.orie
ntation
Specify the camera
mounting orientation for
EagleEye IV USB
cameras: Normal or
Inverted (upside down)
Normal (default)
Inverted
features.cfg video.camera.pres
et.x.label
Enter a label for the
Polycom EagleEye IV
USB camera preset.
NULL (default)
String 0 – 12 characters
No
features.cfg video.camera.pres
et.x.pan
Set the pan for the
Polycom EagleEye IV
USB camera presets,
where x equals the
preset.
500 (default)
0 - 1000
No
Video Features for Polycom Trio
Polycom, Inc. 205
Template Parameter Permitted Values
Change Causes
Restart or Reboot
features.cfg video.camera.pres
et.x.tilt
Set the tilt for the
Polycom EagleEye IV
USB camera presets,
where x equals the
preset.
250 (default)
0 - 1000
No
features.cfg video.camera.pres
et.x.zoom
Set the zoom for the
Polycom EagleEye IV
USB camera presets,
where x equals the
preset.
0 (default)
0 - 1000
No
video.cfg video.camera.satu
ration
Sets the saturation level
of video captured by any
supported USB camera.
NULL (default)
0 - 1000
No
video.cfg video.camera.shar
pness
Sets the sharpness level
of video captured.
NULL (default)
0 - 1000
No
video.cfg video.camera.whit
eBalance
Use to correct the white
balance tint of video
captured by any
supported USB camera.
NULL (default)
0 - 1000
No
Video Features for Polycom Trio
Polycom, Inc. 206

Template Parameter Permitted Values
Change Causes
Restart or Reboot
video.cfg video.localCamera
View.callState
This parameter applies
only when
video.localCamera
View.userControl
is set to PerSession or
Hidden.
1 (default) - The local
camera view displays on
the Polycom Trio Visual+
monitor.
0 - The local camera view
does not display on the
Polycom Trio Visual+
monitor.
No
Supported Video Codecs with Polycom Trio
Use the Polycom Trio Visual+ and a supported USB camera or the Trio VisualPro or RealPresence Group
Series system and a supported Polycom camera to add video to Polycom Trio 8500 and 8800 calls.
Polycom supports the following video standards and codecs:
• H.264 advanced video coding (AVC) baseline profile and high profile
• H.264 scalable video coding (SVC) (X-H264UC) and Remote Desktop Protocol (RDP) for desktop
and application sharing. (Microsoft only)
The following table lists video codecs supported by the Polycom Trio 8500 or 8800 with the Polycom Trio
Visual+, Trio VisualPro, and RealPresence Group Series systems.
Supported Video Codecs
Algorithm MIME Type Frame Size Bit Rate (kbps) Frame Rate (fps)
H.264 H264/90000 6144 kbps 30
XH264UC 6144 kbps
Video Codec Parameters for Polycom Trio
To support Polycom Trio solution video interoperability with Cisco, set the following parameters:
•video.codecPref.H264HP="0"
•video.codecPref.H264HP.packetizationMode0="0"
•video.codecPref.H264="0"
Use the parameters in the following table to prioritize and adjust the video codecs used by the Polycom
Trio solution.
Video Features for Polycom Trio
Polycom, Inc. 207
Video Codec Parameters
Template Parameter Permitted Values
Change Causes
Restart or Reboot
video.cfg video.codecPref.H26
4HP
Sets the H.264 High
Profile video codec
preference priority.
0 - 8
2 (default)
No
video.cfg video.codecPref.H26
4HP.packetizationMo
de0
0 - 8
5 (default)
No
video.cfg video.codecPref.H26
4SVC
No
video.cfg video.codecPref.Xda
ta
Sets the Remote
Desktop Protocol
(RDP) codec
preference priority. A
value of 1 indicates the
codec is the most
preferred and has
highest priority.
0 - 8
7 (default)
No
video.cfg video.codecPref.XH2
64UC
Sets the Microsoft H.
264 UC video codec
preference priority.
0 - 8
1 (default)
No
video.cfg video.codecPref.XUl
pFecUC
Set the forward error
correction (FEC) codec
priority.
8 (default)
0 - 8
No
Toggling Between Audio-only or Audio-Video Calls on
Polycom Trio
You can enable users to toggle between audio-only and audio-video calls.
When this feature is enabled on a Polycom Trio 8500 or 8800 system using video capabilities, you can
toggle calls between audio-only or audio-video.
Video Features for Polycom Trio
Polycom, Inc. 208
This feature applies only to outbound calls from your phone; incoming video calls to your phone are
answered using video even when you set the feature to use audio-only.
When the phone is registered, you can:
▪ Use video.callMode.default to begin calls as audio-video or audio only. By default, calls
begin as audio-video. After a video call has ended, the phone returns to audio-only.
If you set this parameter to audio, users can choose to add Video to the call.
▪ Use up.homeScreen.audioCall.enabled to enable a Home screen icon that allows users to
make audio-only calls. Far-end users can add video during a call if the far-end device is video
capable.
Audio-only or Audio-Video Call Parameters
The following parameters configure whether the phone starts a call with audio and video.
Audio-only or Audio-Video Call Parameters
Template Parameter Permitted Values
Change Causes
Restart or Reboot
feature
s.cfg
up.homeScreen
.audioCall.en
abled
0 (default) - Disable a Home screen icon
that allows users to make audio-only calls.
1 - Enable a Home screen icon that allows
users to make audio-only calls.
Devices that support video calling show an
'Audio Call' button on the Home screen to
initiate audio-only calls.
No
video.c
fg
video.autoSta
rtVideoTx
1 (default) - Automatically begin video to
the far side when you start a call.
0 - Video to the far side does not begin.
Note that when the phone Base Profile is
set to Skype or Lync, the default is 1.
No
video.c
fg
audioVideoTog
gle.callMode.
persistent
0 - Resets the call mode set by a user to
the default.
1 - Maintains the call mode set by a user.
No
video.c
fg
video.callMod
e.default
Allow the user to begin calls as audio-only
or with video.
video (default)
audio - Set the initial call to audio only and
video may be added during a call.
On Polycom Trio solution, you can
combine this parameter with
video.autoStartVideoTx .
No
Video Features for Polycom Trio
Polycom, Inc. 209

I-Frames
When video streams initialize, devices transmit video packets called I-frames (reference frames) that
contain information to display a complete picture.
Subsequent video packets, known as P-frames, are smaller and not as complete to consume less
bandwidth. Due to packet loss, jitter, or corruption, devices occasionally need to make multiple requests
for a complete I-frame in order to reset the full frame, after which devices can revert to P-frame updates.
You can set parameters to control an I-frame request. The following table indicates parameter
dependencies and messaging behavior when setting an I-frame request method.
I-Frame Parameter Dependencies
video.forceRtcpVideo
CodecControl
video.dynamicCo
ntrolMethod
voIpProt.SDP.offer.rtcpVi
deoCodecControl
Behavior when requesting video
I-frame updates
0 0 (n/a) 0 Only SIP INFO messages are
sent. No RTCP-FB is offered in
SDP.
0 1 (n/a) 0 Only SIP INFO messages are
sent. No RTCP-FB is offered in
SDP.
0 0 (n/a) 1 RTCP-FB is offered in SDP. If SDP
responses do not contain the
required RTCP-FB attribute, then
only SIP INFO requests are used.
0 1 (n/a) 1 RTCP-FB is offered in SDP. If SDP
responses do not contain the
required RTCP-FB attribute, then
only SIP INFO requests are used.
1 0 0 The SDP attribute a=rtcp-fb is not
included in SDP offers. Both
RTCP-FB and SIP INFO
messages are attempted.
1 1 0 The SDP attribute a=rtcp-fb is not
included in SDP offers. Both
RTCP-FB and SIP INFO
messages are attempted. If no
RTCP-FB messages are received,
only SIP INFO messages are sent.
If no response is received for SIP
INFO messages then, again, both
RTCP-FB and SIP INFO
messages are attempted.
Video Features for Polycom Trio
Polycom, Inc. 210
video.forceRtcpVideo
CodecControl
video.dynamicCo
ntrolMethod
voIpProt.SDP.offer.rtcpVi
deoCodecControl
Behavior when requesting video
I-frame updates
1 0 1 RTCP-FB is offered in SDP. Even
if the SDP response does not
include an accepted a=rtcp-fb
attribute both RTCP-FB and SIP
INFO messages are sent.
1 1 1 RTCP-FB is offered in SDP. Even
if the SDP response does not
include an accepted a=rtcp-fb
attribute both RTCP-FB and SIP
INFO messages are sent initially. If
no RTCP-FB response is received,
only SIP INFO messages are sent
afterwards.
Video Parameters
The parameters in the table are supported on the VVX 500/501, VVX 600/601, and VVX 1500, and
Polycom Trio solution.
Video Parameters
Template Parameter Permitted Values
Change Causes
Restart or Reboot
video.c
fg
video.allowWi
thSource
Restricts sending video codec
negotiation in Session Description
Protocol (SDP).
0 (default)
0 or 1
This parameter applies only for VVX
500/501 and VVX 600/601.
No
video.c
fg
video.enable 1 (default) - Enables video calling
capabilities for outgoing and incoming
calls.
0 - Disables video calling capabilities.
The G.722.1C and Siren 14 codecs are
disabled when you enable video on the
VVX 500 and 600 business media
phones.
Note: To ensure the USB port is disabled
on when you set feature.usb-
Top.power.enabled to 0, you must
also disable this parameter.
Video Features for Polycom Trio
Polycom, Inc. 211

Template Parameter Permitted Values
Change Causes
Restart or Reboot
video.c
fg
video.autoFul
lScreen
0 (default) - Video calls use the full
screen layout, only if explicitly selected
by the user.
1 - Video calls use the full screen layout
by default.
No
video.cfg video.conf.pr
ofile
Sets the video resolution to large window
in all layouts.
540p (default)
1080p
720p
360p
240p
180p
video.c
fg
video.dynamic
ControlMethod
0 (default)
1 - The first I-Frame request uses the
method defined by
video.forceRtcpVideoCodecCo
ntrol and subsequent requests
alternate between RTCP-FB and SIP
INFO.
To set other methods for I-frame
requests, refer the parameter
video.forceRtcpVideoCodecCo
ntrol.
No
video.c
fg
video.iFrame.
delay
0 (default)
1 -10 seconds - Transmits an extra I-
frame after the video starts.
The amount of delay from the start of
video until the I-frame is sent is
configurable up to 10 seconds.
Yes
video.c
fg
video.iFrame.
minPeriod
Time taken before sending a second I-
frame in response to requests from the
far end.
2 (default)
1 - 60
No
video.c
fg
video.iFrame.
onPacketLoss
0 (default)
1 - Transmits an I-frame to the far end
when video RTP packet loss occurs.
No
Video Features for Polycom Trio
Polycom, Inc. 212
Template Parameter Permitted Values
Change Causes
Restart or Reboot
video.c
fg
video.iFrame.
period.onBoar
d
Set the I-Frame interval used for the VC4
encoder.
180 (default)
300 maximum
No
video.cfg video.mute.se
ndCannedVideo
1 (default) - The Polycom Trio system
sends a custom image to the far end
when you press Stop my video.
0 - The Polycom Trio system does not
send a video to the far end when you
press Stop my video and displays a no
video graphic, by default.
Video Codec Preference Parameters
The following table lists video codec parameters and specifies the video codec preferences for the
Polycom Trio solution.
To disable codecs, set the value to 0. A value of 1 indicates the codec is the most preferred and has
highest priority.
Video Codec Preference Parameters
Template Parameter Permitted Value
Change Causes
Restart or Reboot
video.c
fg
video.codecPr
ef.H261
Sets the H.261 payload type.
6 (default)
0 - 8
No
video.c
fg
video.codecPr
ef.H264
Sets the H.264 payload type.
4 (default)
0 - 8
No
video.c
fg
video.codecPr
ef.H263 1998
Sets the H.263 payload type.
5 (default)
0 - 8
No
video.c
fg
video.codecPr
ef.H263
5 (default)
0 - 8
No
video.c
fg
video.codecPr
ef.H264
4 (default)
0 - 8
No
Video Features for Polycom Trio
Polycom, Inc. 213

Template Parameter Permitted Value
Change Causes
Restart or Reboot
video.c
fg
video.codecPr
ef.H264.packe
tizationMode0
Sets the H.264 payload type when
packetization mode is set to 0.
5 (default)
0 - 8
No
video.c
fg
video.codecPr
ef.H264HP
Sets the H.264 High Profile video codec
preference priority.
2 (default)
0 - 8
No
video.c
fg
video.codecPr
ef.H264HP.pac
ketizationMod
e0
Sets the H.264 high profile payload type
when packetization mode is set to 0.
3 (default)
0 - 8
No
video.c
fg
video.codecPr
ef.H264SVC
No
video.c
fg
video.codecPr
ef.Xdata
Sets the Remote Desktop Protocol
(RDP) codec preference priority.
7 (default)
0 - 8
1 - Codec has highest priority.
No
video.c
fg
video.codecPr
ef.XH264UC
Sets the Microsoft H.264 UC video codec
preference priority.
1 (default)
0 - 8
No
video.c
fg
video.codecPr
ef.XUlpFecUC
Sets the forward error correction (FEC)
codec priority.
8 (default)
0 - 8
No
Video Profile Parameters for Polycom Trio
These settings include a group of low-level video codec parameters.
For most use cases, the default values are appropriate. Polycom does not recommend changing the
default values unless specifically advised to do so.
Video Features for Polycom Trio
Polycom, Inc. 214

Template Parameter Permitted Values
Change Causes
Restart or Reboot
video.cfg video.profile.H26
1.annexD
1 (default) - Enables
Annex D when
negotiating video calls.
0 - Disables Annex D
when negotiating video
calls.
Yes
video.cfg video.profile.H26
4.payloadType
Specifies the RTP
payload format type for
H264/90000 MIME type.
109 (default)
96 to 127
Yes
video.cfg video.profile.H26
4.payloadType.pac
ketizationMode0
Sets the H.264 payload
type when packetization
mode is set to 0.
99 (default)
0 - 127
video.cfg video.profile.H26
4.payloadType.pac
ketizationMode1
Sets the H.264 payload
type when packetization
mode is set to 1.
109 (default)
0 - 127
video.cfg video.profile.H26
4.profileLevel
Specifies the highest
profile level within the
baseline profile supported
in video calls.
1.3 (default)
1, 1b, 1.1, 1.2, 1.3, and 2
VVX 500/501 and VVX
600/601 phones support
H.264 with a profile level
of 2, and VVX 1500
phones support H.264
with a profile level of 1.3.
Yes
Video Features for Polycom Trio
Polycom, Inc. 215

Template Parameter Permitted Values
Change Causes
Restart or Reboot
video.cfg video.profile.H26
4HP.jitterBufferM
ax
The largest jitter buffer
depth to be supported (in
milliseconds).
2000 (default)
533 - 2500 milliseconds
This parameter should be
set to the smallest
possible value that
supports the expected
network jitter. Jitter above
this size always causes
packet loss.
video.cfg video.profile.H26
4HP.jitterBufferM
in
The smallest jitter buffer
depth (in milliseconds)
that must be achieved
before play out begins for
the first time.
150 milliseconds (default)
33 - 1000 milliseconds
Even if this depth is
achieved initially, it may
fall and the play out might
still continue. This
parameter should be set
to the smallest possible
value, at least two packet
payloads, and larger than
the expected short term
average jitter.
video.cfg video.profile.H26
4HP.jitterBufferS
hrink
The absolute minimum
duration time (in
milliseconds) of RTP
packet Rx with no packet
loss between jitter buffer
size shrinks.
70 milliseconds (default)
33 - 1000 milliseconds
Use smaller values (33
ms) to minimize the delay
from trusted networks.
Use larger values
(1000ms) to minimize
packet loss on networks
with large jitter (3000 ms).
Video Features for Polycom Trio
Polycom, Inc. 216

Template Parameter Permitted Values
Change Causes
Restart or Reboot
video.cfg video.profile.H26
4HP.payloadType
Specifies the RTP
payload format type for
H264/90000 MIME type.
100 (default)
0 - 127
video.cfg video.profile.H26
4HP.payloadType.p
acketizationMode1
Sets the H.264 high
profile payload type when
packetization mode is set
to 1.
100 (default)
0 - 127
video.cfg video.profile.H26
4HP.profileLevel
Specifies the highest
profile level within the
baseline profile supported
in video calls.
4.1 (default)
String (1 - 5 characters)
video.cfg video.profile.H26
4M.payloadType.pa
cketizationMode0
Sets the H.264 high
profile payload type when
packetization mode is set
to 0.
113 (default)
0 - 127
video.cfg video.profile.Xda
ta.payloadType
Specifies the payload
type to use in SDP
negotiations of the
payload used for Skype
for Business desktop
content sharing.
127 (default)
0 - 127
Video Features for Polycom Trio
Polycom, Inc. 217

Template Parameter Permitted Values
Change Causes
Restart or Reboot
video.cfg video.profile.XH2
64UC.jitterBuffer
Max
The largest supported
jitter buffer depth.
2000 (default)
533 - 2500 milliseconds
Jitter above 2500ms
always causes packet
loss. This parameter
should be set to the
smallest possible value
that supports the network
jitter.
video.cfg video.profile.XH2
64UC.jitterBuffer
Min
The smallest jitter buffer
depth that must be
achieved before playout
begins for the first time.
150 (default)
33 - 1000 milliseconds
Even if this depth is
achieved initially, it may
fall and the play out might
still continue. This
parameter should be set
to the smallest possible
value, at least two packet
payloads, and larger than
the expected short term
average jitter.
video.cfg video.profile.XH2
64UC.jitterBuffer
Shrink
Specifies the minimum
duration in milliseconds of
Real-time Transport
Protocol (RTP) packet Rx,
with no packet loss to
trigger jitter buffer size
shrinks.
70 (default)
33 - 1000
Use smaller values (1000
ms) to minimize the delay
on known good networks.
Video Features for Polycom Trio
Polycom, Inc. 218

Template Parameter Permitted Values
Change Causes
Restart or Reboot
video.cfg video.profile.XH2
64UC.mstMode
Specifies the multi-
session transmission
packetization mode.
NI-TC (default)
String
The value of NI-TC
identifies non-interleaved
combined timestamp and
CS-DON mode.
This value should not be
modified for interoperation
with other Skype for
Business devices.
video.cfg video.profile.XH2
64UC.payloadType
Specifies the RTP
payload format type for H.
264 MIME type.
122 (default)
0 - 127
No
video.cfg video.profile.XUl
pFecUC.alwaysOn
1 (default) - Enable
Forward Error Correction
during video calls even
when it is not needed.
0 - Disable Forward Error
Correction.
No
video.cfg video.profile.XUl
pFecUC.debug.rxDr
opBurst
1 (default)
1 - 100
video.cfg video.profile.XUl
pFecUC.debug.rxDr
opOnlyLayer0
1 (default)
0 or 1
video.cfg video.profile.XUl
pFecUC.debug.rxDr
opRate
0 (default)
0 - 40000
video.cfg video.profile.XUl
pFecUC.debug.txDr
opBurst
1 (default)
1 - 100
video.cfg video.profile.XUl
pFecUC.debug.txDr
opRate
0 (default)
0 - 40000
Video Features for Polycom Trio
Polycom, Inc. 219

Template Parameter Permitted Values
Change Causes
Restart or Reboot
video.cfg video.profile.XUl
pFecUC.noLossTurn
OffTimeout
300 (default)
10 - 7200
video.cfg video.profile.XUl
pFecUC.payloadTyp
e
123 (default)
0 - 127
video.cfg video.profile.XUl
pFecUC.rxEnabled
1 (default)
0 or 1
video.cfg video.profile.XUl
pFecUC.txEnabled
1 (default)
0 or 1
video.cfg video.simpleJB.en
able
1 (default)
0 or 1
video.cfg video.simpleJB.li
pSyncDelayMs
0 (default)
0 -250 ms
video.cfg video.simpleJB.ti
meoutMs
100 ms (default)
0 - 250 ms
video.cfg video.rtcpbandwid
thdetect.enable
0 (default)
1 - Polycom Trio 8800
uses an estimated
bandwidth value from the
RTCP message to control
Tx/Rx video bps.
Video Features for Polycom Trio
Polycom, Inc. 220

Phone Display and Appearances
Topics:
•Administrator Menu on Polycom Trio Systems
•Polycom Trio Visual+ and Trio VisualPro Display
•Polycom Trio System Theme
•Polycom Trio System Display Name
•Polycom Trio System Status Messages
▪Olson Time Zone Configuration
•Time Zone Location Description
•Time and Date
•Phone Languages
▪Hide the MAC Address
•Unique Line Labels for Registration Lines
•Polycom Trio System Number Formatting
•Number or Custom Label
▪Custom Icons for Contacts and Line Registrations
•Capture Your Device's Current Screen
This section provides information on setting up features involving the phone's user interface.
Administrator Menu on Polycom Trio Systems
On the Polycom Trio 8800 and 8500 systems, you can add a new ‘Advanced' menu containing a subset
of administrator settings.
The added 'Advanced' menu item does not require a password but one can be assigned to it.
After enabling this feature, the added 'Advanced' menu provides access to all administrator features
except:
• Line Configuration
• Call Server Configuration
• TLS Security
• Test Automation
Administrator Menu Parameters
The following table lists the parameters to enable the new Administrator menu.
Polycom, Inc. 221

Admin Menu Parameters
Template Parameter Permitted Values Change Causes
Restart or Reboot
device.cf
g,
site.cfg
device.auth.localAdv
ancedPassword.set
Set a password for the Advanced
menu.
0 (default) - You cannot set a
password for the added Advanced
menu.
1 - You can set a password for the
added Administrator menu.
No
device.cf
g,site.cf
g
device.auth.localAdv
ancedPassword
Enter a password for the added
Administrator menu.
Null (default)
String (0 to 64 characters)
No
feaures.c
fg
feature.advancedUser
.enabled
0 (default) - The normal password-
protected Advanced menu displays.
1 - Causes the 'Advanced' menu item
to be renamed 'Admin' and adds a
menu item 'Advanced' that contains a
subset of administrator features.
The new 'Advanced' menu does not
require a password but you have the
option to assign one to it.
No
Polycom Trio Visual+ and Trio VisualPro Display
When using the Polycom Trio system with the Polycom Trio Visual+ or Trio VisualPro system, you can
configure system information to display on the connected monitor(s).
Polycom Trio Visual+ and Trio VisualPro Display Parameters
The following table lists parameters you can use to hide or display icons and features on the Polycom
Trio Visual+ or Trio VisualPro monitor(s) when paired with a Polycom Trio 8500 or 8800 system.
Phone Display and Appearances
Polycom, Inc. 222

Polycom Trio User Interface Parameters
Template Parameter Permitted Values
Change Causes
Restart or Reboot
features.cf
g
feature.exchangeVoi
ceMail.menuLocation
Default (default) - Show the
Voicemail menu in the global
menu only when unread
voicemails are available. After the
voicemail is accessed, the
Voicemail option no longer
displays in the global menu and is
accessible in the phone menu.
Everywhere - Always show the
Voicemail menu in the global
menu and phone menu.
MenusOnly - Show the Voicemail
menu only in the phone Features
menu.
No
features.cf
g
mr.bg.selection Sets a background image for the
connected monitor(s).
HallstatterSeeLake (default)
Auto - Automatically cycles
through HallstatterSeeLake,
BavarianAlps, and
ForgetMeNotPond. The
background image changes each
time a video call ends.
BlueGradient
BavarianAlps
ForgetMeNotPond
Custom - Use a custom
background specified by
mr.bg.url.
A custom background image must
be a JPEG with 1920x1080
resolution and a maximum size of
2.9 MB for it to display correctly on
the paired Trio VisualPro system
monitor(s). (PNG images, which
typically are supported on Polycom
Trio, are not supported in this
setup.)
No
features.cf
g
mr.bg.showPlcmLogo 1 (default) - The Polycom logo
shows on the connected
monitor(s).
0 - Hides the Polycom logo.
No
Phone Display and Appearances
Polycom, Inc. 223

Template Parameter Permitted Values
Change Causes
Restart or Reboot
features.cf
g
mr.bg.showWelcomeIn
structions
All (default) - Display the content-
sharing graphic and welcome
message on the connected
monitor(s).
TextOnly - Hide the content-
sharing graphic.
None - Hide both the content-
sharing graphic and welcome
message.
No
features.cf
g
mr.bg.url Specify an HTTP URL location of a
background image to use on the
connected monitor(s).
The Polycom Trio system supports
PNG and JPEG images up to 2.9
MB.
A custom background image must
be a JPEG with 1920x1080
resolution and a maximum size of
2.9 MB for it to display correctly on
the paired Trio VisualPro system
monitor(s). (PNG images, which
typically are supported on Polycom
Trio, are not supported in this
setup.)
This background image is used
only if mr.bg.selection=
"Custom"
Null (default)
String (maximum 256 characters)
No
Phone Display and Appearances
Polycom, Inc. 224
Template Parameter Permitted Values
Change Causes
Restart or Reboot
features.cf
g
up.hideSystemIpAddr
ess
Specify where the IP address of
the Polycom Trio system and
Polycom Trio Visual+ system are
hidden from view.
You can access the IP address
from the phone Advanced menu if
you set this parameter to 'Menus'
or 'Everywhere'.
• Nowhere (default) - The IP
addresses display on all user
interfaces.
• TV - IP addresses are hidden
from the monitor.
• HomeScreen - IP addresses
are hidden from the monitor
and phone menu.
• Menus - IP addresses are
hidden from the monitor, phone
Home screen, and menu.
• Everywhere - IP addresses are
hidden from the monitor, phone
Home screen, and menu.
No
Polycom Trio System Theme
You can set the Polycom Trio system theme, labels, and colors that display on the user interface.
When the Polycom Trio system's Base Profile is set to Skype, the Skype for Business theme displays by
default.
Polycom Trio System Theme Parameters
The following parameters configure the Polycom Trio system theme.
Phone Theme Parameters
Template Parameter Permitted Values
Change Causes
Restart or Reboot
featur
es.cfg
up.uiTheme Default (default) - The phone displays the default
Polycom theme.
SkypeForBusiness - The phone displays the Skype for
Business theme.
No
Phone Display and Appearances
Polycom, Inc. 225

Polycom Trio System Display Name
The system name displays in the Global menu of the Polycom Trio 8800 and 8500 systems and on the
monitor(s) connected to the paired Polycom Trio Visual+ or Trio VisualPro system.
The system name also displays on any devices connected with the system wirelessly, such as Bluetooth-
enabled or AirPlay-certified devices.
By default, the system name displays as Polycom Trio <model number> (xxxxxx) where (xxxxxx) is the
last six digits of the phone's MAC address. For example, Polycom Trio 8800 (01161C).
You can configure the name that displays on the system, the connected monitor, and any devices
wirelessly connected to the system. The name you configure for the system, using any of the following
parameters, displays in the subsequent priority order:
•system.name
•reg.1.displayname
•reg.1.label
•reg.1.address
• Default system name
If you set the system name using the system.name parameter, the value you set displays for the
system unless you configure a name to display for a specific feature.
The system name you set using any of the following feature parameters takes precedence over the name
set in system.name :
• AirPlay: content.airplayServer.name
• Bluetooth: bluetooth.devName
• Wireless Display: content.wirelessDisplay.name
System Display Name Parameters
Set the system name using one or more of parameters in the following table.
System Display Name Parameters
Template Parameter Permitted Values Change
Causes
Restart or
Reboot
content.airplaySe
rver.name
Specify a system name for the local
content sink for AirPlay-certified
devices. If left blank, the previously
configured or default system name
is used.
NULL (default)
UTF-8 encoded string
No
Phone Display and Appearances
Polycom, Inc. 226

Template Parameter Permitted Values Change
Causes
Restart or
Reboot
content.wirelessD
isplay.sink.name
Specify a system name for the local
content sink for Android or Windows
devices. If left blank the previously
configured or default system name
is used
NULL (default)
UTF-8 encoded string
No
features.cfg bluetooth.devName Enter the name of the system that
broadcasts over Bluetooth to other
devices.
NULL (default)
UTF-8 encoded string
reg.1.address The user part (for example, 1002) or
the user and the host part (for
example, 1002@polycom.com)
of the registration SIP URI or the H.
323 ID/extension.
Null (default)
string address
reg-advanced.cfg reg.1.displayname The display name used in SIP
signaling and/or the H.323 alias
used as the default caller ID.
Null (default)
UTF-8 encoded string
N
reg.1.label The text label that displays next to
the line key for registration x.
The maximum number of characters
for this parameter value is 256;
however, the maximum number of
characters that a phone can display
on its user interface varies by phone
model and by the width of the
characters you use. Parameter
values that exceed the phone's
maximum display length are
truncated by ellipses (…). The rules
for parameter
up.cfgLabelElide determine
how the label is truncated.
Null (default)
UTF-8 encoded string
No
Phone Display and Appearances
Polycom, Inc. 227
Template Parameter Permitted Values Change
Causes
Restart or
Reboot
sip-interop.cfg system.name The system name that displays at
the top left corner of the monitor,
and at the top of the Global menu of
the Polycom Trio system.
Enter a string, maximum 96
characters.
No
Polycom Trio System Status Messages
You can choose to display a maximum of five multi-line messages in the Polycom Trio Visual+ or Trio
VisualPro system Status Bar.
Each message can contain a maximum of 64 characters. If the length of the message exceeds the size of
the status bar, the message wraps into multiple lines.
When you configure multiple messages, you can adjust the number of seconds each message displays.
Polycom Trio System Status Message Parameters
The following table lists parameters that configure status messages on the Polycom Trio system.
Status Message Parameters
Template Parameter Permitted Values
Change Causes
Restart or Reboot
features.cfg up.status.message.f
lash.rate
Specify the number of seconds to
display a message before moving
to the next message.
2 seconds (default)
1 - 8 seconds
No
features.cfg up.status.message.1
up.status.message.2
up.status.message.3
up.status.message.4
up.status.message.5
<message line one>
<message line two>
<message line three>
<message line four>
<message line five>
No
Olson Time Zone Configuration
Polycom Trio systems support Olson time zones in the Internet Assigned Numbers Authority (IANA)
database.
Phone Display and Appearances
Polycom, Inc. 228
Note: To ensure you set the correct time zone for your devices, Polycom recommends that you
configure an Olson time zone.
When you set a valid Olson time zone ID from the IANA database, it overrides existing Greenwich Mean
Time (GMT) offset and daylight saving time (DST) rules set for your Polycom device and any paired
Polycom Trio Visual+ or Polycom® RealPresence® Group Series system.
If the parameter value is null, the Polycom device attempts to match your existing GMT offset and DST
rules with one of the Olson time zones that you can choose in the Web Configuration Utility or device
menu. Note that your GMT offset and DST rules may not match one of these time zones because not
every Olson time zone in the IANA database is listed in these locations. In these cases:
▪ The Polycom Trio system uses the existing configured GMT offset and DST rules.
▪ The time zone for third-party applications, for example, the Zoom Rooms Controller application, is
set to the GMT offset with DST rules disabled.
▪ The Polycom Trio system application log logs a warning.
▪ Paired Trio VisualPro and RealPresence Group Series systems use the default time zone.
▪ Paired Polycom Trio Visual+ systems use the time zone configured for the Polycom Trio system.
You can set an Olson time zone on Polycom Trio systems using one of the following methods:
▪ Set a valid Olson time zone ID using the parameter tcpIpApp.sntp.olsonTimezoneID.
Polycom recommends this method for mass provisioning.
▪ Use the Web Configuration Utility to select a time zone for a single device.
▪ Use a device menu to choose a time zone for a single device.
Note that if you are using multiple methods, there are priority rules among methods.
Olson Time Zone Parameters
Use the following parameters to configure an Olson time zone.
Olson Time Zone Parameters
Template Parameter Permitted Values Change Causes Restart
or Reboot
site.cfg tcpIpApp.sntp.ols
onTimezoneID
Enter an Olson time zone
ID. If set to an invalid or
unrecognized value, the
time zone is be set to
GMT with daylight saving
disabled.
Null (default)
When set, this parameter
overrides existing GMT
offset and DST rules.
No
Set an Olson Time Zone with the Web Configuration Utility
You can set a valid Olson time zone for a single device using the Web Configuration Utility.
Phone Display and Appearances
Polycom, Inc. 229
Procedure
1. Get the IP address for your Polycom device.
2. Enter the IP address to a browser on a computer connected to the same network as the phone.
3. Log into the Web Configuration Utility as an admin.
4. Go to Preference > Date & Time.
5. From the Time Zone ID, select a time zone.
Refer to the Olson Time Zone IDs table to see which option you should choose for the Olson time
zone you want.
6. Select Save.
Set an Olson Time Zone from the Device Menu
You can set a valid Olson time zone for a single device from its menu.
Procedure
1. On the phone menu, go to Settings > Advanced.
2. In Advanced, login with the admin password.
3. Go to Administration settings > Network Configurations > Time Zone ID.
4. Select a time zone.
Refer to the Olson Time Zone IDs table to see which option you should choose for the Olson time
zone you want.
Olson Time Zone IDs
The following table lists the Olson time zone IDs from the IANA database with the corresponding time
zone IDs you can select using the Polycom Trio system Web Configuration Utility or device menu.
Note: Not every Olson time zone ID in the IANA database is included in the table.
Olson Time Zone IDs
Olson Time Zone ID Polycom Trio Time Zone ID
Pacific/Midway (GMT -11:00) Midway Island
Pacific/Honolulu (GMT -10:00) Hawaii
America/Anchorage (GMT -9:00) Alaska
Mexico/BajaNorte (GMT -8:00) Baja California
America/Phoenix (GMT -7:00) Arizona
America/Chihuahua (GMT -7:00) Chihuahua,La Paz
America/Denver (GMT -7:00) Mountain Time (US & Canada)
Phone Display and Appearances
Polycom, Inc. 230

Olson Time Zone ID Polycom Trio Time Zone ID
America/Costa_Rica (GMT -6:00) Central America
America/Chicago (GMT -6:00) Central Time (US & Canada)
America/Mexico_City (GMT -6:00) Mexico City
America/Regina (GMT -6:00) Saskatchewan
America/Bogota (GMT -5:00) Bogota,Lima
America/New_York (GMT -5:00) Eastern Time (US & Canada)
America/Caracas (GMT -4:30) Caracas
America/Barbados Atlantic Time (Barbados)
America/Halifax (GMT -4:00) Atlantic Time (Canada)
America/Manaus (GMT -4:00) Manaus,La Paz
America/Santiago (GMT -3:00) Santiago
America/St_Johns (GMT -3:30) Newfoundland
America/Sao_Paulo (GMT -3:00) Brasilia
America/Argentina/Buenos_Aires (GMT -3:00) Buenos Aires
America/Godthab (GMT -3:00) Greenland
America/Montevideo (GMT -3:00) Montevideo
Atlantic/South_Georgia (GMT -2:00) Mid-Atlantic
Atlantic/Azores (GMT -1:00) Azores
Atlantic/Cape_Verde (GMT -1:00) Cape Verde Islands
Africa/Casablanca (GMT 0:00) Casablanca
Europe/London (GMT 0:00) London,Lisbon
Europe/Amsterdam (GMT +1:00) Amsterdam,Berlin
Europe/Belgrade (GMT +1:00) Bratislava
Europe/Brussels (GMT +1:00) Brussels
Europe/Sarajevo (GMT +1:00) Sarajevo,Skopje
Africa/Brazzaville (GMT +1:00) West Central Africa
Africa/Windhoek (GMT +1:00) Windhoek
Asia/Amman Amman
Phone Display and Appearances
Polycom, Inc. 231

Olson Time Zone ID Polycom Trio Time Zone ID
Europe/Athens (GMT +2:00) Athens
Asia/Beirut Beirut
Africa/Cairo (GMT +2:00) Bucharest,Cairo
Europe/Helsinki (GMT +2:00) Helsinki,Kyiv
Asia/Jerusalem (GMT +2:00) Jerusalem
Africa/Harare (GMT +2:00) Harare,Pretoria
Europe/Minsk (GMT +3:00) Minsk
Asia/Istanbul (GMT +3:00) Istanbul
Europe/Moscow (GMT +3:00) Moscow
Asia/Kuwait (GMT +3:00) Kuwait,Riyadh
Africa/Nairobi (GMT +3:00) Nairobi
Asia/Tehran (GMT +3:30) Tehran
Asia/Baku (GMT +4:00) Baku,Tbilisi
Asia/Yerevan (GMT +4:00) Yerevan
Asia/Dubai Dubai
Asia/Kabul (GMT +4:30) Kabul
Asia/Karachi (GMT +5:00) Karachi
Asia/Tashkent (GMT +5:00) Tashkent
Asia/Yekaterinburg (GMT +5:00) Yekaterinburg (RTZ 4)
Asia/Calcutta (GMT +5:30) Kolkata,New Delhi
Asia/Colombo (GMT +5:30) Sri Jayawardenepura
Asia/Katmandu (GMT +5:45) Kathmandu
Asia/Dhaka (GMT +6:00) Astana,Dhaka
Asia/Rangoon (GMT +6:30) Yangon (Rangoon)
Asia/Krasnoyarsk (GMT +7:00) Krasnoyarsk (RTZ 6)
Asia/Bangkok (GMT +7:00) Bangkok,Hanoi
Asia/Jakarta (GMT +7:00) Jakarta
Asia/Shanghai (GMT +8:00) Beijing,Chongqing
Phone Display and Appearances
Polycom, Inc. 232

Olson Time Zone ID Polycom Trio Time Zone ID
Asia/Hong_Kong (GMT +8:00) Hong Kong,Urumqi
Asia/Irkutsk (GMT +8:00) Irkutsk (RTZ 7)
Asia/Kuala_Lumpur (GMT +8:00) Kuala Lumpur
Asia/Taipei (GMT +8:00) Taipei,Perth
Asia/Tokyo (GMT +9:00) Tokyo,Seoul,Osaka
Asia/Yakutsk (GMT +9:00) Sapporo,Yakutsk (RTZ 8)
Australia/Adelaide Adelaide
Australia/Darwin Darwin
Australia/Brisbane Brisbane
Australia/Hobart (GMT +10:00) Hobart
Australia/Sydney Sydney,Canberra
Asia/Vladivostok (GMT +10:00) Vladivostok
Pacific/Guam (GMT +10:00) Guam,Port Moresby
Asia/Magadan (GMT +10:00) Magadan (RTZ 9)
Pacific/Auckland (GMT +12:00) Auckland,Anadyr
Pacific/Fiji (GMT +12:00) Fiji Islands
Pacific/Majuro (GMT +12:00) Marshall Islands
Pacific/Tongatapu (GMT +13:00) Nuku'alofa
Time Zone Location Description
The following two parameters configure a time zone location description for their associated GMT offset:
•device.sntp.gmtOffsetcityID If you are not provisioning phones manually from the phone
menu or Web Configuration Utility and you are setting the device.sntp.gmtOffset parameter,
then you must configure device.sntp.gmtOffsetcityID to ensure that the correct time zone
location description displays on the phone menu and Web Configuration Utility. The time zone
location description is set automatically if you set the device.sntp.gmtOffset parameter
manually using the phone menu or Web Configuration Utility.
•tcpIpApp.sntp.gmtOffsetcityID If you are not provisioning phones manually from the Web
Configuration Utility and you are setting the tcpIpApp.sntp.gmtOffset parameter, then you
must configure tcpIpApp.sntp.gmtOffsetcityID to ensure that the correct time zone
location description displays on the Web Configuration Utility. The time zone location description is
set automatically if you set the tcpIpApp.sntp.gmtOffset parameter manually using the Web
Configuration Utility.
Phone Display and Appearances
Polycom, Inc. 233

Related Links
Time and Date Display Parameters on page 236
Time Zone Location Parameters
The following parameters configure time zone location.
Time Zone Location Parameters
Permitted Values Permitted Values
0
1
2
3
4
5
6
7
8
9
10
(GMT -12:00) Eniwetok,Kwajalein
(GMT -11:00) Midway Island
(GMT -10:00) Hawaii
(GMT -9:00) Alaska
(GMT -8:00) Pacific Time (US & Canada)
(GMT -8:00) Baja California
(GMT -7:00) Mountain Time (US & Canada)
(GMT -7:00) Chihuahua,La Paz
(GMT -7:00) Mazatlan
(GMT -7:00) Arizona
(GMT -6:00) Central Time (US & Canada)
61
62
63
64
65
66
67
68
69
70
(GMT +2:00) Helsinki,Kyiv
(GMT +2:00) Riga,Sofia
(GMT +2:00) Tallinn,Vilnius
(GMT +2:00) Athens,Istanbul
(GMT +2:00) Damascus
(GMT +2:00) E.Europe
(GMT +2:00) Harare,Pretoria
(GMT +2:00) Jerusalem
(GMT +2:00) Kaliningrad (RTZ 1)
(GMT +2:00) Tripoli
11
12
13
14
15
16
17
18
19
20
(GMT -6:00) Mexico City
(GMT -6:00) Saskatchewan
(GMT -6:00) Guadalajara
(GMT -6:00) Monterrey
(GMT -6:00) Central America
(GMT -5:00) Eastern Time (US & Canada)
(GMT -5:00) Indiana (East)
(GMT -5:00) Bogota,Lima
(GMT -5:00) Quito
(GMT -4:30) Caracas
71
72
73
74
75
78
76
77
79
80
(GMT +3:00) Moscow
(GMT +3:00) St.Petersburg
(GMT +3:00) Volgograd (RTZ 2)
(GMT +3:00) Kuwait,Riyadh
(GMT +3:00) Nairobi
(GMT +3:00) Baghdad
(GMT +3:00) Minsk
(GMT +3:30) Tehran
(GMT +4:00) Abu Dhabi,Muscat
(GMT +4:00) Baku,Tbilisi
Phone Display and Appearances
Polycom, Inc. 234

Permitted Values Permitted Values
21
22
23
24
25
26
27
28
29
30
(GMT -4:00) Atlantic Time (Canada)
(GMT -4:00) San Juan
(GMT -4:00) Manaus,La Paz
(GMT -4:00) Asuncion,Cuiaba
(GMT -4:00) Georgetown
(GMT -3:30) Newfoundland
(GMT -3:00) Brasilia
(GMT -3:00) Buenos Aires
(GMT -3:00) Greenland
(GMT -3:00) Cayenne,Fortaleza
81
82
83
84
85
86
87
88
89
90
(GMT +4:00) Izhevsk,Samara (RTZ 3)
(GMT +4:00) Port Louis
(GMT +4:00) Yerevan
(GMT +4:30) Kabul
(GMT +5:00) Yekaterinburg (RTZ 4)
(GMT +5:00) Islamabad
(GMT +5:00) Karachi
(GMT +5:00) Tashkent
(GMT +5:30) Mumbai,Chennai
(GMT +5:30) Kolkata,New Delhi
31
32
33
34
35
36
37
38
39
40
(GMT -3:00) Montevideo
(GMT -3:00) Salvador
(GMT -3:00) Santiago
(GMT -2:00) Mid-Atlantic
(GMT -1:00) Azores
(GMT -1:00) Cape Verde Islands
(GMT 0:00) Western Europe Time
(GMT 0:00) London,Lisbon
(GMT 0:00) Casablanca
(GMT 0:00) Dublin
91
92
93
94
95
96
97
98
99
100
(GMT +5:30) Sri Jayawardenepura
(GMT +5:45) Kathmandu
(GMT +6:00) Astana,Dhaka
(GMT +6:00) Almaty
(GMT +6:00) Novosibirsk (RTZ 5)
(GMT +6:30) Yangon (Rangoon)
(GMT +7:00) Bangkok,Hanoi
(GMT +7:00) Jakarta
(GMT +7:00) Krasnoyarsk (RTZ 6)
(GMT +8:00) Beijing,Chongqing
41
42
43
44
45
46
47
48
49
50
(GMT 0:00) Edinburgh
(GMT 0:00) Monrovia
(GMT 0:00) Reykjavik
(GMT +1:00) Belgrade
(GMT +1:00) Bratislava
(GMT +1:00) Budapest
(GMT +1:00) Ljubljana
(GMT +1:00) Prague
(GMT +1:00) Sarajevo,Skopje
(GMT +1:00) Warsaw,Zagreb
101
102
103
104
105
106
107
108
109
110
(GMT +8:00) Hong Kong,Urumqi
(GMT +8:00) Kuala Lumpur
(GMT +8:00) Singapore
(GMT +8:00) Taipei,Perth
(GMT +8:00) Irkutsk (RTZ 7)
(GMT +8:00) Ulaanbaatar
(GMT +9:00) Tokyo,Seoul,Osaka
(GMT +9:00) Sapporo,Yakutsk (RTZ 8)
(GMT +9:30) Adelaide,Darwin
(GMT +10:00) Canberra
Phone Display and Appearances
Polycom, Inc. 235

Permitted Values Permitted Values
51
52
53
54
55
56
57
58
59
60
(GMT +1:00) Brussels
(GMT +1:00) Copenhagen
(GMT +1:00) Madrid,Paris
(GMT +1:00) Amsterdam,Berlin
(GMT +1:00) Bern,Rome
(GMT +1:00) Stockholm,Vienna
(GMT +1:00) West Central Africa
(GMT +1:00) Windhoek
(GMT +2:00) Bucharest,Cairo
(GMT +2:00) Amman,Beirut
111
112
113
114
115
116
117
118
119
120
(GMT +10:00) Magadan (RTZ 9)
(GMT +10:00) Melbourne
(GMT +10:00) Sydney,Brisbane
(GMT +10:00) Hobart
(GMT +10:00) Vladivostok
(GMT +10:00) Guam,Port Moresby
(GMT +11:00) Solomon Islands
(GMT +11:00) New Caledonia
(GMT +11:00) Chokurdakh (RTZ 10)
(GMT +12:00) Fiji Islands
121
122
123
124
125
126
(GMT +12:00) Auckland,Anadyr
(GMT +12:00) Petropavlovsk-Kamchatsky (RTZ 11)
(GMT +12:00) Wellington
(GMT +12:00) Marshall Islands
(GMT +13:00) Nuku'alofa
(GMT +13:00) Samoa
Time and Date
A clock and calendar display on the phones by default.
You can choose how to display the time and date for your time zone in several formats, or you can
disable the display of the time and date. You can also set the time and date format to display differently
when the phone is in certain modes. For example, the display format can change when the phone goes
from idle mode to an active call.
To have the most accurate time, you have to synchronize the phone to the Simple Network Time Protocol
(SNTP) time server. Until a successful SNTP response is received, the phone continuously flashes the
time and date to indicate that they are not accurate.
The time and date display on the phones in PSTN mode and are set by an incoming call with a supported
caller ID standard, or when the phone is connected to Ethernet and you enable the date and time display.
Time and Date Display Parameters
Use the parameters in the following table to configure time and display options.
Phone Display and Appearances
Polycom, Inc. 236

Time and Date Display Parameters
Template Parameter Permitted Values
Change Causes
Restart or Reboot
features.cf
g
up.localClockEnabl
ed
Specifies whether or not the date and
time are shown on the idle display.
1 (Default) - Date and time and shown
on the idle display.
0 - Date and time are not shown on the
idle display.
No
site.cfg lcl.datetime.date.
dateTop
1 (default) - Displays the date above
time.
0 - Displays the time above date.
No
site.cfg lcl.datetime.date.
format
The phone displays day and date.
"D,dM" (default)
String
The field may contain 0, 1 or 2 commas
which can occur only between
characters and only one at a time.
For example: D,dM = Thursday, 3 July
or Md,D = July 3, Thursday.
No
site.cfg lcl.datetime.date.
longFormat
1 (default) - Displays the day and month
in long format (Friday/November).
0 - Displays the day and month in
abbreviated format (Fri/Nov).
No
site.cfg lcl.datetime.time.
24HourClock
1 (default) - Displays the time in 24-hour
clock mode.
0 - Does not display the time in 24-hour
clock mode.
No
site.cfg tcpIpApp.sntp.addr
ess
Specifies the SNTP server address.
NULL (default)
Valid hostname or IP address.
No
site.cfg tcpIpApp.sntp.AQue
ry
Specifies a query to return hostnames.
0 (default) - Queries to resolve the
SNTP hostname are performed using
DNS SRV.
1 - Query the hostname for a DNS A
record.
No
Phone Display and Appearances
Polycom, Inc. 237

Template Parameter Permitted Values
Change Causes
Restart or Reboot
site.cfg tcpIpApp.sntp.addr
ess.overrideDHCP
0 (Default) - DHCP values for the SNTP
server address are used.
1 - SNTP parameters override the
DHCP values.
No
site.cfg tcpIpApp.sntp.dayl
ightSavings.enable
1 (Default) - Daylight savings rules
apply to the displayed time.
0 - Daylight savings time rules are not
applied to the displayed time.
No
site.cfg tcpIpApp.sntp.dayl
ightSavings.fixedD
ayEnable
0 (Default) - Month , date , and
dayOfWeek are used in the DST
calculation.
1 - Only month and date are used
in the DST calculation.
No
site.cfg tcpIpApp.sntp.dayl
ightSavings.start.
date
Start date for daylight savings time.
Range is 1 to 31.
8 (Default) - Second occurrence in the
month after DST starts.
0 - If fixedDayEnable is set to 0,
this value specifies the occurrence of
dayOfWeek when DST should start.
1 - If fixedDayEnable is set to 1,
this value is the day of the month to
start DST.
15 - Third occurrence.
22 - Fourth occurrence.
Example: If value is set to 15, DST
starts on the third dayOfWeek of the
month.
No
site.cfg tcpIpApp.sntp.dayl
ightSavings.start.
dayOfWeek
Specifies the day of the week to start
DST. Range is 1 to 7.
1 (Default) - Sunday
2 - Monday...
7 - Saturday
This parameter is not used if
fixedDayEnable is set to 1.
No
Phone Display and Appearances
Polycom, Inc. 238

Template Parameter Permitted Values
Change Causes
Restart or Reboot
site.cfg tcpIpApp.sntp.dayl
ightSavings.start.
dayOfWeek.lastInMo
nth
0 (Default)
1 - DST starts on the last dayOfWeek
of the month and the start.date is
ignored.
This parameter is not used if
fixedDayEnable is set to 1.
No
site.cfg tcpIpApp.sntp.dayl
ightSavings.start.
month
Specifies the month to start DST.
Range is 1 to 12.
3 (Default) - March
1 - January
2 - February...
12 - December
No
site.cfg tcpIpApp.sntp.dayl
ightSavings.start.
time
Specifies the time of day to start DST in
24-hour clock format. Range is 0 to 23.
2 (Default) - 2 a.m.
0 - 12 a.m.
1 - 1 a.m....
12 - 12 p.m.
13 - 1 p.m...
23 - 11 p.m.
No
site.cfg tcpIpApp.sntp.dayl
ightSavings.stop.d
ate
Specifies the stop date for daylight
savings time. Range is 1 to 31.
1 (Default) - If fixedDayEnable is
set to 1, the value of this parameter is
the day of the month to stop DST. Set 1
for the first occurrence in the month.
0 - If fixedDayEnable is set to 0,
this value specifies the dayOfWeek
when DST should stop.
8 - Second occurrence.
15 - Third occurrence.
22 - Fourth occurrence.
Example: If set to 22, DST stops on the
fourth dayOfWeek in the month.
No
Phone Display and Appearances
Polycom, Inc. 239
Template Parameter Permitted Values
Change Causes
Restart or Reboot
site.cfg tcpIpApp.sntp.dayl
ightSavings.stop.d
ayOfWeek
Day of the week to stop DST. Range is
1 to 7.
1 (default) - Sunday
2 - Monday
3 - Tuesday
7 - Saturday
Parameter is not used if
fixedDayEnable is set to 1.
No
site.cfg tcpIpApp.sntp.dayl
ightSavings.stop.d
ayOfWeek.lastInMon
th
1 - DST stops on the last dayOfWeek
of the month and the stop.date is
ignored).
Parameter is not used if
fixedDayEnable is set to 1.
No
site.cfg tcpIpApp.sntp.dayl
ightSavings.stop.m
onth
Specifies the month to stop DST. Range
is 1 to 12.
11 - November
1 - January
2 - February…
12 - December
No
site.cfg tcpIpApp.sntp.dayl
ightSavings.stop.t
ime
Specifies the time of day to stop DST in
24-hour clock format. Range is 0 to 23.
2 (Default) - 2 a.m.
0 - 12 a.m.
1 - 1 a.m....
12 - 12 p.m.
13 - 1 p.m...
23 - 11 p.m.
No
site.cfg tcpIpApp.sntp.gmtO
ffset
Specifies the offset in seconds of the
local time zone from GMT.
0 (Default) - GMT
3600 seconds = 1 hour
-3600 seconds = -1 hour
Positive or negative integer
No
Phone Display and Appearances
Polycom, Inc. 240
Template Parameter Permitted Values
Change Causes
Restart or Reboot
site.cfg tcpIpApp.sntp.gmtO
ffsetcityID
Range is 0 to127.
NULL (Default)
For descriptions of all values, refer to
Time Zone Location Description.
No
site.cfg tcpIpApp.sntp.gmtO
ffset.overrideDHCP
0 (Default) - The DHCP values for the
GMT offset are used.
1 - The SNTP values for the GMT offset
are used.
No
site.cfg tcpIpApp.sntp.resy
ncPeriod
Specifies the period of time (in seconds)
that passes before the phone
resynchronizes with the SNTP server.
86400 (Default). 86400 seconds is 24
hours.
Positive integer
No
site.cfg tcpIpApp.sntp.retr
yDnsPeriod
Sets a retry period for DNS queries.
86400 (Default). 86400 seconds is 24
hours.
60 - 2147483647 seconds
The DNS retry period is affected by
other DNS queries made on the phone.
If the phone makes a query for another
service during the retry period, such as
SIP registration, and receives no
response, the Network Time Protocol
(NTP) DNS query is omitted to limit the
retry attempts to the unresponsive
server. If no other DNS attempts are
made by other services, the retry period
is not affected. If the DNS server
becomes responsive to another service,
NTP immediately retries the DNS query.
No
Related Links
Time Zone Location Description on page 233
Date Formats
Use the following table to choose values for the lcl.
datetime.date.formatand lcl.datetime.date.longformat parameters. The table shows
values for Friday, August 19, 2011 as an example.
Phone Display and Appearances
Polycom, Inc. 241

Date Formats
lcl.datetime.date.format lcl.datetime.date.longformat Date Displayed on Phone
dM,D 0 19 Aug, Fri
dM,D 1 19 August, Friday
Md,D 0 Aug 19, Fri
Md,D 1 August 19, Friday
D,dM 0 Fri, 19 Aug
D,dM 1 Friday, August 19
DD/MM/YY n/a 19/08/11
DD/MM/YYYY n/a 19/08/2011
MM/DD/YY n/a 08/19/11
MM/DD/YYYY n/a 08/19/2011
YY/MM/DD n/a 11/08/19
YYYY/MM/DD n/a 2011/08/11
Phone Languages
All phones support the following languages: Arabic, Simplified Chinese, Traditional Chinese, Danish,
Dutch,English, French, German, Italian, Japanese, Korean, Norwegian, Polish, Brazilian Portuguese,
Russian, Slovenian, International Spanish, and Swedish.
Each language is stored as a language file in the VVXLocalization folder, which is included with the
Polycom UC Software package. If you want to edit the language files, you must use a Unicode-
compatible XML editor such as XML Notepad 2007 and familiarize yourself with the guidelines on basic
and extended character support.
At this time, the updater is available in English only.
Change the Phone Language and Keyboard Layouts
When you set the phone language and country, the phone uses the default keyboard layout for that
language. For example, setting the phone language to French sets the phone to the AZERTY keyboard
layout. You can enable multiple languages for the phone and switch between keyboard layouts.
Procedure
1. On the phone's keyboard, long-press and release the comma key and choose Input Languages.
2. Uncheck Use System Language.
Phone Display and Appearances
Polycom, Inc. 242
3. Select one or more available languages and press the Back arrow. Each language you select is
enabled along with its default keyboard layout.
When you enable more than one language, a globe key displays on the phone keyboard.
4. Do one of the following:
▪ Long-press the globe key to view and choose from a list of enabled languages. The phone
uses the default keyboard layout for the language you choose.
▪ Short-press the globe key to rotate through enabled languages. The space bar displays the
current language and keyboard layout.
Phone Language Parameters
You can select the language that displays on the phone using the parameters in the following table.
Phone Language Parameters
Template Parameter Permitted Values
Change Causes Restart
or Reboot
site.cf
g
lcl.ml.lang Null (default) - Sets the phone
language to US English.
String - Sets the phone language
specified in the
lcl.ml.lang.menu.x.label
parameter.
No
site.cf
g
lcl.ml.lang.menu.x Specifies the dictionary files for the
supported languages on the phone.
Null (default)
String
Dictionary files must be sequential. The
dictionary file cannot have caps, and
the strings must exactly match a folder
name of a dictionary file.
No
site.cf
g
lcl.ml.lang.menu.x
.label
Specifies the phone language menu
label. The labels must be sequential.
Null (default)
String
No
Multilingual Parameters
The multilingual parameters listed in the following table are based on string dictionary files downloaded
from the provisioning server.
These files are encoded in XML format and include space for user-defined languages.
Phone Display and Appearances
Polycom, Inc. 243
Multilingual Parameters
Template Parameter Permitted Values
Change Causes
Restart or Reboot
site.cf
g
lcl.ml.lang.charse
t
Provides the language character set.
Null (default)
String
Yes
site.cf
g
lcl.ml.lang.clock.
x.24HourClock
Overrides the
lcl.datetime.time.
24HourClock parameter.
1 (default) - Displays the time in 24-
hour clock mode.
0 - Does not display the time in 24-hour
clock mode.
No
site.cf
g
lcl.ml.lang.clock.
x.dateTop
Overrides the
lcl.datetime.date.dateTop
parameter.
1 (default) - Displays date above time.
0 - Displays date below time.
No
site.cf
g
lcl.ml.lang.clock.
x.format
Overrides the
lcl.datetime.date.format
parameterto display the day and date .
"D,dM" (default)
String
The field may contain 0, 1 or 2 commas
which can occur only between
characters and only one at a time.
For example: D,dM = Thursday, 3 July
or Md,D = July 3, Thursday.
No
site.cf
g
lcl.ml.lang.clock.
x.longFormat
Overrides the
lcl.datetime.date.longForm
at parameter.
1 (default) - Displays the day and
month in long format (Friday/
November).
0 - Displays the day and month in
abbreviated format (Fri/Nov).
No
Phone Display and Appearances
Polycom, Inc. 244
Template Parameter Permitted Values
Change Causes
Restart or Reboot
site.cf
g
lcl.ml.lang.japane
se.font.enabled
0 (default) - The phone does not
display the Japanese Kanji character
font.
1 - The phone displays the Japanese
Kanji character font.
This parameter applies to Polycom
Trio, VVX 400, 401, 410, 411, 500,
501, 600, 601, and 1500.
Yes
region.
cfg
lcl.ml.lang.list Displays the list of languages
supported on the phone.
All (default)
String
Yes
The basic character support includes the Unicode character ranges listed in the next table.
Unicode Ranges for Basic Character Support
Name Range
C0 Controls and Basic Latin U+0000 - U+007F
C1 Controls and Latin-1 Supplement U+0080 - U+00FF
Cyrillic (partial) U+0400 - U+045F
Access the Country of Operation Menu in Set Language
You can view the list of countries listed in the Country of Operation menu in the language set by you on
the phone.
If you set the system language as Deutsch (de-de), the list of countries under this menu will be displayed
in German.
Procedure
1. On the Polycom Trio 8800 system Home screen, go to Settings > Advanced > Administration
Settings > Network Configuration > network Interfaces > Wi-Fi Menu.
Add a Language for the Phone Display and Menu
Use the multilingual parameters to add a new language to your provisioning server directory to display on
the phone screen and menu.
Procedure
1. Create a new dictionary file based on an existing one.
Phone Display and Appearances
Polycom, Inc. 245
2. Change the strings making sure to encode the XML file in UTF-8 but also ensuring the UTF-8
characters chosen are within the Unicode character ranges indicated in the tables below.
3. Place the file in an appropriately named folder according to the format language_region
parallel to the other dictionary files under the VVXLocalization folder on the provisioning server.
4. Add an lcl.ml.lang.clock.menu.x parameter to the configuration file.
5. Add lcl.ml.lang.clock.x.24HourClock, lcl.ml.lang.clock.x.format,
lcl.ml.lang.clock.x.longFormat , and lcl.ml.lang.clock.x.dateTop parameters
and set them according to the regional preferences.
6. (Optional) Set lcl.ml.lang to be the new language_region string.
Hide the MAC Address
You can configure the phone to hide MAC address displayed on the phone. When you enable this
feature, users cannot view or retrieve the MAC address from the phone. The MAC address is available to
administrators only.
Hide MAC Address Parameters
The following table lists parameters that configure the display of MAC address.
Hide MAC Address Parameters
Template Parameter Permitted Values Change Causes Reboot
or Restart
device.c
fg
device.mac.hi
de.set
Allows you to use the device.mac.hide
parameter to control the display of MAC
address information of VVX phones to users.
Null (default)
0 – Disables the ability to control the display
of MAC address information.
1 – Enables the ability to control the display of
Mac address information.
No
device.c
fg
device.mac.hi
de
0 (default) – MAC information displays.
1 – MAC address information is hidden.
No
Unique Line Labels for Registration Lines
You can configure unique labels on line keys for registration lines.
You must configure multiple line keys on the phone for a registration in order to configure unique line
labels. For example, you can set different names to display for the registration 4144 that displays on four
line keys.
If you configure the line to display on multiple line keys without a unique label assigned to each line, the
lines are labeled automatically in numeric order. For example, if you have four line keys for line 4144
Phone Display and Appearances
Polycom, Inc. 246

labeled Polycom, the line keys are labeled as 1_Polycom, 2_ Polycom, 3_ Polycom, and 4_ Polycom.
This also applies to lines without labels.
Unique Line Labels for Registration Lines Parameters
When using this feature with the parameter reg.x.label.y where x=2 or higher, multiple line keys
display for the registered line address.
Configure Unique Line Labels
Template Parameter Permitted Values
Change Causes
Restart or Reboot
site.cfg reg.x.line.y.label Configure a unique line label for a
shared line that has multiple line key
appearances. This parameter takes
effect when u
p.cfgUniqueLineLabel=1 . If
reg.x.linekeys=1 , this
parameter does not have any effect.
x = the registration index number
starting from 1.
y = the line index from 1 to the value set
by reg.x.linekeys . Specifying a
string sets the label used for the line key
registration on phones with multiple line
keys.
If no parameter value is set for
reg.x.line.y.label , the phone
automatically numbers multiple lines by
prepending “<y>_” where <y> is the line
index from 1 to the value set by
reg.x.linekeys .
• The following examples show labels
for line 1 on a phone with user
registration 1234, where
reg.x.linekeys=2 :
◦ If no label is configured for
registration, the labels are
“1_1234” and “2_1234”.
◦If reg.1.line.
1.label=Polycom and
reg.1.line.
2.label=VVX , the labels
display as ‘Polycom' and ‘VVX'.
No
Phone Display and Appearances
Polycom, Inc. 247
Template Parameter Permitted Values
Change Causes
Restart or Reboot
features.cf
g
up.cfgLabelElide Controls the alignment of the line label.
When the line label is an alphanumeric
or alphabetic string, the label aligns
right. When the line label is a numeric
string, the label aligns left.
None (Default)
Right
Left
No
features.cf
g
up.cfgUniqueLineLa
bel
Allow unique labels for the same
registration that is split across multiple
line keys using reg.X.linekeys.
0 (Default) - Use the same label on all
line keys.
1 - Display a unique label as defined by
reg.X.line.Y.label.
If reg.X.line.Y.label is not configured,
then a label of the form <integer>_ will
be applied in front of the applied label
automatically.
No
Polycom Trio System Number Formatting
By default, phone numbers entered on the system are automatically formatted with dashes between
dialed numbers following the North American Numbering Plan (NANP), for example: 12223334444
displays as1-222-333-4444.
Polycom Trio System Number Formatting Parameters
Use the parameter in the following table to enable or disable number formatting.
Number Formatting Parameters
Template Parameter Permitted Values
Change Causes
Restart or Reboot
up.format
PhoneNumb
ers
1 (default) - Enable automatic number
formatting.
0 - Disable automatic number formatting.
No
Phone Display and Appearances
Polycom, Inc. 248

Number or Custom Label
On the Polycom Trio 8800 and 8500 systems, you can choose to display a number, an extension, or a
custom label on the Home Screen below the time and date
Configure the Number or Label from the System
You can configure the display of the number or label on the Home screen from the system menu.
Procedure
1. Navigate to Settings > Advanced > Administration Settings > Home Screen Label.
Number and Label Parameters
You can configure display of the Polycom Trio 8800 number or label on the Home screen using
centralized provisioning parameters.
Number and Label Display Parameters
Template Parameter Permitted Values
Change Causes
Restart or Reboot
feature
s.cfg
homeScr
een.pla
ceACall
.enable
1 (default) - Specify Place a Call label to display on the
home screen.
0 - Does not display the label on the home screen.
No
homeScr
een.cus
tomLabe
l
Specify the label to display on the phone's Home screen
when homeScreen.labelType="Custom". The
label can be 0 to 255 characters.
Null (default)
No
homeScr
een.lab
elLocat
ion
Specify where the label displays on the screen.
StatusBar (default) - The phone displays the custom label
in the status bar at the top of the screen.
BelowDate - The phone displays the custom label on the
Home screen only, just below the time and date.
No
Phone Display and Appearances
Polycom, Inc. 249

Template Parameter Permitted Values
Change Causes
Restart or Reboot
homeScr
een.lab
elType
Specify the type of label to display on the phone's Home
screen.
PhoneNumber (default)
• When the phone is set to use Lync Base Profile, the
phone number is derived from the Skype for Business
server.
• When the phone is set to use the Generic Base
Profile, the phone uses the number you specify in reg.
1.address.
Custom - Enter an alphanumeric string between 0 and
255 characters.
PrimaryPhoneNumber – The status bar displays only the
first phone number rather than all of the phone numbers.
None - Don't display a label.
No
reg.
1.usete
luriAsL
ineLabe
l
1 - If reg.x.label="Null" the tel URI/phone number/address
displays as the label of the line key.
0 - If reg.x.label="Null" the value for reg.x.displayName, if
available, displays as the label. If reg.x.displayName is
unavailable, the user part of reg.x.address is used.
No
feature
s.cfg
up.form
atPhone
Numbers
1 (default) - Enables automatic number formatting.
0 - Disables automatic number formatting and numbers
display separated by "-".
No
Custom Icons for Contacts and Line Registrations
You can configure Polycom Trio systems to display custom icons for registered lines and user photos for
contacts in the Local Contact Directory and favorites on the Home screen.
Polycom recommends uploading PNG images that are 106 x 106 pixels with a size of 100 KB or smaller.
The maximum image size you can upload is 200 x 200 pixels, however, the phone automatically scales
the icons to 106 x 106 pixels. You can configure up to 24 icons for registered lines and contacts on the
Polycom Trio system.
You can add the icons to the root directory or a subdirectory on the provisioning server or specify the URL
location for the icons. If you place icons in a subdirectory, specify the subdirectory in the
ICONS_DIRECTORY attribute in the <APPLICATION> tag in the MAC.cfg file.
Note: Make sure that the icons configured and distributed through Polycom UC Software do not violate
any Intellectual Property rights.
Phone Display and Appearances
Polycom, Inc. 250
Custom Icon Parameters
Use the parameters in the following table to configure custom icons for favorite contacts and line
registrations.
Custom Icon Parameters
Template Parameters Permitted Values Change Causes Reboot
or Restart
features.cfg icons.x Specify the icon filename
or URL location
associated with the
registered line (x), where
x equals 1-24. The icons
display on the phone for
lines configured using
parameter reg.y.icon
or favorite contacts set for
<up></up> in the Mac-
directory.xml file.
Null (default)
icon file name or URL
location
For example icons.
1="filename1" or
icons.x="ftp://
icons:icons@10.23
3.234.18/
icon1.png"
Yes
features.cfg reg.y.icon Assign an icon specified
in icons.x to this
registered line (y), where
y equals 1-24.
Null
iconX, where x is 1-24
For example, if icons.
1="filename1" then
reg.
1.icon="icon1".
Yes
Example: Configure an Icon for a Line Registration
Use the following example to set icons for two line registrations.
Procedure
1. Copy icons to your provisioning or FTP server.
2. Configure the following parameters:
Phone Display and Appearances
Polycom, Inc. 251

▪reg.1.address="7756638509"
▪reg.2.address="7756638708"
▪icons.1="blue.png"
▪icons.2="green.png"
▪reg.1.icon="icon1"
▪reg.2.icon="icon2"
Example: Set Icons for Speed Dial Contacts
Use the following example to set icons as user photos for contacts set as speed dials.
Procedure
1. Copy the icons to the provisioning or FTP server.
2. Configure the following parameters:
▪icons.3="help.png"
▪icons.4="reception.png"
3. In the MAC-Directory.xml file, configure the speed dial contacts and icons.
<item>
<fn>Help</fn>
<ln>Desk</ln>
<ct>1234567890</ct>
<sd>1</sd>
<up>3</up>
</item>
<item>
<fn>Front</fn>
<ln>Reception</ln>
<ct>1234567899</ct>
<sd>2</sd>
<up>4</up>
</item>
Related Links
Parameter Elements for the Local Contact Directory on page 259
Capture Your Device's Current Screen
You can capture your phone or expansion module's current screen.
The Polycom Trio system does not support expansion modules.
Before you can take a screen capture, you must provide power and connect the expansion module to a
phone, and enable the phone's web server using the parameter httpd.enabled.
Procedure
1. In the sip-interop.cfg template, locate the parameter up.screenCapture.enabled .
Phone Display and Appearances
Polycom, Inc. 252

You can add the sip-interop.cfg template to the CONFIG-FILES field of the master configuration
file, or copy the parameter to an existing configuration file.
2. Set the value to 1 and save the configuration file.
3. On the device, go to Settings > Basic > Preferences > Screen Capture.
Note you must repeat step 3 each time the device restarts or reboots.
4. Locate and record the phone's IP address at Status > Platform > Phone > IP Address.
5. Set the phone to the screen you want to capture.
6. In a web browser address field, enter https://<phoneIPaddress>/captureScreen where
<phoneIPaddress> is the IP address you obtained in step 5.
The web browser displays an image showing the phone's current screen. You can save the image
as a BMP or JPEG file.
Capture Current Phone Screen Parameters
User the following parameters to get a screen capture of the current screen on your phone or expansion
module.
Parameters Template Permitted Values Change Causes Restart
or Reboot
sip-interop.cfg up.screenCapture.
enabled
0 (Default) - The Screen
Capture menu is hidden
on the phone.
1 - The Screen Capture
menu displays on the
phone.
When the phone reboots,
screen captures are
disabled from the Screen
Capture menu on the
phone.
Yes
sip-interop.cfg up.screenCapture.
value
0 (Default) - The Screen
Capture feature is
disabled.
1 - The Screen Capture
feature is enabled.
No
Phone Display and Appearances
Polycom, Inc. 253

Directories and Contacts
Topics:
•Local Contact Directory
•Speed Dials
•Corporate Directory
•Call Logs
•Resetting Contacts and Recent Calls Lists on Polycom Trio System
You can configure phones with a local contact directory and link contacts to speed dial buttons.
Additionally, call logs stored in the Missed Calls, Received Calls, and Placed Calls call lists let you view
user phone events like remote party identification, time and date of call, and call duration. This section
provides information on contact directory, speed dial, and call log parameters you can configure on your
Polycom phone.
Local Contact Directory
Polycom phones feature a contact directory file you can use to store frequently used contacts.
The UC Software package includes a template contact directory file named 000000000000-
directory~.xml that is loaded to the provisioning server the first time you boot up a phone with UC
Software or when you reset the phone to factory default settings.
When you first boot the phone out of the box or when you reset the phone to factory default settings, the
phone looks for contact directories in the following order:
• An internally stored local directory
• A personal <MACaddress>-directory.xml file
• A global 000000000000-directory.xml file when the phone substitutes <000000000000>
for its own MAC address.
You can configure the phones to hide the Contact Directory and Favorites options from all screens in the
user interface on all VVX phones except the VVX 1500 phone.
In addition, make sure the dir.local.readonly parameter is enabled to restrict the users to modify
speed dials.
Local Contact Directory Parameters
The following parameters configure the local contact directory.
Polycom, Inc. 254

Local Contact Directory Parameters
Template Parameter Permitted Values
Change Causes
Restart or Reboot
features.cfg dir.local.co
ntacts.maxNu
m
Set the maximum number of contacts
that can be stored in the Local
Contact Directory. The maximum
number varies by phone model, refer
to section ‘Maximum Capacity of the
Local Contact Directory'.
VVX 101, 150, 201: Default 99
contacts, Maximum 99 contacts
VVX 3xx, 4xx, 5xx, 6xx, and business
media phones and business IP
phones: Default 500 contacts,
Maximum 500 contacts
Polycom Trio 8800 and 8500:
• 2000 (default)
• Maximum 3000 contacts
Yes
features.cfg dir.local.re
adonly
0 (default) - Disable read only
protection of the local Contact
Directory.
1 - Enable read-only protection of the
local Contact Directory.
No
features.cfg feature.dire
ctory.enable
d
0 - The local contact directory is
disabled when the Polycom Trio
solution Base Profile is set to Lync.
1 (default)- The local directory is
enabled when the Polycom Trio
solution Base Profile is set to Lync.
No
features.cfg dir.search.f
ield
Specify whether to search the
directory by first name or last name.
0 (default) - Contact directory
searches are sorted by contact's last
name. 1 - Contact directory searches
are sorted by first name.
No
Directories and Contacts
Polycom, Inc. 255

Template Parameter Permitted Values
Change Causes
Restart or Reboot
site.cfg voIpProt.SIP
.specialEven
t.checkSync.
downloadDire
ctory
0 (default) - The phone downloads
updated directory files after receiving
a checksync NOTIFY message.
1 - The phone downloads the updated
directory files along with any software
and configuration updates after
receiving a checksync NOTIFY
message. The files are downloaded
when the phone restarts, reboots, or
when the phone downloads any
software or configuration updates.
Note: The parameter
hotelingMode.type set to 2
or 3 overrides this parameter.
No
features.cfg dir.local.UI
enabled
1 (default) – The Directory menus
provide access to Favorites/Speed
Dial and Contact Directory entries and
display the Favorites quick access
menu on the Home screen of the VVX
500/501 and 600/601 business media
phones.
0 – The local Contact Directory and
Favorites/Speed Dial menu entries
are not available. The Favorites quick
access menu on the Home screen are
not available on the VVX 500/501 and
600/601 business media phones.
Set to 0 when
dir.local.readOnly is set to 1
to add speed dials and macros on the
phone and prevent user modification.
If your call control platform provides
direct contact integration and you
want to prevent any access to the
local directory, set
feature.directory.enabled
=0.
No
Directories and Contacts
Polycom, Inc. 256

Template Parameter Permitted Values
Change Causes
Restart or Reboot
features.cfg feature.paus
eAndWaitDigi
tEntryContro
l.enabled
1 (default) - Enable processing of
control characters in the contact
phone number field. When enabled, ','
or 'p' control characters cause a one
second pause.
For example, ',' or 'p' control
characters cause a one second
pause. ';' or 'w' control character
cause a user prompt that allows a
user-controlled wait. Subsequent
digits entered to the contact field are
dialed automatically.
0 - Disable processing of control
characters.
No
features.cfg up.regOnPhon
e
0 (default) – Contacts you assign to a
line key display on the phone in the
position assigned.
1 – Contacts you assign to a line key
are pushed to the attached expansion
module.
Yes
Maximum Capacity of the Local Contact Directory
The following table lists the maximum number of contacts and maximum file size of the local Contact
Directory for each phone.
To conserve phone memory, use the parameter dir.local.contacts.maxNum to set a lower
maximum number of contacts for the phones.
Maximum File Size and Number of Contacts
Phone Maximum File Size
Maximum Number of
Contacts in File
Polycom Trio 8500 4MB 3000
Polycom Trio 8800 4MB 3000
VVX 101, 150, 201 Not available 99
Creating Per-Phone Directory Files
To create a per-phone, personal directory file, replace <000000000000> in the global file name with the
phone's MAC address: <MACaddress > -directory.xml.
Any changes users make to the contact directory from the phone are stored on the phone drive and
uploaded to the provisioning server in the personal directory (<MACaddress > -directory.xml) file, which
enables you to preserve a contact directory during reboots.
Directories and Contacts
Polycom, Inc. 257
To create a global directory file that you can use to maintain the directory for all phones from the
provisioning server, remove the tilde (~) from the template file name 000000000000-directory.xml. When
you update the global directory file on the provisioning server, the updates are downloaded onto the
phone and combined with the phone specific directory.
Maintaining Per-Phone Directory Files
Using the parameter voIpProt.SIP.specialEvent.checkSync.downloadDirectory , you can
configure the phones to download updated directory files. The files are downloaded when the phone
restarts, reboots, or when the phone downloads any software or configuration updates.
Any changes to either the global or personal directory files are reflected in the directory on the phone
after a restarts. When merging the two files, the personal directory always takes precedence over the
changes in the global directory. Thus, if a user modifies a contact from the global directory, the contact is
saved in the personal directory file, and the contact from the global directory is ignored when the files are
next uploaded.
The phone requests both the per-phone <MACaddress>-directory.xml and global contact directory
000000000000-directory.xml files and merges them for presentation to the user. If you created a per-
phone <MACaddress>-directory.xml for a phone, and you want to use the 000000000000-directory.xml
file, add the 000000000000-directory.xml file to the provisioning server and update the phone's
configuration.
Note: You can duplicate contacts in the Contact Directory on phones registered with the GENBAND
server.
Note: To avoid users accidentally deleting the definitions in the contact directory, make the contact
directory file read only.
Local Contact Directory File Size Parameters
The following table lists the parameters you can configure to set the size of the local contact directory.
The maximum local directory size is limited based on the amount of flash memory in the phone and varies
by phone model. Polycom recommends that you configure a provisioning server that allows uploads to
ensure a back-up copy of the directory when the phone reboots or loses power.
Note that on the VVX 1500, the local directory is by default stored in the phone's non-volatile device
settings and you have the option to use the phone's volatile RAM and set the maximum file size.
Local Contact Directory File Size Parameters
Template Parameter Permitted Values
Change Causes
Restart or Reboot
debug.cfg dir.local.nonV
olatile.maxSiz
e
Set the maximum file size of the local
contact directory stored on the
phone's non-volatile memory.
VVX1500 = 100KB (default)
1 - 100KB
No
Directories and Contacts
Polycom, Inc. 258
Template Parameter Permitted Values
Change Causes
Restart or Reboot
debug.cfg dir.local.vola
tile
0 (default) - The phone uses non-
volatile memory for the local contact
directory.
1 - Enables the use of volatile
memory for the local contact
directory.
No
debug.cfg dir.local.vola
tile.maxSize
Sets the maximum file size of the
local contact directory stored on the
phone's volatile memory.
VVX1500 = 200KB (default)
1 - 200KB
No
Parameter Elements for the Local Contact Directory
The following table describes each of the parameter elements and permitted values that you can use in
the local contact directory.
Local Contact Directory Parameter Elements
Element Definition Permitted Values
fn The contact's first
name.
UTF-8 encoded string of up to 40 bytes1
ln The contact's last
name.
UTF-8 encoded string of up to 40 bytes1
ct Contact, Used by the
phone to address a
remote party in the
same way that a string
of digits or a SIP URL
are dialed manually by
the user. This element
is also used to
associate incoming
callers with a particular
directory entry. The
maximum field length
is 128 characters.
Note: This field cannot
be null or duplicated
UTF-8 encoded string containing digits (the user part of a SIP
URL) or a string that constitutes a valid SIP URL
sd Speed Dial Index,
Associates a particular
entry with a speed dial
key for one-touch
dialing or dialing.
VVX=Null, 1 to 9999
Polycom Trio=20
Directories and Contacts
Polycom, Inc. 259
Element Definition Permitted Values
lb The label for the
contact. The label of a
contact directory item
is by default the label
attribute of the item. If
the label attribute does
not exist or is Null,
then the first and last
names form the label.
A space is added
between first and last
names.
UTF-8 encoded string of up to 40 bytes1
pt Protocol,
The protocol to use
when placing a call to
this contact.
SIP or Unspecified
rt Ring Tone,
When incoming calls
match a directory
entry, this field
specifies the ringtone
to be used.
Null, 1 to 21
dc Divert Contact,
The address to forward
calls to if the Auto
Divert feature is
enabled.
UTF-8 encoded string containing digits (the user part of a SIP
URL) or a string that constitutes a valid SIP URL
ad Auto Divert,
If set to 1, callers that
match the directory
entry are diverted to
the address specified
for the divert contact
element.
Note: If auto-divert is
enabled, it has
precedence over auto-
reject.
0 or 1
Directories and Contacts
Polycom, Inc. 260
Element Definition Permitted Values
ar Auto Reject,
If set to 1, callers that
match the directory
entry specified for the
auto reject element are
rejected.
Note: If auto divert is
also enabled, it has
precedence over auto
reject.
0 or 1
bw Buddy Watching,
If set to 1, this contact
is added to the list of
watched phones.
0 or 1
bb Buddy Block,
If set to 1, this contact
is blocked from
watching this phone.
0 or 1
up User Photo
The contact's photo
icon.
1-24
Related Links
Example: Set Icons for Speed Dial Contacts on page 252
Speed Dials
You can link entries in the local contact directory to speed dial contacts to line keys on the Home or Lines
screen to enable users to place calls quickly using dedicated speed dial buttons.
The number of supported speed dial entries varies by phone model
Speed Dial Index Ranges
Phone Model Range
Polycom Trio 8500 1 - 20
Polycom Trio 8800 1 - 20
Directories and Contacts
Polycom, Inc. 261
Speed Dial Contacts Parameters
After setting up your per-phone directory file (<MACaddress > -directory.xml), enter a number in the
speed dial <sd> field to display a contact directory entry as a speed dial contact on the phone. Speed
dial entries automatically display on unused line keys on the phone and are assigned in numerical order.
On some call servers, enabling presence for an active speed dial contact displays that contact's status on
the speed dial's line key label.
Use the parameters in the following table, which identifies the directory XML file and the parameters you
need to set up your speed dial contacts.
Speed Dial Parameters
Template Parameter Permitted Values
The template contact directory
file.
000000000000-directory~.xml
dir.local.contacts.maxFa
vIx
Configure the maximum number of
speed dial contacts that can display on
the Polycom Trio Home screen.
Enter a speed dial index number in the
<sd>x</sd> element in the <MAC
address>-directory.xml file to display a
contact directory entry as a speed dial
key on the phone. Speed dial contacts
are assigned to unused line keys and
to entries in the phone's speed dial list
in numerical order.
Corporate Directory
You can connect phones to a corporate directory server that supports the Lightweight Directory Access
Protocol (LDAP), version 3.
After you set up the corporate directory on the phones, users can search for contacts in the directory,
place calls to directory contacts, and save entries to the local contact directory on the phone.
Polycom phones support corporate directories that support server-side sorting and those that do not. For
servers that do not support server-side sorting, sorting is performed on the phone.
Note: Polycom recommends using corporate directories that have server-side sorting for better
performance. Consult your LDAP administrator when making any configuration changes for the
corporate directory. For more information on LDAP attributes, see RFC 4510 - Lightweight
Directory Access Protocol (LDAP): Technical Specification Road Map
Corporate Directory Parameters
Use the parameters in the following table to configure the corporate directory.
Note that the exact configuration of a corporate directory depends on the LDAP server you use.
Directories and Contacts
Polycom, Inc. 262
Note: For detailed explanations and examples of all currently supported LDAP directories, see
Technical Bulletin 41137: Best Practices When Using Corporate Directory on Polycom Phones at
Polycom Engineering Advisories and Technical Notifications.
Use the Corporate Directory
Template Parameter Permitted Values
Change Causes
Restart or Reboot
features.cf
g
dir.corp.address Set the IP address or hostname of the
LDAP server interface to the corporate
directory.
Null (default)
IP address
Hostname
FQDN
Yes
features.cf
g
dir.corp.allowCred
entialsFromUI.enab
led
Enable users to enter LDAP credentials
on the phone.
0 (default) – Users are not prompted to
enter credentials on the phone when
they access the Corporate Directory.
1 – Users are prompted to enter
credentials on the phone when
accessing the Corporate Directory for
the first time.
Note: Users are only prompted to enter
their credentials when credentials are
not added through configuration or after
a login failure.
No
features.cf
g
dir.corp.alt.proto
col
Set a directory protocol used to
communicate to the corporate directory.
sopi (default)
UTF-8 encoding string
No
features.cf
g
dir.corp.alt.trans
port
Choose a transport protocol used to
communicate to the corporate directory.
TCP (default)
TLS
No
features.cf
g
dir.corp.attribute
.x.addstar
Determine if the wild-card character,
asterisk(*), is appended to the LDAP
query field.
0
1 (default)
Yes
Directories and Contacts
Polycom, Inc. 263
Template Parameter Permitted Values
Change Causes
Restart or Reboot
features.cf
g
dir.corp.attribute
.x.filter
Set the filter string for this parameter,
which is edited when searching.
Null (default)
UTF-8 encoding string
Yes
features.cf
g
dir.corp.attribute
.x.label
Enter the label that shows when data is
displayed.
Null (default)
UTF-8 encoding string
Yes
features.cf
g
dir.corp.attribute
.x.name
Enter the name of the parameter to
match on the server. Each name must
be unique; however, a global address
book entry can have multiple
parameters with the same name. You
can configure up to eight parameters (x
= 1 to 8).
Null (default)
UTF-8 encoding string
Yes
features.cf
g
dir.corp.attribute
.x.searchable
Determine whether quick search on
parameter x (if x is 2 or more) is
enabled or disabled.
0 (default)
1
Yes
features.cf
g
dir.corp.attribute
.x.sticky
0 (default) —the filter string criteria for
attribute x is reset after a reboot.
1—the filter string criteria is retained
through a reboot.
If you set an attribute to be sticky (set
this parameter to 1), a ‘*' displays before
the label of the attribute on the phone.
Yes
Directories and Contacts
Polycom, Inc. 264

Template Parameter Permitted Values
Change Causes
Restart or Reboot
features.cf
g
dir.corp.attribute
.x.type
Define how x is interpreted by the
phone. Entries can have multiple
parameters of the same type.
first_name
last_name (default)
phone_number
SIP_address
other
If the user saves the entry to the local
contact directory on the phone,
first_name, last_name, and
phone_number are copied. The user
can place a call to the phone_number
and SIP_address from the global
address book directory.
Yes
features.cf
g
dir.corp.auth.useL
oginCredentials
0 (default)
1
No
features.cf
g
dir.corp.autoQuery
SubmitTimeout
Set the timeout (in seconds) between
when the user stops entering characters
in the quick search and when the
search query is automatically submitted.
0 (default)—there is no timeout and
automatic submit is disabled.
0 - 60 seconds
Yes
features.cf
g
dir.corp.backGroun
dSync
Determine if background downloading
from the LDAP server is allowed.
0 (default)
1
Yes
features.cf
g
dir.corp.backGroun
dSync.period
Set the time (in seconds) the corporate
directory cache is refreshed after the
corporate directory feature has not been
used for the specified period of time.
86400 (default)
3600 to 604800
Yes
features.cf
g
dir.corp.baseDN Enter the base domain name, which is
the starting point for making queries on
the LDAP server.
Null (default)
UTF-8 encoding string
Yes
Directories and Contacts
Polycom, Inc. 265

Template Parameter Permitted Values
Change Causes
Restart or Reboot
features.cf
g
dir.corp.bindOnIni
t
Determine if bind authentication is used
on initialization.
1 (default)
0
Yes
features.cf
g
dir.corp.cacheSize Set the maximum number of entries that
can be cached locally on the phone.
128 (default)
32 to 256
For VVX 101, the permitted values are
32 to 64 where 64 is the default.
Yes
features.cf
g
dir.corp.customErr
or
Enter the error message to display on
the phone when the LDAP server finds
an error.
Null (default)
UTF-8 encoding string
No
features.cf
g
dir.corp.domain 0 to 255 No
features.cf
g
dir.corp.filterPre
fix
Enter the predefined filter string for
search queries.
(objectclass=person) (default)
UTF-8 encoding string
Yes
features.cf
g
dir.corp.pageSize Set the maximum number of entries
requested from the corporate directory
server with each query.
32 (default)
8 to 32
Yes
features.cf
g
dir.corp.password Enter the password used to
authenticate to the LDAP server.
Null (default)
UTF-8 encoding string
No
Directories and Contacts
Polycom, Inc. 266

Template Parameter Permitted Values
Change Causes
Restart or Reboot
features.cf
g
dir.corp.persisten
tCredentials
Set to securely store and encrypt LDAP
directory user credentials on the phone.
Enable
dir.corp.allowCredentialsF
romUI.enabled to allow users to
enter credentials on the phone.
0 (default)
1
Note: If you disable the feature after en-
abling it, then all the saved user creden-
tials are deleted for all users.
features.cf
g
dir.corp.port Enter the port that connects to the
server if a full URL is not provided.
389 (default for TCP)
636 (default for TLS)
0
Null
1 to 65535
Yes
features.cf
g
dir.corp.querySupp
ortedControlOnInit
Determine if the phone makes an initial
query to check the status of the server
when booting up.
0
1 (default)
No
features.cf
g
dir.corp.scope sub (default)—a recursive search of all
levels below the base domain name is
performed.
one —a search of one level below the
base domain name is performed.
base—a search at the base domain
name level is performed.
Yes
features.cf
g
dir.corp.serverSor
tNotSupported
0 (default) – The server supports
server-side sorting.
1 – The server does not support server-
side sorting, so the phone handles the
sorting.
No
Directories and Contacts
Polycom, Inc. 267

Template Parameter Permitted Values
Change Causes
Restart or Reboot
features.cf
g
dir.corp.sortContr
ol
Determine how a client can make
queries and sort entries.
0 (default)—leave sorting as negotiated
between the client and server.
1—force sorting of queries, which
causes excessive LDAP queries and
should only be used to diagnose LDAP
servers with sorting problems.
Yes
features.cf
g
dir.corp.transport Specify whether a TCP or TLS
connection is made with the server if a
full URL is not provided.
TCP (default)
TLS
Null
Yes
features.cf
g
dir.corp.user Enter the user name used to
authenticate to the LDAP server.
Null (default)
UTF-8 encoding string
No
features.cf
g
dir.corp.viewPersi
stence
0 (default) — the corporate directory
search filters and browsing position are
reset each time the user accesses the
corporate directory.
1— the search filters and browsing
position from the previous session are
displayed each time the user accesses
the corporate directory.
Yes
features.cf
g
dir.corp.vlv.allow Determine whether virtual view list
(VLV) queries are enabled and can be
made if the LDAP server supports VLV.
0 (default)
1
Yes
features.cf
g
dir.corp.vlv.sortO
rder
Enter the list of parameters, in exact
order, for the LDAP server to use when
indexing. For example: sn,
givenName,
telephoneNumber .
Null (default)
list of parameters
Yes
Directories and Contacts
Polycom, Inc. 268
Template Parameter Permitted Values
Change Causes
Restart or Reboot
features.cf
g
feature.contacts.e
nabled
1 (default) - The Contacts icon displays
on the Home screen, the global menu,
and in the dialer.
0 - Disable display of the Contacts icon.
No
features.cf
g
feature.corporateD
irectory.enabled
0 (default) - The corporate directory
feature is disabled and the icon is
hidden.
1 (default) - The corporate directory is
enabled and the icon shows.
No
Call Logs
The phone records and maintains user phone events to a call log, which contains call information such as
remote party identification, time and date of the call, and call duration.
The log is stored on the provisioning server as an XML file named <MACaddress>-calls.xml. If you want
to route the call logs to another server, use the CALL_LISTS_DIRECTORY field in the master
configuration file. All call logs are enabled by default.
The phones automatically maintain the call log in three separate call lists that users can access: Missed
Calls, Received Calls, and Placed Calls. Users can clear lists manually on their phones, or delete
individual records or all records in a group (for example, all missed calls).
Call Log Parameters
Use the parameters in the following table to configure call logs
Call Log Parameters
Template Parameter Permitted Values
Change Causes
Restart or Reboot
site.cfg,
features.cfg
callLists.col
lapseDuplicat
es
Lync Base Profile – 0 (default)
Generic Base Profile – 1 (default)
1 – Consecutive incomplete calls to/
from the same party and in the same
direction are collapsed into one
record in the calls list. The collapsed
entry displays the number of
consecutive calls.
0 – Each call is logged individually in
the calls list.
No
Directories and Contacts
Polycom, Inc. 269

Template Parameter Permitted Values
Change Causes
Restart or Reboot
site.cfg,
features.cfg
callLists.log
ConsultationC
alls
Lync Base Profile – 1 (default)
Generic Base Profile – 1 (default)
0 – Consultation calls not joined into
a conference call are not logged as
separate calls in the calls list.
1 – Each consultation calls is logged
individually in the calls list.
No
features.cfg feature.callL
ist.enabled
1 (default) - Allows you to enable the
missed, placed, and received call
lists on all phone menus including
the Home screen and dial pad.
0 - Disables all call lists.
Hiding call lists from the Home
screen and dial pad requires UCS
5.4.2 RevAA or higher.
No
features.cfg feature.callL
istMissed.ena
bled
0 (Default) - The missed call list is
disabled.
1 - The missed call list is enabled.
To enable the missed, placed, or
received call lists,
feature.callList.enabled
must be enabled.
No
features.cfg feature.callL
istPlaced.ena
bled
0 (Default) - The placed call list is
disabled.
1 - The placed call list is enabled.
To enable the missed, placed, or
received call lists,
feature.callList.enabled
must be enabled.
No
features.cfg feature.callL
istReceived.e
nabled
0 (Default) - The received call list is
disabled.
1 - The received call list is enabled.
To enable the missed, placed, or
received call lists,
feature.callList.enabled
must be enabled.
Directories and Contacts
Polycom, Inc. 270

Template Parameter Permitted Values
Change Causes
Restart or Reboot
features.cfg feature.excha
ngeCallLog.en
abled
If Base Profile is:
Generic - 0 (default)
Skype for Business - 1 (default)
1 - The Exchange call log feature is
enabled, user call logs are
synchronized with the server, and
the user call log history of Missed,
Received, and outgoing calls can be
retrieved on the phone.
You must also enable the parameter
feature.callList.enabled
to use the Exchange call log feature.
• The value of the configuration
parameter
callLists.collapseDupl
icates that collapses call lists
has no effect in a Skype for
Business environment.
• The local call logs are not
generated when the following
parameters are disabled:
◦ feature.callListMissed.enable
d
◦ feature.callListPlaced.enabled
◦ feature.callListReceived.enabl
ed
0 - The Exchange call log feature is
disabled, the user call logs history
cannot be retrieved from the
Exchange server, and the phone
generates call logs locally.
Call Log Elements and Attributes
The following table describes each element and attribute that displays in the call log.
You can place the elements and attributes in any order in your configuration file.
Call Log Elements and Attributes
Element Permitted Values
direction In, Out
Call direction with respect to the user.
Directories and Contacts
Polycom, Inc. 271
Element Permitted Values
disposition Busy, Forwarded, Normal, Partial, Preempted,
Rejected, RemotelyHandled, Transferred
Indicates what happened to the call. When a call entry
is first created, the disposition is set to Partial.
line Positive integer
The line (or registration) index.
protocol SIP
The line protocol.
startTime String
The start time of the call. For example:
2010-01-05T12:38:05 in local time.
duration String
The duration of the call, beginning when it is connected
and ending when the call is terminated.For example:
PT1H10M59S .
count Positive Integer
The number of consecutive missed and abandoned
calls from a call destination.
destination Address
The original destination of the call.
For outgoing calls, this parameter designates the
outgoing call destination; the name is initially supplied
by the local phone (from the name field of a local
contact entry) but may later be updated via call
signaling. This field should be used for basic redial
scenarios.
For incoming calls, the called destination identifies the
requested party, which may be different than any of the
parties that are eventually connected (the destination
may indicate a SIP URI which is different from any SIP
URI assigned to any lines on the phone).
source Address
The source of the call (caller ID from the call recipient's
perspective).
Connection Address
Directories and Contacts
Polycom, Inc. 272

Element Permitted Values
An array of connected parties in chronological order.
As a call progresses, the connected party at the far end
may change, for example, if the far end transfers the
call to someone else. The connected element allows
the progression of connected parties, when known, to
be saved for later use. All calls that contain a
connected state must have at least one connection
element created.
finalDestination Address
The final connected party of a call that has been
forwarded or transferred to a third party.
Resetting Contacts and Recent Calls Lists on
Polycom Trio System
You can reset the Contacts list and Recent call lists are stored locally on the Polycom Trio 8800 system to
their default settings.
Procedure
1. On the phone, go to Settings > Advanced.
2. Enter the administrative password (default 456).
3. Select Reset to defaults > Reset User Data.
4. When prompted “Are you sure?”, select Yes.
Directories and Contacts
Polycom, Inc. 273

Call Controls
Topics:
•Microphone Mute
•Persistent Microphone Mute
•Call Timer
•Called Party Identification
•Connected Party Identification
•Calling Party Identification
•Remote Party Caller ID from SIP Messages
•Calling Line Identification
•SIP Header Warnings
•Distinctive Call Waiting
•Do Not Disturb
•Remote Party Disconnect Alert Tone
•Call Waiting Alerts
•Missed Call Notifications
•Call Hold
•Call Transfer
•Call Forwarding
•Automatic Off-Hook Call Placement
•Multiple Line Keys Per Registration
•Multiple Call Appearances
•Bridged Line Appearance
•Voicemail
•Local Call Recording
▪Local and Centralized Conference Calls on Polycom Trio
•Conference Meeting Dial-In Options
•Hybrid Line Registration
•Local Digit Map
▪Enhanced 911 (E.911)
•Multilevel Precedence and Preemption (MLPP) for Assured Services - Session Initiation
Protocol (AS-SIP)
▪International Dialing Prefix
This section shows you how to configure call control features.
Polycom, Inc. 274
Microphone Mute
All phones have a microphone mute button.
By default, when you activate microphone mute, a red LED glows or a mute icon displays on the phone
screen, depending on the phone model you are using.
You cannot configure the microphone mute feature.
However, you can configure the Polycom Trio 8800 and 8500 systems to play an audible tone when the
mute status of the device is changed either from any of the mute buttons of the system (device and any
connected devices) or far-end system (remote mute). This allows you to know if the system microphones
are in a mute or un-mute state. In addition, you can set a periodic reminder which plays a tone
periodically when the phone is in the mute state. The time interval can be set using configuration
parameter and the value must not be less than 5 seconds.
Microphone Mute Parameters
The following parameters configure microphone mute status alert tones.
Mute Status Alert Tone Parameters
Template Parameter Permitted Description Change
Causes Restart
or Reboot
features.cfg se.touchFeedback.enab
led
0 - Does not play an alert tone
when the mute status is
changed on the Polycom Trio
8800 or 8500 system.
1 - An alert tone is played when
the mute status is changed
either from the Polycom Trio
8800, 8500, or far-end system.
No
features.cfg call.mute.reminder.pe
riod
The time interval in seconds to
play an alert tone periodically
when the Polycom Trio 8800 or
8500 system is in the mute
state.
5 (default)
5 - 3600
No
Persistent Microphone Mute
With this feature, you can enable the microphone mute to persist across all calls managed on a phone.
By default, users can mute the microphone during an active call, and the microphone is unmuted when
the active call ends. With persistent microphone mute enabled, when a user mutes the microphone during
an active call, the microphone remains muted for all following calls until the user unmutes the microphone
or the phone restarts.
Call Controls
Polycom, Inc. 275

\When a user mutes the microphone when the phone is idle, the mute LED glows but no icon displays on
the screen. When a user initiates a new active call with the microphone muted, the mute LED glows and a
Mute icon displays on the phone screen.
Persistent Microphone Mute Parameters
Use the following parameter to enable persistent microphone mute.
Persistent Microphone Mute Parameters
Template Parameter Permitted Values
Change Causes
Restart or Reboot
features.cfg feature.persis
tentMute.enabl
ed
0 (default) - Mute ends when the
active call ends or when the phone
restarts.
1 - Enable the persistent mute
feature.
Yes
Call Timer
By default, a call timer displays on the phone's screen during calls, and a separate call duration timer
displays the hours, minutes, and seconds for each call in progress.
You cannot configure the display of the call timer.
Called Party Identification
By default, the phone displays and logs the identity of all parties called from the phone.
The phone obtains called party identities from network signaling. Because called party identification is a
default feature, the phone displays caller IDs matched to the call server and does not match IDs to entries
in the contact directory or corporate directory.
Calling Party Identification Parameters
Use the parameters in the following table to configure Calling Party Identification.
Call Controls
Polycom, Inc. 276

Calling Party Identification Parameters
Template Parameter Permitted Values
Change Causes
Restart or Reboot
reg-basic.cfg call.callsPerL
ineKey
Set the maximum number of
concurrent calls per line key. This
parameter applies to all registered
lines.
Note that this parameter can be
overridden by the per-registration
parameter
reg.x.callsPerLineKey .
24
1 - 24
VVX 101, 201
8 (default)
1- 8
No
features.cfg up.useDirector
yNames
1 (default) - The name field in the
local contact directory is used as
the caller ID for incoming calls from
contacts in the local directory.
Note: Outgoing calls and corporate
directory entries are not matched.
0 - Names provided through
network signaling are used for
caller ID.
No
Connected Party Identification
By default, the phone displays and logs the identities of remote parties you connect to if the call server
can derive the name and ID from network signaling.
In cases where remote parties have set up certain call features, the remote party you connect to—and the
caller ID that displays on the phone—may be different than the intended party's. For example, Bob places
a call to Alice, but Alice has call diversion configured to divert Bob's incoming calls to Fred. In this case,
the phone logs and displays the connection between Bob and Fred. The phone does not match party IDs
to entries in the contact directory or the corporate directory.
Calling Party Identification
By default, the phone displays the identity of incoming callers if available to the phone through the
network signal.
If the incoming call address has been assigned to the contact directory, you can enable the phones to
display the name assigned to contacts in the contact directory. However, the phone cannot match the
identity of calling parties to entries in the corporate directory.
Call Controls
Polycom, Inc. 277
Calling Party Identification Parameters
Use the parameters in the following table to configure Calling Party Identification.
Calling Party Identification Parameters
Template Parameter Permitted Values
Change Causes
Restart or Reboot
features.cfg up.useDirector
yNames
1 (default) - The name field in the
local contact directory is used as
the caller ID for incoming calls from
contacts in the local directory.
Note: Outgoing calls and corporate
directory entries are not matched.
0 - Names provided through
network signaling are used for
caller ID.
No
Remote Party Caller ID from SIP Messages
You can specify which SIP request and response messages to use to retrieve caller ID information.
Remote Party Caller ID from SIP Messages Parameters
Use the following parameters to specify which SIP request and response messages to use to retrieve
caller ID information.
Call Controls
Polycom, Inc. 278

Remote Party Caller ID from SIP Messages Parameters
Template Parameter Permitted Values
Change Causes
Restart or Reboot
sip-
interop
.cfg
voIpProt.SIP.CID
.request.sourceS
ipMessage
Specify which header in the SIP
request to retrieve remote party caller
ID from. You can use:
•voIpProt.SIP.callee.sou
rcePreference
•voIpProt.SIP.caller.sou
rcePreference
•voIpProt.SIP.CID.source
Preference
UPDATE takes precedence over the
value of this parameter.
NULL (default) - Remote party caller
ID information from INVITE is used.
INVITE
PRACK
ACK
0-6
This parameter does not apply to
shared lines.
No
sip-
interop
.cfg
voIpProt.SIP.CID
.response.source
SipMessage
Specify which header in the SIP
request to retrieve remote party caller
ID from. You can use:
•voIpProt.SIP.callee.sou
rcePreference
•voIpProt.SIP.caller.sou
rcePreference
•voIpProt.SIP.CID.source
Preference
NULL (default) - The remote party
caller ID information from the last SIP
response is used.
100, 180, 183, 200
0-3
This parameter does not apply to
shared lines.
No
Call Controls
Polycom, Inc. 279

Calling Line Identification
The Calling Line Identity Presentation (CLIP) displays the phone number of the caller on the phone
screen.
You can configure this feature by using the parameters in the following table.
Calling Line Identification Parameters
Calling Line Identification Parameters
Template Parameter Permitted Values
Change
Causes Restart
or Reboot
features.c
fg
voIpProt.SIP.CID.so
urcePreference
Specify the priority order for the sources of
caller ID information. The headers can be in
any order.
Null (default) - Caller ID information comes
from P-Asserted-Identity, Remote-Party-ID,
and From in that order.
From,P-Asserted-Identity, Remote-Party-ID
P-Asserted-Identity,From,Remote-Party-ID
Supported Headers Default Order: P-
Asserted-Identity,Remote-Party-ID,From
Note: By default callee and caller will take
identity order from
voIpProt.SIP.CID.sourcePrefer
ence.
If
voIpProt.SIP.Caller.SourcePre
ference or
voIpProt.SIP.Callee.SourcePre
ference are configured then the order set
by
voIpProt.SIP.CID.sourcePrefer
ence is ignored.
No
sip-
interop.cf
g
voIpProt.SIP.caller
.sourcePreference
Set the priority order to display the caller's
identity for incoming calls.
Null (default)
0-120
Supported Headers Default Order: P-
Asserted-Identity,Remote-Party-ID,From
String
No
Call Controls
Polycom, Inc. 280
Template Parameter Permitted Values
Change
Causes Restart
or Reboot
features.c
fg
voIpProt.SIP.callee
.sourcePreference
Set the priority order to display the callee's
identity for outgoing calls.
Null (default)
Supported Headers Default Order: P-
Asserted-Identity,Remote-Party-ID,From
String
No
SIP Header Warnings
You can configure the warning field from a SIP header to display a pop-up message on the phone, for
example, when a call transfer failed due to an invalid extension number.
You can display pop-up messages in any language supported by the phone. The messages display for
three seconds unless overridden by another message or action.
For a list of supported SIP header warnings, see the article ‘Supported SIP Request Headers' in Polycom
Knowledge Base.
SIP Header Warning Parameters
You can use the parameters in the following table to enable the warning display or specify which
warnings to display.
SIP Header Warning Parameters
Template Parameter Permitted Values
Change Causes
Restart or Reboot
sip-interop.cfg voIpProt.SIP.he
ader.warning.en
able
0 (default) - The warning header
is not displayed.
1 - The warning header is
displayed if received.
No
sip-interop.cfg voIpProt.SIP.he
ader.warning.co
des.accept
Specify a list of accepted warning
codes.
Null (default) - All codes are
accepted. Only codes between
300 and 399 are supported.
For example, if you want to
accept only codes 325 to 330:
voIpProt.SIP.header.wa
rning.codes.accept=325
,326,327,328,329,330
No
Call Controls
Polycom, Inc. 281

Distinctive Call Waiting
You can use the alert-info values and class fields in the SIP header to map calls to distinct call-waiting
types.
You can apply three call waiting types: beep, ring, and silent. The following table shows you the
parameters you can configure for this feature. This feature requires call server support.
Distinctive Call Waiting Parameters
You can use the alert-info values and class fields in the SIP header to map calls to distinct call-waiting
types.
You can apply three call waiting types: beep, ring, and silent. The following table lists available
parameters. This feature requires call server support.
Distinctive Call Waiting Parameters
Template Parameter Permitted Values
Change Causes
Restart or Reboot
sip-interop.cfg voIpProt.SIP.al
ertInfo.x.class
Alert-Info fields from INVITE
requests are compared as many
of these parameters as are
specified (x=1, 2, ..., N) and if a
match is found, the behavior
described in the corresponding
ring class is applied.
default (default)
No
sip-interop.cfg voIpProt.SIP.al
ertInfo.x.value
Specify a ringtone for single
registered line using a string to
match the Alert-Info header in the
incoming INVITE.
NULL (default)
No
Do Not Disturb
You can enable Do Not Disturb (DND) locally on the phone or on the server.
The local DND feature is enabled by default, and users can enable or disable DND for all or individual
registered lines on the phone. When enabled, users are not notified of incoming calls placed to their line.
Server-Based Do Not Disturb
If you want to enable server-based DND, you must enable the feature on both a registered phone and on
the server.
The following conditions apply for server-based DND:
Call Controls
Polycom, Inc. 282
• Server-based DND can be applied to multiple registered lines on a phone; however, applying DND
to individual registrations is not supported.
• Server-based DND cannot be enabled on a phone configured as a shared line.
• If server-based DND is enabled but not turned on when the DND feature is enabled on the phone,
the “Do Not Disturb” message displays on the phone, but incoming calls continue to ring.
• Server-based DND disables local Call Forward and DND, however, if an incoming is not routed
through the server, an audio alert still plays on the phone.
Do Not Disturb Parameters
Use the parameters in the following table to configure the local DND feature.
Do Not Disturb Parameters
Template Parameter Permitted Values
Change Causes
Restart or Reboot
features.cfg feature.doNotDi
sturb.enable
1(default) - Enable Do Not
Disturb (DND).
0 - Disable Do Not Disturb
(DND).
Yes
sip-interop.cfg voIpProt.SIP.se
rverFeatureCont
rol.dnd
0 (default) - Disable server-based
DND.
1 - Server-based DND is
enabled. Server and local phone
DND are synchronized.
No
Call Controls
Polycom, Inc. 283

Template Parameter Permitted Values
Change Causes
Restart or Reboot
sip-interop.cfg voIpProt.SIP.se
rverFeatureCont
rol.localProces
sing.dnd
This parameter depends on the
value of
voIpProt.SIP.serverFea
tureControl.dnd .
If set to 1 (default) and
voIpProt.SIP.serverFea
tureControl.dnd is set to
1, the phone and the server
perform DND.
If set to 0 and
voIpProt.SIP.serverFea
tureControl.dnd is set to
1, DND is performed on the
server-side only, and the phone
does not perform local DND.
If both
voIpProt.SIP.serverFea
tureControl.localProce
ssing.dnd and
voIpProt.SIP.serverFea
tureControl.dnd are set to
0, the phone performs local DND
and the localProcessing
parameter is not used.
No
sip-interop.cfg call.rejectBusy
OnDnd
If 1 (default), and DND is turned
on, the phone rejects incoming
calls with a busy signal.
If 0, and DND is turned on, the
phone gives a visual alert of
incoming calls and no audio
ringtone alert.
Note: This parameter does not
apply to shared lines since not all
users may want DND enabled.
No
Call Controls
Polycom, Inc. 284

Template Parameter Permitted Values
Change Causes
Restart or Reboot
reg-
advanced.cfg
call.donotdistu
rb.perReg
This parameter determines if the
do-not-disturb feature applies to
all registrations on the phone or
on a per-registration basis.
0 (default) - DND applies to all
registrations on the phone.
1 - Users can activate DND on a
per-registration basis.
Note: If
voIpProt.SIP.serverFea
tureControl.dnd is set to
1 (enabled), this parameter is
ignored.
No
Remote Party Disconnect Alert Tone
Remote Party Disconnect Alert Tone alerts users when the call has been disconnected by a remote party
or network.
When a remote party or network on an active call gets disconnected, an alert is played to notify the user
about the lost connection. The tone is played only for an active call.
Remote Party Disconnect Alert Tone Parameters
You can configure this feature by using the parameter in the following table.
Remote Party Disconnect Alert Tone Parameters
Template Parameter Permitted Values
features.
cfg
call.remoteDisconnec
t.toneType
Choose an alert tone to play when the remote party
disconnects call.
Silent (Default)
messageWaiting, instantMessage, remoteHoldNotification,
localHoldNotification, positiveConfirm, negativeConfirm,
welcome, misc1, misc2, misc3, misc4, misc5, misc6, misc7,
custom1, custom2, custom3, custom4, custom5, custom6,
custom7, custom8, custom9, custom10
Call Waiting Alerts
By default, the phone alerts users to incoming calls while a user is in an active call.
You can choose to disable these call waiting alerts and specify ringtones for incoming calls.
Call Controls
Polycom, Inc. 285

Call Waiting Alert Parameters
Use the parameters in the following table to configure call waiting alerts.
Call Waiting Alert Parameters
Template Parameter Permitted Values
Change Causes
Restart or Reboot
sip-interop.cfg call.callWaitin
g.enable
Enable or disable call waiting.
1 (default) - The phone alerts you
to an incoming call while you are
in an active call. If 1, and you end
the active call during a second
incoming call, you are alerted to
the second incoming call.
0 - You are not alerted to
incoming calls while in an active
call and the incoming call is
treated as if you did not answer
it.
No
sip-interop.cfg call.callWaitin
g.ring
Specifies the ringtone of
incoming calls when another call
is active. If no value is set, the
default value is used.
beep (default) - A beep tone
plays through the selected audio
output mode on the active call.
ring - The configured ringtone
plays on the speaker.
silent - No ringtone.
No
Missed Call Notifications
By default, a counter with the number of missed calls displays on the Recent Calls icon on the phone.
You can configure the phone to record all missed calls or to display only missed calls that arrive through
the SIP server. You can also enable missed call notifications for each registered line on a phone.
Missed Call Notification Parameters
Use the following table to configure options for missed call notifications.
Call Controls
Polycom, Inc. 286
Missed Call Notification Parameters
Template Parameter Permitted Values
Change Causes
Restart or Reboot
reg-
advanced.cfg
call.missedCa
llTracking.x.
enabled
1 (default) - Missed call tracking for a
specific registration is enabled.
If
call.missedCallTracking.x.en
abled is set to 0, then the missed call
counter is not updated regardless of what
call.serverMissedCalls.x.ena
bled is set to (and regardless of how the
server is configured) and the missed call
list does not display in the phone menu.
If
call.missedCallTracking.x.en
abled is set to 1 and
call.serverMissedCalls.x.ena
bled is set to 0, then the number of
missed calls is incremented regardless of
how the server is configured.
If
call.missedCallTracking.x.en
abled is set to 1 and
call.serverMissedCalls.x.ena
bled is set to 1, then the handling of
missed calls depends on how the server is
configured.
Yes
reg-
advanced.cfg
call.serverMi
ssedCall.x.en
abled
0 (default) - All missed-call events
increment the counter for a specific
registration.
1 - Only missed-call events sent by the
server will increment the counter.
Note: This feature is supported only with
the BroadSoft Synergy call server
(previously known as Sylantro).
Yes
Call Hold
Call hold enables users to pause activity on an active call so that they can use the phone for another task,
such as searching the phone's menu for information.
When an active call is placed on hold, a message displays informing the held party that they are on hold.
If supported by the call server, you can enter a music-on-hold URI. For more information, see RFC Music
on Hold draft-worley-service-example.
Call Controls
Polycom, Inc. 287

Call Hold Parameters
See the following table for a list of available parameters you can configure for this feature.
Call Hold Parameters
Template Parameter Permitted Values
Change Causes
Restart or Reboot
sip-
interop.cfg
voIpProt.SIP.useRF
C2543hold
0 (default) - SDP media direction
parameters (such as a=sendonly) per
RFC 3264 when initiating a call.
1 - the obsolete c=0.0.0.0 RFC2543
technique is used when initiating a call.
No
sip-
interop.cfg
voIpProt.SIP.useSe
ndonlyHold
1 (default) - The phone will send a
reinvite with a stream mode parameter
of “ sendonly ” when a call is put on
hold.
0 - The phone will send a reinvite with a
stream mode parameter of
“ inactive ” when a call is put on
hold
Note: The phone will ignore the value of
this parameter if set to 1 when the
parameter
voIpProt.SIP.useRFC2543hol
d is also set to 1 (default is 0).
No
sip-
interop.cfg
call.hold.localRem
inder.enabled
0 (default) - Users are not reminded of
calls that have been on hold for an
extended period of time.
1 - Users are reminded of calls that
have been on hold for an extended
period of time.
Yes
sip-
interop.cfg
call.hold.localRem
inder.period
Specify the time in seconds between
subsequent hold reminders.
60 (default)
Yes
sip-
interop.cfg
call.hold.localRem
inder.startDelay
Specify a time in seconds to wait before
the initial hold reminder.
90 (default)
Yes
sip-
interop.cfg
voIpProt.SIP.music
OnHold.uri
A URI that provides the media stream to
play for the remote party on hold. This
parameter is used if
reg.x.musicOnHold.uri is Null.
Null (default)
SIP URI
No
Call Controls
Polycom, Inc. 288

Hold Implementation
The phone supports two currently accepted means of signaling hold.
The phone can be configured to use either hold signaling method. The phone supports both methods
when signaled by the remote endpoint.
Supported Hold Methods
Method Notes
Signal the media directions with the “a” SDP media
attributes sendonly, recvonly, inactive, or sendrecv.
Preferred method.
Set the “c” destination addresses for the zmedia streams
in the SDP to zero. For example, c=0.0.0.0
No longer recommended due to RTCP problems
associated with this method.
Receiving sendrecv, sendonly, or inactive from the
server causes the phone to revert to the other hold
method.
Call Transfer
The call transfer feature enables users to transfer an existing active call to a third-party address.
You can configure the call transfer feature and set the default transfer type.
Users can perform the following types of call transfers:
• Blind Transfer—Users complete a call transfer without speaking with the other party first.
• Consultative Transfer—Users speak with the other party before completing the transfer.
By default, users can complete a call transfer without waiting for the other party to answer the call
first, which is a Blind Transfer. In this case, Party A can transfer Party B's call to Party C before
Party C answers the transferred call. You can disable the blind transfer feature so that users must
wait for the other party to answer before completing the transfer.
Call Transfer Parameters
Use the following table to specify call transfer behavior.
Call Controls
Polycom, Inc. 289

Call Transfer Parameters
Template Parameter Permitted Values
Change Causes
Restart or Reboot
sip-
interop.cfg
voIpProt.SIP.allow
TransferOnProceedi
ng
1 (default) - Transfer during the
proceeding state of a consultation call is
enabled.
0 - Transfer during the proceeding state
of a consultation call is disabled
2 - Phones will accept an INVITE with
replaces for a dialog in early state. This
is needed when using transfer on
proceeding with a proxy call server such
as openSIPS, reSIProcate or SipXecs.
No
features.cf
g
call.defaultTransf
erType
Set the transfer type the phone uses
when transferring a call.
Generic Base Profile: Consultative
(default) - Users can immediately
transfer the call to another party.
Skype Base Profile: Blind (default) - The
call is placed on hold while a new call is
placed to the other party.
No
Call Forwarding
Polycom phones support a flexible call forwarding feature that enables users to forward incoming calls to
another contact or phone line.
Users can enable call forwarding in the following ways:
• To all calls
• To incoming calls from a specific caller or extension
• During an incoming call
• When the phone is busy
• When do not disturb is enabled
• After a set number of rings before the call is answered
• To a predefined destination chosen by the user
If you are registering phones with the Skype for Business Server, the following call forwarding options are
available on Skype for Business-enabled phones:
• Forward to a contact
• Forward to voicemail
• Forward to Delegates
• Simultaneously Ring Delegates
• Simultaneously Ring Group Contacts
Call Controls
Polycom, Inc. 290
Call Forward on Shared Lines
You can enable server-based call forwarding for shared lines.
If using BroadWorks R20 server, note the following:
• Local call-forwarding is not supported on shared lines.
• Dynamic call forwarding—forwarding incoming calls without answering the call—is not supported.
Note: The server-based and local call forwarding features do not work with the shared call
appearance (SCA) and bridged line appearance (BLA) features. In order to enable users to
use call forwarding, disable SCA or BLA enabled.
Call Forwarding Parameters
Use the parameters in the following table to configure feature options for call forwarding.
No parameters are needed to enable call forwarding on Skype for Business-enabled phones.
Call Forwarding Parameters
Template Parameter Permitted Values
Change Causes
Restart or Reboot
features.cf
g
feature.forward.en
able
1 (default) - Enables call forwarding.
0 - Disables call forwarding. Users
cannot use Call Forward and the option
is removed from the phone's Features
menu.
No
sip-
interop.cfg
voIpProt.SIP.serve
rFeatureControl.cf
0 (default) - The server-based call
forwarding is not enabled.
1 - The server-based call forwarding is
enabled.
Yes
Call Controls
Polycom, Inc. 291

Template Parameter Permitted Values
Change Causes
Restart or Reboot
sip-
interop.cfg
voIpProt.SIP.serve
rFeatureControl.lo
calProcessing.cf
This parameter depends on the value of
voIpProt.SIP.serverFeature
Control.cf .
1 (default) - If set to 1 and
voIpProt.SIP.serverFeature
Control.cf is set to 1, the phone
and the server perform call forwarding.
0 - If set to 0 and
voIpProt.SIP.serverFeature
Control.cf is set to 1, call
forwarding is performed on the server
side only, and the phone does not
perform local call forwarding.
If both
voIpProt.SIP.serverFeature
Control.localProcessing.cf
and
voIpProt.SIP.serverFeature
Control.cf are set to 0, the phone
performs local call forwarding and the
localProcessing parameter is
not used.
No
sip-
interop.cfg
voIpProt.SIP.heade
r.diversion.enable
0 (default) - If set to 0, the diversion
header is not displayed.
1 - If set to 1, the diversion header is
displayed if received.
Yes
sip-
interop.cfg
voIpProt.SIP.heade
r.diversion.list.u
seFirst
1 (default) - If set to 1, the first diversion
header is displayed.
0 - If set to 0, the last diversion header
is displayed.
Yes
site.cfg divert.x.contact All automatic call diversion features
uses this forward-to contact. All
automatically forwarded calls are
directed to this contact. The contact can
be overridden by a busy contact, DND
contact, or no-answer contact as
specified by the busy , dnd , and
noAnswer parameters that follow.Null
(default)
string - Contact address that includes
ASCII encoded string containing digits
(the user part of a SIP URL) or a string
that constitutes a valid SIP URL (6416
or6416@polycom.com).
Yes
Call Controls
Polycom, Inc. 292

Template Parameter Permitted Values
Change Causes
Restart or Reboot
site.cfg divert.x.sharedDis
abled
1 (default) - Disables call diversion
features on shared lines.
0 - Enables call diversion features on
shared lines.
Yes
site.cfg divert.x.autoOnSpe
cificCaller
1 (default) - Enables the auto divert
feature of the contact directory for calls
on registration x. You can specify to
divert individual calls or divert all calls.0
- Disables the auto divert feature of the
contact directory for registration x.
Yes
site.cfg divert.busy.x.enab
led
1 (default) - Diverts calls registration x is
busy.
0 - Does not divert calls if the line is
busy.
Yes
site.cfg divert.busy.x.cont
act
Calls are sent to the busy contact's
address if it is specified; otherwise calls
are sent to the default contact specified
by divert.x.contact .Null
(default)string - contact address.
Yes
site.cfg divert.dnd.x.enabl
ed
0 (default) - Divert calls when DND is
enabled on registration x. 1 - Does not
divert calls when DND is enabled on
registration x.
Yes
site.cfg divert.dnd.x.conta
ct
Calls are sent to the DND contact's
address if it is specified; otherwise calls
are sent to the default contact specified
by divert.x.contact .
Null (default)string - contact address.
Yes
site.cfg divert.fwd.x.enabl
ed
1 (default) - Users can forward calls on
the phone's Home screen and use
universal call forwarding.
0 - Users cannot enable universal call
forwarding (automatic forwarding for all
calls on registration x).
Yes
site.cfg divert.noanswer.x.
enabled
1 (default) - Unanswered calls after the
number of seconds specified by timeout
are sent to the no-answer contact .0
- Unanswered calls are diverted if they
are not answered.
Yes
Call Controls
Polycom, Inc. 293
Template Parameter Permitted Values
Change Causes
Restart or Reboot
site.cfg divert.noanswer.x.
contact
Null (default) - The call is sent to the
default contact specified by
divert.x.contact .
string - contact address
Yes
site.cfg divert.noanswer.x.
timeout
55 (default) - Number of seconds for
timeout.
positive integer
Yes
reg-
advanced.cf
g
reg.x.fwd.busy.con
tact
The forward-to contact for calls
forwarded due to busy status.
Null (default) - The contact specified by
divert.x.contact is used.
string - The contact specified by
divert.x.contact is not used
No
reg-
advanced.cf
g
reg.x.fwd.busy.sta
tus
0 (default) - Incoming calls that receive
a busy signal is not forwarded
1 - Busy calls are forwarded to the
contact specified by
reg.x.fwd.busy.contact .
No
reg-
advanced.cf
g
reg.x.fwd.noanswer
.contact
Null (default) - The forward-to contact
specified by divert.x.contact is
used.
string - The forward to contact used for
calls forwarded due to no answer.
No
reg-
advanced.cf
g
reg.x.fwd.noanswer
.ringCount
The number of seconds the phone
should ring for before the call is
forwarded because of no answer. The
maximum value accepted by some call
servers is 20.
0 - (default)
1 to 65535
No
reg-
advanced.cf
g
reg.x.fwd.noanswer
.status
0 (default) - The calls are not forwarded
if there is no answer.
1 - The calls are forwarded to the
contact specified by
reg.x.noanswer.contact after
ringing for the length of time specified
by
reg.x.fwd.noanswer.ringCou
nt .
No
Call Controls
Polycom, Inc. 294

Template Parameter Permitted Values
Change Causes
Restart or Reboot
reg-
advanced.cf
g
reg.x.serverFeatur
eControl.cf
This parameter overrides
voIpProt.SIP.serverFeature
Control.cf .
0 (default) - The server-based call
forwarding is disabled.
1 - server based call forwarding is
enabled.
Yes
site.cfg divert.x.sharedDis
abled
1 (default) - Disables call diversion
features on shared lines.
0 - Enables call diversion features on
shared lines.
Yes
sip-
interop.cfg
voIpProt.SIP.serve
rFeatureControl.cf
0 (default) - Disable server-based call
forwarding.
1 - Enable server-based call forwarding.
This parameter overrides
reg.x.serverFeatureControl
.cf .
Yes
sip-
interop.cfg
voIpProt.SIP.serve
rFeatureControl.lo
calProcessing.cf
1 (default) - Allows to use the value for
voIpProt.SIP.serverFeature
Control.cf.
0 - Does not use the value for
This parameter depends on the value of
voIpProt.SIP.serverFeature
Control.cf .
No
sip-
interop.cfg
reg.x.serverFeatur
eControl.localProc
essing.cf
This parameter overrides
voIpProt.SIP.serverFeature
Control.localProcessing.cf
.
0 (default) - If
reg.x.serverFeatureControl
.cf is set to 1 the phone does not
perform local Call Forward behavior.
1 - The phone performs local Call
Forward behavior on all calls received.
No
sip-
interop.cfg
call.shared.disabl
eDivert
1 (default) - Enable the diversion feature
for shared lines.
0 - Disable the diversion feature for
shared lines. Note that this feature is
disabled on most call servers.
Yes
Call Controls
Polycom, Inc. 295

Automatic Off-Hook Call Placement
You can configure the phone to automatically place a call to a specified number when the phone goes off-
hook, which is sometimes referred to as Hot Dialing.
The phone goes off-hook when a user lifts the handset, selects New Call, or presses the speakerphone
buttons on the phone.
Automatic Off-Hook Call Placement Parameters
As shown in the following table, you can specify an off-hook call contact, enable or disable the feature for
each registration, and specify a protocol for the call.
You can specify only one line registration for the Polycom Trio 8800 system.
Automatic Off-Hook Call Placement Parameters
Template Parameter Permitted Values
Change Causes
Restart or Reboot
reg-
advanced.cf
g
call.autoOffHook.x
.contact
Enter a SIP URL contact address. The
contact must be an ASCII-encoded
string containing digits, either the user
part of a SIP URL (for example, 6416),
or a full SIP URL (for example,
6416@polycom.com).
NULL (default)
No
reg-
advanced.cf
g
call.autoOffHook.x
.enabled
0 (default) - No call is placed
automatically when the phone goes off
hook, and the other parameters are
ignored.
1 - When the phone goes off hook, a
call is automatically placed to the
contact you specify in
call.autoOffHook.x.contact and using
the protocol you specify in
call.autoOffHook.x.protocol.
Only the VVX 500/501, 600/601, and
1500 phones use the protocol
parameter. If no protocol is specified,
the phone uses the protocol specified
by
call.autoRouting.preferred
Protocol . If a line is configured for
a single protocol, the configured
protocol is used.
No
Call Controls
Polycom, Inc. 296
Template Parameter Permitted Values
Change Causes
Restart or Reboot
reg-
advanced.cf
g
call.autoOffHook.x
.protocol
Specify the calling protocol. business
media phones use the protocol
parameter. If no protocol is specified,
the phone uses the protocol specified
by
call.autoRouting.preferred
Protocol . If a line is configured for
a single protocol, the configured
protocol is used.
NULL (default)
SIP
H323
No
Multiple Line Keys Per Registration
You can assign a single registered phone line address to multiple line keys on Polycom phones.
This feature can be useful for managing a high volume of calls to a single line. This feature is not
supported when registered with Microsoft Skype for Business Server.
Multiple Line Keys Per Registration Parameters
Use the parameter in the following table to configure this feature.
This feature is one of several features associated with Call Appearances.
Multiple Line Keys Per Registration Parameters
Template Parameter Permitted Values
Change Causes
Restart or Reboot
reg-
advanced.cf
g
reg.x.lineKeys Specify the number of line keys to use
for a single registration. The maximum
number of line keys you can use per
registration depends on your phone
model.
1 (default)
1 to max
No
Multiple Call Appearances
You can enable each registered phone line to support multiple concurrent calls and have each concurrent
call display on the phone's user interface.
Call Controls
Polycom, Inc. 297
For example, with multiple call appearances, users can place one call on hold, switch to another call on
the same registered line, and have both calls display on the phone.
This feature is one of several features associated with flexible call appearances. If you assign a
registered line to multiple line keys, the default number of concurrent calls applies to all line keys.
Polycom Trio can have a maximum of 12 concurrent calls with only one active call in progress. You can
register one line on the Polycom Trio system.
Multiple Call Appearance Parameters
Use the parameters in the following table to set the maximum number of concurrent calls per registered
line and the default number of calls per line key.
Note that you can set the value for the reg.1.callsPerLineKey parameter to a value higher than 1,
for example, 3. After you set the value to 3, for example, you can have three call appearances on line 1.
By default, any additional incoming calls are automatically forwarded to voicemail. If you set more than
two call appearances, a call appearance counter displays at the top-right corner on the phone.
Multiple Call Appearances Parameters
Template Parameter Permitted Values
Change Causes
Restart or Reboot
reg-
basic.cfg
call.callsPerLineK
ey
Set the maximum number of concurrent
calls per line key. This parameter
applies to all registered lines.
Note that this parameter can be
overridden by the per-registration
parameter
reg.x.callsPerLineKey .
24
1 - 24
VVX 101, 201
8 (default)
1- 8
No
Call Controls
Polycom, Inc. 298

Template Parameter Permitted Values
Change Causes
Restart or Reboot
reg-
advanced.cf
g
reg.x.callsPerLine
Key
Set the maximum number of concurrent
calls for a single registration x. This
parameter applies to all line keys using
registration x. If registration x is a
shared line, an active call counts as a
call appearance on all phones sharing
that registration.
This per-registration parameter
overrides
call.callsPerLineKey .
24 (default)
1-24
Polycom Trio systems - 12 (default)
VVX 101, 201
8 (default)
1 - 8
No
Bridged Line Appearance
Bridged line appearance connects calls and lines to multiple phones.
With bridged line appearance enabled, an active call displays simultaneously on multiple phones in a
group. By default, the answering phone has sole access to the incoming call, which is called line seize. If
the answering phone places the call on hold, that call becomes available to all phones of that group. All
call states—active, inactive, on hold—are displayed on all phones of a group.
Important: Shared call appearances and bridged line appearances are similar signaling
methods that enable more than one phone to share the same line or
registration. The methods you use vary with the SIP call server you are using.
In the configuration files, bridged lines are configured by shared line
parameters. The barge-in feature is not available with bridged line
appearances; it is available only with shared call appearances.
Bridged Line Appearance Signaling
A bridged line is an address of record managed by a server.
The server allows multiple endpoints to register locations against the address of record.
The phone supports Bridged Line Appearances (BLA) using the SUBSCRIBE-NOTIFY method in the SIP
Specific Event Notification framework (RFC 3265). The event used is ‘dialog' for bridged line appearance
subscribe and notify.
Call Controls
Polycom, Inc. 299

Bridged Line Appearance Parameters
To begin using bridged line appearance, you must get a registered address dedicated for use with
bridged line appearance from your call server provider.
This dedicated address must be assigned to a phone line in the reg.x.address parameter of the reg-
basic.cfg template.
Use the parameters in the following table to configure this feature.
Bridged Line Appearance Parameters
Template Parameter Permitted Values
Change Causes
Restart or Reboot
sip-
interop.cfg
call.shared.disabl
eDivert
1 (default) - Enable the diversion feature
for shared lines.
0 - Disable the diversion feature for
shared lines. Note that this feature is
disabled on most call servers.
Yes
reg-
advanced.cf
g
reg.x.type private (default) - Use standard call
signaling.
shared - Use augment call signaling
with call state subscriptions and
notifications and use access control for
outgoing calls.
No
reg-
advanced.cf
g
reg.x.thirdPartyNa
me
Null (default) - In all other cases.
string address -This field must match
the reg.x.address value of the
registration which makes up the part of
a bridged line appearance (BLA).
No
site.cfg divert.x.sharedDis
abled
1 (default) - Disables call diversion
features on shared lines.
0 - Enables call diversion features on
shared lines.
Yes
reg-
advanced.cf
g
voIpProt.SIP.blaGl
areHonorRetryAfter
Controls the Retry mechanism.
1 (default) – The phone honors the
Retry-after header on glare and sends
NOTIFY with the same state and line-id
after the requested time interval.
0 – The phone ignores the Retry-after
header on glare and immediately sends
NOTIFY with the next available line-id.
No
Call Controls
Polycom, Inc. 300
Voicemail
When you configure Polycom phones with a SIP URL that integrates with a voicemail server contact,
users receive a visual and audio alert when they have new voicemail messages available on their phone.
Voicemail Parameters
Use the parameters in the following table to configure voicemail and voicemail settings.
Voicemail Parameters
Template Parameter Permitted Values
Change Causes
Restart or Reboot
features.cfg feature.voice
mail.enabled
1 (default) - Enable voicemail.
0 - Disable voicemail.
sip-basic.cfg msg.mwi.x.cal
lBackMode
The message retrieval mode and
notification for registration x.
registration (default) - The
registration places a call to itself (the
phone calls itself).
contact - a call is placed to the
contact specified by
msg.mwi.x.callback.
disabled - Message retrieval and
message notification are disabled.
No
sip-
interop.cfg
msg.mwi.x.cal
lBack
The contact to call when retrieving
messages for this registration if
msg.mwi.x.callBackMode is
set to contact .
ASCII encoded string containing
digits (the user part of a SIP URL) or
a string that constitutes a valid SIP
URL (6416 or 6416@polycom.com)
NULL (default)
No
sip-
interop.cfg
msg.mwi.x.sub
scribe
Specify the URI of the message
center server. ASCII encoded string
containing digits (the user part of a
SIP URL) or a string that constitutes
a valid SIP URL (6416 or
6416@polycom.com)
If non-Null, the phone sends a
SUBSCRIBE request to this contact
after bootup.
NULL (default)
Call Controls
Polycom, Inc. 301

Template Parameter Permitted Values
Change Causes
Restart or Reboot
site.cfg mwi.backLight
.disable
Specify if the phone screen backlight
illuminates when you receive a new
voicemail message.
0 (default) - Disable the back light
message alert.
1 - Enable the back light message
alert.
Yes
features.cfg up.mwiVisible Specify if message waiting indicators
(MWI) display or not.
0 (default) - If
msg.mwi.x.callBackMode=0
, MWI do not display in the message
retrieval menus.
1 - MWI display.
Yes
sip-
interop.cfg
up.oneTouchVo
iceMail
1 (default) - Lync Base Profile
0 (default) - Generic Base Profile
0 (default) - The phone displays a
summary page with message counts.
1 - You can call voicemail services
directly from the phone, if available
on the call server, without displaying
the voicemail summary.
Yes
Local Call Recording
Local call recording enables you to record audio calls to a USB device connected to the phone.
You can play back recorded audio on the phone or devices that run applications like Windows Media
Player® or iTunes® on a Windows® or Apple® computer. To use this feature, ensure that the USB port is
enabled.
Audio calls are recorded in .wav format and include a date/time stamp. The phone displays the recording
time remaining on the attached USB device, and users can browse all recorded files using the phone's
menu.
Important: Federal, state, and/or local laws may legally require that you notify some or all
of the call parties when a call recording is in progress.
Local Call Recording Parameters
Use the parameters in the following table to configure local call recording.
Call Controls
Polycom, Inc. 302
Local Call Recording Parameters
Template Parameter Permitted Values
Change Causes
Restart or Reboot
features.cfg feature.callRe
cording.enable
d
0 (default) - Disable audio call
recording.
1 - Enable audio call recording.
Yes
Local and Centralized Conference Calls on Polycom
Trio
When a Polycom Trio 8500 or 8800 system is paired with a Polycom Trio Visual+, Trio VisualPro, or
RealPresence Group Series system, users can initiate and join the following types of conferences:
▪ Local multipoint audio conference with up to four external connections
▪ Local video conferences
▪ Video calls on supported H.264 standards-compliant video bridges or services
The Polycom Trio solution can send and receive one video connection and displays the far-end device
that joined the call last. Polycom Trio does not support locally-hosted multipoint video conferencing.
For video and content for conference calls, you must connect a supported camera and monitor(s) to a
Polycom Trio Visual+, Trio VisualPro, or RealPresence Group Series system. When the devices are
connected and paired, users can send video and share content. For details and limitations of content
sharing, refer to the section Content Sharing.
Local and Centralized Conference Call Parameters
The following table lists available call management parameters.
You can specify whether, when the host of a three-party local conference leaves the conference, the
other two parties remain connected or disconnected. If you want the other two parties remain connected,
the phone performs a transfer to keep the remaining parties connected. If the host of four-party local
conference leaves the conference, all parties are disconnected and the conference call ends. If the host
of a centralized conference leaves the conference, each remaining party remains connected. For more
ways to manage conference calls, see Conference Management.
Local and Centralized Conference Call Parameters
Template Parameter Permitted Values
Change Causes
Restart or Reboot
sip-
interop.cfg
call.localCo
nferenceCall
Hold
0 (default) - The host cannot place
parties on hold.
1 - During a conference call, the host
can place all parties or only the host
on hold.
No
Call Controls
Polycom, Inc. 303

Template Parameter Permitted Values
Change Causes
Restart or Reboot
sip-
interop.cfg
call.transfe
rOnConferenc
eEnd
1 (default) - After the conference host
exits the conference, the remaining
parties can continue.
0 - After the conference host exits the
conference, all parties are exited and
the conference ends.
No
sip-
interop.cfg
call.singleK
eyPressConfe
rence
Specify whether or not all parties hear
sound effects while setting up a
conference.
0 (default) - Phone sound effects are
heard only by the conference initiator.
1 - A conference is initiated when a
user presses Conference the first time.
Also, all sound effects (dial tone,
DTMF tone while dialing and ringing
back) are heard by all participants in
the conference.
No
sip-
interop.cfg
voIpProt.SIP
.conference.
address
Null (default) - Conferences are set up
on the phone locally.
String 128 max characters - Enter a
conference address. Conferences are
set up by the server using the
conferencing agent specified by this
address. Acceptable values depend on
the conferencing server
implementation policy.
No
video.cfg video.conf.a
ddVideoWhenA
vailable
0 (default) - When Polycom Trio
system is added to a conference by
another participant via digit dialing, the
Polycom Trio system does not add
video.
1 - When Polycom Trio system is
added to a conference by another
participant via digit dialing, the
Polycom Trio system adds video if
video is available on the conference.
No
Conference Meeting Dial-In Options
When you enable the Calendar, the Polycom Trio system displays a meeting reminder for upcoming
meetings.
Call Controls
Polycom, Inc. 304
If a dial-in number is available for the meeting, the reminder presents a Join button that enables users to
join the meeting. If a meeting lists multiple dial-in numbers or URIs for the meeting, by default, the Join
button automatically dials the first number.
You have the option to configure the Polycom Trio system to offer users a list of available numbers when
they tap the Join button instead of dialing the first number.
You can enable this feature using the exchange.meeting.join.promptWithList parameter. When
enabled, the Polycom Trio system provides multiple dial-in options when the user taps the Join button on
the meeting reminder. You can enable users to choose any of the following dial-in options to join a
meeting:
• SIP URI
• Tel URI
• PSTN number
• IP dial
Conference Meeting Dial-In Options Parameters
The following table lists the parameters to configure the dial-in information.
SIP URI Dial-in Parameters
Template Parameter Permitted Values Change Causes
Restart or
Reboot
applicat
ions.cfg
exchange.meeting.j
oin.promptWithList
Specifies the behavior of the Join button on
meeting reminder pop-ups.
0 (default) - Tapping Join on a meeting
reminder should show a list of numbers to dial
rather than immediately dialing the first one.
1 - A meeting reminder does not show a list of
numbers to dial.
No
applicat
ions.cfg
exchange.meeting.p
arseWhen
Specifies when to scan the meeting's subject,
location, and description fields for dialable
numbers.
NonSkypeMeeting (default)
Always
Never
Yes
applicat
ions.cfg
exchange.meeting.p
arseOption
Specifies where to search for a dialable
number.
All (default)
Yes
Call Controls
Polycom, Inc. 305

Template Parameter Permitted Values Change Causes
Restart or
Reboot
applicat
ions.cfg
exchange.meeting.p
arseEmailsAsSipUri
s
List instances of text like user@domain or
user@ipaddress in the meeting
description or subject under the More Actions
pane as dialable SIP URIs.
0 (default) - it does not list the text as a
dialable SIP URI
1 - it treats user@domain or
user@ipaddress as a dialable SIP URI.
Yes
applicat
ions.cfg
exchange.meeting.p
arseAllowedSipUriD
omains
List of comma-separated domains that will be
permitted to be interpreted as SIP URIs
Null (default)
String (maximum of 255 characters)
Yes
Hybrid Line Registration
The Polycom Trio 8500 and 8800 system supports hybrid (Skype for Business / Open SIP) registration.
You can simultaneously register one line with Skype for Business or Open SIP and a second line with
another Open SIP server. Similarly, you can choose to register all lines with Open SIP sever. You can
also choose the number of lines you want to use by setting the value in reg.limit parameter.
If you plan to configure and register Skype for Business on one line, make sure to always use Line 1 for
Skype for Business. You cannot simultaneously register two Skype for Business lines.
In addition, you can configure the line switching feature based on dial plan when the phone is on-hook.
The line switching feature enables the dialed number to switch to the corresponding line. For example,
when you place a call from the phone and the number corresponds to an Open SIP line, the line switching
feature enables the dialed number to switch to the corresponding line.
Moreover, for dial plan based line switching, when all the lines are registered to Open SIP, the value
defined in the global parameter for a dial plan takes the priority. For example,
dialplan.impossibleMatchHandling and dialplan.conflictMatchHandling . Similarly, if
the line is registered to Skype for Business, the value defined in the per-registration dial plan parameter
takes priority over general dial plan parameter. For example, dialplan.1.conflictMatchHandling
and dialplan.1.impossibleMatchHandling .
When more than one digit maps are getting matched to the dialed number - a conflict match - and the
parameter is disabled, the first matching digit map starting from left to right takes priority. However, if
dialplan.conflictMatchHandling parameter is enabled, the matching digit map having the lowest
timeout value takes priority.
However, line switching is configurable based on dial plan when the phone is off-hook. By default, line
switching for on-hook and off-hook dialing is disabled.
Note that the Presence feature is available only on the Skype for Business line and will display the Device
status. The following table list the Presence status for specific environment.
Call Controls
Polycom, Inc. 306

Presence Status Indicators for Hybrid Line Registration
Use Cases Presence State on Skype for
Business Line
Presence String Presence State on Open SIP
Line
Non-Skype line in
a call
Busy In a call Not Supported
Skype line in a
call
Busy In a call Not Supported
Content shared
over PPCIP
Busy In a call Not Supported
Non-Skype line in
conference
Busy In a conference Not Supported
Skype line in
conference
Busy In a conference Not Supported
DND on Skype
line
DND Do Not Disturb Not Supported
DND on Open
SIP line
Available Available Not Supported
Hybrid Line Registration Limitations
The Hybrid Registration feature include the following limitations:
• You cannot merge local conferences on Skype for Business registration lines. You can merge local
conferences on Open SIP registration lines.
• You cannot bridge Skype for Business and Open SIP registration lines.
• Local merging of two point-to-point calls made using two different lines between two Polycom Trio
systems is not supported.
• Only call transfers between different SIP registrations with the same SIP call servers is supported.
Call transfer between SIP registrations on different SIP call servers is not supported.
• To avoid unexpected phone behavior, do not use the same user name for multiple registrations.
Use similar but not identical user names. For example, use: reg.
1.address="John.Smith@company.com" and reg.
2.address="J.Smith@business.com".
• Transport Layer Security (TLS) encryption of Real-time Transport Protocol (RTP) media for secure
communication in hybrid Open SIP registrations is not supported.
Hybrid Line Registration Parameters
The following tables lists the parameters to configure dial plan and line switching for Hybrid Registration.
Call Controls
Polycom, Inc. 307

Dial Plan and Digit Map Parameters for Hybrid Registrations
Template Parameter Permitted Values Change Causes
Restart or Reboot
site.cfg dialplan.digitmap.
lineSwitching.enab
le
0 (default) - Disable the line switching in
dial plan to switch the call to the dial
plan matched line.
1 - Enable the line switching in dial plan
to switch the call to the dial plan
matched line.
This is not applicable for off-hook
dialing.
No
reg.cfg reg.limit Specify the maximum number of lines to
use for registration.
1 (default)
12 maximum (1-3 supported)
No
sip-
interop.c
fg
reg.
1.mergeServerDigit
MapLocally
1 (default) - Allow the digit map from the
in-band provisioning parameter
dialplan.1.digitmap to merge
with the local digit map.
0 - The digit map is not merged.
No
Configure Hybrid Line Registration using the Web Configuration
Utility
You can configure the phone to support the Hybrid (Skype for Business/ Open SIP) Registration from
phone's Web Configuration Utility page after enabling the feature using configuration parameter.
Make sure the to set the Base profile as Skype for Business on the Polycom Trio 8800 system.
Procedure
1. Sign in to the Polycom Trio 8800 system's Web configuration Utility page using Admin account.
If configuring Skype for Business on Line 1, sign in to the Web Configuration Utility as Skype for
Business user.
2. On the Web Configuration Utility page, navigate to Settings > Line.
The number of lines enabled to configure is displayed.
3. Configure the Skype for Business registration on Line 1.
4. Configure the Open SIP registration on Line 2.
You can configure other lines with Open SIP registration.
Local Digit Map
The local digit map feature allows the phone to automatically call a dialed number when configured.
Call Controls
Polycom, Inc. 308
Dial plans apply on-hook when no Skype for Business line is registered or when line switching is enabled
and at least one line has a non-empty dial plan.
Digit maps are defined by a single string or a list of strings. If a dialed number matches any string of a
digit map, the call is automatically placed. If a dialed number matches no string—an impossible match—
you can specify the phone's behavior. If a number ends with #, you can specify the phone's behavior,
called trailing # behavior. You can also specify the digit map timeout, the period of time after you dial a
number that the call is placed. The configuration syntax of the digit map is based on recommendations in
section 2.1.5 of RFC 3435.
Local Digit Maps Parameters
Polycom support for digit map rules varies for open SIP servers and Microsoft Skype for Business Server.
Use the parameters in the following table to configure this feature.
Configure the Local Digit Map
Template Parameter Permitted Values
Change Causes
Restart or Reboot
site.cfg dialplan.applyToCa
llListDial
Choose whether the dial plan applies to
numbers dialed from the received call
list or missed call list, including sub-
menus.
1 (default)
0
Yes
site.cfg dialplan.applyToDi
rectoryDial
Lync Base Profile – 1 (default)
Generic Base Profile – 0 (default)
0— The dial plan is not applied to
numbers dialed from the directory or
speed dial, including auto-call contact
numbers.
1—The dial plan is applied to numbers
dialed from the directory or speed dial,
including auto-call contact numbers.
Yes
site.cfg dialplan.applyToFo
rward
Lync Base Profile – 1 (default)
Generic Base Profile – 0 (default)
0—The dial plan does not apply to
forwarded calls.
1—The dial plan applies to forwarded
calls.
Yes
site.cfg dialplan.applyToTe
lUriDial
Choose whether the dial plan applies to
URI dialing.
1 (default)
0
Yes
Call Controls
Polycom, Inc. 309

Template Parameter Permitted Values
Change Causes
Restart or Reboot
site.cfg dialplan.applyToUs
erDial
Choose whether the dial plan applies to
calls placed when the user presses Dial.
1 (default)
0
Yes
site.cfg dialplan.applyToUs
erSend
Choose whether the dial plan applies to
calls placed when the user presses
Send.
1 (default)
0
Yes
site.cfg dialplan.conflictM
atchHandling
Selects the dialplan based on more than
one match with the least timeout.
0 (default for Generic Profile)
1 (default for Skype Profile)
site.cfg dialplan.digitmap.
timeOut
Specify a timeout in seconds for each
segment of the digit map using a string
of positive integers separated by a
vertical bar ( | ). After a user presses a
key, the phone waits this many seconds
before matching the digits to a dial plan
and dialing the call.
(Default) 3 | 3 | 3 | 3 | 3| 3
If there are more digit maps than
timeout values, the default value 3 is
used. If there are more timeout values
than digit maps, the extra timeout
values are ignored.
Yes
Call Controls
Polycom, Inc. 310

Template Parameter Permitted Values
Change Causes
Restart or Reboot
site.cfg dialplan.digitmap Specify the digit map used for the dial
plan using a string compatible with the
digit map feature of MGCP described in
2.1.5 of RFC 3435. This parameter
enables the phone to automatically
initiate calls to numbers that match a
digit map pattern.
Generic Base Profile (default) –
[2-9]11|0T|+011xxx.T|
0[2-9]xxxxxxxxx|
+1[2-9]xxxxxxxx|
[2-9]xxxxxxxxx|[2-9]xxxT
Lync Base Profile (default) – NULL
[2-9]11|0T|+011xxx.T|
0[2-9]xxxxxxxxx|
+1[2-9]xxxxxxxx|
[2-9]xxxxxxxxx|[2-9]xxxT
(default)
The string is limited to 2560 bytes and
100 segments of 64 bytes, and the
following characters are allowed in the
digit map
• A comma (,), which turns dial tone
back on.
• A plus sign (+) is allowed as a valid
digit.
• The extension letter 'R' indicates
replaced string.
• The extension letter 'Pn' indicates
precedence, where 'n' range is 1-9.
1—Low precedence
9—High precedence
Yes
debug.cfg dialplan.filterNon
DigitUriUsers
Determine whether to filter out (+) from
the dial plan.
0 (default)
1
Yes
Call Controls
Polycom, Inc. 311

Template Parameter Permitted Values
Change Causes
Restart or Reboot
site.cfg dialplan.impossibl
eMatchHandling
0 (default)—The digits entered up to
and including the point an impossible
match occurred are sent to the server
immediately.
1—The phone gives a reorder tone.
2—Users can accumulate digits and
dispatch the call manually by pressing
Send.
3 (default) (Skype for Business) — No
digits are sent to the call server until the
timeout is configured by
dialplan.impossibleMatchHa
ndling.timeout parameter.
If a call orbit number begins with a
pound (#) or asterisk (*), you need to
set the value to 2 to retrieve the call
using off-hook dialing.
Yes
site.cfg dialplan.removeEnd
OfDial
Sets if the trailing # is stripped from the
digits sent out.
1 (default)
0
Yes
site.cfg dialplan.routing.e
mergency.outboundI
dentity
Choose how your phone is identified
when you place an emergency call.
NULL (default)
10-25 digit number
SIP
TEL URI
If using a URI, the full URI is included
verbatim in the P-A-I header. For
example:
•dialplan.routing.emergen
cy.outboundIdentity =
5551238000
•dialplan.routing.emergen
cy.outboundIdentity =
sip:john@emergency.com
•dialplan.routing.emergen
cy.outboundIdentity = tel:
+16045558000
No
Call Controls
Polycom, Inc. 312

Template Parameter Permitted Values
Change Causes
Restart or Reboot
site.cfg dialplan.routing.e
mergency.preferred
Source
Set the precedence of the source of
emergency outbound identities.
ELIN (default)— the outbound identity
used in the SIP P-Asserted-Identity
header is taken from the network using
an LLDP-MED Emergency Location
Identifier Number (ELIN).
Config— the parameter
dialplan.routing.emergency
.outboundIdentity has priority
when enabled, and the LLDP-MED
ELIN value is used if
dialplan.routing.emergency
.outboundIdentity is NULL.
No
site.cfg dialplan.routing.e
mergency.x.descrip
tion
Set the label or description for the
emergency contact address.
x=1: Emergency, Others: NULL (default)
string
x is the index of the emergency entry
description where x must use sequential
numbering starting at 1.
Yes
site.cfg dialplan.routing.e
mergency.x.server.
y
Set the emergency server to use for
emergency routing
( dialplan.routing.server.x
.address where x is the index).
x=1: 1, Others: Null (default)
positive integer
x is the index of the emergency entry
and y is the index of the server
associated with emergency entry x. For
each emergency entry (x), one or more
server entries (x,y) can be configured. x
and y must both use sequential
numbering starting at 1.
Yes
Call Controls
Polycom, Inc. 313

Template Parameter Permitted Values
Change Causes
Restart or Reboot
site.cfg dialplan.routing.e
mergency.x.value
Set the emergency URL values that
should be watched for. When the user
dials one of the URLs, the call is
directed to the emergency server
defined by
dialplan.routing.server.x.
address .
x=15: 911, others: Null (default)
SIP URL (single entry)
x is the index of the emergency entry
description where x must use sequential
numbering starting at 15.
No
site.cfg dialplan.routing.s
erver.x.address
Set the IP address or hostname of a
SIP server to use for routing calls.
Multiple servers can be listed starting
with x=1 to 3 for fault tolerance.
Null (default)
IP address
hostname
Blind transfer for 911 or other
emergency calls may not work if
registration and emergency servers are
different entities.
Yes
site.cfg dialplan.routing.s
erver.x.port
Set the port of a SIP server to use for
routing calls.
5060 (default)
1 to 65535
Yes
site.cfg dialplan.routing.s
erver.x.transport
Set the DNS lookup of the first server to
use and dialed if there is a conflict with
other servers.
DNSnaptr (default)
TCPpreferred
UDPOnly
TLS
TCPOnly
For example, if
dialplan.routing.server.
1.transport = "UDPOnly" and
dialplan.routing.server.
2.transport = "TLS", then
UDPOnly is used.
Yes
Call Controls
Polycom, Inc. 314

Template Parameter Permitted Values
Change Causes
Restart or Reboot
site.cfg dialplan.userDial.
timeOut
Specify the time in seconds that the
phone waits before dialing a number
entered while the phone is on hook.
Generic Base Profile (default) – 0
Lync Base Profile (default) – 4
0-99 seconds
You can apply
dialplan.userDial.timeOut
only when its value is lower than
up.IdleTimeOut .
No
Open SIP Digit Map
If you are using a list of strings, each string in the list can be specified as a set of digits or timers, or as an
expression which the gateway uses to find the shortest possible match.
In addition, the digit map feature allows SIP URI dialing to match the URIs based on dial plan.
When making a URI call, the Polycom Trio 8500 and 8800 systems allow dial plan matching for SIP URI
calls to append strings to the dialed number. SIP URI dial plan can also be used with auto line switching
in Hybrid registration scenarios to automatically select the line based on dial plan.
The following is a list of digit map string rules for open SIP environments.
• The following letters are case sensitive: x, T, R, S, and H.
• You must use only *, #, +, or 0-9 between the second and third R.
• If a digit map does not comply, it is not included in the digit plan as a valid map. That is, no match is
made.
• There is no limit to the number of R triplet sets in a digit map. However, a digit map that contains
less than a full number of triplet sets (for example, a total of 2 Rs or 5 Rs) is considered an invalid
digit map.
• Digit map extension letter R indicates that certain matched strings are replaced. Using an RRR
syntax, you can replace the digits between the first two Rs with the digits between the last two Rs.
For example, R555R604R would replace 555 with 604. Digit map timer letter T indicates a timer
expiry. Digit map protocol letters S and H indicate the protocol to use when placing a call.
• If you use T in the left part of RRR's syntax, the digit map will not work. For example, R0TR322R
will not work.
The following examples illustrate the semantics of the syntax:
• R9R604Rxxxxxxx-Replaces 9 with 604
• xxR601R600Rxx-When applied to 1160122 gives 1160022
• R9RRxxxxxxx-Remove 9 at the beginning of the dialed number (replace 9 with nothing)
◦ For example, if you dial 914539400, the first 9 is removed when the call is placed.
• RR604Rxxxxxxx-Prepend 604 to all seven-digit numbers (replace nothing with 604)
◦ For example, if you dial 4539400, 604 is added to the front of the number, so a call to
6044539400 is placed.
Call Controls
Polycom, Inc. 315
• xR60xR600Rxxxxxxx-Replace any 60x with 600 in the middle of the dialed number that matches.
For example, if you dial 16092345678, a call is placed to 16002345678.
• 911xxx.T-A period (.) that matches an arbitrary number, including zero, of occurrences of the
preceding construct. For example:
• 911123 with waiting time to comply with T is a match
• 9111234 with waiting time to comply with T is a match
• 91112345 with waiting time to comply with T is a match and the number can grow indefinitely given
that pressing the next digit takes less than T.
•sip\:764xxxxxRR@registrar.polycomcsn.comR - appends
@registrar.polycomcsn.com to any URI calls matching with "764xxxxx".
For example, if you make a SIP URI call with 76412345 then @registrar.polycomcsn.com is
appended to the string such that the SIP URI call INVITE becomes sip::
76412345@vc.polycom.com . Here, @domain string is required only for SIP URI calls from
unregistered lines.
•sip\:xxxx\@registrar\.polycomcsn\.com - This will match with any four digit URI calls
having the domain @registrar.polycomcsn.com .
For example, if you configure three lines and has dial plan based line switching enabled. Now, if the
third line's dial plan has sip\:xxxx\@registrar\.polycomcsn\.com then call will be initiated
from the third line if user dial 1234@registrar.polycomcsn.com because it matches with the
third line's dial plan.
Generating Secondary Dial Tone with Digit Maps
You can regenerate a dial tone by adding a comma "," to the digit map.
You can dial seven-digit numbers after dialing "8" as shown next in the example rule 8,[2-9]xxxxxxT :
[2-9]11|0T|011xxx.T|[0-1][2-9]xxxxxxxxx|8,[2-9]xxxxxxT|[2-9]xx.T
By adding the digit "8", the dial tone plays again, and users can complete the remaining seven-digit
number. In this example, if users also have a 4-digit extension that begins with "8", then users will hear
dial tone after the first "8" was dialed because "8" matches the "8" in the digit map.
If you want to generate dial tone without the need to send the "8", replace one string with another using
the special character "R" as shown next in the rule R8RR. In the following example, replace "8" with an
empty string to dial the seven-digit number:
[2-9]11|0T|011xxx.T|[0-1][2-9]xxxxxxxxx|R8RR,[2-9]xxxxxxT|[2-9]xx.T
Enhanced 911 (E.911)
This E.911 feature allows you to configure one of three sources the phone obtains location information
from:
▪ LLDP-MED
▪ DHCP via option 99
▪ LIS compliant with RFC 5985
Configuring the source of location information allows the phone to share its location details in the invite
sent when a 911 call is made to ensure the 911 operator dispatches emergency services to the correct
address.
Call Controls
Polycom, Inc. 316

Enhanced 911 (E.911) Parameters
Use the following parameters to configure E.911.
E.911 Parameters
Template Parameter Permitted Values Change Causes Restart
or Reboot
features.cfg feature.E911.loca
tionInfoSchema
HYBRID (default) - SIP
invites use an XML
schema as per the
RFC4119 and RFC5139
standards.
RFC 4119 - SIP invites
use an XML schema as
per the RFC4119
standards.
RFC5139 - SIP invites
use an XML schema as
per the RFC5139
standards.
No
site.cfg feature.E911.HELD
.server
NULL (default)
Set the IP address or
hostname of the Location
Information Server (LIS)
address. For example,
host.domain.com or
https://xxx.xxx.xxx.xxx.
0 - 255
No
site.cfg feature.E911.HELD
.username
NULL (default)
Set the user name used
to authenticate to the LIS.
No
site.cfg feature.E911.HELD
.password
NULL (default)
Set the password used to
authenticate to the
Location Information
Server.
0-255
No
site.cfg feature.E911.HELD
.identity
Set the vendor-specific
element to include in a
location request
message. For example,
‘companyID’.
NULL (default)
String 255 character max
No
Call Controls
Polycom, Inc. 317
Template Parameter Permitted Values Change Causes Restart
or Reboot
site.cfg feature.E911.HELD
.identityValue
Set the value for the
vendor-specific element
to include in a location
request message.
NULL (default)
String 255 character max
No
site.cfg feature.E911.loca
tionRetryTimer
Specify the retry timeout
value in seconds for the
location request sent to
the Location Information
Server (LIS).
The phone does not retry
after receiving location
information received
through the LIS.
60 seconds (default)
60 - 86400 seconds
No
site.cfg feature.E911.HELD
.nai.enable
0 (default) – The NAI is
omitted as a device
identity in the location
request sent to the LIS.
1 - The NAI is included as
a device identity in the
location request sent to
the LIS.
No
Call Controls
Polycom, Inc. 318

Template Parameter Permitted Values Change Causes Restart
or Reboot
site.cfg locInfo.source Specify the source of
phone location
information. This
parameter is useful for
locating a phone in
environments that have
multiple sources of
location information.
LLDP (default for Generic
Base Profile) – Use the
network switch as the
source of location
information.
MS_E911_LIS (default for
Lync Base Profile) – Use
the Skype for Business
Server as the source of
location information.
CONFIG – You can
manually configure the
source of location
information for Skype for
Business.
LIS – Use the location
information server as the
source of location
information. Generic Base
Profile only.
DHCP – Use DHCP as
the source of location
information. Generic Base
Profile only.
If location information is
not available from a
default or configured
source, the fallback
priority is as follows:
Generic Base Profile: No
fallback supported for
Generic Base Profile
Lync Base Profile:
MS_E911_LIS > CONFIG
> LLDP
No
Lync.cfg locInfo.x.label Enter a label for the
location.
Null (default)
No
Call Controls
Polycom, Inc. 319

Template Parameter Permitted Values Change Causes Restart
or Reboot
Lync.cfg locInfo.x.country Enter the country where
the phone is located.
Null (default)
No
Lync.cfg locInfo.x.A1 Enter the national
subdivision where the
phone is located. For
example, a state or
province.
Null (default)
No
Lync.cfg locInfo.x.A3 Enter the city where the
phone is located.
Null (default)
No
Lync.cfg locInfo.x.PRD Enter the leading direction
of the street location.
Null (default)
No
Lync.cfg locInfo.x.RD Enter the name of road or
street where the phone is
located.
Null (default)
No
Lync.cfg locInfo.x.STS Enter the suffix of the
name used
inlocInfo.x.RD. For
example, street or
avenue.
Null (default)
No
Lync.cfg locInfo.x.POD Enter the trailing street
direction. For example,
southwest.
Null (default)
No
Lync.cfg locInfo.x.HNO Enter the street address
number of the phone’s
location.
Null (default)
No
Lync.cfg locInfo.x.HNS Enter a suffix for the
street address used in
locInfo.x.HNS. For
example, A or ½.
Null (default)
No
Call Controls
Polycom, Inc. 320

Template Parameter Permitted Values Change Causes Restart
or Reboot
Lync.cfg locInfo.x.LOC Enter any additional
information that identifies
the location.
Null (default)
No
Lync.cfg locInfo.x.NAM Enter a proper name to
associate with the
location.
Null (default)
No
Lync.cfg locInfo.x.PC Enter the ZIP or postal
code of the phone’s
location.
Null (default)
No
site.cfg feature.E911.enab
led
0 (default) – Disable the
E.911 feature.
1 – Enable the E.911
feature.
The INVITE sent for
emergency calls from the
phone includes the
geolocation header
defined in RFC 6442 and
PIDF presence element
as specified in RFC3863
with a GEOPRIV location
object specified in
RFC4119 for in Open SIP
environments.
This parameter is
mutually exclusive of the
GENBAND E.911 feature
and if this parameter and
feature.genband.E
911.enabled are
enabled, this parameter
takes precedence.
No
Call Controls
Polycom, Inc. 321

Template Parameter Permitted Values Change Causes Restart
or Reboot
site.cfg feature.E911.HELD
.requestType
Any (default) - Send a
request to the Location
Information Server (LIS)
to return either ‘Location
by Reference’ or ‘Location
by Value’. Note this is not
the ‘Any’ value referred to
in RFC 5985.
Civic – Send a request to
the LIS to return a
location by value in the
form of a civic address for
the device as defined in
RFC 5985.
RefID – Send a request to
the LIS to return a set of
Location URIs for the
device as defined in RFC
5985.
No
site.cfg voIpProt.SIP.head
er.priority.enabl
e
0 (default) – Do not
include a priority header
in the E.911 INVITE
message.
1 - Include a priority
header in the E.911
INVITE message.
No
site.cfg voIpProt.SIP.head
er.geolocation-
routing.enable
0 (default) – Do not
include the geolocation-
routing header in the E.
911 INVITE message.
1 - Include the
geolocation-routing
header in the E.911
INVITE message.
No
Call Controls
Polycom, Inc. 322

Template Parameter Permitted Values Change Causes Restart
or Reboot
site.cfg feature.E911.HELD
.secondary.server
Set the IP address or
hostname of the
secondary Location
Information Server (LIS)
address. For example,
host.domain.com or
https://xxx.xxx.xxx.xxx.
NULL (default)
0-255
Dotted-decimal IP
address
Hostname
Fully-qualified domain
name (FQDN)
No
site.cfg feature.E911.HELD
.secondary.userna
me
Set a user name to
authenticate to the
secondary Location
information Server (LIS).
NULL (default)
String
0-255
No
site.cfg feature.E911.HELD
.secondary.passwo
rd
Set a password to
authenticate to the
secondary LIS.
NULL (default)
String
No
site.cfg feature.E911.usag
erule.retransmiss
ion
0 (default) - The recipient
of this location object is
not permitted to share the
enclosed location
information, or the object
as a whole, with other
parties.
1 - Distributing this
location is permitted.
No
Call Controls
Polycom, Inc. 323

Multilevel Precedence and Preemption (MLPP) for
Assured Services - Session Initiation Protocol (AS-
SIP)
Multilevel Precedence and Preemption (MLPP) enables you to configure a precedence level for outgoing
calls. Polycom implements MLPP in accordance with the standards set by Assured Services for Session
Initiation Protocol (AS-SIP).
Higher precedence calls preempt—end—active calls with a lower precedence level. When an active call
is preempted, the phone plays a preemption tone and displays a preemption screen. The preemption
screen display time can be configured in the config file. The default time for the preempted screen is 0
seconds for callee and 3 seconds for caller. If the default time for the preempted screen is 0 seconds,
then preemption screen is displayed until you press the OK button. The preemption screen shows that the
current call was preempted, and an OK button to acknowledge the preemption. The user can then answer
the incoming higher-precedence call or reject the call. If the callee doesn’t acknowledge the incoming call,
the notification disappears and the current call ends.
If a lower-precedence call is on hold, and you receive a higher-precedence call, the preemption screen
doesn’t display, and the preemption tone doesn’t play.
MLPP treats incoming calls with the same precedence level as the active call depending on the call state,
as shown in the following table.
MLPP Behavior
Current Call State New call—same precedence: one
active call
One call per line
New call—same precedence:
multiple active calls
Multiple calls per line
Active Call Rejected If you accept the new call, it’s
placed in the first slot. The active
call is placed on hold and moved to
the second slot.
If all lines and call appearances are
at capacity, new incoming call with
the same precedence will get
rejected.
Ringing State Rejected The new call displays in the top
center corner and the current call is
in the main screen.
Call on Hold Rejected If the user acknowledges the new
call, the current call is moved to the
second slot. The new call is placed
in the first slot.
Call Controls
Polycom, Inc. 324

The caller’s phone displays the precedence of the outgoing call. Callee phones display call precedence
on each phone line: 1 indicates the lowest precedence and 5 indicates the highest precedence. Phone
models vary in how they display precedence:
• ◦ Trio 8500: Priority-1, Priority-2, Priority-3
◦Trio 8800: Priority-1, Priority-2, Priority-3
Preemption Behavior on Low Priority Calls
A 180 ringing response is sent to the far end only when a call appearance is allocated for the incoming
precedence call.
The following table illustrates the preemption behavior of the low priority call's status.
Preemption Behavior on Low Priority Calls
Low Priority Call's Status for Preemption Behavior
Connected The call is terminated with a BYE request containing a
preemption Reason header, and a local preemption tone
is played for a configurable duration or until the user
hangs up, whichever comes first.
Locally Held The call may be terminated with a BYE request containing
a preemption Reason header.
Alerting A 486 Busy Here response is sent to the far end
containing a preemption Reason header.
Dial Tone or Setup When the final call appearance is in the dial tone or setup
(digit collection) state (including consultation calls) and a
precedence call arrives, no action is taken until the new
outgoing call is of higher priority or is not is determined. If
the call is of lower priority, then the call is not placed and
a preemption tone is played for a configurable duration or
until the user hangs up, whichever is less. If the call is of
the same or higher priority, then the incoming call is
terminated by sending a 486 Busy Here response to the
far end containing a preemption Reason header.
Preceding If the final call appearance is in the preceding (digit
collection) state (including consultation calls) when a
precedence call arrives, no action is taken until it can be
determined whether the new outgoing call is of higher
priority or not. If the call is determined to be of lower
priority, then the call is not placed and a preemption tone
should be played for a configurable duration or until the
user hangs up, whichever is less. If the call is determined
to be of the same or higher priority, then the incoming call
is terminated by sending a 486 Busy Here response to
the far end containing a preemption Reason header.
Call Controls
Polycom, Inc. 325

MLPP with AS-SIP Parameters
The following parameters configure MLPP with AS-SIP.
AS-SIP Parameters
Template Parameter Permitted Values
Change Causes Restart
or Reboot
sip-interop.cfg voIpProt.SIP.assu
redService.defaul
tPriority
Default priority assigned
to an outgoing call.
1 (default)
1 to 10
This value is overridden if
priority is assigned from
the dial plan for that
number.
No
sip-interop.cfg voIpProt.SIP.assu
redService.enable
0 (default) - Disables the
AS-SIP feature.
1 - Enables the AS-SIP
feature
No
sip-interop.cfg voIpProt.SIP.assu
redService.namesp
ace.custom.name
The name for the custom
namespace label.
Null (default)
String
No
sip-interop.cfg voIpProt.SIP.assu
redService.namesp
ace.custom.priori
ty.x
The namespace
precedence values,
lowest to highest.
Null (default)
String
No
sip-interop.cfg voIpProt.SIP.assu
redService.preced
enceThreshold
The minimum call priority
required for a call to be
treated as a precedence
call.
2 (default)
1 to 10
No
sip-interop.cfg voIpProt.SIP.assu
redService.preemp
tionAutoTerminati
onDelay.local
Set the duration after a
callee preemption event
that a call appearance is
automatically cleared.
0 (default)
0- 3600
No
Call Controls
Polycom, Inc. 326
Template Parameter Permitted Values
Change Causes Restart
or Reboot
sip-interop.cfg voIpProt.SIP.assu
redService.preemp
tionAutoTerminati
onDelay.remote
Set the duration after a
caller preemption event
that a call appearance is
automatically cleared.
3 (default)
0-3600
No
sip-interop.cfg voIpProt.SIP.assu
redService.server
Controlled
1 (default) - The
precedence level of
outgoing calls is set by
the server or non-EI
equipment.
0 - The precedence level
is set by the phone and
must not change if it is an
outgoing call.
No
International Dialing Prefix
Enter a '+' symbol before you dial an international phone numbers to identify to the switch that the phone
number you are dialing is international.
International Dialing Prefix Parameters
The following parameters configure the international dialing prefixes.
Call Controls
Polycom, Inc. 327

International Dialing Prefix Parameters
Template Parameter Permitted Values Change Causes Restart
or Reboot
site.cfg call.internationa
lDialing.enabled
This parameter applies to
all numeric dial pads on
the phone, including for
example, the contact
directory.
Changes you make to this
parameter cause a restart
or reboot.
1 (default) - Disable the
key tap timer that
converts a double tap of
the asterisk "*" symbol to
the "+" symbol to indicate
an international call. By
default, this parameter is
enabled so that a quick
double tap of "*" converts
immediately to "+". To
enter a double asterisk
"**", tap "*" once and wait
for the key tap timer to
expire to enter a second
"*".
0 - When you disable this
parameter, you cannot
dial"+" and you must
enter the international exit
code of the country you
are calling from to make
international calls.
No
site.cfg call.internationa
lPrefix.key
The phone supports
international call prefix (+)
with both '0' and '*'.
0 (default) - Set the
international prefix with *.
1 - Set the international
prefix with 0.
No
Call Controls
Polycom, Inc. 328
Shared Lines
Topics:
•Shared Call Appearances
•Private Hold on Shared Lines
•Intercom Calls
•Group Paging
This section shows you how to configure shared line features.
Shared Call Appearances
Shared call appearance enables an active call to display simultaneously on multiple phones in a group.
All call states of a call—active, inactive, on hold—are displayed on all phones of a group.
By default, the answering phone has sole access to the incoming call, which is called line seize. If the
answering phone places the call on hold, that call becomes available for pickup to all phones in that
group. You can enable other phones in the group the ability to enter a conversation on one of the group
phones, which is referred to as a barge in.
Note: Shared call appearances and bridged line appearances are similar signaling methods that enable
more than one phone to share the same line or registration. The method you use varies with the
SIP call server you are using.
Shared Call Appearances Parameters
This feature is dependent on support from a SIP call server.
To enable shared call appearances on your phone, you must obtain a shared line address from your SIP
service provider.
Use the parameters in the following table to configure options for this feature.
.
Shared Call Appearances Parameters
Template Parameter Permitted Values
Change Causes
Restart or Reboot
reg-
basic.cfg
reg.x.address The user part (for example, 1002) or the
user and the host part (for example,
1002@polycom.com ) of the
registration SIP URI .
Null (default)
string address
No
Polycom, Inc. 329

Template Parameter Permitted Values
Change Causes
Restart or Reboot
reg-
advanced.cf
g
reg.x.type private (default) - Use standard call
signaling.
shared - Use augment call signaling
with call state subscriptions and
notifications and use access control for
outgoing calls.
No
sip-
interop.cfg
call.shared.reject For shared line calls on the BroadWorks
server.
0 - The phone displays a Reject soft key
to reject an incoming call to a shared
line.
1 - The Reject soft key does not display.
No
sip-
interop.cfg
call.shared.expose
AutoHolds
0 (default) - No re-INVITE is sent to the
server when setting up a conference on
a shared line.
1 - A re-INVITE is sent to the server
when setting up a conference on a
shared line.
Yes
sip-
interop.cfg
call.shared.oneTou
chResume
0 (default) - Selecting the shared line
opens all current calls that the user can
choose from.
1 - All users on a shared line can
resume held calls by pressing the
shared line key. If more than one call is
on hold, the first held call is selected
and resumed.
A quick press and release of the line
key resumes a call whereas pressing
and holding down the line key shows a
list of calls on that line.
Yes
sip-
interop.cfg
call.shared.prefer
CallInfoCID
0 (default) - The Caller-ID information
received in the 200 OK status code is
not ignored if the NOTIFY message
received with caller information includes
display information.
1 - The Caller-ID information received in
the 200 OK status code is ignored if the
NOTIFY message received with caller
information includes display information.
No
Shared Lines
Polycom, Inc. 330
Template Parameter Permitted Values
Change Causes
Restart or Reboot
sip-
interop.cfg
, site.cfg
call.shared.remote
ActiveHoldAsActive
1 (default) - Shared remote active/hold
calls are treated as a active call on the
phone.
0 - Shared remote active/hold calls are
not treated as a active call on the
phone.
No
sip-
interop.cfg
call.shared.seizeF
ailReorder
1 (default) - Play a re-order tone locally
on shared line seize failure.
0 - Do not play a re-order tone locally on
shared line seize failure.
Yes
sip-
interop.cfg
voIpProt.SIP.speci
alEvent.lineSeize.
nonStandard
Controls the response for a line-seize
event SUBSCRIBE.
1 (default) - This speeds up the
processing of the response for line-
seize event.
0 - This will process the response for
the line seize event normally
Yes
reg-
advanced.cf
g
reg.x.ringType The ringer to be used for calls received
by this registration. The default is the
first non-silent ringer.
If you use the configuration parameters
ringer13 and ringer14 on a single
registered line, the phone plays
SystemRing.wav.
default (default)
ringer1 to ringer24
No
Shared Lines
Polycom, Inc. 331

Template Parameter Permitted Values
Change Causes
Restart or Reboot
site.cfg reg.x.line.y.label Configure a unique line label for a
shared line that has multiple line key
appearances. This parameter takes
effect when u
p.cfgUniqueLineLabel=1 . If
reg.x.linekeys=1 , this
parameter does not have any effect.
x = the registration index number
starting from 1.
y = the line index from 1 to the value set
by reg.x.linekeys . Specifying a
string sets the label used for the line key
registration on phones with multiple line
keys.
If no parameter value is set for
reg.x.line.y.label , the phone
automatically numbers multiple lines by
prepending “<y>_” where <y> is the line
index from 1 to the value set by
reg.x.linekeys .
• The following examples show labels
for line 1 on a phone with user
registration 1234, where
reg.x.linekeys=2 :
◦ If no label is configured for
registration, the labels are
“1_1234” and “2_1234”.
◦If reg.1.line.
1.label=Polycom and
reg.1.line.
2.label=VVX , the labels
display as ‘Polycom' and ‘VVX'.
No
Shared Lines
Polycom, Inc. 332
Template Parameter Permitted Values
Change Causes
Restart or Reboot
reg-
advanced.cf
g
reg.x.callsPerLine
Key
Set the maximum number of concurrent
calls for a single registration x. This
parameter applies to all line keys using
registration x. If registration x is a
shared line, an active call counts as a
call appearance on all phones sharing
that registration.
This per-registration parameter
overrides
call.callsPerLineKey.
24 (default)
1-24
VVX 101, 201
8 (default)
1 - 8
Polycom Trio systems
12 (default)
No
reg-
advanced.cf
g
reg.x.header.pearl
ymedia.support
0 (Default) - The p-early-media header
is not supported on the specified line
registration.
1 - The p-early-media header is
supported by the specified line
registration.
No
reg-
basic.cfg
reg.X.insertOBPAdd
ressInRoute
1 (Default) - The outbound proxy
address is added as the topmost route
header.
0 - The outbound proxy address is not
added to the route header.
No
features.cf
g
reg.x.path 0 (Default) - The path extension header
field in the Register request message is
not supported for the specific line
registration.
1 - The phone supports and provides
the path extension header field in the
Register request message for the
specific line registration.
No
Shared Lines
Polycom, Inc. 333
Template Parameter Permitted Values
Change Causes
Restart or Reboot
features.cf
g
reg.x.regevent 0 (default) - The phone is not
subscribed to registration state change
notifications for the specific phone line.
1 - The phone is subscribed to
registration state change notifications
for the specific phone line.
This parameter overrides the global
parameter voIpProt.SIP.regevent.
No
reg-
advanced.cf
g
reg.x.rejectNDUBIn
vite
Specify whether or not the phone
accepts a call for a particular
registration in case of a Network
Determined User Busy (NDUB) event
advertised by the SIP server.
0 (Default) - If an NDUB event occurs,
the phone does not reject the call.
1 - If an NDUB event occurs, the phone
rejects the call with a 603 Decline
response code.
No
reg-
advanced.cf
g
reg.x.server.y.spe
cialInterop
Specify the server-specific feature set
for the line registration.
Standard (Default)
VVX 101:
Standard
GENBAND
ALU-CTS
DT
VVX 201:
Standard,
GENBAND
ALU-CTS
ocs2007r2
lync2010
All other phones:
Standard
GENBAND
ALU-CTS
ocs2007r2
lync2010
lcs2005
Shared Lines
Polycom, Inc. 334

Template Parameter Permitted Values
Change Causes
Restart or Reboot
sip-
interop.cfg
reg.x.gruu 1 - The phone sends sip.instance in the
REGISTER request.
0 (default) - The phone does not send
sip.instance in the REGISTER request.
No
reg-
advanced.cf
g
reg.x.serverFeatur
eControl.securityC
lassification
0 (default) - The visual security
classification feature for a specific
phone line is disabled.
1 - The visual security classification
feature for a specific phone line is
enabled.
No
reg-
advanced.cf
g
reg.x.terminationT
ype
Determines the type of termination that
is used for the line where the line can
be managed automatically on the VVX,
the wireless handset, or on both. X =
each registration index.
NULL (default)
VVX, DECT, or VVX-DECT
No
reg-
advanced.cf
g reg-
advanced.cf
g
reg.x.acd-login-
logout reg.x.acd-
agent-available
0 (default) - The ACD feature is
disabled for registration.
1 - If both ACD login/logout and agent
available are set to 1 for registration x,
the ACD feature is enabled for that
registration.
No
reg-
advanced.cf
g
reg.x.auth.domain The domain of the authorization server
that is used to check the user names
and passwords.
Null (default)string
No
reg-
advanced.cf
g
reg.x.auth.optimiz
edInFailover
The destination of the first new SIP
request when failover occurs.
0 (default) - The SIP request is sent to
the server with the highest priority in the
server list.
1 - The SIP request is sent to the server
which sent the proxy authentication
request.
No
Shared Lines
Polycom, Inc. 335

Template Parameter Permitted Values
Change Causes
Restart or Reboot
reg-
basic.cfg
reg.x.auth.passwor
d
The password to be used for
authentication challenges for this
registration.
Null (default)
string - It overrides the password
entered into the Authentication
submenu on the Settings menu of the
phone.
No
reg-
basic.cfg
reg.x.auth.userId User ID to be used for authentication
challenges for this registration.
Null (default)
string - If the User ID is non-Null, it
overrides the user parameter entered
into the Authentication submenu on the
Settings menu of the phone.
No
reg-
advanced.cf
g
reg.x.auth.useLogi
nCredentials
0 - (default) The Login credentials are
not used for authentication to the server
on registration x.
1 - The login credentials are used for
authentication to the server.
No
features.cf
g
reg.x.broadsoft.us
erId
Enter the BroadSoft user ID to
authenticate with the BroadSoft XSP
service interface.
Null (default)
string
No
features.cf
g
reg.x.broadsoft.us
eXspCredentials
If this parameter is disabled, the phones
use standard SIP credentials to
authenticate.
1 (default) - Use this value, if phone
lines are registered with a server
running BroadWorks R19 or earlier.
0 - Set to 0, if phone lines are registered
with a server running BroadWorks R19
SP1 or later.
No
features.cf
g
reg.x.broadsoft.xs
p.password
Enter the password associated with the
BroadSoft user account for the line.
Required only when
reg.x.broadsoft.useXspCred
entials=1 .
Null (default)
string
No
Shared Lines
Polycom, Inc. 336
Template Parameter Permitted Values
Change Causes
Restart or Reboot
reg-
advanced.cf
g
reg.x.displayName The display name used in SIP signaling
as the default caller ID.
Null (default)
UTF-8 encoded string
No
features.cf
g
reg.x.enablePvtHol
dSoftKey
This parameter applies only to shared
lines.
0 (default) - To disable user on a shared
line to hold calls privately.
1 - To enable users on a shared line to
hold calls privately.
No
reg.x.filterReflec
tedBlaDialogs
1 (default) - bridged line appearance
NOTIFY messages are ignored.
0 - bridged line appearance NOTIFY
messages is not ignored
No
reg-
advanced.cf
g
reg.x.fwd.busy.con
tact
The forward-to contact for calls
forwarded due to busy status.
Null (default) - The contact specified by
divert.x.contact is used.
string - The contact specified by
divert.x.contact is not used
No
reg-
advanced.cf
g
reg.x.fwd.busy.sta
tus
0 (default) - Incoming calls that receive
a busy signal is not forwarded
1 - Busy calls are forwarded to the
contact specified by
reg.x.fwd.busy.contact .
No
reg-
advanced.cf
g
reg.x.fwd.noanswer
.contact
Null (default) - The forward-to contact
specified by divert.x.contact is
used.
string - The forward to contact used for
calls forwarded due to no answer.
No
reg-
advanced.cf
g
reg.x.fwd.noanswer
.ringCount
The number of seconds the phone
should ring for before the call is
forwarded because of no answer. The
maximum value accepted by some call
servers is 20.
0 - (default)
1 to 65535
No
Shared Lines
Polycom, Inc. 337
Template Parameter Permitted Values
Change Causes
Restart or Reboot
reg-
advanced.cf
g
reg.x.fwd.noanswer
.status
0 (default) - The calls are not forwarded
if there is no answer.
1 - The calls are forwarded to the
contact specified by
reg.x.noanswer.contact after
ringing for the length of time specified
by
reg.x.fwd.noanswer.ringCou
nt .
No
debug.cfg reg.x.gruu Specify if the phone sends sip.instance
in the REGISTER request.
0 (default)
1
No
reg-
basic.cfg
reg.x.label The text label that displays next to the
line key for registration x.
The maximum number of characters for
this parameter value is 256; however,
the maximum number of characters that
a phone can display on its user
interface varies by phone model and by
the width of the characters you use.
Parameter values that exceed the
phone's maximum display length are
truncated by ellipses (…). The rules for
parameter up.cfgLabelElide determine
how the label is truncated.
Null (default) - the label is determined
as follows:
•If reg.
1.useteluriAsLineLabel=1
, then the tel URI/phone number/
address displays as the label.
•If reg.
1.useteluriAsLineLabel=0,
then the value for
reg.x.displayName , if
available, displays as the label. If
reg.x.displayName is
unavailable, the user part of
reg.x.address is used.
UTF-8 encoded string
No
Shared Lines
Polycom, Inc. 338
Template Parameter Permitted Values
Change Causes
Restart or Reboot
reg-
basic.cfg
reg.x.lineAddress The line extension for a shared line.
This parameter applies to private lines
and BroadSoft call park and retrieve. If
there is no extension provided for this
parameter, the call park notification is
ignored for the shared line.
Null (default)
String
No
reg-
advanced.cf
g
reg.x.lineKeys Specify the number of line keys to use
for a single registration. The maximum
number of line keys you can use per
registration depends on your phone
model.
1 (default)
1 to max
No
lync.cfg reg.x.lisdisclaime
r
This parameter sets the value of the
location policy disclaimer. For example,
the disclaimer may be “Warning: If you
do not provide a location, emergency
services may be delayed in reaching
your location should you need to call for
help.”
Null (default)
string, 0 to 256 characters
No
reg-
advanced.cf
g
reg.x.musicOnHold.
uri
A URI that provides the media stream to
play for the remote party on hold.
Null (default) - This parameter does not
overrides
voIpProt.SIP.musicOnHold.u
ri .
a SIP URI - This parameter overrides
voIpProt.SIP.musicOnHold.u
ri .
No
reg-
advanced.cf
g
reg.x.offerFullCod
ecListUponResume
1 (default) - The phone sends full audio
and video capabilities after resuming a
held call irrespective of the audio and
video capabilities negotiated at the
initial call answer.
0 - The phone does not send full audio
and video capabilities after resuming a
held call.
No
Shared Lines
Polycom, Inc. 339

Template Parameter Permitted Values
Change Causes
Restart or Reboot
reg-
basic.cfg
reg.x.outboundProx
y.address
The IP address or hostname of the SIP
server to which the phone sends all
requests.
Null (default)
IP address or hostname
No
sip-
interop.cfg
reg.x.outboundProx
y.failOver.failBac
k.mode
The mode for failover failback (overrides
reg.x.server.y.failOver.fa
ilBack.mode ).
duration - (default) The phone tries the
primary server again after the time
specified by
reg.x.outboundProxy.failOv
er.failBack.timeout expires.
newRequests - All new requests are
forwarded first to the primary server
regardless of the last used server.
DNSTTL - The phone tries the primary
server again after a timeout equal to the
DNS TTL configured for the server that
the phone is registered to.
No
reg-
advanced.cf
g
reg.x.outboundProx
y.failOver.failBac
k.timeout
3600 (default) -The time to wait (in
seconds) before failback occurs
(overrides
reg.x.server.y.failOver.fa
ilBack.timeout ).
0, 60 to 65535 - The phone does not fail
back until a failover event occurs with
the current server.
No
reg-
advanced.cf
g
reg.x.outboundProx
y.failOver.failReg
istrationOn
1 (default) - The reRegisterOn
parameter is enabled, the phone silently
invalidates an existing registration.
0 - The reRegisterOn parameter is
enabled, existing registrations remain
active.
No
reg-
advanced.cf
g
reg.x.outboundProx
y.failOver.onlySig
nalWithRegistered
1 (default) - The reRegisterOn and
failRegistrationOn parameters are
enabled, no signaling is accepted from
or sent to a server that has failed until
failback is attempted or failover occurs.
0 - The reRegisterOn and
failRegistrationOn parameters are
enabled, signaling is accepted from and
sent to a server that has failed.
No
Shared Lines
Polycom, Inc. 340
Template Parameter Permitted Values
Change Causes
Restart or Reboot
reg-
advanced.cf
g
reg.x.outboundProx
y.failOver.reRegis
terOn
This parameters overrides
reg.x.server.y.failOver.re
RegisterOn .
0 (default) - The phone won't attempt to
register with the secondary server.
1 - The phone attempts to register with
(or via, for the outbound proxy
scenario), the secondary server.
No
reg-
advanced.cf
g
reg.x.outboundProx
y.port
The port of the SIP server to which the
phone sends all requests.
0 - (default)
1 to 65535
No
reg-
advanced.cf
g
reg.x.outboundProx
y.transport
The transport method the phone uses to
communicate with the SIP server.
DNSnaptr (default)
DNSnaptr, TCPpreferred, UDPOnly,
TLS, TCPOnly
No
sip-
interop.cfg
reg.x.protocol.SIP You can use this parameter for the VVX
500/501, 600/601, and 1500.
1 (default) - SIP signaling is enabled for
this registration.
0 - SIP signaling is not enabled for this
registration.
No
sip-
interop.cfg
reg.x.proxyRequire Null (default) - No Proxy-Require is
sent.
string - Needs to be entered in the
Proxy-Require header.
No
reg-
advanced.cf
g
reg.x.ringType The ringer to be used for calls received
by this registration.
ringer2 (default) - Is the first non-silent
ringer.
ringer1 to ringer24 - To play ringer on a
single registered line.
No
reg-
advanced.cf
g
reg.x.serverFeatur
eControl.callRecor
ding
1 (default) - BroadSoft BroadWorks v20
call recording feature for individual
phone lines is enabled.
0 - BroadSoft BroadWorks v20 call
recording feature for individual phone
lines is disabled.
No
Shared Lines
Polycom, Inc. 341

Template Parameter Permitted Values
Change Causes
Restart or Reboot
reg-
advanced.cf
g
reg.x.serverFeatur
eControl.cf
This parameter overrides
voIpProt.SIP.serverFeature
Control.cf .
0 (default) - The server-based call
forwarding is disabled.
1 - server based call forwarding is
enabled.
Yes
reg-
advanced.cf
g
reg.x.serverFeatur
eControl.dnd
This parameter overrides
voIpProt.SIP.serverFeature
Control.dnd.
0 (default) - server-based do-not-disturb
(DND) is disabled.
1 - server-based DND is enabled and
the call server has control of DND.
Yes
sip-
interop.cfg
reg.x.serverFeatur
eControl.localProc
essing.cf
This parameter overrides
voIpProt.SIP.serverFeature
Control.localProcessing.cf
.
0 (default) - If
reg.x.serverFeatureControl
.cf is set to 1 the phone does not
perform local Call Forward behavior.
1 - The phone performs local Call
Forward behavior on all calls received.
No
sip-
interop.cfg
reg.x.serverFeatur
eControl.localProc
essing.dnd
This parameter overrides
voIpProt.SIP.serverFeature
Control.localProcessing.dn
d .
0 (default) - If
reg.x.serverFeatureControl
.dnd is set to 1, the phone does not
perform local DND call behavior.
1 - The phone performs local DND call
behavior on all calls received.
No
reg-
advanced.cf
g
reg.x.serverFeatur
eControl.securityC
lassification
0 (default) - The visual security
classification feature for a specific
phone line is disabled.
1 - The visual security classification
feature for a specific phone line is
enabled.
No
Shared Lines
Polycom, Inc. 342

Template Parameter Permitted Values
Change Causes
Restart or Reboot
reg-
advanced.cf
g
reg.x.serverFeatur
eControl.signaling
Method
Controls the method used to perform
call forwarding requests to the server.
serviceMsForwardContact (default)
string
No
sip-
interop.cfg
reg.x.srtp.enable 1 (default) - The registration accepts
SRTP offers.
0 - The registration always declines
SRTP offers.
Yes
sip-
interop.cfg
reg.x.srtp.offer This parameter applies to the
registration initiating (offering) a phone
call.
0 (default) - No secure media stream is
included in SDP of a SIP INVITE.
1 - The registration includes a secure
media stream description along with the
usual non-secure media description in
the SDP of a SIP INVITE.
Yes
sip-
interop.cfg
reg.x.srtp.require 0 (default) - Secure media streams are
not required.
1 - The registration is only allowed to
use secure media streams.
Yes
sip-
interop.cfg
reg.x.srtp.simplif
iedBestEffort
This parameter overrides
sec.srtp.simplifiedBestEff
ort .
1 (default) - Negotiation of SRTP
compliant with Microsoft Session
Description Protocol Version 2.0
Extensions is supported.
0 - No SRTP is supported.
No
sip-
interop.cfg
reg.x.strictLineSe
ize
0 (default) - Dial prompt is provided
immediately without waiting for a
successful OK from the call server.
1 - The phone is forced to wait for 200
OK on registration x when receiving a
TRYING notify.
This parameter overrides
voIpProt.SIP.strictLineSeize for
registration x.
No
Shared Lines
Polycom, Inc. 343
Template Parameter Permitted Values
Change Causes
Restart or Reboot
sip-
interop.cfg
reg.x.tcpFastFailo
ver
0 (default) - A full 32 second RFC
compliant timeout is used.
1 - failover occurs based on the values
of
reg.x.server.y.retryMaxCou
nt and
voIpProt.server.x.retryTim
eOut .
No
reg-
advanced.cf
g
reg.x.thirdPartyNa
me
Null (default) - In all other cases.
string address -This field must match
the reg.x.address value of the
registration which makes up the part of
a bridged line appearance (BLA).
No
reg-
advanced.cf
g
reg.x.useCompleteU
riForRetrieve
This parameters overrides
voipPort.SIP.useCompleteUr
iForRetrieve .
1 (default) - The target URI in BLF
signaling uses the complete address as
provided in the XML dialog document.
0 - Only the user portion of the XML
dialog document is used and the current
registrar's domain is appended to create
the full target URI.
No
site.cfg reg.x.server.y.add
ress
If this parameter is set, it takes
precedence even if the DHCP server is
available.
Null (default) - SIP server does not
accepts registrations.
IP address or hostname - SIP server
that accepts registrations. If not Null, all
of the parameters in this table override
the parameters specified in
voIpProt.server.*
No
reg-
advanced
reg.x.server.y.exp
ires
The phone's requested registration
period in seconds.
The period negotiated with the server
may be different. The phone attempts to
re-register at the beginning of the
overlap period.
3600 - (default)
positive integer, minimum 10
No
Shared Lines
Polycom, Inc. 344

Template Parameter Permitted Values
Change Causes
Restart or Reboot
reg-
advanced
reg.x.server.y.exp
ires.lineSeize
Requested line-seize subscription
period.
30 - (default)
0 to 65535
No
reg-
advanced
reg.x.server.y.exp
ires.overlap
The number of seconds before the
expiration time returned by server x at
which the phone should try to re-
register.
The phone tries to re-register at half the
expiration time returned by the server if
the server value is less than the
configured overlap value.
60 (default)
5 to 65535
No
site.cfg reg.x.server.y.fai
lOver.failBack.mod
e
duration (default) - The phone tries the
primary server again after the time
specified by
reg.x.server.y.failOver.fa
ilBack.timeout .
newRequests - All new requests are
forwarded first to the primary server
regardless of the last used server.
DNSTTL - The phone tries the primary
server again after a timeout equal to the
DNS TTL configured for the server that
the phone is registered to.
registration - The phone tries the
primary server again when the
registration renewal signaling begins.
This parameter overrides
voIpProt.server.x.failOver
.failBack.mode)
No
site.cfg reg.x.server.y.fai
lOver.failBack.tim
eout
3600 (default) - The time to wait (in
seconds) before failback occurs.
0 - The phone does not fail back until a
failover event occurs with the current
server.
60 to 65535 - If set to Duration, the
phone waits this long after connecting to
the current working server before
selecting the primary server again.
No
Shared Lines
Polycom, Inc. 345

Template Parameter Permitted Values
Change Causes
Restart or Reboot
site.cfg reg.x.server.y.fai
lOver.failRegistra
tionOn
1 (default) - The reRegisterOn
parameter is enabled, the phone silently
invalidates an existing registration (if it
exists), at the point of failing over.
0 - The reRegisterOn parameter is
disabled, existing registrations remain
active.
No
site.cfg reg.x.server.y.fai
lOver.onlySignalWi
thRegistered
1 (default) - Set to this value and
reRegisterOn and failRegistrationOn
parameters are enabled, no signaling is
accepted from or sent to a server that
has failed until failback is attempted or
failover occurs. If the phone attempts to
send signaling associated with an
existing call via an unregistered server
(for example, to resume or hold a call),
the call ends. No SIP messages are
sent to the unregistered server.
0 - Set to this value and reRegisterOn
and failRegistrationOn parameters are
enabled, signaling is accepted from and
sent to a server that has failed (even
though failback hasn't been attempted
or failover hasn't occurred).
No
site.cfg reg.x.server.y.fai
lOver.reRegisterOn
0 (default) - The phone does not
attempt to register with the secondary
server, since the phone assumes that
the primary and secondary servers
share registration information.
1 - The phone attempts to register with
(or via, for the outbound proxy
scenario), the secondary server. If the
registration succeeds (a 200 OK
response with valid expires), signaling
proceeds with the secondary server.
This parameter overrides
voIpProt.server.x.failOver
.reRegisterOn .
No
site.cfg reg.x.server.y.por
t
Null (default) - The port of the SIP
server does not specifies registrations.
0 - The port used depends on
reg.x.server.y.transport .
1 to 65535 - The port of the SIP server
that specifies registrations.
No
Shared Lines
Polycom, Inc. 346
Template Parameter Permitted Values
Change Causes
Restart or Reboot
site.cfg reg.x.server.y.reg
ister
1 (default) - Calls can not be routed to
an outbound proxy without registration.
0 - Calls can be routed to an outbound
proxy without registration.
See
voIpProt.server.x.register
for more information, see SIP Server
Fallback Enhancements on Polycom
Phones - Technical Bulletin 5844 on
Polycom Engineering Advisories and
Technical Notifications.
No
sip-
interop.cfg
reg.x.server.y.reg
isterRetry.baseTim
eOut
For registered line x, set y to the
maximum time period the phone waits
before trying to re-register with the
server.Used in conjunction with
reg.x.server.y.registerRet
ry.maxTimeOut to determine how
long to wait.
60 (default)
10 - 120 seconds
No
sip-
interop.cfg
reg.x.server.y.reg
isterRetry.maxTime
out
For registered line x, set y to the
maximum time period the phone waits
before trying to re-register with the
server. Use in conjunction with r
eg.x.server.y.registerRetr
y.baseTimeOut to determine how
long to wait. The algorithm is defined in
RFC 5626.
180 - (default)
60 - 1800 seconds
No
reg-
advanced.cf
g
reg.x.server.y.ret
ryMaxCount
The number of retries attempted before
moving to the next available server.
3 - (default)
0 to 20 - 3 is used when the value is set
to 0.
No
reg-
advanced.cf
g
reg.x.server.y.ret
ryTimeOut
0 (default) - Use standard RFC 3261
signaling retry behavior.
0 to 65535 - The amount of time (in
milliseconds) to wait between retries.
No
Shared Lines
Polycom, Inc. 347

Template Parameter Permitted Values
Change Causes
Restart or Reboot
reg-
advanced.cf
g
reg.x.server.y.sub
scribe.expires
The phone's requested subscription
period in seconds after which the phone
attempts to resubscribe at the beginning
of the overlap period.
3600 seconds - (default)
10 - 2147483647 (seconds)
You can use this parameter in
conjunction with
reg.x.server.y.subscribe.e
xpires.overlap .
No
reg-
advanced.cf
g
reg.x.server.y.sub
scribe.expires.ove
rlap
The number of seconds before the
expiration time returned by server x
after which the phone attempts to
resubscribe. If the server value is less
than the configured overlap value, the
phone tries to resubscribe at half the
expiration time returned by the server.
60 seconds (default)
5 - 65535 seconds
No
site.cfg reg.x.server.y.tra
nsport
The transport method the phone uses to
communicate with the SIP server.
DNSnaptr (default) - If
reg.x.server.y.address is a
hostname and
reg.x.server.y.port is 0 or
Null, do NAPTR then SRV look-ups to
try to discover the transport, ports and
servers, as per RFC 3263. If
reg.x.server.y.address is an
IP address, or a port is given, then UDP
is used.
TCPpreferred - TCP is the preferred
transport; UDP is used if TCP fails.
UDPOnly - Only UDP is used.
TLS - If TLS fails, transport fails. Leave
port field empty (defaults to 5061 ) or
set to 5061 .
TCPOnly - Only TCP is used.
No
Shared Lines
Polycom, Inc. 348
Template Parameter Permitted Values
Change Causes
Restart or Reboot
site.cfg reg.x.server.y.use
OutboundProxy
1 (default) - Enables to use the
outbound proxy specified in
reg.x.outboundProxy.addres
s for server x.
0 - Disable to use the outbound proxy
specified in
reg.x.outboundProxy.addres
s for server x.
No
site.cfg divert.x.sharedDis
abled
1 (default) - Disables call diversion
features on shared lines.
0 - Enables call diversion features on
shared lines.
Yes
A shared line is an address of record managed by a call server. The server allows multiple endpoints to
register locations against the address of record.
Polycom devices support Shared Call Appearance (SCA) using the SUBSCRIBE-NOTIFY method
specified in RFC 6665. The events used are:
• call-info for call appearance state notification
• line-seize for the phone to ask to seize the line
Private Hold on Shared Lines
Enable the private hold feature to enable users to hold calls without notifying other phones registered with
the shared line.
When you enable the feature, users can hold a call, transfer a call, or initiate a conference call and the
shared line displays as busy to others sharing the line.
Private Hold on Shared Lines Parameters
You can configure private hold only using configuration files; you cannot configure the feature on the Web
Configuration Utility or from the local phone interface.
Use the parameters in the following table to configure this feature.
Shared Lines
Polycom, Inc. 349
Private Hold Parameters
Template Parameter Permitted Values
Change Causes
Restart or Reboot
sip-
interop.cfg
call.shared.expose
AutoHolds
0 (default) - No re-INVITE is sent to the
server when setting up a conference on
a shared line.
1 - A re-INVITE is sent to the server
when setting up a conference on a
shared line.
Yes
features.cf
g
reg.x.enablePvtHol
dSoftKey
This parameter applies only to shared
lines.
0 (default) - To disable user on a shared
line to hold calls privately.
1 - To enable users on a shared line to
hold calls privately.
No
Intercom Calls
The Intercom feature enables users to place an intercom call that is answered automatically on the dialed
contact's phone.
This is a server-independent feature provided the server does not alter the Alert-Info header sent in the
INVITE.
Creating a Custom Intercom Soft Key
By default, an Intercom soft key displays on the phone, but you have the option to provide users the
ability to initiate intercom calls directly to a specified contact using enhanced feature keys (EFKs).
You do not need to disable the default Intercom soft key to create a custom soft key.
For example, you can create an intercom action string for a custom soft key in one of the following ways:
• $FIntercom$
This is an F type macro that behaves as a custom Intercom soft key. Pressing the soft key opens
the Intercom dial prompt users can use to place an Intercom call by entering the destination's digits
and using a speed dial or BLF button.
• <number>$Tintercom$
This is a T type macro that enables you to specify a Direct intercom button that always calls the
number you specify in <number>. No other input is necessary.
Intercom Calls Parameters
Use the parameters in the table to configure the behavior of the calling and answering phone.
Shared Lines
Polycom, Inc. 350
Intercom Parameters
Template Parameter Permitted Values
Change Causes
Restart or Reboot
features.cf
g
feature.intercom.e
nable
0 (default) - Disable the Intercom
feature.
1 - Enable the Intercom feature.
No
features.cf
g
homeScreen.interco
m.enable
1 (default) - Enable the Intercom icon on
the phone Home screen.
0 - Disable the Intercom icon on the
phone Home screen.
No
sip-
interop.cfg
voIpProt.SIP.inter
com.alertInfo
The string you want to use in the Alert-
Info header. You can use the following
characters: '@', '-' ,'_' , '.' .
If you use any other characters, NULL,
or empty spaces, the call is sent as
normal without the Alert-Info header.
Intercom (default)
Alpha - Numeric string
No
Group Paging
The group paging feature is available on VVX phones and Polycom Trio solution.
Group Paging enables users to make pages —one-way audio announcements—to users subscribed to a
page group. There are 25 groups/channels users can subscribe to. If you are using Group Paging with
Polycom Trio solution, you can only receive incoming pages. You cannot use Polycom Trio solution to
send outgoing pages.
Group paging users can send announcements to recipients subscribed to any of the 25 paging groups.
Any announcements sent to the paging group play through the phone's speakerphone.
Administrators must enable paging before users can subscribe to a page group. You can specify the
same IP multicast address in the parameter ptt.address for both PTT and paging mode.
Note: The push-to-talk and group paging features use an IP multicast address. If you want to change
the default IP multicast address, ensure that the new address does not already have an official
purpose as specified in the IPv4 Multicast Address Space Registry.
Group Paging Parameters
Administrators must enable paging and PTT before users can subscribe to a page group.
Use the parameters in the following table to configure this feature.
Shared Lines
Polycom, Inc. 351
Note: The default port used by Group Paging conflicts with the UDP port 5001 used by Polycom®
People+Content™ on the Polycom Trio system. Since the port used by People+Content is fixed
and cannot be configured, configure one of the following workarounds:
• Configure a different port for Group Paging using parameter ptt.port or
• Disable People+Content IP using parameter content.ppcipServer.enabled='0' .
Group Paging Parameters
Template Parameter Permitted Values
Change Causes
Restart or Reboot
site.cfg ptt.address The multicast IP address to send page audio to
and receive page audio from.
224.0.1.116 (default)
multicast IP address.
site.cfg ptt.pageMode
.allowOffHoo
kPages
0 (default) - Group pages do not play out on the
phone during an active call except for Priority and
Emergency pages.
1 - Group pages play out on the handset during an
active call.
site.cfg ptt.pageMode
.defaultGrou
p
The paging group used to transmit an outgoing
page if the user does not explicitly specify a group.
1 (default)
1 to 25
site.cfg ptt.pageMode
.transmit.ti
meout.contin
uation
The time (in seconds) to add to the initial timeout
( ptt.pageMode.transmit.timeout.ini
tial ) for terminating page announcements. If
this value is non-zero, Extend displays on the
phone. Pressing Extend continues the initial
timeout for the time specified by this parameter. If
0, announcements cannot be extended.
60 (default)
0 to 65535
site.cfg ptt.pageMode
.transmit.ti
meout.initia
l
The number of seconds to wait before
automatically terminating an outgoing page
announcement
0 (default) -The page announcements do not
automatically terminate.
0 to 65535 - The page announcements
automatically terminate.
Shared Lines
Polycom, Inc. 352

Template Parameter Permitted Values
Change Causes
Restart or Reboot
site.cfg ptt.pageMode
.priorityGro
up
The paging group to use for priority pages.
24 (default)
1 to 25
site.cfg ptt.pageMode
.payloadSize
The page mode audio payload size.
20 (default)
10, 20, ..., 80 milliseconds
site.cfg ptt.pageMode
.emergencyGr
oup
The paging group used for emergency pages.
25 (default)
1 to 25
site.cfg ptt.pageMode
.codec
The audio codec to use for outgoing group pages.
Incoming pages are decoded according to the
codec specified in the incoming message.
G.722 (default)
G.711Mu, G.726QI, or G.722
site.cfg ptt.pageMode
.displayName
This display name is shown in the caller ID field of
outgoing group pages. If Null, the value from reg.
1.displayName is used.
NULL (default)
up to 64 octet UTF-8 string
site.cfg ptt.pageMode
.enable
0 (default) - The group paging is disabled.1 - The
group paging is enabled.
features
.cfg
ptt.pageMode
.group.x.ava
ilable
Make the group available to the user.
1 (default) - Group available to the user is enabled.
0 - Group available to the user is disabled.
features
.cfg
ptt.pageMode
.group.x.all
owReceive
1 (default) - The phone can receive pages on the
specified group.
0 -The phone cannot receive pages on the
specified group.
features
.cfg
ptt.pageMode
.group.x.all
owTransmit
Allows outgoing announcements to the group
1 (default)
0
Shared Lines
Polycom, Inc. 353

Template Parameter Permitted Values
Change Causes
Restart or Reboot
features
.cfg
ptt.pageMode
.group.x.lab
el
The label to identify the group
ch24: Priority,ch25: Emergency, others:Null ch1,
24, 25: 1, others: 0 (default)
string
features
.cfg
ptt.pageMode
.group.x.sub
scribed
Subscribe the phone to the group.
A page mode group x, where x= 1 to 25. The
label is the name used to identify the group
during pages.
If available is disabled (0), the user cannot
access the group or subscribe and the other page
mode group parameters is ignored. If enabled, the
user can access the group and choose to
subscribe.
If allowTransmit is disabled (0), the user
cannot send outgoing pages to the group. If
enabled, the user may send outgoing pages.
1 (default) - If enabled, the phone subscribes to the
group.
0 - If disabled, the phone does not subscribe to the
group.
Shared Lines
Polycom, Inc. 354

User Profiles
Topics:
•User Profile Parameters
•Remotely Logging Out Users
▪Authentication of User Profiles
When you set up user profiles, you enable users to access their personal phone settings, including their
contact directory, speed dials, and other phone settings from any phone on the network.
This feature is particularly useful for remote and mobile workers who do not have a dedicated work space
and conduct their business in more than one location. This feature is also useful if an office has a
common conference phone from which multiple users need to access their personal settings.
Note: You can configure all company phones so that anyone can call authorized and emergency
numbers when not logged in to a phone. For more information, see
dialplan.routing.emergency.outboundIdentity.
If you set up the user profile feature, a user can log in to a phone by entering their user ID and password.
The default password is 123. If the user profile feature is set up on your company's phones, users can:
• Log in to a phone to access their personal phone settings.
• Place a call to an authorized number from a phone that is in the logged out state.
• Change their user password.
• Log out of a phone after they finish using it.
If a user changes any settings while logged in to a phone, the settings save and display the next time the
user logs in to another phone. When a user logs out, the user's personal phone settings are no longer
displayed.
User Profile Parameters
Before you configure user profiles, you must complete the following:
• Create a phone configuration file, or update an existing file, to enable the feature's settings.
• Create a user configuration file in the format <user>.cfg to specify the user's password, registration,
and other user-specific settings that you want to define.
Important: You can reset a user's password by removing the password parameter
from the override file. This causes the phone to use the default
password in the <user>.cfg file.
When you set up the user profile feature, you can set the following conditions:
• If users are required to always log in to use a phone and access their personal settings.
• If users are required to log in and have the option to use the phone as is without access to their
personal settings.
Polycom, Inc. 355

• If users are automatically logged out of the phone when the phone restarts or reboots.
• If users remain logged in to the phone when the phone restarts or reboots.
Use the parameters in the following table to enable users to access their personal phone settings from
any phone in the organization.
User Profile Parameters
Template Parameter Permitted Values
Change Causes
Restart or Reboot
site.cfg prov.login.auto
maticLogout
Specify the amount of time before
a non-default user is logged out.
0 minutes (default)
0 to 46000 minutes
No
site.cfg prov.login.defa
ultOnly
0 (default) - The phone cannot
have users other than the default
user.
1 - The phone can have users
other than the default user.
No
site.cfg prov.login.defa
ultPassword
Specify the default password for
the default user.
NULL (default)
No
site.cfg prov.login.defa
ultUser
Specify the name of the default
user. If a value is present, the user
is automatically logged in when
the phone boots up and after
another user logs out.
NULL (default)
No
site.cfg prov.login.enab
led
0 (default) - The user profile is
disabled.
1 - The user profile feature is
enabled.
No
site.cfg prov.login.loca
lPassword.hashe
d
0 (default) - The user's local
password is formatted and
validated as clear text.
1 - The user's local password is
created and validated as a hashed
value.
No
site.cfg prov.login.loca
lPassword
Specify the password used to
validate the user login. The
password is stored either as plain
text or as an encrypted SHA1
hash.
123 (default)
No
User Profiles
Polycom, Inc. 356

Template Parameter Permitted Values
Change Causes
Restart or Reboot
site.cfg prov.login.pers
istent
0 (default) - Users are logged out
if the handset reboots.
1 - Users remain logged in when
the phone reboots.
No
site.cfg prov.login.requ
ired
0 (default) - The user does not
have to log in.
1 - The user must log in when the
login feature is enabled.
No
site.cfg prov.login.useP
rovAuth
0 (default) - The phone do not
user server authentication.
1 - The phones use server
authentication and user login
credentials are used as
provisioning server credentials.
No
site.cfg voIpProt.SIP.sp
ecialEvent.chec
kSync.downloadC
allList
0 (default) - The phone does not
download the call list for the user
after receiving a checksync event
in the NOTIFY.
1 - The phone downloads the call
list for the user after receiving a
checksync event in the NOTIFY.
No
Remotely Logging Out Users
Note that if an unexpected reboot occurs while a user is logged in, the user is not logged out and the
phone returns to the user profile after reboot.
If a user is not logged out from a phone and other users are not prevented from logging in, the user can
ask the administrator to log out remotely. Administrators can log out a user remotely with a checksync
event in the NOTIFY by setting the parameter profileLogout=remote .
Authentication of User Profiles
When using the User Profiles feature, you can authenticate users with phone-based or server-based
authentication methods. Phone-based authentication authenticates credentials entered by the user
against the crednetials in the <user>.cfg file. Server-based authentication passes user credentials to
the provisioning server for authentication.
Server Authentication of User Profiles
Instead of phone-based authentication of user profiles, you can configure server authentication.
User Profiles
Polycom, Inc. 357
When you enable server authentication, you set up user accounts on the provisioning server and each
user can authenticate their phone by entering correct server credentials.
The phone downloads log files app.log and boot.log from the generic profile on the provisioning server
regardless of user logins.
Create a Generic Profile Using Server Authentication
Create a generic profile and generic credentials on the provisioning server when a user is not logged into
the phone.
If you enable server authentication of user profiles, the following parameters do not apply and you do not
need to configure them:
•prov.login.defaultUser
•prov.login.defaultPassword
•prov.login.defaultOnly
•prov.login.localPassword
•prov.login.localPassword.hashed
Procedure
1. On the server, create an account and directory for the generic profile, for example,
'Generic_Profile'.
2. In the Generic_Profile directory, create a configuration file for a generic profile the phone uses by
default, for example, genericprofile.cfg.
3. In genericprofile.cfg, include registration and server details and set all phone feature parameters.
You must set the following parameters to use server authentication:
•prov.login.enabled="1"
•prov.login.useProvAuth="1"
•prov.login.persistent="1" Note that if you enable prov.login.enabled=1 and
do not enable prov.login.useProvAuth=0 , users are authenticated by a match with
credentials you store in the user configuration file <user>.cfg.
4. Create a master configuration file 000000000000.cfg for all the phones, or a <MACAddress>.cfg
for each phone, and add genericprofile.cfg to the CONFIG_FILES field.
5. Set the provisioning server address and provisioning server user name and password credentials
for the generic user account on the phone at Settings > Advanced > Provisioning Server details
and inform users of their user profile credentials.
The following override files are uploaded to the generic profile directory:
• Log files
• Phone menu settings
• Web Configuration Utility settings
• Call logs
• Contact directory file
User Profiles
Polycom, Inc. 358

Create a User Profile Using Server Authentication
Create a user profile in the Home directory of each user with a user-specific configuration file that you
store on the provisioning server with a unique name as well as user-specific files such as settings,
directory, and call lists.
When a user logs in with credentials, the phone downloads the user profile from the provisioning server.
When the user logs out, the phone downloads the default user profile using the generic credentials.
Procedure
1. On the server, create an account and a directory for each user, for example, 'User1', 'User2”.
2. In each user directory, create a configuration file for each user, for example, User1.cfg, User2.cfg,
that contains the user's registration details and feature settings.
The following override files are uploaded to the generic profile account on the server:
• Log files
• Web Configuration Utility settings
The following override files are uploaded to the user profile account on the server:
• Phone menu settings
• Contact directory file
Phone Authentication of User Profiles
You can create default credentials and user profiles without use of server authentication.
Create Default Credentials and a Profile for a Phone
You can choose to define default credentials for a phone, which the phone uses to automatically log itself
in each time an actual user logs out or the phone restarts or reboots.
When the phone logs itself in using the default login credentials, a default phone profile displays, and
users retain the option to log in and view their personal settings.
You can create a new phone configuration file for the default profile, then add and set the attributes for
the feature. You can also update an existing phone configuration file to include the user login parameters
you want to change.
Important: Polycom recommends that you create a single default user password for all
users.
Procedure
1. Create a site.cfg file for the phone and place it on the provisioning server.
You can base your file on the sample configuration template in your software package. To find the
file, navigate to <provisioning server location>/Config/site.cfg.
2. In site.cfg, open the <prov.login/> attribute, then add and set values for the user login attributes.
Create a User Configuration File
Create a configuration file for each user that you want to enable to log in to the phone.
User Profiles
Polycom, Inc. 359

The name of the file should specify the user's login ID. In the file, specify any user-specific settings that
you want to define for the user.
If a user updates their password or other user-specific settings on the phone, the updates are stored in
<user>-phone.cfg, not <MACaddress>-phone.cfg.
If a user updates their contact directory while logged in to a phone, the updates are stored in <user>-
directory.xml. Directory updates display each time the user logs in to a phone. For certain phones (for
example, the VVX 1500 phone), an up-to-date call lists history is defined in <user>-calls.xml. This list is
retained each time the user logs in to their phone. The following is a list of configuration parameter
precedence (from first to last) for a phone that has the user profile feature enabled:
• <user>-phone.cfg
• Web Configuration Utility
• Configuration files listed in the master configuration file (including <user>.cfg)
• Default values
Note: To convert a phone-based deployment to a user-based deployment, copy the
<MACaddress>-phone.cfg file to <user>-phone.cfg and copy
phoneConfig<MACaddress>.cfg to <user>.cfg.
Procedure
1. On the provisioning server, create a user configuration file for each user.
2. Name each file the ID the user will use to log in to the phone.
For example, if the user's login ID is user100, the name of the user's configuration file is
user100.cfg.
3. In each <user>.cfg file, you are required to add and set values for the user's login password.
4. Add and set values for any user-specific parameters, such as:
• Registration details such as the number of lines the profile displays and line labels.
• Feature settings such as microbrowser settings).
Caution: If you add optional user-specific parameters to <user>.cfg, add only those
parameters that will not cause the phone to restart or reboot when the parameter
is updated.
User Profiles
Polycom, Inc. 360

Network
Topics:
•Two-Way Active Measurement Protocol
•System and Model Names
•Incoming Network Signaling Validation
•SIP Subscription Timers
▪Enhanced IPv4 ICMP Management
•Provisional Polling of Polycom Phones
•SIP Instance Support
•IP Type-of-Service
•Static DNS Cache
•DNS SIP Server Name Resolution
•Server Redundancy
•Network Address Translation (NAT)
•Real-Time Transport Protocol (RTP) Ports
•Wireless Network Connectivity (Wi-Fi)
▪Bluetooth and NFC-Assisted Bluetooth for Polycom Trio Systems
Polycom UC Software allows you to make custom network configurations.
Related Links
Supported Network Configurations on page 18
Two-Way Active Measurement Protocol
Polycom UC Software supports Two-Way Active Measurement Protocol (TWAMP), which is RFC 5357
compliant, to check network performance by measuring the round-trip time between two devices using
TWAMP protocols.
TWAMP defines the following protocols:
• TWAMP Control protocol, which uses TCP.
• TWAMP Test protocol, which uses UDP.
TWAMP Limitations
TWAMP includes the following limitations:
• TWAMP Control and Test protocols only support unauthenticated mode
• A maximum of 10 clients can establish a connection with the server
• The server is limited to handle a maximum of 10 sessions per client
Polycom, Inc. 361
Two-Way Active Measurement Protocol Configuration Parameters
The following table includes the new or modified parameters for the two-way active measurement
protocol feature.
Two-Way Active Measurement Protocol Configuration Parameters
Template Parameters Permitted Values
Change Causes
Restart or Reboot
site.cfg feature.twamp.ena
bled
0 (default) - Disable TWAMP
protocol support.
1 - Enable TWAMP protocol
support.
No
site.cfg twamp.port.udp.Po
rtRangeEnd
Set the TWAMP UDP session
max port range value.
60000 (default)
1024 - 65486
No
site.cfg twamp.port.udp.Po
rtRangeStart
Set the TWAMP UDP session
start port range value.
40000 (default)
1024 - 65485
No
site.cfg twamp.udp.maxSess
ion
Set the maximum UDP
session supported by
TWAMP.
1 (default)
1 - 10
No
System and Model Names
The following table outlines the system and model names that Polycom phones transmit with network
protocols.
If you need to customize your network for a specific phone model, you can parse the network packets for
these strings.
Polycom Trio System and Model Names
Model System Name Model Name
Polycom Trio 8800 Polycom Trio 8800 Polycom Trio-Polycom Trio_8800
Polycom Trio 8500 Polycom Trio 8500 Polycom Trio-Polycom Trio_8500
Polycom Trio Visual+ Polycom Trio Visual+ Polycom Trio-Polycom Trio_Visual+
Network
Polycom, Inc. 362
Model System Name Model Name
Polycom Trio VisualPro Polycom Trio VisualPro Polycom Trio-Polycom
Trio_VisualPro
Incoming Network Signaling Validation
You can choose from the following optional levels of security for validating incoming network signaling:
• Source IP address validation
• Digest authentication
• Source IP address validation and digest authentication
Network Signaling Validation Parameters
The following table includes the parameters you can use to specify the validation type, method, and the
events for validating incoming network signaling.
Network Signaling Validation Parameters
Template Parameter Permitted Values
Change Causes
Restart or Reboot
sip-
interop.cfg
voIpProt.SIP.reque
stValidation.x.met
hod
Null (default) - no validation is made.
Source - ensure request is received
from an IP address of a server
belonging to the set of target
registration servers.
digest: challenge requests with digest
authentication using the local
credentials for the associated
registration (line).
both or all: apply both of the above
methods.
Yes
sip-
interop.cfg
voIpProt.SIP.reque
stValidation.x.req
uest
Sets the name of the method for which
validation will be applied.
Null (default)
INVITE, ACK , BYE, REGISTER,
CANCEL, OPTIONS, INFO, MESSAGE,
SUBSCRIBE, NOTIFY, REFER,
PRACK, UPDATE
Note: Intensive request validation may
have a negative performance impact
due to the additional signaling required
in some cases.
Yes
Network
Polycom, Inc. 363
Template Parameter Permitted Values
Change Causes
Restart or Reboot
sip-
interop.cfg
voIpProt.SIP.reque
stValidation.x.req
uest.y.event
Determines which events specified with
the Event header should be validated;
only applicable when
voIpProt.SIP.requestValida
tion.x.request is set to
SUBSCRIBE or NOTIFY .
Null (default) - all events will be
validated.
A valid string - specified event will be
validated.
Yes
SIP Subscription Timers
You can configure a subscription expiry independently of the registration expiry.
You can also configure an overlap period for a subscription independently of the overlap period for the
registration, and a subscription expiry and subscription overlap for global SIP servers and per-registration
SIP servers. Note that per-registration configuration parameters override global parameters. If you have
not explicitly configured values for any user features, the default subscription values are used.
SIP Subscription Timers Parameters
Use the parameters in the following table to configure when a SIP subscription expires and when
expirations overlap.
SIP Subscription Timers
Template Parameter Permitted Values
Change Causes
Restart or Reboot
sip-
interop.cfg
voIpProt.server.x.
subscribe.expires
The phone's requested subscription
period in seconds after which the phone
attempts to resubscribe at the beginning
of the overlap period.
3600 - (default)
10 - 2147483647
No
sip-
interop.cfg
voIpProt.server.x.
subscribe.expires.
overlap
The number of seconds before the
expiration time returned by server x
after which the phone attempts to
resubscribe. If the server value is less
than the configured overlap value, the
phone tries to resubscribe at half the
expiration time returned by the server.
60 - (default)
5 - 65535 seconds
No
Network
Polycom, Inc. 364

Template Parameter Permitted Values
Change Causes
Restart or Reboot
reg-
advanced.cf
g
reg.x.server.y.sub
scribe.expires
The phone's requested subscription
period in seconds after which the phone
attempts to resubscribe at the beginning
of the overlap period.
3600 seconds - (default)
10 - 2147483647 (seconds)
You can use this parameter in
conjunction with
reg.x.server.y.subscribe.e
xpires.overlap .
No
reg-
advanced.cf
g
reg.x.server.y.sub
scribe.expires.ove
rlap
The number of seconds before the
expiration time returned by server x
after which the phone attempts to
resubscribe. If the server value is less
than the configured overlap value, the
phone tries to resubscribe at half the
expiration time returned by the server.
60 seconds (default)
5 - 65535 seconds
No
Enhanced IPv4 ICMP Management
Polycom phones support IPv4 by enabling the phone to ignore Internet Control Message Protocol (ICMP)
redirect requests for an alternate path from the router or gateway.
IPv4 Parameters
You can configure IPv4 using parameters listed in the following table.
Network
Polycom, Inc. 365

IPv4 Parameters
Template Parameter Permitted
Values
Change Causes Restart
or Reboot
device.cfg,
site.cfg
device.icmp.ipv4I
cmpIgnoreRedirect
.set
0 (default) - The phone
does not allow to use
device.icmp.ipv4I
cmpIgnoreRedirect
parameter to configure
Enhanced IPv4 ICMP
Management feature.
1 - The phone allows to
use
device.icmp.ipv4I
cmpIgnoreRedirect
parameter to configure
Enhanced IPv4 ICMP
Management feature
No
device.cfg device.icmp.ipv4I
cmpIgnoreRedirect
1 (default) - The phone
ignores ICMP redirect
requests for an alternate
path from the router or
gateway.
0 - The phone allows
ICMP redirects.
No
Provisional Polling of Polycom Phones
You can configure phones to poll the server for provisioning updates automatically, and you can set the
phone's automatic provisioning behavior to one of the following:
•Absolute—The phone polls at the same time every day.
•Relative—The phone polls every x seconds, where x is a number greater than 3600.
•Random—The phone polls randomly based on a set time interval.
◦ If the time period is less than or equal to one day, the first poll is at a random time between
when the phone starts up and the polling period. Afterwards, the phone polls every x seconds.
◦ If you set the polling period to be greater than one day with the period rounded up to the
nearest day, the phone polls on a random day based on the phone's MAC address and within
a random time set by the start and end polling time.
Provisional Polling Parameters
Use the parameters in the following table to configure provisional polling.
Network
Polycom, Inc. 366

Note that If prov.startupCheck.enabled is set to 0, then Polycom phones do not look for the sip.ld
or the configuration files when they reboot, lose power, or restart. Instead, they look only when receiving
a checksync message, a polling trigger, or a manually started update from the menu or web UI.
Some files such as bitmaps, .wav, the local directory, and any custom ringtones are downloaded each
time as they are stored in RAM and lost with every reboot.
Provisional Polling of Polycom Phones
Template Parameter Permitted Values
Change Causes
Restart or Reboot
site.cfg prov.polling To enable polling and set the mode,
period, time, and time end parameters.
site.cfg prov.polling.enabl
ed
0 (default) - Disables the automatic
polling for upgrades.
1 - Initiates the automatic polling for
upgrades.
No
site.cfg prov.polling.mode The polling modes for the provisioning
server.
abs (default) - The phone polls every
day at the time specified by
prov.polling.time .
rel - The phone polls after the
number of seconds specified by
prov.polling.period .
random - The phone polls at
random between a starting time set in
prov.polling.time and an end
time set in
prov.polling.timeRandomEnd
.
If you set the polling period in
prov.polling.period to a time
greater than 86400 seconds (one day)
polling occurs on a random day within
that polling period and only between the
start and end times. The day within the
period is decided based upon the
phones MAC address and does not
change with a reboot whereas the time
within the start and end is calculated
again with every reboot
No
Network
Polycom, Inc. 367

Template Parameter Permitted Values
Change Causes
Restart or Reboot
site.cfg prov.polling.perio
d
The polling period is calculated in
seconds and is rounded up to the
nearest number of days in an absolute
and random mode. If this is set to a time
greater than 86400 (one day) polling
occurs on a random day based on the
phone's MAC address.
86400 (default) - Number of seconds in
a day.
Integer - An integer value greater than
3600 seconds.
No
site.cfg prov.polling.time The start time for polling on the
provisioning server.
03:00 (default)
hh:mm
No
site.cfg prov.polling.timeR
andomEnd
The stop time for polling on the
provisioning server.
Null (default)
hh:mm
No
Example Provisional Polling Configuration
The following are examples of polling configurations you can set up:
• If prov.polling.mode is set to rel and prov.polling.period is set to 7200, the phone polls
every two hours.
• If prov.polling.mode is set to abs and prov.polling.timeRandomEnd is set to 04:00, the
phone polls at 4am every day.
• If prov.polling.mode is set to random, prov.polling.period is set to 604800 (7 days),
prov.polling.time is set to 01:00 , prov.polling.timeRandomEnd is set to 05:00, and
you have 25 phones, a random subset of those 25 phones, as determined by the MAC address,
polls randomly between 1am and 5am every day.
• If prov.polling.mode is set to abs and prov.polling.period is set to 2328000, the phone
polls every 20 days.
SIP Instance Support
In environments where multiple phones are registered using the same address of record (AOR), the
phones are identified by their IP address.
However, firewalls set up in these environments can regularly change the IP addresses of phones for
security purposes. You can configure SIP instance to identify individual phones instead of using IP
addresses. This feature complies with RFC 3840.
Network
Polycom, Inc. 368

This feature is not available on:
• VVX 150 business IP phone
• VVX 101 and 201 business media phones
SIP Instance Parameters
The parameter reg.x.gruu provides a contact address to a specific user agent (UA) instance, which
helps to route the request to the UA instance and is required in cases in which the REFER request must
be routed to the correct UA instance. Refer to the following table for information on configuring this
feature.
Template Parameter Permitted Values
Change Causes
Restart or Reboot
sip-interop.cfg reg.x.gruu 1 - The phone sends sip.instance
in the REGISTER request.
0 (default) - The phone does not
send sip.instance in the
REGISTER request.
No
IP Type-of-Service
The type-of-service field in an IP packet header consists of four type-of-service (TOS) bits and a 3-bit
precedence field.
Each TOS bit can be set to either 0 or 1. The precedence field can be set to a value from 0 through 7.
The type of service can be configured specifically for RTP packets and call control packets, such as SIP
signaling packets.
IP Type-of-Service Parameters
You can configure the IP TOS feature specifically for RTP and call control packets, such as SIP signaling
packets.
Type of Service (ToS) and the Differentiated Services Code Point (DSCP) allows specification of a
datagrams desired priority and routing through low-delay, high-throughput, or highly-reliable networks.
The IP ToS header consists of four ToS bits and a 3-bit precedence field. DSCP replaces the older ToS
specification and uses a 6-bit DSCP in the 8-bit differentiated services field (DS field) in the IP header.
The parameters listed in the table configure the type of service field RTP and call control packets for
Quality of Service (QoS).
Network
Polycom, Inc. 369

IP Type of Service Parameters
Template Parameter Permitted Values
Change Causes
Restart or Reboot
site.cfg qos.ethernet.tcp
QosEnabled
0 (default) - The phone does not
send configured QoS priorities
for SIP over TCP transport.
1 - The phone sends configured
QoS priorities for SIP over TCP
transport.
Yes
site.cfg qos.ip.callContr
ol.dscp
Specify the DSCP of packets.
If the value is set to the default
NULL the phone uses
qos.ip.callControl.*
parameters.
If the value is not NULL, this
parameter overrides
qos.ip.callControl.*
parameters.
• NULL (default)
• 0 to 63
• EF
• Any of AF11,AF12,
AF13,AF21, AF22,AF23,
AF31,AF32, AF33,AF41,
AF42,AF43
Yes
site.cfg qos.ip.callContr
ol.max_reliabili
ty
Set the max reliability bit in the
IP ToS field of the IP header
used for call control.
0 (default) - The bit in the IP ToS
field of the IP header is not set.
1 - The bit is set.
Yes
site.cfg qos.ip.callContr
ol.max_throughpu
t
Set the throughput bit in the IP
ToS field of the IP header used
for call control.
0 (default) - The bit in the IP ToS
field of the IP header is not set.
1 - The bit is set.
Yes
site.cfg qos.ip.callContr
ol.min_cost
Set the min cost bit in the IP ToS
field of the IP header used for
call control.
0 (default) - The bit in the IP ToS
field of the IP header is not set.
1 - The bit is set.
Yes
Network
Polycom, Inc. 370
Template Parameter Permitted Values
Change Causes
Restart or Reboot
site.cfg qos.ip.callContr
ol.min_delay
Set the min delay bit in the IP
ToS field of the IP header used
for call control.
1 (default) - The bit is set.
0 - The bit in the IP ToS field of
the IP header is not set.
Yes
site.cfg qos.ip.callContr
ol.precedence
Set the min delay bit in the IP
ToS field of the IP header used
for call control.
5 (default)
0 - 7
Yes
site.cfg qos.ip.rtp.dscp Specify the DSCP of packets.
If the value is set to the default
NULL the phone uses
quality.ip.rtp.*
parameters.
If the value is not NULL, this
parameter overrides
quality.ip.rtp.*
parameters.
• Null (default)
• 0 to 63
• EF
• Any of AF11,AF12,
AF13,AF21, AF22,AF23,
AF31,AF32, AF33,AF41,
AF42,AF43
Yes
site.cfg qos.ip.rtp.max_r
eliability
Set the max reliability bit in the
IP ToS field of the IP header
used for RTP.
0 (default) - The bit in the IP ToS
field of the IP header is not set.
1 - The bit is set.
Yes
site.cfg qos.ip.rtp.max_t
hroughput
Set the throughput bit in the IP
ToS field of the IP header used
for RTP.
0 (default) - The bit in the IP ToS
field of the IP header is not set.
1 - The bit is set.
Yes
Network
Polycom, Inc. 371

Template Parameter Permitted Values
Change Causes
Restart or Reboot
site.cfg qos.ip.rtp.min_c
ost
Set the min cost bit in the IP ToS
field of the IP header used for
RTP.
0 (default) - The bit in the IP ToS
field of the IP header is not set.
1 - The bit is set.
Yes
site.cfg qos.ip.rtp.min_d
elay
Set the min delay bit in the IP
ToS field of the IP header used
for RTP.
1 (default) - The bit is set.
0 - The bit in the IP ToS field of
the IP header is not set.
Yes
site.cfg qos.ip.rtp.prece
dence
Set the precedence bit in the IP
ToS field of the IP header used
for RTP.
5 (default)
0 - 7
Yes
site.cfg qos.ip.rtp.video
.dscp
Allows you to specify the DSCP
of packets.
If the value is set to the default
NULL the phone uses
qos.ip.rtp.video.*
parameters.
If the value is not NULL, this
parameter overrides
qos.ip.rtp.video.*
parameters.
• NULL (default)
• 0 to 63
• EF
• Any of AF11,AF12,
AF13,AF21, AF22,AF23,
AF31,AF32, AF33,AF41,
AF42,AF43
Yes
site.cfg qos.ip.rtp.video
.max_reliability
Set the reliability bits in the IP
ToS field of the IP header used
for RTP video.
0 (default) - The bit in the IP ToS
field of the IP header is not set.
1 - The bit is set.
Yes
Network
Polycom, Inc. 372
Template Parameter Permitted Values
Change Causes
Restart or Reboot
site.cfg qos.ip.rtp.video
.max_throughput
Set the throughput bits in the IP
ToS field of the IP header used
for RTP video.
0 (default) - The bit in the IP ToS
field of the IP header is not set.
1 - The bit is set.
Yes
site.cfg qos.ip.rtp.video
.min_cost
Set the min cost bits in the IP
ToS field of the IP header used
for RTP video.
0 (default) - The bit in the IP ToS
field of the IP header is not set.
1 - The bit is set.
Yes
site.cfg qos.ip.rtp.video
.min_delay
Set the min delay bits in the IP
ToS field of the IP header used
for RTP video.
1 (default) - The bit is set.
0 - The bit in the IP ToS field of
the IP header is not set.
Yes
site.cfg qos.ip.rtp.video
.precedence
Set the precedence bits in the IP
ToS field of the IP header used
for RTP video.
5 (default)
0 - 7
Yes
Static DNS Cache
Failover redundancy can be used only when the configured IP server hostname resolves (through SRV or
A record) to multiple IP addresses.
Unfortunately, the DNS cache cannot always be configured to take advantage of failover redundancy.
You can statically configure a set of DNS NAPTR SRV and/or A records into the phone. You can enter a
maximum of 12 record entries for DNS-A, DNS-NAPTR, and DNS-SRV. records.
Support for negative DNS caching as described in RFC 2308 is also provided to allow faster failover
when prior DNS queries have returned no results from the DNS server. For more information, see
RFC2308.
Configuring Static DNS
Phones configured with a DNS server behave as follows:
Network
Polycom, Inc. 373

1. The phone makes an initial attempt to resolve a hostname that is within the static DNS cache. For
example, a query is made to the DNS if the phone registers with its SIP registrar.
2. If the initial DNS query returns no results for the hostname or cannot be contacted, then the values
in the static cache are used for their configured time interval.
3. After the configured time interval has elapsed, a resolution attempt of the hostname again results
in a query to the DNS.
4. If a DNS query for a hostname that is in the static cache returns a result, the values from the DNS
are used and the statically cached values are ignored.
If a phone is not configured with a DNS server, when the phone attempts to resolve a hostname within
the static DNS cache, it always returns the results from the static cache.
Static DNS Parameters
Use the following table to configure static DNS settings.
Static DNS Cache Parameters
Template Parameter Permitted Values
Change Causes
Restart or Reboot
reg-
basic.cfg
reg.x.address The user part (for example, 1002) or the
user and the host part (for example,
1002@polycom.com ) of the
registration SIP URI .
Null (default)
string address
No
sip-
interop.cfg
reg.x.server.y Specify the call server used for this
registration.
reg-
advanced.cf
g
reg.x.server.y.spe
cialInterop
Specify the server-specific feature set
for the line registration.
VVX 101: Standard (default),
GENBAND, ALU-CTS, DT
VVX 201: Standard (default),
GENBAND, ALU-CTS, ocs2007r2,
lync2010
All other phones: Standard (default),
GENBAND, ALU-CTS, ocs2007r2,
lync2010, lcs2005
Network
Polycom, Inc. 374

Template Parameter Permitted Values
Change Causes
Restart or Reboot
site.cfg reg.x.server.y.add
ress
If this parameter is set, it takes
precedence even if the DHCP server is
available.
Null (default) - SIP server does not
accepts registrations.
IP address or hostname - SIP server
that accepts registrations. If not Null, all
of the parameters in this table override
the parameters specified in
voIpProt.server.*
No
reg-
advanced
reg.x.server.y.exp
ires
The phone's requested registration
period in seconds.
The period negotiated with the server
may be different. The phone attempts to
re-register at the beginning of the
overlap period.
3600 - (default)
positive integer, minimum 10
No
reg-
advanced
reg.x.server.y.exp
ires.lineSeize
Requested line-seize subscription
period.
30 - (default)
0 to 65535
No
reg-
advanced
reg.x.server.y.exp
ires.overlap
The number of seconds before the
expiration time returned by server x at
which the phone should try to re-
register.
The phone tries to re-register at half the
expiration time returned by the server if
the server value is less than the
configured overlap value.
60 (default)
5 to 65535
No
Network
Polycom, Inc. 375

Template Parameter Permitted Values
Change Causes
Restart or Reboot
site.cfg reg.x.server.y.fai
lOver.failBack.mod
e
duration (default) - The phone tries the
primary server again after the time
specified by
reg.x.server.y.failOver.fa
ilBack.timeout .
newRequests - All new requests are
forwarded first to the primary server
regardless of the last used server.
DNSTTL - The phone tries the primary
server again after a timeout equal to the
DNS TTL configured for the server that
the phone is registered to.
registration - The phone tries the
primary server again when the
registration renewal signaling begins.
This parameter overrides
voIpProt.server.x.failOver.failBack.mode
No
site.cfg reg.x.server.y.fai
lOver.failBack.tim
eout
3600 (default) - The time to wait (in
seconds) before failback occurs.
0 - The phone does not fail back until a
failover event occurs with the current
server.
60 to 65535 - If set to Duration, the
phone waits this long after connecting to
the current working server before
selecting the primary server again.
No
site.cfg reg.x.server.y.fai
lOver.failRegistra
tionOn
1 (default) - The reRegisterOn
parameter is enabled, the phone silently
invalidates an existing registration (if it
exists), at the point of failing over.
0 - The reRegisterOn parameter is
disabled, existing registrations remain
active.
No
Network
Polycom, Inc. 376

Template Parameter Permitted Values
Change Causes
Restart or Reboot
site.cfg reg.x.server.y.fai
lOver.onlySignalWi
thRegistered
1 (default) - Set to this value and
reRegisterOn and failRegistrationOn
parameters are enabled, no signaling is
accepted from or sent to a server that
has failed until failback is attempted or
failover occurs. If the phone attempts to
send signaling associated with an
existing call via an unregistered server
(for example, to resume or hold a call),
the call ends. No SIP messages are
sent to the unregistered server.
0 - Set to this value and reRegisterOn
and failRegistrationOn parameters are
enabled, signaling is accepted from and
sent to a server that has failed (even
though failback hasn't been attempted
or failover hasn't occurred).
No
site.cfg reg.x.server.y.fai
lOver.reRegisterOn
0 (default) - The phone does not
attempt to register with the secondary
server, since the phone assumes that
the primary and secondary servers
share registration information.
1 - The phone attempts to register with
(or via, for the outbound proxy
scenario), the secondary server. If the
registration succeeds (a 200 OK
response with valid expires), signaling
proceeds with the secondary server.
This parameter overrides
voIpProt.server.x.failOver
.reRegisterOn .
No
site.cfg reg.x.server.y.por
t
Null (default) - The port of the SIP
server does not specify registrations.
0 - The port used depends on
reg.x.server.y.transport .
1 to 65535 - The port of the SIP server
that specifies registrations.
No
Network
Polycom, Inc. 377
Template Parameter Permitted Values
Change Causes
Restart or Reboot
site.cfg reg.x.server.y.reg
ister
1 (default) - Calls can not be routed to
an outbound proxy without registration.
0 - Calls can be routed to an outbound
proxy without registration.
See voIpProt.server.x.register for more
information, see SIP Server Fallback
Enhancements on Polycom Phones -
Technical Bulletin 5844 on Polycom
Engineering Advisories and Technical
Notifications.
No
sip-
interop.cfg
reg.x.server.y.reg
isterRetry.baseTim
eOut
For registered line x, set y to the
maximum time period the phone waits
before trying to re-register with the
server.Used in conjunction with
reg.x.server.y.registerRet
ry.maxTimeOut to determine how
long to wait.
60 (default)
10 - 120 seconds
No
sip-
interop.cfg
reg.x.server.y.reg
isterRetry.maxTime
out
For registered line x, set y to the
maximum time period the phone waits
before trying to re-register with the
server. Use in conjunction with r
eg.x.server.y.registerRetr
y.baseTimeOut to determine how
long to wait. The algorithm is defined in
RFC 5626.
180 - (default)
60 - 1800 seconds
No
reg-
advanced.cf
g
reg.x.server.y.ret
ryMaxCount
The number of retries attempted before
moving to the next available server.
3 - (default)
0 to 20 - 3 is used when the value is set
to 0.
No
reg-
advanced.cf
g
reg.x.server.y.ret
ryTimeOut
0 (default) - Use standard RFC 3261
signaling retry behavior.
0 to 65535 - The amount of time (in
milliseconds) to wait between retries.
No
Network
Polycom, Inc. 378

Template Parameter Permitted Values
Change Causes
Restart or Reboot
reg-
advanced.cf
g
reg.x.server.y.sub
scribe.expires
The phone's requested subscription
period in seconds after which the phone
attempts to resubscribe at the beginning
of the overlap period.
3600 seconds - (default)
10 - 2147483647 (seconds)
You can use this parameter in
conjunction with
reg.x.server.y.subscribe.e
xpires.overlap .
No
reg-
advanced.cf
g
reg.x.server.y.sub
scribe.expires.ove
rlap
The number of seconds before the
expiration time returned by server x
after which the phone attempts to
resubscribe. If the server value is less
than the configured overlap value, the
phone tries to resubscribe at half the
expiration time returned by the server.
60 seconds (default)
5 - 65535 seconds
No
site.cfg reg.x.server.y.tra
nsport
The transport method the phone uses to
communicate with the SIP server.
DNSnaptr (default) - If
reg.x.server.y.address is a hostname
and reg.x.server.y.port is 0 or Null, do
NAPTR then SRV look-ups to try to
discover the transport, ports and
servers, as per RFC 3263. If
reg.x.server.y.address is an IP address,
or a port is given, then UDP is used.
TCPpreferred - TCP is the preferred
transport; UDP is used if TCP fails.
UDPOnly - Only UDP is used.
TLS - If TLS fails, transport fails. Leave
port field empty (defaults to 5061) or set
to 5061.
TCPOnly - Only TCP is used.
No
Network
Polycom, Inc. 379
Template Parameter Permitted Values
Change Causes
Restart or Reboot
site.cfg reg.x.server.y.use
OutboundProxy
1 (default) - Enables to use the
outbound proxy specified in
reg.x.outboundProxy.addres
s for server x.
0 - Disable to use the outbound proxy
specified in
reg.x.outboundProxy.addres
s for server x.
No
site.cfg divert.x.sharedDis
abled
1 (default) - Disables call diversion
features on shared lines.
0 - Enables call diversion features on
shared lines.
Yes
site.cfg dns.cache.A.x. Specify the DNS A address, hostname,
and cache time interval.
site.cfg dns.cache.A.x.addr
ess
Null (default)
IP version 4 address
No
site.cfg dns.cache.A.x.name Null (default)
valid hostname
No
site.cfg dns.cache.A.x.ttl The TTL describes the time period the
phone uses the configured static cache
record. If a dynamic network request
receives no response, this timer begins
on first access of the static record and
once the timer expires, the next lookup
for that record retries a dynamic
network request before falling back on
the static entry and it resets TTL timer
again.
300 (default)
300 to 536870912 (2^29), seconds
No
site.cfg dns.cache.NAPTR.x. Specify the DNS NAPTR parameters,
including: name, order, preference,
regexp, replacement, service, and ttl.
site.cfg dns.cache.NAPTR.x.
flags
The flags to control aspects of the
rewriting and interpretation of the fields
in the record. Characters are case-
sensitive. At this time, only ‘S', ‘A', ‘U',
and ‘P' are defined as flags. See RFC
2915 for details of the permitted flags.
Null (default)
A single character from [A-Z, 0-9]
No
Network
Polycom, Inc. 380
Template Parameter Permitted Values
Change Causes
Restart or Reboot
site.cfg dns.cache.NAPTR.x.
name
Null (default)
domain name string - The domain name
to which this resource record refers.
No
site.cfg dns.cache.NAPTR.x.
order
0 (default)
0 to 65535 - An integer that specifies
the order in which the NAPTR records
must be processed to ensure the
correct ordering of rules.
No
site.cfg dns.cache.NAPTR.x.
preference
0 (default)
0 to 65535 - A 16-bit unsigned integer
that specifies the order in which NAPTR
records with equal "order" values should
be processed. Low numbers are
processed before high numbers.
No
site.cfg dns.cache.NAPTR.x.
regexp
This parameter is currently unused.
Applied to the original string held by the
client. The substitution expression is
applied in order to construct the next
domain name to look up. The grammar
of the substitution expression is given in
RFC 2915.
Null (default)string containing a
substitution expression
No
site.cfg dns.cache.NAPTR.x.
replacement
The next name to query for NAPTR
records depending on the value of the
flags field. It must be a fully qualified
domain-name.
Null (default)
domain name string with SRV prefix
No
site.cfg dns.cache.NAPTR.x.
service
Specifies the service(s) available down
this rewrite path. For more information,
see RFC 2915.
Null (default)
string
No
Network
Polycom, Inc. 381
Template Parameter Permitted Values
Change Causes
Restart or Reboot
site.cfg dns.cache.NAPTR.x.
ttl
The TTL describes the time period the
phone uses the configured static cache
record. If a dynamic network request
receives no response, this timer begins
on first access of the static record and
once the timer expires, the next lookup
for that record retries a dynamic
network request before falling back on
the static entry and it resets TTL timer
again.300 (default)
300 to 536870912 (2^29), seconds
No
site.cfg dns.cache.A.networ
kOverride
0 (default) - Does not allow the static
DNS A record entry to take priority over
dynamic network DNS.
1 – Allows the static DNS cached A
record entry to take priority over
dynamic network DNS. Moreover, the
DNS TTL value is ignored.
No
site.cfg dns.cache.SRV.x. Specify DNS SRV parameters,
including: name, port, priority, target, ttl,
and weight.
site.cfg dns.cache.SRV.x.na
me
Null (default)
Domain name string with SRV prefix
No
site.cfg dns.cache.SRV.x.po
rt
The port on this target host of this
service. For more information, see RFC
2782.
0 (default)
0 to 65535
No
site.cfg dns.cache.SRV.x.pr
iority
The priority of this target host. For more
information, see RFC 2782.
0 (default)
0 to 65535
No
site.cfg dns.cache.SRV.x.ta
rget
Null (default)
domain name string - The domain name
of the target host. For more information,
see RFC 2782.
No
Network
Polycom, Inc. 382
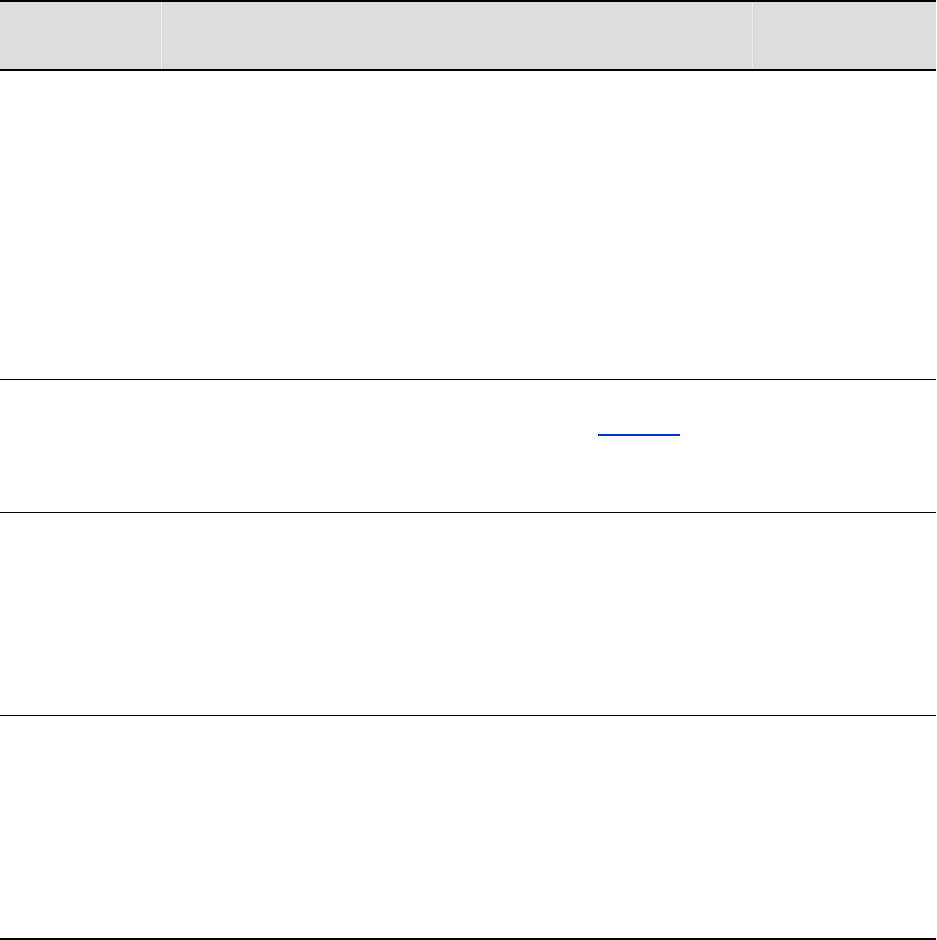
Template Parameter Permitted Values
Change Causes
Restart or Reboot
site.cfg dns.cache.SRV.x.tt
l
The TTL describes the time period the
phone uses the configured static cache
record. If a dynamic network request
receives no response, this timer begins
on first access of the static record and
once the timer expires, the next lookup
for that record retries a dynamic
network request before falling back on
the static entry and it resets TTL timer
again.
300 (default)
300 to 536870912 (2^29), seconds
No
site.cfg dns.cache.SRV.x.we
ight
A server selection mechanism. For
more information, see RFC 2782.
0 (default)
0 to 65535
No
site.cfg tcpIpApp.dns.addre
ss.overrideDHCP
Specifies how DNS addresses are set.
0 (default) - DNS address requested
from the DHCP server.
1 - DNS primary and secondary address
is set using the parameters
tcpIpApp.dns.server and
tcpIpApp.dns.altServer .
Yes
site.cfg tcpIpApp.dns.domai
n.overrideDHCP
Specifies how the domain name is
retrieved or set.
0 (default) - Domain name retrieved
from the DHCP server, if one is
available.
1 - DNS domain name is set using the
parameter
tcpIpApp.dns.domain .
Yes
Example Static DNS Cache Configuration
The following example shows how to configure static DNS cache using A records IP addresses in SIP
server address fields.
The addresses listed in this example are read by Polycom UC Software in the order listed.
When the static DNS cache is not used, the site.cfg configuration looks as follows:
Network
Polycom, Inc. 383
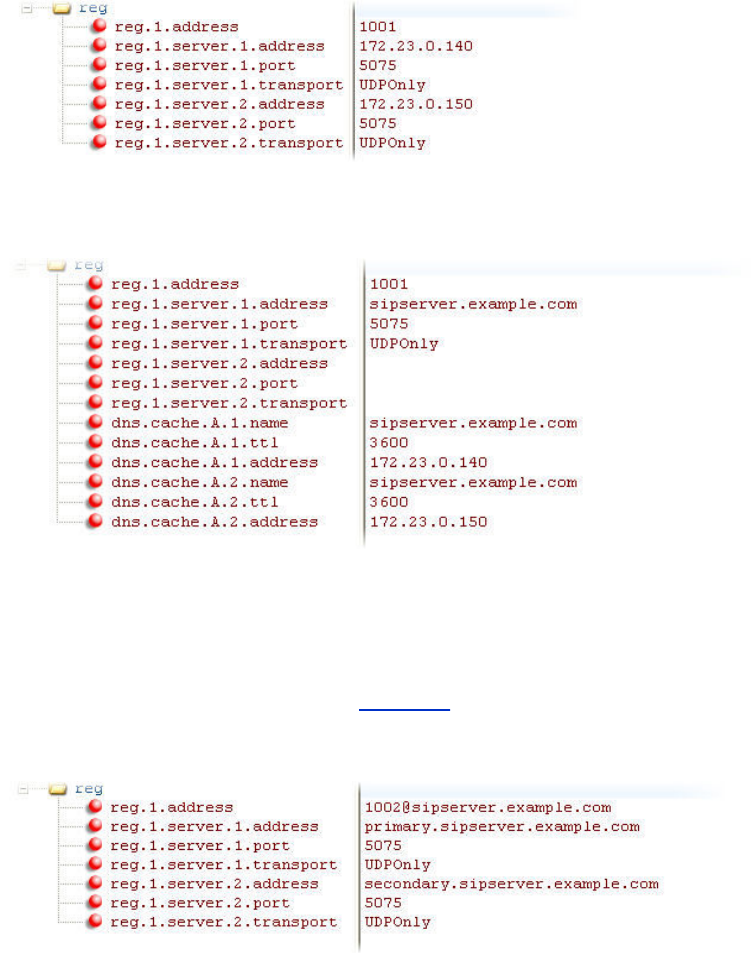
When the static DNS cache is used, the site.cfg configuration looks as follows:
Example: Static DNS Cache with A Records
This example shows how to configure static DNS cache where your DNS provides A records for
reg.x.server.x.address but not SRV. In this case, the static DNS cache on the phone provides
SRV records. For more information, see RFC 3263.
When the static DNS cache is not used, the site.cfg configuration looks as follows:
When the static DNS cache is used, the site.cfg configuration looks as follows:
Network
Polycom, Inc. 384
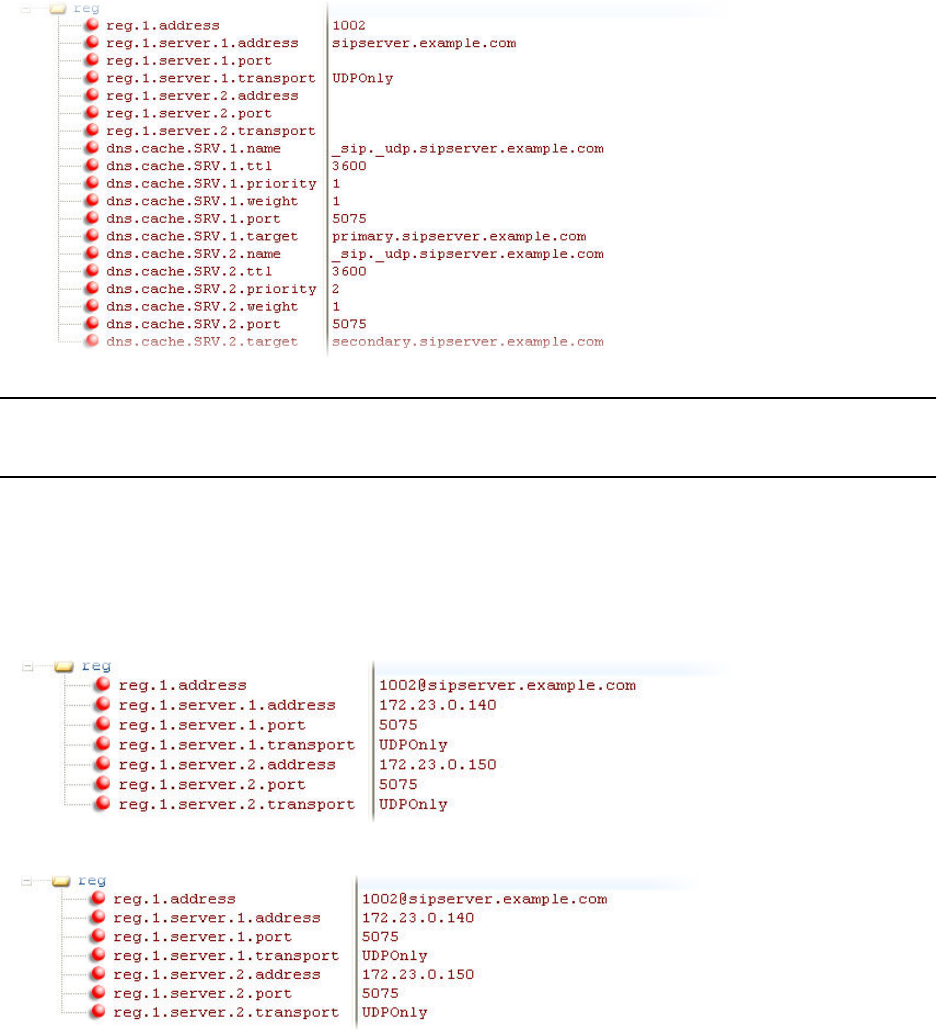
Note: The reg.1.server.1.port and reg.1.server.2.port values in this example are set to
null to force SRV lookups.
Example: Static DNS Cache with NAPTR and SRV Records
This example shows how to configure static DNS cache where your DNS provides NAPTR and SRV
records for reg.x.server.x.address .
When the static DNS cache is not used, the site.cfg configuration looks as follows:
When the static DNS cache is used, the site.cfg configuration looks as follows:
Network
Polycom, Inc. 385
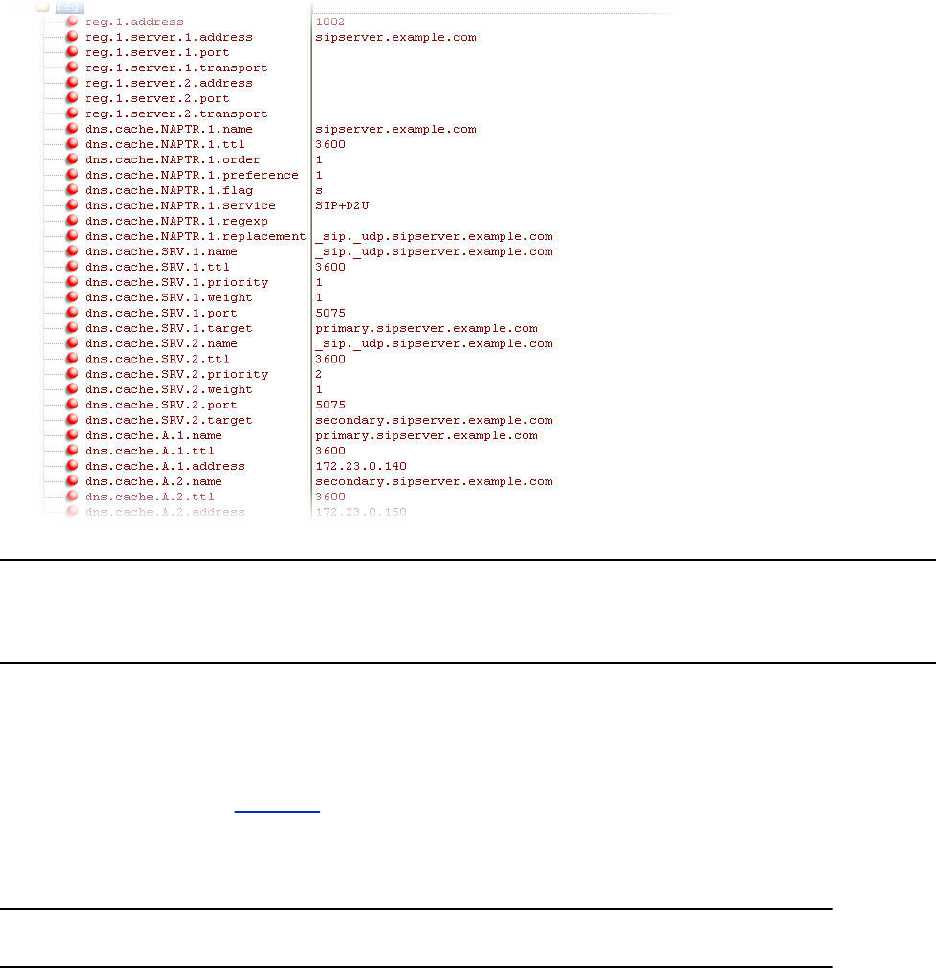
Note: The reg.1.server.1.port , reg.1.server.2.port , reg.1.server.1.transport ,
and reg.1.server.2.transport values in this example are set to null to force NAPTR
lookups.
DNS SIP Server Name Resolution
If a DNS name is given for a proxy/registrar address, the IP addresses associated with that name is
discovered as specified in RFC3263.
If a port is given, the only lookup is an A record. If no port is given, NAPTR and SRV records are tried
before falling back on A records if NAPTR and SRV records return no results. If no port is given, and
none is found through DNS, port 5060 is used. If the registration type is TLS, port 5061 is used.
Caution: Failure to resolve a DNS name is treated as signaling failure that causes a failover.
The following configuration causes the phone to build an SRV request based on the address you provide,
including all subdomains. Use the format:
•voIpProt.SIP.outboundProxy.address ="sip.example.com”
•voIpProt.SIP.outboundProxy.port ="0"
This SRV request produces a list of servers ordered by weight and priority, enabling you to specify sub-
domains for separate servers, or you can create partitions of the same system. Please note that while
making SRV queries and transport is configured as TCP, the phone adds the prefix
<_service._proto.> to the configured address/FQDN but does not remove the sub-domain prefix,
for example sip.example.com becomes _sip._tcp.sip.example.com . A single SRV query can
be resolved into many different servers, session border controllers (SBCs), or partitions ordered by weight
Network
Polycom, Inc. 386

and priority, for example, voice.sip.example.com and video.sip.example.com . Alternatively,
use DNS NAPTR to discover what services are available at the root domain.
Customer Phone Configuration
The phones at the customer site are configured as follows:
• Server 1 (the primary server) is configured with the address of the service provider call server. The
IP address of the server(s) is provided by the DNS server, for example: reg.1.server.
1.address=voipserver.serviceprovider.com .
• Server 2 (the fallback server) is configured to the address of the router/gateway that provides the
fallback telephony support and is on-site, for example: reg.1.server.
2.address=172.23.0.1 .
Caution: Be careful when using multiple servers per registration. It is possible to configure the
phone for more than two servers per registration but ensure that the phone and network
load generated by registration refresh of multiple registrations does not become
excessive. This is of particular concern when a phone has multiple registrations with
multiple servers per registration and some of these servers are unavailable.
For Outgoing Calls (INVITE Fallback)
When the user initiates a call, the phone completes the following steps to connect the call:
1. The phone tries to call the working server.
2. If the working server does not respond correctly to the INVITE, the phone tries and makes a call
using the next server in the list (even if there is no current registration with these servers). This
could be the case if the Internet connection has gone down, but the registration to the working
server has not yet expired.
3. If the second server is also unavailable, the phone tries all possible servers (even those not
currently registered) until it either succeeds in making a call or exhausts the list at which point the
call fails.
At the start of a call, server availability is determined by SIP signaling failure. SIP signaling failure
depends on the SIP protocol being used:
• If TCP is used, then the signaling fails if the connection fails or the Send fails.
• If UDP is used, then the signaling fails if ICMP is detected or if the signal times out. If the signaling
has been attempted through all servers in the list and this is the last server, then the signaling fails
after the complete UDP timeout defined in RFC 3261. If it is not the last server in the list, the
maximum number of retries using the configurable retry timeout is used.
Caution: If DNS is used to resolve the address for Servers, the DNS server is unavailable, and
the TTL for the DNS records has expired, the phone attempts to contact the DNS server
to resolve the address of all servers in its list before initiating a call. These attempts
timeout, but the timeout mechanism can cause long delays (for example, two minutes)
before the phone call proceeds using the working server. To prevent this issue, long
TTLs should be used. Polycom recommends deploying an on-site DNS server as part of
the redundancy solution.
Network
Polycom, Inc. 387
VoIP Server Parameters
The next table describes VoIP server configuration parameters.
VoIP Server Parameters
Template Parameter Permitted Values
Change Causes
Restart or Reboot
site.cf
g
voIpProt.serv
er.dhcp.avail
able
0 (default) - Do not check with the DHCP
server for the SIP server IP address.
1 - Check with the server for the IP
address.
Yes
site.cf
g
voIpProt.serv
er.dhcp.optio
n
The option to request from the DHCP
server if
voIpProt.server.dhcp.availab
le = 1.
128 (default) to 254
If reg.x.server.y.address is
non-Null, it takes precedence even if the
DHCP server is available.
Yes
site.cf
g
voIpProt.serv
er.dhcp.type
Type to request from the DHCP server if
voIpProt.server.dhcp.availab
le is set to 1.
0 (default) - Request IP address
1 - Request string
Yes
site.cf
g
voIpProt.OBP.
dhcpv4.type
Define the type of Outbound Proxy
address.
0 (default) - IP address
1 - String
Yes
site.cf
g
voIpProt.OBP.
dhcpv4.option
Phone requests for DHCP option 120 and
applies the outbound proxy obtained in
DHCP to
voIpProt.SIP.outboundProxy.a
ddress
120 (default)
Yes
site.cf
g
voIpProt.OBP.
dhcpv6.option
Define the type of Outbound Proxy
address from DHCPv6.
21 (default) - list of domain name
22 - list of IP address
Yes
Phone Operation for Registration
After the phone has booted up, it registers to all configured servers.
Network
Polycom, Inc. 388

Server 1 is the primary server and supports greater SIP functionality than other servers. For example,
SUBSCRIBE/NOTIFY services used for features such as shared lines, presence, and BLF is established
only with Server 1.
Upon the registration timer expiry of each server registration, the phone attempts to re-register. If this is
unsuccessful, normal SIP re-registration behavior (typically at intervals of 30 to 60 seconds) proceeds
and continues until the registration is successful (for example, when the Internet link is again operational).
While the primary server registration is unavailable, the next highest priority server in the list serves as the
working server. As soon as the primary server registration succeeds, it returns to being the working
server.
Note: If reg.x.server.y.register is set to 0, the phone does not register to that server. However,
the INVITE fails over to that server if all higher priority servers are down.
Recommended Practices for Fallback Deployments
In situations where server redundancy for fallback purpose is used, the following measures should be
taken to optimize the solution:
• Deploy an on-site DNS server to avoid long call initiation delays that can result if the DNS server
records expire.
• Do not use OutBoundProxy configurations on the phone if the OutBoundProxy could be
unreachable when the fallback occurs.
• Avoid using too many servers as part of the redundancy configuration as each registration
generates more traffic.
• Educate users as to the features that are not available when in fallback operating mode.
Note: The concurrent/registration failover/fallback feature is not compatible with Microsoft
environments.
Server Redundancy
Server redundancy is often required in VoIP deployments to ensure continuity of phone service if, for
example, the call server is taken offline for maintenance, the server fails, or the connection between the
phone and the server fails.
Polycom phones support failover and fallback server redundancy types. In some cases, you can deploy a
combination of the two server redundancy types. Consult your SIP server provider for recommended
methods of configuring phones and servers for failover configuration.
Note that the default value of the new parameters
reg.x.server.y.failOver.concurrentRegistration and
voIpProt.server.y.failOver.concurrentRegistration=0 effective UC Software 5.5.2 for
Polycom Trio systems change default behavior in previous releases. Prior to UC Software 5.5.2, the
server you specify in y concurrently registers with other configured servers. As of UC Software 5.5.2,
server y is added to the set of redundant failover servers. If you want to register the server concurrently
with other servers set reg.x.server.y.failOver.concurrentRegistration=1 or
voIpProt.server.y.failOver.concurrentRegistration=1.
Note: The concurrent failover/fallback feature is not compatible with Microsoft environments.
Network
Polycom, Inc. 389
For more information, see Technical Bulletin 5844: SIP Server Fallback Enhancements on Polycom
Phones and Technical Bulletin 66546: Configuring Optional Re-Registration on Failover Behavior.
Server Redundancy Parameters
Use the parameters in the following table to set up server redundancy for your environment.
Server Redundancy Parameters
Template Parameter Permitted Values
Change
Causes
Restart or
Reboot
reg-
advanced.cfg
reg.x.auth.optimize
dInFailover
Set the destination for the first new SIP
request when failover occurs.
0 (default) - The SIP request is sent to the
server with the highest priority in the
server list.
1 - The SIP request is sent to the server
that sent the proxy authentication request.
No
sip-
interop.cfg
reg.x.outboundProxy
.failOver.failBack.
mode
The mode for failover failback (overrides
reg.x.server.y.failOver.fail
Back.mode).
duration (default) - The phone tries the
primary server again after the time
specified by
reg.x.outboundProxy.failOver
.failBack.timeout expires.
newRequests - All new requests are
forwarded first to the primary server
regardless of the last used server.
DNSTTL - The phone tries the primary
server again after a timeout equal to the
DNS TTL you configured for the server
the phone is registered to.
No
reg-
advanced.cfg
reg.x.outboundProxy
.failOver.failBack.
timeout
3600 (default) - The time to wait (in
seconds) before failback occurs
(overrides
reg.x.server.y.failOver.fail
Back.timeout).
0, 60 to 65535 - The phone does not fail
back until a failover event occurs with the
current server.
No
Network
Polycom, Inc. 390

Template Parameter Permitted Values
Change
Causes
Restart or
Reboot
reg-
advanced.cfg
reg.x.outboundProxy
.failOver.failRegis
trationOn
1 (default) - The global and per-line
reRegisterOn parameter is enabled
and the phone silently invalidates an
existing registration.
0 - The global and per-line
reRegisterOn parameter is enabled
and existing registrations remain active.
No
reg-
advanced.cfg
reg.x.outboundProxy
.failOver.onlySigna
lWithRegistered
1 (default) - The global and per-line
reRegisterOn and
failRegistrationOn parameters
are enabled, no signaling is accepted
from or sent to a server that has failed
until failback is attempted or failover
occurs.
0 - The global and per-line
reRegisterOn and
failRegistrationOn parameters
are enabled, signaling is accepted from
and sent to a server that has failed.
No
reg-
advanced.cfg
reg.x.outboundProxy
.failOver.reRegiste
rOn
This parameter overrides
reg.x.server.y.failOver.reRe
gisterOn .
0 (default) - The phone won't attempt to
register with the secondary server.
1 - The phone attempts to register with (or
via, for the outbound proxy scenario), the
secondary server.
No
reg-
advanced.cfg
reg.x.outboundProxy
.port
The port of the SIP server to which the
phone sends all requests.
0 - (default)
1 to 65535
No
reg-
advanced.cfg
reg.x.outboundProxy
.transport
The transport method the phone uses to
communicate with the SIP server.
DNSnaptr (default)
DNSnaptr, TCPpreferred, UDPOnly, TLS,
TCPOnly
No
Network
Polycom, Inc. 391

Template Parameter Permitted Values
Change
Causes
Restart or
Reboot
sip-
interop.cfg
reg.x.server.y.fail
Over.concurrentRegi
stration
0 (default) - If 0 and
failOver.reRegisterOn is set to
1, add this server to the set of redundant
failover servers.
1 - This server registers concurrently with
other servers for this registration.
Note that the default value of the new
parameter
reg.x.server.y.failOver.conc
urrentRegistration=0 effective
UC Software 5.5.2 for Polycom Trio
systems changes default behavior in
previous releases. Prior to UC Software
5.5.2, the server you specify in y
concurrently registers with other
configured servers. As of UC Software
5.5.2, server y is added to the set of
redundant failover servers. If you want to
register the server concurrently with other
servers set
reg.x.server.y.failOver.conc
urrentRegistration=1.
No
sip-
interop.cfg
voIpProt.server.y.f
ailOver.concurrentR
egistration
0 (default) - If 0 and
failOver.reRegisterOn is set to
1, add this server to the set of redundant
failover servers.
1 - This server registers concurrently with
other servers.
Note that the default value of the new
parameter
voIpProt.server.y.failOver.c
oncurrentRegistration=0
effective UC Software 5.5.2 for Polycom
Trio systems changes default behavior in
previous releases. Prior to UC Software
5.5.2, the server you specify in y
concurrently registers with other
configured servers. As of UC Software
5.5.2, server y is added to the set of
redundant failover servers. If you want to
register the server concurrently with other
servers set
voIpProt.server.y.failOver.c
oncurrentRegistration=1.
No
Network
Polycom, Inc. 392

Template Parameter Permitted Values
Change
Causes
Restart or
Reboot
sip-
interop.cfg
voIpProt.server.x.f
ailOver.failBack.mo
de
Specify the failover failback mode.
duration (default) - The phone tries the
primary server again after the time
specified by
voIpProt.server.x.failOver.f
ailBack.timeout
newRequests - All new requests are
forwarded first to the primary server
regardless of the last used server.
DNSTTL - The phone tries the primary
server again after a timeout equal to the
DNS TTL configured for the server that
the phone is registered to.
registration - The phone tries the primary
server again when the registration
renewal signaling begins.
No
sip-
interop.cfg
voIpProt.server.x.f
ailOver.failBack.ti
meout
If
voIpProt.server.x.failOver.f
ailBack.mode is set to duration, this
is the time in seconds after failing over to
the current working server before the
primary server is again selected as the
first server to forward new requests.
Values between 1 and 59 result in a
timeout of 60. 0 means do not fail-back
until a fail-over event occurs with the
current server.
3600 (default)
0, 60 to 65535
No
sip-
interop.cfg
voIpProt.server.x.f
ailOver.failRegistr
ationOn
1 (default) - When set to 1, and the global
or per-line reRegisterOn parameter is
enabled, the phone silently invalidates an
existing registration (if it exists), at the
point of failing over.
0 - When set to 0, and the global or per-
line reRegisterOn parameter is
enabled, existing registrations remain
active. This means that the phone
attempts failback without first attempting
to register with the primary server to
determine if it has recovered.
No
Network
Polycom, Inc. 393

Template Parameter Permitted Values
Change
Causes
Restart or
Reboot
sip-
interop.cfg
voIpProt.server.x.f
ailOver.onlySignalW
ithRegistered
1 (default) - When set to 1, and the global
or per-line reRegisterOn and
failRegistrationOn parameters
are enabled, no signaling is accepted
from or sent to a server that has failed
until failback is attempted or failover
occurs. If the phone attempts to send
signaling associated with an existing call
via an unregistered server (for example,
to resume or hold a call), the call ends.
No SIP messages are sent to the
unregistered server.
0 - When set to 0, and the global or per-
line reRegisterOn and
failRegistrationOn parameters
are enabled, signaling is accepted from
and sent to a server that has failed (even
though failback hasn't been attempted or
failover hasn't occurred).
No
sip-
interop.cfg
voIpProt.server.x.f
ailOver.reRegisterO
n
0 (default) - When set to 0, the phone
won't attempt to register with the second.
1 - When set to 1, the phone attempts to
register with (or by, for the outbound
proxy scenario), the secondary server. If
the registration succeeds (a 200 OK
response with valid expires), signaling
proceeds with the secondary server.
No
Network Address Translation (NAT)
Network Address Translation (NAT) enables a local area network (LAN) to use one set of IP addresses
for internal traffic and another set for external traffic.
The phone's signaling and RTP traffic use symmetric ports. Note that the source port in transmitted
packets is the same as the associated listening port used to receive packets.
Network Address Translation Parameters
You can configure the external IP addresses and ports used by the NAT on the phone's behalf on a per-
phone basis.
Use the parameters in the following table to configure NAT.
Network
Polycom, Inc. 394

Network Access Translation Parameters
Template Parameter Permitted Values
Change Causes
Restart or Reboot
sip-
interop.cfg
nat.ip Specifies the IP address to advertise
within SIP signaling. This should match
the external IP address used by the
NAT device.
Null (default)
IP address
Yes
sip-
interop.cfg
nat.keepalive.inte
rval
The keep-alive interval in seconds. Sets
the interval at which phones sends a
keep-alive packet to the gateway/NAT
device to keep the communication port
open so that NAT can continue to
function. If Null or 0, the phone does not
send out keep-alive messages.
0 (default)
0 - 3600
No
sip-
interop.cfg
nat.mediaPortStart The initially allocated RTP port.
Overrides the value set for
tcpIpApp.port.rtp.mediaPor
tRangeStart parameter.
0 (default)
0 - 65440
Yes
sip-
interop.cfg
nat.signalPort The port used for SIP signaling.
Overrides the
voIpProt.local.port
parameter.
0 (default)
1024 - 65535
No
Real-Time Transport Protocol (RTP) Ports
You can configure RTP ports for your environment in the following ways:
• Filter incoming packets by IP address or port.
• Reject packets arriving from a non-negotiated IP address, an unauthorized source, or non-
negotiated port for greater security.
• Enforce symmetric port operation for RTP packets. When the source port is not set to the
negotiated remote sink port, arriving packets are rejected.
• Fix the phone's destination transport port to a specified value regardless of the negotiated port.
Network
Polycom, Inc. 395

This is useful for communicating through firewalls. When you use a fixed transport port, all RTP
traffic is sent to and arrives on that specified port. Incoming packets are sorted by the source IP
address and port, which allows multiple RTP streams to be multiplexed.
• Specify the phone's RTP port range.
Since the phone supports conferencing and multiple RTP streams, the phone can use several ports
concurrently. Consistent with RFC 1889, 3550, and 3551, the next-highest odd-numbered port is
used to send and receive RTP.
RTP Ports Parameters
Use the parameters in the following table to configure RTP packets and ports.
Real-Time Transport Protocol Port Parameters
Template Parameter Permitted Values
Change Causes
Restart or Reboot
site.cfg tcpIpApp.port.rtp.
feccPortRange.enab
le
0 (default) – Use the Open SIP far-end
camera control media port range.
1 - Use the far-end camera control port
range configuration for Open SIP-
registered lines.
No
site.cfg tcpIpApp.port.rtp.
feccPortRangeEnd
Specify the far-end camera control port
range end port for Open SIP
registrations.
2419 (default)
1024 - 65486
No
site.cfg tcpIpApp.port.rtp.
feccPortRangeStart
Specify the far-end camera control port
range start port for Open SIP
registrations.
2372 (default)
1024 – 65486
No
site.cfg tcpIpApp.port.rtp.
filterByIp1
IP addresses can be negotiated through
the SDP protocols.
1 (Default) - Phone rejects RTP packets
that arrive from non-negotiated IP
addresses.
Yes
site.cfg tcpIpApp.port.rtp.
filterByPort1
Ports can be negotiated through the
SDP protocol.
0 (Default)
1 - Phone rejects RTP packets arriving
from (sent from) a non-negotiated port.
Yes
Network
Polycom, Inc. 396

Template Parameter Permitted Values
Change Causes
Restart or Reboot
site.cfg tcpIpApp.port.rtp.
forceSend1
Send all RTP packets to, and expect all
RTP packets to arrive on, this port.
Range is 0 to 65535.
0 (Default) - RTP traffic is not forced to
one port.
Both
tcpIpApp.port.rtp.filterBy
Ip and
tcpIpApp.port.rtp.filterBy
Port must be set to 1.
Yes
site.cfg tcpIpApp.port.rtp.
mediaPortRangeEnd
Determines the maximum supported
end range of audio ports. Range is 1024
to 65485.
2269 (Default)
Yes
site.cfg tcpIpApp.port.rtp.
mediaPortRangeStar
t1
Set the starting port for RTP port range
packets. Use an even integer ranging
from 1024 to 65440.
2222 (Default)
Each call increments the port number
+2 to a maximum of 24 calls after the
value resets to the starting point.
Because port 5060 is used for SIP
signaling, ensure that port 5060 is not
within this range when you set this
parameter. A call that attempts to use
port 5060 has no audio.
Yes
site.cfg tcpIpApp.port.rtp.
videoPortRange.ena
ble
Specifies the range of video ports.
0 - Video ports are chosen within the
range specified by
tcpIpApp.port.rtp.mediaPor
tRangeStart and
tcpIpApp.port.rtp.mediaPor
tRangeEnd .
1 - Video ports are chosen from the
range specified by
tcpIpApp.port.rtp.videoPor
tRangeStart and
tcpIpApp.port.rtp.videoPor
tRangeEnd .
Base profile (Default)
Skype = 1 (Default)
Generic = 0 (Default)
No
Network
Polycom, Inc. 397

Template Parameter Permitted Values
Change Causes
Restart or Reboot
site.cfg tcpIpApp.port.rtp.
videoPortRangeEnd
Determines the maximum supported
end range of video ports. Range is 1024
to 65535.
2319 (Default)
Yes
site.cfg tcpIpApp.port.rtp.
videoPortRangeStar
t
Determines the start range for video
ports. Range is 1024 to 65486.
2272 (Default)
Used only if value of
tcpIpApp.port.rtp.videoPor
tRange.enable is 1.
Yes
Wireless Network Connectivity (Wi-Fi)
The Polycom Trio 8800 supports various wireless modes, security options, radio controls, and Quality of
Service monitoring.
To ensure the best performance in your location, set a proper country code with the parameter
device.wifi.country before enabling Wi-Fi.
Enabling Wi-Fi automatically disables the Ethernet port. You cannot use Wi-Fi and Ethernet
simultaneously to connect Polycom Trio 8800 to your network. When you connect the system to your
network over Wi-Fi, only audio-only calls are available. Note that Polycom Trio 8800 does not support Wi-
Fi captive portals or Wireless Display (WiDi).
Note: When you provision the Polycom Trio solution via Wi-Fi connection to the network, the Polycom
Trio solution looks for files on the provisioning server using the LAN MAC address and not the Wi-
Fi MAC address.
The Polycom Trio solution supports the following wireless modes:
• 2.4 GHz / 5 GHz operation
• IEEE 802.11a radio transmission standard
• IEEE 802.11b radio transmission standard
• IEEE 802.11g radio transmission standard
• IEEE 802.11n radio transmission standard
Note: Note: You cannot use a Polycom Trio Visual+, Trio VisualPro or RealPresence Group
Series system for video calls when you connect Polycom Trio 8800 to your network using
Wi-Fi. The Polycom Trio 8800 system does not pair with those devices when it is connected
using Wi-Fi.
Network
Polycom, Inc. 398
Wi-Fi Parameters
The parameters you configure depend on the security mode of your organization and whether or not you
enable DHCP.
Polycom Trio 8800 solution is shipped with a security-restrictive worldwide safe Wi-Fi country code
setting.
The Polycom Trio solution supports the following Wi-Fi security modes:
• WEP
• WPA PSK
• WPA2 PSK
• WPA2 Enterprise
Wi-Fi Parameters
Template Parameter Permitted Values
Change Causes
Restart or Reboot
device.cfg
,
wireless.c
fg
device.wifi.enabl
ed
Enable or disable Wi-Fi on the Polycom
Trio 8800 system.
0 (default)
1
No
device.cfg
,
wireless.c
fg
device.wifi.count
ry
Enter the two-letter code for the country
where you are operating the Polycom Trio
8800 system with Wi-Fi enabled.
NULL (default)
Two-letter country code
No
device.cfg
,
wireless.c
fg
device.wifi.dhcpE
nabled
Enable or disable DHCP for Wi-Fi on the
Polycom Trio 8800 system.
0 (default)
1
No
device.cfg device.wifi.dhcpB
ootServer
For use with the Polycom Trio 8800
system.
0 (default)
1
2
V4
V6
Static
Network
Polycom, Inc. 399

Template Parameter Permitted Values
Change Causes
Restart or Reboot
device.cfg device.wifi.ipAdd
ress
Enter the IP address of the wireless device
if you are not using DHCP on the Polycom
Trio 8800 system.
0.0.0.0 (default)
String
No
device.cfg
, site.cfg
device.wifi.subne
tMask
For use with the Polycom Trio 8800
system. Set the network mask address of
the wireless device if not using DHCP.
255.0.0.0 (default)
String
No
device.cfg
, site.cfg
device.wifi.ipGat
eway
Enter the IP gateway address for the
wireless interface if not using DHCP on the
Polycom Trio 8800 system.
0.0.0.0 (default)
String
No
device.cfg
,
wireless.c
fg
device.wifi.ssid For use with the Polycom Trio 8800
system. Set the Service Set Identifier
(SSID) of the wireless network.
SSID1 (default)
SSID
No
device.cfg
,
wireless.c
fg
device.wifi.secur
ityMode
For use with the Polycom Trio 8800
system. Specify the wireless security mode.
NULL (default)
None
WEP
WPA-PSK
WPA2-PSK
WPA2-Enterprise
No
device.cfg
,
wireless.c
fg
device.wifi.wep.k
ey
For use with the Polycom Trio 8800
system. Set the length of the hexadecimal
WEP key.
0 = 40-bits (default)
1 = 104-bits
No
Network
Polycom, Inc. 400
Template Parameter Permitted Values
Change Causes
Restart or Reboot
device.cfg
,
wireless.c
fg
device.wifi.psk.k
ey
For use with the Polycom Trio 8800
system. Enter the hexadecimal key or
ASCII passphrase.
0xFF (default)
String
No
device.cfg
,
wireless.c
fg
device.wifi.wpa2E
nt.method
For use with the Polycom Trio 8800
system. Set the Extensible Authentication
Protocol (EAP) to use for 802.1X
authentication.
NULL (default)
EAP-PEAPv0/MSCHAPv2
EAP-FAST
EAP-TLS
EAP-PEAPv0-GTC
EAP-TTLS-MSCHAPv2
EAP-TTLS-GTC
EAP-PEAPv0-NONE
EAP-TTLS-NONE
EAP-PWD
No
device.cfg
,
wireless.c
fg
device.wifi.wpa2E
nt.user
The WPA2-Enterprise user name. No
device.cfg
,
wireless.c
fg
device.wifi.wpa2E
nt.password
The WPA2-Enterprise password. No
device.cfg
,
wireless.c
fg
device.wifi.radio
.enable2ghz
No
device.cfg
,
wireless.c
fg
device.wifi.radio
.enable5ghz
No
Network
Polycom, Inc. 401
Enable Wi-Fi on the Polycom Trio 8800
You can wirelessly connect the Polycom Trio 8800 to your network using Wi-Fi, which is disabled by
default.
When you enable Wi-Fi, the system reboots.
Procedure
1. Go to Settings > Advanced > Administration Settings > Network Configuration > Network
Interfaces > Wi-Fi Menu, and turn Wi-Fi to On.
The phone restarts.
2. When the phone completes restart, go to Settings > Advanced > Administration Settings >
Network Configuration > Network Interfaces > Wi-Fi Menu to view available networks.
3. Select a network you want to connect to and press Connect.
Configuring Wireless Network Settings on the Polycom Trio Phones
Polycom UC Software supports wireless network connectivity with Polycom Trio phones.
You can manually configure a Polycom Trio phone to connect to a wireless network by selecting an
enterprise- based network by selecting EAP method for better security.
Procedure
1. Go to Settings > Advanced > Administrator Settings > Network Configuration > Network
Interfaces > Wi-Fi Menu.
2. Turn Wi-Fi to On.
3. The phone restarts.
4. When the phone completes restart, go to Settings > Advanced > Administration Settings >
Network Configuration > Network Interfaces > Wi-Fi Menu to view available networks.
5. Select a network you want to connect to and press Connect.
6. Select the SSID name of the wireless network.
7. Select the security type of the wireless network. If you have an enterprise-based network, enter
the User ID and Password and select the following EAP- Method type as supported on the
Wireless network for authentication:
▪ EAP-TLS
▪ EAP-PEAP-MSCHAPv2
▪ EAP-PEAP-GTC
▪ EAP-TTLS-MSCHAPv2
▪ EAP-TTLS-GTC
▪ EAP-MD5
▪ EAP-FAST
8. Save the settings to apply configuration changes.
Network
Polycom, Inc. 402
Bluetooth and NFC-Assisted Bluetooth for Polycom
Trio Systems
Polycom Trio systems support Bluetooth connection and pairing with compatible devices. The Polycom
Trio 8800 system supports near-field communication (NFC).
When you enable Bluetooth, users can connect a Bluetooth-capable device, such as a mobile phone,
tablet, or laptop to the Polycom Trio system. You can make calls from the connected device and play
audio from calls, video, or music from the Polycom Trio system speaker. Note you can connect one
device at a time to the Polycom Trio system via Bluetooth. You cannot connect via Bluetooth during an
active call. The Polycom Trio 8800 conference phone can remember up to 10 previously paired devices.
When NFC is enabled on the Polycom Trio 8800 system and you connect a personal device to the
Polycom Trio 8800, the NFC logo displays on the device screen. When your device is connected over
Bluetooth during an audio or a video call, you can use the Polycom Trio system microphones for audio
instead of the microphone(s) of your connected device.
Note: The Polycom Trio system does not automatically reconnect to paired devices after the device
Bluetooth connection is disconnected or after a reboot of the Polycom Trio system. If the paired
Bluetooth device is disconnected or the Polycom Trio system reboots, you must manually
reconnect and pair the device to the Trio system.
Bluetooth and NFC-Assisted Bluetooth Parameters
Use the parameters in the following table to configure Bluetooth on Polycom Trio 8500 and 8800 systems
and NFC on the Polycom Trio 8800 system.
Bluetooth and Near Field Communication Parameters
Template Parameter Permitted Values
Change
Causes
Restart or
Reboot
features.
cfg
bluetooth.device.dis
coverable
1 (default) - This device is discoverable for
Bluetooth pairing.
0 - This device is not discoverable for
Bluetooth pairing.
No
sip-
interop.c
fg
bluetooth.devName NULL (default)
UTF-8 string
Enter the name of the device that broadcasts
over Bluetooth to other devices.
No
Network
Polycom, Inc. 403

Template Parameter Permitted Values
Change
Causes
Restart or
Reboot
features.
cfg
bluetooth.discoverab
leTimeout
0 (default) - Other devices can always discover
this device over Bluetooth.
0 - 3600 seconds
Set the time in seconds after which other
devices can discover this device over
Bluetooth.
No
features.
cfg
bluetooth.radioOn 0 - The Bluetooth radio (transmitter/receiver) is
off.
1 (default) - The Bluetooth radio is on. The
Bluetooth radio must be turned on before other
devices can connect to this device over
Bluetooth.
No
features.
cfg
feature.bluetooth.en
abled
For high security environments.
1 (default) - Bluetooth connection is enabled
and the Bluetooth menu displays.
0 - Bluetooth connection is disabled and the
Bluetooth icon does not display.
No
features.
cfg
feature.nfc.enabled 0 - The NFC pairing feature for the Polycom
Trio 8800 system is disabled.
1 - The NFC pairing is enabled and users can
pair NFC-capable devices to the Polycom Trio
8800 solution.
No
features.
cfg
bluetooth.beacon.ipA
ddress.enabled
Set to send the IP address of the system over
Bluetooth.
1 (default) - Enables sending the system IP
address over Bluetooth. Turns Bluetooth radio
on when feature.bluetooth.enabled
= 1.
0 - Disables sending the system IP address
over Bluetooth
Note: Enable the parameter fea-
ture.bluetooth.enabled to use this
feature.
No
Network
Polycom, Inc. 404

Third-Party Servers
Topics:
•BroadSoft BroadWorks Server
•Microsoft Exchange Integration
This section provides information on configuring phones and features with third-party servers.
BroadSoft BroadWorks Server
This section shows you how to configure Polycom devices with BroadSoft Server options.
You can use the features available on the BroadWorks R18 server or the BroadWorks R20 or later server
on all VVX phones except the following:
• VVX 101, 150, 201 phones
Note that you cannot register lines with the BroadWorks R18 server and the R20 and later server on the
same phone. All lines on the phone must be registered to the same BroadWorks server.
Some BroadSoft features require you to authenticate the phone with the BroadWorks XSP service
interface as described in the section Authentication with BroadWorks Xtended Service Platform (XSP)
Service Interface.
Authentication with BroadWorks Xtended Service Platform (XSP)
Service Interface
You can configure Polycom phones to use advanced features available on the BroadSoft BroadWorks
server.
The phones support the following advanced BroadSoft features:
• BroadSoft Enhanced Call Park
• Executive-Assistant
• BroadSoft UC-One directory, favorites, and presence
• BroadSoft UC-One personal call control features
To use these features on Polycom devices with a BroadWorks server, you must authenticate the phone
with the BroadSoft XSP service interface.
Authentication for BroadWorks XSP Parameters
The authentication method you use depends on which version of BroadWorks you are running.
If your server is running BroadWorks R19 or earlier, enable the following parameters to authenticate on
the BroadWorks server using separate XSP credentials:
•dir.broadsoft.xsp.address
•reg.x.broadsoft.userId
•reg.x.broadsoft.xsp.password
•reg.x.broadsoft.useXspCredentials
Polycom, Inc. 405

If your server is running BroadWorks R19 Service Pack 1 or later, enable the following parameters to
authenticate on the BroadWorks server using the same SIP credentials you used to register the phone
lines: dir.broadsoft.xsp.address
•reg.x.auth.userId
•reg.x.auth.password
•reg.x.broadsoft.userId
See the following table for additional details on these parameters.
Configure BroadWorks XSP Service Interface Authentication
Template Parameter Permitted Values
Change Causes
Restart or Reboot
features.cf
g
reg.x.broadsoft.xs
p.password
Enter the password associated with the
BroadSoft user account for the line.
Required only when
reg.x.broadsoft.useXspCred
entials=1 .
Null (default)
string
No
features.cf
g
reg.x.broadsoft.us
erId
Enter the BroadSoft user ID to
authenticate with the BroadSoft XSP
service interface.
Null (default)
string
No
features.cf
g
reg.x.broadsoft.us
eXspCredentials
If this parameter is disabled, the phones
use standard SIP credentials to
authenticate.
1 (default) - Use this value, if phone
lines are registered with a server
running BroadWorks R19 or earlier.
0 - Set to 0, if phone lines are registered
with a server running BroadWorks R19
SP1 or later.
No
reg-
basic.cfg
reg.x.auth.userId User ID to be used for authentication
challenges for this registration.
Null (default)
string - If the User ID is non-Null, it
overrides the user parameter entered
into the Authentication submenu on the
Settings menu of the phone.
No
Third-Party Servers
Polycom, Inc. 406
Template Parameter Permitted Values
Change Causes
Restart or Reboot
reg-
basic.cfg
reg.x.auth.passwor
d
The password to be used for
authentication challenges for this
registration.
Null (default)
string - It overrides the password
entered into the Authentication
submenu on the Settings menu of the
phone.
No
Polycom BroadSoft UC-One Application
The Polycom BroadSoft UC-One application integrates with BroadSoft Enterprise Directory and
BroadCloud services—a set of hosted services by BroadSoft—to provide the following features:
• BroadSoft Directory—Displays information for all users in the enterprise, for example, work and
mobile phone numbers.
• BroadSoft Self-Presence—Displays the user’s aggregated presence received from the BroadSoft
Messaging Server (UMS) on the VVX phone.
• BroadCloud Presence—Enables users to share presence information with the BroadTouch
Business Communicator (BTBC) client application.
• BroadCloud Favorites—Enables users to mark contacts as favorites with the BroadTouch Business
Communicator (BTBC) client application.
These features are available on Polycom VVX 300, 400, 500 and VVX 600 series business media
phones. These features require support from the BroadSoft BroadWorks R18 SP1 platform with patches
and BroadSoft BroadCloud services. For details on how to set up and use these features, see the latest
Polycom VVX Business Media Phones - User Guide at Latest Polycom UC Software Release.
Polycom's BroadSoft UC-One application enables you to:
• Access the BroadSoft Directory
• Search for contacts in BroadSoft Directory
• View BroadSoft UC-One contacts and groups
• View the presence status of BroadSoft UC-One contacts
• View and filter BroadSoft UC-One contacts
• Activate and control BroadSoft UC-One personal call control features.
BroadSoft UC-One Configuration Parameters
The following table lists all parameters available to configure features in the BroadSoft UC-One
application.
Third-Party Servers
Polycom, Inc. 407
BroadSoft UC-One Application
Template Parameter Permitted Values
Change Causes
Restart or Reboot
features.cf
g
feature.qml.enable
d
0 (default) - Disable the QML viewer on
the phone. Note that the UC-One
directory user interface uses QML as
the user interface framework and the
viewer is used to load the QML
applications.
1 - Enable the QML viewer on phone.
Yes
features.cf
g
feature.broadsoftd
ir.enabled
0 (default) - Disable simple search for
Enterprise Directories.
1 - Enable simple search for Enterprise
Directories.
Yes
features.cf
g
feature.broadsoftU
cOne.enabled
0 (default) - Disables the BroadSoft UC-
One feature.
1 - Enables the BroadSoft UC-One
feature.
Yes
features.cf
g
feature.presence.e
nabled
0 (default) - Disable the presence
feature—including buddy managements
and user status.
1 - Enable the presence feature with the
buddy and status options.
No
features.cf
g
homeScreen.UCOne.e
nable
1 (default) - Enable the UC-One
Settings icon to display on the phone
Home screen.
0 - Disable the UC-One Settings icon to
display on the phone Home screen.
No
features.cf
g
dir.broadsoft.xsp.
address
Set the IP address or hostname of the
BroadSoft directory XSP home address.
Null (default)
IP address
Hostname
FQDN
No
application
s.cfg
dir.broadsoft.xsp.
username
To set the BroadSoft Directory XSP
home address.
features.cf
g
dir.broadsoft.xsp.
password
Set the password used to authenticate
to the BroadSoft Directory XSP server.
Null (default)
UTF-8 encoding string
No
Third-Party Servers
Polycom, Inc. 408
Template Parameter Permitted Values
Change Causes
Restart or Reboot
features.cf
g
xmpp.
1.auth.password
Specify the password used for XMPP
registration.
Null (Default)
UTF-8 encoded string
No
features.cf
g
xmpp.1.dialMethod For SIP dialing, the destination XMPP
URI is converted to a SIP URI, and the
first available SIP line is used to place
the call.
SIP (default)
String min 0, max 256
No
features.cf
g
xmpp.1.jid Enter the Jabber identity used to
register with the presence server, for
example:
presence.test2@polycom-
alpha.eu.bc.im .
Null (default)
String min 0, max 256
No
features.cf
g
xmpp.
1.roster.invite.ac
cept
Choose how phone users receive the
BroadSoft XMPP invitation to be added
to a buddy list.
prompt (default) - phone displays a list
of users who have requested to add you
as a buddy and you can accept or reject
the invitation.
Automatic
No
features.cf
g
xmpp.1.server Sets the BroadSoft XMPP presence
server to an IP address, host name, or
FQDN, for example: polycom-
alpha.eu.bc.im .
Null (default)
dotted-decimal IP address, host name,
or FQDN.
No
features.cf
g
xmpp.1.verifyCert Specifies to enable or disable
verification of the TLS certificate
provided by the BroadSoft XMPP
presence server.
1 (default)
0
No
Third-Party Servers
Polycom, Inc. 409

Configuring BroadSoft UC-One
You can configure the UC-One Call Settings menu and feature options on the phone, in the Web
Configuration Utility, and using configuration parameters.
Configure BroadSoft UC-One on the Phone
You can enable the BroadSoft UC-One feature directly from the phone.
Procedure
1. Navigate to Settings > UC-One.
2. Under General, click Enable for BroadSoft UC-One.
This enables the UC-One Call Settings menu to display on the phone.
Configure BroadSoft UC-One in the Web Configuration Utility
You can enable the BroadSoft UC-One feature and feature options in the Web Configuration Utility.
Procedure
1. In the Web Configuration Utility, navigate to Settings > UC-One.
2. Under Call Settings Features, enable each feature menu you want available on the phone.
BroadSoft UC-One Directory Parameters
Use the parameters listed in the following table with the Polycom BroadSoft UC-One directory.
BroadSoft UC-One Directory Parameters
Template Parameter Permitted Values
Change Causes
Restart or Reboot
features.cfg dir.broadsoft.regMap Specify the registration line
credentials you want to use for
BroadSoft R20 Server or later
to retrieve directory information
from the BroadSoft UC-One
directory when
dir.broadsoft.useXsp
Credentials =0.
1 (default)
0 - Const_NumLineReg
No
Third-Party Servers
Polycom, Inc. 410
Template Parameter Permitted Values
Change Causes
Restart or Reboot
features.cfg dir.broadsoft.useXsp
Credentials
Specify which method of
credentials the phone uses to
sign in with the BroadSoft
server.
1 (default)—uses BroadSoft
XSP credentials.
0—uses SIP credentials from
dir.broadsoft.regMap
.
No
Anonymous Call Rejection
Anonymous Call Rejection enables users to automatically reject incoming calls from anonymous parties
who have restricted their caller identification.
After you enable the feature for users, users can turn call rejection on or off from the phone. When a user
turns Anonymous Call Rejection on, the phone gives no indication that an anonymous call was received.
You can configure this option in the Web Configuration Utility.
Configure Anonymous Call Rejection using the Web Configuration Utility
You can configure Anonymous Call Rejection in the Web Configuration Utility.
Procedure
1. Navigate to Settings > UC-One.
2. Under the Call Setting Features, click Enable for Anonymous Call Rejection.
Anonymous Call Rejection Parameters
You can enable the Anonymous Call Rejection feature using configuration files or the Web Configuration
Utility.
Use the parameters in the following table to enable this feature.
Anonymous Call Rejection
Template Parameter Permitted Values
Change Causes
Restart or Reboot
features.cf
g
feature.broadsoft.
xsi.AnonymousCallR
eject.enabled
0 (default) - Does not display the
Anonymous Call Rejection menu to
users.
1 - Displays the Anonymous Call
Rejection menu and the user can turn
the feature on or off from the phone.
No
Third-Party Servers
Polycom, Inc. 411
Template Parameter Permitted Values
Change Causes
Restart or Reboot
features.cf
g
feature.broadsoftU
cOne.enabled
0 (default) - Disables the BroadSoft UC-
One feature.
1 - Enables the BroadSoft UC-One
feature.
Yes
features.cf
g
reg.x.broadsoft.us
erId
Enter the BroadSoft user ID to
authenticate with the BroadSoft XSP
service interface.
Null (default)
string
No
Simultaneous Ring Personal
The Simultaneous Ring feature enables users to add phone numbers to a list of contacts whose phones
ring simultaneously when the user receives an incoming call.
When you enable the display of the Simultaneous Ring menu option on the phone, users can turn the
feature on or off from the phone and define which numbers should be included in the Simultaneous Ring
group.
Simultaneous Ring Parameters
You can enable or disable the Simultaneous Ring feature for users using configuration files or the Web
Configuration Utility.
Use the parameters in the following table to enable this feature.
Simultaneous Ring
Template Parameter Permitted Values
Change Causes
Restart or Reboot
features.cf
g
feature.broadsoft.
xsi.SimultaneousRi
ng.enabled
0 (default) - Disables and does not
display the Simultaneous Ring Personal
feature menu on the phone.
1 - Enables the Simultaneous Ring
Personal feature menu on the phone.
No
features.cf
g
feature.broadsoftU
cOne.enabled
Enable or disable all BroadSoft UC-One
features.
Line ID Blocking
You can enable or disable the display of the Line ID Blocking menu option on the phone.
When you enable the menu for users, users can choose to hide their phone number before making a call.
Third-Party Servers
Polycom, Inc. 412
Line ID Blocking Parameters
You can configure this feature using configuration parameters or the Web Configuration Utility.
Use the parameters in the following table to enable this feature.
Line ID Blocking
Template Parameter Permitted Values
Change Causes
Restart or Reboot
features.cf
g
feature.broadsoft.
xsi.LineIdblock.en
abled
0 (default) - Disables and does not
display the Line ID Blocking feature
menu on the phone.
1 - Enables the Line ID Blocking feature
menu on the phone.
No
features.cf
g
feature.broadsoftU
cOne.enabled
0 (default) - Disables the BroadSoft UC-
One feature.
1 - Enables the BroadSoft UC-One
feature.
Yes
BroadWorks Anywhere
BroadWorks Anywhere enables users to use one phone number to receive calls to and dial out from their
desk phone, mobile phone, or home office phone.
When you enable this feature, users can move calls between phones and perform phone functions from
any phone. When enabled, the BroadWorks Anywhere settings menu displays on the phone and users
can turn the feature on or off and add BroadWorks Anywhere locations on the phone.
BroadWorks Anywhere Parameters
You can configure BroadWorks Anywhere using configuration files or the Web Configuration Utility.
Use the parameters in the following table to enable this feature.
BroadWorks Anywhere
Template Parameter Permitted Values
Change Causes
Restart or Reboot
features.cf
g
feature.broadsoft.
xsi.BroadWorksAnyw
here.enabled
0 (default) - Disables and does not
display the BroadWorks Anywhere
feature menu on the phone.
1 - Enables the BroadWorks Anywhere
feature menu on the phone.
No
features.cf
g
feature.broadsoftU
cOne.enabled
0 (default) - Disables the BroadSoft UC-
One feature.
1 - Enables the BroadSoft UC-One
feature.
Yes
Third-Party Servers
Polycom, Inc. 413

Remote Office
Remote Office enables users to set up a phone number on their office phone to forward incoming calls to
a mobile device or home office number.
When enabled, this feature enables users to answer incoming calls to the office phone on the phone, and
any calls placed from that phone show the office phone number.
Remote Office Parameters
Use the parameters in the following table to enable this feature.
Remote Office
Template Parameter Permitted Values
Change Causes
Restart or Reboot
features.cf
g
feature.broadsoft.
xsi.RemoteOffice.e
nabled
0 (default) - Disables the Remote Office
feature menu on the phone.
1 - Enables and displays the Remote
Office feature menu on the phone.
No
features.cf
g
reg.x.broadsoft.us
erId
Enter the BroadSoft user ID to
authenticate with the BroadSoft XSP
service interface.
Null (default)
string
No
features.cf
g
feature.broadsoftU
cOne.enabled
0 (default) - Disables the BroadSoft UC-
One feature.
1 - Enables the BroadSoft UC-One
feature.
Yes
features.cf
g
dir.broadsoft.xsp.
password
Set the password used to authenticate
to the BroadSoft Directory XSP server.
Null (default)
UTF-8 encoding string
No
BroadSoft UC-One Credentials
Enabling this feature allows users to enter their BroadWorks UC-One credentials on the phone instead of
in the configuration files.
The parameters reg.x.broadsoft.useXspCredentials , and
feature.broadsoftUcOne.enabled must be enabled to display the UC-One Credentials menu
option on the phone.
BroadSoft UC-One Credential Parameters
Use the parameters in the following table to enable this feature.
Third-Party Servers
Polycom, Inc. 414

Configure XSP User Name an Password
Template Parameter Permitted Values
Change Causes
Restart or Reboot
features.cf
g
dir.broadsoft.xsp.
address
Set the IP address or hostname of the
BroadSoft directory XSP home address.
Null (default)
IP address
Hostname
FQDN
No
features.cf
g
reg.x.broadsoft.us
erId
Enter the BroadSoft user ID to
authenticate with the BroadSoft XSP
service interface.
Null (default)
string
No
features.cf
g
feature.broadsoftU
cOne.enabled
0 (default) - Disables the BroadSoft UC-
One feature.
1 - Enables the BroadSoft UC-One
feature.
Yes
application
s.cfg
dir.broadsoft.xsp.
username
To set the BroadSoft Directory XSP
home address.
features.cf
g
dir.broadsoft.xsp.
password
Set the password used to authenticate
to the BroadSoft Directory XSP server.
Null (default)
UTF-8 encoding string
No
features.cf
g
feature.broadsoftd
ir.enabled
0 (default) - Disable simple search for
Enterprise Directories.
1 - Enable simple search for Enterprise
Directories.
Yes
BroadSoft Server-Based Call Forwarding
To enable server-based call forwarding, you must enable the feature on both the server and the
registered phone.
If you enable server-based call forwarding on one registration, other registrations are not affected.
The following conditions apply for server-based call forwarding:
• If server-based call forwarding is enabled, but inactive, when a user presses the Forward soft key,
the ‘moving arrow' icon does not display on the phone and incoming calls are not forwarded.
The call server uses the Diversion field with a SIP header to inform the phone of a call's history. For
example, when you enable call forwarding, the Diversion header allows the receiving phone to indicate
who the call was from, and the phone number it was forwarded from.
Third-Party Servers
Polycom, Inc. 415

Microsoft Exchange Integration
If you have a Skype for Business, Office 365, Lync Server 2010 or 2013 deployment, you can integrate
with Microsoft Exchange Server.
You can set up visual voicemail, call log synchronization, Outlook contact search, and Skype for Business
Address Book Service (ABS) adaptive search. Each of these features is enabled by default on Polycom
phones registered with Skype for Business.
Note: If your Polycom phones are configured with G.722 and users find that they do not hear audio
when retrieving voicemail from the Microsoft Skype for Business Server, you need to make the
following changes to parameters in the site.cfg template file:
• Change voice.codecPref.G7221.24kbps from 0 to 5.
• Change voice.codecPref.G7221.32kbps from 5 to 0.
• Add voice.audioProfile.G7221.24kbps.payloadType and set it to 112.
After the phone is connected with the Exchange Server, you can:
• Verify the status of Exchange Server services on each phone.
• View the status of each service in the Web Configuration Utility.
Integrating with Microsoft Exchange
You can integrate with Microsoft Exchange using one of the following methods:
• Exchange Server auto-discover
• Provision the phone with the Microsoft Exchange address
• Web Configuration Utility
Note: If you enter sign-in credentials to the configuration file, phone users must enter credentials
to the phone Sign In screen.
Provision the Microsoft Exchange Calendar
You can provision your phones with the Microsoft Exchange calendar.
When you connect a Polycom Trio 8500 or 8800 system to Skype for Business, a Calendar icon displays
on the phone Home screen that enables users to access features. Users can view and join Outlook
calendar events directly from Polycom Trio 8800 which displays the day and meeting view for scheduled
events. You can't schedule calendar events or view email from the phone.
When you pair Polycom Trio 8500 or 8800 with a Polycom Trio Visual+, Trio VisualPro, or Polycom
RealPresence Group Series system, you can configure if users receive reminder notifications on the
display monitor and whether or not an alert sound accompanies reminder notifications.
If you are using the Polycom Trio Solution, parameters are included in Example Configuration File for
Polycom Trio Collaboration Kit with Skype for Business on Polycom Trio > Documentation > Setup
Documents.
Procedure
1. Add the following parameters to one of your configuration files:
Third-Party Servers
Polycom, Inc. 416
•feature.exchangeCalendar.enabled=1
•exchange.server.url=https://<example URL>
Enable Microsoft Exchange Calendar Using the Web Configuration Utility
You can use the Web Configuration Utility to manually enable your phones with the Microsoft Exchange
calendar.
This is useful for troubleshooting if auto-discovery is not working or misconfigured. This method applies
only to a single phone at a time.
Procedure
1. Enable access to the Web Configuration Utility if the phone is registered with Skype for Business.
For instructions, see "Accessing the Web Configuration Utility" in the Polycom UC Software with
Skype for Business - Deployment Guide on Polycom Trio.
2. Log in to the Web Configuration Utility as Admin (default password 456).
3. Go to Settings > Applications > Exchange Applications, and expand Exchange Applications.
4. In the Exchange Calendar field, select Enable.
5. Enter the exchange web services URL using a Microsoft Exchange Server URL, for example
https://<mail.com>/ews/exchange.asmx.
In this example, the URL part <mail.com> is specific to an organization
6. At the bottom of the browser page, click Save.
7. When the confirmation dialog displays, click Yes.
Your Exchange Calendar is successfully configured and the Calendar icon displays on your phone
screen.
Calendar Meeting Details
You can use exchange.meeting.show* parameters to show or hide the following meeting details from the
calendar display on the Polycom Trio 8500 and 8800 system screen and on the monitor(s) connected to
the Polycom Trio Visual+, Trio VisualPro, or RealPresence Group Series system:
▪ Subject.
▪ Location.
▪ Invitee(s).
▪ Agenda/Notes. When you hide Agenda/Notes, a message indicates the meeting is private.
▪ Meeting organizer. The organizer does not display for meetings displayed on the monitor.
▪ Show More Actions. If multiple numbers are available to dial into a meeting, More Actions displays
in Meeting Details to allow users to choose the dial-in number.
Meeting Reminder Messages
Polycom Trio systems display several meeting reminder messages.
A meeting reminder displays on the Polycom Trio system screen at five minutes and one minute before
the start of a meeting. The five-minute reminder disappears after 30 seconds if not disPolycom Trio
systems display several missed. If the one-minute reminder has not been dismissed, the reminder
message displays on the Polycom Trio system Home Screen during the duration of the meeting. The one
Third-Party Servers
Polycom, Inc. 417

minute reminder disappears when the meeting ends or when the next meeting reminder pops up,
whichever comes first.
When multiple meetings are booked at the same time or overlap, a message displays available meetings.
Users can tap the message to display the calendar day view and choose which meeting to join.
You can also show or hide all day events, configure the maximum number of future meetings, or
configure a user requirement to enter the Skype for Business conference ID when a meeting organize
marks a meeting as ‘private’. When meeting organizers mark a meeting invitation as Private in Outlook,
the Polycom Trio system displays the meeting invite on the Trio phone calendar and TV screens with
‘Private Meeting’ in the subject line and a lock icon. The conference ID is included in the Outlook
invitation.
Verify the Microsoft Exchange Integration
You can verify if all of the Exchange services are working.
Procedure
1. Go to Status > Diagnostics > Warnings on the phone.
2. View the status of each service in the Web Configuration Utility.
Polycom Trio Solution with Skype for Business
You can deploy a Polycom Trio system with Skype for Business Online, Skype for Business 2013, and
Lync 2010 on-premises.
For a list of available features and instructions on deploying Polycom Trio solution with Skype for
Business and Lync Server, see the latest Polycom UC Software for Polycom Trio Solution - Skype for
Business Deployment Guide on Polycom Trio.
When you register a Polycom Trio 8800 or 8500 system with Skype for Business, a Calendar icon
displays on the phone Home screen that enables users to access features. Users can view and join
Outlook calendar events directly from Polycom Trio system. This displays the day and meeting view for
scheduled events; the month view is not currently available. Note you cannot schedule calendar events or
view email from the phone.
When you pair Polycom Trio 8500 or 8800 with Polycom Trio Visual+, the system automatically displays
the Calendar and up to five meetings scheduled within the next 24-48 hours on the Home screen of
connected monitor. You can configure whether or not users receive reminder notifications on the display
monitor and whether or not an alert sound accompanies reminder notifications.
Private Meetings in Microsoft Exchange
When a Skype for Business meeting is set to Private, you can choose which meeting information to show
or hide.
Skype for Business Private Meeting Parameters
Use the following parameters to configure Skype for Business private meetings.
Third-Party Servers
Polycom, Inc. 418

Private Meeting Parameters
Template Parameter Permitted Values
Change Causes
Restart or Reboot
applica
tions.c
fg
exchange.meeting.priva
te.showAttendees
0 (default) - Meetings marked as
private in Outlook do not show the
list of meeting attendees and
invitees on the Polycom Trio
calendar.
1 - Meetings marked as private in
Outlook show the list of meeting
attendees and invitees on the
Polycom Trio calendar.
No
applica
tions.c
fg
exchange.meeting.priva
te.showDescription
0 (default) - Meetings marked as
private in Outlook do not display a
meeting description on the
Polycom Trio calendar.
1 - Meetings marked as private in
Outlook display a meeting
description on Polycom Trio
calendar.
No
applica
tions.c
fg
exchange.meeting.priva
te.showLocation
0 (default) - Meetings marked as
private in Outlook do not display
the meeting location on the
Polycom Trio calendar.
1 - Meetings marked as private in
Outlook display the meeting
location on the Polycom Trio
calendar.
No
applica
tions.c
fg
exchange.meeting.priva
te.showSubject
0 (default) - Meetings marked as
private in Outlook do not display a
subject line on Polycom Trio
calendar.
1 - Meetings marked as private in
Outlook display a subject line on
Polycom Trio calendar.
No
applica
tions.c
fg
exchange.meeting.priva
te.showMoreActions
1 (default) - Meetings marked as
private in Outlook display the
‘More Actions' button, when
applicable.
0 - Meetings marked as private in
Outlook do not display the ‘More
Actions' button.
No
Third-Party Servers
Polycom, Inc. 419
Template Parameter Permitted Values
Change Causes
Restart or Reboot
applica
tions.c
fg
exchange.meeting.priva
te.showOrganizer
1 (default) - Meetings marked as
private in Outlook display the
name of the meeting organizer on
the Polycom Trio calendar.
0 - Meetings marked as private in
Outlook display the name of the
meeting organizer on the Polycom
Trio calendar.
No
applica
tions.c
fg
exchange.meeting.priva
te.enabled
1 (default) - The Polycom Trio
considers the private meeting flag
for meetings marked as private in
Outlook.
0 - Treat meetings marked as
private in Outlook the same as
other meetings.
No
applica
tions.c
fg
exchange.meeting.priva
te.promptForPIN
applications.cfg
0 (default) - Disable the Skype for
Business Conference ID prompt
that allows users to join meetings
marked as 'private'.
1 - Enable the Skype for Business
Conference ID prompt that allows
users to join meetings marked as
'private'.
No
Configuring the Microsoft Exchange Server
You should configure the following settings to take advantage of Microsoft Exchange services on your
phones.
Note: Web Info: For help with Lync Server 2010, refer to Microsoft Configure Exchange Services for the
Autodiscover Service.
For help with Lync Server 2013, refer to Microsoft Configuring Unified Messaging on Microsoft
Exchange Server to work with Lync Server 2013.
Visual Voicemail
On the exchange server, enable unified messaging and enable messages to play on the phone for each
user.
If you disable feature.exchangeVoiceMail.enabled, the Message Center and Skype for Business
Voice mail menus display the message: Skype for Business Server only plays voicemail and you cannot
download voicemails or play locally on the phone.
Third-Party Servers
Polycom, Inc. 420

Synchronizing Call Logs
On the Exchange server, you can enable the option to save calls logs to each user's conversation history
in Outlook.
ABS Adaptive Search
You can enable the ABS service on the Exchange server.
There are three possible configurations.
• Outlook and ABS are both enabled by default. When both are enabled, the phone displays the
Skype for Business Directory.
• If you disable Outlook and enable only ABS, the phone displays the Skype for Business Directory.
• If you enable Outlook and disable ABS, the Outlook Contact Search displays in Directories.
VVX business media phones registered with Skype for Business server display a one-touch Join button
that allows you to join a Skype for Business conference in a federated environment, even if you haven’t
configured Transport Neutral Encapsulation Format (TNEF).
Microsoft Exchange Parameters
The following table lists parameters that configure the Microsoft Exchange integration.
Microsoft Exchange Parameters
Template Parameter Permitted Values
Change
Causes
Restart or
Reboot
application
s.cfg
exchange.meeting.alereal
ConnectProcessing.skype.
enabledrt.followOfficeHo
urs
1 (default) - Audible alerts occur
during business hours.
0 - Audible alerts occur at all times.
No
application
s.cfg
exchange.meeting.alert.t
onePattern
positiveConfirm (default) - Set the
tone pattern of the reminder alerts
using any tone specified by
se.pat.*.
No
application
s.cfg
exchange.meeting.alert.t
oneVolume
10 (default) - Set the volume level of
reminder alert tones.
0 - 17
No
application
s.cfg
exchange.meeting.allowSc
rollingToPast
0 (default) - Do not allow scrolling
up in the Day calendar view to see
recently past meetings.
1 - Allow scrolling up in the Day
calendar view to see recently past
meetings.
No
Third-Party Servers
Polycom, Inc. 421

Template Parameter Permitted Values
Change
Causes
Restart or
Reboot
application
s.cfg
exchange.meeting.hideAll
DayNotification
0 (default) - All day and Multi-day
meeting notifications display on the
Calendar screen.
1 - All day and Multi-day meeting
notifications are hidden from the
Calendar screen.
No
application
s.cfg
exchange.meeting.parseOp
tion
Indicates the field in the meeting
invite from which the VMR or
meeting number should be fetched.
Location (default)
All
LocationAndSubject
Description
No
application
s.cfg
exchange.meeting.parseWh
en
NonSkypeMeeting (default) -
Disable number-searching on the
Calendar for additional numbers to
dial in Skype Meetings.
Always - Enable number-searching
on the Calendar for additional
numbers to dial in Skype Meetings.
No
application
s.cfg
exchange.meeting.phonePa
ttern
NULL (default)
string
The pattern used to identify phone
numbers in meeting descriptions,
where "x" denotes any digit and "|"
separates alternative patterns (for
example, xxx-xxx-xxxx|
604.xxx.xxxx).
No
features.cf
g
exchange.meeting.realCon
nectProcessing.outboundR
egistration
Choose a line number to use to
make Polycom RealConnect calls.
2 (default)
1-34
Yes
features.cf
g
exchange.meeting.realCon
nectProcessing.skype.ena
bled
0 (default) – Disable the Skype for
Business meeting on Polycom
RealConnect technology.
1 - Enable the Skype for Business
meeting on Polycom RealConnect
technology.
Yes
Third-Party Servers
Polycom, Inc. 422

Template Parameter Permitted Values
Change
Causes
Restart or
Reboot
application
s.cfg
exchange.meeting.reminde
rEnabled
1 (default) - Meeting reminders are
enabled.
0 - Meeting reminders are disabled.
No
application
s.cfg
exchange.meeting.reminde
rInterval
300 seconds (default)
60 - 900 seconds
Set the interval at which phones
display reminder messages.
No
application
s.cfg
exchange.meeting.reminde
rSound.enabled
1 (default) - The phone makes an
alert sound when users receive
reminder notifications of calendar
events.
0 - The phone does not make an
alert sound when users receives
reminder notifications of calendar
events. Note that when enabled,
alert sounds take effect only if
exchange.meeting.reminde
rEnabled is also enabled.
No
application
s.cfg
exchange.meeting.reminde
rType
Customize the calendar reminder
and tone.
2 (default) - Reminder is always
audible and visual.
1 - The first reminder is audible and
visual reminders are silent.
0 - All reminders are silent.
No
application
s.cfg
exchange.meeting.reminde
rWake.enabled
1 (default) - The phone wakes from
low power mode after receiving a
calendar notification.
0 - The phone stays in low power
mode after receiving a calendar
notification.
No
application
s.cfg
exchange.meeting.showAtt
endees
1 (default) - Show the names of the
meeting invitees.
0 - Hide the names of the meeting
invitees.
No
Third-Party Servers
Polycom, Inc. 423

Template Parameter Permitted Values
Change
Causes
Restart or
Reboot
application
s.cfg
exchange.meeting.showDes
cription
1 (default) - Show Agenda/Notes in
Meeting Details that displays after
you tap a scheduled meeting on the
Polycom Trio 8800 system
calendar.
0 - Hide the meeting Agenda/Notes.
No
application
s.cfg
exchange.meeting.showLoc
ation
1 (default) - Show the meeting
location.
0 - Hide the meeting location.
No
application
s.cfg
exchange.meeting.showMor
eActions
1 (default) - Show More Actions in
Meeting Details to allow users to
choose a dial-in number.
0 - Hide More Actions in Meeting
Details.
No
application
s.cfg
exchange.meeting.showOnl
yCurrentOrNext
0 (default) - Disable the limitation to
display only the current or next
meeting on the Calendar.
1 - Enable the limitation to display
only the current or next meeting on
the Calendar.
No
application
s.cfg
exchange.meeting.showOrg
anizer
1 (default) - Show the meeting
organizer in the meeting invite.
0 - Hide the meeting organizer in
the meeting invite.
No
application
s.cfg
exchange.meeting.showSub
ject
1 (default) - Show the meeting
Subject.
0 - Hide the meeting Subject.
No
application
s.cfg
exchange.meeting.showTom
orrow
1 (default) - Show meetings
scheduled for tomorrow as well as
meetings scheduled for today.
0 - Do not show meetings
scheduled for tomorrow.
No
application
s.cfg
exchange.menu.location Features (default) - Displays the
Calendar in the global menu under
Settings > Features.
Administrator - Displays the
Calendar in the Admin menu at
Settings > Advanced >
Administration Settings.
No
Third-Party Servers
Polycom, Inc. 424

Template Parameter Permitted Values
Change
Causes
Restart or
Reboot
application
s.cfg
exchange.pollInterval The interval, in seconds, to poll the
Exchange server for new meetings.
30000 (default)
4000 minimum
60000 maximum
No
application
s.cfg
exchange.reconnectOnErro
r
1 (default) - The phone attempts to
reconnect to the Exchange server
after an error.
0 - The phone does not attempt to
reconnect to the Exchange server
after an error.
No
application
s.cfg
exchange.server.url NULL (default)
string
The Microsoft Exchange server
address.
No
application
s.cfg
feature.EWSAutodiscover.
enabled
If you configure
exchange.server.url and
set this parameter to 1, preference
is given to the value of
exchange.server.url .
1 (default) - Lync Base Profile
0 (default) - Generic Base Profile
1 - Exchange autodiscovery is
enabled and the phone
automatically discovers the
Exchange server using the email
address or SIP URI information.
0 - Exchange autodiscovery is
disabled on the phone and you
must manually configure the
Exchange server address.
No
Third-Party Servers
Polycom, Inc. 425

Template Parameter Permitted Values
Change
Causes
Restart or
Reboot
application
s.cfg
feature.exchangeCalendar
.enabled
1 (default) - The calendaring feature
is enabled.
0 - The calendaring feature is
disabled.
You must enable this parameter if
you also enable
feature.exchangeCallLog.
enabled .
If you disable
feature.exchangeCalendar
.enabled , also disable
feature.exchangeCallLog.
enabled to ensure call log
functionality.
No
features.cf
g
feature.exchangeCalendar
.enabled
Available for:
▪ Polycom Trio 8800 and 8500
systems
▪ VVX 300/301, 310/311,
400/401, 410/411, 500/501,
600/601 and 1500 business
media phones
▪ CX5500 Unified Conference
Station
1 (default) - Lync Base Profile
0 (default) - Generic Base Profile
0 - The calendaring feature is
disabled.
1 - The calendaring feature is
enabled. You must enable this
parameter if you also enable
feature.exchangeCallLog.
enabled . If you disable
feature.exchangeCalendar
.enabled , also disable
feature.exchangeCallLog.
enabled to ensure call log
functionality.
No
Third-Party Servers
Polycom, Inc. 426

Template Parameter Permitted Values
Change
Causes
Restart or
Reboot
features.cf
g
feature.exchangeContacts
.enabled
1 (default) - Lync Base Profile
0 (default) - Generic Base Profile
1 - The Exchange call log feature is
enabled and users can retrieve the
call log histories for missed,
received, and outgoing calls.
0 - The Exchange call log feature is
disabled and users cannot retrieve
call logs histories.
You must also enable the
parameter
feature.exchangeCallLog.
enabled to use the Exchange call
log feature.
No
features.cf
g
feature.exchangeContacts
.enabled
1 (default) - The Exchange call log
feature is enabled and users can
retrieve call logs history of Missed,
Received, and outgoing calls on the
phone.
0 - The Exchange call log feature is
disabled and users cannot retrieve
call logs history from the Exchange
server.
You must also enable the
parameter
feature.exchangeCallLog.
enabled to use the Exchange
call log feature.
No
features.cf
g
feature.exchangeVoiceMai
l.enabled
1 (default) - Lync Base Profile
0 (default) - Generic Base Profile
1 - The Exchange voicemail feature
is enabled and users can retrieve
voicemails stored on the Exchange
server from the phone.
0 - The Exchange voicemail feature
is disabled and users cannot
retrieve voicemails from Exchange
Server on the phone.
You must also enable
feature.exchangeCalendar
.enabled to use the Exchange
contact feature.
No
Third-Party Servers
Polycom, Inc. 427

Template Parameter Permitted Values
Change
Causes
Restart or
Reboot
features.cf
g
feature.exchangeVoiceMai
l.enabled
1 (default) - The Exchange
voicemail feature is enabled and
users can retrieve voicemails stored
on the Exchange server from the
phone.
0 - The Exchange voicemail feature
is disabled and users cannot
retrieve voicemails from Exchange
Server on the phone.
You must also enable
feature.exchangeCalendar
.enabled to use the Exchange
contact feature.
No
features.cf
g
feature.exchangeVoiceMai
l.skipPin.enabled
0 (default) - Enable PIN
authentication for Exchange
Voicemail. Users are required to
enter their PIN before accessing
Exchange Voicemail.
1 - Disable PIN authentication for
Exchange Voicemail. Users are not
required to enter their PIN before
accessing Exchange Voicemail.
No
features.cf
g
feature.lync.abs.enabled 1 (default) - Lync Base Profile
0 (default) - Generic Base Profile
1 - Enable comprehensive contact
search in the Skype for Business
address book service.
0 - Disable comprehensive contact
search in the Skype for Business
address book service.
No
features.cf
g
feature.lync.abs.maxResu
lt
Define the maximum number of
contacts to display in a Skype for
Business address book service
contact search.
12 (default)
5 - 50
No
Third-Party Servers
Polycom, Inc. 428

Template Parameter Permitted Values
Change
Causes
Restart or
Reboot
features.cf
g
feature.wad.enabled Do not disable this parameter if you
are using Skype Online or Web
Sign-In.
1 (default) – The phone attempts to
use Web auto-discovery and if no
FQDN is available, falls back to
DNS.
0 - The phone uses DNS to locate
the server FQDN and does not use
Web auto-discovery. Polycom does
not recommend disabling this
parameter when using Skype for
Business Online and Web Sign In.
No
features.cf
g
features.contacts.readon
ly
0 (default) - Skype for Business
Contacts are editable.
1 - Skype for Business are read-
only.
No
features.cf
g
up.oneTouchVoiceMail11 (default) - Lync Base Profile
0 (default) - Generic Base Profile
0 - The phone displays a summary
page with message counts. The
user must press the Connect soft
key to dial the voicemail server.
1 - The phone dials voicemail
services directly (if available on the
call server) without displaying the
voicemail summary.
No
Join a Meeting with a SIP URI
When you set up a meeting in the Calendar, the Polycom Trio system displays a meeting reminder pop
up.
If a dial-in number is available for the meeting, the reminder pop-up presents a Join button that joins you
to the meeting. If a meeting lists multiple dial-in numbers or URIs for the meeting, by default the Join
button automatically dials the first number.
▪ SIP URI
▪ Tel URI
▪ PSTN number
▪ IP dial
Third-Party Servers
Polycom, Inc. 429
Join a Meeting with SIP URI Parameters
The following table lists the parameters that configure dial-in information.
SIP URI Dial-in Parameters
Template Parameter Permitted Values Change Causes Restart
or Reboot
applications.cfg exchange.meeting.
join.promptWithLi
st
Specifies the behavior of
the Join button on
meeting reminder pop-
ups.
0 (default) - Tapping Join
on a meeting reminder
should show a list of
numbers to dial rather
than immediately dialing
the first one.
1 - A meeting reminder
does not show a list of
numbers to dial.
No
applications.cfg exchange.meeting.
parseWhen
Specifies when to scan
the meeting's subject,
location, and description
fields for dialable
numbers.
NonSkypeMeeting
(default)
Always
Never
No
applications.cfg exchange.meeting.
parseOption
Specifies where to search
for a dialable number.
All (default)
No
applications.cfg exchange.meeting.
parseEmailsAsSipU
ris
List instances of text like
user@domain or
user@ipaddress in the
meeting description or
subject under the More
Actions pane as dialable
SIP URIs.
0 (default) - it does not list
the text as a dialable SIP
URI
1 - it treats user@domain
No
Third-Party Servers
Polycom, Inc. 430
Template Parameter Permitted Values Change Causes Restart
or Reboot
applications.cfg exchange.meeting.
parseAllowedSipUr
iDomains
List of comma-separated
domains that will be
permitted to be
interpreted as SIP URIs
Null (default)
String (maximum of 255
characters)
No
Microsoft Exchange Advanced Login
You can configure your phone to support the Advanced Login feature which enables a dual sign-in mode
for users to make calls and join meetings seperately.
When you enable the Advanced Login feature, users can log in to multiple phones using one account to
access the Exchange calendar and another account for making calls.
Microsoft Exchange Advanced Login Parameters
The following table lists parameters that configure Microsoft Exchange Advanced Login.
Microsoft Exchange Advanced Login Parameters
Template Parameter Permitted Values Change Causes Restart/
Reboot
applications.cfg exchange.showSepa
rateAuth
0 (default) - Phone
disbales the dual user
sign-in mode.
1 - Phone enables the
dual user sign-in mode.
No
applications.cfg exchange.auth.ema
il
This parameter configures
the email address of the
Exchange account.
NULL (default)
String (maximum of 255
characters)
No
device.cfg device.loginAltCr
ed.domain
This parameter configures
the domain of the
Exchange account.
NULL (default)
String (maximum of 255
characters)
No
Third-Party Servers
Polycom, Inc. 431

Template Parameter Permitted Values Change Causes Restart/
Reboot
device.cfg device.loginAltCr
ed.user
This parameter configures
the User ID of Exchange
account.
NULL (default)
String (maximum of 255
characters)
No
device.cfg device.loginAltCr
ed.password
This parameter configures
the password of
Exchange Account.
NULL (default)
String (maximum of 32
characters)
No
device.cfg device.loginAltCr
ed.domain.set
This parameter overrides
the value set for
device.loginAltCred.domai
n using other
configuration methods like
Phone Menu, Web
Config.
0 (default)
No
device.cfg device.loginAltCr
ed.user.set
This parameter overrides
the value set for
device.loginAltCred.user
using other configuration
methods like Phone
Menu, Web Config.
0 (default)
No
device.cfg device.loginAltCr
ed.password.set
This parameter overrides
the value set for
device.loginAltCred.pass
word using other
configuration methods like
Phone Menu, Web
Config.
0 (default)
No
Third-Party Servers
Polycom, Inc. 432

Device Parameters
Topics:
•Changing Device Parameters
•Device Parameters
The < device/ > parameters—also known as device settings—contain default values that you can use
to configure basic settings for multiple phones within your network.
Polycom provides a global device.set parameter that you must enable to install software and change
device parameters. In addition, each <device/> parameter has a corresponding .set parameter that
enables or disables the value for that device parameter. You need to enable the corresponding .set
parameter for each parameter you want to apply.
After you complete the software installation or configuration changes to device parameters, remove
device.set to prevent the phones from rebooting and triggering a reset of device parameters that
phone users might have changed after the initial installation.
If you configure any parameter values using the <device/> parameters, any subsequent configuration
changes you make from the Web Configuration Utility or phone local interface do not take effect after a
phone reboot or restart.
The <device/> parameters are designed to be stored in flash memory and for this reason, the phone
does not upload <device/> parameters to the <MAC>-web.cfg or <MAC>-phone.cfg override files
if you make configuration changes through the Web Configuration Utility or phone interface. This design
protects your ability to manage and access the phones using the standard set of parameters on a
provisioning server after the initial software installation.
Changing Device Parameters
Keep the following in mind when modifying device parameters:
• Note that some parameters may be ignored. For example, if DHCP is enabled, it will still override
the value set with device.net.ipAddress.
• Though individual parameters are checked to see whether they are in range, the interaction
between parameters is not checked. If a parameter is out of range, an error message displays in
the log file and the parameter is not be used.
• Incorrect configuration can put the phones into a reboot loop. For example, server A has a
configuration file that specifies that server B should be used, and server B has a configuration file
that specifies that server A should be used.
To detect errors, including IP address conflicts, Polycom recommends that you test the new configuration
files on two phones before initializing all phones.
Types of Device Parameters
The following table outlines the three types of <device/> parameters, their permitted values, and the
default value.
Polycom, Inc. 433
Types of Device Parameters
Template Parameter Permitted Values
Change Causes
Restart or Reboot
device.cfg
site.cfg
device.set 0 (default) -Do not use any
device.xxx fields to set any
parameters. Set this to 0 after the initial
software installation.
1 - Use the device.xxx fields that
have device.xxx.set=1. Set this
to 1 only for the initial software
installation.
Yes
device.cfg device.xxx string Yes
device.cfg device.xxx.set 0 (default) - Do not use the
device.xxx value.
1 - Use the device.xxx value.
For example, if
device.net.ipAddress.set=1,
then use the value set for
device.net.ipAddress.
Yes
Device Parameters
The following table lists each of the <device/> parameters that you can configure.
Note: The default values for the <device/> parameters are set at the factory when the phones are
shipped. For a list of the default values, see the latest Product Shipping Configuration Change
Notice at Polycom Engineering Advisories and Technical Notifications.
Device Parameters
Template Parameter Permitted Values
Change Causes
Restart or Reboot
device.cfg
site.cfg
device.auth.
localAdminPa
ssword
Set the phone's local administrative password.
The minimum length is defined by
sec.pwd.length.admin.
string (32 character max)
No
device.cfg
reg-
advanced
device.auth.
localUserPas
sword
Set the phone user's local password. The
minimum length is defined by
sec.pwd.length.user.
string (32 character max)
No
Device Parameters
Polycom, Inc. 434
Template Parameter Permitted Values
Change Causes
Restart or Reboot
device.cfg device.auxPo
rt.enable
Enable or disable the phone auxiliary port.
0
1 (default)
Yes
device.cfg device.baseP
rofile
NULL (default)
Generic —Sets the base profile to Generic for
OpenSIP environments.
Lync —Sets this Base Profile for Skype for
Business deployments.
SkypeUSB —Sets the Base Profile for
connecting the Polycom Trio solution to a
Microsoft Room System or a Microsoft Surface
Hub.
No
device.cfg
site.cfg
device.dhcp.
bootSrvOpt
When the boot server is set to Custom or
Custom+Option66, specify the numeric DHCP
option that the phone looks for.
Null
128 to 254
Yes
device.cfg
site.cfg
device.dhcp.
bootSrvOptTy
pe
Set the type of DHCP option the phone looks
for to find its provisioning server if
device.dhcp.bootSrvUseOpt is set
to Custom .
IP address—The IP address provided must
specify the format of the provisioning server.
String—The string provided must match one of
the formats specified by
device.prov.serverName .
Yes
Device Parameters
Polycom, Inc. 435

Template Parameter Permitted Values
Change Causes
Restart or Reboot
device.cfg
site.cfg
device.dhcp.
bootSrvUseOp
t
Default—The phone looks for option number
66 (string type) in the response received from
the DHCP server. The DHCP server should
send address information in option 66 that
matches one of the formats described for
device.prov.serverName .
Custom —The phone looks for the option
number specified by
device.dhcp.bootSrvOpt , and the
type specified by
device.dhcp.bootSrvOptType in the
response received from the DHCP server.
Static —The phone uses the boot server
configured through the provisioning server
device.prov.* parameters.
Custom and Default—The phone uses the
custom option first or use Option 66 if the
custom option is not present.
Yes
device.cfg
site.cfg
device.dhcp.
dhcpVlanDisc
Opt
Set the DHCP private option to use when
device.dhcp.dhcpVlanDiscUseOpt
is set to Custom .
128 to 254
Yes
device.cfg
site.cfg
device.dhcp.
dhcpVlanDisc
UseOpt
Set how VLAN Discovery occurs.
Disabled—no VLAN discovery through DHCP.
Fixed—use predefined DHCP vendor-specific
option values of 128, 144, 157 and 191
( device.dhcp.dhcpVlanDiscOpt is
ignored). Custom—use the number specified
by device.dhcp.dhcpVlanDiscOpt .
Yes
device.cfg
site.cfg
device.dhcp.
enabled
Enable or disable DHCP.
0
1
Yes
device.cfg
site.cfg
device.dhcp.
option60Type
Set the DHCP option 60 type.
Binary—vendor-identifying information is in the
format defined in RFC 3925.
ASCII—vendor-identifying information is in
ASCII format.
Yes
device.cfg
site.cfg
device.dns.a
ltSrvAddress
Set the secondary server to which the phone
directs domain name system (DNS) queries.
Server Address
Yes
Device Parameters
Polycom, Inc. 436

Template Parameter Permitted Values
Change Causes
Restart or Reboot
device.cfg
site.cfg
device.dns.d
omain
Set the phone's DNS domain.
String
Yes
device.cfg
site.cfg
device.dns.s
erverAddress
Set the primary server to which the phone
directs DNS queries.
Server Address
Yes
device.cfg
site.cfg
device.hostn
ame
Specify a hostname for the phone when using
DHCP by adding a hostname string to the
phone's configuration.
If device.host.hostname.set = 1,
and device.host.hostname = Null ,
the DHCP client uses Option 12 to send a
predefined hostname to the DHCP registration
server using Polycom_<MACaddress> .
String —The maximum length of the hostname
string is <=255 bytes, and the valid character
set is defined in RFC 1035.
Yes
device.cfg
site.cfg
device.net.c
dpEnabled
Determine if the phone attempts to determine
its VLAN ID and negotiate power through
CDP.
0
1
Yes
device.cfg
site.cfg
wireless.c
fg
device.net.d
ot1x.anonid
EAP-TTLS and EAP-FAST only. Set the
anonymous identity (user name) for 802.1X
authentication.
String
Yes
device.cfg
site.cfg
wireless.c
fg
device.net.d
ot1x.enabled
Enable or disable 802.1X authentication.
0
1
Yes
device.cfg
site.cfg
wireless.c
fg
device.net.d
ot1x.identit
y
Set the identity (user name) for 802.1X
authentication.
String
Yes
Device Parameters
Polycom, Inc. 437

Template Parameter Permitted Values
Change Causes
Restart or Reboot
device.cfg
site.cfg
wireless.c
fg
device.net.d
ot1x.method
Specify the 802.1X authentication method,
where EAP-NONE means no authentication.
EAP-None
EAP-TLS
EAP-PEAPv0-MSCHAPv2
EAP-PEAPv0-GTC
EAP-TTLS-MSCHAPv2
EAP-TTLS-GTC
EAP-FAST
EAP-MD5
No
device.cfg
site.cfg
wireless.c
fg
device.net.d
ot1x.passwor
d
Set the password for 802.1X authentication.
This parameter is required for all methods
except EAP-TLS.
String
Yes
device.cfg
site.cfg
device.net.e
therModeLAN
Set the LAN port mode that sets the network
speed over Ethernet.
Polycom recommends that you do not change
this setting.
Auto
10HD
10FD
100HD
100FD
1000FD
HD means half-duplex and FD means full
duplex.
Yes
device.cfg
site.cfg
device.net.e
therModePC
Set the PC port mode that sets the network
speed over Ethernet.
Auto (default)
Disabled—disables the PC port.
10HD
10FD
100HD
100FD
1000FD
HD means half-duplex and FD means full
duplex.
Yes
Device Parameters
Polycom, Inc. 438
Template Parameter Permitted Values
Change Causes
Restart or Reboot
device.cfg
site.cfg
device.net.e
therStormFil
ter
1—DoS storm prevention is enabled and
received Ethernet packets are filtered to
prevent TCP/IP stack overflow caused by bad
data or too much data.
0— DoS storm prevention is disabled.
Yes
device.cfg
site.cfg
device.net.e
therStormFil
terPpsValue
Set the corresponding packets per second
(pps) for storm filter and to control the
incoming network traffic.
17 to 40
38 (default)
No
device.cfg
site.cfg
device.net.e
therStormFil
terPpsValue.
set
0 (default) - You cannot configure the
device.net.etherStormFilterPpsV
alue parameter.
1 - You can configure the
device.net.etherStormFilterPpsV
alue parameter.
No
device.cfg
site.cfg
device.net.e
therVlanFilt
er
VLAN filtering for VVX phones is done by the
Linux operating system and it cannot be
disabled.
0
1
Yes
device.cfg device.net.i
pAddress
Set the phone's IP address.
This parameter is disabled when
device.dhcp.enabled is set to 1.
String
Yes
device.cfg
site.cfg
device.net.I
Pgateway
Set the phone's default router.
IP address
Yes
device.cfg
site.cfg
device.net.l
ldpEnabled
0—The phone doesn't attempt to determine its
VLAN ID.
1—The phone attempts to determine its VLAN
ID and negotiate power through LLDP.
Yes
device.cfg
site.cfg
device.net.l
ldpFastStart
Count
Specify the number of consecutive LLDP
packets the phone sends at the time of LLDP
discovery, which are sent every one second.
5 (default)
3 to 10
No
Device Parameters
Polycom, Inc. 439

Template Parameter Permitted Values
Change Causes
Restart or Reboot
device.cfg
site.cfg
device.net.s
ubnetMask
Set the phone's subnet mask.
This parameter is disabled when
device.dhcp.enabled is set to 1.
subnet mask
Yes
device.cfg
site.cfg
device.net.v
lanId
Set the phone's 802.1Q VLAN identifier.
Null—No VLAN tagging.
0 to 4094
Yes
device.cfg
site.cfg
device.prov.
maxRedunServ
ers
Set the maximum number of IP addresses to
use from the DNS.
1 - 8
Yes
device.cfg
site.cfg
device.prov.
password
Set the password for the phone to log in to the
provisioning server, which may not be
required.
If you modify this parameter, the phone re-
provisions. The phone may also reboot if the
configuration on the provisioning server has
changed.
string
Yes
device.cfg
site.cfg
device.prov.
redunAttempt
Limit
Set the maximum number of attempts to
attempt a file transfer before the transfer fails.
When multiple IP addresses are provided by
DNS, 1 attempt is considered to be a request
sent to each server.
1 to 10
Yes
device.cfg
site.cfg
device.prov.
redunInterAt
temptDelay
Set the number of seconds to wait after a file
transfer fails before retrying the transfer. When
multiple IP addresses are returned by DNS,
this delay only occurs after each IP has been
tried.
0 to 300
Yes
Device Parameters
Polycom, Inc. 440

Template Parameter Permitted Values
Change Causes
Restart or Reboot
device.cfg
site.cfg
device.prov.
serverName
Enter the IP address, domain name, or URL of
the provisioning server followed by an optional
directory and optional configuration filename.
This parameter is used if
( device.dhcp.enabled is 0 ), if the
DHCP server does not send a boot server
option, or if the boot server option is static
( device.dhcp.bootSrvUseOpt is
static ).
IP address
Domain name string
URL
If you modify this parameter, the phone re-
provisions. The phone also reboots if the
configuration on the provisioning server has
changed.
No
device.cfg
site.cfg
device.prov.
serverType
Set the protocol the phone uses to connect to
the provisioning server. Active FTP is not
supported for BootROM version 3.0 or later,
and only implicit FTPS is supported.
FTP (default)
TFTP
HTTP
HTTPS
FTPS
Yes
device.cfg
site.cfg
device.prov.
tagSerialNo
0—The phone's serial number (MAC address)
is not included in the User-Agent header of
HTTPS/HTTPS transfers and communications
to the microbrowser and web browser.
1— the phone's serial number is included.
No
device.cfg
site.cfg
device.prov.
upgradeServe
r
Specify the URL or path for a software version
to download to the device.
On the Web Configuration Utility, the path to
the software version you specify displays in
the drop-down list on the Software Upgrade
page.
NULL (default)
string
0 -255 characters
No
Device Parameters
Polycom, Inc. 441
Template Parameter Permitted Values
Change Causes
Restart or Reboot
device.cfg
site.cfg
device.prov.
user
The user name required for the phone to log in
to the provisioning server (if required).
If you modify this parameter, the phone re-
provisions, and it may reboot if the
configuration on the provisioning server has
changed.
string
No
device.cfg
site.cfg
device.prov.
ztpEnabled
Enable or disable Zero Touch Provisioning
(ZTP).
0
1
For information, see Zero-Touch Provisioning:
https://support.polycom.com/content/support/
North_America/USA/en/support/voice/
Zero_Touch_Provisioning/
zero_touch_provisioning_solution.html.
No
device.cfg
site.cfg
device.sec.c
onfigEncrypt
ion.key1
Set the configuration encryption key used to
encrypt configuration files.
string
For more information, see the
sectionConfiguration File Encryption.
Yes
device.cfg
site.cfg
device.sec.c
oreDumpEncry
ption.enable
d
Determine whether to encrypt the core dump
or bypass the encryption of the core dump.
0—encryption of the core dump is bypassed.
1 (default)—the core dump is encrypted
No
device.cfg
site.cfg
device.sec.T
LS.customCaC
ert1( TLS
Platform Profile
1 )
device.sec.T
LS.customCaC
ert2( TLS
Platform Profile
2 )
Set the custom certificate to use for TLS
Platform Profile 1 and TLS Platform Profile 2
and TLS Application Profile 1 and TLS
Application Profile 2. The parameter
device.sec.TLS.profile.caCertLi
st must be configured to use a custom
certificate. Custom CA certificate cannot
exceed 4096 bytes total size.
string
PEM format
No
Device Parameters
Polycom, Inc. 442
Template Parameter Permitted Values
Change Causes
Restart or Reboot
debug.cfg device.sec.T
LS.customDev
iceCert1.pri
vateKey
device.sec.T
LS.customDev
iceCert2.pri
vateKey
Enter the corresponding signed private key in
PEM format (X.509).
Size constraint: 4096 bytes for the private key.
No
debug.cfg device.sec.T
LS.customDev
iceCert1.pub
licCert
device.sec.T
LS.customDev
iceCert2.pub
licCert
Enter the signed custom device certificate in
PEM format (X.509).
Size constraint: 8192 bytes for the device
certificate.
No
device.cfg
site.cfg
device.sec.T
LS.customDev
iceCert1.set
device.sec.T
LS.customDev
iceCert2.set
Use to set the values for parameters
device.sec.TLS.customDeviceCert
X.publicCert and
device.sec.TLS.customDeviceCert
X.privateKey .
Size constraints are: 4096 bytes for the private
key, 8192 bytes for the device certificate.
0 (default)
1
No
device.cfg device.sec.T
LS.profile.c
aCertList1
( TLS Platform
Profile 1 )
device.sec.T
LS.profile.c
aCertList2
( TLS Platform
Profile 2 )
Choose the CA certificate(s) to use for TLS
Platform Profile 1 and TLS Platform Profile 2
authentication:
Builtin—The built-in default certificate
BuiltinAndPlatform—The built-in and Custom
#1 certificates
BuiltinAndPlatform2—The built-in and Custom
#2 certificates
All—Any certificate (built in, Custom #1 or
Custom #2)
Platform1—Only the Custom #1 certificate
Platform2—Only the Custom #2 certificate
Platform1AndPlatform2—Either the Custom
#1 or Custom #2 certificate
No
Device Parameters
Polycom, Inc. 443
Template Parameter Permitted Values
Change Causes
Restart or Reboot
device.cfg
site.cfg
device.sec.T
LS.profile.c
ipherSuite1
( TLS Platform
Profile 1 )
device.sec.T
LS.profile.c
ipherSuite2
( TLS Platform
Profile 2 )
Enter the cipher suites to use for TLS Platform
Profile 1 and TLS Platform Profile 2
string
No
device.cfg
site.cfg
device.sec.T
LS.profile.c
ipherSuiteDe
fault1 ( TLS
Platform Profile
1 )
device.sec.T
LS.profile.c
ipherSuiteDe
fault2 ( TLS
Platform Profile
2 )
Determine the cipher suite to use for TLS
Platform Profile 1 and TLS Platform profile 2.
0—The custom cipher suite is used.
1—The default cipher suite is used.
No
device.cfg
site.cfg
device.sec.T
LS.profile.d
eviceCert1
( TLS Platform
Profile 1 )
device.sec.T
LS.profile.d
eviceCert2
( TLS Platform
Profile 2 )
Choose the device certificate(s) for TLS
Platform Profile 1 and TLS Platform Profile 2
to use for authentication.
Builtin
Platform1
Platform2
No
device.cfg
site.cfg
device.sec.T
LS.profileSe
lection.dot1
x
Choose the TLS Platform Profile to use for
802.1X.
PlatformProfile1
PlatformProfile2
No
device.cfg
site.cfg
device.sec.T
LS.profileSe
lection.prov
isioning
Set the TLS Platform Profile to use for
provisioning.
PlatformProfile1
PlatformProfile2
Yes
Device Parameters
Polycom, Inc. 444
Template Parameter Permitted Values
Change Causes
Restart or Reboot
device.cfg
site.cfg
device.sec.T
LS.profileSe
lection.sysl
og
Set the TLS Platform Profile to use for syslog.
PlatformProfile1
PlatformProfile2
Yes
device.cfg
site.cfg
device.sec.T
LS.prov.stri
ctCertCommon
NameValidati
on
0
1 (default)—Provisioning server always
verifies the server certificate for the
commonName/SubjectAltName match
with the server hostname that the phone is
trying to connect.
No
device.cfg
site.cfg
device.sec.T
LS.syslog.st
rictCertComm
onNameValida
tion
0
1—Syslog always verifies the server certificate
for the commonName/SubjectAltName
match with the server hostname that the
phone is trying to connect.
No
device.cfg
site.cfg
device.sntp.
gmtOffset
Set the GMT offset—in seconds—to use for
daylight savings time, corresponding to -12 to
+13 hours.
-43200 to 46800
No
device.cfg
site.cfg
device.sntp.
gmtOffsetcit
yID
Sets the correct time zone location description
that displays on the phone menu and in the
Web Configuration Utility.
NULL (default)
0 to 126 (The maximum range for Polycom
Trio system is 127.)
For descriptions of all values, refer to Time
Zone Location Description.
No
device.cfg
site.cfg
device.sntp.
serverName
Enter the SNTP server from which the phone
obtains the current time.
IP address
Domain name string
No
device.cfg
site.cfg
device.syslo
g.facility
Determine a description of what generated the
log message.
0 to 23
For more information, see RFC 3164.
No
device.cfg
site.cfg
device.syslo
g.prependMac
0
1—The phone's MAC address is prepended to
the log message sent to the syslog server.
Yes
Device Parameters
Polycom, Inc. 445

Template Parameter Permitted Values
Change Causes
Restart or Reboot
device.cfg
site.cfg
device.syslo
g.renderLeve
l
Specify the logging level for the lowest
severity of events to log in the syslog. When
you choose a log level, the log includes all
events of an equal or greater severity level,
but it excludes events of a lower severity level.
0 or 1—SeverityDebug(7).
2 or 3—SeverityInformational(6).
4—SeverityError(3).
5—SeverityCritical(2).
6—SeverityEmergency(0).
Yes
device.cfg
site.cfg
device.syslo
g.serverName
Set the syslog server IP address or domain
name string.
IP address
Domain name string
No
device.cfg
site.cfg
device.syslo
g.transport
Set the transport protocol that the phone uses
to write to the syslog server.
None—Transmission is turned off but the
server address is preserved.
UDP
TCP
TLS
No
device.cfg
wireless.c
fg
device.wifi.
country
Enter the two-letter code for the country where
you are operating the Polycom Trio 8800
solution with Wi-Fi enabled.
NULL (default)
Two-letter country code
device.cfg
wireless.c
fg
device.wifi.
dhcpBootServ
er
0 (default)
1
2
V4
V6
Static
device.cfg
wireless.c
fg
device.wifi.
dhcpEnabled
Enable or disable DHCP for Wi-Fi.
0 (default)
1
Device Parameters
Polycom, Inc. 446
Template Parameter Permitted Values
Change Causes
Restart or Reboot
device.cfg
wireless.c
fg
device.wifi.
enabled
Enable or disable Wi-Fi.
0 (default)
1
device.cfg
wireless.c
fg
device.wifi.
ipAddress
Enter the IP address of the wireless device if
you are not using DHCP.
0.0.0.0 (default)
String
device.cfg
wireless.c
fg
device.wifi.
ipGateway
Enter the IP gateway address for the wireless
interface if not using DHCP.
0.0.0.0 (default)
String
device.cfg
wireless.c
fg
device.wifi.
psk.key
Enter the hexadecimal key or ASCII
passphrase.
0xFF (default)
String
device.cfg
wireless.c
fg
device.wifi.
radio.band2_
4GHz.enable
For use with the Polycom Trio 8800 system.
Enable or disable 2.4 GHz band for Wi-Fi.
0 (default)
1
device.cfg
wireless.c
fg
device.wifi.
radio.band5G
Hz.enable
For use with the Polycom Trio 8800 system.
Enable or disable the 5 GHz band for Wi-Fi.
0 (default)
1
device.cfg
wireless.c
fg
device.wifi.
securityMode
Specify the wireless security mode.
NULL (default)
None
WEP
WPA-PSK
WPA2-PSK
WPA2-Enterprise
device.cfg
wireless.c
fg
device.wifi.
ssid
Set the Service Set Identifier (SSID) of the
wireless network.
SSID1 (default)
SSID
Device Parameters
Polycom, Inc. 447
Template Parameter Permitted Values
Change Causes
Restart or Reboot
device.cfg
wireless.c
fg
device.wifi.
subnetMask
Set the network mask address of the wireless
device if not using DHCP.
255.0.0.0 (default)
String
device.cfg
wireless.c
fg
device.wifi.
wep.key
Set the length of the hexadecimal WEP key.
0 = 40-bits (default)
1 = 104-bits
device.cfg
wireless.c
fg
device.wifi.
wpa2Ent.caCe
rt.name
For use with the Polycom Trio 8800 system.
Specify the CA certificate for Wireless WPA2
Entrprise security. To use the default
certificate, set the value to Polycom 802.1X
Device Certificate.
NULL (default)
String (0 - 128 characters)
device.cfg
wireless.c
fg
device.wifi.
wpa2Ent.clie
ntCert.name
For use with the Polycom Trio 8800 system.
Specify the Client certificate for for Wireless
WPA2 Entrprise security. To use the default
certificate, set the value to Polycom 802.1X
Device Credential.
NULL (default)
String (0 - 128 characters)
device.cfg
wireless.c
fg
device.wifi.
wpa2Ent.meth
od
Set the Extensible Authentication Protocol
(EAP) to use for 802.1X authentication.
NULL (default)
EAP-PEAPv0/MSCHAPv2
EAP-FAST
EAP-TLS
EAP-PEAPv0-GTC
EAP-TTLS-MSCHAPv2
EAP-TTLS-GTC
EAP-PEAPv0-NONE
EAP-TTLS-NONE
EAP-PWD
device.cfg
wireless.c
fg
device.wifi.
wpa2Ent.pass
word
For use with the Polycom Trio 8800 system.
Enter the WPA2-Enterprise password.
Device Parameters
Polycom, Inc. 448

Template Parameter Permitted Values
Change Causes
Restart or Reboot
device.cfg
wireless.c
fg
device.wifi.
wpa2Ent.user
For use with the Polycom Trio 8800 system.
Enter the WPA2-Enterprise user name.
Device Parameters
Polycom, Inc. 449

Configuration Parameters
Topics:
•Quick Setup Soft Key Parameters
•Per-Registration Call Parameters
•Remote Packet Capture Parameters
•Per-Registration Dial Plan Parameters
•Local Contact Directory File Size Parameters
•Feature Activation/Deactivation Parameters
•HTTPD Web Server Parameters
•Home Screen Parameters
•Feature License Parameters
•Chord Parameters
•Message Waiting Parameters
•Ethernet Interface MTU Parameters
•Presence Parameters
•Provisioning Parameters
•Configuration Request Parameters
•General Security Parameters
•User Preferences Parameters
•Upgrade Parameters
•Voice Parameters
•Session Description Protocol (SDP) Parameters
•Web Configuration Utility Parameters
•XML Streaming Protocol Parameters
▪Session Headers
This section is a reference guide for configuration parameters available for UC Software features.
This section provides a description and permitted values of each configuration parameter.
Quick Setup Soft Key Parameters
The following table lists the parameters that configure Quick Setup soft key.
Polycom, Inc. 450
Quick Setup Soft Key Parameters
Template Parameter Permitted Values
Change Causes
Restart or Reboot
site.cfg prov.quickSetup.enab
led
0 (default) - Disables the quick setup
feature.
1 - Enables the quick setup feature.
No
Related Links
Test the Provisioning Settings on page 45
Per-Registration Call Parameters
Polycom phones support an optional per-registration feature that enables automatic call placement when
the phone is off-hook.
The phones also support a per-registration configuration that determines which events cause the missed-
calls counter to increment. You can enable/disable missed call tracking on a per-line basis.
In the following table, x is the registration number.
Per-Registration Call Parameters
Template Parameter Permitted Values
Change Causes
Restart or Reboot
sip-
interop.cfg
call.advancedM
issedCalls.add
ToReceivedList
Applies to calls on that are answered
remotely.
0 (default) - Calls answered from the
remote phone are not added to the
local receive call list.
1 - Calls answered from the remote
phone are added to the local
receive call list.
No
sip-
interop.cfg
call.advancedM
issedCalls.ena
bled
Use this parameter to improve call
handling.
1 (default) - Shared lines can correctly
count missed calls.
0 - Shared lines may not correctly
count missed calls.
No
sip-
interop.cfg
call.advancedM
issedCalls.rea
sonCodes
Enter a comma-separated list of
reason code indexes interpreted to
mean that a call should not be
considered as a missed call.
200 (default)
No
Configuration Parameters
Polycom, Inc. 451

Template Parameter Permitted Values
Change Causes
Restart or Reboot
reg-
advanced.cfg
call.autoAnswe
r.micMute
1 (default) - The microphone is initially
muted after a call is auto-answered.
0 - The microphone is active
immediately after a call is auto-
answered.
No
reg-
advanced.cfg
call.autoAnswe
r.ringClass
The ring class to use when a call is to
be automatically answered using the
auto-answer feature. If set to a ring
class with a type other than answer
or ring-answer , the setting are
overridden such that a ringtone of
visual (no ringer) applies.
ringAutoAnswer (default)
No
reg-
advanced.cfg
call.autoAnswe
r.ringTone
Intercom (default) – Auto answer
plays the intercom tone.
doubleBeep – Auto answer plays the
double-beep tone.
No
reg-
advanced.cfg
call.autoAnswe
r.SIP
This parameter cannot be used with
VVX 101, 150, or 201 phones.
0 (default) - Disable auto-answer for
SIP calls.
1 - Enable auto-answer for SIP calls.
No
reg-
advanced.cfg
call.autoAnswe
r.ringTone
Sets the auto-answer tone on the
phone.
intercom (default) – While auto
answering a call, phone plays an
intercom tone.
doubleBeep – Phone plays the double
beep tone.
No
featurescfg call.autoAnswe
rMenu.enable
1 (default) - The autoanswer menu
displays and is available to the user.
0 - The autoanswer menu is disabled
and is not available to the user.
No
sip-
interop.cfg
call.BlindTran
sferSpecialInt
erop
0 (default) - Do not wait for an
acknowledgment from the transferee
before ending the call.
1 - Wait for an acknowledgment from
the transferee before ending the call.
No
Configuration Parameters
Polycom, Inc. 452

Template Parameter Permitted Values
Change Causes
Restart or Reboot
sip-
interop.cfg
call.dialtoneT
imeOut
The time is seconds that a dial tone
plays before a call is dropped.
60 (default)
0 - The call is not dropped.
Yes
sip-
interop.cfg
call.internati
onalDialing.en
abled
Use this parameter to enable or
disable the key tap timer that converts
a double tap of the asterisk “*” symbol
to the “+” symbol used to indicate an
international call.
1 (default) - A quick double tap of “*”
converts immediately to “+”. To enter
a double asterisk “**”, tap “*” once and
wait for the key tap timer to expire to
enter a second “*”.
0 - You cannot dial”+” and you must
enter the international exit code of the
country you are calling from to make
international calls.
This parameter applies to all numeric
dial pads on the phone including for
example, the contact directory.
Yes
sip-
interop.cfg,
site.cfg
call.internati
onalPrefix.key
0 (default)
1
No
sip-
interop.cfg
call.localConf
erenceEnabled
1 (default) - The feature to join a
conference during an active call is
enabled and the Conference soft key
displays.
0 - The feature to join a conference
during an active call is disabled and
the Conference soft key does not
display. When you try to join the
Conference, an ‘Unavailable' message
displays.
Yes
sip-
interop.cfg
call.offeringT
imeOut
Specify a time in seconds that an
incoming call rings before the call is
dropped.
60 (default)
0 - No limit.
Note that the call diversion, no answer
feature takes precedence over this
feature when enabled.
Yes
Configuration Parameters
Polycom, Inc. 453
Template Parameter Permitted Values
Change Causes
Restart or Reboot
sip-
interop.cfg
call.playLocal
RingBackBefore
EarlyMediaArri
val
Determines whether the phone plays
a local ring-back after receiving a first
provisional response from the far end.
1 (default) - The phone plays a local
ringback after receiving the first
provisional response from the far end.
If early media is received later, the
phone stops the local ringback and
plays the early media.
0 - No local ringback plays, and the
phone plays only the early media
received.
No
sip-
interop.cfg
call.ringBackT
imeOut
Specify a time in seconds to allow an
outgoing call to remain in the ringback
state before dropping the call.
60 (default)
0 - No limit.
Yes
sip-
interop.cfg
call.showDialp
adOnProceeding
0 (default) – The phone does not
show the dialpad button while a
placed call is outgoing.
1 – The phone displays the dialpad
button while a placed call is outgoing.
No
sip-
interop.cfg,
site.cfg
call.stickyAut
oLineSeize
0 - Dialing through the call list uses
the line index for the previous call.
Dialing through the contact directory
uses a random line index.
1 - The phone uses sticky line seize
behavior. This helps with features that
need a second call object to work
with. The phone attempts to initiate a
new outgoing call on the same SIP
line that is currently in focus on the
LCD. Dialing through the call list when
there is no active call uses the line
index for the previous call. Dialing
through the call list when there is an
active call uses the current active call
line index. Dialing through the contact
directory uses the current active call
line index.
Yes
Configuration Parameters
Polycom, Inc. 454
Template Parameter Permitted Values
Change Causes
Restart or Reboot
sip-
interop.cfg,
site.cfg
call.stickyAut
oLineSeize.onH
ookDialing
0 (default)
If call.stickyAutoLineSeize
is set to 1, this parameter has no
effect. The regular
stickyAutoLineSeize behavior is
followed.
If call.stickyAutoLineSeize
is set to 0 and this parameter is set to
1, this overrides the
stickyAutoLineSeize behavior for hot
dial only. (Any new call scenario
seizes the next available line.)
If call.stickyAutoLineSeize
is set to 0 and this parameter is set to
0, there is no difference between hot
dial and new call scenarios.
A hot dial occurs on the line which is
currently in the call appearance. Any
new call scenario seizes the next
available line.
Yes
sip-
interop.cfg
call.switchToL
ocalRingbackWi
thoutRTP
Determines whether local ringback
plays in the event that early media
stops.
0 (default) – No ringback plays when
early media stops.
1 – The local ringback plays if no early
media is received.
No
site.cfg call.teluri.sh
owPrompt
1 (default) - Phone displays a pop-up
box to either call or cancel the number
when tel URI is executed.
0 - Phone does not display the pop-up
box.
No
sip-
interop.cfg
call.urlModeDi
aling
0 (default) - Disable URL dialing.
1 - Enable URL dialing.
Yes
Remote Packet Capture Parameters
Use these parameters to enable and set up the remote packet capture feature.
Configuration Parameters
Polycom, Inc. 455

Remote Packet Capture Parameters
Template Parameter Permitted Values
Change Causes
Restart or Reboot
features.cf
g
diags.dumpcore.enable
d
Determine whether the phone
generates a core file if it
crashes.
1 (default)
0
Yes
techsupport
.cfg
diags.pcap.enabled Enable or disable all on-board
packet capture features.
0 (default)
1
No
techsupport
.cfg
diags.pcap.remote.ena
bled
Enable or disable the remote
packet capture server.
0 (default)
1
No
techsupport
.cfg
diags.pcap.remote.pas
sword
Enter the remote packet
capture password.
<MAC Address> (default)
alphanumeric value
No
techsupport
.cfg
diags.pcap.remote.por
t
Specify the TLS profile to use
for each application.
2002 (default)
Valid TCP Port
No
Per-Registration Dial Plan Parameters
All of the parameters listed in the following table are per-registration parameters that you can configure
instead of the general equivalent dial plan parameters.
Note that the per-registration parameters override the general parameters where x is the registration
number, for example, dialplan.x.applyToTelUriDial overrides
dialplan.applyToTelUriDial for registration x.
Configuration Parameters
Polycom, Inc. 456

Per-Registration Dial Plan (Digit Map) Parameters
Template Parameter Permitted Values
Change Causes
Restart or Reboot
site.cfg dialplan.userDial.timeOut Specify the time in
seconds that the phone
waits before dialing a
number entered while the
phone is on hook.
Generic Base Profile
(default) – 0
Lync Base Profile
(default) – 4
0-99 seconds
0-99 seconds
You can apply
dialplan.userDia
l.timeOut only when
its value is lower than
up.IdleTimeOut .
No
site.cfg dialplan.x.applyToCallListDia
l
Generic Base Profile
(default) – 1
Lync Base Profile
(default) – 0
0 - The dial plan does not
apply to numbers dialed
from the received call list
or missed call list,
including sub-menus for
this line.
1 - The dial plan applies
to numbers dialed from
the received call list or
missed call list, including
sub-menus for this line.
Yes
Configuration Parameters
Polycom, Inc. 457

Template Parameter Permitted Values
Change Causes
Restart or Reboot
site.cfg dialplan.x.applyToDirectoryDi
al
Generic Base Profile
(default) – 1
Lync Base Profile
(default) – 0
Polycom Trio (default) - 0
0 - The dial plan is not
applied to numbers
dialed from the directory
or speed dial, including
auto-call contact
numbers for this line.
1 - The dial plan is
applied to numbers
dialed from the directory
or speed dial, including
auto-call contact
numbers for this line.
Yes
site.cfg dialplan.x.applyToForward Generic Base Profile
(default) – 1
Lync Base Profile
(default) – 0
Polycom Trio system
(default) - 0
0 - The dial plan applies
to forwarded calls for this
line.
1 - The dial plan applies
to forwarded calls for this
line.
No
site.cfg dialplan.x.applyToTelUriDial 0
1 (default)
Yes
site.cfg dialplan.x.applyToUserDial 0
1 (default)
Yes
site.cfg dialplan.x.applyToUserSend 0
1 (default)
Yes
Configuration Parameters
Polycom, Inc. 458

Template Parameter Permitted Values
Change Causes
Restart or Reboot
site.cfg dialplan.x.conflictMatchHandl
ing
Selects the dialplan
based on more than one
match with the least
timeout.
0 (default for Generic
Profile)
1 (default for Skype
Profile)
No
site.cfg dialplan.x.digitmap.timeOut Generic Base Profile
(default) – 0
Lync Base Profile
(default) – 4
Yes
site.cfg dialplan.x.digitmap Generic Base Profile
(default) - Null
Lync Base Profile
(default) - 4
string - max number of
characters 100
Yes
site.cfg dialplan.x.e911dialmask Null (default)
string - max number of
characters 256
No
site.cfg dialplan.x.e911dialstring Null (default)
string - max number of
characters 256
No
site.cfg dialplan.x.impossibleMatchHan
dling
0 (default) - Digits are
sent to the call server
immediately.
1 - A reorder tone is
played and the call is
canceled.
2 - No digits are sent to
the call server until the
Send or Dial key is
pressed.
3 - No digits are sent to
the call server until the
timeout is configured by
dialplan.X.impos
sibleMatchHandli
ng.timeOut
parameter.
Yes
Configuration Parameters
Polycom, Inc. 459

Template Parameter Permitted Values
Change Causes
Restart or Reboot
site.cfg dialplan.x.originaldigitmap Null (default)
string - max number of
characters 2560
No
site.cfg dialplan.x.removeEndOfDial 0
1 (default)
Yes
site.cfg dialplan.x.routing.emergency.
y.server.z
0 (default)
1
2
3
x, y, and z = 1 to 3
Yes
site.cfg dialplan.x.routing.emergency.
y.value
Null (default)
string - max number of
characters 64
Yes
site.cfg dialplan.x.routing.server.y.a
ddress
Null (default)
string - max number of
characters 256
Yes
site.cfg dialplan.x.routing.server.y.p
ort
5060 (default)
1 to 65535
Yes
site.cfg dialplan.x.routing.server.y.t
ransport
DNSnaptr (default)
TCPpreferred
UDPOnly
TLS
TCPOnly
Yes
Local Contact Directory File Size Parameters
The following table lists the parameters you can configure to set the size of the local contact directory.
The maximum local directory size is limited based on the amount of flash memory in the phone and varies
by phone model. Polycom recommends that you configure a provisioning server that allows uploads to
ensure a back-up copy of the directory when the phone reboots or loses power.
Note that on the VVX 1500, the local directory is by default stored in the phone's non-volatile device
settings and you have the option to use the phone's volatile RAM and set the maximum file size.
Configuration Parameters
Polycom, Inc. 460
Local Contact Directory File Size Parameters
Template Parameter Permitted Values
Change Causes
Restart or Reboot
debug.cfg dir.local.nonV
olatile.maxSiz
e
Set the maximum file size of the local
contact directory stored on the
phone's non-volatile memory.
VVX1500 = 100KB (default)
1 - 100KB
No
debug.cfg dir.local.vola
tile
0 (default) - The phone uses non-
volatile memory for the local contact
directory.
1 - Enables the use of volatile
memory for the local contact
directory.
No
debug.cfg dir.local.vola
tile.maxSize
Sets the maximum file size of the
local contact directory stored on the
phone's volatile memory.
VVX1500 = 200KB (default)
1 - 200KB
No
Parameter Elements for the Local Contact Directory
The following table describes each of the parameter elements and permitted values that you can use in
the local contact directory.
Local Contact Directory Parameter Elements
Element Definition Permitted Values
fn The contact's first
name.
UTF-8 encoded string of up to 40 bytes1
ln The contact's last
name.
UTF-8 encoded string of up to 40 bytes1
Configuration Parameters
Polycom, Inc. 461

Element Definition Permitted Values
ct Contact, Used by the
phone to address a
remote party in the
same way that a string
of digits or a SIP URL
are dialed manually by
the user. This element
is also used to
associate incoming
callers with a particular
directory entry. The
maximum field length
is 128 characters.
Note: This field cannot
be null or duplicated
UTF-8 encoded string containing digits (the user part of a SIP
URL) or a string that constitutes a valid SIP URL
sd Speed Dial Index,
Associates a particular
entry with a speed dial
key for one-touch
dialing or dialing.
VVX=Null, 1 to 9999
Polycom Trio=20
lb The label for the
contact. The label of a
contact directory item
is by default the label
attribute of the item. If
the label attribute does
not exist or is Null,
then the first and last
names form the label.
A space is added
between first and last
names.
UTF-8 encoded string of up to 40 bytes1
pt Protocol,
The protocol to use
when placing a call to
this contact.
SIP or Unspecified
rt Ring Tone,
When incoming calls
match a directory
entry, this field
specifies the ringtone
to be used.
Null, 1 to 21
Configuration Parameters
Polycom, Inc. 462
Element Definition Permitted Values
dc Divert Contact,
The address to forward
calls to if the Auto
Divert feature is
enabled.
UTF-8 encoded string containing digits (the user part of a SIP
URL) or a string that constitutes a valid SIP URL
ad Auto Divert,
If set to 1, callers that
match the directory
entry are diverted to
the address specified
for the divert contact
element.
Note: If auto-divert is
enabled, it has
precedence over auto-
reject.
0 or 1
ar Auto Reject,
If set to 1, callers that
match the directory
entry specified for the
auto reject element are
rejected.
Note: If auto divert is
also enabled, it has
precedence over auto
reject.
0 or 1
bw Buddy Watching,
If set to 1, this contact
is added to the list of
watched phones.
0 or 1
bb Buddy Block,
If set to 1, this contact
is blocked from
watching this phone.
0 or 1
up User Photo
The contact's photo
icon.
1-24
Related Links
Example: Set Icons for Speed Dial Contacts on page 252
Configuration Parameters
Polycom, Inc. 463

Feature Activation/Deactivation Parameters
The feature parameters listed in the following table control the activation or deactivation of a feature at
run time.
Feature Activation/Deactivation Parameters
Template Parameter Permitted Values
Change Causes
Restart or Reboot
feature
s.cfg
feature.callCen
terCallInformat
ion.enable
1 (default) - The phone displays a full-
screen popup showing call information
details. The popup closes after 40
seconds or you can press the Exit
button to close it and return to the active
call screen. You can set how long the
popup displays using the parameter
up.idleTimeout.
0 - The phone uses the active call
screen and ACD call information is not
available.
No
feature
s.cfg
feature.callCen
terStatus.enabl
ed
0 (default) - Disable the status event
threshold capability.
1 - Enable the status event threshold
capability to display at the top of the
phone screen.
No
feature
s.cfg
feature.enhance
dCallDisplay.en
abled
0 (default) - The phone displays the
protocol at the end of the called party
identification (for example, 1234567
[SIP]).
1 - The phone displays the number only
(for example, 1234567).
No
feature
s.cfg
feature.flexibl
eLineKey.enable
0 (default) - Disables the Flexible Line
Key feature.
1 - Enables the Flexible Line Key
feature.
Not available for the VVX 101, 150,
201, or 1500 business media phones.
No
feature
s.cfg
feature.ringDow
nload.enabled
1 (default) - The phone downloads
ringtones when starting up.
0 - The phone does not download
ringtones when starting up.
Yes
Configuration Parameters
Polycom, Inc. 464

Template Parameter Permitted Values
Change Causes
Restart or Reboot
feature
s.cfg
feature.uniqueC
allLabeling.ena
bled
0 (default) - Disable Unique Call
Labeling.
1 - Enable Unique Call Labeling. Use
reg.x.line.y.label to define
unique labels.
Yes
feature
s.cfg
feature.urlDial
ing.enabled
1 (default) - URL/name dialing is
available from private lines, and
unknown callers are identified on the
display by their phone's IP address.
0 - URL/name dialing is not available.
No
feature
s.cfg
feature.usb.dev
ice.enabled
The USB device port enables you to
use Polycom Trio 8800 and 8500
system as an audio device for your
laptop.
1 (default) - Enable the USB device
port.
0 - Disable the USB device port.
When you disable the Polycom Trio
system's USB device port using the
parameter
feature.usb.device.enabled
, the USB Connections settings do not
display on the phone menu at Settings
> Advanced > Administration Settings >
USB Computer Connections.
No
feature
s.cfg
feature.usb.hos
t.enabled
1 (default) Enable the USB host port on
the Polycom Trio 8800 and 8500
system.
0 - Disable the USB host port on the
Polycom Trio 8800 and 8500 system.
Use the host port for memory sticks,
mouse, keyboards, and charging your
devices.
No
feature
s.cfg
reg.x.urlDialin
g.enabled
1 (default) - Enable dialing by URL for
SIP registrations.
0 - Disable dialing by URL for SIP
registrations.
HTTPD Web Server Parameters
The phone contains a local Web Configuration Utility server for user and administrator features.
Configuration Parameters
Polycom, Inc. 465

Note that several of these parameters can be used with Microsoft Skype for Business Server and the
parameter values listed in the table Enable Web Configuration Utility have two default states: a generic
default value for UC Software 5.1.0 and a different value when the phone is registered with Skype for
Business Server. The following table lists the default values for both states where applicable.
The web server supports both basic and digest authentication. The authentication user name and
password are not configurable for this release.
HTTPD Web Server Parameters
Template Parameter Permitted Values
Change Causes
Restart or Reboot
site.cfg httpd.enabled Base Profile = Generic
1 (default) - The web server is
enabled.
0 - The web server is disabled.
Base Profile = Skype
0 (default) - The web server is
disabled.
1 - The web server is enabled.
Yes
site.cfg httpd.cfg.enabled Base Profile = Generic
1 (default) - The Web
Configuration Utility is enabled.
0 - The Web Configuration
Utility is disabled.
Base Profile = Skype
0 (default) - The Web
Configuration Utility is
disabled.
1 - The Web Configuration
Utility is enabled.
Yes
site.cfg httpd.cfg.port Port is 80 for HTTP servers.
Take care when choosing an
alternate port.
80 (default)
1 to 65535
Yes
site.cfg httpd.cfg.secureTunn
elPort
The port to use for
communications when the
secure tunnel is used.
443 (default)
1 to 65535
Yes
Configuration Parameters
Polycom, Inc. 466
Template Parameter Permitted Values
Change Causes
Restart or Reboot
site.cfg httpd.cfg.secureTunn
elRequired
1 (default) - Access to the Web
Configuration Utility is allowed
only over a secure tunnel
(HTTPS) and non-secure
(HTTP) is not allowed.
0 - Access to the Web
Configuration Utility is allowed
over both a secure tunnel
(HTTPS) and non-secure
(HTTP).
Yes
Home Screen Parameters
The following table lists parameters that configure the phone's Home screen display.
Home Screen Parameters
Template Parameter Permitted Values
Change Causes
Restart or Reboot
features.cfg homeScreen.applicati
on.enable
1 (default) - Enable display of
the Applications icon on the
phone Home screen.
0 - Enable display of the
Applications icon on the phone
Home screen.
No
features.cfg homeScreen.calendar.
enable
1 (default) - Enable display of
the Calendar icon on the
phone Home screen.
0 - Disable display of the
Calendar icon on the phone
Home screen.
No
homeScreen.diagnosti
cs.enable
0 (default) - A Diagnostics icon
does not show on the Home
screen.
1 - A Diagnostics icon shows
on the Home screen to provide
quick access to the
Diagnostics menu.
No
Configuration Parameters
Polycom, Inc. 467

Template Parameter Permitted Values
Change Causes
Restart or Reboot
features.cfg homeScreen.directori
es.enable
1 (default) - Enable display of
the Directories menu icon on
the phone Home screen.
0 - Disable display of the
Directories menu icon on the
phone Home screen.
No
features.cfg homeScreen.doNotDist
urb.enable
1 (default) - VVX
0 (default) - Polycom Trio
1 - Enable display of the DND
icon on the phone Home
screen.
0 - Disable display of the DND
icon on the phone Home
screen.
No
features.cfg homeScreen.forward.e
nable
1 (default) - Enable display of
the call forward icon on the
phone Home screen.
0 - Disable display of the call
forward icon on the phone
Home screen.
No
features.cfg homeScreen.messages.
enable
1 (default) - Enable display of
the Messages menu icon on
the phone Home screen.
0 - Disable display of the
Messages menu icon on the
phone Home screen.
No
features.cfg homeScreen.newCall.e
nable
1 (default) - Enable display of
the New Call icon on the
phone Home screen.
0 - Disable display of the New
Call icon on the phone Home
screen.
No
Configuration Parameters
Polycom, Inc. 468
Template Parameter Permitted Values
Change Causes
Restart or Reboot
homeScreen.present.e
nable
Control whether the Content
icon displays on the Polycom
Trio system Home screen
when Content Sharing is
enabled and the system is
paired with a Polycom Trio
Visual+, Trio VisualPro, or
RealPresence Group Series
system.
1 (default)
0
No
features.cfg homeScreen.redial.en
able
1 (default) - VVX
0 (default) - Polycom Trio
1 - Enable display of the Redial
menu icon on the phone Home
screen.
0 - Disable display of the
Redial menu icon on the phone
Home screen.
No
features.cfg homeScreen.settings.
enable
1 (default) - Enable display of
the Settings menu icon on the
phone Home screen.
0 - Disable display of the
Settings menu icon on the
phone Home screen.
No
Feature License Parameters
The parameters listed in the next table enable you to configure the feature licensing system.
Once the license is installed on a phone, it cannot be removed.
Feature License Parameters
Template Parameter Permitted Values
Change Causes
Restart or Reboot
site.cfg license.polling.tim
e
Specifies the time (using the 24-
hour clock) to check if the license
has expired.
02:00 (default
00:00 - 23:59
Yes
Configuration Parameters
Polycom, Inc. 469

Chord Parameters
Chord-sets are the sound effect building blocks that use synthesized audio instead of sampled audio.
Most call progress and ringer sound effects are synthesized. A chord-set is a multi-frequency note with an
optional on/off cadence, and can contain up to four frequency components generated simultaneously,
each with its own level.
Three chord sets are supported: callProg , misc , and ringer . Each chord set has different chord
names, represented by x in the following table.
For callProg , x can be one of the following chords:
dialTone, busyTone, ringback, reorder, stutter_3, callWaiting,
callWaitingLong, howler, recWarning, stutterLong, intercom, callWaitingLong,
precedenceCallWaiting, preemption, precedenceRingback, or spare1 to spare6.
For misc , x can be one of the following chords:
•spare1 to spare9
For ringer , x can be one of the following chords:
•ringback, originalLow, originalHigh , or spare1 to spare19
Chord Parameters
Template Parameter Permitted Values
Change Causes
Restart or Reboot
region.
cfg
tone.chord.callProg
.x.freq.y
tone.chord.misc.x.f
req.y
tone.chord.ringer.x
.freq.y
Frequency (in Hertz) for component y.
Up to six chord-set components can
be specified (y=1 to 6).
0-1600
0-1600
0-1600
No
region.
cfg
tone.chord.callProg
.x.level.y
tone.chord.misc.x.l
evel.y
tone.chord.ringer.x
.level.y
Level of component y in dBm0. Up to
six chord-set components can be
specified (y=1 to 6).
-57 to 3
-57 to 3
-57 to 3
No
region.
cfg
tone.chord.callProg
.x.onDur
tone.chord.misc.x.o
nDur
tone.chord.ringer.x
.onDur
On duration (length of time to play
each component) in milliseconds.
0=infinite
positive integer
positive integer
positive integer
No
Configuration Parameters
Polycom, Inc. 470
Template Parameter Permitted Values
Change Causes
Restart or Reboot
region.
cfg
tone.chord.callProg
.x.offDur
tone.chord.misc.x.o
ffDur
tone.chord.ringer.x
.offDur
Off duration (the length of silence
between each chord component) in
milliseconds
0=infinite
positive integer
positive integer
positive integer
No
region.
cfg
tone.chord.callProg
.x.repeat
tone.chord.misc.x.r
epeat
tone.chord.ringer.x
.repeat
Number of times each ON/OFF
cadence is repeated.
0=infinite
positive integer
positive integer
positive integer
No
Message Waiting Parameters
The next table lists parameters you can use to configure the message-waiting feature, which is supported
on a per-registration basis.
The maximum number of registrations (x) for each phone model is listed in the table Flexible Call
Appearances under the column Registrations.
Message Waiting Parameters
Template Parameter Permitted Values
Change Causes
Restart or Reboot
sip-
interop.
cfg
msg.bypassInsta
ntMessage
0 (default) -Displays the menus
Message Center and Instant Messages
on pressing Messages or MSG key.
1 - Bypasses these menus and goes to
voicemail.
No
Configuration Parameters
Polycom, Inc. 471

Template Parameter Permitted Values
Change Causes
Restart or Reboot
sip-
interop.
cfg
msg.mwi.x.led 0 (default) - Red MWI LED does not
flash when there are new unread
messages for the selected line.
1 - The LED flashes as long as there
are new unread voicemail messages
for any line in which this is parameter is
enabled.
for VVX phones, the default value is 0.
For Polycom Trio systems, the default
value is 1.
Also, x is an integer referring to the
registration indexed by reg.x.
No
Ethernet Interface MTU Parameters
The parameters listed in this section control the Ethernet interface maximum transmission unit (MTU) on
all VVX phones.
Ethernet Interface MTU Parameters
Template Parameter Permitted Values
Change Causes
Restart or Reboot
site.cf
g
net.interface.mt
u
Configures the Ethernet or Wi-Fi
interface maximum transmission unit
(MTU) on VVX phones and Polycom
Trio system.
1496 (default)
800 - 1500
This parameter affects the LAN port
and the PC port.
No
site.cf
g
net.interface.mt
u6
Specifies the MTU range for IPv6.
1500 (default)
1280 - 1500
No
Configuration Parameters
Polycom, Inc. 472
Template Parameter Permitted Values
Change Causes
Restart or Reboot
sip-
interop
.cfg
net.lldp.extened
Discovery
Specifies the duration of time that
LLDP discovery continues after
sending the number of packets defined
by the parameter
lldpFastStartCount .
0 (default)
0 - 3600
The LLDP packets are sent every 5
seconds during this extended discovery
period.
No
Presence Parameters
The next table lists parameters you can configure for the presence feature.
Note that the parameter pres.reg is the line number used to send SUBSCRIBE. If this parameter is
missing, the phone uses the primary line to send SUBSCRIBE.
Presence Parameters
Template Parameter Permitted Values
Change Causes
Restart or Reboot
feature
s.cfg
pres.idleTimeou
toffHours.enabl
ed
1 (default) - Enables the off hours idle
timeout feature.
0 - Disables the off hours idle timeout
feature.
No
debug.c
fg
pres.idleTimeou
toffHours.perio
d
The number of minutes to wait while the
phone is idle during off hours before
showing the Away presence status.
15 (default)
1 - 600
feature
s.cfg
pres.idleTimeou
t.officeHours.e
nabled
1 (default) - Enables the office hours
idle timeout feature
0 - Disables the office hours idle timeout
feature
No
debug.c
fg
pres.idleTimeou
t.officeHours.p
eriods
The number of minutes to wait while the
phone is idle during office hours before
showing the Away presence status
15 (default)
1 - 600
Configuration Parameters
Polycom, Inc. 473

Provisioning Parameters
The parameters listed in the next table control the provisioning server system for your phones.
Provisioning Parameters
Template Parameter Permitted Values
Change Causes
Restart or Reboot
site.cf
g
prov.autoConfigU
pload.enabled
1 (default) - Enables the automatic
upload of configuration files from the
phone or Web configuration utility to the
provisioning server.
0 - Disabled the automatic upload of
configuration files from the phone or
Web configuration utility to the
provisioning server.
No
site.cf
g
prov.configUploa
dPath
Specifies the directory path where the
phone uploads the current configuration
file.
Null (default)
String
No
site.cfg prov.eula.accept
ed
0 (default) - Accept manually the product
EULA agreement on Polycom Trio 8800
system at the initial startup.
1 - The EULA agreement is
automatically accepted Polycom Trio
8800 system at the initial startup.
No
site.cf
g
prov.login.lcCac
he.domain
The user's domain name to sign-in.
Null (default)
String
No
site.cf
g
prov.login.lcCac
he.user
The user's sign-in name to login.
Null (default)
String
No
site.cf
g
prov.login.passw
ord.encodingMode
The default encoding mode for the text
in the Password field on the User Login
screen.
123 (default)
Alphanumeric
No
Configuration Parameters
Polycom, Inc. 474
Template Parameter Permitted Values
Change Causes
Restart or Reboot
site.cf
g
prov.login.userI
d.encodingMode
The default encoding mode for the text
in the User ID field on User Login
screen.
Abc (default)
Alphanumeric
No
region.
cfg
prov.loginCredPw
dFlushed.enabled
1 (default) - Resets the password field
when the user logs in or logs out.
0 - Does not reset the password field
when the user logs in or logs out.
No
site.cf
g
prov.startupChec
k.enabled
1 (default) - The phone is provisioned on
startup.
0 - The phone is not provisioned on
startup.
No
site.cf
g
prov.quickSetup.
limitServerDetai
ls
0 (default) - Provide all the necessary
details for the given fields.
1 - Enter only the user name and
password fields. Other details are taken
from ztp/dhcp (option66).
No
Configuration Request Parameters
The parameters listed in the following table configure the phone's behavior when a request for restart or
reconfiguration is received.
Configuration Request Parameters
Template Parameter Permitted Values
Change Causes
Restart or Reboot
sip-
interop.cfg
request.delay
.type
Specifies whether the phone should restart
or reconfigure.
call (default) - The request will be executed
when there are no calls.
audio - The request will be executed when
there is no active audio.
Yes
General Security Parameters
The parameters listed in the next table configure security features of the phone.
Configuration Parameters
Polycom, Inc. 475
.
General Security Parameters
Template Parameter Permitted Values
Change Causes
Restart or Reboot
site.cf
g
sec.tagSerial
No
0 (default) - The phone does not display
the serial number.
1 - The phone displays the serial number
through protocol signaling.
Yes
site.cf
g
sec.uploadDev
ice.privateKe
y
0 (default) - While generating the
Certificate Signing Request from the
phone, the device private key is not
uploaded to provisioning server.
1 - The device private key is uploaded to
provisioning server along with the CSR.
No
DHCP Parameters
Enables you to configure how the phone reacts to DHCP changes.
DHCP Parameters
Template Parameter Permitted Values
Change Causes
Restart or Reboot
site.cf
g
tcpIpApp.dhcp.relea
seOnLinkRecovery
Specifies whether or not a DHCP
release occurs.
1 (default) - Performs a DHCP
release after the loss and recovery of
the network.
0 - No DHCP release occurs.
No
Domain Name System (DNS) Parameters
Allows you to set Domain Name System (DNS).
However, values set using DHCP have a higher priority, and values set using the <device/> parameter in
a configuration file have a lower priority.
Configuration Parameters
Polycom, Inc. 476
Domain Name System (DNS) Parameters
Template Parameter Permitted Values
Change Causes
Restart or Reboot
site.cf
g
tcpIpApp.dns.server Phone directs DNS queries to this
primary server.
NULL (default)
IP address
Yes
site.cf
g
tcpIpApp.dns.altSer
ver
Phone directs DNS queries to this
secondary server.
NULL (default)
IP address
Yes
site.cf
g
tcpIpApp.dns.domain Specifies the DNS domain for the
phone.
NULL (default)
String
Yes
TCP Keep-Alive Parameters
Allows you to configure TCP keep-alive on SIP TLS connections; the phone can detect a failure quickly
(in minutes) and attempt to re-register with the SIP call server (or its redundant pair).
TCP Keep-Alive Parameters
Template Parameter Permitted Values
Change Causes
Restart or Reboot
site.cf
g
tcpIpApp.keepalive.
tcp.idleTransmitInt
erval
Specifies the amount of time to wait
(in seconds) before sending the keep-
alive message to the call server.
Range is 10 to 7200.
30 (Default)
If this parameter is set to a value that
is out of range, the default value is
used.
On VVX phones and the
SoundStructure VoIP interface,
specifies the number of seconds TCP
waits between transmission of the last
data packet and the first keep-alive
message.
No
Configuration Parameters
Polycom, Inc. 477
Template Parameter Permitted Values
Change Causes
Restart or Reboot
site.cf
g
tcpIpApp.keepalive.
tcp.noResponseTrans
mitInterval
Specifies the amount of idle time
between the transmission of the
keep-alive packets the TCP stack
waits on VVX phones and the
SoundStructure VoIP interface. This
applies whether or not the last keep-
alive was acknowledged.
If no response is received to a keep-
alive message, subsequent keep-
alive messages are sent to the call
server at this interval (every x
seconds). Range is 5 to 120.
No
site.cf
g
tcpIpApp.keepalive.
tcp.sip.persistentC
onnection.enable1
Specifies whether the TCP socket
connection remains open or closes.
0 (Default) - The TCP socket opens a
new connection when the phone tries
to send any new SIP message and
closes after one minute.
1 - The TCP socket connection
remains open.
Yes
site.cf
g
tcpIpApp.keepalive.
tcp.sip.tls.enable
Specifies whether to disable or
enable TCP keep-alive for SIP
signaling connections.
0 (Default) - Disables TCP keep-alive
for SIP signaling connections that use
TLS transport.
1 - Enables TCP keep-alive for SIP
signaling connections that use TLS
transport.
No
File Transfer Parameters
Allows you to configure file transfers from the phone to the provisioning server.
Configuration Parameters
Polycom, Inc. 478
File Transfer Parameters
Template Parameter Permitted Values
Change Causes
Restart or Reboot
site.cf
g
tcpIpApp.fileTransf
er.waitForLinkIfDow
n
Specifies whether a file transfer from
the FTP server is delayed or not
attempted.
1 (Default) - File transfer from the
FTP server is delayed until Ethernet
comes back up.
0 - File transfer from the FTP server
is not attempted.
No
User Preferences Parameters
Sets phone user preferences.
User Preferences Parameters
Templat
e Parameter Permitted Values
Change Causes
Restart or Reboot
featur
es.cfg
up.25mm Specifies whether to use a mobile phone or a
PC to connect to the 2.5mm audio port on a
conference phone.
1 (Default) - Mobile phone
2 - PC
No
featur
es.cfg
up.accessibilityF
eatures
Specifies whether to display accessibility
features or not.
0 (Default) - Accessibility features are
disabled.
1 - Screen background flashes orange for
incoming calls.
For VVX 1500 only.
No
Configuration Parameters
Polycom, Inc. 479

Templat
eParameter Permitted Values
Change Causes
Restart or Reboot
featur
es.cfg
up.backlight.idle
Intensity
Brightness of the LCD backlight when the
phone is idle. Range is 0 to 3.
1 (Default) - Low
0
2 - Medium
3 - High
VVX 300/301/310/311 = 0, 1, 2, 3
All other phones = 1, 2, 3
If this setting is higher than active backlight
brightness ( onIntensity ), the active
backlight brightness is used.
No
featur
es.cfg
up.backlight.onIn
tensity
Brightness of the LCD backlight when the
phone is active (in use). Range is 0 to 3.
3 (Default) - High
1 - Low
2 - Medium
VVX 300/301/310/311 = 0, 1, 2, 3
All other phones = 1, 2, 3
No
featur
es.cfg
up.backlight.time
out
Number of seconds to wait before the
backlight dims from the active intensity to the
idle intensity. Range is 5 to 60.
40 (default)
No
featur
es.cfg
up.basicSettings.
networkConfigEnab
led
Specifies whether Network Configuration is
shown or not shown under the Basic
Settings menu.
0 (default) - Network Configuration is not
shown under Basic Settings.
1 - Basic Settings menu shows Network
Configuration with configurable network
options for the user without administrator
rights.
No
featur
es.cfg
up.DIDFormat NumberAndExtension (default) – Display the
DID number and extension.
NumberOnly – Display the DID number on the
phone screen.
No
Configuration Parameters
Polycom, Inc. 480

Templat
eParameter Permitted Values
Change Causes
Restart or Reboot
featur
es.cfg
up.cfgWarningsEna
bled
Specifies whether a warning displays on a
phone or not.
0 (Default) - Warning does not display.
1 - Warning is displayed on the phone if it is
configured with pre-UC Software 3.3.0
parameters.
No
featur
e.cfg
up.formatPhoneNum
bers
Enable or disable automatic number
formatting.
1 (Default)
0
No
featur
es.cfg
up.hearingAidComp
atibility.enabled
Specifies whether audio Rx equalization is
enabled or disabled.
0 (Default) - Audio Rx equalization is enabled.
1 - Phone audio Rx (receive) equalization is
disabled for hearing aid compatibility.
No
featur
es.cfg
up.idleBrowser.en
abled
Specifies if the idle browser is enabled or
disabled.
0 (Default) - Idle browser is disabled.
1 - Idle browser is enabled.
If the parameter
up.prioritizeBackgroundMenuIte
m.enabled is set to 1, displays the
background or the idle browser on the phone
menu.
No
featur
es.cfg
up.idleStateView Sets the phone default view.
0 (Default) - Call/line view is the default view.
1 - Home screen is the default view.
Yes
sip-
intero
p.cfg
up.idleTimeout Set the number of seconds that the phone is
idle for before automatically leaving a menu
and showing the idle display.
During a call, the phone returns to the Call
screen after the idle timeout.
40 seconds (default)
0 to 65535 seconds
Yes
Configuration Parameters
Polycom, Inc. 481

Templat
eParameter Permitted Values
Change Causes
Restart or Reboot
featur
es.cfg
up.IdleViewPrefer
enceRemoteCalls
Determines when the phone displays the idle
browser.
0 (Default) - Phone with only remote calls
active, such as on a BLF monitored line, is
treated as in the idle state and the idle
browser displays.
1 - Phone with only remote calls active, such
as on a BLF monitored line, is treated as in
the active state and the idle browser does not
display.
Yes
sip-
intero
p.cfg
up.lineKeyCallTer
minate
Specifies whether or not you can press the
line key to end an active call.
0 (Default) - User cannot end an active call by
pressing the line key.
1 - User can press a line key to end an active
call.
No
sip-
intero
p.cfg
up.numberFirstCID Specifies what is displayed first on the Caller
ID display.
0 (Default) - Caller ID display shows the
caller's name first.
1 - Caller's phone number is shown first.
Yes
featur
es.cfg
up.numOfDisplayCo
lumns
Sets the maximum number of columns the
VVX 500/501, 600/601, or Polycom Trio
solution display. Set the maximum number of
columns that phones display. Range is 0 to 4.
VVX 500/501 = 3 (Default)
VVX 600/601 = 4 (Default)
Polycom Trio=3 (Default)
0 - Phones display one column.
Yes
featur
es.cfg
up.osdIncomingCal
l.Enabled
Specifies whether or not to display full screen
popup or OSD for incoming calls.
1 (Default) - Full screen popup or OSD for
incoming calls displays.
0 - Full screen popup or OSD for incoming
calls does not display.
No
Configuration Parameters
Polycom, Inc. 482

Templat
eParameter Permitted Values
Change Causes
Restart or Reboot
sip-
intero
p.cfg
up.prioritizeBack
groundMenuItem.en
abled
User can choose whether or not the phone
background should take priority over the idle
browser.
1 (Default) - If
up.idleBrowser.enabled is set to 1,
this parameter can be set to 1 to display a
Prioritize Background menu to the user.
Yes
featur
es.cfg
up.rebootSoundEna
bled
1 (default) – Enable a sound effect alert when
the phone reboots.
0 – Disable a sound effect alert when the
phone reboots.
No
site.c
fg
up.ringer.minimum
Volume
Configure the minimum ringer volume. This
parameter defines how many volume steps
are accessible below the maximum level by
the user.
16 (Default) - Full 16 steps of volume range
are accessible.
0 - Ring volume is not adjustable by the user
and the phone uses maximum ring volume.
Example: Upon bootup, the volume is set to ½
the number of configured steps below the
maximum (16). If the parameter is set to 8 on
bootup, the ringer volume is set to 4 steps
below maximum.
No
featur
es.cfg
up.screenSaver.en
abled
0 (Default) - Screen saver feature is disabled.
1 - Screen saver feature is enabled. If a USB
flash drive containing images is connected to
the phone, and the idle browser is not
configured, a slide show cycles through the
images from the USB flash drive when the
screen saver feature is enabled.
The images must be stored in the directory on
the flash drive specified by
up.pictureFrame.folder. The screen saver
displays when the phone has been in the idle
state for the amount of time specified by
up.screenSaver.waitTime.
No
Configuration Parameters
Polycom, Inc. 483
Templat
eParameter Permitted Values
Change Causes
Restart or Reboot
featur
es.cfg
up.screenSaver.ty
pe
Choose the type of screen saver to display.
0 (Default) - Phone screen saver displays
default images.
2 - Phone screen saver displays the idle
browser.
You can use this parameter with the VVX 300
and 400 series phones.
No
featur
es.cfg
up.screenSaver.wa
itTime
Number of minutes that the phone waits in the
idle state before the screen saver starts.
Range is 1 to 9999 minutes.
15 (Default)
No
featur
es.cfg
up.simplifiedSipC
allInfo
1 (Default) - This displayed host name is
trimmed for both incoming and outgoing calls
and the protocol tag/information is not
displayed for incoming and outgoing calls.
0 - The full host name displays and the
protocol tag/information displays for incoming
and outgoing calls.
No
site.c
fg
up.softkey.transf
erTypeOption.enab
led
1 (default) -The user can change the transfer
type from consultative to blind and vice versa
using a soft key after the user has initiated a
transfer, but before completing the call to the
far end.
0 - There is no option to change from
consultative to blind and blind to consultative
when the user is in dial prompt after pressing
the Transfer soft key.
No
featur
es.cfg
up.status.message
.flash.rate
Controls the scroll rate of the status bar on
VVX 300 and 400 series business media
phones. Range is 2 to 8 seconds.
2 seconds (Default)
No
Configuration Parameters
Polycom, Inc. 484

Templat
eParameter Permitted Values
Change Causes
Restart or Reboot
featur
es.cfg
up.showDID AllScreens (default) – Display the DID number
on all the screens.
None – Disable DID number on phone.
LockedScreen – Display the DID number on
the lock screen.
StatusScreen – Display the DID number on
the Status screen/Idle screen.
IncomingOSD – Display the DID number on
the incoming On Screen Display (OSD)
screen.
LockedScreenIncomingOSD – Display the
DID number on the lock and incoming OSD
screen.
LockedAndStatusScreen – Display the DID
number on the lock and Status/Idle screen.
StatusScreenIncomingOSD – Display the DID
number on the incoming OSD and Status/Idle
screen.
No
featur
es.cfg
up.volumeChangeTo
ne.enabled
1 (default) – The phone plays a tone when the
user adjusts the ringer or call volume.
0 – The phone does not play a tone.
Zoom Rooms Base Profile: 0 (default)
No
featur
es.cfg
up.warningLevel Line keys block display of the background
image. All warnings are listed in the
Warnings menu.
0 (Default) - The phone's warning icon and a
pop-up message display on the phone for all
warnings.
1 - Warning icon and pop-up messages are
only shown for critical warnings.
2 - Phone displays a warning icon and no
warning messages. For all the values, all
warnings are listed in the Warnings menu.
Access to the Warnings menu varies by
phone model:
VVX 1500 - Menu > Status > Diagnostics >
Warnings
VVX phones - Settings > Status >
Diagnostics > Warnings
Yes
Configuration Parameters
Polycom, Inc. 485

Templat
eParameter Permitted Values
Change Causes
Restart or Reboot
featur
es.cfg
up.welcomeSoundEn
abled
1 (Default) - Welcome sound is enabled and
played each time the phone reboots.
0 - Welcome sound is disabled.
To use a welcome sound you must enable the
parameter up.welcomeSoundEnabled and
specify a file in saf.x. The default UC
Software welcome sound file is Welcome.wav.
Yes
featur
es.cfg
up.welcomeSoundOn
WarmBootEnabled
0 (Default) - Welcome sound is played when
the phone powers on (cold boot), but not after
it restarts or reboots (warm boot).
1 - Welcome sound plays each time the
phone powers on, reboots, or restarts.
Yes
featur
es.cfg
up.display.showFu
llCallerID
Phone displays the caller ID.
0 (default) – Phone displays the caller ID on
the first line.
1 – Phone displays the caller ID on the
second line.
No
featur
es.cfg
up.answerCall.lis
tOrder
Defines the order to answer a call upon
pressing speaker button on the phone.
LIFO (default)
FIFO
LIFO stands for Last-In, First-Out. FIFO
stands for
First-In, First-Out.
No
Upgrade Parameters
Specify the URL of a custom download server and the Polycom UC Software download server when you
want the phone to check when to search for software upgrades.
Upgrade Parameters
Template Parameter Permitted Values
Change Causes
Restart or Reboot
site.cf
g
upgrade.custom.serv
er.url
The URL of a custom download
server.
URL (default) - NULL
No
Configuration Parameters
Polycom, Inc. 486
Template Parameter Permitted Values
Change Causes
Restart or Reboot
site.cf
g
upgrade.plcm.server
.url
The URL of the Polycom UC Software
software download.
URL - http://
downloads.polycom.com/
voice/software/
No
Voice Parameters
The parameters listed in the following tables configure phone audio.
Voice Parameters
Template Parameter Permitted Values
Change Causes
Restart or Reboot
site.cfg voice.rxPacketFi
lter
Define a high-pass filter to improve
sound intelligibility when the phone
receives narrow band signals. Narrow
band signals occur when a narrow
band codec is in use, such as G.
711mu, G.711A, G.729AB, iLBC, and
some Opus and SILK variants.
0 (default) - Pass through.
1 - 300 Hz high-pass.
2 - 300 Hz high-pass with pre-
emphasis. Use this value with G.729.
No
Configuration Parameters
Polycom, Inc. 487

Template Parameter Permitted Values
Change Causes
Restart or Reboot
site.cfg voice.txPacketDe
lay
Null (default)
normal, Null - Audio parameters are
not changed.
low - If there are no precedence
conflicts, the following changes are
made:
voice.codecPref.G722="1"
voice.codecPref.G711Mu="2"
voice.codecPref.G711A="3"
voice.codecPref.<OtherCode
cs>=""
voice.audioProfile.G722.pa
yloadSize="10"
voice.audioProfile.G711Mu.
payloadSize= "10"
voice.audioProfile.G711A.p
ayloadSize= "10"
voice.aec.hs.enable="0"
voice.ns.hs.enable="0"
Yes
site.cfg voice.txPacketFi
lter
Null (default)
0 - Tx filtering is not performed.
1 - Enables Narrowband Tx high pass
filter.
Yes
Acoustic Echo Suppression (AES) Parameters
Use these parameters to control the speakerphone acoustic echo suppression (AES).
These parameters remove residual echo after AEC processing. Because AES depends on AEC, enable
AES only when you also enable AEC using voice.aec.hd.enable .
Acoustic Echo Suppression Parameters
Template Parameter Permitted Values
Change Causes
Restart or Reboot
techsup
port.cf
g
voice.aes.hs.
enable
1 (default) - Enables the handset AES
function.
0 - Disables the handset AES function.
No
Comfort Noise Parameters
Use these parameters to configure the addition and volume of comfort noise during conferences.
Configuration Parameters
Polycom, Inc. 488
Comfort Noise Parameters
Template Parameter Permitted Values
Change Causes
Restart or Reboot
debug.c
fg
voice.cn.hf.e
nable
1 (default) - Adds comfort noise added into
the Tx path for hands-free operation.
0 - Comfort noise not added.
Far end users should use this feature
when they find the phone to be 'dead', as
the near end user stops talking.
No
debug.c
fg
voice.cn.hf.a
ttn
35 (default) - quite loud
0 - 90
Attenuation of the inserted comfort noise
from full scale in decibels; smaller values
insert louder noise. Use this parameter
only when voice.cn.hf.enabled is
1.
No
debug.c
fg
voice.cn.hd.a
ttn
30 (default) - quite loud
0 - 90
Attenuation of the inserted comfort noise
from full scale in decibels; smaller values
insert louder noise. Use this parameter
only when voice.cn.hd.enabled is
1.
No
debug.c
fg
voice.cn.hs.e
nable
0 (default) - Comfort noise is not added
into the Tx path for the handset.
1 - Adds comfort noise is added into the
Tx path for the headset.
Far end users should use this feature
when they find the phone to be 'dead', as
the near end user stops talking.
No
site.cf
g
voice.cn.hs.a
ttn
35 (default) - quite loud
0 - 90
Attenuation of the inserted comfort noise
from full scale in decibels; smaller values
insert louder noise. Use this parameter
only when voice.cn.hs.enabled is
1.
No
Configuration Parameters
Polycom, Inc. 489

Template Parameter Permitted Values
Change Causes
Restart or Reboot
site.cf
g
voice.vadRxGa
in
Tunes VAD or CNG interoperability in a
multi-vendor environment.
0 (default)
-20 to +20 dB
The specified gain value in dB is added to
the noise level of an incoming VAD or
CNG packet, when in a narrow band call.
When tuning in multi-vendor
environments, the existing Polycom to
Polycom phone behavior can be retained
by setting voice.vadTxGain = -
voice.vadRxGain.
This parameter is ignored for HD calls.
No
site.cf
g
voice.vadTxGa
in
Tunes VAD or CNG interoperability in a
multi-vendor environment.
0 (default)
-20 to +20 dB
The specified gain value in dB is added to
the noise level of an incoming VAD or
CNG packet, when in a narrow band call.
This causes the noise level to synthesize
at the local phone to change by the
specified amount.
When tuning in multi-vendor
environments, the existing Polycom to
Polycom phone behavior can be retained
by setting voice.vadTxGain = -
voice.vadRxGain.
This parameter is ignored for HD calls.
No
Voice Jitter Buffer Parameters
The following table lists the jitter buffer parameters for wired network interface voice traffic and push-to-
talk interface voice traffic.
Configuration Parameters
Polycom, Inc. 490

Voice Jitter Buffer Parameters
Template Parameter Permitted Values
Change Causes
Restart or Reboot
site.cf
g
voice.rxQoS.a
vgJitter
The average jitter in milliseconds for
wired network interface voice traffic.
20 (default)
0 to 80
avgJitter The wired interface
minimum depth will be automatically
configured to adaptively handle this level
of continuous jitter without packet loss.
Yes
site.cf
g
voice.rxQoS.m
axJitter
The average jitter in milliseconds for
wired network interface voice traffic.
240 (default)
0 to 320
maxJitter The wired interface jitter
buffer maximum depth will be
automatically configured to handle this
level of intermittent jitter without packet
loss.
Actual jitter above the average but below
the maximum may result in delayed audio
play out while the jitter buffer adapts, but
no packets will be lost. Actual jitter above
the maximum value will always result in
packet loss. If legacy
voice.audioProfile.x.jitter
Buffer.* parameters are explicitly
specified, they will be used to configure
the jitter buffer and these
voice.rxQoS parameters will be
ignored.
Yes
site.cf
g
voice.rxQoS.p
tt.avgJitter
The average jitter in milliseconds for IP
multicast voice traffic.
150 (default)
0 - 200
avgJitter The PTT/Paging
interface minimum depth will be
automatically configured to adaptively
handle this level of continuous jitter
without packet loss.
Yes
Configuration Parameters
Polycom, Inc. 491
Template Parameter Permitted Values
Change Causes
Restart or Reboot
site.cf
g
voice.rxQoS.p
tt.maxJitter
The maximum jitter in milliseconds for IP
multicast voice traffic.
480 (default)
20 - 500
maxJitter The PTT/Paging
interface jitter buffer maximum depth will
be automatically configured to handle this
level of intermittent jitter without packet
loss.
Actual jitter above the average but below
the maximum may result in delayed audio
play out while the jitter buffer adapts, but
no packets will be lost. Actual jitter above
the maximum value will always result in
packet loss.
If legacy
voice.audioProfile.x.jitter
Buffer.* parameters are explicitly
specified, they will be used to configure
the jitter buffer and these
voice.rxQoS parameters will be
ignored for PTT/Paging interface
interfaces.
Yes
Template Parameter Permitted Values
Change Causes
Restart or Reboot
techsup
port.cf
g
voice.handsfr
eePtt.rxdg.of
fset
This parameter allows a digital Rx boost
for Push To Talk.
0 (default)
9 to -12 - Offsets the RxDg range of the
hands-free and hands-free Push-to-Talk
(PTT) by the specified number of
decibels.
No
techsup
port.cf
g
voice.ringerP
age.rxdg.offs
et
This parameter allows a digital Rx boost
for Push To Talk. Use this parameter for
handsfree paging in high noise
environments.
0 (default)
9 to -12 - Raise or lower the volume of
the ringer and hands-free page by the
specified number of decibels.
No
Configuration Parameters
Polycom, Inc. 492

Session Description Protocol (SDP) Parameters
This table describes Session Description Protocol configuration parameters.
Session Description Protocol (SDP) Parameters
Template Parameter Permitted Values
Change Causes
Restart or Reboot
sip-
interop
.cfg
voIpProt.SDP.
answer.useLoc
alPreferences
0 (default) - The phone's use of its own
preference list is disabled.
1 -The phone uses its own preference list
instead of the preference list in the offer
when deciding which video codec to use.
No
sip-
interop
.cfg
voIpProt.SDP.
answer.useLoc
alPreferences
.video
Allows you to reset the parameter
voIpProt.SDP.answer.useLocal
Preferences to the default 0 for audio
only.
1(default) - The phone uses its own
preference list instead of the preference
list in the offer when deciding which video
codec to use.
0 - The phone's use of its own preference
list is disabled.
No
sip-
interop
.cfg
voIpProt.SDP.
early.answerO
rOffer
0 (default) - SDP offer or answer is not
generated.
1 - SDP offer or answer is generated in a
provisional reliable response and PRACK
request and response.
Note: An SDP offer or answer is not
generated if
reg.x.musicOnHold.uri is set.
No
sip-
interop
.cfg
voIpProt.SDP.
offer.iLBC.
13_33kbps.inc
ludeMode
1(default) - The phone should include the
mode=30 FMTP parameter in SDP offers:
If voice.codecPref.iLBC.13_33kbps is set
and voice.codecPref.iLBC.15_2kbps is
Null.
If voice.codecPref.iLBC.13_33kbps and
voice.codecPref.iLBC.15_2kbps are both
set, the iLBC 13.33 kbps codec is set to a
higher preference.
0 - the phone should not include the
mode=30 FTMP parameter in SDP offers
even if iLBC 13.33 kbps codec is being
advertised.
No
Configuration Parameters
Polycom, Inc. 493
Template Parameter Permitted Values
Change Causes
Restart or Reboot
sip-
interop
.cfg
voIpProt.SDP.
useLegacyPayl
oadTypeNegoti
ation
0 (default) - RFC 3264 is followed for
transmit and receive RTP payload type
values.
1 - The phone transmits and receives RTP
using the payload type identified by the
first codec listed in the SDP of the codec
negotiation answer.
No
sip-
interop
.cfg
voIpProt.SDP.
offer.rtcpVid
eoCodecContro
l
This parameter determines whether or not
RTCP-FB-based controls are offered in
Session Description Protocol (SDP) when
the phone negotiates video I-frame
request methods. Even when RTCP-FB-
based controls are not offered in SDP, the
phone may still send and receive RTCP-
FB I-frame requests during calls
depending on other parameter settings.
For more information about video I-frame
request behavior, refer to
video.forceRtcpVideoCodecControl. For
an account of all parameter dependencies
refer to the I-Frames
section.
0 (default) - The phone does not include
the SDP attribute "a=rtcp-fb".
1 - The phone includes SDP attribute
"a=rtcp-fb" into offers during outbound SIP
calls.
No
Web Configuration Utility Parameters
The parameters listed specify the download location of the translated language files for the Web
Configuration Utility.
Configuration Parameters
Polycom, Inc. 494
Web Configuration Utility Parameters
Template Parameter Permitted Values
Change Causes
Restart or Reboot
site.cf
g
webutility.la
nguage.plcmSe
rverUrl
Specifies the download location of the
translated language files for the Web
Configuration Utility.
http://
downloads.polycom.com/voice/
software/languages/
(default)
URL
No
XML Streaming Protocol Parameters
The parameters in the following table set the XML streaming protocols for instant messaging, presence,
and contact list for BroadSoft features.
XML Streaming Protocol Parameters
Template Parameter Permitted Values
Change Causes
Restart or Reboot
feature
s.cfg
xmpp.
1.auth.domain
Specify the domain name of the XMPP
server.
Null (Default)
Other values - UTF-8 encoded string
No
feature
s.cfg
xmpp.
1.auth.useLog
inCredentials
Specifies whether or not to use the login
credentials provided in the phone's Login
Credentials Menu for XMPP
authentication.
0 (Default)
1
No
feature
s.cfg
xmpp.1.enable Specifies to enable or disable the XMPP
presence.
0 (Default)
1
No
Session Headers
You can enable session header parameters to convey information between phones about the SIP
message.
Configuration Parameters
Polycom, Inc. 495
Session Header Parameters
The following table lists parameters that configure session header components.
Session Header Parameters
Template Parameter Permitted Values
Change
Causes
Restart or
Reboot
sip-
interop
.cfg
voIpProt.SIP.
supportFor100
rel
Polycom recommends setting this parameter to 1 when
using Polycom Trio systems with Polycom RealPresence
DMA systems.
1 (default) - The phone advertises support for reliable
provisional responses in its offers and responses.
0 - The phone does not offer 100rel and rejects offers
requiring 100rel.
No
sip-
interop
.cfg
voIpProt.SIP.
keepalive.ses
sionTimers
0 (default) – The phone does not declare “timer” in
“Support” header in an INVITE. The call does not get
disconnected when the phone does not receive UPDATE
packet. The phone still responds to a re-INVITE or
UPDATE and follows session timer to send re-INVITE or
UPDATE if the remote endpoint asks for it.
1 – The session timer is enabled and the call gets
disconnected when the phone does not receive UPDATE
packet within the specified session timer.
No
reg.cfg reg.x.keepali
ve.sessionTim
ers
1 (default) – The session timer is enabled and the call
received on the registered line gets disconnected when
the phone does not receive UPDATE packet within the
specified timer.
0 – The session timer is disabled and the call received on
the registered line does not get disconnected when the
phone does not receive UPDATE packet.
No
Configuration Parameters
Polycom, Inc. 496
