Phantasy Star Online (5.2M) Pso Dc Manual
User Manual: Phantasy Star Online (5.2M) La Biblioteca de los 8 bits
Open the PDF directly: View PDF ![]() .
.
Page Count: 17

1
CONTENTS
PROLOGUE - - - - - - - - - - - - - - - - - - - - - - - - - - - - - - - - - - - - - - - - - -02
BASIC CONTROLS - - - - - - - - - - - - - - - - - - - - - - - - - - - - - - - - - - - -03
SOFTWARE KEYBOARD - - - - - - - - - - - - - - - - - - - - - - - - - - - - - - - - 04
SAVING - - - - - - - - - - - - - - - - - - - - - - - - - - - - - - - - - - - - - - - - - - - - - 04
STARTING A GAME - - - - - - - - - - - - - - - - - - - - - - - - - - - - - - - - - - -05
CHARACTER CREATION - - - - - - - - - - - - - - - - - - - - - - - - - - - - - - - -05
CHARACTER TYPES - - - - - - - - - - - - - - - - - - - - - - - - - - - - - - - - - - - 07
MODE SELECTION - - - - - - - - - - - - - - - - - - - - - - - - - - - - - - - - - - - -08
ONLINE NETWORK STRUCTURE - - - - - - - - - - - - - - - - - - - - - - - -09
THE WORLD OF PSO ONLINE - - - - - - - - - - - - - - - - - - - - - - - - - - - 10
A TOUR OF PIONEER 2 - - - - - - - - - - - - - - - - - - - - - - - - - - - - - - - - 13
PLAYING PSO - - - - - - - - - - - - - - - - - - - - - - - - - - - - - - - - - - - - - - - 16
GAME DISPLAYS AND MENUS - - - - - - - - - - - - - - - - - - - - - - - - - - 19
OPTIONS - - - - - - - - - - - - - - - - - - - - - - - - - - - - - - - - - - - - - - - - - - - 27
ACTIONS USED IN PSO - - - - - - - - - - - - - - - - - - - - - - - - - - - - - - - - 27
WEAPONS - - - - - - - - - - - - - - - - - - - - - - - - - - - - - - - - - - - - - - - - - -29
ARMOR & SHIELDS - - - - - - - - - - - - - - - - - - - - - - - - - - - - - - - - - -- 30
PSO requires a memory card [Visual Memory Unit (VMU) sold separately]. 15 blocks are
required to save the main game file and 30 blocks are required to save the guild
card file. Additional blocks are required to save any downloaded files. This game saves
automatically when you quit. While saving or loading data, never turn the Dreamcast power OFF,
attempt to remove the memory card or disconnect the controller. For details about saving, see p. 4.
Thank you for purchasing Phantasy Star Online. Please note that this software
is designed only for use with the Dreamcast console. Be sure to read
this instruction manual thoroughly before you begin playing.
Note: “Phantasy Star Online” will hereafter be referred to as “PSO.”
2 3
PROLOGUE BASIC CONTROLS
Faced with the imminent dest ruction of their home wo rld, a large-scale evacuation plan known as
the Pioneer Project was established to find a new home planet. Unmanned probes sent into deep
space discove red a habitable planet th ey dubbed Ragol and the fi rst inte rstellar tra n s p o rt ship
Pioneer 1 was sent to establish a colony. After confi r ming Ragol was suitable, the initial colonist s
b e gan pre p a ring the planet sta rting with const r uction of the central dome.
7 ye a r s late r...
Pioneer 2 comp l eted its long voya ge
w i th the main wave of re f u g ees aboard
but just as th e y ente r ed orbit and opened
a communications link with the Central
Dome, an enormous explosion occurred.
All contact with the men and women
of Pioneer 1 was lost .
E xa c t l y what happened on Ra g o l ?
PSO is a net wo rk RPG. Online you will meet a va ri et y
of people from all over the wo r ld. Ove rcome language
b a r ri e rs by using the fi v e language “wo r d select”
fe a t u r e that enables communication with users whose
l a n g u a ge is diffe rent from your own. Organize a te a m
to play the game online or embark on Hunte r’s Guild
qu e s ts, all the while chatting to exch a n ge info rmation.
Of course you don’t have to be online to play PSO.
T h e r e is also an offline mode that enables ga m e p l ay.
Online or offline, we hope you will enjoy the exc i t i n g
wo rld of PSO.
What is PSO?
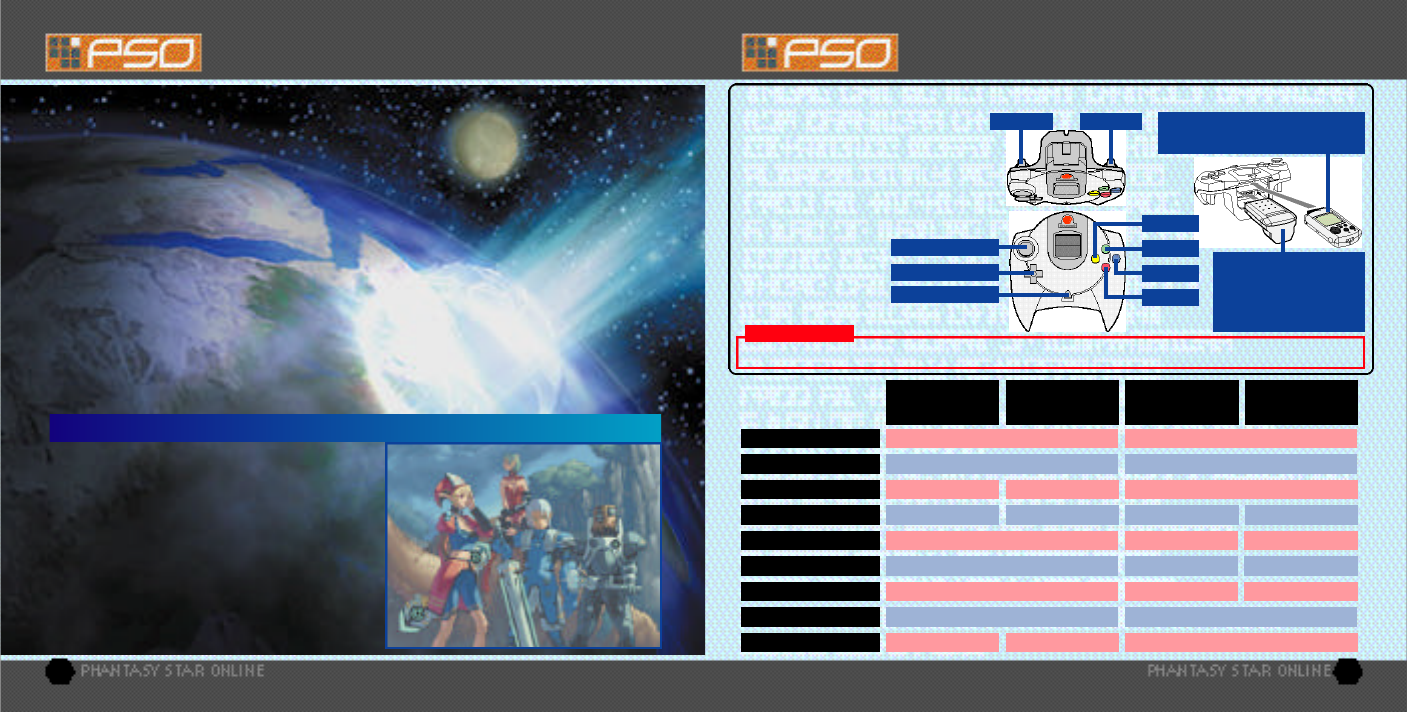
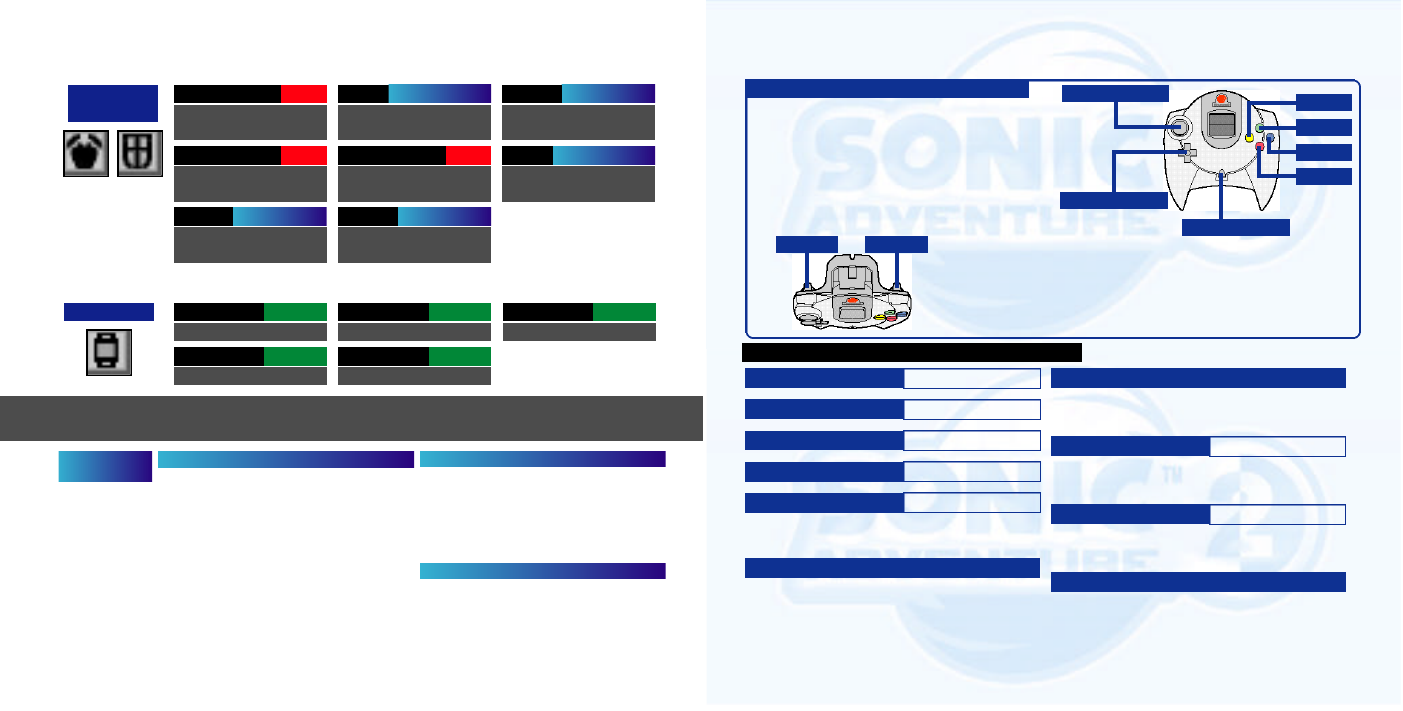
PSO is a one-player game (fo u r- p l a yer when playing online). Connect the controller to be used to Control Po rt A.
To return to the title screen at any time
during gameplay,
simultaneously press
and hold the A,B,
X,Yand Start Buttons.
Never touch the Analog Thumb Pad or
the Triggers L/Rwhile turning the
Dreamcast power ON. Doing so may
disrupt the controller initialization
procedure and result in malfunction.
ANALOG THUMB PAD
XBUTTON
YBUTTON
BBUTTON
DIRECTIONAL PAD
ABUTTON
It is not possible to play PSO without a memory card so be sure to insert one before starting gameplay.
ANALOG THUMB PAD SELECT MOVE CHARACTER
NOT USED ROTATE CAMERA
ENTER USE LOWER ACTION PA L E T T E
DISPLAY INFO USE LEFT ACTION PA L E T T E
CAMERA VIEW (Reset to behind character)
GAME START RETURN DISPLAY THE MAIN MENU
NOT USED NOT USEDROTATE CAMERA TOGGLE ACTION PA L E T T E
CANCEL USE RIGHT ACTION PA L E T T E
SELECT SELECT
ENTER
CANCEL
NOT USED
NOT USED D I S P LAY SOFT KEYBOA R D / WORD SELECT (TOGGLE = X)
D I R E C T I O N AL PAD (D-PA D )
TRIGGER L
TRIGGER R
ABUTTON
BBUTTON
XBUTTON
YBUTTON
START BUTTON
TITLE SCREEN/
GAME MENUS/
SHIP SELECTION SCREEN CHARACTER
SELECTION V I S U AL LO B BY /
WITHIN THE CITY IN BATTLE
TRIGGER LTRIGGER R
When using the Jump Pack (sold
separately), always be sure to
insert the Jump Pack into
Expansion Socket 2.
CAUTION
Insert a memory card (sold separately) into
Expansion Socket 1 of the controller.
START BUTTON
4 5
SOFTWARE KEYBOARD STARTING A GAME
When playing online, select “Quit Game” from the main menu. To confirm
disconnection from the Network, use *@ to select “YES” or “NO” and press Ato
enter and save your game. If you are playing with a team, you will disband from the
team. At this time, any experience points gained in battle or items collected, etc. will be
saved. If you disband from your team while on a quest and should the team complete the quest without
you, the entire team may not be eligible to receive the reward unless all members go to claim it together.
SAVING ONLINE
When playing offline, select “Quit Game” from the main menu. You will be asked if
you wish to save. Use *@ to select “YES” or “NO” and press Ato enter.
SAVING OFFLINE
A memory card is required to save PSO game data. 15 blocks of free space are required to save the
main game file and 30 blocks are required to save the guild card file. Additional blocks are required to
save any downloaded files. To save your game data, select “Quit Game” from the main menu. Never
attempt to turn OFF the Dreamcast power, remove the memory card or disconnect the controller while
saving. Also, the data may not save correctly if the memory card is removed/re-inserted during gameplay.
If you quit the game without saving properly (via “Quit Game” on the
main menu)or if for any reason you are disconnected from the server while playing online,
any items or money (Meseta) held, left in the city or game field will be lost.
CAUTION
SAVING
Use the software keyboard to chat with other players while playing PSO or connect a Dreamcast
Keyboard (sold separately) to Control Port B, C or D.
D-PAD/ANALOG THUMB PAD - - - - Select Characters
- - - - - - - - - - - - - - - - - - - - - - - - - - - - - - Enter (to display text)
BBUTTON - - - - - - - - - - - - - - - - - - - - - Delete 1 Character
XBUTTON - - - - - - - - - - - - - - - - - - - - - Toggle Screens
YBUTTON - - - - - - - - - - - - - - - - - - - - - Close Keyboard
TRIGGER L/R - - - - - - - - - - - - - - - - -- Toggle Symbols
B S or
SIGN or
ENTER
EXIT or
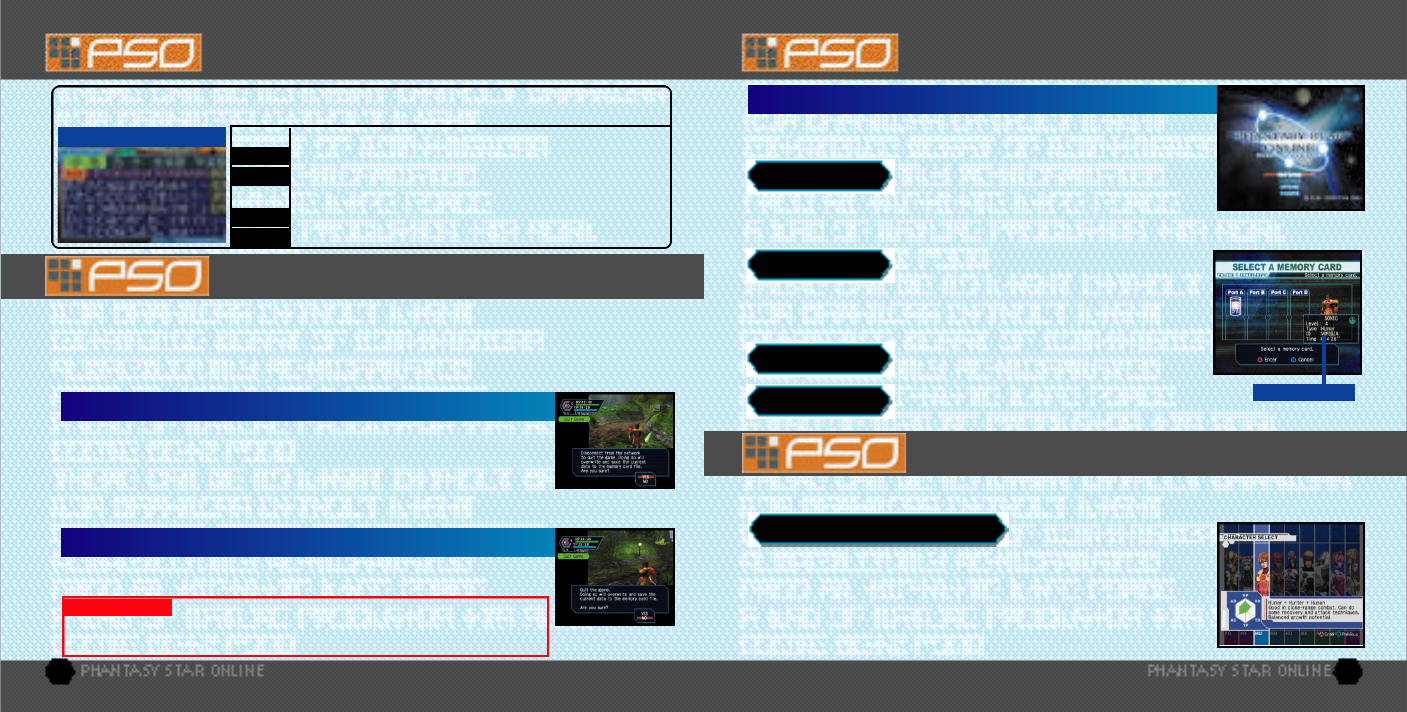
SOFTWARE KEYBOARD Once the title screen appears, press the Start Button to display the title screen
menu. Use *@ to select a mode and press Ato enter your selection.
Select to begin a new game starting from character
creation. Select the memory card to which you want to
save the main game data. Only one main file (one character) can be saved to
any one memory card. If a PSO file already exists, you will be asked whether to
overwrite the older file. Also, it is not possible to save game data without a memory card.
TITLE SCREEN MENU
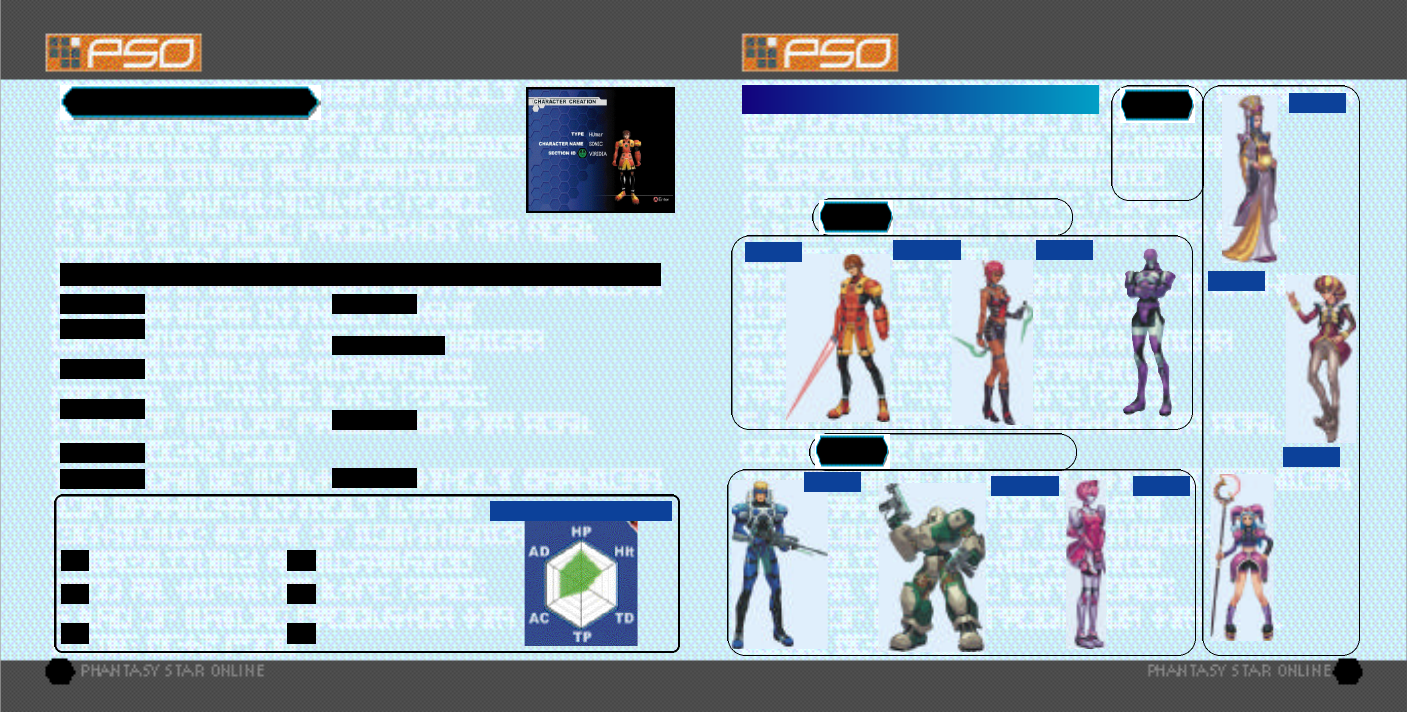
You will need to create a character whenever you start a new game.
Use $ ^ to select the type of character (see p. 7) you wish to use and press A
to enter. A brief summary is displayed under each profession/species header
alongside a graph indicating the attributes (see p. 6) of each character. Press A
again to proceed to the CHARACTER CREATION screen or press Bto cancel
and return to the previous screen.
NEW GAME
Select to continue playing a previously saved file.
Once the memory card selection screen appears, use
*@$ ^ to select the memory card containing the PSO file you wish to play and
press A. A mini-menu with the options “OK” or “DELETE” will appear. Select load
(“OK”) or delete the file. Press Bto cancel.
CONTINUE
Here you can modify the various game settings.
See p.27 for details.
OPTIONS
Use this link to access the official PSO website
or the SONICTEAM homepage.
WEBSITE
SELECT A CHARACTER TYPE
CHARACTER DATA
CH A R ACTER CREATION
6 7
CHARACTER TYPES
CHARACTER CREATION
Select a facial type.
To customize the appearance of your character, use *@ to select a modification
item (see below) and press A. Then use $ ^ to select a style for that item (the
available settings will vary among different character base types). Use L/Rto
rotate the character. Press Aor Bto return to the previous screen. Note that if
you press the Start Button while on the CHARACTER CREATION screen, all of
your settings will be erased and you will return to the CHARACTER SELECT
screen. Once you press OK your character will be assigned one of the 10 available SECTION IDs. Press
Ato continue. (It is not possible to cancel after entering OK.)
MODIFY YOUR CHARACTER
FACE
Select an outfit color.
COSTUME Select to enter the character modifications.
OK
Select a skin color.
SKIN
Select a head type.
(Androids only)
HEAD
Select a hair (or hat) style.
Use $^ to adjust the color with the RGB bars.
HEAD
Use *@ to adjust the height and $ ^
to adjust the body size.
PROPORTION
Input a name for your character.
Press Ato display the software keyboard. After
inputting a name, press Aagain to enter. Note that you
can not select OK to proceed without inputting a name.
CHARACTER NAME
Press Ato automatically create
a character at random. Press Aagain to create a
different character, and so on.
AUTO
Select a body color.
(Androids only)
BODY COLOR
MODIFICATION ITEMS
The character attributes graph will give you a general idea of the strengths
and weaknesses of each character type for the following attributes: CHARACTER ATTRIBUTES GRAPH
Accuracy rate when attacking.
Hit
Health Points availability.
HP
Technique Damage - rate at
which TP decreases when used.
TD
Technique Points availability.
TP Armor Class - level of defense
against enemy attack.
AC
Attack Damage - level of damage
inflicted upon enemies.
AD
CHARACTER PROFESSIONS
Proficient with blade weapons,
we excel in close-range combat.
HUNTER
HUmar
Hunter+Human
I am we l l - ve rsed in
c l o s e - ra n g e
combat, have a
balanced grow th
p o tential and can
handle some
re c ove ry and
a t ta ck te ch n i qu e s .
Beginner ori e n te d .
Hunter+Newman
My TP is higher
than HUm a r’s so
I have a much
b et t er balance
b et we e n
te ch n i que usage
and close-ra n ge
combat skills.
I n te rm e d i a te
o ri e n ta ted.
HUnewear Hunter+Android
Among all the
characters I have
the highest HP. As
Hunters go, I have
the most attacking
power, and can
use a variety of
different weapons.
However, I can’t
use any techniques
because I have
no TP.
HUcast
Proficient with gun-type weapons,
we excel in long-range combat.
RANGER
RAmar
Ranger+Human
Though shooting is
my speciality,
I can also
do some atta ck and
re c ove ry te ch n i qu e s .
My grow th pote n t i a l
is the most balanced
of all the Ra n ge rs .
I n te rm e d i a te
o ri e n ta ted.
Ranger+Android
I am famous fo r
my opt i m a l
a c c u r acy ra te. I
can use all
weapons but no
te ch n i q ues. I have
m o r e atta ck i n g
p o wer than any
other Ra n ge r .
RAcast Ranger+Android
I too am famous
for my optimal
accuracy rate
and can can use
all weapons but
no techniques.
While RAcast
may have more
attacking power,
I have the best
defense power.
RAcaseal
FOnewm
Force+Newman
I can use all
te ch n i ques and am
p roud to have th e
h i g h e s t TP level. Once
I learn a va ri ety of
te ch n i ques, I can
become a leader
on the battlefi e l d .
Ad vanced ori e n te d .
Force+Human
I am able
to handle
techniques
quite well
and I have
the most
balanced
growth
potential
as a Force.
FOmarl
Force+Newman
My TP level and
technique usage
is the same as
FOnewm’s but
I have more
defense power.
My slightly
lower HP makes
me a bit weaker
in close-range
combat.
Advanced
oriented
FOnewear
Proficient with
techniques, we
are best suited
for combat
support.
FORCE
In the world of PSO each of the nine character types is one of three
species (human, newman or android) whose profession is either
Hunter, Ranger or Force. While members of each profession start
out with the same equipment level, the attributes of each character
vary according to their species.
8 9
MODE SELECTION
After you have created your character you will proceed to the mode selection
menu. Use *@ to select whether to play PSO online or offline and press A. The
content and how to proceed will vary according to which mode is selected.
OFFLINE MODE
The NORMAL level is automatically
selected the first time you play PSO.
After you clear the game at this level, this screen will appear the next time you play.
Use *@ to select either NORMAL or HARD and press A. Press Bto cancel. Clear
the game in HARD to earn the right to attempt VERY HARD.
GAME DIFFICULTY
The first time you connect to the PSO
network to play online you must input
the unique serial number and access
key from the label that was included inside your PSO package. Use *@ $ ^ to
select each character and press Ato enter. Press Bto cancel. Enter the serial number
as it appears on the label and select the enter key, then do the same for the access key. When you have
input both the codes, select ENTER and press A. This information will then be sent to the PSO server and
once verified, will be saved to the main file in your VMU so that you won’t need to input the serial
number and access key every time you connect. However, it is very important that you do not lose
these numbers or allow a third party access to them before you can register with the PSO
server.You must use the same Dreamcast to play PSO in the online mode.
SERIAL NUMBER & ACCESS KEY
As with the online mode, th e re are a number of Hunte r’s Guild
qu e sts for you to embark upon in the offl i n emode in addition to the main sto ryl i n e .
E s s e n t i a l ly you will proceed th rough the scenario alone. Howeve r , th e r e are a number of NPCs (Non Playe r
C h a ra c te rs) with whom you will inte r act. You can also use the offl i n emode to build your ch a ra c te r’s ex p e ri e n c e
and then make your debut online.
OFFLINE PLAY
You will need to pay for access time from your Inte rn et
S e rvice Provider (ISP) and any additional phone ch a r ge s
needed to connect to your ISP’s access point.
ONLINE NETWORK STRUCTURE
Once you have organized your team, you will be transported to the city Pioneer 2 to begin play.
Here you and your team members can equip yourselves at the shops, etc. to prepare for your
expedition. When your team is ready, proceed to the main transporter within the city. Once inside,
select a destination on the planet Ragol (the game world) and your team will be transported there.
In the event you are felled by an enemy (p. 18), etc. you will be transported back to the city.
SHIP (p. 10)
BLOCK (p. 10) Move to
Another
VISUAL
LOBBY
V I S UAL LO B BY (p. 21
SHIP
CONNECT ONLINE
SHIP SELECTION
TRANSPORTER (p. 11)
PLANET RAGOL (Game Field)
C I T Y (PIONEER 2 - p. 13 )
ORGANIZE TEAM
(p. 10-11)
INFORMATION
COUNTER (p. XX)
Proceed to the main game story.
Embark on quest missions from
the Hunter’s Guild (p. 15)
Move to
Another
BLOCK TRANSPORTER
(p. 10)
Each SHIP is comprised of various
BLOCKS from which the city can be
accessed. It is possible to move
between BLOCKS or to a different
SHIP via the BLOCKS and join a
team within the same SHIP.
SHIP
Move to Another SHIP
ONLINE MODE
CHARGES FOR ONLINE PLAY Inquires
S E GA Customer
S e rvices Depart m e n t
I n te rn e t: www. s e ga . c o m
Telephone: 1-800-USA- S E GA
10 11
THE WORLD OF PSO ONLINE THE WORLD OF PSO ONLINE
Whenever you connect to the network via the ONLINE mode, the SHIP selection window will appear.
Consider this screen to be your gateway into PSO.
Use *@ to select the SHIP you wish to join and press A. To see how many
players or teams there are on a SHIP, select that SHIP and press X. After
selecting a BLOCK, you will be transported to the visual lobby there. You
can move between SHIPS and/or BLOCKS by selecting TRANSPORT from
the information counter. Use the transporter located in the corner to move
between visual lobbies within a BLOCK.
Another feature available on the SHIP selection menu is a quest downloading service which you can use
to download and save new quest missions to your memory card. Select “Download_Server” to display a
list of the available quests. Use *@ to select a quest to download press A. If there are not enough free
memory blocks available, a message will appear and you will automatically return to the previous screen.
For details on accessing newly downloaded quests, see p. 15.
SHIP & BLOCK SELECTION
Once inside the visual lobby you can move around and chat with other users
within the same block in real time. Visit the information counter and select
“Organize TEAM” when you wish to create a new or join an existing team.
Select “Transport” to move to a different SHIP or BLOCK. Use *@ to select
menu items and press Ato enter your selections. Press Bto cancel.
V I S UAL LO B BY INFO R M A TION CO U N T E R
You need to belong a team in order to investigate
the planet of Ragol. To do so you can either join
an existing team or create one of your own.
TEAMS
Use the transporters to move between SHIPSor BLOCKS to interact with PSO
users located in other lobbies. Use *@ to select a destination and press A.
TRANSPORTERS
The visual lobby is where you can interact with other players of PSO. You can chat with anyone who is in
the same visual lobby. When playing the game or while on quests you will only be able to chat with those
players on your team. Another form of communication called Simple Mail is also available (see p. 26).
CH AT T I N G IN THE VISUAL LO B BY
Select this to display a list of the teams available in this
BLOCK. Display information about the members in each team by pressing X.
Select and enter a team to join in and you will be transported to the city in
the field where that team is currently playing. A lock mark will appear next
to teams that require a password to join. If you do not know the password,
you won’t be able to join that team.
JOIN A TEAM
Select this to create your own team and become its leader.
Input the team name and password required for entry (if preferred) and set the
difficulty level. Once you enter the information, your team will be created and you
will be transported to the game field city. Other players can now join you. (Note
that if no password is set, other users can join simply by selecting the team name.)
A maximum of 4 players can join your team. Once 3 other players have joined,
the team will become automatically locked. Provided that any one member is still
connected online, that team will remain available for play. However, if all
members of a team return to the visual lobby or disconnect from the network, that team will disappear.
CREATE A TEAM
TEAM NAME - - - - - - - - - - - - - - - - - - Input a name for your team.
PASSWORD - - - - - - - - - - - - - - - - - - - Set a password to limit access to your team.
DIFFICULTY - - - - - - - - - - - - - - - - - - - - Set a difficulty level of NORMAL, HARD or VERY HARD.
BATTLE - - - - - - - - - - - - - - - - - - - - - - - Set ON/OFF to enable/disable friendly fire damage.
Press Yat any time during gameplay to
display the software keyboard. With the software keyboard displayed, press X
to display the Word Select menu and then press Xagain to display the Symbol
Chat menu. Press Xonce more to toggle back to the software keyboard.
TOGGLING MENUS
12 13
THE WORLD OF PSO ONLINE
Chatting in PSO occurs via chat balloons that are
displayed over your characters head. A total of 32
alphanumeric characters can be input into each balloon. Press Yto display the
software keyboard to input messages using the controller. Or you can use the
Dreamcast Keyboard (sold separately) to type in your messages directly.
BALLOON CHAT
Use the Wo r d Select menu to communicate by const ru c t i n g
s i mple sentences from a number of pre - s e l e c ted phra s e s
w i th the contro l l e r . This system is 5 language (English, Fre n ch, German, Spanish and
Japanese) compatible so all messages cre a ted and sent will be auto m a t i c a l l y
t ra n s l a ted into the language setting designate by each playe r. (E.g., if you display a
Wo rd Select message in English, the selected message will appear in Japanese for a
p l ayer whose language setting is Japanese.)
WORD SELECT
Use the Symbol Chat menu to communicate using a
simple picture to express a feeling or action. With the software keyboard
displayed, press Xtwice to display the Symbol Chat menu. Then use *@ to
select an item and press Ato display it.
SYMBOL CHAT
The city in PSOis a safe haven with shops where you can buy or sell items, a
medical center where you can revive your HP/TP and the Hunter’s Guild where you
can sign up for quests to earn rewards. To interact with city staff, approach a
counter and press Ato display a menu, and then use *@ to make your selections
accordingly. To cancel and close a menu, press B.
Used to purchase goods (weapons, tools, armor, etc.) and services
(HP/TP recovery) in the city, money can be obtained during gameplay by picking up the
item pictured here or as reward money for quests. If you don’t wish to carry it around, you
can deposit your money at the Check Room where it can be accessed at anytime.
In the city shops you can buy or sell weapons,
armor, technique discs and various tool items.
Approach a counter, press Ato display the current amount of money (Meseta) you
have and the “Buy/Sell” menu. Select “Buy” or “Sell” and use *@ to select an
item. Then select whether to “Buy/Sell” or “Cancel” from the confirmation menu.
When buying tool items, you may be asked in what quantity to buy (a maximum of
10 can be carried at one time). When buying weapons or armor you may be given
the option of equipping the item immediately. Whether you can use a weapon or
armor item will depend on your characters profession and/or experience. Items that
can be used are identified by the color as follows:
THE CITY SHOPS
MONEY (MESETA)
With the software keyboard displayed, press Xto toggle to the Word
Select menu.
Use *@ to select a “form” and press Ato enter.
Press L/Rto toggle between pages, *@ to select a phrase and
press Ato enter. (Depending on the form, selection may continue.)
Select a target and the constructed message will be displayed.
Use ^to move between selection menus. Select “Send” during
message construction to display the message (or partial message)
without designating a target. Select “Return” or press Bto return to
the previous menu. Select “EXIT” or press Yto close the Word Select
menu at any point without displaying a message.
USING THE WORD SELECT MENU
1
2
3
4
Send/Return/
EXIT
Form/Phrase
Selection Menu
Message Under Construction
THE CITY
If you find an item labeled “???” while
playing PSO, bring it here to have the item
appraised. Approach the counter and use *@ to select the item and press A. The
fee you must pay to have the item identified will appear. Select “Yes” to continue or
“No” to cancel. If you agree to appraise the item you will then be asked whether
you choose to agree with the resulting judgement. Select “Yes” or “No”
accordingly. Note that if you select “No” the item will return to an
unidentified state and your Meseta will not be refunded.
TEKKER BOOTH
Item can be equipped.
Item cannot be equipped at current experience level.
Item can Never be Equipped
A speciality item with slot usage, Photon efficiency, etc.
WHITE
GREY
X
GREEN
A TOUR OF PIONEER 2
14 15
This is the main transporter used to travel
back and forth between the planet Ragol and the City. Position your character in
the center of the transporter and a menu listing possible destinations will appear.
Use *@ to select your destination and press Ato be transported there. To
cancel, move your character off of the transporter. When you first start playing
PSO, only the “FOREST 1” destination can be selected. However, as you progress
more destinations will become available.
MAIN TRANSPORTER
Visit here whenever you need to restore your
HP (Health Points)/TP (Technique Points) levels. The fee you must for this service
will be displayed when you approach the counter. Also, whenever you are felled
in battle during gameplay or while on quests your character will restart here.
MEDICAL CENTER
The Principal is the commander of the
Pioneer 2. When you first start playing in the Offline mode you should visit here
often to find out details regarding your mission.
THE PRINCIPAL
Deposit items or money here to be held for you. Approach the
counter and press Ato display the “Deposit/Take” menu. When playing online, any deposited items are
saved so they will still be available even if you are disconnected from the network.
CHECK ROOM
After selecting “Deposit” use *@ to select “Meseta” or
“Item” and press A. If you select “Meseta” the amount you currently have will
be displayed. Use *@ to select the amount you wish to deposit. If you select
“Items” all the items you have will be displayed. Use *@ to select an item to
deposit and select “Yes” or “No” from the displayed menu.
DEPOSITING ITEMS
Select “Take” then use *@ to select “Meseta” or “Item”
and press A. Then select the amount of money or items you wish to withdraw.
WITHDRAWING ITEMS
There are different types of
transporters located throughout the game such as “WARP”
transporters used to move around in the same area, large boss
transporters that will move you and your team to a boss’s lair,
etc. To use each type, position your character inside and press
A. With boss transporters after pressing Ayou will be asked
to select which team members to transport.
To fight against the boss as a team, all team members must use the boss transporter
together. Unlike other transporters, if one or more players on your team has already used
it to travel to the boss lair, it will be unavailable for use until those players return.
OTHER TRANSPORTER TYPES
In addition to the main storyline of PSO (investigating the planet Ragol to discover
what happened to Pioneer 1), you can also undertake quest missions via the Hunter’s
Guild. Essentially quests are carried out the same in both the Onlineand Offline
modes, however the content of the quest missions and rewards offered will differ.
Also, it is only possible to accept quest missions Online if your entire team agrees to
do so. The team leader is responsible for quest selection.
It is possible to quit a quest mid-mission, but if you do you will be unable to claim the reward offered.
When playing PSO online, there is a transporter located in the Hunter’s Guild that you can use to travel
from the visual lobby to the city. By doing so, you will leave your team.
HUNTER’S GUILD
To undertake a quest mission, approach the counter and
speak to the representative. Use *@ to select a quest from the menu and press Ato
view a summary of details about the quest. If you decide to accept the quest, press A
again and confirm your selection. You will meet with the client who has commissioned
the quest and find out further details about your mission. Good luck!
You can download new quest missions online from the PSO server. To do so, connect
online and select “Download Quests” from the SHIP selection menu. The new quests will be saved to your
memory card. To access the new quests, select “Download Quests” from the quest selection menu at the
Hunter’s Guild counter. Once the new quests are displayed, select a new mission to accept.
QUESTS
A TOUR OF PIONEER 2 A TOUR OF PIONEER 2
16 17
If you complete a quest successfully, you will be eligible to claim a
reward. To do so, return to the Hunter’s Guild and speak to the
representative there. Offline you will receive the entire reward, but online the reward will be distributed
among all the members of your team evenly.
QUEST REWARDS
P LAY I N G PSO
Play in the main story or quests either Online or Offline is controlled largely with your Action Palette
(note it cannot be used in the city or visual lobby) which you will need to customize before heading into
battle. For details on the Action Palette and how to set up your Action Menus, see p. 24.
CONTROLLING YOUR CHARACTER IN THE FIELD
MOVEMENT When playing PSO online, it is
possible to chat with your te a m
m e m b e rs during ga m e p l a y. Use
the Soft Key b o a r d or connect a
D re a m c a st Key b o a r d to a fre e
C o n t rol Po rt to type in message s .
Or use the Wo rd Select menu to
c re a te sentences that will be
u n d e rstood in fi v e languages.
For details about using Wo r d
Select, see p. 12.
CHAT I tems can be used to re c over HP or
TP as well as ret u rn the ch a ra c te r
to a normal sta te when affe c ted in
some way. There are numero u s
i tems that you can obtain duri n g
ga m e p l ay or purchase in the city
shops. Up to 10 units of any one
i tem can be carried by the playe r
at one time. Items will disappear
when th ey are used. For deta i l s
about using Items, see p. 21.
ITEMS
Use the Analog Thumb Pad to move
a round. Press and hold it to have
your ch a ra c ter walk and then run in
the direction pressed. If th e re are
a ny enemies nearby your ch a ra c te r
will walk slower andw i th th e i r
weapon drawn. If the camera view
becomes off center when wa l k i n g
and turning around, simp ly pre s s
Tri g g er Lto ret u rn the camera to
the default view facing fo rwa rd s
f rom behind the ch a ra c te r.
There are three basic forms of attack; the Attack,
Heavy Attack and Extra Attack. Each attack can be executed by pressing the
corresponding X,A, or Bbutton the attack is assigned to on the Action
Palette. Customize the set up of your Action Palette by assigning actions to
each space (see p. 24). To attack an enemy, position your character so that
they are facing the enemy and as soon as a sight cursor appears, press an
attack button. When your attack is successful, the number of damage points
inflicted will appear. But when you miss, the word “MISS” will appear in red.
If you can time three attacks just right you can achieve a successive chain attack that is
overall slightly faster and more accurate than executing each attack separately. This can be especially
effective when attacking enemies that are hard to hit because the third hit is more likely to find its mark.
Attack when the
cursor appears!
ATTACKS
There are a variety of different technique types that
can be used in different ways such as to attack enemies, for status recovery, to
teleport to the city, etc. Both techniques and their level ups are acquired via
Technique Discs found or purchased (see p. 13). Each technique requires a
certain level of experience to be used. Also, the effectiveness of each
technique increases the higher its level.
To use Attack Techniques, position your character towards an enemy with a
cursor displayed and press the corresponding button to which a technique is assigned. With Recovery
Techniques, essentially only the player using the technique is effected. However Recovery Techniques of a
certain level can effect other members within range when the technique is used.
TECHNIQUES
The colors of the controller buttons correspond to the colors of
the bands that surround each of the three Action Palette
spaces. Also, the color of the cursor that appears over an
enemy will change to indicate which button, if pressed, has the
most likely chance of landing an attack or technique attack.
Left Action Palette Slot
ATTACK
High accuracy rate, but low damage.
Standard Attack
HEAVY ATTACK
Low accuracy rate, but high damage.
Strong Attack
EXTRA ATTACK
L o w accuracy ra t e, but can affect special
a t ta ck when used with certain we a p o n s .
Special Attack
YELLOW Bottom Action Palette Slot
RED Right Action Palette Slot
BLUE
X
A
X
P LAY I NG PSO
18 19
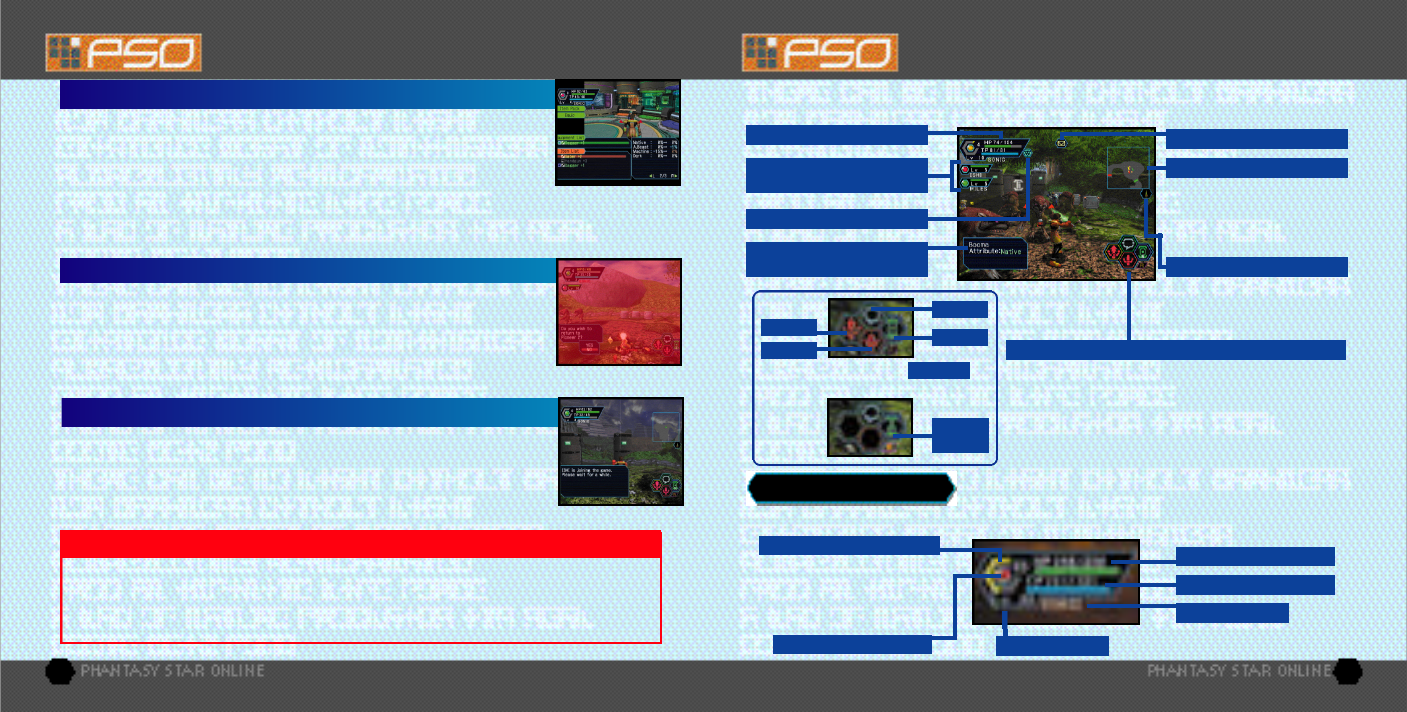
P L AY I NG PSO GAME DISPLAYS & MENUS
Essentially the game displays used for the online and offlinemodes of PSO are the same. However,
because the onlinemode has a few additions, the online mode game display is explained here.
Triangles indicate players
(color as shown on status bar).
Yellow circles indicate enemies.
Blocks indicate gates.
TEAM MEMBER HP/LEVEL &
PLAYER COLOR (FOR MAP)
STATUS SUMMARY
ENEMY NAME/ATTRIBUTE
or ITEM NAME
CONDITION CHANGE INDICATOR
MAIL
CURRENT HP/MAXIMUM HP
CURRENT TP/MAXIMUM TP
PLAYER COLOR
PLAYER NAME
CURRENT LEVEL
RADAR MAP
Once your Photon blast gauge
reaches 100% you can
perform a special attack. For
details, see p. 23.
PHOTON BLAST GUAGE
Controller A,B,Xand YButtons correspond to the Action
Palette spaces as shown here. For details about assigning
actions or items to customize your Action Palette, see p. 24.
Use
to toggle.
ACTION PALETTE
COMPASS
XBUTTON YBUTTON
BBUTTON
ABUTTON TRIGGER R
*@
Quantity
of Item
This item provides a simple overview of your HP/TP status, current
level, your Photon blaster gauge, etc. To help keep track of
everyones’ positions on the radar map, each player is automatically assigned one of four colors.
STATUS SUMMARY
PHOTON EFFICIENCY
In the world of PSO, all weaponry is powered by Photon energy. The effectiveness of a
weapon used to attack an enemy will vary according to that weapon’s Photon
efficiency level. Different types of enemies have different attributes and the amount of
damage you can inflict on each type will vary according to the suitability of the
weapon used to attack it. Also, the Photon efficiency of weapons will vary, even
among weapons with the same name.
To ch e ck the Photon efficiency of a weapon, select the weapon in qu e stion from the EQUIP or ITEMS menu
under ITEM PACK on the main menu (see p. 21) and use Tri g ger L/Rto to g gle the right window to th e
s c reen shown here. Also, a weapon name will appear in green if it has a high Photon effi c i e n c y .
WHEN YOUR HP LEVEL REACHES ZERO...
In the event you are felled in battle, you will be asked if you wish to return to Pioneer
2. If you agree your character will be sent to the medical center and revived so that
you can restart. Note that all your money (Meseta) as well as the weapon you had
equipped will be left behind in the place where you fell. If you decline to return to the
medical center, your current game data will be saved and the game will end. In the
online mode, if you decline to return, your character will remain inactive until a team
member revives you or you press Aand select “yes” to ret u rn to Pioneer 2.
JOINING IN MID-PLAY
When playing online, it is possible to join a team already in the field provided there
are less than four players already in that team. If a password has been set the joining
player must input the password in order to join, but if no password has been set,
anyone can join in. Whenever a new player joins, the game will temporarily pause and
the message “PLAYER has joined. Please wait.” will appear. As soon as the new
character appears, gameplay will resume.
Because pausing a net wo rk online game can inconvenience other playe rs, it is not possible to
pause this game either ONLINE or OFFLINE. If you need to te mp o ra ri ly inte r ru p t and
discontinue ga m e p l ay, it is recommended that you select “Quit Game” from the main menu
and then re s ta r t ga m e p l ay late r. (When playing online, rejoin your team by selecting “Join
Team” at the visual lobby info rmation counte r. [See p. 10] )
CAUTION: THIS GAME CANNOT BE PAUSED!

20 21
MAIN MENU ITEMS
STATUS SUMMARY
EXPLANATION WINDOW
DETAILED PLAYER STATUS
INTERNET TIME (SEE BELOW)
Press the Start Button to display the main menu used for a variety of actions such as equipping weapons,
using items, customizing your Action Palette, etc. Note that gameplay does not pause while the
main menu is displayed. All menu operations take place in REAL TIME. You can monitor
gameplay via the reduced sized game display that appears in the upper right portion of your screen.
MAIN MENU
This window displays full details of your character’s status. Use
Trigger L/Rto toggle between the three screens of information.
DETAILED PLAYER STATUS
$^
RL
$^
RL
GAME DISPLAYS & MENUS GAME DISPLAYS & MENUS
This gl o b a l ly compatible fo rmat for telling time developed by Swa t ch, is based
on Inte rn et Time Units called “.beats” (24 hours divided into 1000 beats). It is
e s p e c i a l ly useful when arranging meeting times with PSOp l aye rs from around the wo rld.
INTERNET TIME
PLAYER NAME
MONEY
TOTAL EXPERIENCE POINTS
P O I N TS NEEDED TO REACH NEXT LEVEL
CHARACTER TYPE
SECTION ID
CURRENT LEVEL ATP - NORMAL ATTACKING POWER
LCK - TECHNIQUE LUCK
ATA - ACCURACY RATE OF ATTACK
EVP - RATE OF DEFENSIVE EVASION
DFP - DEFENSE POWER
MST - SIZE OF TECHNIQUE EFFECT
EFR - FIRE AT TACK RESISTA NC E
EDK - DARKNESS AT T ACK RESISTA NC E
ELT - LIGHTNESS AT TACK RESISTA NC E
EIC - ICE AT T ACK RESISTA NC E
ETH - LIGHTNING AT TACK RESISTA NC E
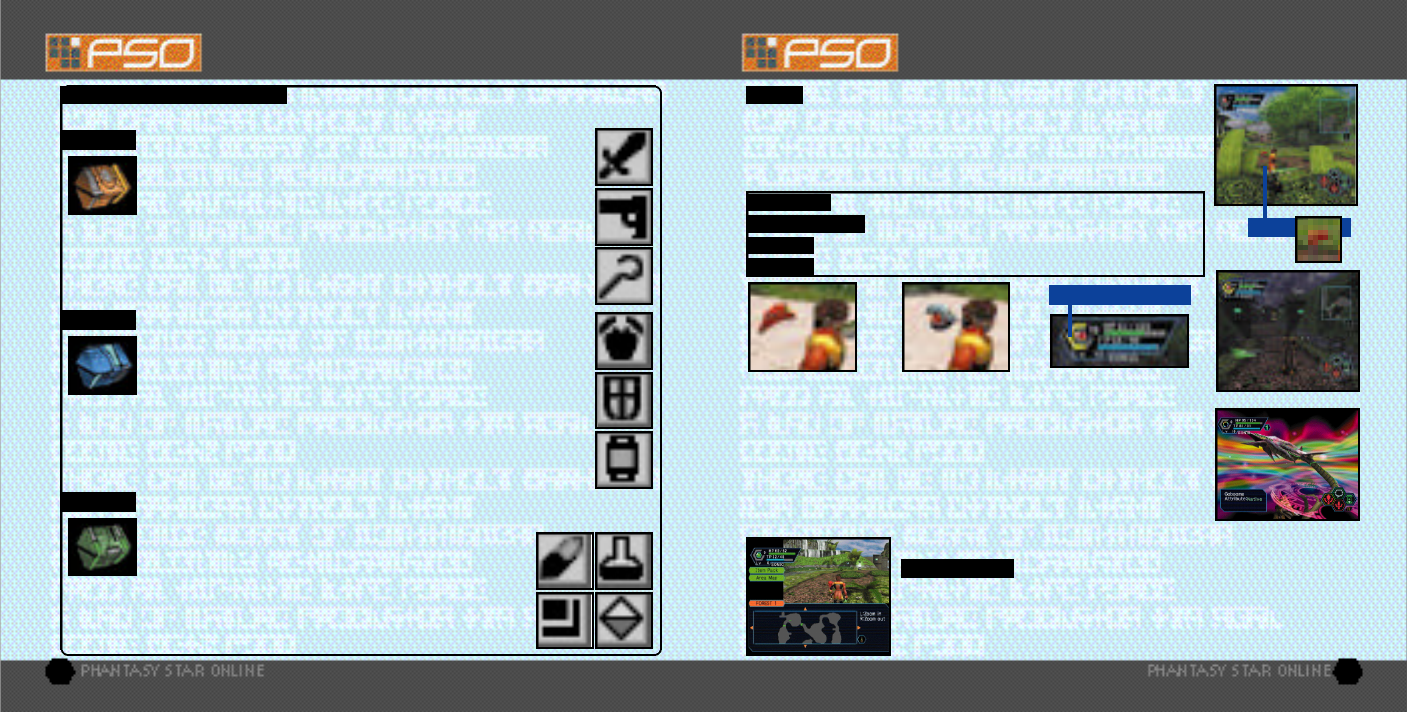
Use the item pack menu to equip weapons or armor, utilize tool items, take
care of your MAG (see p. 23), view a map of the area you are currently in,
review quest information, etc. Your item pack can hold a maximum of 30 total item types (including
weapons and armor) at a time. Use *@ to make selections and press Ato enter. Press Bto return to the
previous menu.
ITEM PACK
S h own in R E D if incre a s e d ,
B LU E if decreased.
i n d i c a tes an item
that is equ i p p e d .
ITEM ATTRIBUTES
Select this item to equip your character with weapons or
armor. Use *@ to select an item from the Equipment List and press Ato
display the Item List containing the available options you can equip. A
window to the lower right displays the attributes the currently selected
item will yield if it is equipped (use Trigger L/Rto toggle between the
three screens of information). Once a weapon or armor item is equipped,
a violet & white box will appear to the left of the item name. Also, an item
name will appear in green if it has a high Photon efficiency
EQUIPMENT
Select this to use/equip, discard or sort the items in your item
pack. Use *@ to select an item from the Item List and press Ato display
the Purpose menu. Next use *@ to select an option as described below. A
window to the lower right displays information about or attributes of the
currently selected item (use Trigger L/Rto toggle between the information
screens). With tool items, a maximum quantity of 10 of each item type can
be carried at a time. When your item pack is full it is a good idea to sell or
deposit items in the city Check Room.
ITEMS
Select to use this item right away. For items that are currently
equipped this option will change to Remove (un-equip). For items that can
be equipped, this option will change to Equip.
USE
Select to sort the items in your pack. Then select whether to do so
Automatically or Manually (item by item). Press Bwhen finished sorting
manually to return to the Item list display.
SORT
Select this to discard the item. To pick up the item again, close the
main menu and press Ato pick up the item again.
DROP
The number to the left indicates equipped status (the number to the right indicates unequipped status).
22 23
A variety of weapon, armor and tool items are available on the
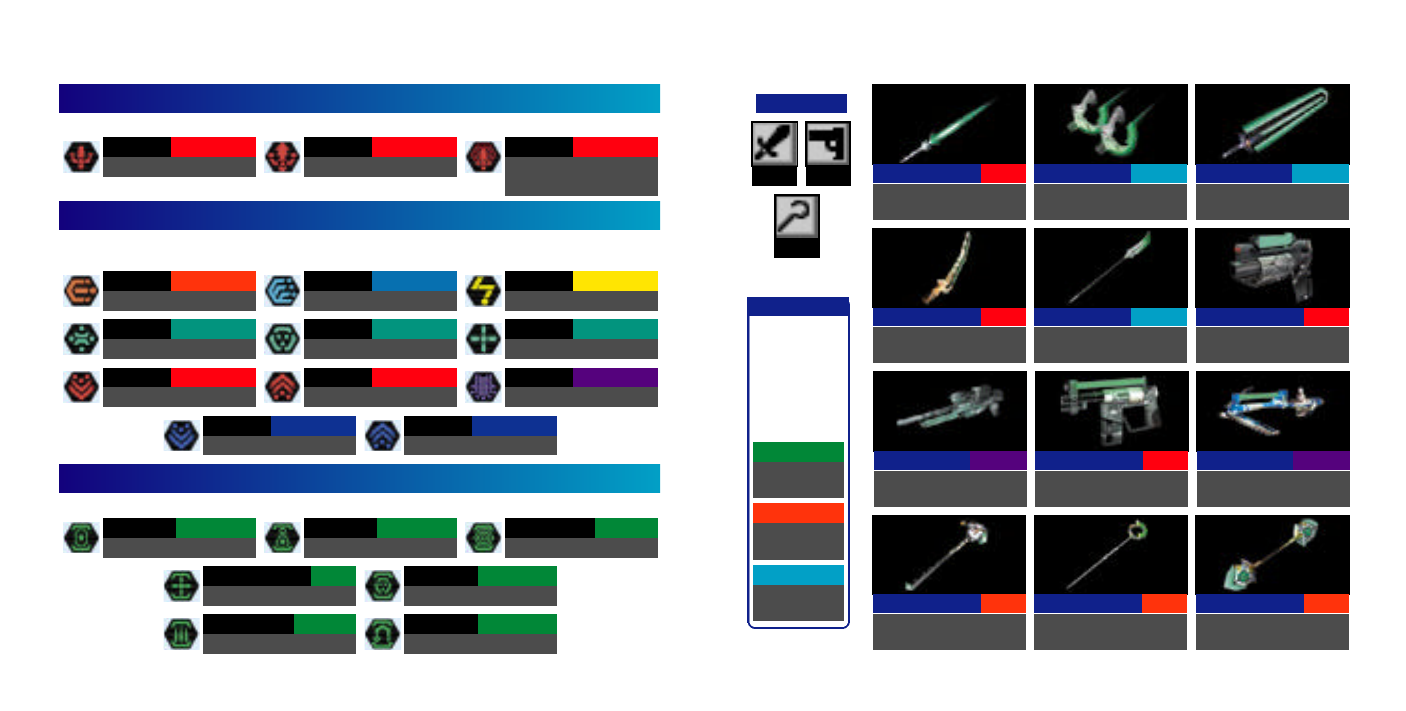
planet Ragol and the shops of the city on Pioneer 2. Each type is distinguished by their boxes as follows:
INTRODUCTION TO ITEMS FOUND IN PSO
There are three main categories of weapons found in PSO that correspond
with each of the three professions. In general, “blade” weapons are used by
Hunters, “gun-type” weapons are used by Rangers and “cane-style” weapons
are used by Force. Your ATP (attacking power) and ATA (accuracy) will
increase whenever a weapon is equipped.
Each weapon requires a certain level of experience in order to be able to use it. If your
character has yet to reach the level required, you will not be able to equip the weapon.
Furthermore, some weapons can only be used by members of certain professions.
Weapons that have special abilities are indicated by the weapon name color (see p. 13).
Also weapons with unknown capabilities should be taken to the tekker for assessment.
WEAPONS
There are various types of armor and shields that are used to protect from
enemy attack. Of the two main classes of armor protection “frames” can be
used by all professions, however “armor” can only be used by Hunters and
Rangers. Similarly, of the two main classes of shield protection (equipped to
the left hand), there are barriers that can be used by all professions and
shields that can only be equipped by Hunters and Rangers. Your DFP (defensive power)
and EVP (rate of defensive evasion) will increase whenever armor is equipped.
As with weapons, individual armor items also require certain levels of experience to be
obtained before they can be used. Some types of armor have “slots” which can be further
equipped with “units” to provide even greater protection or other specialized effects.
ARMOR
There are a wide variety of useful tool items available in the world of PSO that will assist
you in your adventures. Item names ending in “mate” indicate items which are used for HP
recovery while item names ending in “fluid”are used for TP recovery.
Item names starting with “anti” are used to return those affected with
poison or paralysis to normal.
Techniques are acquired via items called “technique disks.” Use “telepipes” to
create temporary teleport gates to the city. If you happen to have an item called
“scape doll” with you if you are felled, you will be resurrected automatically.
Items will disappear when they are used.
TOOL ITEMS
Each player has a mysterious little protector unit called a MAG.
When equipped, the mag floats just behind your character’s shoulders. If it is
raised properly your mag will grow and change. Eventually it will acquire an
attack technique called a “Photon blast” that you can utilize in battle. Care for
your mag via the mag menu and that appears when you select MAG from your
Item Pack (use Trigger L/Rto toggle between status screens).
When your MAG has developed to a certain level, it will be able to save up
Photon power discharged when you attack enemies. The rate of storage is
indicated by the yellow Photon blast gauge. Once this gauge reaches 100% you
can utilize the saved power in the form of a Photon blast action. To do so, use
Trigger Rto toggle the Action Palette to display the available Photon blast
actions. Then press the corresponding controller button. Remember that your mag
can only do this once their level is high enough. Essentially a Photon blast is the
release of stored Photon energy accumulated inside the mag. However, how the
mechanism of this process and what effects can occur are still largely unknown.
MAG
Select an item from the displayed list to give to your mag.
GIVE ITEMS
Select to remove (or equip) your mag.
REMOVE Select this to discard your mag.
DROP
View the available Photon blast actions.
PHOTON BLAST MAG
PHOTON BLAST GAUGE
Select this item to view an overhead map of the entire
area you are located in. Only the areas in which you have entered will be
displayed. Use the D-Pad to move the map and Trigger L/Rto zoom in/out.
AREA MAP
^
GAME DISPLAYS & MENUS GAME DISPLAYS & MENUS
24 25
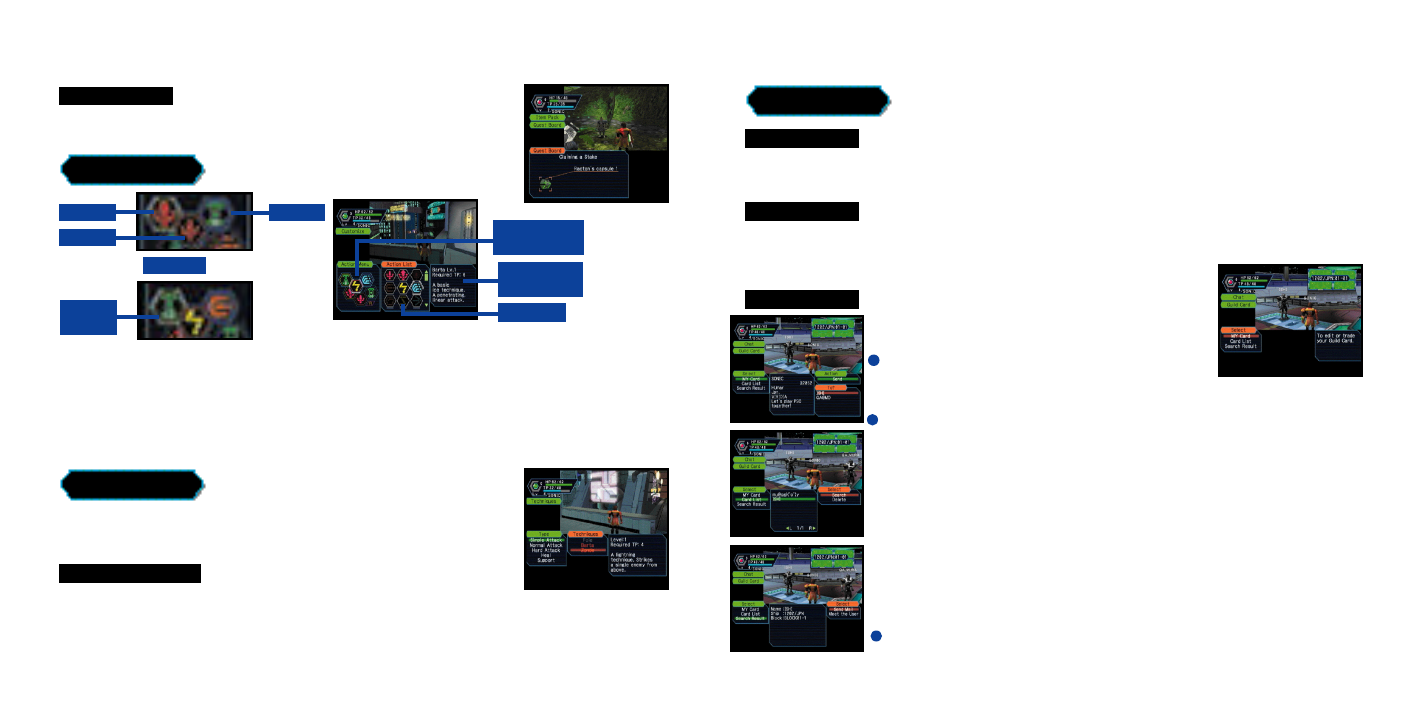
When you are undertaking a quest, select this item to review
details about your mission. Use Trigger L/Rto toggle between screens, $ ^ to
move the cursor and press Ato check information.
QUEST BOARD
Techniques are acquired or learned via items called
“Technique Discs” that can be found in the field or purchased at the tool shop in
the city. Once you obtain a technique disc, select it from the Item List and then “use” it in order to enable
usage. Techniques themselves have multiple levels and each requires that your character obtain a certain
level of MST before it can be acquired.
ACQUIRING TECHNIQUES
Select this item to customize
your Action Palette.
A total of six actions, 3 to each of the two palettes available, can be assigned to your Action Palette.
With the Action Menu displayed use Trigger Ror * @ to toggle between the two palettes. Use $ ^ to
select an action space and press Ato display the Action List. Then use * @$ ^ to select an action and
press Ato have it replace the action currently assigned to the Action Menu. If you attempt to replace the
same action to an action space where that action is already assigned the setting will be cleared and no
action will be assigned. When you are finished customizing your Action Palette, press Bto close the
Action Menu and return to the Item Pack menu. For details on the actions available, see p. 27-28.
CUSTOMIZE
Select this item to utilize your characters TP to perform
a technique. (Character types that cannot use
techniques do not have this item.) Use * @ to select a technique Type, then
select a technique from available options and press Aenter. For details on
techniques and their effects, see p. 28.
TECHNIQUES
Action Currently
Assigned
Explanation of
Selected Action
ActionList
Use to toggle.
XBUTTON BBUTTON
ABUTTON
TRIGGER R
*@
Quantity
of Item
Here you can modify your chat settings, guild card, send Simple Mail, etc. Use
* @ to select an item, press Ato enter or Bto return to the previous screen.
CHAT
Select this to create and assign (or delete) a chat balloon to each of the D-Pad keys
or soft keyboard F keys that can then be easily displayed during gameplay. With the List displayed, use
Trigger L/Rto toggle between screens and * @ to select a short cut key. Then press Ato display the
“Register/delete” menu. Select Register to input a message and then confirm your entry.
SHORT CUT
Here you can create and register symbol chat messages to the symbol chat list. Each
symbol chat message can be composed of face parts to create an expression and object parts (a
maximum of four). With “The Registered data” list displayed, use * @ to select a current symbol chat
message to edit or select “Not in use” to create a new one.
SYMBOL CHAT
Guild Cards are a simple form of communication that you
can trade with other PSO players. By collecting Guild Cards
you can easily keep track of the other players you meet.
GUILD CARD
To edit your own card, select “Wri te
Comment” and input a message. To send your card to anoth e r
p l ayer online, select “Send” and then select a player from the displayed list .
MY CARD:
Display the results of player search.SEARCH RESULTS
View or delete cards you have collected from other users. You
can also search for current information on a player whose card you have.
CARD LIST:
Use * @ to select a card from the card list and press A(use Trigger L/Rto
toggle between screens).
Select “Search” to find out where that player is currently located. If the player
is found, an icon will appear to the right of your status summary. To delete a
card, select “delete” and then confirm as requested.
Select “Search Results” to display the results. The information displayed will
vary depending on where the player. If the player is online you can send them
a Simple Mail (See p. 26) and if the player is in the visual lobby you can select
“Meet in lobby” to be transported to where that player is located.
1
2
3
GAME DISPLAYS & MENUS GAME DISPLAYS & MENUS
26
You can input and send a mail message of up to 55
characters to a another player online whose guild card you have. Select “Send
Mail” from the Simple Mail menu and then select a player from the list displayed.
Once you have input the message, select enter and then confirm.
When another player sends you a simple mail message, an envelope icon will
appear next to your status summary. To read the message, select “Received
Mail” from the Simple Mail menu to display any mail received.
SIMPLE MAIL
When chatting in the visual lobby you can normally only
read the chat balloons of those players nearby. However, by displaying the Log
Window you can see the chat messages of everyone in the same lobby. Provided
that your Log Window setting is ON, simply select “Log Window” from the Chat
menu to display the log window on the left half of your display. While the Log
Window is displayed you can input chat messages. Use * @ to scroll through the
log. To close the log window, press Bor the Start Button.
LOG WINDOW
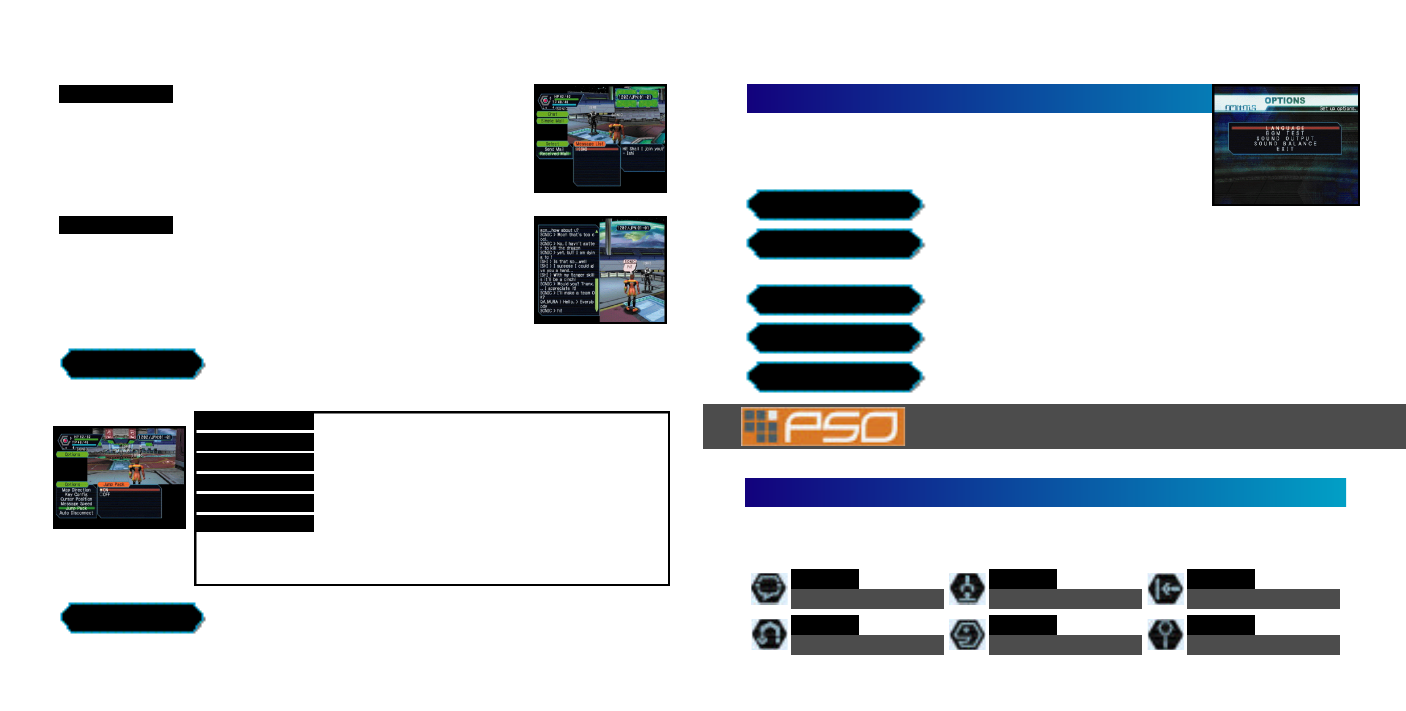
Select “Options” from the main menu to modify the fo l l owing game settings duri n g
ga m e p l ay. Use * @ to select an item from the Options menu and press Ato
e n te r. Then use * @ to select the desired setting and press Ato ente r. Press Bto ret u rn to the previous menu.
OPTIONS
Select this to disconnect from the net wo r k (if playing online), save your curre n t
game data and exit the game.
QUIT GAME
Set whether fix the map position relative to your movements.
Map Direction Select the preferred Trigger L/Rsettings.
Key Config Set whether to save the the cursor to the last position used.
Cursor Position
Set a time limit at which to automatically save the current
game data and disconnect from the network in the event
that you remain idle (e.g., if you leave the controller
untouched) for the amount of time set.
Auto Disconnect
Select a speed at which chat balloons are displayed.
Message Speed Select whether to enable the Jump Pack.
Jump Pack
GAME DISPLAYS & MENUS OPTIONS
Select OPTIONSfrom the PSOtitle screen menu to modify the following game
settings. Note that these settings cannot be modified during gameplay. Use * @
to select an item from the OPTIONS menu and press A. Then use * @ to select th e
d e s i red setting and press Ato ente r. Press Bto ret u rn to the previous menu.
Select this to modify the language setting of PSO.
OPTIONS
AUTOMATIC ACTIONS
Select this item to playback the BGM (Background Music) tracks used in
PSO. Use * @ to select song and press Ato play it. Press Bto sto p
p l ay b a ck. Press Ba gain to ret u r n to the OPTIONSmenu.
Adjust the volume balance. Use * @ to select either BGM or SE (Sound
E ffects) and then use $ ^ to adjust the levels.
SOUND BALANCE
BGM TEST
LANGUAGE
Select to return to the title screen.
EXIT
Set the sound output to either STEREO or MONAURAL
SOUND OUTPUT
27
The following introduces some of the many basic actions you will encounter in PSO.
There are a number of actions that you can perform automatically in the field simply by pressing Awhen
one of the following icons appears in the bottom space on your Action Palette. The exception to this is the
CHAT icon which always appears in the upper space on both Action Palettes.
ACTIONS USED IN PSO
CHAT
Enable the chat features.
CO M M U N I CAT E
TELEPORT
Activate a transporter.
AUTO ACTION
PICK UP
Pick up an item.
AUTO ACTION
TALK
Speak to a NPC.
AUTO ACTION
PRESS
Press or push an object.
AUTO ACTION
VIEW
View an object.
AUTO ACTION
28
ATTACKING ACTIONS
These are the main attacks used in battle. For details, see p. 17.
TECHNIQUE ACTIONS
The five types of techniques found in PSO are simple attack, normal attack, hard attack, healing and
support. Each technique requires a certain level of experience in order to be acquired or used.
ATTACK
High accura c y, low damage .
STANDARD
FOIE
H u r ls a fireball at one enemy.
ATTACK
ATTACK
L ow accura c y , high damage .
HEAVY
BARTA
A penet rating linear ice atta ck.
ATTACK
ATTACK
L o w accura c y , some we a p o n s
can yield a special effe c t .
EXTRA
TOOL ACTIONS
You can either assign tool items to your Action Palette or use them via the item menu of your item pack.
M O NO M AT E
Re stores 70 HP.
RECOVERY M O NO F LU I D
Re stores 70 TP.
RECOVERY
A N T I D OT E
Ne u t ralizes poisons.
RECOVERY
T E L E P I P E
Opens a te l e p o rt ga te to the city.
SUPPORTTRAP VISION
Reveals hidden tra p s .
SUPPORT
MOON ATOMIZER
Rev i ves a fallen team member.
REVIVE
A N T I PA R A LYS I S
Re m o ves para lys i s .
R E COV E RY
ZONDE
Lightning st ri k e on one enemy.
ATTACK
RESTA
HP recovery technique.
HEALING ANTI
No r malizes a playe r’s condition.
HEALING REVERSER
Rev i v es a fallen team member.
HEALING
JELLEN
Lowers the enemy’s ATP.
SUPPORT SHIFTA
Raises a team member’s AT P.
SUPPORT RYUKER
Opens a te l e p o rt ga t e to the city.
SUPPORT
ZALURE
Lowers the enemy’s DFP.
SUPPORT DEBAND
Raises a team member’s DFP.
SUPPORT
ACTIONS USED IN PSO
29
ELEMENTS
WEAPONS
DRAIN
Use to steal HP
from an enemy.
FIRE
B u r ns an enemy
w i th a fire atta ck.
ICE
Freezes an enemy
w i th an ice atta ck.
Weapons with
special abilities
can use va ri o u s
“elements” to
yield uniqu e
e ffects such as
the fo l l owing:
BLADE GUN
STAFF
SABER
A swo r d with a Photon blade
that can atta ck one enemy.
ALL
SLICER
A boomerang st yle blade that
can atta ck multiple enemies.
ALL
CANE
This common sta ff with weak AT P
can only be equipped by Fo r c e s .
FORCE
DAGGER
A pair of short Photon swo rd s
that can atta ck one enemy.
HUNTER
PARTISAN
A long swo r d with a Photon blade
that can atta c k multiple enemies.
HUNTER
RIFLE
A long-ra n g e gun that
fires Photon bullet s .
RANGER SHOTGUN
A shotgun that fires a spray
of Photon bullet s .
RANGER
SWORD
A large Photon bladed swo rd th a t
can atta c k multiple enemies.
HUNTER
MACHINE GUN
A pair of ra p i d - fire guns that
s h o ot Photon bullet s .
ALL
ROD
A battle rod that can only
be equipped by Fo r c e s .
FORCE
HANDGUN
A small gun that fires
P h oton bullet s
ALL
WAND
A te ch n i q ue wand that can only
be equipped by Fo r c e s .
FORCE
W E A P O N S
30
FRAME
This beginner ori e n t ed prote c to r
can be equipped by all profe s s i o n s .
ALL
GIGA FRAME
A prote c tor with unit slots that can
be equipped by all professions.
ALL
ARMOR
A basic prote c t or that can be
e quipped by Hunte r s & Ra n ge rs .
HUNTER/RANGER A basic prote c tor that can be
e quipped by Hunte r s & Ra n ge rs .
H U N T E R / R A NG E R
ARMOR &
SHIELDS P S Y ARMOR
BARRIER
This beginner ori e n ted prote c to r
can be equipped by all profe s s i o n s .
ALL SHIELD
A basic prote c tor that can be
e quipped by Hunte rs & Ra n ge rs .
HUNTER/RANGER
A basic prote c t or that can be
e quipped by Hunte r s & Ra n ge rs .
H U N T E R / R A NG E R
CORE SHIELD This beginner ori e n ted shield can
be equipped by all profe s s i o n s .
H U N T E R / R A NG E R
G I G A SHIELD
SEGA of JAPAN
Manual Production
Wri te r / Tra n s l a to r / DT P
M o n i k a Hudgins
D e s i g n
Yo s h i h i r o Saku t a
Wri ter (JPN)
C h i e ko Na ka m u r a
S u p e rv i s o r
Ka o ru Ich i g o z a k i
RESIST/FIRE
Boosts fire resistance.
PROTECT RESIST/COLD
Boosts ice resistance.
PROTECT
RESIST/LIGHT
Boosts light resistance.
PROTECT RESIST/DARK
Boosts dark resistance.
PROTECT
RESIST/SHOCK
Boosts lightning resistance.
PROTECT
UNITS
Some types of armor have open slots that can be equipped with “units” such as the following to provide
even greater protection or other specialized effects. Each slot (a maximum of four) can hold one unit.
Sega of America Dreamcast, Inc.
Localization Producer
Jason Ku o
Localization Manage r
Osamu Shibamiya
VP of Localization
Jin Shimazaki
D i r e c t or of Product Market i n g
John Golden
Product Manage r
R i ch Bri g g s
A s s o c i a te Product Manage r
Dennis Lee
Lead Analyst
G a b r ielle Brow n
A s s i s tant Leads
Tom Fo n g
Shaheed Khan
Game Analyst s
Mabel Chung
B r ent Fi l l m o re
Ka ri Hattner
Ke e h w an Her
M i c hael Jao
C h r is Meye r
B r ian Miller
Ray Mura kawa
M i k e Rhinehart
Ron Ro d ri g u e z
J o r dan Ro m a i d i s
M i k e Sch m i d t
D a vid Ta l a g
Alan Ti n g
S a m i ra Gupta
Josh Simp s o n
Ryan Sindledecke r
Nic Azizian
D a r ren Na g ta l o n
E r ic Wi l h e l m
C l i f f Wi l h e l m
J o e y Edwa rd s
Leland Wa re
A l e x Vaughan
Pe d r o Po n c e
Paul Pro n e r
SEGA.COM
SPECIAL THANKS
Net wo r k Producer
Ryan Hurth
M a r keting Project Manage r
Bee Yinn Low
Lead Net wo rk Analyst
Jason No l e n
Net wo r k Game Analyst s
Paco Yo u n ge l
Game Analysts (con’t )
H i t oshi Oku n o
Shinobu Shindo
H e a t her Haw k i n s
G w en Marke r
Bob Sch o n fi s c h
A n g ela Santo s
Simon McIlroy
S h e ri Hocka d ayS c ott Howa rd
Fred Borch e rd t
John Ku n e r
D a vid Cahill
R i c ky Vi r ay
C h r is Olson
S i r r Less
ARMOR & SHIELDS
CREDITS The fo l l owing credits list the sta f f responsible for the localization, market i n g
and manual production for the U.S. ve rsion of PSO. Credits for the ori g i n a l
d e velopment sta ff of the game are listed in the credits of the game itself.
SONIC ADVENTURE 2 - THE TRIAL
DREAMCAST CONTROLLER
With this trial version you can play as Sonic through
the first part of the upcoming Sonic Adventure 2 game.
Once the title screen appears, press the Start Button to
start the game.
Never touch the Analog Thumb Pad or the Triggers L/Rwhile
turning the Dreamcast power ON. Doing so may disrupt the
controller initialization procedure and result in malfunction.
To return to the title screen at any time during
gameplay, simultaneously press and hold the A,
B,X,Yand Start Buttons.
When using the Jump Pack (sold separately), always be sure to
insert the Jump Pack into Expansion Socket 2.
Use the Directional Pad/Analog Thumb Pad to
select and press Ato ente r / p r oceed to next scre e n .
If any enemies are nearby, Sonic will
automatically home in and attack.
XBUTTON
YBUTTON
BBUTTON
ABUTTON
TRIGGER LTRIGGER RSTART BUTTON
DIRECTIONAL PAD
ANALOG THUMB PAD
BASIC CONTROLS & SONIC ACTIONS
31
START BUTTON
OPEN/CLOSE PAUSE MENU
ABUTTONJUMP
AIN MID-AIR
JUMP DASH
Use this move to attack enemies, bust up
containers or perform rolling flips in the air.
BBUTTONSOMERSAULT
Press and hold Bto start Sonic spinning and
release to dash off at supersonic speed!
HOLD BBUTTONSPIN DASH
ITEM SELECTION
Sonic can grind railings! Use the Analog Thumb
Pad $ ^ to control Sonic mid-grind and
p ress Bto leap off .
GRIND
Use the Analog Thumb Pad $ ^ to steer th e
b o a rd, press Ato jump and Bto bra ke.
To perfo rm cool board tri cks, press A
while on the jump ra mp s
BOARD
TRIGGER L/R
PAN THE CAMERA
A NA LOG THUMB PA D
WALK & RUN
SONIC ADVENTURE 2 - THE TRIAL
32
P roceed th r ough the game field while collecting ri n g s .
G et the GOAL RING at the destination point to clear
the sta g e but if you run out of lives its game ove r.
PLAYING THE GAME & GAME OVER
W h e n ever you successfully pass a POINTM A R K E R
along the ro u te you will re sta rt from that point if yo u
lose a life after passing it.
Select RESTA R T from the pause menu to fo rfeit an
ex t ra life and re sta rt from the begining. Note that yo u
c a n n ot select this option if you have no ex t ra lives.
You can surv i ve any damage infl i c t ed by an enemy if
you have at least one ring. Howeve r, if you are
a t ta cked when you have no rings, you will lose a life.
ACTION STAGE DISPLAY & PAUSE MENU
Use the action button to perfo rm
actions such as picking up or
v i ewing items, etc. A window will
appear at the top left corner of th e
d i s p l ay to indicate the appro p ri a te action. When more than one
action is possible at a time, press Yto to g gle the action window
B/XACTION BUTTON
YTOGGLE ACTION WINDOWS
SCORE
ELAPSED
TIME
REMAINING
LIVES
RINGS
COLLECTED
PAUSE MENU
Resume play.
CONTINUE
From the begining.
RESTART
Quit and return to
the title screen.
EXIT
P i ck up/carry items. Appro a ch
an item to display this window.
PICK UP
P ress to bra ke when boarding.
BRAKE Use to locate hidden cre a t u re s .
P ress to display this window.
WHISTLE
P ress to find out about an ite m .
A p p ro a ch a myste rious item to
d i s p l ay this window.
VIEW
ACTION WINDOW
ACTION BUTTON & ACTION WINDOW
STAY TUNED FOR MORE ACTION PACKED EXCITEMENT IN SONIC ADVENTURE 2!!
In addition to collecting rings or defeating enemies to build your score, you will be able to earn
bonus points at certain hidden locations by perfo rming special actions in succession to cre a te
AC T I O NLINKS. Seek out these places and perfo r m action links to gain the highest ranking!
Wi th this trial ve rsion you can only play in one part of the adve n t u re field, but with the full
ve rsion of Sonic Ad ve n t u r e 2 th e re will be many more ch a ra c te rs and exciting action sta ge s
available.
