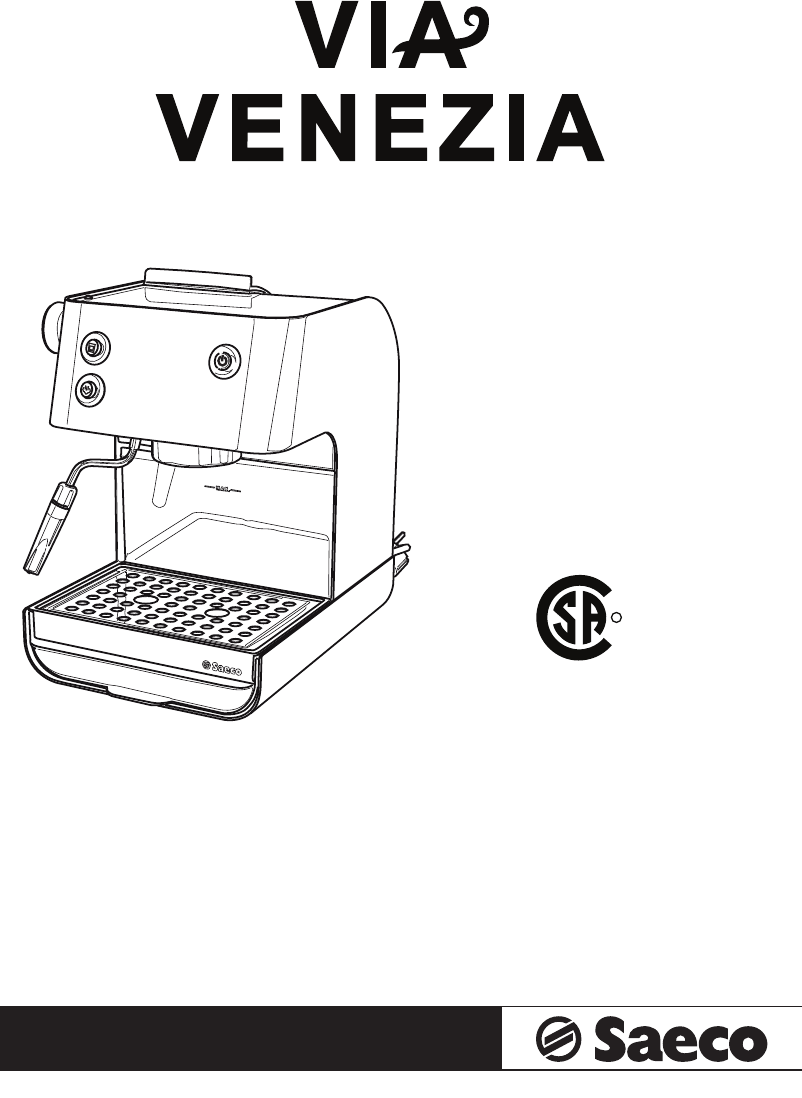
Saeco Via Venezia Espresso Machine RI9366 Ri9366_47 Manual 47
User Manual: saeco-via-venezia-ri9366_47-manual Fante's Kitchen Shop
Open the PDF directly: View PDF ![]() .
.
Page Count: 18
OPERATING INSTRUCTIONS
MODE D’EMPLOI
INSTRUCCIONES PARA EL USO
READ THESE OPERATING INSTRUCTIONS CAREFULLY BEFORE USING THE MACHINE.
LIRE ATTENTIVEMENT CES INSTRUCTIONS AVANT D’UTILISER LA MACHINE.
LÉANSE ATENTAMENTE LAS SIGUIENTES INSTRUCCIONES DE USO ANTES DE UTILIZAR LA MÁQUINA.
Ideas with Passion
CUS
R
FOR HOUSEHOLD USE ONLY
USAGE DOMESTIQUE SEULEMENT

ENGLISH
• 2 •
IMPORTANT SAFEGUARDS
When using electrical appliances, basic safety precautions should always be followed to
reduce the risk of fire, electric shock, and/or injury to persons, including the following:
1. Read all instructions and information in this instruction book and any other literature
included in the carton referring to this product before operating or using this
appliance.
2. Do not touch hot surfaces (i.e. steam wand, portafilter). Use handles or knobs.
3. To protect against fire, electric shock and personal inury, do not place cord, plugs or
appliance in water or other liquid.
4. This appliance must be kept out of the reach of children.
5. Unplug from outlet when not in use and before cleaning.
6. Allow to cool before putting on or taking off parts, and before cleaning the appliance.
7. Do not remove the portafilter during brewing cycles as there is a danger of burns.
8. The use of accessory attachments not recommended by the appliance manufacturer
may result in fire, electric shock, or personal injury.
9. Do not use outdoors.
10. Do not let cord hang over edge of table or counter, or touch hot surfaces.
11. Do not place on or near a hot gas or electric burner, or in a heated oven.
12. This machine was designed to process normal household quantities only. Not suitable
for continuous operation or commercial use.
13. Do not operate any appliance with a damaged cord or plug, if the appliance malfunctions,
or has been damaged in any manner. Return appliance to an authorized service facility
for examination, repair, or adjustment.
14. Do not use if the water tank is not filled.
15. Always use cold water. Warm water or other liquids could cause damage to the
appliance.
16. When plugging in the machine, always turn appliance “OFF”, attach power cord to the
machine first, then plug cord into wall outlet. To disconnect, always turn appliance
“OFF”, then remove plug from wall outlet.
17. Use extreme caution when using hot steam.
18. Do not use appliance for other than intended use.
SAVE THESE INSTRUCTIONS

ENGLISH
• 3 •
ENGLISH
SHORT CORD INSTRUCTION
A short power supply cord is provided to reduce the risk of tripping over or becoming
entangled with a longer cord.
The cord should be accessible after installation of the machine in order to disconnect it at
any moment if necessary.
Longer extension cords are available at retailers authorized to sell electrical accessories, and
may be utilized if care is exercised in their use. If an extension cord is used:
• The marked electrical rating of the extension cord should be at least as great as the
electrical rating of the appliance.
• If the appliance plug is grounded, the extension cord should be a 3-wire grounded
extension cord.
• The longer cord should be arranged so that it will not drape over the countertop or
tabletop, where it may be pulled on by children or accidentally tripped over.
ENGLISH
• 4 •
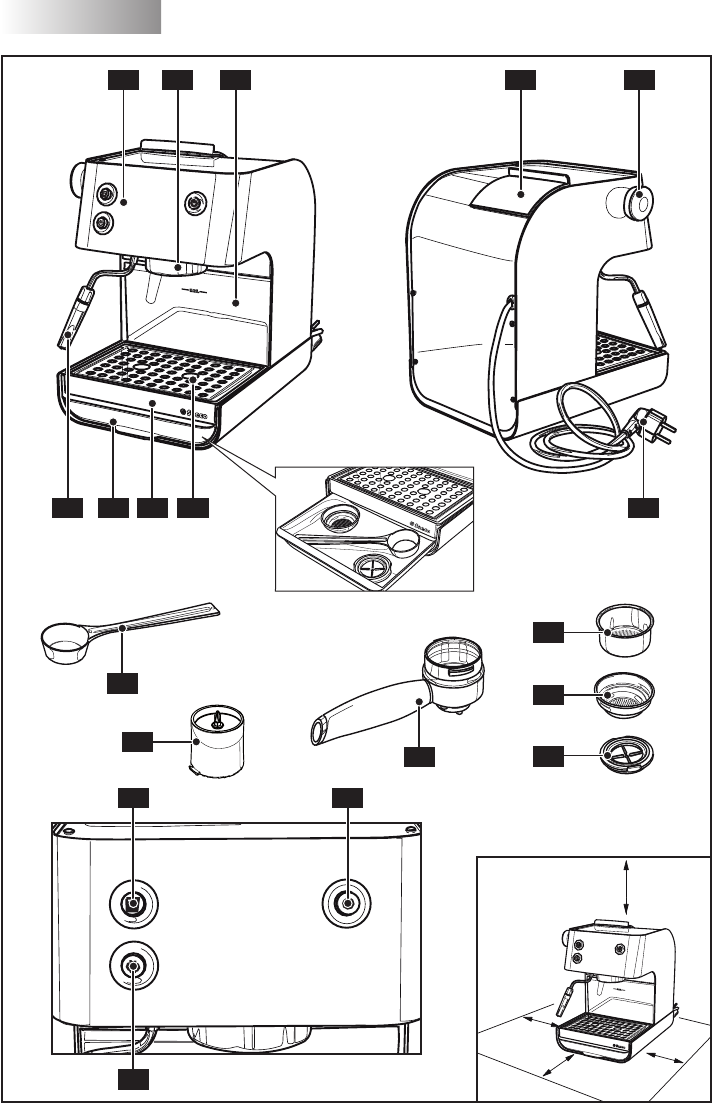
4 51 2 3
6 7 8 9 10
11
12
13
16
17
15
14
19
18
Fig.A
20 cm
8 in
20 cm
8 in 20 cm
8 in
40 cm
16 in
ENGLISH
• 5 •
Fig.1 Fig.2 Fig.3
Fig.4 Fig.5 Fig.6
Fig.7 Fig.8 Fig.9
Fig.10 Fig.11 Fig.12
A
B
A
B
ENGLISH
ENGLISH
• 6 •
Fig.13 Fig.14 Fig.15
Fig.16 Fig.17 Fig.18
Fig.19 Fig.20 Fig.21
Fig.22 Fig.23 Fig.24
ENGLISH
• 7 •
ENGLISH
1 GENERAL INFORMATION
The coffee machine is made for brewing 1 or 2 cups of
espresso coffee and features a swivel steam and hot
water spout. The controls on the front of the machine are
labeled with easy-to-read symbols.
The machine has been designed for domestic use only
and is not suitable for professional, continuous use.
Warning. No liability is assumed for any damage
caused by:
• Incorrect use not in accordance with the intended
uses;
• Repairs not carried out by authorized service
centers;
• Tampering with the power cable;
• Tampering with any part of the machine;
• The use of non-original spare parts and accesso-
ries;
• Failure to descale the machine and storage at
temperatures below 0°C.
In these cases, the warranty is not valid.
1.1 To facilitate reading
A warning triangle draws the at-
tention to all the instructions that
are important for the user’s safety.
Please carefully follow these instructions to avoid
serious injury!
The reference to illustrations, parts of the appliance or
controls, etc. is indicated by numbers or letters; in this
case please refer to the illustration.
This symbol is used to highlight the information
that is particularly important for ensuring opti-
mal use of the machine.
The illustrations corresponding to the text may be found
on the inside cover. Keep this page open while reading
the instructions.
1.2 How to use these operating instructions
Keep these operating instructions in a safe place and
make them available to anyone else who may use the
coffee machine.
For further information or in case of problems, please
refer to any authorized service center.
2 TECHNICAL DATA
The manufacturer reserves the right to make changes to
the technical specications of the product.
The machine conforms to the European Directive 89/336/
EEC (Italian Legislative Decree 476 dated 04/12/92)
concerning electromagnetic compatibility.
Nominal Voltage - Power rating - Power supply
See label on the appliance
Housing material
Metal
Size (w x h x d)
220mm x 300mm x 270mm - 9" x 12" x 11"
Weight
4 kg - 9 lbs
Cable length
1.2 m - 47"
Control panel
Front
Filter holder
Pressurized portalter
Pannarello
Plastic
Water tank (removable)
2 litres - 68 oz
Pump pressure
15 bar
Boiler
Stainless steel
Safety devices
Manual reset thermostat
Thermofuse
3 SAFETY REGULATIONS
Never place live parts in contact with water: danger of
short circuit! Steam and hot water may cause scalding!
Do not direct the steam or hot water jet toward parts of
the body; handle the steam/hot water spout with care:
danger of scalding!
Intended use
The coffee machine is intended for domestic use only.
Do not make any technical changes or use the machine
for unlawful purposes since this would create serious
hazards! The appliance is not for use by persons (inclu-
ded children) with reduced physical, mental or sensory
abilities or with scarce experience and/or competences,
unless they are under supervision of a person in charge
of their safety or they are informed by him/her on the use
of the appliance.
Power supply
Only connect the coffee machine to a suitable socket.
The voltage must correspond to the indication on the
machine’s label.

ENGLISH
• 8 •
Power cable
Never use the coffee machine if the power cable is
defective. If damaged, the power cable must be replaced
by the manufacturer or its customer service department.
Do not pass the cable around corners, over sharp edges
or over hot objects and keep it away from oil.
Do not use the power cable to carry or pull the coffee
machine. Do not pull out the plug by pulling on the power
cable or touch it with wet hands.
Do not let the power cable hang freely from tables or
shelves.
Protecting others
Prevent children from playing with the appliance.
Children are not aware of the risks linked with electrical
appliances. Do not leave the coffee machine packaging
within the reach of children.
Danger of burning
Never direct the jet of hot steam and/or hot water towards
yourself or others. Always use the handles or knobs
provided.
Do not disconnect (remove) the portalter during coffee
brewing. Hot water drips may spill out from the coffee
brew unit during the warming phase.
Location
Position the coffee machine in a safe place, where
nobody may overturn it or be injured.
Hot water or steam may spill out: danger of scalding!
Do not keep the machine at a temperature below 0°C;
freezing may damage the machine.
Do not use the coffee machine outdoors.
Do not place the machine on hot surfaces and close to
open ames to prevent the housing from melting or being
damaged.
Cleaning
Before cleaning the machine, deselect all buttons and
then remove the plug from the socket.
Then wait for the machine to cool down. Never immerse
the machine in water!
It is strictly forbidden to tamper with the inside of the
machine.
Any water left in the tank for several days should not be
consumed. Wash the tank and ll it with fresh drinking
water.
Space for use and maintenance
To ensure that the coffee machine works properly and
efciently, the following conditions are recommended:
• Choose a level surface;
• Select a location that is sufciently well-lit, clean and near
an easily reachable socket;
• Allow for a minimum distance from the sides of the ma-
chine as shown in the illustration (Fig.A).
Storing the machine
If the machine is to remain out of use for a long time, turn
it off and unplug it from the socket. Store it in a dry place
out of the reach of children. Keep it protected from dust
and dirt.
Servicing / Maintenance
In case of failure, faults or a suspected fault after
dropping, immediately remove the plug from the socket.
Never attempt to operate a faulty machine. Servicing
and repairs may only be carried out by authorized service
center. All liability for damages caused by works not
carried out in a professional manner is declined.
Fire safety
In case of re, use Carbon Dioxide extinguishers (CO2).
Do not use water or dry-powder extinguishers.
Key to machine components (Pag.4)
1 Control panel
2 Brew unit
3 Water tank
4 Funnel for water tank lling
5 Hot water/steam knob
6 Steam/hot water wand (Pannarello)
7 Accessory drawer
8 Drip tray
9 Metal grill
10 Power cord
11 Ground coffee measuring scoop
12 Ground coffee lter holder
(one only for brewing 1 or 2 coffees)
13 Pressurized portalter
14 Pod lter adapter
15 Pod lter
16 Brew button
17 Steam button
18 ON/OFF button
19 Scraper
4 INSTALLATION
For your own and for other people's safety, carefully
follow the "Safety Regulations" in section 3.
4.1 Packaging
The original packaging has been designed to protect the
machine during transport. We recommend keeping the
packaging for future transport.
4.2 Installation instructions
Before installing the machine, read the following safety
instructions carefully:
• Place the machine in a safe place;
• Make sure children cannot play with the machine;
• Do not place the machine on hot surfaces or near open
ames.
The coffee machine is now ready to be connected to the
power supply.
ENGLISH
• 9 •
ENGLISH
Note: It is recommended to wash the parts before
their rst use and/or after they have not been
used for a certain period of time.
4.3 Machine connection
Electric current can be dangerous! It is there-
fore essential to follow the safety regulations
carefully. Never use faulty cords! Faulty cords and
plugs must be replaced immediately by authorized
service centers.
The voltage of the appliance has been set by the
manufacturer. Check that the voltage supplied matches
the indications on the identication label on the bottom of
the appliance.
• Check that the ON/OFF switch (18) is not pressed before
connecting the machine to the power supply.
• Connect the plug to a wall socket with suitable voltage.
4.4 Water tank
• (Fig.1) - Remove the accessory drawer (7), the drip tray
(8) and the grill (9).
• (Fig.2) - Remove the water tank (3). Be careful not to
damage the water suction pipe.
• (Fig.3) - Rinse and ll it with fresh drinking water taking
care not to overll.
• (Fig.4) - Reinsert the tank into its seat. Take care to
correctly replace the previously extracted pipe
Only use fresh, non-sparkling drinking water to
ll the tank. Hot water or any other liquid may
damage the tank. Do not turn on the machine without
water: make sure there is enough water in the tank.
Note: For a quick water tank rell, the funnel
placed in the upper part of the machine can be
used. Open the funnel (Fig.5) and rell with water (Fig.6).
After relling, always close the funnel.
4.5 Priming the water circuit
Before starting up the machine, after long storage and
when the water has been used up, the machine’s water
circuit must be primed.
• (Fig.7) - Press the ON/OFF switch (18). The inside light
turns on.
• (Fig.8) - Place a container below the steam spout.
Open the hot water/steam knob (5) by turning it counter-
clockwise.
• Wait until a steady jet of water is emitted from the steam/
hot water wand.
• Close the hot water/steam knob (5) by turning it clockwise.
Remove the container.
The machine is now ready to brew coffee and dispense
steam. Please see related sections for operating details.
5 COFFEE BREWING
Caution! Do not remove the portalter during the
coffee brewing. Danger of burning.
• During this operation, the brew button light (16) may ash
on and off; this operation should be considered normal
and not as a fault.
• Before using the machine, make sure that the hot water/
steam knob (5) is closed and that there is sufcient water
in the tank.
• (Fig.7) - Press the ON/OFF button (18). The inside light
turns on.
• Wait until the brew button light (16) turns on. The machine
is now ready for coffee brewing.
5.1 Using ground coffee
• (Fig.9-A) - Insert the ground coffee lter (12) into the
portalter (13).
• (Fig.11) - Insert the portalter in the brew unit from the
bottom (2).
• (Fig.12) - Turn the portalter from left to right until it locks
in place. Release the grip from the portalter. The handle
slightly turns on the left. This movement guarantees the
perfect operation of the portalter.
• (Fig.14) - Preheat the portalter by pressing the brew
button (16). Water will spill out of the portalter (this
operation is only necessary for the rst coffee).
• After 4 oz (50cc) of water has owed out, press the brew
button (16) again to stop hot water dispensing.
• (Fig.16) - Remove the portalter from the machine by
turning it to the left and pour out any water left. As the
machine is tted with the ground coffee lter (12), there is
no need to change the lter to make one or two coffees.
• (Fig.9-B) - Add 1 or 2 level measuring scoops of ground
coffee to the lter for one or two coffees; clean any coffee
residues from the edge of the lter holder.
• (Fig.11) - Insert the portalter (13) in the brew unit from
the bottom (2).
• (Fig.12) - Turn the portalter from left to right until it locks
in place.
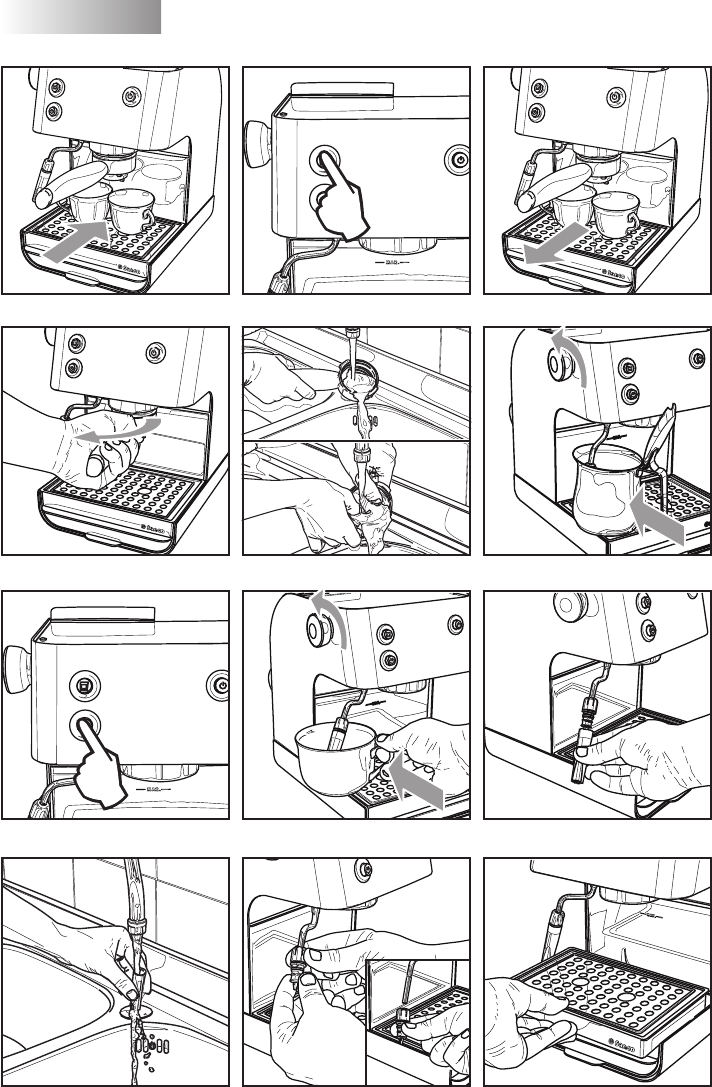
• (Fig.13) - Take 1 or 2 preheated cups and place them
under the portalter; check that they are correctly placed
under the coffee dispensing holes.
• (Fig. 14) - Press the brew button (16).
• When the desired quantity of coffee has been obtained,
press the brew button again (16) to stop the coffee brewing
and remove the cups of coffee (Fig.15).
• (Fig.16) - Wait a few seconds after brewing, then remove
the portalter and empty the remaining coffee grounds.
Note: Keep the filter of the portafilter clean
by removing it from its seat and washing with
drinking water (Fig. 17).
ENGLISH
• 10 •
5.2 Coffee pods
• (Fig.9-A) - Remove the ground coffee lter (12) from the
portalter (13) by pulling it up.
• (Fig.10) - Insert the coffee pod adapter (14), with the
curved part facing down, into the portalter (13); then
insert the pod lter (15).
• (Fig.11) - Insert the portalter in the brew unit from the
bottom (2).
• (Fig.12) - Turn the portalter from left to right until it locks
in place.
Release the grip from the portafilter. The handle is
automatically turned slightly towards the left.
This movement assures the perfect functioning of the
portalter.
• (Fig.14) - Preheat the portalter by pressing the brew
button (16). Water will spill out of the portalter (this
operation is only necessary for the rst coffee).
• After 4 oz. (50cc) of water has owed out, press the brew
button (16) again to stop hot water dispensing.
• (Fig.16) - Remove the portalter from the machine by
turning it from right to left and emptying out the remaining
water.
• Insert the pod in the portalter; make sure the paper from
the pod does not overhang the portalter.
• (Fig.11) - Insert the portalter in the brew unit from the
bottom (2).
• (Fig.12) - Turn the portalter from left to right until it locks
in place.
• Take 1 preheated cup and place it under the portalter;
check that it is correctly placed under the coffee
dispensing holes.
• (Fig.14) - Press the brew button (16).
• When the desired quantity of coffee has been obtained,
press the brew button (16) again to stop coffee brewing
and remove the cup of coffee.
• (Fig.16) - Wait a few seconds after dispensing, then
remove the portalter and dispose of the used pod.
Note: Keep the filter of the portafilter clean
by removing it from its seat and washing with
drinking water (Fig. 17).
6 TIPS FOR CHOOSING COFFEE
As a general rule any type of coffee available on the
market can be used. However, coffee is a natural product
and its avor changes according to its origin and blen-
ding. It is therefore a good idea to try different types, in
order to nd the most suited to your personal taste.
For best results, we recommend using blends which
are expressly indicated for espresso coffee machines.
Coffee should always be dispensed by the portalter
without dripping. The speed of coffee dispensing can be
modied by slightly changing the amount of coffee in the
lter and/or using a different coffee grind.
BEFORE USING THE HOT WATER/STEAM WAND,
MAKE SURE THAT THE WAND IS POSITIONED
OVER THE DRIP TRAY.
7 HOT WATER
Danger of scalding! At the beginning, short
spurts of hot water may come out. The brewing
spout can reach high temperatures: do not touch it with
bare hands.
• (Fig.7) - Press the ON/OFF button (18). The inside light
turns on.
• Wait until the brew button light (16) turns up. The machine
is now ready.
• (Fig.18) - Place a container or glass under the steam/hot
water wand (Pannarello). Open the knob (5) by turning it
counterclockwise.
• When the desired quantity of hot water has been dispen-
sed, close the knob (5) by turning it clockwise.
• Remove the container with hot water.
8 STEAM / CAPPUCCINO
Danger of scalding! At the beginning, short
spurts of hot water may come out. The brewing
spout can reach high temperatures: do not touch it with
bare hands.
• (Fig.7) - Press the ON/OFF button (18). The inside light
turns on.
• Wait until the brew button light (16) turns on.
• (Fig.19) - Press the steam button (17). The brew button
light goes off (16).
• Wait for the steam button (17) and brew button (16) lights
to turn on. Now the machine is ready to eject steam.
• (Fig.18) - Insert a container below the steam spout and
open the knob (5) for a few seconds, so that remaining
water exits from the steam/hot water wand (Pannarello);
in a short time only steam will come out.
• Close the knob (5) and put the container away.
• Fill 1/3 of the container you wish to use to prepare the
cappuccino with cold milk.
Use cold milk to get a better froth.
• (Fig.20) - Immerse the steam wand in the milk and open
the knob (5) by turning it counterclockwise; turn the
milk container with slow upward movements so that it is
warmed evenly.
• Close the knob (5); take the cup with the frothed milk.
• (Fig.19) - Press the steam button (17) again.
• Proceed with circuit priming as described in section 4.5
to make the machine ready for use.
ENGLISH
• 11 •
ENGLISH
Note: The machine is ready when the brew button
light (16) is permanently on.
Note: If it is not possible to dispense a
cappuccino as described, prime the circuit as
explained in section 4.5 and then repeat the steps.
The same process can be used to heat other
beverages.
• After this operation, clean the steam wand with a wet
cloth.
9 CLEANING
Maintenance and cleaning operations may only be
carried out when the machine has cooled down and has
been disconnected from the power supply.
• Do not immerse the machine in water or place any of its
parts in a dishwasher.
• Do not use spirit, solvents and/or aggressive chemical
agents.
• We recommend cleaning the water tank and lling it up
with fresh water daily.
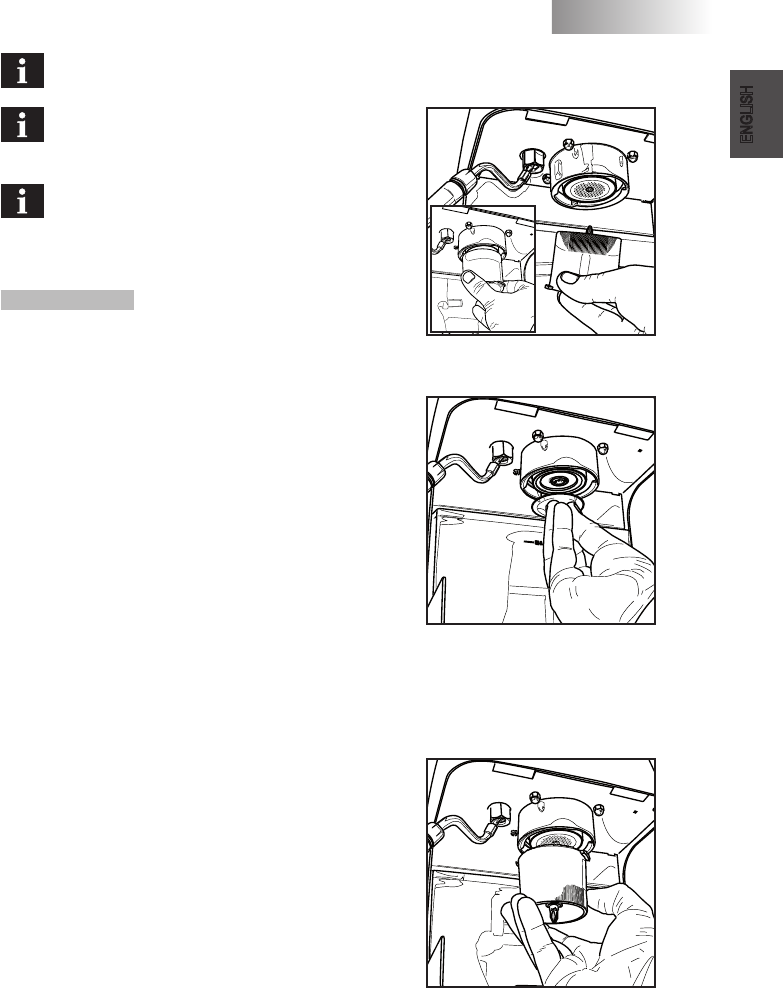
• (Fig.21-22) - Every day, after heating the milk, remove
the external part of the Pannarello and wash it with fresh
drinking water.
• (Fig.23) - The steam wand should be cleaned every week.
In order to do this operation, you have to:
- remove the external part of the Pannarello (for standard
cleaning);
- loosen the ring nut (without removing it);
- remove the upper part of the Pannarello from the steam
wand;
- wash the upper part of the Pannarello with fresh drinking
water;
- wash the steam wand with a wet cloth and remove any
milk residue;
- replace the upper part of the steam wand (make sure
it is completely inserted);
- tighten the ring nut.
Reassemble the external part of the Pannarello.
• (Fig.24) - Empty and clean the drip tray every day.
• Use a soft cloth damp cloth to clean the appliance.
• (Fig.17) - To clean the portalter proceed as follows:
- remove the lter, wash it thoroughly with hot water.
- remove the adapter (if tted), wash it thoroughly with
hot water.
- wash the internal part of the portalter.
• Do not dry the machine and/or its components using a
microwave and/or conventional oven.
Once descaling has been performed (see section 10), the
brew unit lter and the gasket should be cleaned.
To clean the lter, proceed as follows:
• Loosen the screw xing the lter to the brew unit by means
of the screwdriver which is supplied with the scraper.
• Remove the lter and wash it thoroughly with a neutral
detergent.
• Rinse and reinstall the lter; fasten the screw by means
of the screwdriver which is supplied with the scraper.
To clean the gasket, proceed as follows:
• insert the scraper into the brew unit as shown;
ENGLISH
• 12 •
• Gently turn the scraper to remove any coffee residues
from the gasket;
• Finally remove the scraper and clean with a wet cloth to
eliminate any coffee traces.
10 DESCALING CYCLE
The formation of limescale inside the appliance is inevi-
table. It is necessary to descale the machine every 3-4
months of use and/or when you notice a reduction in the
water capacity of the appliance.
If you want to descale the machine yourself,
you can use a non-toxic and/or non-harmful
descaling product for coffee machines (commercially
available). We recommend using Saeco descaling
solution.
Caution! Do not use vinegar as a descaler.
• (Fig.2) - Remove and empty the water tank.
• (Fig.3) - Mix the descaling solution with water as specied
on the pack of the descaling product and ll the water tank;
insert the tank into the machine.
• (Fig.7) - Turn on the machine by pressing the ON/OFF
button (18).
• (Fig.8) - Place a container below the steam spout.
• Open the knob (5) to remove, at intervals and one cup at
a time, the whole descaling product. Close the knob (5)
to stop the dispensing.
• (Fig.7) - During each interval allow the descaling solution
to take effect for about 10-15 minutes, disconnecting the
ON/OFF button (18). Empty the container.
• (Fig.2-3) - When the descaling solution is finished,
remove the water tank, rinse it and ll it with fresh drinking
water.
• (Fig.4; Fig.8) - Reinsert the tank in the machine. Open
the knob (5) to empty 2/3 of the water. Close the steam
knob (5) clockwise to stop dispensing.
• Let the machine warm up and empty the water tank as
described above.
If you are using a product other than the
recommended one it is important to always
follow the manufacturer’s instructions shown on the
pack of the descaling product.
11 DISPOSAL
• Put unused appliances out of service.
• Disconnect the plug from the socket and cut the electrical
cord .
• At the end of its life, take the appliance to a suitable waste
collection site.
ENGLISH
• 13 •
ENGLISH
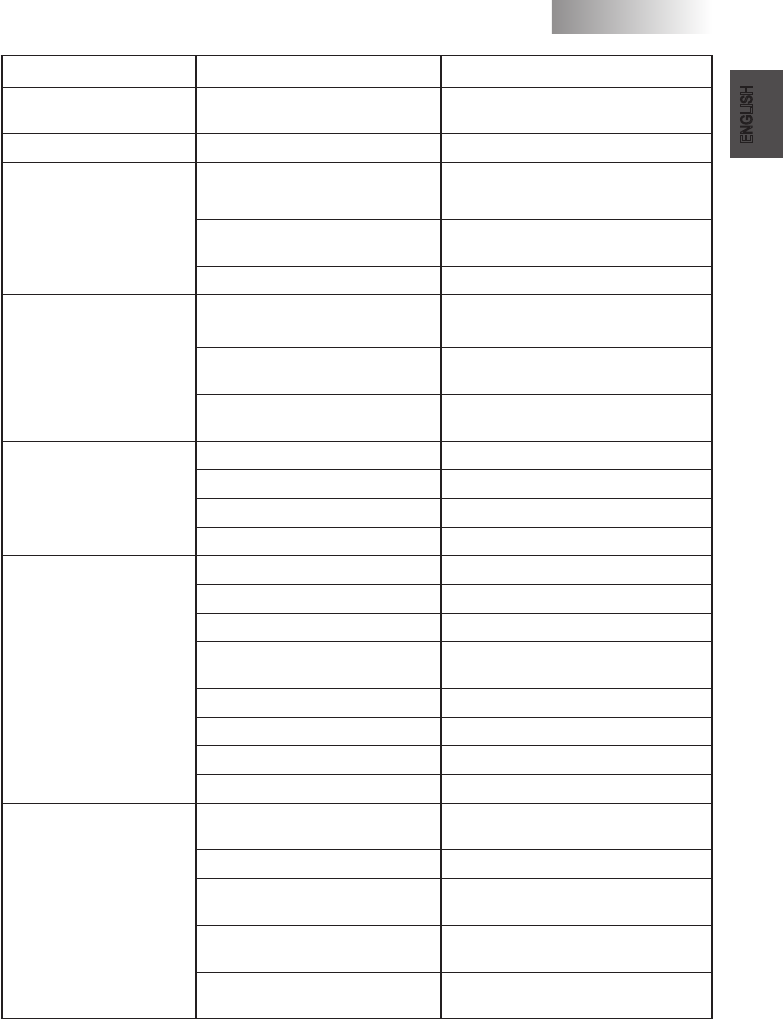
Fault Possible cause Solution
The machine does not turn on. The machine is not connected to the
power supply. Connect the machine to the power supply.
The pump is very noisy. No water in the tank. Rell with water (section 4.4).
The coffee is too cold.
The brew button light (16) was off when
the button was pressed.
Wait until the brew button light (16) turns
on.
The lter holder is not inserted for
preheating (section 5). Preheat the lter holder.
Cold cups. Preheat the cups with hot water.
The milk does not froth.
It is not possible to prepare a
cappuccino.
Milk is not suitable. Use cold, whole milk.
The steam wand is dirty. Clean the steam wand as described in
section 9.
There is no more steam in the boiler. Prime the circuit (section 4.5) and repeat
the operations described in section 8.
The coffee is dispensed too
fast, no crema builds up.
Too little coffee in the lter holder. Add coffee (section 5).
The grind is too coarse. Use a different blend (section 6).
Coffee is old or not suitable. Use a different blend (section 6).
Old or not suitable pod. Change the pod.
Coffee does not come out or
drips only.
No water. Rell with water. (section 4.4).
The grind is too ne. Use a different blend (section 6).
Coffee pressed in the lter holder. Shake the ground coffee.
Too much coffee in the lter holder. Reduce the quantity of coffee in the lter
holder.
Knob (5) is open. Close the knob (5).
Calcied machine. Descale the machine (section 10).
The lter in the lter holder is clogged. Clean the lter (section 9).
Not suitable pod. Change type of pod.
The coffee comes out from
the side.
The lter holder is incorrectly inserted
in the brew unit. Insert the lter holder correctly (section 5).
Upper edge of the lter holder is dirty. Clean the rim of the lter holder.
The gasket of the boiler is dirty or
worn. Clean or replace the gasket.
Pod wrongly inserted. Insert the pod correctly. Make sure it
doesn’t come out of the lter holder.
Too much coffee in the lter holder. Reduce the quantity of coffee by means of
the measuring scoop.
Please contact an authorized service center for any faults not covered in the above table or when the suggested
solutions do not solve the problem.
Limited Warranty & Descaling your
Espresso Coffee Machine
Limited Warranty
This warranty covers all defects in workmanship or
materials in the mechanical and electrical parts, arising
under normal usage and care, in this Saeco USA product
for a period of 1 (one) year from the date of purchase.
A valid proof-of-purchase must be provided prior to
any warranty service being rendered. A valid proof-of-
purchase is an authorized retailer receipt specifying
item, date purchased, and cost of item. An authorized
retailer gift receipt with date of purchase and item is also
an acceptable proof-of-purchase. Product is intended
for household use only. Any commercial use voids the
warranty. Exception: Royal machines are sold by Saeco
USA for commercial use and will be covered by a 1 (one)
year warranty on parts and labor both for household and
commercial applications.
Who is covered?
The original purchaser or gift recipient who can provide
proof-of-purchase from an authorized Saeco USA dealer.
What is not covered?
Improper usage and care can result in mineral buildup
that damages the product. Saeco USA is not responsible
for any expense resulting from such damage including
transportation, shipping, and repairs resulting from
mineral buildup, also known as calcium deposits, scale
and lime scale.
What will be done?
During the applicable warranty period under normal hou-
sehold usage and care, Saeco USA will repair or replace,
at their discretion, any mechanical or electrical part which
proves defective, or replace product with a comparable
model. The repaired or replacement product is warranted
for one year from the original date of purchase or 90
days, whichever is greater.
How can you receive service?
Call 1-800-933-7876 to request service. A Return
Authorization will be issued, when necessary. All
warranty service must be performed by Saeco USA or an
authorized Saeco USA Service Center or dealer. Please
contact Saeco USA for details. Repair or attempted repair
by unauthorized persons voids the warranty.
Unauthorized returned products will not be accepted and
will be returned to sender at sender’s expense.
In the event service is required:
• To obtain warranty service, a valid proof-of-purchase must
be submitted to Saeco USA before returning product.
Maintain a copy of proof-of-purchase for your records.
• Return Authorization number issued by Saeco USA is
necessary to obtain warranty service and must be clearly
labeled on box.
• Saeco USA is not responsible for loss or damage during
incoming shipment.
• Be sure to enclose any accessories or components related
to the product’s problem.
• Carefully package product. Saeco USA is not responsible
for any transportation and shipping expense.
• Retain tracking information for your protection in case of
loss or damage in shipment.
THIS LIMITED WARRANTY COVERS PRODUCTS
PURCHASED AND USED WITHIN THE UNITED STATES
AND DOES NOT COVER:
• Damages from improper installation.
• Damages in shipping.
• Defects other than manufacturing defects.
• Damages from misuse, abuse, accident, alteration, lack
of proper care and maintenance, or incorrect current or
voltage.
• Damage from service by other than a Saeco USA
authorized dealer or service center. Contact Saeco USA
for details.
• Any transportation and shipping charges.
Manufacturer makes no warranty, express or implied,
including without limitation, any warranties of tness
or merchantability, except as expressly set forth above
with respect to such products or parts therefor. Nor
shall manufacturer have incurred any other bligations or
liabilities on its part or be liable for any anticipated or lost
prots, incidental damages, consequential damages, time
charges, or any other losses incurred in connection with
the purchase, installation, replacement, or repair of such
products or any parts therefor whether original equipment
or installed as a replacement covered by this warranty or
otherwise; & manufacturer does not authorize any person
to assume for manufacturer any other liability in con-
nection withthe products or parts therefor. Manufacturer
assumes no liability for delay in performing its obligations
hereunder if failure results, directly or indirectly, from any
cause beyond its control, including but not limited to acts
of god, acts of government, oods, res, shortages of
materials, strikes and other labor difculties, or delays,
or failures of transportation facilities. This warranty gives
you specic legal rights, and you may also have other
rights which vary from state to state.
DESCALING YOUR ESPRESSO COFFEE MACHINE
As part of normal preventative maintenance, espresso
makers should be descaled approx. every 2-3 months,
depending on the volume of use and hardness of your
local water supply.
WARNINGS
Do not swallow. Avoid eye contact. Wash hands after
use. Do not expose to heat.
• Keep out of reach of children.
• This product is non-toxic.
To descale your espresso coffee machine, please follow
these steps:
MANUAL FILTER HOLDER MACHINES (ie: VIA VENE-
ZIA, GRAN CREMA, AROMA, MAGIC CAPPUCCINO,
SIRENA):
1. Fill the water tank with the descaling solution. (1 packet
of Saeco descaling solution to one full tank of water.)
2. Turn on the machine and remove lter holder.
3. Run approximately 8 oz. of solution through the brew head.
Turn machine off and let the machine sit for 15 minutes.
4. Run approximately 8 oz. through the steam wand, and
again, turn machine off and let sit for 15 minutes.
5. Repeat this procedure, alternating between the brew head
and steam wand until the water tank is empty. Then rinse
water tank thoroughly and run two tanks of clear water
through the machine, alternating between the brew head
and steam wand.
Should be bold, just like other headers.
1. Fill the water tank with the descaling solution. (1 packet
of Saeco descaling solution to 4 cups of water.)
2. Turn on the machine.
3. Run approximately 8 oz. through the steam wand, turn
machine off and let sit for 15 minutes.
4. Repeat this procedure until the water tank is empty.
Then rinse water tank thoroughly and ush the machine
by running two tanks of clear water through the steam
wand.
PRIMEA / TALEA / ODEA / INCANTO / MAGIC / ROYAL /
V’SPRESSO AUTOMATIC MACHINES:
1. Fill the water tank with the descaling solution.
(1 packet of Saeco descaling solution to 4 cups of
water.)
2. Follow automatic descaling instructions as described in
manual.
This procedure, when performed as necessary, should
help avoid any major descaling requirements and related
expenses.
We always recommend the use of bottled or ltered
water to extend the longevity of your espresso machine.
Distilled water should not be used, as too many of the
necessary minerals are missing to make a good tasting
espresso.
To cancel the descale message upon completion of the
descaling cycle:
• Primea, Talea, Odea, Incanto or V’spresso: See individual
machine manuals.
• Magic Deluxe or Royal Digital: Press and hold the steam
button for 5-10 seconds.
• Royal Exclusive or Royal Professional: Enter programming
mode by pressing and holding the ENT (preground)
button. Scroll to the sub-menu ‘Sign.Descal’. Press the
enter button, scroll to yes, press the enter button. Scroll
to the ‘Exit’ sub-menu and press enter.
There are many good descaling agents on the market to-
day including Saeco’s own product: Part number 524000,
3 packets, MSRP $7.00 plus $5.90 shipping & handling.
Any descaling product used for our machines should be
citric based. Do not use vinegar or lemon juice as this will
cause damage to the machine.
This product is non-toxic, biodegradable & odorless.
FIRST AID: If ingested, drink 2-3 glasses of water. In
case of eye contact, ush thoroughly with cool running
water for 15 minutes. Remove any contact lenses. Con-
tact physician in either case, then get prompt medical
attention. For skin contact, ush with water.
If you have any questions or comments,
please call
Customer Service 1-800-933-7876
or visit: www.saecooutlet.com

UNITED STATES SERVICE CENTER LISTING - LISTE DES CENTRES
D’ASSISTANCE - LISTA DE CENTROS DE ASISTENCIA
State City Service Center Telephone
Pays Ville Centre d’assistance Numéro de téléphone
Estado Ciudad Centro de asistencia Teléfono
AZ Phoenix Kitchen Classics/Kitchen Store 602-954-8141
CA Burlingame Espresso Equip Engineering LLC 650-375-8480
CA Escondido Mart's Appliance Service 760-745-7711
CA Gardena A Latte Hotte 310-294-9744
CA San Jose Appliance Repair Express 408-371-8853
CA Signal Hill Swiss Systems, Inc. 310-689-2372
CA Woodland Hills Speedy Appliance Service 818-225-7774
CO Colorado Springs Maric Beverage Systems 719-380-1610
FL Boca Raton SmArt Deco 561-620-0287
FL Sarasota Beanz, Inc. (The Beanz Man) 941-359-8916
IL Bensenville The Expresso Shoppe 630-350-0066
IL Chicago Longo & Siefer, Inc. (Coffee Exchange) 773-745-9295
IN Indianapolis Pro Tech Beverage Service 317-271-8515
MA Everett TC's Repair Service, Inc. 800-381-5001
MI Utica (Shelby Township) Espresso Machine Experts MI 586-739-9500
MN Minneapolis Kitchen Window / Alternative Con 612-824-4417
NC Cornelius The Coffeeboss, LLC 704-987-3310
NC Wilmington Personal Systems, Ltd 877-286-2833
NJ Berkeley Heights The Repair Shack 908-464-0797
NJ Somerville Butensky Services Co. 908-707-0912
NY Bronx Cerini Coffee Services Inc 718-584-6120
NY Brooklyn Solomon's Appliance Center 718-236-5065
NY Mount Kisco Enscrybe, Inc. (The Java Fix) 914-514-8042
OH Rocky River River Espresso 216-544-4954
OR Elmira Stefano's Espresso Care 541-935-1212
OR Medford Cafe West Distribution 877-701-2020
PA Bethel Park Espresso D'Milan, LLC 412-663-0125
PA Lansdale Services Unlimited, Inc. 215-361-7000
SC Myrtle Beach Coffee Joe's Repair 843-293-2886
TX Richardson Espresso RMI, Inc. 972-690-6969
UT Salt Lake City Rimini Coffee / Shea Service 801-539-1210
WA Seattle Home Espresso Repair Service 206-789-9513
WA Spokane Tech One Services 509-536-0524
WA Vancouver Espresso Resource NW 503-251-2970


Cod. 15001163 Rev.00 15-05-07
Saeco International Group S.p.A. Via Torretta, 240 - 40041 Gaggio Montano
Bologna - Italy - Tel. +39 0534.771.111 - Fax. +39 0534.31025
http://www.saeco.com
Type Sin006XN
Customer Service 1-800-933-7876
or visit: www.saecooutlet.com
