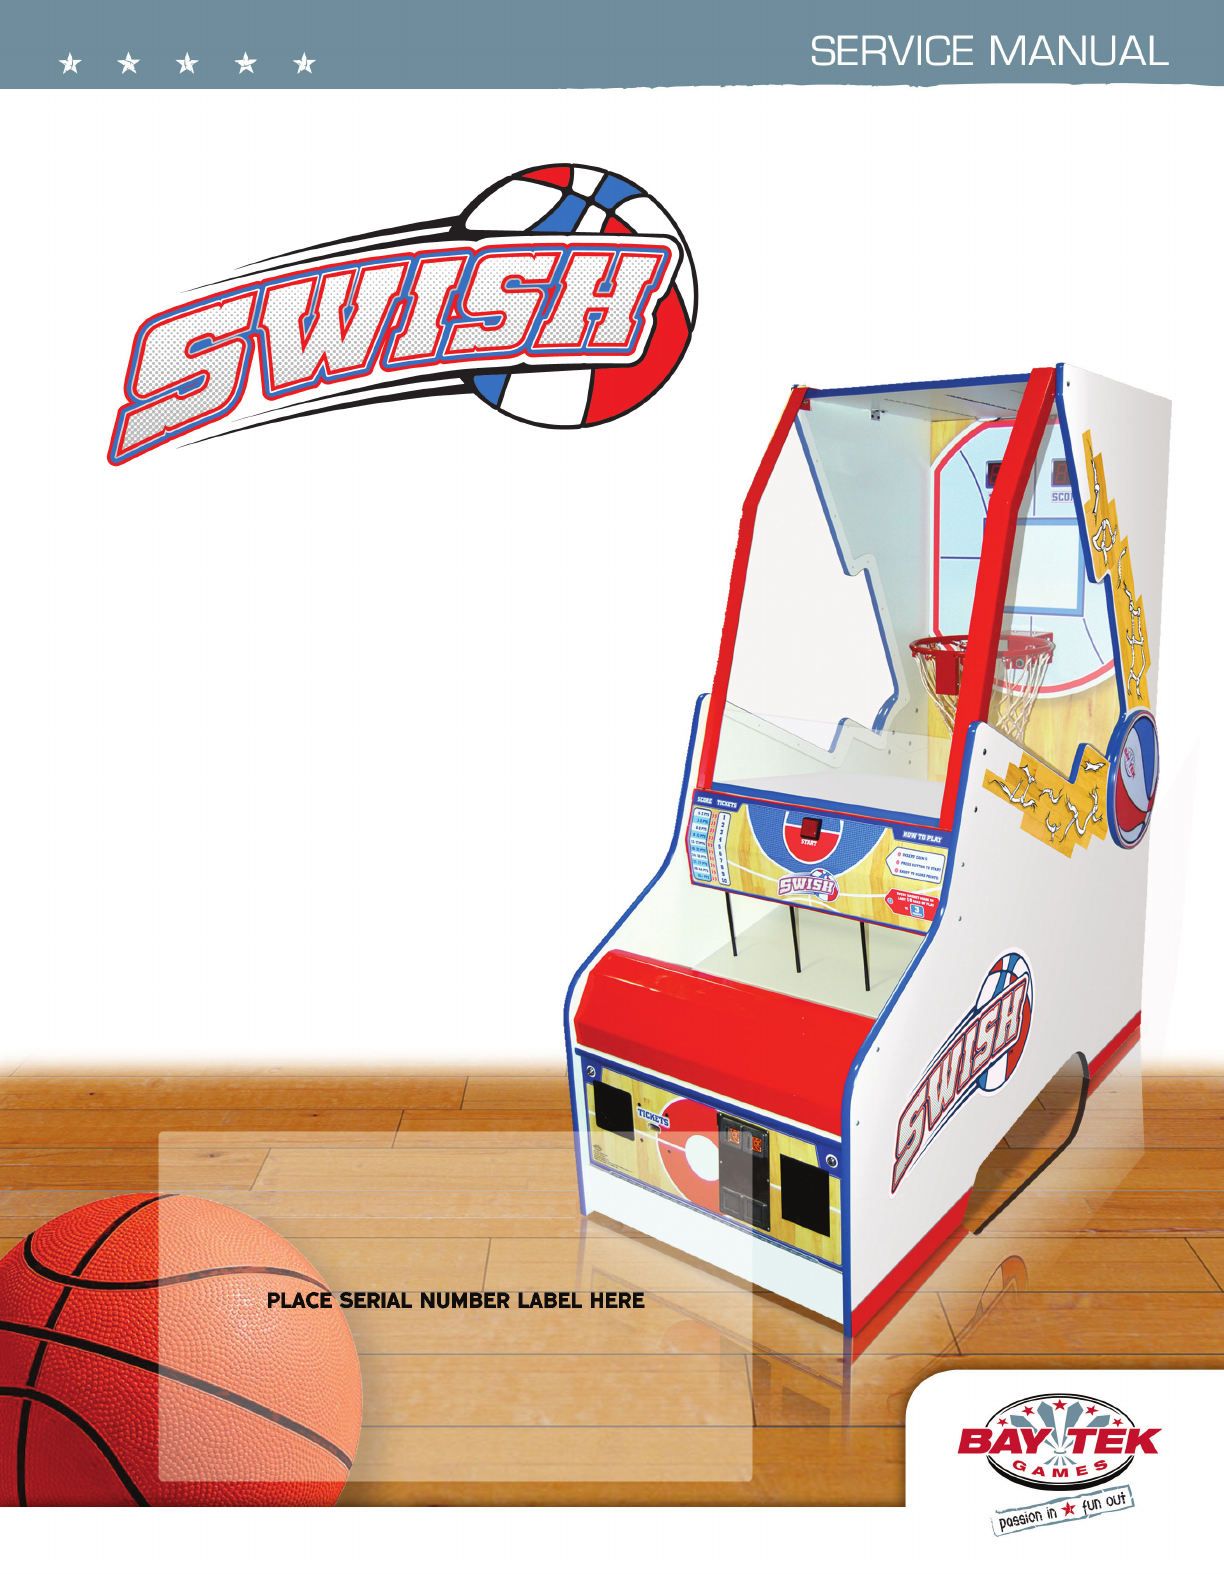
Swish Redemption Games Service Manual Bay Tek
User Manual: swish-redemption-games-service-manual-bay tek games
Open the PDF directly: View PDF  .
.
Page Count: 33
1
You can get this game at www.magic-play.eu
You can get this game at www.magic-play.eu
2
FACTORY CONTACT INFORMATION
BAY TEK GAMES INC.
Pulaski Industrial Park
1077 East. Glenbrook Drive
Pulaski, WI 54162 USA
JOIN OUR SERVICE FIRST NETWORK!
This free service is intended to keep you up to date on the latest
game information, early notication of parts specials, pertinent
technical bulletins, updates on retro t parts, software upgrades,
and much more.
Log on to: www.baytekgames.com/parts
then click on the Parts N’ Service tab, or scan the QR code to
the right with your Smartphone to jump straight to this game’s
parts page!
PARTS
P: 920.822.3951 X 1101
F: 920.822.1496
E: parts@baytekgames.com
MON - FRI
8 AM - 5 PM C.S.T.
SERVICE
P: 920.822.3951 X 1102
F: 920.822.1496
E: service@baytekgames.com
SALES
P: 920.822.3951
F: 920.822.8936
E: sales@baytekgames.com
All games are proudly manufactured at our factory in Pulaski, Wisconsin, USA
Scan here!
GAME INSPECTION
Inspect the game for any damaged, loose, or missing parts. If damage is found, please
contact your freight carrier rst. Then, contact Bay Tek Games’ Service Department at
920.822.3951 or e-mail them at service@baytekgames.com for further assistance.
You can get this game at www.magic-play.eu
You can get this game at www.magic-play.eu

3
TABLE OF CONTENTS
FACTORY CONTACT INFORMATION ..............................2
WELCOME TO: SWISH .........................................4
HOW TO PLAY ................................................5
SPECIFICATIONS ..............................................6
SAFETY PRECAUTIONS ........................................6
DIP SWITCH SETTINGS ........................................7
MAIN MENU FUNCTIONS .......................................8
CREDIT/TICKET CLEAR ....................................8
CREDITS PER PLAY .......................................9
TICKET PATTERNS .......................................9
GAME VOLUME ..........................................9
ATTRACT VOLUME .......................................9
TICKET PATTERNS ......................................10
MERCY TICKETS ........................................10
DIVIDE BY 2 TICKET DISPENSE ............................10
FIXED TICKET PAYOUT ...................................11
STORED CREDITS/ TICKETS OWED ........................11
GAME TIME .............................................11
STATISTICS ............................................12
RESET STATS ...........................................12
RESET FACTORY DEFAULTS ..............................12
MAIN BOARD PINOUT GUIDE ................................13-15
WIRING DIAGRAMS ........................................16-19
TROUBLESHOOTING GUIDE ................................20-22
POWER SUPPLY DIAGNOSTICS ................................23
DBA DIAGNOSTICS ...........................................24
PARTS LIST .................................................25
PARTS PICTURES ............................................26
DECAL IDENTIFICATION .......................................27
MAINTENANCE LOG ..........................................28
TECHNICAL SUPPORT ........................................29
WARRANTY .................................................30
You can get this game at www.magic-play.eu
You can get this game at www.magic-play.eu

4
WELCOME TO: SwishTM
Congratulations on your SwishTM purchase!
Newly redesigned and ready to slam dunk, SwishTM makes a great addition to any
gameroom. With cool, modern graphics and classic game play, this mini basketball free
throw machine is sure to make the winning shot!
Please take a moment to read through this manual and be sure to contact our factory if
you have any questions, or would like some more information.
Thank you for your purchase! Your business is important to us and we hope you enjoy
this game as much as we do!
Your Friends at Bay Tek Games
GAME INSPECTION
Inspect the game for any damaged, loose, or missing parts.
If damage is found, please contact your freight carrier rst.
Then, contact Bay Tek Games’ Service Department at 920.822.3951
or e-mail them at service@baytekgames.com for further assistance.
You can get this game at www.magic-play.eu
You can get this game at www.magic-play.eu
5
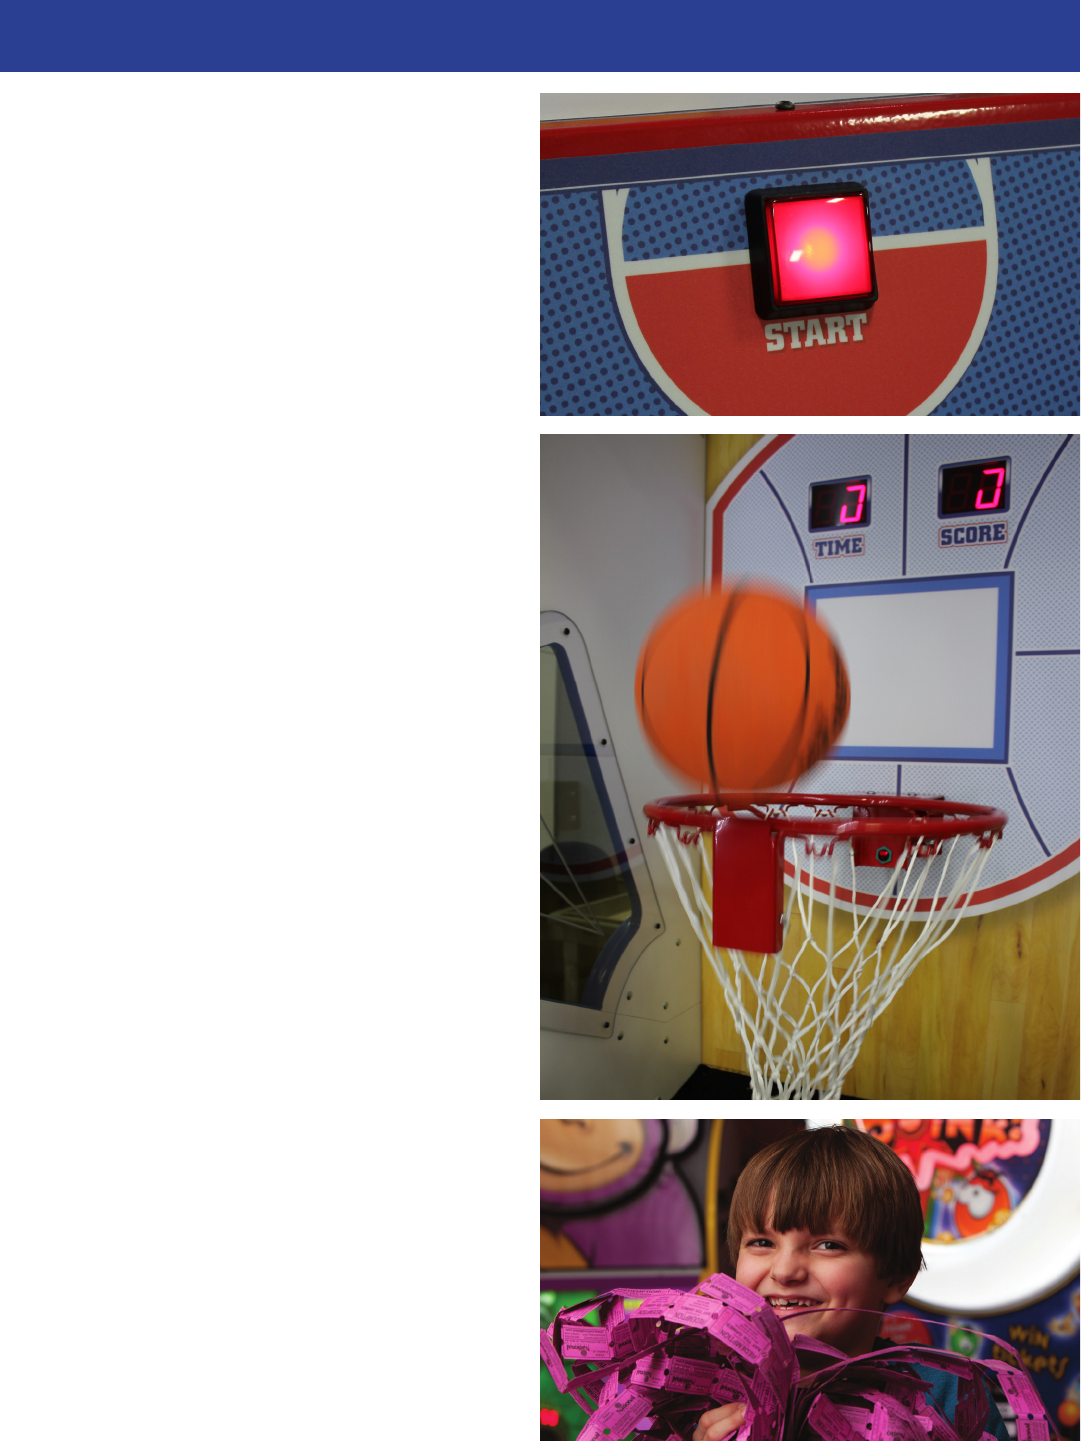
HOW TO PLAY
Coin up and hit the start button to release
the basketballs.
Shoot as many hoops as you can in the
time allotted! Hurry! In the last 10 seconds,
baskets are worth 3 points!
Grab your tickets and play again!
You can get this game at www.magic-play.eu
You can get this game at www.magic-play.eu
6
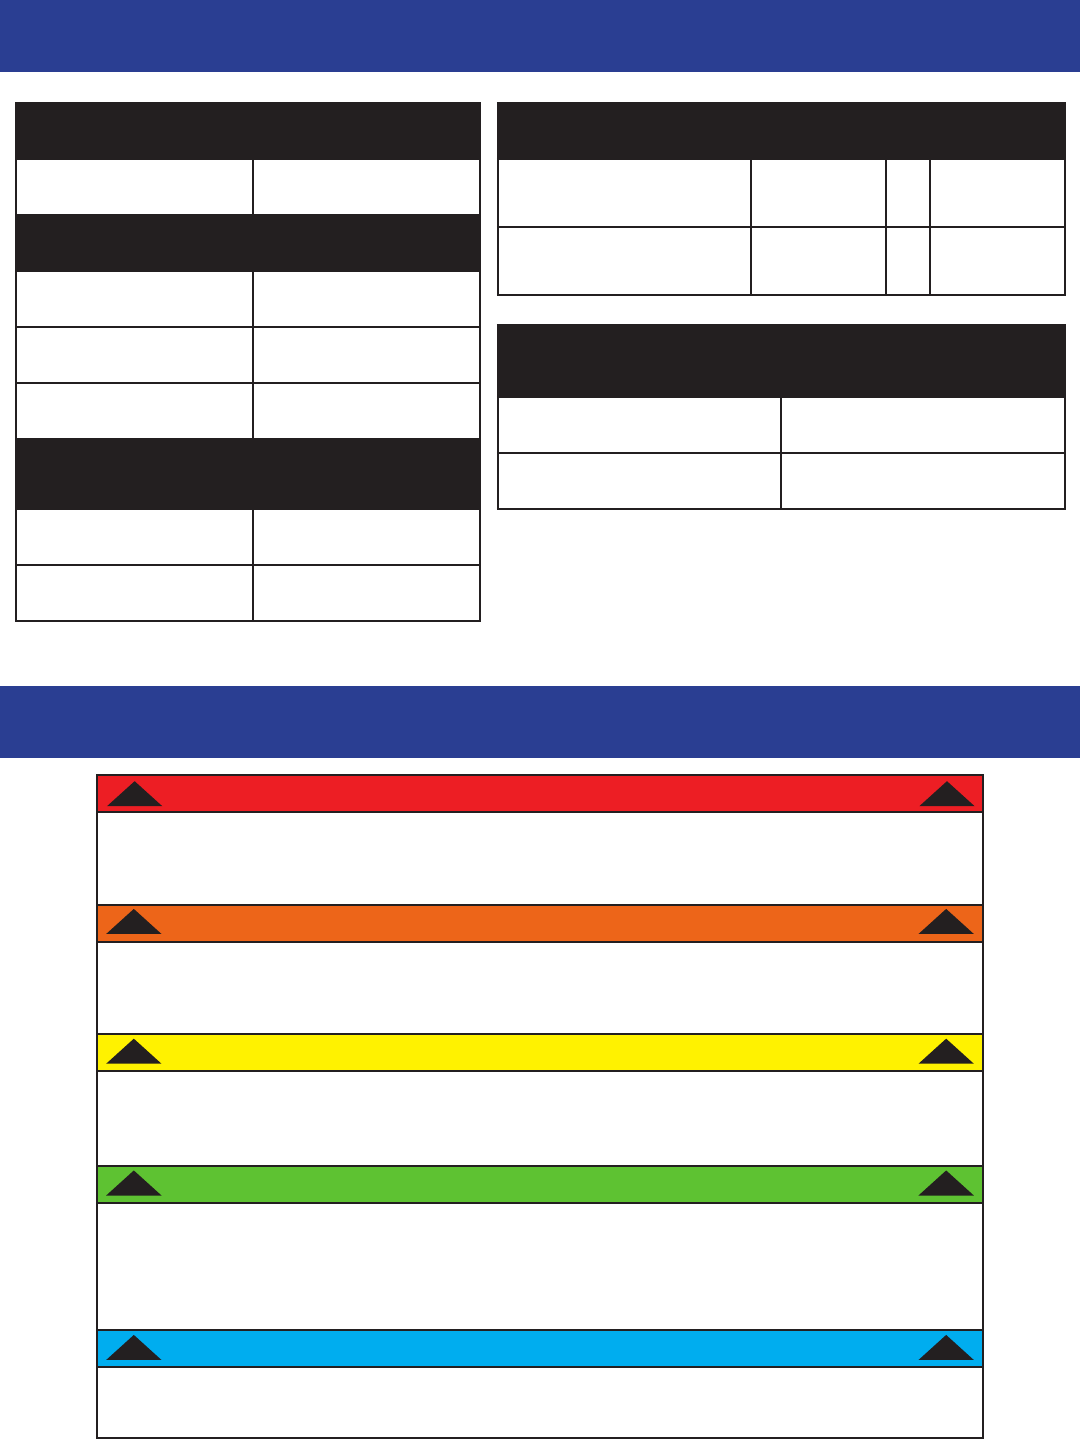
GAME SPECIFICATIONS
SAFETY PRECAUTIONS
WEIGHT
SHIP WEIGHT 350 LBS
DIMENSIONS
WIDTH 32”
DEPTH 67.25”
HEIGHT 77.58”
OPERATING
TEMPERATURE
FAHRENHEIT 80-100
CELSIUS 26.7-37.8
POWER REQUIREMENTS
INPUT VOLTAGE
RANGE
100 to 120
VAC /220 to 240
VAC
INPUT FREQUENCY
RANGE 50 HZ / 60 HZ
MAX START UP
CURRENT
OPERATING
CURRENT
1.5 AMPS @ 115 VAC 0.7 AMPS @ 115 VAC
0.75 AMPS @ 230 VAC .35 AMPS @ 230 VAC
DANGER
WARNING
CAUTION
ATTENTION
IN CASE OF EMERGENCY
DO NOT perform repairs or maintenance on this game with the power ON.
Unplug the unit from the wall outlet or shut off the power strip located inside the
cabinet.
Use of ammable subtances can cause sever burns or serious injury.
Always use NON-FLAMMABLE solvents for cleaning. DO NOT use gasoline kero-
sene or thinners.
Lifting heavy objects can cause back, neck or other injuries. Be sure adequate lift-
ing and moving devices are available when unloading, unpacking and moving this
game.
Be sure the electrical power matches the game requirements. See the serial num-
ber located on the back of the game cabinet. Always plug into a grounded circuit. If
the supply cord is damaged, it must be replaced by an approved cord or assembly
provided by the manufacturer.
UNPLUG THE POWER CORD.
The power cord must be accesible at all times in case of an emergency.
!!
!!
!!
!!
!!
You can get this game at www.magic-play.eu
You can get this game at www.magic-play.eu
7
DIP SWITCH SETTINGS
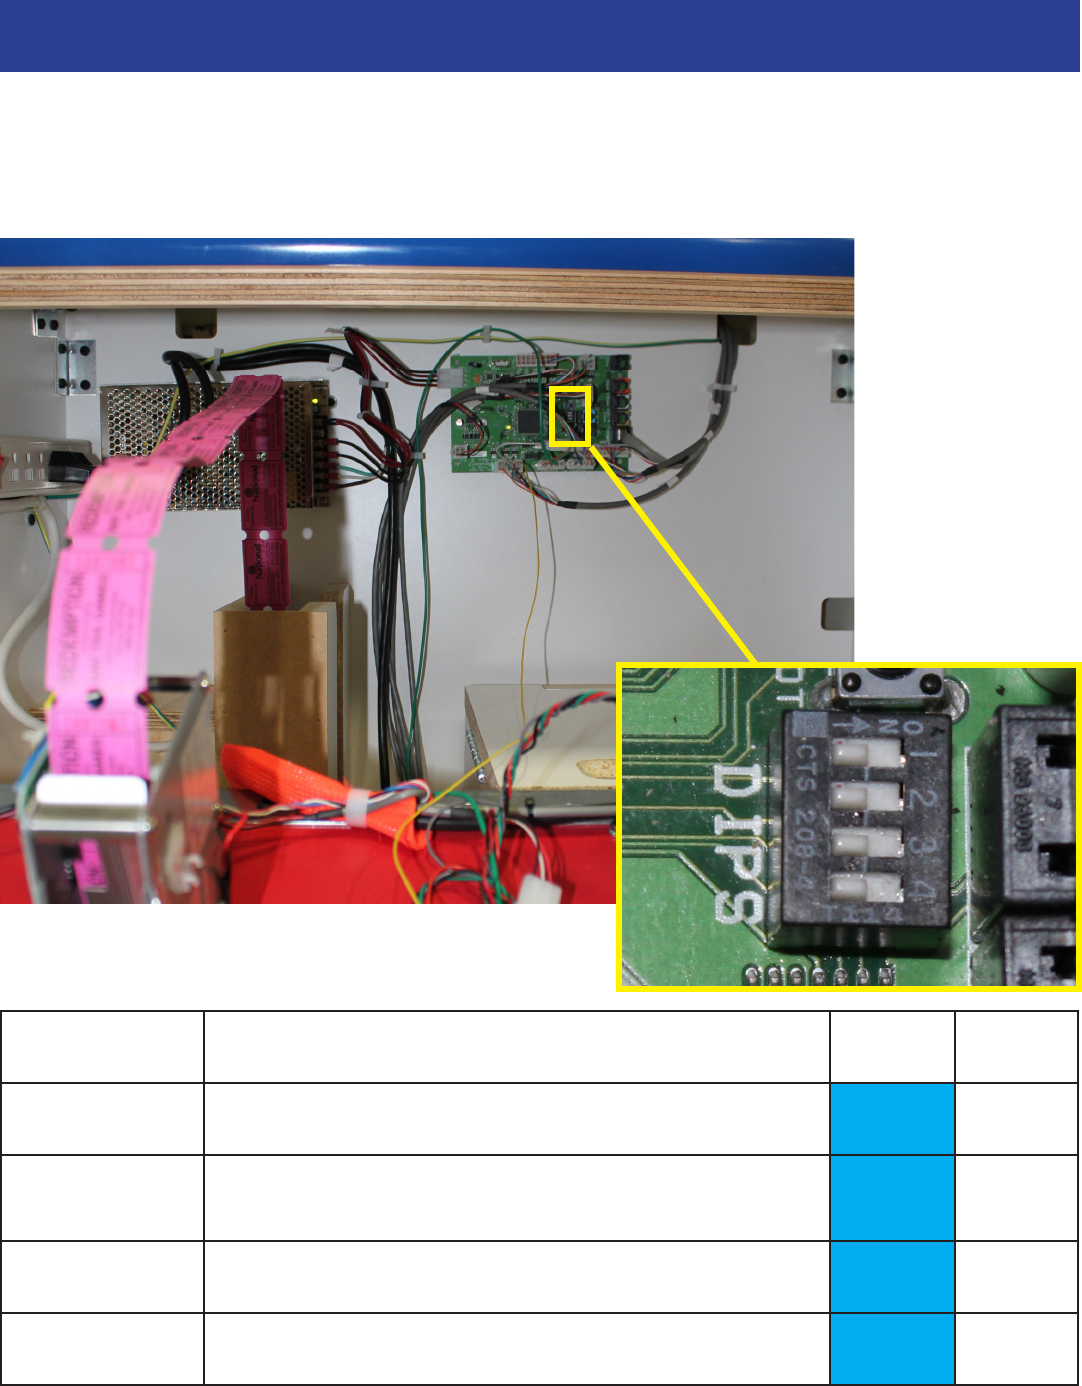
The dip switch bank is located on the mainboard,
inside the front door of the game.
*factory default settings are highlighted below
SWITCH DESCRIPTION OFF ON
1 not used
2Jersey: Stored Coin/DBA lockout &
Tickets/Credits owed
3 not used
4 not used
You can get this game at www.magic-play.eu
You can get this game at www.magic-play.eu
8
MAIN MENU FUNCTIONS
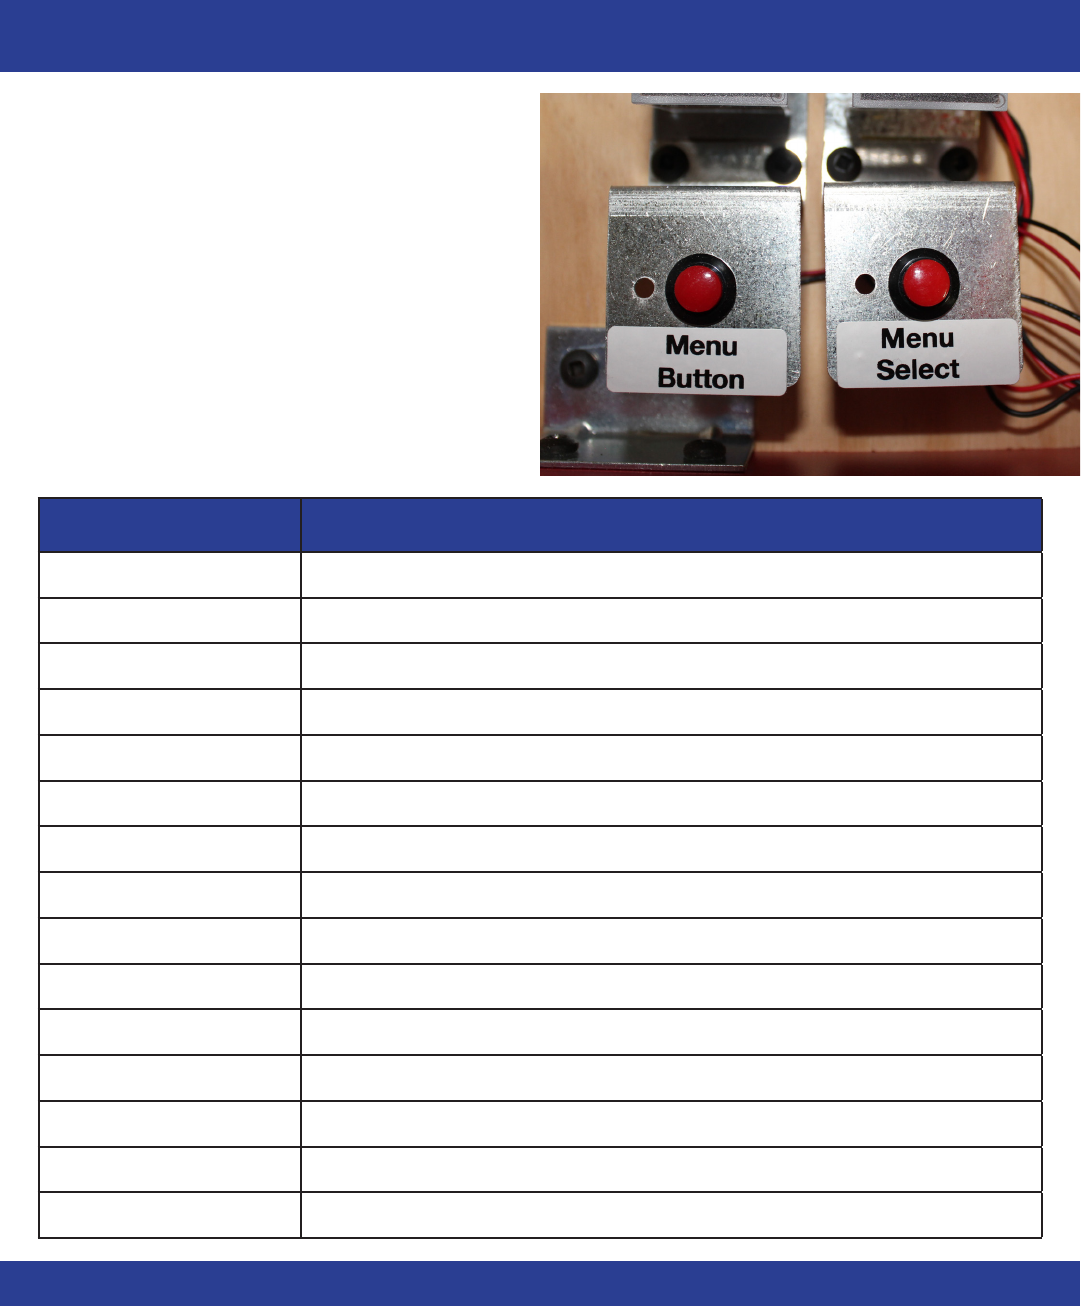
1. Press the “MENU” button and hold
for 3 seconds to enter the menu
2. Scroll through the options with the
“SELECT” button
3. Make your selection with the
“MENU” button and scroll through
each sub-menu’s options
4. Press the “SELECT” button to
make your selection and exit the
menu
MENU DESCRIPTION
N1 Coins / Credits per Play
N2 Game Volume
N3 Attract Volume
N4 Attract Timing
N5 Ticket Pattern
N6 Mercy Tickets
N7 Divide by Two Ticket Dispense
N8 Fixed Ticket Payout
N9 Stored Credits / Tickets Owed
N10 Game Time
N11 Statistics
N12 Reset Statistics
N13 Diagnostics
N14 Ball Gate Mech Test
N15 Restore Factory Settings
CLEAR CREDITS/ TICKETS OWED
Press and hold both buttons together for one second
until the display shows the software version number.
You can get this game at www.magic-play.eu
You can get this game at www.magic-play.eu
9
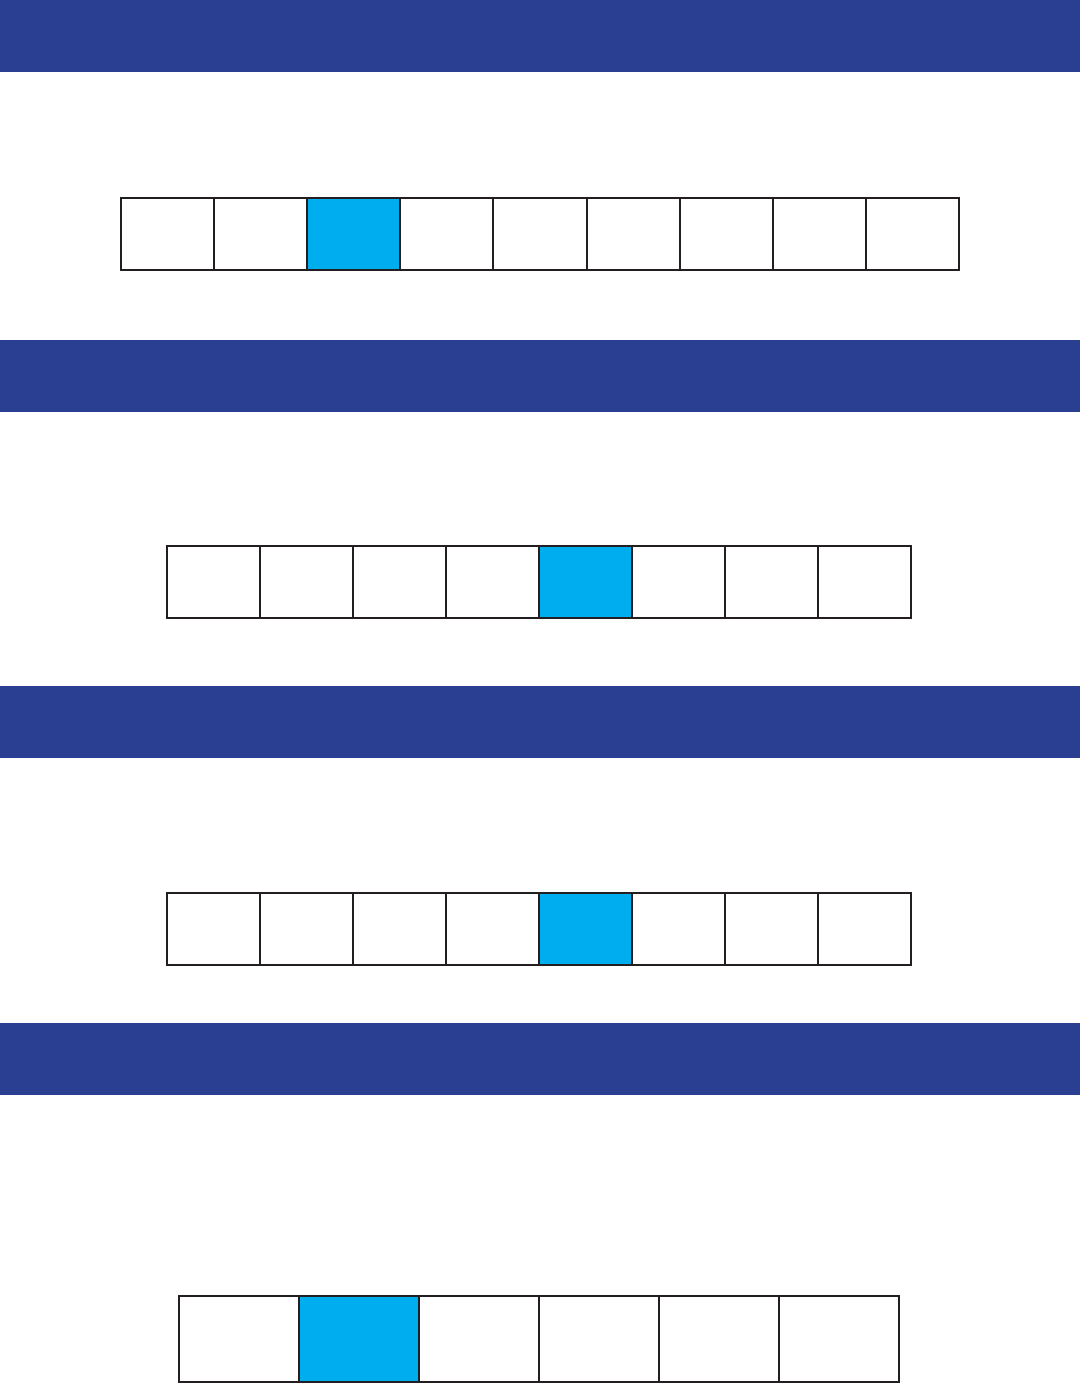
N1- COINS/CREDITS PER PLAY
N2- GAME VOLUME
N3- ATTRACT VOLUME
012345678
Scroll through the N1 menu with the “MENU” button.
Make your selection with the “SELECT” button.
The factory settings are highlighted below.
Scroll through the N2 menu with the “MENU” button.
Make your selection with the “SELECT” button.
The factory settings are highlighted below.
0 1 2 3 4 5 6 7
Scroll through the N3 menu with the “MENU” button.
Make your selection with the “SELECT” button.
The factory settings are highlighted below.
0 1 2 3 4 5 6 7
N4- ATTRACT TIMING
30
sec
1
min
5
min
10
min
15
min
0
(off)
Scroll through the N4 menu with the “MENU” button.
Make your selection with the “SELECT” button.
The factory settings are highlighted below.
This setting determines how often the attract loop audio is played.
You can get this game at www.magic-play.eu
You can get this game at www.magic-play.eu
10
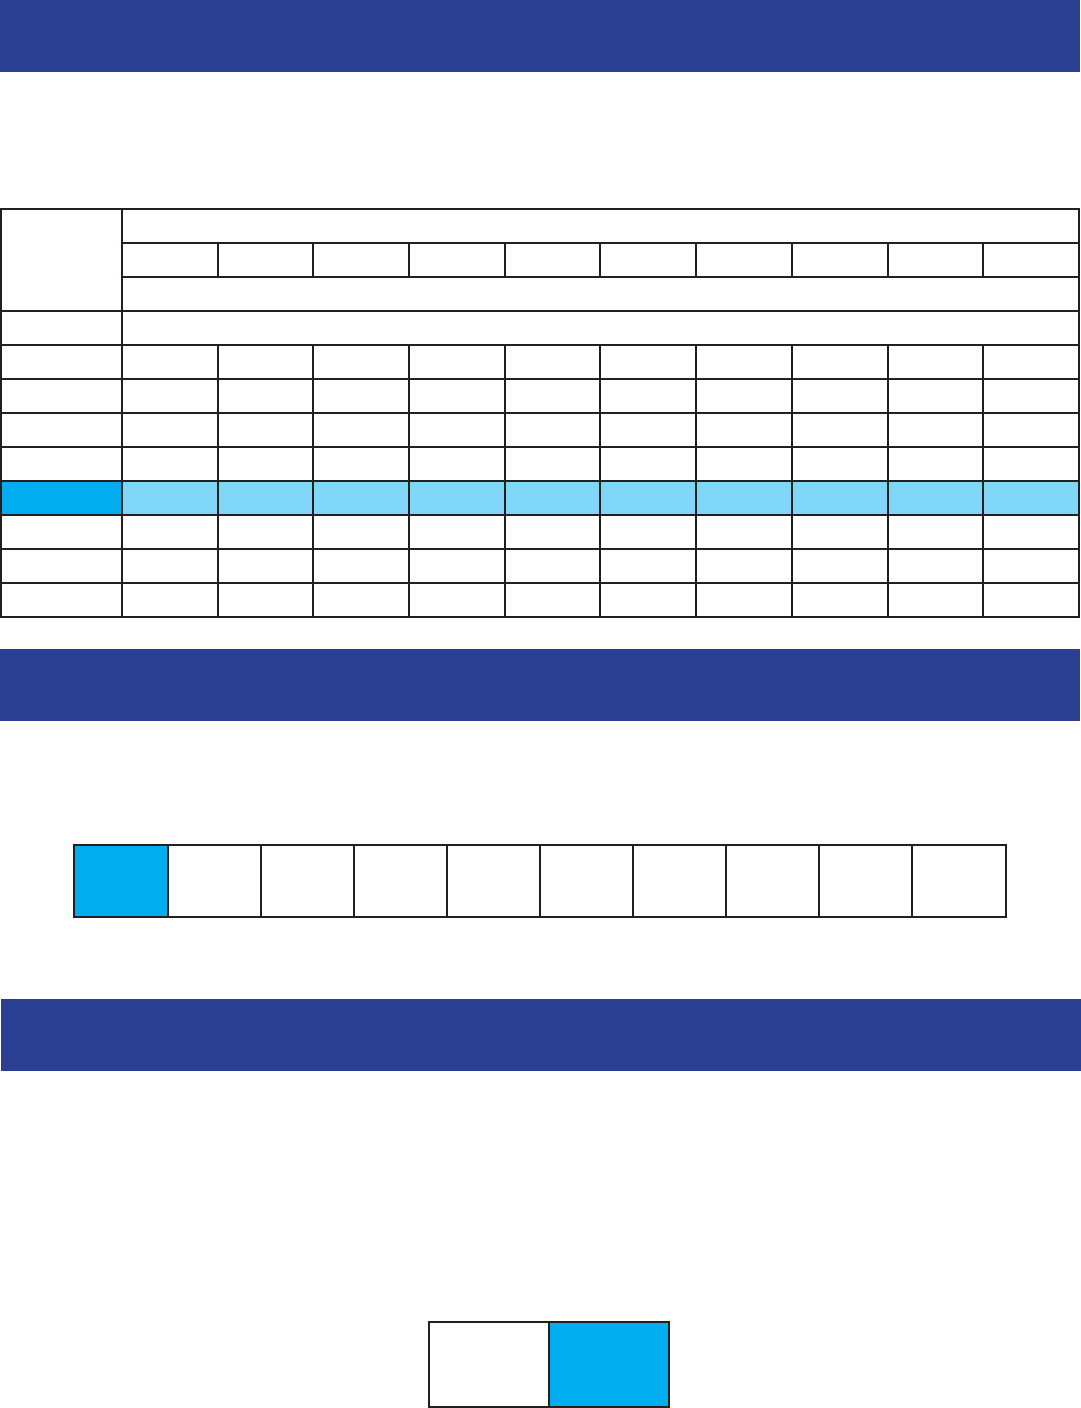
N5- TICKET PATTERNS
Scroll through the N5 menu with the “MENU” button.
Make your selection with the “SELECT” button.
The factory settings are highlighted below.
TICKET
PATTERN
POINTS
0-2 3-5 6-8 9-12 13-17 18-23 24-30 31-37 38-44 45-99
TICKETS
0no tickets
10011223345
20112345678
31122334456
41122345678
512345678910
63344556677
72 2 4 4 6 8 10 12 14 16
82 4 6 8 10 12 14 16 18 20
N6- MERCY TICKETS
Scroll through the N6 menu with the “MENU” button.
Make your selection with the “SELECT” button.
The factory settings are highlighted below.
0 1 2 3 4 5 6 7 8 9
When enabled, mercy tickets are awarded when zero points are scored.
N7- DIVIDE BY TWO TICKET DISPENSE
1
(ON)
0
(OFF)
Scroll through the N7 menu with the “MENU” button.
Make your selection with the “SELECT” button.
The factory settings are highlighted below.
This setting will halve the number of tickets dispensed, in the case that 1 physical ticket is worth 2 in
your location.
This setting truncates the value, so a score of 5 tickets will yield 2 physical tickets (5/2=2).
You can get this game at www.magic-play.eu
You can get this game at www.magic-play.eu
11
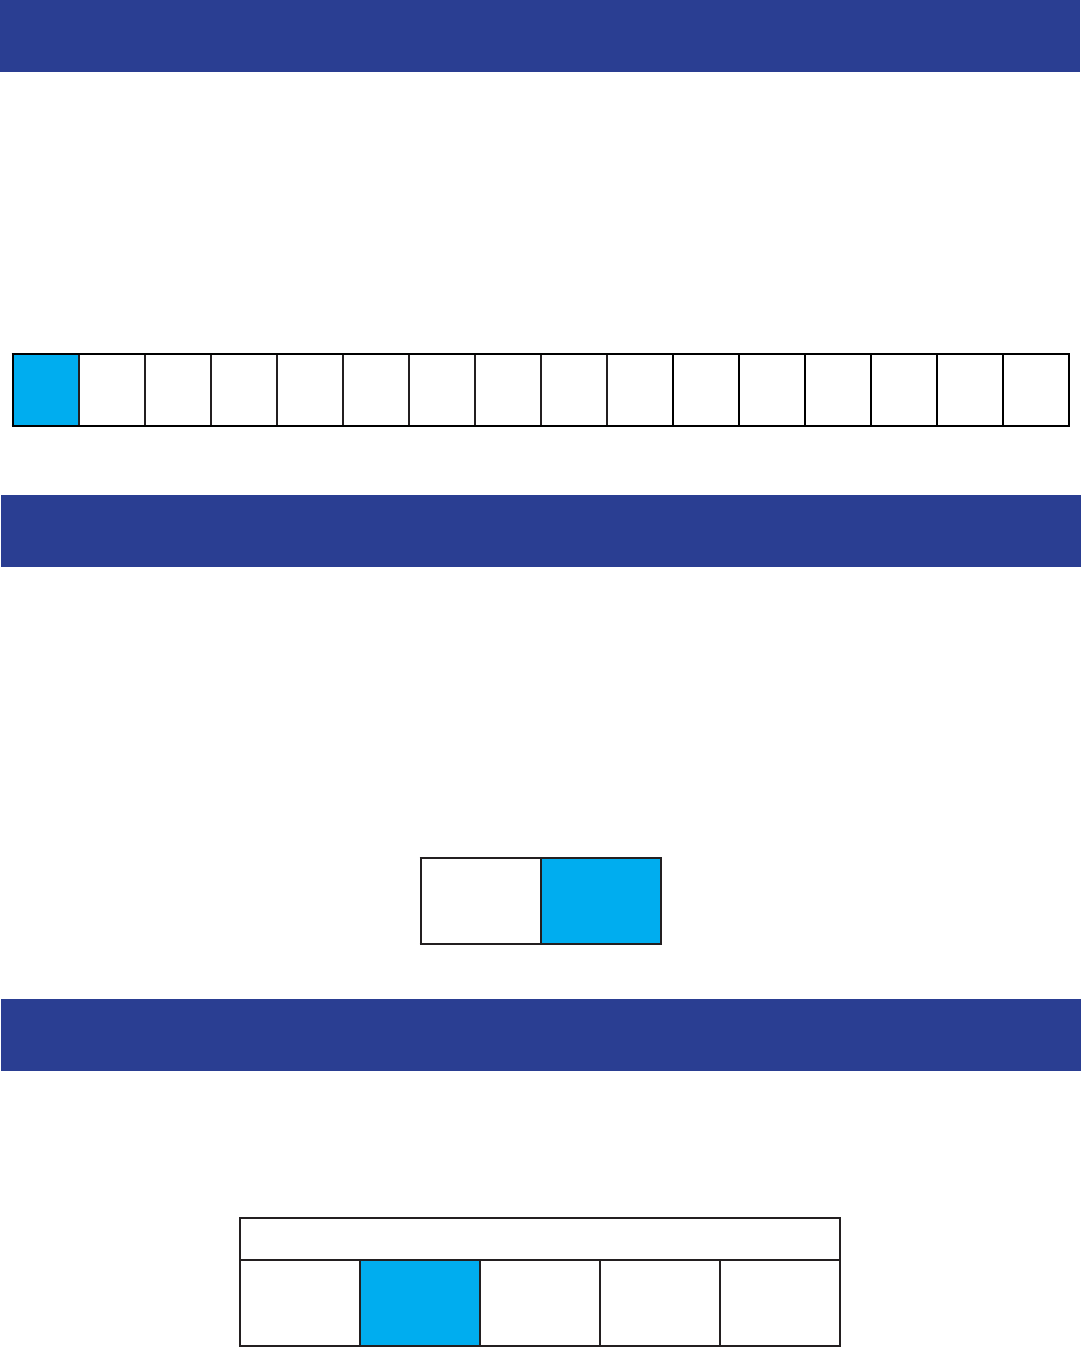
N8- FIXED TICKET PAYOUT (JERSEY)
Scroll through the N8 menu with the “MENU” button.
Make your selection with the “SELECT” button.
The factory settings are highlighted below.
This setting will make the game dispense the selected number of tickets no matter the player’s score.
If not set to 0 (off), this setting overrides N5 and N6.
01234567891011 12 13 14 15
N9- STORED CREDITS/ TICKETS OWED
N10- GAME TIME
Scroll through the N9 menu with the “MENU” button.
Make your selection with the “SELECT” button.
The factory settings are highlighted below.
This setting will cause the game to “remember” stored credits and tickets owed in the case of a
power loss or game shutdown.
Setting DIP 2 to ON will override this function.
1
(ON)
0
(OFF)
Scroll through the N10 menu with the “MENU” button.
Make your selection with the “SELECT” button.
The factory settings are highlighted below.
SECONDS
30 45 60 75 90
You can get this game at www.magic-play.eu
You can get this game at www.magic-play.eu

12
N11- GAME STATISTICS
Scroll through the N15- menu with the “MENU” button.
Make your selection with the “SELECT” button.
The factory settings are highlighted below.
The game statistics will scroll through on the display in numerical order.
S1 TOTAL GAMES PLAYED
S2 TOTAL TICKETS DISPENSED
S3 AVERAGE TICKETS PER GAME
S4 SCORING BUCKET 1
S5 SCORING BUCKET 2
S6 SCORING BUCKET 3
S7 SCORING BUCKET 4
S8 SCORING BUCKET 5
S9 SCORING BUCKET 6
S10 SCORING BUCKET 7
S11 SCORING BUCKET 8
S12 SCORING BUCKET 9
S13 SCORING BUCKET 10
N12- RESET STATISTICS
Press and hold the “SELECT” button until the display reads “CL”.
All statistics in N15 will be reset back to 0.
You can get this game at www.magic-play.eu
You can get this game at www.magic-play.eu
13
N15- RESTORE FACTORY SETTINGS
Press and hold the “SELECT” button until the display reads “dE”.
All game settings will be restored to their factory defaults, which are
highlighted in this manual.
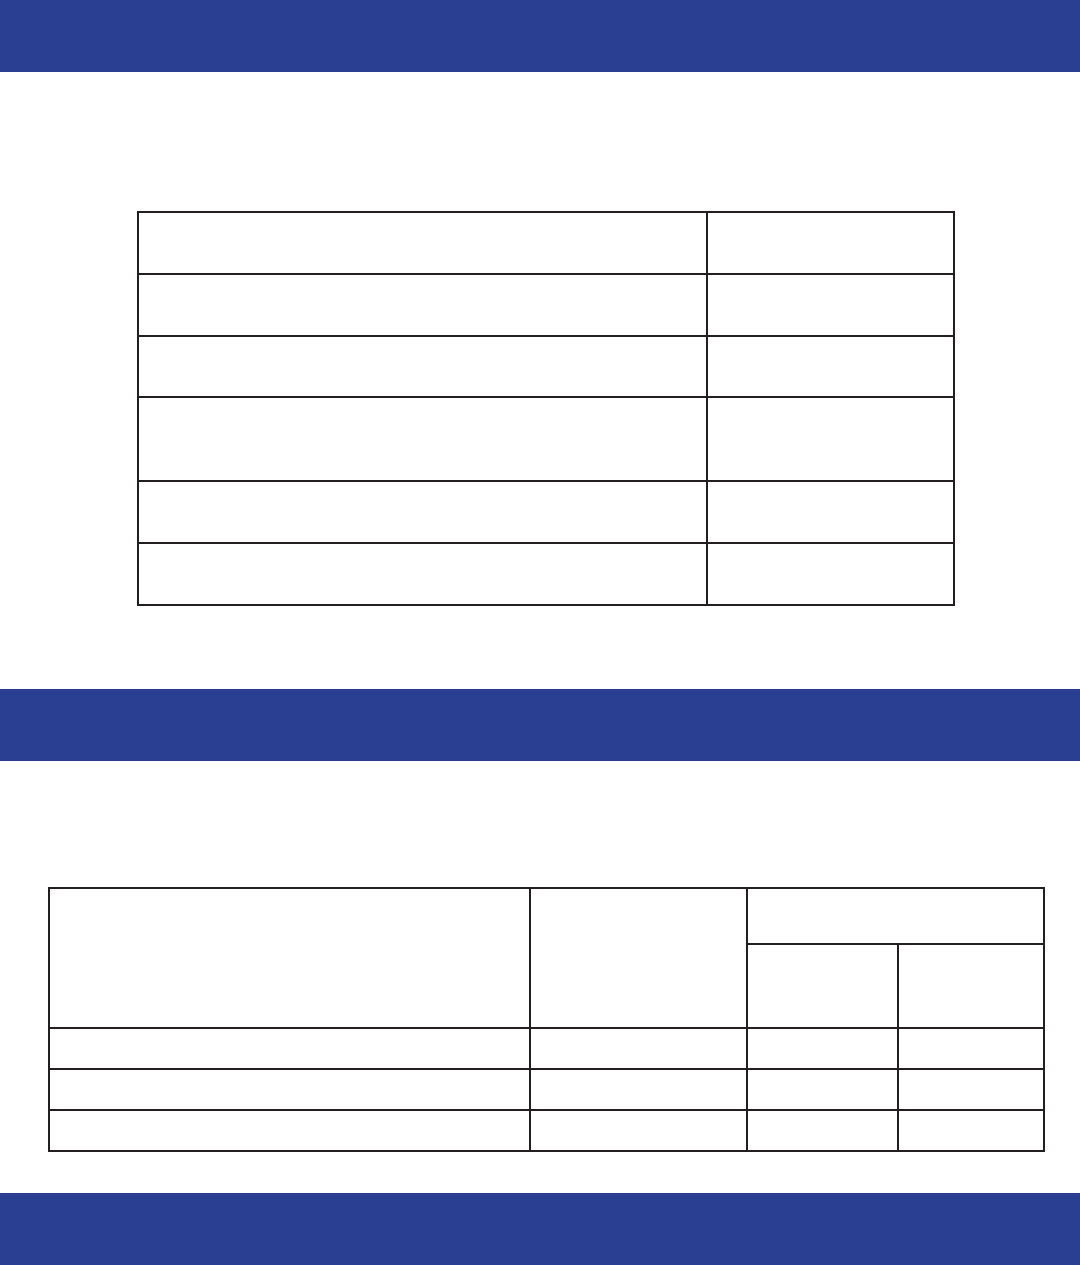
N13- DIAGNOSTICS
The diagnostics mode will help you troubleshoot problems and allow you to determine if all inputs are
working correctly.
The display will show “-” when no inputs or switches are activated.
Once one or more inputs are activated, their symbols alternate on the display (see the chart below).
Scoring Sensor (hoop) 1
*Ball Gate Open b
*Ball Gate Closed r
Tickets Low Lo (closed)
“.” (open)
Game Start Button o
Coin Switch C
*Note: both Gate Open and Gate Closed sensors are closed when gate is closed.
N14- BALL GATE MECH TEST
While in the Ball Gate Test mode, pressing the SELECT button turns the motor to the next location.
The current gate position is shown on the displays.
The motor will time out if the sensor is not reading movement.
GATE MOTOR POSITION LEFT DISPLAY
RIGHT DISPLAY
X
(Gate Open
Sensor)
Y
(Gate Closed
Sensor)
Gate is Open OP 0 1
Gate is Closed CL 0 0
Gate is Moving 1 1
You can get this game at www.magic-play.eu
You can get this game at www.magic-play.eu
14
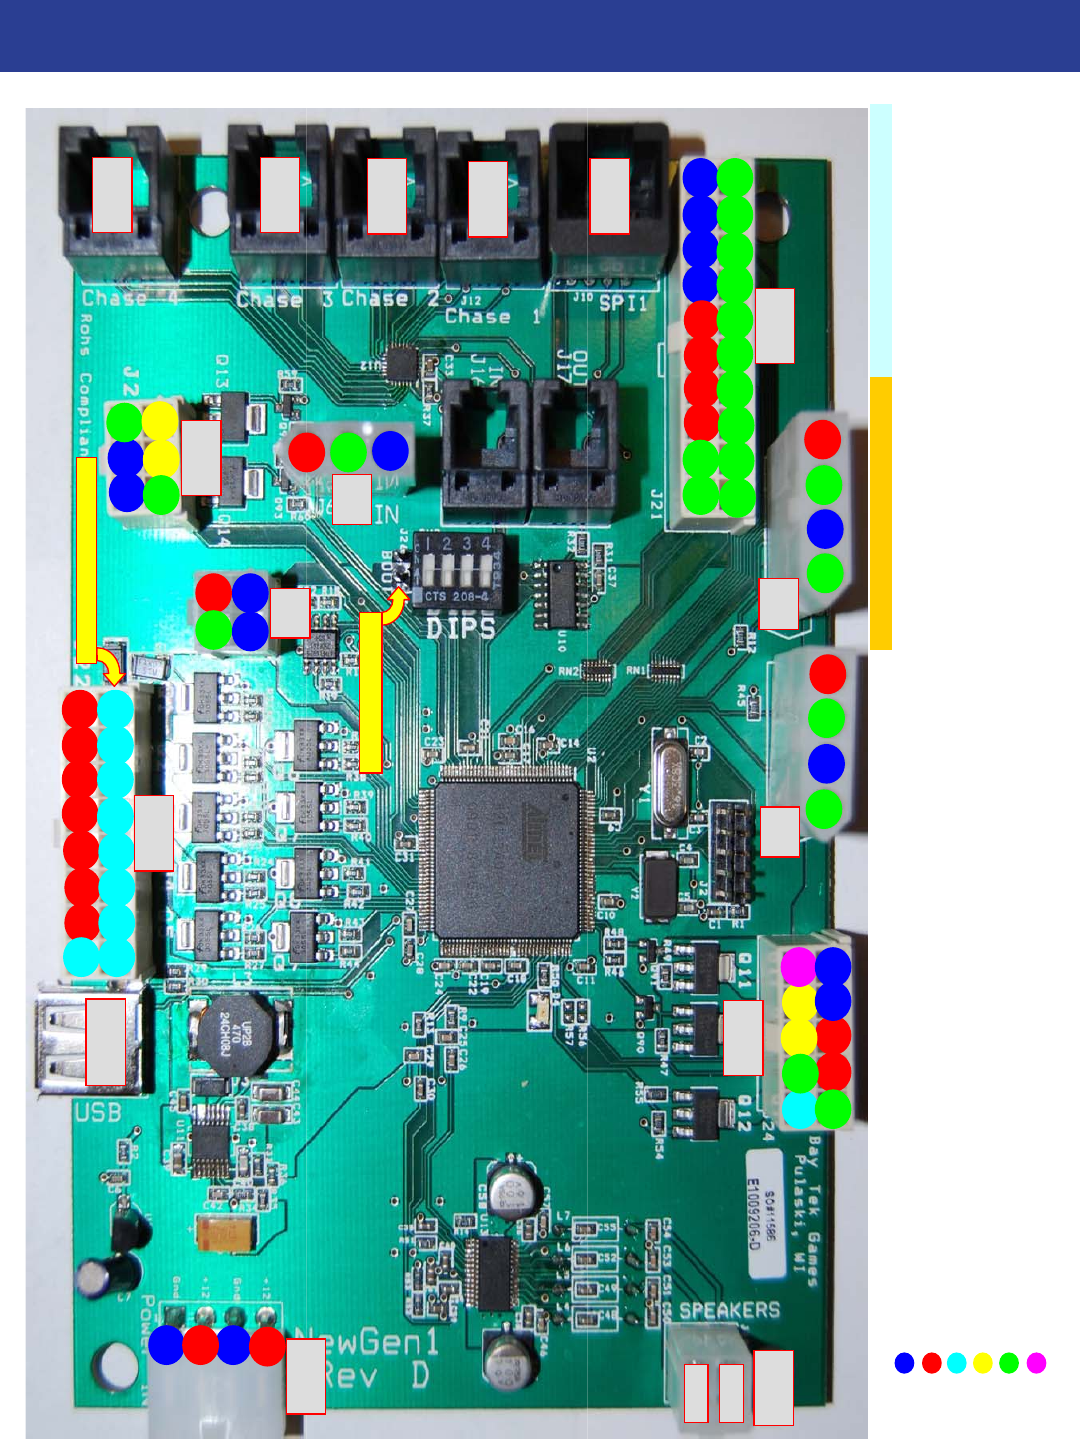
MAINBOARD PINOUT
SPI Out - Display - (J10) Chase Lights (J11,J12,J13,J14)
Ground Pin 1 & Pin 3 - +12V Pin 1 - Chase Output
+12V Pin 2 - SCLK_BUS2 Pin 2 - Chase Output
Low Side Driver Pin 4 - SMOSI_BUS2 Pin 3 - +12V
High Side Driver Pin 5 & Pin 7 - Ground Pin 4 - Chase Output
+3.3V TTL Logic Pin 6 - SCS2_BUS2 Pin 5 - Chase Output
+3.3V Pin 8 - SMISO_BUS2 Pin 6 - +12V
R- R+
L+ L-
USB
J19 J24
J9 J5 J21
J14
J13
J11
J12
J10
J6
J25
J8
J22
J18
Flyback Diodes on Q1, Q2
PX37 PB18PB16 PB17
PB7
PX29
PA06
1
8
9
1
6
1
3
4
6
12
3
4
1
1
0
11
2
0
1
5
6
1
0
PA05
PX10
PX11
Bootloader Jumper
PB19PX39PX00PX01PB20PX02PB21PB22PB23PB24
PB25
PB26
Q12 Q10 Q11
Q1Q2Q3Q4
Q5Q6Q7Q8
Q9
Q13Q14
You can get this game at www.magic-play.eu
You can get this game at www.magic-play.eu
15
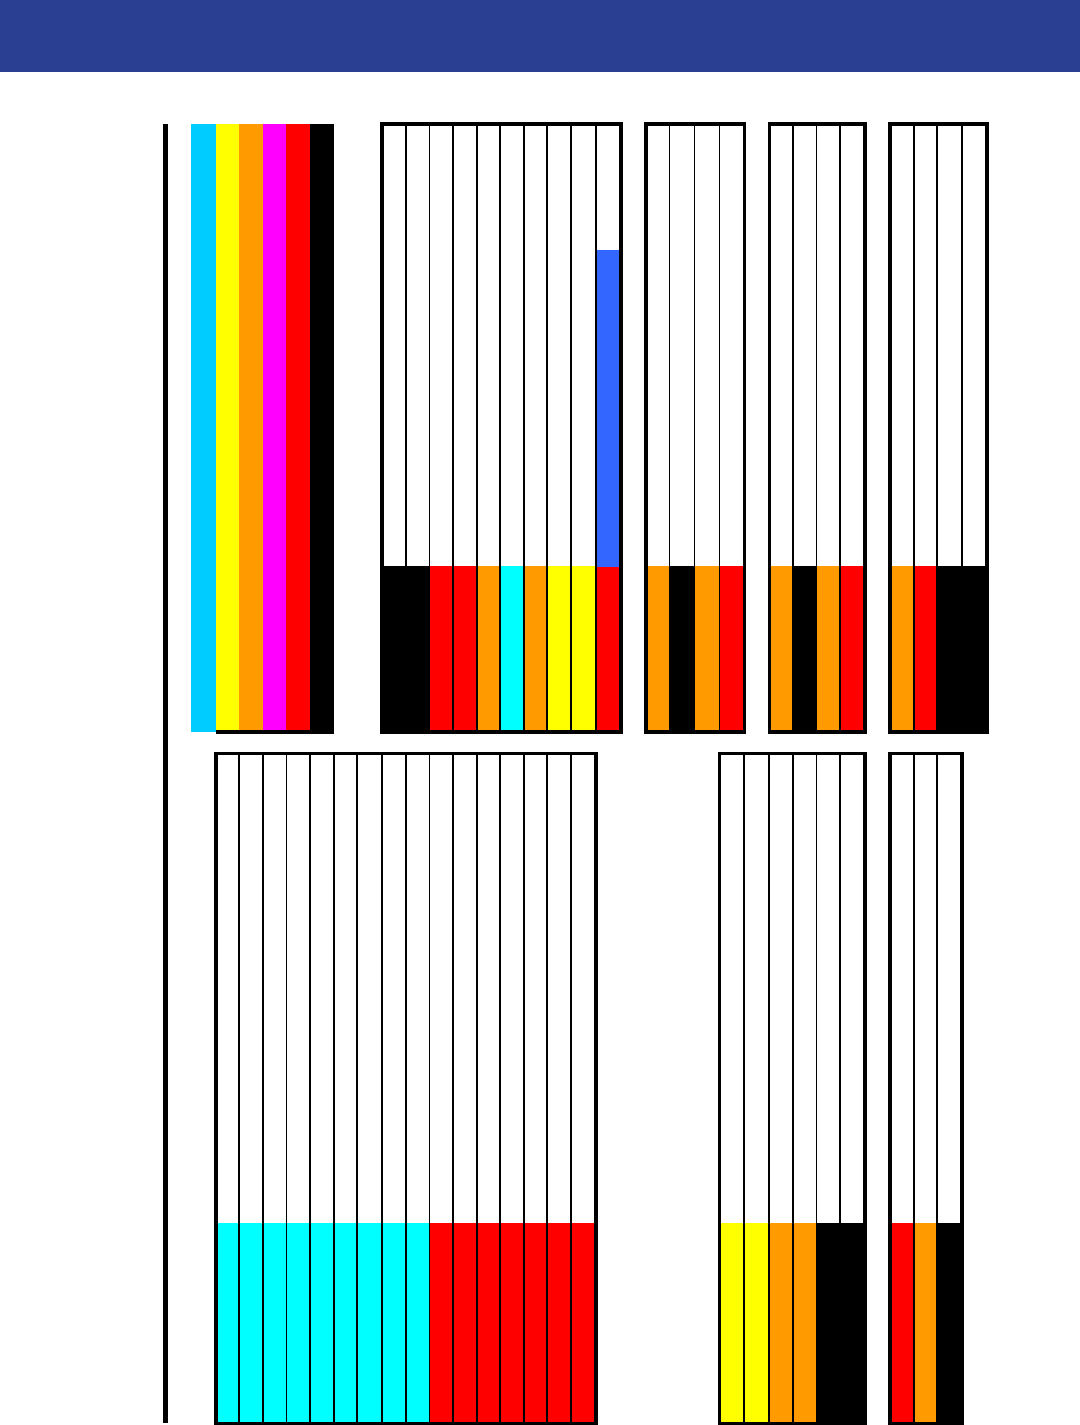
MAINBOARD PINOUT GUIDE
SWISH IO for GEN1 REV D, E & E2
Pin Type Purpose Ref Pin #
LOWSIDE #1,w diode Mechanical Count #1 Game J22 1
LOWSIDE #2, w diode Mechanical Count #2 Ticket J22 2
LOWSIDE #3 J22 3
LOWSIDE #4 J22 4
LOWSIDE #5 J22 5
LOWSIDE #6 J22 6
LOWSIDE #7 J22 7 Pin Type Purpose Ref Pin #
LOWSIDE #8 J22 8 Ground Gate Motor Common/GND J24 1
LOWSIDE #9 J22 9 Ground Sensor, Gate Motor J24 2
+12 Volts Mechanical Count #1 Game +12V J22 10 +12 Volts J24 3
+12 Volts Mechanical Count #2 Ticket +12V J22 11 +12 Volts Sensor, Gate Motor +12V J24 4
+12 Volts J22 12 PB7 Sensor, Gate Motor Input UP J24 5
+12 Volts Strip Light - Top Lights, +12V J22 13 LOWSIDE #12 J24 6
+12 Volts Strip Light - Side Lights, +12V J22 14 PX29 Sensor, Gate Motor Input DOWN J24 7
+12 Volts J22 15 HIGHSIDE #10 Start Push Button Light +12V J24 8
+12 Volts J22 16 HIGHSIDE #11 Gate Motor Driver J24 9
3.3V J24 10
* = Attract Mode Lights TBD
PX37 Ticket Notch #1 J5 1
Ground Ground for Ticket Dispensor J5 2
PB18 Ticket Motor #1 J5 3
HIGHSIDE #13 J25 1 +12 Volts Power for Ticket Dispensor J5 4
HIGHSIDE #14 J25 2
PX10 Service Button #1 J25 3 PB16 Low Ticket Switch J9 1
PX11 Service Button #2 J25 4 Ground Ground for Low Ticket Switch J9 2
Ground J25 5 PB17 Jersey Coin Lockout (Not Used?) J9 3
Ground Ground for Service Buttons J25 6 +12 Volts J9 4
+12 Volts Coin Door Power J6 1 PA06 DBA Input J8 1
PA05 Coin Input J6 2 +12 Volts DBA +12V J8 2
Ground Coin Ground J6 3 Ground DBA Gnd J8 3
Ground J8 4
= LED Constant Current Drive
= 12 Volts
= Ground
BayTek Swish NEWGEN1 Hardware Pinout
=Low Side Driver
=High Side Driver
= TTL Input/Output
H:\Service Manuals & Documents\DROPBOX\SWISH\2011-03-19rev io_newgen_swish.xls
Page 1 of 1 Printed: 3/8/2012 9:33 AM
You can get this game at www.magic-play.eu
You can get this game at www.magic-play.eu
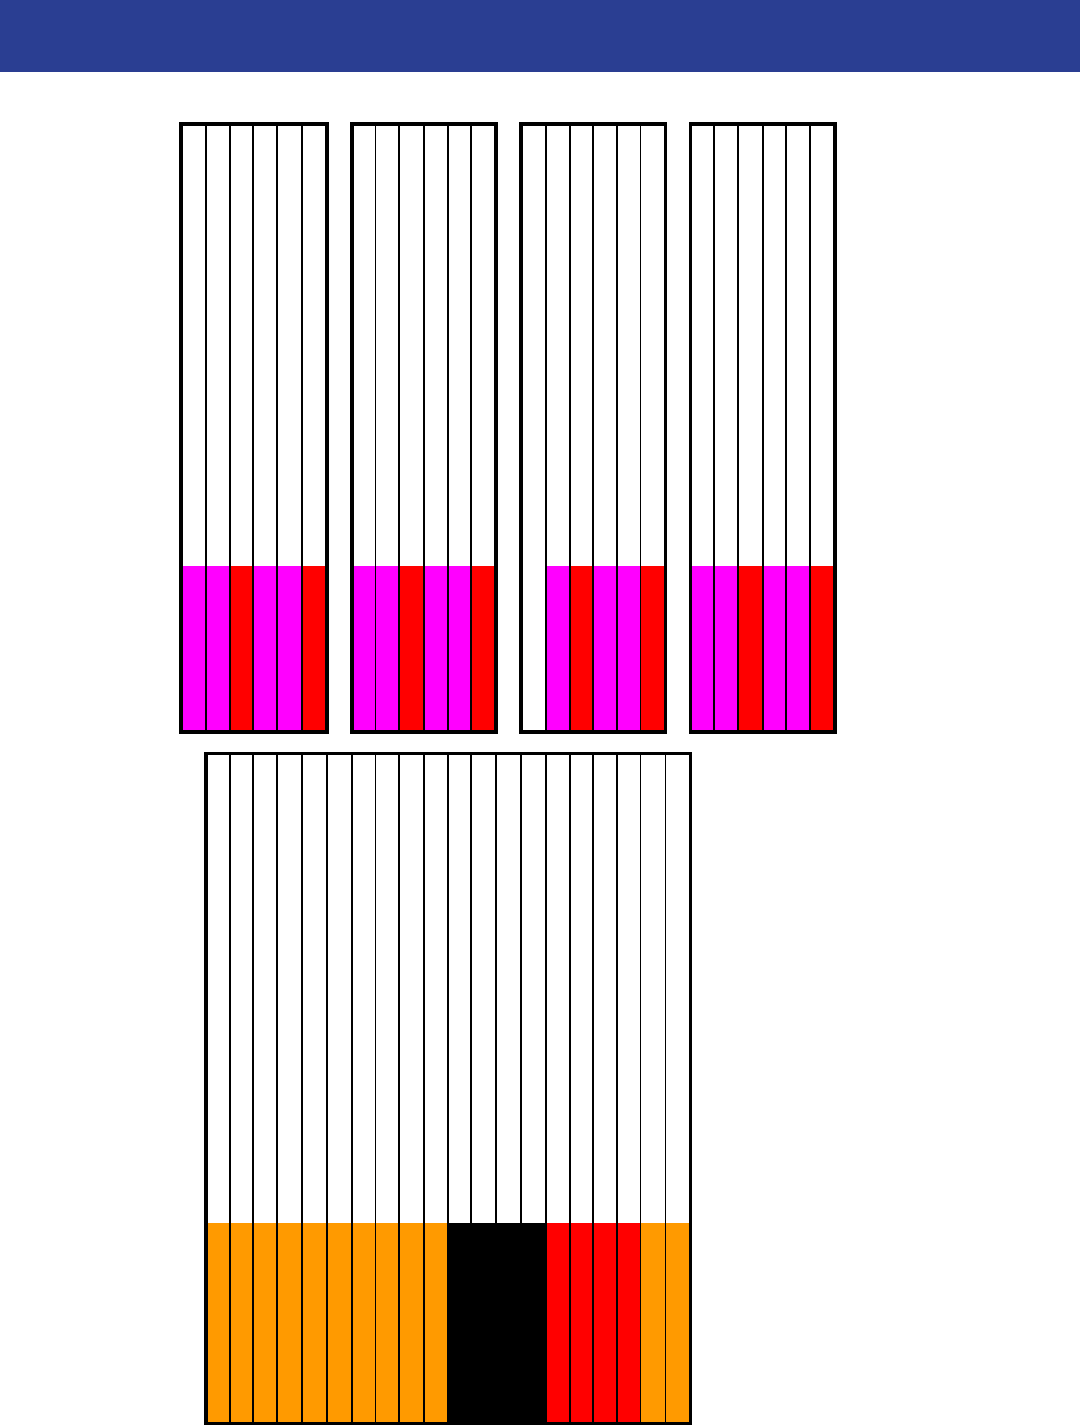
16
MAINBOARD PINOUT GUIDE
SWISH IO for GEN1 REV D, E & E2
Driver 1 J12 1
PB19 Hoop Sensor J21 1 Driver 2 J12 2
PX39 J21 2 +12 Volts J12 3
PX00 J21 3 Driver 3 J12 4
PX01 J21 4 Driver 4 J12 5
PB20 J21 5 +12 Volts J12 6
PX02 J21 6
PB21 J21 7 Driver 5 J11 1
PB22 J21 8 Driver 6 J11 2
PB23 J21 9 +12 Volts J11 3
PB24 J21 10 Driver 7 J11 4
Ground Start Push Button Light J21 11 Driver 8 J11 5
Ground Hoop Sensor Ground J21 12 +12 Volts J11 6
Ground J21 13
Ground J21 14 Driver 9 J13 1
+12 Volts J21 15 Driver 10 J13 2
+12 Volts Hoop Sensor +12V J21 16 +12 Volts J13 3
+12 Volts J21 17 Driver 11 J13 4
+12 Volts J21 18 Driver 12 J13 5
PB25 J21 19 +12 Volts J13 6
PB26 Start Push Button Inpu
t
J21 20
Driver 13 J14 1
Driver 14 J14 2
+12 Volts J14 3
Driver 15 J14 4
Driver 16 J14 5
+12 Volts J14 6
H:\Service Manuals & Documents\DROPBOX\SWISH\2011-03-19rev io_newgen_swish.xls
Page 1 of 1 Printed: 3/6/2012 3:04 PM
You can get this game at www.magic-play.eu
You can get this game at www.magic-play.eu
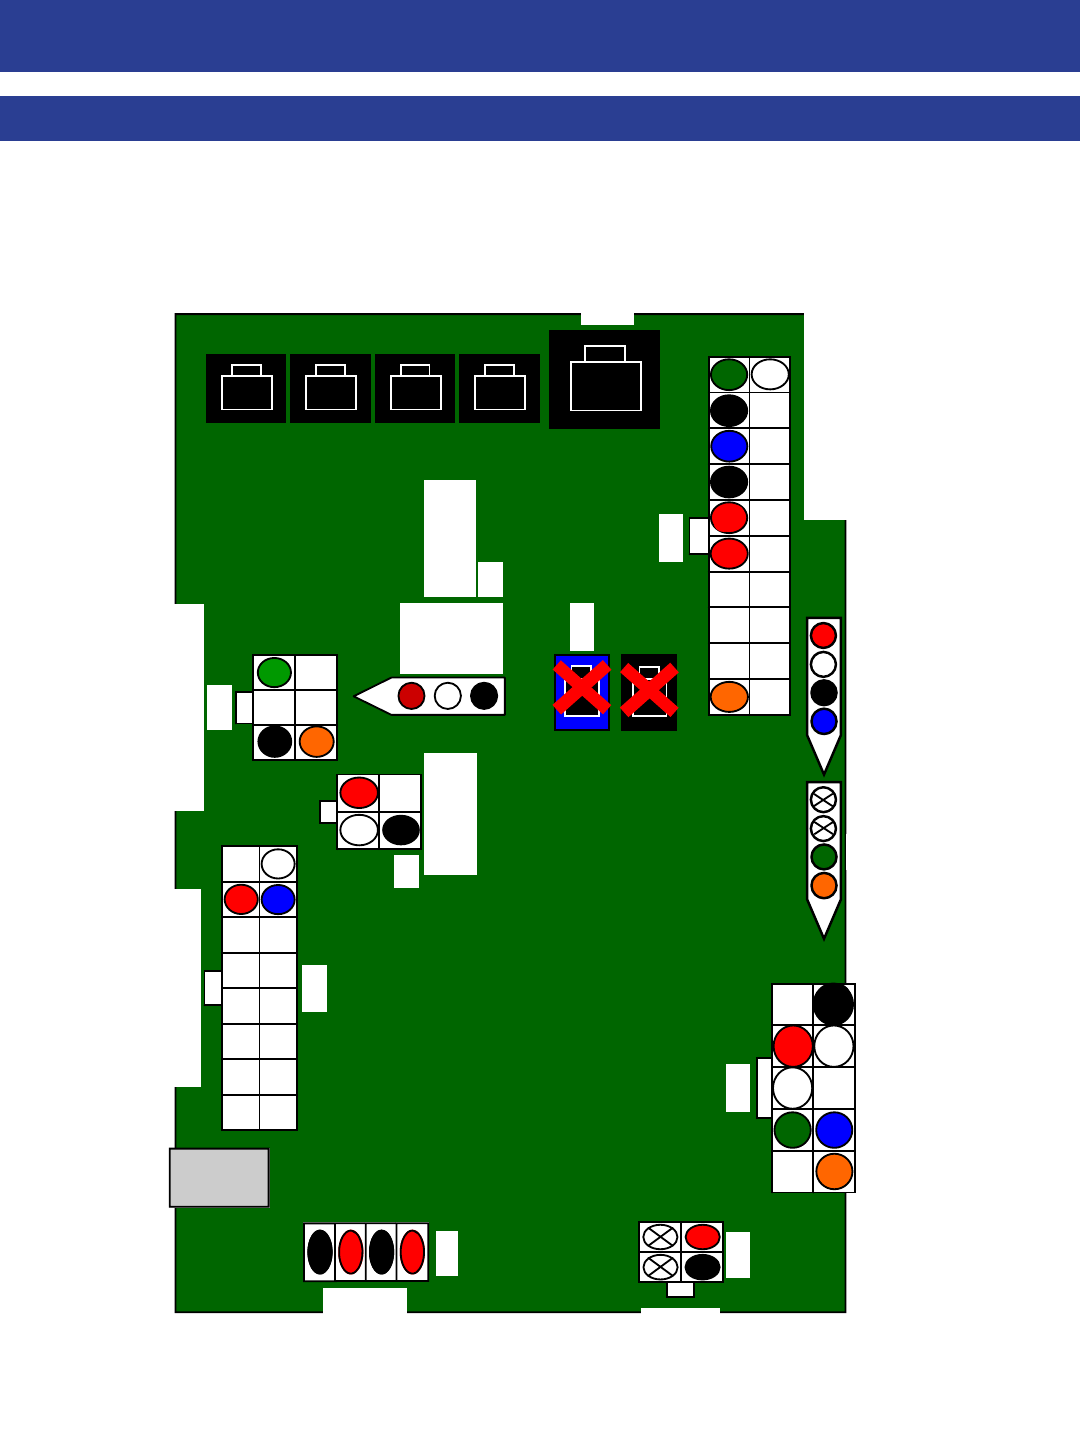
17
MAIN BOARD PINOUT
A5NEWGEN1
J18
AACE2508
12 Volt DC
Power In Cable
AACE2502 Buttons
and Counters
J22
J25
AACE2502
Buttons and Counters
J8
AACE2510
Bill Acceptor
J21
AACE2002 Lights and
Player Start Buttons
J24
AACE2512 Motor
and Motor Sensor
J5
J9
AACE2501 Ticket
Dispenser/Low ticket Cable
J6
AACE2503
Coin Door
+12 V
Signal
Com
J19
AACE2507
Cable to
Speakers
J16 AACE2506
Display Cable
You can get this game at www.magic-play.eu
You can get this game at www.magic-play.eu
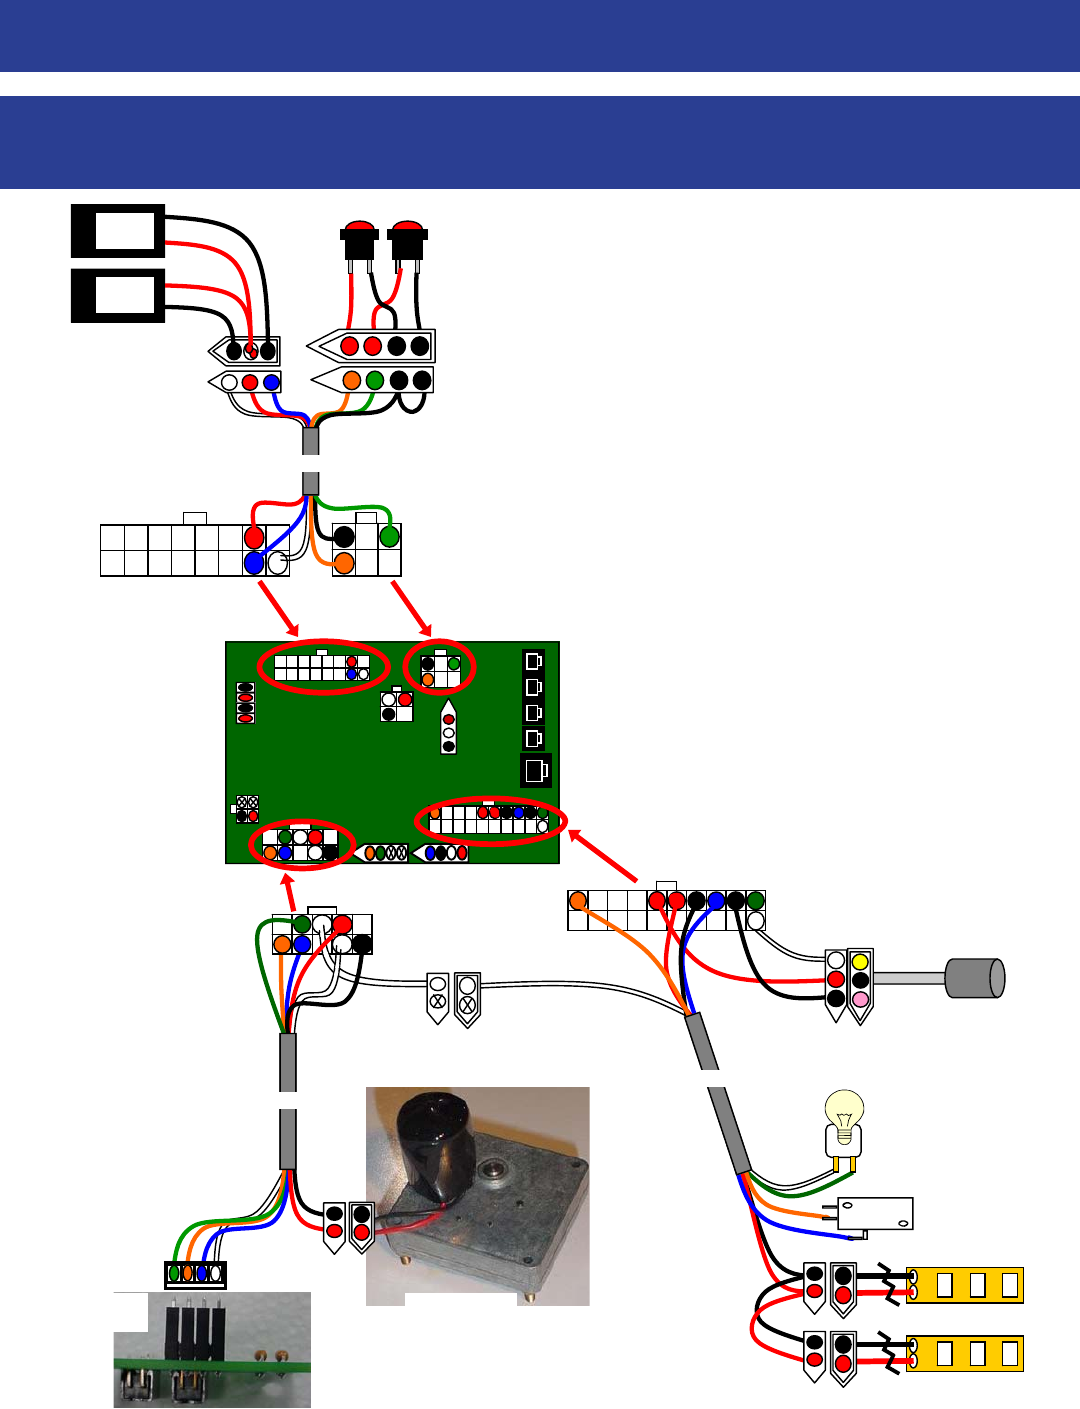
18
WIRING DIAGRAMS
MENU BUTTONS, COUNTERS, START SWITCH, LED’S BALL
SENSOR, GATE MOTOR & SENSOR
2
AACE2511
Menu
Select
Button
Menu
Button
Ticket and Game
Counters
AACO1000
Ticket
Counter
Game
Counter
AACE2502
AASE0020
Hoop Sensor
AACE2500
Game Start
Pushbutton
and Light
AACE2514
+
-
+
-
LED Cabinet Lighting
A5PB8000
AACE2512
AAMO1001
Ball Gate Motor
AACB2501
Ball Gate Sensor
To J25 on
Main Board
To J22 on
Main Board
To J21 on
Main Board
To J24 on
Main Board
You can get this game at www.magic-play.eu
You can get this game at www.magic-play.eu
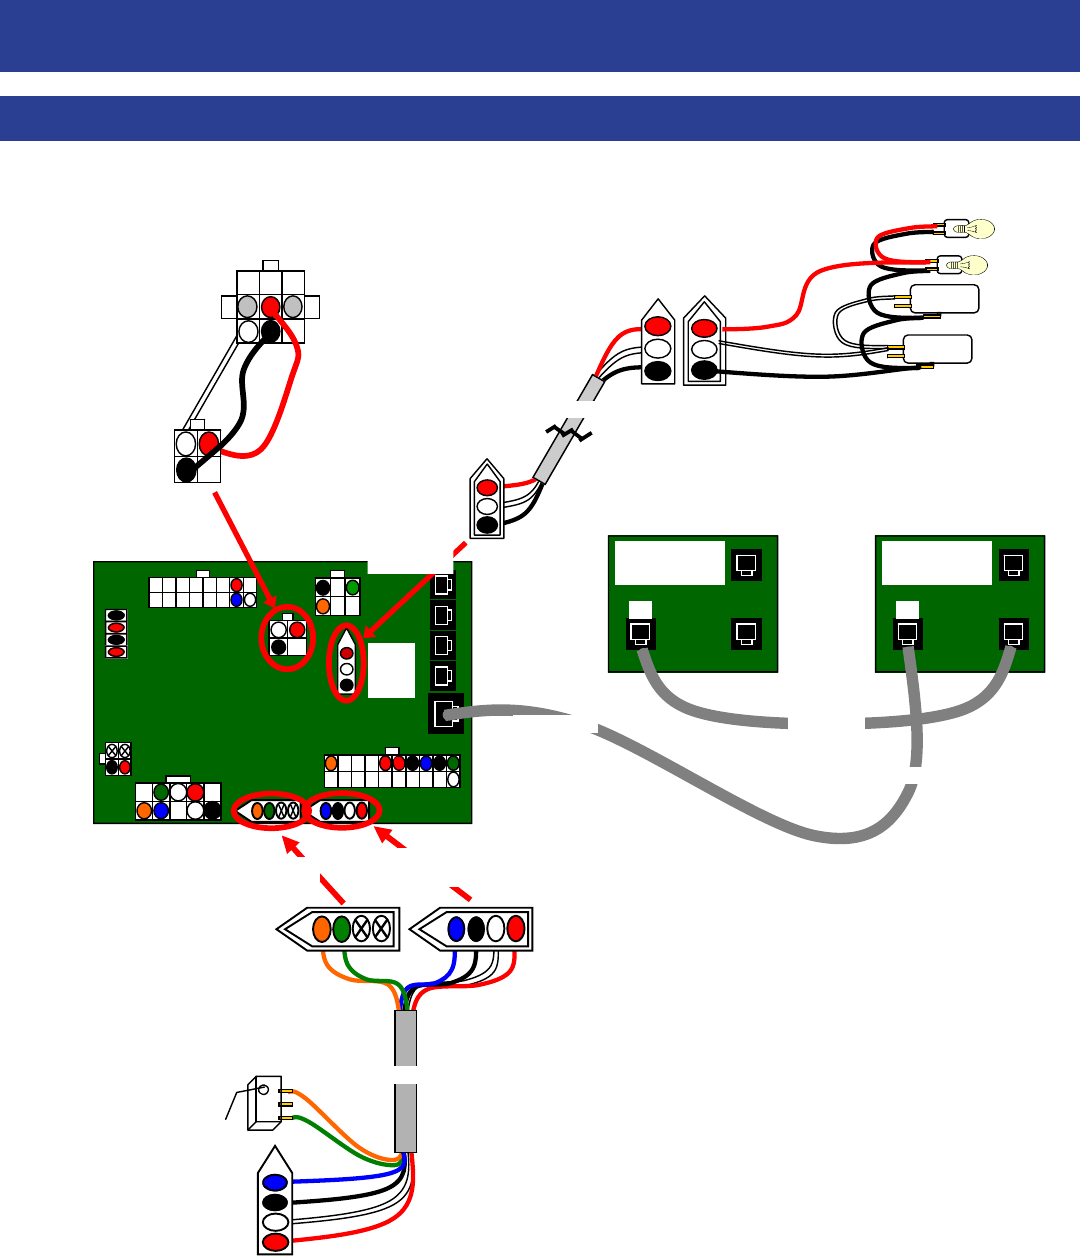
19
WIRING DIAGRAMS
COIN DOOR, DBA, TICKET DISPENSER, DISPLAY
3
+12 V
Signal
Com
To Ticket Dispense (A5TD1)
Notch Signal
Com Ground
Enable Signal
12 Volt Power
Low Ticket Switch
Wired Normally Open
AASW200
1/4” Spacer (A5SENY020)
To J5 on
Main Board
To J9 on
Main Board
AACE2501
Coin Switches
(AASW9903)
Wired Normal
Open
ToJ6
(COIN)on
Main Board
AACE2503
Coin Door Harness
AACBL4A-DOOR
IN
Time Display
AABD4208
IN
Score Display
AABD4208
AACE2505
AACE2506
AACE2506
To J8
on Main
Board
AACE2510
Bill Acceptor
Cable
You can get this game at www.magic-play.eu
You can get this game at www.magic-play.eu
20
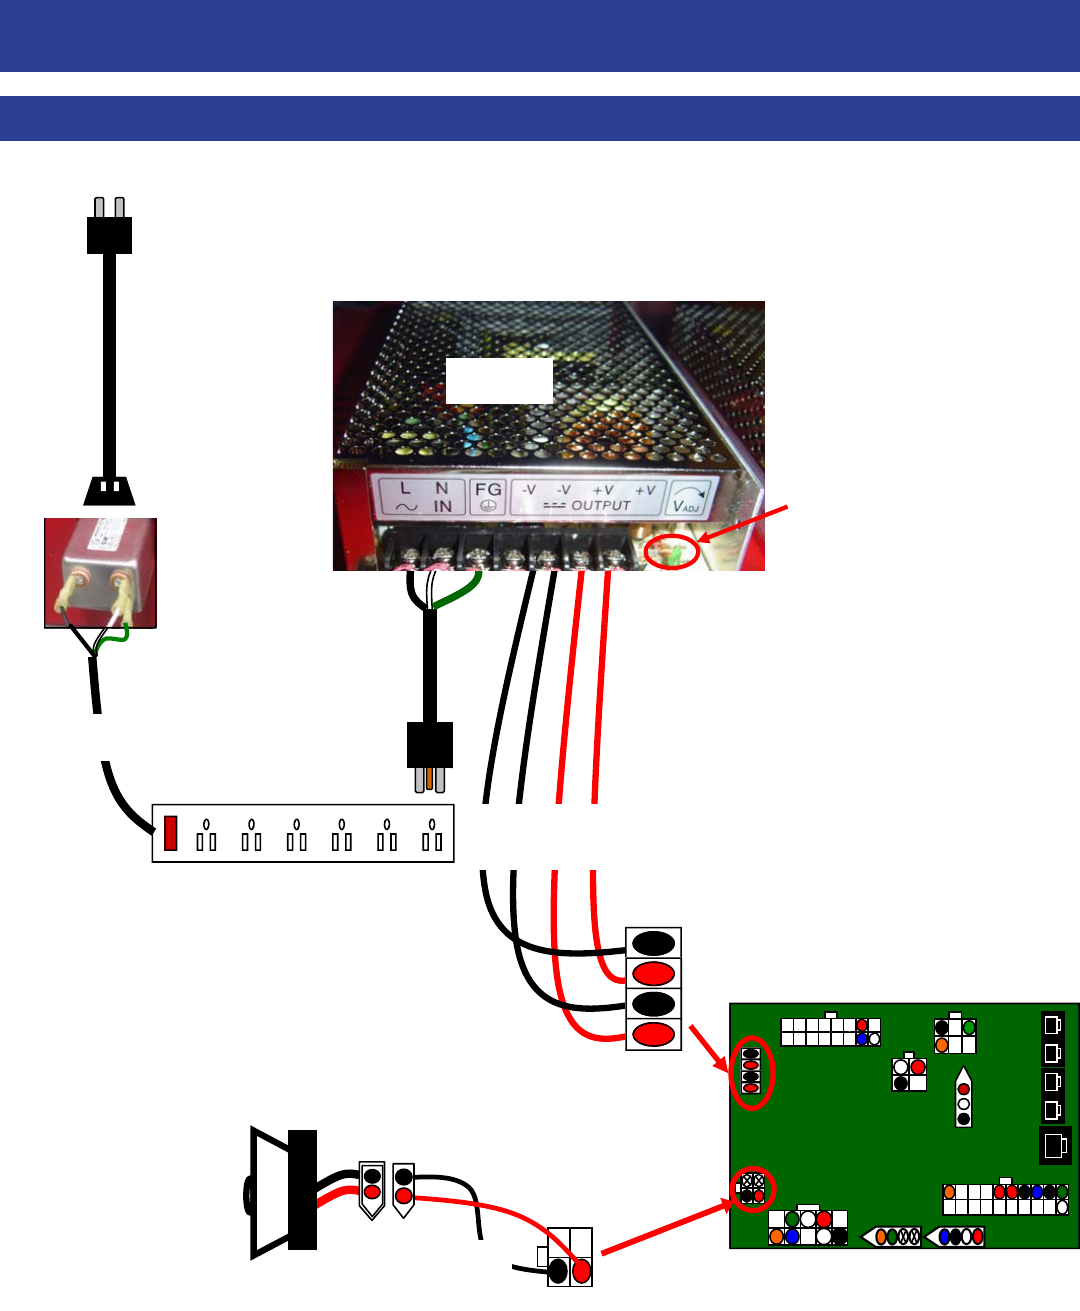
WIRING DIAGRAMS
POWER IN & SPEAKER
4
Power In Cord
From Wall
A5CORD5
Outlet Strip
AACE2504
Line Filter
A5FI9010
To J18
“POWER IN”
Connector on
Main Board
Speaker
A5SP1050
To J19
on Main
Board
AACE2507
To Speaker
Power Supply
Power Cable
AACE2509
Power Supply 12
Volt Cable
AACE2508
Power Supply
A5PS1001
Green LED power
indicator and voltage
adjustment pot
You can get this game at www.magic-play.eu
You can get this game at www.magic-play.eu
21
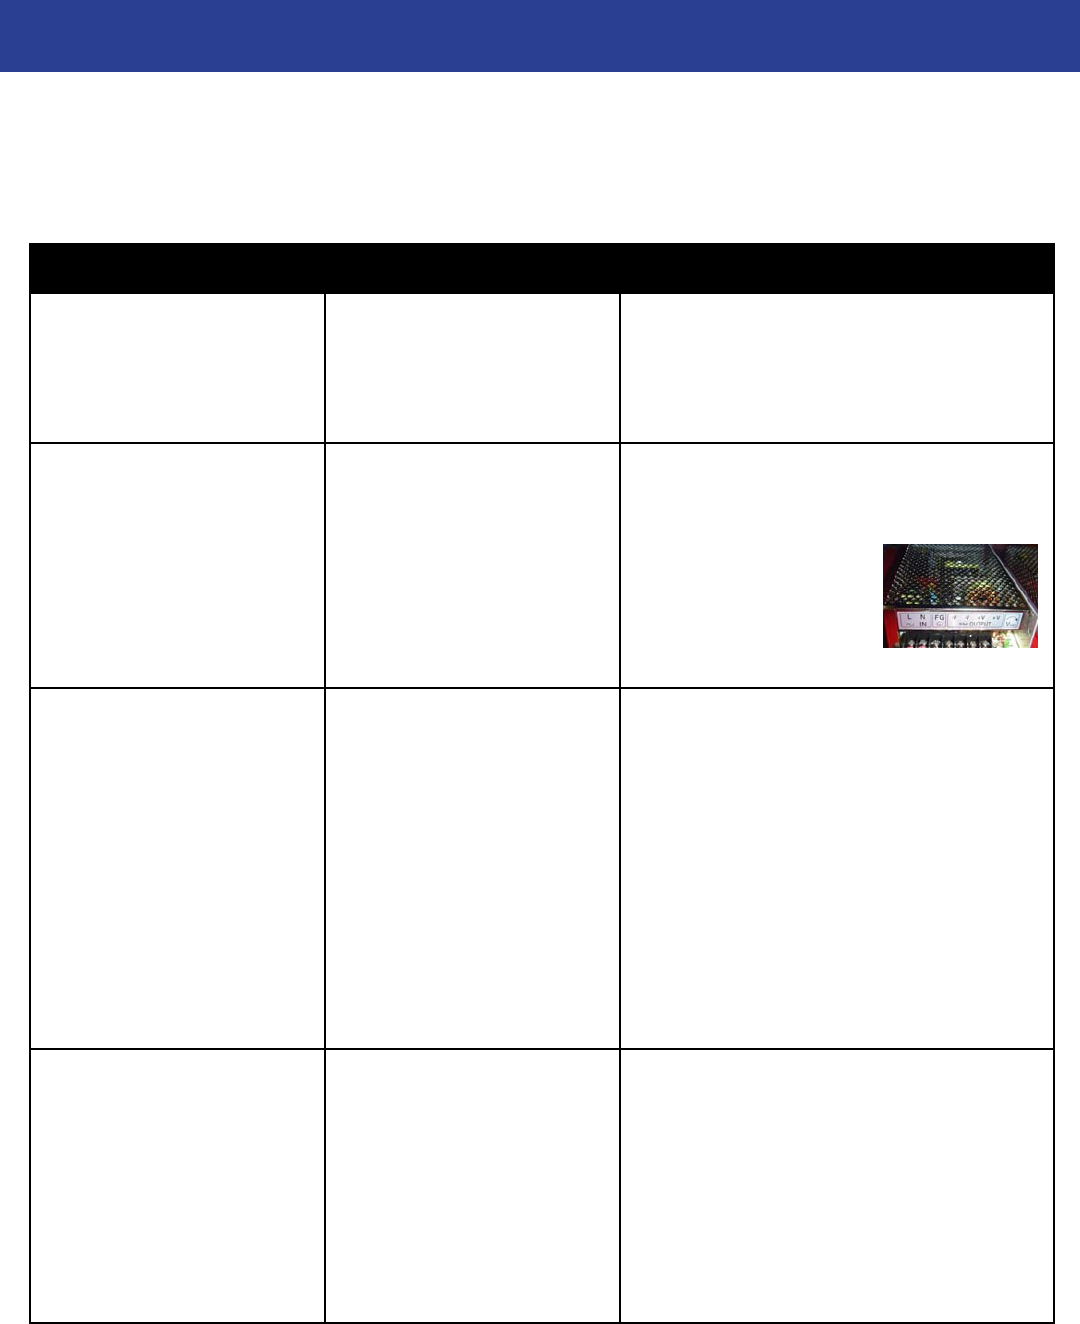
TROUBLESHOOTING GUIDE
5
Troubleshooting Strategy
Use common sense and a systematic method of troubleshooting to determine the exact problem, probable cause and
remedy. Use the process of elimination to find the faulty component. Always check for the simple and obvious causes
first such as unplugged, loose or broken wires and bad sensors, bent, pinched, stuck or jammed components.
Problem Probable Cause Remedy
No power to the game.
No lights on at all.
Unplugged.
Circuit breaker tripped.
Power strip faulty.
Faulty cable/power supply.
Check wall outlet.
Reset power strip breaker switch or building
circuit breaker.
Change plug position, replace if needed.
See Power Supply diagnostic below.
Bill Acceptor on.
But everything else off.
(Power Supply not ON)
Power supply unplugged.
Power supply shutting down
because of 12 V overload.
Faulty power supply.
Insure unit is plugged into power strip and
red rocker switch is light up.
See power supply diagnostics to isolate bad
component. A bad motor
or 12 volt short
would cause this.
See Power Supply Diagnostic below.
Dollar Bill Acceptor not
functioning.
Ensure Bill Acceptor is set to
“Always Enable”
Check for power to Bill
Acceptor.
Dirt or debris in acceptor
slot.
Pinched, broken, or
disconnected wiring.
Bill acceptor problem.
Acceptor should cycle stacker at game
power up. If not, check cable connections.
Refer to “How to Clean Bill Acceptor”
Or clean with bill reader cleaning card.
(A5CC9000)
Check wiring from bill acceptor
to Main Board. (AACE2510)
Repair or replace wiring harness.
Check J8 connector on Main Board
Make sure wires are secure in connectors.
Refer to troubleshooting section of dollar bill
acceptor manual included with this game or
the diagnostics label of the back of the unit.
No Sound Volume set to zero in menu.
Disconnected, loose or bro-
ken wires.
Faulty speaker.
Increase the volume by entering menu.
Press and hold red menu button down to
enter menu.
Enter N2 in menu for game volume.
Enter N3 in menu for attract volume.
Check connections and reseat J19 on main
board. Cable # AACE2507
Replace speaker. AACE8811
You can get this game at www.magic-play.eu
You can get this game at www.magic-play.eu
22
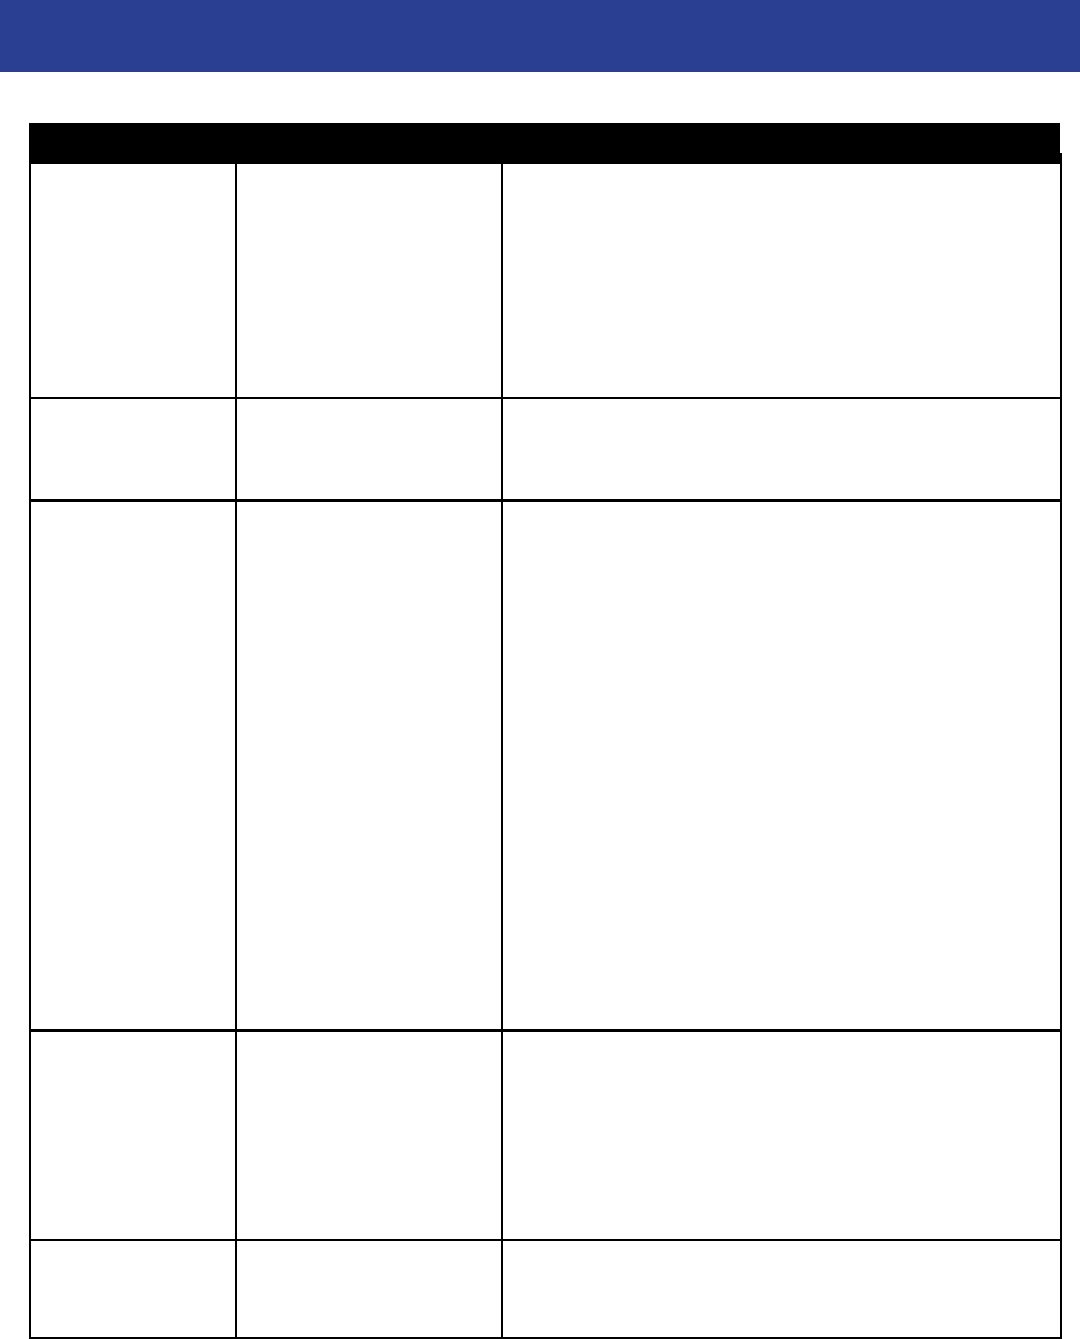
TROUBLESHOOTING GUIDE
6
Problem Probable Cause Remedy
Display not light-
ing up
Cycle game power off,
wait 10 seconds, turn
back on after checking
connections.
Phone cable to Display is
bent, pinched or un-
plugged.
Previous board in line
faulty.
Faulty Display Board.
Inspect cable and sockets. Replace cable if needed.
AACE2505, AACE2506
The displays are wired in series—if the output on the 1st
board is bad, the 2nd board will not light up. Refer to Dis-
play Wiring Diagram.
Replace Display Board. AABD4208
Part of a Display is
not showing
Segment faulty Replace display board.
Refer to Display Wiring Diagram. (AABD4208)
Game not
coining up.
Game does not
start.
Ensure game makes
sound when coin switch is
triggered.
Game set to large amount
of credits per game.
Start Pushbutton Faulty.
Check coin switches—both should be wired normally
open. If one switch is “closed” the other will not work.
Check wiring to main board.
Cable AACBL4A-DOOR, AACE2503
Enter N1 mode in menu to set credits per game.
Inspect pushbutton, clean, and check wires for continuity.
(AACE2500) back to main board.
Cabinet Lighting
not functioning
properly.
Led’s in top of cabinet plug
into J21 of main board.
Inspect cable and sockets. Replace cable if needed.
AACE2500, AACE2514
Tickets do not
dispense or
Wrong amount
dispensed.
If notch signal is
not seen, game will
stop trying until
power reset.
Press and hold red menu button down to enter menu.
Enter N5 in menu for Ticket Patterns - see if your game
matches any of patterns in manual. Change to ticket
pattern which matches your decal
Enter N6 in menu to enable or disable mercy tickets.
Enter N7 to make sure “Divide by 2” is off.
Enter N8 to make sure “Fixed Ticket Payout” is off.
Blow dust from sensor and clean with isopropyl alcohol.
Cycle game power and try again.
Replace with working dispenser to isolate the problem.
Flip tickets and load upside-down to have large cut notch
toward opto sensor.
Check cables AACE2501 from ticket dispenser to J9 on
main board.
Replace main board. (A5NEWGEN1)
Refer to “Game scores too many balls.” above.
Incorrect menu settings.
Opto Sensor on ticket dis-
penser dirty.
Faulty ticket dispenser.
Notch on tickets cut too
shallow.
Faulty cable.
Faulty Main Board.
Game is scoring too
many balls.
You can get this game at www.magic-play.eu
You can get this game at www.magic-play.eu
23
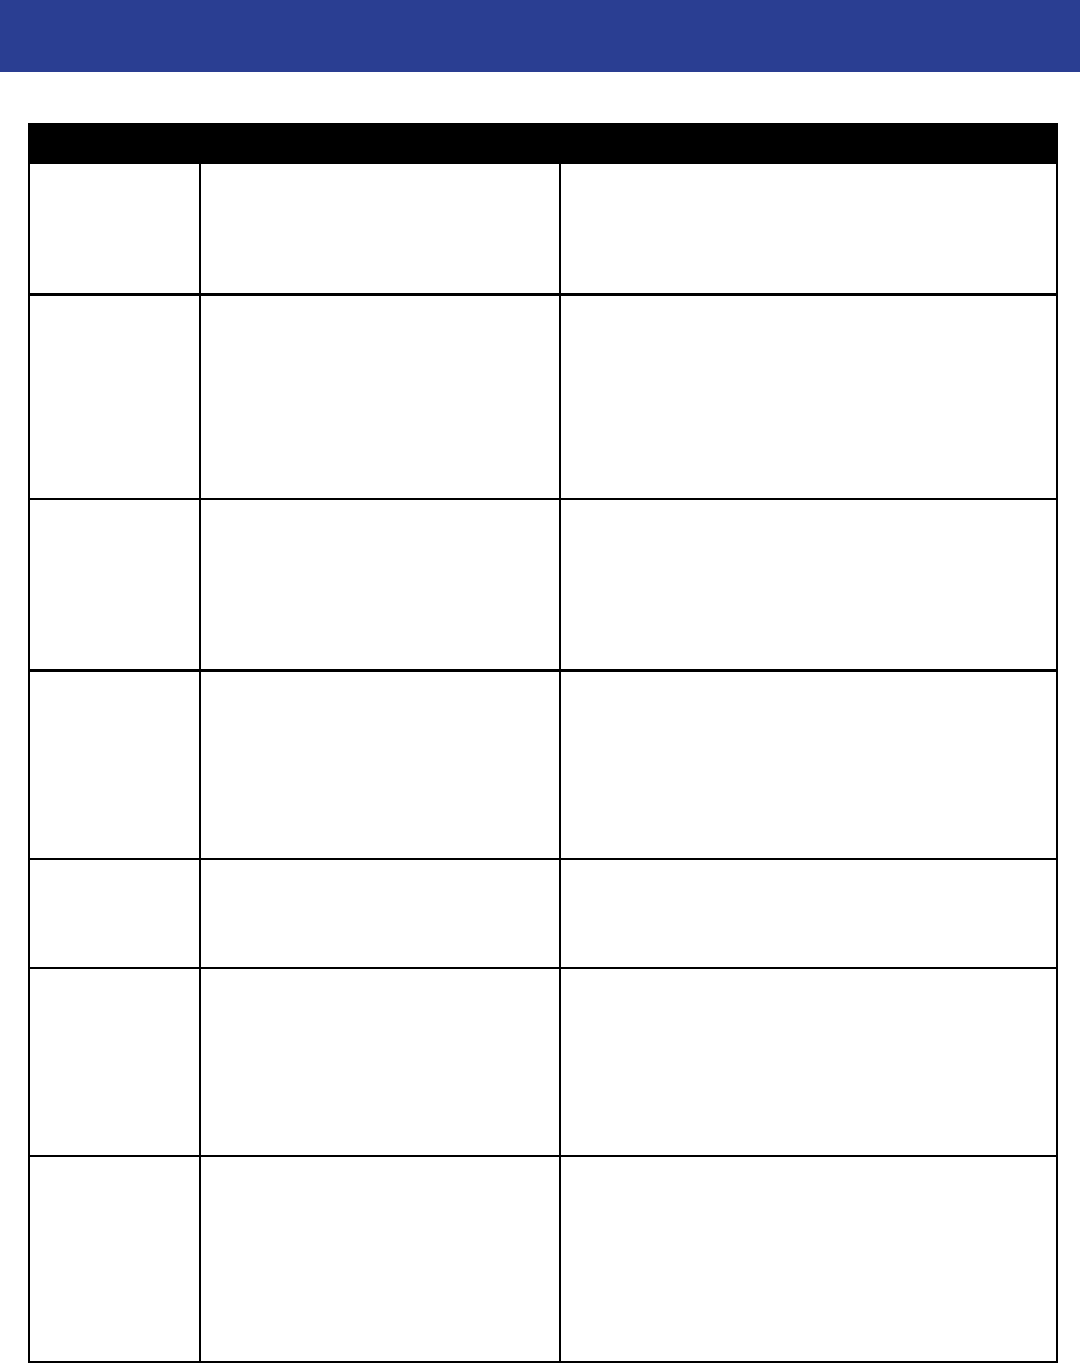
TROUBLESHOOTING GUIDE
7
Problem Probable Cause Remedy
Meters do not
work.
Disconnected, loose or broken wires.
Faulty counters.
Game meter will click at start of next game
Check connections and reseat J22 on main board.
Cables # AACE2500 and AACO1000
Replace counters. AACO1000
Ticket meter will click for every notch the dispenser “sees”
Balls do not
score.
Hoop is bent down so that sensor
and mirror are not in perfect align-
ment.
Hoop Sensor is unplugged or faulty.
Faulty Hoop Sensor
Crawl inside game and pull up on hoop’s front rim.
Hoop should move enough to realign beam.
Check cable from sensor to main board.
(AASE0020 & AACE2500)
Replace sensor. (AASE0020)
Game scores
too many
balls.
Hoop Sensor is slightly out of align-
ment.
Faulty Hoop Sensor
Crawl inside game and pull up on hoop’s front rim.
Hoop should move enough to realign beam.
Replace sensor. (AASE0020)
Ball gate turns
all the time.
Motor should stop when
“Home Position” is seen.
A shorted motor may damage the
main board.
Clean sensor and check for 5 volts dropping to
zero when arm is in front of sensor.
Replace sensor if needed.
Check motor for proper resistance and replace
main board if transistors are damaged.
(A5NEWGEN1)
Ball Gate does
not turn.
Sensor on motor will go to home
position at power up. If sensor is not
seen, motor will stop and not start
until power is cycled.
Check 12 Volts at motor on power
up.
Sensor is faulty.
Check continuity on cables from sensor and motor
to main board. (AACE2512)
Replace motor if has 12 Volts DC, replace motor.
(AAMO1001)
Clean sensor and ensure set screw is tight.
Replace sensor if needed. (AACB2501)
Display shows
“LO”
Ticket tray is empty.
Disconnected, loose or broken wires.
Faulty low ticket switches.
Faulty Main Board.
Refill tray with tickets, check low ticket switch.
Check connections and reseat J25 on main board.
(AACE2501)
Switch is wired normally open.
Replace switch if needed. AASW200
Replace main board. Part # A5NEWGEN1
Menu buttons
do not work.
Stuck pushbutton
Cable problem.
Faulty pushbutton.
Inspect pushbutton to make sure it is not stuck.
Check continuity on connector.
Check cable from pushbutton to main board.
(AACE2511 & AACE2502)
Replace pushbutton. (AACE2511)
You can get this game at www.magic-play.eu
You can get this game at www.magic-play.eu
24
POWER SUPPLY DIAGNOSTICS
8
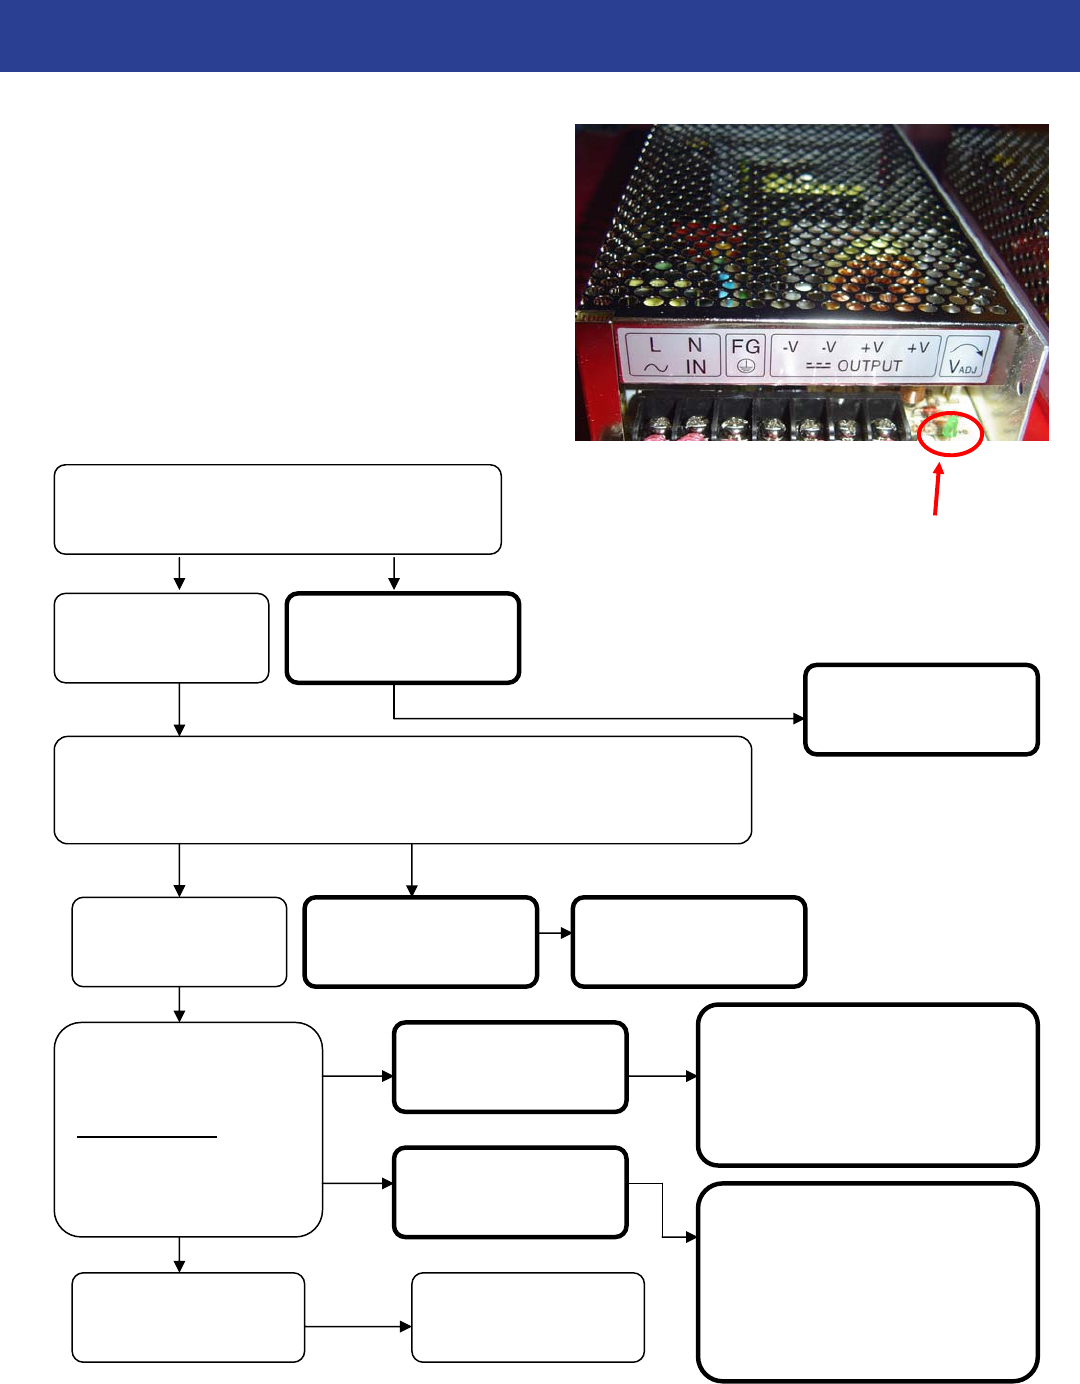
Turn power OFF. Disconnect all 12 volt
output wires only. Turn power ON.
Green LED Light
comes ON.
Green LED Light
remains OFF.
Replace Power
Supply.
Turn power OFF. Unplug all outputs from the Main Board.
Reconnect the 12 volt output wires to the Power Supply. Turn
power ON.
Green LED Light
comes ON.
Green LED Light
remains OFF.
Turn power OFF. Re-
connect the outputs at
the Main Circuit Board
one at a time. Wait 1
minute between tests
to turn power ON.
Green LED Light
comes ON.
Green LED Light
remains OFF.
That cable or related compo-
nent is shorted out. See
Jumper Cable Pin-Outs to see
which component might be at
fault.
Short in Main
Board - Replace.
That cable is OK.
Green LED Light
dims. A related component such as
a solenoid is causing an over-
load. See Jumper Cable Pin-
Outs beginning on page 16 to
see which component might
be at fault.
Diagnose Power Supply
Power Supply is located under carpet inside game.
Please refer to “How to Access Blower” for informa-
tion.
Check the small green LED light on the power supply
circuit board. If the light is out there is a short
somewhere. If the light dims, there is an overload in
one of the circuits.
Green LED
power indicator
and voltage
adjustment pot
You can get this game at www.magic-play.eu
You can get this game at www.magic-play.eu
25
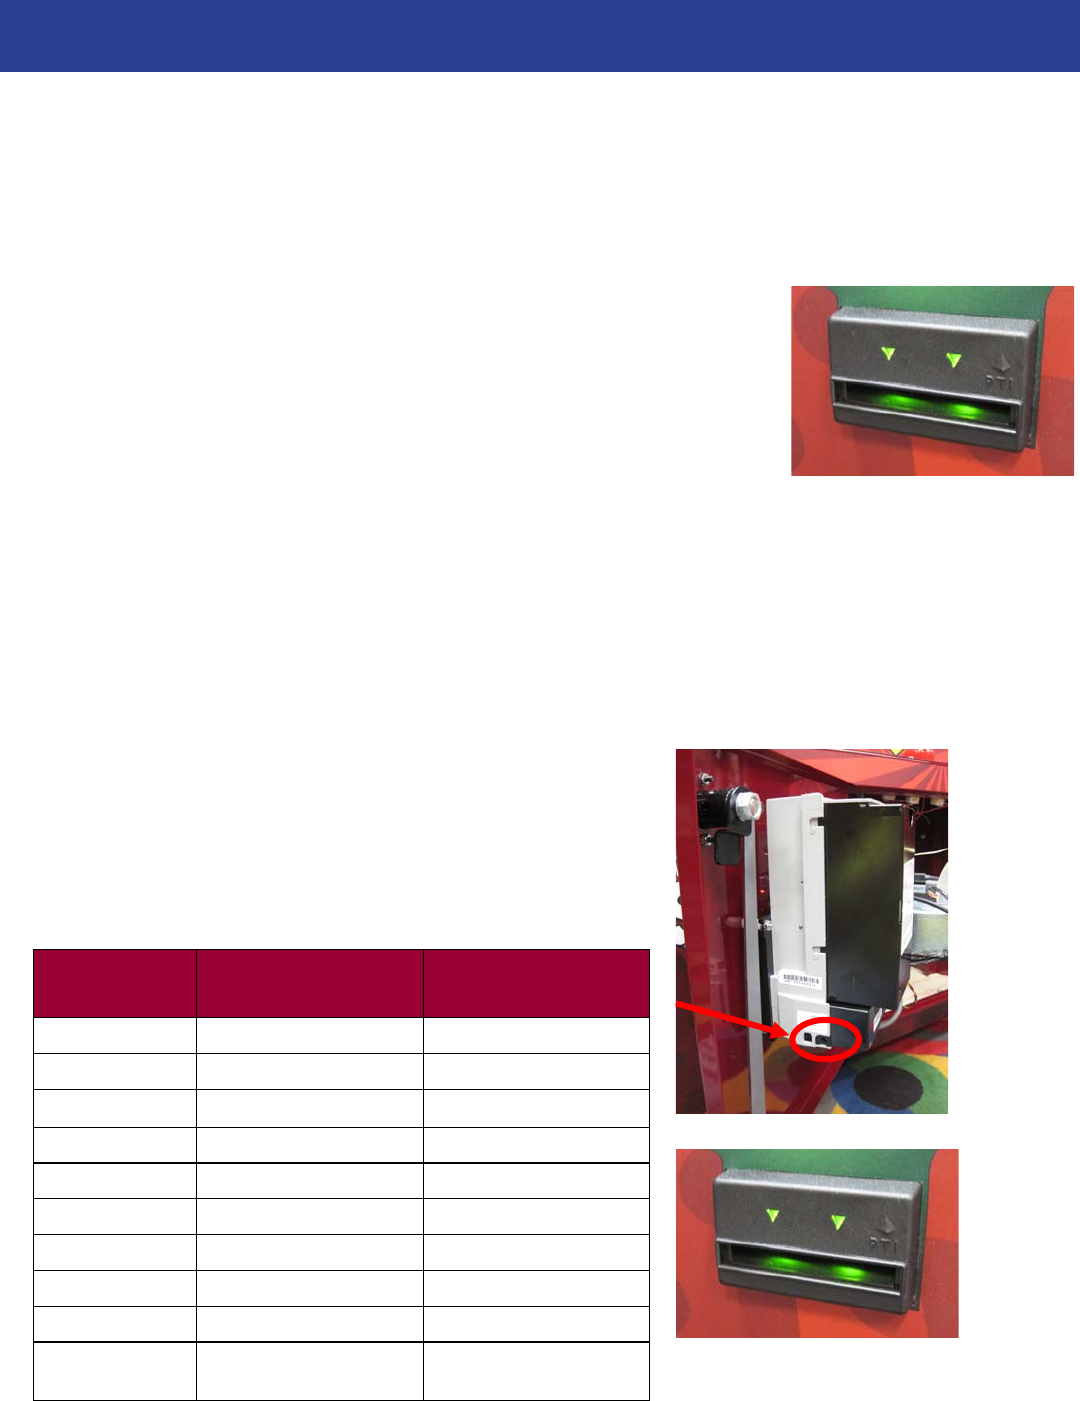
DOLLAR BILL ACCEPTOR DIAGNOSTICS
9
FLASHING
CODE DESCRIPTION CORRECTIVE
ACTION
LEDs off Power off Turn on power
LEDs on Acceptor is OK
1 flash Bill path blockage Un-jam bill path
2 flashes Stacker jam Un-jam stacker
3 flashes Cassette is full of bills Empty the cassette
4 flashes Cassette is removed Replace the cassette
5 flashes Acceptor is defective Replace the acceptor
6 flashes Acceptor not enabled See service manual
10 flashes Configuration Mode Power down to exit
Rapid flashing
during operation
Stringing attempt de-
tected; or sensors dirty Clean the sensors
To enter Diagnostic Mode, press and hold the
Diagnostic Button on the back left corner of the DBA for
1-3 seconds.
The lights above the bill slot will flash the code.
First determine if Bill Acceptor has power:
Turn game ON—The bill acceptor should make noise as stacker cycles and
green lights on outside bezel should flash.
If NO power:
Due to the different models and brands of Bill Acceptors that are used:
Examine Bill Acceptor and determine if acceptor is 12 Volt DC or 110 VAC
Use meter to measure voltage at cable going into Bill Acceptor.
If power is OK:
Clean Bill Acceptor path to make sure there is nothing jamming unit.
Enter DBA Diagnostics Mode -
Important—Do not hold button down to long or Bill Acceptor will enter
programming mode.
If accidentally entered programming mode by mistake—Unplug game and plug back in.
ERROR CODES
Count the number of flashes on front bezel of Bill Acceptor and
follow chart for repair.
Note: There are many different models and brands of Bill Acceptors that are used on
redemption games. Your Bill Acceptor may differ from the unit shown.
You can get this game at www.magic-play.eu
You can get this game at www.magic-play.eu
26
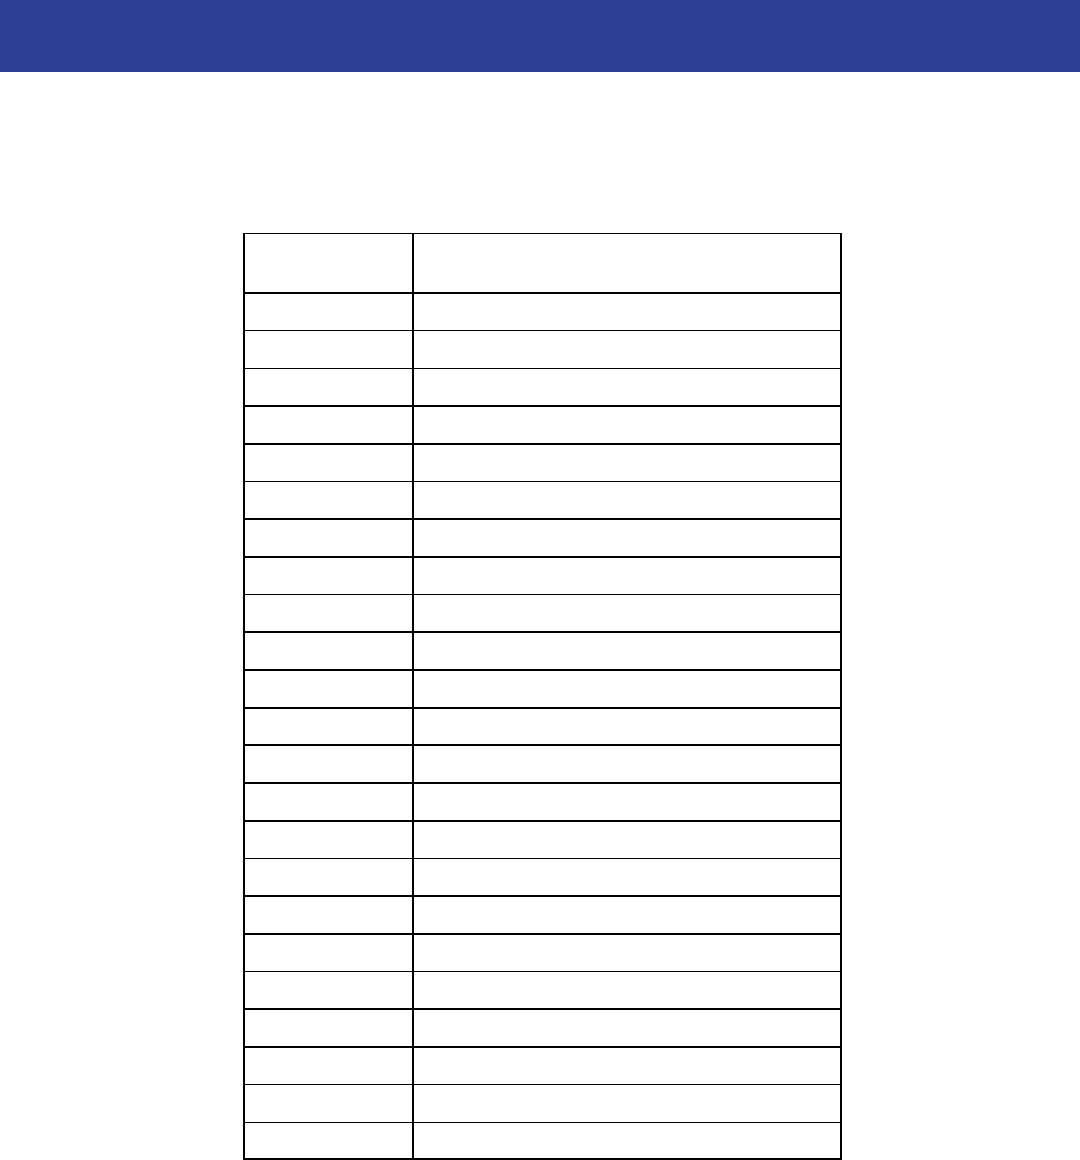
PARTS LIST
10
A5DE2500 Backboard Decal
A5DE2501 Side Seam, Left Decal
A5DE2502 Side Seam, Right Decal
A5DE2503 Control Panel Decal
A5DE2504 Front Door Decal
A5DE2505 Side Bottom Decal
A5DE2506 Window Top Left Decal
A5DE2507 Window Bottom Left Decal
PART # DESCRIPTION
A5DE2508 Window Top Right Decal
A5DE2509 Window Bottom Right Decal
AACB2501 Sensor for Ball Gate
AABD4208 Score/ Time Display (2 per game)
A5NEWGEN1 Main Board
A5TD1 Ticket Dispenser
A5PS1001 Power Supply
A5LK2000 Cash Box Key
A5LK5001 Front Door Key
A5FI9010 Line Filter for AC In
AASW200 Low Ticket Switch
A5CORD Power In Cord
A5MI2300 Mirror Surface for Hoop Sensor
AAMO1001 Ball Gate Motor
A5PB8000 Start Button
You can get this game at www.magic-play.eu
You can get this game at www.magic-play.eu
27
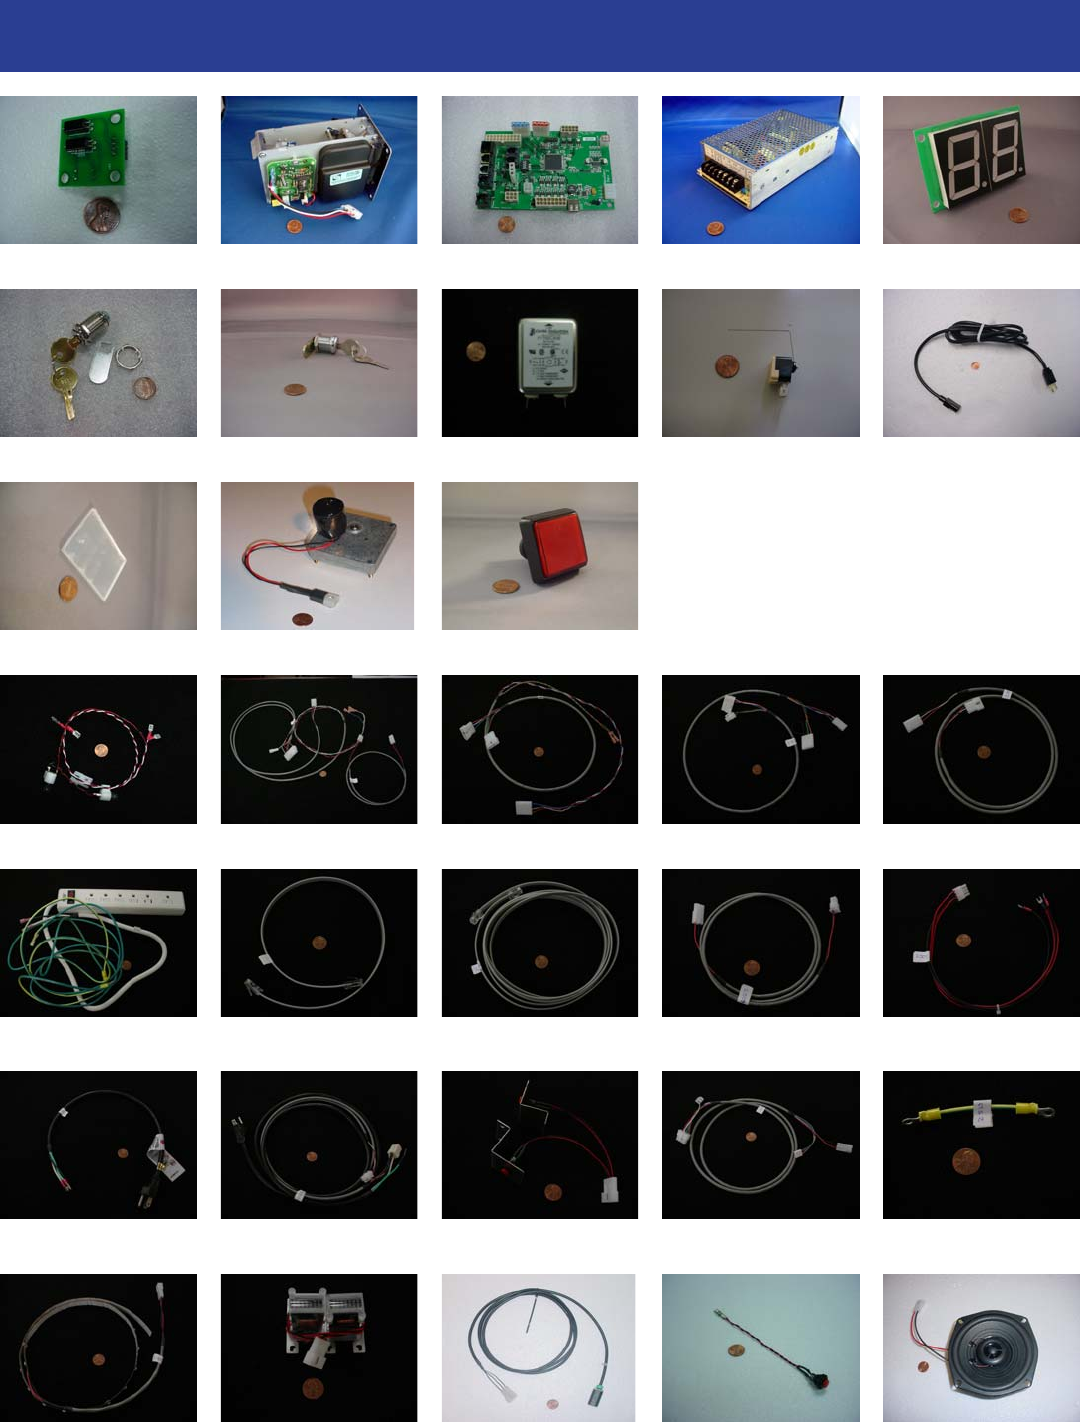
PARTS PICTURES
11
AACBL4A-DOOR AACE2500 AACE2501 AACE2502 AACE2503
AACE2504 AACE2505 AACE2506 AACE2507 AACE2508
AACE2509 AACE2510 AACE2511 AACE2512 AACE2513
AACE2514 AACO1000 AASE0020 AAPB2700 A5SP1050
AACB2501 A5TD1 A5NEWGEN1 A5PS1001 AABD4208
A5LK2000 A5LK5001 A5FI9010 AASW200 A5CORD5
A5MI2300 AAMO1001 A5PB8000
You can get this game at www.magic-play.eu
You can get this game at www.magic-play.eu
28
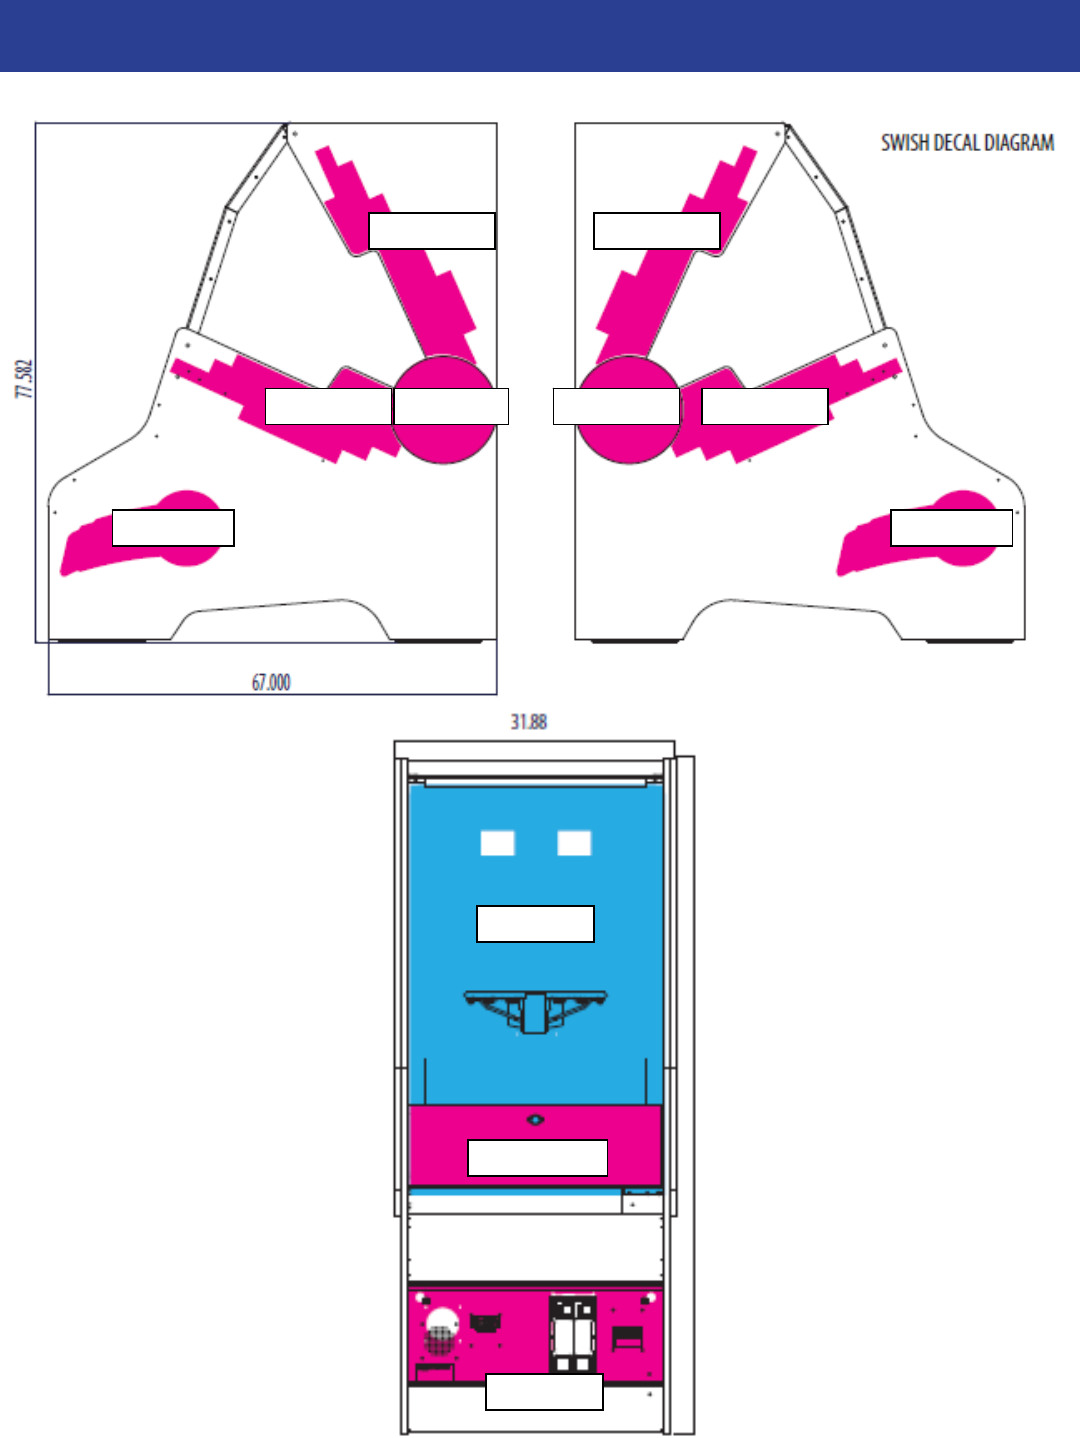
DECAL DIAGRAM
12
A5DE2508 Window
Decal Top Right
A5DE2509 Window
Decal Bottom Right
A5DE2502 Seam
Decal Right
A5DE2505 Side
Cabinet Decal
A5DE2506 Window
Decal Top Left
A5DE2501 Seam
Decal Left
A5DE2507 Window
Decal Bottom Left
A5DE2505 Side
Cabinet Decal
A5DE2500
Backboard Decal
A5DE2503
Control Panel Decal
A5DE2504
Front Door Decal
You can get this game at www.magic-play.eu
You can get this game at www.magic-play.eu
29
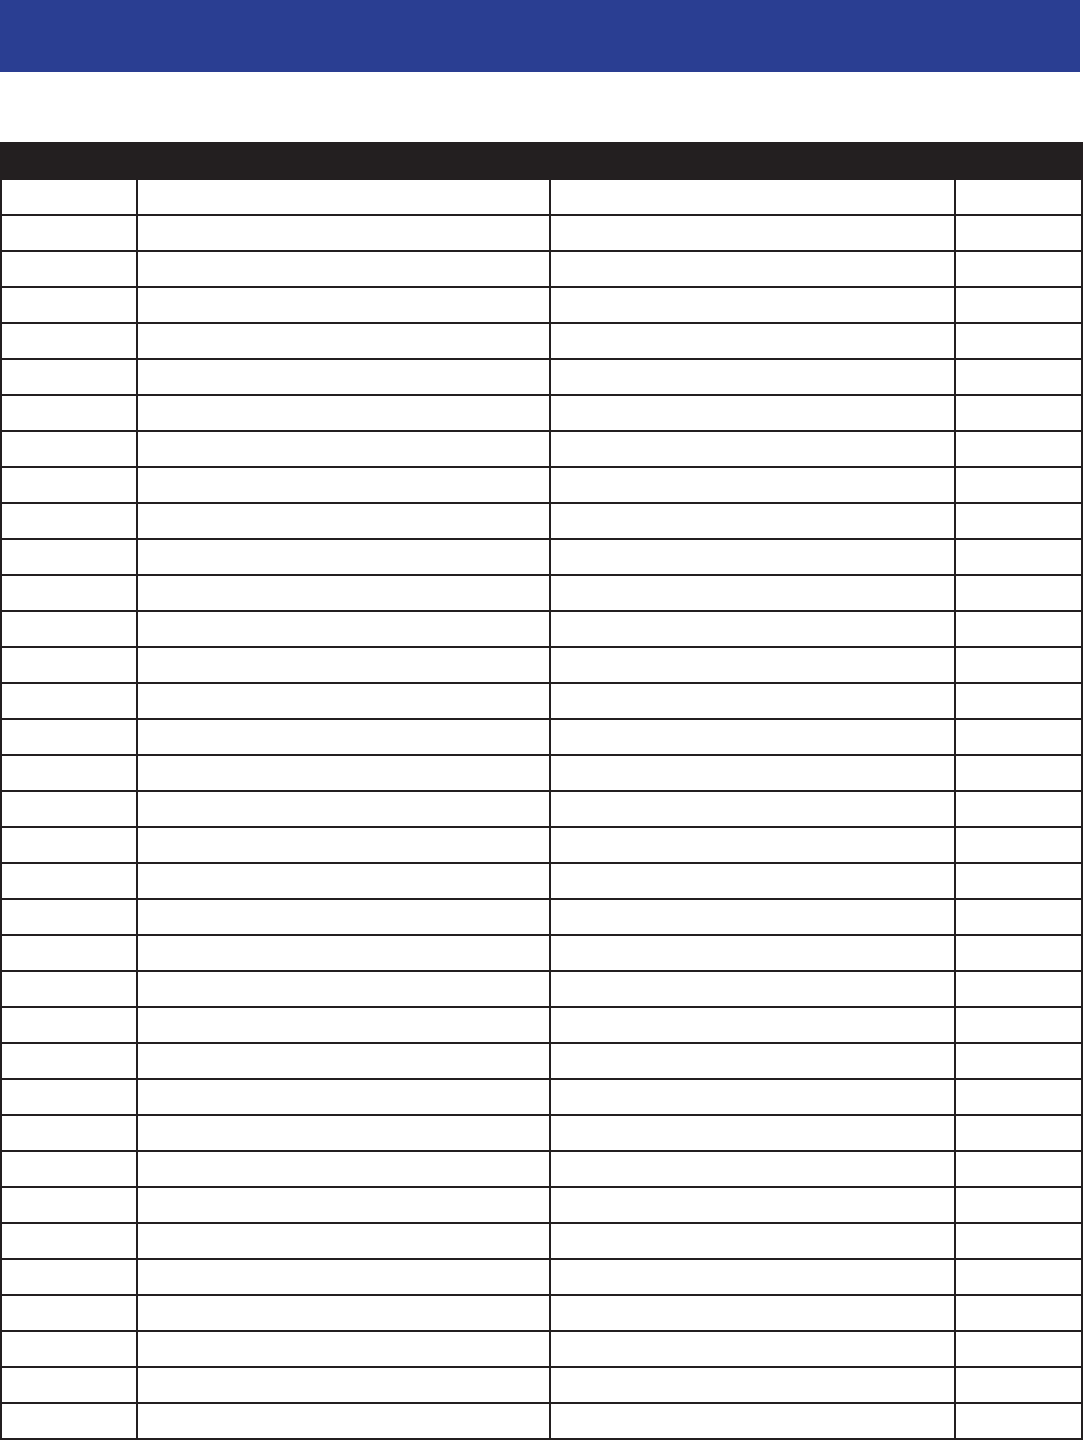
MAINTENANCE LOG
If repairs are necessary, it is good practice to keep a log of repairs done and parts ordered.
The chart below will assist you in tracking your game’s maintenance.
DATE MAINTENANCE PERFORMED PARTS ORDERED INITIALS
You can get this game at www.magic-play.eu
You can get this game at www.magic-play.eu

30
TECHNICAL SUPPORT
Excellent customer service is very important to Bay Tek Games!
We know that keeping your games in great operating condition is important to your business.
When you need us, we are here to help. You can call us for free technical assistance, and you can
count on us to have parts on-hand to support your game. We offer options that t your needs.
Electronics / Circuit Boards - Repair Options
Repair & Return – If you have Circuit Board issues with your Bay Tek game, you can send the board
to us and we’ll repair it right away. Most items sent to us are repaired and returned to you within two
days. This option is your best value as we offer this fast turn-around service at the most reasonable
price.
Advance Replacement – If you have Circuit Board issues with your Bay Tek game, but you don’t
have time to send in your board in for repair, give us a call and ask for an Advance Replacement.
We’ll send you a replacement board that same day (pending availability). When you get your new
board, just repackage the defective board in the same box and send it back to us. We make it easy by
including a UPS Return Shipping label for you to put on the box (not available for international ship-
ments). This is your best option when you need to get your game up and running as quickly as pos-
sible!
Spare Parts – Take matters into your own hands and purchase new spare Circuit Boards for your
Bay Tek games. Many of our games share the same main-board electronics. This means you can buy
one set of spare electronics to support many of your Bay Tek games. Spare boards allow you to get
your game up and running the quickest and provide you a valuable troubleshooting option. Call our
technicians to get recommendations for what you should keep on hand for spare parts!
Technical Support:
“You” are the best tool for troubleshooting! Your abilities to understand the game and your skills to
repair the game are invaluable to us! If you need help, you know you can call us. It’s not easy to diag-
nose a game remotely by phone, but our technicians do a great job. They’ll need your help to perform
some troubleshooting steps and convey to them exactly what’s happening with your game.
Returns, Credits, & Fees:
NOTICE! ALL ITEMS being sent to Bay Tek Games for repair or return, etc. require prior Return
Authorization! Bay Tek Games will provide a Product Return Form with an authorizing Ticket Number
for each item to be returned. Please be certain to include this document with all shipments!
Late Fees and Non-Return Fees - Advance Replacement and Warranty Replacement items require
the defective items to be returned by Bay Tek games promptly to avoid Late Fees. We expect items to
be returned with 10 working days. Late fees are invoiced monthly. Late fees are non-refundable under
any circumstance! Any item not returned within 90 days will be invoiced in full as a replacement part.
Bench Fees - Bench fees will apply for each electronic item returned to Bay Tek Games (this includes
unused Advance Replacement items). This charge covers our cost to inspect, evaluate and retest
each item. Please note that returned items that do not pas our tests will be charged accordingly as
replacement items or advance replacements.
Restocking Fees - Unused items returned for credit will be credited minus a restocking fee. Items
must be returned with in 30 days of purchase in order to qualify for any credit amount. No shipping
charges will be credited.
You can get this game at www.magic-play.eu
You can get this game at www.magic-play.eu
31
WARRANTY
NON-WARRANTY
Bay Tek Games warrants to the original purchaser that all game components will be free of defects
in workmanship and materials for a period of 6 months from the date of purchase. If you ll out the
registration card in the cashbox of the game, Bay Tek will add another 3 months to your warranty, free
of charge.
Bay Tek Games will, without charge, repair or replace defective component parts upon notication to
the parts/service department while the game is under warranty.
Warranty replacement parts will be shipped immediately, via ground service, along with a Product
Return Form for the return of defective parts.
Defective parts must be shipped back to Bay Tek Games unless otherwise instructed. Items not re-
turned to Bay Tek Games will be invoiced as replacement parts.
This warranty does not apply in the event of any misuse or abuse to the product, or as a result of any
unauthorized repairs or alterations. The warranty does not apply if any serial number decal is altered,
defaced, or removed from its original position.
Should you need your game serviced, determine the serial number from the decal placed on the
front of this manual, or locate it on the back of the game. Then contact our Service Department at:
920.822.3951 or e-mail: service@baytekgames.com
Options and estimated charges will be provided to you for your approval.
Please remember that any items being sent to Bay Tek Games must include prior return
authorization from our Parts & Service Department.
This approval will include a Product Return Form which is required to be included with any incoming
shipments. Repaired parts will be shipped back using the same method in which they were received.
Repairs are warranted for 30 days from the date of return shipment.
ATTENTION
!!
In order to maintain the safety & compliance certications of this
game, ONLY approved parts may be used. For approved
replacement parts, refer to the parts list in this manual.
You can get this game at www.magic-play.eu
You can get this game at www.magic-play.eu
32
You can get this game at www.magic-play.eu
You can get this game at www.magic-play.eu

33
You can get this game at www.magic-play.eu
You can get this game at www.magic-play.eu
