PetaLinux Tools Ation: Reference Guide (UG1144) Ug1144
User Manual:
Open the PDF directly: View PDF ![]() .
.
Page Count: 127 [warning: Documents this large are best viewed by clicking the View PDF Link!]
- PetaLinux Tools Documentation: Reference Guide
- Revision History
- Table of Contents
- Ch. 1: Overview
- Ch. 2: Setting up your Environment
- Ch. 3: Creating a Project
- Ch. 4: Configuring and Building
- Ch. 5: Booting and Packaging
- Ch. 6: Customizing the Project
- Ch. 7: Customizing the Rootfs
- Including Prebuilt Libraries
- Including Prebuilt Applications
- Including Prebuilt Modules
- Creating and Adding Custom Applications
- Creating and Adding Custom Modules
- Building User Applications
- Testing User Application
- Building User Modules
- PetaLinux Auto Login
- Application Auto Run at Startup
- Adding Layers
- Adding an Existing Recipe into Rootfs
- Adding a Package Group
- Ch. 8: Debugging
- Ch. 9: Advanced Configurations
- PetaLinux Menuconfig System
- Settings
- Subsystem AUTO Hardware Settings
- System Processor
- Memory Settings
- Serial Settings
- Ethernet Settings
- Flash Settings
- SD/SDIO Settings
- Timer Settings
- Reset GPIO Settings
- RTC Settings
- Advanced bootable images storage Settings
- Kernel Bootargs
- ATF Compilation Configuration
- PMU Firmware Configuration
- U-Boot Configuration
- Image Packaging Configuration
- Firmware Version Configuration
- Yocto Settings
- Configuring Out-of-tree Build
- Configuring Project Components
- PetaLinux Menuconfig System
- Ch. 10: Yocto Features
- Ch. 11: Technical FAQs
- Appx. A: Migration
- Appx. B: PetaLinux Project Structure
- Appx. C: Generating Boot Components
- Appx. D: QEMU Virtual Networking Modes
- Appx. E: Xilinx IP Models Supported by QEMU
- Appx. F: Xen Zynq Ultrascale+ MPSoC Example
- Appx. G: Additional Resources and Legal Notices

PetaLinux Tools
Documentation
Reference Guide
UG1144 (v2018.2) June 6, 2018
Reference Guide 2
UG1144 (v2018.2) June 6, 2018 www.xilinx.com
Revision History
The following table shows the revision history for this document.
Section Revision Summary
06/06/2018 Version 2018.2
CR updates • Removed DSA warning and recommendations
throughout the book.
04/18/2018 Version 2018.1
General updates • Merged the contents of PetaLinux Tools Documentation:
Workflow Tutorial (UG1156) and made it obsolete
• Removed Appendix - Obsolete Features
• Organized the content in the document
Yocto Features • Added a new section SDK Generation
• Added a new section Machine Support
• Added a new section SOC Variant Support
• Added a new section Image Features
Configuring and Building • Added a new section Build Optimization
Migration • Added a new Appendix

Reference Guide 3
UG1144 (v2018.2) June 6, 2018 www.xilinx.com
Table of Contents
Revision History . . . . . . . . . . . . . . . . . . . . . . . . . . . . . . . . . . . . . . . . . . . . . . . . . . . . . . . . . . . . . . . . . . . . 2
Chapter 1: Overview
Introduction . . . . . . . . . . . . . . . . . . . . . . . . . . . . . . . . . . . . . . . . . . . . . . . . . . . . . . . . . . . . . . . . . . . . . . 6
Chapter 2: Setting up your Environment
Installation Requirements. . . . . . . . . . . . . . . . . . . . . . . . . . . . . . . . . . . . . . . . . . . . . . . . . . . . . . . . . . . 9
Installation Steps . . . . . . . . . . . . . . . . . . . . . . . . . . . . . . . . . . . . . . . . . . . . . . . . . . . . . . . . . . . . . . . . . 11
PetaLinux Working Environment Setup . . . . . . . . . . . . . . . . . . . . . . . . . . . . . . . . . . . . . . . . . . . . . . . 14
Design Flow Overview . . . . . . . . . . . . . . . . . . . . . . . . . . . . . . . . . . . . . . . . . . . . . . . . . . . . . . . . . . . . . 16
Chapter 3: Creating a Project
PetaLinux BSP Installation. . . . . . . . . . . . . . . . . . . . . . . . . . . . . . . . . . . . . . . . . . . . . . . . . . . . . . . . . . 17
Creating Hardware Platform with Vivado . . . . . . . . . . . . . . . . . . . . . . . . . . . . . . . . . . . . . . . . . . . . . 19
Exporting Hardware Platform to PetaLinux Project . . . . . . . . . . . . . . . . . . . . . . . . . . . . . . . . . . . . . 21
Creating a New PetaLinux Project. . . . . . . . . . . . . . . . . . . . . . . . . . . . . . . . . . . . . . . . . . . . . . . . . . . . 21
Chapter 4: Configuring and Building
Version Control . . . . . . . . . . . . . . . . . . . . . . . . . . . . . . . . . . . . . . . . . . . . . . . . . . . . . . . . . . . . . . . . . . 23
Importing Hardware Configuration . . . . . . . . . . . . . . . . . . . . . . . . . . . . . . . . . . . . . . . . . . . . . . . . . . 24
Build System Image . . . . . . . . . . . . . . . . . . . . . . . . . . . . . . . . . . . . . . . . . . . . . . . . . . . . . . . . . . . . . . . 25
Generate Boot Image for Zynq Family Devices . . . . . . . . . . . . . . . . . . . . . . . . . . . . . . . . . . . . . . . . . 28
Generate Boot Image for MicroBlaze . . . . . . . . . . . . . . . . . . . . . . . . . . . . . . . . . . . . . . . . . . . . . . . . . 28
Build Optimizations . . . . . . . . . . . . . . . . . . . . . . . . . . . . . . . . . . . . . . . . . . . . . . . . . . . . . . . . . . . . . . . 29
Chapter 5: Booting and Packaging
Packaging Prebuilt Images. . . . . . . . . . . . . . . . . . . . . . . . . . . . . . . . . . . . . . . . . . . . . . . . . . . . . . . . . . 33
Using petalinux-boot Command with Prebuilt Images . . . . . . . . . . . . . . . . . . . . . . . . . . . . . . . . . . . 34
Booting a PetaLinux Image on QEMU. . . . . . . . . . . . . . . . . . . . . . . . . . . . . . . . . . . . . . . . . . . . . . . . . 35
Boot a PetaLinux Image on Hardware with SD Card . . . . . . . . . . . . . . . . . . . . . . . . . . . . . . . . . . . . . 38
Boot a PetaLinux Image on Hardware with JTAG . . . . . . . . . . . . . . . . . . . . . . . . . . . . . . . . . . . . . . . 41
Boot a PetaLinux Image on Hardware with TFTP. . . . . . . . . . . . . . . . . . . . . . . . . . . . . . . . . . . . . . . . 44
BSP Packaging. . . . . . . . . . . . . . . . . . . . . . . . . . . . . . . . . . . . . . . . . . . . . . . . . . . . . . . . . . . . . . . . . . . . 46

Reference Guide 4
UG1144 (v2018.2) June 6, 2018 www.xilinx.com
Chapter 6: Customizing the Project
Firmware Version Configuration. . . . . . . . . . . . . . . . . . . . . . . . . . . . . . . . . . . . . . . . . . . . . . . . . . . . . 48
Root File System Type Configuration . . . . . . . . . . . . . . . . . . . . . . . . . . . . . . . . . . . . . . . . . . . . . . . . . 49
Boot Images Storage Configuration . . . . . . . . . . . . . . . . . . . . . . . . . . . . . . . . . . . . . . . . . . . . . . . . . . 49
Primary Flash Partition Configuration . . . . . . . . . . . . . . . . . . . . . . . . . . . . . . . . . . . . . . . . . . . . . . . . 50
Managing Image Size . . . . . . . . . . . . . . . . . . . . . . . . . . . . . . . . . . . . . . . . . . . . . . . . . . . . . . . . . . . . . . 51
Configuring INITRAMFS Boot . . . . . . . . . . . . . . . . . . . . . . . . . . . . . . . . . . . . . . . . . . . . . . . . . . . . . . . 52
Configure TFTP Boot . . . . . . . . . . . . . . . . . . . . . . . . . . . . . . . . . . . . . . . . . . . . . . . . . . . . . . . . . . . . . . 53
Configuring NFS Boot. . . . . . . . . . . . . . . . . . . . . . . . . . . . . . . . . . . . . . . . . . . . . . . . . . . . . . . . . . . . . . 54
Configuring SD Card ext filesystem Boot . . . . . . . . . . . . . . . . . . . . . . . . . . . . . . . . . . . . . . . . . . . . . . 55
Chapter 7: Customizing the Rootfs
Including Prebuilt Libraries . . . . . . . . . . . . . . . . . . . . . . . . . . . . . . . . . . . . . . . . . . . . . . . . . . . . . . . . . 58
Including Prebuilt Applications . . . . . . . . . . . . . . . . . . . . . . . . . . . . . . . . . . . . . . . . . . . . . . . . . . . . . . 59
Including Prebuilt Modules . . . . . . . . . . . . . . . . . . . . . . . . . . . . . . . . . . . . . . . . . . . . . . . . . . . . . . . . . 60
Creating and Adding Custom Applications. . . . . . . . . . . . . . . . . . . . . . . . . . . . . . . . . . . . . . . . . . . . . 61
Creating and Adding Custom Modules . . . . . . . . . . . . . . . . . . . . . . . . . . . . . . . . . . . . . . . . . . . . . . . . 63
Building User Applications . . . . . . . . . . . . . . . . . . . . . . . . . . . . . . . . . . . . . . . . . . . . . . . . . . . . . . . . . 64
Testing User Application . . . . . . . . . . . . . . . . . . . . . . . . . . . . . . . . . . . . . . . . . . . . . . . . . . . . . . . . . . . 66
Building User Modules. . . . . . . . . . . . . . . . . . . . . . . . . . . . . . . . . . . . . . . . . . . . . . . . . . . . . . . . . . . . . 66
PetaLinux Auto Login . . . . . . . . . . . . . . . . . . . . . . . . . . . . . . . . . . . . . . . . . . . . . . . . . . . . . . . . . . . . . . 68
Application Auto Run at Startup. . . . . . . . . . . . . . . . . . . . . . . . . . . . . . . . . . . . . . . . . . . . . . . . . . . . . 68
Adding Layers . . . . . . . . . . . . . . . . . . . . . . . . . . . . . . . . . . . . . . . . . . . . . . . . . . . . . . . . . . . . . . . . . . . . 70
Adding an Existing Recipe into Rootfs . . . . . . . . . . . . . . . . . . . . . . . . . . . . . . . . . . . . . . . . . . . . . . . . 71
Adding a Package Group . . . . . . . . . . . . . . . . . . . . . . . . . . . . . . . . . . . . . . . . . . . . . . . . . . . . . . . . . . . 71
Chapter 8: Debugging
Debugging the Linux Kernel in QEMU. . . . . . . . . . . . . . . . . . . . . . . . . . . . . . . . . . . . . . . . . . . . . . . . . 73
Debugging Applications with TCF Agent. . . . . . . . . . . . . . . . . . . . . . . . . . . . . . . . . . . . . . . . . . . . . . . 74
Debugging Zynq UltraScale+ MPSoC Applications with GDB . . . . . . . . . . . . . . . . . . . . . . . . . . . . . . 79
Chapter 9: Advanced Configurations
PetaLinux Menuconfig System . . . . . . . . . . . . . . . . . . . . . . . . . . . . . . . . . . . . . . . . . . . . . . . . . . . . . . 84
Configuring Out-of-tree Build . . . . . . . . . . . . . . . . . . . . . . . . . . . . . . . . . . . . . . . . . . . . . . . . . . . . . . . 90
Configuring Project Components . . . . . . . . . . . . . . . . . . . . . . . . . . . . . . . . . . . . . . . . . . . . . . . . . . . . 93
Chapter 10: Yocto Features
SDK Generation . . . . . . . . . . . . . . . . . . . . . . . . . . . . . . . . . . . . . . . . . . . . . . . . . . . . . . . . . . . . . . . . . . 99
Accessing BitBake in a Project. . . . . . . . . . . . . . . . . . . . . . . . . . . . . . . . . . . . . . . . . . . . . . . . . . . . . . 100
Shared sstate-cache . . . . . . . . . . . . . . . . . . . . . . . . . . . . . . . . . . . . . . . . . . . . . . . . . . . . . . . . . . . . . . 101

Reference Guide 5
UG1144 (v2018.2) June 6, 2018 www.xilinx.com
Mirror Downloads . . . . . . . . . . . . . . . . . . . . . . . . . . . . . . . . . . . . . . . . . . . . . . . . . . . . . . . . . . . . . . . 101
Machine Support . . . . . . . . . . . . . . . . . . . . . . . . . . . . . . . . . . . . . . . . . . . . . . . . . . . . . . . . . . . . . . . . 102
SOC Variant Support . . . . . . . . . . . . . . . . . . . . . . . . . . . . . . . . . . . . . . . . . . . . . . . . . . . . . . . . . . . . . 103
Image Features. . . . . . . . . . . . . . . . . . . . . . . . . . . . . . . . . . . . . . . . . . . . . . . . . . . . . . . . . . . . . . . . . . 103
Chapter 11: Technical FAQs
Troubleshooting. . . . . . . . . . . . . . . . . . . . . . . . . . . . . . . . . . . . . . . . . . . . . . . . . . . . . . . . . . . . . . . . . 105
Appendix A: Migration
Device Tree. . . . . . . . . . . . . . . . . . . . . . . . . . . . . . . . . . . . . . . . . . . . . . . . . . . . . . . . . . . . . . . . . . . . . 108
Fixing Irregularities . . . . . . . . . . . . . . . . . . . . . . . . . . . . . . . . . . . . . . . . . . . . . . . . . . . . . . . . . . . . . . 108
Re-factoring Rootfs Menu Config . . . . . . . . . . . . . . . . . . . . . . . . . . . . . . . . . . . . . . . . . . . . . . . . . . . 108
Fit Image . . . . . . . . . . . . . . . . . . . . . . . . . . . . . . . . . . . . . . . . . . . . . . . . . . . . . . . . . . . . . . . . . . . . . . . 109
Appendix B: PetaLinux Project Structure
Project Layers . . . . . . . . . . . . . . . . . . . . . . . . . . . . . . . . . . . . . . . . . . . . . . . . . . . . . . . . . . . . . . . . . . . 114
Appendix C: Generating Boot Components
First Stage Bootloader . . . . . . . . . . . . . . . . . . . . . . . . . . . . . . . . . . . . . . . . . . . . . . . . . . . . . . . . . . . . 115
Arm Trusted Firmware (ATF). . . . . . . . . . . . . . . . . . . . . . . . . . . . . . . . . . . . . . . . . . . . . . . . . . . . . . . 116
PMU Firmware . . . . . . . . . . . . . . . . . . . . . . . . . . . . . . . . . . . . . . . . . . . . . . . . . . . . . . . . . . . . . . . . . . 116
FS-Boot For MicroBlaze Platform Only. . . . . . . . . . . . . . . . . . . . . . . . . . . . . . . . . . . . . . . . . . . . . . . 117
Appendix D: QEMU Virtual Networking Modes
Redirecting ports in non-root mode . . . . . . . . . . . . . . . . . . . . . . . . . . . . . . . . . . . . . . . . . . . . . . . . . 119
Specifying the QEMU Virtual Subnet . . . . . . . . . . . . . . . . . . . . . . . . . . . . . . . . . . . . . . . . . . . . . . . . 120
Appendix E: Xilinx IP Models Supported by QEMU
Appendix F: Xen Zynq Ultrascale+ MPSoC Example
Appendix G: Additional Resources and Legal Notices
Xilinx Resources . . . . . . . . . . . . . . . . . . . . . . . . . . . . . . . . . . . . . . . . . . . . . . . . . . . . . . . . . . . . . . . . . 126
Solution Centers. . . . . . . . . . . . . . . . . . . . . . . . . . . . . . . . . . . . . . . . . . . . . . . . . . . . . . . . . . . . . . . . . 126
Documentation Navigator and Design Hubs . . . . . . . . . . . . . . . . . . . . . . . . . . . . . . . . . . . . . . . . . . 126
References . . . . . . . . . . . . . . . . . . . . . . . . . . . . . . . . . . . . . . . . . . . . . . . . . . . . . . . . . . . . . . . . . . . . . 127
Please Read: Important Legal Notices . . . . . . . . . . . . . . . . . . . . . . . . . . . . . . . . . . . . . . . . . . . . . . . 127

Reference Guide 6
UG1144 (v2018.2) June 6, 2018 www.xilinx.com
Chapter 1
Overview
Introduction
PetaLinux is an Embedded Linux System Development Kit targeting Xilinx® FPGA-based
System-on-Chip designs. This guide helps the reader to familiarize with the tool enabling
overall usage of PetaLinux.
Note: The reader of this document is assumed to have basic Linux knowledge, such as how to run
Linux commands. The reader should also be aware of OS and Host system features such as OS bit
version, Linux Distribution and Security Privileges.
The PetaLinux tool contains the following:
1. Yocto Extensible SDK
Table 1-1 details the four Extensible SDKs installed.
Table 1-1: Extensible SDKs
Path Architecture
$PETALINUX/components/yocto/source/aarch64 for Zynq® UltraScale+™
MPSoC
$PETALINUX/components/yocto/source/arm for Zynq
$PETALINUX/components/yocto/source/microblaze_full for MicroBlaze™ full designs
$PETALINUX/components/yocto/source/microblaze_lite for MicroBlaze lite designs

Reference Guide 7
UG1144 (v2018.2) June 6, 2018 www.xilinx.com
Chapter 1: Overview
The Yocto extensible SDK (e-SDK) consists of:
a. Layers - This contains all the layers for an architecture. The Yocto e-SDk had core,
meta-oe and other popular layers.
For example, for Zynq UltraScale+ MPSoC:
$PETALINUX/components/yocto/source/aarch64/layers
b. sstate-cache - By design, the OpenEmbedded build system builds everything from
scratch unless BitBake can determine that parts do not need to be rebuilt.
Fundamentally, building from scratch is attractive as it means all parts are built fresh
and there is no possibility of stale data causing problems.
The Yocto Project implements shared state code that supports incremental builds. It
stores all task intermediate build artifacts and reuses them if there is no change in
input tasks, hence reduces the build time.
For example: The sstate-cache of Zynq UltraScale+ MPSoC is located at:
$PETALINUX/components/yocto/source/aarch64/sstate-cache
Note: By default, all the recipes are sstate locked. Changes in the recipes will not get
affected unless they are signature unlocked. For more information, see Shared sstate-cache
in Chapter 10.
c. sysroots - This contains sysroot for host and the target
For example: The sysroot of Zynq UltraScale+ MPSoC is at:
$PETALINUX/components/yocto/source/aarch64/sysroots
2. Minimal downloads
BitBake checks pre-mirrors before looking upstream for any source files. Pre-mirrors are
appropriate when you have shared the directory that is not a directory defined by the
DL_DIR variable. A Pre-mirror points to a shared directory that is in tool. All projects of
the tool use these pre-mirrors and fetch the source code from them.
Table 1-2: Layers from Xilinx
Layer Recipes
meta-xilinx Contains recipes of linux kernel, U-boot and Arm Trusted Firmware (ATF)
meta-xilinx-tools Contains recipes of all embeddedsw apps: fsbl, pmu firmware, fsboot,
device-tree
meta-petalinux Contains distro recipes and package groups
petalinux-image-minimal --> minimal feature set
petalinux-image-full ---> Full feature set
meta-openamp Contains openamp recipes and configurations

Reference Guide 8
UG1144 (v2018.2) June 6, 2018 www.xilinx.com
Chapter 1: Overview
The pre-mirror in tool points to: $PETALINUX/components/yocto/downloads.
The downloads directory has tar balls of source code for linux kernel, U-Boot and other
minimal utilities. For more information, see Mirror Downloads in Chapter 10.
3. XSCT and tool chains
The PetaLinux tool uses XSCT underneath for all embeddedSW apps. Linux tool chain for
all three architectures is from Yocto (meta-linaro)
4. PetaLinux CLI tools
This contains all the PetaLinux commands that you require.

Reference Guide 9
UG1144 (v2018.2) June 6, 2018 www.xilinx.com
Chapter 2
Setting up your Environment
Installation Requirements
The PetaLinux Tools Installation requirements are:
• Minimum workstation requirements:
°8 GB RAM (recommended minimum for Xilinx tools)
°2 GHz CPU clock or equivalent (minimum of 8 cores)
°100 GB free HDD space
°Supported OS:
- Red Hat Enterprise Workstation/Server 7.2, 7.3, 7.4 (64-bit)
- CentOS 7.2, 7.3, 7.4 (64-bit)
- Ubuntu Linux 16.04.3 (64-bit)
• You need to have root access to perform some operations. The PetaLinux tools need to
be installed as a non-root user.
• PetaLinux requires a number of standard development tools and libraries to be installed
on your Linux host workstation. Install the libraries and tools listed in the following
table on the host Linux. All of the listed Linux Workstation Environments below have
the 32-bit libraries needed by the PetaLinux tool. If there are any additional tool chain
packages that need 32-bit libs on the host, install the same before issuing
petalinux-build. Table 2-1 below describes the required packages, and how to install
them on different Linux workstation environments.
Table 2-1: Packages and Linux Workstation Environments
Tool / Library CentOS 7.2/7.3/7.4 RHEL7.2/7.3/7.4 Ubuntu 16.04.3
dos2unix dos2unix-6.0.3-4.el7.x86_64.rpm dos2unix-6.0.3-4.el7.x86_64.rp
m
tofrodos_1.7.13+ds-2.debia
n.tar.xz
ip iproute-3.10.0-74.el7.x86_64.rpm iproute-3.10.0-74.el7.x86_64.r
pm
iproute2 4.3.0-1ubuntu3
gawk gawk-4.0.2-4.el7.x86_64.rpm gawk-4.0.2-4.el7.x86_64.rpm gawk (1:4.1.3+dfsg-0.1)
gcc gcc-4.8.5-11.el7.x86_64 gcc-4.8.5-11.el7.x86_64 -

Reference Guide 10
UG1144 (v2018.2) June 6, 2018 www.xilinx.com
Chapter 2: Setting up your Environment
g++
(gcc-c++)
gcc-c++-4.8.5-11.el7.x86_64 gcc-c++-4.8.5-11.el7.x86_64 -
xvfb xorg-x11-server-Xvfb-1.15.0-7.el
7.x86_64.rpm
xorg-x11-server-Xvfb-1.15.0-7
.el7.x86_64.rpm
xvfb (2:1.18.3-1ubuntu2.3)
git git 1.8.3 git 1.8.3 git 1.7.1 or above
make make 3.81 make 3.82 make 3.81
netstat net-tools
2.0
net-tools
2.0
net-tools
ncurses
devel
ncurses
-devel
5.9-13
ncurses
-devel
5.9-13
libncurses5
-dev
tftp server tftp-server tftp-server tftpd
zlib devel
(also, install
32-bit of this
version)
zlib-devel-1.2.7-17.el7.x86_64.rp
m
zlib-devel-1.2.7-17.el7.x86_64.
rpm
i386/zlib1g-dev/1:1.2.8.dfsg
-2ubuntu4-dev
openssl
devel
openssl
-devel 1.0
openssl
-devel 1.0
libssl
-dev
flex flex 2.5.37 flex 2.5.37 flex
bison bison-2.7 bison-2.7.4 bison
libselinux libselinux
2.2.2
libselinux
2.2.2
libselinux1
gnupg gnupg gnupg gnupg
wget wget wget wget
diffstat diffstat diffstat diffstat
chrpath chrpath chrpath chrpath
socat socat socat socat
xterm xterm xterm xterm
autoconf autoconf autoconf autoconf
libtool libtool libtool libtool
tar tar:1.24 tar:1.24 tar:1.24
unzip unzip unzip unzip
texinfo texinfo texinfo texinfo
zlib1g-dev - - zlib1g-dev
gcc-multilib - - gcc-multilib
build-essenti
al
- - build-essential
libsdl1.2-dev - - libsdl1.2-dev
Table 2-1: Packages and Linux Workstation Environments (Cont’d)
Tool / Library CentOS 7.2/7.3/7.4 RHEL7.2/7.3/7.4 Ubuntu 16.04.3

Reference Guide 11
UG1144 (v2018.2) June 6, 2018 www.xilinx.com
Chapter 2: Setting up your Environment
CAUTION! Consult your system administrator if you are not sure about the correct procedures for host
system package management.
IMPORTANT: PetaLinux tools require your host system "/bin/sh" is bash. If you are using Ubuntu
distribution and your "/bin/sh" is dash, you can consult your system administrator to change your
default with sudo dpkg-reconfigure dash command.
IMPORTANT: PetaLinux v2018.1 works only with Vivado 2018.1.
Installation Steps
Prerequisites
The prerequisites to install the PetaLinux tools are:
• PetaLinux Tools Installation Requirements is completed. See the Installation
Requirements for more information.
• PetaLinux release package is downloaded. You can download PetaLinux installer from
PetaLinux Downloads.
libglib2.0-de
v
- - libglib2.0-dev
SDL-devel SDL-devel SDL-devel -
glibc-devel glibc-devel glibc-devel -
32-bit glibc glibc-2.17-157.el7_3.4.i686
glibc-2.17-157.el7_3.4.x86_64
glibc-2.17-157.el7_3.4.i686
glibc-2.17-157.el7_3.4.x86_64
-
glib2-devel glib2-devel glib2-devel -
automake automake automake -
screen screen screen screen
pax pax pax pax
gzip gzip gzip gzip
libstdc++ libstdc++-4.8.5-11.el7.x86_64
libstdc++-4.8.5-11.el7.i686
libstdc++-4.8.5-11.el7.x86_64
libstdc++-4.8.5-11.el7.i686
-
Table 2-1: Packages and Linux Workstation Environments (Cont’d)
Tool / Library CentOS 7.2/7.3/7.4 RHEL7.2/7.3/7.4 Ubuntu 16.04.3
Reference Guide 12
UG1144 (v2018.2) June 6, 2018 www.xilinx.com
Chapter 2: Setting up your Environment
Run PetaLinux Tools Installer
PetaLinux Tools installation is straight-forward. Without any options, the PetaLinux Tools
are installed into the current working directory. Alternatively, an installation path may be
specified.
For example: To install PetaLinux Tools under /opt/pkg/petalinux:
$ mkdir -p /opt/pkg/petalinux
$ ./petalinux-v2018.1-final-installer.run /opt/pkg/petalinux
This installs the PetaLinux Tools into /opt/pkg/petalinux directory.
IMPORTANT: Once installed, you cannot move or copy the installed directory. In the above example,
you cannot move or copy /opt/pkg/petalinux.
Note: You cannot install the tool with the root user, instead the permissions for
/opt/pkg/petalinux should be 755. It is not mandatory to install tool in /opt/pkg/petalinux
directory. You can install at any desired location that has the 755 permissions.
Reading and agreeing to the PetaLinux End User License Agreement (EULA) is a required
and integral part of the PetaLinux Tools installation process. You can read the license
agreement prior to running the installation. If you wish to keep the license for the records,
the licenses are available in plain ASCII text in the following files:
•$PETALINUX/etc/license/petalinux_EULA.txt. EULA specifies in detail the
rights and restrictions that apply to the PetaLinux.
•$PETALINUX/etc/license/Third_Party_Software_End_User_License_Agree
ment.txt. The third party license agreement specifies in details the licenses of the
distributable and non-distributable components in PetaLinux tools.
Note: PetaLinux tools do not require a license to install or run.
By default, the webtalk option is enabled to send tools usage statistics back to Xilinx. You
can turn off the webtalk feature by running the petalinux-util --webtalk command:
IMPORTANT: Before running the PetaLinux command, you need to source PetaLinux settings first. For
more information, see PetaLinux Working Environment Setup.
$ petalinux-util --webtalk off
Note: By default, PetaLinux uses the Internet to fetch sstate or sources for various utilities. If you
want to run PetaLinux independently without network, download and extract the sstate cache file.
Follow the instructions in the README file to link to a project.
Troubleshooting
This section describes some common issues you may experience while installing the
PetaLinux Tools. If the PetaLinux Tools installation fails, the file

Reference Guide 13
UG1144 (v2018.2) June 6, 2018 www.xilinx.com
Chapter 2: Setting up your Environment
$PETALINUX/post-install.log will be generated in your PetaLinux installation
directory.
Table 2-2: PetaLinux Installation Troubleshooting
Problem / Error Message Description and Solution
WARNING: You have less than
1 GB free space on the
installation drive
Problem Description:
This warning message indicates that installation drive is almost full. You
may not have enough free space to develop the hardware project
and/or software project after the installation.
Solution:
• Clean up the installation drive to clear some more free space.
Alternatively,
• Move PetaLinux installation to another hard disk drive.
WARNING: No tftp server
found
Problem Description:
This warning message indicates that you do not have a TFTP service
running on the workstation. Without a TFTP service, you cannot
download Linux system images to the target system using the U-Boot
network/TFTP capabilities. This warning can be ignored for other boot
modes.
Solution:
Enable the TFTP service on your workstation. If you are unsure how to
enable this service, contact your system administrator.
ERROR: GCC is not installed -
unable to continue. Please
install and retry
Problem Description:
This error message indicates that you do not have gcc installed on the
workstation.
Solution:
Install gcc using your Linux work-stations package management system.
If you are unsure how to do this, contact your system administrator.

Reference Guide 14
UG1144 (v2018.2) June 6, 2018 www.xilinx.com
Chapter 2: Setting up your Environment
PetaLinux Working Environment Setup
After the installation, the remaining setup is completed automatically by sourcing the
provided ‘settings’ scripts.
Prerequisites
This section assumes that the following prerequisites have been satisfied:
• PetaLinux Tools Installation is completed. For more information, see Installation Steps
• "/bin/sh" is bash
ERROR: You are missing the
following system tools
required by PetaLinux:
missing-tools-list
or
ERROR: You are missing these
development libraries
required by PetaLinux:
missing-library-list
Problem Description:
This error message indicates that you do not have the required tools or
libraries listed in the "missing-tools-list" or "missing-library-list".
Solution:
Install the packages of the missing tools. For more information, see
Installation Requirements.
Failed to open PetaLinux lib. Problem Description:
This error message indicates that a PetaLinux library failed to load. The
possible reasons are:
• The PetaLinux "settings.sh" has not been loaded.
• The Linux Kernel that is running has SELinux configured. This can
cause issues with regards to security context and loading libraries.
Solution:
1. Source the "settings.sh" script from the top-level PetaLinux
directory. For more information, see PetaLinux Working Environment
Setup.
2. If you have SELinux enabled, determine if SELinux is in ’enforcing
mode’.
If SELinux is configured in ’enforcing mode’, eithe reconfigure SELinux
to ’permissive mode’ (see the SELinux manual), or change the security
context of the libraries to allow access.
$ cd $PETALINUX/tools/common/petalinux/lib
$ chcon -R -t textrel_shlib_t lib
Table 2-2: PetaLinux Installation Troubleshooting (Cont’d)
Problem / Error Message Description and Solution
Reference Guide 15
UG1144 (v2018.2) June 6, 2018 www.xilinx.com
Chapter 2: Setting up your Environment
Steps to Setup PetaLinux Working Environment
1. Source the appropriate settings script:
°For Bash as user login shell:
$ source <path-to-installed-PetaLinux>/settings.sh
°For C shell as user login shell:
$ source <path-to-installed-PetaLinux>/settings.csh
Below is an example of the output when sourcing the setup script for the first time:
PetaLinux environment set to '/opt/pkg/petalinux'
INFO: Checking free disk space
INFO: Checking installed tools
INFO: Checking installed development libraries
INFO: Checking network and other services
WARNING: No tftp server found - please see "PetaLinux SDK Installation Guide" for its
impact and solution
2. Verify that the working environment has been set:
$ echo $PETALINUX
/opt/pkg/petalinux
Environment variable "$PETALINUX" should point to the installed PetaLinux path. The
output may be different from this example, based on the PetaLinux installation path.
Troubleshooting
This section describes some common issues that you may experience while setting up
PetaLinux Working Environment.
Table 2-3: PetaLinux Working Environment Troubleshooting
Problem / Error Message Description and Solution
WARNING: /bin/sh is not bash Problem Description:
This warning message indicates that your default shell is linked to
dash.
Solution:
See Ubuntu Forum and follow the steps.
Reference Guide 16
UG1144 (v2018.2) June 6, 2018 www.xilinx.com
Chapter 2: Setting up your Environment
Design Flow Overview
In general, the PetaLinux tools follow a sequential workflow model. The table below
provides an example design workflow, demonstrating the order in which the tasks should
be completed and the corresponding tool or workflow for that task.
Table 2-4: Design Flow Overview
Design Flow Step Tool / Workflow
Hardware Platform Creation Vivado
Create PetaLinux Project petalinux-create -t project
Initialize PetaLinux Project petalinux-config --get-hw-description
Configure System-Level Options petalinux-config
Create User Components petalinux-create -t COMPONENT
Configure the Linux Kernel petalinux-config -c kernel
Configure the Root Filesystem petalinux-config -c rootfs
Build the System petalinux-build
Deploy the System petalinux-package
Test the System petalinux-boot

Reference Guide 17
UG1144 (v2018.2) June 6, 2018 www.xilinx.com
Chapter 3
Creating a Project
PetaLinux BSP Installation
PetaLinux reference board support packages (BSPs) are reference designs for you to start
working with and customize your own projects. In addition, these designs can be used as a
basis for creating your own projects. PetaLinux BSPs are provided in the form of installable
BSP files, and include all necessary design and configuration files, pre-built and tested
hardware and software images, ready for downloading on your board or for booting in the
QEMU system emulation environment.
BSP reference designs are not included in the PetaLinux tools installer and need to be
downloaded and installed separately. PetaLinux BSP packages are available on the
Xilinx.com Download Center.
Prerequisites
This section assumes that the following prerequisites have been satisfied:
• PetaLinux BSP is downloaded. You can download PetaLinux BSP from PetaLinux
Downloads.
• PetaLinux Working Environment Setup is completed. For more details, see on PetaLinux
Working Environment Setup in Chapter 2.
PetaLinux BSP Installation Steps
Follow the below steps to install a BSP:
1. Change to the directory under which you want PetaLinux projects to be created. For
example, if you want to create projects under /home/user:
$ cd /home/user
2. Run petalinux-create command on the command console:
petalinux-create -t project -s <path-to-bsp>
The board being referenced is based on the BSP installed. You will see the output, similar
to the below output:
Reference Guide 18
UG1144 (v2018.2) June 6, 2018 www.xilinx.com
Chapter 3: Creating a Project
INFO: Create project:
INFO: Projects:
INFO: * xilinx-zcu102-v2018.1
INFO: has been successfully installed to /home/user/
INFO: New project successfully created in /home/user/
In the above example, when the command runs, it tells you the projects that are extracted
and installed from the BSP. If the specified location is on the Network File System (NFS), it
changes the TMPDIR to /tmp/<projname_timestamp>.
If /tmp/<projname_timestamp> is also on NFS, then it throws an error. You can change
TMPDIR anytime through petalinux-config -->Yocto-settings. Do not configure the same
location as TMPDIR for two different PetaLinux projects, this can cause build errors.
If you run ls from "/home/user", you will see the installed project(s). For more details on
the structure of a PetaLinux project, see PetaLinux Project Structure in Appendix B.
Troubleshooting
This section describes some common issues you may experience while installing PetaLinux
BSP.
BSP Naming
There are multiple revisions of silicon and board that are being shipped. Table 3-2 lists the
supported BSPs that can be downloaded, for Zynq UltraScale family.
Click here to download the BSPs.
Table 3-1: PetaLinux BSP Installation Troubleshooting
Problem / Error Message Description and Solution
petalinux-create: command
not found
Problem Description:
This message indicates that it is unable to find "petalinux-create"
command, hence it cannot proceed with BSP installation.
Solution:
You have to setup your environment for PetaLinux Tools. For more
information, see the PetaLinux Working Environment Setup in
Chapter 2.
Table 3-2: BSP Naming
Platform Silicon Version Board Version PetaLinux BSP Name
ZCU102
3.0 Silicon (zu9-es2) Rev-1.0 xilinx-zcu102-zu9-es2-rev1.0-v2018.1-fi
nal.bsp
Production Silicon
(zu9)
Rev-1.0
xilinx-zcu102-v2018.1-final.bsp
Patched Rev-B
Patched
Rev-D
Reference Guide 19
UG1144 (v2018.2) June 6, 2018 www.xilinx.com
Chapter 3: Creating a Project
Creating Hardware Platform with Vivado
This section describes how to configure a hardware platform ready for PetaLinux project.
Prerequisites
This section assumes that the following prerequisites have been satisfied:
• Vivado® Design Suite is installed. You can download Vivado Design Suite from Vivado
Design Tool Downloads.
• You have setup Vivado Tools Working Environment. If you have not, source the
appropriate settings scripts as follows:
$ source <path-to-installed-Xilinx-Vivado>/settings64.sh
• You know how to use Xilinx Vivado and SDK tools.
Configure a Hardware Platform for Linux
You can create your own hardware platform with Vivado. Regardless of how the hardware
platform is created and configured, there are a small number of hardware IP and software
platform configuration changes required to make the hardware platform Linux ready. These
are described below:
Zynq UltraScale+ MPSoC
The following is a list of hardware requirements for a Zynq® UltraScale+™ MPSoC hardware
project to boot Linux:
1. External memory controller with at least 64 MB of memory (required)
2. UART for serial console (required)
3. Non-volatile memory (optional), for example, QSPI Flash and SD/MMC
4. Ethernet (optional, essential for network access)
IMPORTANT: If soft IP is used, ensure the interrupt signal is connected. If soft IP with interrupt or
external PHY device with interrupt is used, ensure the interrupt signal is connected.
Zynq-7000
The following is a list of hardware requirements for a Zynq-7000 hardware project to boot
Linux:
1. One Triple Timer Counter (TTC) (required)
Reference Guide 20
UG1144 (v2018.2) June 6, 2018 www.xilinx.com
Chapter 3: Creating a Project
IMPORTANT: If multiple TTCs are enabled, the Zynq-7000 Linux kernel uses the first TTC block from the
device tree. Please make sure the TTC is not used by others.
2. External memory controller with at least 32 MB of memory (required)
3. UART for serial console (required)
4. Non-volatile memory (optional), for example, QSPI Flash and SD/MMC
5. Ethernet (optional, essential for network access)
IMPORTANT: If soft IP is used, ensure the interrupt signal is connected. If soft IP with interrupt or
external PHY device with interrupt is used, ensure the interrupt signal is connected.
MicroBlaze (AXI)
The following is a list of requirements for a MicroBlaze™ hardware project to boot Linux:
1. IP core check list:
°External memory controller with at least 32 MB of memory (required)
°Dual channel timer with interrupt connected (required)
°UART with interrupt connected for serial console (required)
°Non-volatile memory such as Linear Flash or SPI Flash (required)
°Ethernet with interrupt connected (optional, but required for network access)
2. MicroBlaze CPU configuration:
°MicroBlaze with MMU support by selecting either Linux with MMU or Low-end
Linux with MMU configuration template in the MicroBlaze configuration wizard.
IMPORTANT: Do not disable any instruction set related options that are enabled by the template,
unless you understand the implications of such a change.
°MicroBlaze initial bootloader FS-BOOT needs minimum 4K Bytes of BRAM for
Parallel flash and 8K Bytes for SPI flash, when system boots from non-volatile
memory.
Exporting Hardware Platform to PetaLinux Project
This section describes how to export hardware platform to PetaLinux Project.
Note: Device Support Archive (DSA) is hardware description format introduced in Vivado. DSA is super set
of HDF holding additional configurations that can be changed by XSCT/XSDK.

Reference Guide 21
UG1144 (v2018.2) June 6, 2018 www.xilinx.com
Chapter 3: Creating a Project
Prerequisites
This section assumes that a hardware platform is created with the Vivado design suite. For
more information, see the Creating Hardware Platform with Vivado.
Exporting Hardware Platform
After you have configured your hardware project, build the hardware bitstream. The
PetaLinux project requires a hardware description file (.hdf/.dsa file) with information
about the processing system. You can get the hardware description file by running "Export
Hardware" from Vivado.
During project initialization (or update), PetaLinux generates a device tree source () file,
U-Boot configuration header files, and enables Linux kernel drivers based on the hardware
description file. These details are explored in Appendix B, PetaLinux Project Structure.
For Zynq UltraScale+ MPSoC platform, you need to boot with the Platform Management
Unit (PMU) firmware and ATF. See Appendix C, Generating Boot Components for building
PMU firmware and ATF. If you want First Stage Boot Loader (FSBL) built for Cortex-R5 boot,
you will also need to build it with XSDK since the FSBL built with PetaLinux tools is for A53
boot. For details on how to build the FSBL for Cortex-R5 with XSDK, see MPSoC Software
Development Guide (UG1137) [Ref 2].
Creating a New PetaLinux Project
This section describes how to create a new PetaLinux project.
Prerequisites
This section assumes that the PetaLinux Working Environment Setup is complete. For more
information, see PetaLinux Working Environment Setup.
Create New Project
The petalinux-create command is used to create a new PetaLinux project:
$ petalinux-create --type project --template <CPU_TYPE> --name
<PROJECT_NAME>
The parameters are as follows:
•--template <CPU_TYPE> - The following CPU types are supported:
°zynqMP (for UltraScale+ MPSoC)
Reference Guide 22
UG1144 (v2018.2) June 6, 2018 www.xilinx.com
Chapter 3: Creating a Project
°zynq (for Zynq)
°microblaze (for MicroBlaze).
Note: The MicroBlaze option cannot be used along with Zynq or Zynq UltraScale+ designs in
the Programmable Logic (PL).
•--name <PROJECT_NAME> - The name of the project you are building.
This command creates a new PetaLinux project folder from a default template. Later steps
customize these settings to match the hardware project created previously.
TIP: If --template option is used instead of a bsp. you can use the petalinux-config command to choose
default board configs, that are close to your board design, as shown below:
1. petalinux-config--get-hw-description=<PATH-TO-HDF/DSA-DIRECTORY>
2. Set CONFIG_SUBSYSTEM_MACHINE_NAME as required. The possible values are: ac701-full,
kc705-lite, zc1751-dc1, zc706, zcu102-revb, zedboard, ac701-lite, kcu105,
zc1751-dc2, zcu102-rev1.0, kc705-full, zc702, zcu102-reva, zcu104-reva,
zcu104-revc and zcu106-reva. In petalinux-config DTG Settings ---> (template)
MACHINE_NAME, change the template to any of the above mentioned possible value.
TIP: For details on the PetaLinux project structure, see Appendix B, PetaLinux Project Structure.
CAUTION! When a PetaLinux project is created on NFS, petalinux-create automatically changes the
TMPDIR to /tmp/<projname_timestamp>. If /tmp is also on NFS, it will throw an error. If you
want to change the TMPDIR to a local storage use petalinux-config --> Yocto-settings --> TMPDIR.
Do not configure the same location as TMPDIR for two different PetaLinux projects. This may cause
build errors. If TMPDIR is at /tmp/.., deleting the project will not clean it. You have to explicitly do
this step, or use petalinux-build -x mrproper.

Reference Guide 23
UG1144 (v2018.2) June 6, 2018 www.xilinx.com
Chapter 4
Configuring and Building
Version Control
This section details about version management/control in PetaLinux project.
Prerequisites
This section assumes that the you have created a new PetaLinux project or have an existing
PetaLinux project. See Creating a New PetaLinux Project for more information on creating
the PetaLinux project.
Version Control
You can have version control over your PetaLinux project directory "<plnx-proj-root>"
excluding the following:
•<plnx-proj-root>/.petalinux
•<plnx-proj-root>/build/
•<plnx-proj-root>/images/
•<plnx-proj-root>/pre-built/
•<plnx-proj-root>/project-spec/meta-plnx-generated/
•<plnx-proj-root>/components/plnx-workspace/
By default, these files are added into .gitignore while creating the project.
Note: A PetaLinux project should be cleaned before submitting to the source control.
IMPORTANT: The version control is not fully covered for now in a project. It is recommended to share
projects with bsp methodology.
Note: In concurrent development, TMPDIR in petalinux-config should be unique for each user. Use
${PROOT} as reference to specify the relative path before checking in the project into version control.

Reference Guide 24
UG1144 (v2018.2) June 6, 2018 www.xilinx.com
Chapter 4: Configuring and Building
Importing Hardware Configuration
This section explains the process of updating an existing/newly created PetaLinux project
with a new hardware configuration. This enables you to make PetaLinux Tools software
platform ready for building a Linux system, customized to your new hardware platform.
Prerequisites
This section assumes that the following prerequisites have been satisfied:
• You have exported the hardware platform and .hdf/.dsa file is generated. For more
information, see Exporting Hardware Platform.
• You have created a new PetaLinux project or have an existing PetaLinux project. For
more information on creating a PetaLinux project, see Creating a New PetaLinux
Project.
Steps to Import Hardware Configuration
Steps to import hardware configuration are:
1. Change into the directory of your PetaLinux project.
$ cd <plnx-proj-root>
2. Import the hardware description with petalinux-config command, by giving the
path of the directory containing the.hdf/.dsa file as follows:
$ petalinux-config --get-hw-description=<path-to-directory-containing-hardware
description-file>
Note: If both DSA and HDF files are placed in the hardware description directory, the DSA file is
given priority over the HDF file.
This launches the top system configuration menu when petalinux-config
--get-hw-description runs first time for the PetaLinux project or the tool detects there
is a change in the system primary hardwares candidates:
Linux Components Selection --->
Auto Config Settings --->
-*- Subsystem AUTO Hardware Settings --->
DTG Settings --->
Kernel Bootargs --->
ARM Trusted Firmware Compilation Configuration --->
PMU FIRMWARE Configuration --->
u-boot Configuration --->
Image Packaging Configuration --->
Firmware Version Configuration --->
Yocto Settings --->

Reference Guide 25
UG1144 (v2018.2) June 6, 2018 www.xilinx.com
Chapter 4: Configuring and Building
Ensure Subsystem AUTO Hardware Settings ---> is selected, and go into the menu which
is similar to the following:
Subsystem AUTO Hardware Settings
System Processor (psu_cortexa53_0) --->
Memory Settings --->
Serial Settings --->
Ethernet Settings --->
Flash Settings --->
SD/SDIO Settings --->
RTC Settings --->
[*]Advanced bootable images storage Settings --->
The Subsystem AUTO Hardware Settings ---> menu allows customizing system wide
hardware settings.
This step may take a few minutes to complete. This is because the tool will parse the
hardware description file for hardware information required to update the device tree,
PetaLinux U-Boot configuration files and the kernel config files based on the “Auto Config
Settings --->” and “Subsystem AUTO Hardware Settings --->” settings.
For example, if ps7_ethernet_0 as the Primary Ethernet is selected and you enable the
auto update for kernel config and U-Boot config, the tool will automatically enable its
kernel driver and also updates the U-Boot configuration headers for U-Boot to use the
selected ethernet controller.
Note: For more details on Auto Config Settings menu, see the Settings.
Build System Image
Prerequisites
This section assumes that you have PetaLinux Tools software platform ready for building a
Linux system, customized to your hardware platform. For more information, see the
Importing Hardware Configuration.
Steps to Build PetaLinux System Image
1. Change into the directory of your PetaLinux project.
$ cd <plnx-proj-root>
2. Run petalinux-build to build the system image:
$ petalinux-build
This step generates a device tree DTB file, a first stage bootloader (if selected), U-Boot,
the Linux kernel, and a root filesystem image. Finally, it generates the necessary boot
images.

Reference Guide 26
UG1144 (v2018.2) June 6, 2018 www.xilinx.com
Chapter 4: Configuring and Building
3. The compilation progress shows on the console. Wait until the compilation finishes.
TIP: A detailed compilation log is in "<plnx-proj-root>/build/build.log" file.
When the build finishes, the generated images will be within the <plnx-proj-root>/
images and /tftpboot directories.
The console shows the compilation progress. For example:
[INFO] building project
[INFO] generating Kconfig for project
[INFO] oldconfig project
[INFO] sourcing bitbake
[INFO] generating plnxtool conf
[INFO] generating meta-plnx-generated layer
[INFO] generating machine configuration
[INFO] generating bbappends for project . This may take time !
[INFO] generating u-boot configuration files
[INFO] generating kernel configuration files
[INFO] generating kconfig for Rootfs
Generate rootfs kconfig
[INFO] oldconfig rootfs
[INFO] generating petalinux-user-image.bb
INFO: bitbake petalinux-user-image
Loading cache: 100%
|########################################################################| Time:
0:00:00
Loaded 3252 entries from dependency cache.
Parsing recipes: 100%
|######################################################################| Time:
0:00:01
Parsing of 2461 .bb files complete (2422 cached, 39 parsed). 3253 targets, 224
skipped, 0 masked, 0 errors.
NOTE: Resolving any missing task queue dependencies
Initialising tasks: 100%
|###################################################################| Time: 0:00:11
Checking sstate mirror object availability: 100%
|###########################################| Time: 0:00:13
NOTE: Executing SetScene Tasks
NOTE: Executing RunQueue Tasks
pmu-firmware-2018.1+gitAUTOINC+b3f9b55770-r0 do_compile: NOTE: pmu-firmware:
compiling from external source tree /opt/pkg/petalinux/tools/hsm/data/embeddedsw
fsbl-2018.1+gitAUTOINC+b3f9b55770-r0 do_compile: NOTE: fsbl: compiling from external
source tree /opt/pkg/petalinux/tools/hsm/data/embeddedsw
NOTE: Tasks Summary: Attempted 2459 tasks of which 1865 didn't need to be rerun and
all succeeded.
INFO: Copying Images from deploy to images
INFO: Creating images/linux directory
NOTE: Failed to copy built images to tftp dir: /tftpboot
[INFO] successfully built project
The full compilation log "build.log" is stored in the build subdirectory of your PetaLinux
project. The final image is <plnx-proj-root>/images/linux/image.ub which is a FIT
image. The kernel image is "Image" for Zynq UltraScale+ MPSoC, "zImage" for Zynq-7000
or "image.elf" for MicroBlaze and is located in the

Reference Guide 27
UG1144 (v2018.2) June 6, 2018 www.xilinx.com
Chapter 4: Configuring and Building
"<plnx-proj-root>/images/linux" directory. Optionally, a copy is also placed in the
"/tftpboot" directory if this option is enabled in the system-level configuration for the
PetaLinux project.
IMPORTANT: By default, besides the kernel, rootfs and U-Boot, the PetaLinux project is configured to
generate and build the first stage bootloader. For more details on the auto generated first stage
bootloader, see Appendix C, Generating Boot Components.
Generate uImage
When you run petalinux-build, it generates FIT image for Zynq family devices and
MicroBlaze platforms and RAM disk image rootfs.cpio.gz.u-boot will also be
generated. If you want to use uImage instead, you can use "petalinux-package
--image" instead. For example:
$ petalinux-package --image -c kernel --format uImage
The uImage will be generated to images/linux subdirectory of your PetaLinux project.
You will then need to configure your U-Boot to boot with uImage. If you have selected
"PetaLinux u-boot config" as your U-Boot config target, you can modify
"<plnx-proj-root>/project-spec/meta-user/recipes-bsp/u-boot/files/p
latform-top.h" of your PetaLinux project to overwrite the
CONFIG_EXTRA_ENV_SETTINGS macro to define your U-Boot boot command to boot
with uImage.
Generate Boot Image for Zynq UltraScale+ MPSoC
This section is for Zynq UltraScale+ MPSoC only and describes how to generate BOOT.BIN
for Zynq UltraScale+ MPSoC.
Prerequisites
This section assumes that you have built PetaLinux system image. For more information, see
Build System Image.
Generate Boot Image
Before executing this step, ensure you have built the hardware bitstream. The boot image
can be put into Flash or SD card. When you power on the board, it can boot from the boot
image. A boot image usually contains a first stage bootloader image, FPGA bitstream, PMU
firmware and U-Boot.
Execute the following command to generate the boot image in ".BIN" format.
$ petalinux-package --boot --fsbl <FSBL image> --fpga <FPGA bitstream> --pmufw
<PATH_TO_PMU_FW_ELF> --u-boot

Reference Guide 28
UG1144 (v2018.2) June 6, 2018 www.xilinx.com
Chapter 4: Configuring and Building
For detailed usage, see the --help option or PetaLinux Tools Documentation: PetaLinux
Command Line Reference (UG1157) [Ref 4].
Generate Boot Image for Zynq Family Devices
This section is for Zynq family devices only and describes how to generate BOOT.BIN.
Prerequisites
This section assumes that you have built PetaLinux system image. For more information, see
Build System Image.
Generate Boot Image
Before executing this step, ensure you have built the hardware bitstream. The boot image
can be put into Flash or SD card. When you power on the board, it can boot from the boot
image. A boot image usually contains a first stage bootloader image, FPGA bitstream and
U-Boot.
Follow the step below to generate the boot image in ".BIN" format.
$ petalinux-package --boot --fsbl <FSBL image> --fpga <FPGA bitstream> --u-boot
For detailed usage, see the --help option or PetaLinux Tools Documentation: PetaLinux
Command Line Reference (UG1157) [Ref 4].
Generate Boot Image for MicroBlaze
This section is for MicroBlaze only and describes how to generate MCS file for MicroBlaze.
Prerequisites
This section assumes that you have built the PetaLinux system image. For more information,
see the Build System Image.
Generate Boot Image
Execute the following command to generate MCS boot file for MicroBlaze.
$ petalinux-package --boot --fpga <FPGA bitstream> --u-boot --kernel

Reference Guide 29
UG1144 (v2018.2) June 6, 2018 www.xilinx.com
Chapter 4: Configuring and Building
It generates boot.mcs in your working directory and it will be copied to the
<plnx-proj-root>/images/linux/ directory. With the above command, the MCS file
contains FPGA bitstream, fs-boot, U-Boot and kernel image image.ub.
Command to generate the MCS file with fs-boot and FPGA bitstream only:
$ petalinux-package --boot --fpga <FPGA bitstream>
Command to generate the MCS file with FPGA bitstream, fs-boot and U-Boot:
$ petalinux-package --boot --fpga <FPGA bitstream> --u-boot
For detailed usage, see the --help option or document PetaLinux Tools Documentation:
PetaLinux Command Line Reference (UG1157) [Ref 4].
Build Optimizations
This section describes the build optimization techniques with the PetaLinux tools.
opt-out default components
You can opt-out default components if not needed. You can disable FSBL and PMUFW by
un-selecting in petalinux-config -> Linux -> Components Selection ->
°FSBL -> [ ] First Stage Bootloader
°PMUFW -> [ ] PMU Firmware
Un-selecting these components will remove these components from the default build
flow.
Local Mirror servers
You can set internal mirrors on the NFS or web server which speeds up the builds.
Download the sstate-cache tar file which is shipped along with petalinux tools.
Table 4-1: Local Mirror Servers
Server Description
downloads Source of components in raw git format
aarch64 Sstate mirrors for zynqmp
arm Sstate mirrors for zynq
mb-full Sstate mirrors for microblaze designs
mb-lite Sstate mirrors for microblaze designs

Reference Guide 30
UG1144 (v2018.2) June 6, 2018 www.xilinx.com
Chapter 4: Configuring and Building
Source Mirrors
You can set source mirrors through petalinux-config -> Yocto-settings -> Add pre-mirror
URL. Enter with file:// for local paths.
Sstate feeds
You can set sstate feeds through petalinux-config
• sstate feeds on NFS: Go to petalinux-config -> Yocto Settings -> Local sstate feeds
settings and enter the full path of the sstate directory.
• sstate feeds on webserver: Go to petalinux-config -> Yocto Settings--> Network
sstate feeds URL and enter the URL for sstate feeds.
Building ignoring dependencies
Default image configuration has Initramfs enabled. This leads to multiple dependencies,
such as:
• Kernel needs rootfs to be built for initramfs
• Building rootfs builds FSBL, PMUFW, and ATF as they are part of complete images
• Device-tree needs kernel headers
• U-Boot needs device-tree, as it compiles with the External Device Tree
You can build components individually by handling dependencies explicitly
(petalinux-build-b component). This option has to be handled very carefully, as it builds
the specified recipe/tasks, ignoring its dependencies. Its usage may lead to multiple
intermittent errors, if dependencies are not resolved explicitly by the user. To clean the
project on random error, use petalinux-build -x mrproper.
Initramfs mode
The default mode in the PetaLinux BSPs is the Initramfs mode. This mode has multiple
dependencies, such as:
• kernel needs rootfs to be built for initramfs
• Building rootfs builds FSBL, PMUFW and ATF
• Device-tree needs kernel headers
• U-Boot needs device-tree, as it compiles with the External Device Tree
Hence, building the device-tree builds all the components.

Reference Guide 31
UG1144 (v2018.2) June 6, 2018 www.xilinx.com
Chapter 4: Configuring and Building
Example 1: Build device-tree only
The below example shows the steps to generate device-tree from PetaLinux project. The
device-tree recipe depends on HDF, native tools (dtc, python-yaml..) and kernel headers.
The setup commands are:
1. Import HDF into work space:
petalinux-config --get-hw-description=<PATH-to-HDF/DSA-DIRECTORY>
The above command will only copy hardware design from external location into the
petalinux project <proj-root>/project-spec/hw-description/. The
external-hdf is a recipe in yocto which imports hdf from this location into yocto work
space. All the HDF dependent recipes uses hardware design from Yocto workspace. By
default this dependency is handled internal to recipes. You have to run the following
command for every update in hardware design if you are building without
dependencies.
petalinux-build -c external-hdf
2. Prepare all the prerequisites (native utilities):
This command has to run only for the first time, re-run is needed only after cleaning
petalinux-build -c device-tree -x do_prepare_recipe_sysroot
3. Build the device-tree ignoring dependency tasks, using the following command:
petalinux-build -b device-tree
This command builds device-tree ignoring all dependencies and deploys it in the
images/linux/ directory. If there is any dependency that is not met, it will error out.
The above command can be used for incremental builds as well.
Note: The above individual commands need to run with -b option. You can get all above
functionality in one run: petalinux-build -c device-tree, it will take of all dependencies
automatically which results in building few more dependent components.
Example 2: Build U-Boot only
The below example demonstrate building u-boot ignoring dependencies. u-boot-xlnx
recipe depends on HDF, device-tree and native tools (mkimage, dtc..)
• You cannot skip the device tree dependency, it is required. Instead, use the above
example to build device tree
• Setup native tools for u-boot recipe. To do this, use the following command:
petalinux-build -c u-boot -x do_prepare_recipe_sysroot
The above command needs to run only for the first time or after every clean.

Reference Guide 32
UG1144 (v2018.2) June 6, 2018 www.xilinx.com
Chapter 4: Configuring and Building
• Build U-Boot ignoring dependency tasks. To do this, use the following command:
petalinux-build -b u-boot-xlnx_2018.1
The above command builds U-Boot and deploys in images/linux.
Note: -b option needs full name/path of recipe, virtual targets will not work.
Use the following command to find the path of a recipe:
petalinux-build -c "-e virtual/kernel" | grep "^FILE="
Replace virtual/kernel with any virtual target or recipe name.
Note: petalinux-build -b needs all pre-requisites explicitly done by user. petalinux-build
-c takes care of all dependencies automatically, explicit running of individual commands is not
needed.
Table 4-2: Paths of Recipes
Recipe Path
kernel, virtual/kernel linux-xlnx_2018.1
u-boot, virtual/bootloader u-boot-xlnx-2018.1
device-tree, device-tree device-tree

Reference Guide 33
UG1144 (v2018.2) June 6, 2018 www.xilinx.com
Chapter 5
Booting and Packaging
Packaging Prebuilt Images
This section describes how to package newly built images into prebuilt directory.
Note: This step helps in making use of prebuilt capability to boot with JTAG/QEMU. This step is not
mandatory to boot with JTAG/QEMU.
Prerequisites
This section assumes that the following prerequisites have been satisfied:
• For Zynq family devices, you have generated boot image. For more information, see
Generate Boot Image for Zynq UltraScale+ MPSoC.
• For MicroBlaze, you have generated system image. For more information, see Build
System Image.
Steps to Package Prebuilt Image
1. Change into the root directory of your project.
$ cd <plnx-proj-root>
2. Use petalinux-package --prebuilt to package the prebuilt images.
$ petalinux-package --prebuilt --fpga <FPGA bitstream>
For detailed usage, see the --help option or document PetaLinux Tools Documentation:
PetaLinux Command Line Reference (UG1157) [Ref 4].

Reference Guide 34
UG1144 (v2018.2) June 6, 2018 www.xilinx.com
Chapter 5: Booting and Packaging
Using petalinux-boot Command with Prebuilt
Images
Booting a PetaLinux Image is achieved with the petalinux-boot command, along with
--qemu option to boot the image under software emulation (QEMU) and --jtag on a
hardware board. This section describes different boot levels for prebuilt option.
Prerequisites
This section assumes that you have packaged prebuilt images. For more information, see
Packaging Prebuilt Images.
Boot Levels for Prebuilt Option
--prebuilt <BOOT_LEVEL> boots prebuilt images (override all settings). Supported
boot level is 1 to 3.
• Level 1: Download the prebuilt FPGA bitstream.
°It will also boot FSBL for Zynq-7000 and, FSBL and PMU firmware for Zynq
UltraScale+ MPSoC.
• Level 2: Download the prebuilt FPGA bitstream and boot the prebuilt U-Boot.
°For Zynq-7000: It will also boot FSBL before booting U-Boot.
°For Zynq UltraScale+ MPSoC: It will also boot PMU firmware, FSBL, and ATF before
booting U-Boot.
•Level 3:
°For MicroBlaze: Downloads the prebuilt FPGA bitstream and boot the prebuilt
kernel image on target.
°For Zynq-7000: Downloads the prebuilt FPGA bitstream and FSBL and boot the
prebuilt U-Boot and boot the prebuilt kernel on target.
°For Zynq UltraScale+ MPSoC: Downloads PMU Firmware, prebuilt FSBL, prebuilt
kernel, prebuilt FPGA bitstream, linux-boot.elf and the prebuilt ATF on target.
Example to show the usage of boot level for prebuilt option:
$ petalinux-boot --jtag --prebuilt 3
Reference Guide 35
UG1144 (v2018.2) June 6, 2018 www.xilinx.com
Chapter 5: Booting and Packaging
Booting a PetaLinux Image on QEMU
This section describes how to boot a PetaLinux image under software emulation (QEMU)
environment.
Note: For the details on Xilinx IP models supported by QEMU, see the Appendix E, Xilinx IP Models
Supported by QEMU.
Prerequisites
This section assumes that the following prerequisites have been satisfied:
• You have a PetaLinux system image by either installing a PetaLinux BSP (see PetaLinux
BSP Installation) or by building your own PetaLinux project (see the Build System
Image).
• If you are going to use --prebuilt option for QEMU boot, you need to have prebuilt
images packaged. For more information, see the Packaging Prebuilt Images.
IMPORTANT: Unless otherwise indicated, the PetaLinux tool command must be run within a project
directory ("<plnx-proj-root>").
Steps to Boot a PetaLinux Image on QEMU
PetaLinux provides QEMU support to enable testing of PetaLinux software image in a
simulated environment without any hardware.
Use the following steps to test the PetaLinux reference design with QEMU:
1. Change to your project directory and boot the prebuilt linux kernel image:
$ petalinux-boot --qemu --prebuilt 3
Note: If you do not wish to use prebuilt capability for QEMU boot, see the Additional Options
for Booting on QEMU.
The --qemu option tells petalinux-boot to boot QEMU, instead of real hardware via
JTAG, and the --prebuilt 3 boots the linux kernel, with PMUFW running in the
background.
°The --prebuilt 1 performs a Level 1 (FPGA bitstream) boot. This option is not
valid for QEMU.
°A Level 2 boot includes U-Boot.
°A Level 3 boot includes a pre-built Linux image.
Reference Guide 36
UG1144 (v2018.2) June 6, 2018 www.xilinx.com
Chapter 5: Booting and Packaging
TIP: To know more about different boot levels for prebuilt option, see Using petalinux-boot Command
with Prebuilt Images.
The example of the kernel boot log messages displayed on the console during
successful petalinux-kernel, is shown below:
[ 10.709243] Freeing unused kernel memory: 5568K (ffffffc000c20000 -
ffffffc001190000)
[ 13.448003] udevd[1666]: starting version 3.2
[ 13.458788] random: udevd: uninitialized urandom read (16 bytes read)
[ 13.556064] udevd[1667]: starting eudev-3.2
[ 14.045406] random: udevd: uninitialized urandom read (16 bytes read)
[ 37.446360] random: dd: uninitialized urandom read (512 bytes read)
[ 40.406936] IPv6: ADDRCONF(NETDEV_UP): eth0: link is not ready
[ 41.460975] macb ff0e0000.ethernet eth0: link up (100/Full)
[ 41.474152] IPv6: ADDRCONF(NETDEV_CHANGE): eth0: link becomes ready
[ 44.787172] random: dropbearkey: uninitialized urandom read (32 bytes read)
PetaLinux 2018.1 xilinx-zcu102-2018_1 /dev/ttyPS0
xilinx-zcu102-2018_1 login: root
Password:
root@xilinx-zcu102-2018_1:~#
root@xilinx-zcu102-2018_1:~#
2. Login to PetaLinux with the default user name root and password root.
TIP: To exit QEMU, press Ctrl+A together, release and then press X.
Additional Options for Booting on QEMU
• To download newly built <plnx-proj-root>/images/linux/u-boot.elf with
QEMU:
$ petalinux-boot --qemu --u-boot
°For MicroBlaze and Zynq-7000, it will boot
<plnx-proj-root>/images/linux/u-boot.elf with QEMU.
°For Zynq UltraScale+ MPSoC, it loads
<plnx-proj-root>/images/linux/u-boot.elf and boots the ATF image
<plnx-proj-root>/images/linux/bl31.elf with QEMU, and the ATF will
then boot the loaded U-Boot image. Build the system image using
petalinux-build.
• To download newly built kernel with qemu:
$ petalinux-boot --qemu --kernel
° For MicroBlaze, it will boot <plnx-proj-root>/images/linux/image.elf
with QEMU.

Reference Guide 37
UG1144 (v2018.2) June 6, 2018 www.xilinx.com
Chapter 5: Booting and Packaging
° For Zynq-7000, it will boot <plnx-proj-root>/images/linux/zImage with
QEMU.
° For Zynq UltraScale+ MPSoC, it loads the kernel image
<plnx-proj-root>/images/linux/Image and boots the ATF image
<plnx-proj-root>/images/linux/bl31.elf with QEMU, and the ATF will
then boot the loaded kernel image, with PMU firmware running in the background.
During start up, you will see the normal Linux boot process, ending with a login prompt
as shown below:
[ 10.709243] Freeing unused kernel memory: 5568K (ffffffc000c20000 -
ffffffc001190000)
[ 13.448003] udevd[1666]: starting version 3.2
[ 13.458788] random: udevd: uninitialized urandom read (16 bytes read)
[ 13.556064] udevd[1667]: starting eudev-3.2
[ 14.045406] random: udevd: uninitialized urandom read (16 bytes read)
[ 37.446360] random: dd: uninitialized urandom read (512 bytes read)
[ 40.406936] IPv6: ADDRCONF(NETDEV_UP): eth0: link is not ready
[ 41.460975] macb ff0e0000.ethernet eth0: link up (100/Full)
[ 41.474152] IPv6: ADDRCONF(NETDEV_CHANGE): eth0: link becomes ready
[ 44.787172] random: dropbearkey: uninitialized urandom read (32 bytes read)
PetaLinux 2018.1 xilinx-zcu102-2018_1 /dev/ttyPS0
xilinx-zcu102-2018_1 login: root
Password:
root@xilinx-zcu102-2018_1:~#
root@xilinx-zcu102-2018_1:~#
You may see slightly different output from the above example, depending on the Linux
image you test and its configuration.
Login to the virtual system when you see the login prompt on the emulator console with
the login root and password root. Try some Linux commands such as ls, ifconfig,
cat/proc/cpuinfo and so on. They behave the same as on real hardware. To exit the
emulator when you are finished, press Ctrl + A, release and then X.
• Boot a specific linux image:
The petalinux-boot tool can also boot a specific Linux image, using the image
option (-i or --image):
$ petalinux-boot --qemu --image <path-to-Linux-image-file>
For example:
$ petalinux-boot --qemu --image ./images/linux/zImage
• Direct Boot a Linux Image with Specific DTB:
Device Trees (DTB files) are used to describe the hardware architecture and address map
to the Linux kernel. The PetaLinux system emulator also uses DTB files to dynamically
configure the emulation environment to match your hardware platform.

Reference Guide 38
UG1144 (v2018.2) June 6, 2018 www.xilinx.com
Chapter 5: Booting and Packaging
If no DTB file option is provided, petalinux-boot extracts the DTB file from the given
image.elf for MicroBlaze and from
<plnx-proj-root>/images/linux/system.dtb for Zynq-7000 and Zynq
UltraScale+ MPSoC. Alternatively, you can use the --dtb option as follows:
$ petalinux-boot --qemu --image ./images/linux/zImage --dtb
./images/linux/system.dtb
Note: QEMU version has been upgraded to 2.6. The old options are deprecated in new version,
they functionally operational. PetaLinux tools still use old options, therefore it gets warning
messages, which can be ignored.
Warning message for Zynq UltraScale+ MPSoC:
qemu-system-aarch64: -tftp /home/user/xilinx-zcu102-2018.1/images/linux: The -tftp
option is deprecated. Please use '-netdev user,tftp=...' instead.g
Boot a PetaLinux Image on Hardware with SD Card
This section describes how to boot a PetaLinux image on Hardware with SD Card.
Note: This section is for Zynq-7000 and Zynq UltraScale+ MPSoC only, since they allow you to boot
from SD card.
Prerequisites
This section assumes that the following prerequisites have been satisfied:
• You have installed PetaLinux Tools on the Linux workstation. If you have not installed,
see the Installation Steps.
• You have installed PetaLinux BSP on the Linux workstation. If you have not installed, see
the PetaLinux BSP Installation.
• A serial communication program such as minicom/kermit/gtkterm has been installed;
the baud rate of the serial communication program has been set to 115200 bps.
Steps to Boot a PetaLinux Image on Hardware with SD Card
1. Mount the SD card on your host machine.
2. Copy the following files from <plnx-proj-root>/pre-built/linux/images/
into the root directory of the first partition which is in FAT32 format in the SD card:
°BOOT.BIN
°image.ub
3. Connect the serial port on the board to your workstation.

Reference Guide 39
UG1144 (v2018.2) June 6, 2018 www.xilinx.com
Chapter 5: Booting and Packaging
4. Open a console on the workstation and start the preferred serial communication
program (For example: kermit, minicom, gtkterm) with the baud rate set to 115200 on
that console.
5. Power off the board.
6. Set the boot mode of the board to SD boot. Refer to the board documentation for
details.
7. Plug the SD card into the board.
8. Power on the board.
9. Watch the serial console, you will see the boot messages similar to the following:
[ 5.546354] clk: Not disabling unused clocks
[ 5.550616] ALSA device list:
[ 5.553528] #0: DisplayPort monitor
[ 5.576326] sd 1:0:0:0: [sda] 312581808 512-byte logical blocks: (160 GB/149 GiB)
[ 5.583894] sd 1:0:0:0: [sda] Write Protect is off
[ 5.588699] sd 1:0:0:0: [sda] Write cache: enabled, read cache: enabled, doesn't
support DPO or FUA
[ 5.630942] sda:
[ 5.633210] sd 1:0:0:0: [sda] Attached SCSI disk
[ 5.637897] Freeing unused kernel memory: 512K (ffffffc000c20000 -
ffffffc000ca0000)
INIT: version 2.88 booting
Starting udev
[ 5.746538] udevd[1772]: starting version 3.2
[ 5.754868] udevd[1773]: starting eudev-3.2
Populating dev cache
Starting internet superserver: inetd.
Running postinst /etc/rpm-postinsts/100-sysvinit-inittab...
Running postinst /etc/rpm-postinsts/libglib-2.0-0...
update-rc.d: /etc/init.d/run-postinsts exists during rc.d purge (continuing)
INIT: Entering runlevel: 5
Configuring network interfaces... [ 6.607236] IPv6: ADDRCONF(NETDEV_UP): eth0:
link is not ready
udhcpc (v1.24.1) started
Sending discover...
[ 7.628323] macb ff0e0000.ethernet eth0: link up (1000/Full)
[ 7.633980] IPv6: ADDRCONF(NETDEV_CHANGE): eth0: link becomes ready
Sending discover...
Sending select for 10.10.70.1...
Lease of 10.10.70.1 obtained, lease time 600
/etc/udhcpc.d/50default: Adding DNS 172.19.128.1
/etc/udhcpc.d/50default: Adding DNS 172.19.129.1
Done.
Starting Dropbear SSH server: Generating key, this may take a while...
Public key portion is:
ssh-rsa
AAAAB3NzaC1yc2EAAAADAQABAAABAQCxGtijKDWcJgnDxRCGiUPJJIMapFc0tcsCkMGyjJEDs9LRugWzgaa
8XA+pGy4aTvZqHvGnFTvkMw4gZE/O+BBgO8mMK9dFei2BvENbljm8M4NotG5LXRCFDaw6bXBCtg4ekCKWNU
6lUQU+PPdpmj9X+JgnTHnHnNB3jP6MrymCuS5wfFbyHfKdrwWXwfLmCycZr7DjRumee7T/3SrBU3oRJoLcC
Vj2lf5Z7673+rOT1GM3QFzO2HWCCzyz/3IUcEh9mhKpjzgs4iNEKmxwyi29rl37x7PD7zRsQbaW8uUtheCa
in3M1mjKfPnnygopdVh6IFsAT3FFMK4PYJ1GPL+h root@xilinx-zcu102-zu9-es2-rev1_0-2018.1
Fingerprint: md5 f2:ce:1d:f2:50:e6:e2:55:5a:96:6f:bc:98:8f:82:99
dropbear.
Reference Guide 40
UG1144 (v2018.2) June 6, 2018 www.xilinx.com
Chapter 5: Booting and Packaging
Starting syslogd/klogd: done
Starting domain watchdog daemon: xenwatchdogd startup
PetaLinux 2018.1 xilinx-zcu102-zu9-es2-rev1_0-2018.1 /dev/ttyPS0
xilinx-zcu102-zu9-es2-rev1_0-2018.1 login: root
Password:
root@xilinx-zcu102-zu9-es2-rev1_0-2018:~#
TIP: If you wish to stop auto-boot, hit any key when you see the messages similar to the following on
the console: Hit any key to stop autoboot:
10. Type user name root and password root on the serial console to log into the PetaLinux
system.
Troubleshooting
This section describes some common issues you may experience while booting a PetaLinux
image on hardware with SD card.
TIP: To know more about U-Boot options, use the command:$ U-Boot-PetaLinux> printenv
Table 5-1: PetaLinux Image on Hardware Troubleshooting
Problem / Error Message Description and Solution
Wrong Image Format for boot
command.
ERROR: Can’t get kernel
image!
Problem Description:
This error message indicates that the u-boot bootloader is unable to
find kernel image. This is likely because bootcmd
environment variable
is not set properly.
Solution:
To see the default boot device, print bootcmd environment variable
using the following command in U-Boot console.
U-Boot-PetaLinux> print bootcmd
If it is not boot from SD card by default, there are a few options as
follows,
• Without rebuild PetaLinux, set bootcmd to boot from your desired
media, use setenv command. For SD card boot, set the environment
variable as follows.
U-Boot-PetaLinux> setenv bootcmd ’run sdboot’ ;
saveenv
•Run
petalinux-config to set to load kernel image from SD card.
For more information, see the Boot Images Storage Configuration.
Rebuild PetaLinux and regenerate BOOT.BIN with the rebuilt U-Boot,
and then use the new BOOT.BIN to boot the board. See Generate
Boot Image for Zynq UltraScale+ MPSoC on how to generate
BOOT.BIN.

Reference Guide 41
UG1144 (v2018.2) June 6, 2018 www.xilinx.com
Chapter 5: Booting and Packaging
Boot a PetaLinux Image on Hardware with JTAG
This section describes how to boot a PetaLinux image on hardware with JTAG.
Prerequisites
This section assumes that the following prerequisites have been satisfied:
• You have a PetaLinux system image by either installing a PetaLinux BSP (see PetaLinux
BSP Installation) or by building your own PetaLinux project (see Build System Image).
• This is optional and only needed if you wish to make use of prebuilt capability for JTAG
boot. You have packaged prebuilt images, see Packaging Prebuilt Images.
• A serial communication program such as minicom/kermit/gtkterm has been installed;
the baud rate of the serial communication program has been set to 115200 bps.
• Appropriate JTAG cable drivers have been installed. You can download drivers from
Digilent Adept Downloads.
Steps to Boot a PetaLinux Image on Hardware with JTAG
1. Power off the board.
2. Connect the JTAG port on the board with the JTAG cable to your workstation.
3. Connect the serial port on the board to your workstation.
4. If your system has ethernet, also connect the Ethernet port on the board to your local
network.
5. For Zynq family device boards, ensure that the mode switches are set to JTAG mode.
Refer to the board documentation for details.
6. Power on the board.
7. Open a console on your workstation and start with preferred serial communication
program (For example, kermit, minicom) with the baud rate set to 115200 on that
console.
8. Run the petalinux-boot command as follows on your workstation:
$ petalinux-boot --jtag --prebuilt 3
Note: If you wish not to use prebuilt capability for JTAG boot, refer to Additional options for
booting with JTAG.
The --jtag option tells petalinux-boot to boot on hardware via JTAG, and the
--prebuilt 3 option boots the linux kernel. Wait for the appearance of the shell
prompt on the command console to indicate completion of the command.

Reference Guide 42
UG1144 (v2018.2) June 6, 2018 www.xilinx.com
Chapter 5: Booting and Packaging
Note: To know more about different boot levels for prebuilt option, see Using petalinux-boot
Command with Prebuilt Images.
The example of the message on the workstation command console for successful
petalinux-boot is:
INIT: Entering runlevel: 5
Configuring network interfaces... [ 6.607236] IPv6: ADDRCONF(NETDEV_UP): eth0:
link is not ready
udhcpc (v1.24.1) started
Sending discover...
[ 7.628323] macb ff0e0000.ethernet eth0: link up (1000/Full)
[ 7.633980] IPv6: ADDRCONF(NETDEV_CHANGE): eth0: link becomes ready
Sending discover...
Sending select for 10.10.70.1...
Lease of 10.10.70.1 obtained, lease time 600
/etc/udhcpc.d/50default: Adding DNS 172.19.128.1
/etc/udhcpc.d/50default: Adding DNS 172.19.129.1
Done.
Starting Dropbear SSH server: Generating key, this may take a while...
Public key portion is:
ssh-rsa
AAAAB3NzaC1yc2EAAAADAQABAAABAQCxGtijKDWcJgnDxRCGiUPJJIMapFc0tcsCkMGyjJEDs9LRugWzgaa
8XA+pGy4aTvZqHvGnFTvkMw4gZE/O+BBgO8mMK9dFei2BvENbljm8M4NotG5LXRCFDaw6bXBCtg4ekCKWNU
6lUQU+PPdpmj9X+JgnTHnHnNB3jP6MrymCuS5wfFbyHfKdrwWXwfLmCycZr7DjRumee7T/3SrBU3oRJoLcC
Vj2lf5Z7673+rOT1GM3QFzO2HWCCzyz/3IUcEh9mhKpjzgs4iNEKmxwyi29rl37x7PD7zRsQbaW8uUtheCa
in3M1mjKfPnnygopdVh6IFsAT3FFMK4PYJ1GPL+h root@xilinx-zcu102-zu9-es2-rev1_0-2018.1
Fingerprint: md5 f2:ce:1d:f2:50:e6:e2:55:5a:96:6f:bc:98:8f:82:99
dropbear.
Starting syslogd/klogd: done
Starting domain watchdog daemon: xenwatchdogd startup
PetaLinux 2018.1 xilinx-zcu102-zu9-es2-rev1_0-2018.1 /dev/ttyPS0
xilinx-zcu102-zu9-es2-rev1_0-2018.1 login: root
Password:
root@xilinx-zcu102-zu9-es2-rev1_0-2018:~
By default, network settings for PetaLinux reference designs are configured using DHCP.
The output you see may be slightly different from the above example, depending on the
PetaLinux reference design being tested.
9. Type user name root and password root on the serial console to log into the
PetaLinux system.
10. Determine the IP address of the PetaLinux by running ifconfig on the system console.
Additional options for booting with JTAG
• To download a bitstream to target board:
$ petalinux-boot --jtag --fpga --bitstream <BITSTREAM>
• To download newly built <plnx-proj-root>/images/linux/u-boot.elf to
target board:
$ petalinux-boot --jtag --u-boot

Reference Guide 43
UG1144 (v2018.2) June 6, 2018 www.xilinx.com
Chapter 5: Booting and Packaging
• To download newly built kernel to target board:
$ petalinux-boot --jtag --kernel
°For MicroBlaze, this will boot <plnx-proj-root>/images/linux/image.elf
on target board.
°For Zynq-7000, this will boot <plnx-proj-root>/images/linux/zImage on
target board.
°For Zynq UltraScale+ MPSoC, this will boot
<plnx-proj-root>/images/linux/Image on target board.
• To Download a image with a bitstream with --fpga --bitstream <BITSTREAM> option:
$ petalinux-boot --jtag --u-boot --fpga --bitstream <BITSTREAM>
The above command downloads the bitstream and then download the U-Boot image.
• To see the verbose output of jtag boot with -v option:
$ petalinux-boot --jtag --u-boot -v
Logging Tcl/XSDB for JTAG Boot
Use the following command to take log of XSDB commands used during JTAG boot. It
dumps tcl script (which in turn invokes the xsdb commands) data to test.txt.
$ cd <plnx-proj-root>
$ petalinux-boot --jtag --prebuilt 3 --tcl test.txt
Troubleshooting
This section describes some common issues you may experience while booting a PetaLinux
image on hardware with JTAG.
Reference Guide 44
UG1144 (v2018.2) June 6, 2018 www.xilinx.com
Chapter 5: Booting and Packaging
Boot a PetaLinux Image on Hardware with TFTP
This section describes how to boot a PetaLinux image using Trivial File Transfer Protocol
(TFTP).
TIP: TFTP boot saves a lot of time because it is much faster than booting through JTAG and you do not
have to flash the image for every change in kernel source.
Prerequisites
This section assumes that the following prerequisites have been satisfied:
• Host environment with TFTP server is setup and PetaLinux Image is built for TFTP boot.
For more information, see Configure TFTP Boot
• You have packaged prebuilt images. For more information, see Packaging Prebuilt
Images
Table 5-2: PetaLinux Image on Hardware with JTAG Troubleshooting
Problem / Error Message Description and Solution
ERROR: This tool requires
’xsdb’ and it is missing. Please
source Xilinx Tools settings
first.
Problem Description:
This error message indicates that PetaLinux tools can not find the xsdb
tool that is a part of the Xilinx Vivado or SDK tools.
Solution:
You have to setup Vivado Tools Working Environment. For more
information, see PetaLinux Working Environment Setup.
Cannot see any console
output when trying to boot
U-Boot or kernel on hardware
but boots correctly on QEMU.
Problem Description:
This problem is usually caused by one or more of the following:
• The serial communication terminal application is set with the wrong
baud rate.
• Mismatch between hardware and software platforms.
Solution:
• Ensure your terminal application baud rate is correct and matches
your hardware configuration.
• Ensure the PetaLinux project is built with the right hardware platform.
°Import hardware configuration properly, see the Importing
Hardware Configuration.
°Check the "Subsystem AUTO Hardware Settings --->" submenu to
ensure that it matches the hardware platform.
°Check the "Serial settings --->" submenu under "Subsystem AUTO
Hardware Settings --->" to ensure stdout, stdin are set to the
correct UART IP core.
°Rebuild system images, see Build System Image.

Reference Guide 45
UG1144 (v2018.2) June 6, 2018 www.xilinx.com
Chapter 5: Booting and Packaging
• A serial communication program such as minicom/kermit/gtkterm has been installed;
the baud rate of the serial communication program has been set to 115200 bps
• Ethernet connection is setup properly between Host and Linux Target
• Appropriate JTAG cable drivers have been installed. You can download drivers from
Digilent Adept Downloads
Steps to Boot a PetaLinux Image on Hardware with TFTP
1. Power off the board
2. Connect the JTAG port on the board to the workstation using a JTAG cable
3. Connect the serial port on the board to your workstation
4. Connect the Ethernet port on the board to the local network via a network switch
5. For Zynq family device boards, ensure that the mode switches are set to JTAG mode
Refer to the board documentation for details
6. Power on the board
7. Open a console on your workstation and start with preferred serial communication
program (for example, kermit, minicom) with the baud rate set to 115200 on that
console
8. Run the petalinux-boot command as follows on your workstation
$ petalinux-boot --jtag --prebuilt 2
The --jtag option tells petalinux-boot to boot on hardware via JTAG, and the
--prebuilt 2 option downloads the prebuilt bitstream (and FSBL for Zynq) to target
board, and then boot prebuilt U-Boot on target board.
9. When autoboot starts, hit any key to stop it
The example of a Workstation console output for successful U-Boot download is:
U-Boot 2018.1 (Mar 30 2017 - 12:00:00 -0600) Xilinx ZynqMP ZCU102 rev1.0
I2C: ready
DRAM: 4 GiB
EL Level:EL2
Chip ID:xczuunkn
MMC: Card did not respond to voltage select!
sdhci@ff170000 - probe failed: -95
Card did not respond to voltage select!
zynqmp_qspi_ofdata_to_platdata: CLK 104156250
SF: Detected n25q512a with page size 512 Bytes, erase size 128 KiB, total 128 MiB
*** Warning - bad CRC, using default environment
In: serial
Out: serial
Err: serial

Reference Guide 46
UG1144 (v2018.2) June 6, 2018 www.xilinx.com
Chapter 5: Booting and Packaging
Bootmode: JTAG_MODE
Net: ZYNQ GEM: ff0e0000, phyaddr c, interface rgmii-id
Warning: ethernet@ff0e0000 MAC addresses don't match:
Address in SROM is ff:ff:ff:ff:ff:ff
Address in environment is 00:0a:35:00:22:01
eth0: ethernet@ff0e0000
U-BOOT for xilinx-zcu102-2018_1
BOOTP broadcast 1
DHCP client bound to address 10.0.2.15 (2 ms)
Hit any key to stop autoboot: 0
ZynqMP>
10. Check whether the TFTP
server IP address is set to the IP Address of the host where the
image resides. This can be done using the following command:
ZynqMP> print serverip
11. Set the server IP address to the host IP address using the following commands:
ZynqMP> set serverip <HOST IP ADDRESS>; saveenv
12. Boot the kernel using the following command:
ZynqMP> run netboot
Troubleshooting
BSP Packaging
BSPs are useful for distribution between teams and customers. Customized PetaLinux
project can be shipped to next level teams or external customers through BSPs. This section
explains, with an example, how to package a BSP with PetaLinux project.
Prerequisites
This section assumes that you have PetaLinux Tools software platform ready for building a
Linux system customized to your hardware platform. For more information, see Importing
Hardware Configuration.
Table 5-3: PetaLinux Image on Hardware with TFTP
Problem / Error Message Description and Solution
Error: "serverip" not defined. Problem Description:
This error message indicates that U-Boot environment variable
serverip is not set. You have to set it to IP Address of the host where
the image resides.
Solution:
Use the following command to set the serverip:
ZynqMP> set serverip <HOST IP ADDRESS>;saveenv

Reference Guide 47
UG1144 (v2018.2) June 6, 2018 www.xilinx.com
Chapter 5: Booting and Packaging
Steps for BSP Packaging
Steps on how to package a project for submission to WTS for debug are as follows:
1. You can go outside the PetaLinux project directory to run petalinux-package
command.
2. Use the following commands to package the bsp.
$ petalinux-package --bsp -p <plnx-proj-root> --output MY.BSP
3. This generates MY.BSP including the following elements from the specified project:
°<plnx-proj-root>/project-spec/
°<plnx-proj-root>/config.project
°<plnx-proj-root>/.petalinux/
°<plnx-proj-root>/pre-built/
°All selected components
Additional BSP Packaging Options
1. BSP packaging with hardware source.
$ petalinux-package --bsp -p <plnx-proj-root> \ --hwsource <hw-project-root>
--output MY.BSP
It will not modify the specified PetaLinux project <plnx-proj-root>. It will put the
specified hardware project source to <plnx-proj-root>/hardware/ inside MY.BSP
archive.
2. BSP packaging with external sources.
The support for search path is obsolete. It is your responsibility to copy the external
sources under components/ext_sources. For more information, see Using External
Kernel and U-Boot With PetaLinux. The BSP has to be packaged.

Reference Guide 48
UG1144 (v2018.2) June 6, 2018 www.xilinx.com
Chapter 6
Customizing the Project
Firmware Version Configuration
This section explains how to do firmware version configuration using petalinux-config
command.
Prerequisites
This section assumes that you have PetaLinux Tools software platform ready for building a
Linux system customized to your hardware platform. For more information, see the
Importing Hardware Configuration.
Steps for Firmware Version Configuration
1. Change into the root directory of your PetaLinux project.
$ cd <plnx-proj-root>
2. Launch the top level system configuration menu.
$ petalinux-config
3. Select Firmware Version Configuration -->.
4. Select Host Name, Product Name, Firmware Version as per the requirement to edit
them.
5. Exit the menu and select <Yes> when asked Do you wish to save your new
configuration?:
Do you wish to save your new configuration ? <ESC><ESC>
to continue.
< Yes > < No >

Reference Guide 49
UG1144 (v2018.2) June 6, 2018 www.xilinx.com
Chapter 6: Customizing the Project
Root File System Type Configuration
This section details configuration of RootFS type using petalinux-config command.
Prerequisites
This section assumes that you have PetaLinux Tools software platform ready for building a
Linux system customized to your hardware platform. For more information, see the
Importing Hardware Configuration.
Steps for Root file system Type Configuration
1. Change into the root directory of your PetaLinux project
$ cd <plnx-proj-root>
2. Launch the top level system configuration menu
$ petalinux-config
3. Select Image Packaging Configuration ---> Root file System type --->
4. Select INITRAMFS/INITRD/JFFS2/NFS/SD card as per the requirement
5. Save Configuration settings.
Boot Images Storage Configuration
This section provides details about configuration of the Boot Device, for example, Flash and
SD/MMC using petalinux-config command.
Prerequisites
This section assumes that you have PetaLinux Tools software platform ready for building a
Linux system customized to your hardware platform. For more information, see the
Importing Hardware Configuration.
Steps for Boot Images Storage Configuration
1. Change into the root directory of your PetaLinux project.
$ cd <plnx-proj-root>
2. Launch the top level system configuration menu.
$ petalinux-config
Reference Guide 50
UG1144 (v2018.2) June 6, 2018 www.xilinx.com
Chapter 6: Customizing the Project
3. Select Subsystem AUTO Hardware Settings ---> Advanced Bootable Images
Storage Settings ---> boot image settings ---> Image Storage Media.
4. Select boot device as per the requirement. To set flash as the boot device select primary
flash. To make SD card as the boot device select primary sd.
5. Under the Advanced Bootable Images Storage Settings submenu, select kernel
image settings.
6. Select Image Storage Media.
7. Select storage device as per the requirement. To set flash as the boot device select
primary flash. To make SD card as the boot device select primary sd.
8. Save Configuration settings.
TIP: To select a menu/submenu which was deselected before, press the down arrow key (ë) to scroll
down the menu or the up arrow key (") to scroll up the menu.Once the cursor is on the menu, then press
"y". To deselect a menu/submenu, follow the same process and press "n" at the end.
Troubleshooting
This section describes some common issues you may experience while working with boot
device configuration.
Primary Flash Partition Configuration
This sections provides details on how to configure flash partition with PetaLinux
menuconfig.
1. Change into the root directory of your PetaLinux project
$ cd <plnx-proj-root>
2. Launch the top level system configuration menu
$ petalinux-config
3. Select Subsystem AUTO Hardware Settings ---> Flash Settings --->.
Table 6-1: Boot Images Storage Troubleshooting
Problem / Error Message Description and Solution
ERROR: Failed to config
linux/kernel!
Problem Description:
This error message indicates that it is unable to configure the
linux-kernel component with menuconfig.
Solution:
Check whether all required libraries/packages are installed properly. For
more information, see the Installation Requirements.

Reference Guide 51
UG1144 (v2018.2) June 6, 2018 www.xilinx.com
Chapter 6: Customizing the Project
4. Select a flash device as the Primary Flash
5. Set the name and the size of each partition
Note: The PetaLinux tools uses the boot, bootenv (it is for U-Boot environment variables) and kernel
partitions to generate the U-Boot commands:
The PetaLinux tools uses the start address for parallel flash or start offset for SPI flash and
the size of the above partitions to generate the following U-Boot commands:
•update_boot if the boot image, which is a u-boot image for MicroBlaze, a BOOT.BIN
image for Zynq family devices, is selected to be stored in the primary flash.
•update_kernel, and load_kernel if the kernel image which is the FIT image
image.ub, is selected to be stored in the flash.
Managing Image Size
In an embedded environment, it is important to reduce the size of the kernel image stored
in flash and the static size of kernel image in RAM. This section describes impact of config
item on kernel size and RAM usage.
FIT image is the default bootable image format. By default the FIT image is composed of
kernel image, DTB and rootfs image.
Prerequisites
This section assumes that you have PetaLinux Tools software platform ready for building a
Linux system customized to your hardware platform. For more information, see the
Importing Hardware Configuration.
Steps for Managing Image Size
FIT Image size can be reduced using the following methods:
1. Launch the RootFS configuration menu using the following command:
$ cd <plnx-proj-root>
$ petalinux-config -c rootfs
Select Filesystem Packages --->. Under this submenu, you can find the list of options
corresponding to RootFS packages. If your requirement does not need some of these
packages, you can shrink the size of RootFS image by disabling them.
2. Launch the kernel configuration menu using the following command:
$ cd <plnx-proj-root>
$ petalinux-config -c kernel
Reference Guide 52
UG1144 (v2018.2) June 6, 2018 www.xilinx.com
Chapter 6: Customizing the Project
Select General Setup --->. Under this sub-menu, you can find options to set the config
items. Any item that is not mandatory to have in the system can be disabled to reduce the
kernel image size. For example, CONFIG_SHMEM, CONFIG_AIO, CONFIG_SWAP,
CONFIG_SYSVIPC. For more details, see the Linux kernel documentation.
CAUTION! Note that disabling of some config items may lead to unsuccessful boot. So it is expected
that you have the knowledge of config items before disabling them.
TIP: Inclusion of extra config items and Filesystem packages lead to increase in the kernel image size
and RootFS size respectively.
Note: If kernel or rootfs size increases and is greater than 128 MB, you need to do the following:
1. Mention the Bootm length in platform-top.h
#define CONFIG_SYS_BOOTM_LEN <value greater then image size>
2. Undef the CONFIG_SYS_BOOTMAPSZ in platform-top.h
Configuring INITRAMFS Boot
INITRAMFS, abbreviated as initial RAM File System, is the successor of initrd. It is a cpio
archive of the initial file system that gets loaded into memory during the PetaLinux startup
process. The Linux kernel mounts it as RootFS and starts the initialization process.
This section describes the procedure to configure INITRAMFS boot.
Prerequisites
This section assumes that you have created a new PetaLinux project (see Creating a New
PetaLinux Project) and imported the hardware platform (see Importing Hardware
Configuration).
Steps to Configure INITRAMFS Boot
1. Set the RootFS type to INITRAMFS. For more information, see Root File System Type
Configuration.
2. Build the system image. For more information, see Build System Image.
3. Use one of the following methods to boot the system image.
a. Boot a PetaLinux Image on QEMU, see Booting a PetaLinux Image on QEMU.
b. Boot a PetaLinux Image on Hardware with SD Card, see Boot a PetaLinux Image on
Hardware with SD Card.
c. Boot a PetaLinux Image on Hardware with JTAG, see Boot a PetaLinux Image on
Hardware with JTAG.
Reference Guide 53
UG1144 (v2018.2) June 6, 2018 www.xilinx.com
Chapter 6: Customizing the Project
IMPORTANT: The default RootFS for PetaLinux is INITRAMFS.
In INITRAMFS mode, rootfs is included in kernel images.
Image -> Image ( kernel ) + rootfs.cpio
zImage -> zImage ( kernel ) + rootfs.cpio
image.elf -> simpleImage.mb ( kernel ) + rootfs.cpio
As you select the rootfs components, its size increases proportionally.
Configure TFTP Boot
This section describes how to configure the Host and the PetaLinux image for the TFTP
boot.
TIP: TFTP boot saves a lot of time because it is much faster than booting through JTAG and you do not
have to flash the image for every change in kernel source.
Prerequisites
This section assumes that the following prerequisites have been satisfied:
• You have created a new PetaLinux project (see Creating a New PetaLinux Project) and
imported the hardware platform (see Importing Hardware Configuration).
• You have TFTP server running on your host.
PetaLinux Configuration and Build System Image
Steps to configure PetaLinux for TFTP boot and build the system image are:
1. Change to root directory of your PetaLinux project.
$ cd <plnx-proj-root>
2. Launch the top level system configuration menu.
$ petalinux-config
3. Select Image Packaging Configuration.
4. Select Copy final images to tftpboot and set tftpboot directory. By default the TFTP
directory ID is /tftpboot.
5. Save Configuration settings and build system image as explained in Build System Image.
Reference Guide 54
UG1144 (v2018.2) June 6, 2018 www.xilinx.com
Chapter 6: Customizing the Project
Configuring NFS Boot
One of the most important components of a Linux system is the root file system. A good
development root file system provides the developer with all the useful tools that can help
him/her on his/her work. Such a root file system can become big in size, so it is hard to
store it in flash memory.
The most convenient thing is to mount the entire root file system from the network,
allowing the host system and the target to share the same files. The root file system can be
modified quickly and also on the fly (meaning that the file system can be modified while
the system is running). The most common way to setup a system like the one described is
through NFS.
TIP: In case of NFS, no manual refresh is needed for new files.
Prerequisites
This section assumes that the following prerequisites have been satisfied:
• You have created a new PetaLinux project (see Creating a New PetaLinux Project) and
imported the hardware platform (see Importing Hardware Configuration).
• You have Linux file and directory permissions.
• You have NFS server setup on your host.
PetaLinux Configuration and Build System Image
Steps to configure the PetaLinux for NFS boot and build the system image are as follows:
1. Change to root directory of your PetaLinux project.
$ cd <plnx-proj-root>
2. Launch the top level system configuration menu.
$ petalinux-config
3. Select Image Packaging Configuration ---> Root filesystem type --->.
4. Select NFS as the RootFS type.
5. Select Location of NFS root directory and set it to /home/NFSshare.
6. Exit menuconfig and save configuration settings. The boot arguments in the auto
generateid DTSI will be automatically updated. You can check
<plnx-proj-root>/components/plnx_workspace/device-tree/device-tr
ee/plnx_aarch64-system.dts.
7. Build the system image. For more information, see Build System Image.
Reference Guide 55
UG1144 (v2018.2) June 6, 2018 www.xilinx.com
Chapter 6: Customizing the Project
8. You can see the updated boot arguments only after building.
Booting with NFS
In case of NFS Boot, RootFS is mounted through the NFS. But bootloader (fsbl, bitstream,
U-Boot) and kernel can be downloaded using various methods as mentioned below.
1. JTAG: In this case, bootloader and kernel will be downloaded on to the target through
JTAG. For more information, see Boot a PetaLinux Image on Hardware with JTAG.
TIP: If you want to make use of prebuilt capability to boot with JTAG, package images into prebuilt
directory. For more information, see Packaging Prebuilt Images.
2. TFTPBOOT: In this case, bootloader will be downloaded through JTAG and kernel will be
downloaded on to the target through TFTPBOOT. For more information, see Boot a
PetaLinux Image on Hardware with TFTP.
3. SD card: In this case, bootloader (BOOT.BIN) and kernel image (image.ub) will be
copied to SD card and will be downloaded from SD card. For more information, see Boot
a PetaLinux Image on Hardware with SD Card.
Configuring SD Card ext filesystem Boot
This section describes how to configure SD Card ext filesystem boot.
Prerequisites
This section assumes that the following prerequisites have been satisfied:
• You have created a new PetaLinux project (see Creating a New PetaLinux Project) and
imported the hardware platform (see Importing Hardware Configuration).
• An SD memory card with at least 4 GB of storage space. It is recommended to use a
card with speed-grade 6 or higher to achieve optimal file transfer performance.
Preparing the SD card
Steps to prepare the SD card for PetaLinux SD card ext filesystem boot:
1. The SD card is formatted with two partitions using a partition editor such as gparted.
2. The first partition should be at least 60 MB in size and formatted as a FAT32 filesystem.
Ensure that there is 4 MB of free space preceding the partition. The first partition will
contain the bootloader, devicetree and kernel images. Label this partition as BOOT.

Reference Guide 56
UG1144 (v2018.2) June 6, 2018 www.xilinx.com
Chapter 6: Customizing the Project
3. The second partition should be formatted as an ext4 filesystem and can take up the
remaining space on the SD card. This partition will store the system root filesystem.
Label this partition as rootfs.
TIP: For optimal performance ensure that the SD card partitions are 4 MB aligned.
PetaLinux Configuration and Build System Image
Steps to configure PetaLinux for SD card ext filesystem boot and build the system image are
as follows:
1. Change to root directory of your PetaLinux project.
$ cd <plnx-proj-root>
2. Launch top level system configuration menu.
$ petalinux-config
3. Select Image Packaging Configuration ---> Root filesystem type.
4. Select SD card as the RootFS type.
5. Exit menuconfig and save configuration settings.
Note: The boot arguments will be automatically updated in the
<plnx-proj-root>/components/plnx_workspace/device-tree/device-tree/syst
em-conf.dtsi. These changes will be reflected only after the build.
6. Build PetaLinux images. For more information, see Build System Image.
7. Generate boot image. For more information, see Generate Boot Image for Zynq
UltraScale+ MPSoC.
8. The generated rootfs.tar.gz file will be present in images/linux directory. To
extract, use tar xvf rootfs.tar.gz.
Copying Image Files
This section explains how to copy image files to SD card partitions.
1. Change to root directory of your PetaLinux project.
$ cd <plnx-proj-root>
2. Copy BOOT.BIN and image.ub to BOOT partition of SD card. The image.ub file will
have device tree and kernel image files.
$ cp images/linux/BOOT.BIN /media/BOOT/
$ cp images/linux/image.ub /media/BOOT/
3. Copy rootfs.cpio file to rootfs partition of SD card and extract the file system.
$ sudo tar xvf rootfs.tar.gz -C /media/rootfs

Reference Guide 57
UG1144 (v2018.2) June 6, 2018 www.xilinx.com
Chapter 6: Customizing the Project
In order to boot this SD card ext image, see Boot a PetaLinux Image on Hardware with SD
Card.
Troubleshooting
Table 6-2: Configuring SD Card ext Filesystem Boot
Problem / Error Message Description and Solution
EXT4-fs (mmcblk0p2):
mounted filesystem with
ordered data mode. Opts:
(null) Kernel panic - not
syncing: No working init
found.
Problem Description:
This message indicates that the Linux kernel is unable to mount EXT4
File System and unable to find working init.
Solution:
Extract RootFS in rootfs partition of SD card. For more information, see
the Copying Image Files.

Reference Guide 58
UG1144 (v2018.2) June 6, 2018 www.xilinx.com
Chapter 7
Customizing the Rootfs
Including Prebuilt Libraries
This section explains how to include pre-compiled libraries to PetaLinux root file system.
If a library is developed outside PetaLinux , you may just want to add the library in the
PetaLinux root file system. In this case, an application template is created to allow copying
of the existing content to target filesystem.
Prerequisites
This section assumes that you have PetaLinux Tools software platform ready for building a
Linux system customized to your hardware platform. For more information, see Importing
Hardware Configuration.
Steps to Include Prebuilt Applications
If your prebuilt application name is mylib.so, including this into PetaLinux root file system
is explained in following steps.
1. Ensure that the pre-compiled code has been compiled for your PetaLinux target
architecture (For example, MicroBlaze, Arm etc.).
2. Create an application with the following command.
$ petalinux-create -t apps --template install --name mylib --enable
3. Change to the newly created application directory.
$ cd <plnx-proj-root>/project-spec/meta-user/recipes-apps/mylib/files/
4. Remove existing mylib file and copy the prebuilt mylib.so into mylib/files
directory.
$ rm mylib
$ cp <path-to-prebuilt-mylib.so> ./
5. Edit
<plnx-proj-root>/project-spec/meta-user/recipes-apps/mylib/mylib
.bb. The file should look like the following.
# This file is the libs recipe.

Reference Guide 59
UG1144 (v2018.2) June 6, 2018 www.xilinx.com
Chapter 7: Customizing the Rootfs
#
SUMMARY = "Simple libs application"
SECTION = "PETALINUX/apps"
LICENSE = "MIT"
LIC_FILES_CHKSUM = "file://${COMMON_LICENSE_DIR}/MIT;md5=0835ade698e0bcf8506ecda2f7b4f302"
SRC_URI = "file://mylib.so \
"
S = "${WORKDIR}"
TARGET_CC_ARCH += "${LDFLAGS}"
do_install() {
install -d ${D}${libdir}
install -m 0655 ${S}/mylib.so ${D}${libdir}
}
FILES_${PN} += "${libdir}"
FILES_SOLIBSDEV = ""
6. Run petalinux-build -c rootfs.
IMPORTANT: You need to ensure that the binary data being installed into the target file system by an
install template application is compatible with the underlying hardware implementation of your
system.
Including Prebuilt Applications
If an application is developed outside PetaLinux (for example, through Xilinx SDK), you may
just want to add the application binary in the PetaLinux root file system. In this case, an
application template is created to allow copying of the existing content to target filesystem.
This section explains how to include pre-compiled applications to PetaLinux root file
system.
Prerequisites
This section assumes that you have PetaLinux Tools software platform ready for building a
Linux system customized to your hardware platform. For more information, see Importing
Hardware Configuration.
Steps to Include Prebuilt Applications
If your prebuilt application name is myapp, including this into PetaLinux root file system is
explained in following steps.
Reference Guide 60
UG1144 (v2018.2) June 6, 2018 www.xilinx.com
Chapter 7: Customizing the Rootfs
1. Ensure that the pre-compiled code has been compiled for your PetaLinux target
architecture (For example, MicroBlaze, Arm etc.).
2. Create an application with the following command.
$ petalinux-create -t apps --template install --name myapp --enable
3. Change to the newly created application directory.
$ cd <plnx-proj-root>/project-spec/meta-user/recipes-apps/myapp/files/
4. Remove existing myapp app and copy the prebuilt myapp into myapp/files directory.
$ rm myapp
$ cp <path-to-prebuilt-app> ./
IMPORTANT: You need to ensure that the binary data being installed into the target file system by an
install template application is compatible with the underlying hardware implementation of your
system.
Including Prebuilt Modules
If you have pre-compiled kernel modules, you may just want to add the module into
PetaLinux root file system. This section explains how to include pre-compiled Modules to
PetaLinux root file system.
Prerequisites
This section assumes that you have PetaLinux Tools software platform ready for building a
Linux system customized to your hardware platform. For more information, see Importing
Hardware Configuration.
Steps to Include Prebuilt Modules
If your prebuilt module name is mymodule, including this into PetaLinux root file system is
explained in following steps:
1. Ensure that the pre-compiled kernel module has been compiled for your PetaLinux
target architecture (For example, MicroBlaze, Arm etc.).
2. To create a module project, use the following command.
$ petalinux-create -t apps --template install --name mymodule --enable
3. Change to the newly created module directory.
$ cd <plnx-proj-root>/project-spec/meta-user/recipes-apps/mymodule/files
4. Place the pre-built module gpiomod.ko into meta-user/mymodule/files/
directory

Reference Guide 61
UG1144 (v2018.2) June 6, 2018 www.xilinx.com
Chapter 7: Customizing the Rootfs
$ cp <path-to-prebuilt-module>/gpiomod.ko ./
5. Edit mymodule.bb file, the file should look like the following:
#
# This file is the mymodule recipe.
#
SUMMARY = "Simple shivamod application"
SECTION = "PETALINUX/apps"
LICENSE = "MIT"
LIC_FILES_CHKSUM = "file://${COMMON_LICENSE_DIR}/MIT;md5=0835ade698e0bcf8506ecda2f7b4f302"
SRC_URI = "file://gpiomod.ko \
"
inherit module-base
S = "${WORKDIR}"
do_install() {
install -d ${D}${base_libdir}/modules/${KERNEL_VERSION}/extra
install -m 0755 ${S}/gpiomod.ko ${D}/${base_libdir}/modules/${KERNEL_VERSION}/extra/
}
FILES_${PN} = "${base_libdir}/modules/"
6. Run.
petalinux-build
Creating and Adding Custom Applications
This section explains how to add custom applications to PetaLinux root file system.
Prerequisites
This section assumes that you have PetaLinux Tools software platform ready for building a
Linux system customized to your hardware platform. For more information, see Importing
Hardware Configuration.
Steps to Add Custom Applications
The basic steps are as follows:
1. Create a user application by running petalinux-create -t apps from inside a PetaLinux
project on your workstation:
$ cd <plnx-proj-root>
$ petalinux-create -t apps [--template TYPE] --name <user-application-name> --enable
For example, to create a user application called myapp in C (the default):
$ petalinux-create -t apps --name myapp --enable
Reference Guide 62
UG1144 (v2018.2) June 6, 2018 www.xilinx.com
Chapter 7: Customizing the Rootfs
or:
$ petalinux-create -t apps --template c --name myapp --enable
To create a C++ application template, pass the --template c++ option, as follows:
$ petalinux-create -t apps --template c++ --name myapp --enable
Note: If the application name has ‘_’, see Recipe name having ‘ _ ‘ in Chapter 11.
To create an autoconf application template, pass the --template autoconf option,
as follows:
$ petalinux-create -t apps --template autoconf --name myapp --enable
The new application sources can be found in the
<plnx-proj-root>/project-spec/meta-user/recipes-apps/myapp
directory.
2. Change to the newly created application directory.
$ cd <plnx-proj-root>/project-spec/meta-user/recipes-apps/myapp
You will see the following PetaLinux template-generated files:
Note: If you want to use the build artifacts for debugging with the third party utilities, add the
following line in
<plnx-proj-root>/project-spec/meta-user/conf/petalinuxbsp.conf:
RM_WORK_EXCLUDE += "myapp"
Note: You can find all build artifacts under ${TMPDIR}/work/aarch64-xilinx-linux/myapp/1.0-r0/.
TIP: Mapping of Make file clean with do_clean in recipe is not recommended. This is because, Yocto
maintains its own do_clean.
Table 7-1: Adding Custom Applications Files
Template Description
<plnx-proj-root>/project-
spec/meta-user/recipes-co
re/images/petalinux-image
.bbappend
Configuration file template - This file controls the integration of
your application into the PetaLinux rootfs menu configuration. It
also allows you select or de-select the app and its dev, dbg
packages into the target root file system
Makefile Compilation file template - This is a basic Makefile containing
targets to build and install your application into the root filesystem.
This file needs to be modified when you add additional source code
files to your project.
README A file to introduce how to build the user application.
myapp.c for C;
myapp.cpp for C++
Simple application program in either C or C++, depending upon
your choice.
Reference Guide 63
UG1144 (v2018.2) June 6, 2018 www.xilinx.com
Chapter 7: Customizing the Rootfs
3. myapp.c/myapp.cpp file can be edited or replaced with the real source code for your
application. Later if you want to modify your custom user application, this file should be
edited.
CAUTION! You can delete the app directory if it is no longer required. Apart from deleting the app
directory, you have to remove the line: IMAGE_INSTALL_append= " myapp" from
<plnx-proj-root>/project-spec/meta-user/recipes-core/images/petalinux-image.bbappend. Deleting
the directory by keeping the mentioned line will throw an error.
Creating and Adding Custom Modules
This section explains how to add custom kernel modules to PetaLinux root file system.
Prerequisites
This section assumes that you have PetaLinux Tools software platform ready for building a
Linux system customized to your hardware platform. For more information, see Importing
Hardware Configuration for more information.
Steps to Add Custom Modules
1. Create a user module by running petalinux-create -t modules from inside a PetaLinux
project on your workstation:
$ cd <plnx-proj-root>
$ petalinux-create -t modules --name <user-module-name> --enable
For example, to create a user module called mymodule in C (the default):
$ petalinux-create -t modules --name mymodule --enable
You can use -h or --help to see the usage of the petalinux-create -t modules. The
new module recipe you created can be found in the
<plnx-proj-root>/project-spec/meta-user/recipes-modules/mymodule
directory.
Note: If the module name has ‘_’, see Recipe name having ‘ _ ‘ in Chapter 11.
2. Change to the newly created module directory.
$ cd
<plnx-proj-root>/project-spec/meta-user/recipes-modules/mymodule
You will see the following PetaLinux template-generated files:
Reference Guide 64
UG1144 (v2018.2) June 6, 2018 www.xilinx.com
Chapter 7: Customizing the Rootfs
3. mymodule.c file can be edited or replaced with the real source code for your module.
Later if you want to modify your custom user module, you are required to edit this file.
Note: If you want to use the build artifacts for debugging with the third party utilities, add the
following line in project-spec/meta-user/conf/petalinuxbsp.conf:
RM_WORK_EXCLUDE += "mymodule"
Note: You can find all build artifacts under ${TMPDIR}/work/aarch64-xilinx-linux/myapp/1.0-r0/.
CAUTION! You can delete the module directory if it is no longer required. Apart from deleting the
module directory, you have to remove the line: IMAGE_INSTALL_append= "mymodule" from
<plnx-proj-root>/project-spec/meta-user/recipes-core/images/petalinux-image.bbappend.
Deleting the directory by keeping the mentioned line in petalinux-image.bbappend throws an error.
Building User Applications
This section explains how to build and install pre-compiled/custom user applications to
PetaLinux root file system.
Prerequisites
This section assumes that you have included pre-compiled applications to PetaLinux root
file system (see Including Prebuilt Applications) or added custom applications to PetaLinux
root file system (see Creating and Adding Custom Applications).
Steps to Build User Applications
Running petalinux-build in the project directory "<plnx-proj-root>" will rebuild
the system image including the selected user application myapp. (The output directory for
this build process is "<TMPDIR>/work/aarch64-xilinx-linux/myapp/1.0-r0/")
Table 7-2: Adding Custom Module Files
Template Description
Makefile Compilation file template - This is a basic Makefile containing
targets to build and install your module into the root filesystem.
This file needs to be modified when you add additional source code
files to your project. Click here to customize the make file.
README A file to introduce how to build the user module.
mymodule.c Simple kernel module in C.
<plnx-proj-root>/project-
spec/meta-user/recipes-co
re/images/petalinux-image
.bbappened
Configuration file template - This file controls the integration of
your application into the petalinux rootfs menu configuration
system. It also allows you to select or de-select the app and its dev,
dbg packages into the target root file system.

Reference Guide 65
UG1144 (v2018.2) June 6, 2018 www.xilinx.com
Chapter 7: Customizing the Rootfs
$ petalinux-build
To build myapp into an existing system image:
$ cd <plnx-proj-root>
$ petalinux-build -x do_populate_sysroot
$ petalinux-build -c rootfs
$ petalinux-build -x package
Note: do_populate_sysroot is to generate the sysroot based on the selected prebuilt packages
options from the menuconfig. You do not have to always run do_populate_sysroot before
building the application, but you need to run it at least once before you build the application.
Other petalinux-build options are explained with --help. Some of the build options
are:
• To clean the selected user application:
$ petalinux-build -c myapp -x do_clean
• To rebuild the selected user application:
$ petalinux-build -c myapp
This will just compile the application, the compiled executable files will be in
${TMPDIR}/work/aarch64-xilinx-linux/myapp/1.0-r0/ directory.
Note: If you want to use the build artifacts for debugging with the third party utilities, add the
line: RM_WORK_EXCLUDE += "myapp" in
<plnx-proj-root>/project-spec/meta-user/conf/petalinuxbsp.conf. Without this line the
bitbake will remove all the build artifacts after building successfully.
• To see all list of tasks for myapp:
petalinux-build -c myapp -x listtasks
• To install the selected user application:
$ petalinux-build -c myapp -x do_install
This will install the application into the target rootfs host copy:
<TMPDIR>/work/<MACHINE_NAME>-xilinx-linux/petalinux-user-image/1
.0-r0/rootfs/.
Note: TMPDIR can be found in petalinux-config >Yocto-settings > TMPDIR. If the project is on local
storage, TMPDIR is <plnx-proj-root>/build/tmp/.
If you want to use the build artifacts for debugging with third party utilities, add the
following line in project-spec/meta-user/conf/petalinuxbsp.conf:
RM_WORK_EXCLUDE += "myapp"

Reference Guide 66
UG1144 (v2018.2) June 6, 2018 www.xilinx.com
Chapter 7: Customizing the Rootfs
Testing User Application
This section describes how to test a user application.
Prerequisites
This section assumes that you have built and installed pre-compiled/custom user
applications. For more information, see Building User Applications.
Steps to Test User Application
1. Boot the newly created system image.
2. Confirm that your user application is present on the PetaLinux system, by running the
following command on the target system login console:
# ls /usr/bin
Unless you have changed the location of user application through its Makefile, the user
application will be put in to "/usr/bin" directory.
3. Run your user application on the target system console. For example, to run user
application myapp:
# myapp
4. Confirm that the result of the application is as expected.
If the new application is missing from the target filesystem, ensure that you have completed
the petalinux-build -x package step as described in the previous section. This
ensures that your application binary is copied into the root filesystem staging area, and
that the target system image is updated with this new filesystem.
Building User Modules
This section explains how to build and install pre-compiled/custom user kernel modules to
PetaLinux root file system.
Prerequisites
This section assumes that you have included pre-compiled modules to PetaLinux root file
system (see Including Prebuilt Modules) or added custom modules to PetaLinux root file
system (see Creating and Adding Custom Modules).

Reference Guide 67
UG1144 (v2018.2) June 6, 2018 www.xilinx.com
Chapter 7: Customizing the Rootfs
Steps to Build User Modules
Running petalinux-build in the project directory "<plnx-proj-root>" will rebuild
the system image including the selected user module mymodule. (The output directory for
this build process is
<TMPDIR>/work/<MANCHINE_NAME>-xilinx-linux/mymodule/1.0-r0/)
$ petalinux-build
To build mymodule into an existing system image:
$ cd <plnx-proj-root>
$ petalinux-build -c rootfs
$ petalinux-build -x package
Other petalinux-build options are explained with --help. Some of the build options
are:
• To clean the selected user module:
$ petalinux-build -c mymodule -x do_cleansstate
• To rebuild the selected user module:
$ petalinux-build -c mymodule
This will just compile the module, the compiled executable files will be in
<TMPDIR>/work/<MANCHINE_NAME>-xilinx-linux/mymodule/1.0-r0/
directory.
• To see all list of tasks for this module:
$ petalinux-build -c mymodule -x listtasks
• To install the selected user module:
$ petalinux-build -c mymodule -x do_install
This will install the module into the target rootfs host copy:
<TMPDIR>/work/<MACHINE_NAME>-xilinx-linux/petalinux-user-image/1
.0-r0/rootfs/.
Note: TMPDIR can be found in petalinux-config->Yocto-settings --> TMPDIR. If the project is on
local storage, TMPDIR is <${PROOT}>/build/tmp/.
If you want to use the build artifacts for debugging with third party utilities, add the
following line in project-spec/meta-user/conf/petalinuxbsp.conf:
RM_WORK_EXCLUDE += "mymodule"

Reference Guide 68
UG1144 (v2018.2) June 6, 2018 www.xilinx.com
Chapter 7: Customizing the Rootfs
PetaLinux Auto Login
This section explains how to login directly from boot without having to enter login
credentials.
Prerequisites
This section assumes that you have PetaLinux Tools software platform ready for building a
Linux system customized to your hardware platform. For more information, see Importing
Hardware Configuration.
Steps for PetaLinux Auto Login
Follow the below steps for PetaLinux Auto Login:
1. Change the root directory of your PetaLinux project
cd <plnx-proj-root>
2. petalinux-config
3. Select Yocto-settings > Enable debug-tweaks
4. Save the configuration and exit
5. petalinux-build.
Application Auto Run at Startup
This section explains how to add applications that run automatically at system startup.
Prerequisites
This section assumes that you have already added and built the PetaLinux application. For
more information, see Creating and Adding Custom Applications and Building User
Applications.
Steps for Application Auto Run at Startup
If you have a prebuilt or newly created custom user application myapp located in your
PetaLinux project at
<plnx-proj-root>/project-spec/meta-user/recipes-apps/, you may want to
execute it at system startup. The steps to enable that are:

Reference Guide 69
UG1144 (v2018.2) June 6, 2018 www.xilinx.com
Chapter 7: Customizing the Rootfs
TIP: If you have prebuilt application and you have not included in PetaLinux Root file system, see
Including Prebuilt Applications.
If you want to create custom application and install it in PetaLinux Root file system, see Creating and
Adding Custom Applications.
If your auto run application is a blocking application which will never exit, launch this application as a
daemon.
1. Create and install new app - myapp-init
cd <plnx-proj-proot>/
petalinux-create -t apps --template install -n myapp-init --enable
2. Edit the file
project-spec/meta-user/recipes-apps/myapp-init/myapp-init.bb. The
file should look like the following:
#
# This file is the myapp-init recipe.
#
SUMMARY = "Simple myapp-init application"
SECTION = "PETALINUX/apps"
LICENSE = "MIT"
LIC_FILES_CHKSUM =
"file://${COMMON_LICENSE_DIR}/MIT;md5=0835ade698e0bcf8506ecda2f7b4f302"
SRC_URI = "file://myapp-init \
"
S = "${WORKDIR}"
FILESEXTRAPATHS_prepend := "${THISDIR}/files:"
inherit update-rc.d
INITSCRIPT_NAME = "myapp-init"
INITSCRIPT_PARAMS = "start 99 S ."
do_install() {
install -d ${D}${sysconfdir}/init.d
install -m 0755 ${S}/myapp-init ${D}${sysconfdir}/init.d/myapp-init
}
FILES_${PN} += "${sysconfdir}/*"
3. To run myapp as daeomon
Edit the file
project-spec/meta-user/recipes-apps/myapp-init/files/myapp-init
The file should look like below:

Reference Guide 70
UG1144 (v2018.2) June 6, 2018 www.xilinx.com
Chapter 7: Customizing the Rootfs
#!/bin/sh
DAEMON=/usr/bin/myapp
start ()
{
echo " Starting myapp"
start-stop-daemon -S -o --background -x $DAEMON
}
stop ()
{
echo " Stoping myapp"
start-stop-daemon -K -x $DAEMON
}
restart()
{
stop
start
}
[ -e $DAEMON ] || exit 1
case "$1" in
start)
start; ;;
stop)
stop; ;;
restart)
restart; ;;
*)
echo "Usage: $0 {start|stop|restart}"
exit 1
esac
exit $?
4. Run petalinux-build.
Adding Layers
You can add layers into the PetaLinux project. The upstream layers for Rocko version can be
found here.
The following steps demonstrate adding the meta-my layer into the PetaLinux project
1. Copy or create a layer in <proj_root>/project-spec/meta-mylayer
2. Run petalinux-config --> Yocto Settings ---> User Layers --->
3. Enter the following command:
${proot}/project-spec/meta-mylayer
4. Save and exit
5. Verify by viewing the file in <proj_root>/build/conf/bblayers.conf.
Reference Guide 71
UG1144 (v2018.2) June 6, 2018 www.xilinx.com
Chapter 7: Customizing the Rootfs
Note: 2018.1 PetaLinux is on rocko base line. The layers/recipes should be chosen from the rocko
branch only. Some of the layers/recipes might not be compatible with our architectures. You are
responsible for all additional layers/recipes.
Adding an Existing Recipe into Rootfs
Most of the rootfs menu config is static. These are the utilities that are supported by Xilinx.
You can add your own layers in a project or add existing additional recipes from the existing
layers in PetaLinux. Layers in PetaLinux can be found in
/opt/pkg/petalinux/components/yocto/source/aarch64/ (for Zynq UltraScale)
By default, iperf3 is not in the rootfs menuconfig. The following example demonstrates
adding the giperf3 into the rootfs menuconfig.
1. The location of the recipe is
/opt/pkg/petalinux/components/yocto/source/aarch64/layers/meta-o
penembedded/meta-oe/recipes-benchmark/iperf3/iperf3_3.2.bb
2. Add the following line in
<plnx-proj-root>/project-spec/meta-user/recipes-core/images/petalinux-image.bbappend
IMAGE_INSTALL_append = " iperf3"
Note: Do not ignore the space before iperf3.
3. Run petalinux-config -c rootfs
Select user packages --> iperf3-->. Enable it, save and exit
4. Run petalinux-build
Note: It is your responsibility to add the recipes in the layers available in petalinux tools, apart
from petalinux default rootfs menuconfig.
Note: The above procedure is applicable only to t he recipes from the user layers.
IMPORTANT: All recipes which are in petalinux-image-full had sstate locked. To unlock you have to add
SIGGEN_UNLOCKED_RECIPES += "my-recipe" in project-spec/meta-user/conf/petalinuxbsp.conf.
Note: Whenever “_append” is used, there should exist an initial space after = “.
Adding a Package Group
One of the best approaches for customizing images is to create a custom package group,
that will be used to build the images. Some of the package group recipes are shipped with
the PetaLinux tools.
For example:

Reference Guide 72
UG1144 (v2018.2) June 6, 2018 www.xilinx.com
Chapter 7: Customizing the Rootfs
$PETALINUX/components/yocto/source/aarch64/layers/meta-petalinux/recipes-core/packa
gegroups/packagegroup-petalinux-self-hosted.bb
Note: The name of the package group should be unique and should not conflict with the existing
recipe names.
We can create custom package group, for example, an ALSA package group would look like:
DESCRIPTION = "PetaLinux ALSA supported Packages"
inherit packagegroup
ALSA_PACKAGES = " \
alsa-lib \
alsa-plugins \
alsa-tools \
alsa-utils \
alsa-utils-scripts \
pulseaudio \
"
RDEPENDS_${PN}_append += " \
${ALSA_PACKAGES} \
"
This can be added to
<plnx-proj-root>/meta-user/recipes-core/packagegroups/packagegroup-petalinux-alsa.bb
To add this package group in rootfs menuconfig, add IMAGE_INSTALL_append = "
packagegroup-petalinux-alsa" in
<plnx-proj-root>/project-spec/meta-user/recipes-core/petalinux-imag
e.bbappend to reflect in menuconfig.
Then launch petalinux-config -c rootfs, select user packages --->
packagegroup-petalinux-alsa, save and exit.
petalinux-build

Reference Guide 73
UG1144 (v2018.2) June 6, 2018 www.xilinx.com
Chapter 8
Debugging
Debugging the Linux Kernel in QEMU
This section describes how to debug the Linux Kernel inside QEMU, using the GDB
debugger. Note that this function is only tested with Zynq family devices platform.
Prerequisites
This section assumes that you have built PetaLinux system image. For more information, see
Build System Image.
Steps to Debug the Linux Kernel in QEMU
1. Launch QEMU with the currently built Linux by running the following command:
$ petalinux-boot --qemu --kernel
2. Watch the qemu console, you should see the details of the QEMU command, get the
GDB TCP port from -gdb tcp:<TCP_PORT>.
3. Open another command console (ensuring the PetaLinux settings script has been
sourced), and change to the Linux directory:
$ cd "<plnx-proj-root>/images/linux"
4. Start GDB on the vmlinux kernel image in command mode:
$ petalinux-util --gdb vmlinux
You should see the gdb prompt. For example:
GNU gdb (Linaro GDB 2018.1) 7.12.1.20170130-git
Copyright (C) 2018 Free Software Foundation, Inc.
License GPLv3+: GNU GPL version 3 or later <http://gnu.org/licenses/gpl.html>
This is free software: you are free to change and redistribute it.
There is NO WARRANTY, to the extent permitted by law. Type "show copying"
and "show warranty" for details.
This GDB was configured as "--host=x86_64-unknown-linux-gnu
--target=aarch64-linux-gnu".
Type "show configuration" for configuration details.
For bug reporting instructions, please see:
<http://www.gnu.org/software/gdb/bugs/>.
Find the GDB manual and other documentation resources online at:
Reference Guide 74
UG1144 (v2018.2) June 6, 2018 www.xilinx.com
Chapter 8: Debugging
<http://www.gnu.org/software/gdb/documentation/>.
For help, type "help".
Type "apropos word" to search for commands related to "word"...
Reading symbols from vmlinux...done.
5. Attach to the QEMU target in GDB by running the following GDB command:
(gdb) target remote :9000
6. To let QEMU continue execution:
(gdb) continue
7. You can use Ctrl+C to interrupt the kernel and get back the GDB prompt.
8. You can set break points and run other GDB commands to debug the kernel.
CAUTION! If another process is using port 9000, petalinux-boot will attempt to use a different port.
Look at the output of petalinux-boot to determine what port was used. In the following example port
9001 was used.
INFO: qemu-system-arm ... -gdb tcp::9001 ...
TIP: It may be helpful to enable kernel debugging in the kernel configuration menu (petalinux-config
--kernel > Kernel hacking > Kernel debugging), so that kernel debug symbols are present in the image.
Troubleshooting
This section describes some common issues you may experience while debugging the Linux
kernel in QEMU.
Debugging Applications with TCF Agent
This section describes debugging user applications with the Eclipse Target Communication
Framework (TCF) Agent. This section describes the basic debugging procedure for Zynq
user application myapp.
Table 8-1: Debugging the Linux Kernel in QEMU Troubleshooting
Problem / Error Message Description and Solution
(gdb) target remote
W.X.Y.Z:9000:9000:
Connection refused.
Problem Description:
GDB failed to attach the QEMU target. This is most likely because the
port 9000 is not the one QEMU is using.
Solution:
• Check your QEMU console to ensure QEMU is running.
• Watch the Linux host command line console. It will show the full
QEMU commands, you should be able to see which port is used by
QEMU.

Reference Guide 75
UG1144 (v2018.2) June 6, 2018 www.xilinx.com
Chapter 8: Debugging
Prerequisites
This section assumes that the following prerequisites have been satisfied:
• Working knowledge with the XSDK tool. For more information, see Xilinx Software
Development Kit.
• The PetaLinux Working Environment is properly set. For more information, see
PetaLinux Working Environment Setup.
• You have created a user application and built the system image including the selected
user application. For more information, see Building User Applications.
Preparing the build system for debugging
1. Change to the project directory:
$ cd <plnx-proj-root>
2. Run petalinux-config -c rootfs on the command console:
$ petalinux-config -c rootfs
3. Scroll down the linux/rootfs Configuration menu to Filesystem Packages
admin --->
audio --->
base --->
baseutils --->
benchmark --->
bootloader --->
console --->
devel --->
fonts --->
kernel --->
libs --->
misc --->
multimedia --->
net --->
network --->
optional --->
power management --->
utils --->
x11 --->
4. Select base ---> submenu, and then click into misc ---> submenu:
base --->
baseutils --->
benchmark --->
console --->
devel --->
fonts --->
kernel -->
libs --->
misc --->
multimedia -->

Reference Guide 76
UG1144 (v2018.2) June 6, 2018 www.xilinx.com
Chapter 8: Debugging
net -->
network -->
optional -->
utils -->
xll -->
5. Packages are in alphabetical order. Navigate to the letter ‘t’, as shown below:
serf --->
sysfsutils --->
sysvinit-inittab --->
tbb --->
tcf-agent --->
texi2html --->
tiff --->
trace-cmd --->
util-macros --->
v4l-utils --->
6. Ensure that tcf-agent is enabled.
[*] tcf-agent
[ ] tcf-agent-dev
[ ] tcf-agent-dbg
7. Select console/network ---> submenu, and then click into dropbear --->
submenu. Ensure "dropbear-openssh-sftp-server" is enabled.
[*] dropbear-openssh-sftp-server
8. Exit the menu.
9. Rebuild the target system image including myapp. For more information, see Build
System Image.
Performing a Debug Session
1. Boot your board (or QEMU) with the new image.
2. The boot log should indicate that tcf-agent has started. The following message should
be seen:
Starting tcf-agent: OK
3. Launch Xilinx SDK, and create a workspace.
4. Add a Hardware Platform Specification by selecting File > New > Project.
5. In the pop-up window select Xilinx > Hardware Platform Specification.
6. Give the Hardware Project a name. For example, ZC702
7. Locate the system.hdf / system.dsa for your target hardware. This can be found in
<plnx-proj-root>/project-spec/hw-description.
8. Open the Debug Launch Configuration window by selecting Run > Debug
Configurations.
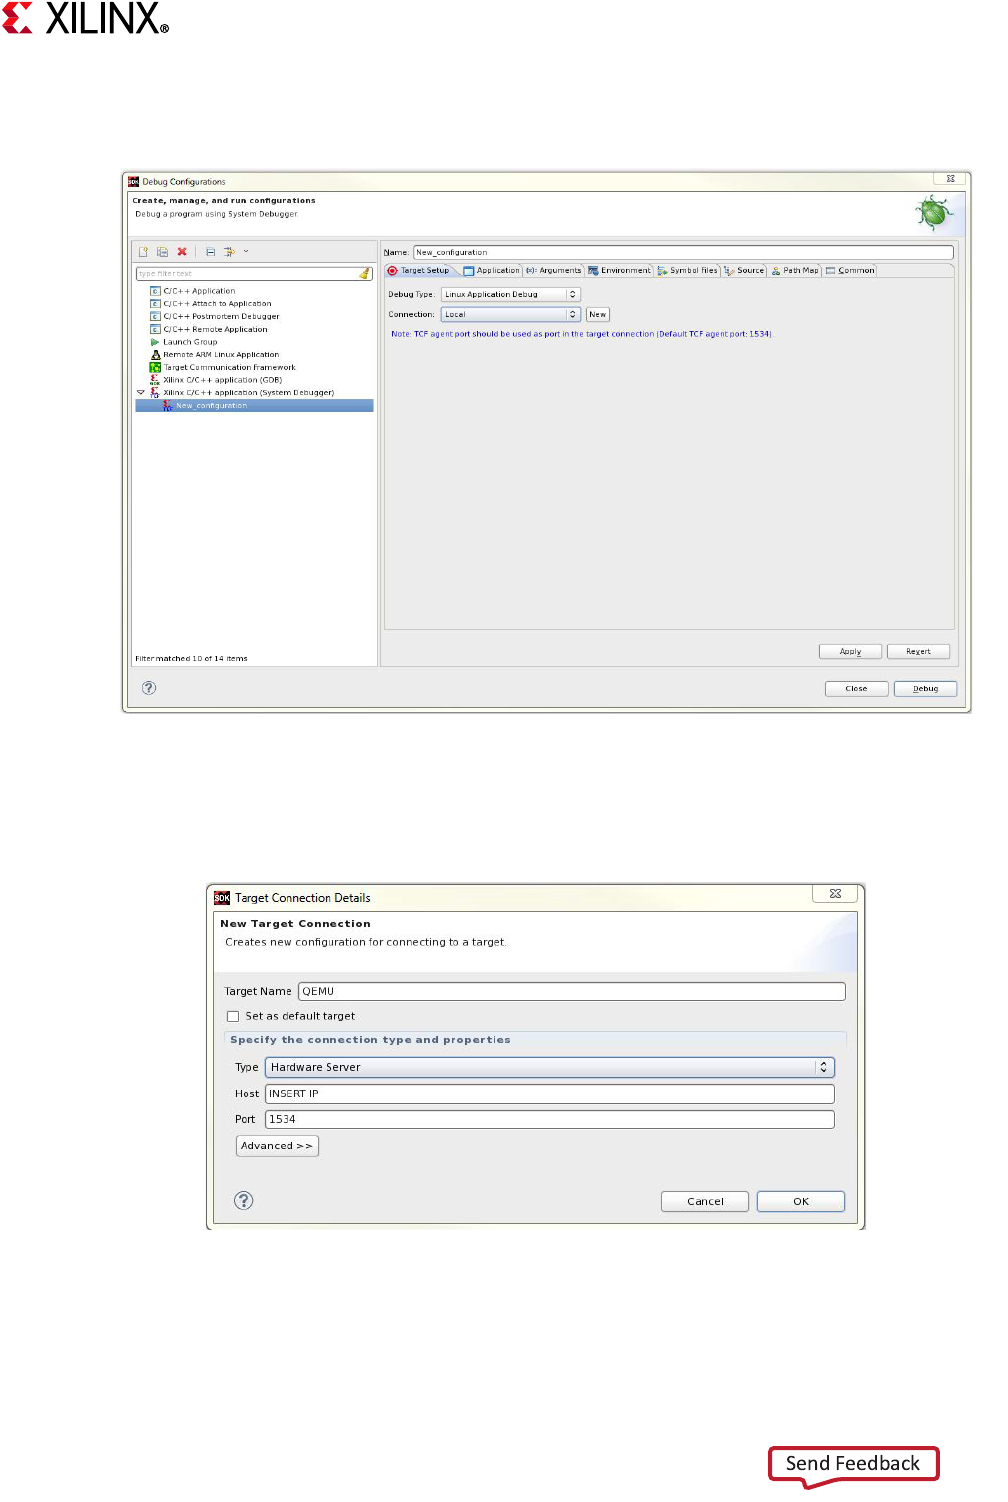
Reference Guide 77
UG1144 (v2018.2) June 6, 2018 www.xilinx.com
Chapter 8: Debugging
9. Create a new Xilinx C/C++ application (System Debugger) and launch
configuration:
10. The Debug Type should be set to Linux Application Debug.
11. Select the New option to enter the Connection details.
12. Give the Target Connection a name, and specify the Host (IP address for the target).
13. Set the port of tcf-agent and select OK.
X-Ref Target - Figure 8-1
Figure 8-1: XSDK Debug Configurations
X-Ref Target - Figure 8-2
Figure 8-2: XSDK Debug New Target Configuration
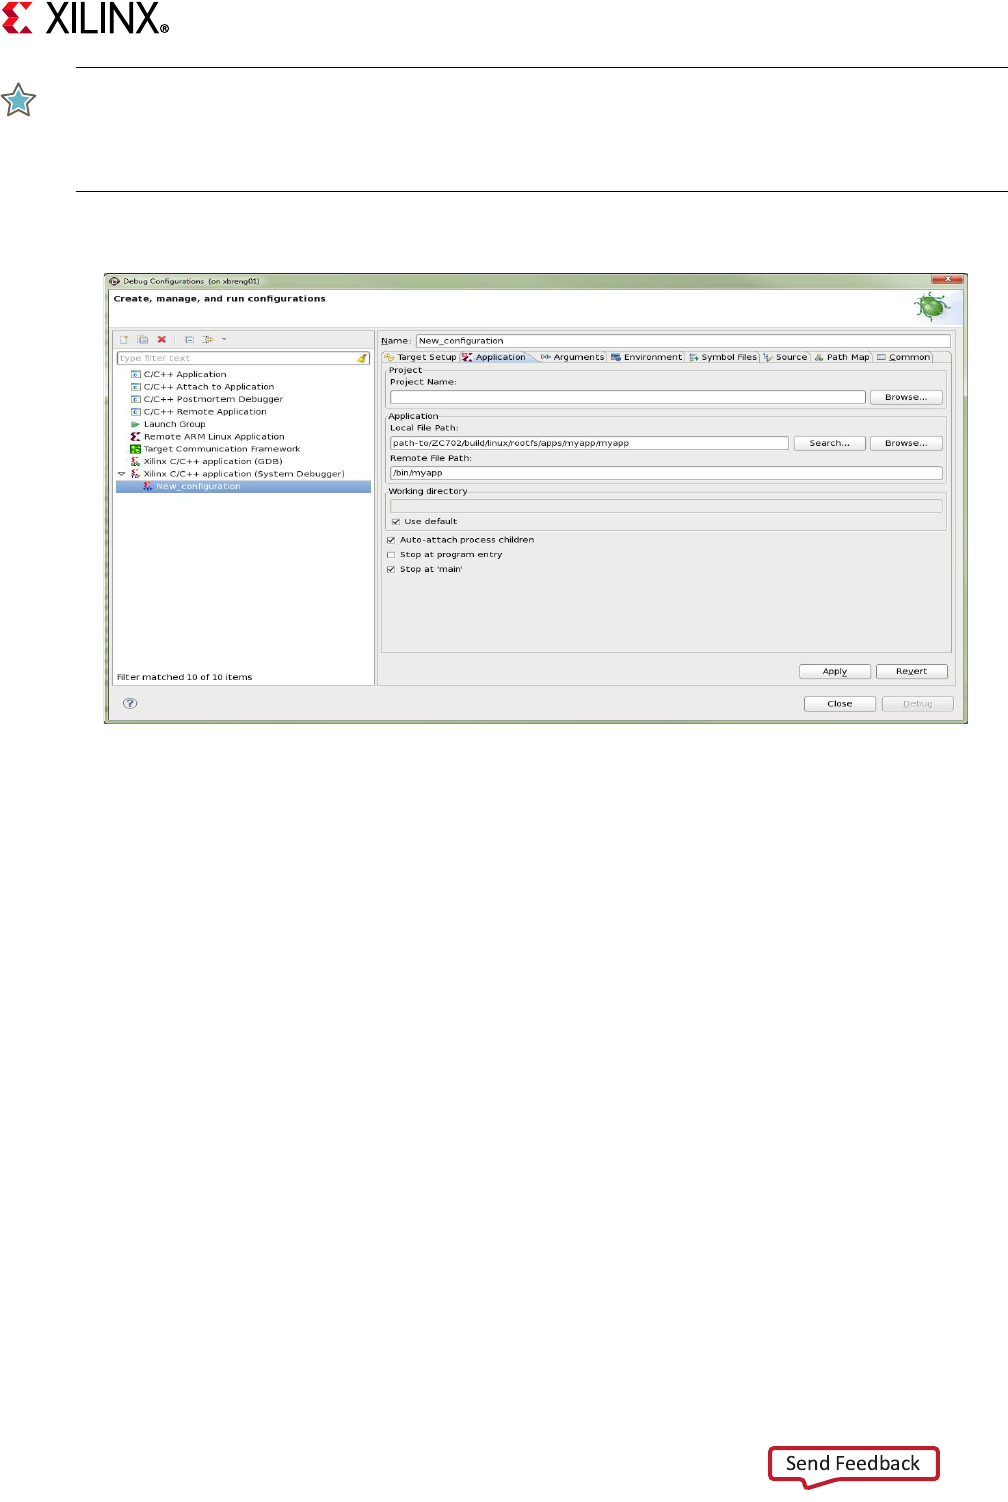
Reference Guide 78
UG1144 (v2018.2) June 6, 2018 www.xilinx.com
Chapter 8: Debugging
IMPORTANT: If debugging on QEMU, see Appendix D, QEMU Virtual Networking Modes for
information regarding IP and port redirection when testing in non-root (default) or root mode. For
example, if testing in non-root mode, you will need to use localhost as the target IP in the subsequent
steps.
14. Switch to the Application Tab.
15. Enter the Local File Path to your compiled application in the project directory. For
example,
<TMPDIR>/work/aarch64-xilinx-linux/myapp1/1.0-r0/image/usr/bin/.
Note: While creating the app, you need to add RM_WORK_EXCLUDE += "myapp" in
project-spec/meta-user/conf/petalinuxbsp.conf, otherwise the images will not be
available for debugging.
16. The Remote File Path on the target file system should be the location where the
application can be found. For example, /usr/bin/myapp.
17. Select Debug to Apply the configuration and begin the Debug session. (If asked to
switch to Debug Perspective, accept).
18. Standard XSDK debug flow is ready to start:
X-Ref Target - Figure 8-3
Figure 8-3: XSDK Debug Configurations
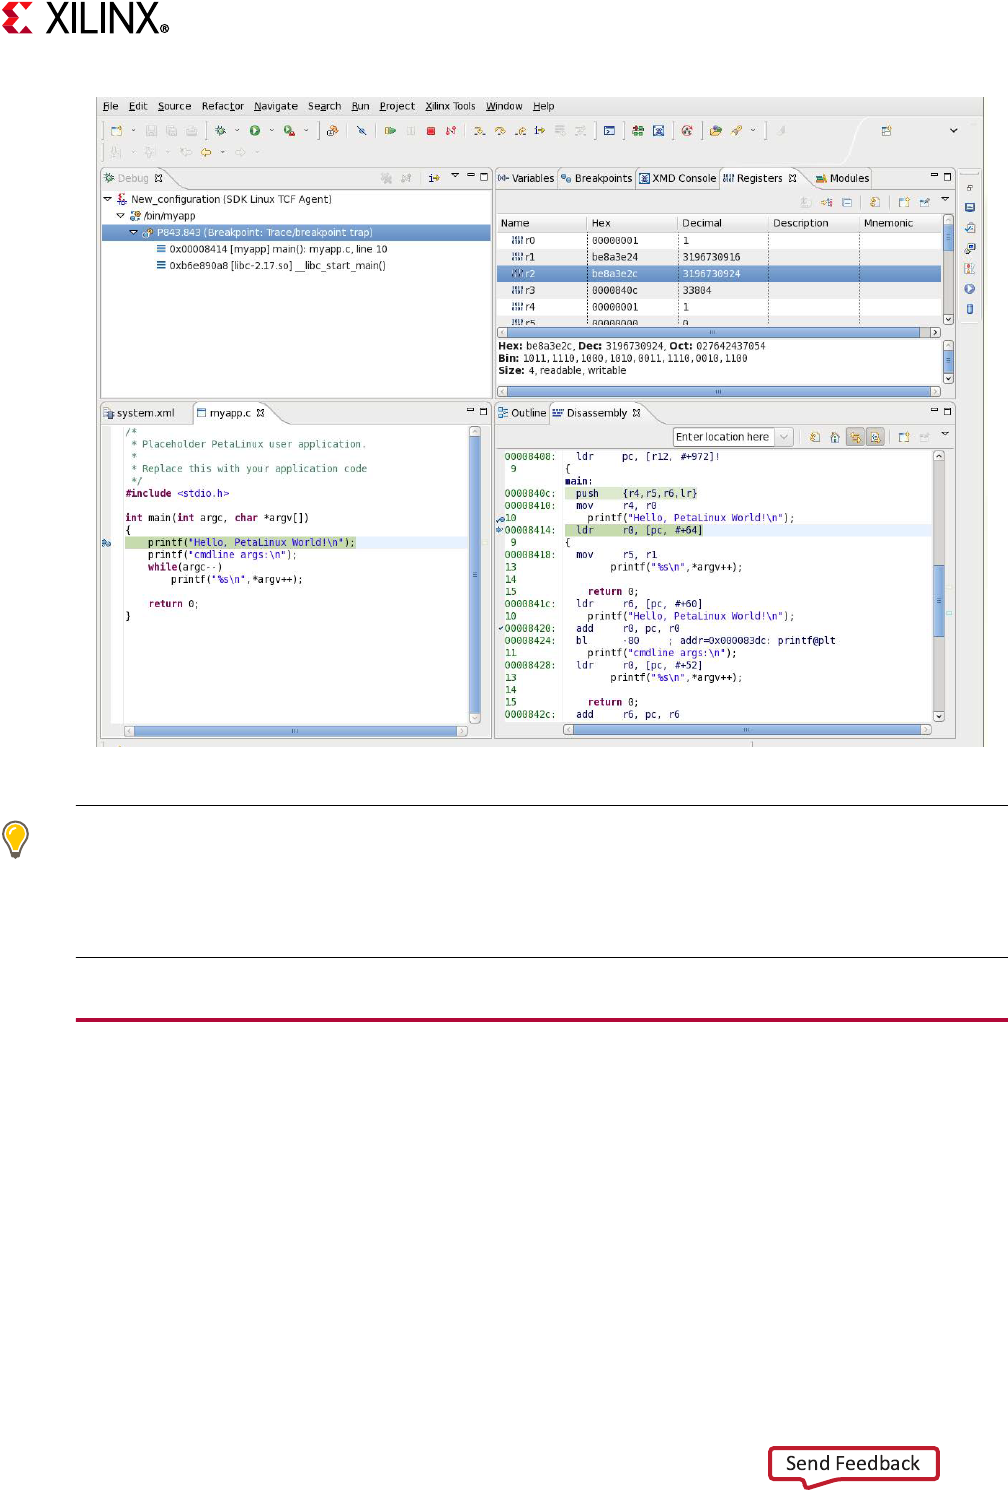
Reference Guide 79
UG1144 (v2018.2) June 6, 2018 www.xilinx.com
Chapter 8: Debugging
TIP: To analyze the code and debug you can use the following short keys:
Step Into (F5)
Step Over (F6)
Step Return (F7)
Resume (F8)
Debugging Zynq UltraScale+ MPSoC Applications
with GDB
PetaLinux supports debugging Zynq UltraScale+ MPSoC user applications with GDB. This
section describes the basic debugging procedure.
Prerequisites
This section assumes that the following prerequisites have been satisfied:
X-Ref Target - Figure 8-4
Figure 8-4: XSDK Debug

Reference Guide 80
UG1144 (v2018.2) June 6, 2018 www.xilinx.com
Chapter 8: Debugging
• The PetaLinux Working Environment is properly set. For more information, see
PetaLinux Working Environment Setup.
• You have created a user application and built the system image including the selected
user application. For more information, see Building User Applications.
Preparing the build system for debugging
1. Change to the project directory:
$ cd <plnx-proj-root>
2. Add the following lines in
<plnx-proj-root>/project-spec/meta-user/recipes-core/images/peta
linux-image.bbappend
IMAGE_INSTALL_append = " myapp-dev"
IMAGE_INSTALL_append = " myapp-dbg"
3. Run petalinux-config -c rootfs on the command console:
$ petalinux-config -c rootfs
4. Scroll down the user packages Configuration menu to Debugging:
Filesystem Packages --->
PetaLinux Package Groups --->
apps --->
user packages --->
PetaLinux RootFS Settings --->
5. Select user packages -->
[X] myapp-dbg
[ ] myapp-dev
Select myapp-dbg. Exit the myapp sub-menu.
6. Exit the user packages ---> sub-menu, and select Filesystem Packages --->misc
--->gdb --->
7. Select the gdb ---> sub-menu option, and ensure gdbserver is enabled:
[ ] gdb
[ ] gdb-dev
[X] gdbserver
[ ] gdb-dbg
8. Exit the menu and select <Yes> to save the configuration.
9. Rebuild the target system image. Add the below line in
<plnx-proj-root>/project-spec/meta-user/conf/petalinuxbsp.conf
RM_WORK_EXCLUDE += "myapp"
For more information, see Build System Image.
Reference Guide 81
UG1144 (v2018.2) June 6, 2018 www.xilinx.com
Chapter 8: Debugging
Performing a Debug Session
1. Boot your board (or QEMU) with the new image created above.
2. Run gdbserver with the user application on the target system console (set to listening
on port 1534):
root@plnx_aarch64:~# gdbserver host:1534 /usr/bin/myapp
Process /bin/myapp created; pid = 73
Listening on port 1534
1534 is the gdbserver port - it can be any unused port number
3. On the workstation, navigate to the compiled user application’s directory:
$ cd <<TMPDIR>/work/aarch64-xilinx-linux/myapp1/1.0-r0/image/usr/bin/myapp
4. Run GDB client.
$ petalinux-util --gdb myapp
5. The GDB console will start:
...
GNU gdb (crosstool-NG 1.18.0) 7.6.0.20130721-cvs
...
(gdb)
6. In the GDB console, connect to the target machine using the command:
a. Use the IP address of the target system, for example: 192.168.0.10. If you are not sure
about the IP address, run ifconfig on the target console to check.
b. Use the port 1534. If you select a different gdbserver port number in the earlier step,
use that value instead.
IMPORTANT: If debugging on QEMU, refer to the QEMU Virtual Networking Modes for information
regarding IP and port redirection when testing in non-root (default) or root mode. For example, if
testing in non-root mode, you will need to use localhost as the target IP in the subsequent steps.
(gdb) target remote 192.168.0.10:1534
The GDB console will attach to the remote target. Gdbserver on the target console will
display the following confirmation, where the host IP is displayed:
Remote Debugging from host 192.168.0.9
7. Before starting the execution of the program, create some breakpoints. Using the GDB
console you can create breakpoints throughout your code using function names and
line numbers. For example, create a breakpoint for the main function:
(gdb) break main
Breakpoint 1 at 0x10000444: file myapp.c, line 10.
8. Run the program by executing the continue command in the GDB console. GDB will
begin the execution of the program.
Reference Guide 82
UG1144 (v2018.2) June 6, 2018 www.xilinx.com
Chapter 8: Debugging
(gdb) continue
Continuing.
Breakpoint 1, main (argc=1, argv=0xbffffe64) at myapp.c:10
10 printf("Hello, PetaLinux World!\n");
9. To print out a listing of the code at current program location, use the list command.
(gdb) list
5 */
6 #include <stdio.h>
7
8 int main(int argc, char *argv[])
9 {
10 printf("Hello, PetaLinux World!\n");
11 printf("cmdline args:\n");
12 while(argc--)
13 printf("%s\n",*argv++);
14
10. Try the step, next and continue commands. Breakpoints can be set and removed
using the break command. More information on the commands can be obtained using
the GDB console help command.
11. When the program finishes, the GDB server application on the target system will exit.
Here is an example of messages shown on the console:
Hello, PetaLinux World!
cmdline args:
/usr/bin/myapp
Child exited with status 0
GDBserver exiting
root@plnx_aarch64:~#
TIP: A .gdbinit file will be automatically created, to setup paths to libraries. You may add your own
GDB initialization commands at the end of this file.
Going Further With GDB
Visit www.gnu.org, for more information on general usage of GDB, refer to the GDB project
documentation:
Troubleshooting
This section describes some common issues you may experience while debugging
applications with GDB.

Reference Guide 83
UG1144 (v2018.2) June 6, 2018 www.xilinx.com
Chapter 8: Debugging
Table 8-2: Debugging Zynq UltraScale+ MPSoC Applications with GDB Troubleshooting
Problem / Error Message Description and Solution
GDB error message: <IP
Address>:<port>: Connection
refused. GDB cannot connect
to the target board using
<IP>: <port>
Problem Description:
This error message indicates that the GDB client failed to connect to the
GDB server.
Solution:
• Check whether the gdbserver is running on the target system.
• Check whether there is another GDB client already connected to the
GDB server. This can be done by looking at the target console. If you
can see:
Remote Debugging from host <IP>
It means there is another GDB client connecting to the server.
• Check whether the IP address and the port are correctly set.

Reference Guide 84
UG1144 (v2018.2) June 6, 2018 www.xilinx.com
Chapter 9
Advanced Configurations
PetaLinux Menuconfig System
In this release, the Linux system components available in the sub-menu are shown as
follows:
• First stage bootloader
• PMU Firmware, for Zynq UltraScale+ MPSoC only
•U-Boot
•Kernel
• ATF, for Zynq UltraScale+ MPSoC only
For ATF, U-Boot and kernel there are 3 options available
1. Default
The default component is shipped through PetaLinux tool.
2. External source
When you have a component downloaded at any specified location, you can feed your
component instead of the default one through this config option.
Note: The external source folder is required to be unique to a project and its user, but the
content can be modified.
3. Remote
If you want to build a component which was on a custom git repo, this config option has
to be used.

Reference Guide 85
UG1144 (v2018.2) June 6, 2018 www.xilinx.com
Chapter 9: Advanced Configurations
Settings
When a component is selected to enable automatic configuration (autoconfig) in the
system-level menuconfig, its configuration files are automatically updated when the
petalinux-config is run.
Subsystem AUTO Hardware Settings
The Subsystem AUTO Hardware Settings menu allows you to customize how the Linux
system interacts with the underlying hardware platform.
System Processor
The System Processor menu specifies the CPU processor on which the system runs.
Table 9-1: Components and their Configuration Files
Component in
the Menu Files Impacted when the Autoconfig is enabled
Device tree The following files are in
<plnx-proj-root>/components/plnx_workspace/device-tree/devic
e-tree/
°skeleton.dtsi (Zynq-7000 only)
°zynq-7000.dtsi (Zynq-7000 only)
°zynqmp.dtsi (Zynq UltraScale+ MPSoC only)
°zynqmp-clk-ccf.dtsi (Zynq UltraScale+ MPSoC only)
°pcw.dtsi (Zynq-7000 and Zynq UltraScale+ MPSoC)
°pl.dtsi
°system-conf.dtsi
°system-top.dts
°<board>.dtsi
kernel The following files are in
<plnx-proj-root>/project-spec/meta-plnx-generated/recipes-ke
rnel/linux/configs/
°plnx_kernel.cfg
°bsp.cfg
U-Boot The following files are in
<plnx-proj-root>/project-spec/meta-plnx-generated/recipes-bs
p/u-boot/configs/
°config.cfg
°config.mk (MicroBlaze only)
°platform-auto.h

Reference Guide 86
UG1144 (v2018.2) June 6, 2018 www.xilinx.com
Chapter 9: Advanced Configurations
Memory Settings
The Memory Settings menu allows you to:
• Select which memory IP is the primary system memory
• Set the system memory base address
• Set the size of the system memory
• Set the U-Boot text base address offset to a memory high address
The configuration in this menu impacts the memory settings in the device tree and U-Boot
automatic configuration (autoconfig) files.
If manual is selected as the primary memory, you are responsible for ensuring proper
memory settings for the system.
Serial Settings
The Serial Settings sub-menu allows you to select which serial device is the system’s
primary STDIN/STDOUT interface. If manual is selected as the primary serial, you are
responsible for ensuring proper serial interface settings for the system.
Ethernet Settings
The Ethernet Settings sub-menu allows you to:
• Select which Ethernet is the systems’ primary Ethernet
• Select to randomize MAC address
• Set the MAC address of the primary Ethernet
Note: If MAC address is programmed into EEPROM, keep this empty here. Refer U-Boot
documentation for commands to program EEPROM and to configure for the same.
• Set whether to use DHCP or static IP on the primary Ethernet
If manual is selected as the primary Ethernet, you are responsible for ensuring proper
Ethernet settings for the system.
Flash Settings
The Flash Settings sub-menu allows you to:
• Select which flash is the system’s primary flash
• Set the flash partition table
If manual is selected as the primary flash, you are responsible for the flash settings for the
system.

Reference Guide 87
UG1144 (v2018.2) June 6, 2018 www.xilinx.com
Chapter 9: Advanced Configurations
SD/SDIO Settings
The SD/SDIO Settings sub-menu is for Zynq family devices (Zynq-7000 and Zynq
UltraScale+ MPSoC) only. It allows you to select which SD controller is the system’s primary
SD card interface.
If manual is selected as the primary flash, you are responsible for the flash settings for the
system.
Timer Settings
The Timer Settings sub-menu is for MicroBlaze and Zynq UltraScale+ MPSoC. It allows you
to select which timer is the primary timer.
IMPORTANT: A Primary timer is required for a MicroBlaze system.
Reset GPIO Settings
The Reset GPIO Settings sub-menu is for MicroBlaze only. It allows you to select which GPIO
is the system reset GPIO.
TIP: MicroBlaze systems use GPIO as a reset input. If a reset GPIO is selected, you can reboot the system
from Linux.
RTC Settings
Select an RTC instance that is used as a primary timer for the Linux kernel. If your preferred
RTC is not on the list, select manual. In this case, you will be responsible to enable the
property kernel driver for your RTC.
Advanced bootable images storage Settings
The advanced bootable images storage settings sub-menu allows you to specify where the
bootable images are located. The settings in this sub-menu are used by PetaLinux to
configure U-Boot.
If this sub-menu is disabled, PetaLinux uses the flash partition table specified in the "Flash
Settings --- >" sub-menu to define the location of the bootable images.

Reference Guide 88
UG1144 (v2018.2) June 6, 2018 www.xilinx.com
Chapter 9: Advanced Configurations
Kernel Bootargs
The Kernel Bootargs sub-menu allows you to let PetaLinux automatically generate the
kernel boot command-line settings in DTS, or pass PetaLinux user defined kernel boot
command-line settings. The following are the default bootargs.
Microblaze-full -- console=ttyS0,115200 earlyprintk
Microblaze-lite -- console=ttyUL0,115200 earlyprintk
zynq -- console=ttyPS0,115200 earlyprintk
zynqmp -- earlycon clk_ignore_unused root=/dev/ram rw
For more information, see kernel documentation.
ATF Compilation Configuration
The ATF Compilation Configuration appears only for the ZynqMP platform. This sub-menu
allows you to set:
• Extra ATF compilation settings
• Change the base address of bl31 binary
• Change the size of bl31 binary
PMU Firmware Configuration
The PMU Firmware Configuration option allows PetaLinux to add power related kernel
configs.
Table 9-2: Flash Partition Table
Bootable Image /
U-Boot Environment
Partition
Default Partition
Name Description
Boot Image boot • BOOT.BIN for Zynq family devices (Zynq and Zynq
UltraScale+ MPSoC)
• Relocatable U-Boot BIN file (u-boot-s.bin) for
MicroBlaze
U-Boot Environment
Partition
bootenv U-Boot environment variable partition. When primary sd
is selected, U-Boot Environment is stored in the first
partition.When primary flash is selected, U-Boot
Environment is stored in the partition mentioned in flash
partition name option.
Kernel Image kernel Kernel image image.ub (FIT format)
DTB Image dtb If "Advanced bootable images storage Settings" is disabled
and a dtb partition is found in the flash partition table
settings, PetaLinux configures U-Boot to load the DTB from
the partition table. Else, it assumes a DTB is contained in
the kernel image.

Reference Guide 89
UG1144 (v2018.2) June 6, 2018 www.xilinx.com
Chapter 9: Advanced Configurations
U-Boot Configuration
The U-Boot Configuration sub-menu allows you to select to use U-Boot automatic
configuration (autoconfig) by PetaLinux or use a U-Boot board configuration target.
Image Packaging Configuration
The Image Packaging Configuration sub-menu allows you to set the following image
packaging configurations:
• Root filesystem type
• File name of the generated bootable kernel image
• Linux kernel image hash function
•DTB padding size
• Whether to copy the bootable images to host TFTP server directory.
TIP: The petalinux-build tool always generates a FIT image as the kernel image.
Firmware Version Configuration
The Firmware Version Configuration sub-menu allows you to set the firmware version
information:
TIP: The host name does not get updated. Please see AR for more details.
Yocto Settings
Yocto settings allows you to configure various yocto features available in a project.
Table 9-3: Firmware Version Options
Firmware Version Option File in the Target RootFS
Host name /etc/hostname
Product name /etc/petalinux/product
Firmware Version /etc/petalinux/version
Table 9-4: Yocto Settings
Parameter Description
TMPDIR Location This directory is used by bitbake to store logs and build artifacts
YOCTO_MACHINE_NAME Specifies the Yocto machine name for the project
Parallel thread execution To limit the number of threads of bitbake instances

Reference Guide 90
UG1144 (v2018.2) June 6, 2018 www.xilinx.com
Chapter 9: Advanced Configurations
Configuring Out-of-tree Build
PetaLinux has the ability to automatically download up-to-date kernel/U-Boot source code
from a Git repository. This section describes how this features works and how it can be
used in system-level menu config. It describes two ways of doing the out-of-tree builds.
Prerequisites
This section assumes that the following prerequisites have been satisfied:
• You have PetaLinux Tools software platform ready for building a Linux system
customized to your hardware platform. For more information, see Importing Hardware
Configuration.
• Internet connection with git access is available.
Steps to Configure out-of-tree Build
Steps to configure UBOOT/Kernel out-of-tree build:
1. Change into the root directory of your PetaLinux project.
$ cd <plnx-proj-root>
2. Launch the top level system configuration menu.
$ petalinux-config
3. Select linux Components Selection ---> sub-menu.
°For kernel, select linux-kernel () ---> and then select remote
( ) linux-xlnx
( ) ext-local-src
(X) remote
°For U-Boot, select u-boot () ---> and then select remote
Add pre-mirror url Adds mirror sites for downloading source code of components
Local sstate feeds settings To use local sstate cache at a specific location
Enable Debug Tweaks Login into target without pass word
Enable Network sstate feeds Enabled NW sstate feeds
User layers Adds user layers into projects
Table 9-4: Yocto Settings (Cont’d)
Parameter Description

Reference Guide 91
UG1144 (v2018.2) June 6, 2018 www.xilinx.com
Chapter 9: Advanced Configurations
( ) u-boot-plnx
(X) remote
( )ext-local-src
4. For kernel, select Remote linux-kernel settings ---> Remote linux-kernel git URL and
enter git URL for linux-kernel.
For example: To use https://github.com/torvalds/linux, enter
git://github.com/torvalds/linux.git;protocol=https
For U-Boot, select Remote U-Boot settings ---> Remote u-boot git URL and enter git
URL for u-boot. For example:
git://github.com/u-boot/u-boot.git;protocol=https
Note: Only git:// has to be entered.
Set a git tag as "Remote git TAG/commit ID".
You have to set any of the following values to this setting, otherwise an error message
appears.
°To point to HEAD of repository:
s${AUTOREV}
°To point to any tag:
mytag
°To point to any commit id:
commit id sha key
5. Exit the menu, and save your settings.
Using External Kernel and U-Boot With PetaLinux
PetaLinux includes kernel source and U-Boot source. However, you can build your own
kernel and U-Boot with PetaLinux.
PetaLinux supports local sources for kernel, Uboot and ATF
For external sources create a directory <plnx-proj-root>/components/ext_sources/
1. Copy the kernel source directory to
<plnx-proj-root>/components/ext_sources/<MY-KERNEL>
2. Copy the U-Boot source directory to
<plnx-proj-root>/components/ext_sources/<MY-U-BOOT>
3. Run petalinux-config, and go into linux Components Selection ---> sub-menu,
Reference Guide 92
UG1144 (v2018.2) June 6, 2018 www.xilinx.com
Chapter 9: Advanced Configurations
°For kernel, select linux-kernel () ---> and then select ext-local-src
( ) linux-xlnx
(X) ext-local-src
( ) remote
°For U-Boot, select u-boot () ---> and then select ext-local-src
( ) u-boot-plnx
( ) remote
(X) ext-local-src
4. Add external source path
°For kernel, select External linux-kernel local source settings ---> . Enter the path:
${TOPDIR}/../components/ext_sources/<MY-KERNEL>
°For uboot, select External u-boot local source settings --->. Enter the path:
${TOPDIR}/../components/ext_sources/<MY-U-BOOT>
${TOPDIR} is a yocto variable pointing to <plnx-proj-root>/build directory.
You can also specify an absolute path of the source. The sources can be placed outside the
project as well.
Note: When creating a BSP with external sources in project, it is your responsibility to copy the
sources into the project and do the packing. For more information, see BSP Packaging.
IMPORTANT: It is not mandatory to have external sources under components/ . You can specify any
location outside the project as well. However, while packaging the bsp, you are responsible for copying
the external sources into components/ and setting relative path.
Troubleshooting
This section describes some common issues you may experience while configuring
out-of-tree build.
Reference Guide 93
UG1144 (v2018.2) June 6, 2018 www.xilinx.com
Chapter 9: Advanced Configurations
Configuring Project Components
If you want to perform advanced PetaLinux project configuration such as enabling Linux
kernel options or modifying flash partitions, use the petalinux-config tool with the
appropriate -c COMPONENT option.
IMPORTANT: Only Xilinx-specific drivers or optimizations in the Linux kernel configuration are
supported by Xilinx technical support.
The examples below demonstrate how to use petalinux-config to review or modify
your PetaLinux project configuration.
1. Change into the root directory of your PetaLinux project.
$ cd <plnx-proj-root>
2. Launch the top level system configuration menu and configure it to meet your
requirements:
$ petalinux-config
3. Launch the Linux kernel configuration menu and configure it to meet your
requirements:
$ petalinux-config -c kernel
4. Launch the root filesystem configuration menu and configure it to meet your
requirements:
$ petalinux-config -c rootfs
Table 9-5: Configuring Out-of-Tree Build Troubleshooting
Problem / Error Message
fatal: The remote end hung up
unexpectedly ERROR: Failed
to get linux-kernel
Problem Description:
This error message indicates that system is unable to download the
source code (Kernel/UBOOT) using remote git URL and hence can not
proceed with petalinux-build.
Solution:
• Check whether entered remote git URL is proper or not.
• If above solution does not solve the problem, Cleanup the build with
the following command:
$ petalinux-build -x mrproper
Above command will remove following directories.
°< plnx-proj-root>/images/
°<plnx-proj-root>/build/
Re-build the system image. For more information, see the Build System
Image.

Reference Guide 94
UG1144 (v2018.2) June 6, 2018 www.xilinx.com
Chapter 9: Advanced Configurations
TIP: Set U-BOOT TARGET in petalinux-config menuconfig as required, for your custom board.
$petalinux-config
Set MACHINE_NAME as required. Values possible are ac701-full, kc705-lite, zc1751-dc1, zc706,
zcu102-revb, zedboard, ac701-lite, kcu105, zc1751-dc2, zcu102-rev1.0, kc705-full, zc702, zcu102-reva,
zcu104-reva, zcu104-revc and zcu106-reva.
Note: Please make sure board and user specific dtsi entries are added to
project-spec/meta-user/recipes-bsp/device-tree/files/system-user.dtsi.
Using template flow, for zcu102,zcu106 boards, add the following line to
<plnx-proj-root>/project-spec/meta-user/recipes-bsp/fsbl/fsbl_%.bba
ppend for fsbl initializations.
YAML_COMPILER_FLAGS_append = " -DXPS_BOARD_ZCU102" #for zcu102
YAML_COMPILER_FLAGS_append = " -DXPS_BOARD_ZCU106" # for zcu106
PetaLinux automated the system currently, it does not add these macros.
Devicetree Configuration
This section describes which files are safe to modify for the device tree configuration and
how to add new information into the device tree.
Prerequisites
This section assumes that you have PetaLinux Tools software platform ready for building a
Linux system customized to your hardware platform. For more information, see Importing
Hardware Configuration.
Configuring Devicetree
PetaLinux device tree configuration is associated with following config files, that are
located at
<plnx-projroot>/project-spec/meta-user/recipes-bsp/device-tree/file
s/:
• multi-arch/
• system-user.dtsi
• xen-overlay.dtsi
• zynqmp-qemu-arm.dts
• openamp-overlay.dtsi
• xen-qemu-overlay.dtsi
The generated files will be in the
<plnx-projroot>/components/plnx_workspace/device-tree/device-tree/
directory.
Reference Guide 95
UG1144 (v2018.2) June 6, 2018 www.xilinx.com
Chapter 9: Advanced Configurations
CAUTION! All the above mentioned dtsi files are generated by the tool. Editing any of these files is not
recommended.
The <plnx-projroot>/project-spec/meta-user/recipes-bsp/device-tree
holds the device-tree bbappend and files directory. The files directory holds the
system-user.dtsi which can be modified.
For more details on device-tree files, see Appendix B, PetaLinux Project Structure.
CAUTION! DTSI files listed above *.dtsi are automatically generated; you are not supposed to edit
these files.
If you wish to add information, like the Ethernet PHY information, this should be included in
the system-user.dtsi file. In this case, device tree should include the information
relevant for your specific platform as information (here, Ethernet PHY information) is board
level and board specific.
Note: The need for this manual interaction is because some information is "board level" and the
tools do not have a way of predicting what should be here. Refer to the Linux kernel Device Tree
bindings documents (Documentation/devicetree/bindings from the root of the kernel source) for the
details of bindings of each device.
An example of a well-formed Device-tree node for the system-user.dtsi is shown
below:
/dts-v1/;
/include/ "system-conf.dtsi"
/ {
};
&gem0 {
phy-handle = <&phy0>;
ps7_ethernet_0_mdio: mdio {
phy0: phy@7 {
compatible = "marvell,88e1116r";
device_type = "ethernet-phy";
reg = <7>;
};
};
};
IMPORTANT: Ensure that the device tree node name, MDIO address, and compatible strings correspond
to the naming conventions used in your specific system.
The following example demonstrates adding the sample-user-1.dtsi file:
1. Add /include/ “system-user-1.dtsi in
project-spec/meta-user/recipes-bsp/device-tree/files/system-user
.dtsi. The file should look like the following:
/include/ "system-conf.dtsi"

Reference Guide 96
UG1144 (v2018.2) June 6, 2018 www.xilinx.com
Chapter 9: Advanced Configurations
/include/ "system-user-1.dtsi"
/ {
};
2. Add file://system-user-1.dtsi to
project-spec/meta-user/recipes-bsp/device-tree/device-tree.bbapp
end. The file should look like this:
FILESEXTRAPATHS_prepend := "${THISDIR}/files:"
SRC_URI += "file://system-user.dtsi"
SRC_URI += "file://system-user-1.dtsi"
It is not recommended to change anything in
<plnx-proj-root>/components/plnx_workspace/device-tree/device-tree/
It is recommended to use system-user DTSIs for adding, modifying and deleting nodes or
values. System user DTSIs are added at the end, which makes the values in it at higher
priority.
You can overwrite any existing value in other DTSIs by defining in system user DTSIs. You
can delete a particular node from any of the generated DTSI, using delete-node.
U-Boot Configuration
This section describes which files are safe to modify for the U-Boot configuration and
discusses about the U-Boot CONFIG_ options/settings.
Prerequisites
This section assumes that you have PetaLinux Tools software platform ready for building a
Linux system customized to your hardware platform. Refer to section Importing Hardware
Configuration for more information.
Configuring U-Boot
Universal Bootloader (U-Boot) Configuration is usually done using C pre-processor defines:
• Configuration _OPTIONS_:
You will be able to select the configuration options. They have names beginning with
"CONFIG_".
• Configuration _SETTINGS_:
These depend osn the hardware etc. They have names beginning with "CONFIG_SYS_".
Reference Guide 97
UG1144 (v2018.2) June 6, 2018 www.xilinx.com
Chapter 9: Advanced Configurations
TIP: Detailed explanation on CONFIG_ options/settings documentation and README on U-Boot can
be found at Denx U-Boot Guide.
PetaLinux U-Boot configuration is associated with config.cfg and platform-auto.h
configuration files which are located at <plnxproj_root>/project-spec/
meta-plnx-generated/recipes-bsp/u-boot/configs and platform-top.h
located at <plnxproj_root>/project-spec/meta-user/recipes-bsp/
u-boot/files/.
For setting u-boot environment variables, edit CONFIG_EXTRA_ENV_SETTINGS variable in
platform-auto.h. Note that platform-auto.h is regenerated each time
"petalinux-config" is run.
CAUTION! config.cfg and platform-auto.h files are automatically generated; do not edit these
files.
PetaLinux does not currently automate U-Boot configuration with respect to CONFIG_
options/settings. You can add these CONFIG_ options/settings into platform-top.h
file.
Steps to add CONFIG_ option (For example, CONFIG_CMD_MEMTEST) to
platform-top.h:
• Change into the root directory of your PetaLinux project.
$ cd <plnx-proj-root>
• Open the file platform-top.h
$ vi project-spec/meta-user/recipes-bsp/u-boot/files/platform-top.h
• If you want to add CONFIG_CMD_MEMTEST option, add the following line to the file.
Save the changes.
#define CONFIG_CMD_MEMTEST
TIP: Defining CONFIG_CMD_MEMTEST enables the Monitor Command "mtest", which is used for
simple RAM test.
• Build the U-Boot image.
$ petalinux-build -c u-boot
• Generate BOOT.BIN using the following command.
$ petalinux-package --boot --fsbl <FSBL image> --fpga <FPGA bitstream> --u-boot
• Boot the image either on hardware or QEMU and stop at U-Boot stage.
• Enter the "mtest" command in the U-Boot console as follows:
ZynqMP mtest

Reference Guide 98
UG1144 (v2018.2) June 6, 2018 www.xilinx.com
Chapter 9: Advanced Configurations
• Output on the U-Boot console should be similar to the following:
Testing 00000000 ... 00001000:
Pattern 00000000 Writing... Reading...Iteration: 20369
IMPORTANT: If CONFIG_CMD_MEMTEST is not defined, output on U-Boot console will be as follows:
U-Boot-PetaLinux> mtest
Unknown command ’mtest’ - try ’help’

Reference Guide 99
UG1144 (v2018.2) June 6, 2018 www.xilinx.com
Chapter 10
Yocto Features
This chapter gives all the information regarding the various features provided by Yocto.
SDK Generation
The OpenEmbedded build system uses BitBake to generate the Software Development Kit
(SDK) installer script standard SDKs. PetaLinux builds and installs SDK. The installed SDK can
be used as sysroot for the application development.
Building SDK:
The following command builds SDK and copies it at <proj_root>/images/linux/sdk.sh
petalinux-build --sdk
The following is the equivalent bitbake command
bitbake petalinux-user-image -c do_populate_sdk
Installing SDK:
The generated SDK has to be installed/extracted to a directory. The following command
extracts the SDK to a specified directory. The default sdk is
<proj_proot>/images/linux/sdk.sh and default installation directory is
<proj_proot>/images/linux/sdk/.
petalinux-package --sysroot -s|--sdk <custom sdk path> -d|--dir <custom directory path>
Examples:
1. This example demonstrates the process of adding a cross compiling qt tool chain.
To build SDK with qt toolchain:
a. Create the
<proj-root>/project-spec/meta-user/recipes-core/images/petalin
ux-user-image.bbappend file.

Reference Guide 100
UG1144 (v2018.2) June 6, 2018 www.xilinx.com
Chapter 10: Yocto Features
b. Add inherit populate_sdk_qt5 in the newly created file.
c. Run petalinux-config -c rootfs and select packagegroup-petalinux-qt.
d. Run petalinux-build -s
e. Run petalinux-package --sysroot
To verify:
a. Open a new terminal
b. Go to <plnx-proj>/image/linux/sdk
c. Run source environment-setup-aarch64-xilinx-linux
d. Run which qmake. This confirms that the qmake is coming from the SDK.
2. Build OpenCV applications
°Create a PetaLinux project
°Add packagegroup-petalinux-opencv in the rootfs menu config
°Build SDK
petalinux-build --sdk
This command builds SDK and deploys it at <proj_root>/images/linux/sdk.sh
°Install SDK
petalinux-package --sysroot
This command installs SDK at <proj_root>/images/linux/sdk
°Use the images/linux/sdk directory as sysroot for building the OpenCV
applications.
Accessing BitBake in a Project
BitBake is available only in the bash shell.
Steps to get the BitBake utility for Zynq UltraScale+ MPSoC:
1. You should run petalinux-config or petalinux-config --oldconfig at least
once after creating the project, so that the required environment is setup.
2. Source the PetaLinux tools script:
source /opt/pkg/petalinux/settings.sh
3. Source the Yocto e-SDK:
Reference Guide 101
UG1144 (v2018.2) June 6, 2018 www.xilinx.com
Chapter 10: Yocto Features
source /opt/pkg/petalinux/components/yocto/source/aarch64/environment-setup
-aarch64-xilinx-linux
4. Source the environment setup script:
source /opt/pkg/petalinux/components/yocto/source/aarch64/layers/core/
oe-init-build-env
5. After the above step, you will be redirected to the build directory. Stay in the build
directory to run bitbake.
6. Export XSCT:
export PATH=/opt/pkg/petalinux/tools/hsm/bin:$PATH
7. Parse the PetaLinux variable to recipes:
export BB_ENV_EXTRAWHITE="$BB_ENV_EXTRAWHITE PETALINUX"
8. To test if the bitbake is available, run:
bitbake strace
The generated images will be placed in the deploy directory. You have to copy the
generated images into <plnx-proj-root>/images/linux directory to work with the
other commands.
Shared sstate-cache
Yocto e-SDK contains minimal shared sstate-cache. Xilinx hosts the full petalinux-image
shared sstate-cache at http://petalinux.xilinx.com/sswreleases/rel-v2018.1/.
During petalinux-build, bitbake will search for sstate cache in the petalinux tool, that is the
minimal set. If the sstate cache is not found in this location, bitbake then searches for the
same in www.xilinx.com. Yet, if the sstate cache is not found, bitbake will build from scratch.
sstate is signature locked. To add any .bbappend files for any rootfs components, which
already exists, you need to add SIGGEN_UNLOCKED_RECIPES += "<component>" in
<plnx-proj-root>/project-spec/meta-user/conf/petalinuxbsp.conf.
Mirror Downloads
Xilinx hosts all source download tar files on amazon web services for each release at
http://petalinux.xilinx.com/sswreleases/rel-v2018.1/downloads. By default, this URL is
added to the Yocto SOURCE Mirror in petalinux-config.
If any component is rebuilt from the scratch, bitbake first searches for its source in
pre-mirrors, that is, in downloads of the tool, and then searches in petalinux.xilinx.com
downloads mirror URL. Later, it searches in SRC_URI of recipes for downloading the source
of that component.
Reference Guide 102
UG1144 (v2018.2) June 6, 2018 www.xilinx.com
Chapter 10: Yocto Features
Note: You can add more mirrors by adding
SOURCE_MIRROR_URL += file:///home/you/your-download-dir/ in
<proj-root>/project-spec/meta-user/conf/petalinuxbsp.conf.
Machine Support
The Yocto Machine specifies the target device for which the image is built.The variable
corresponds to a machine configuration file of the same name, through which
machine-specific configurations are set. Currently, PetaLinux supports the user machine
configuration file.
You can add your own machine configuration file under
<proj_root>/project-spec/meta-user/conf/machine/ or you can add your
machine configuration file in any additional layers and add it into project through
petalinux-config.
Follow these steps to specify the user machine configuration file name in the PetaLinux
project:
1. Go into the PetaLinux project
2. Select petalinux-config -> Yocto settings -> () MACHINE NAME
3. Specify your machine configuration file name
The BSPs are now updated with the meta-xilinx machines.
Table 10-1: Machine Name Change for Templates
Template Machine
zynq plnx-zynq7
zynqmp plnx-zynqmp
microblaze plnx-microblazeel
Table 10-2: Machine Name Change for BSPs
BSP Machine
zc702 zc702-zynq7
zc706 zc706-zynq7
zcu102 (All variants ) zcu102-zynqmp
zcu106 zcu106-zynqmp
zcu104 zcu104-zynqmp
kc705 plnx-microblazeel
ac701 plnx-microblazeel
kcu105 plnx-microblazeel

Reference Guide 103
UG1144 (v2018.2) June 6, 2018 www.xilinx.com
Chapter 10: Yocto Features
SOC Variant Support
Xilinx delivers multiple devices for each SOC product. Zynq UltraScale+ is shipped in three
device variants. For more information see here. Zynq-7000 is shipped in two device variants.
For more information, see here.
SOC_VARIANT extends overrides with ${SOC_FAMILY}${SOC_VARIANT}. It further extends
overrides with components on the SOC. (for example, mali, vcu). This makes reusing the
component overrides depending on the SOC. This feature is mainly used to switch to
hardware acceleration automatically if the hardware design has the corresponding IP (VCU
or USP). Xilinx distributes SOC's with multiple variants as shown below.
1. Zynq-700 devices are distributed under Zynq7000zs and Zynq7000z. The available
SOC_VARIANTs are:
°"7zs" - Zynq-7000 Single A9 Core
"7z" - Zynq-7000 Dual A9 Core
°Default SOC_VARIANT for Zynq-7000 devices is "7z". For 7000zs devices, add the
SOC_VARIANT = "7zs" in petalinuxbsp.conf
There are no additional overrides for Zynq-700 devices. The mali440 override is added
for EG and EV devices. VCU override is added based on the VCU IP in hardware design
2. ZynqMP is shipped in three device variants. The available SOC_VARIANTs are:
°"cg" - Zynq UltraScale+ CG Devices
°"eg" - Zynq UltraScale+ EG Devices
°"ev" - Zynq UltraScale+ EV Devices
°"dr" - RFSOC devices
The default value is "eg". PetaLinux automatically assigns "ev" and "dr" based on the
presence of IP in the HDF.
Note: You have to explicitly set SOC_VARIANT = "cg" in petalinuxbsp.conf for "CG" devices.
Image Features
The contents of images generated by the OpenEmbedded build system can be controlled
by the IMAGE_FEATURES and EXTRA_IMAGE_FEATURES variables that you typically
configure in your image recipes. Through these variables, you can add several different
predefined packages such as development utilities or packages with debug information
needed to investigate application problems or profile applications.

Reference Guide 104
UG1144 (v2018.2) June 6, 2018 www.xilinx.com
Chapter 10: Yocto Features
To remove any default feature, add the following code in the petalinuxbsp.conf:
IMAGE_FEATURES_remove = "ssh-server-dropbear"
To add any new feature, add the following command in the petalinuxbsp.conf:
IMAGE_FEATURES_append = " myfeature"

Reference Guide 105
UG1144 (v2018.2) June 6, 2018 www.xilinx.com
Chapter 11
Technical FAQs
Troubleshooting
This section details the common errors that appear, while working with the PetaLinux
commands, and also lists their recovery steps in detail.
TMPDIR on NFS
The error displayed is
“ERROR: OE-core's config sanity checker detected a potential
misconfiguration”.Either fix the cause of this error or disable the
checker at your own risk (see sanity.conf). For the list of potential
problems or advisories.
The TMPDIR: /home/user/xilinx-kc705-axi-full-2018.1/build/tmp cannot be located on NFS.
When TMPDIR is on NFS, bitbake throws an error at the time of parsing. You have to change
it from petalinux-config and then provide any local storage. To do this, select
Yocto-settings --> TMPDIR.
Do not configure the same TMPDIR for two different PetaLinux projects. This can cause
build errors.
Recipe name having ‘ _ ‘
If the app name is plnx_myapp, bitbake throws an error. A version number has to be
entered after ‘ _ ‘.
For example, myapp_1 is an accurate app/module name.
To recover, you have to delete the app created and also delete the line in
<plnx-proj-root>/project-spec/meta-user/recipes-core/images/petalin
ux-image.bbappend.
IMAGE_INSTALL_append = " plnx_myapp"

Reference Guide 106
UG1144 (v2018.2) June 6, 2018 www.xilinx.com
Chapter 11: Technical FAQs
Recover from Corrupted Terminal
When PetaLinux is exited forcefully by entering Ctrl+C twice, the following error appears:
NOTE: Sending SIGTERM to remaining 1 tasks
Error in atexit._run_exitfuncs:
Traceback (most recent call last):
File
"/opt/pkg/petalinux/components/yocto/source/aarch64/layers/core/bitbake/lib/bb/ui/k
notty.py", line 313, in finish
self.termios.tcsetattr(fd, self.termios.TCSADRAIN, self.stdinbackup)
termios.error: (5, 'Input/output error')
After this error, the console is broken, you cannot see the text that you typed. To restore the
console, enter stty sane and press enter twice.
Python Language Settings
This error appears when the language settings are missing. You will see the error “Could not
find the /log/cooker/plnx_microblaze in the /tmp directory” during petalinux-config. To
resolve, set the following:
export LC_ALL=en_US.UTF-8
export LANG=en_US.UTF-8
export LANGUAGE=en_US.UTF-8
Menuconfig Hang for Kernel and U-Boot
For petalinux-config -c, when the kernel and U-Boot bitbake try to open a new terminal
inside, sometimes it fails. The following are the possible error message.
1. ERROR: Unable to spawn new terminal
2. ERROR: Continuing the execution without opening the terminal
The solutions can be:
a. Use ssh -X
b. Uncomment the OE_TERMINAL line in
<plnx-proj-root>/project-spec/meta-user/conf/petalinuxbsp.conf
You can set any terminal which suits you. For more details, see Chapter 10, Yocto
Features.
You have to change the OE_TERMINAL as it is not able to get through default.
Uncomment the OE_TERMINAL in
<plnx-proj-root>/project-spec/meta-user/conf/petalinuxbsp.conf
and set it to xterm or screen. For this, you are required to have the corresponding utility
installed in your PC.

Reference Guide 107
UG1144 (v2018.2) June 6, 2018 www.xilinx.com
Chapter 11: Technical FAQs
External Source Configurations
The cfg or ssc files will not be applied with external source in Yocto flow (upstream
behavior). PetaLinux needs to handle external source with configurations applied, it has the
faculty to handle only cfgs. Therefore, it is always recommended to use cfgs instead of sccs.
Xen and openamp are handled though distro features. Adding in DISTRO feature will not
enable their corresponding configurations in kernel as they are handled in scc file. The
solution is to edit
<plnx-project-root>/project-spec/meta-user/recipes-kernel/linux/lin
ux-xlnx_%.bbappend.
Add the following lines:
SRC_URI += "file://xilinx=kmeta/bsp/xilinx/xen.cfg"
Note: All the scc files have to be taken care by replacing with their respective cfg files, while using
external source methodology.
do_image_cpio: Function Failed
CPIO format does not support sizes greater than 2GB. Therefore, you cannot use initramfs
for larger sizes. The following steps describes the process for larger image sizes (greater
than 2GB).
1. Change the rootfs type to SD-card
$ petalinux-config
Select Image Packaging Configuration -> Root filesystem type -> SD card
2. Add the following lines in the
<proj-root>/project-spec/meta-user/conf/petalinuxbsp.conf
IMAGE_FSTYPES_remove = "cpio cpio.gz cpio.bz2 cpio.xz cpio.lzma cpio.lz4
cpio.gz.u-boot"
IMAGE_FSTYPES_DEBUGFS_remove = "cpio cpio.gz cpio.bz2 cpio.xz cpio.lzma cpio.lz4
cpio.gz.u-boot"
3. Build the project
$ petalinux-build

Reference Guide 108
UG1144 (v2018.2) June 6, 2018 www.xilinx.com
Appendix A
Migration
This section describes the migration details of the current release versus the previous
release.
Device Tree
•device-tree-generation_%.bbappend is changed to device-tree.bbappend
•Workspace is moved from components/plnx_workspace/device-tree-generation
to components/plnx_workspace/device-tree.
• System device tree generation is deprecated in upstream. It is deprecated in PetaLinux
as well.
• iperf is deprecated. Use iperf3 instead.
Fixing Irregularities
BOOT.BIN Generation
• All the PetaLinux commands deploy build artifacts at <proj-root>/images/linux
•petalinux-package generates BOOT.BIN in the current working directory. 2018.1
onwards it will deploy in images/linux.
Bitstream
Bitstream can have a design specific name, and it will be deployed consistently as
system.bit.
Re-factoring Rootfs Menu Config
• All packagegroup-petalinux which are under Filesystem Packages -> misc are now
moved under the Top level menu Petalinux Package Groups.

Reference Guide 109
UG1144 (v2018.2) June 6, 2018 www.xilinx.com
Appendix A: Migration
• Each packagegroup-petalinux is updated with help displaying utilities pulled by it.
Fit Image
Xilinx fit image class was deprecated earlier. We adopted to kernel-fitimage class from
upstream.
In the previous releases it is built as an image task. Currently, the fit image is built as a part
of kernel.
petalinux-build -x package
petalinux-package --image
These are equivalent to petalinux-build -c kernel (Internally bitbake virtual/kernel).

Reference Guide 110
UG1144 (v2018.2) June 6, 2018 www.xilinx.com
Appendix B
PetaLinux Project Structure
This section provides a brief introduction to the file and directory structure of a PetaLinux
project. A PetaLinux project supports development of a single Linux system development at
a time. A built Linux system is composed of the following components:
• Device tree
• First stage bootloader (optional)
•U-Boot
• Linux kernel
• Rootfs. rootfs is composed of the following components:
°Prebuilt packages
°Linux user applications (optional)
°User modules (optional)
A PetaLinux project directory contains configuration files of the project, the Linux
subsystem, and the components of the subsystem. The petalinux-build command
builds the project with those configuration files. You can run petalinux-config to
modify them. Here is an example of a PetaLinux project:
components
-plnx_workspace
-device-tree
-fsbl
-pmufw
config.project
hardware
-xilinx-zcu102-2018.1
pre-built
-linux
-images
-implementation
project-spec
-attributes
-configs
-config
-rootfs_config
-rootfs_config.old
-hw-description
-meta-plnx-generated
-conf
Reference Guide 111
UG1144 (v2018.2) June 6, 2018 www.xilinx.com
Appendix B: PetaLinux Project Structure
-COPYING.MIT
-README
-recipes-bsp
-recipes-core
-recipes-kernel
-meta-user
-conf
-COPYING.MIT
-README
-recipes-apps
-recipes-bsp
-recipes-core
-recipes-kernel
-yocto-layer.log
README
README.hw
Table B-1: PetaLinux Project Description
File / Directory in a PetaLinux
Project Description
<plnx-proj-root>/.petalinux/ Directory to hold tools usage and WebTalk data.
<plnx-proj-root>/config.proj
ect/
Project configuration file.
<plnx-proj-root>/project-spe
c
Project specification.
<plnx-proj-root>/project-spe
c/hw-description
Hardware description imported from Vivado.
<plnx-projroot>/project-spec
/configs
Configuration files of top level config and rootfs config
<plnx-proj-root>/project-spe
c/configs/config
Configuration file used to store user setiings
<plnx-proj-root>/project-spe
c/configs/rootfs_config
Configuration file used for root filesystem.
<plnx-proj-root>/components/
plnx_workspace/device-tree/d
evice-tree/
Device tree files used to build device tree. The following files
are auto generated by petalinux-config:
•skeleton.dtsi (Zynq-7000 only)
•zynq-7000.dtsi (Zynq-7000 only)
•zynqmp.dtsi (Zynq UltraScale+ MPSoC only)
•pcw.dtsi (Zynq-7000 and Zynq UltraScale+MPSoC only)
• pl.dtsi
• system-conf.dtsi
• system-top.dts
• <bsp name>.dtsi
It is not recommended to edit these files, as these files are
regenerated by the tools.

Reference Guide 112
UG1144 (v2018.2) June 6, 2018 www.xilinx.com
Appendix B: PetaLinux Project Structure
When the project is built, three directories will be auto generated:
•"
<plnx-proj-root>/build" for the files generated for build.
•"
<plnx-proj-root>/images" for the bootable images.
•"
<plnx-proj-root>/build/tmp" for the files generated by Yocto. This directory is
configurable through petalinux-config.
Here is an example:
<plnx-proj-root>
-build
-bitbake.lock
-build.log
-config.log
-cache/
-conf/
-downloads/
-misc/
"<plnx-proj-root>/project-sp
ec/meta-user/recipes-bsp/dev
ice-tree/files/”
system-user.dtsi is not modified by any PetaLinux tools.
This file is safe to use with revision control systems. In addition,
you can add your own DTSI files to this directory. You have to
edit the
<plnx-proj-root>/project-spec/meta-user/recipe
s-bsp/device-tree/device-tree.bbappend by adding
your dtsi file.
"<plnx-projroot>/project-spe
c/meta-plnx-generated/recipe
s-bsp/u-boot/configs"
U-Boot PetaLinux configuration files. The following files are
auto generated by petalinux-config:
•config.mk for MicroBlaze only
• platform-auto.h
• config.cfg
platform-top.h will not be modified by any PetaLinux tools.
When U-Boot builds, these files are copied into U-Boot build
directory build/linux/u-boot/src/<U_BOOT_SRC>/ as
follows:
• config is the u-boot kconfig file.
• config.mk is copied to board/xilinx/microblaze-generic/ for
MicroBlaze.
<plnx-projroot>/project-spec
/meta-user/recipes-bsp/u-boo
t/files/platform-top.h
•platform-auto.h and platform-top.h is copied to
include/configs/ directory.
"<plnx-proj-root>/components
/"
Directory for embeddedSW workspace and place to hold
external sources while packing BSP. You can also manually copy
components into this directory. Here is the rule to place a
external component:
"<plnx-proj-root>/components/ext_source/<COMPONENT>"
Table B-1: PetaLinux Project Description (Cont’d)
File / Directory in a PetaLinux
Project Description

Reference Guide 113
UG1144 (v2018.2) June 6, 2018 www.xilinx.com
Appendix B: PetaLinux Project Structure
-config/
-plnx-generated/
-rootfs_config/
-sstate-cache/
-tmp/
-components
-plnx_workspace/
-config.project
-hardware
-images
-linux/
-pre-built
-linux/
-project-spec
-attributes
-configs/
-config
-rootfs_config
-hw-description/
-meta-plnx-generated/
-meta-user/
CAUTION! "<plnx-proj-root>/build/" are automatically generated. Do not manually edit files
in this directory. Contents in this directory will get updated when you run petalinux-config or
petalinuxbuild.
"<plnx-proj-root>/images/" are also automatically generated. Files in this directory will get
updated when you run petalinux-build.
The table below is an example for Zynq UltraScale+ MPSoC.
By default the build artifacts are removed to preserve space after petalinux-build. To preserve the
build artifacts, you have to remove INHERIT += "rm_work" from build/conf/local.conf, but it increases
the project-space.
Table B-2: Build Directory in a PetaLinux Project
Build Directory in a aPetaLinux Project Description
<plnx-proj-root>/build/build.lo
g
Logfile of the build
<plnx-proj-root>/build/misc/con
fig/
Directory to hold files related to the linux subsystem build
<plnx-proj-root>/build/misc/roo
tfs_config/
Directory to hold files related to the rootfs build
${TMPDIR}/work/plnx_aarch64-xil
inx-linux/petalinux-ser-image/1
.0-r0/rootfs
Rootfs copy of target. This is the staging directory.
${TMPDIR}/plnx_aarch64 Stage directory to hold the libs and header files required to
build user apps/libs
${TMPDIR}/work/plnx_aarch64-xil
inx-linux/linux-xlnx
Directory to hold files related to the kernel build

Reference Guide 114
UG1144 (v2018.2) June 6, 2018 www.xilinx.com
Appendix B: PetaLinux Project Structure
Project Layers
The PetaLinux project has two following layers under
<proj-plnx-root>/project-spec
1. meta-plnx-generated
This layer holds all bbappends and configuration fragment (cfg) for all components. All files
in this layer are generated by the tool based on HDF/DSA and user configuration. The files
in this layer should not be updated manually, as it is regenerated for petalinux-config
and petalinux-build commands.
2. meta-user
This layer is a place holder for all user-specific changes. You can add your own bbappend
and configuration files in this layer.
${TMPDIR}/work/plnx_aarch64-xil
inx-linux/u-boot-xlnx
Directory to hold files related to the u-boot build
<plnx-proj-root>/components/pln
x_workspace/device-tree/device-
tree"
Directory to hold files related to the device-tree build
<plnx-projroot>/components/plnx
_workspace/fsbl
Directory to hold files related to the bootloader build
Table B-3: Image Directory in a PetaLinux Project
Image Directory in a PetaLinux Project Description
"<plnx-proj-root>/images/linux/
"
Directory to hold the bootable images for Linux subsystem
Table B-2: Build Directory in a PetaLinux Project (Cont’d)
Build Directory in a aPetaLinux Project Description

Reference Guide 115
UG1144 (v2018.2) June 6, 2018 www.xilinx.com
Appendix C
Generating Boot Components
First Stage Bootloader
By default, the top level system settings are set to generate the first stage bootloader. This
is optional.
CAUTION! If you do not want the PetaLinux build FSBL/FS-BOOT, then you will need to manually build
it on your own. Else, your system will not boot properly.
If you had disabled first stage bootloader from menuconfig previously, You can configure
the project to build first stage bootloader as follows:
1. Launch top level system settings configuration menu and configure:
$ petalinux-config
a. Select linux Components Selection --->sub-menu.
b. Select First Stage Bootloader option.
[*] First Stage Bootloader
c. Exit the menu and save the change.
This operation will generate the First Stage Bootloader (FSBL) source into
components/bootloader/ inside your PetaLinux project root directory, if it does not
already exist.
The directory for Zynq® UltraScale+™ MPSoC is as below.
components/plnx_workspace/fsbl/fsbl/zynqmp_fsbl
The directory for Zynq-7000 is as below.
components/plnx_workspace/fsbl/fsbl/zynq_fsbl
The directory for MicroBlaze is as below.
components/plnx_workspace/fs-boot
FSBL should be in the local project directory.
Reference Guide 116
UG1144 (v2018.2) June 6, 2018 www.xilinx.com
Appendix C: Generating Boot Components
2. Launch petalinux-build to build the FSBL:
Build the FSBL when building the project:
$ petalinux-build
Build the FSBL only:
$ petalinux-build -c bootloader
The bootloader ELF file will be installed as zynqmp_fsbl.elf for Zynq UltraScale+
MPSoC, zynq_fsbl.elf for Zynq-7000 and fs-boot.elf for MicroBlaze in
images/linux inside the project root directory.
TIP: fsbl_bsp, fsbl_bsp will be auto updated when you run petalinux-build.
Arm Trusted Firmware (ATF)
This is for Zynq UltraScale+ MPSoC only. This is mandatory. By default, the top level system
settings are set to generate the ATF.
You can set the ATF configurable options as follows:
1. Launch top level system settings configuration menu and configure:
$ petalinux-config
a. Select the Arm Trusted Firmware Compilation Configuration ---> submenu.
b. Enter your settings.
c. Exit the menu and save the change.
2. Build the ATF when building the project:
$ petalinux-build
Build the ATF only:
$ petalinux-build -c arm-trusted-firmware
The ATF ELF file will be installed as bl31.elf for Zynq UltraScale+ MPSoC in
images/linux inside the project root directory.
PMU Firmware
This is for Zynq UltraScale+ MPSoC only. This is optional. By default, the top level system
settings are set to generate the PMU firmware.
Reference Guide 117
UG1144 (v2018.2) June 6, 2018 www.xilinx.com
Appendix C: Generating Boot Components
CAUTION! If the user wishes not to have PetaLinux build the PMU firmware, then you will need to
manually build it on your own. Else, your system will not boot properly.
You can configure the project to build PMU firmware as follows:
1. Launch top level system settings configuration menu and configure:
$ petalinux-config
a. Select linux Components Selection.
b. Select PMU Firmware option.
[*] PMU Firmware
c. Exit the menu and save the change.
2. Build the PMU firmware when building the project:
$ petalinux-build
Build the PMU firmware only:
$ petalinux-build -c pmufw
The PMU firmware ELF file will be installed as pmufw.elf for Zynq UltraScale+ MPSoC
in images/linux inside the project root directory.
FS-Boot For MicroBlaze Platform Only
FS-Boot in PetaLinux is a first stage bootloader demo for MicroBlaze platform only. It is to
demonstrate how to load images from flash to the memory and jump to it. If you want to try
FS-Boot, you will need 8 KB BRAM at least.
FS-Boot supports Parallel flash and SPI flash in standard SPI mode only. If you are using
axi_quad_spi, it only works with X1 mode.
In order for FS-Boot to know where in the flash should get the image, macro
CONFIG_FS_BOOT_START needs to be defined. This is done by the PetaLinux tools.
PetaLinux tools set this macro automatically from the boot partition settings in the
menuconfig primary flash partition table settings. For parallel flash, it is the start address of
boot partition. For SPI flash, it is the start offset of boot partition.
The image in the flash requires a wrapper header followed by a BIN file. FS-Boot gets the
target memory location from wrapper. The wrapper needs to contain the following
information:

Reference Guide 118
UG1144 (v2018.2) June 6, 2018 www.xilinx.com
Appendix C: Generating Boot Components
FS-Boot ignores other fields in the wrapper header. PetaLinux tools generate the wrapper
header to wrap around the u-boot BIN file.
Table C-1: Wrapper Information
Offset Description Value
0×0 FS-Boot bootable image magic code 0×b8b40008
0×4 BIN image size User defined
0×100 FS-Boot bootable image target memory
address
User defined. PetaLinux tools automatically
calculate it from the u-boot text base address
offset from the Memory Settings from the
menuconfig.
0×10c Where the BIN file start None

Reference Guide 119
UG1144 (v2018.2) June 6, 2018 www.xilinx.com
Appendix D
QEMU Virtual Networking Modes
There are two execution modes in QEMU: non-root (default) and root requires sudo or root
permission). The difference in the modes relates to virtual network configuration.
In non-root mode QEMU sets up an internal virtual network which restricts network traffic
passing from the host and the guest. This works similar to a NAT router. You can not access
this network unless you redirect tcp ports.
In root mode QEMU creates a subnet on a virtual Ethernet adapter, and relies on a DHCP
server on the host system.
The following sections detail how to use the modes, including redirecting the non-root
mode so it is accessible from your local host.
Redirecting ports in non-root mode
If running QEMU in the default non-root mode, and you wish to access the internal (virtual)
network from your host machine (For example, to debug with either GDB or TCF Agent), you
will need to forward the emulated system ports from inside the QEMU virtual machine to
the local machine. The petalinux-boot --qemu command utilizes the --qemu-args
option to perform this redirection. The following table outlines some example redirection
arguments. This is standard QEMU functionality, refer to the QEMU documentation for more
details.
Table D-2: Redirection Arguments
QEMU Options
Switch Purpose Accessing guest from host
-tftp
<path-to-directory>
Sets up a TFTP server at the specified
directory, the server is available on the
QEMU internal IP address of 10.0.2.2.
-redir tcp:10021:
10.0.2.15:21
Redirects port 10021 on the host to port 21
ftp) in the guest
host> ftp localhost 10021
-redir tcp:10023:
10.0.2.15:23
Redirects port 10023 on the host to port 23
telnet) in the guest
host> telnet localhost 10023
Reference Guide 120
UG1144 (v2018.2) June 6, 2018 www.xilinx.com
Appendix D: QEMU Virtual Networking Modes
The following example shows the command line used to redirect ports:
$ petalinux-boot --qemu --kernel --qemu-args "-redir tcp:1534::1534"
This document assumes the use of port 1534 for gdbserver and tcf-agent, but it is possible
to redirect to any free port. The internal emulated port can also be different from the port
on the local machine:
$ petalinux-boot --qemu --kernel --qemu-args "-redir tcp:1444::1534"
Specifying the QEMU Virtual Subnet
By default, PetaLinux uses 192.168.10.* as the QEMU virtual subnet in --root mode.
If it has been used by your local network or other virtual subnet, you may wish to use
another subnet. You can configure PetaLinux to use other subnet settings for QEMU by
running petalinux-boot as follows on the command console:
CAUTION! This feature requires sudo access on the local machine, and must be used with the --root
option.
$ petalinux-boot --qemu --root --u-boot --subnet <subnet gateway IP>/
<number of the bits of the subnet mask>
For example, to use subnet 192.168.20.*:
$ petalinux-boot --qemu --root --u-boot --subnet 192.168.20.0/24
-redir tcp:10080:
10.0.2.15:80
Redirects port 10080 on the host to port 80
http) in the guest
Type
http://localhost:10080 in
the web browser
-redir tcp:10022:
10.0.2.15:22
Redirects port 10022 on the host to port 22
ssh) in the guest
Run ssh -P 10022
localhost on the host to
open a SSH session to the target
Table D-2: Redirection Arguments (Cont’d)
QEMU Options
Switch Purpose Accessing guest from host

Reference Guide 121
UG1144 (v2018.2) June 6, 2018 www.xilinx.com
Appendix E
Xilinx IP Models Supported by QEMU
The QEMU emulator shipped in PetaLinux tools supports the following Xilinx IP models:
• Zynq-7000 Arm Cortex-A9 CPU
• Zynq UltraScale+ MPSoC Arm Cortex-A53 MPCore
• Zynq UltraScale+ MPSoC Cortex-R5
• MicroBlaze CPU (little-endian AXI)
• Xilinx Zynq-7000/Zynq UltraScale+ MPSoC DDR Memory Controller
• Xilinx Zynq UltraScale+ MPSoC DMA Controller
• Xilinx Zynq UltraScale+ MPSoC SD/SDIO Peripheral Controller
• Xilinx Zynq UltraScale+ MPSoC Gigabit Ethernet Controller
• Xilinx Zynq UltraScale+ MPSoC NAND Controller
• Xilinx Zynq UltraScale+ MPSoC UART Controller
• Xilinx Zynq UltraScale+ MPSoC QSPI Controller
• Xilinx Zynq UltraScale+ MPSoC I2C Controller
• Xilinx Zynq UltraScale+ MPSoC USB Controller (Host support only)
• Xilinx Zynq-7000 Triple Timer Counter
• Xilinx Zynq-7000 DMA Controller
• Xilinx Zynq-7000 SD/SDIO Peripheral Controller
• Xilinx Zynq-7000 Gigabit Ethernet Controller
• Xilinx Zynq-7000 USB Controller (Host support only)
• Xilinx Zynq-7000 UART Controller
• Xilinx Zynq-7000 SPI Controller
• Xilinx Zynq-7000 QSPI Controller
• Xilinx Zynq-7000 I2C Controller
• Xilinx AXI Timer and Interrupt controller peripherals
• Xilinx AXI External Memory Controller connected to parallel flash

Reference Guide 122
UG1144 (v2018.2) June 6, 2018 www.xilinx.com
Appendix E: Xilinx IP Models Supported by QEMU
• Xilinx AXI DMA Controller
• Xilinx AXI Ethernet
• Xilinx AXI Ethernet Lite
• Xilinx AXI UART 16650 and Lite
IMPORTANT: By default, QEMU will disable any devices for which there is no model available. For this
reason it is not possible to use QEMU to test your own customized IP Cores (unless you develop C/C++
models for them according to QEMU standard).
For more information refer to Xilinx Quick Emulator User Guide (UG1169) [Ref 5].

Reference Guide 123
UG1144 (v2018.2) June 6, 2018 www.xilinx.com
Appendix F
Xen Zynq Ultrascale+ MPSoC Example
This section details on the Xen Zynq® Ultrascale+™ MPSoC example. It describes how to
get Linux to boot as dom0 on top of Xen on Zynq Ultrascale+ MPSoC.
Prerequisites
This section assumes that the following prerequisites have been satisfied:
• You have PetaLinux Tools software platform ready for building a Linux system
customized to your hardware platform. For more information, see Importing Hardware
Configuration.
• You have created a PetaLinux project from the ZCU102 reference BSP.
°There are Xen related prebuilts in the pre-built/linux/images directory, which
are xen.dtb, xen.ub, xen-image and xen-rootfs.cpio.gz.u-boot.
Boot prebuilt Linux as dom0
1. Copy prebuilt Xen images and Linux Kernel image to your tftp directory so that you can
load them from u-boot with tftp.
$ cd <plnx-proj-root>
$ cp pre-built/linux/images/xen.dtb <tftpboot>/
$ cp pre-built/linux/images/xen.ub <tftpboot>/
$ cp pre-built/linux/images/xen-Image <tftpboot>/
$ cp pre-built/linux/images/xen-rootfs.cpio.gz.u-boot <tftpboot>/
2. Boot prebuilt u-boot image on the board with either jtag boot or boot from SD card.
3. Setup tftp server IP from u-boot
U-Boot-PetaLinux> setenv serverip <TFTP SERVERIP>
4. Load Xen images and kernel images from u-boots
U-Boot-PetaLinux> tftpboot 1000000 xen.dtb
U-Boot-PetaLinux> tftpboot 80000 xen-Image
U-Boot-PetaLinux> tftpboot 1030000 xen.ub
U-Boot-PetaLinux> tftpboot 2000000 xen-rootfs.cpio.gz.u-boot
U-Boot-PetaLinux> bootm 1030000 2000000 1000000
TIP: For re-built images that differ in rootfs image size, the above addresses have to be adjusted so that
there is no overlap when these images are copied to the RAM.

Reference Guide 124
UG1144 (v2018.2) June 6, 2018 www.xilinx.com
Appendix F: Xen Zynq Ultrascale+ MPSoC Example
Rebuild Xen
After creating a PetaLinux project for Zynq Ultrascale + MPSoC, follow the below steps to
build xen images:
1. Go to cd <proj root directory>
2. In the Petalinux-config command, select Image Packaging Configuration --->
Root filesystem type (INITRD)
3. In Petalinux-config -c rootfs, select PetaLinux Package Groups --->
Packagegroup-petalinux-xen ---> [*] packagegroup-petalinux-xen
4. Edit the device tree to build in the extra Xen related configs. Edit this file:
project-spec/meta-user/recipes-bsp/device-tree/files/system-user
.dtsi and add this line:
/include/ "xen-overlay.dtsi".
It should look like the following:
/include/ "system-conf.dtsi"
/include/ "xen-overlay.dtsi"
/ {
};
5. Edit the file:
project-spec/meta-user/recipes-bsp/device-tree/device-tree.bbapp
end and add this line to it:
SRC_URI += "file://xen-overlay.dtsi"
The file should look like this:
FILESEXTRAPATHS_prepend := "${THISDIR}/files:"
SRC_URI += "file://system-user.dtsi"
SRC_URI += "file://xen-overlay.dtsi"
6. Run petalinux-build: $ petalinux-build
7. The build artifacts will be in images/linux in the project directory.
Note: By default, the petalinux-build command does not build Xen. The default root file system
does not contain the Xen tools. You have to use Xen rootfs.
IMPORTANT: You are required to update dom0 memory in the xen-overlay.dtsi file based on the
image/rootfs size. Also, adjust the above load addresses based on the image/rootfs size without
overlapping.
TIP: For more information on XEN, see the Building Xen Hypervisor with PetaLinux 2018.1.

Reference Guide 125
UG1144 (v2018.2) June 6, 2018 www.xilinx.com
Appendix F: Xen Zynq Ultrascale+ MPSoC Example
Execute OpenAMP
Use the following steps to execute OpenAMP:
1. Boot kernel
$ cd <plnx-proj-root>
$ cp pre-built/linux/images/openamp.dtb pre-built/linux/images/system.dtb
$ petalinux-boot --jtag --prebuilt 3 --hw_server-url <hostname:3121>
2. To load any firmware and run any test application
$ echo <echo_test_firmware> > /sys/class/remoteproc/remoteproc0/firmware
For example, to load image_echo_test:
$ echo image_echo_test > /sys/class/remoteproc/remoteproc0/firmware
$ echo start > /sys/class/remoteproc/remoteproc0/state
$ modprobe rpmsg_user_dev_driver
$ echo_test
For more information on OpenAMP, see Libmetal and OpenAMP for Zynq Devices User Guide
(UG1186) [Ref 6].

Reference Guide 126
UG1144 (v2018.2) June 6, 2018 www.xilinx.com
Appendix G
Additional Resources and Legal Notices
Xilinx Resources
For support resources such as Answers, Documentation, Downloads, and Forums, see Xilinx
Support.
Solution Centers
See the Xilinx Solution Centers for support on devices, software tools, and intellectual
property at all stages of the design cycle. Topics include design assistance, advisories, and
troubleshooting tips.
Documentation Navigator and Design Hubs
Xilinx® Documentation Navigator provides access to Xilinx documents, videos, and support
resources, which you can filter and search to find information. To open the Xilinx
Documentation Navigator (DocNav):
• From the Vivado® IDE, select Help > Documentation and Tutorials.
• On Windows, select Start > All Programs > Xilinx Design Tools > DocNav.
• At the Linux command prompt, enter docnav.
Xilinx Design Hubs provide links to documentation organized by design tasks and other
topics, which you can use to learn key concepts and address frequently asked questions. To
access the Design Hubs:
• In the Xilinx Documentation Navigator, click the Design Hubs View tab.
• On the Xilinx website, see the Design Hubs page.
Note: For more information on Documentation Navigator, see the Documentation Navigator page
on the Xilinx website.

Reference Guide 127
UG1144 (v2018.2) June 6, 2018 www.xilinx.com
Appendix G: Additional Resources and Legal Notices
References
1. PetaLinux Documentation (www.xilinx.com/petalinux)
2. Xilinx Answer Record (55776)
3. Ultrascale+ MPSoC Software Developer Guide (UG1137)
4. PetaLinux Tools Documentation: Command Line Reference (UG1157)
5. Zynq UltraScale+ MPSoC QEMU: User Guide(UG1169)
6. OpenAMP Framework for Zynq Devices Getting Started Guide (UG1186)
7. PetaLinux Yocto Tips
8. Yocto Project Technical FAQ
Please Read: Important Legal Notices
The information disclosed to you hereunder (the “Materials”) is provided solely for the selection and use of Xilinx products. To the
maximum extent permitted by applicable law: (1) Materials are made available "AS IS" and with all faults, Xilinx hereby DISCLAIMS
ALL WARRANTIES AND CONDITIONS, EXPRESS, IMPLIED, OR STATUTORY, INCLUDING BUT NOT LIMITED TO WARRANTIES OF
MERCHANTABILITY, NON-INFRINGEMENT, OR FITNESS FOR ANY PARTICULAR PURPOSE; and (2) Xilinx shall not be liable (whether
in contract or tort, including negligence, or under any other theory of liability) for any loss or damage of any kind or nature related
to, arising under, or in connection with, the Materials (including your use of the Materials), including for any direct, indirect, special,
incidental, or consequential loss or damage (including loss of data, profits, goodwill, or any type of loss or damage suffered as a
result of any action brought by a third party) even if such damage or loss was reasonably foreseeable or Xilinx had been advised
of the possibility of the same. Xilinx assumes no obligation to correct any errors contained in the Materials or to notify you of
updates to the Materials or to product specifications. You may not reproduce, modify, distribute, or publicly display the Materials
without prior written consent. Certain products are subject to the terms and conditions of Xilinx’s limited warranty, please refer to
Xilinx’s Terms of Sale which can be viewed at https://www.xilinx.com/legal.htm#tos; IP cores may be subject to warranty and
support terms contained in a license issued to you by Xilinx. Xilinx products are not designed or intended to be fail-safe or for use
in any application requiring fail-safe performance; you assume sole risk and liability for use of Xilinx products in such critical
applications, please refer to Xilinx’s Terms of Sale which can be viewed at https://www.xilinx.com/legal.htm#tos.
AUTOMOTIVE APPLICATIONS DISCLAIMER
AUTOMOTIVE PRODUCTS (IDENTIFIED AS “XA” IN THE PART NUMBER) ARE NOT WARRANTED FOR USE IN THE DEPLOYMENT OF
AIRBAGS OR FOR USE IN APPLICATIONS THAT AFFECT CONTROL OF A VEHICLE (“SAFETY APPLICATION”) UNLESS THERE IS A
SAFETY CONCEPT OR REDUNDANCY FEATURE CONSISTENT WITH THE ISO 26262 AUTOMOTIVE SAFETY STANDARD (“SAFETY
DESIGN”). CUSTOMER SHALL, PRIOR TO USING OR DISTRIBUTING ANY SYSTEMS THAT INCORPORATE PRODUCTS, THOROUGHLY
TEST SUCH SYSTEMS FOR SAFETY PURPOSES. USE OF PRODUCTS IN A SAFETY APPLICATION WITHOUT A SAFETY DESIGN IS FULLY
AT THE RISK OF CUSTOMER, SUBJECT ONLY TO APPLICABLE LAWS AND REGULATIONS GOVERNING LIMITATIONS ON PRODUCT
LIABILITY.
© Copyright 2018 Xilinx, Inc. Xilinx, the Xilinx logo, Artix, ISE, Kintex, Spartan, Virtex, Vivado, Zynq, and other designated brands
included herein are trademarks of Xilinx in the United States and other countries. AMBA, AMBA Designer, Arm, ARM1176JZ-S,
CoreSight, Cortex, PrimeCell, Mali, and MPCore are trademarks of Arm Limited in the EU and other countries. All other trademarks
are the property of their respective owners.
