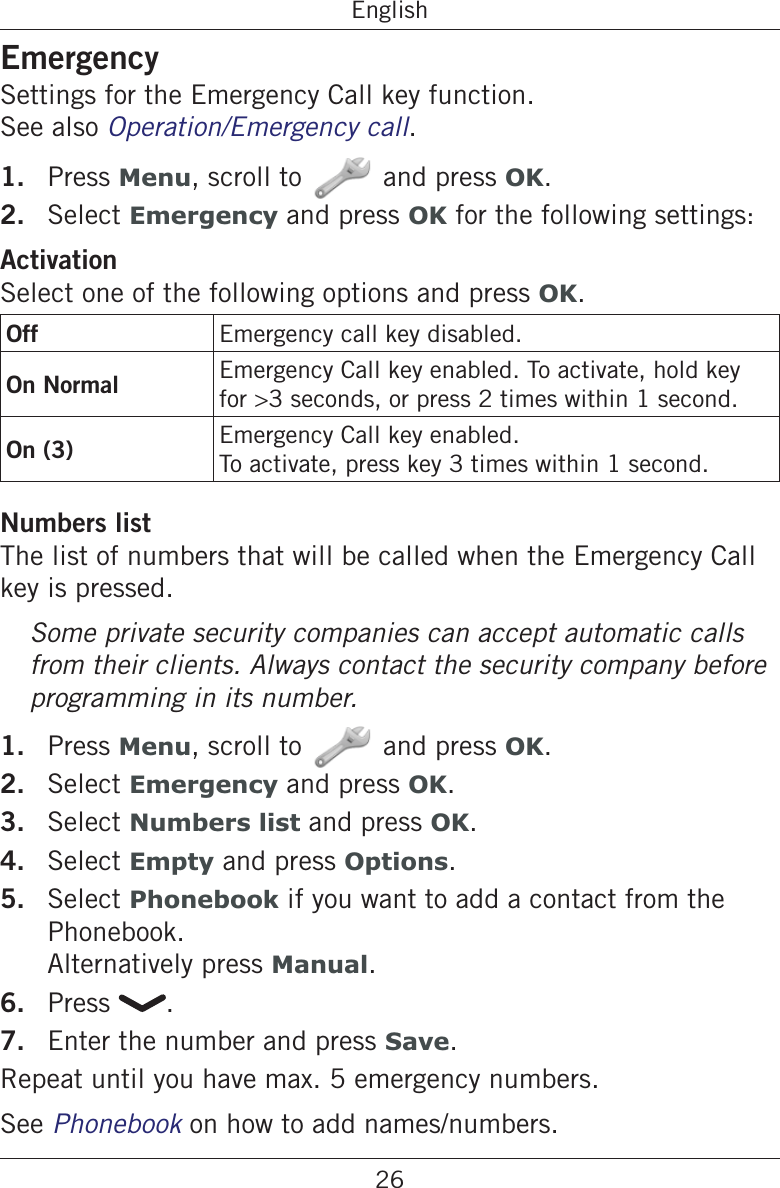
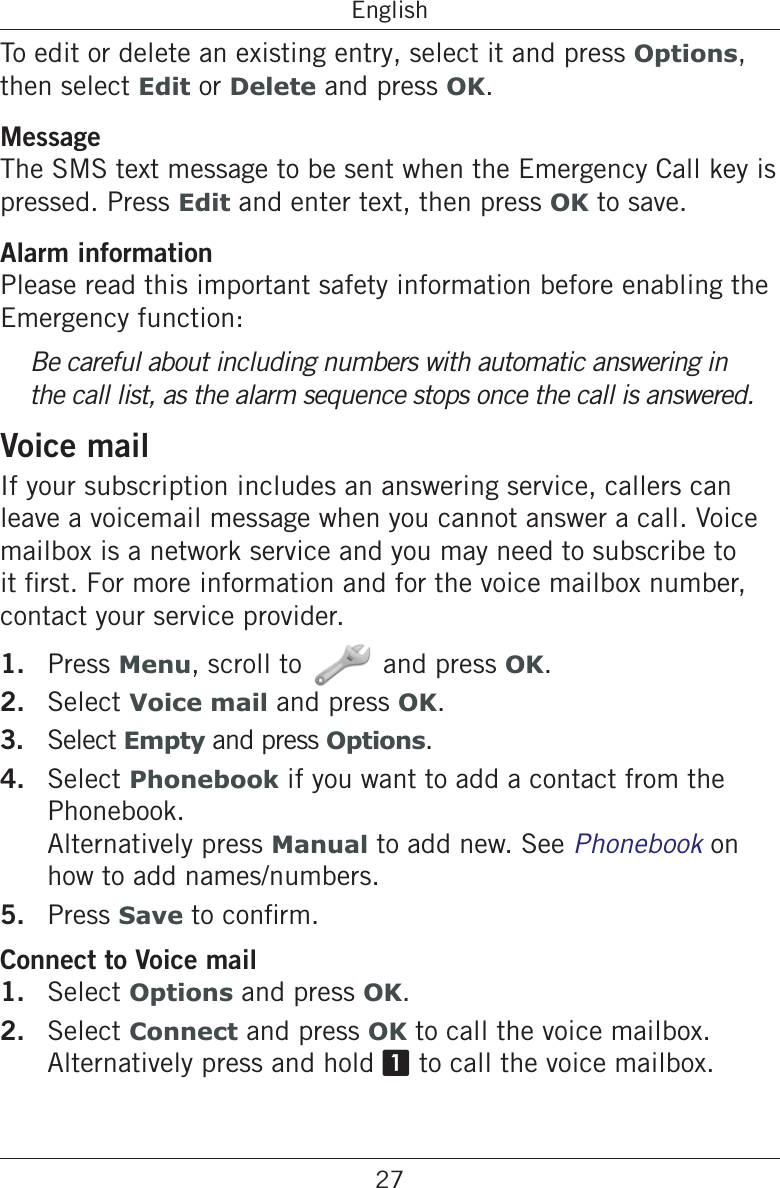
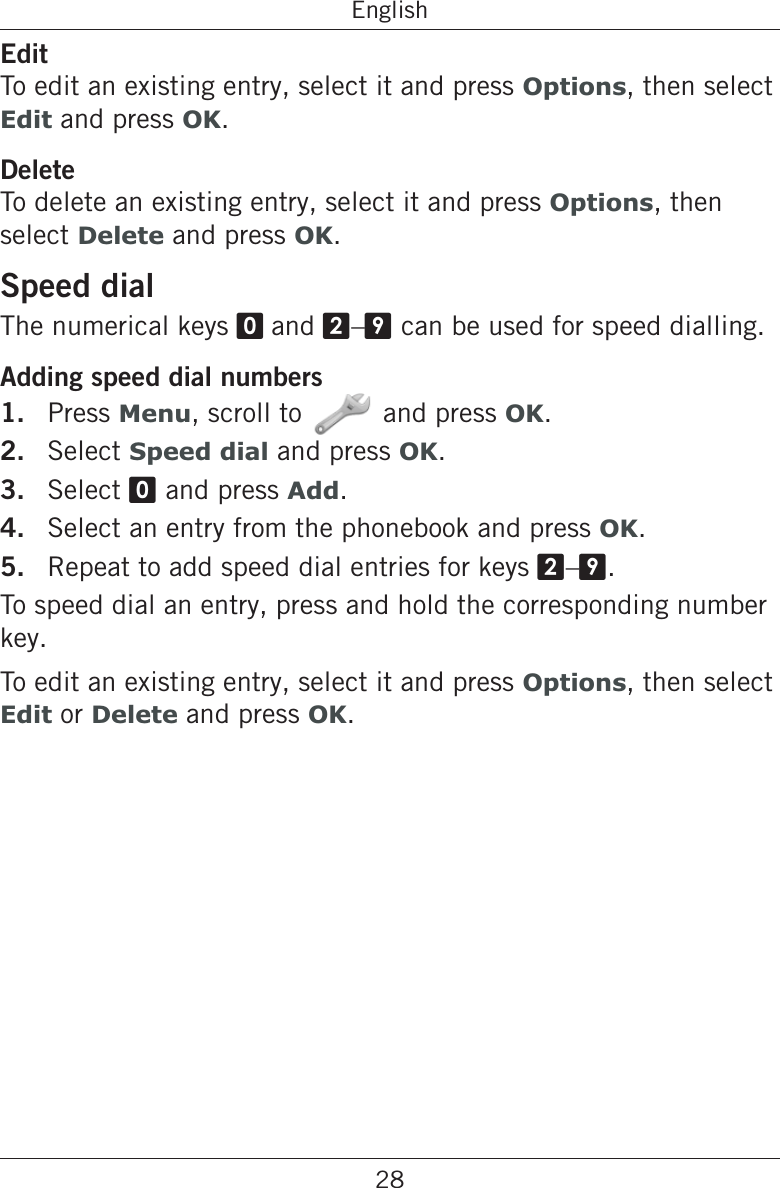
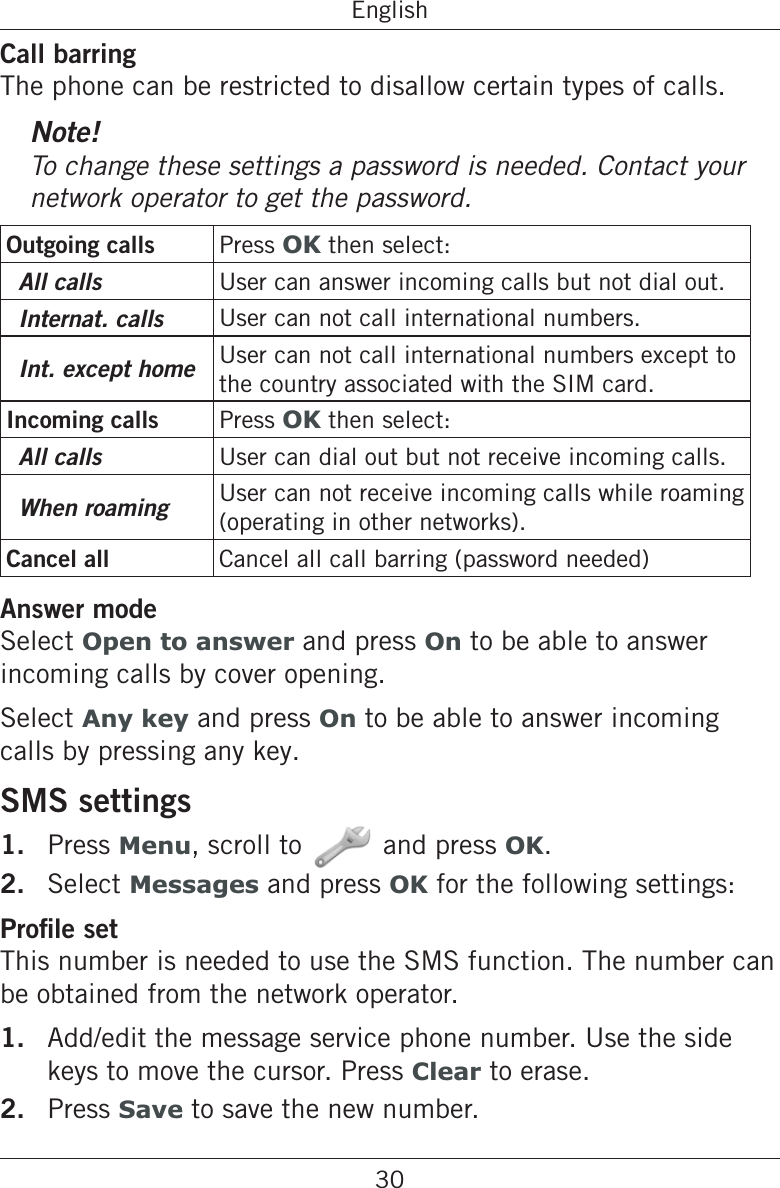
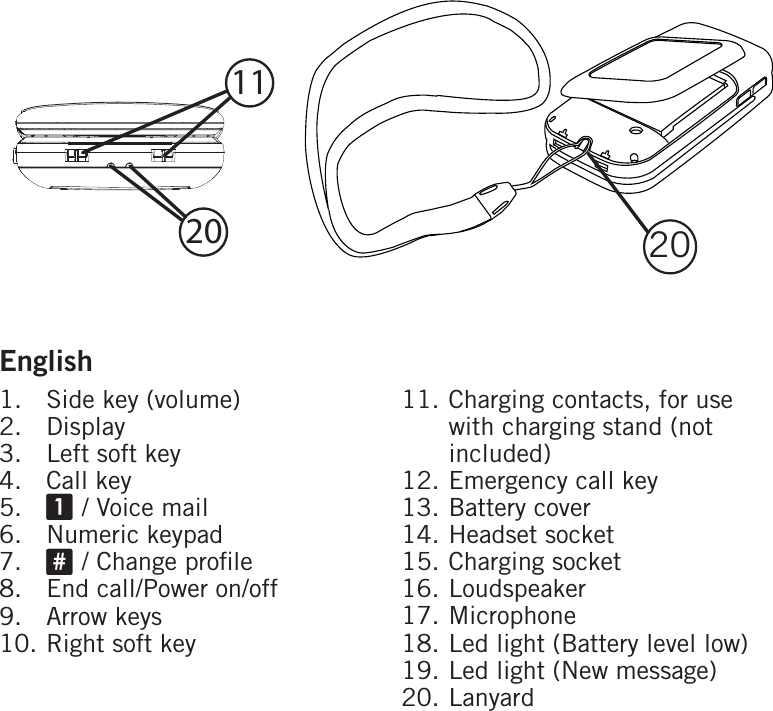
Doro DORO409S GSM Mobile Phone User Manual

Doro AB GSM Mobile Phone

User Manual

Doro PhoneEasy® 409s gsm
1.  Side key (volume)2. Display3.  Left soft key4. Call key5.  1 / Voice mail6. Numeric keypad7.  #8.  End call/Power on/off9. Arrow keys10. Right soft key11. Charging contacts, for use with charging stand (not included)12. Emergency call key13. Battery cover14. Headset socket15. Charging socket16. Loudspeaker17. Microphone18. Led light (Battery level low)19. Led light (New message)20. LanyardEnglish20
1EnglishContentsInstallation  .................................... 3Installing the SIM card and battery .................. 3Charging  .................................... 4Phone indicators ............................... 5Operation ...................................... 6Activating the phone ............................ 6Making a call ................................. 7Making a call from the Phonebook  .................. 7Receiving a call  ............................... 7Volume control ................................ 7Display symbols ................................. 8Additional functions .............................. 9Call options  .................................. 9Call waiting  ................................. 10Call information  .............................. 10Call log  .................................... 10Phonebook .................................. 11Silent mode ................................. 13Headset .................................... 13SOS calls ................................... 14Emergency Call key ............................ 14Games ..................................... 15Alarm ...................................... 15Calendar  ................................... 16Calculator ................................... 16Text input ................................... 17SMS messaging ................................ 18Creating and sending SMS ....................... 18Incoming SMS (Inbox) .......................... 19Outgoing SMS (Outbox) ......................... 19
2EnglishSettings ...................................... 21Time and date ................................ 21User setup .................................. 22Tone settings (rings & tones)  ..................... 24Silent ...................................... 25Blocking functions  ............................ 25Emergency .................................. 26Voice mail  .................................. 27Speed dial .................................. 28Call setup ................................... 29SMS settings  ................................ 30Network setup  ............................... 32Services .................................... 32Security settings .............................. 32Safety instructions .............................. 34Troubleshooting  ................................ 37Care and maintenance  ........................... 39Warranty and technical data  ....................... 40
3EnglishInstallationWarning!Turn off the phone and disconnect the charger before removing the battery cover.Installing the SIM card and batteryThe SIM card holder is located behind the battery.1.  Remove the battery cover by pressing it carefully down and sliding away from the emergency call key.2.  Remove the battery if it is already installed.3.  Press lightly on the cardholder and carefully slide it towards the emergency call key.4.  The SIM card holder can now be folded into an upright position.5.  Placing the SIM-card on the marked area of the compartment. Make sure that the SIM card’s contacts are facing downwards and that the cut-off corner is placed accordingly with the marked area. See picture. Take care not to scratch or bend the contacts on the SIM card.6.  Fold the SIM-card holder down and carefully slide it away from the emergency call key until it “clicks” into place.7.  Insert the battery by sliding it into the battery compartment with the contacts facing towards the emergency call key.8.  Replace the battery cover until it “clicks” into place.
4EnglishChargingWarning!Only use batteries, charger and accessories that have been approved for use with this particular model. Connecting other accessories may be dangerous and may invalidate the phone’s type approval and guarantee.When the battery is running low,   is displayed and a warning signal is heard. To charge the battery, connect the mains adapter to the wall socket and to the charging socket y.phone, and   when it is disconnected. The battery charge indicator will be animated while charging.It takes approximately 3 hours to fully charge the battery.  is displayed when charging is completed. If the phone is turned off when the charger is connected to the phone only the battery charge status indicator will be shown in the display.Note!To save power the LCD backlight goes off after a short while but the phone is still charging. Press any key to illuminate the display.Full battery capacity will not be reached until the battery has been charged 3–4 times.Batteries degrade over time, which means that call time and standby time will normally decrease with regular use.
5EnglishSave energyWhen you have fully charged the battery and disconnected the charger from the device, unplug the charger from the wall outlet.Phone indicatorsWhen 5When ]
6EnglishOperationActivating the phonePress and hold the red button   on the phone to turn it on/off. The following messages may be displayed:SIM card missing or incorrectly inserted.SIM card damaged or not valid.If the SIM card is valid but protected with a PIN code (Personal PIN: is displayed. Enter the PIN code and press OK (  upper left corner of keypad).  Delete with Clear (  upper right corner of keypad).Note!If PIN and PUK codes were not provided with your SIM card, please contact your network operator.Attempts: # shows the number of PIN attempts left. When no more attempts remain, SIM blocked is displayed. The SIM card must now be unlocked with the PUK code (Personal Unblocking Key).OK.OK.Changing the language, time and dateThe default language is determined by the SIM card. See Settings on how to change language, time and date.
7EnglishMaking a call1.  Enter the phone number. Delete with Clear.2.  Press q to dial. Press Abort to cancel dialling.3.  Press L to end the call.Note!When making international calls, press * twice for the code (instead of 00 or similar) for best operation.Making a call from the Phonebook1.  Press Name to open the phonebook.2.  Use the arrow keys   /   to scroll through the phonebook, or quick search by pressing the key corresponding .3.  Press Call to dial the selected entry, or press Back to return to standby mode.Receiving a call1.  Press q to answer, or press Silent to switch off the ring signal and then Reject to reject the call (busy signal).  Alternatively, press L to reject the call directly.2.  Press L to end the call.See also Call options.Volume controlUse the side keys +/– to adjust the sound volume during a call. The volume level is indicated on the display.
8EnglishDisplay symbolsSignal strength Headset connectedRing only Battery levelRing + vibration New SMSVibration only SilentAlarm active Roaming (in other network)SIM card missing Charger connectedSIM card error Charger disconnectedMute Headset connectedNew SMS message Headset disconnectedSOS calls only Handsfree on Handsfree offQuery WarningBattery level low ErrorCalling Charging (animated)Incoming call Call endedSearching Missed callProgressing (animated) Call on-hold
9EnglishAdditional functionsCall optionsDuring a call the soft keys1 give access to additional functions:Options (left soft key)A menu with the following options is displayed: Hold single call Hold the current callEnd single call End the current call (same as L)New call Call another number (three-party call)Phonebook Search the phonebookMsg centre Write or read SMS messages.Mute Disable the microphoneSPK on (right soft key)Activates handsfree mode, which allows you to speak without holding the phone.Speak clearly into the microphone at a maximum distance of 1 meter (3 feet). Use the side keys +/– to adjust the loudspeaker volume.Press SPK off to return to normal mode.Note!The handsfree function allows only one person at a time to talk. Switching between talk/listen is triggered by the sound of the person talking. Loud noises (music, etc.) in the background may interfere with the handsfree function.1  Soft keys   have multiple functions. The current key function is shown above the soft key on the display.
10EnglishCall waitingAn alert tone will be heard if there is an incoming call while talking. To put the current call on hold and answer the incoming call, press Options.This service must be activated, see Settings/Call setup.Call informationDuring a call, the called or calling phone number and the elapsed call time is displayed.If the identity of the caller is withheld, Unknown is displayed.Call logAnswered, missed, and outgoing calls are saved in a combined call log. 20 calls of each type can be stored in the log. For multiple calls related to the same number, only the most recent call is saved.Retrieving and dialling1.  Press q. Alternatively press Menu, scroll to   and press OK.2.  Use the arrow keys   /   to scroll through the call list.    = Incoming call   = Outgoing call   = Missed call3.  Press q to dial the number or press Options for the following settings:View Show details for the selected callDelete Delete the callDelete all Delete all calls in the call logSave Save the number in the Phonebook
11EnglishPhonebookThe phonebook can store 100 entries with 3 phone numbers in each entry.Creating a phonebook entry1.  Press Menu, scroll to   and press OK.2.  Select -New contact- and press Add.3.  Enter a name for the contact, see . Delete with Clear.4.  Use   /   to select Mobile, Home number or number, and enter the phone number(s), then press Save.5.  Press L to return to standby mode.Note!country code (instead of 00 or similar) for best operation.Managing phonebook entries1.  Press Menu, scroll to   and press OK.2.  Select an entry and press Options.3.  Select one of the following options and press OK.ViewShow details for the selected contact.Edit1.  Use   /   to move the cursor. Delete with Clear.2.  Press Save.Add newSee Creating a phonebook entry.CallPress OK to call the contact.
12EnglishSend SMSPress OK to write a SMS message, see SMS messaging.Top 10 settingphonebook.1.  Select one of the empty entries and press Add.2.  Use the arrow keys   /   to scroll through the phonebook, or quick search by pressing the key corresponding 3.  Press OK to save the selected entry, or press Back to return to the menu.To delete a Top 10 entry, select the entry in the Top 10 list and press Options, then Delete.DeletePress OK to delete the selected phonebook entry. Press Yes to No to abort.Delete allSelect From SIM or From Phone and press OK to delete all phonebook entries from the SIM card or phone memory.Enter the phone code and press OKPhone code is 1234.Copy allSelect From SIM and press OK to copy all phonebook entries from the SIM card to the phone memory. Press YesNo to abort.Select From Phone and press OK to copy all phonebook entries from the phone memory to the SIM card. Press YesNo to abort.
13EnglishStorageSelect SIM or Phone (default) and press OK to select the default storage for new phonebook entries.Phone 100 contacts with 3 phone numbers each Mobile,  Home number or .SIM 1 phone number per contact.Number of entries and length of the phone numbers/contacts that can be stored will vary depending on SIM card.Send vCardSelect Send by SMS and press OK to send the selected phonebook entry as a vCard via SMS. Enter the phone number of the recipient (or press Search) and press OK to send.Silent modewhile vibration and key tone settings are unchanged. Press and hold # to activate/deactivate Silent mode.See also Settings.HeadsetWhen a headset is connected, the internal microphone in the phone is automatically disconnected.When receiving a call you can use the answer key on the headset cable to answer and end calls.Warning!Using a headset at high volume can damage your hearing. Adjust the sound volume carefully when using a headset.
14EnglishSOS callsAs long as the phone is switched on, it is possible to place an SOS call by entering the main local emergency number followed by q.Some networks accept calls to SOS numbers without a valid SIM card. Contact your network operator for more information.Emergency Call keyThe Emergency Call function must be activated before use. See Settings on how to activate this function as described below or with 3 key presses, how to enter Emergency Numbers, and how to edit the emergency SMS message.To make an emergency call, press and hold the Emergency Call key on the back of the phone for 3 seconds, or press it two times within 1 second. The phone will send an emergency SMS text message to all phone numbers in the Emergency numbers list. is not answered within 25 seconds, the next number is dialled. Dialling is repeated 3 times or until the call is answered, or until L is pressed.Warning:Do not hold the device near your ear when the handsfree mode is in use, because the volume may be extremely loud.Note!When an emergency call is activated the phone is pre-set to handsfree mode. 999, 911) are normally not allowed. Do not save such numbers in the list of numbers to be called automatically. Some private security companies can accept automatic calls from their clients. Always contact the security company before programming in its number.
15EnglishGames1.  Press Menu, scroll to   and press OK.2.  Select a game (e.g. Robot) then press OK for the following settings:Start game Press OK to start a new game.Game level OK.Best grades Shows your best results. Press Back to return to the menu or Reset to reset the scores.Help Shows instructions for the game. Press Back to return to the menu.Alarm1.  Press Menu, scroll to   and press OK.2.  Select On and press OK.3.  Enter the alarm time using the keypad, then press OK.4.  For a single occurence, select Single and press Save.5.  For a repeated alarm, select Repeated and press OK. Scroll through the list of weekdays and press On/Off to enable/disable the alarm for each weekday, then press Save.6.  To edit an alarm, press Edit, then press OK.7.  To stop the alarm, press Off. The alarm is now deleted.Note!The alarm will work even when the phone is switched off.Do not press Yes when wireless phone use is prohibited or when it may cause interference or danger.When the alarm goes off a signal will sound.  Press Stop to turn off the alarm or press Snooze to repeat the alarm after 9 minutes.
16EnglishCalendar1.  Press Menu, scroll to   and press OK.2.  Select Options.3.  Select one of the following options and press OK.View tasksShow tasks for the selected date.Add task1.  Enter a date for the task, then press   .2.  Enter a time for the task, then press   .3.  Press Edit, enter a description for the task (see ), then press Done.4.  Press Save to save the task.At the recorded date/time, an alert tone will be played and the task description will be shown on the display.Jump to dateEnter the date and press OK.Note!The calendar will work even when the phone is switched off. Do not press Yes when wireless phone use is prohibited or when it may cause interference or danger.CalculatorThe Calculator can perform basic math operations.1.  Press Menu, scroll to   and press OK.2.  # to enter decimal points.3.  Use the arrow keys to select an operation (+, -, x, ÷) and  press OK.4.  Enter the next number and press OK.5.  Repeat steps 2–4 as necessary. Select = and press OK to calculate the result.
17EnglishText inputText is entered by pressing the numerical keys repeatedly to select characters. When writing SMS messages in some languages you can use the Smart ABC (eZiType™) input method which uses a dictionary to suggest words.See Settings on how to change input method.Entering textPress the key repeatedly until the desired character is shown. Wait a few seconds before entering the next character.Press * for a list of special characters. Select the desired character and press OK to enter it.Use the side keys +/– or   /   to move the cursor within the text.Press # to cycle upper case, lower case and numerals.Entering text with Smart ABCPress each key once, even if the displayed character is not the one you want. The dictionary will suggest words based on the keys you have pressed. Use the arrow keys to select a word, then press OK and continue with the next word.If none of the suggested words are correct, press # to change to manual input mode. The icon on the top left of the display indicates the input mode:eZi ABC UPPER CASE with SmartABCeZi abc lower case with SmartABCABC UPPER CASEabc lower case123 Numerals
18EnglishSMS messagingCreating and sending SMS1.  Press Menu, scroll to and press OK.2.  Select Write message and press OK.3.  Type your message (see ) then press Done.4.  Select one of the sending options below and press OK to Save and send Send the message and save it in the OutboxSend only Send the message without savingSend to many Add more recipients for the messageIf Send to many was selected, do the following:1.  Select Recipients and press OK.2.  Select one of the empty entries and press Edit.3.  Enter a phone number or press Search to open the phonebook. After entering or selecting a number, press OK.4.  Repeat step 2–3 to add additional recipients. Done.Note!country code (instead of 00 or similar) for best operation.
19EnglishIncoming SMS (Inbox)1.  Press Menu, scroll to and press OK.2.  Select Inbox and press OK.3.  Select a message from the list and press Read.  Use   /   to scroll the message up/down.4.  Press Options, see .Outgoing SMS (Outbox)1.  Press Menu, scroll to and press OK.2.  Select Outbox and press OK.3.  Select a message and press OK. Use   /   to scroll the message up/down.4.  Press Options.Send (Outbox)Select one of the sending options and press OK(see Creating and sending SMS).Reply (Inbox)Type your reply, then press Done. The message will be sent immediately.
20EnglishCallPress OK to call the contact.DeletePress Yes to delete the message, or No to return to the menu.EditEdit the message, then press Done to show the sending options (see Creating and sending SMS).Forward (Inbox)Forward a message from your Inbox. Press Done to show the sending options.Delete allPress Yes to delete all messages in the Inbox. Press No to return to the menu.Use numberDisplays all phone numbers contained in the message as well as the number of the sender.1.  Use the arrow keys to select one of the displayed numbers.2.  Press Options.3.  Select one of the following options and press OK.Call Call the selected numberSave Save the number in the phonebookSend SMS Write a new SMS message
21EnglishSettingsNote!The settings described in this chapter are carried out in standby mode.Time and dateSetting the time and date1.  Press Menu, scroll to and press OK.2.  Select Time & date and press OK.3.  Select Set time and press OK.4.  Enter the time (HH:MM), then press OK.5.  Select Set date and press OK.6.  Enter the date (DD/MM/YYYY), then press OK.Setting the time/date format1.  Press Menu, scroll to and press OK.2.  Select Time & date and press OK.3.  Select Set format and press OK.4.  Select Time Format and press OK.5.  Select 12 hours or 24 hours and press OK.6.  Select Date Format and press OK.7.  Select the desired date format and press OK.Setting Auto time on/off1.  Press Menu, scroll to and press OK.2.  Select Time & date and press OK.3.  Select Auto time and press OK.4.  Select On/Off and press OK.
22EnglishTo set the phone to automatically update the time and date according to the current time zone, select On. Automatic update of date and time does not change the time you have set for the alarm clock, calendar or the alarm notes. They are in local time. Updating may cause some alarms you have set to expire.User setupLanguageThe default language for the phone menus, messages etc. is determined by the SIM card. You can change this to any other language supported by the phone.1.  Press Menu, scroll to and press OK.2.  Select User setup and press OK.3.  Select Language and press OK.4.  Scroll up/down to select a language, then press OK.WallpaperYou can select from 8 different display backgrounds.1.  Press Menu, scroll to and press OK.2.  Select User setup and press OK.3.  Select Wallpaper and press OK.4.  Scroll up/down to display the available wallpapers.5.  Press OKBack to discard changes.Idle displayIn standby mode the display can present date, time, and the connected network, or just the time.1.  Press Menu, scroll to and press OK.2.  Select User setup and press OK.3.  Select Idle display and press OK.4.  Select Clock only or All info and press OK.
23EnglishOwner numberThe phone numbers assigned to your SIM card are saved in Owner numbers if this is allowed by the card.To view/edit/delete the numbers:1.  Press Menu, scroll to and press OK.2.  Select User setup and press OK.3.  Select Owner number and press OK.See Phone book on how to add names/numbers.To edit or delete an existing entry, select it and press Options, then select Edit or Delete and press OK.LCD backlightSets the delay time before the display backlight is turned off.1.  Press Menu, scroll to and press OK.2.  Select User setup and press OK.3.  Select LCD backlight and press OK.4.  Select 15 sec., 30 sec. or 1 min. and press OK.Audio setuptelephone in noisy environment, you can customize the phone’s audio settings.1.  Press Menu, scroll to   and press OK.2.  Select User setup and press OK.3.  Select Audio setup and press OK.4.  Select one of the following options and press OK.Normal For normal hearing in normal conditions.High For mild hearing impairment or usage in noisy environment.
24EnglishTone settings (rings & tones)Tone setup1.  Press Menu, scroll to   and press OK.2.  Select Tone settings and press OK.3.  Select Tone setup and press OK.4.  Select Ring Tone and press OK.5.  Select one of the available tones, the tone will be played. Press OKBack to discard changes.6.  Set up the Alarm, Opening tone, Closing tone,  Message tone and Keypad tone in the same way.Ringtone volume1.  Press Menu, scroll to and press OK.2.  Select Tone settings and press OK.3.  Select Volume and press OK.4.  Scroll   /   to change the ring volume, then press OK.Alert type (ring/vibrate)Incoming calls can be signalled by a ring tone and/or vibration.1.  Press Menu, scroll to and press OK.2.  Select Tone settings and press OK.3.  Select Alert type and press OK.4.  Select the desired signalling mode and press OK.Ring only Ring tone onlyVib. only Vibration onlyVib & ring Vibration and ring toneVib -> ring Starts with vibration and adds ring tone after a short while
25EnglishWarning and error tonesWarning and error tones are used to alert the user of low battery power, phone and SIM card errors, etc.1.  Press Menu, scroll to and press OK.2.  Select Tone settings and press OK.3.  Select Extra tone and press OK.4.  Select Warning and press On/Off to enable/disable it.5.  Select Error and press On/Off to enable/disable it.6.  Press Done to save.Silentwhile vibration and key tone settings are unchanged.1.  Press Menu, scroll to and press OK.2.  Select Silent and press OK.3.  Select On/Off to enable/disable it.4.  Press OK to save.Alternatively press and hold # to activate/deactivate Silent.Blocking functionsYou can disable some functions to simplify use of the phone.1.  Press Menu, scroll to and press OK.2.  Select Block function and press OK.3.  Select each function you want to disable and press On.4.  Press Done
26EnglishEmergencySettings for the Emergency Call key function.  See also Operation/Emergency call.1.  Press Menu, scroll to and press OK.2.  Select Emergency and press OK for the following settings:ActivationSelect one of the following options and press OK.Off Emergency call key disabled.On Normal Emergency Call key enabled. To activate, hold key for >3 seconds, or press 2 times within 1 second.On (3) Emergency Call key enabled.To activate, press key 3 times within 1 second.Numbers listThe list of numbers that will be called when the Emergency Call key is pressed.Some private security companies can accept automatic calls from their clients. Always contact the security company before programming in its number.1.  Press Menu, scroll to and press OK.2.  Select Emergency and press OK.3.  Select Numbers list and press OK.4.  Select Empty and press Options.5.  Select Phonebook if you want to add a contact from the Phonebook. Alternatively press Manual.6.  Press  .7.  Enter the number and press Save.Repeat until you have max. 5 emergency numbers.See Phonebook on how to add names/numbers.
27EnglishTo edit or delete an existing entry, select it and press Options, then select Edit or Delete and press OK.MessageThe SMS text message to be sent when the Emergency Call key is pressed. Press Edit and enter text, then press OK to save.Alarm informationPlease read this important safety information before enabling the Emergency function:Be careful about including numbers with automatic answering in the call list, as the alarm sequence stops once the call is answered.Voice mailIf your subscription includes an answering service, callers can leave a voicemail message when you cannot answer a call. Voice mailbox is a network service and you may need to subscribe to contact your service provider.1.  Press Menu, scroll to and press OK.2.  Select Voice mail and press OK.3.  Select Empty and press Options.4.  Select Phonebook if you want to add a contact from the Phonebook.  Alternatively press Manual to add new. See Phonebook on how to add names/numbers.5.  Press SaveConnect to Voice mail1.  Select Options and press OK.2.  Select Connect and press OK to call the voice mailbox. Alternatively press and hold 1 to call the voice mailbox.
28EnglishEditTo edit an existing entry, select it and press Options, then select Edit and press OK.DeleteTo delete an existing entry, select it and press Options, then select Delete and press OK.Speed dialThe numerical keys 0 and 2–9 can be used for speed dialling.Adding speed dial numbers1.  Press Menu, scroll to and press OK.2.  Select Speed dial and press OK.3.  Select 0 and press Add.4.  Select an entry from the phonebook and press OK.5.  Repeat to add speed dial entries for keys 2–9.To speed dial an entry, press and hold the corresponding number key.To edit an existing entry, select it and press Options, then select Edit or Delete and press OK.
29EnglishCall setupDepending on network support and subscription.1.  Press Menu, scroll to and press OK.2.  Select Call setup and press OK for the following settings: Caller IDControls display of your phone number on the recipients phone. Select an option and press OK.Set by network Use default setting by the networkHide ID Never show your numberSend ID Always show your numberCall waitingSelect an option and press OK. See also Operation - Call waiting.Activate Enables the functionDeactivate Disables the functionQuery status Displays if the service is active or notCall divertSet up which calls should be diverted.Select a condition and press OK, then select Activate, Deactivate or Query status (see Call waiting above) for each.Div. voice calls Diverts all voice calls.Div. unreach Diverts incoming calls if the phone is turned off or out of range.Div. no reply Diverts incoming calls if unanswered.Divert if busy Diverts incoming calls if the line is busy.Cancel diverts Do not divert calls
30EnglishCall barringThe phone can be restricted to disallow certain types of calls.Note!To change these settings a password is needed. Contact your network operator to get the password.Outgoing calls Press OK then select:All calls User can answer incoming calls but not dial out.Internat. calls User can not call international numbers.Int. except home User can not call international numbers except to the country associated with the SIM card.Incoming calls Press OK then select:All calls User can dial out but not receive incoming calls.When roaming User can not receive incoming calls while roaming (operating in other networks).Cancel all Cancel all call barring (password needed)Answer modeSelect Open to answer and press On to be able to answer incoming calls by cover opening.Select Any key and press On to be able to answer incoming calls by pressing any key.SMS settings1.  Press Menu, scroll to and press OK.2.  Select Messages and press OK for the following settings:This number is needed to use the SMS function. The number can be obtained from the network operator.1.  Add/edit the message service phone number. Use the side keys to move the cursor. Press Clear to erase.2.  Press Save to save the new number.
31EnglishMemory statusDisplays the percentage of memory space used in the SIM card and phone memory.Pref. storage1.  Select SIM to store messages on the SIM card, or Phone to store messages in the phone memory.2.  Press OKPredictive text (Smart ABC)1.  Press On to enable Smart ABC/eZiType™, see .2.  Select a dictionary (language) and press OKCell informationYou can receive messages on various topics from your service region. For available channels and relevant channel settings, contact your service provider. Cell broadcast messages cannot be received when the device is Roaming.Select Cell information and press OK for the following settings:Function on/off To turn information On or OffRead Select Read and press OK to read the messageLanguages Select language and press OKSettings Select from which channels you want to receive/subscribe messages. Use the options Select, Add, Edit and Delete
32EnglishNetwork setup1.  Press Menu, scroll to and press OK.2.  Select Network setup and press OK.3.  Select one of the following options and press OKAutomatic Network is selected automatically.Manual A list of available network operators is displayed (after a short delay). Select the desired operator and press OK.ServicesThis menu may contain pre-programmed services from your network provider. Depending on network support and subscription.Security settings1.  Press Menu, scroll to and press OK.2.  Select Security and press OK.SIM lockNumber). The phone can be set to ask for the PIN code on startup.Select On/Off and press OK to enable/disable SIM card lock.Note!You need to input the current PIN code to disable/enable SIM lock.Phone lockSelect On/Off and press OK to enable/disable the Phone lock.Note!You need to input the current Phone code to change this setting. The default Phone code is 1234.
33EnglishFixed dial (FDN)You can restrict calls to certain numbers saved on the SIM card. The list of restricted numbers is protected by your PIN2-code.Mode Select On/Off and press OK. Enter PIN2 and press OK Fixed numbersPress Options for the following settings:Add, Edit or Delete and press OK.Enter PIN2 and press OK Please note!save 01234, allows calls to all numbers starting with 01234. It is possible to place an SOS call by entering the main local emergency number followed by qactivated. manage any phone numbers saved on the SIM card.PIN / PIN2 / Phone passwordTo change the PIN codes or the phone lock password:1.  OK2.  OK.3.  OK.ResetResets the phone to the factory settings.  Input the phone lock password and press OK to reset.
34EnglishSafety instructionsWarning!The unit and the accessories can contain small parts.  Keep all of the equipment out of the reach of small children. The mains adapter is the disconnect device between the product and mains power. The mains socket outlet must be close to the equipment and easily accessible.Operating environmentFollow the rules and laws that apply wherever you are, and always turn off the unit whenever its use is prohibited or can cause interference or hazards. Only use the unit in its normal user position.This unit complies with guidelines for radiation when it is used either in a normal position against your ear, or when it is at least 1.5 cm from your body. If the unit is carried close to your body in a case, belt holder or other holder, these holders should not contain any metal, and the product sure that the distance instructions above are followed until the transfer is complete.Parts of the unit are magnetic. The unit can attract metal objects. Do not keep credit cards or other magnetic media near the unit. There is a risk that information stored on them can be erased.Medical unitsThe use of equipment that transmits radio signals, for example, mobile Consult a doctor or the manufacturer of the equipment to determine if it has adequate protection against external radio signals, or if you have any questions. If notices have been put up at health care facilities instructing you to turn off the unit while you are there, you should comply. Hospitals and other health care facilities sometimes use equipment that can be sensitive to external radio signals.
35EnglishPacemakersThe Health Industry Manufacturers Association recommends that a minimum separation of 15 cm be maintained between a handheld wireless phone and a pacemaker to avoid potential interference with the pacemaker. Persons with pacemakers: Should always keep the phone more than 15 cm from their pacemaker when the phone is turned on Should not carry the phone in a breast pocket Should use the ear opposite the pacemaker to minimize the potential for interferenceIf you have any reason to suspect that interference is taking place, turn the phone off immediately.Areas with explosion riskAlways turn off the unit when you are in an area where there is a risk of explosion. Follow all signs and instructions. There is a risk of explosion in places that include areas where you are normally requested to turn off can lead to personal injury or even death.pumps and auto repair facilities.Follow the restrictions that apply to the use of radio equipment near places where fuel is stored and sold, chemical factories and places where blasting is in progress.Areas with risk for explosion are often – but not always – clearly marked. This also applies to below decks on ships; the transport or storage of chemicals; vehicles that use liquid fuel (such as propane or butane); areas where the air contains chemicals or particles, such as grain, dust or metal powder.
36EnglishEmergency callsImportant!  Mobile phones use radio signals, the mobile phone network, the terrestrial network and user-programmed functions. This means that connection cannot be guaranteed in all circumstances. Therefore, never rely only on a mobile phone for very important calls such as medical emergencies.Hearing aidsThis device should work with most hearing aid equipment in the market. However, full compatibility with all equipment can not be promised.VehiclesRadio signals can affect electronic systems in motor vehicles (for example, electronic fuel injection, ABS brakes, automatic cruise control, air bag systems) that have been incorrectly installed or are inadequately protected. Contact the manufacturer or its representative for more information about your vehicle or any additional equipment.with the unit or its accessories. For vehicles equipped with air bags: area above the airbag or the area where it might expand. Serious injuries may be caused if the mobile phone equipment is incorrectly installed and a plane. Using wireless telecom units inside a plane can pose risks to air safety and interfere with telecommunications. It may also be illegal.
37EnglishRF exposure information (SAR)This model phone meets the government’s requirements for exposure to radio waves.This phone is designed and manufactured not to exceed the emission limits for exposure to radio frequency (RF) energy set by the Federal Communications Commission of the U.S. Government. The exposure standard for wireless mobile phones employs a unit of SAR limit set by the FCC is 1.6W/kg. *Tests for SAR are conducted using standard operating positions accepted by the FCC with the phone level, the actual SAR level of the phone while operating can be well below the maximum value. This is because the phone is designed to operate at multiple power levels so as to use only the poser required to reach the network. In general, the closer you are to a wireless base station antenna, the lower the power output.The highest SAR value for the model phone as reported to the FCC when tested for use at the ear is 0.088 W/kg and when worn on the body, as described in this user guide, is 0.537 W/kg (Body-worn measurements differ among phone models, depending upon available enhancements and FCC requirements.) While there may be differences between the SAR levels of various phones and at various positions, they all meet the government requirement. The FCC has granted an Equipment Authorization for this model phone with all reported SAR levels evaluated as in compliance with the FCC RF the FCC and can be found under the Display Grant section of http://www.fcc.gov/oet/fccid after searching on FCC ID: WS5DORO409SFor body worn operation, this phone has been tested and meets the FCC RF exposure guidelines for use with an accessory that contains no metal and the positions the handset a minimum of 5/8 inch (1.5 cm) from the body. Use of other enhancements may not ensure compliance with FCC RF exposure guidelines. If you do no t use a body-worn accessory and are not holding the phone at the ear, position the handset a minimum of 5/8 inch (1.5 cm) from your body when the phone is switched on.
38EnglishFCC/INDUSTRY CANADA NOTICEThis device complies with part 15 of the FCC Rules. This Class B digital apparatus complies with Canadian ICES-003. Operation is subject to the following two conditions: (1) This device may not cause harmful interference, and (2) this device must accept any interference received, including interference that may cause undesired operation. This equipment has been tested and found to comply with the limits for a Class B digital device, pursuant to part 15 of the FCC Rules/Canadian ICES-003. These limits are designed to provide reasonable protection against harmful interference in a residential installation. This equipment generates, uses and can radiate radio frequency energy and, if not installed and used in accordance with the instructions, may cause harmful interference to radio communications. However, there is no guarantee that interference will not occur in a particular installation. If this equipment does cause harmful interference to radio or television reception, which can be determined by turning the equipment off and on, the user is encouraged to try to correct the interference by one or more of the following measures: Reorient or relocate the receiving antenna. Increase the separation between the equipment and the receiver. Connect the equipment to an outlet on a circuit different from that to which the receiver is connected. Consult the dealer or an experienced radio/TV technician for help.Changes or modifications not expressly approved by the party responsible for compliance could void the user‘s authority to operate the equipment.The antenna(s) used for this transmitter must not be co-located or operating in conjunction with any other antenna or transmitter.The FCC or Industry Canada can require you to stop using your telephone if such interference cannot be eliminated.Cet appareil numérique de la classe B est conforme à la norme NMB-003 du Canada.operate the equipment.
39EnglishTroubleshootingPhone cannot be switched onBattery charge low Connect the power adapter and charge the battery for 3 hours.Battery incorrectly installed Check the installation of the battery.Failure to charge the batteryBattery or charger damaged Check the battery and charger.Battery recharged in temperatures  < 0°C or > 40°CImprove the charging environment.Charger incorrectly connected to phone or power socketCheck the charger connections.Standby time decreasesBattery charge capacity too low Install a new battery.Too far from base station, phone is constantly searching for signalSearching the network consumes battery power. Find a place with a stronger signal, or temporarily turn off the phone.Failure to place or receive callsCall barring activated Deactivate call barring. If this does not solve the problem, contact the network operator.PIN code not acceptedWrong PIN code entered too many timesEnter the PUK code to change the PIN code, or contact the network operator.
40EnglishSIM card errorSIM card damaged Check the condition of the SIM card. If it is damaged, contact the network operator.SIM card incorrectly installed Check the installation of the SIM card. Remove the card and reinstall it.SIM card dirty or damp Wipe the contact surfaces of the SIM card with a clean cloth.Failure to connect to networkSIM card invalid Contact the network operator.No coverage of GSM service Contact the network operator.Signal too weak See Weak signal below.Weak signalToo far from base station Try again from another location.Network congestion Try calling at a later time.Echo or noiseRegional problem from bad network relayHang up and redial. This may switch to another network relay.Failure to add a contactPhonebook memory full Delete contacts to free up memory.Failure to set a functionFunction not supported or subscribed from networkContact the network operator.
41EnglishCare and maintenanceYour unit is a technically advanced product and should be treated with the greatest care. Negligence may void the warranty. Protect the unit from moisture. Rain/snowfall, moisture and all types of liquid can contain substances that corrode the electronic circuits. If the unit gets wet, you should remove the battery and allow the unit to dry completely before you replace it. Do not use or keep the unit in dusty, dirty environments. The unit’s moving parts and electronic components can be damaged. Do not keep the unit in warm places. High temperatures can reduce the lifespan for electronic equipment, damage batteries and distort or melt certain plastics. Do not keep the unit in cold places. When the unit warms up to normal temperature, condensation can form on the inside which can damage the electronic circuits. Do not try to open the unit in any other way than that which is indicated here. Do not drop the unit. Do not knock or shake it either. If it is treated roughly the circuits and precision mechanics can be broken. Do not use strong chemicals to clean the unit. Do not expose your product to extreme high or low  temperatures. Your phone operates best in temperature  between 0 °C and 40°C. Minimum and maximum temperatures recommended by the manufacturer are 0°C  and 40°C.The advice above applies to the unit, battery, mains adapter and other accessories. If the phone is not working as it should, please contact the place of purchase for service. Don’t forget the receipt or a copy of the invoice.
42EnglishWarranty and technical dataThis product is guaranteed for a period of 12 months from the date of purchase. In the unlikely event of a fault occurring during this period, please contact the place of purchase. Proof of purchase is required for any service or support needed during the guarantee period.This guarantee will not apply to a fault caused by an accident or a similar incident or damage, liquid ingress, negligence, abnormal usage, non-maintenance or any other circumstances on the user’s part. Furthermore, this guarantee will not apply to any fault caused by a thunderstorm or disconnecting the charger during a thunderstorm.Batteries are consumables and are not included in any guarantee.This guarantee does not apply if batteries other than DORO original batteries are used.NOTE! This guarantee does not affect your legal (statutory) rights under your applicable national laws relating to the sale of consumer products.Network:   GSM 900/DCS1800/PCS1900 Triple BandDimensions:  98 mm x 51 mm x 19 mmWeight:  99 g (including battery)Battery:   3.7V/800 mAh Li-ion batteryDeclaration of ConformityDoro hereby declares that Doro PhoneEasy 409s gsm conforms to the essential requirements and other relevant regulations contained in the Directives 1999/5/EC (R&TTE) and 2002/95/EC (RoHS).A copy of the Declaration of Conformity is available at www.doro.com/dofc© 2009 Doro AB. All rights reserved.eZiType™ is a trademark of Zi Corporation. vCard is a trademark of the Internet Mail Consortium.
                                        English                                  43This device have been tested to comply with the Sound Pressure Level requirement laid down in the applicable EN 50332-1 standards. Permanent hearing loss may occur if earphones or headphones are used at high volume for prolonged periods of time. Logo Warning statement:   A pleine puissance, l’écoute prolongée du baladeur peut endommager l’oreille de l’utilisateur. CautionRisk of explosion if battery replaced aced by an incorrect type.   Dispose of used batteries according to the instructions.   Please make sure the temperature for adapter will not be higher than 40 °CPlease make sure the temperature for device will not be higher than 40 °CThe device could be used with a separation distance of 1.5cm to the human body. The adapter shall be installed near the equipment and shall be easily accessible. Only can use adapter as below:Adatper mfg: Shenzhen Huntkey Electronics Co., Ltd. Adapter 1 model: HKA00605055-3B I/P:100-240V,50/60Hz,0.2A,O/P 5V,0.55A Adapter 2 model: HKA00605055-4B I/P:100-240V,50/60Hz,0.2A,O/P 5V,0.55A The plug considered as disconnect device of adapter
44English
English (A3)Version 1.1 0700

Navigation menu