Drift Innovation FD9960 Wireless Camera Ghost S with Remote Control User Manual P2F FD9960 Rev0
Drift Innovation Ltd Wireless Camera Ghost S with Remote Control P2F FD9960 Rev0
UserManual.wiki
>
Drift Innovation
>
FD9960 User Manual
P2F-FD9960_User Manual_Rev0
Navigation menu
Upload a User Manual
Namespaces
Wiki Guide
HTML
PDF
Info
Views
User Manual
Discussion / Help
Navigation

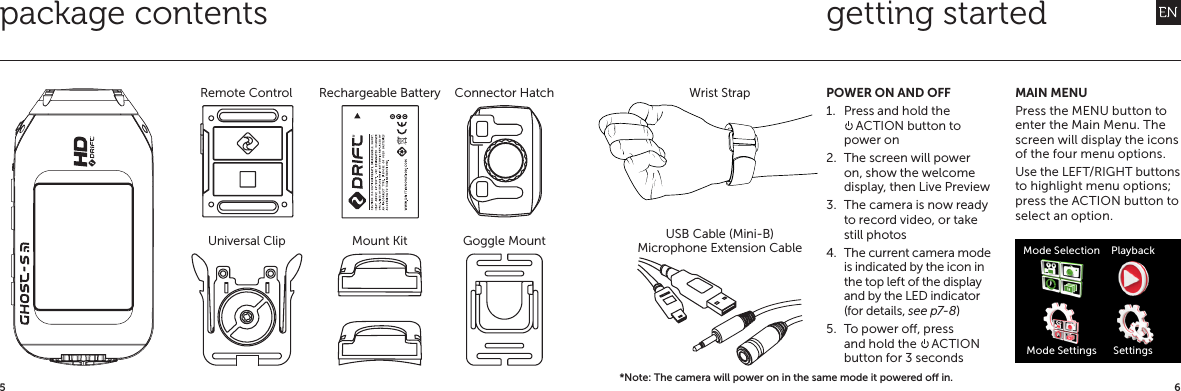
![109playback & camera settingsSelecting the Playback icon opens the Mode Selection menu, and display the four camera mode icons.The number of videos or photos is displayed beside each camera mode icon.Selecting a mode will display the most recent video or photo, timelapse or photoburst folder.Navigate through the files using LEFT/RIGHT. To play a video, or open a timelapse or photoburst sequence, press the ACTION button.Press MENU to go back.CAMERA SETTINGS• Wi-Fi ON / OFF• Wi-Fi Network Name GHOST-S [000]• WiFi Password ----• Mic Sensitivity OFF / LOW / MED / HIGH• Speaker Volume OFF / LOW / MED / HIGH• LCD Brightness LOW / MED / HIGH• LCD O OFF / 5S / 10S / 20S / 1MIN / 5MIN• Remote Control YES / NO• Remote Pairing ONE-ONE / ONE-ALL• Remote LED ON / OFF• Camera LED ON / OFF• Digital Zoom ON / OFF• Camera O OFF / 2MIN / 5MIN• HDMI Out Resolution 1080p / 1080i / 720p• HDMI frame Rate 60 / 59.97 / 50 / 30 / 29.97 / 25• Date YEAR / MONTH / DAY• Date / Timestamp ON / OFF• Language (list of languages)• Save Settings A / B / C• Load Settings A / B / C• Reset Settings YES / NO• Format Memory Card YES / NO• Firmware Version CURRENT VERSIONmounting the camera1. Attach the Universal Clip to the camera in any 360° orientation as needed—first position the clip in the desired orientation, then secure by rotating the screw base by hand2. Slide the Universal Clip into your chosen mount, ensuring that it ‘clicks’ into place *Double check it has been fully inserted by pushing out the clips3. Align your shot. Rotate the lens by hand until the screen is orientated correctly. Use the lens marker as an ‘up’ reference.PLAYBACK](https://usermanual.wiki/Drift-Innovation/FD9960/User-Guide-2130760-Page-6.png)
![1211featuresSIMULTANEOUS PHOTOWhile recording video, pressing the MENU button will simultaneously take an 8mp still photo.When using the two-way remote control, press the ACTION button for the same result.This feature is not available when Video Tagging (left) is enabled.CAR DVR MODEThis hands o mode setting is ideal for insurance and security purposes. In this mode the camera records footage in a continuous loop style (DVR Intervals) recording loop after loop until it fills the Micro SD Card. Once full, the oldest loops will be deleted as the newest ones are saved. DVR loop intervals can be 1min, 3min, 5min, 10min or 15min intervals.BIT RATE [NEW]Users can select to keep the normal compression used by the H.264 codec, or if they prefer, allow a higher flow of data for preserving more of the original recording. This will result in a higher file size.CLONE MODE [NEW]Connect to multiple cameras with the new clone mode feature. Through Wi-Fi all cameras within the vicinity of each other will be able to “see” each other and communicate their current settings and recording modes to each other. The result is a synchronisation between cameras, if one camera starts recording, all synced cameras will record - this feature is perfect for capturing multiple angles.Clone mode is compatible with the Ghost-S and Stealth II featuresMODE INDICATORThe Drift Ghost-S features our multi-coloured active statusTM indicator light system. There are LED indicators positioned on both the 2-way remote control and the front face of the camera, these change colour depending on the current camera mode.SCENE MODE [NEW]Choose your recording conditions with scene mode select between Normal / Vivid / Low LightSETTING PROFILESAll camera settings can be saved by selecting Save Settings from the Camera Settings menu and choosing a save profile: A, B or C.Profiles can be loaded by selecting Load Settings from the menu, then A, B or C.VIDEO TAGGINGWhen activated, this feature allows the camera to continuously record video, but only saving on ‘tagging’ important footage.While recording video, pressing the MENU button will tag and save past, present and future video.For example, with a video tagging interval of 30s selected, on pressing MENU while recording, the camera will save the previous 30s, the current 30s and an additional 30s—a total of 1m30s of ‘tagged’ footage.The Video Tagging feature requires a class 10 micro SD card with 4GB of free space to function correctly.](https://usermanual.wiki/Drift-Innovation/FD9960/User-Guide-2130760-Page-7.png)
![1615TURNING ON AND OFFIn the Camera Settings menu, highlight the ‘WiFi’ option and press ACTION, and select P and press ACTION.In Live Preview, wait for the WiFi indicator icon @ to show WiFi is enabled then, on your WiFi device, select the network:‘Ghost-S [000]’.The three digit network name can be changed from the general settings menu.A Micro SD card must be installed to allow WiFi to work.UPDATING THE FIRMWAREDownload the latest firmware from the Drift website and copy the Ghost_S.bin file to a formatted micro SD card.Insert the micro SD card into the camera and power on. The camera screen will display ‘Firmware Updating’ as the update is installed.Once complete, the camera will power down. To check the firmware has updated correctly, power the camera on and, from the Main menu, open the Camera Settings menu and select ‘Version’ to view the current firmware.DOWNLOAD THE DRIFT APPShot setup, record, capture & playback on your device. CONNECTING TO A PC1. Connect the camera using the USB cable (provided); the camera screen will show a USB icon2. The camera’s folder may open automatically; if not, open My Computer3. The camera should be recognised as a removable disk; double-click to open4. Open the DCIM folder to access your filesCONNECTING TO A MAC1. Connect the camera using the USB cable (provided); the camera screen will show a USB icon2. The camera’s folder may open automatically; if not, open Finder3. The camera should be recognised as a external device; double-click to open4. Open the DCIM folder to access your filesCONNECTING TO A TV1. While the camera is powered o, connect the camera using a mini HDMI (Type C) to full HDMI cable, available from Drift retailers.2. Power on the camera3. The camera’s display will now show on the TV and playback of video or photos will show on screen; video sound will come out of the TV speakersconnecting the camerawifi firmware! While charging only (not through a computer), press ACTION to return to Live Preview](https://usermanual.wiki/Drift-Innovation/FD9960/User-Guide-2130760-Page-9.png)
![2019disclosuresFCC InformationThis device complies with Part 15 of the FCC Rules.Operation is subject to the following two conditions: (1) this device may not cause harmful interference, and (2) this device must accept interference received, including interference that may cause undesired operation.WARNINGChanges or modifications to this unit not expressly approved by the party responsible for compliance could void the user’s authority to operate the equipment.The equipment has been tested and found to comply with the limits for a Class B digital device, pursuant to Part 15 of the FCC Rules. These limits are designed to provide reasonable protection against harmful interference in a residential installation. This equipment generates, uses, and can radiate radio frequency energy and, if not installed and used in accordance with the instructions, may cause harmful interference to radio communications. However, there is no guarantee that interference will not occur in a particular installation. If this equipment does cause harmful interference to radio or television reception, which can be determined by powering the equipment on and o, the user is encouraged to try to correct the interference by one or more of the following measures:Reorient or relocate the receiving antenna;Increase the separation between the equipment and the receiver;Connect the equipment into an outlet on a circuit dierent from that which the receiver is connected;Consult the dealer or an experienced radio / TV technician for help.This device complies with Industry Canada license-exempt RSS standard(s).Operation is subject to the following two conditions: (1) this device may not cause interference, and (2) this device must accept any interference, including interference that may cause undesired operation of the device.This Class [B] digital apparatus complies with Canadian ICES-003.Son fonctionnement est soumis aux deux conditions suivantes: (1) cet appareil ne peut pas causer l’intervention, et (2) cet appareil doit accepter de l’intervention, y compris l’intervention qui peut causer l’opération non désirée de.Cet appareil numérique de la classe [B] est conforme à la norme NMB-003 du Canada.Cet appareil s’accorde avec Industrie Canada licence-exempte RSS standard.FCC RADIATION EXPOSURE This equipment complies with FCC radiation exposure limits set forth for an uncontrolled This transmitter must not be co-located or operating in conjunction with any other antenna or transmitter.MOTORCYCLE DISCLAIMERInteracting with the camera while riding could cause a crash and you or others may be seriously injured or killed.• Keep your eyes and mind on the road;• Avoid looking at the camera for too long;• Stop the vehicle in a safe location before adjusting the camera.environment.](https://usermanual.wiki/Drift-Innovation/FD9960/User-Guide-2130760-Page-11.png)