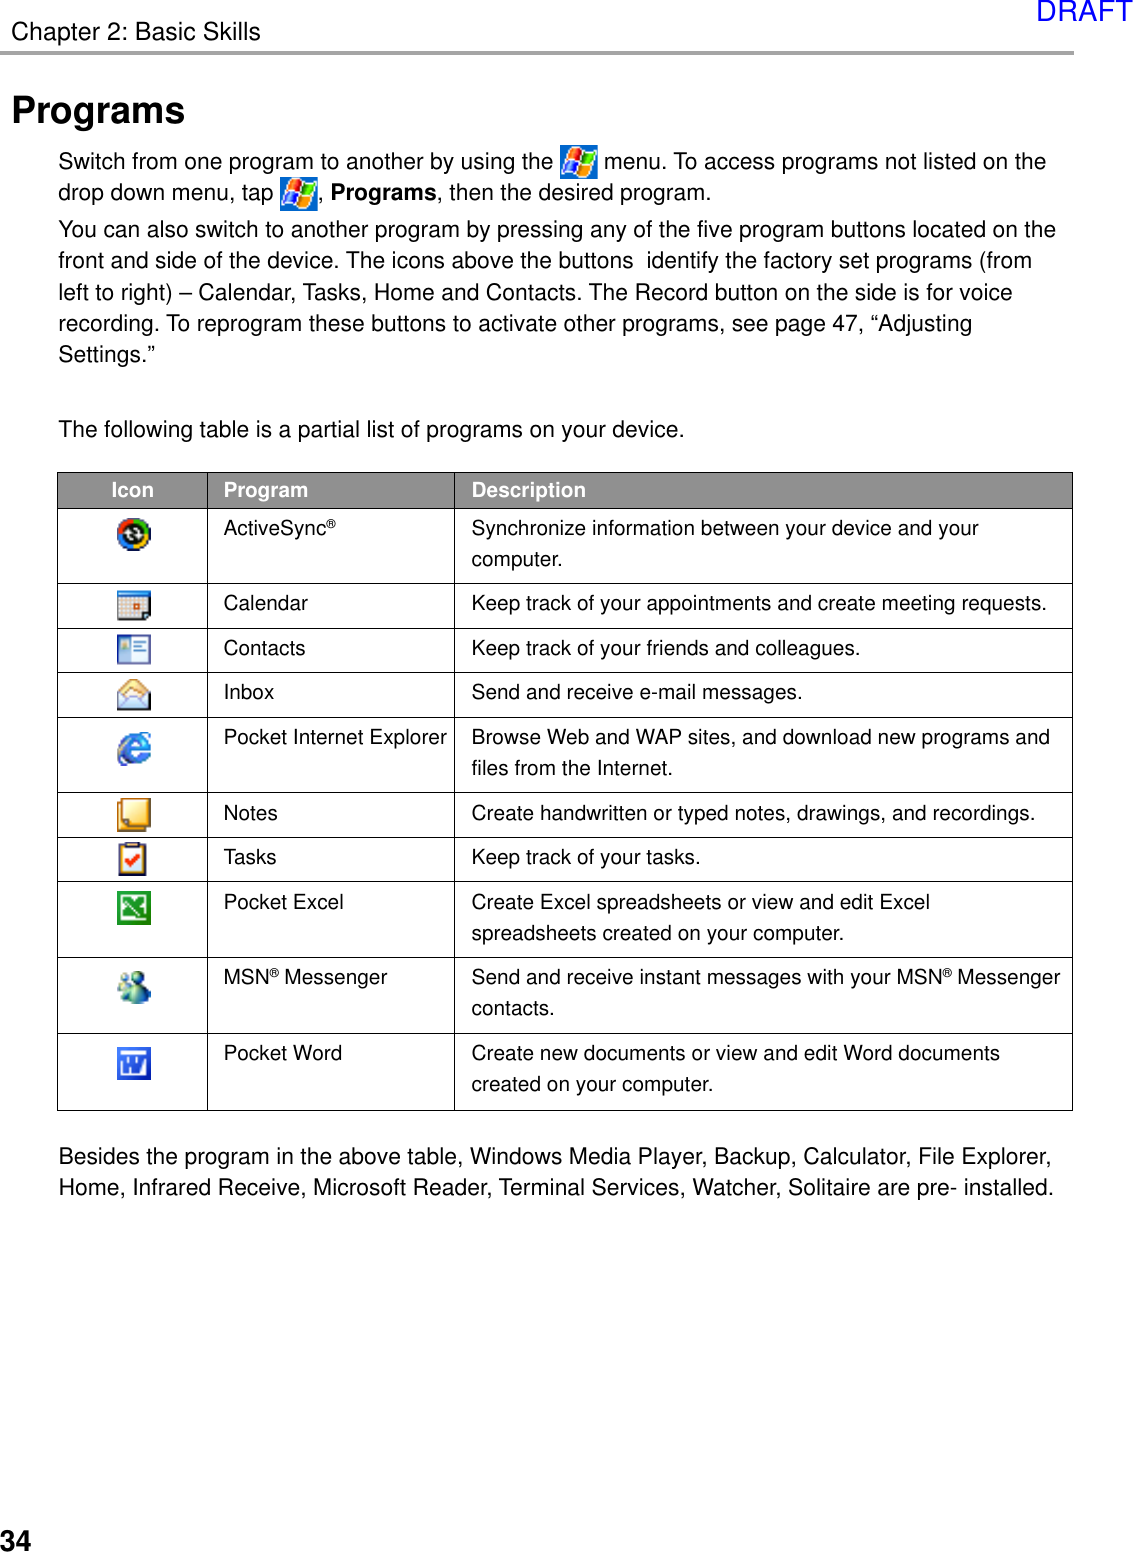
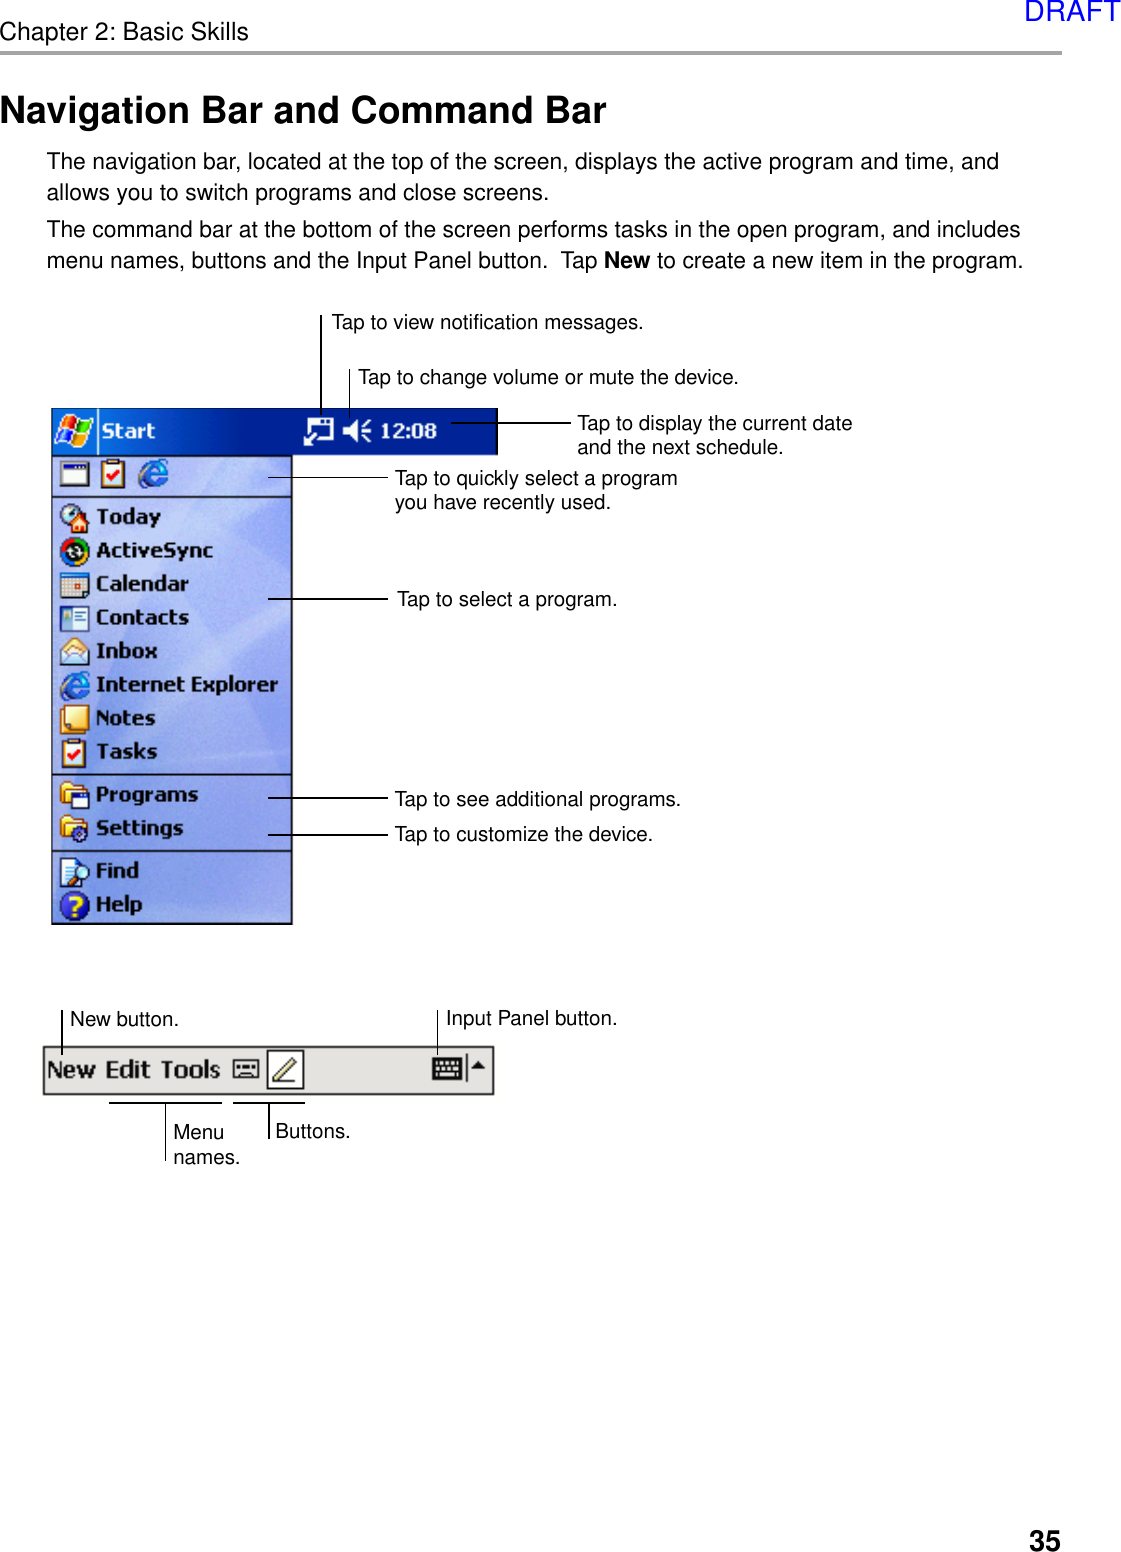
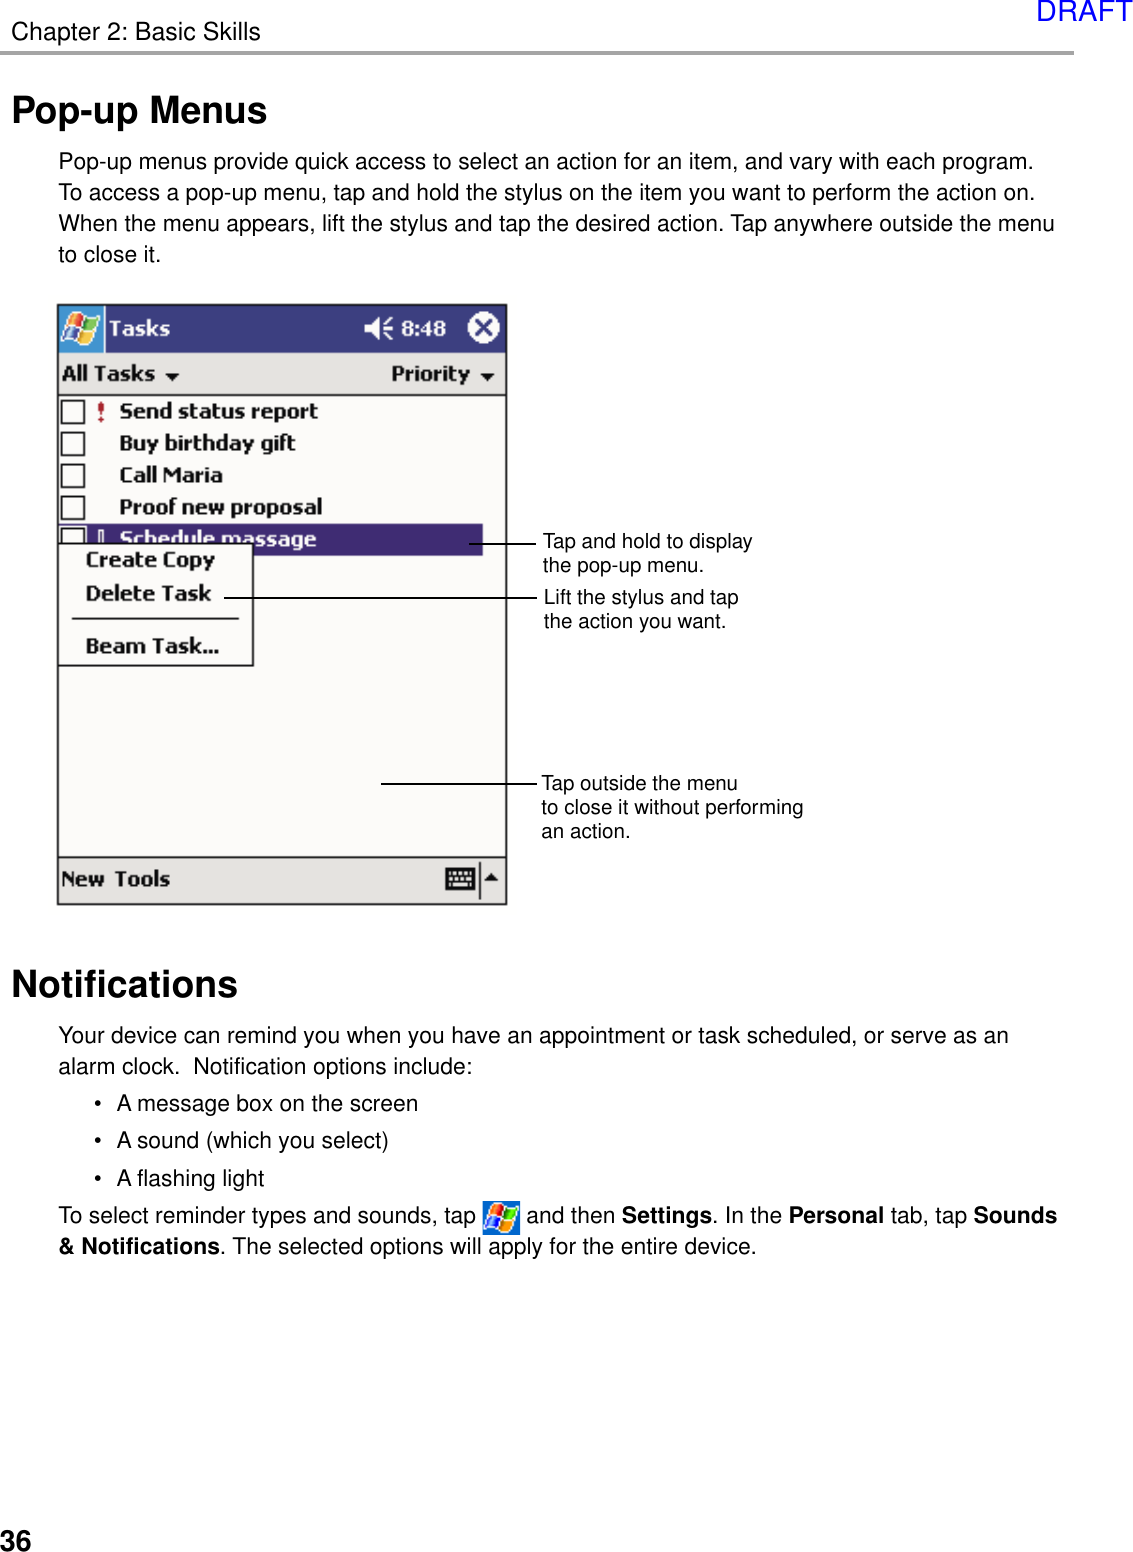
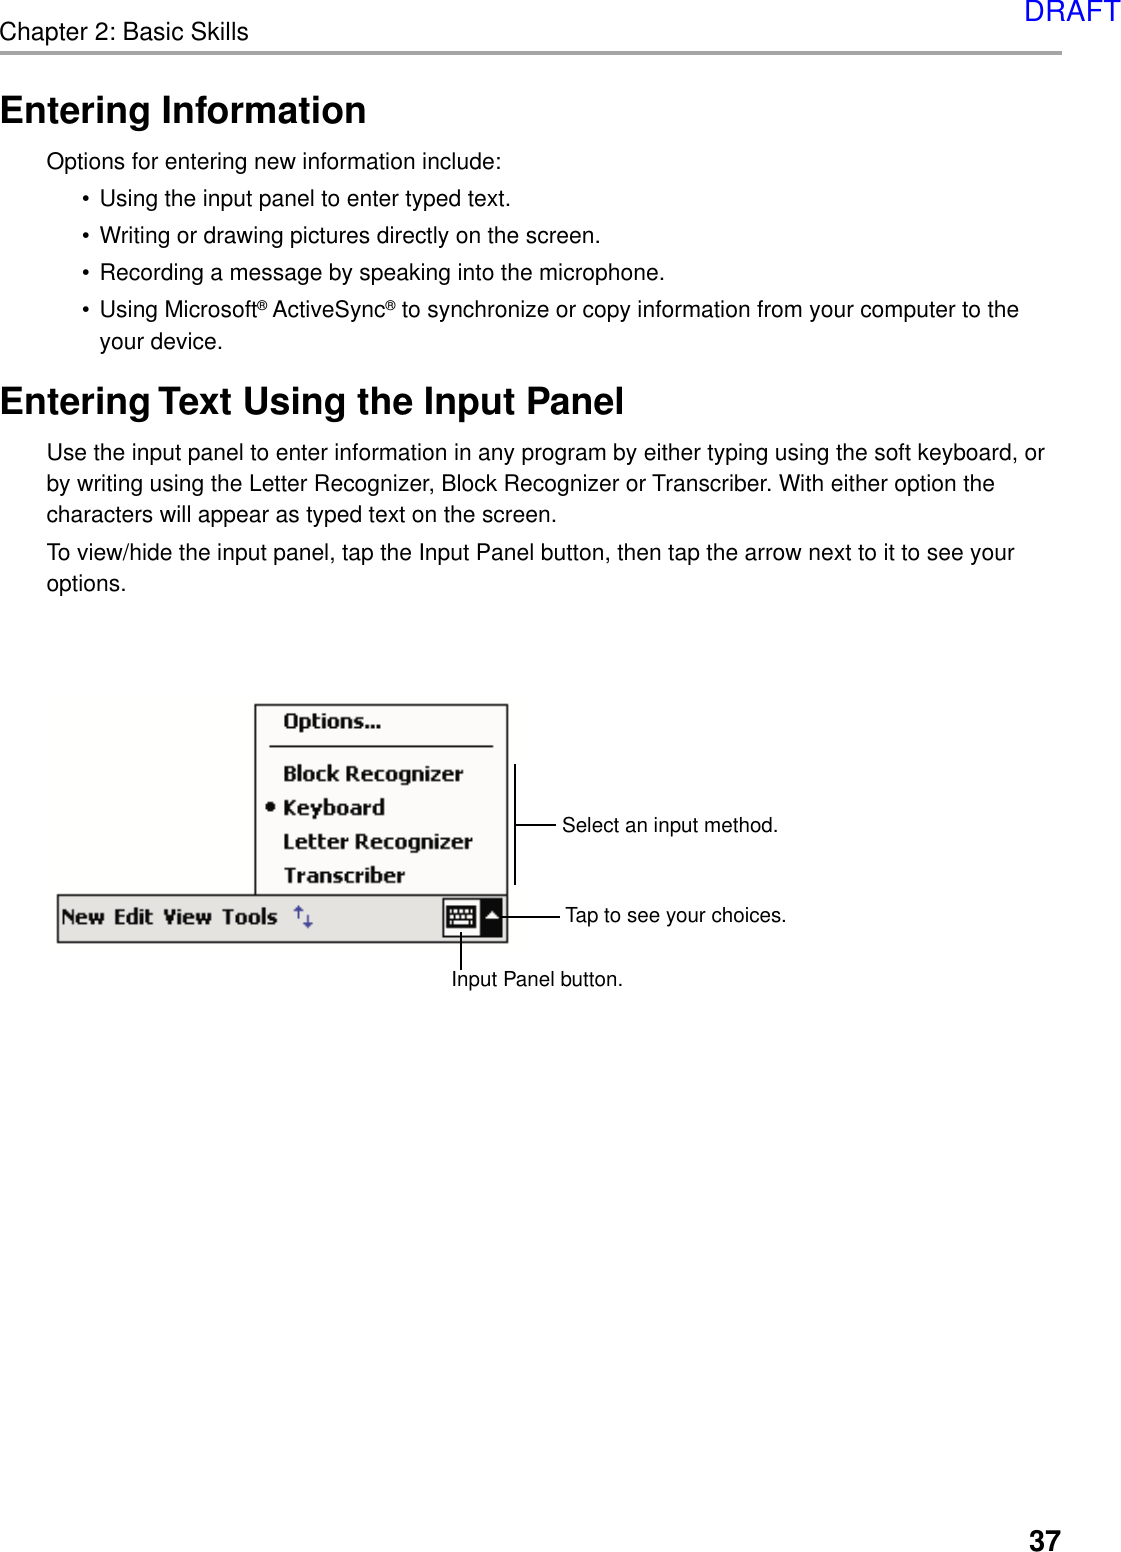
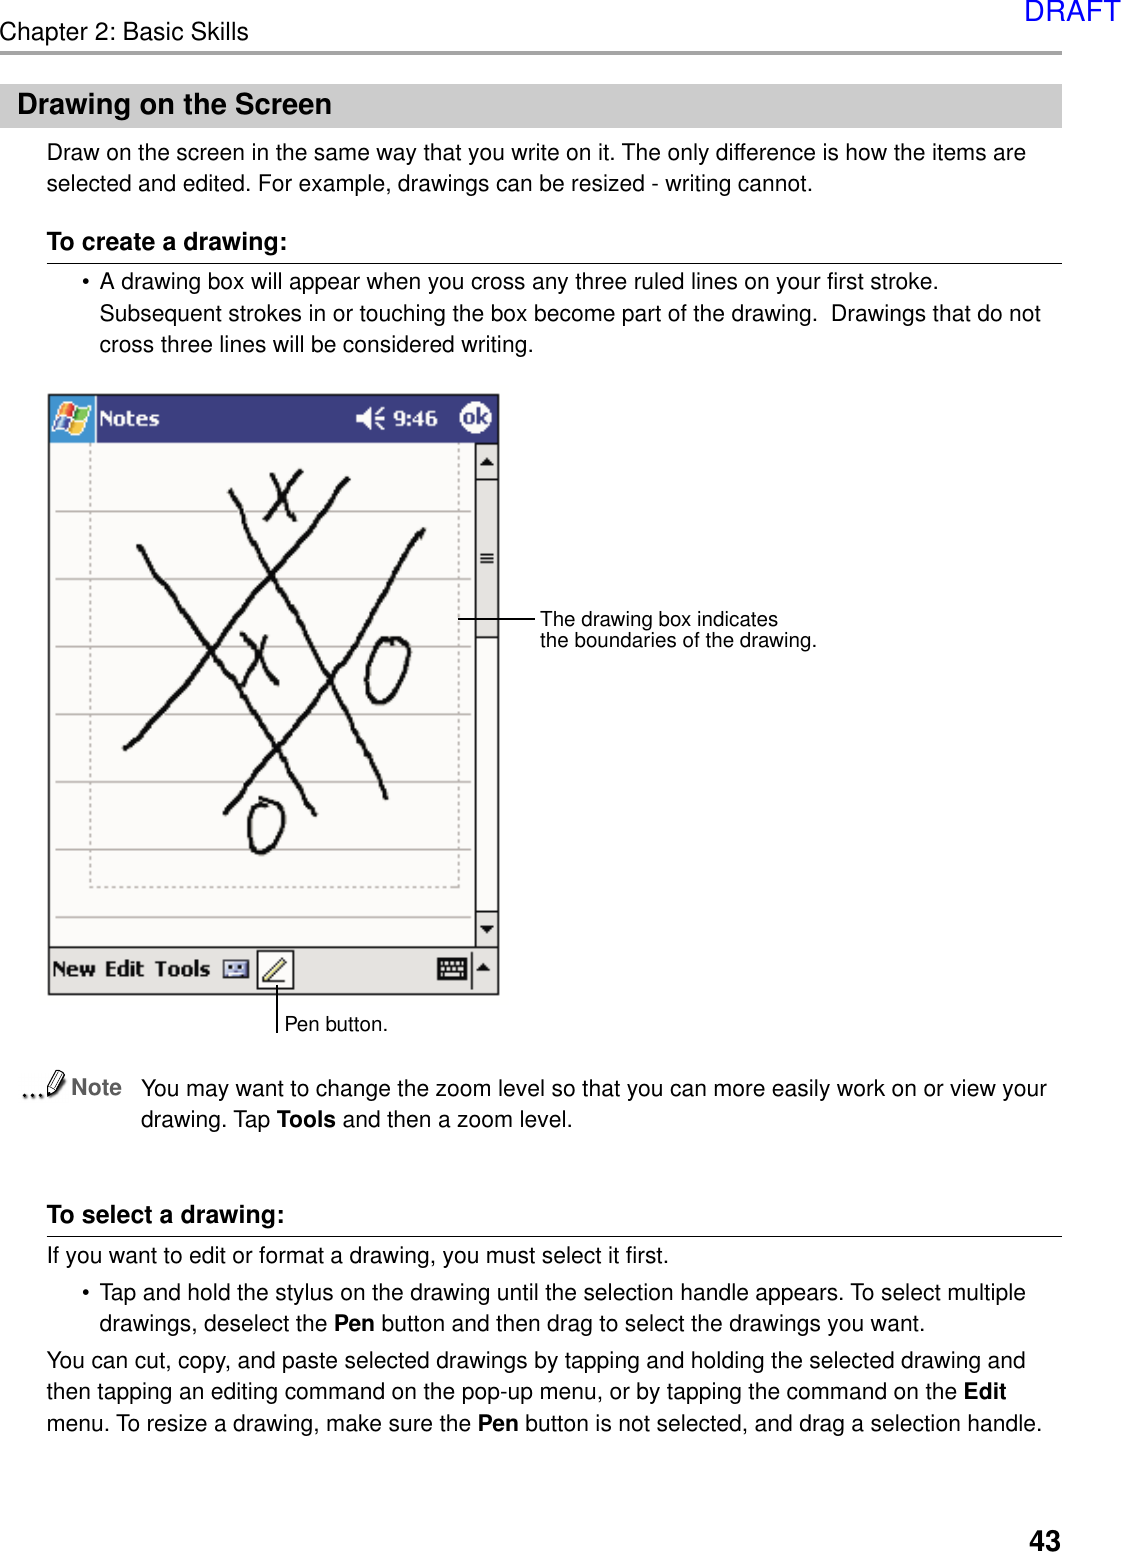
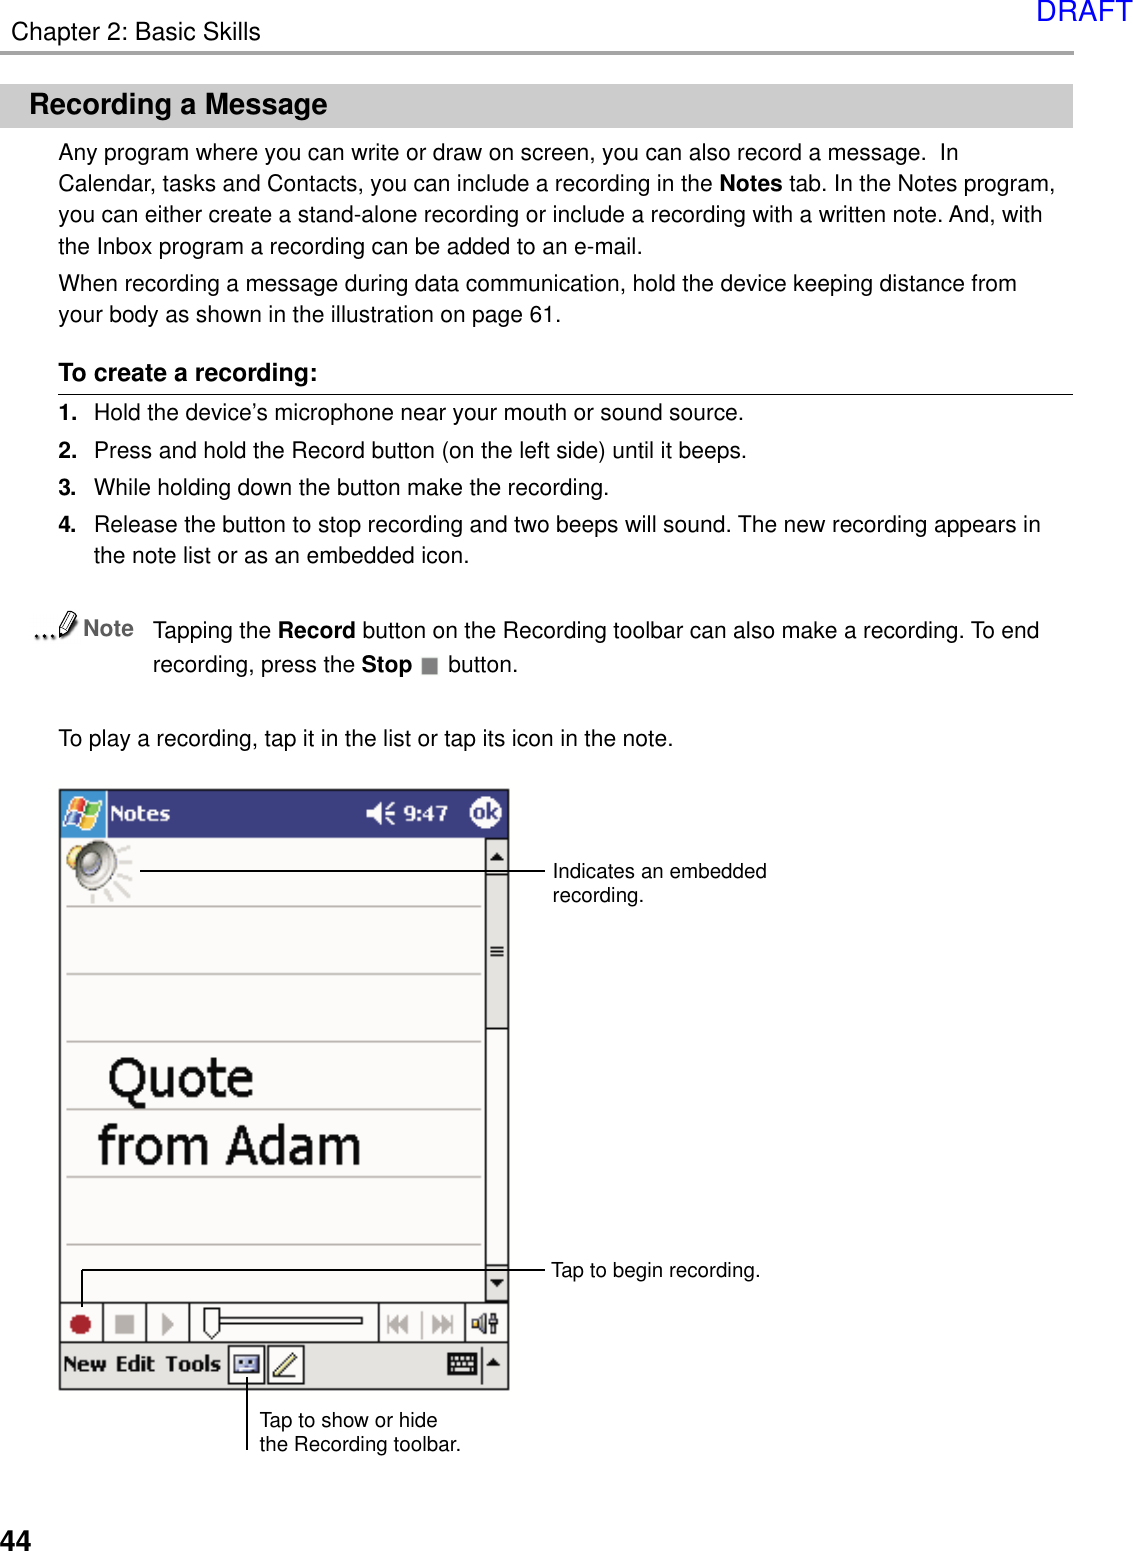
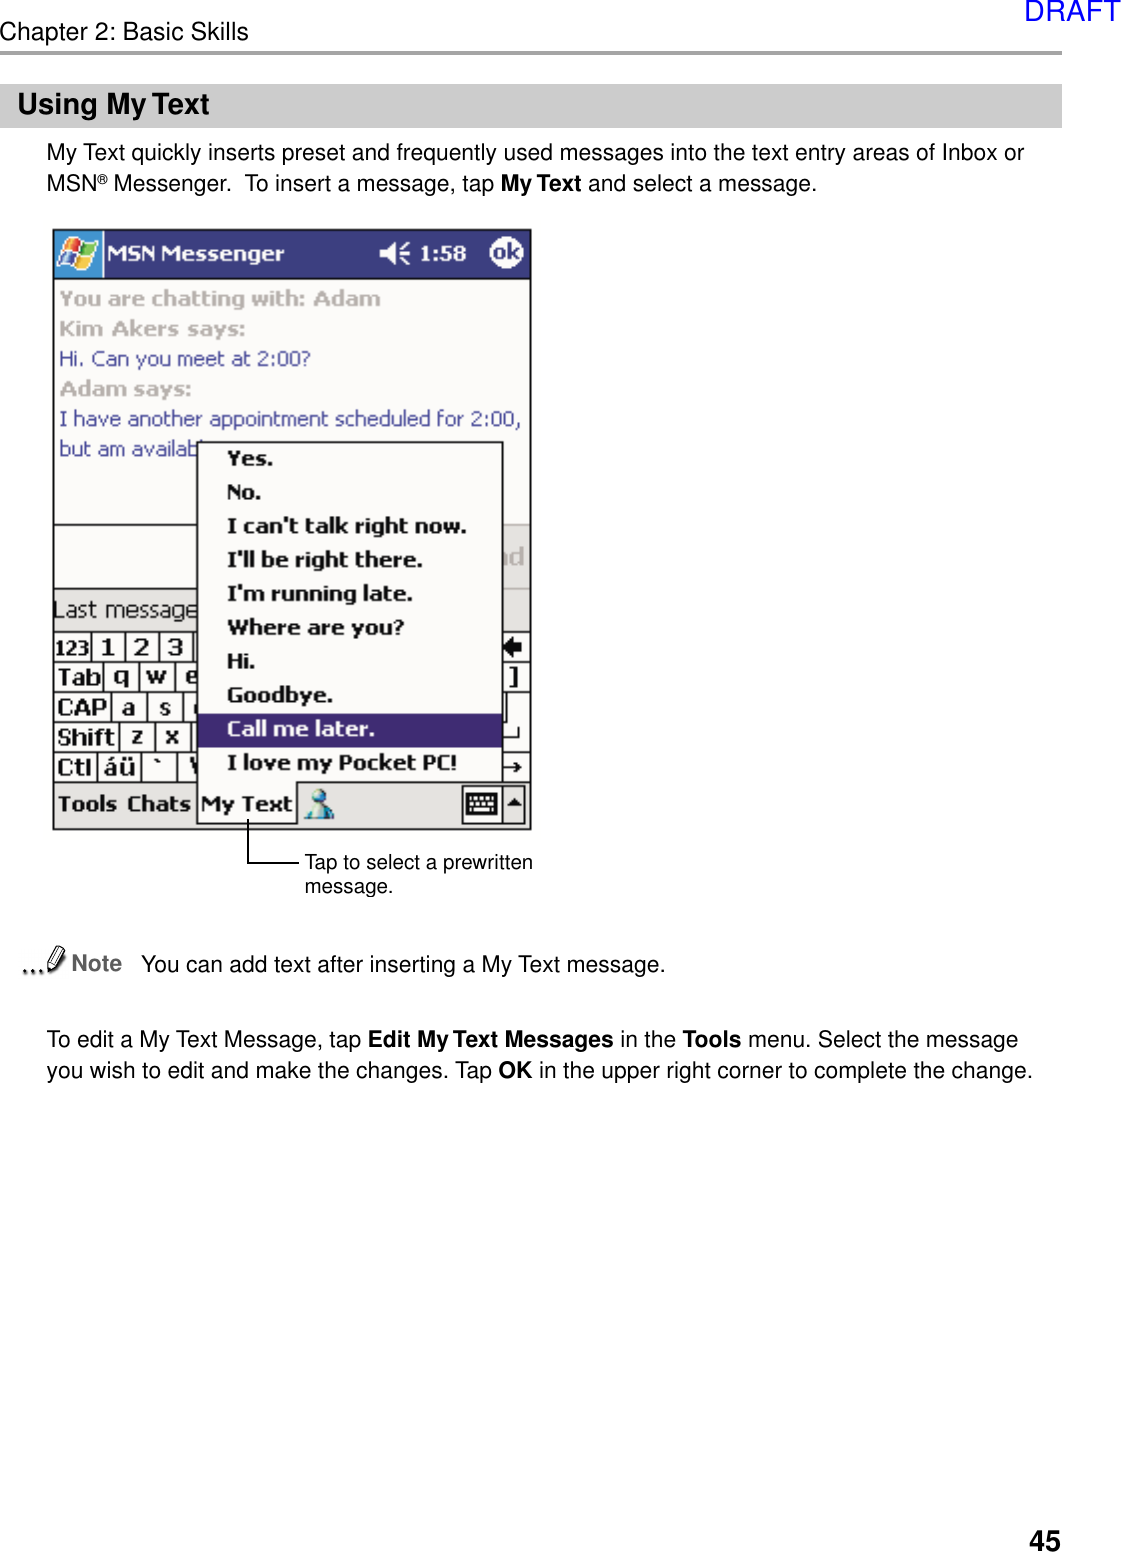
Dynabook CET0200MT Hand-held Computer and Cellular Telephone User Manual Thera

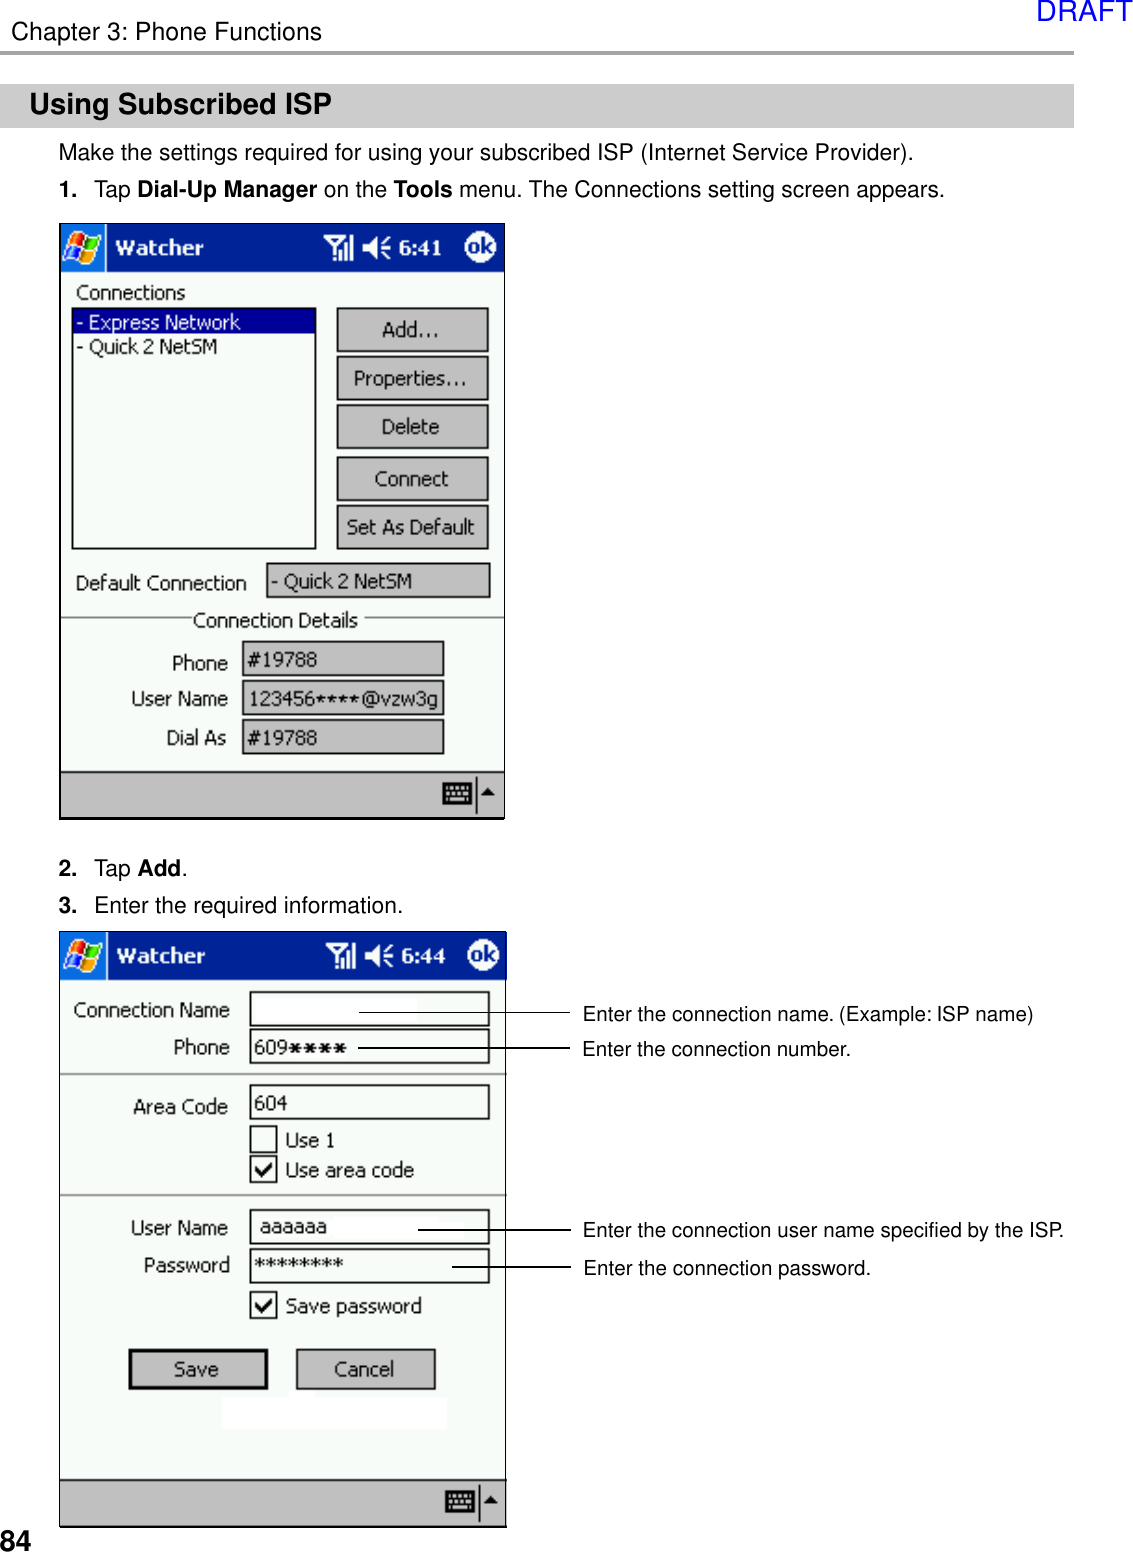
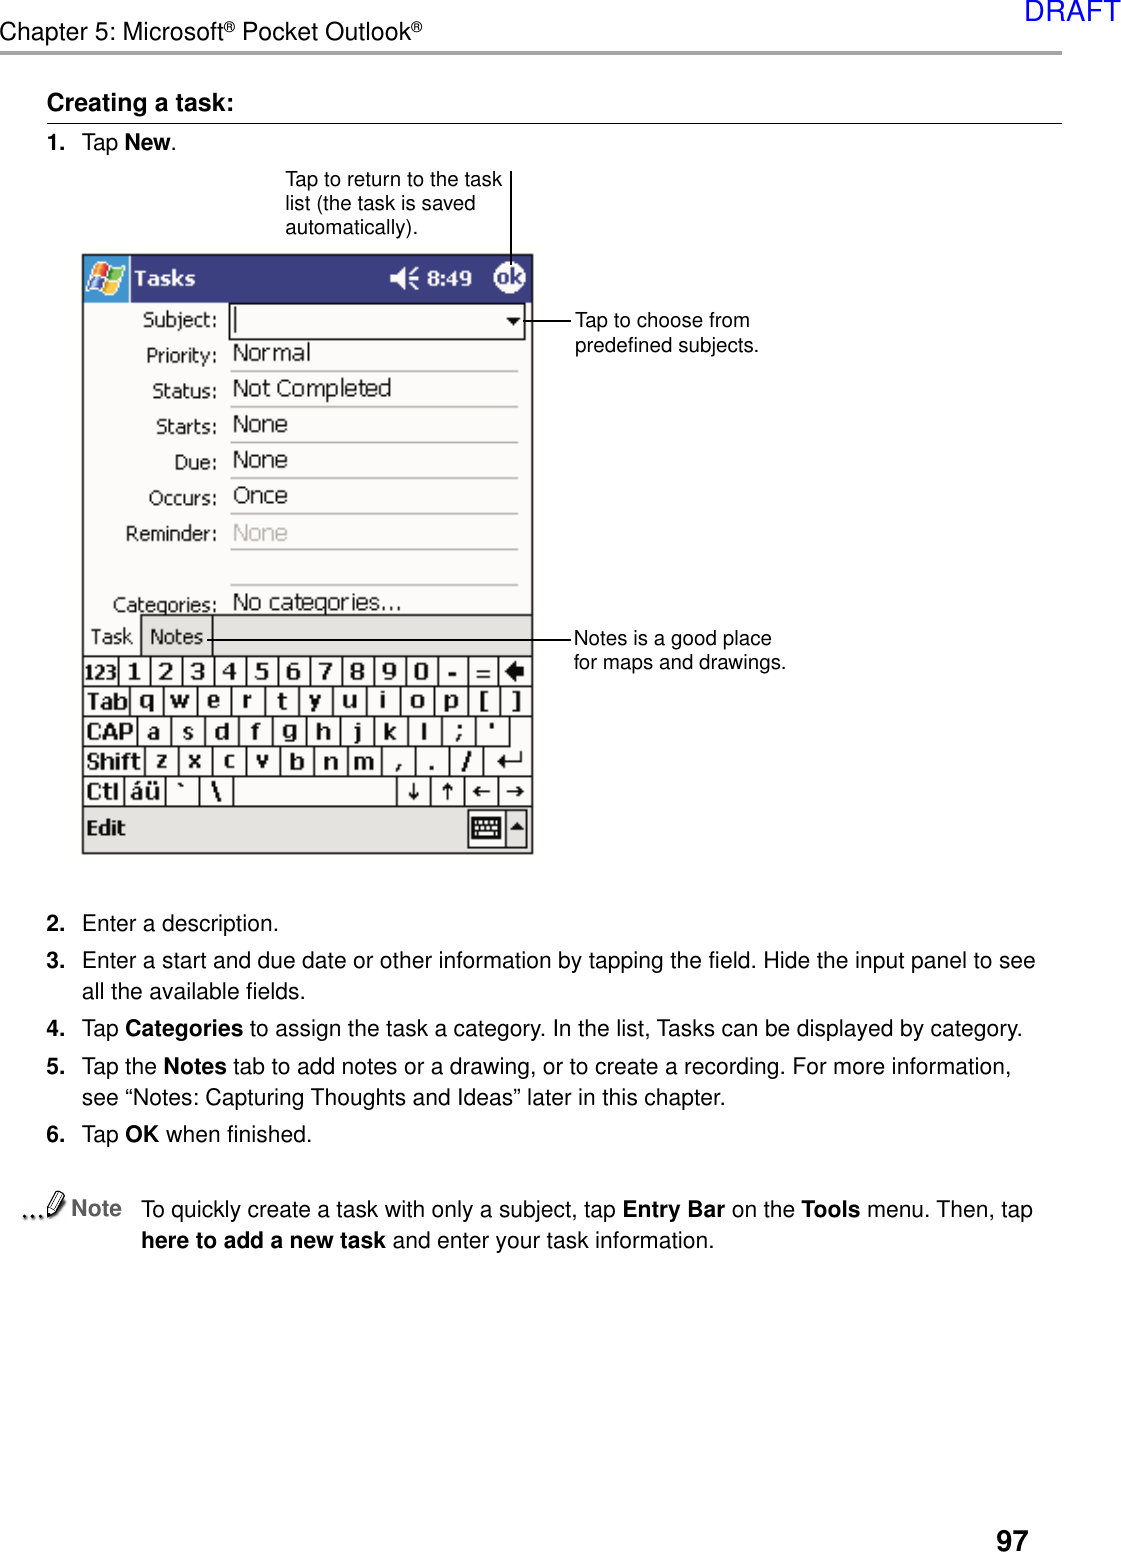
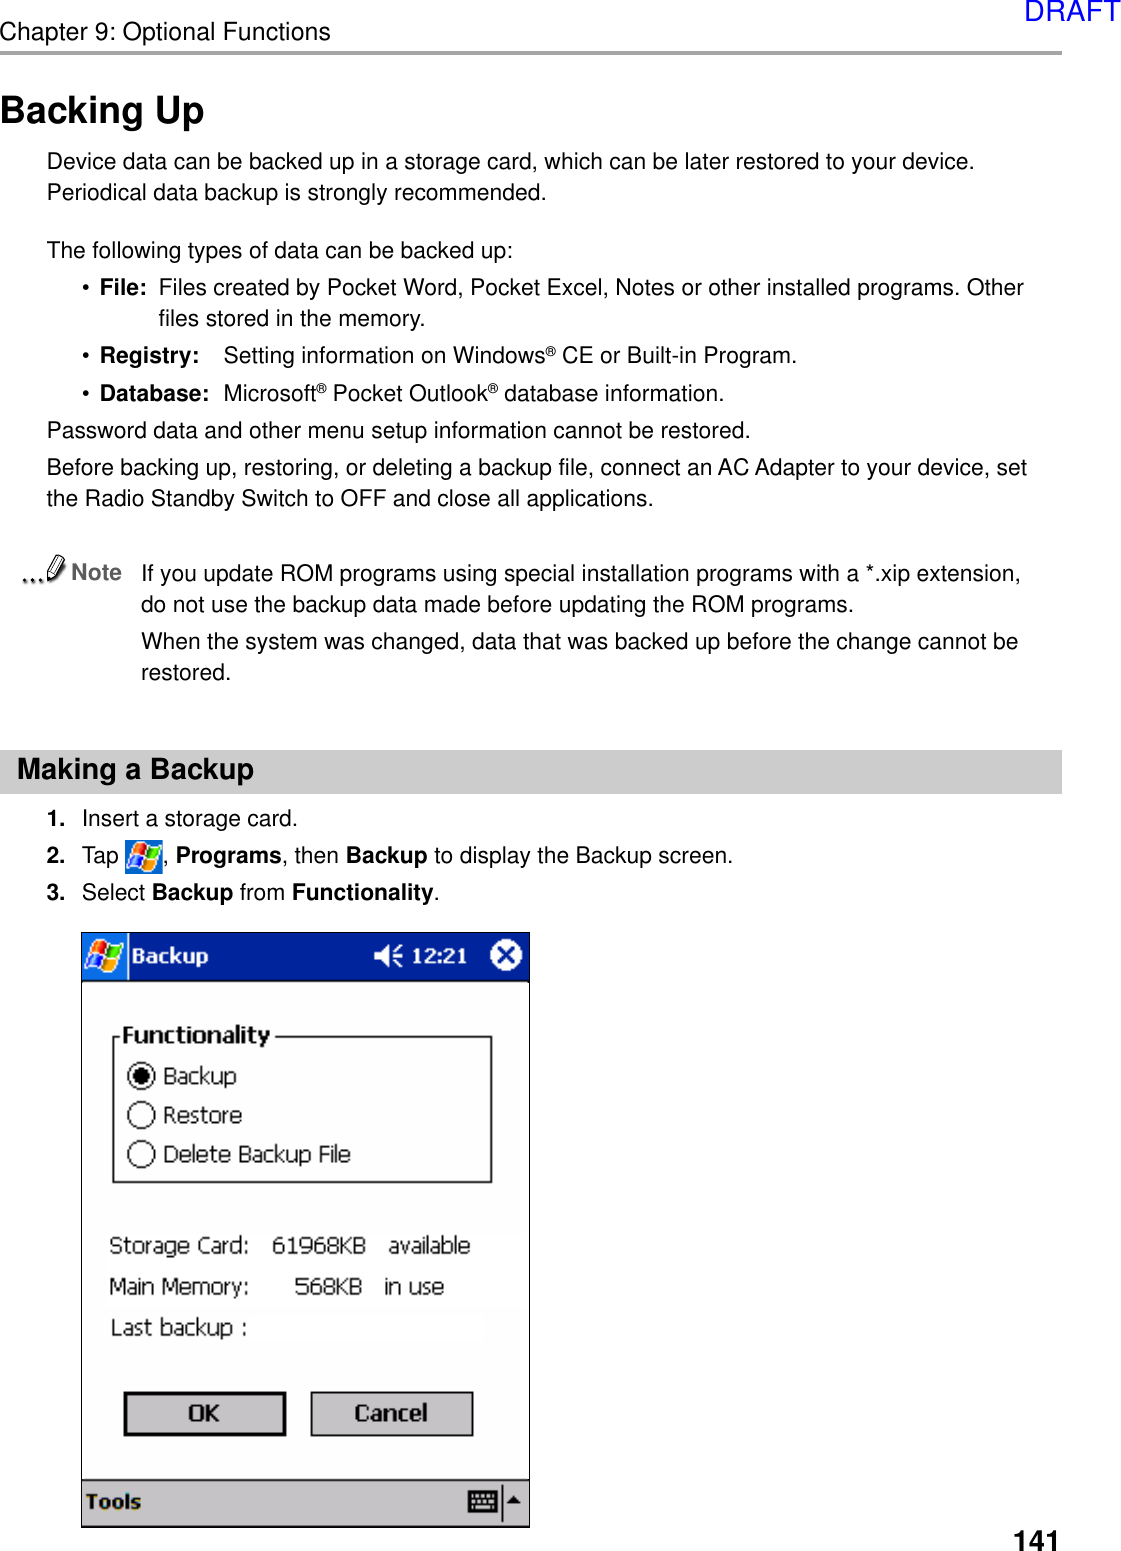
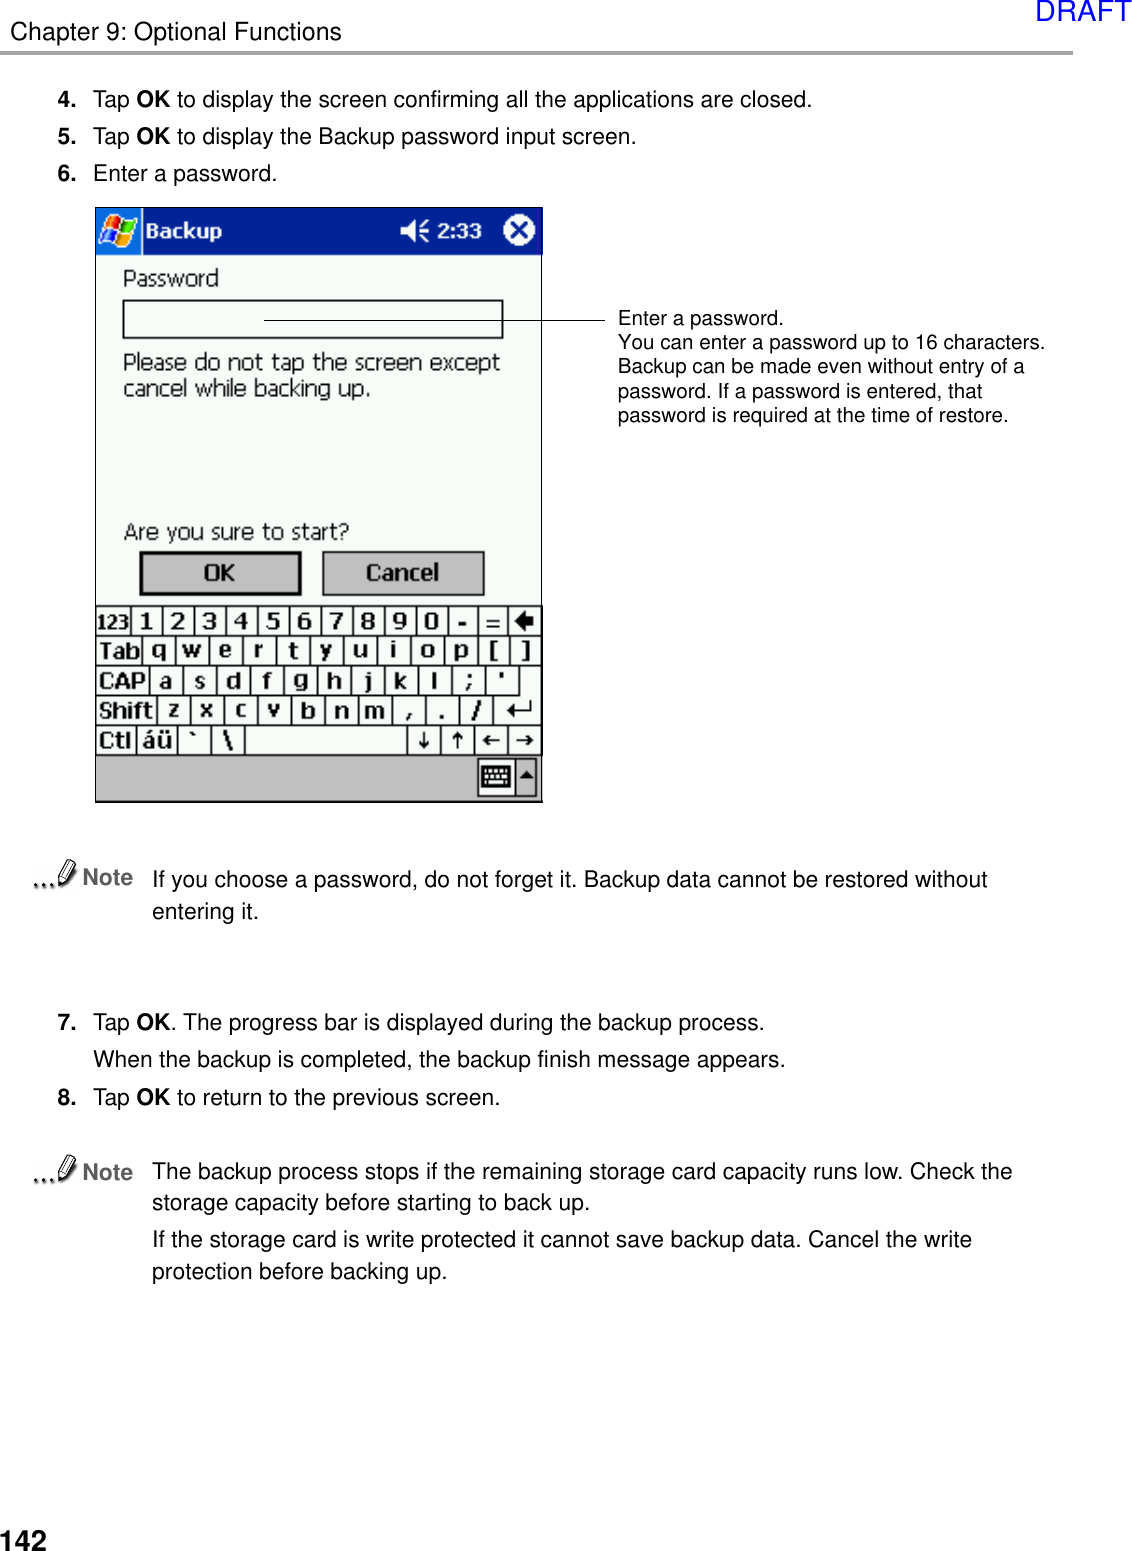
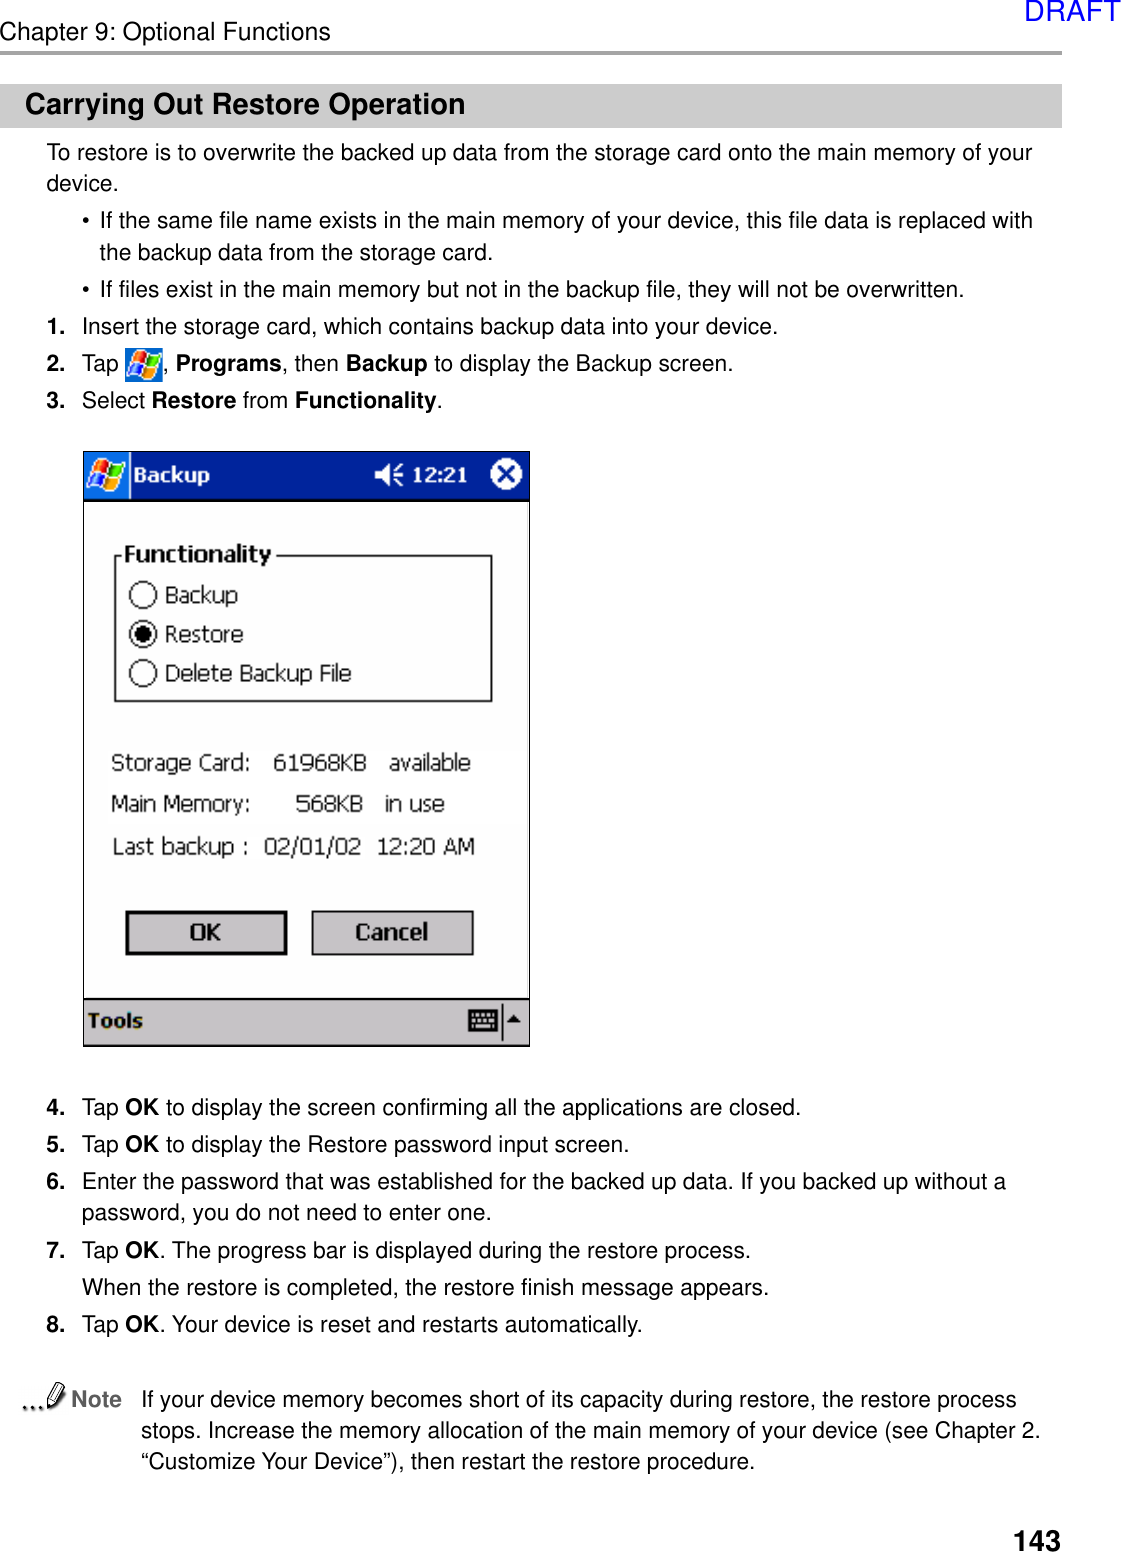
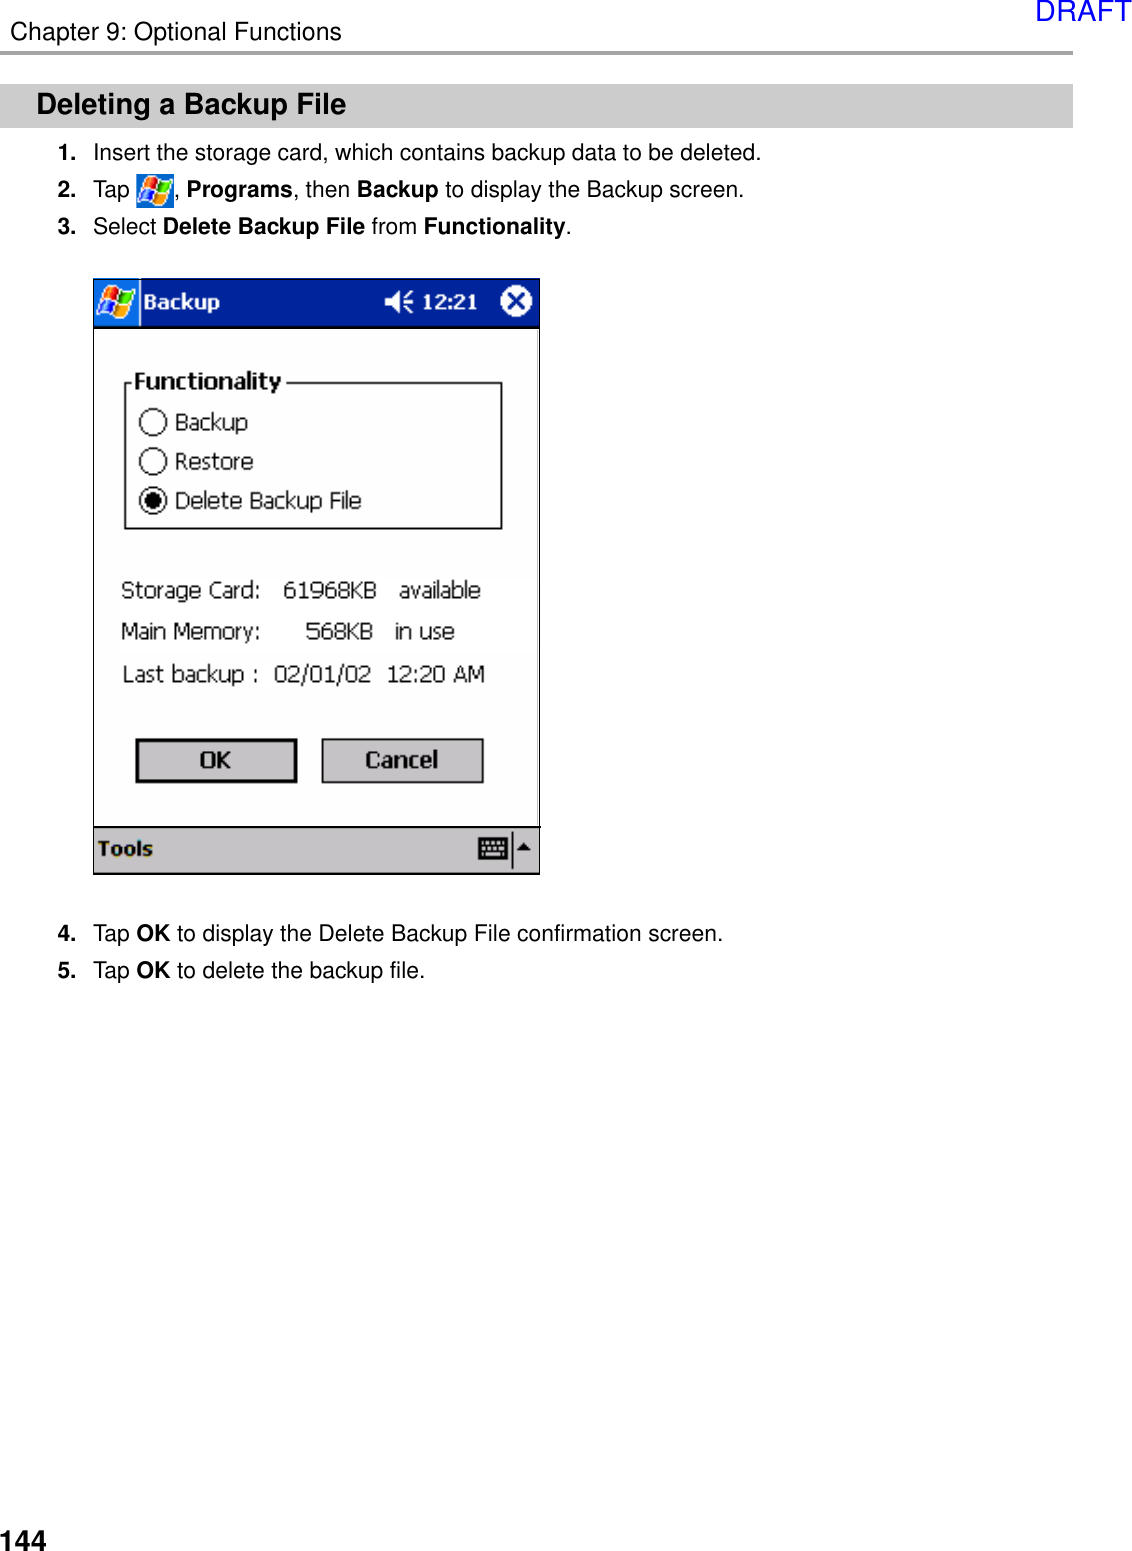
Toshiba Corporation Hand-held Computer and Cellular Telephone Thera
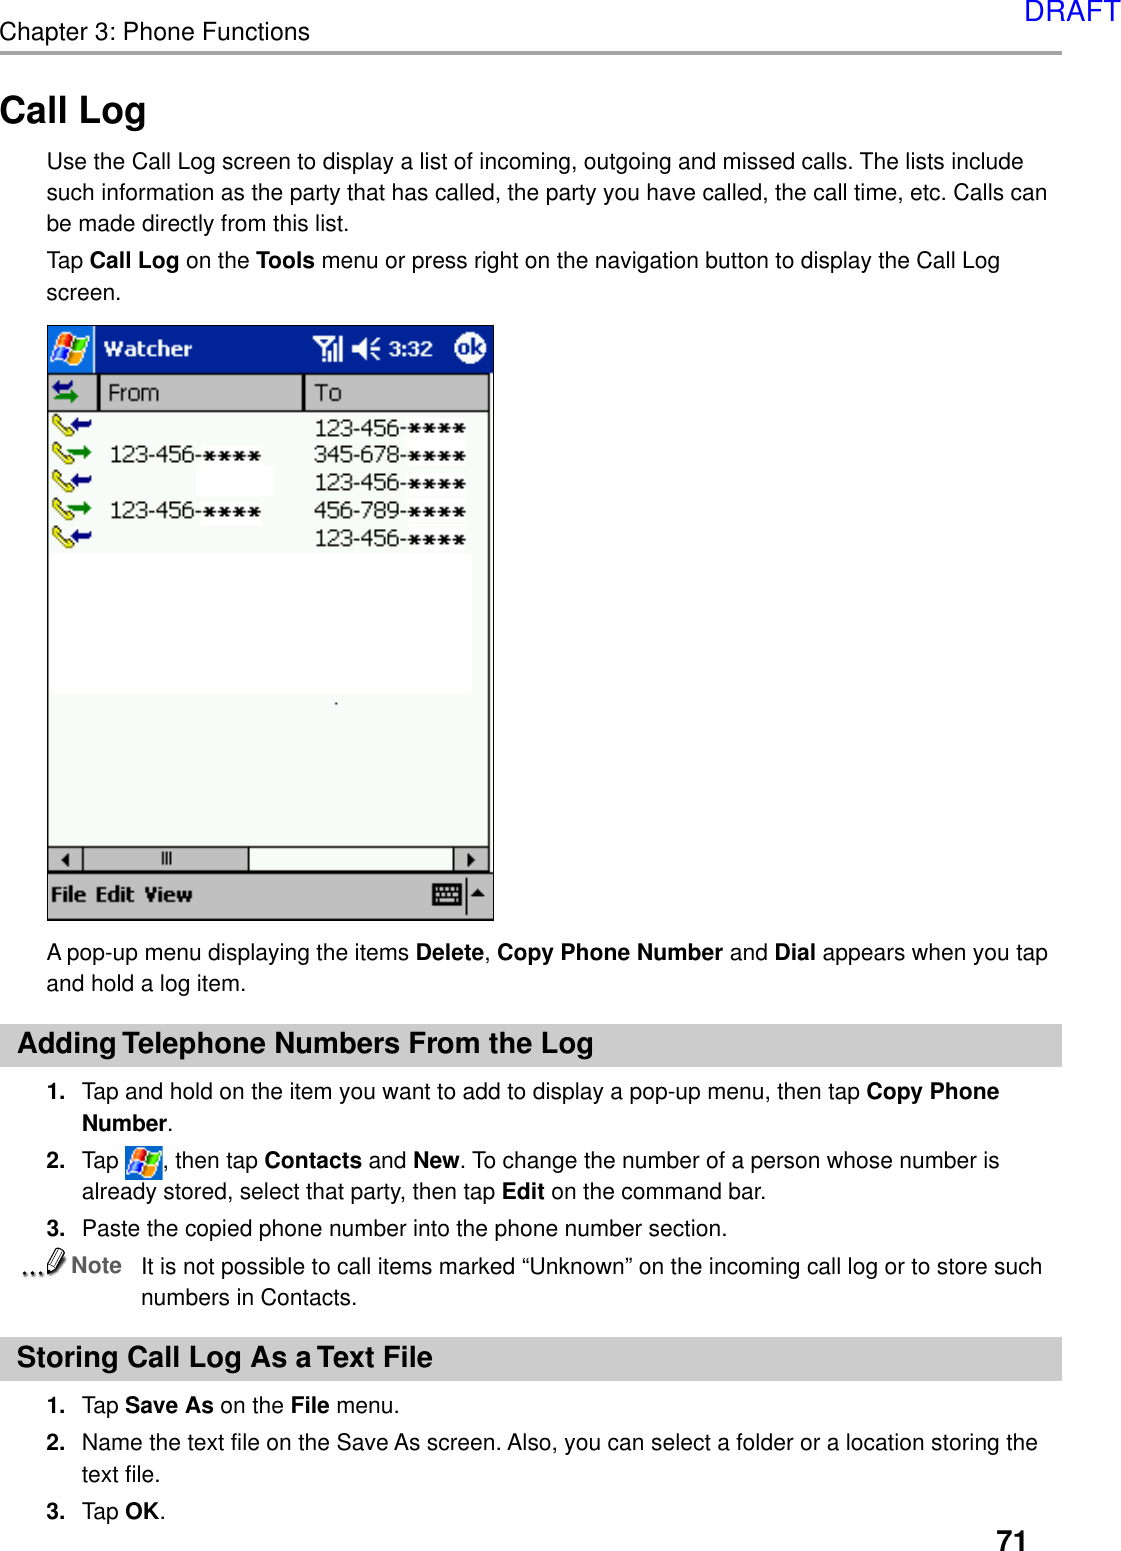
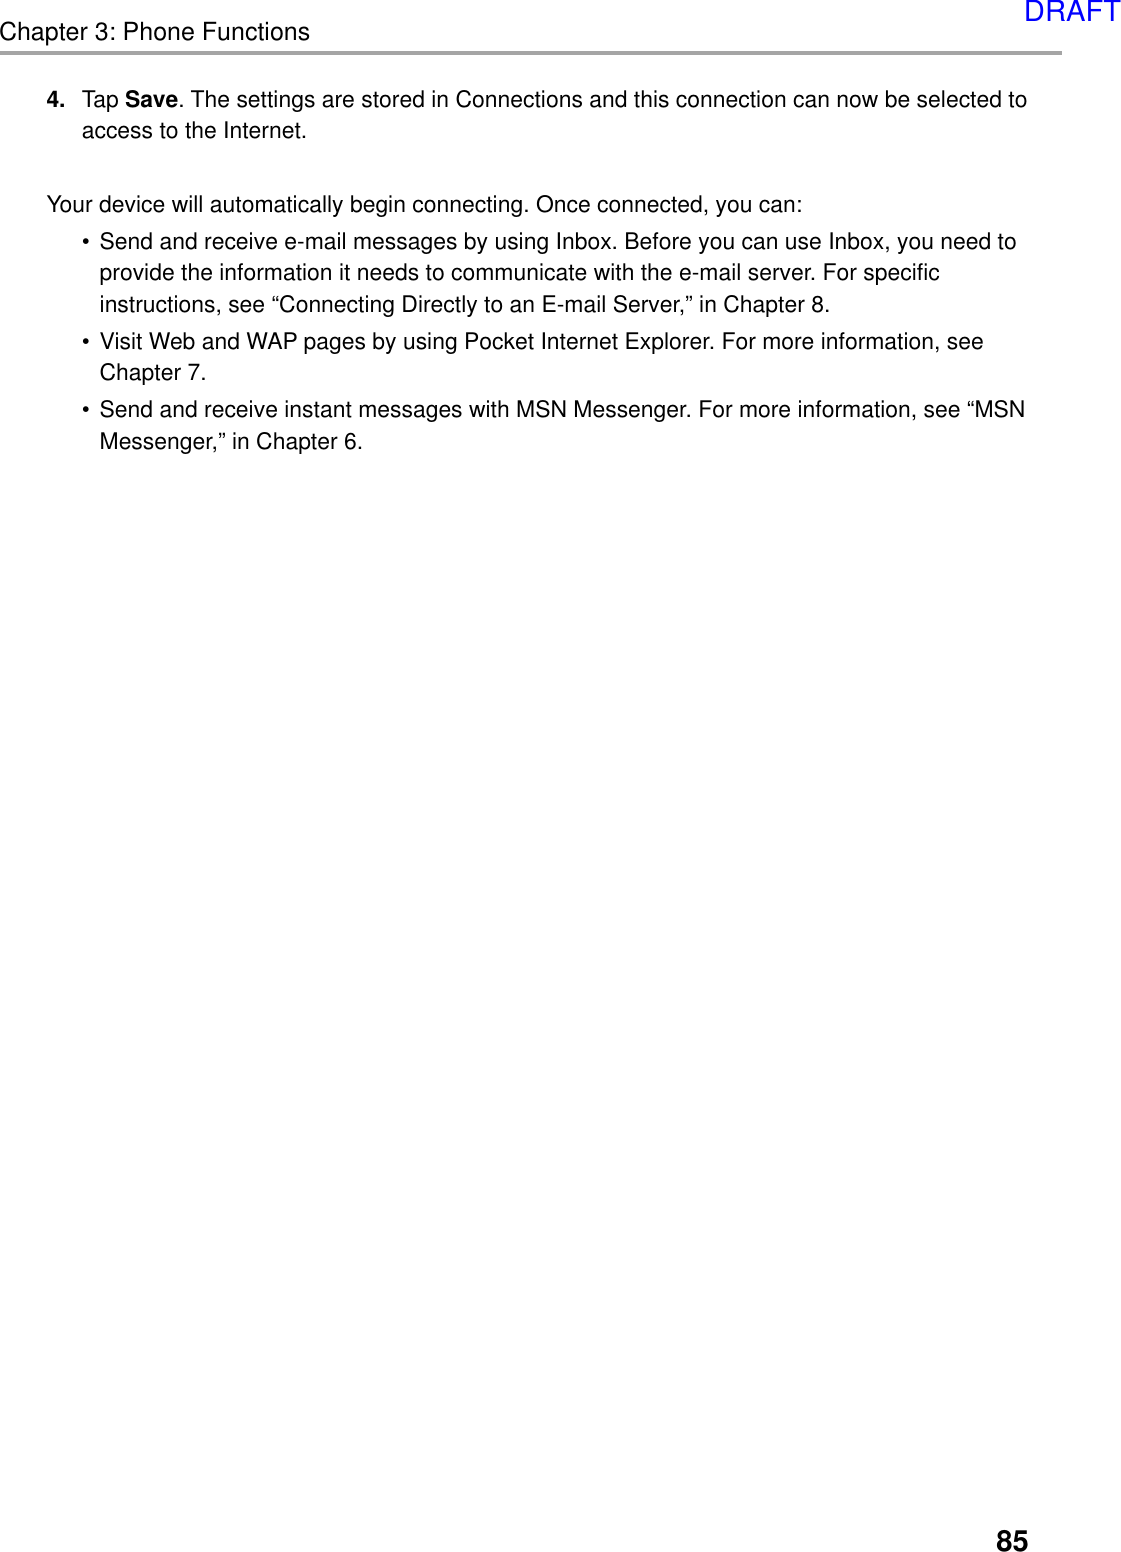
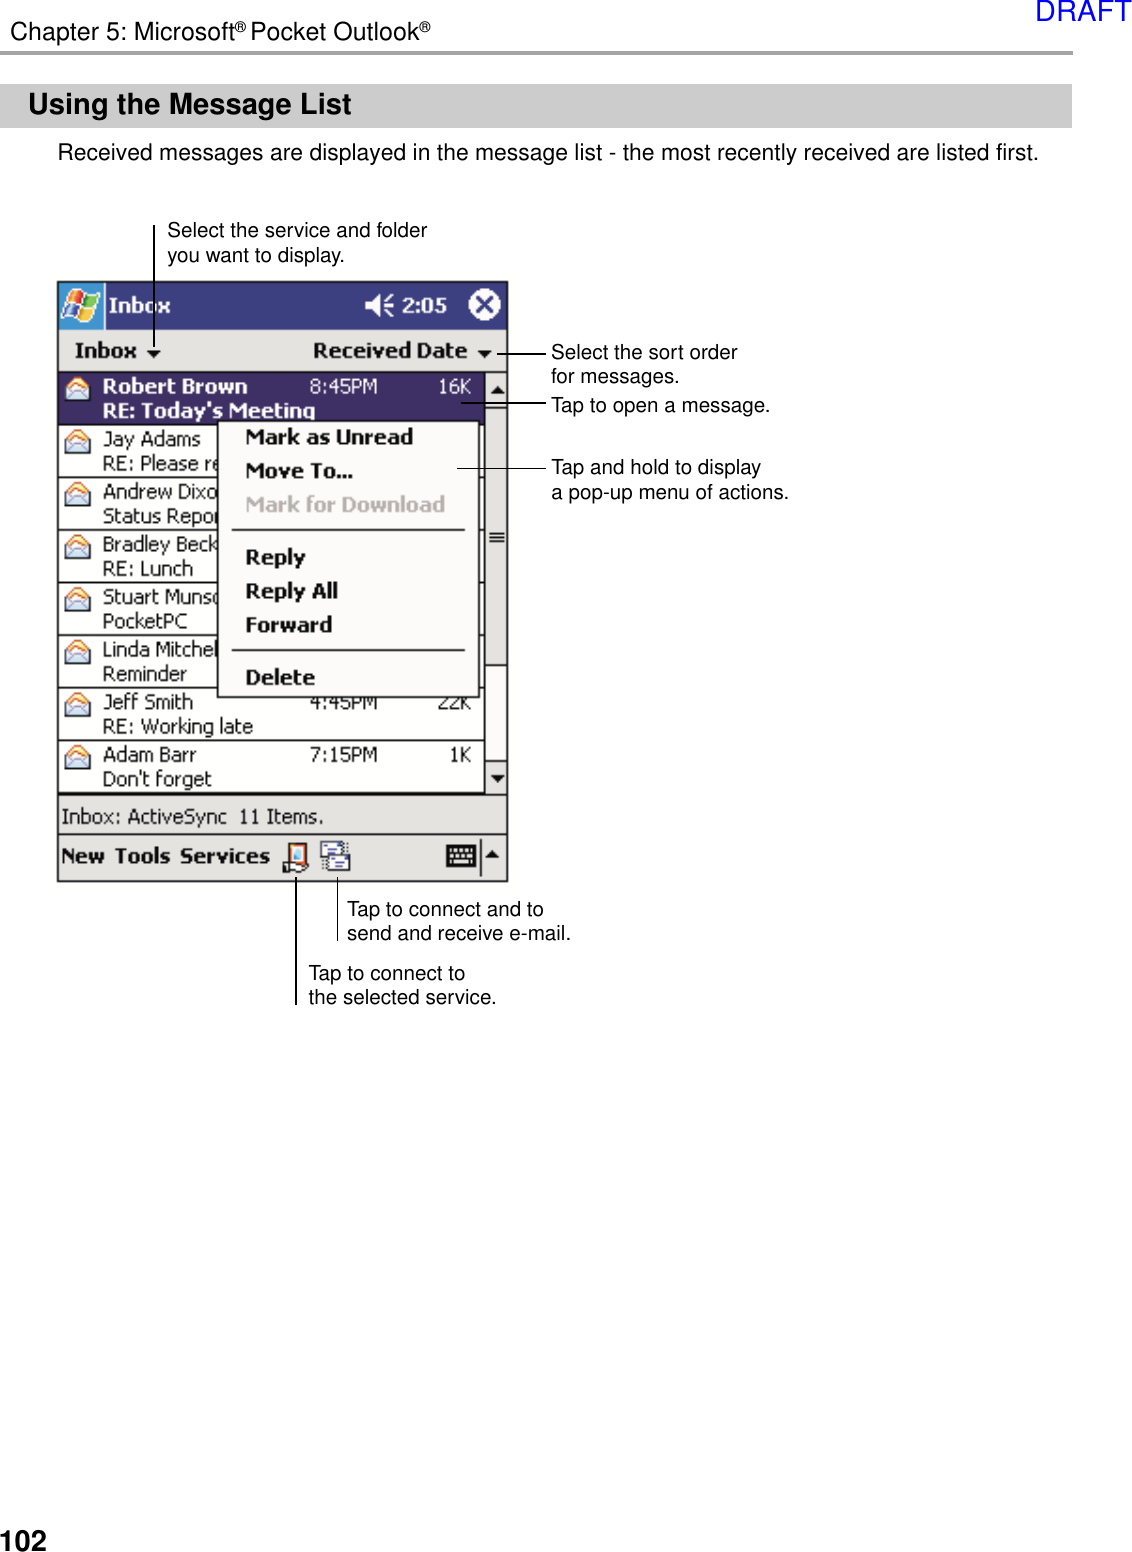
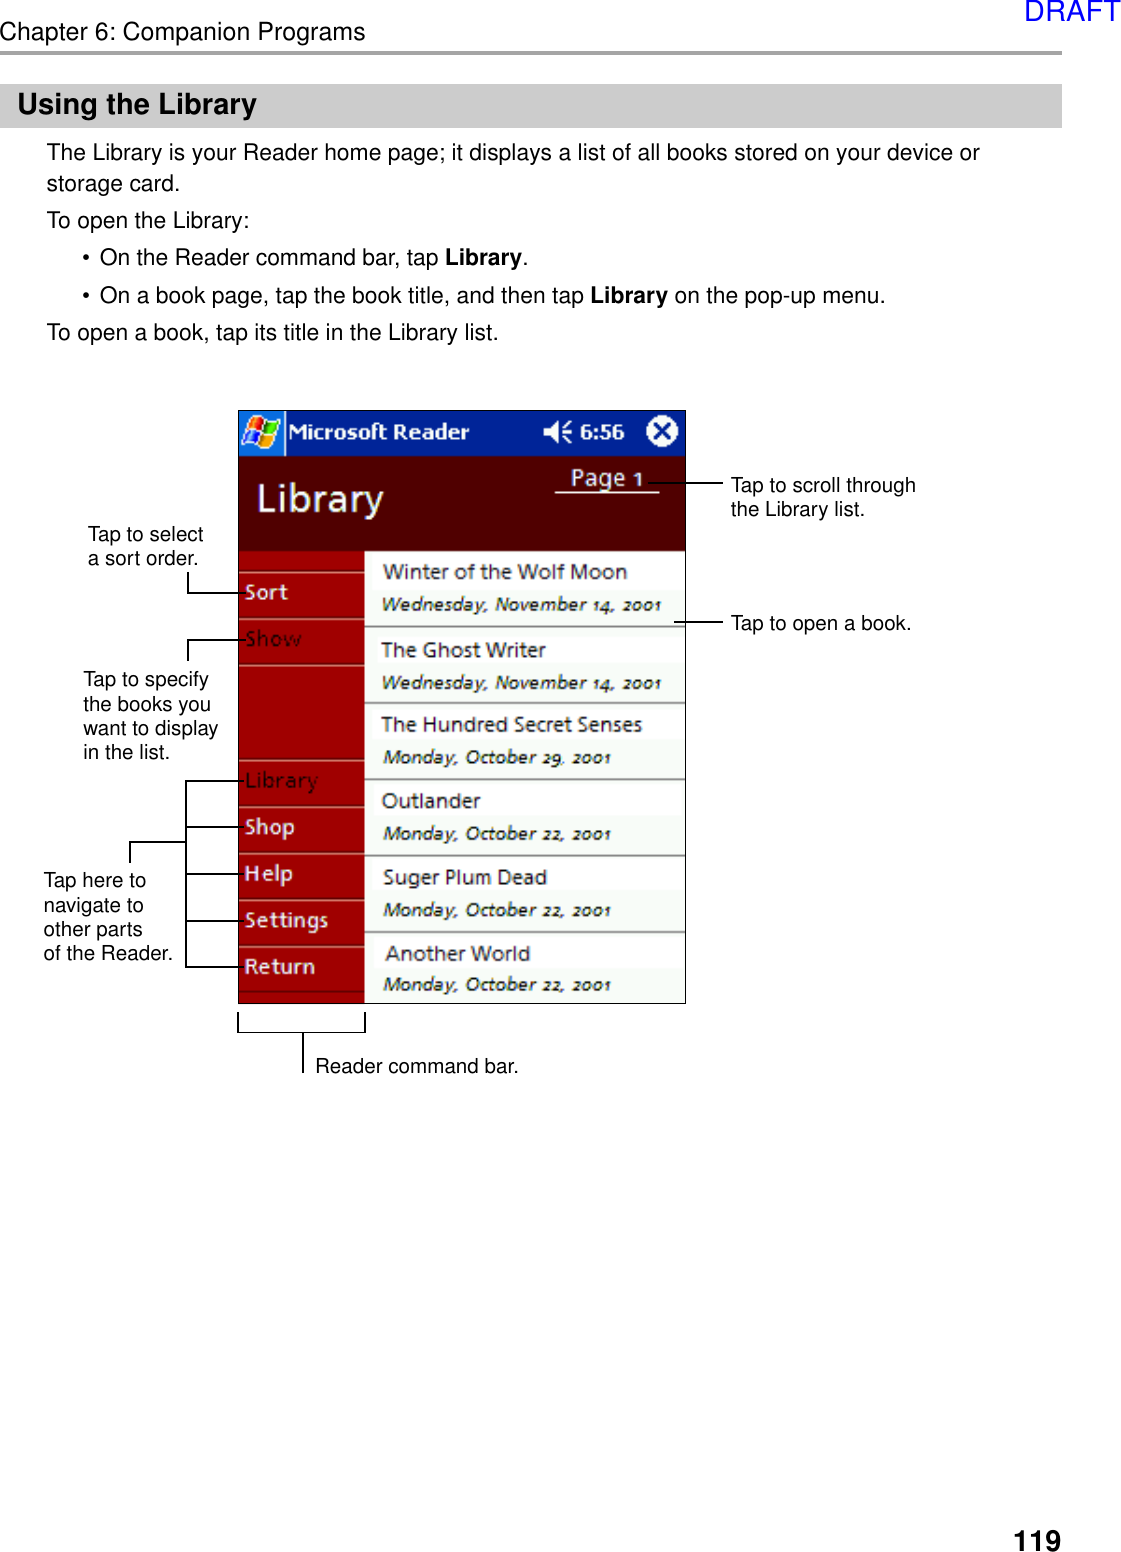
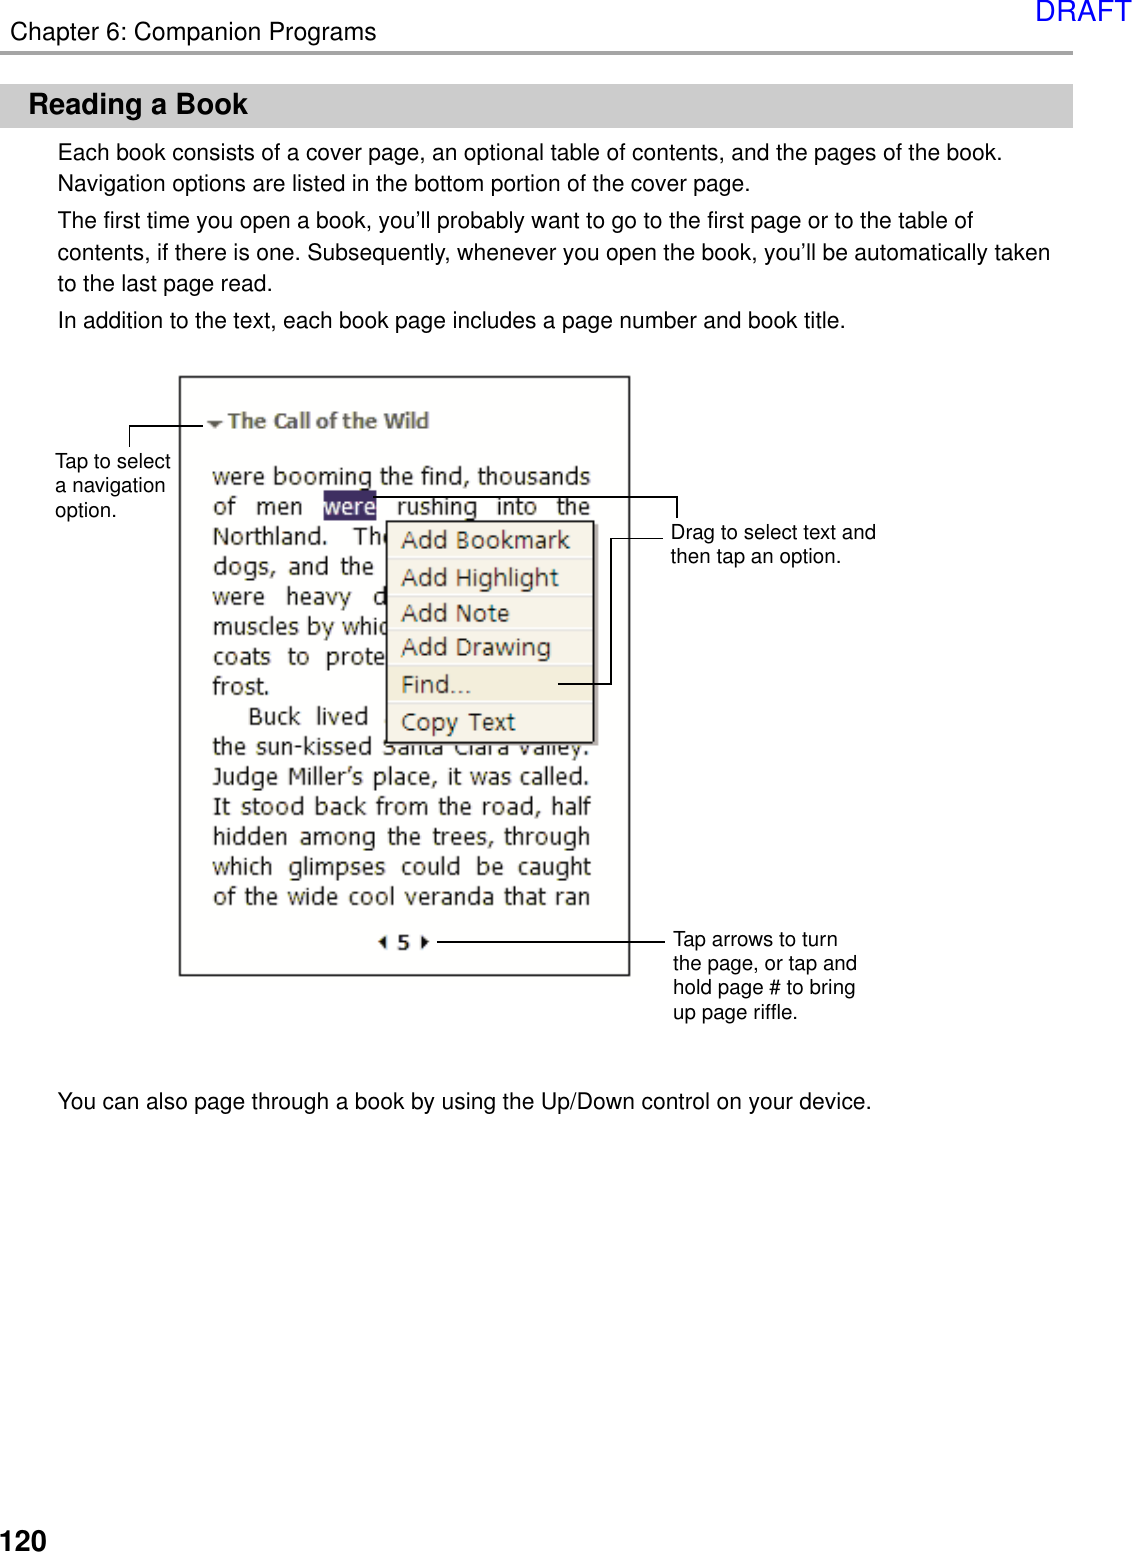
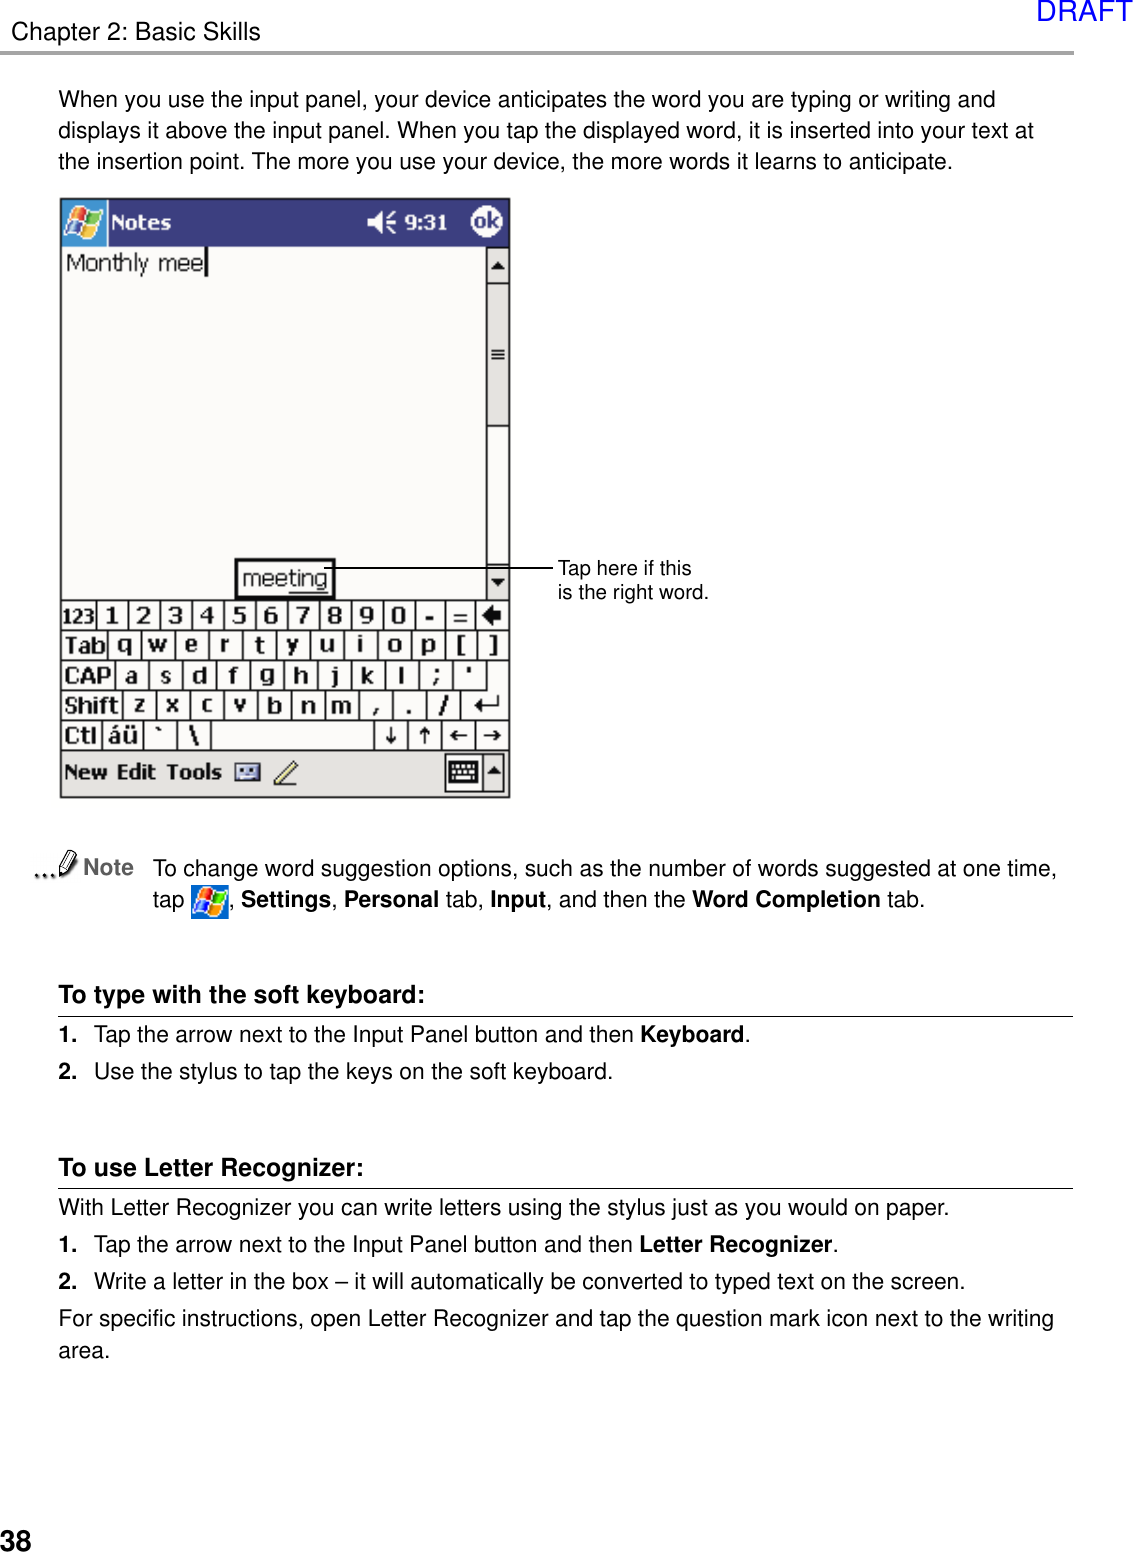
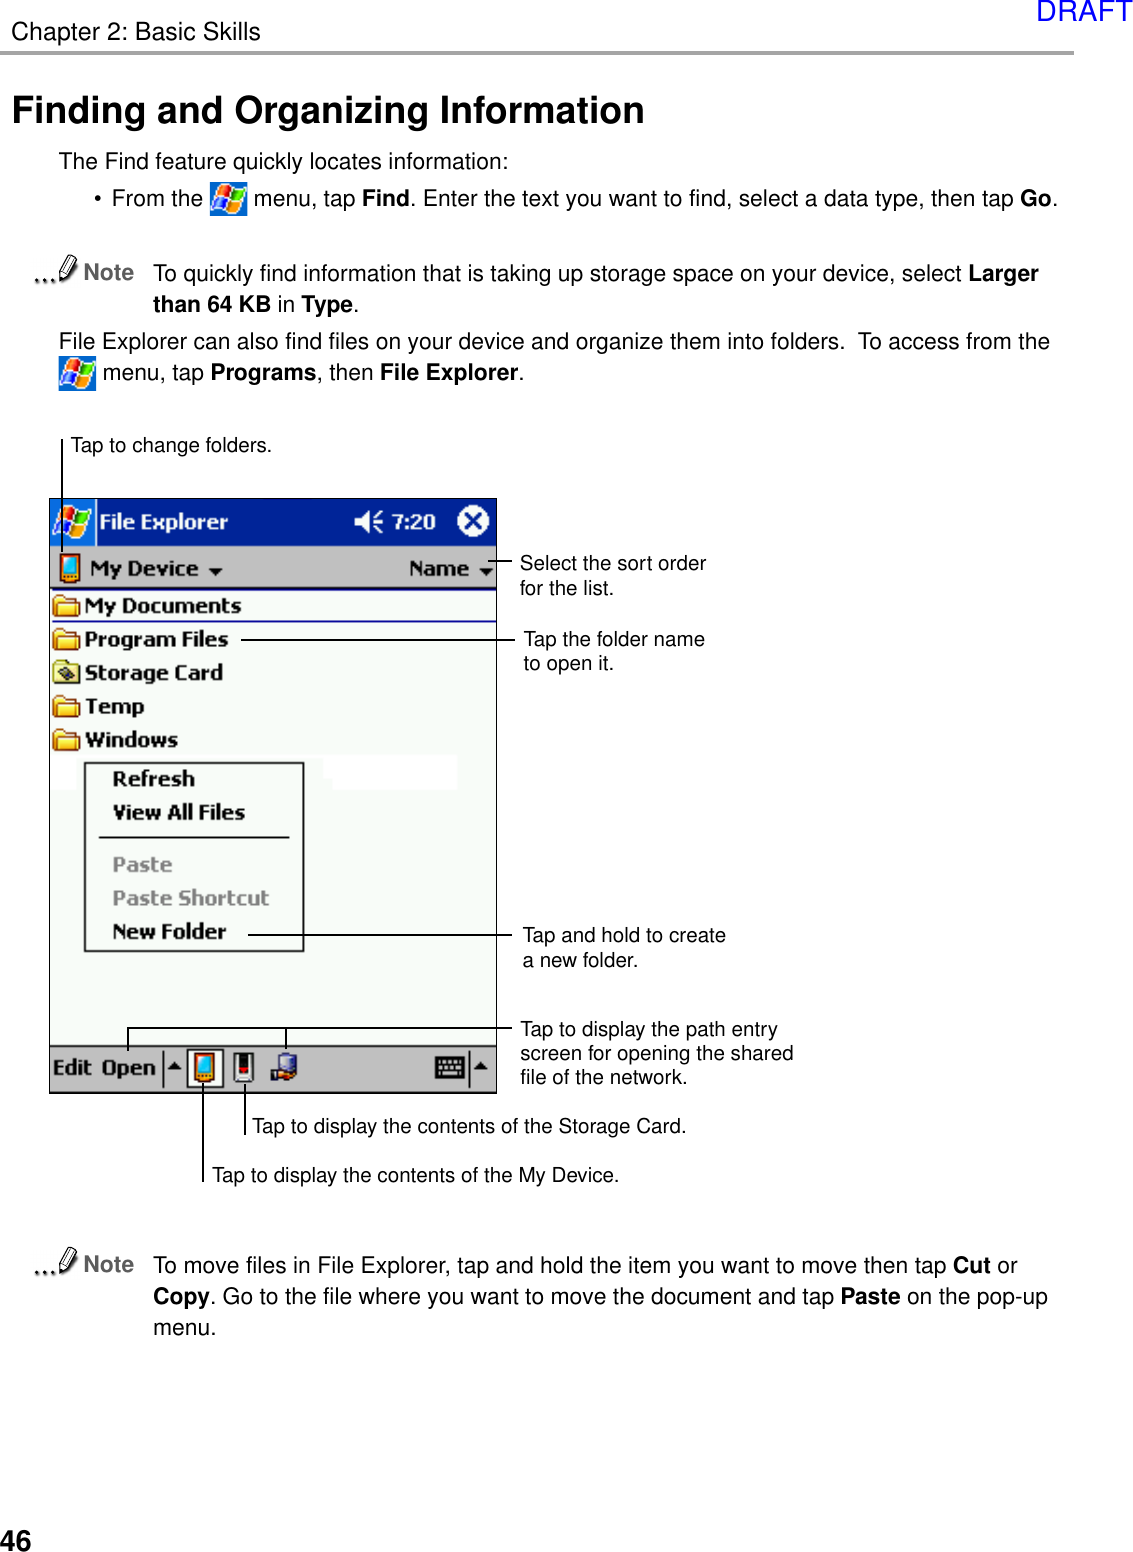
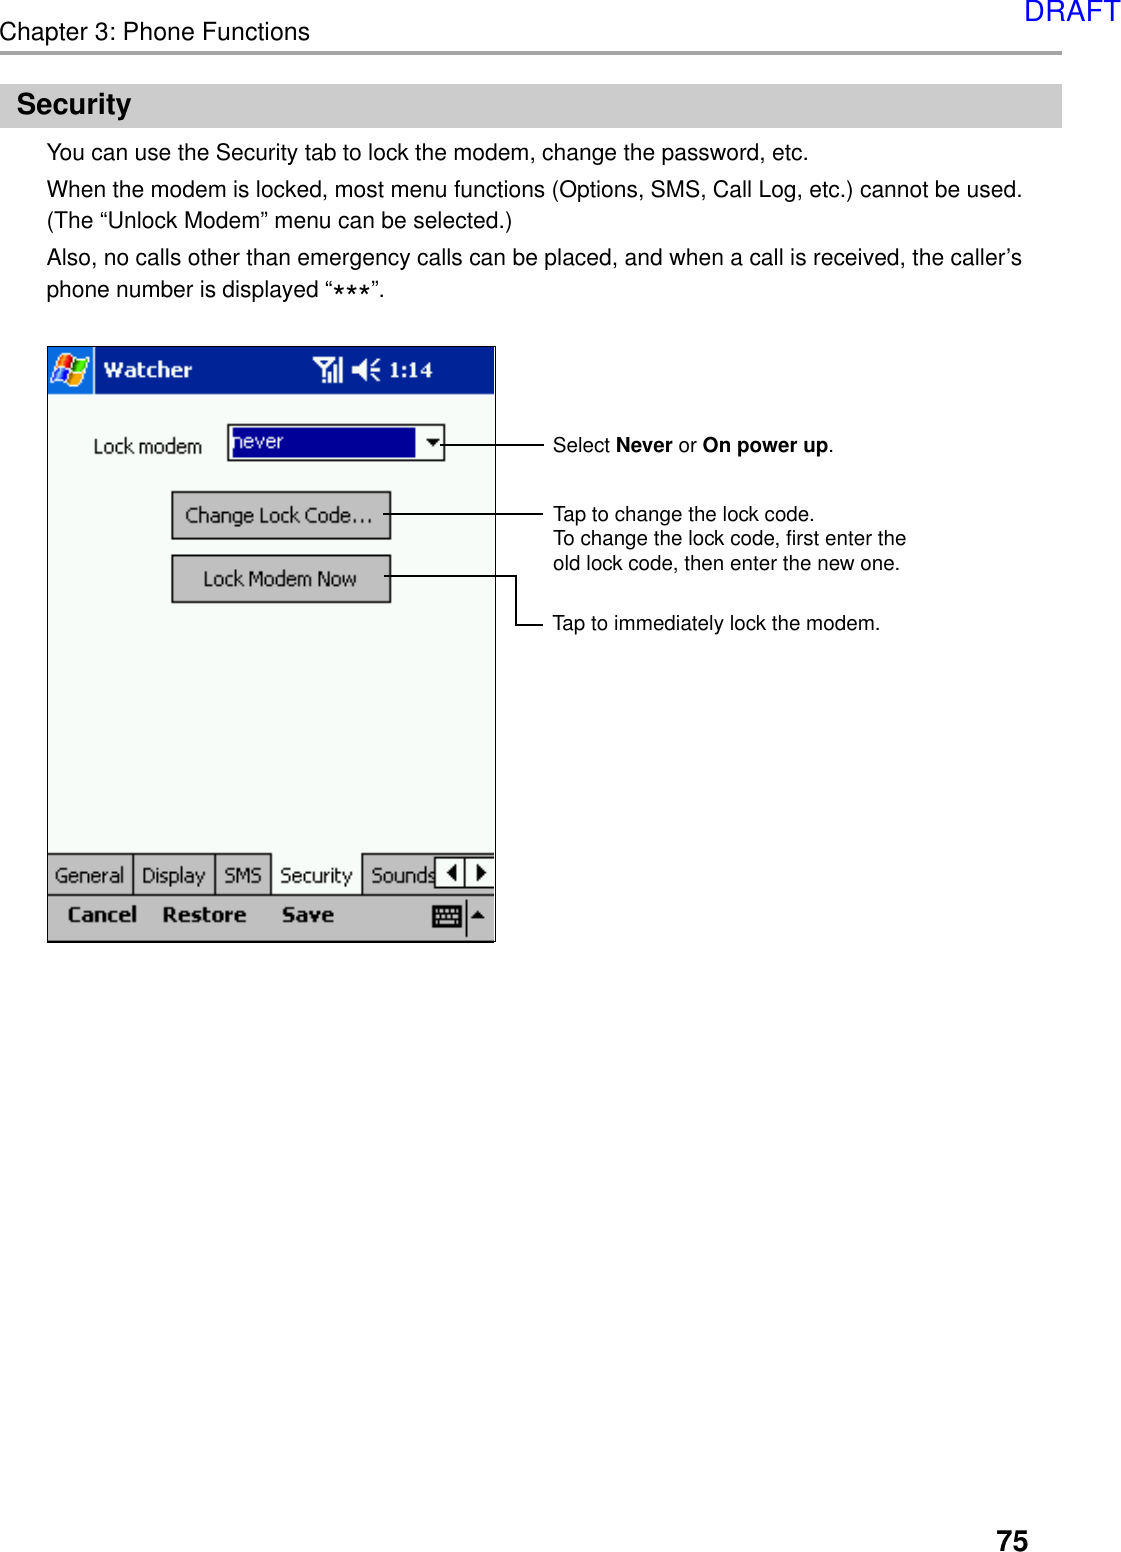
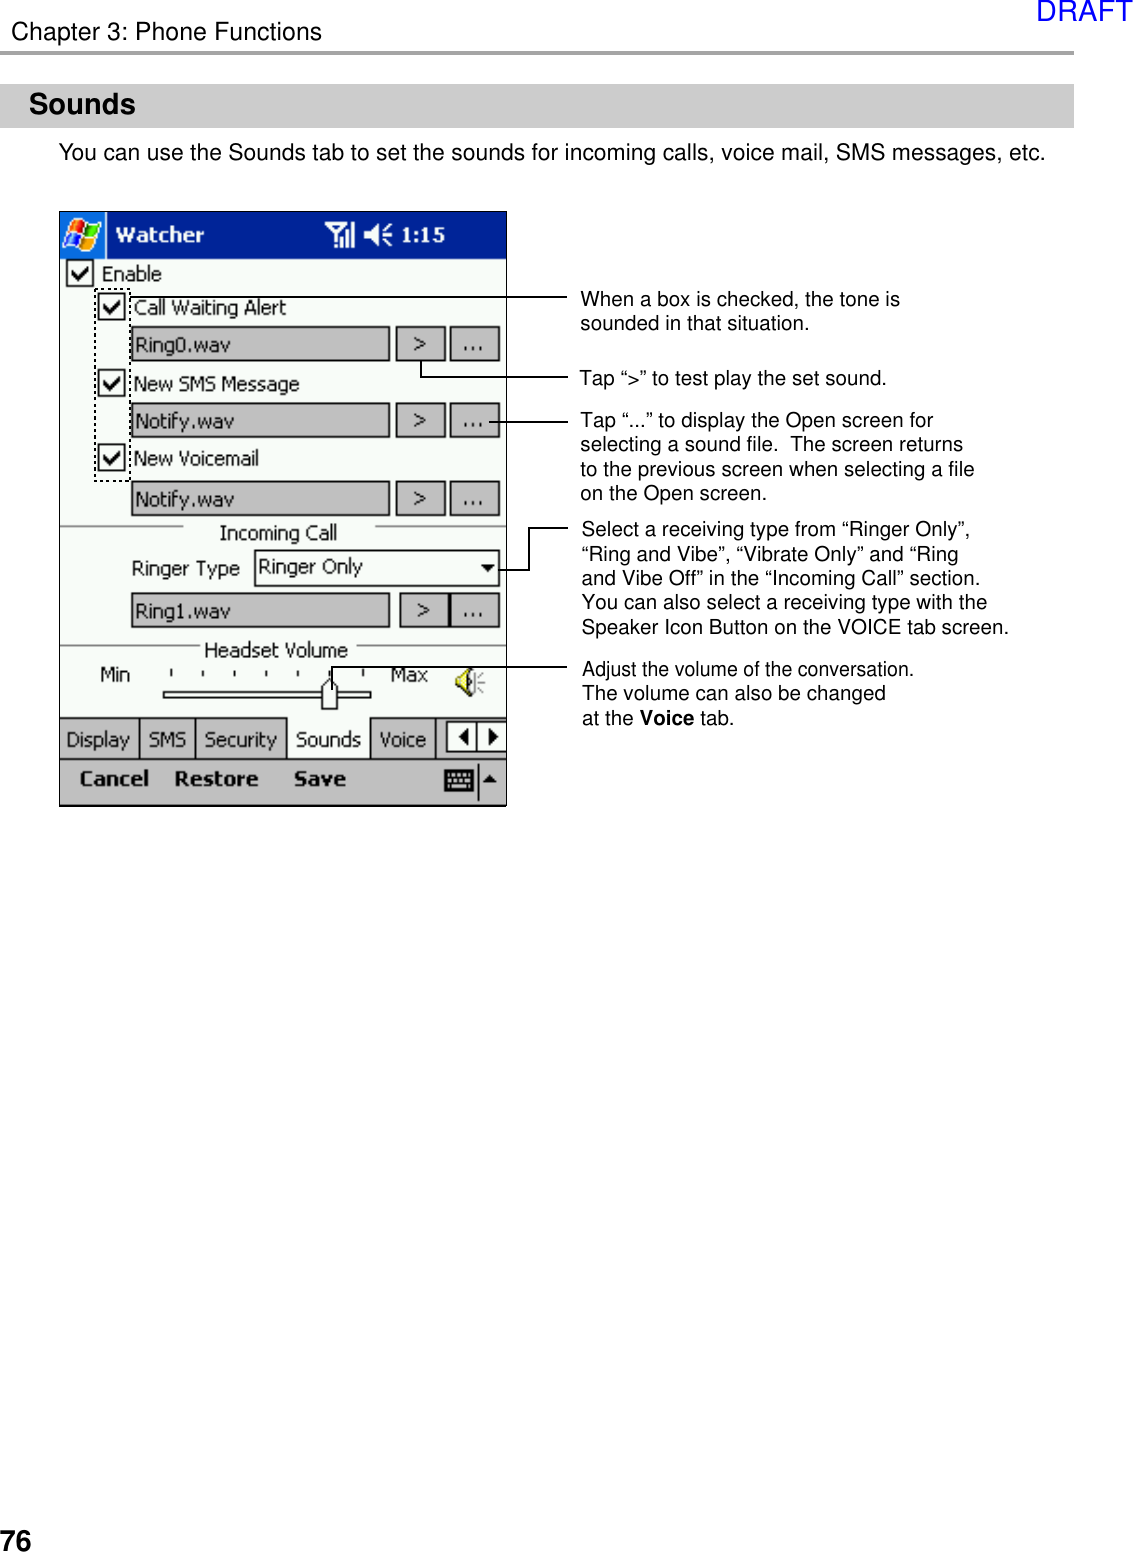
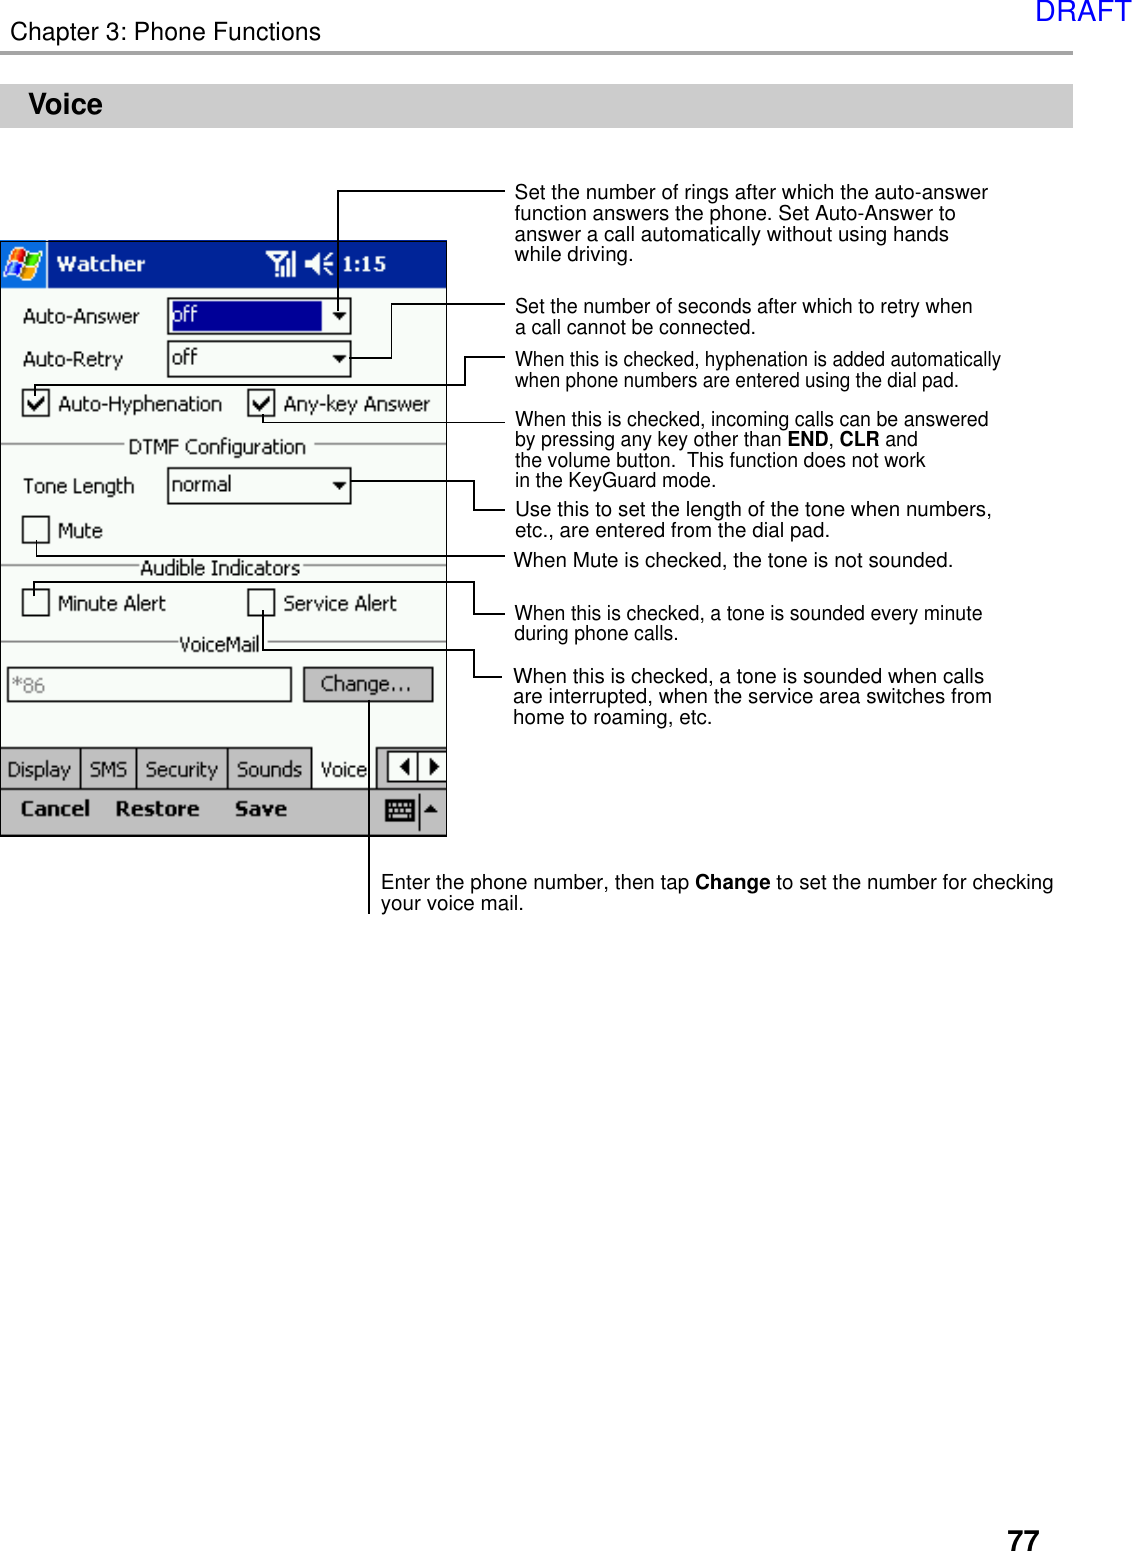
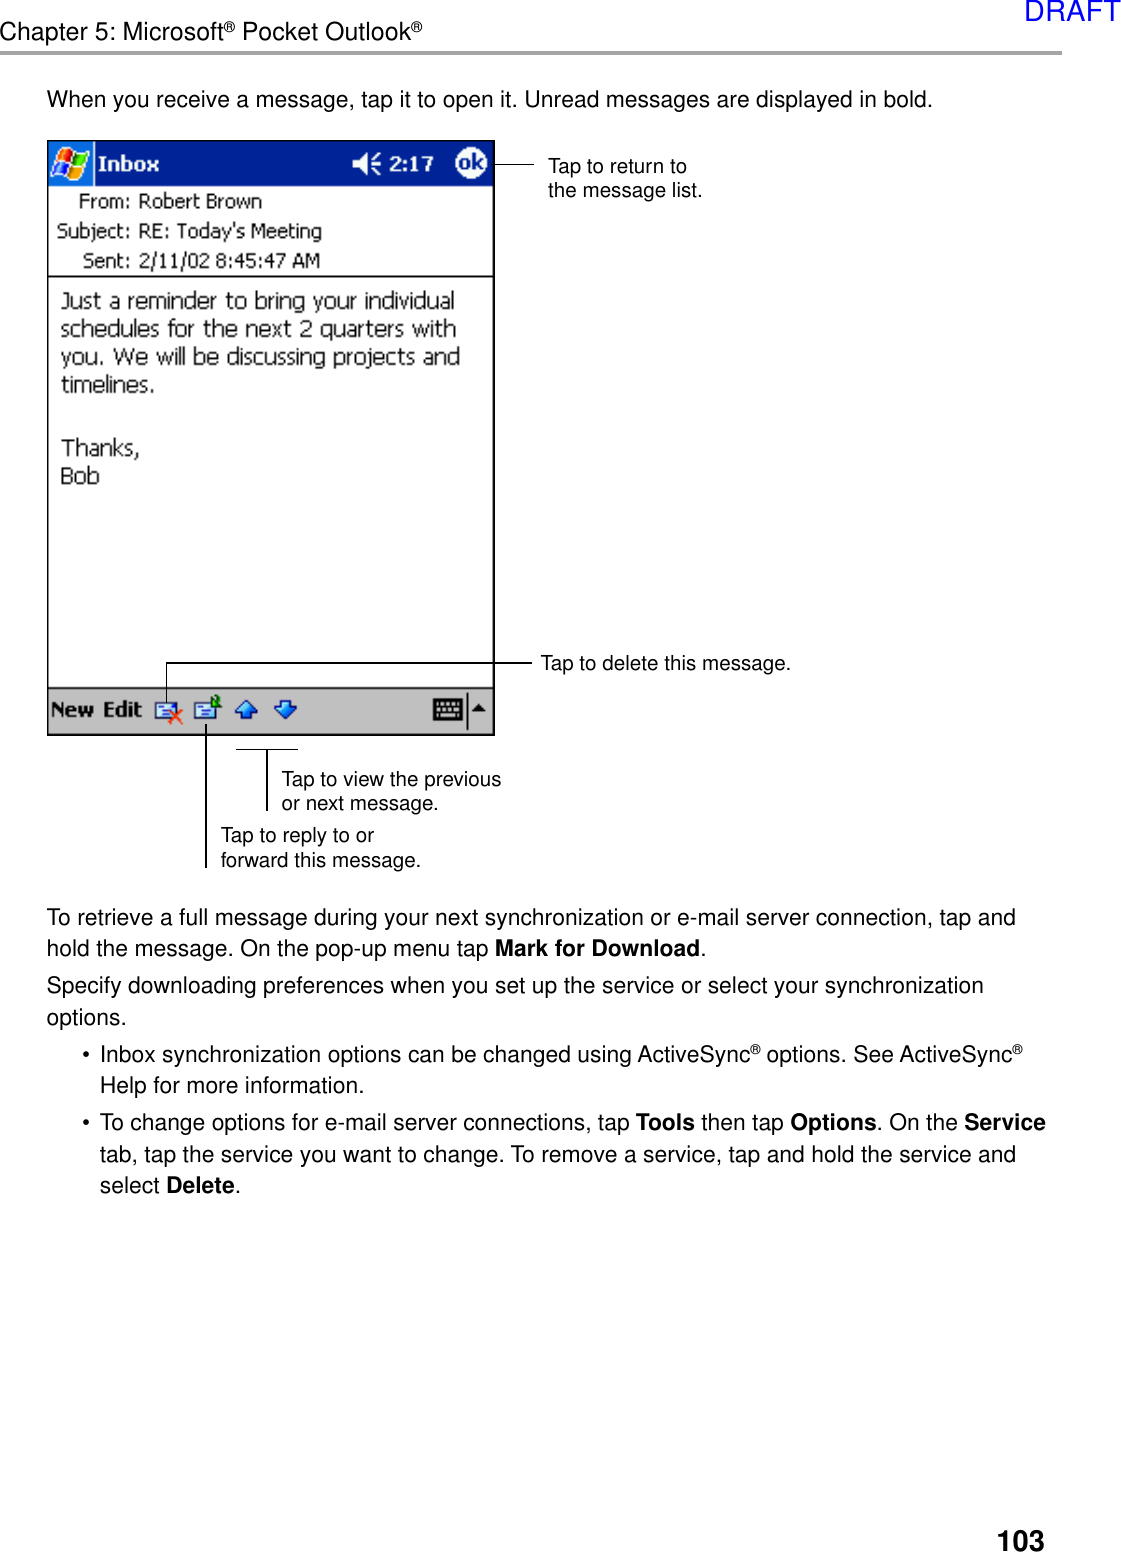
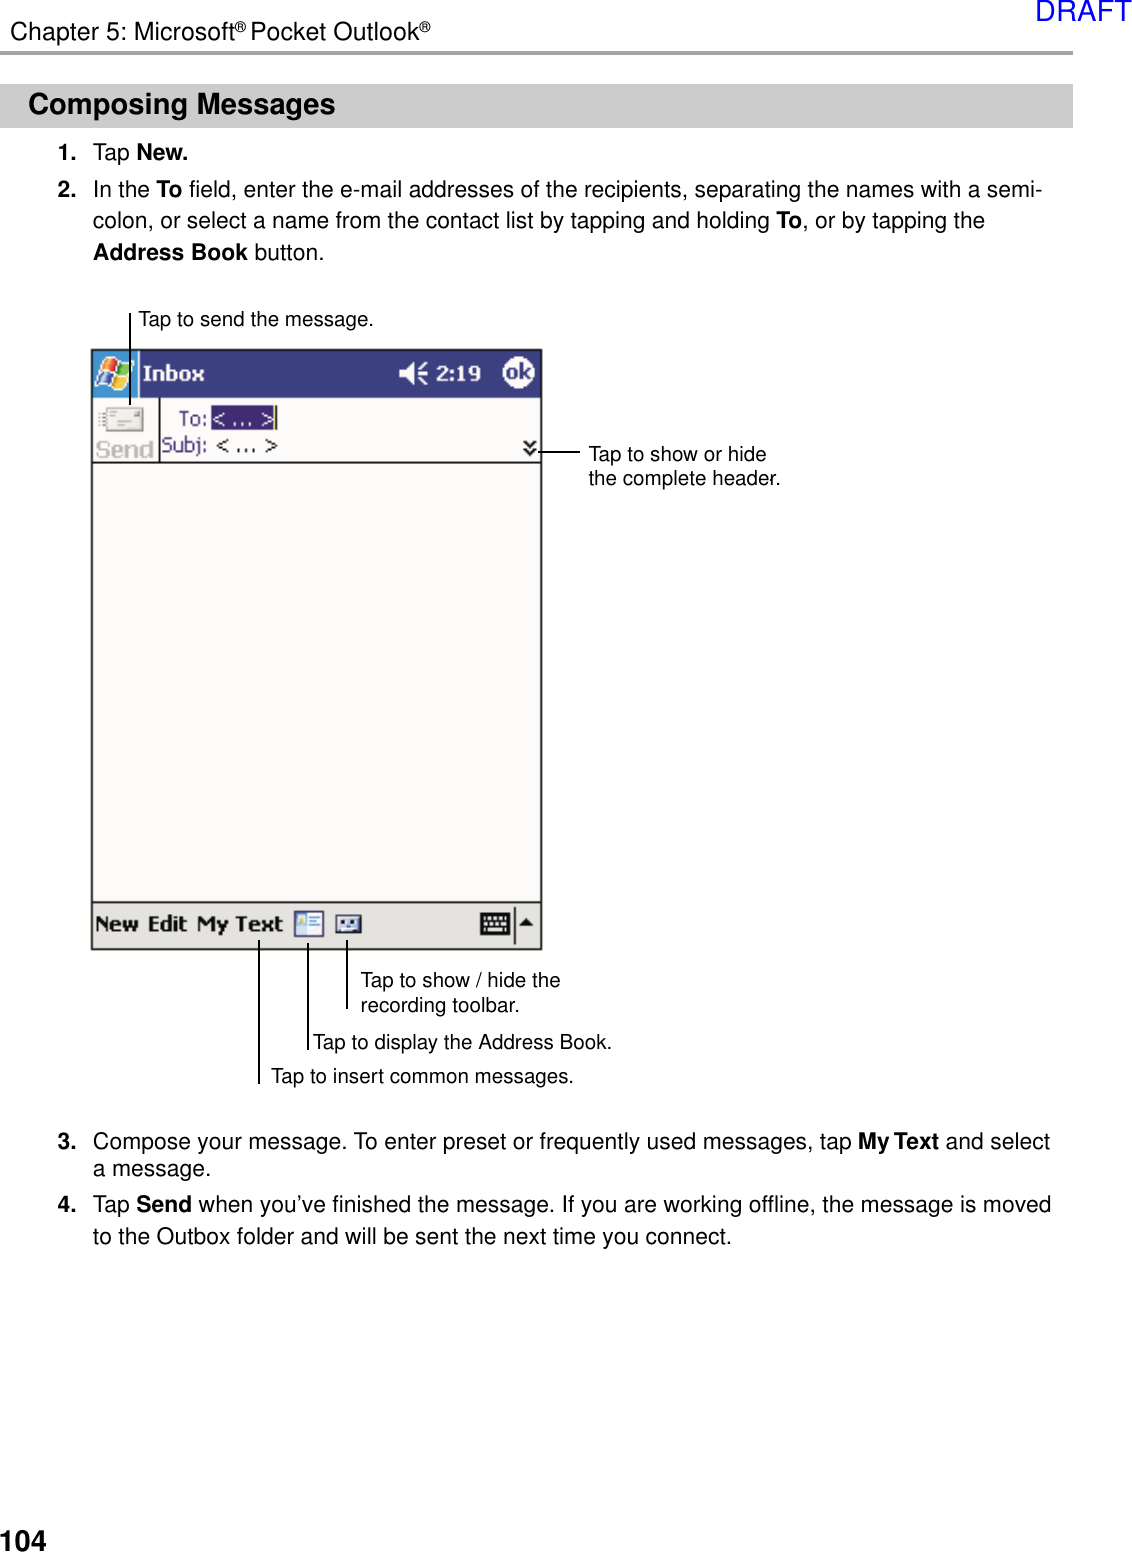
Users Manual NEW FILE
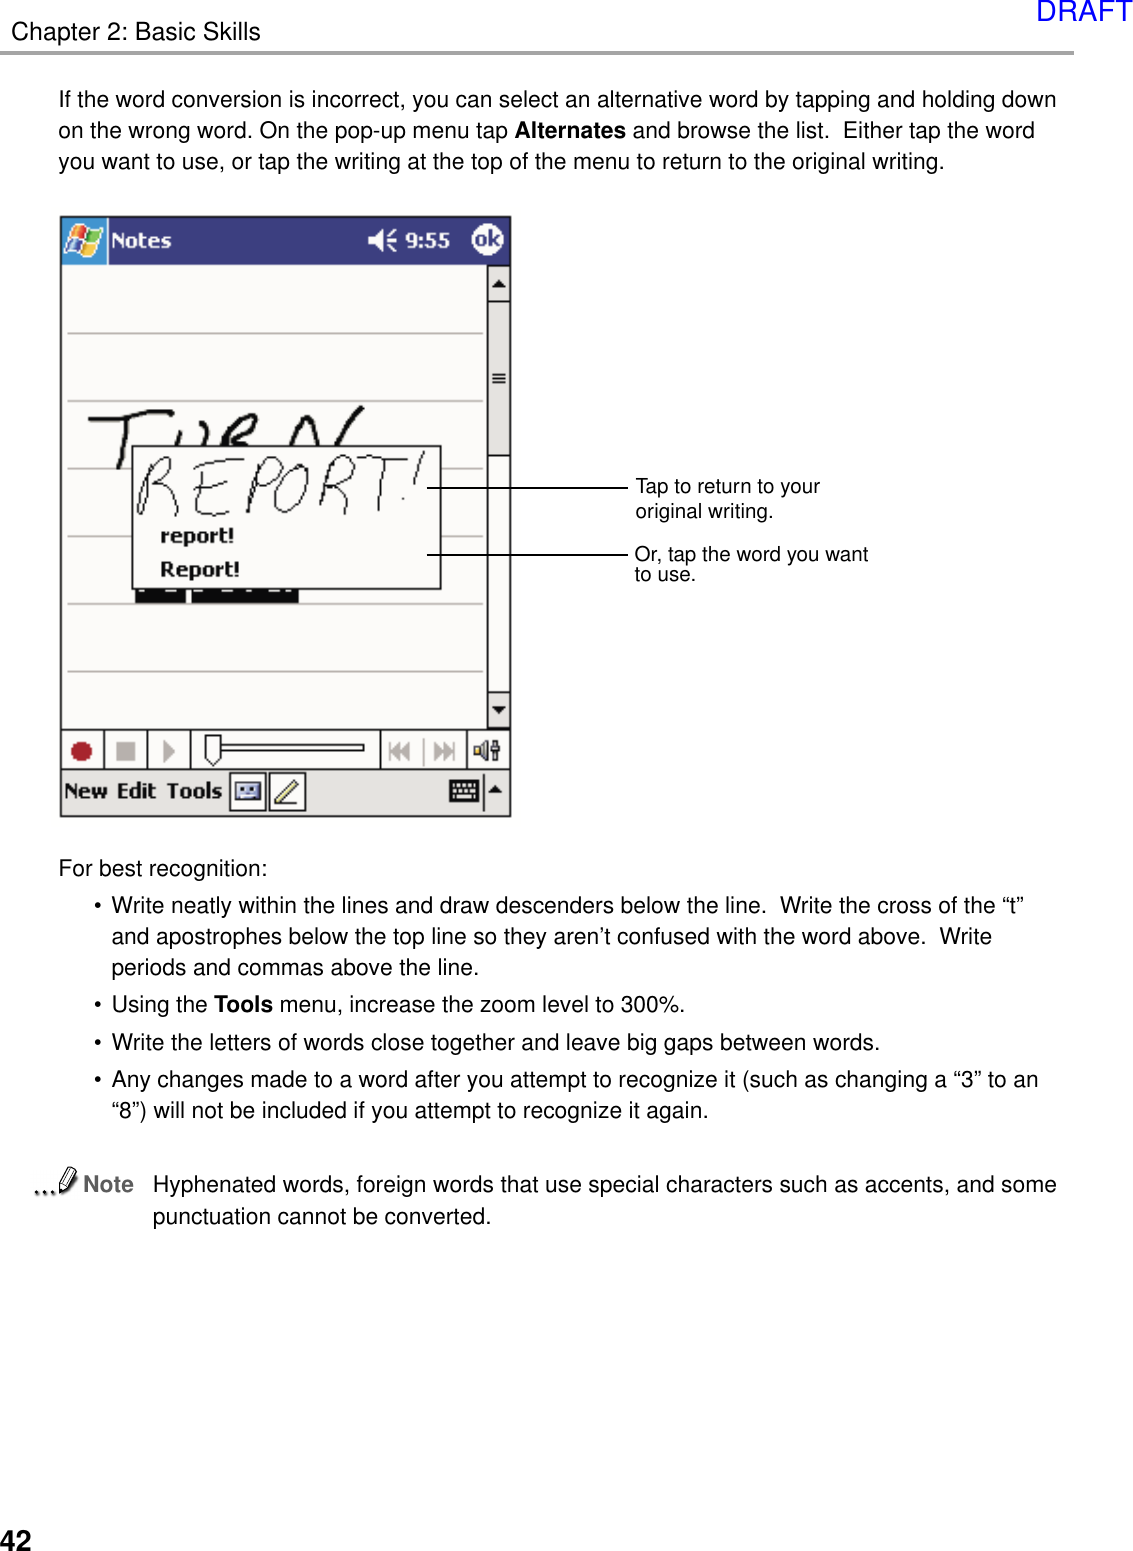
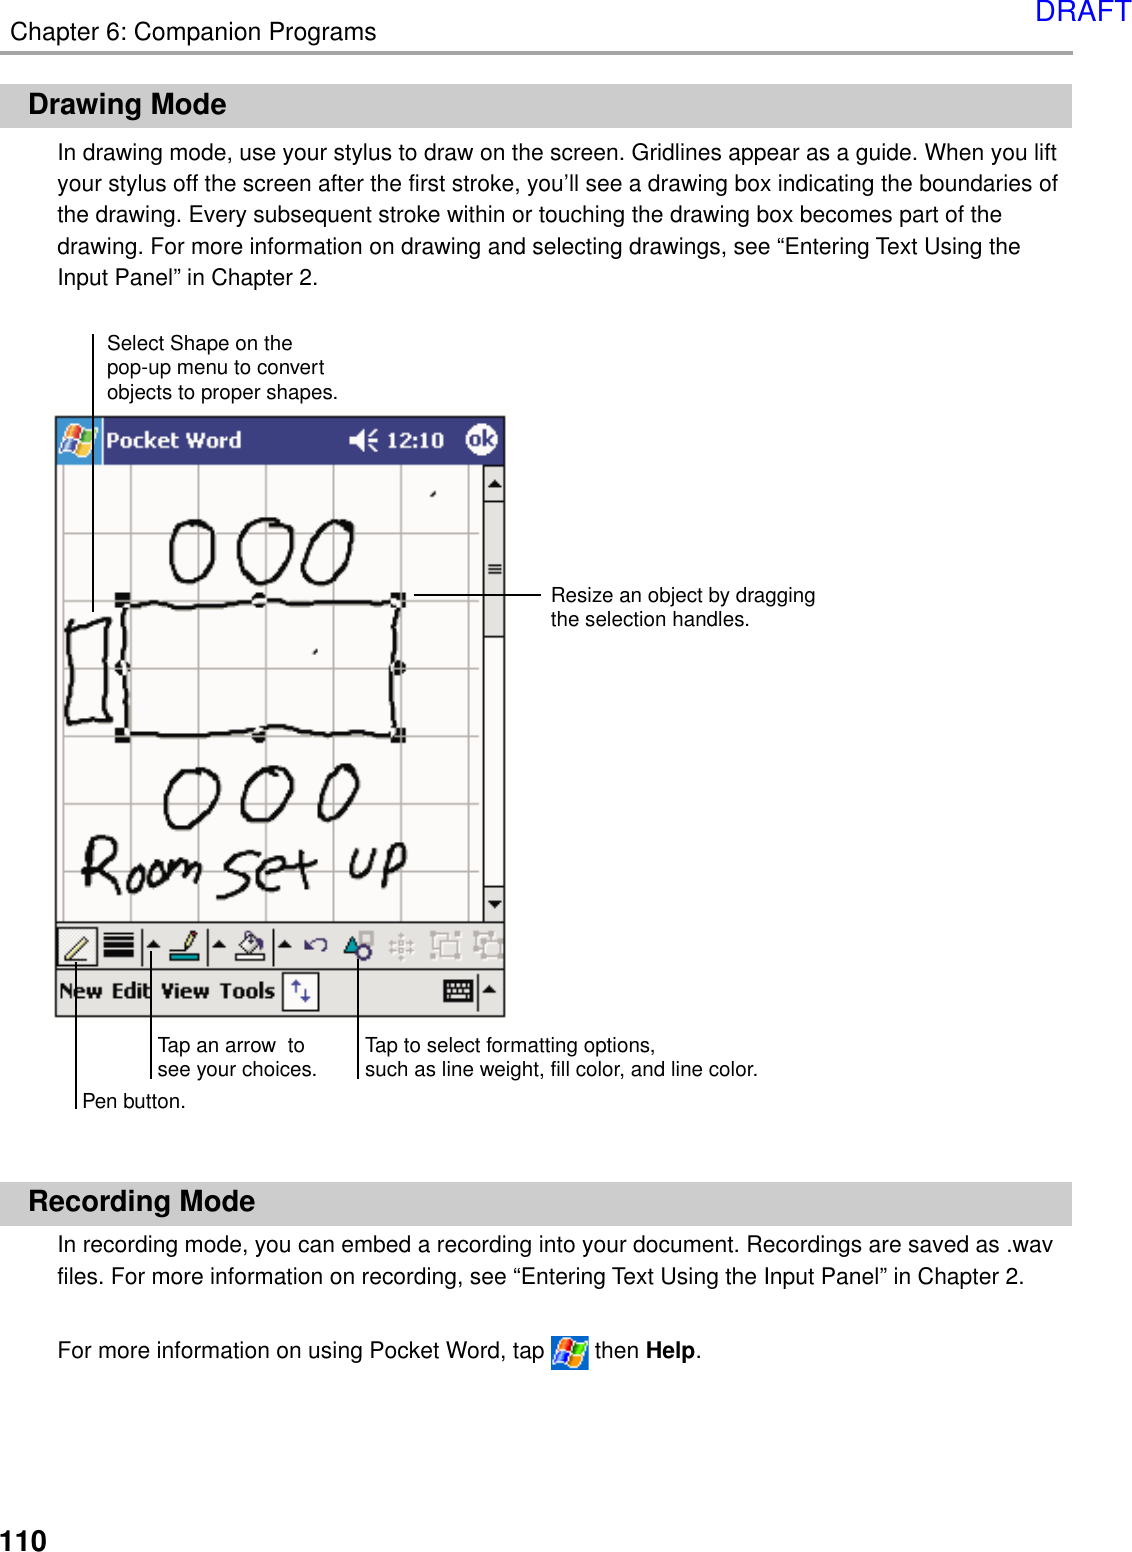
DRAFT
2INTRODUCTIONIt is important you read this manual (USER’S GUIDE) before using your device (  Pocket PC)to ensure its proper operation.It is recommended that important data stored in your device should be saved to a memory card(sold separately) or your personal computer (data transfer with ActiveSync®) on a regular basis.Before returning your unit for service, be sure to back up your data and remove any confidential,proprietary or personal information.  Audiovox Communications Corp. is not responsible fordamage to or loss of any programs, data or removable storage media.The purpose of the Safety Instructions in this manual is to provide you with warnings and safetyinstructions that will assist in preventing the misuse of your device.*All of the Safety Instructions that are contained in this manual must be read carefully and mustbe fully understood before you attempt to use your device in order to avoid potential hazards thatcould cause bodily injury or property damage, or could result in damage to your device or loss ofdata.*Always keep this manual in a convenient place for future reference.Trademark Information• Microsoft, ActiveSync, Outlook, Pocket Outlook, Windows, Windows NT, and the Windows logoare either registered trademarks or trademarks of Microsoft Corporation in the United Statesand/or other countries. Microsoft products are licensed to OEMs by Microsoft Licensing, Inc., awholly owned subsidiary of Microsoft Corporation.• Sierra Wireless, the Sierra Wireless logo, red wave design and, Watcher are trademarks ofSierra Wireless, Inc. Heart of the Wireless Machine is a registered trademark of Sierra Wireless,Inc.  © 2001 Sierra Wireless, inc.• Other product names mentioned in this manual are trademarks or registered trademarks of therespective companies.DRAFT
3Product Name: Model Number(s): CET0200A (PDA2032)FCC Notice “Declaration of Conformity Information”This equipment has been tested and found to comply with the limits for a Class B digital device,pursuant to part 15 of the FCC Rules. These limits are designed to provide reasonable protectionagainst harmful interference in a residential installation. This equipment generates, uses and canradiate radio frequency energy and, if not installed and used in accordance with the instructions,may cause harmful interference to radio communications.However, there is no guarantee that interference will not occur in a particular installation. If thisequipment does cause harmful interference to radio or television reception, which can bedetermined by turning the equipment off and on, the user is encouraged to try to correct theinterference by one or more of the following measures:• Reorient or relocate the receiving antenna.• Increase the separation between the equipment and receiver.• Connect the equipment into an outlet on a circuit different from that to which the receiver isconnected.• Consult the dealer or an experienced radio/TV technician for help.Warning: Only peripherals complying with the FCC class B limits may be attached to thisequipment.Operation with non-compliant peripherals or peripherals not recommended by us islikely to result in interference to radio and TV reception. Shielded cables must be usedbetween the external devices and the cradle connecting port.Changes or modifications made to this equipment, not expressly approved by us orparties authorized by us could void the user’s authority to operate the equipment.This device complies with part 15 of the FCC Rules. Operation is subject to the following twoconditions:(1) This device may not cause harmful interference, and(2) this device must accept any interference received, including interference that may causeundesired operation.Modifications or changes to this equipment not expressly approved by Audiovox may void theuser’s authority to operate the equipment.DRAFT
4Product Name: USB CradleModel Number(s): CEX0208B (CRU2032B)FCC Notice “Declaration of Conformity Information”This equipment has been tested and found to comply with the limits for a Class B digital device,pursuant to part 15 of the FCC Rules. These limits are designed to provide reasonable protectionagainst harmful interference in a residential installation. This equipment generates, uses and canradiate radio frequency energy and, if not installed and used in accordance with the instructions,may cause harmful interference to radio communications.However, there is no guarantee that interference will not occur in a particular installation. If thisequipment does cause harmful interference to radio or television reception, which can bedetermined by turning the equipment off and on, the user is encouraged to try to correct theinterference by one or more of the following measures:• Reorient or relocate the receiving antenna.• Increase the separation between the equipment and receiver.• Connect the equipment into an outlet on a circuit different from that to which the receiver isconnected.• Consult the dealer or an experienced radio/TV technician for help.This device complies with part 15 of the FCC Rules. Operation is subject to the following twoconditions:(1) This device may not cause harmful interference, and(2) this device must accept any interference received, including interference that may causeundesired operation.DRAFT
5SAFETY INSTRUCTIONSSAFETY INSTRUCTIONS• There are two categories of Safety Instructions included in this manual:✓Product Warnings, (i.e., what must never be done to assure avoiding those hazards that couldcause bodily injury or property damage); and✓User Directions (i.e., what must always be done to assure the safe use of your device).• The Safety Instructions contained in this manual have been categorized in accordancewith the seriousness of the potential hazards through the use of Signal Words.Those Signal Words, and their intended meanings, are as follows:DANGER: Indicates that a failure to observe the Safety Instructions could result in death orcatastrophic bodily injury.WARNING: Indicates that a failure to observe the Safety Instructions could result in seriousbodily injury.CAUTION: Indicates that a failure to observe the Safety Instructions could result in minorbodily injury or property damage.NOTE: Designates important information that relates to activities and/or conditions thatmight result in loss of data and/or damage to your device.Safe Use And Operation of Your DeviceAll portable computers produce low levels of RF energy due to the generation of digital timingpulses by its clock oscillator circuits. Your device has been equipped with internal shielding tominimize stray emissions of RF energy. Airlines may nevertheless prohibit the on-board use ofportable PCs (and all other portable electronic devices that could potentially emit stray RF energy),particularly during take-offs and landings, to prevent any possible interference with the reception ofsignals by airborne electronic navigational devices. Other locations, such as hospitals, may alsorestrict the use of Pocket PC’s and other devices that emit low-level RF energy.WARNING■Always request and obtain prior consent and approval of an authorized airline representativebefore using your device aboard an aircraft.■Always follow the instructions of the airline representative whenever using your device aboardan aircraft, to prevent any possible interference with airborne electronic equipment.WARNING■Always comply with posted prohibitions of the use of RF-emitting devices, such as in hospitals.Failure to follow such directives could result in the interference with medical equipment and/ordevices.■Never come closer than 6 inches to a person with a heart pacemaker implant when using thisdevice. Failure to do so could result in interference with the function of the pacemaker.DRAFT
6SAFETY INSTRUCTIONSWARNING■Never use your device while driving an automobile or any other moving vehicle. Always pull outof traffic and come to a stop in a legally permissible and safe location before using your device.Failure to do so could result in serious bodily injury in a traffic accident.■Never use your device while walking. Usage while walking could result in bodily injury caused byinattention to automobile traffic or other pedestrian hazards.WARNING■Never allow metallic objects, such as staples and paper clips, to enter inside your device.Metallic objects, such as staples and paper clips, if allowed to enter your device, could cause thegeneration of excess heat or fire.■Never connect terminals (metal parts) to metallic objects (such as wires). Connecting terminalsto metal objects could cause excessive heat or fire.■Always immediately disconnect the AC Adapter from the power outlet and turn the battery switchto the “Stop” position in the event the device emits an unusual odor or sound or generatessmoke.WARNING■Never use or store your device in the following locations:• Anywhere it may be exposed to water, such as a bathroom or sauna;• In conditions of high humidity, such as in the rain or fog;• Where your device will be exposed to high temperatures, such as near a fire or equipmentthat emits high temperatures;• In direct sunlight; or• In a sealed automobile left in the sun and subject to high temperatures.• Never store or transport flammable liquids, gases or explosive materials in the samecompartment of your automobile as the device or any of its accessories, as possible sparkingin the PC could cause ignition or explosion.• When driving, always secure your device in its softcase, when it is not in use. Never placeyour device on the passenger seat or any place else in the car where it can become aprojectile during a collision or stop.■Never drop your device or subject it to severe shock. Dropping your device or subjecting it tosevere shock could cause the built-in battery to leak, ignite and/or rupture.■Always immediately remove your device and its battery from the vicinity of any source of heat,such as an open flame, in the event the built-in battery leaks liquid or emits an unusual odor.Continued use of your device under either of these conditions could cause ignition (i.e., fire) ofthe leaked battery liquid, or rupture.■Never touch any fluid that might leak from the built-in battery.  Such liquid when in contact withDRAFT
7SAFETY INSTRUCTIONSthe eyes or skin, could cause injury to the skin or eyes.  Should the liquid come into contactwith the eyes, irrigate the eyes thoroughly with clean water and immediately seek medicalattention. In the event the liquid comes into contact with the skin or clothing, wash it awayimmediately with clean water.Failure to follow the above directions concerning use and storage could result in bodily injury and/or property damage due to battery liquid leakage, fire or rupture. Failure to follow the abovedirections concerning use and storage could also result in damage to your device.WARNING■Always use authorized Audiovox accessories and optional devices when operating this device,as the use of incompatible auxiliary equipment could result in fire, electric shock or other bodilyinjury. The use of unauthorized accessories will also void your Warranty.WARNING■Never attempt to disassemble, repair or make any modification to your device. Disassembly,modification or any attempt at repair could cause bodily injury or property damage, as well asdamage to the device itself.WARNING■Your device is not a toy. Never allow children to play with your device. Misuse, rough or improperhandling of your device by children could result in serious bodily injury for any of the enumeratedsafety warnings in this manual. In addition, always keep all accessories and components out ofthe reach of small children as small parts might present a choking hazard.CAUTION■Never raise the sound volume level too high when using your device with earphones. Anexcessive sound volume level could cause damage to your hearing.■Never touch the liquid that might leak from a broken liquid crystal display. Contact with this liquidcould cause a skin rash. If the crystal display liquid should come into contact with the skin orclothing, wash it immediately with clean water.NOTE■Under certain conditions, data may be lost, including:✓Failure to follow all instructions for use and warnings in this manual.✓Misuse of your device;✓Subjecting the main unit of your device to static electricity and/or noise;✓Total loss of electric charge in the built-in battery; and✓Servicing of your device.DRAFT
8SAFETY INSTRUCTIONS■Use of your device in locations where the following ambient environmental conditions areexceeded:✓Under normal operational use ambient temperatures not less than 32°F and not in excess of104°F (0°C and 40°C);✓With humidity of not less than 30% or in excess of 80%; and✓When charging the battery ambient temperatures not less than 41°F and not to exceed 95°F(5°C and 35°C).■Do not store or use your device in the following locations:✓Those subject to extremely high or low temperatures;✓Dusty locations; and✓Locations or sites subject to strong vibration.Use or storage in these location, sites or areas can result in product failure, malfunction or lossof data.■Avoid connecting your device to an external device such as a computer in an environment likelyto be affected by static electricity. For example, during low-humidity weather, shuffling yourshoes upon a rug can produce static electricity.  Before you handle your computer, you shouldtouch a grounded object to discharge any static electricity from your body.■Do not subject your device to sudden and severe temperature changes. This could result inmoisture condensation in the device that could cause damage to your device, computer functionloss, and/or the loss of data. In the event of moisture condensation, allow your device to dry outcompletely.■It is normal for the AC Adapter to become warm when charging.■Disconnect the power plug from the outlet when not in use.■Take care not to sit on device when it is located in the back pocket of trousers, etc. This couldcause damage to your device or malfunction of the device functions.■Do not place objects on top of your device or drop them on top of your device. This could causedamage to your device and/or malfunction.■Never paint or apply any foreign substance to this device as this can clog and damage movingparts.■Clean terminals (metallic parts) on a regular basis with a dry cotton swab.  Dirty terminals couldaffect battery charging.■Never use organic solvents such as benzene or paint thinner to clean your device. Use of thesesolvents can cause deformation or discoloration. Wipe dirty parts with a soft dry cloth.■Do not wipe the display with a damp or wet cloth or touch the display with damp or wet hands.Wiping or touching the display under this condition can cause product failure or malfunction.Always use a soft dry cloth to wipe the display.■When using the optional “SD memory card”, be sure to read the relevant instruction manual andensure that you know the proper procedures for their use and compatibility with your device.✓Never subject the card to any severe shock while connected to your device. Such a shock cancause damage to the card and a malfunction.✓Do not carry your device with the card connected to it. This can result in the damage or loss ofthe card.DRAFT
9SAFETY INSTRUCTIONS■Never connect cradle terminals with metallic objects, such as wires. Connecting these terminalswith metallic objects may cause the production of excess heat, burns and damage to the chargerand/or your device.CAUTION■A lithium ion battery is used in this device. When a replacement is needed, please request thedealer from whom your device was purchased to assist you.■Lithium ion batteries are recyclable. When you replace your built-in battery, please request therepair center to recycle the battery in accordance with RBRC standards. When disposing of thebattery by yourself, please call RBRC at (800) 822-2237 for tips on the proper disposal of thelithium ion battery. Never dispose of the battery with ordinary waste.Safe Use of AC AdapterDANGER■Never attempt to disassemble or repair an AC Adapter, and never alter the power cords or plugsas exposure to electric shock hazards may result.Always contact an authorized Audiovox service center, if repair or replacement is required.■If the plug will not fit into the available outlet, have a proper outlet installed by a qualifiedelectrician. Improper connection can result in the risk of electric shock. Never attempt to modifyor alter the AC cord or plug of the AC Adapter.WARNING■Never allow the AC Adapter to come into contact with water or any other liquid. Water or anyother liquid in contact with the AC Adapter can create a risk of fire or electric shock.■Always use the authorized Audiovox AC Adapter to avoid any risk of fire or damage to yourdevice or battery. Bodily injury or property damage may occur as a result of the use of anunauthorized and incompatible AC Adapter.■Never use an AC Adapter if it has a damaged or worn power cord or plug. The use of damagedor worn power cords or plugs could result in electric shock, burns or fire. Contact an authorizedAudiovox service center immediately to obtain a suitable replacement.DRAFT
10SAFETY INSTRUCTIONS■Never connect or disconnect the AC Adapter with wet hands. Connecting or disconnecting theAC Adapter to a power source with wet hands could cause electric shock.■Never attempt to connect or disconnect the power plug with damp or wet hands. Connecting ordisconnecting the power plug with damp or wet hands could result in an electric shock.■Always unplug the AC Adapter from the power source before attempting any cleaning in order toavoid the risk of electric shock. Always use a soft dry cloth to clean the equipment, after it hasbeen unplugged.■Never attempt to use an unauthorized AC Adapter with your device in order to avoid any risk ofbodily injury or property damage. Since unauthorized accessories have different specifications,they may be incompatible with your device.CAUTION■Never place an AC Adapter on a wooden surface (or any other surface that could be marred byexposure to heat) while it is in use. Since its surface temperature of the AC adapter increasesduring normal use, always rest it on a suitable heat-insulating material.■Never cover the AC Adapter with any object while it is in use, and never place it adjacent to aheat source. An excessive temperature increase could detrimentally affect its performance.■Never place a Power Supply Cable near a heat source, as damage to the cord or to its insulationcould result.■Always use a surge protector when utilizing the AC Adapter during an electrical storm.Otherwise, a power surge could result in the loss of stored data.■Always insert the power plug to a household electric outlet supplying 110V AC.■When traveling abroad, never plug the AC Adapter into a power source that does not correspondto both the voltage and the frequency specified on the rating plate of the AC Adapter, asequipment damage will result. When you connect to a power supply of more than 125V AC,change the Power Supply Cable with one that corresponds to the power supply specification.CAUTION■Always locate an accessory Power Supply Cable so that it will not be stepped on, tripped over,or otherwise subjected to damage or stress.■Never place heavy objects on a Power Supply Cable, as this could result in damage to the cord.■Never bend or twist a Power Supply Cable, and never pull on a Power Supply Cable in anattempt to remove an AC Adapter or accessory plug from a socket. Always grasp the AC Adapteror the accessory plug directly when unplugging the Power Supply Cable in order to avoiddamaging the cable.■Always ensure the power plug pins are clean and free of dust or other foreign material by wipingthe pins with a clean dry cloth.  Dust or other foreign material accumulation on the power plugpins could cause fire.■Always disconnect the AC Adapter from the power source when it is not in use.DRAFT
11SAFETY INSTRUCTIONSSAFE USE AND OPERATION OF DEVICE (WIRELESS HANDHELDPHONE)Read this information before using your device.Your device is a low power radio transmitter and receiver. When it is ON, it receives and alsosends out radiofrequency (RF) signals.FCC RF EXPOSURE INFORMATIONIn August 1996, the Federal Communications Commission (FCC) of the United States, with itsaction in Report and Order FCC 96-326, adopted an updated safety standard for human exposureto radiofrequency (RF) electromagnetic energy emitted by FCC regulated transmitters. Thoseguidelines are consistent with the safety standard previously set by both U.S. and internationalstandards bodies. The design of this device complies with the FCC guidelines and theseinternational standards.Use only the supplied or an approved antenna. Unauthorized antennas, damaged antennas,modifications, or attachments could impair call quality, damage the phone, or result in violation ofFCC regulations. Please contact your local dealer for replacement antenna.Body-worn OperationThis device was tested with the BC-2032 belt clip and LB-2032 softcase, offered by Audiovox, asan accessory to this device and was found to comply with the FCC exposure requirements. Otherthird-party belt clip and softcase or holsters have not been tested with this device and thereforetheir compliance with the FCC RF exposure limits cannot be confirmed.When operating this device, a minimum separation distance of 1.0 inch (2.5 cm) must bemaintained between the user’s body and the device, including its antenna, to comply with the FCCexposure limits.This particular device has not been designed for held-to-ear use and should never be used againstthe ear. It is designed to be used in a belt clip with an earphone microphone or as a speakerphone.For more information about RF exposure, please visit the FCC website at www.fcc.gov .PHONE OPERATIONNormal position: In front of your face, hold the device keeping distance from your body. or, Infront of your face, hold the device wearing the earpiece keeping distance from your body.Tips on Efficient Operation:For your phone to operate most efficiently:•Do not touch the antenna unnecessarily and keep the antenna from metal when the phone is inuse. Contact with the antenna affects call quality and may cause the phone to operate at ahigher power level than otherwise needed.DRAFT
12SAFETY INSTRUCTIONSWARNINGDRIVINGNever use a device and/or cell phone while driving an automobile or any other moving vehicle.Always pull out of traffic and come to a stop in a legally permissible and safe location before usingyour device. Failure to do so could result in serious bodily injury in a traffic accident.WARNINGELECTRONIC DEVICESMost modern electronic equipment is shielded from RF signals. However, certain electronicequipment may not be shielded against the RF signals from your device.PacemakersThe Health Industry Manufacturers Association recommends that a minimum separation of six (6")inches must be maintained between your device and a pacemaker to avoid potential interferencewith the pacemaker. These recommendations are consistent with the independent research andrecommendations of Wireless Technology Research.Persons with pacemakers:•Should ALWAYS keep the device more than six (6”) inches from their pacemaker when thedevice is turned ON.•Should not carry the device in a breast pocket.•If you have any reason to suspect that interference is taking place, turn your device OFFimmediately.WARNINGVehiclesRF signals may affect improperly installed or inadequately shielded electronic systems in motorvehicles. Check with the manufacturer or its representative regarding your vehicle. You should alsoconsult the manufacturer of any equipment that has been added to your vehicle.Posted FacilitiesTurn your device OFF in any facility where posted notices require so.AIRCRAFTFCC regulations prohibit using your device while in the air. Turn your device OFF before boardingan aircraft.DRAFT
13SAFETY INSTRUCTIONSBLASTING AREASTo avoid interfering with blasting operations, turn your device OFF when in a  “Blasting area” or inareas posted  “Turn off two-way radio”. Obey all signs and instructions.POTENTIALLY EXPLOSIVE ATMOSPHERESTurn your device OFF when in any area with a potentially explosive atmosphere and obey all signsand instructions. Sparks in such areas could cause an explosion or fire resulting in bodily injury oreven death. Areas with a potentially explosive atmosphere are often, but not always markedclearly. Potential areas may include: fueling areas (such as gasoline stations); below deck onboats; fuel or chemical transfer or storage facilities; vehicles using liquefied petroleum gas (such aspropane or butane); areas where the air contains chemicals or particles (such as grain, dust, ormetal powders); and any other area where you would normally be advised to turn off your vehicleengine.For Vehicles Equipped with an Air BagAn air bag inflates with great force. DO NOT place objects, including either installed or portablewireless equipment, in the area over the air bag or in the air bag deployment area. If in-vehiclewireless equipment is improperly installed and the air bag inflates, serious injury could result.CAUTIONHearing AidsSome digital wireless phones may interfere with some hearing aids. In the event of suchinterference, you may want to consult your service provider [or call the customer service line todiscuss alternatives].Other Medical DevicesIf you use any other personal medical device, consult the manufacturer of your device to determineif they are adequately shielded from external RF energy. Your physician may be able to assist youin obtaining this information.Turn your device OFF in health care facilities when any regulations posted in these areas instructyou to do so. Hospitals or health care facilities may be using equipment that could be sensitive toexternal RF energy.“device OFF” means to turn the Radio Standby Switch “OFF”, then turn the power off using thePower button.DRAFT
14SAR InformationSAR InformationSpecific Absorption RateTHIS MODEL PHONE MEETS THE GOVERNMENT’S REQUIREMENTS FOREXPOSURE TO RADIO WAVES.Your wireless phone is a radio transmitter and receiver. It is designed and manufactured not toexceed the emission limits for exposure to radiofrequency (RF) energy set by the FederalCommunications Commission of the U.S. Government. These limits are part of comprehensiveguidelines and establish permitted levels of RF energy for the general population. The guidelinesare based on standards that were developed by independent scientific organizations throughperiodic and thorough evaluation of scientific studies. The standards include a substantial safetymargin designed to assure the safety of all persons, regardless of age and health.The exposure standard for wireless mobile phones employs a unit of measurement known as theSpecific Absorption Rate, or SAR. The SAR limit set by the FCC is 1.6 W/kg.* Tests for SAR areconducted with the phone transmitting at its highest certified power level in all tested frequencybands. Although the SAR is determined at the highest certified power level, the actual SAR level ofthe phone while operating can be well below the maximum value. This is because the phone isdesigned to operate at multiple power levels so as to use only the power required to reach thenetwork. In general, the closer you are to a wireless base station antenna, the lower the poweroutput.Before a phone model is available for sale to the public, it must be tested and certified to the FCCthat it does not exceed the limit established by the government-adopted requirement for safeexposure. The tests are performed in positions and locations (e.g., worn on the body) as requiredby the FCC for each model. The highest SAR value for this model phone tested when being wornon the body, as described in this user guide, is 0.56W/kg. (Body-worn measurements differ amongphone models, depending upon available accessories and FCC requirements). While there may bedifferences between the SAR levels of various phones and at various positions, they all meet thegovernment requirement for safe exposure.The FCC has granted an Equipment Authorization for this model phone with all reported SARlevels evaluated as in compliance with the FCC RF exposure guidelines. SAR information on thismodel phone is on file with the FCC and can be found under the Display Grant section of http://www.fcc.gov/oet/fccid after searching on FCC ID CJ6CET0200MT.Additional information on Specific Absorption Rates (SAR) can be found on the CellularTelecommunications & Internet Association (CTIA) web-site at http://www.phonefacts.net.*In the United States and Canada, the SAR limit for mobile phones used by the public is 1.6watts/kg (W/kg) averaged over one gram of tissue. The standard incorporates a substantialmargin of safety to give additional protection for the public and to account for any variations inmeasurements.DRAFT
15Table of ContentsSAFETY INSTRUCTIONS ............................................................................................................ 5SAFE USE AND OPERATION OF DEVICE(WIRELESS HANDHELD PHONE) .......................................................................... 11SAR Information ........................................................................................................................ 14Chapter 1: Getting Started ................................................................................................. 17Welcome ................................................................................................................... 18Where to Find Information ........................................................................................ 18Chapter 2: Basic Skills........................................................................................................ 19Parts Names and Function ....................................................................................... 20Battery Charging....................................................................................................... 26Initial Setup ............................................................................................................... 28Setup Options ........................................................................................................... 29Connecting to a Computer........................................................................................ 31Today Screen ............................................................................................................ 32Programs .................................................................................................................. 34Navigation Bar and Command Bar ........................................................................... 35Pop-up Menus .......................................................................................................... 36Notifications .............................................................................................................. 36Entering Information ................................................................................................. 37Entering Text Using the Input Panel ......................................................................... 37Finding and Organizing Information.......................................................................... 46Customizing Your Device.......................................................................................... 47Chapter 3: Phone Functions .............................................................................................. 55Using Phone Function .............................................................................................. 56Placing Calls ............................................................................................................. 62Receiving a Call........................................................................................................ 64Call Waiting............................................................................................................... 66Call Forwarding......................................................................................................... 66Three-Way Calling .................................................................................................... 66Voice Mail ................................................................................................................. 66Digital Numeric Page ................................................................................................ 66Missed Call ............................................................................................................... 67Link Dialing ............................................................................................................... 67Emergency Dialing.................................................................................................... 68Phone Book .............................................................................................................. 68KeyGuard Lock ......................................................................................................... 69Scratch Pad .............................................................................................................. 69DRAFT
16Speed Dial ................................................................................................................ 70Call Log..................................................................................................................... 71Options (Preferences)............................................................................................... 72SMS (Mobile Messenger) ......................................................................................... 78Accessing the Internet .............................................................................................. 83Chapter 4: Microsoft® ActiveSync®................................................................................................................................................. 86Chapter 5: Microsoft® Pocket Outlook®..................................................................................................................................... 89Calendar: Scheduling Appointments and Meetings .................................................. 90Contacts: Tracking Friends and Colleagues ............................................................. 93Tasks: Keeping a To Do List ..................................................................................... 96Notes: Capturing Thoughts and Ideas ...................................................................... 99Inbox: Sending and Receiving E-mail Messages ................................................... 101Chapter 6: Companion Programs .................................................................................... 106Pocket Word ........................................................................................................... 107Pocket Excel ............................................................................................................111MSN® Messenger ................................................................................................... 113Windows Media™ Player for Pocket PC ................................................................ 117Microsoft® Reader ................................................................................................... 118Chapter 7: Pocket Internet Explorer ................................................................................ 122The Mobile Favorites Folder ................................................................................... 123Mobile Favorites ..................................................................................................... 123Using AvantGo Channels........................................................................................ 125Using Pocket Internet Explorer ............................................................................... 126Chapter 8: Getting Connected ......................................................................................... 128Transferring Items Using Infrared ........................................................................... 129Connecting to the Internet ...................................................................................... 130Connecting to Work ................................................................................................ 131Ending a Connection .............................................................................................. 132Connecting Directly to an E-mail Server................................................................. 132Get Help on Connecting ......................................................................................... 132Chapter 9: Optional Functions......................................................................................... 133Home ...................................................................................................................... 134Backing Up ............................................................................................................. 141Chapter 10: Additional Information ................................................................................... 145Resetting................................................................................................................. 146Clearing Memory (Initialization) .............................................................................. 147Specifications.......................................................................................................... 148DRAFT
17Chapter 1: Getting StartedGetting StartedChapter 1DRAFT
18Chapter 1: Getting StartedFor information on: See this source:Programs on your deviceAdditional programs that can beinstalled on the deviceConnecting to and synchronizing with acomputerLast-minute updates and detailedtechnical informationUp-to-date information on Pocket PCProduct & technical support informationabout   and other AudiovoxPocket PC devices.This manual and device Help. To view Help, tap   then Help.The   Companion CD.The Quick Start Card or ActiveSync® Help on your computer.To view Help, click Help then Microsoft ActiveSync Help.The Read Me files, located in the Microsoft ActiveSync folderon the computer and on the   Companion CD.http://www.microsoft.com/mobile/pocketpchttp://www.audiovox.com/pdaWelcomeCongratulations on the purchase of your   Pocket PC. You can keep your most importantbusiness and personal information up to date and close at hand. And with the power of Microsoft®ActiveSync® you can synchronize and download information on your desktop or laptop computerwith your handheld device.With your   Pocket PC you can:• Make and receive phone calls.• Instantly view the day’s appointments with the touch of a button.• Send and receive e-mails.• Download web pages.• Make handwritten notesWhere to Find InformationThis manual describes your device hardware, an overview of its programs and explains how toconnect to a computer, network, or the Internet. See the Quick Start Card for instructions on settingup the unit and installing ActiveSync®.DRAFT
Basic SkillsBasic SkillsChapter 2Chapter 2DRAFT
Chapter 2: Basic Skills20 Parts Names and FunctionMain Unit (front view)The CradleInitial Setting of Program ButtonsProgram button 1 ........CalendarProgram button 2 ........TasksProgram button 3 ........HomeProgram button 4 ........ContactsProgram button 5 ........Voice RecorderTouch ScreenProgram Button 1, 2, 3 & 4(From the Left)Record Button(Program Button 5)Incoming Call / System Notification LEDFixed AntennaRadio Standby SwitchCharging LEDMicrophoneSEND ButtonEND Button Cursor Button / Navigation ButtonPower Button / Front Light ButtonSpeakerAC Adapter JackCradle Connection PortUSB CradleDRAFT
Chapter 2: Basic Skills21Main Unit (back view)Stylus HolderStylusSD Card SlotHeadphone JackReset SwitchInfrared PortColor PanelHand Strap AttachmentDRAFT
Chapter 2: Basic Skills22Battery SwitchBattery Switch LockPower Button / Front Light ButtonPress this to turn the device and the front light on/off.Even if the power is turned off, pressing the program button turns the power on and the programscreen is displayed. (However, you can change the setting. See “Setting Power” in “CustomizingYour Device” later in this chapter.)Battery SwitchThe Battery Switch supplies/cuts the battery power to the device. When shipped the setting is“Stop.” Before using your device for the first time:1. Detach the Color Panel (see illustration) to expose the Battery Switch.2. Confirm that the Radio Standby Switch is set to “OFF”, then slide the Battery Switch to “Supply”(lower side).Power button When the power is off When the power is onPress it for some time. The power turns on. The front light alternately turns on/off.Press it quickly. The power turns on. The power turns off.DRAFT
Chapter 2: Basic Skills233. Reattach the Color Panel.NoteReturning the switch to the “Stop” (the upper side) resets the device back to its factorysettings - initial setup will need to be repeated. To move to the “Stop” side, slide theswitch while inserting the stylus into the Battery Switch Lock.Charging LED• Steady orange .............. Built-in battery charging• Flashing yellow ............. Charging has stopped due to extreme temperatures.  Charge at atemperature of approximately 41°F - 95°F (5°C and 35°C).• Steady green ................ Built-in battery fully charged.• Steady yellow ............... Built-in battery charging but level is not strong enough to power.Incoming Call / System Notification LED• Fast flashing orange ..... Incoming call(Approx. 2Hz)• Slow flashing orange .... Indicates alarm as set through Calendar or Tasks.(Approx. 1Hz)Radio Standby SwitchDetermines functionality of device. To turn ON, slide Radio Standby Switch to the upper side.• ON .......Can be used as phone to make and receive calls• OFF .....Cannot function as a phoneUsing the StylusUsed only on touch-screen for menu selection or data input.•Tap: Touch the screen once with the stylus to open items and select options.•Drag: Hold the stylus on the screen and drag it across to select text and images. Drag in a listto select multiple items.•Tap and hold: Tap and hold the stylus on an item to see a list of actions available for thatitem. On the pop-up menu that appears, tap the action you want to perform.NoteOnly use the supplied stylus on the touch screen. If the stylus tip becomes damagereplace with a new one. Using a ballpoint pen or damaged stylus may damage thescreen.DRAFT
Chapter 2: Basic Skills24Microphone To Headphone JackClipYou can attach the Earphone Microphone to your pocket, etc., by using this clip.About Cursor ButtonNavigate the cursor on screen by pressing the upper, lower, right or left part of the cursor button.In the “New” menu press the center of the button to select the program you wish to launch.NoteThe cursor movement depends on the screen. When the cursor is at the right or the leftside of the screen, it may not move.Earphone MicrophoneThe supplied Earphone Microphone can be used to receive phone calls. When the EarphoneMicrophone is inserted into the unit, the microphone and speaker on the main unit will becomeinactive.Also, this microphone can be used as a recorder.This device’s phone component can be used with the Earphone Microphone or as aspeakerphone. Unlike conventional cell phones, it is not designed to be held against the head inconversation. Such unauthorized use of the phone, without an Earphone Microphone or other thanas a speakerphone, is contrary to the design of this product and is not recommended. Forinstructions on how to use the phone with Earphone Microphone or as a speakerphone, pleaserefer to page 61 of this manual.DRAFT
Chapter 2: Basic Skills25Audio Remote Controller with MicrophoneThe supplied Audio Remote Controller with Microphone can be used to listen to audio playback.Combined with the headphone (sold separately), it can be used to receive phone calls. When theAudio Remote plug is inserted into the device, the microphone and speaker on the main unit willbecome inactive.Also, this microphone can be used as a recorder.Hold SwitchAll other remotekeys become inactive when “HOLD” is set. The SEND/END button is active.Stop button+–Adjust VolumePlay / PauseSkip to the next songPlay a previous songSEND / END buttonPlay / Pause, FF, REW SwitchTo Headphone JackClipYou can attach the Audio Remote Controller with Microphone to your pocket, etc., by using this clip.Stereo headphone jackMicrophoneVolume buttonHeadphone (sold separately)Audio Remote Controller with MicrophoneDuring a call, it is not possible to adjust the volume with the Volume button.Use ø 3.5mm mini-plug type headphone to connect to the Audio Remote Controller withMicrophone.This device’s phone component can be used with the Audio Remote Controller with Microphone oras a speakerphone. Unlike conventional cell phones, it is not designed to be held against the headin conversation. Such unauthorized use of the phone, without an Audio Remote Controller withMicrophone or other than as a speakerphone, is contrary to the design of this product and is notrecommended. For instructions on how to use the phone with Audio Remote Controller withMicrophone or as a speakerphone, please refer to page 61 of this manual.DRAFT
Chapter 2: Basic Skills26Battery ChargingWhen using the device for the first time, set the Battery Switch to the supply side (see page 22),then fully charge the battery.Charging the BatteryYou can use two charging methods.When you connect the AC Adapter to the device, turn the unit off.•Connect the supplied AC Adapter to the cradle as shown in the figure below, and then insertthe device into the cradle.•Connect the supplied AC Adapter to the device as shown in the figure below.NoteCharge the battery in an environment between 41°F - 95°F (5°C and 35°C).  Temperaturesoutside this range may pause the charging process. Refer to page 23 for additionalinformation on charging.DRAFT
Chapter 2: Basic Skills27Maximizing the Battery Operating Time•Whenever possible, use the device with the AC Adapter – especially when it is connected toyour computer.•Select the short powered-off time in the setting menu. This will shorten the time the unit willremain on if not used. See “Customizing Your Device” later in this chapter for more information.•Turn off the front light.•Set the screen brightness to power savings mode (front light off) or shorten the front lightturn-off time. See “Customizing Your Device” later in this chapter for more information.•For optimal performance use in an environment between 59°F - 77°F (15°C and 25°C).Anything outside this temperature range may decrease the operating time.Battery LifeThe built-in battery has a limited life that will gradually decrease after repeated charging.  Replacethe battery when you notice a dramatic decrease in battery performance.Battery Charge Level and Stored Data ProtectionIf the battery charge level becomes extremely low or completely discharged, stored memory datawill be deleted. As soon as the low battery status icon or the alarm message appears, immediatelyconnect the AC Adapter to the device so it can charge.•The battery gradually discharges even when not in use. If not used for a long time, it maycompletely discharge.•It is strongly recommended that you save the device’s memory data to your computer or astorage card.  The manufacturer is not responsible for data changed or lost due to batterydischarge.DRAFT
Chapter 2: Basic Skills28Initial SetupWhen using your device for the first time, completely charge the battery then follow the initial setupprocedures below:1. Press the Power button and when the welcome screen appears, tap the screen with the stylusto start the setup process.2. When the align screen appears, follow the directions for adjusting the touch screen until thestylus screen appears.•If a finger or any other object touches the screen during a correction, it will be cancelled.Repeat the correction procedure.NoteTo display the align screen after the initial setup process, press the Record button whilepressing the center of the navigation button, or by tapping  , Settings, System, andthen Screen.3. Read and understand how to use the stylus then tap Next.NoteSee “Using the Stylus” on page 23 for more information.4. Read and understand pop-up menu operation, then tap Next.•Read the on-screen explanation and then operate the screen.Display the pop-up menus, and cut and paste the data according to the screen instructions.•When you finished the paste operation, this stage is completed. Tap Next.5. Follow the directions for setting the location, then tap Next.6. When the complete screen appears, initial setup is finished.  The Today screen will appear andthe device will be ready to use. See “Today Screen,” later in this chapter for more information.DRAFT
Chapter 2: Basic Skills29Method of Setting Card into SD Card SlotTo insert a card:1. Turn off the power.2. Insert the card with its contact surface (metal contact surface) facing backward into thedevice.To remove a card:1. Make sure that no application is accessing the SD card.2. Turn off the power.3. Lightly press down on the card until a clicking sound is heard. The card will pop out slightlyfrom the slot.4. Pull the card straight up to remove.Contact surfaceSetup OptionsDRAFT
Chapter 2: Basic Skills30How to Change the Color PanelYou can change the Color Panel (optional).To remove the Color Panel, unlock in the direction of the arrow, as shown in the figure below, thendetach the Color Panel by pulling it upward.1.2.To attach a new Color Panel, perform the procedure in reverse order.DRAFT
Chapter 2: Basic Skills31Connecting to a ComputerBefore connecting your device to a computer, check the following.•ActiveSync® is on your computer. (See Chapter 4 for more information)•The device is turned off.•The computer you’re connecting has an available USB port for the cradle.To connect using the supplied USB cradle:1. Connect the USB cradle to your computer as shown in the illustration below.2. Insert the device into the USB cradle.Make sure that the connector on the cradle is inserted into the port on the bottom of the device.Data can not be transferred if the connection is not made.When your device is properly inserted into the cradle, your device will turn on automatically andActiveSync® will automatically open on your computer.NoteAvoid using your device in environments that are likely to be affected by static electricityor are prone to high electrical noise. If you connect your device to a computer via thedocking cradle for data transfer or data restoration purposes, Audiovox CommunicationsCorp. will not be responsible for any device or computer malfunction, problems with datatransfer or (strikethrough: restoration creation or data communication), or datamodification/loss that may occur in these environments.USB portDRAFT
Chapter 2: Basic Skills32Tap to switchto a program.Tap to change date and time.Tap to open information setting.Your day at a glance.Tap to view connection status.Tap to create a new item.Today ScreenThe first time you turn on your device each day, or after 4 hours of inactivity, the Today screen willbe displayed. It can be accessed by tapping   and then Today.DRAFT
Chapter 2: Basic Skills33Status Icon MeaningTurns all sounds on and off and changes the volume levelBatteries chargingBatteries are lowBatteries are very lowBatteries are fullActive connectionSynchronization is beginning or endingSynchronization in processNotification that a new program or system update is availableInstant message receivedE-mail message receivedFollowing are some of the status icons you may see.Status Icon MeaningNot connected to the networkConnected to the networkThere is a missed callThere is an unread SMS messageThere is a voice mail messageWatcher™ Status IconsWhen Watcher™ is activated, the following icons may be displayed on the command bar of theToday screen.NoteIf more notification icons need to be displayed than there is room for on the screen, the will display. Tap the icon to view all the notifications.DRAFT
Chapter 2: Basic Skills34ProgramsSwitch from one program to another by using the   menu. To access programs not listed on thedrop down menu, tap  , Programs, then the desired program.You can also switch to another program by pressing any of the five program buttons located on thefront and side of the device. The icons above the buttons  identify the factory set programs (fromleft to right) – Calendar, Tasks, Home and Contacts. The Record button on the side is for voicerecording. To reprogram these buttons to activate other programs, see page 47, “AdjustingSettings.”The following table is a partial list of programs on your device.Icon Program DescriptionActiveSync®Synchronize information between your device and yourcomputer.Calendar Keep track of your appointments and create meeting requests.Contacts Keep track of your friends and colleagues.Inbox Send and receive e-mail messages.Pocket Internet Explorer Browse Web and WAP sites, and download new programs andfiles from the Internet.Notes Create handwritten or typed notes, drawings, and recordings.Tasks Keep track of your tasks.Pocket Excel Create Excel spreadsheets or view and edit Excelspreadsheets created on your computer.MSN® Messenger Send and receive instant messages with your MSN® Messengercontacts.Pocket Word Create new documents or view and edit Word documentscreated on your computer.Besides the program in the above table, Windows Media Player, Backup, Calculator, File Explorer,Home, Infrared Receive, Microsoft Reader, Terminal Services, Watcher, Solitaire are pre- installed.DRAFT
Chapter 2: Basic Skills35Navigation Bar and Command BarThe navigation bar, located at the top of the screen, displays the active program and time, andallows you to switch programs and close screens.The command bar at the bottom of the screen performs tasks in the open program, and includesmenu names, buttons and the Input Panel button.  Tap New to create a new item in the program.New button.Menunames. Buttons.Input Panel button.Tap to select a program.Tap to see additional programs.Tap to customize the device.Tap to change volume or mute the device.Tap to quickly select a programyou have recently used.Tap to display the current date and the next schedule.Tap to view notification messages.DRAFT
Chapter 2: Basic Skills36Pop-up MenusPop-up menus provide quick access to select an action for an item, and vary with each program.To access a pop-up menu, tap and hold the stylus on the item you want to perform the action on.When the menu appears, lift the stylus and tap the desired action. Tap anywhere outside the menuto close it.NotificationsYour device can remind you when you have an appointment or task scheduled, or serve as analarm clock.  Notification options include:• A message box on the screen• A sound (which you select)• A flashing lightTo select reminder types and sounds, tap   and then Settings. In the Personal tab, tap Sounds& Notifications. The selected options will apply for the entire device.Tap and hold to displaythe pop-up menu.Lift the stylus and tapthe action you want.Tap outside the menuto close it without performingan action.DRAFT
Chapter 2: Basic Skills37Entering InformationOptions for entering new information include:•Using the input panel to enter typed text.•Writing or drawing pictures directly on the screen.•Recording a message by speaking into the microphone.•Using Microsoft® ActiveSync® to synchronize or copy information from your computer to theyour device.Entering Text Using the Input PanelUse the input panel to enter information in any program by either typing using the soft keyboard, orby writing using the Letter Recognizer, Block Recognizer or Transcriber. With either option thecharacters will appear as typed text on the screen.To view/hide the input panel, tap the Input Panel button, then tap the arrow next to it to see youroptions.Input Panel button.  Select an input method.Tap to see your choices.DRAFT
Chapter 2: Basic Skills38When you use the input panel, your device anticipates the word you are typing or writing anddisplays it above the input panel. When you tap the displayed word, it is inserted into your text atthe insertion point. The more you use your device, the more words it learns to anticipate.NoteTo change word suggestion options, such as the number of words suggested at one time,tap  , Settings, Personal tab, Input, and then the Word Completion tab.To type with the soft keyboard:1. Tap the arrow next to the Input Panel button and then Keyboard.2. Use the stylus to tap the keys on the soft keyboard.To use Letter Recognizer:With Letter Recognizer you can write letters using the stylus just as you would on paper.1. Tap the arrow next to the Input Panel button and then Letter Recognizer.2. Write a letter in the box – it will automatically be converted to typed text on the screen.For specific instructions, open Letter Recognizer and tap the question mark icon next to the writingarea.Tap here if thisis the right word.DRAFT
Chapter 2: Basic Skills39To use Block Recognizer:With Block Recognizer you can use the stylus to input character strokes similar to those used onother devices.1. Tap the arrow next to the Input Panel button and then Block Recognizer.2. Write a letter in the box — it will automatically be converted to typed text on the screen.For specific instructions, open Block Recognizer and tap the question mark icon next to the writingarea.To use Transcriber:With Transcriber you can write anywhere on the screen using the stylus just as you would onpaper. Unlike Letter Recognizer and Block Recognizer, you can write a sentence or more ofinformation. Then, pause and let Transcriber change the written characters to typed characters.1. Tap the arrow next to the Input Panel button and then Transcriber.2. Write anywhere on the screen.For specific instructions, open Transcriber and tap the question mark icon next to the writing area.To select typed text:1. Drag the stylus across the text you want to select.2. Format or edit text by tapping the command on the Edit menu or by tapping and holding theselected words until the pop-up menu appears.DRAFT
Chapter 2: Basic Skills40Writing on the ScreenTo write on the screen, write the same way do on paper. The text can be edited, formatted orconverted at a later time.To write on the screen:•To switch to the writing mode, tap the Pen button. Lines will appear on the screen to help youwrite.NoteNot all programs that accept writing feature the Pen button. Refer to that program’sdocumentation to find out how to switch to writing.To select writing:If you want to edit or format writing, you must select it first.1. Tap and hold the stylus next to the text you want to select.2. At the moment the red circles of the pop-up menu appear, drag the stylus across the text youwant to select without lifting.If you accidentally write on the screen, tap Edit, then Undo and try again. You can also select textby tapping the Pen button to deselect it and then dragging the stylus across the screen.You can cut, copy, and paste written text in the same way you work with typed text: tap and holdthe selected words and then tap an editing command on the pop-up menu, or tap the command onthe Edit menu.Tap the Pen button and useyour stylus like a pen.DRAFT
Chapter 2: Basic Skills41To convert writing to text:•Tap Tools and then Recognize.If you want to convert only certain words, select them before tapping Recognize on the Toolsmenu (or tap and hold the selected words and then tap Recognize on the pop-up menu). If a wordis not recognized, it is left as writing.Select the text you wantto convert and tap Recognize on thepop-up menu.The writing is turned intotext.DRAFT
Chapter 2: Basic Skills42If the word conversion is incorrect, you can select an alternative word by tapping and holding downon the wrong word. On the pop-up menu tap Alternates and browse the list.  Either tap the wordyou want to use, or tap the writing at the top of the menu to return to the original writing.For best recognition:•Write neatly within the lines and draw descenders below the line.  Write the cross of the “t”and apostrophes below the top line so they aren’t confused with the word above.  Writeperiods and commas above the line.•Using the Tools menu, increase the zoom level to 300%.•Write the letters of words close together and leave big gaps between words.•Any changes made to a word after you attempt to recognize it (such as changing a “3” to an“8”) will not be included if you attempt to recognize it again.NoteHyphenated words, foreign words that use special characters such as accents, and somepunctuation cannot be converted.Or, tap the word you wantto use.Tap to return to youroriginal writing.DRAFT
Chapter 2: Basic Skills43Drawing on the ScreenDraw on the screen in the same way that you write on it. The only difference is how the items areselected and edited. For example, drawings can be resized - writing cannot.To create a drawing:•A drawing box will appear when you cross any three ruled lines on your first stroke.Subsequent strokes in or touching the box become part of the drawing.  Drawings that do notcross three lines will be considered writing.NoteYou may want to change the zoom level so that you can more easily work on or view yourdrawing. Tap Tools and then a zoom level.To select a drawing:If you want to edit or format a drawing, you must select it first.•Tap and hold the stylus on the drawing until the selection handle appears. To select multipledrawings, deselect the Pen button and then drag to select the drawings you want.You can cut, copy, and paste selected drawings by tapping and holding the selected drawing andthen tapping an editing command on the pop-up menu, or by tapping the command on the Editmenu. To resize a drawing, make sure the Pen button is not selected, and drag a selection handle.The drawing box indicatesthe boundaries of the drawing.Pen button.DRAFT
Chapter 2: Basic Skills44Recording a MessageAny program where you can write or draw on screen, you can also record a message.  InCalendar, tasks and Contacts, you can include a recording in the Notes tab. In the Notes program,you can either create a stand-alone recording or include a recording with a written note. And, withthe Inbox program a recording can be added to an e-mail.When recording a message during data communication, hold the device keeping distance fromyour body as shown in the illustration on page 61.To create a recording:1. Hold the device’s microphone near your mouth or sound source.2. Press and hold the Record button (on the left side) until it beeps.3. While holding down the button make the recording.4. Release the button to stop recording and two beeps will sound. The new recording appears inthe note list or as an embedded icon.NoteTapping the Record button on the Recording toolbar can also make a recording. To endrecording, press the Stop  button.To play a recording, tap it in the list or tap its icon in the note.Indicates an embeddedrecording.Tap to show or hidethe Recording toolbar.Tap to begin recording.DRAFT
Chapter 2: Basic Skills45Using My TextMy Text quickly inserts preset and frequently used messages into the text entry areas of Inbox orMSN® Messenger.  To insert a message, tap My Text and select a message.NoteYou can add text after inserting a My Text message.To edit a My Text Message, tap Edit My Text Messages in the Tools menu. Select the messageyou wish to edit and make the changes. Tap OK in the upper right corner to complete the change.Tap to select a prewrittenmessage. DRAFT
Chapter 2: Basic Skills46Finding and Organizing InformationThe Find feature quickly locates information:•From the   menu, tap Find. Enter the text you want to find, select a data type, then tap Go.NoteTo quickly find information that is taking up storage space on your device, select Largerthan 64 KB in Type.File Explorer can also find files on your device and organize them into folders.  To access from the menu, tap Programs, then File Explorer.NoteTo move files in File Explorer, tap and hold the item you want to move then tap Cut orCopy. Go to the file where you want to move the document and tap Paste on the pop-upmenu.Tap the folder nameto open it.Tap and hold to createa new folder.Select the sort orderfor the list.Tap to change folders.Tap to display the path entry screen for opening the shared file of the network.Tap to display the contents of the My Device.Tap to display the contents of the Storage Card.DRAFT
Chapter 2: Basic Skills47Customizing Your DeviceAdjusting the settings and installing additional software can customize your device.Adjusting SettingsSettings can be adjusted by tapping  , Settings, and then the Personal or System tab locatedat the bottom of the screen.  The following settings or the like can be adjusted:•Clock: To change the time or to set alarms.•Menus: To customize what appears on the   menu, and to enable a pop-upmenu from the New button.•Owner Information: To enter your contact information.•Today: To customize the look and the information that is displayed on theToday screen.•Buttons: To assign your favorite program to the program button.•Remove Programs: See the following pages.•Password: See the following pages.•Front Light: See the following pages.•Power: See the following pages.•Memory: See the following pages.DRAFT
Chapter 2: Basic Skills48Adding or Removing ProgramsPrograms installed on your device at the factory are stored on ROM (read-only memory) andcannot be removed or accidentally lost. ROM programs can be updated using special installationprograms with a *.xip extension. Any programs and files added after factory installation are storedin RAM (random access memory). As long as you have enough memory, you can install anyprogram created for your device. To find software for your device, visit the Pocket PC website athttp://www.microsoft.com/mobile/pocketpc.NoteIf you update ROM programs using special installation programs with a *.xip extension,do not use the backup data which you made before updating ROM programs.To add programs using ActiveSync®:You’ll need to install the appropriate software for your device on your computer before installing iton your device.1. Determine your device and processor type so that you know which version of the software toinstall. Tap  , then Settings. On the System tab, tap About. In the Version tab, make a noteof the information in Processor.2. Download the program to your computer (Or insert the CD or disk that contains the programinto your computer). You may see a single *.xip, *.exe, or *.zip file, a Setup.exe file, or severalversions of files for different Pocket PC types and processors. Be sure to select the programdesigned for the Pocket PC and your device processor type.3. Read any installation instructions, Read Me files, or documentation that comes with theprogram. Many programs provide special installation instructions.4. Connect your device and your computer.5. Double-click the *.exe file.•If the file is an installer, the installation wizard will begin. Follow the directions on the screen.Once the software has been installed on your computer, the installer will automaticallytransfer the software to your device.•If the file is not an installer, you will see an error message stating that the program is valid butit is designed for a different type of computer. You will need to move this file to your device. Ifyou cannot find any installation instructions for the program in the Read Me file ordocumentation, use ActiveSync® Explore to copy the program file to the Program Files folderon your device. For more information on copying files using ActiveSync®, see ActiveSync®Help.Once installation is complete, tap  , Programs, and then the program icon to switch to it.DRAFT
Chapter 2: Basic Skills49To add a program directly from the Internet:1. Determine your device and processor type so that you know which version of the software toinstall.Tap  , then Settings. On the System tab, tap About. In the Version tab, make a note of theinformation in Processor.2. Download the program to your device straight from the Internet using Pocket Internet Explorer.You may see a single *.xip, *.exe or *.zip file, a Setup.exe file, or several versions of files fordifferent device types and processors. Be sure to select the program designed for the PocketPC and your device processor type.3. Read any installation instructions, Read Me files, or documentation that comes with theprogram. Many programs provide special installation instructions.4. Tap the file, such as a *.xip or *.exe file. The installation wizard will begin. Follow the directionson the screen.To add a program to the Start menu:Tap  , Settings, Menus, the Start Menu tab, then the check box for the program. If you do notsee the program listed, you can either use File Explorer on the device to move the program to theStart Menu folder or use ActiveSync® on your computer to create a shortcut to the program andplace the shortcut in the Start Menu folder.•Using File Explorer on the device: Tap  , Programs, File Explorer, and locate theprogram (tap the folder list, labeled My Documents by default, then My Device to see a listof all folders on the device). Tap and hold the program and tap Cut on the pop-up menu.Open the Start Menu folder located in the Windows folder, tap and hold a blank area of thescreen, and tap Paste on the pop-up menu.The program will now appear on the   menu. For more information on using File Explorer,see “Find and Organize Information,” on page 46.•Using ActiveSync® on your computer: Use the Explorer in ActiveSync® to explore yourdevice files and locate the program. Right-click the program, then click Create Shortcut.Move the shortcut to the Start Menu folder in the Windows folder. The shortcut now appearson the   menu. For more information, see ActiveSync® Help.To remove programs•Tap  , then Settings. On the System tab, tap Remove Programs.If the program does not appear in the list of installed programs, use File Explorer on your device tolocate the program, tap and hold the program, and then tap Delete on the pop-up menu.DRAFT
Chapter 2: Basic Skills50Setting PasswordProtect data and settings by setting a password that will be requested every time the power isturned on.1. Tap  , then Settings. On the Personal tab, tap Password.2. Select the type of password you would like to use.3. Enter a password and tap OK.4. Tap YES on the confirmation screen. The password is saved and the screen returns to thePersonal tab screen.NoteRecord your password in a safe place. If you wish to change your password you will haveto know the existing one to access the Password setting screen. If you forget yourpassword you will have to initialize the device, which deletes all stored data and settings.If the power is off, you will not be able to answer or make a phone call without enteringyour password.You can automatically receive a call when the Auto-Answer is activated. However, youcannot disconnect without entering the password.Enter the password.Select how long your device must beturned off before the password is requiredto use your device.Your password must be at least seven characters long and contain a combination of uppercase letters, lowercase letters, numerals or punctuation.Your password must be four numerals.DRAFT
Chapter 2: Basic Skills51Setting the Front Light1. Tap  , then Settings. On the System tab, tap Front Light.2. Set the Front Light.3. When finished, tap OK.Check and select when you want front light to automatically turn off.Sets the time that elapses until the front light automatically turns off.Automatically turns the front light off when the AC Adapter (external power) is in use.Tap to select brightness level. If Power Save is activated, the front light turns off.DRAFT
Chapter 2: Basic Skills52Setting PowerTo confirm and control power usage:1. Tap  , then Settings. On the System tab, tap Power.2. Set Power Options.3. When finished, tap OK.Displays remaining battery power.When the AC Adapter is used, the battery charging mode is displayed, but the remaining battery power is not displayed.Automatically turns the power off when the AC Adapter (external power) is in use.Sets the time that elapses until the power automatically turns off.When checked, automatically turns off whenthe device hasn't been used for a user-setamount of time.Check to turn the power on if you press the program buttons or the SEND button when the device is off. To prevent the device from being turned on when the button is pressed accidentally, clear the checkbox.DRAFT
Chapter 2: Basic Skills53Setting MemoryMemory for the device is automatically managed. You can adjust data storage memory andprogram running memory, and confirm the amount of free space on a storage card.To change Memory allocation:1. Tap  , then Settings. On the System tab, tap Memory to display the Memory setting screen.2. Drag the slider widthwise to adjust the memory allocation between Storage and Program.3. When finished, tap OK.Slider.Free space of the Program memory.Free space of the Storage memory.DRAFT
Chapter 2: Basic Skills54To release memory:If memory is approaching full capacity, you can free up space by:• Transferring data to a storage card or to your computer and delete from your device.• Deleting unnecessary files and programs.• Quitting the program currently in use.NoteFor more detailed information on operation method or the releasing memory, tap   thenHelp.To confirm usage status of a storage card:1. Tap  , then Settings. On the System tab, tap Memory, then the Storage Card tab on thebottom.2. When finished, tap OK.Capacity of a storage card being inserted.Free space.Capacity in use.DRAFT
Phone Functions Phone Functions Chapter 3Chapter 3DRAFT
56Chapter 3: Phone FunctionsUsing Phone FunctionLaunching WatcherA program named Watcher is used for the phone functions on your device. When Watcher islaunched, the screen will automatically switch to the Watcher screen when a call is received, evenif you are in another program.1. Turn the Radio Standby Switch ON. Your device power is on and Watcher is launched. WhenWatcher has completed launching and the main screen (see next page) is displayed, you canuse phone functions.NoteWhen Watcher is launched, a status icon of Watcher is displayed on the right part of thecommand bar of the Today screen.When you do not place a call or use your device, press the Power button to turn off thepower of the main unit.If the Radio Standby Switch is ON, the Watcher screen appears automatically when a callcomes in, even if the main unit is turned off.Ending Watcher1. Turn the Radio Standby Switch OFF. Watcher will turn off and the screen will disappear.Do not quit Watcher during a call or communication.NoteAfter Watcher is OFF, phone functions will not work even if the power of the device is on.If you turn the Radio Standby Switch OFF while the power of the device is OFF, Watcherwill turn off when the device is turned on again.The phone portion of this device is designed to be used with an earpiece which is supplied, or as aspeakerphone. Unlike conventional cell phones, it is not designed to be held against the head inconversation without the use of a supplied authorized earpiece. Any other hand held use againstthe head without an earpiece is not warranted. Such unauthorized use of the phone, without anearpiece or as other than a speakerphone, has not been tested by the FCC for RF exposurecompliance.DRAFT
57Chapter 3: Phone FunctionsMain ScreenDATA tabVOICE tabCoverage Indicator IconsConnection Drop-ListShortcut to Dial-up ManagerReceiving Signal Strength/No Service IndicatorIn Use IndicatorStatus box displays information about the current call and any status messages.Indicator iconsData/Voice Controls Tab SelectionReceiving Signal Strength IndicatorThe number of lines indicates thereceived Signal Strength.Phone number of the connection destinationCall progress indication.Incoming or Outgoing number and cross-referenced Phone Book nameDial-padPhone BookVolume up and down, andMicrophone MuteScratchPadSEND buttonEND buttonCLR buttonDRAFT
58Chapter 3: Phone FunctionsIconsIcon MeaningAuto-Answer incoming Voice CallsDisplayed when there is an unread message. When a message set toHigh Priority is received, the icon flashes.Notification that one or more voice mail messages have been receivedNotification that there were one or more Missed callsThe Earphone is connected to the device.When receiving a call, the ringer tone sounds and the vibrating alertvibrates simultaneously.When receiving a call, the ringer tone does not sound but the vibratingalert vibrates.When receiving a call, the ringer tone does not sound and the vibratingalert does not vibrate.Enhanced Voice Privacy is available during a call.V.42bis is available.Displayed when the 1X Service can be used.Displayed when roamingIcons of the modemIcon MeaningDisplayed when an error occurs during a call.Displayed during data transfer.Displayed during high speed data transfer.Displayed during voice calls.Displayed when modem is not used.Icons of the display indicationDRAFT
59Chapter 3: Phone FunctionsKeypad Operation ListIf you press the SEND/END button while the Watcher program is open, the VOICE tab of theWatcher screen will be displayed, even if you were not in the Watcher program at that time. Oncethe Watcher screen is displayed, the SEND/END button on your device can be used for the sameoperations of the SEND/END button of the screen. Each button on the VOICE tab screen can beused for the various operations according to the situation.SENDENDCLR0-9,*, #IdlePlace a call to the phone numberdisplayed on the screen. Whenthe number is not displayed onthe screen, a call is placed to thelast number dialed.Delete all entered numbers at onetime.Delete entered numbers one byone or tap and hold CLR buttonto delete them all at one time.Enter the number you wish tocall. Tap and hold the Speed Diallocation number for one-touchdialing of that number.Incoming CallAnswer a call.Reject the incomingcall.Mute the ringertone.If Any-key Answer isset, you can answera call by tappingany of these keys.During a Voice CallWhen receiving a call from the newparty, answer the call. Also, you canswitch to the Three-Way calling.End all calls including the three-waycalling.Delete messages or entered numbersone by one. Tap and hold the CLRbutton to delete them all at one time.With the current call being kept, thenumber you entered is displayed on thescreen.Navigation Button and ProgramIf you press the navigation button of your device when the Watcher screen is displayed, theprograms stored will open.Top : The Phone Book is open.Bottom : The Mobile Messenger is open.Right : The Call Log is open.Left : The Speed Dial is open.Speed Dial Call LogPhone BookMobile MessengerDRAFT
60Chapter 3: Phone FunctionsTools menuYou can select the following items from the Tools menu at the DATA and VOICE tabs:Displays the Mobile Messenger screen.Displays the Connections setting screen.Displays a screen for storing phone numbers at numbers 1 to 9 on the dial pad.Displays a list of incoming calls, outgoing calls, missed calls.Turn on the KeyGuard function to protect against accidental operation.Displays the Options screen for changing or establishing various settings (Security, Sounds, etc.).Displays the Phone Book screen from which stored numbers can be called.Admin menuYou can select the following items from the Admin menu at the DATA and VOICE tabs:Displays information about Watcher.Use this function when the phone functions of device are not activated.DRAFT
61Chapter 3: Phone FunctionsTalking on the PhoneHere explains how to use your device when you talk on the phone.To use the Microphone and Speaker of your device:You can use the Microphone and Speaker of your device to talk on the phone.To use the Earphone Microphone:You can use the supplied Earphone Microphone by inserting it into the headphone jack to talk onthe phone.For the Earphone Microphone, see page 24 of Chapter 2.To use the Audio Remote Controller with Microphone:You can use the Audio Remote Controller with Microphone connected to a separately soldheadphone, by inserting it into the headphone jack to talk on the phone.For the Audio Remote Controller with Microphone, see page 25 of Chapter 2.You can use the SEND/END button of this controller as SEND button by releasing it immediatelyafter pressing, and as END button by pressing and holding.DRAFT
62Chapter 3: Phone FunctionsPlacing CallsWatcher must be launched in order to place a call.Dialing1. On the VOICE tab screen, enter the phone number of the other party using the dial-pad. appears when the call is connected.NoteIf you make a mistake when entering the phone number, tap the CLR button to clear thelast digit. Tap the END button to clear the entire number.Ending a Call1. Tap the END button to end a call. When the call is ended, the call time disappears from thedisplay.Call is connectedDRAFT
63Chapter 3: Phone FunctionsDialing from the Phone Book1. Either tap   on the VOICE tab screen or tap Phone Book on the Tools menu.2. Once the Phone Book screen is displayed, select the phone number you wish to call, then tapDial on the command bar. The number is dialed and the Phone Book screen closes. appears when the call is connected.NoteDial can also be selected from the pop-up menu that appears when you tap and hold theother party’s phone number. In addition, calls can also be placed by tapping the desiredphone number twice continuously.Speed Dialing1. On the VOICE tab screen, tap and hold the corresponding speed dial location number of thenumber you wish to call for at least one second. The phone number stored at that location isdialed.NoteSelect the number stored for speed dialing, then tap the SEND button, you can place acall.For details on the speed dial function, see Speed Dial (page 70)Dialing from the Call Log1. Tap Call Log on the Tools menu.2. At the Call Log screen, tap the number you want to dial and select Dial from the File menu orpress center of the navigation button. The number is dialed and the Call Log screen closes.NoteYou can also place calls by tapping and holding the number you want to dial andselecting Dial from the pop-up menu. For details on the Call Log screen, see Call Log(page 71).Redialing1. Tap the SEND button on the VOICE tab screen to call the last number dialed.NoteThe redial function does not work when there has been a missed call.DRAFT
64Chapter 3: Phone FunctionsReceiving a CallWhen a call is received, your device alerts you with an audible alert sound, the flashing indicatorand the vibrating alert, depending on which alert mode is set.1. Tap the SEND button on your device or the screen to answer the call.When a call is received, you can mute the ringer tone by tapping, the CLR or Volume button.About Any-key Answer:•When Any-key Answer has been set, you can answer a call by tapping any button other thanthe END, CLR or Volume button.Also, you can answer the call using 4 program buttons on the main unit.•Any-key Answer can be set at the Voice tab in Options. For details, see page 77.About Caller ID:When a call is received from the caller whose number is stored in the Pocket Outlook Contacts list,the name and the phone number will be displayed.If the call is from the caller who is not in the list, “Unknown” will be displayed.NoteWhen you tap the END button during an incoming call, the call is rejected and missed callicon   appears.DRAFT
65Chapter 3: Phone FunctionsSpeaker Icon ButtonThe setting changes each time you tap the Speaker Icon button.In standby mode, the setting options are “Ringer Only”, “Ring and Vibe”, “Vibrate Only”, and “SilentMode” (Ring and Vibe Off).During a call, the setting switches between “Sound on” and “Mute”.Volume ButtonsWhen you tap the Volume buttons, a volume bar appears on the screen to indicate the volumelevel (6 levels excluding Mute).You can also change the volume on the Headset Volume at the Sounds tab of the Options .Volume ControlYou can change the ringing setting by using the Speaker Icon Button. You can adjust the volumeduring a call by using the Volume Buttons.Speaker Icon ButtonVolume ButtonsAppears when Volume Buttons are used.Tap to adjust the ringer volume by tapping here.DRAFT
66Chapter 3: Phone FunctionsCall WaitingWhen another call is received while you are talking on the phone, you hear a call waiting tone and“Call Alert From” appear on the display.1. Tap the SEND button at this time to put the party you were originally talking to on hold andswitch to the new party. When it is switched to the new party, the information of the other partywill not be displayed.2. The party switches each time you tap the SEND button.Call ForwardingCall Forwarding is a service which transfers your incoming calls to another phone number.Please contact your service provider about this feature.Three-Way CallingThis feature allows you to talk to two people at two different phone numbers at the same time. Thisis a service dependent feature. Please contact your service provider about this feature.1. When connected to one other party, tap the SEND button and dial the second party’s number.2. When the call to the second party is connected, tap the SEND button to talk to both parties atthe same time.3. Tap the END button to disconnect both parties.Voice Mail appears on the display when you have new voice mail.1. Tap  .2. On the confirmation dialog screen, tap YES. The phone connects to your voice mailbox.The voice mailbox phone number can be set at the Voice tab in Options. For details, see page77.Digital Numeric PageWhen Digital numeric page is received, “Numeric Page: XXX-XXXX” appears on the screen. XXX-XXXX is numerical.The received “Digital numeric page” is saved as SMS in Inbox.Open the Digital numeric page in the Inbox, and select Call back Sender, you can place a call tothe number.DRAFT
67Chapter 3: Phone FunctionsMissed Call appears if you receive a call that you do not answer. When there is one missed call, “1 newMissed Call(s)” is displayed. When there are two missed calls, “2 new Missed Call(s)” is displayed.Tap the END button to turn off the missed call message.Calling Missed Calls BackYou can call the caller back.When there is one missed call, tap the SEND button to call the caller back.If there are more than one missed calls, tap the SEND button to call back the last missed call.The Call Log screen appears when   is tapped. You can use this to select a party who has calledand call that party back. For details on the Call Log function, see page 71.NoteIf the caller’ number is not notified, you cannot call back.Link DialingWhen Link Dialing is set, you can place the calls requiring multiple number inputs in a sequence ofcontinuous operations.This is convenient for example for using your home answering machine while you are out.Link Dialing is set when storing phone numbers in Contacts in Pocket Outlook.Link Dialing Storing1. At the Contacts, start up a screen for a new party or open the screen for the party you want tochange.2. Enter the phone number.3. After the phone number, enter uppercase “L” or lowercase “l”, then the next number.4. To enter more numbers after this, repeat steps 3.5. Once all the numbers have been entered, save, then start up Phone Book in Watcher.6. Tap Refresh on the command bar. The set number is read into Phone Book, and calls can nowbe placed from there using Link Dialing.Example: 604-323-**** L 9837*** l 9832**DRAFT
68Chapter 3: Phone FunctionsEmergency DialingEmergency calls can be placed as long as the power is on and there is a signal, even if the phoneis not registered, is not activated or if the KeyGuard mode is activated.1.  Enter “911” from the dial pad, then tap the SEND button.2.  Tap the END button to end the call.NoteWhen the emergency call number is stored in the speed dial memory, you place theemergency call by pressing a single key. This function does not work in the KeyGuardmode.The emergency call number varies from region to region.Phone BookThe Phone Book screen displays a list of the names and numbers stored in Contacts in PocketOutlook. The Phone Book screen can be used to place calls, and numbers added to Outlook caneasily be read into the Phone Book.Tap Phone Book on the Tools menu to display the Phone Book screen. The Phone Book screencan also be displayed by tapping   on the VOICE tab screen.Tap the first letter of the name you want to display. The first name starting with that letter is displayed at the very top.(Example:  When you tap “lmn”, the first name starting with the letter “l” is displayed at the very top.)Tap to dial the selected phone number.Tap to read in the data from Contacts and refresh the Phone Book. NoteNames and phone numbers cannot be added directly to the Phone Book screen.DRAFT
69Chapter 3: Phone FunctionsKeyGuard LockUse this function to guard against accidentally inputting numbers, or other unwanted key presses,etc.1. Tap KeyGuard on the Tools menu. The KeyGuard mode turns on and “KeyGuard enabled”appears on the screen.2. Tap KeyGuard on the Tools menu again to turn the mode off.NoteWhen the KeyGuard mode is on, the operations that are possible are turning theKeyGuard mode off, selecting the Tools/Admin menu, placing emergency calls, andreceiving incoming calls by tapping the SEND button.Scratch Pad1. Tap  . Using the scratch pad to take simple notes or to note a phone number during a call,etc.Tap to delete all the notes you have entered.Tap to close ScratchPad.When starting up at the next time, the same contents as the previous ones are displayed.DRAFT
70Chapter 3: Phone FunctionsSpeed DialStoring phone numbers in the speed dial memory for numbers 1 to 9 on the dial pad makes itsimpler to call those phone numbers.Storing1. Tap Speed Dial on the Tools menu or press left on the navigation button. The names andphone numbers stored in the speed dial locations appear.2. Tap the section next to the dial pad number at which you want to store a speed dial number.The Phone Book screen appears.3. Select the phone number you want to store, then tap Add on the command bar. The selectedname and phone number appear next to the dial pad number. (Tap the desired dial pad numberto call the phone number stored at that dial pad number.)4. Tap OK.Clearing1. Tap Speed Dial on the Tools menu or press left on the navigation button. The phone numbersection storing Dial pad number appears.2. Tap and hold the section on the right side of the dial pad number which you want to clear theentry.3. Tap Clear Speed Dial Entry on the pop-up menu which is displayed. The entry is cleared and“<Unassigned>” appears.4. Tap OK.Tap to call to the phone number in theright section.DRAFT
71Chapter 3: Phone FunctionsA pop-up menu displaying the items Delete, Copy Phone Number and Dial appears when you tapand hold a log item.Adding Telephone Numbers From the Log1. Tap and hold on the item you want to add to display a pop-up menu, then tap Copy PhoneNumber.2. Tap  , then tap Contacts and New. To change the number of a person whose number isalready stored, select that party, then tap Edit on the command bar.3. Paste the copied phone number into the phone number section.NoteIt is not possible to call items marked “Unknown” on the incoming call log or to store suchnumbers in Contacts.Storing Call Log As a Text File1. Tap Save As on the File menu.2. Name the text file on the Save As screen. Also, you can select a folder or a location storing thetext file.3. Tap OK.Call LogUse the Call Log screen to display a list of incoming, outgoing and missed calls. The lists includesuch information as the party that has called, the party you have called, the call time, etc. Calls canbe made directly from this list.Tap Call Log on the Tools menu or press right on the navigation button to display the Call Logscreen.DRAFT
72Chapter 3: Phone FunctionsSet the number of minutes after which the line is disconnected after you end the data communication.  (A warning message appears before the line is disconnected if so set at Options.)When this is checked, the CDMA network is used to update the time to the accurate time when Watcher is started up.Select the mode for answering incoming calls.Select the number of calls to be retained in the Call Log.  Calls exceeding this number are automatically deleted.Tap to save the new settings.Tap to restore all the settings to the defaults.Tap to return to the previous screen without storing the settings.When contracting with two NAMs (NumberAssignment Modules), you can select to use either of the NAMs.Check when connecting teletypewriter, etc.to the headphone jack.System selection is possible in an area that permits roaming.Automatic A:Scans the Priority system, if not found, scans the A-system.Automatic B:Scans the Priority system, if not found, scans the B-system.Home Preferred:Permits roaming if the home service is not found.Home Only: Permits only home service.Options (Preferences)Tap Options on the Tools menu to display the Options setting screen. A number of settings(Sound, Security, etc.) can be made at this screen.GeneralThese operations function in the same way on the different tab screens.DRAFT
73Chapter 3: Phone FunctionsDisplayCheck to display the Warning Message whilemeeting the conditions on the right part.DRAFT
74Chapter 3: Phone FunctionsSMSAt the SMS tab, you can set options for short message service like expire timeframe.Set the dead line to expire received messages.Check the checkbox, then tap Changeto display the Callback number entry screen. Enter a phone number other than the one of your own, the number sethere is displayed as a callback number at the time when a message is sent.Set whether or not to store the sent message in Outbox.DRAFT
75Chapter 3: Phone FunctionsSecurityYou can use the Security tab to lock the modem, change the password, etc.When the modem is locked, most menu functions (Options, SMS, Call Log, etc.) cannot be used.(The “Unlock Modem” menu can be selected.)Also, no calls other than emergency calls can be placed, and when a call is received, the caller’sphone number is displayed “***”.Select Never or On power up.Tap to immediately lock the modem.Tap to change the lock code.To change the lock code, first enter the old lock code, then enter the new one.DRAFT
76Chapter 3: Phone FunctionsSoundsYou can use the Sounds tab to set the sounds for incoming calls, voice mail, SMS messages, etc.When a box is checked, the tone is sounded in that situation.Tap “...” to display the Open screen for selecting a sound file.  The screen returns to the previous screen when selecting a fileon the Open screen.Tap “>” to test play the set sound.Adjust the volume of the conversation.The volume can also be changed at the Voice tab.Select a receiving type from “Ringer Only”, “Ring and Vibe”, “Vibrate Only” and “Ring and Vibe Off” in the “Incoming Call” section.You can also select a receiving type with the Speaker Icon Button on the VOICE tab screen.DRAFT
77Chapter 3: Phone FunctionsVoiceSet the number of rings after which the auto-answer function answers the phone. Set Auto-Answer to answer a call automatically without using hands while driving.Set the number of seconds after which to retry when a call cannot be connected.  When this is checked, hyphenation is added automatically when phone numbers are entered using the dial pad.When this is checked, incoming calls can be answered by pressing any key other than END, CLR and the volume button.  This function does not work in the KeyGuard mode.Use this to set the length of the tone when numbers, etc., are entered from the dial pad.  When this is checked, a tone is sounded every minute during phone calls.When this is checked, a tone is sounded when calls are interrupted, when the service area switches from home to roaming, etc.Enter the phone number, then tap Change to set the number for checking your voice mail.When Mute is checked, the tone is not sounded.DRAFT
78Chapter 3: Phone FunctionsSMS (Mobile Messenger)Contact your service provider before using this function.Tap Mobile Messenger on the Tools menu to display the SMS message screen.When you receive a message,   appears on the display. The indicator flashes if the receivedmessage is set to high priority.Tap this indicator to open the SMS screen.The following is a list of the icons displayed with the SMS function.Icon MeaningThis icon is displayed next to the message in the Inbox or Outbox if themessage is set to high priority.This is displayed when there is a saved message in the Outbox that hasnot yet been sent.This is displayed when an error occurs during transmission and themessage could not be sent.This is displayed when transmission to the network is completed.This is displayed when the person who the message was sent to hasreceived the message.Messages marked with this check will be deleted when Delete is selectedDRAFT
79Chapter 3: Phone FunctionsInboxReceived messages are stored in the Inbox.You can select New Message, Forward Message, Reply to Sender and Call back Sender fromthe File menu.New Message: Displays a screen for creating a new message.Forward Message: Forwards the message as such.  When selected, an input screen with nosending number is displayed.Reply to Sender: Displays the screen for composing a new message with the sending numberalready entered.Call back Sender: Calls the person who sent the message.You can select Delete and Delete All from the Edit menu.Delete: Deletes all the messages with checks in their check boxes.Delete All: Deletes all the messages in the box, regardless of whether or not they are checked.Displays the number of the sender.A list of received messages.The details of the selected message are displayed in the section below.Unread messages are displayed in bold.Displays the time the message was received.Displays the number of messages stored in the Inbox and the number of unread messages.Displays Callback number whenthe sender specified it.Tap to display a screen for composing a new message.Displays the status of the Priority which is set.DRAFT
80Chapter 3: Phone FunctionsOutboxSent and unsent messages are stored in the Outbox.You can select New Message and Edit Message from the File menu.Edit Message: Displays a screen for editing stored messages. If the message is edited, theprevious message is overwritten.You can select Delete and Delete All from the Edit menu.A list of sent or saved messages.The details of the selected messages are displayed in the section below.The icon displayed depends on the message’s status.Displays the status of the message (whether or not it has been sent, whether or not it has been sent to the network, whether or not the recipients have received it, etc.).Displays the Callback number which is set.Displays the number of messages stored in the Outbox and the number of unsent messages.Displays the destination address. DRAFT
81Chapter 3: Phone FunctionsComposing New Messages1. At the Mobile Messenger screen, tap   on the command bar.2. Enter the recipient and select Normal or High for Priority. The recipient can be selected fromthe Phone Book when To is tapped. (See the following page.)3. Enter the message, then tap Send. Once the message is sent with no error, the screen closesautomatically.If an error occurs (no service, message incomplete, etc.), transfer is interrupted and an errormessage appears.  Choose whether to resend the message or save it and try again later.NoteAlso, you can send Messages by selecting Send from the File menu.Set whether or not to store sent messages in the Outbox at the SMS tab at Options.  Youcannot check whether the recipient has received the message unless this function is set.You can select Send and Save from the File menu.Send:  Sends the message.Save:  Saves the message in the Outbox without sending it.Tap OK when you want to stop the operation while composing a message. A dialog asking whetheror not save the message appears. When you select YES, the message is stored, and when youselect NO, the message is not saved.Tap to display the selection screen of the phone number or address.The maximum number of characters that can be entered per message is 160.Once this number reaches 0, nothing more can be entered.Select Normal or High.Select High to notify the recipient that the message is urgent.DRAFT
82Chapter 3: Phone FunctionsTo select the recipient from a listUse this function to select the recipient’s number from the Phone Book.1. On the message screen, tap To.2. Select the recipient from the list, then tap Add. Also, you can select the recipient by tapping ittwice continuously.3. Once you have selected the recipient, tap OK.A recipient can be removed by selecting that recipient and tapping Remove.Displays the selected recipient.  Tap to cancel the setting and return to the previous screen.  Other than selecting from the list, you can tap Add after entering the phone number or address to Add them to the Recipients.To send messages simultaneously to multiple recipientsAdd multiple recipients by repeating the operation of selecting recipients from the list and tappingAdd.If you are not using the list, messages can be sent to multiple recipients by entering a comma “,” or“;” after each number.Example: 98701****, 98712****DRAFT
83Chapter 3: Phone FunctionsAccessing the InternetYou can access the Internet by selecting “1xRTT” or “Quick net Connect” from the DATA tab orusing subscribed ISP.High-speed packet serviceConnection service allowing smooth connection to the Internet.1. Tap the pull-down list and select the desired connection name.2. Tap Connect to access the Internet using the selected service.DRAFT
84Chapter 3: Phone FunctionsUsing Subscribed ISPMake the settings required for using your subscribed ISP (Internet Service Provider).1. Tap Dial-Up Manager on the Tools menu. The Connections setting screen appears.2. Tap Add.3. Enter the required information.Enter the connection name. (Example: ISP name)Enter the connection user name specified by the ISP.Enter the connection number.Enter the connection password.DRAFT
85Chapter 3: Phone Functions4. Tap Save. The settings are stored in Connections and this connection can now be selected toaccess to the Internet.Your device will automatically begin connecting. Once connected, you can:•Send and receive e-mail messages by using Inbox. Before you can use Inbox, you need toprovide the information it needs to communicate with the e-mail server. For specificinstructions, see “Connecting Directly to an E-mail Server,” in Chapter 8.•Visit Web and WAP pages by using Pocket Internet Explorer. For more information, seeChapter 7.•Send and receive instant messages with MSN Messenger. For more information, see “MSNMessenger,” in Chapter 6.DRAFT
Chapter 4: Microsoft® ActiveSync®86Microsoft® ActiveSync®Microsoft® ActiveSync®Chapter 4Chapter 4DRAFT
Chapter 4: Microsoft® ActiveSync®87Microsoft® ActiveSync® synchronizes the information on your computer with the information on yourPocket PC.  Synchronization compares data between the two and updates both with the mostrecent information.  For example:•Keep Pocket Outlook® data up-to-date by synchronizing your device with your computer’sMicrosoft® Outlook®.•Synchronize Microsoft® Word and Microsoft® Excel files between the two. Files will beautomatically converted to the correct format.NoteUse ActiveSync® options to select which types of information to be synchronized.With ActiveSync®, you can also:•Back up and restore your device data.•Copy (rather than synchronize) files between your device and computer.•Control when synchronization occurs by selecting a synchronization mode. For example, youcan synchronize continually while connected to your computer or only when you choose thesynchronize command.•Select which information types are synchronized and control how much data is synchronized.For example, you can choose how many weeks of past appointments you want synchronized.Before you begin synchronization, install ActiveSync® on your computer from the   CompanionCD. For more information on installing ActiveSync®, see your Quick Start Card. ActiveSync® isalready installed on your device.DRAFT
Chapter 4: Microsoft® ActiveSync®88After installation is complete. The ActiveSync® Setup Wizard will:1. Help connect your device to your computer2. Set up a partnership to synchronize information between the two devices3. Customize the synchronization settings.Synchronization automatically begins when you finish using the Wizard.  After this initialsynchronization, view your device’s Calendar, Contacts and Tasks.  Everything stored in Microsoft®Outlook® on your computer should now be on your device.  Disconnect the device from yourcomputer and you’re ready to go.To initiate ActiveSync® on your device, tap  , and then tap ActiveSync.For information about using ActiveSync® on your computer, see ActiveSync® Help in the ActiveSyncprogram.Tap to synchronize via IR orchange synchronization settings.View connection status.Tap to connect and synchronize.View synchronization status.Tap to stop synchronization.For more information about ActiveSync® on your device, switch to ActiveSync®, tap  , then tapHelp.DRAFT
Microsoft® Pocket Outlook®Microsoft® Pocket Outlook®Chapter 5Chapter 5 DRAFT
90Chapter 5: Microsoft® Pocket Outlook®Microsoft® Pocket Outlook® includes Calendars, Contacts, Tasks, Inbox and Notes which can beused individually or together. For example, e-mail addresses stored in Contacts can be addresse-mail messages in Inbox.ActiveSync® synchronizes information in Microsoft® Outlook® or Microsoft® Exchange on yourcomputer with your   Pocket PC, comparing changes made on both and updating each ofthem with the latest information. For information on using ActiveSync®, see ActiveSync® Help onthe computer.Calendar: Scheduling Appointments and MeetingsUse Calendar to schedule appointments, including meetings and other events. You can check yourappointments in one of several views (Agenda, Day, Week, Month, and Year) and easily switchviews by tapping one of the 5 view icons at the bottom of the screen or by pressing the CalendarProgram (button#1 on front of your device).To access the Calendar, tap  , then Calendar.  Or, press the Calendar Program button on thefront of the device.NoteTap Options on the Tools menu to customize the Calendar display.Tap to go to today.Tap to display or editthe appointment details.Tap to create a new appointment.Tap to switch between the 5 views(Agenda, Day, Week, Month and Year).DRAFT
91Chapter 5: Microsoft® Pocket Outlook®To create an appointment:If you are in Day or Week view, tap the desired date and time for the appointment.1. Tap New.2. Enter a description and location.3. Adjust date and time as needed.4. Enter other desired information.  Hide the input panel to view all available fields.5. Tap the Notes tab to add notes or a drawing, or to create a recording, for more information see“Notes: Capturing Thoughts and Ideas” later in this chapter.6. Tap OK when finished.NoteIf you select Remind me in an appointment, your device will remind you according to theoptions set in  , Settings, Personal tab, Sounds & Notifications.Tap to select a date.Tap to select a time.Tap to return to the calendar(the appointment is savedautomatically).Tap to choose frompreviously entered locations.Tap to choose frompredefined text.Notes is a good placefor maps and directions.DRAFT
92Chapter 5: Microsoft® Pocket Outlook®Using the Summary ScreenTap an appointment to display the summary screen. To make changes, tap Edit.Creating Meeting RequestsCalendar can set up meetings with Outlook® or Pocket Outlook® users. The meeting request will becreated automatically and sent either when you synchronize Inbox or when you connect to youre-mail server. Indicate how you want meeting requests sent by tapping Tools then Options. If yousend and receive e-mail messages through ActiveSync®, select ActiveSync.To schedule a meeting:1. Create an appointment.2. In the appointment details, hide the input panel, then tap Attendees.3. Select the meeting attendees from your Contacts list. Tap OK.The meeting notice is created automatically and placed in the Outbox folder.For more information on sending and receiving meeting requests, see Calendar Help andInbox Help on the device.View appointment details.  Display notes.Tap to changeappointment.DRAFT
93Chapter 5: Microsoft® Pocket Outlook®Contacts: Tracking Friends and ColleaguesContacts maintains an easily accessible list of friends and colleagues. The device’s infrared (IR)port allows you to quickly share Contacts information with other device users. To access Contacts,tap  , then Contacts. Or, press the Contacts Program button on the front of the device.NoteTap Tools then Options to change the way information is displayed.All phone numbers stored in Contacts can be accessed from the Phone Book to place acall.When transfering the contact to another device by using infrared (IR), tap and hold thatcontact, then tap the Beam Contact from the displayed pop-up menu. For moreinformation, See “Transfering Items Using Infrated” in chapter 8.Tap and enter part of a name toquickly find it in the list.   Tap to display or editthe contact details.Tap and hold to displaya pop-up menu of actions.Tap to see additional phonenumbers and e-mail addresses.Tap to create a new contact.Select the category of contactsyou want displayed in the list.DRAFT
94Chapter 5: Microsoft® Pocket Outlook®Creating a contact:1. Tap New.2. Enter name and contact information. Scroll down to see all available fields.3. Tap Categories to assign the contact to a category. In the list, Contacts can be displayed bycategory.4. Tap the Notes tab to add notes or a drawing, or to create a recording. For more information,see “Notes: Capturing Thoughts and Ideas” later in this chapter.5. Tap OK when finished.Finding a contactThere are four ways to find a contact from the contact list:•Enter a name in the box under the navigation bar. To view all contacts clear text from the boxor tap the button to the right of the box.•Tap the category list (labeled All Contacts by default) and select the type of contact you wantdisplayed. To view unassigned contacts, select No Categories. Select All Contacts to viewthe entire contacts list.•To view contacts by their company names, tap View, then By Company. The number ofcontacts working for that company will be displayed to the right of the company name.•Tap  , Find, enter the contact name, select Contacts for the type, then tap Go.Notes is a good placefor maps and directions.Tap to return to the contactlist (the contact is savedautomatically).Scroll to see more fields.DRAFT
95Chapter 5: Microsoft® Pocket Outlook®Using the Summary ScreenTap a contact to display the summary screen. To make changes, tap Edit.View contact details.Tap to view or add notes.Tap to change contact information.DRAFT
96Chapter 5: Microsoft® Pocket Outlook®Tasks: Keeping a To Do ListTasks keeps track of what has to be done. To access, tap  , then Tasks. Or, press the TasksProgram button on the front of the device.NoteTap Tools then Options to change the way information is displayed.Tap to create a new task.Select the sort orderof the list.Indicates high priority.Select the category of tasksyou want displayed in the list.Tap to display or editthe task details.Tap and hold to displaya pop-up menu of actions.DRAFT
97Chapter 5: Microsoft® Pocket Outlook®Creating a task:1. Tap New.2. Enter a description.3. Enter a start and due date or other information by tapping the field. Hide the input panel to seeall the available fields.4. Tap Categories to assign the task a category. In the list, Tasks can be displayed by category.5. Tap the Notes tab to add notes or a drawing, or to create a recording. For more information,see “Notes: Capturing Thoughts and Ideas” later in this chapter.6. Tap OK when finished.NoteTo quickly create a task with only a subject, tap Entry Bar on the Tools menu. Then, taphere to add a new task and enter your task information.Tap to return to the tasklist (the task is savedautomatically).Tap to choose frompredefined subjects.Notes is a good placefor maps and drawings.DRAFT
98Chapter 5: Microsoft® Pocket Outlook®Using the Summary ScreenTap a task to display the summary screen. To make changes, tap Edit.View task details.View notes.Tap to show and hide additionalsummary information.Tap to change task.DRAFT
99Chapter 5: Microsoft® Pocket Outlook®Notes: Capturing Thoughts and IdeasNotes quickly captures thoughts, reminders, ideas and phone numbers. You can also create arecording to include with the entry.Tap and hold to displaya pop-up menu of actions.Tap to create a new item.Tap to change the sortorder of the list.Tap to show or hide theRecording toolbar.Tap to record.Tap to open a note or play a recording.DRAFT
100Chapter 5: Microsoft® Pocket Outlook®Creating a note:1. Tap New.2. Create your note by writing, drawing, typing, and recording. For more information about usingthe input panel, writing and drawing on the screen, and creating recordings, see “Entering TextUsing the Input Panel” in Chapter 2.Tap to add a recordingto the note.Tap to return to the notelist (the note is savedautomatically).Tap to show or hidethe input panel.Tap to write on the screen.DRAFT
101Chapter 5: Microsoft® Pocket Outlook®Inbox: Sending and Receiving E-mail MessagesUse Inbox to send and receive e-mail messages in either of these ways:•Synchronize e-mail messages with Microsoft® Exchange or Microsoft® Outlook® on yourcomputer.•Send and receive e-mail messages by connecting directly to an e-mail server through anInternet service provider (ISP) or a network.Synchronizing E-mail MessagesE-mail messages can be synchronized as part of the general synchronization process. You willneed to enable Inbox synchronization in ActiveSync®. For information on enabling Inboxsynchronization, see ActiveSync® Help on the computer.During synchronization:•Messages are copied from the mail folders of Exchange or Outlook on your computer to theActiveSync folder in Inbox on your device. By default, you will receive messages from thepast five days only, the first 100 lines of each message, and file attachments of less than 100KB in size.•E-mail messages in the Outbox folder on your device are transferred to Exchange or Outlook,and then sent from those programs.•E-mail messages in subfolders must be selected in ActiveSync® on your computer in order tobe transferred.NoteYou can also synchronize e-mail messages with your computer from a remote location.For more information, see Chapter 8.Connecting Directly to an E-mail ServerThe phone on your device can send and receive e-mail messages by connecting to an e-mailserver. For more information about setting up this remote connection, see Chapter 8.Once connected to the e-mail server:• New messages are downloaded to the device Inbox folder,• Messages in the device Outbox folder are sent; and• Deleted messages are removed from the device Inbox folderMessages received directly from an e-mail server are linked to your e-mail server rather than yourcomputer. When a message is deleted from your device it will also be deleted from the e-mailserver the next time you connect.When working online connected to your server, you can immediately read and respond tomessages - they are sent as soon as you tap Send, saving space on your device.To work offline, download new message headers or partial messages, and disconnect from theserver. You can then mark which messages to completely download the next time you connect.DRAFT
102Chapter 5: Microsoft® Pocket Outlook®Using the Message ListReceived messages are displayed in the message list - the most recently received are listed first.Select the sort orderfor messages.Select the service and folderyou want to display.Tap to connect tothe selected service.Tap to connect and tosend and receive e-mail.Tap to open a message.Tap and hold to displaya pop-up menu of actions.DRAFT
103Chapter 5: Microsoft® Pocket Outlook®When you receive a message, tap it to open it. Unread messages are displayed in bold.To retrieve a full message during your next synchronization or e-mail server connection, tap andhold the message. On the pop-up menu tap Mark for Download.Specify downloading preferences when you set up the service or select your synchronizationoptions.•Inbox synchronization options can be changed using ActiveSync® options. See ActiveSync®Help for more information.•To change options for e-mail server connections, tap Tools then tap Options. On the Servicetab, tap the service you want to change. To remove a service, tap and hold the service andselect Delete.Tap to delete this message.Tap to view the previousor next message.Tap to reply to orforward this message.Tap to return tothe message list.DRAFT
104Chapter 5: Microsoft® Pocket Outlook®Composing Messages1. Tap New.2. In the To field, enter the e-mail addresses of the recipients, separating the names with a semi-colon, or select a name from the contact list by tapping and holding To, or by tapping theAddress Book button.3. Compose your message. To enter preset or frequently used messages, tap My Text and selecta message.4. Tap Send when you’ve finished the message. If you are working offline, the message is movedto the Outbox folder and will be sent the next time you connect.Tap to show or hidethe complete header..Tap to send the message.Tap to show / hide the recording toolbar.Tap to display the Address Book.Tap to insert common messages.DRAFT
105Chapter 5: Microsoft® Pocket Outlook®Managing E-mail Messages and FoldersMessages are displayed in one of five folders: Inbox, Deleted Items, Drafts, Outbox and SentItems. The Deleted Items folder contains messages that have been deleted on the device. Thebehavior of the Deleted and Sent Items folders depends on the options you have chosen. In themessage list, tap Tools  then Options. On the Message tab, select your options.To create new folders, tap Tools then Manage Folders. To move a message to another folder, tapand hold the message and then tap Move to on the pop-up menu.Folder behavior with a direct connection to an e-mail serverThe behavior of the folders you create depends on whether you are using ActiveSync®, POP3, orIMAP4:•If you use ActiveSync®, e-mail messages in the Inbox folder in Outlook® will automatically besynchronized with your device. You can select to synchronize additional folders bydesignating them for ActiveSync®. The folders you create and the messages you move willthen be mirrored on the server. For example, if you move two messages from the Inbox folderto a folder named Family, and you have designated Family for synchronization, the servercreates a copy of the Family folder and copies the messages into that folder. You can thenread the messages while away from your computer.•If you use POP3 and you move e-mail messages to a folder you created, the link is brokenbetween the messages on the device and their copies on the mail server. The next time youconnect, the mail server will see that the messages are missing from the device Inbox anddelete them from the server. While this eliminates duplicate copies of messages, you will nolonger have access to messages moved to folders created anywhere except the device.•If you use IMAP4, the folders you create and the e-mail messages you move are mirrored onthe server. Therefore, messages are available to you anytime you connect to your mailserver, whether it is from your device or computer. This synchronization of folders occurswhenever you connect to your mail server, create new folders, or rename/delete folders whenconnected.DRAFT
106Chapter 6: Companion ProgramsCompanion ProgramsCompanion ProgramsChapter 6Chapter 6DRAFT
107Chapter 6: Companion ProgramsCompanion programs include Microsoft® Pocket Word, Microsoft® Pocket Excel, Windows MediaTMPlayer for Pocket PC, and Microsoft® Reader.To switch to a companion program, tap  , then Programs, then the program name.Pocket WordPocket Word works with Microsoft® Word on your computer, providing easy access to copies ofdocuments. You can also create new documents on your device or copy documents from yourcomputer.To create a new file, tap  , Programs, Pocket Word, then New. Or, from the Today screen, tapNew, then Word Document. Only one document can be opened at a time; when you open asecond you will have to save the first. Documents can be saved in a variety of formats includingWord (.doc), Pocket Word (.psw), Rich Text Format (.rtf), and Plain Text (.txt).Pocket Word contains a list of stored files. Tap a file to open it, and tap and hold to delete, makecopies of, or send it from the pop-up menu.Tap to change the sortorder of the list.Tap to open a document.Tap and hold an item to seea pop-up menu of actions.Tap to create a new document.Select the type of folder youwant displayed in the list.DRAFT
108Chapter 6: Companion ProgramsYou can enter information in Pocket Word in one of four modes (typing, writing, drawing, andrecording), which are displayed on the View menu. Each mode has its own toolbar, which you canshow and hide by tapping the Show/Hide Toolbar button on the command bar.NoteYou can change the zoom magnification by tapping View then Zoom. Then select thepercentage you want. Select a higher percentage to enter text and a lower one to seemore of your document.If you’re opening a Word document created on a computer, select Wrap to Window onthe View menu so that you can see the entire document.Typing ModeEnter text using the input panel (See “Entering Text Using the Input Panel” in Chapter 2 for moreinformation). To format or edit text, highlight it by dragging the stylus over the text you wish toselect. Use the Edit menu or toolbars for formatting changes.A document can be searched for text by tapping Edit then Find/Replace.Tap to changeformatting options.Tap to format text.Tap and hold to see apop-up menu of actions.Tap to show or hidethe toolbar.Tap to return to thedocument list (changes aresaved automatically).DRAFT
109Chapter 6: Companion ProgramsWriting ModeIn writing mode, use your stylus to write directly on the screen. Ruled lines are displayed as aguide, and the zoom magnification is greater than in typing mode to allow you to write more easily.For more information on writing and selecting writing, see “Entering Text Using the Input Panel” inChapter 2.NoteIf you cross three ruled lines in a single stylus stroke, the writing becomes a drawing, andcan be edited and manipulated as described in the following section.Written words are converted to graphics (metafiles) when a Pocket Word document isconverted to a Word document on your computer.With Space button selected,drag to insert space. An arrowappears showing the spacedirection and size. Tap to highlight selected text.Space button.Tap to select formatting options,such as pen weight and line color.Pen button.DRAFT
110Chapter 6: Companion ProgramsDrawing ModeIn drawing mode, use your stylus to draw on the screen. Gridlines appear as a guide. When you liftyour stylus off the screen after the first stroke, you’ll see a drawing box indicating the boundaries ofthe drawing. Every subsequent stroke within or touching the drawing box becomes part of thedrawing. For more information on drawing and selecting drawings, see “Entering Text Using theInput Panel” in Chapter 2.Recording ModeIn recording mode, you can embed a recording into your document. Recordings are saved as .wavfiles. For more information on recording, see “Entering Text Using the Input Panel” in Chapter 2.For more information on using Pocket Word, tap   then Help.Select Shape on thepop-up menu to convertobjects to proper shapes.Resize an object by draggingthe selection handles.Tap an arrow  tosee your choices. Tap to select formatting options,such as line weight, fill color, and line color.Pen button.DRAFT
111Chapter 6: Companion ProgramsPocket ExcelPocket Excel works with Microsoft® Excel on your computer, providing easy access to copies ofspreadsheets. You can also create new spreadsheets on your device or copy spreadsheets fromyour computer.To create a new file, tap  , Programs, Pocket Excel, then New. Or, from the Today screen, tapNew, then Excel Workbook. Only one spreadsheet can be opened at a time; when you open asecond you will have to save the first. Spreadsheets can be saved in a variety of formats includingExcel (.xls) and Pocket Excel (.pls).Pocket Excel contains a list of stored files. Tap a file to open it, and tap and hold to delete, makecopies of, or send it from the pop-up menu.Pocket Excel provides fundamental spreadsheet tools such as formulas, functions, sorting andfiltering. To display toolbar, tap View then Toolbar.NoteIf your spreadsheet contains sensitive information, you can protect it with a password. Todo so, open the file, tap Edit, then Password. Every time you open that file, you will needto enter the password.Cell contents appear hereas you enter them.AutoSum button.Format button.Zoom button.DRAFT
112Chapter 6: Companion ProgramsTips for Working in Pocket Excel•To view in full screen mode, tap View then Full Screen. Tap Restore to exit mode.•Tap View to select items you want to show or hide.•To freeze panes, select the cell(s) you want to freeze, tap View then Freeze Panes. Freezethe top and leftmost panes in a spreadsheet to keep row and column labels visible as youscroll through a sheet.•To split panes to view different areas of a spreadsheet, tap View then Split. Drag the split barto the desired location. To remove, tap View then Remove Split.•To hide a row or column, select it then tap Format, then Row or Column, then Hide. To showa hidden row or column tap Tools, then Go To, then type a reference that is in the hidden rowor column. Then tap Format, then Row or Column, then Unhide.For more information on using Pocket Excel, tap   then Help.DRAFT
113Chapter 6: Companion ProgramsMSN® MessengerMSN® Messenger on your mobile device is an instant messaging program that lets you:•View a list of instant messaging contacts who are online.•Send and receive instant messages.•Have instant message conversations with groups of contacts.To use MSN® Messenger, you must have a Microsoft PassportTM account or a Microsoft® Exchangee-mail account. If you have a Hotmail® or MSN® account, you already have a Passport. Once youhave obtained either a Microsoft PassportTM or a Microsoft® Exchange account, you are ready toset up your account.NoteSign up for a Microsoft PassportTM account at http://www.passport.com. Get a freeMicrosoft® Hotmail® e-mail address at http://www.hotmail.com.To switch to MSN® Messenger, tap  , Programs, then tap MSN Messenger.Setting UpBefore you can connect, you must enter Passport or Exchange account information.To set up an account and sign in:1. In the Tools menu, tap Options.2. On the Accounts tab, enter your Passport or Exchange account information.3. To sign in, tap the sign-in screen and enter your e-mail address and password.NoteIf you use MSN® Messenger on your computer, your contacts will automatically show upon your device.DRAFT
114Chapter 6: Companion ProgramsWorking with ContactsThe MSN® Messenger window displays all your message contacts divided into Online and NotOnline categories. While connected, tap and hold any contact and a pop-up menu appearsallowing you to chat, send e-mail, block the contact or delete the contact.NoteTo see others online without being seen, in the Tools menu, tap My Status and selectAppear Offline.If you block a contact, you will appear offline but will remain on the blocked contact’s list.To unblock a contact, tap and hold the contact, then tap Unblock on the pop-up menu.Tap and hold to displaya pop-up menu of actions. Tap a contact to start a chat.DRAFT
115Chapter 6: Companion ProgramsChatting with ContactsTap a contact name to open a chat window. Enter your message in the text entry area at thebottom of the screen, or tap My Text to enter a preset message, and tap Send. To invite anothercontact to a multi-user chat, in the Tools menu, tap Invite and tap the contact you wish to invite.NoteTo switch back to the main window without closing a chat, tap the Contacts button. Torevert back to your chat window, tap Chats and select the person whom you werechatting with.Enter message.Tap to send message.DRAFT
116Chapter 6: Companion ProgramsTo see if the contact you are chatting with is responding, look for the message under the text entryarea.For more information on using MSN® Messenger, tap   then Help.View full chat.View status of the chat.DRAFT
117Chapter 6: Companion ProgramsWindows MediaTM Player for Pocket PCUse Microsoft® Windows MediaTM Player for Pocket PC to play digital audio and video files that arestored on your device or on a network. To switch to Windows MediaTM Player for Pocket PC, tap, then tap Windows Media.Use Microsoft® Windows MediaTM Player on your computer to copy digital audio and video files toyour device. You can play Windows MediaTM and MP3 files on your device.Windows MediaTM player can be used even if the screen is turned off. Tap Tools, Settings thenButtons, and select the Scan Toggle from the pull-down list beside “Select Function”, then pressthe hardware button you wish to allocate. By pressing the allocated button, you can turn on and offthe screen.For more information about using Windows MediaTM Player for Pocket PC, tap  , then tap Help.Tap to skip tothe next file.Tap to playa previous file.Taptostop.Tap to playor pause.Indicates the progressof the current track.Tap to adjust volumeDRAFT
118Chapter 6: Companion ProgramsMicrosoft® ReaderMicrosoft® Reader enables you to read eBooks on your device. Using ActiveSync®, book files canbe copied from your computer to your device.Each book consists of a cover page, an optional table of contents, and the pages of the book. Youcan:•Page through the book by using the Up/Down control on your device or by tapping the pagenumber on each page.•Annotate the book with highlighting, bookmarks, notes, and drawings.•Search for text and look up definitions for words.The Guidebook contains detailed information on using the software. To open, tap Help on theReader command bar. From a book page, tap and hold the book title, then tap Help on the pop-upmenu.To open Microsoft® Reader, tap  , Programs then Microsoft Reader.Getting Books on Your DeviceDownload book files from the Web by visiting your favorite eBook retailer and following thedirections for downloading.The   Companion CD also includes sample books and a dictionary in the MSReader folder ofthe Extras folder.The Read Me file in the MSReader folder gives directions for using ActiveSync® to download filesfrom your computer.DRAFT
119Chapter 6: Companion ProgramsUsing the LibraryThe Library is your Reader home page; it displays a list of all books stored on your device orstorage card.To open the Library:•On the Reader command bar, tap Library.•On a book page, tap the book title, and then tap Library on the pop-up menu.To open a book, tap its title in the Library list.Tap to specifythe books youwant to displayin the list.Tap here tonavigate toother parts of the Reader.Tap to selecta sort order.Tap to scroll throughthe Library list.Tap to open a book.Reader command bar.DRAFT
120Chapter 6: Companion ProgramsReading a BookEach book consists of a cover page, an optional table of contents, and the pages of the book.Navigation options are listed in the bottom portion of the cover page.The first time you open a book, you’ll probably want to go to the first page or to the table ofcontents, if there is one. Subsequently, whenever you open the book, you’ll be automatically takento the last page read.In addition to the text, each book page includes a page number and book title.You can also page through a book by using the Up/Down control on your device.Tap arrows to turnthe page, or tap andhold page # to bringup page riffle.Drag to select text andthen tap an option.Tap to selecta navigationoption.DRAFT
121Chapter 6: Companion ProgramsUsing Reader FeaturesReading an eBook gives you several options not available with paper books. Select text bydragging stylus across it and follow options outlined below:•Search for Text: Find text by tapping Find on the pop-up menu. Enter your search word andtap the desired Find option. Results are highlighted on the page. Tap outside the box to closeFind, and to return to your original page, tap the title then Return on the pop-up menu.•Copy Text: You can copy text from books into any program that accepts text. Select the textyou want to copy, then tap Copy Text on the pop-up menu. Paste it into the program of yourchoice.•Bookmarks: When Bookmark is selected from the pop-up menu, a color-coded bookmarkappears in the right margin. Multiple bookmarks can be added, and they can be accessedfrom anywhere in the book by tapping the bookmark icon.•Highlights: When text is highlighted it appears with a colored background.•Notes: Enter text in the note that appears on top of the page. To show or hide the note, tapthe Note icon displayed in the left margin.•Drawing: When you add a drawing, a Drawing icon appears in the top-right corner of thepage along with tools on the bottom of the page.•Tap Go to then Annotations on the book’s cover page to see a list of the book’s annotationsincluding bookmarks, highlights, text notes and drawings. Tapping an entry takes you to theannotated page.Removing a BookWhen you finish reading a book, it can be deleted (to conserve space) by tapping and holding thetitle in the Library list, and then Delete on the pop-up menu.DRAFT
122Chapter 7: Pocket Internet ExplorerPocket Internet ExplorerPocket Internet ExplorerChapter 7Chapter 7DRAFT
123Chapter 7: Pocket Internet ExplorerUse Microsoft® Pocket Internet Explorer to view Web or WAP pages in either of these ways:• During synchronization with your computer, download your favorite links and mobile favoritesthat are stored in the Mobile Favorites subfolder in Internet Explorer on the computer.• Connect to an Internet service provider (ISP) or network and browse the Web. See“Accessing the Internet” in Chapter 3.When connected to an ISP or network, you can also download files and programs from the Internetor intranet.To switch to Pocket Internet Explorer, tap   then Internet Explorer.The Mobile Favorites FolderOnly items in your computer’s Mobile Favorites folder will be synchronized with your device. Thisfolder is automatically created when ActiveSync® is installed.Favorite LinksDuring synchronization your computer’s Mobile Favorites folder is synchronized with your device’sPocket Internet Explorer. Both computers are updates each time you synchronize. If the link is notmarked as mobile favorite, you will have to connect to your ISP or network to view page content.For more information, see ActiveSync® Help on the computer.Mobile FavoritesIf you are using Microsoft® Internet Explorer 5.0 or later on your computer, you can downloadmobile favorites to your device. Synchronize the web content of your mobile favorites downloads toyour device so that you can view pages while you are disconnected from your ISP and computer.Use the Internet Explorer plug-in installed with ActiveSync® to create mobile favorites quickly.To create a mobile favorite:1. In Internet Explorer on your computer, click Tools then Create Mobile Favorite.2. To change the link name, enter a new name in the Name box.3. Optionally, in Update, select a desired update schedule.4. Click OK. Internet Explorer downloads the latest version of the page to your computer.DRAFT
124Chapter 7: Pocket Internet Explorer5. If you want to download the pages that are linked to the mobile favorites you just created, right-click the mobile favorite then click Properties. In the Download tab, specify the number of linksdeep you want to download. To conserve device memory, go only one level deep.6. Synchronize your device and computer and the Mobile Favorites folder will be downloaded toyour device.NoteIf an update scheduled was not specified in step 3, content will have to be manuallydownloaded to keep both computers updated. To see the last time content wasdownloaded to the computer, click Tools then Synchronize from the Internet Explorerwindow. Manually download content as needed.To add a button to your computer’s Internet Explorer toolbar for creating mobile favorites,click View, Toolbars then Customize.Saving device memoryTo minimize the amount of memory used by mobile favorites:• In the Favorites settings, select ActiveSync® options and turn off pictures and sounds, or stopselect mobile favorites from being downloaded. For more information see ActiveSync® Help.• Limit the number of downloaded linked pages. On your computer’s Internet Explorer, rightclick the mobile favorite you want changed and then Properties. In the Download tab,specify 0 or 1 for the number of linked pages you want to download.DRAFT
125Chapter 7: Pocket Internet ExplorerUsing AvantGo ChannelsAvantGo, a free interactive service that provides access to personalized content and popularwebsites, can be subscribed to directly from your device. Content can be downloaded when yousynchronize your device and computer, or directly from the Internet. Visit the AvantGo website formore information.To sign up for AvantGo:1. In ActiveSync® options on the computer, turn on synchronization for the AvantGo informationtype.2. In Pocket Internet Explorer on your device, tap the Favorites button to display your list offavorites.3. Tap the AvantGo Channels link.4. Tap the Activate button.5. Follow the directions on the screen. You will need to synchronize your device with yourcomputer and then tap the My Channels button to complete the AvantGo setup.When synchronization is complete, tap the AvantGo Channels link in your list of favorites to see afew of the most popular channels. To add or remove channels, tap the Add or Remove link.DRAFT
126Chapter 7: Pocket Internet ExplorerUsing Pocket Internet ExplorerWithout connecting to the Internet, Pocket Internet Explorer can browse mobile favorites andchannels that have been downloaded to your device. Or, you can connect to the Internet throughan ISP or a network connection. Hide pictures button. Favorites button.  Home button.Refresh button. DRAFT
127Chapter 7: Pocket Internet ExplorerTo view mobile favorites and channels:1. Tap the Favorites button to display your list of favorites.2. Tap the page you want to view.The version of the page that was downloaded the last time you synchronized will be displayed. Ifthe page is not on your device, the favorite will be dimmed. Synchronize with your computer todownload the page to your device, or connect to the Internet to view the page.To browse the Internet:1. Set up a connection to your ISP or corporate network using Connections, as described inChapter 8.2. To connect and start browsing, do one of the following:•Tap the Favorites button, and then tap the favorite you want to view.•Tap View then Address Bar. Enter the destination web address and tap  . Tap the arrow toselect from previously entered websites.NoteTo add a favorite link, tap and hold on the page and tap Add to Favorites in the pop-upmenu.Tap to add or deletea folder or favorite link.Tap the favorite youwant to view.DRAFT
Chapter 8: Getting Connected128Getting ConnectedGetting ConnectedChapter 8Chapter 8DRAFT
Chapter 8: Getting Connected129Your device can exchange information with other mobile devices as well as your computer, anetwork, or the Internet. The connection options include the following:• The device’s infrared (IR) port can send and receive files from another device. See“Transfering Items Using Infrared” below for more information.• When connected to the Internet via your service provider, you can send and receive e-mail byusing Inbox and view web and WAP pages using Pocket Internet Explorer. Your serviceprovider should provide the software necessary to install other services, such as paging andfaxing. See “Connecting to the Internet” later in this chapter for more information.• When connected to a Network you can send and receive e-mail by using Inbox and view weband WAP pages using Pocket Internet Explorer and synchronize with your computer. See“Connecting to the Work” later in this chapter for more information.• Remotely connect to your computer to synchronize information such as Pocket Outlook®. SeeActiveSync® Help on your computer or Connection Help on your device for more information.Transfering Items Using InfraredUsing infrared (IR), you can send and receive information, such as contacts and appointments,between two devices.To send information:1. Locate the item to send.2. Align the IR ports so that they are unobstructed and within a close range.3. Tap and hold the item, and tap Beam Item on the pop-up menu.NoteYou can also send items, but not folders, from File Explorer. Tap and hold the item youwant to send, then tap Beam File on the pop-up menu.To receive information:1. Align the IR ports so that they are unobstructed and within a close range.2. Have the owner of the other device send the information to you. Your device will automaticallyreceive it.DRAFT
Chapter 8: Getting Connected130Connecting to the InternetYou can connect to your ISP, and use the connection to send and receive e-mail messages andview Web or WAP pages.NoteTo use Watcher to connect to the Internet, see “Accessing the Internet” in Chapter 3.Creating a modem connection to an ISP:1. Obtain the following information from your ISP: ISP dial-up access telephone number, username, password, and TCP/IP settings. Some ISPs require information in front of the username, such as MSN/username.2. Tap   then Settings. In the Connections tab, tap Connections. Under The Internetsettings, select Internet Settings and tap Modify.3. In the Modem tab, tap New.4. Enter a name for the connection, such as “ISP Connection.”5. In the Select a modem list, select Sierra Wireless SB555 Modem.6. You should not need to change any settings in Advanced. Most ISPs now use a dynamically-assigned address. If the ISP you are connecting to does not use a dynamically-assignedaddress, tap Advanced then the TCP/IP tab, and enter the address. When finished, tap OKand then Next.7. Enter the access phone number, and tap Next.8. Select other desired options, and tap Finish.9. In the Dialing Locations tab, specify your current location and phone type. These settings willapply to all connections you create.To automatically start a connection perform one of the following tasks:• Use the Inbox to send and receive messages. Review “Connecting Directly to an E-mailServer” later in this chapter for detailed set-up instructions.• Use Internet Explorer to visit Web and WAP pages. See Chapter 7 for more information.• Use MSN® Messenger to send and receive instant messages. See “MSN® Messenger” inChapter 6 for more information.DRAFT
Chapter 8: Getting Connected131Connecting to WorkTo connect to a network at work, you need to set up a RAS account through your networkadministrator, then follow the steps below in “To create a modem connection to a network.”• Create a modem connection by using a RAS account. Before you can create this modemconnection, your network administrator will need to set up a RAS account for you. If this is themethod you want to use, see “To create a modem connection to a network.” Your networkadministrator may also give you VPN settings.To create a modem connection to a network:1. Get the following information from your network administrator: dial-up access telephonenumber, user name, password, domain name, and TCP/IP settings.2. Tap    then Settings. In the Connections tab, tap Connections. Under The Internetsettings, select Work Settings and tap Modify.3. In the Modem tab, tap New.4. Enter a name for the connection, such as “Company Connection.”5. In the Select a modem list, select Sierra Wireless SB555 Modem.6. You should not need to change any settings in Advanced. Most servers now use adynamically-assigned address. If the server you are connecting to does not use a dynamically-assigned address, tap Advanced and then the TCP/IP tab and enter the address. Whenfinished, tap OK then Next.7. Enter the access phone number, and tap Next.8. Select other desired options, and tap Finish.9. In the Dialing Locations tab, specify your current location and phone type. These settings willapply to all connections you create.To automatically start a connection perform one of the following tasks:• Use the Inbox to send and receive messages. Review “Connecting Directly to an E-mailServer” later in this chapter for detailed set-up instructions.• Use Internet Explorer to visit Web and WAP pages. See Chapter 7 for more information.• Use MSN® Messenger to send and receive instant messages. See “MSN® Messenger” inChapter 6 for more information.• Synchronize. See ActiveSync® Help on the computer for more information.DRAFT
Chapter 8: Getting Connected132Ending a ConnectionTo disconnect, do one of the following:• When connected via dial-up or VPN, tap the Connection icon,  , on your navigation bar andtap End.• When connected via cable or cradle, detach your device from the cradle.• When connected via Infrared, move the device away from the other one.Connecting Directly to an E-mail ServerYou can set up a connection to an e-mail server so that you can send and receive e-mailmessages by using a modem or network connection and Inbox on your device.NoteThe ISP or network must use a POP3 or IMAP4 e-mail server and an SMTP gateway.You can use multiple e-mail services to receive messages. For each e-mail address you intend touse, set up and name the e-mail service following the directions below.To set up an e-mail service:• In Inbox on your device, tap Services, then New Service. Follow the directions in the NewService wizard.For an explanation of a screen, tap   then Help. When finished, to connect to your e-mail server,tap Services then Connect. For more information on using the Inbox program, see “Inbox:Sending and Receiving E-mail Messages” in Chapter 5.Get Help on ConnectingAdditional help and information can be found in the following locations:• “Inbox: Sending and Receiving E-mail Messages” in Chapter 5.• Online Help on the device. Tap   then Help. Tap View, All Installed Help, then Inbox orConnections.• ActiveSync® Help on the computer. In ActiveSync®, click Microsoft ActiveSync Help on theHelp menu.• For troubleshooting information, see the Pocket PC Web site at: http://www.microsoft.com/mobile/pocketpc.DRAFT
Chapter 9: Optional Functions133Optional FunctionsOptional FunctionsChapter 9Chapter 9DRAFT
Chapter 9: Optional Functions134HomeTo easily launch the built-in or installed applications tap the icon displayed on the Home screen.Launching an Application from Home1. Tap  , Programs, then Home to display the Home screen.You can also launch the Home by pressing the device Home Program button.For initial setting, the respective applicationicons are registered on three tabs: Main,Programs and Games. In the Running tab,active applications are displayed.2. Tap the desired tab, then tap the application icon you want to launch.NotePress the Home Program button to switch tabs.An application can also be launched by moving the cursor button to select a program andpressing it to launch.You can add up to 10 tabs, with up to 18 icons in each.Tab.Tap to select Tab Settings or About.Tap to select Large Icon, Small Icon or Text color.Tap to select Paste or Add.DRAFT
Chapter 9: Optional Functions135About RunningThe Running tab displays active applications. Icons do not appear.To activate/stop the application:To activate an application tap its name, or tap Activate in the pop-up menu.NoteTap and hold anywhere on the Running tab, except the application names, and Stop Allappears in the pop-up menu.Tap View to select Text Color. Tap Tools for Tab Settings or About.Tap to activate the selected application.Tap to stop the selected application, when finished, the application name disappears.Tap to stop all applications displayed in the Running tab.DRAFT
Chapter 9: Optional Functions136Pocket Internet Explorer File ExplorerBackupInfrared ReceiveSolitaireWindows Media™ PlayerNotesTasksInboxCalendarContactsPocket WordPocket ExcelCalculatorRunningMainProgramsGamesTabs Icons Applications Tabs Icons ApplicationsWatcherFront LightPowerMicrosoft® ReaderMSN® MessengerDisplay Icon ListThe following list shows the tabs and icons for the initial setup.DRAFT
Chapter 9: Optional Functions137Moving an Application Icon into Another TabA moved icon appears next to the last icon in its new location. It cannot be moved to a tab thatalready contains 18 icons.To move using pop-up menu:1. Tap and hold the icon to be moved.2. Tap Cut on the pop-up menu.3. Tap the destination tab, then tap Paste on the Edit menu.NoteYou can also select Paste from the pop-up menu displayed by tapping and holding anyportion other than the icon.To move using drag and drop:Tap the icon you want to move and drag it to the destination tab, after the tab name is highlighted,drop it.The icon is transferred and deleted from its original location.Deleting an Icon1. Tap and hold the icon to be deleted.2. Tap Drop on the pop-up menu.NoteYou cannot delete the Watcher icon.DRAFT
Chapter 9: Optional Functions138Adding an IconApplication and file icons can be added to the Home screen.1. Tap Edit, then Add to display the Add Application screen.You can also select Add from the pop-up menu displayed by tapping and holding any portionother than the icon.2. Tap ▼ of Application file to show the file list. If there is no desired file on the file list, you canfind it by tapping Browse. To refer to all folders and files, tap Browse to show the BrowseDialog screen. When the file is selected, its name is displayed in the Application file box.3. Enter an icon name (up to 32 characters) in the Application name box that will display on theHome screen.4. Tap OK when finished.NoteA new icon cannot be added if the Application file is not designated or if the Application isnot entered.An icon added from a storage card cannot be launched unless the same card is insertedin the device.Tap to designate a folder you want to browse.When a storage card is inserted, files or folders contained in the storage card are displayed from thetop directory.Tap to move up one level in the directory folders.Tap to select kinds of application or file to be browsed.If a file is selected from the list, the screen returns to the Add Application screen.DRAFT
Chapter 9: Optional Functions139Tab SettingA tab can be added, deleted, or removed from the Tab Settings screen.To add a tab:1. Tap Tools, then Tab Settings.2. Tap New to display a text box.3. Enter the new tab name (up to 10 characters) and tap OK when finished.4. Tap OK on the Tab Settings screen to return to the Home screen.To delete a tab:1. Tap Tools, then Tab Settings.2. Select the tab to delete, then tap Delete. Tap Yes or No in the confirmation box. All iconscontained in the tab will also be deleted.3. Tap OK on the Tab Settings screen to return to the Home screen.Note   You cannot delete the Running tab or the tab containing the Watcher icon.To change the name of a tab:1. Tap Tools, then Tab Settings.2. Select the tab to be renamed and tap Rename.3. Enter a new name (up to 10 characters), and tap OK when finished.4. Tap OK on the Tab Settings screen to return to the Home screen.Note   You cannot rename the Running tab.To change a background:1. Select the background setup tab on the Tab Settings menu, then tap Browse to display theBrowse Dialog screen.Even if a storage card is inserted, the files in the storage card will not be displayed.2. Tap the desired bitmap file from the list to return to the Tab Settings screen.3. Tap OK on the Tab Settings screen to return to the Home screen.NoteOnly bitmap files can be set on the screen background.  The displayable range of thebitmap image on the Home screen is 240 (W) X 246 (H).DRAFT
Chapter 9: Optional Functions140Text Color SettingTo set the Text Color:1. Tap the tab whose color you want to set to display the selected tab screen.2. Tap View, then Text Color to display the color list.You can set the color of the application name as desired.3. Tap the color you want to set, and the color of the application name changes.DRAFT
Chapter 9: Optional Functions141Backing UpDevice data can be backed up in a storage card, which can be later restored to your device.Periodical data backup is strongly recommended.The following types of data can be backed up:•File: Files created by Pocket Word, Pocket Excel, Notes or other installed programs. Otherfiles stored in the memory.•Registry: Setting information on Windows® CE or Built-in Program.•Database: Microsoft® Pocket Outlook® database information.Password data and other menu setup information cannot be restored.Before backing up, restoring, or deleting a backup file, connect an AC Adapter to your device, setthe Radio Standby Switch to OFF and close all applications.NoteIf you update ROM programs using special installation programs with a *.xip extension,do not use the backup data made before updating the ROM programs.When the system was changed, data that was backed up before the change cannot berestored.Making a Backup1. Insert a storage card.2. Tap  , Programs, then Backup to display the Backup screen.3. Select Backup from Functionality.DRAFT
Chapter 9: Optional Functions1424. Tap OK to display the screen confirming all the applications are closed.5. Tap OK to display the Backup password input screen.6. Enter a password.NoteIf you choose a password, do not forget it. Backup data cannot be restored withoutentering it.7. Tap OK. The progress bar is displayed during the backup process.When the backup is completed, the backup finish message appears.8. Tap OK to return to the previous screen.NoteThe backup process stops if the remaining storage card capacity runs low. Check thestorage capacity before starting to back up.If the storage card is write protected it cannot save backup data. Cancel the writeprotection before backing up.Enter a password.You can enter a password up to 16 characters.Backup can be made even without entry of a password. If a password is entered, that password is required at the time of restore.DRAFT
Chapter 9: Optional Functions143 Carrying Out Restore OperationTo restore is to overwrite the backed up data from the storage card onto the main memory of yourdevice.•If the same file name exists in the main memory of your device, this file data is replaced withthe backup data from the storage card.•If files exist in the main memory but not in the backup file, they will not be overwritten.1. Insert the storage card, which contains backup data into your device.2. Tap  , Programs, then Backup to display the Backup screen.3. Select Restore from Functionality.4. Tap OK to display the screen confirming all the applications are closed.5. Tap OK to display the Restore password input screen.6. Enter the password that was established for the backed up data. If you backed up without apassword, you do not need to enter one.7. Tap OK. The progress bar is displayed during the restore process.When the restore is completed, the restore finish message appears.8. Tap OK. Your device is reset and restarts automatically.NoteIf your device memory becomes short of its capacity during restore, the restore processstops. Increase the memory allocation of the main memory of your device (see Chapter 2.“Customize Your Device”), then restart the restore procedure.DRAFT
Chapter 9: Optional Functions144 Deleting a Backup File1. Insert the storage card, which contains backup data to be deleted.2. Tap  , Programs, then Backup to display the Backup screen.3. Select Delete Backup File from Functionality.4. Tap OK to display the Delete Backup File confirmation screen.5. Tap OK to delete the backup file.DRAFT
Additional InformationAdditional InformationChapter 10Chapter 10DRAFT
Chapter 10: Additional Information146ResettingReset is equal to “Restart” on a computer. Reset only in unusual circumstances such as when thescreen freezes and doesn’t respond to tapping. Information not saved prior to resetting will bedeleted.When your device is reset, phone functions are abruptly ended.To reset, press and release the Reset Switch while the power is on. Once reset, the Today screenappears.NoteIf the function cannot be restored even after resetting, initialize your device (see “ClearingMemory” on the next page).• When the power is on, press the Reset Switch with the stylus, then release. By doing so,reset is made and the Today screen appears.DRAFT
Chapter 10: Additional Information147Clearing Memory (Initialization)Initializing the device returns it to the status when it was originally purchased.NoteInitializing the device deletes all stored data, except built-in programs.Before initialization, remove a storage card.To initialize:1. Turn off the power.2. Press the Power button while pressing and holding the Reset Switch with the stylus, thenrelease the Power button.3. Release the Reset Switch when a screen appears.When initialization is complete, the welcome screen appears. Proceed with setup.DRAFT
Chapter 10: Additional Information148SpecificationsAlthough the display is manufactured using an extremely high order of technology, there may be acase that some dots do not light or always light. It is not a malfunction.External dimensions 3 in. x 5 in. x 3/4 in. (excluding protrusion part)(77.5(W) x 127.5(H) x 19.5(D) mm)Operating conditions Temperature: 32°F to 104°F (0°C to 40°C), Humidity: 30 to80% RH• Temperature capable of charging: 41°F to 95°F (5°C to 35°C)(According to the operating status, the charging may pauseeven when the ambient temperature is below 95°F (35°C).)Built-in batteryType Advanced Lithium Ion batteryStandby time Approx. ? hours. (Radio Standby Switch: ON, Power: OFF)Continuing operating time Approx. ? hours.For continuous indication of the Today screen, front light: OFF,ambient temperature: 77°F (25°C)Memory keeping time Approx. ? hoursIf left at ambient temperature of 77°F (25°C) after the power isnot able to turn on.Note: Continuing operating time and memory keeping timevary according to the charging condition, ambienttemperature, operating condition, etc.Processor StrongARM SA-1110Action clock 206MHzMemory 32MB  SDRAMDisplay Reflective color TFT, 240x320 pixels, 65,536 colorsInterfaceSD card slot Possible to insert SD memory card or SDI/O cardNote: The security function of the SD memory card is notusable. Data encrypted by the SD memory cardsecurity function-compatible equipment is not usable.Infrared port Based on IrDA Ver.1.2,Maximum data transmission speed: 115 kbpsStereo headphone jack ø2.5mm, five poles stereo mini plugCradle connection portAC Adapter jackAC Adapter INPUT: 100-240V AC, 0.36-0.2A, 50-60HzOUTPUT: 5V DC, 3A• An attached Power Supply Cable is a 125 V AC type.DRAFT
FDA Consumer Update149U.S. Food and Drug Administration -Center for devices and Radiological Health Consumer Update on MobilePhones1. Do wireless phones pose a health hazard?The available scientific evidence does not show that any health problems are associated withusing wireless phones. There is no proof, however, that wireless phones are absolutely safe.Wireless phones emit low levels of radiofrequency energy (RF) in the microwave range while beingused. They also emit very low levels of RF when in the stand-by mode. Whereas high levels of RFcan produce health effects (by heating tissue), exposure to low level RF that does not produceheating effects causes no known adverse health effects. Many studies of low level RF exposureshave not found any biological effects. Some studies have suggested that some biological effectsmay occur, but such findings have not been confirmed by additional research. In some cases,other researchers have had difficulty in reproducing those studies, or in determining the reasonsfor inconsistent results.2. What is FDA’s role concerning the safety of wireless phones?Under the law, FDA does not review the safety of radiation-emitting consumer products such aswireless phones before they can be sold, as it does with new drugs or medical devices. However,the agency has authority to take action if wireless phones are shown to emit radiofrequency energy(RF) at a level that is hazardous to the user. In such a case, FDA could require the manufacturersof wireless phones to notify users of the health hazard and to repair, replace or recall the phonesso that the hazard no longer exists.Although the existing scientific data do not justify FDA regulatory actions, FDA has urged thewireless phone industry to take a number of steps, including the following:• Support needed research into possible biological effects of RF of the type emitted by wirelessphones;• Design wireless phones in a way that minimizes any RF exposure to the user that is notnecessary for device function; and• Cooperate in providing users of wireless phones with the best possible information on possibleeffects of wireless phone use on human health.FDA belongs to an interagency working group of the federal agencies that have responsibility fordifferent aspects of RF safety to ensure coordinated efforts at the federal level. The followingagencies belong to this working group:• National Institute for Occupational Safety and Health• Environmental Protection Agency• Federal Communications Commission• Occupational Safety and Health Administration• National Telecommunications and Information AdministrationDRAFT
FDA Consumer Update150The National Institutes of Health participates in some interagency working group activities, as well.FDA shares regulatory responsibilities for wireless phones with the Federal CommunicationsCommission (FCC). All phones that are sold in the United States must comply with FCC safetyguidelines that limit RF exposure. FCC relies on FDA and other health agencies for safetyquestions about wireless phones.FCC also regulates the base stations that the wireless phone networks rely upon. While thesebase stations operate at higher power than do the wireless phones themselves, the RF exposuresthat people get from these base stations are typically thousands of times lower than those they canget from wireless phones. Base stations are thus not the subject of the safety questions discussedin this document.3. What kinds of phones are the subject of this update?The term “wireless phone” refers here to hand-held wireless phones with built-in antennas, oftencalled “cell,” “mobile,” or “PCS” phones. These types of wireless phones can expose the user tomeasurable radiofrequency energy (RF) because of the short distance between the phone and theuser’s head. These RF exposures are limited by Federal Communications Commission safetyguidelines that were developed with the advice of FDA and other federal health and safetyagencies. When the phone is located at greater distances from the user, the exposure to RF isdrastically lower because a person’s RF exposure decreases rapidly with increasing distance fromthe source. The so-called “cordless phones,” which have a base unit connected to the telephonewiring in a house, typically operate at far lower power levels, and thus produce RF exposures farbelow the FCC safety limits.4. What are the results of the research done already?The research done thus far has produced conflicting results, and many studies have suffered fromflaws in their research methods. Animal experiments investigating the effects of radiofrequencyenergy (RF) exposures characteristic of wireless phones have yielded conflicting results that oftencannot be repeated in other laboratories. A few animal studies, however, have suggested that lowlevels of RF could accelerate the development of cancer in laboratory animals. However, many ofthe studies that showed increased tumor development used animals that had been geneticallyengineered or treated with cancer-causing chemicals so as to be pre-disposed to develop cancerin the absence of RF exposure. Other studies exposed the animals to RF for up to 22 hours perday. These conditions are not similar to the conditions under which people use wireless phones, sowe don’t know with certainty what the results of such studies mean for human health.Three large epidemiology studies have been published since December 2000. Between them, thestudies investigated any possible association between the use of wireless phones and primarybrain cancer, glioma, meningioma, or acoustic neuroma, tumors of the brain or salivary gland,leukemia, or other cancers. None of the studies demonstrated the existence of any harmful healtheffects from wireless phone RF exposures. However, none of the studies can answer questionsabout long-term exposures, since the average period of phone use in these studies was aroundthree years.DRAFT
FDA Consumer Update1515. What research is needed to decide whether RF exposure from wireless phones poses ahealth risk?A combination of laboratory studies and epidemiological studies of people actually using wirelessphones would provide some of the data that are needed. Lifetime animal exposure studies couldbe completed in a few years. However, very large numbers of animals would be needed to providereliable proof of a cancer promoting effect if one exists. Epidemiological studies can provide datathat is directly applicable to human populations, but 10 or more years’ follow-up may be needed toprovide answers about some health effects, such as cancer. This is because the interval betweenthe time of exposure to a cancer-causing agent and the time tumors develop - if they do - may bemany, many years. The interpretation of epidemiological studies is hampered by difficulties inmeasuring actual RF exposure during day-to-day use of wireless phones. Many factors affect thismeasurement, such as the angle at which the phone is held, or which model of phone is used.6. What is FDA doing to find out more about the possible health effects of wireless phoneRF?FDA is working with the U.S. National Toxicology Program and with groups of investigators aroundthe world to ensure that high priority animal studies are conducted to address important questionsabout the effects of exposure to radiofrequency energy (RF).FDA has been a leading participant in the World Health Organization International ElectromagneticFields (EMF) Project since its inception in 1996. An influential result of this work has been thedevelopment of a detailed agenda of research needs that has driven the establishment of newresearch programs around the world. The Project has also helped develop a series of publicinformation documents on EMF issues.FDA and the Cellular Telecommunications & Internet Association (CTIA) have a formal CooperativeResearch and Development Agreement (CRADA) to do research on wireless phone safety. FDAprovides the scientific oversight, obtaining input from experts in government, industry, andacademic organizations. CTIA-funded research is conducted through contracts to independentinvestigators. The initial research will include both laboratory studies and studies of wireless phoneusers. The CRADA will also include a broad assessment of additional research needs in thecontext of the latest research developments around the world.7. How can I find out how much radiofrequency energy exposure I can get by using mywireless phone?All phones sold in the United States must comply with Federal Communications Commission(FCC) guidelines that limit radiofrequency energy (RF) exposures. FCC established theseguidelines in consultation with FDA and the other federal health and safety agencies. The FCC limitfor RF exposure from wireless telephones is set at a Specific Absorption Rate (SAR) of 1.6 wattsper kilogram (1.6 W/kg). The FCC limit is consistent with the safety standards developed by theInstitute of Electrical and Electronic Engineering (IEEE) and the National Council on RadiationProtection and Measurement. The exposure limit takes into consideration the body’s ability toremove heat from the tissues that absorb energy from the wireless phone and is set well belowlevels known to have effects.DRAFT
FDA Consumer Update152Manufacturers of wireless phones must report the RF exposure level for each model of phone tothe FCC. The FCC website (http://www.fcc.gov/oet/rfsafety) gives directions for locating the FCCidentification number on your phone so you can find your phone’s RF exposure level in the onlinelisting.8. What has FDA done to measure the radiofrequency energy coming from wirelessphones?The Institute of Electrical and Electronic Engineers (IEEE) is developing a technical standard formeasuring the radiofrequency energy (RF) exposure from wireless phones and other wirelesshandsets with the participation and leadership of FDA scientists and engineers. The standard,“Recommended Practice for Determining the Spatial-Peak Specific Absorption Rate (SAR) in theHuman Body Due to Wireless Communications devices: Experimental Techniques,” sets forth thefirst consistent test methodology for measuring the rate at which RF is deposited in the heads ofwireless phone users. The test method uses a tissue-simulating model of the human head.Standardized SAR test methodology is expected to greatly improve the consistency ofmeasurements made at different laboratories on the same phone. SAR is the measurement of theamount of energy absorbed in tissue, either by the whole body or a small part of the body. It ismeasured in watts/kg (or milliwatts/g) of matter. This measurement is used to determine whether awireless phone complies with safety guidelines.9. What steps can I take to reduce my exposure to radiofrequency energy from my wirelessphone?If there is a risk from these products—and at this point we do not know that there is—it is probablyvery small. But if you are concerned about avoiding even potential risks, you can take a few simplesteps to minimize your exposure to radiofrequency energy (RF). Since time is a key factor in howmuch exposure a person receives, reducing the amount of time spent using a wireless phone willreduce RF exposure.• If you must conduct extended conversations by wireless phone every day, you could place moredistance between your body and the source of the RF, since the exposure level drops offdramatically with distance. For example, you could use a headset and carry the wireless phoneaway from your body or use a wireless phone connected to a remote antenna.Again, the scientific data do not demonstrate that wireless phones are harmful. But if you areconcerned about the RF exposure from these products, you can use measures like thosedescribed above to reduce your RF exposure from wireless phone use.10. What about children using wireless phones?The scientific evidence does not show a danger to users of wireless phones, including children andteenagers. If you want to take steps to lower exposure to radiofrequency energy (RF), themeasures described above would apply to children and teenagers using wireless phones.Reducing the time of wireless phone use and increasing the distance between the user and the RFsource will reduce RF exposure.DRAFT
FDA Consumer Update153Some groups sponsored by other national governments have advised that children be discouragedfrom using wireless phones at all. For example, the government in the United Kingdom distributedleaflets containing such a recommendation in December 2000. They noted that no evidence existsthat using a wireless phone causes brain tumors or other ill effects. Their recommendation to limitwireless phone use by children was strictly precautionary; it was not based on scientific evidencethat any health hazard exists.11.What about wireless phone interference with medical equipment?Radiofrequency energy (RF) from wireless phones can interact with some electronic devices. Forthis reason, FDA helped develop a detailed test method to measure electromagnetic interference(EMI) of implanted cardiac pacemakers and defibrillators from wireless telephones. This testmethod is now part of a standard sponsored by the Association for the Advancement of Medicalinstrumentation (AAMI). The final draft, a joint effort by FDA, medical device manufacturers, andmany other groups, was completed in late 2000. This standard will allow manufacturers to ensurethat cardiac pacemakers and defibrillators are safe from wireless phone EMI.FDA has tested hearing aids for interference from handheld wireless phones and helped develop avoluntary standard sponsored by the Institute of Electrical and Electronic Engineers (IEEE). Thisstandard specifies test methods and performance requirements for hearing aids and wirelessphones so that that no interference occurs when a person uses a “compatible” phone and a“compatible” hearing aid at the same time. This standard was approved by the IEEE in 2000.FDA continues to monitor the use of wireless phones for possible interactions with other medicaldevices. Should harmful interference be found to occur, FDA will conduct testing to assess theinterference and work to resolve the problem.12.Where can I find additional information?For additional information, please refer to the following resources:• FDA web page on wireless phones (http://www.fda.gov/cdrh/phones/index.html)• Federal Communications Commission (FCC) RF Safety Program (http://www.fcc.gov/oet/rfsafety)• International Commission on Non-Ionizing Radiation Protection (http://www.icnirp.de)• World Health Organization (WHO) International EMF Project (http://www.who.int/emf)• National Radiological Protection Board (UK) (http://www.nrpb.org.uk/)DRAFT
AUDIOVOX COMMUNICATIONS CORP.555 Wireless Blvd., Hauppauge, New York 11788, 800-229-123516808 Marquardt Avenue, Cerritos, California 90701, 562-802-5100http://www.audiovox.com© 2002 Audiovox Communications CorporationDRAFT

Navigation menu