Dynabook CET0200MT Hand-Held Computer and Cellular Telephone User Manual RF battery cover0102

Toshiba Corporation Hand-Held Computer and Cellular Telephone RF battery cover0102

Contents

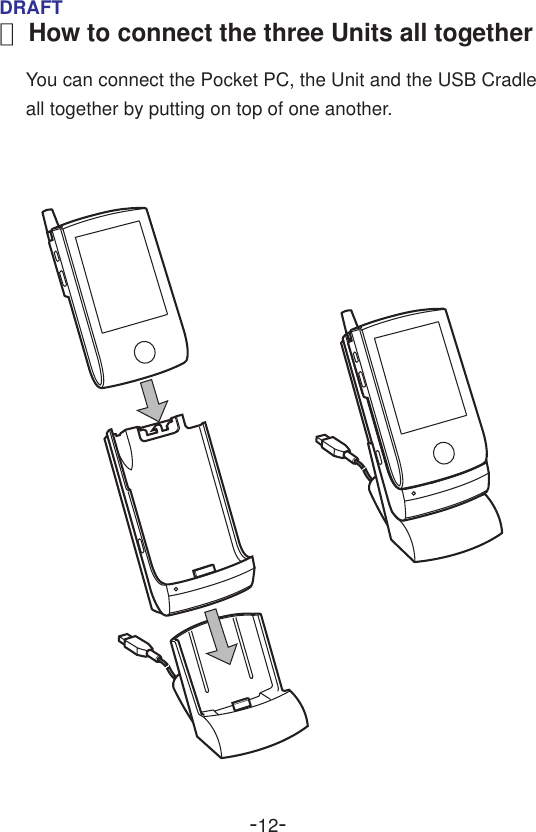
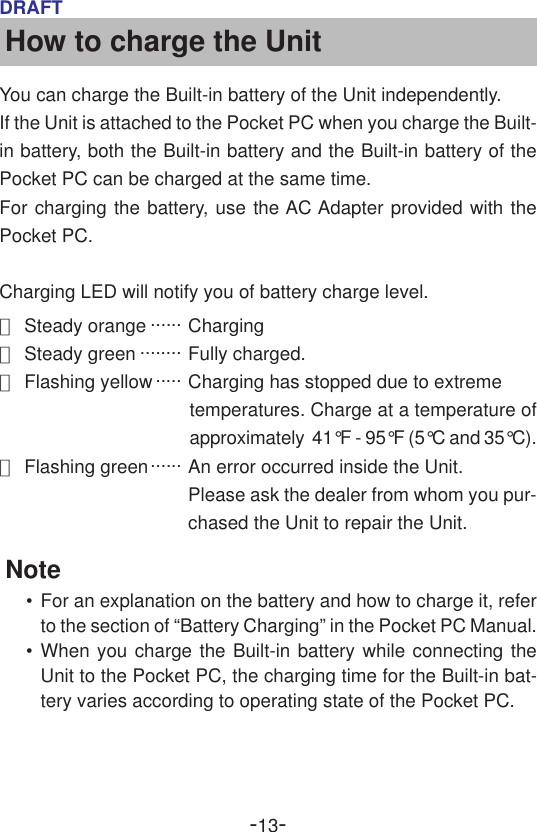
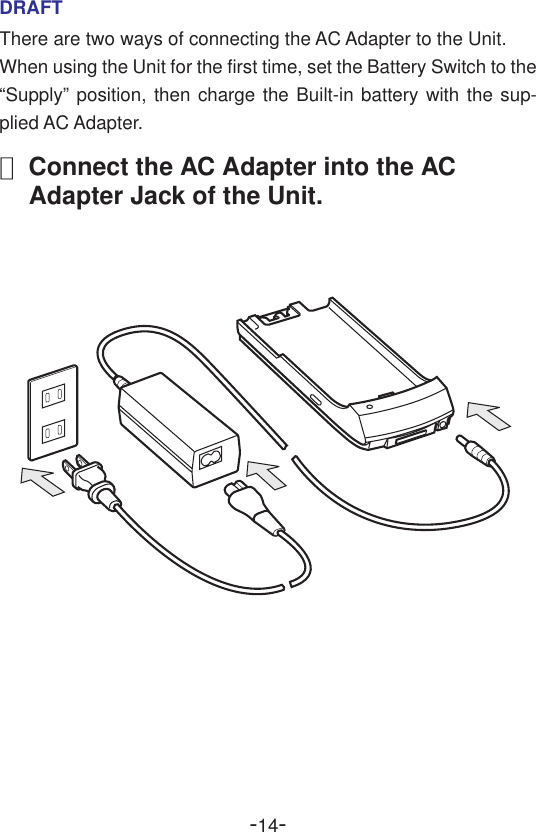
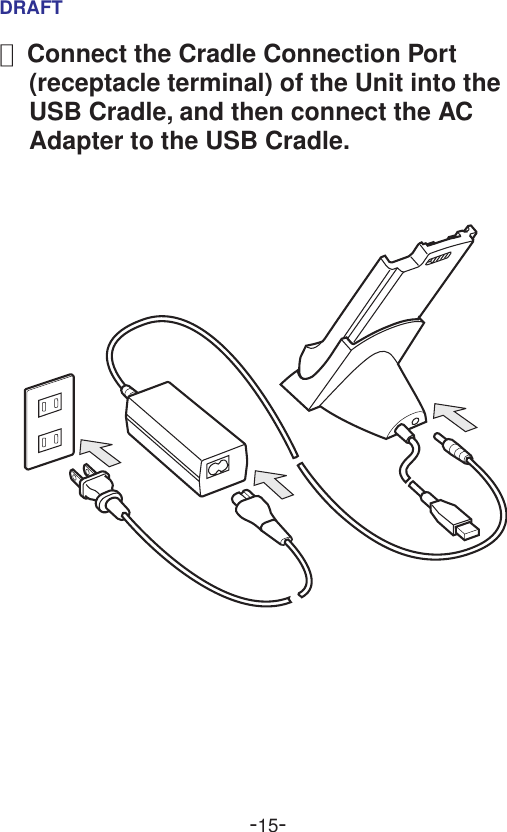
Usetr Manual for the New Battery Unit

DRAFTBattery Expansion Unit Manual/2032SP
DRAFTIntroductionThank you for purchasing the Battery Expansion Unit.This manual contains the important information concerning the safeand correct use of your Battery Expansion Unit.After reading this manual, keep it in a convenient place for futurereference.Package contentsThe following items are included in the Battery Expansion Unitpackage. Please verify that all of the items are present.●Battery Expansion Unit 1●Fixture 2●Attachment Tool 1●Soft Case 1●Belt Clip 1●Manual (This manual) 1
-1-DRAFTSAFETY INSTRUCTIONS●Before using the Battery Expansion Unit (hereinafter the Unit),be sure to thoroughly read the Manual of Thera/2032SP (here-inafter the Pocket PC Manual) to ensure proper use and toprevent damage to Thera/2032SP and/or to data.●Before using the Unit, be sure to thoroughly read all the SAFETYINSTRUCTIONS contained in the Pocket PC Manual.These SAFETY INSTRUCTIONS provide the important infor-mation to prevent serious hazards to individuals and damageto their property.WARNING●If the Unit emits an unusual odor or sounds or generates smoke,immediately disconnect the AC Adapter from the power outlet.And then set the Battery Switch of the Unit to “Stop”, and stopusing the Unit.●Never drop the Unit or subject it to severe shock.Dropping the Unit or subjecting it to severe shock could causethe built-in battery of the Unit (hereinafter the Built-in battery)to leak, ignite and/or rupture.●Never throw the Unit into a fire or heat it.Throwing the Unit into a fire might cause the Built-in battery toleak fluid, ignite and/or rupture.●Always immediately remove the Unit from the vicinity of anysource of heat, such as an open flame in theevent the Built-in battery leaks liquid or emits an unusual odor.
-2-DRAFTContinued use of the Unit under either of these conditionscould cause ignition (i.e., fire) of the leaked battery liquid, orrupture.●Never touch any fluid that might leak from the Built-in battery.Such liquid when in contact with the eyes or skin, could causeinjury to the skin or eyes.Should the liquid come into contact with the eyes, irrigate theeyes thoroughly with clean water and immediately seek medi-cal attention.In the event the liquid comes into contact with the skin orclothing, wash it away immediately with clean water.●This Unit generates heat as part of its normal operation.Therefore, avoid any direct contact between this Unit andyour bare skin as skin irritation may result from extended con-tact.●Never attempt to disassemble, repair or make any modificationto the Unit.Disassembly, modification or any attempt at repair could causebodily injury or property damage, as well as damage to the Unititself.Consult your store of purchase for repair.NOTE●Clean terminals (metallic parts) on a regular basis with a cottonswab.Dirty terminals could affect battery charging.
-3-DRAFT●The Built-in battery gradually discharges of itself.If you leave the Unit unused for a long period of time, the Built-in battery may completely discharge.Completely charge the battery before using the Unit.●A lithium ion battery is used in the Unit.When a replacement is needed, please request the dealer fromwhom the Unit was purchased to assist you.●Lithium ion batteries are recyclable.When you replace the Built-in battery, please request that therepair center recycle the battery in accordance with RBRC stan-dards.When disposing of the battery by yourself, please call RBRC at(800) 822-8837 for tips on the proper disposal of the lithium ionbattery. Never dispose of the battery with ordinary waste.
-4-DRAFTSafe use and operation of the UnitThe Unit is exclusively for Thera/2032SP (hereinafter the pocketPC).Please do not use the Unit for other devices.As a result of the test for the Unit under the condition that the Unitis connected to the Pocket PC put in the provided Soft Case andBelt Clip, the Unit was found to comply with FCC exposure re-quirements.Other third-party Belt Clips and Soft Cases or Holsters have notbeen tested with the Units and therefore their compliance with theFCC RF exposure limits cannot be confirmed.When you wear the Pocket PC connecting with the Unit, pleaseput it into the provided Soft Case.When you use the Unit connected to the Pocket PC, a minimumseparation distance of 1.0 inch (2.5cm) must be maintained be-tween the user's body/head and the Units, to comply with the FCCexposure limits.For more information about RF exposure, please visit the FCCwebsite at www.fcc.gov.
-5-DRAFTPart NamesThera/2032SP Connection Port(plug-in terminal)AC Adapter JackCradle Connection Port(receptacle terminal)Charging LEDBattery SwitchLock Switch
-6-DRAFTSpecificationsYou can use the Unit as auxiliary power supply for the Pocket PCby connecting the Unit to the Pocket PC.Please do not connect two or more Units by putting on top of oneanother when using the Unit.The Unit has a built-in advanced lithium-ion battery.The Built-in battery gradually discharges of itself.This battery can be repeatedly recharged even if it is drained.If you leave the Unit unused for a long period of time, the Built-inbattery may completely discharge.There is no display function of battery remaining amount in theUnit.Completely charge the battery before using the Unit.Battery SwitchThe Battery Switch supplies/stops the battery power to the Unit.The factory setting of this Switch is “Stop” position.When using the Unit for the first time, set the Battery Switch tothe “Supply” position.This Switch should normally be on the “Supply” position. If youdo not use the Unit for a long time, set the Battery Switch to the“Stop” position.SupplyStopBattery Switch
-7-DRAFTAttachment ToolFixtureScrew holeHow to attach the Fixture to the Pocket PC1Please clean off the seal area of the Pocket PC.3Peel off a protection seal of a double-faced tape on theback of the Fixture.2Put the Attachment Tool into the Fixture as follows.Seal area
-8-DRAFT4Fit the two protrusions of the Attachment Tool into thetwo screw holes of the Pocket PC to attach the Fixtureto the Pocket PC.5Make sure that the double-faced tape is firmly stuck onthe Pocket PC and the Fixture is attached to the PocketPC, and then remove the Attachment Tool as follows.
-9-DRAFTHow to connect■ How to connect the Unit to the Pocket PC1Put the Pocket PC on top of the Unit.Slide the Pocket PC and put the Cradle Connection Port ofthe Pocket PC into the Thera/2032SP Connection Port (plug-in terminal) of the Unit.• Firmly put the Port into place until you hear it click.
-10-DRAFT2Check the Lock Switch is on the “LOCK” position.●When you remove the Unit, slide the Lock Switch to the “Re-lease” position before pulling out the Pocket PC.LockRelease
-11-DRAFT■ How to connect the Unit to the USB Cradle1  Put the Unit on top of the USB Cradle (the Pocket PCaccessory), and then slide the Unit into the USB Cradle,and put the Cradle Connection Port (receptacle terminal)of the Unit into the USB Cradle.• Be sure to put the Port deeply into the USB Cradle.
-12-DRAFT■ How to connect the three Units all togetherYou can connect the Pocket PC, the Unit and the USB Cradleall together by putting on top of one another.
-13-DRAFTHow to charge the UnitYou can charge the Built-in battery of the Unit independently.If the Unit is attached to the Pocket PC when you charge the Built-in battery, both the Built-in battery and the Built-in battery of thePocket PC can be charged at the same time.For charging the battery, use the AC Adapter provided with thePocket PC.Charging LED will notify you of battery charge level.●Steady orange ...... Charging●Steady green ........ Fully charged.●Flashing yellow ..... Charging has stopped due to extremetemperatures. Charge at a temperature ofapproximately  41°F - 95°F (5°C and 35°C).●Flashing green...... An error occurred inside the Unit.Please ask the dealer from whom you pur-chased the Unit to repair the Unit.Note•For an explanation on the battery and how to charge it, referto the section of “Battery Charging” in the Pocket PC Manual.•When you charge the Built-in battery while connecting theUnit to the Pocket PC, the charging time for the Built-in bat-tery varies according to operating state of the Pocket PC.
-14-DRAFTThere are two ways of connecting the AC Adapter to the Unit.When using the Unit for the first time, set the Battery Switch to the“Supply” position, then charge the Built-in battery with the sup-plied AC Adapter.■Connect the AC Adapter into the ACAdapter Jack of the Unit.
-15-DRAFT■ Connect the Cradle Connection Port(receptacle terminal) of the Unit into theUSB Cradle, and then connect the ACAdapter to the USB Cradle.
-16-DRAFTHow to use the Soft Case1Attach the Belt Clip to the Soft Case as follows.•Firmly put the Belt Clip into place until you hear it click.2Put the Pocket PC into the Soft Case as follows.Soft CaseBelt Clip
-17-DRAFTFCC informationProduct Name: Battery Expansion UnitModel Number(s): CEX0216AFCC Notice “Declaration of Conformity Infor-mation”This equipment has been tested and found to comply with the lim-its for a Class B digital device, pursuant to part 15 of the FCCRules.These limits are designed to provide reasonable protection againstharmful interference in a residential installation.This equipment generates, uses and can radiate radio frequencyenergy and, if not installed and used in accordance with the in-structions, may cause harmful interference to radio communica-tions.However, there is no guarantee that interference will not occur in aparticular installation.If this equipment does cause harmful interference to radio ortelevision reception, which can be determined by turning theequipment off and on, the user is encouraged to try to correct theinterference by one or more of the following measures:- Reorient or relocate the receiving antenna.- Increase the separation between the equipment and receiver.- Connect the equipment into an outlet on a circuit different fromthat to which the receiver is connected.- Consult the dealer or an experienced radio/TV technician for help.
-18-DRAFTThis device complies with part 15 of the FCC Rules.Operation is subject to the following two conditions:(1) This device may not cause harmful interference, and(2) this device must accept any interference received, includ-ing interference that may cause undesired operation.PM0007826010

Navigation menu