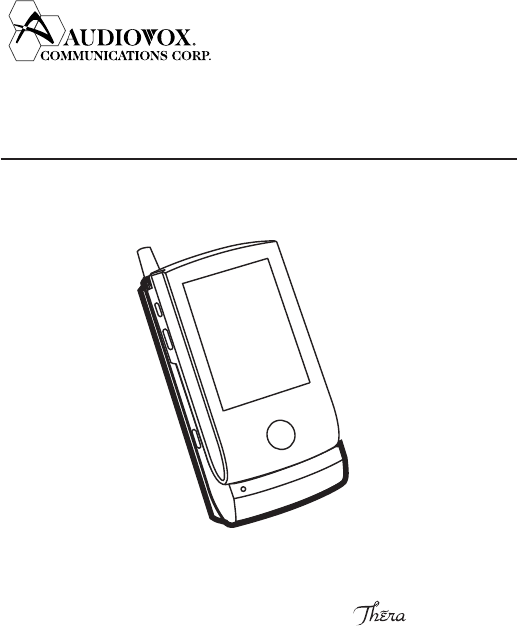
Dynabook CET0200MT Hand-Held Computer and Cellular Telephone User Manual RF battery cover0102
Toshiba Corporation Hand-Held Computer and Cellular Telephone RF battery cover0102
Dynabook >
Contents
- 1. Users Manual NEW FILE
- 2. Cor Ref No 12812 Rev Manual Info
- 3. Usetr Manual for the New Battery Unit
Usetr Manual for the New Battery Unit
DRAFT
Battery Expansion Unit Manual
/2032SP

DRAFT
Introduction
Thank you for purchasing the Battery Expansion Unit.
This manual contains the important information concerning the safe
and correct use of your Battery Expansion Unit.
After reading this manual, keep it in a convenient place for future
reference.
Package contents
The following items are included in the Battery Expansion Unit
package. Please verify that all of the items are present.
●Battery Expansion Unit 1
●Fixture 2
●Attachment Tool 1
●Soft Case 1
●Belt Clip 1
●Manual (This manual) 1

-1-
DRAFT
SAFETY INSTRUCTIONS
●Before using the Battery Expansion Unit (hereinafter the Unit),
be sure to thoroughly read the Manual of Thera/2032SP (here-
inafter the Pocket PC Manual) to ensure proper use and to
prevent damage to Thera/2032SP and/or to data.
●Before using the Unit, be sure to thoroughly read all the SAFETY
INSTRUCTIONS contained in the Pocket PC Manual.
These SAFETY INSTRUCTIONS provide the important infor-
mation to prevent serious hazards to individuals and damage
to their property.
WARNING
●If the Unit emits an unusual odor or sounds or generates smoke,
immediately disconnect the AC Adapter from the power outlet.
And then set the Battery Switch of the Unit to “Stop”, and stop
using the Unit.
●Never drop the Unit or subject it to severe shock.
Dropping the Unit or subjecting it to severe shock could cause
the built-in battery of the Unit (hereinafter the Built-in battery)
to leak, ignite and/or rupture.
●Never throw the Unit into a fire or heat it.
Throwing the Unit into a fire might cause the Built-in battery to
leak fluid, ignite and/or rupture.
●Always immediately remove the Unit from the vicinity of any
source of heat, such as an open flame in the
event the Built-in battery leaks liquid or emits an unusual odor.

-2-
DRAFT
Continued use of the Unit under either of these conditions
could cause ignition (i.e., fire) of the leaked battery liquid, or
rupture.
●Never touch any fluid that might leak from the Built-in battery.
Such liquid when in contact with the eyes or skin, could cause
injury to the skin or eyes.
Should the liquid come into contact with the eyes, irrigate the
eyes thoroughly with clean water and immediately seek medi-
cal attention.
In the event the liquid comes into contact with the skin or
clothing, wash it away immediately with clean water.
●This Unit generates heat as part of its normal operation.
Therefore, avoid any direct contact between this Unit and
your bare skin as skin irritation may result from extended con-
tact.
●Never attempt to disassemble, repair or make any modification
to the Unit.
Disassembly, modification or any attempt at repair could cause
bodily injury or property damage, as well as damage to the Unit
itself.
Consult your store of purchase for repair.
NOTE
●Clean terminals (metallic parts) on a regular basis with a cotton
swab.
Dirty terminals could affect battery charging.

-3-
DRAFT
●The Built-in battery gradually discharges of itself.
If you leave the Unit unused for a long period of time, the Built-
in battery may completely discharge.
Completely charge the battery before using the Unit.
●A lithium ion battery is used in the Unit.
When a replacement is needed, please request the dealer from
whom the Unit was purchased to assist you.
●Lithium ion batteries are recyclable.
When you replace the Built-in battery, please request that the
repair center recycle the battery in accordance with RBRC stan-
dards.
When disposing of the battery by yourself, please call RBRC at
(800) 822-8837 for tips on the proper disposal of the lithium ion
battery. Never dispose of the battery with ordinary waste.

-4-
DRAFT
Safe use and operation of the Unit
The Unit is exclusively for Thera/2032SP (hereinafter the pocket
PC).
Please do not use the Unit for other devices.
As a result of the test for the Unit under the condition that the Unit
is connected to the Pocket PC put in the provided Soft Case and
Belt Clip, the Unit was found to comply with FCC exposure re-
quirements.
Other third-party Belt Clips and Soft Cases or Holsters have not
been tested with the Units and therefore their compliance with the
FCC RF exposure limits cannot be confirmed.
When you wear the Pocket PC connecting with the Unit, please
put it into the provided Soft Case.
When you use the Unit connected to the Pocket PC, a minimum
separation distance of 1.0 inch (2.5cm) must be maintained be-
tween the user's body/head and the Units, to comply with the FCC
exposure limits.
For more information about RF exposure, please visit the FCC
website at www.fcc.gov.
-5-
DRAFT
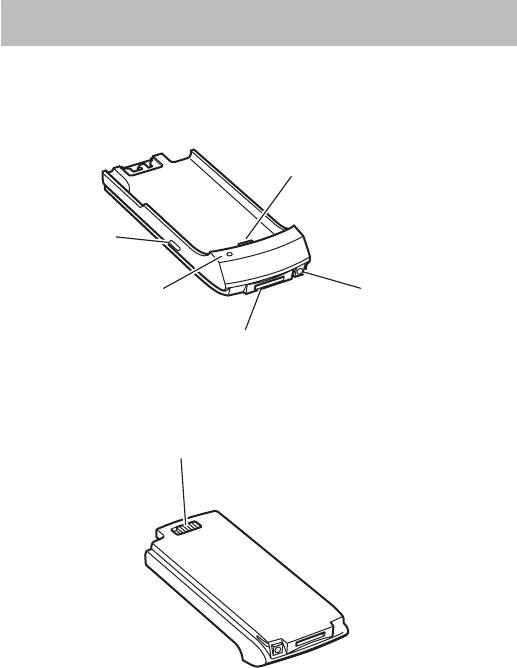
Part Names
Thera/2032SP Connection Port
(plug-in terminal)
AC Adapter Jack
Cradle Connection Port
(receptacle terminal)
Charging LED
Battery Switch
Lock Switch
-6-
DRAFT
Specifications
You can use the Unit as auxiliary power supply for the Pocket PC
by connecting the Unit to the Pocket PC.
Please do not connect two or more Units by putting on top of one
another when using the Unit.
The Unit has a built-in advanced lithium-ion battery.
The Built-in battery gradually discharges of itself.
This battery can be repeatedly recharged even if it is drained.
If you leave the Unit unused for a long period of time, the Built-in
battery may completely discharge.
There is no display function of battery remaining amount in the
Unit.
Completely charge the battery before using the Unit.
Battery Switch
The Battery Switch supplies/stops the battery power to the Unit.
The factory setting of this Switch is “Stop” position.
When using the Unit for the first time, set the Battery Switch to
the “Supply” position.
This Switch should normally be on the “Supply” position. If you
do not use the Unit for a long time, set the Battery Switch to the
“Stop” position.
Supply
Stop
Battery Switch
-7-
DRAFT
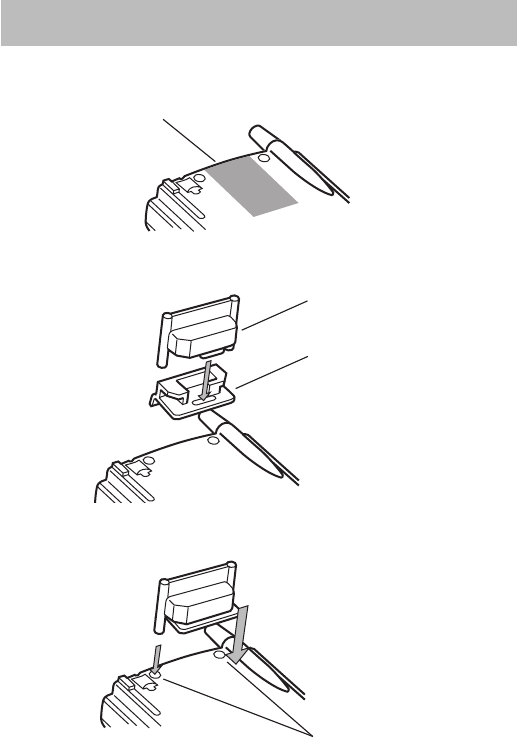
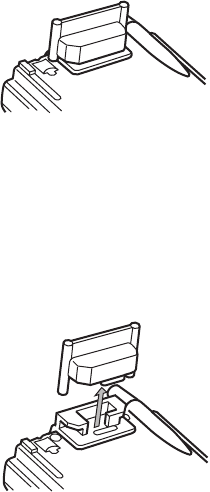
Attachment Tool
Fixture
Screw hole
How to attach the Fixture to the Pocket PC
1Please clean off the seal area of the Pocket PC.
3Peel off a protection seal of a double-faced tape on the
back of the Fixture.
2Put the Attachment Tool into the Fixture as follows.
Seal area
-8-
DRAFT
4Fit the two protrusions of the Attachment Tool into the
two screw holes of the Pocket PC to attach the Fixture
to the Pocket PC.
5Make sure that the double-faced tape is firmly stuck on
the Pocket PC and the Fixture is attached to the Pocket
PC, and then remove the Attachment Tool as follows.
-9-
DRAFT
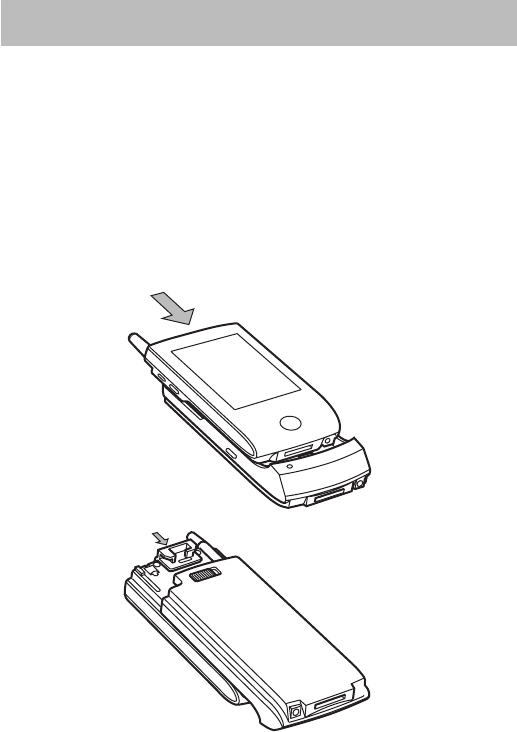
How to connect
■ How to connect the Unit to the Pocket PC
1Put the Pocket PC on top of the Unit.
Slide the Pocket PC and put the Cradle Connection Port of
the Pocket PC into the Thera/2032SP Connection Port (plug-
in terminal) of the Unit.
• Firmly put the Port into place until you hear it click.

-10-
DRAFT
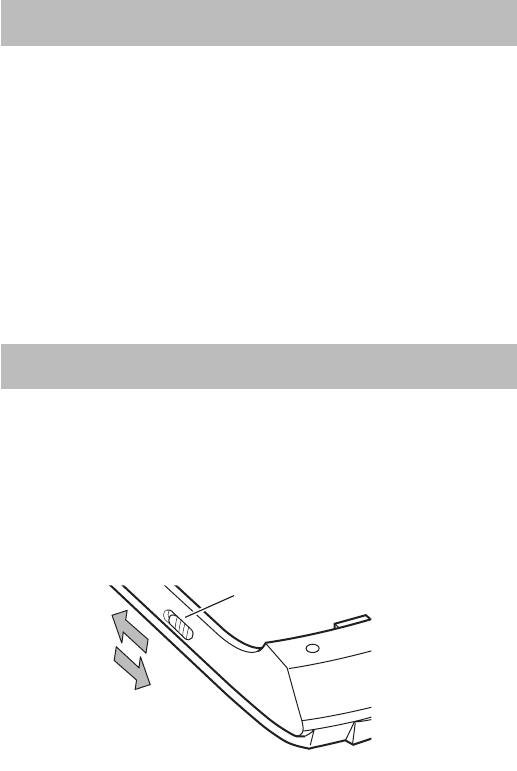
2Check the Lock Switch is on the “LOCK” position.
●When you remove the Unit, slide the Lock Switch to the “Re-
lease” position before pulling out the Pocket PC.
Lock
Release
-11-
DRAFT
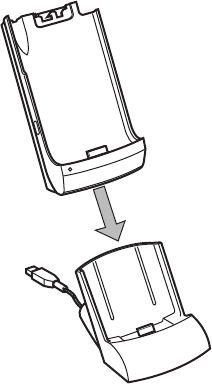
■ How to connect the Unit to the USB Cradle
1 Put the Unit on top of the USB Cradle (the Pocket PC
accessory), and then slide the Unit into the USB Cradle,
and put the Cradle Connection Port (receptacle terminal)
of the Unit into the USB Cradle.
• Be sure to put the Port deeply into the USB Cradle.
-12-
DRAFT
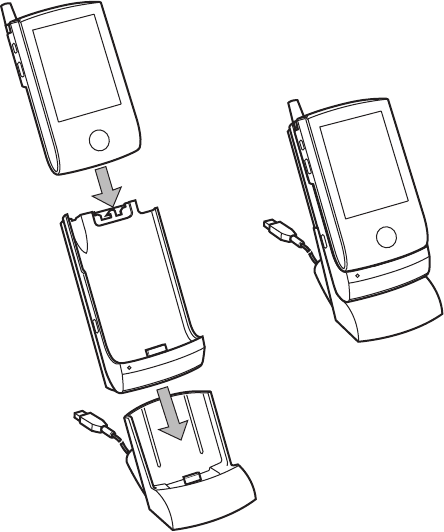
■
How to connect the three Units all together
You can connect the Pocket PC, the Unit and the USB Cradle
all together by putting on top of one another.

-13-
DRAFT
How to charge the Unit
You can charge the Built-in battery of the Unit independently.
If the Unit is attached to the Pocket PC when you charge the Built-
in battery, both the Built-in battery and the Built-in battery of the
Pocket PC can be charged at the same time.
For charging the battery, use the AC Adapter provided with the
Pocket PC.
Charging LED will notify you of battery charge level.
●Steady orange ...... Charging
●Steady green ........ Fully charged.
●Flashing yellow ..... Charging has stopped due to extreme
temperatures. Charge at a temperature of
approximately 41°F - 95°F (5°C and 35°C).
●Flashing green...... An error occurred inside the Unit.
Please ask the dealer from whom you pur-
chased the Unit to repair the Unit.
Note
•For an explanation on the battery and how to charge it, refer
to the section of “Battery Charging” in the Pocket PC Manual.
•When you charge the Built-in battery while connecting the
Unit to the Pocket PC, the charging time for the Built-in bat-
tery varies according to operating state of the Pocket PC.
-14-
DRAFT
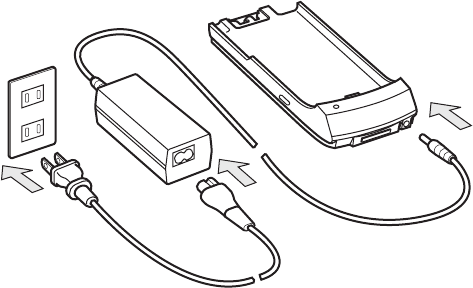
There are two ways of connecting the AC Adapter to the Unit.
When using the Unit for the first time, set the Battery Switch to the
“Supply” position, then charge the Built-in battery with the sup-
plied AC Adapter.
■Connect the AC Adapter into the AC
Adapter Jack of the Unit.
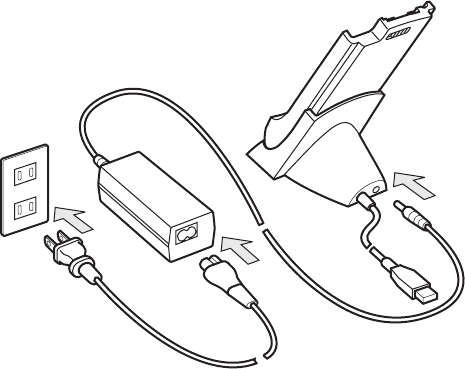
-15-
DRAFT
■ Connect the Cradle Connection Port
(receptacle terminal) of the Unit into the
USB Cradle, and then connect the AC
Adapter to the USB Cradle.
-16-
DRAFT
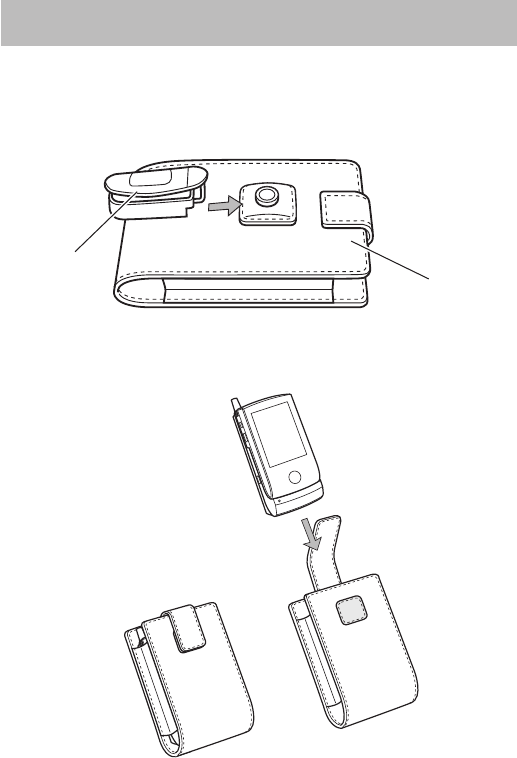
How to use the Soft Case
1Attach the Belt Clip to the Soft Case as follows.
•Firmly put the Belt Clip into place until you hear it click.
2Put the Pocket PC into the Soft Case as follows.
Soft Case
Belt Clip

-17-
DRAFT
FCC information
Product Name: Battery Expansion Unit
Model Number(s): CEX0216A
FCC Notice “Declaration of Conformity Infor-
mation”
This equipment has been tested and found to comply with the lim-
its for a Class B digital device, pursuant to part 15 of the FCC
Rules.
These limits are designed to provide reasonable protection against
harmful interference in a residential installation.
This equipment generates, uses and can radiate radio frequency
energy and, if not installed and used in accordance with the in-
structions, may cause harmful interference to radio communica-
tions.
However, there is no guarantee that interference will not occur in a
particular installation.
If this equipment does cause harmful interference to radio or
television reception, which can be determined by turning the
equipment off and on, the user is encouraged to try to correct the
interference by one or more of the following measures:
- Reorient or relocate the receiving antenna.
- Increase the separation between the equipment and receiver.
- Connect the equipment into an outlet on a circuit different from
that to which the receiver is connected.
- Consult the dealer or an experienced radio/TV technician for help.
-18-
DRAFT
This device complies with part 15 of the FCC Rules.
Operation is subject to the following two conditions:
(1) This device may not cause harmful interference, and
(2) this device must accept any interference received, includ-
ing interference that may cause undesired operation.
PM0007826010