Dynabook DCE37529A Tri-Mode Dual Band Mobile Telephone User Manual CDM 9000 OWNER S MANUAL
Toshiba Corporation Tri-Mode Dual Band Mobile Telephone CDM 9000 OWNER S MANUAL
Dynabook >
Contents
- 1. EA96706 Users Manual Part 1
- 2. EA96706 Users Manual Part 2
- 3. EA96706 Users Manual RF Exposure Warning Page
- 4. Users Manual RF Exposure Info
EA96706 Users Manual Part 1
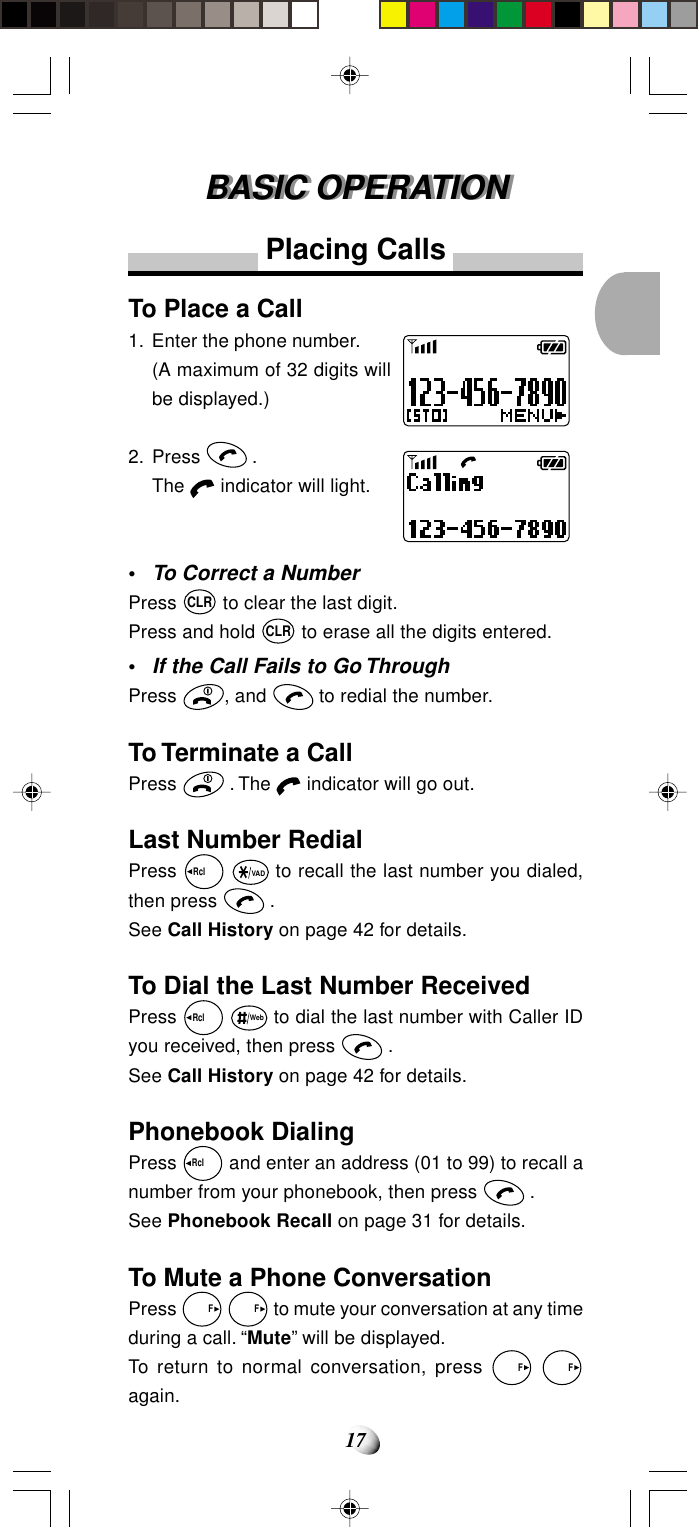
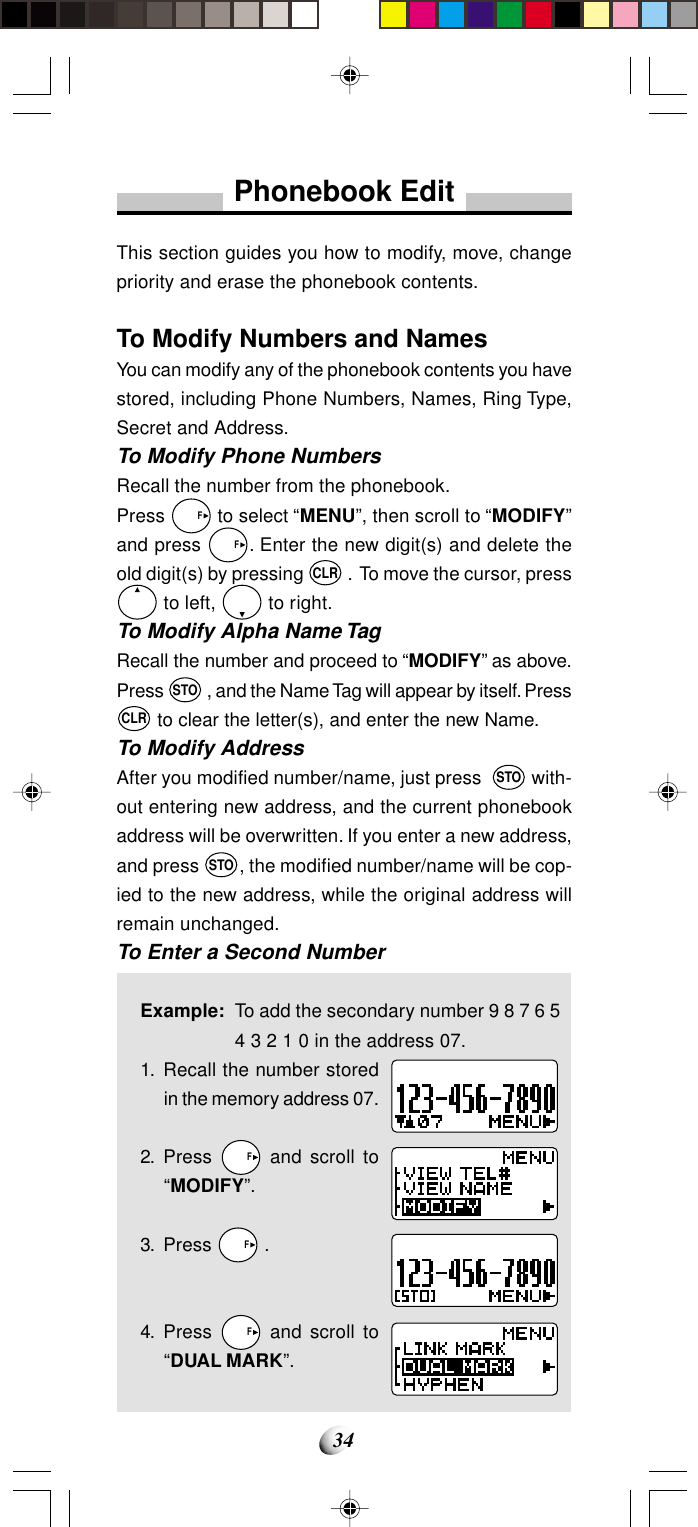
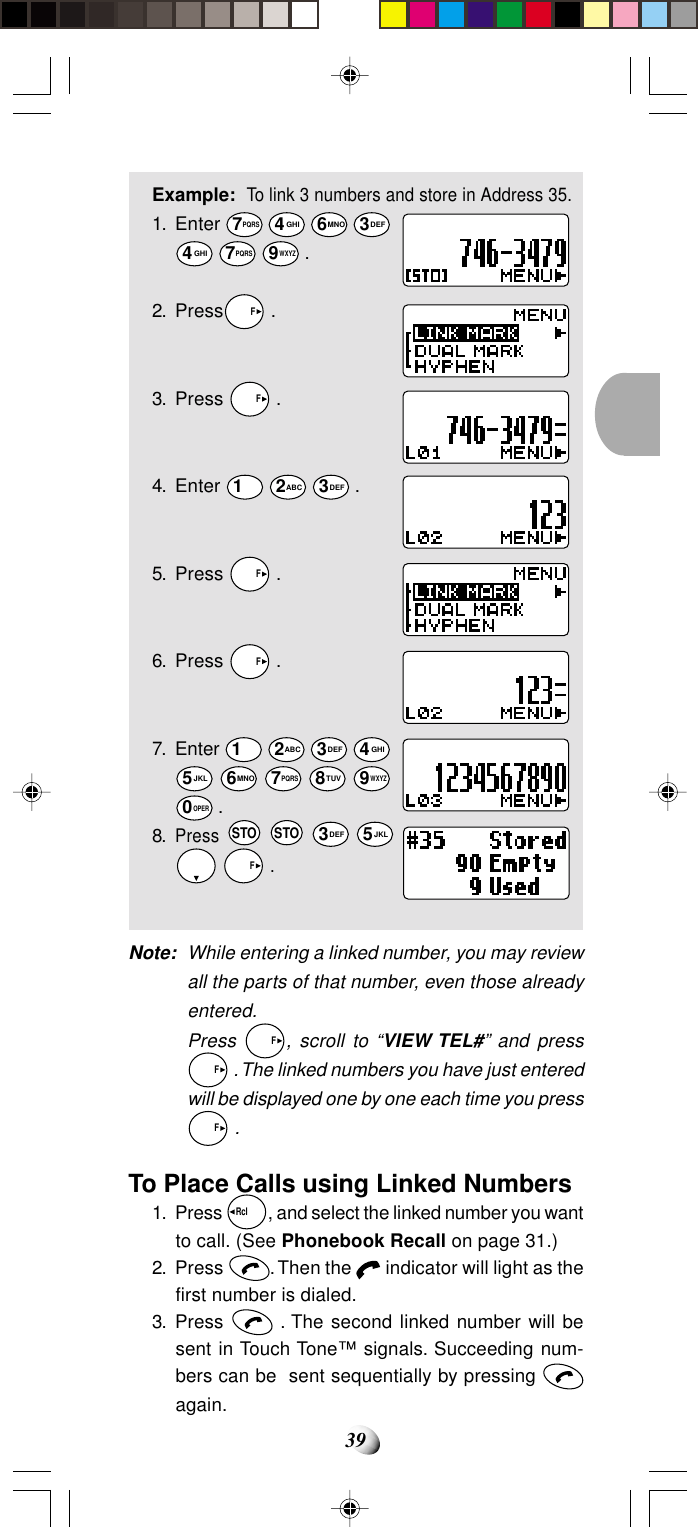
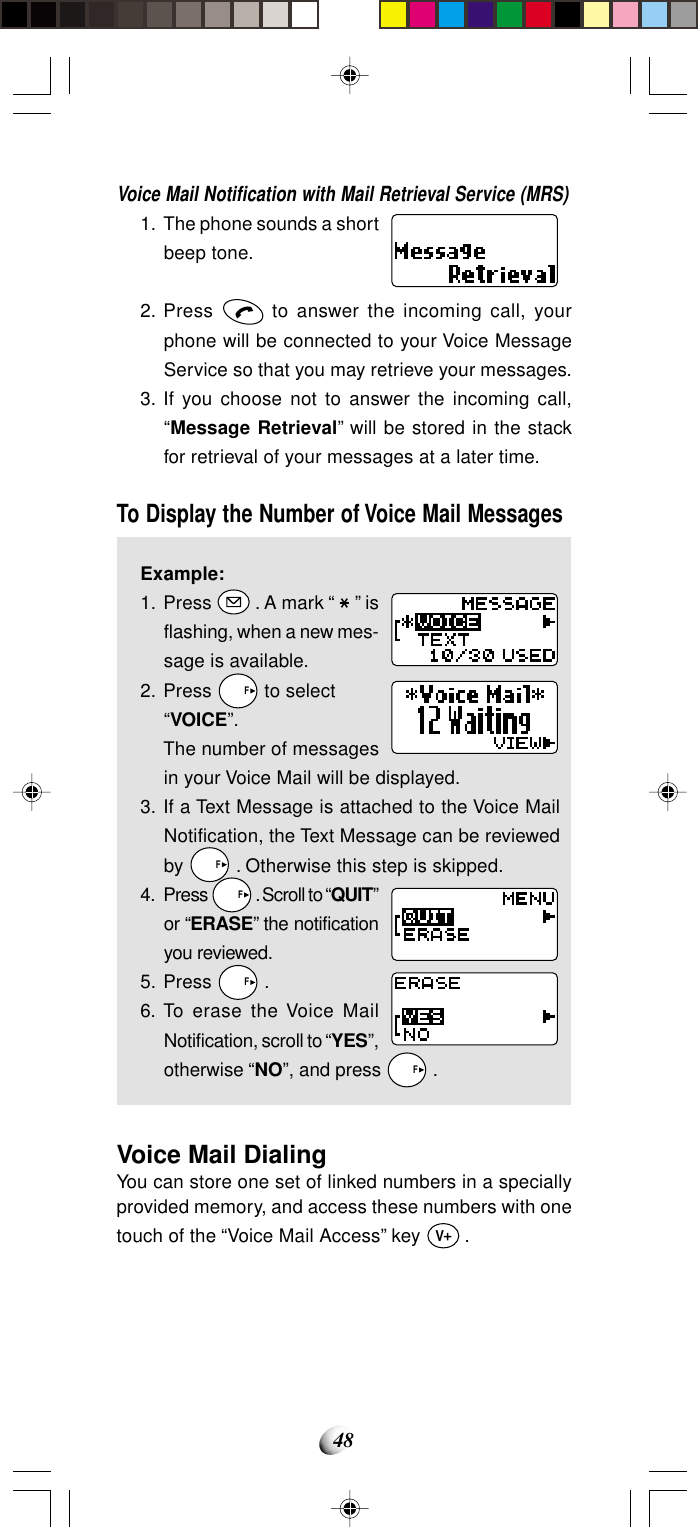
![7Tips on Efficient Operation:For your phone to operate most efficiently:• Extend your antenna fully.• Do not touch the antenna unnecessarily when thephone is in use. Contact with the antenna affects callquality and may cause the phone to operate at ahigher power level than otherwise needed.DRIVINGCheck the laws and regulations on the use of wirelesstelephones in the areas where you drive. Always obeythem. Also, if using your phone while driving, please:• Give full attention to driving — driving safely is yourfirst responsibility.• Use handsfree operation, if available.• Pull off the road and park before making or answer-ing a call if driving conditions so require.ELECTRONIC DEVICESMost modern electronic equipment is shielded from RF sig-nals. However, certain electronic equipment may not beshielded against the RF signals from your wireless phone.PacemakersThe health Industry Manufacturers Association recom-mends that a minimum separation of six (6”) inches bemaintained between a handheld wireless phone and apacemaker to avoid potential interference with the pace-maker. These recommendations are consistent with theindependent research by and recommendations of Wire-less Technology Research.Persons with pacemakers: Should ALWAYS keep the phone more than six(6”) inches from their pacemaker when thephone is turned ON. Should not carry the phone in a breast pocket. Should use the ear opposite the pacemaker tominimize the potential for interference. If you have any reason to suspect that interfer-ence is taking place, turn your phone OFF im-mediately.Hearing AidsSome digital wireless phones may interfere with somehearing aids. In the event of such interference, you maywant to consult your service provider [or call the cus-tomer service line to discuss alternatives.]](https://usermanual.wiki/Dynabook/DCE37529A.EA96706-Users-Manual-Part-1/User-Guide-92094-Page-7.png)

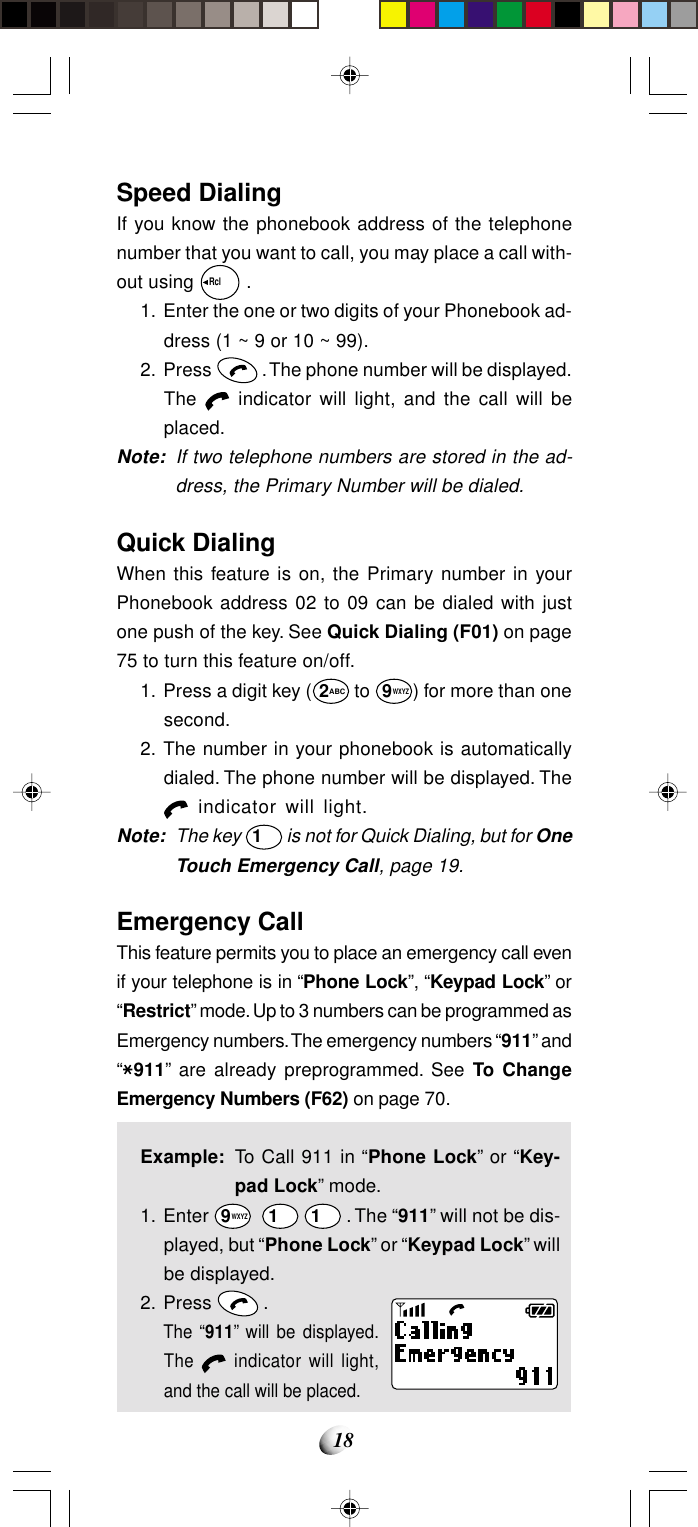

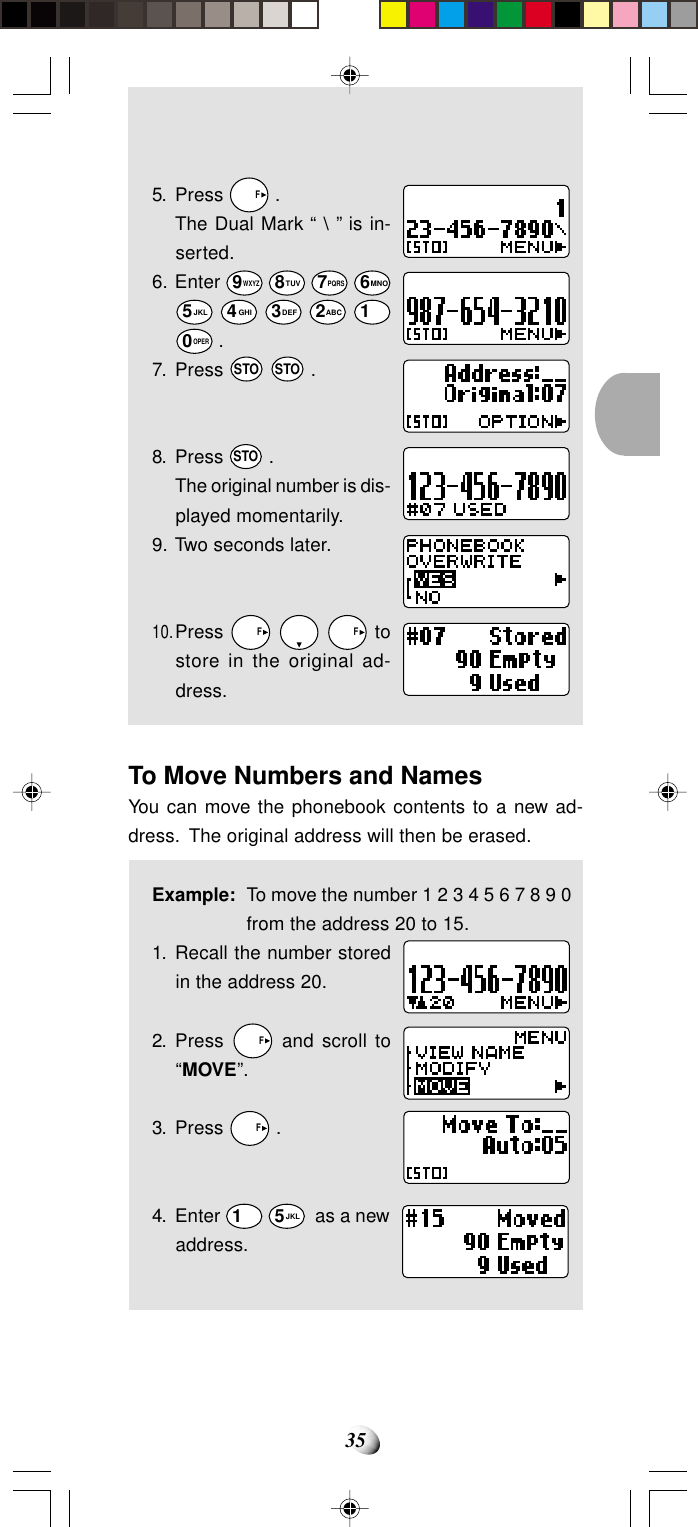

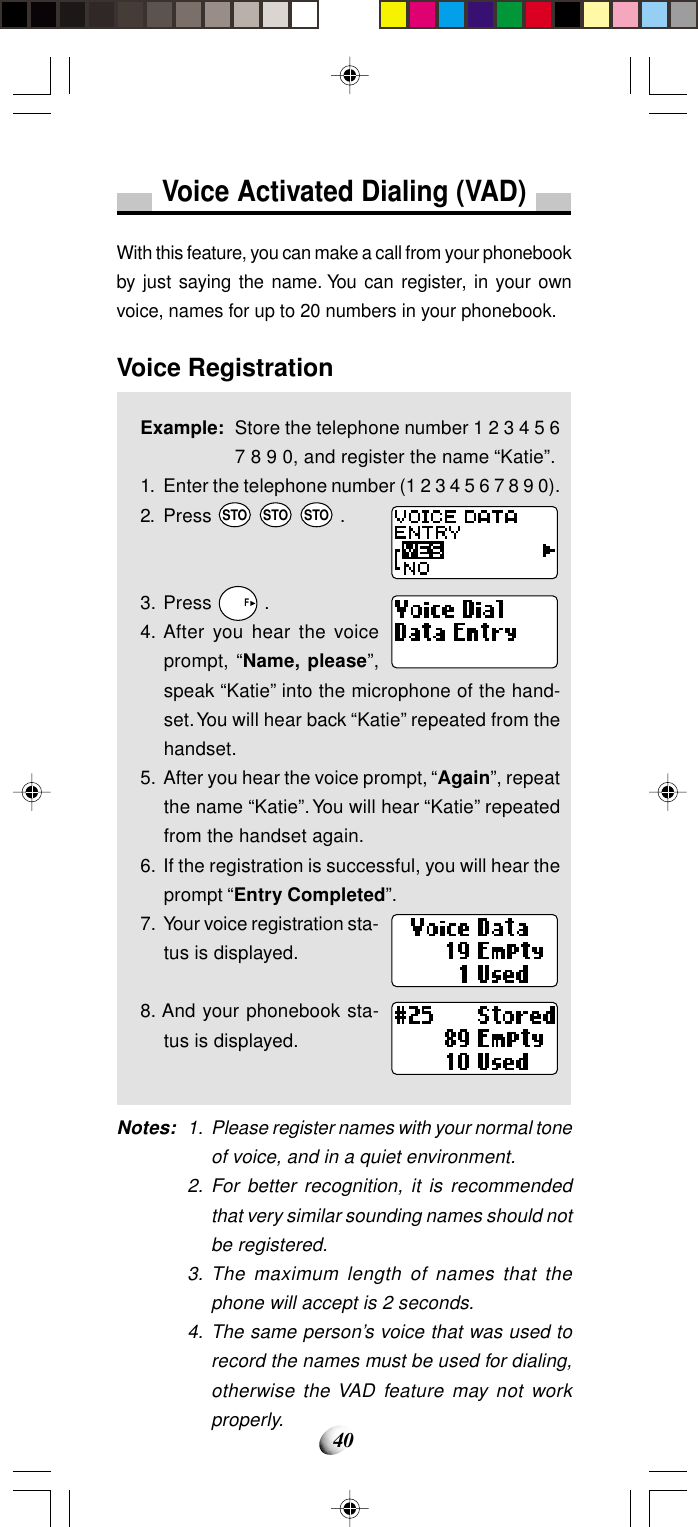
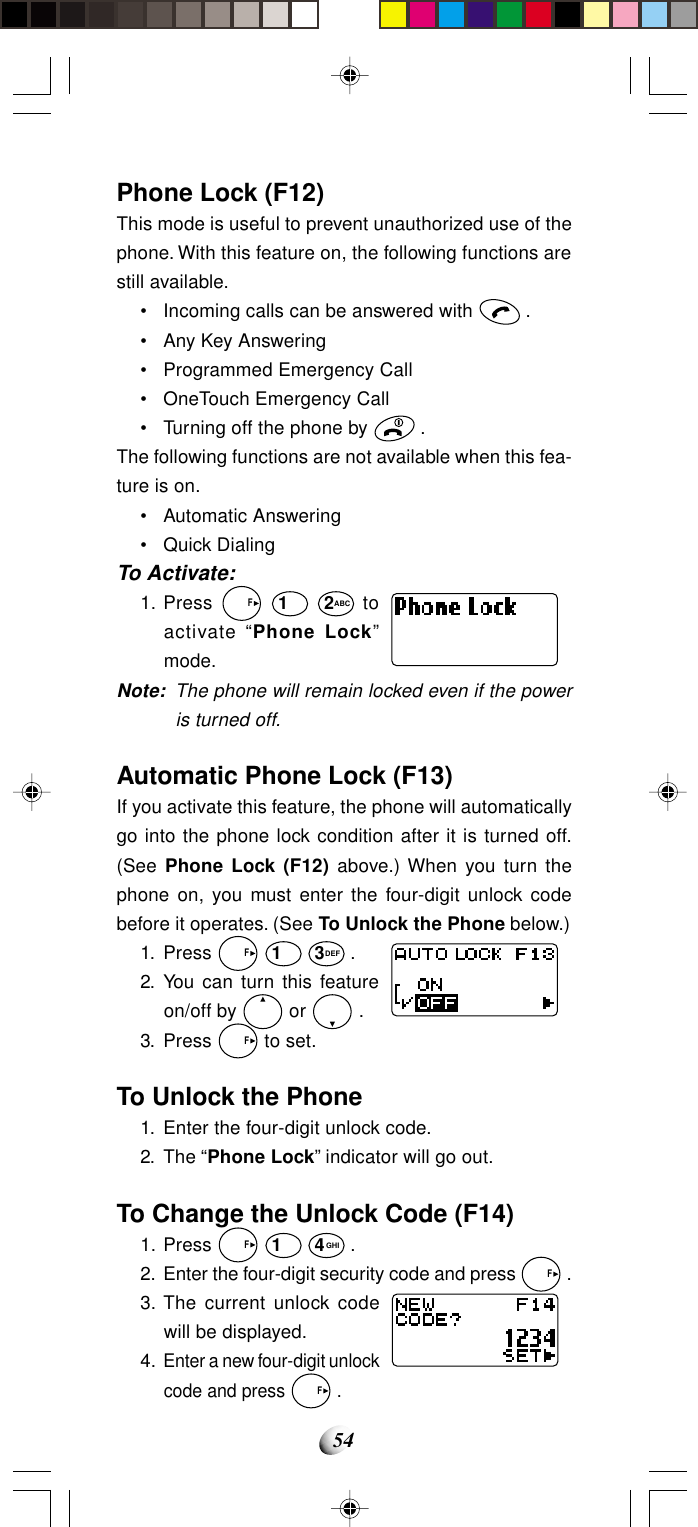
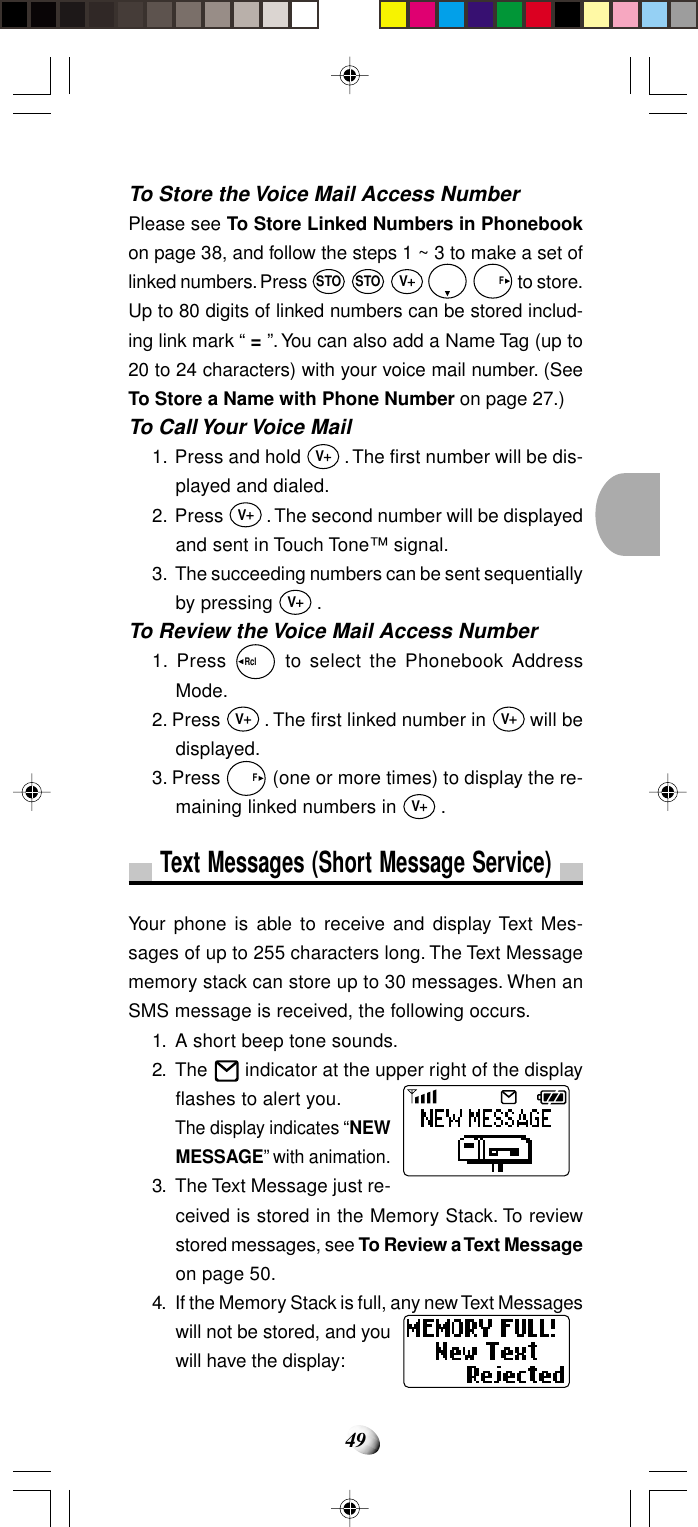
![46Alpha Entry in Browser Mode“Alpha” mode will automatically be active when it is nec-essary to enter alphabet character such as URL.Example:ALPHA/alpha — Alphabet ModePress F to switch upper and lower cases. Press to move the cursor to left, and to right. To exit theAlphabet Mode, press VS2 .SYM — Symbol ModeBy pressing S1, “SYM1” (symbol) mode will be ac-tive. Scroll “SYM1” to “SYM4” by or , and pressthe corresponding digit key (1 to 9WXYZ) to select.NUM — Numeric ModePress S1 S1 to set “NUM” (numeric) mode. PressS1 again to reset to “Alpha” mode.Alphabet ModeSymbol ModeSYM1SYM2SYM3SYM41.@;~Key12 ABC3 DEF4 GHI5 JKL6 MNO7 PQRS8 TUV9 WXYZ0 OPER1 pressBlankA / aD / dG / gJ / jM / mP / pT / tW / w02 press1B / bE / eH / hK / kN / nQ / qU / uX / x.3 press@C / cF / fI / iL / lO / oR / rV / vY / y,4 press/23456S / s8Z / z?5 press:79!VADWeb@.-,_?/!$’%”(;):+2!#<`3?:>ˆ4,/=|5-$[\6’&]7”%_8(+{9)}](https://usermanual.wiki/Dynabook/DCE37529A.EA96706-Users-Manual-Part-1/User-Guide-92094-Page-46.png)
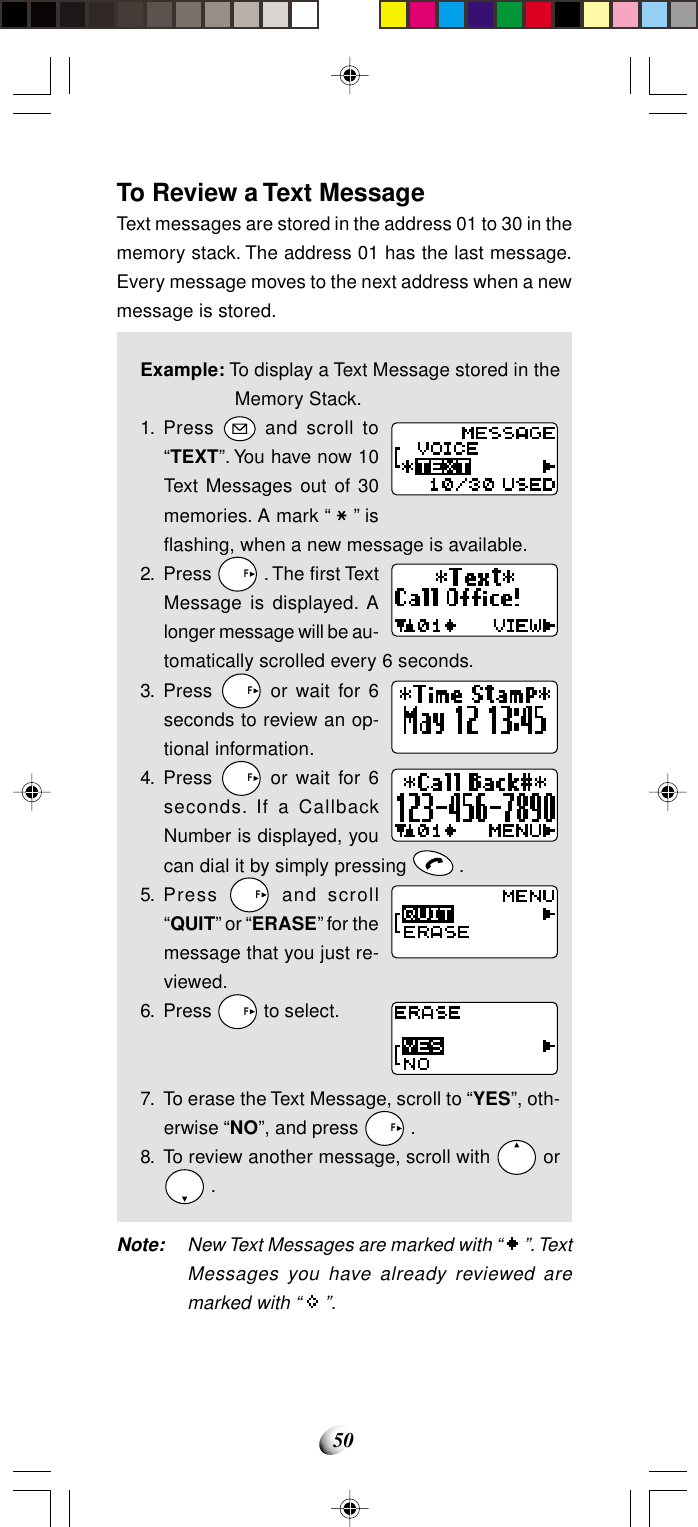

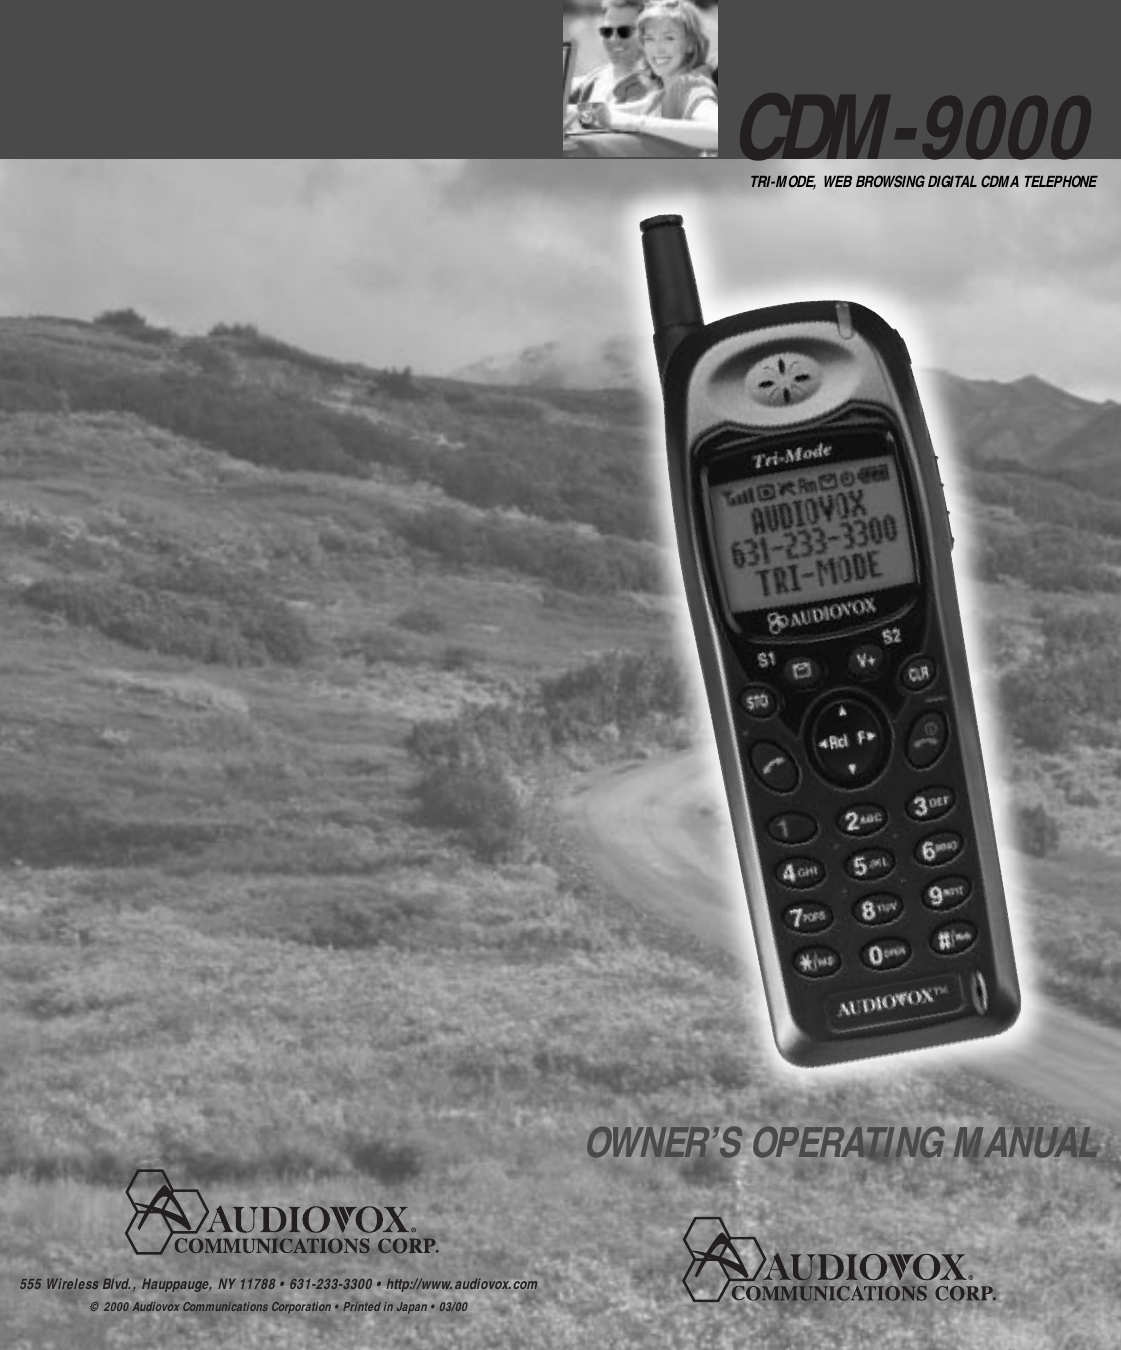
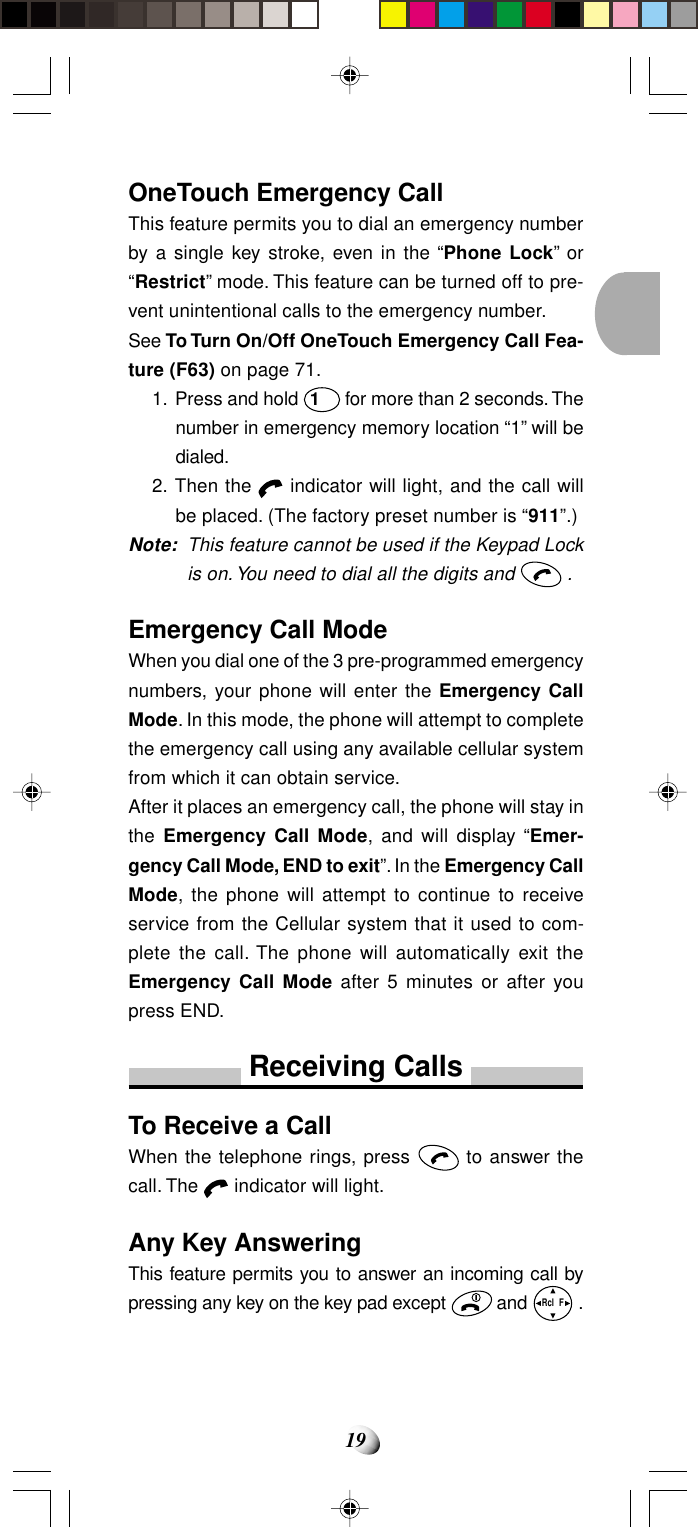
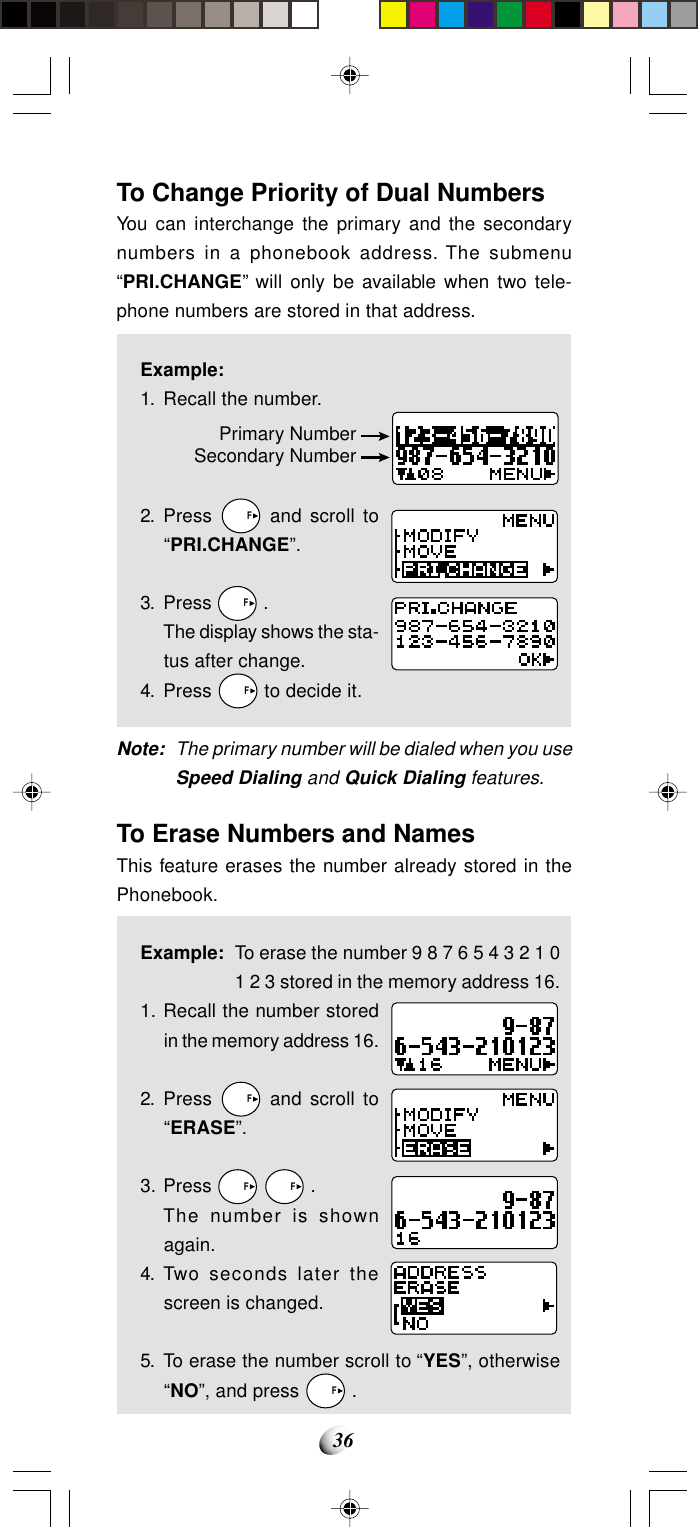
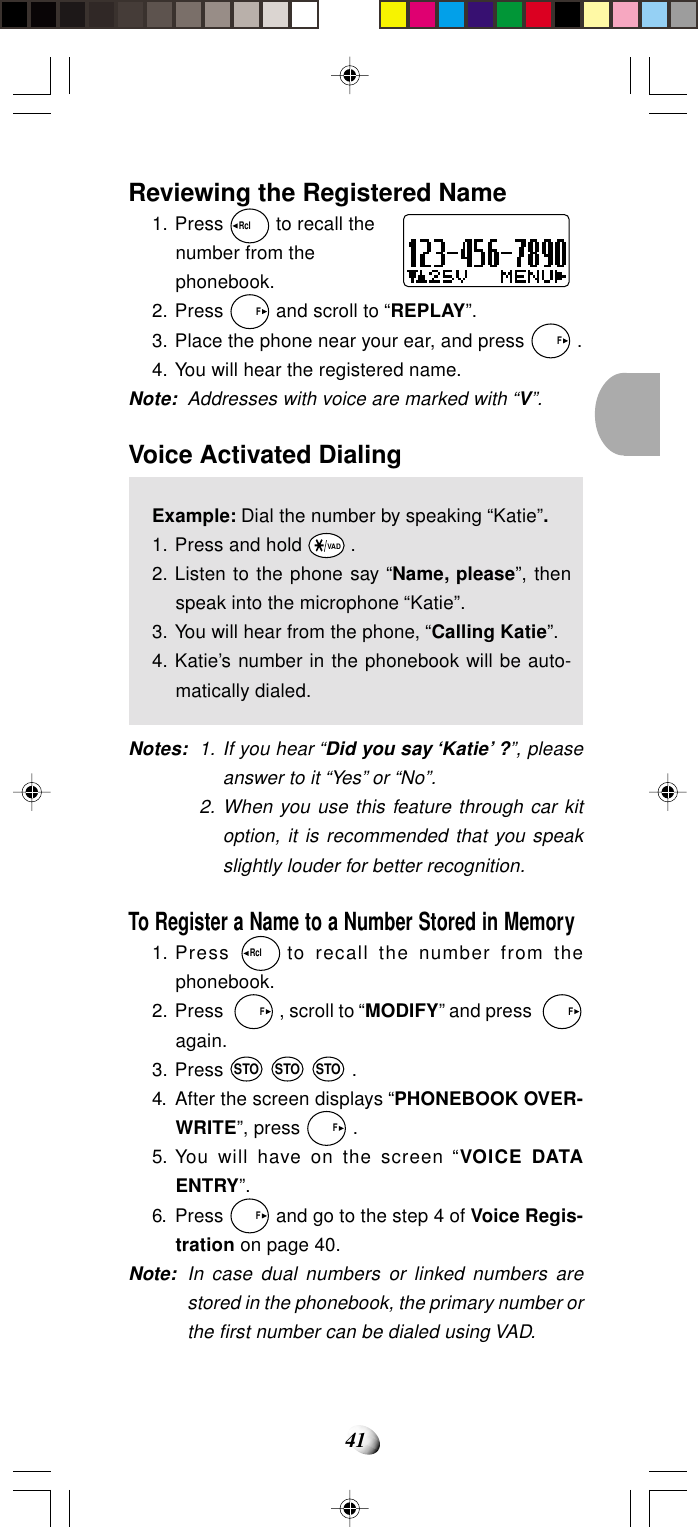
![52Function Menu Tree1: LOCK 1: KEY LOCK (F11)2: LOCK (F12)3: AUTO LOCK (F13)4: LOCK CODE (F14)3: TONES 1: RING VOL. (F31)2: RING TYPE (F32)3: KEY VOL. (F33)4: MUTE (F34)5: DTMF SEND (F35)6: SETTINGS (F36)1: STANDBY2: IN-USE2: DISPLAY 1: MY NUMBER (F21)2: BACKLIGHT (F22)3: HYPHEN (F23)4: SMS LINES (F24)5: CONTRAST (F25)6: VERSION (F26)7: LAST SID (F27)8: PRL ID (F28)1: LAST CALL2: OUTGOING3: ALL CALLS4: LIFETIME5: WEB TOTAL4: TIMES 1: TIMERS (F41)2: CLOCK (F42)3: ADJUST (F43)4: ALARM (F44)5: C.D TIMER (F45)Main Menu Submenu Branch1: KEY TONE2: BEEP ALT.3: VOICEMAIL4: TEXT MSG.5: CALLER ID6: SERVICE7: PRIVACY8: MINUTE9: LOW BATT.0: OTHER 1: QUICK DIAL (F01)2: AUTO ANS. (F02)3: ABSENCE (F03)4: ABS. TIMER (F04)5: SYSTEM 1: A/B SW. (F51)2: NAM CHG. (F52)3: ANALOG (F53)4: SETTINGS (F54)1: NAM NAME2: AUTO NAM3: RETRY4: PRIVACY5: AUTO PIN6: PIN CODE6: SECURITY1: RESTRICT (F61)2: EMER. # (F62)3: [1] EMER. (F63)4: SEC. CODE (F64)5: RESET (F65)7: DATA/FAX1: MODE (F71)2: WEB SETUP (F72)3: BROWSER (F73)8: VIBRATOR1: TIMERS2: PHONEBOOK3: HISTORY4: TXT/VOICE5: SETTINGS1: LOCK2: BACKLIGHT3: IDLE TIMER4: WEB LINK A5: WEB LINK B6: USER NAME7: PASSWORD8: LINK CHG.](https://usermanual.wiki/Dynabook/DCE37529A.EA96706-Users-Manual-Part-1/User-Guide-92094-Page-52.png)