Dynabook UPA3906WL Digital Video Camera User Manual 1 Manual EN Camileo AIR10 20120309
Toshiba Corporation Digital Video Camera 1 Manual EN Camileo AIR10 20120309
UserManual.wiki
>
Dynabook
>
UPA3906WL User Manual
user manual
Navigation menu
Upload a User Manual
Namespaces
Wiki Guide
HTML
PDF
Info
Views
User Manual
Discussion / Help
Navigation

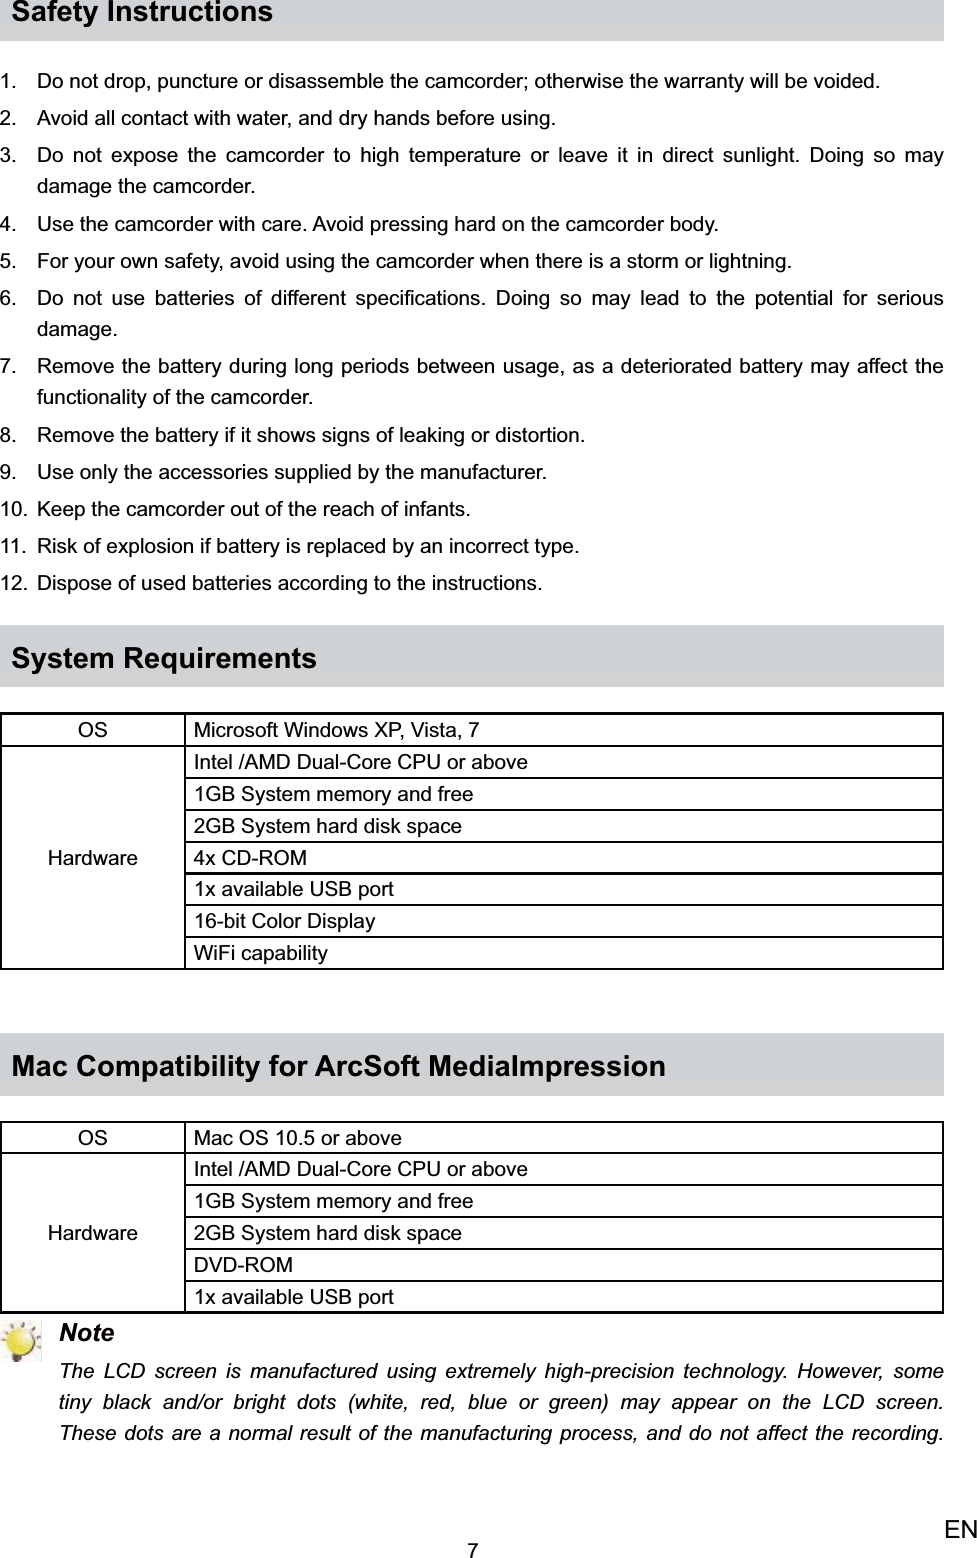
![ContentsSection 4 Playback Mode..................................................................... 27Button Function .................................................................. 27LCD Monitor Information .................................................... 28Operations for Playback Mode ......................................... 29Video Playback .................................................................... 30Photo Playback ................................................................... 30Delete File in Playback Mode ............................................. 31Section 5 Setting Your Camcorder .................................................... 32Setup Menu .......................................................................... 32Section 6 WiFi Function ....................................................................... 36Uploading the File to the Social Web Site ....................... 36Broadcast live streaming on USTREAM ........................... 40Section 7 AIR10 Connect Program ..................................................... 42Advanced Operation on Your Computer - AIR10 Connect ......... 42Installing [AIR10 Connect] ................................................. 42Using AIR10 Connect via WiFi Connection (Infrastructure Mode) .... 44Using AIR10 Connect via USB Connection ...................... 47Section 8 Viewing Photos and Videos on TV ..................................... 50Connecting to a High-Definition 16:9(Wide) TV ............... 50Section 9 Viewing Photos and Videos on PC .................................... 51Installing Bundled Software ............................................... 51Transferring Photos or Videos to a Computer ................. 51](https://usermanual.wiki/Dynabook/UPA3906WL/User-Guide-1655045-Page-4.png)
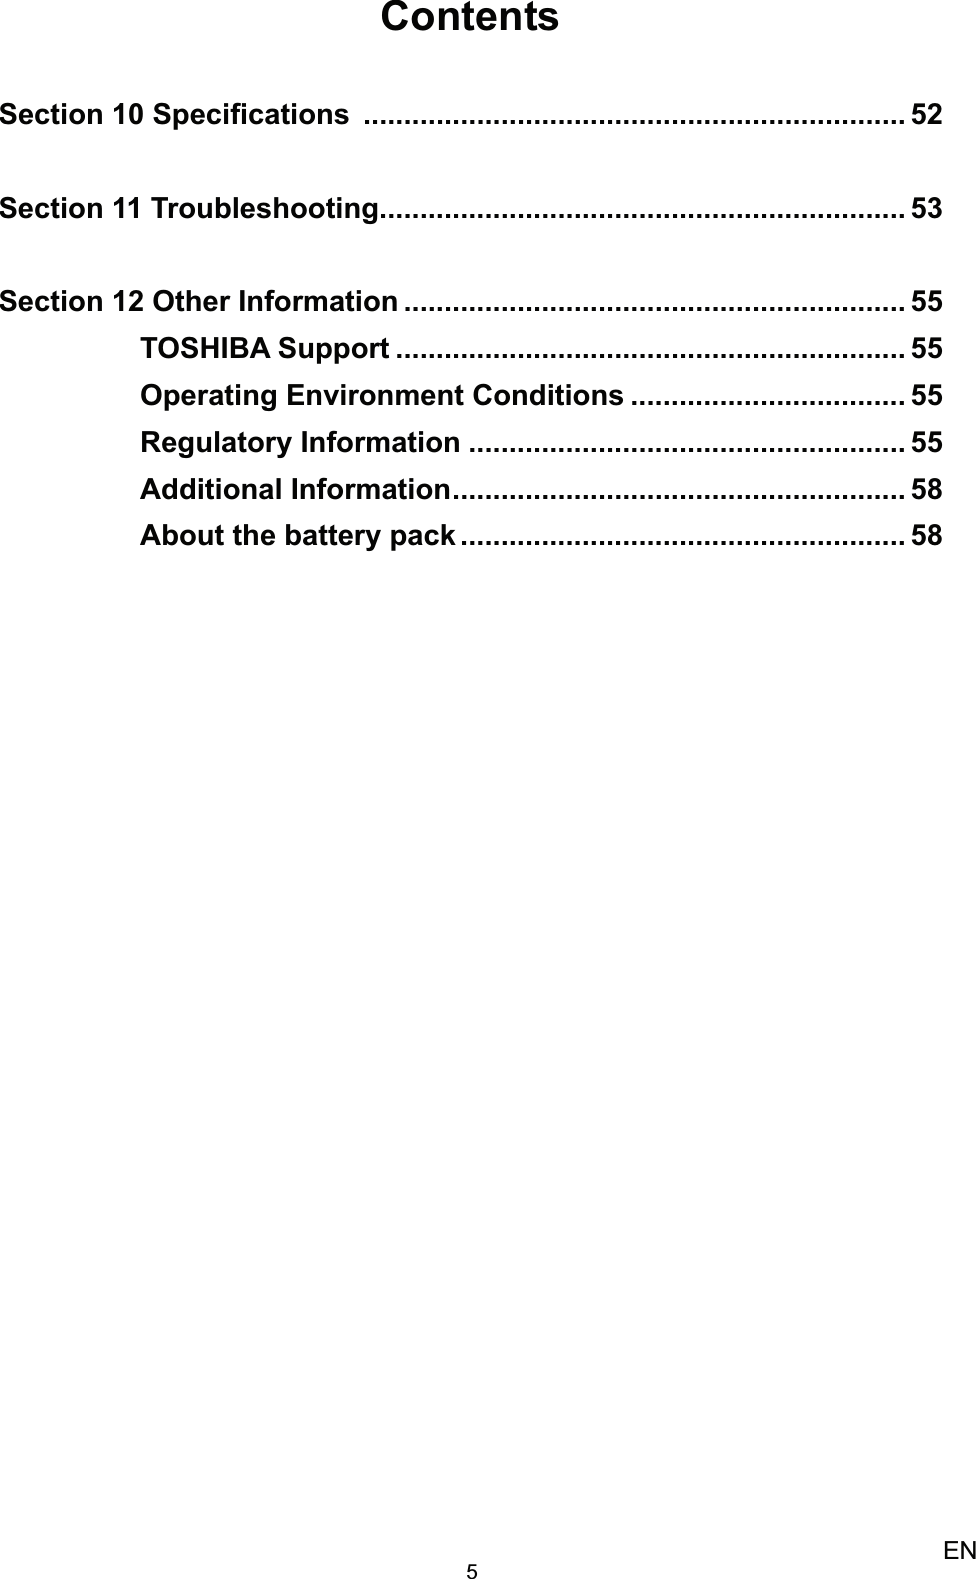
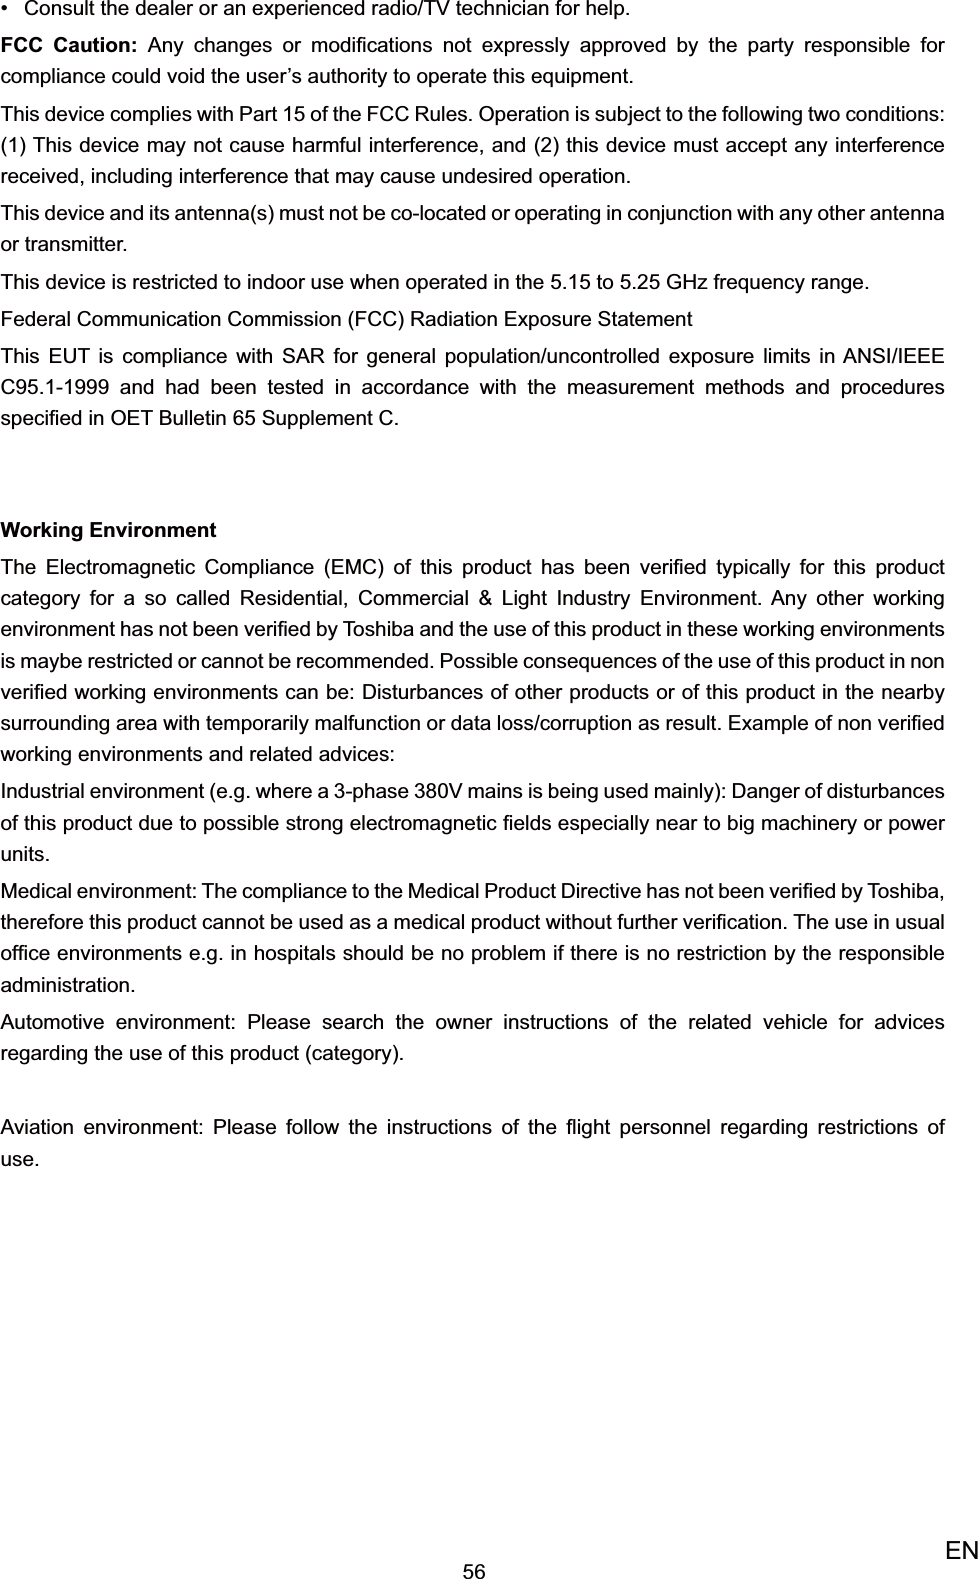
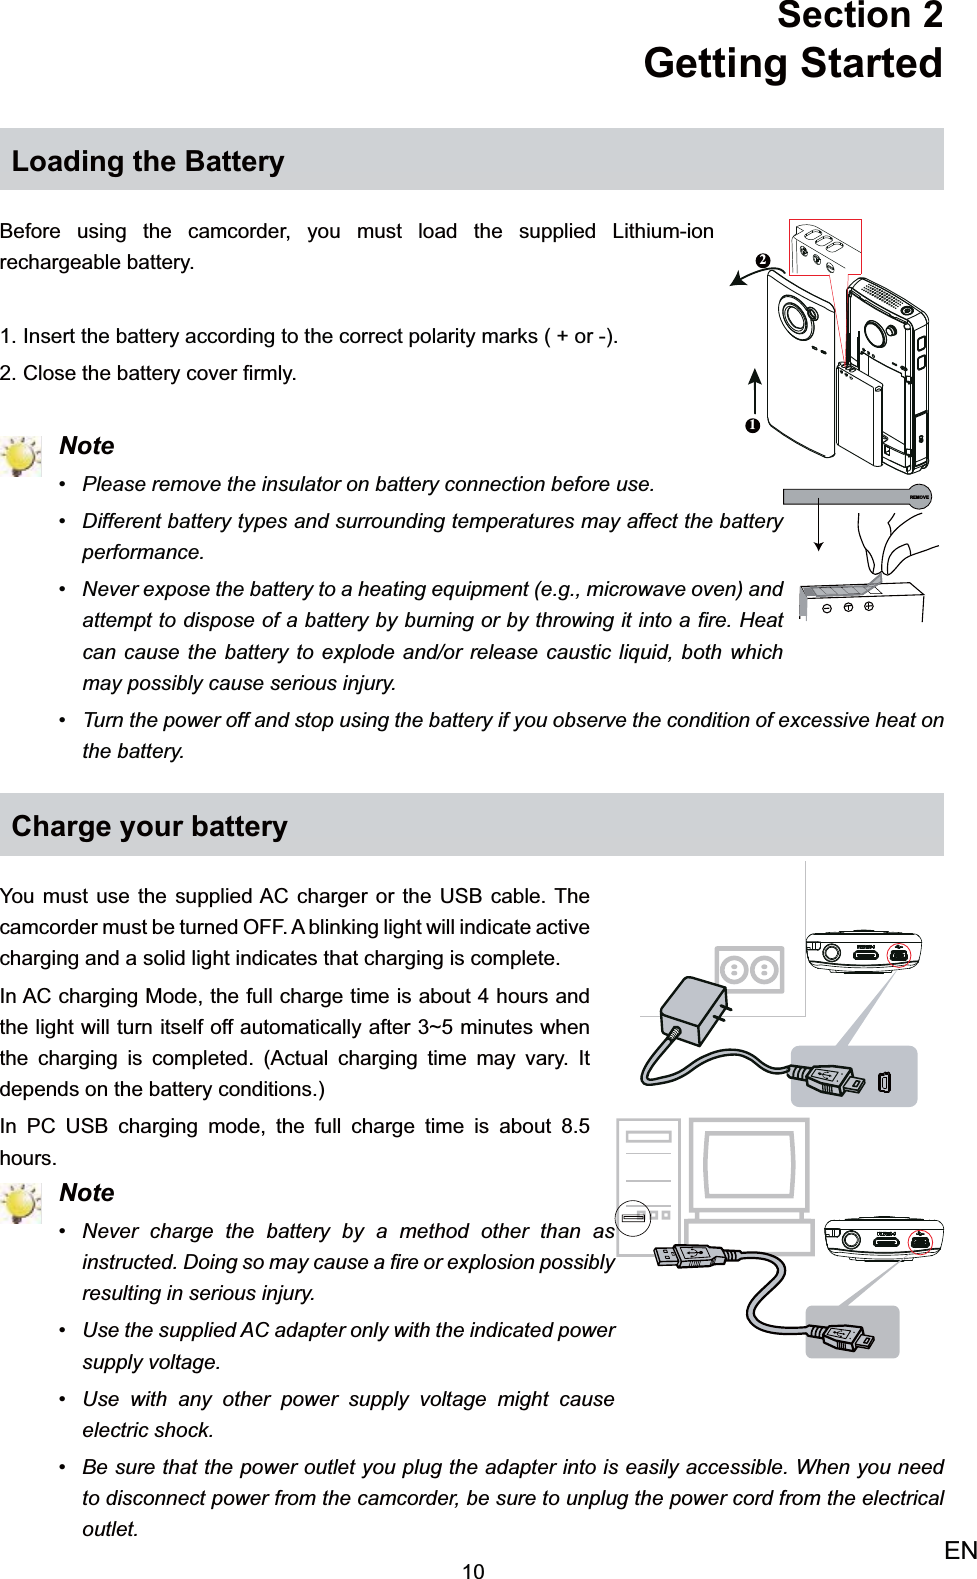
![8ENFront View MENUOKLCD Screen[Return/Exit] Button[Playback] Button[Tele(Up)] Button[Thumbnail] Button[Wide(Down)] Button[Delete] Button[Right] Button[Left] Button[Menu/OK] Button[Video] Button[Photo] Button](https://usermanual.wiki/Dynabook/UPA3906WL/User-Guide-1655045-Page-8.png)
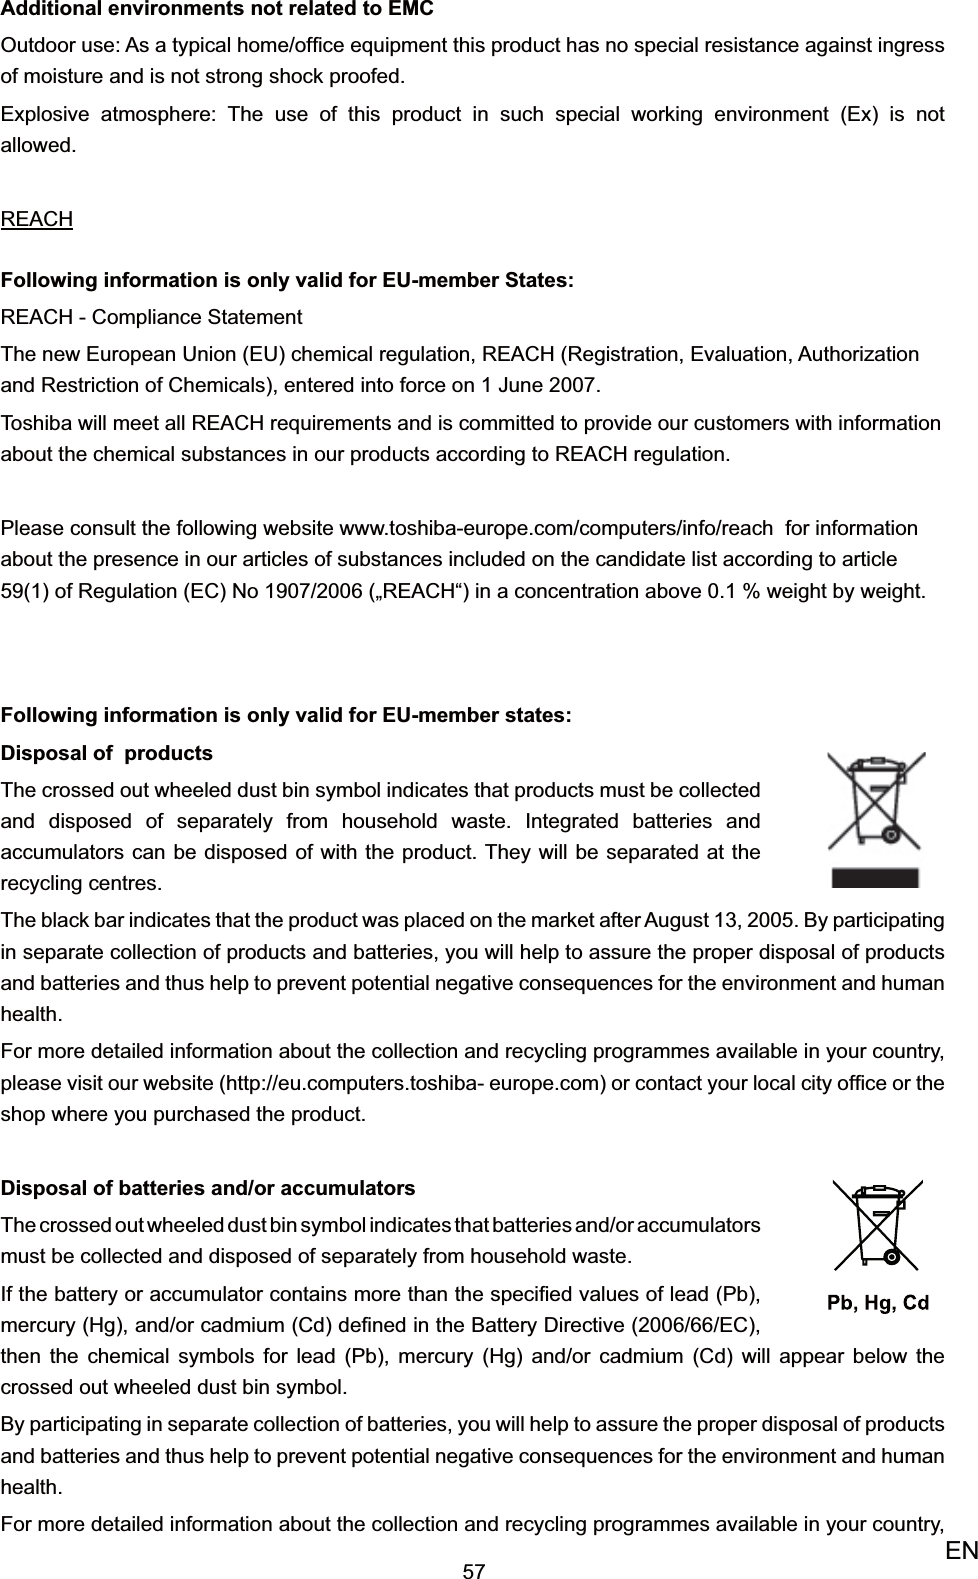
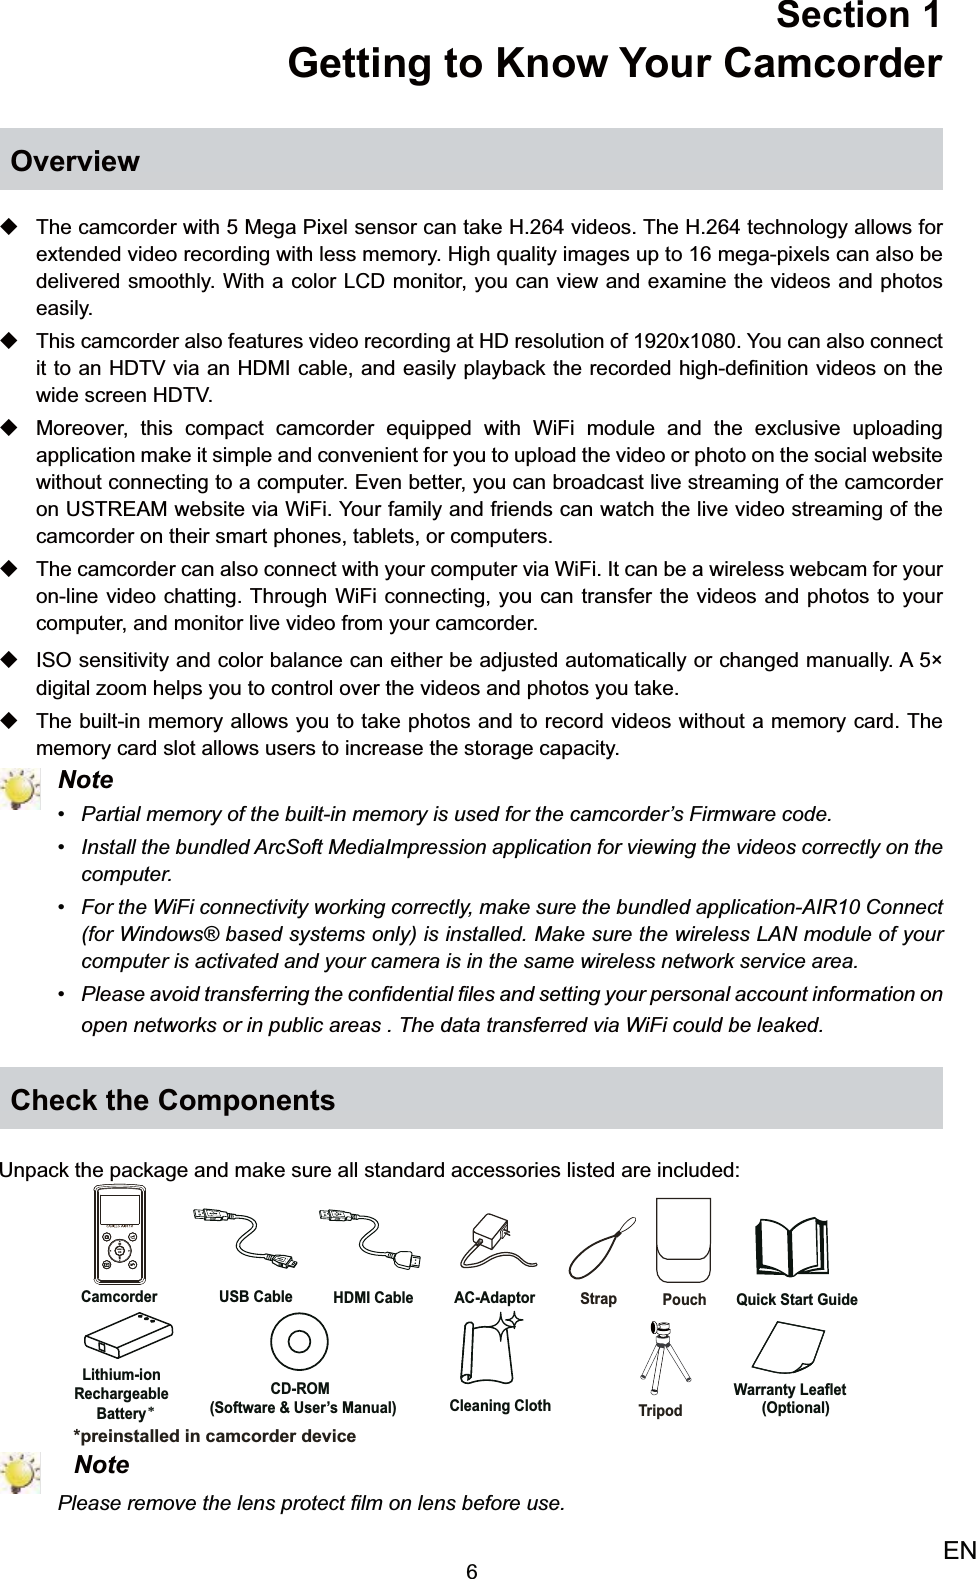
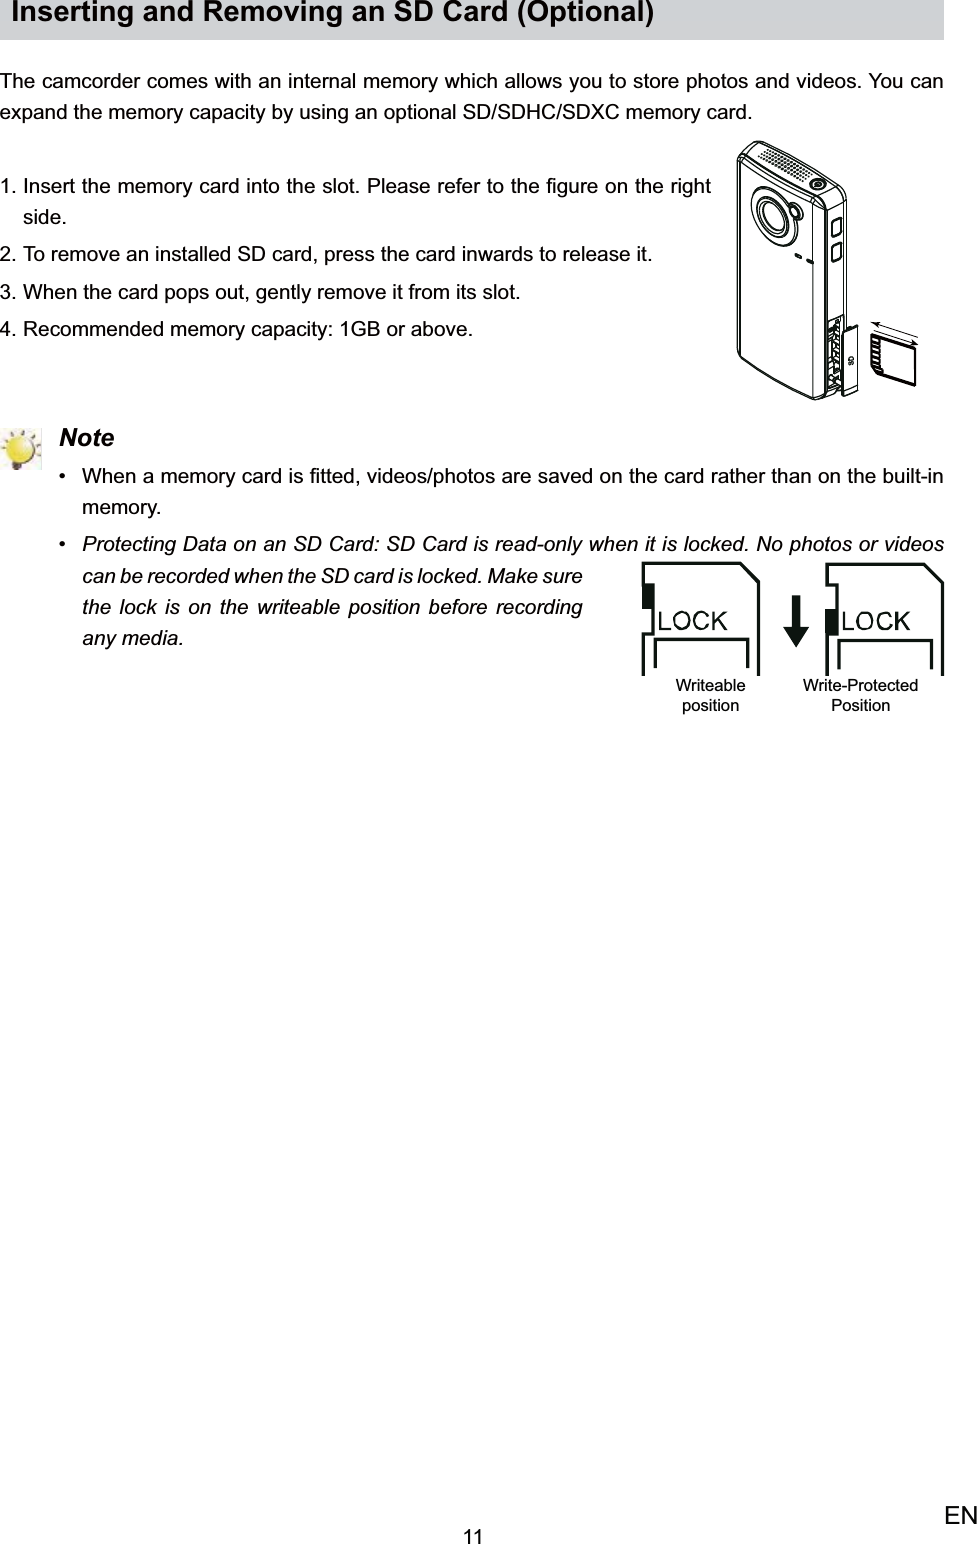
![9ENSide ViewBottom ViewStrap HookTripod SocketHDMI PortMini USB 2.0 PortSpeakerLensPower ButtonIndicator light SD card CoverBattery Cover[WiFi] Button[Internet] ButtonLightMicrophone](https://usermanual.wiki/Dynabook/UPA3906WL/User-Guide-1655045-Page-9.png)
![12ENTurning the Camcorder On and Getting StartedTo turn on the camcorder: • Press [Power Button] for one second to turn it on.1. To record video: • In Record Mode, press [Video Button] to record videos. To stop recording, press it again.To take a photo: • In Record Mode, press [Photo Button] to take photo.To view stored videos and photos: • Press [Playback Button] to switch to the Playback mode.Turning the Camcorder OffTo turn off the camcorder: • Press [Power Button] for one second to turn off.2.](https://usermanual.wiki/Dynabook/UPA3906WL/User-Guide-1655045-Page-12.png)
![13ENSection 3 Record ModeButton Function[Video] Button:Press to take video. 1. To stop recording, press it again.2. [Photo] Button: P1. ress to take photo.[Playback] Button: Switch between the Record /Playback Mode.1. [Return/Exit] Button: Return to the previous screen.1. Exit.2. MENUOK[Tele(Up)] Button: Zoom In.1. Move between the option items.2. [Wide(Down)] Button: Zoom Out.1. Move between the option items.2. [Left] Button: Move between the option items.1. [Right] Button: Move between the option items.1. [Menu/OK] Button: Menu ON.1. Validate the setting.2. Power Button: Press down for one second to turn on or turn off the camcorder.1. [WiFi] Button:Press to turn on / off WiFi.1. [Internet] Button:Press to upload video/photo to the internet via WiFi.1.](https://usermanual.wiki/Dynabook/UPA3906WL/User-Guide-1655045-Page-13.png)
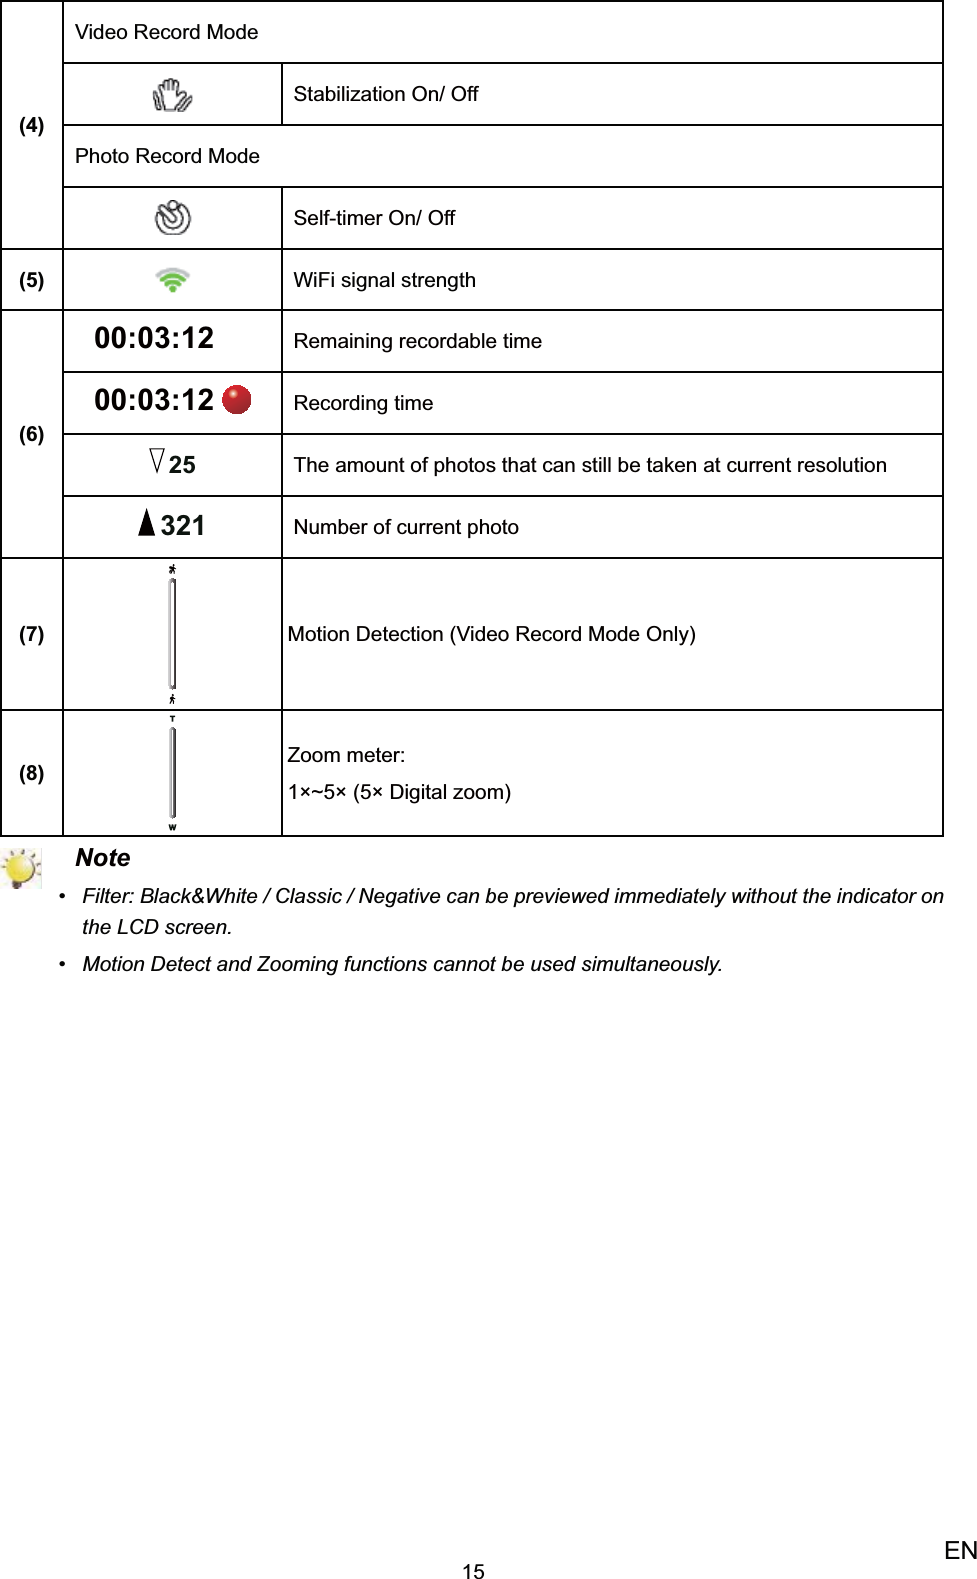
![16ENVideo RecordingIn Video Record Mode, • press [Video] Button to start recording. When a video is being recorded, a time indicator will display on the LCD monitor. To stop recording, press the [Video] Button again. Press the [Playback] Button to view the recorded• videos.Four resolution settings are available: • Video QualityFULL HD 1080/30: 1920x1080p 30HD 720/60: 1280x720p 60HD 720/30: 1280x720p 30VGA 480/30: 640x480p 30Photo RecordingIn Photo Record Mode, • press the [Photo] Button to take photos.Press the [Playback] Button to• view the photos.Three resolution settings are available: • Image Quality High-16 Mega Pixels: 4608 x 3456Standard-5 Mega Pixels: 2592 x 1944Low-3 Mega Pixels: 2048 x 1536Using Digital ZoomThe digital zoom magnifies images when recording videos or taking photos.• To zoom in/out, press the 1. [Tele(Up)] / [Wide(Down)] Button.The digital zoom can be set from 12. × to 5x.](https://usermanual.wiki/Dynabook/UPA3906WL/User-Guide-1655045-Page-16.png)
![17ENOptions for MenuVideo Setting Photo Setting Effects Setup* WiFi*Light• Resolution• Stabilization• Motion Detect• Continuous • PlayLight• Resolution• Self-Timer• Face Tracking• Date Printing• ISO• Slideshow• Scene• Filter• White Balance• Menu Sound• TV• Language• Time Setting• Format• Default Setting• Available • Networks (List)PC_Direct• * Please refer to Section 5 for the detailed information about [Setup].* Please refer to Section 6 for the detailed information about [WiFi].Operations Operation ScreenPress the [Menu/OK] Button in the Record Mode. 1. The main menu will show on the screen. The options are Video Setting, Photo Setting, Effects, 2. Setup, and WiFi. Use the Direction Button to select the desired option, 3. and then press the [OK] Button to enter the submenu.Use the Direction Button4. to select the specific option you want to adjust and then press the [OK] Button to validate the setting.Or press the [Playback] Button/ select the 5. Return icon ( ) to exit.](https://usermanual.wiki/Dynabook/UPA3906WL/User-Guide-1655045-Page-17.png)
![18ENVideo SettingOperation Display ScreenPress [Menu/OK] Button in the Record Mode. 1. The main menu will show on the screen. Use the Direction Button to select2. the [Video Setting ] icon and then press the [OK] Button to enter its submenu.The Video Setting menu contains 5 options-- 3. Light, Resolution, Stabilization, Motion Detect, and Continuous Play --for you to adjust the camcorder settings. LightYou can select the mode to brighten the area or to extend the brightness of the objects.On The light will be turned on and provides light when recording.Off The light is turned off.Digital Light Extend the dynamic range for backlight and high contrast sense, so that the objects will be brighter and clearer.Operation Display ScreenIn the Video Setting menu, select the [Light] 1. icon and then press the [OK] Button to enter its setting menu.Select the desired option 2. and then press the [OK] Button to validate the setting. Or press the [Playback] Button/ select the 3. Return icon ( ) to exit.](https://usermanual.wiki/Dynabook/UPA3906WL/User-Guide-1655045-Page-18.png)
![19EN ResolutionFour resolution settings are available.FULL HD 1080/30 Record videos at 1920x1080p 30 resolution.HD 720/60 Record videos at 1280x720p 60 resolution.HD 720/30 Record videos at 1280x720p 30 resolution.VGA 480/30 Record videos at 640x480p 30 resolution.Operation Display ScreenIn the Video Setting menu, select the [Resolution] 1. icon and then press the [OK] Button to enter its setting menu.Select the desired option 2. and then press the [OK] Button to validate the setting. Or press the [Playback] Button/ select the 3. Return icon ( ) to exit. Stabilization Record with an effect of reducing the camcorder shake to result in more stable video. Operation Display ScreenIn the Video Setting menu, select the 1. [Stabilization] icon and then press the [OK] Button to enter its setting menu.Select the desired option 2. and then press the [OK] Button to validate the setting. Or press the [Playback] Button/ select the 3. Return icon ( ) to exit.](https://usermanual.wiki/Dynabook/UPA3906WL/User-Guide-1655045-Page-19.png)
![20EN Motion Detection Record video automatically when the camcorder detects a movement.Operation Display ScreenIn the Video Setting menu, select the [Motion 1. Detect] icon and then press the [OK] Button to enter its setting menu.Select the desired option 2. and then press the [OK] Button to validate the setting. Or press the [Playback] Button/ select the 3. Return icon ( ) to exit.The camcorder will begin recording automatically 4. if movement is detected. It stops recording when movement stops. Continuous Play This option allows you to playback files continuously. Operation Display ScreenIn the Video Setting menu, select the 1. [Continuous Play] icon and then press the [OK] Button to enter its setting menu.Select the desired option 2. and then press the [OK] Button to validate the setting. Or press the [Playback] Button/ select the 3. Return icon ( ) to exit.](https://usermanual.wiki/Dynabook/UPA3906WL/User-Guide-1655045-Page-20.png)
![21ENPhoto SettingOperation Display ScreenPress [Menu/OK] Button in the Record Mode. 1. The main menu will show on the screen. Use the Direction Button to select2. the [Photo Setting ] icon and then press the [OK] Button to enter its submenu.The Photo Setting menu contains 7 options-- 3. Light, Resolution, Self-Timer, Face Tracking, Date Printing, ISO, and Slideshow--for you to adjust the camcorder settings. LightYou can select the mode to brighten the area or to extend the brightness of the objects.On The light will be turned on and provides light when recording.Off The light is turned off.Digital Light Extend the dynamic range for backlight and high contrast sense, so that the objects will be brighter and clearer.Operation Display ScreenIn the Photo Setting menu, select the [Light] 1. icon and then press the [OK] Button to enter its setting menu.Select the desired option 2. and then press the [OK] Button to validate the setting. Or press the [Playback] Button/ select the 3. Return icon ( ) to exit.](https://usermanual.wiki/Dynabook/UPA3906WL/User-Guide-1655045-Page-21.png)
![22EN ResolutionThree resolution settings are available.High-16M Shoot photo at 4608 x 3456, 16 Mega Pixels quality.Standard-5M Shoot photo at 2592 x 1944, 5 Mega Pixels quality.Low-3M Shoot photo at 2048 x 1536, 3 Mega Pixels quality.Operation Display ScreenIn the Photo Setting menu, select the [Resolution] 1. icon and then press the [OK] Button to enter its setting menu.Select the desired option 2. and then press the [OK] Button to validate the setting. Or press the [Playback] Button/ select the 3. Return icon ( ) to exit. Self-TimerThe self-timer allows you to take photos with a ten-second time delay. The Indicator light on the rear of the camcorder will also blink. The speed of blinking will increase just before the photo is taken.Operation Display ScreenIn the Photo Setting menu, select the [Self-1. Timer] icon and then press the [OK] Button to enter its setting menu.Select the desired option 2. and then press the [OK] Button to validate the setting. Or press the [Playback] Button/ select the 3. Return icon ( ) to exit.](https://usermanual.wiki/Dynabook/UPA3906WL/User-Guide-1655045-Page-22.png)
![23EN Face TrackingThe camcorder detects and focuses on face(s) automatically. This function works in Photo mode to capture portraits in backlit conditions.Operation Display ScreenIn the Photo Setting menu, select the [Face 1. Tracking] icon and then press the [OK] Button to enter its setting menu.Select the desired option 2. and then press the [OK] Button to validate the setting. Or press the [Playback] Button/ select the 3. Return icon ( ) to exit. In Record Mode, aim the camcorder at the 4. face(s). The face frame(s) will appear around the face. Date PrintingImprint the date and time on the photo.Operation Display ScreenIn the Photo Setting menu, select the [Date 1. Printing] icon and then press the [OK] Button to enter its setting menu.Select the desired option 2. and then press the [OK] Button to validate the setting. Or press the [Playback] Button/ select the 3. Return icon ( ) to exit. As the function is activated, the date will 4. appear on the corner of the photo.](https://usermanual.wiki/Dynabook/UPA3906WL/User-Guide-1655045-Page-23.png)
![24EN ISOThe camcorder adjusts the ISO sensitivity of its images automatically. Two manual ISO sensitivity settings are available. (800/1600). Use the higher setting to take a photo in the dark or in a poorly lit location, or for an subject moving at a high rate of speed.Auto Set the ISO sensitivity automatically.800 ISO 8001600 ISO 1600Operation Display ScreenIn the Photo Setting menu, select the [ISO] 1. icon and then press the [OK] Button to enter its setting menu.Select the desired option 2. and then press the [OK] Button to validate the setting. Or press the [Playback] Button/ select the 3. Return icon ( ) to exit. NoteThe image may become grainy with a higher ISO setting. Slideshow Photos can be viewed one after another in a slideshow in a chosen interval of time. 2 Seconds Display one photo every 2 seconds5 Seconds Display one photo every 5 seconds10 Seconds Display one photo every 10 secondsOFF Disable Slideshow Operation Display ScreenIn the Photo Setting menu, select the [Slideshow] 1. icon and then press the [OK] Button to enter its setting menu.Select the desired option 2. and then press the [OK] Button to validate the setting. Or press the [Playback] Button/ select the 3. Return icon ( ) to exit.](https://usermanual.wiki/Dynabook/UPA3906WL/User-Guide-1655045-Page-24.png)
![25ENEffectsOperation Display ScreenPress [Menu/OK] Button in the Record Mode. 1. The main menu will show on the screen. Use the Direction Button to select2. the [ Effects ] icon and then press the [OK] Button to enter its submenu.The Effects menu contains 3 options-- Scene, 3. Filter, and White Balance --for you to adjust the camcorder settings. SceneYou can select the mode according to the scene condition.Auto Automatic adjustmentSkin Shoot with an effect that makes skin tones more natural.Night Use Night Mode for night scenes or low light conditions.Backlight You can take shots when the bright light is behind the subject.Operation Display ScreenIn the Effects menu, select the [Scene] icon 1. and then press the [OK] Button to enter its setting menu.Select the desired option 2. and then press the [OK] Button to validate the setting. Or press the [Playback] Button/ select the 3. Return icon ( ) to exit. NoteTo avoid blurry photos, place the camcorder on a flat, steady surface, or use a tripod when taking shots in the Night Mode.](https://usermanual.wiki/Dynabook/UPA3906WL/User-Guide-1655045-Page-25.png)
![26EN FilterYou can select a special filter effect for videos and photos. Auto Shoot without any special effect on the image.Black & White The image is converted to black-and-white.Classic The image is converted to a sepia look.Negative The image is converted as the negative of the normal.Operation Display ScreenIn the Effects menu, select the [Filter] icon 1. and then press the [OK] Button to enter its setting menu.Select the desired option 2. and then press the [OK] Button to validate the setting. Or press the [Playback] Button/ select the 3. Return icon ( ) to exit. White BalanceThe camcorder adjusts the color balance of images automatically. Three manual white balance settings are available:Auto The camcorder automatically adjusts white balance.Daylight Under outdoor condition.Fluorescent Under fluorescent light condition.Tungsten Under tungsten light condition.Operation Display ScreenIn the Effects menu, select the [1. White Balance] icon and then press the [OK] Button to enter its setting menu.Select the desired option 2. and then press the [OK] Button to validate the setting. Or press the [Playback] Button/ select the 3. Return icon ( ) to exit.](https://usermanual.wiki/Dynabook/UPA3906WL/User-Guide-1655045-Page-26.png)
![27ENSection 4 Playback ModeButton FunctionThe Buttons have the following functions in Playback Mode. [Video] Button:In Playback Mode, press to switch to the Video Playback Mode. 1. [Photo] Button: In Playback Mode, press to switch to the Photo Playback Mode. 1. [Playback] Button: Switch between the Record /Playback Mode.1. [Return/Exit] Button: Return to the previous screen.1. Exit.2. MENUOK[Tele(Up)] Button: Go to the video/photo thumbnail screen.1. When playing video, press to increase volume.2. [Wide(Down)] Button: Go to the delete screen.1. When playing video, press to decrease volume.2. [Left] Button: Go to the previous video/photo.1. [Right] Button: Go to the next video/ photo.1. [Menu/OK] Button: In Video Playback mode, press to play/pause the video.1. Validate the setting.2. [WiFi] Button:Press to turn on / off WiFi.1. [Internet] Button:Press to upload video/photo to the internet via WiFi.1.](https://usermanual.wiki/Dynabook/UPA3906WL/User-Guide-1655045-Page-27.png)
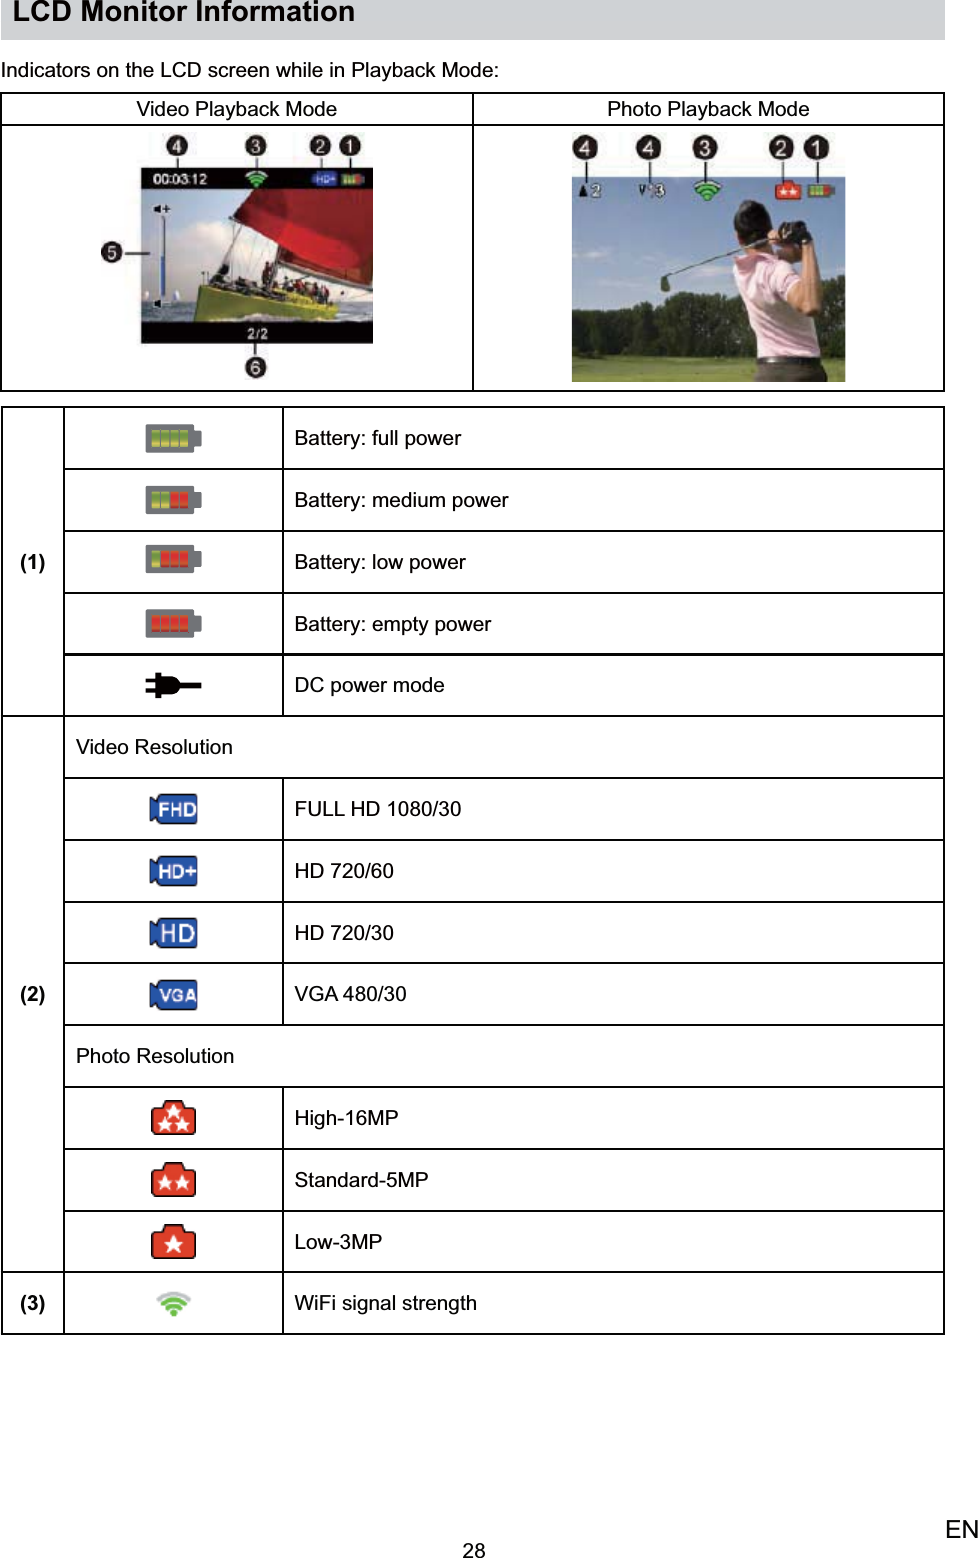
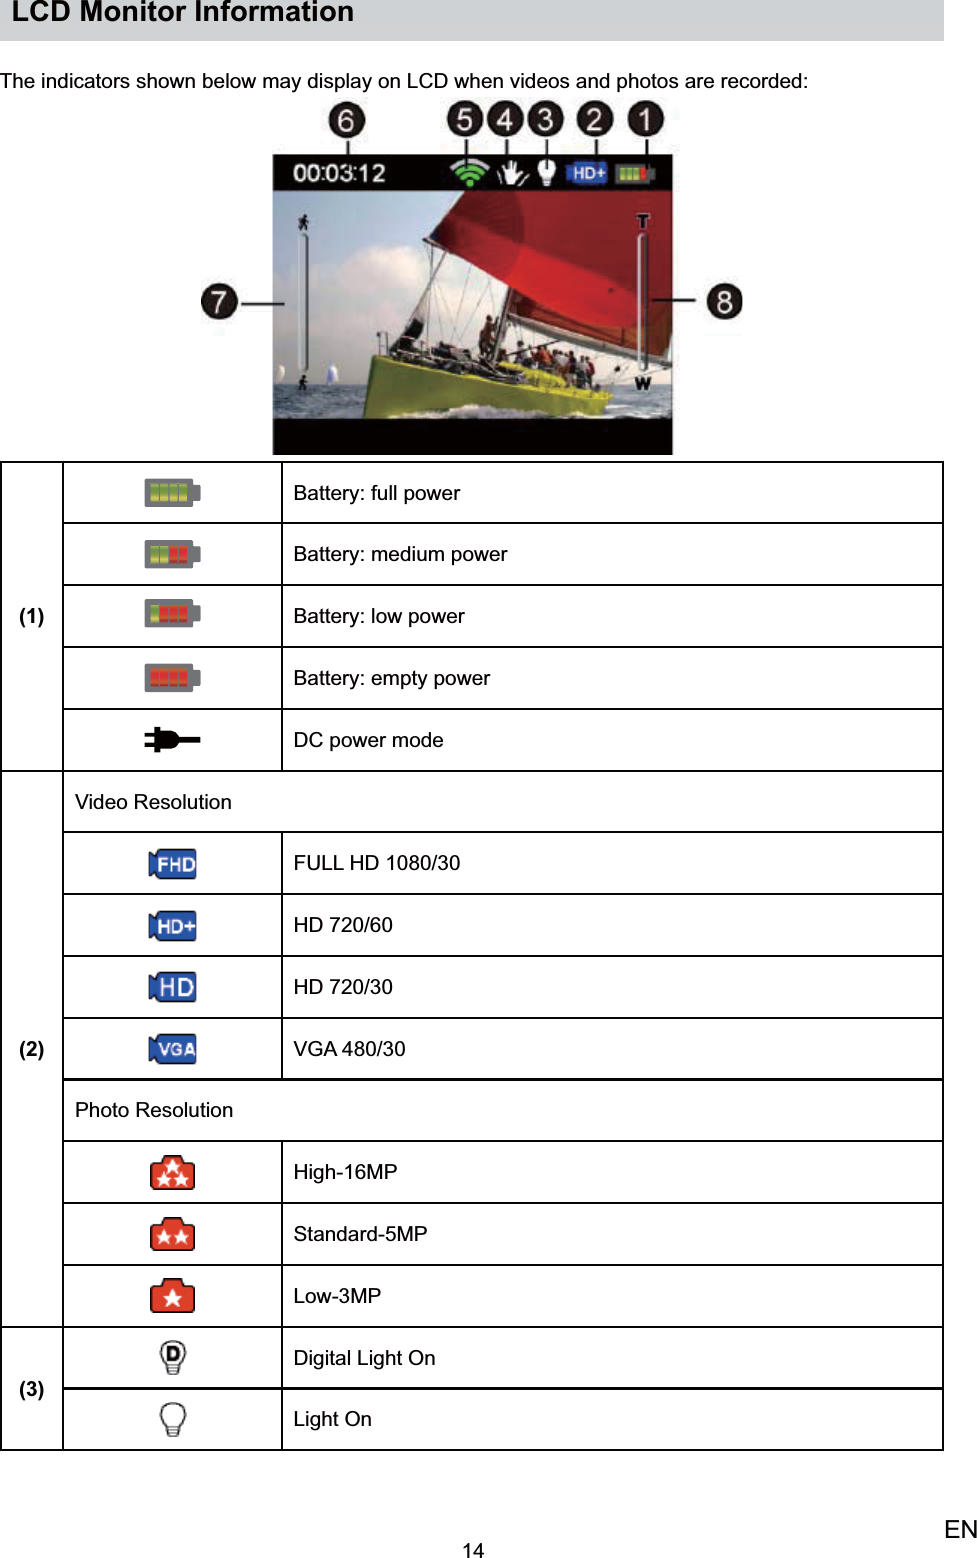
![29EN(4)00:03:12 Playback time counter12 Number of current photo 25 Total number of photos(5) Volume(6) 22/Current number/ Total number of videosOperations for Playback Mode The Playback Mode is for viewing and managing videos and photos on the built-in memory or on an SD Card.Operation Display ScreenIn Video Record Mode, press the [ Playback ] 1. Button to switch to the Video Playback Mode.In Photo Record Mode, press the [ Playback ]1. Button to switch to the Photo Playback Mode.Press the 2. [ Tele (Up) ] Button to go to the video/photo thumbnail screen of videos and photos.In 3. the thumbnail screen of videos and photos, select the file and then press the [OK] Button to go the file.Or press the [Playback] Button 4. to exit.](https://usermanual.wiki/Dynabook/UPA3906WL/User-Guide-1655045-Page-29.png)
![30ENVideo PlaybackOperation Display ScreenIn the Video Playback Mode, press 1. the [OK] Button to play or pause the video.When the video is paused, press the [Down] 2. Button to go to its delete screen.Use the [Right/Left] Button to go to the next/ 3. previous video. While playing video, 4. press the [Right/Left] Button to fast forward/rewind, then press the [OK] Button to stop.Use the 5. [Tele(Up)/Wide(Down)] Button to adjust the volume.Press the [Internet] Button to select the current 6. video to upload to Internet.Photo PlaybackOperation Display ScreenIn the 1. Photo Playback Mode, use the [Right/Left] Button to go to the next/ previous photo.Press t2. he [OK] Button to pause the slideshow.Press the [Internet] Button to select the current 3. photo to upload to Internet.](https://usermanual.wiki/Dynabook/UPA3906WL/User-Guide-1655045-Page-30.png)
![31ENDelete File in Playback ModeOperation Display ScreenIn the Playback Mode, 1. press the [Down] Button to go to the delete screen.Select 2. to delete the current file and then select to delete it. Select to cancel and exit.Select 3. to delete all files and select to delete them. Select to cancel and exitOr 4. press the [Return/Exit] Button to cancel the operation and exit. NoteVideos and Photos on a written-protected memory card cannot be deleted.•](https://usermanual.wiki/Dynabook/UPA3906WL/User-Guide-1655045-Page-31.png)
![32ENSection 5 Setting Your Camcorder Setup MenuOperation Display ScreenPress [Menu/OK] Button in the Record Mode. 1. The main menu will show on the screen. Use the Direction Button to select2. the [Setup] icon and then press the [OK] Button to enter its submenu.The Setup menu contains 7 options 3. for configuring your camcorder setup. They are Menu Sound (operation sound), TV, Language, Time Setting, Format, Default Setting, and Information (shows the information of this camcorder).Menu SoundEnable or disable the keypad tone and the operation sound.Operation Display ScreenIn the 1. Setup menu, select the [Menu Sound] icon and then press the [OK] Button to enter its setting menu.Select the desired option 2. and then press the [OK] Button to validate the setting. Or press the [Playback] Button/ select the 3. Return icon ( ) to exit.](https://usermanual.wiki/Dynabook/UPA3906WL/User-Guide-1655045-Page-32.png)
![33ENTVEnsure that the appropriate TV standard of your area is selected – either NTSC or PAL. Wrong TV system setting may cause image flickers.NTSC(60Hz) USA, Canada, Japan, South Korea and Taiwan, etc.PAL(50Hz) UK, Europe, China, Australia, Singapore and Hong Kong, etc.Operation Display ScreenIn the 1. Setup menu, select the [TV] icon and then press the [OK] Button to enter its setting menu.Select the desired option 2. and then press the [OK] Button to validate the setting. Or press the [Playback] Button/ select the 3. Return icon ( ) to exit.LanguageUse this option to select the language of the user interface. Operation Display ScreenIn the 1. Setup menu, select the [Language] icon and then press the [OK] Button to enter its setting menu.Select the desired option 2. and then press the [OK] Button to validate the setting. Or press the [Playback] Button/ select the 3. Return icon ( ) to exit.](https://usermanual.wiki/Dynabook/UPA3906WL/User-Guide-1655045-Page-33.png)
![34ENTime SettingOperation Display ScreenIn the 1. Setup menu, select the [Time Setting] icon and then press the [OK] Button to enter its setting menu.Use the [Right/Left] Button to 2. move between Day, Month, Year, Hour and Minute. Use the [3. Up/Down] Button to adjust the numeric value.Press the [OK] Button / 4. select the [Confirm] icon ( ) to validate the setting. Or press the [Playback] Button/ select the 5. Return icon ( ) to exit.FormatUse this option to erase all data in tthe built-in memory or the SD card.Yes Format the built-in memory ( When there is no SD card in the camcorder ) / SD card (When there is an SD card in the camcorder).No Do not format the built-in memory ( When there is no SD card in the camcorder ) / SD card (When there is an SD card in the camcorder).Operation Display ScreenIn the 1. Setup menu, select the [Format] icon and then press the [OK] Button to enter its setting menu.Select the desired option 2. and then press the [OK] Button to validate the setting. Or press the [Playback] Button/ select the 3. Return icon ( ) to exit. NoteAll the data will be erased if the SD card is formatted. Make sure all the data are copied to your PC before formatting the SD card.](https://usermanual.wiki/Dynabook/UPA3906WL/User-Guide-1655045-Page-34.png)
![35ENDefault SettingUse this option to restore the default factory setting.Yes Restore the default factory setting.No Do not restore the default factory setting.Operation Display ScreenIn the 1. Setup menu, select the [Default Setting] icon and then press the [OK] Button to enter its setting menu.Select the desired option 2. and then press the [OK] Button to validate the setting. Or press the [Playback] Button/ select the 3. Return icon ( ) to exit. NoteThe WiFi setting, such as profile of access points and account information of the websites will be erased.The following table indicates the camcorder’s default settings Setting Default Factory SettingResolution Full HD 1080/30 for VideoStandard- 5M for PhotoLight OffStabilization OnMotion Detection OffContinuous Play OffSelf-Timer OffFace Tracking OffDate Printing OffISO AutoSlideshow OffScene AutoFilter AutoWhite Balance AutoMenu Sound OnTV Depends on shipping areaLanguage Depends on shipping areaVolume Level 3](https://usermanual.wiki/Dynabook/UPA3906WL/User-Guide-1655045-Page-35.png)
![36ENSection 6 WiFi FunctionWiFi FunctionThe camcorder equipped with WiFi module allows you to:Upload the file to the social websites.• Broadcast live streaming on USTREAM website.• With [AIR10 Connect] application (for Windows® based systems only) on your computer, you can: Download the files from the camcorder to your computer. • Watch live streaming video from the camcorder on your computer.• Use the camcorder as a wireless webcam for online video chatting.• Configure your account information of the social web sites.• Uploading the File to the Social Web Site Follow the step to connect to an available AP successfully. Operation ScreenPress the [WiFi] Button 1. . The camcorder scans the available access point (AP) device and connects to it automatically. (You can also select the available access point (Network) manually by selecting [WiFi] in the Menu Mode. )If the 2. available AP(Network) requires the password or its profile is not saved yet, the AP list shows on the screen. Icon DescriptionExisting Profile-the profile of the AP is saved on the camcorder. Secured network-requires the password to access the AP.Signal strengthDown cursor-indicates more than four access points are available on the next page, press the [Down] Button to go to the next page.Select the AP3. (Network) and then press the [OK] Button.](https://usermanual.wiki/Dynabook/UPA3906WL/User-Guide-1655045-Page-36.png)
![37ENIf the selected AP requires the password 4. authentication, you will enter its setting screen. Use the Direction Button to select the text and press 5. the [OK] Button to confirm it. Field DescriptionCapital lettersLower case lettersNumbers, symbolsWhen the setting is done, select 7. the [Confirm] icon ( ) to validate the password and connect to the AP. Or press the [Playback] Button/ select the 8. Return icon ( ) to exit.The screen shown [CONNECTION OK] indicates the 9. connection is established. When the connection is 10. established, the signal strength will show on the top of the screen.The screen shown [CONNECTION FAILED] indicates 11. the camcorder does not connect to the AP. NoteThis camcorder only supports the AP(SSID) named in English/number/symbols (ASCII • characters).The possible reasons for “CONNECTION FAILED” could be (1) wrong password ; (2) you • are not in the wireless network area of the AP. (3) the camcorder does not support the type of encryption used on the AP. This model only supports WEP/WPA/WPA2 personal type of encryption, but not up to enterprise level (4)your network requires PPPoE account/password information.You can only enter text in English, regardless of the OSD language.•](https://usermanual.wiki/Dynabook/UPA3906WL/User-Guide-1655045-Page-37.png)
![38ENAfter the connection to AP is established, follow the steps to upload the video/photo to the social websites. Operation ScreenPress the [Internet] Button 1. . The camcorder automatically connects to the network.Some network require the authentication from the 2. network service provider (NSP). Please follow the instruction on the screen--- pressing the [OK] Button/[Return] button; or contact with the network service provider.](https://usermanual.wiki/Dynabook/UPA3906WL/User-Guide-1655045-Page-38.png)
![39ENThe screen shown [CONNECTION OK] indicates the 3. connection is established. The screen shown [CONNECTION FAILED] indicates 4. the camcorder does not connect to the network.Once the 5. connection to the network has been established, The camcorder automatically connects to the network and launches the built-in uploading application.Select the website you want to upload.6. **Before you upload the file to the social website, you have to set up your social website account information on the [AIR10 Connect ] application and save to your camcorder. (please refer to next section for the detail.)Select the file you want to upload, and then press 7. the [OK] Button to confirm it.During uploading, the status bar shown as the 8. screenshot on the right side. To cancel uploading, press the [9. Playback] Button/ [Return] Button to go back to the previous screen.](https://usermanual.wiki/Dynabook/UPA3906WL/User-Guide-1655045-Page-39.png)
![40ENBroadcast live streaming on USTREAMFollow the steps 1-6 on the pervious pages. 1. Select USTREAM on the website list screen.2. To cancel streaming, press the [3. Playback] Button/ [Return] Button to terminate streaming.The video streaming will be broadcasted on the 4. USTREAM website.People who has your account / channel name, they 5. can visit USTREAM website and watch the live video streaming from you camcorder through their various devices, such as computers, tablets, or smart phones. (The steps to watch live streaming on USTREAM, please refer to the instruction on the USTREAM website.) NoteIf you do not have a account, please sign up on the website first.• Make sure you create the channel on USTREAM website for your broadcast. For detailed • setup procedure, please refer to USTREAM website.Some AP routers do not allow you to connect to the network (e.g. firewall).• You may be charged by the network service provider.• Please stay away from any electronic equipment since the radio frequency signals may interfere • connecting.The camcorder cannot connect to the network while it is connected to an HDTV via the cable, • or vice versa.It may take time to scan and connect to the AP/network or to upload. The upload speed is • affected by the Internet connection speed or other factors. Please be sure the battery is fully charged before connecting to the network. It may take time • to upload.](https://usermanual.wiki/Dynabook/UPA3906WL/User-Guide-1655045-Page-40.png)
![41ENOnce the Default Setting is activated, • the profile of access points and the account information of the websites will be erased. The social website update is the subject to change without notice. (e.g. password validation,• create a channel) Please visit the website first to update your account setting.• Some social websites may not be allowed to access in certain regions or networks.• Configure through the [AIR10 Connect] application on your computer may required to enable • WiFi uploading / streaming features (e.g. Select the channel for broadcasting on YouTube/ USTREAM).Please avoid transferring the confidential files and setting your personal account information on • the open networks or in public areas . The data transferred via WiFi could be leaked.To prevent the camcorder from turning off accidentally, please be sure the battery is fully • charged.](https://usermanual.wiki/Dynabook/UPA3906WL/User-Guide-1655045-Page-41.png)
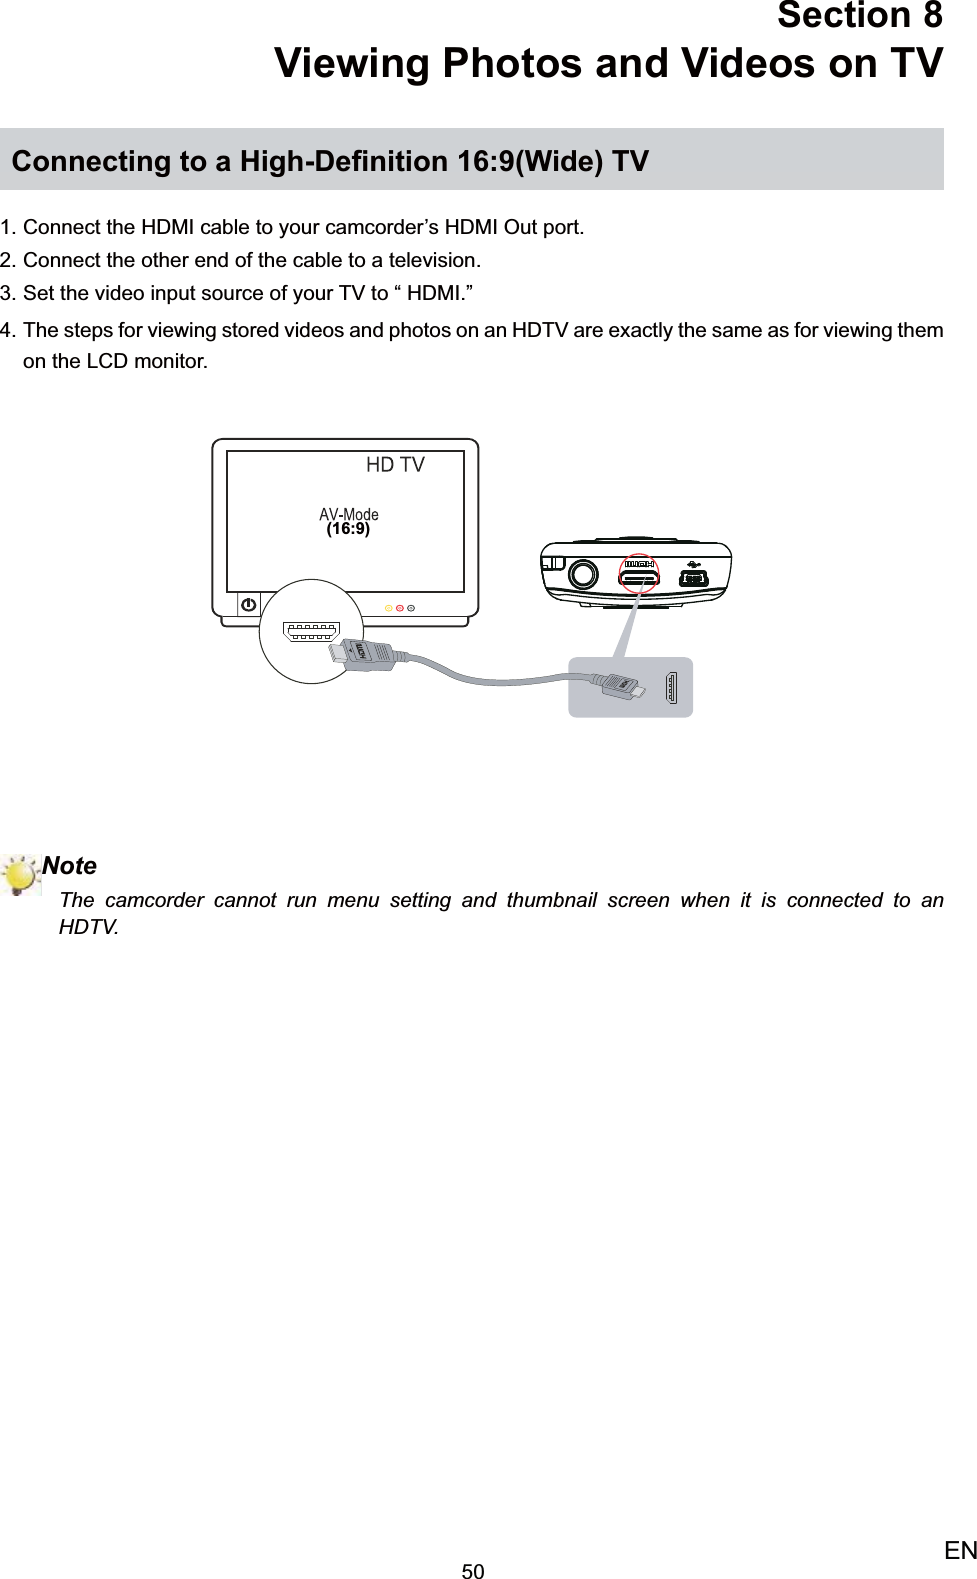
![42ENSection 7 AIR10 Connect ProgramAdvanced Operation on Your Computer - AIR10 ConnectThe camcorder can connect to your computer via WiFi or USB. Once you launch the [AIR10 Connect] application (for Windows® based systems only) on your computer, it will search for your camcorder and connect to it. Then, you can operate more functions on your computer. There are several functions as below:Transfer the files from the camcorder. ( • )Watch live streaming video from the • camcorder on your computer. ( )Use the camcorder as a wireless webcam for online video chatting. • ( )Configure your account information of the social web sites and save to the camcorder.• ( )Synchronize the WiFi profile with your camcorder and set up a security password for opening [AIR10 • Connect] application via Wi-Fi connection.( )Installing [AIR10 Connect]To connect to the camcorder and launch [AIR10 Connect] application via WiFi correctly, you have to install this program firstly. It is a perfect platform for you to watch live streaming video from your camcorder and use the camcorder as a webcam for your online video chatting. The application also facility the configuration of the WiFi profiles and your social website account information.Follow the steps below to install the [AIR10 Connect] on the computer. The program pack is bundled in thecamera and on the CD as backup.1. Connect the camcorder to your computer by using the supplied USB cable.Via CDInsert the 1. bundled CD into your computer’s CD-ROM drive. The autorun screen appears.Click on [ Install AIR10 Connect] to install the application.2.](https://usermanual.wiki/Dynabook/UPA3906WL/User-Guide-1655045-Page-42.png)
![43ENAfter making a USB connection, the program installs automatically, or the AutoPlay window appears. 3. (It may be different based on OS recognition. If the AutoPlay window does not appear. Please click [My Computer]-->[AIR10 Connect] to execute the installation of this program.Follow the on-screen instructions to complete the installation.4. The shortcut of AIR10 Connect shows on the desktop. (Or you can find the application at [Start]-->[All 5. Program].)The main screen appears automatically on the desktop.6. When the installation is completed, you can unplug the USB cable. 7. NoteIf ArcSoft MediaImpression is not installed, AIR10 Connect program will install the H.264 Codec • (ffdshow-a free software under GPL license) for viewing the videos correctly.To work correctly on the video chatting, you have to log out /quit from the Instant Message (IM) • application before the installation.During the installation, a warning message may pop out. Please click on [Continue Anyway]/ • [Yes] to go on the installation.AIR10 Connect is for Windows® based systems only.•](https://usermanual.wiki/Dynabook/UPA3906WL/User-Guide-1655045-Page-43.png)
![44ENUsing AIR10 Connect via WiFi Connection (Infrastructure Mode)Operation ScreenOn your camcorder:Press [Menu/OK] Button in the Record Mode. 1. The main menu will show on the screen. Use the Direction Button to select2. the [ WiFi ] icon and then press the [OK] Button. The screen shows the available AP list. Select the available access point (Network) 3. and connect to it. (Refer to page 36 for detailed instruction.)On your computer: (Make sure your computer is on the same wireless network.)Double click on the AIR10 Connect shortcut on the 4. desktop. (make sure the [AIR10 Connect] application is installed in your computer.)The camcorder connects to your computer and the [AIR10 5. Connect] main screen displays on your computer.**One task window may pop out to ask you to select your camcorder when there are two or more WiFi devices in the same wireless network range.](https://usermanual.wiki/Dynabook/UPA3906WL/User-Guide-1655045-Page-44.png)
![46ENVIDEO CHAT Use your camcorder as a wireless webcam for online video chatting(You have to select this device as your webcam on the camera/audio setting first.)*(On the camcorder)(*You have to select [Virtual Camera] as your webcam and [Virtual Audio Device] as your microphone for the online video chatting.) NoteACCOUNT SETUP and WiFi SETUP are not available during WiFi connecting.• For the WiFi connectivity working correctly, make sure the bundled AIR10 Connect (for • Windows® based systems only) is installed and the wireless LAN module of your computer is activated. Make sure your computer connects with your access point (AP) correctly and your camcorder • is in the same range of the WLAN.For the much more stable video streaming when using LIVE VIDEO or VIDEO CHAT, please • make sure the WiFi signal strength shows 2 bars () or above on the camcorder. To boost the WiFi signal strength, you can move the camcorder closer to your computer.• If the camcorder is far from your computer or the AP device, it may take longer to connect to • the network. ( The signal and the radio frequency may be interfered.)](https://usermanual.wiki/Dynabook/UPA3906WL/User-Guide-1655045-Page-46.png)
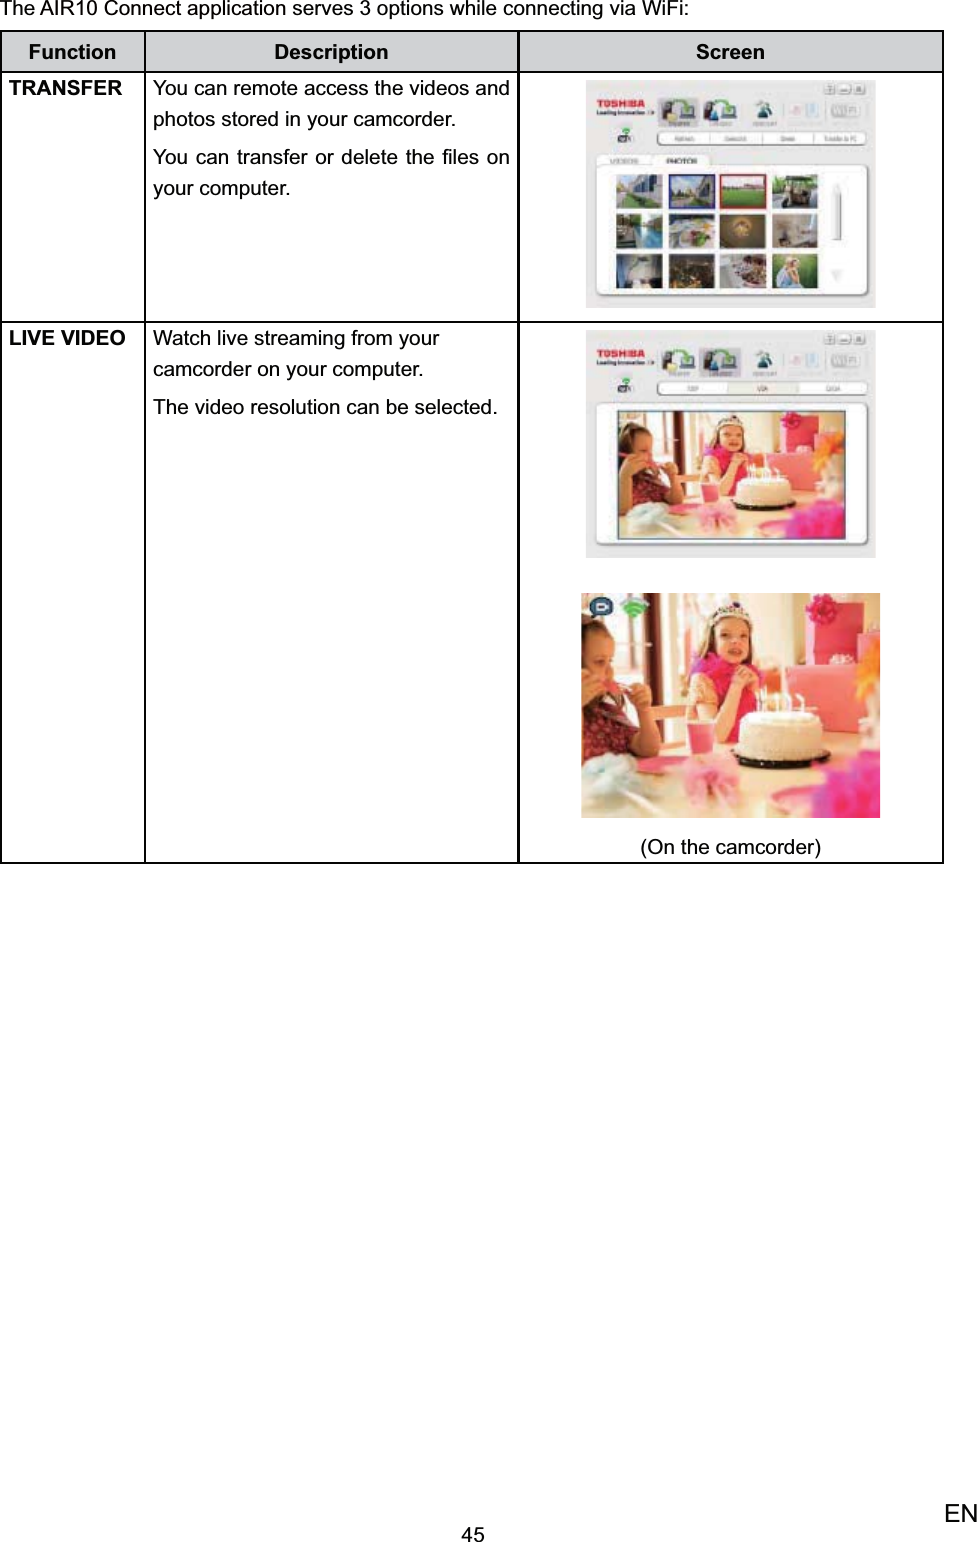
![47ENUsing AIR10 Connect via USB ConnectionConnect the camcorder to your computer by using the supplied USB cable.1. After making a USB connection, the main screen will appear. Or please click [AIR10 Connect] shortcut 2. on the desktop to execute the application. Or you can find it at [Start]-->[All Program].The AIR10 Connect application serves 3 options while connecting via USB:Function Description ScreenTRANSFER You can access the videos and photos stored in your camcorder and upload files to the social websites. UploadSelect the videos/photos on the 1. thumbnail screen. Click on [Upload].2. The website options appears.3. Select the website and check the 4. Username/Email and password of the specific social website in the fields.Click on [OK] to upload.5.](https://usermanual.wiki/Dynabook/UPA3906WL/User-Guide-1655045-Page-47.png)
![48ENACCOUNT SETUP Set up your social website account information and save to your camcorder.*Select the social website tab that 1. you want to configure. Enter your Username/Email and 2. password of the specific social website in the fields. (If you ever create more than one account informations on the same computer, you can select the account in the drop-down list. )Click on 3. [Save] to save this account information to your camcorder. You can delete the information by 4. clicking on [Remove].*For USTREAM setup, you may choose the channel. *You MUST set up your account information of the social websites on the computer by this [AIR10 Connect] application and save to the camcorder before uploading.](https://usermanual.wiki/Dynabook/UPA3906WL/User-Guide-1655045-Page-48.png)
![49ENWiFi SETUP WiFi ProfileSynchronize the WiFi profile of your computer with your camcorder. Click on 1. [Add to Camera] to add the WiFi profile of your computer to your camcorder.*Click on [Up]/[Down]/[Remove] to 2. sort the priority of the WiFi profiles on your camcorder.*Make sure your computer is equipped with a wireless LAN adapter and connects with your access point (AP) correctly; otherwise the SSID field will be blank.Camcorder SettingCreate a name for your camcorder or a security password for opening the [WiVideo] application.Create a password in the 1. [Password] field and type again in the [Confirm] field.Check on [Enable Security] to 2. enable it. Then, you will be asked to type the password before accessing [AIR10 Connect] application via WiFi connection next time. NoteLIVE VIDEO and VIDEO CHAT are not available during USB connecting.• Some • social websites may not be allowed to access in certain regions or networks. Your computer must have internet access to upload files to the website.• If you do not have a account, please sign up on the website first.• The social website update is the subject to change without notice. (e.g. password validation, • create a channel) Please visit the website first to update your account setting.](https://usermanual.wiki/Dynabook/UPA3906WL/User-Guide-1655045-Page-49.png)
![53ENSection 11 TroubleshootingTroubleshooting If the camcorder fails to function as expected, check the list of the common problems below. Problem/Situation Remediation/SolutionCannot turn on the camcorder. The power turns off suddenly.Power is off. Press the [Power Button] to turn on.• Battery pack is weak or dead. Recharge the battery pack.• The files on the memory card do not display smoothly when the LCD shows the “!” marking.The “!” means the SD card is low speed or contains corrupted • files. To solve this, format SD card using the camcorder instead of a computer. (Please refer to the detailed Format instruction in Section 5). The card has some problems and can not be recognized. Change • the card with another one.Or please change the SD/SDHC/SDXC card to a high speed • one.Cannot take video/photo. Memory is full. Delete some unnecessary videos/photos or insert • a new SD card.Power is off. Press the [Power Button] to turn on.• How do I charge battery? You must use the supplied AC charger or the USB cable.• The camcorder must be turned OFF.• A blinking light will indicate active charging and a solid light • indicates that charging is complete.In AC charging Mode, • the full charge time is about 4 hours and the light will turn itself off automatically after 3~5 minutes when the charging is completed. (Actual charging time may vary. It depends on the battery conditions.)The camcorder is freezes. Try to turn off the camcorder and remove the battery. Then, insert • the battery and turn on the camcorder again. The date imprinted on the photo is incorrect Set the date and time in SETUP menu.• Why do some of my indoor photos look blurry and dark?Poor lighting. Take photo in better lighting.• The camcorder extends photo exposure time under low light/ indoor • condition. Keep the camcorder (and the target subject) steady for several seconds when taking photos. Place the camcorder on a flat and steady surface, or use a tripod • when take photo.The color of the video/photo is not natural.Select the proper white balance option to match the light source.•](https://usermanual.wiki/Dynabook/UPA3906WL/User-Guide-1655045-Page-53.png)
![54ENAfter connecting the USB cable to the computer:[DV] indicates the internal memory of the camcorder.• [Removable Disk] indicates the external memory (SD/SDHC/• SDXC card installed in the camcorder).[AIR10 Connect] indicates the bundled program. If you want to • install this program, please double-click on it to start installation automatically.The LCD shows [CONNECTION FAILED] after pressing Internet/ WiFi Button.The password configuration does not match to the AP you want • to connect. The AP router or the computer is not turned on. Turn the AP router • or your computer on.The camcorder is not in the wireless network service area or weak • network signal. Please make sure the AP router is able to access the Internet.The camcorder does not support the type of encryption used on • the AP. This model only supports WEP/WPA/WPA2 personal type of encryption, but not up to enterprise level.Your network requires PPPoE account/password information.• Some AP routers do not allow you to connect to the network (e.g. • firewall).The AIR10 Connect application cannot be installed.Check the computer system is compatible.•](https://usermanual.wiki/Dynabook/UPA3906WL/User-Guide-1655045-Page-54.png)