E Lead Electronic 719TMC1 Rear Seat Entertainment 10.2 inch User Manual
E-Lead Electronic Co., Ltd Rear Seat Entertainment 10.2 inch
User manual
10.2’’ Roof-Mounted DVD Combo
User’s Manual

1
Introduction ................................................................................................... 2
Important Notice .......................................................................................... 2
Before Use ...................................................................................................... 3
Product Features ......................................................................................... 3
Optional Devices ......................................................................................... 4
Basic Functions
RSE Panel Button Functions. .............................................................................. 5
Remote Control Functions. ................................................................................. 7
IR Earphones Functions. ..................................................................................... 9
General Operations
DVD/VCD/MP3/CD............................................................................................ 10
Status Settings. ................................................................................................. 13
Monitor .............................................................................................................. 16
FM Transmitter .................................................................................................. 17
IR Transmitter .................................................................................................... 18
LED Button. ....................................................................................................... 19
Disc Playback
DVD/VCD Video Disc Playback. ....................................................................... 20
CD/MP3 Disc Playback. .................................................................................... 22
A/V Source ................................................................................................... 24
DLNA(Digital Living Network Alliance) ............................................ 25
MIRACAST Function ................................................................................ 32
USB Source ................................................................................................. 35
Specification ............................................................................................... 37
Supportable File Types for USB ........................................................................ 38
Turning off the machine. ................................................................................... 38
Glossary ........................................................................................................ 39
Basic Trouble Shooting .......................................................................... 41
Table of Contents

2
Introduction
Thank you for your Purchase!
Please read through this instruction manual thoroughly and carefully, in order
to properly operate this equipment. Please keep this instruction manual in a
safe place for further reference after reading.
Important Notice
•
To prevent the risk of traffic accidents and violation of traffic laws and
regulations, this equipment should not be installed within the driver's line of
sight.
•
It is illegal for passengers to view the screen in some countries or states. If
situated in such regions where these regulations apply, these regulations
must be complied with.
Note
- Please keep this instruction manual in an easily accessible storage area
for easy reference on operating procedures and notices.
- Please do not let the product get in contact with water.
-
Please close the screen before turning off the engine to ensure the
product's longevity.
-
If the product cannot operate normally, please contact the dealer or a
nearby service center.
-
Do not attempt to disassemble the machine yourself, in case of possible
danger or further malfunctions. The insurance does not cover this issue.
- Please do not use mobile phone while operating this product to prevent
the sound disturbance.

3
Please make sure that the items listed below are in the package. If there is
something missing, please contact the dealer where the product was bought.
Please read and understand the operation of this product before using, and
please follow this user’s manual instruction.
- Adopt 10.2” TFT-LCD monitor with monitor angle memory.
- Support three kinds of aspect ratios [FULL, WIDE (16:9), NORMAL (4:3)].
-
Allow CD-ROM of DVD, VCD, CD, CD-R, CD-RW and MP3 formats.
-
Allow automatic switching to NTSC/PAL system.
- AV input x 2 (AV1& AV2).
- Panel angle, 90 to 115 degree, is not affected by vibration.
-
Can be controlled by Remote Control.
-
Support USB 2.0
-
Support Miracast and DLNA.
-
IR earphones are optional.
Before Use
Product Features
4
Optional Devices
Note: Available in some vehicles.
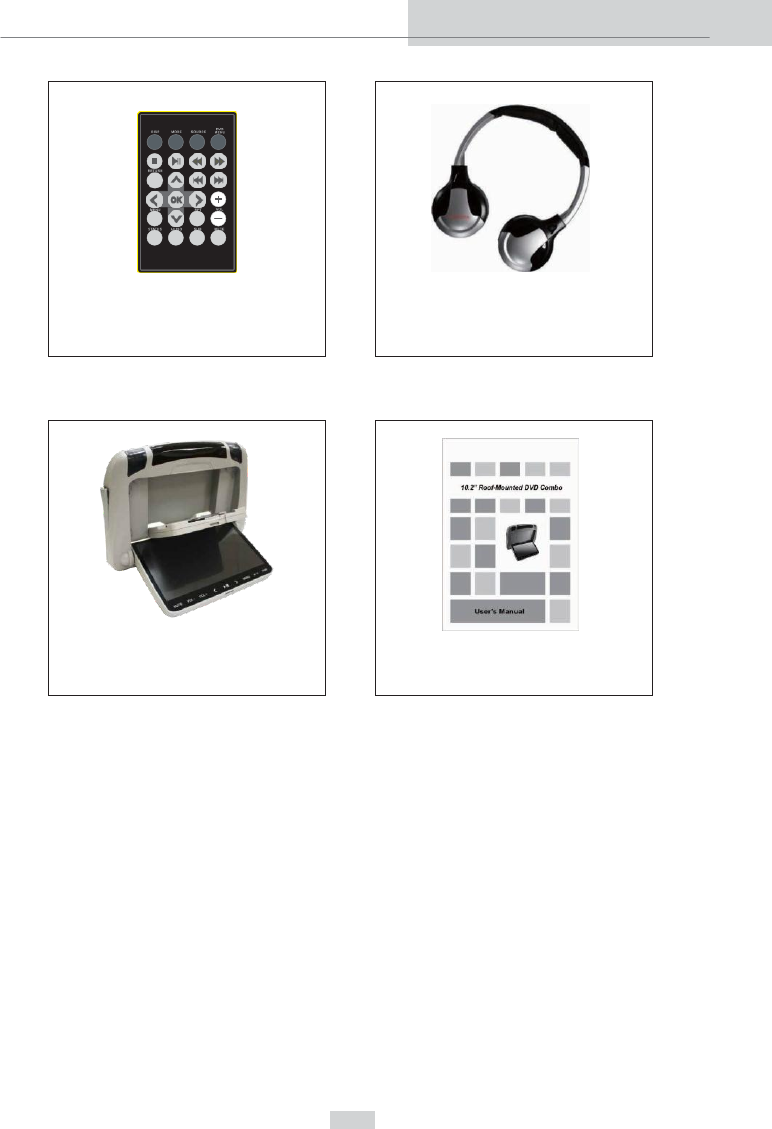
Remote Control
(With Battery)
IR Earphones
(With 2 AAA Battery)
DVD Player &
10.2" TFT LCD Panel
User’s Manual
5
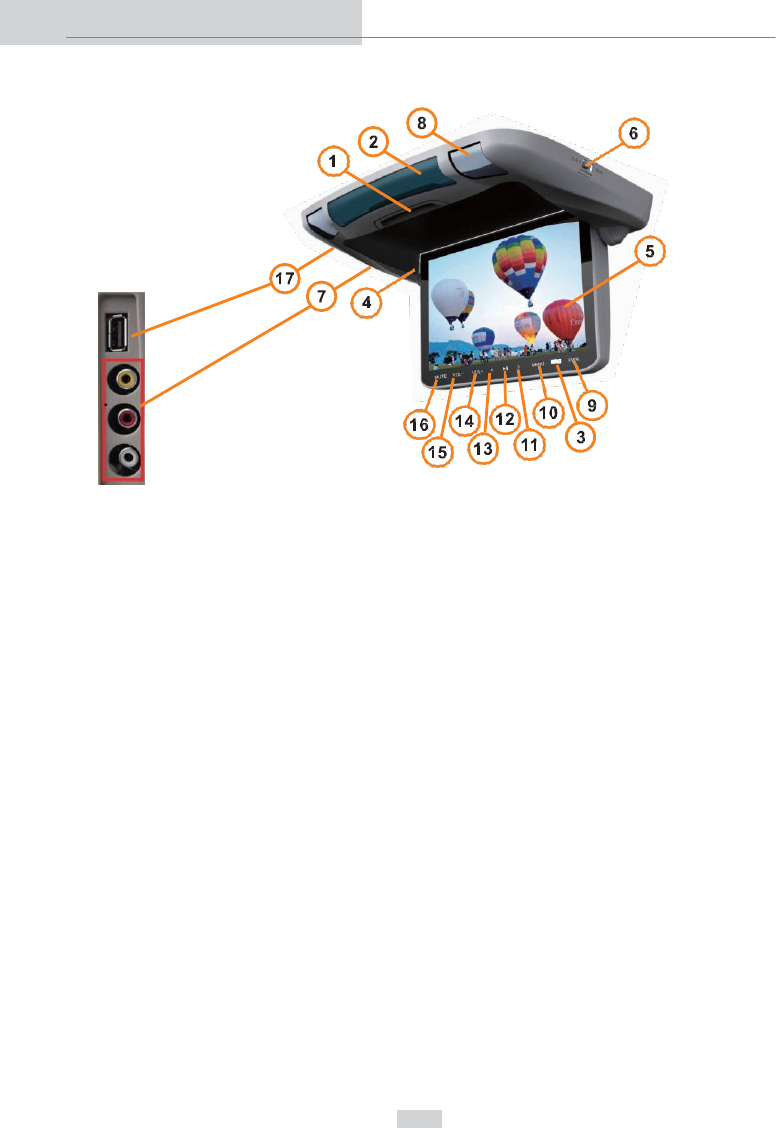
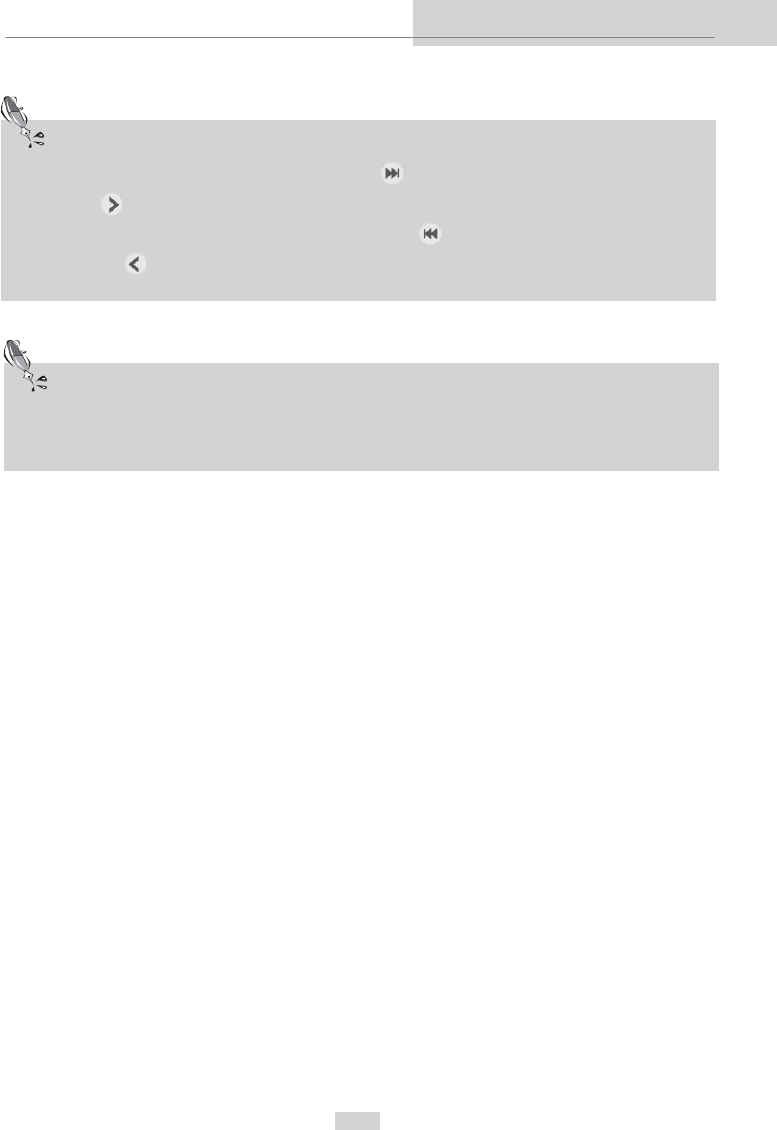
RSE Panel Button Functions
1. TFT & DVD disc tray release button: Press once to open the TFT monitor
(the monitor will automatically drop down), and press twice to open the disc
tray (pickup and place the disc in the tray).
2.
IR emitter and receiver: Use the IR emitter to transmit the sound to the IR
earphones and receive the signal from the remote control.
3.
SRC buttons (When press SRC button, media can be selected as following.)
(1)
DVD
(2)
AV1 video signal from DVD of main head unit.
(3)
AV2 video signal from any video player
(4)
Miracast / DLNA
(5)
USB
4.
TFT angle adjustment knob (Rotate it up to adjust the monitor towards users
and rotate it down to adjust monitor turning out from users.)
5. 10.2” TFT Panel
6.
Dome lamp switch: Switch to select to ON, DOOR or OFF.
7.
AV IN connects one external video and audio input.
8.
Average lifetime of LED lamp is 10,000 hrs.
9.
Power button (Press PWR button to turn ON or OFF the RSE.)
Basic Functions

6
Basic Functions
10. Menu Button (Press MENU to enter OSD setting.)
11. Next chapter button: (Press it: For OSD setting, press to move selection to
the right. For USB mode, press to skip to next section, song, video or
photo.)
12. Play / Pause button (Press it: For OSD setting, press to confirm, enter or
choose the selection. For USB mode, press the button to play or pause.)
13.
Previous button (Press it: For OSD setting, press to move selection to the
left. For USB mode, press twice to go back to previous section, song, video
or photo.)
14.
Volume Up (General function: increase the volume. In OSD setting mode,
move selection up.)
15.
Volume Down (General function: reduce the volume. In OSD setting mode,
move selection down.)
16.
Mute (Press to mute audio and press again to unmute.)
17.
USB Port
Note
•
Use only LED from original LED manufacturer. Other LED may overheat
causing damage due to melting.
7
Remote Control Functions
1.
DISP button (Use only for roof monitor with DVD.)
2.
MODE button (Press it to choose a source of multimedia such as DVD,
AV1, AV2, MIRACAST / DLNA or USB.)
3.
SOURCE button (Press it to choose a source of multimedia such as DVD,
AV1, AV2, MIRACAST / DLNA or USB respectively.)
4.
DVD Menu button (Press it to get into the DVD menu page. Use for roof
monitor with DVD only.)
5.
PLAY / PAUSE button (Press it to play or pause the video or audio, and
press it again to continue playing the video or audio. This function is similar
to other general entertainment products.)
6.
STOP button (Press it to stop playing video.)
7.
REWIND / FORWARD: Rewind/Fast forward playback.(x2, x4, x8, x16)
8.
PREVIOUS / NEXT button: Press to skip to previous or next file.
9.
Volume adjustment button: Press + or - to adjust the volume.
Basic Functions

8
Basic Functions
10.
MUTE button (Press to mute audio and press again to unmute.)
11.
RETURN button (Press to return the file or folder.)
12. Orientation button: Press to move up, down, left, right or OK (in the center)
on the screen.
13.
MENU button (Press it to enter OSD setting.)
14.
STATUS button (Press it to enter DISC playback setting. It is used only for
roof monitor with DVD.)
15.
AUDIO button (Press it to change the language of DVD. It is used only for
roof monitor with DVD.)
16.
SUB button (Press it to change subtitle of DVD. It is used only for roof
monitor with DVD.)
17.
RPT button (Press it to repeat.)
Note
•
While using this products, these buttons on the panel ( </> / VOL + /
VOL-/ ►) will operate as the orientation button and OK button on the
remote control.
9
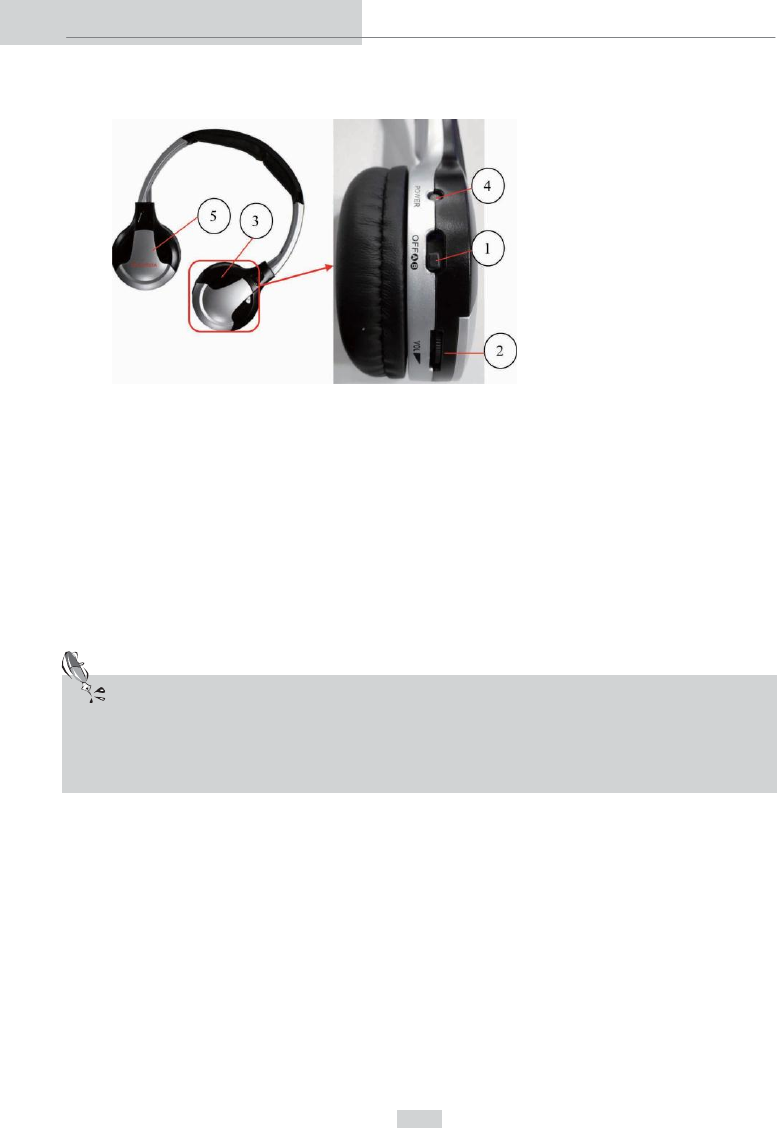
How to Operate IR Earphones
IR Earphones Functions
1. POWER:
-
Switch to OFF to turn the earphones off.
-
Switch to A to output one-sided sound only.
-
Switch to B to output both sides sound.
2. VOLUME:
-
Adjust the knob for volume control.
3.
IR sound receiver.
4.
Power LED indicator.
- Indicate the status of the earphones.
5.
Battery cover: Needs 2 AAA batteries.
Basic Functions
Caution
•
Do not cover this part with hands or other objects. Otherwise, it will affect
the sound quality.
10
General Operations
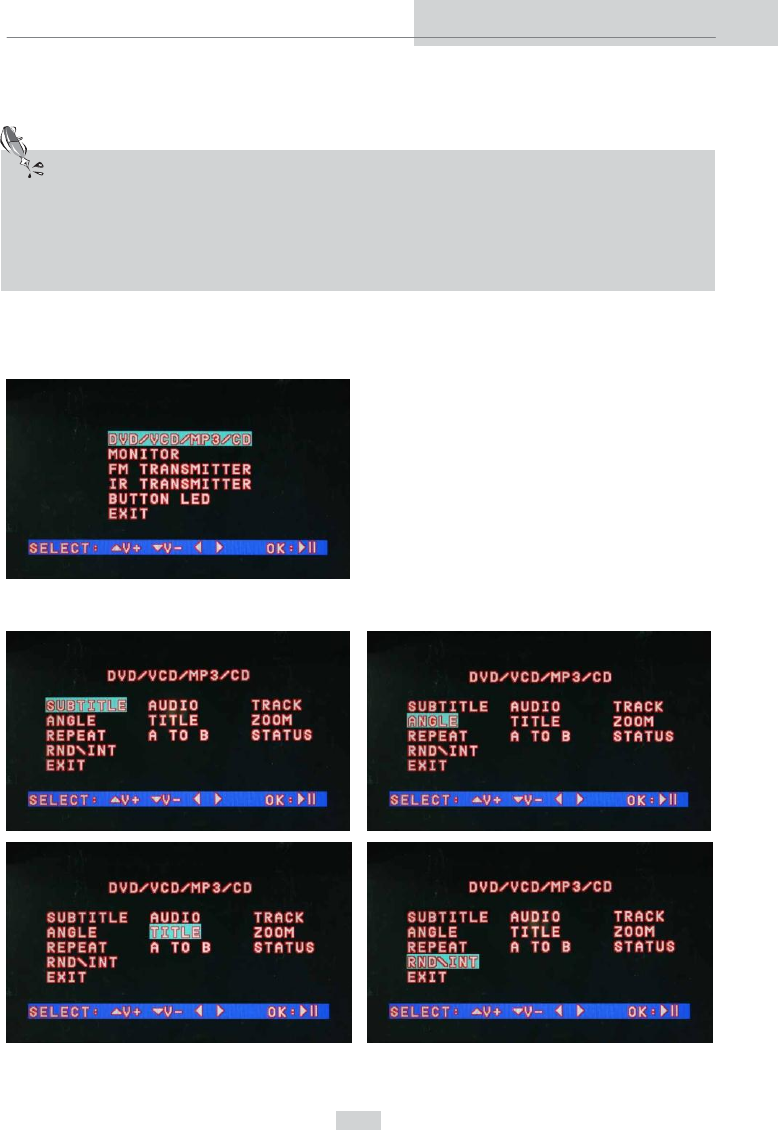
DVD/VCD/MP3/CD
-
Press MENU to open OSD setting.
-
Select DVD/VCD/MP3/CD.
-
There are items can be changed while playing the disc.
Caution
•
This should be operated under DVD/VCD/MP3/CD mode.
•
Some functions settings are operative in particular circumstance depends
on the disc standards.

11
By selecting AUDIO, sound tracks can be changed.
-
Tracks can be selected by entering the numbers, shown as below.
-
Select ZOOM to enlarge the screen while playing the disc.
General Operations
12
General Operations
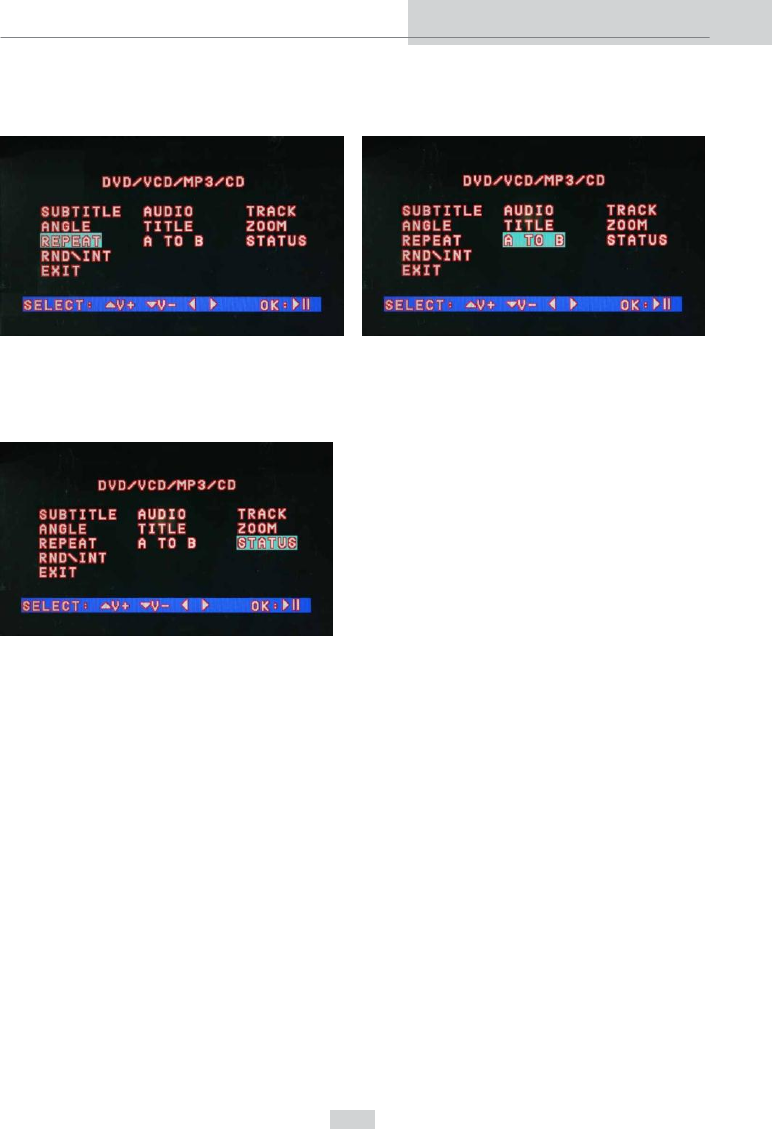
- Select REPEAT mode A to B mode to make repeating of the tracks.
- Select STATUS, setting interface will be shown.
13
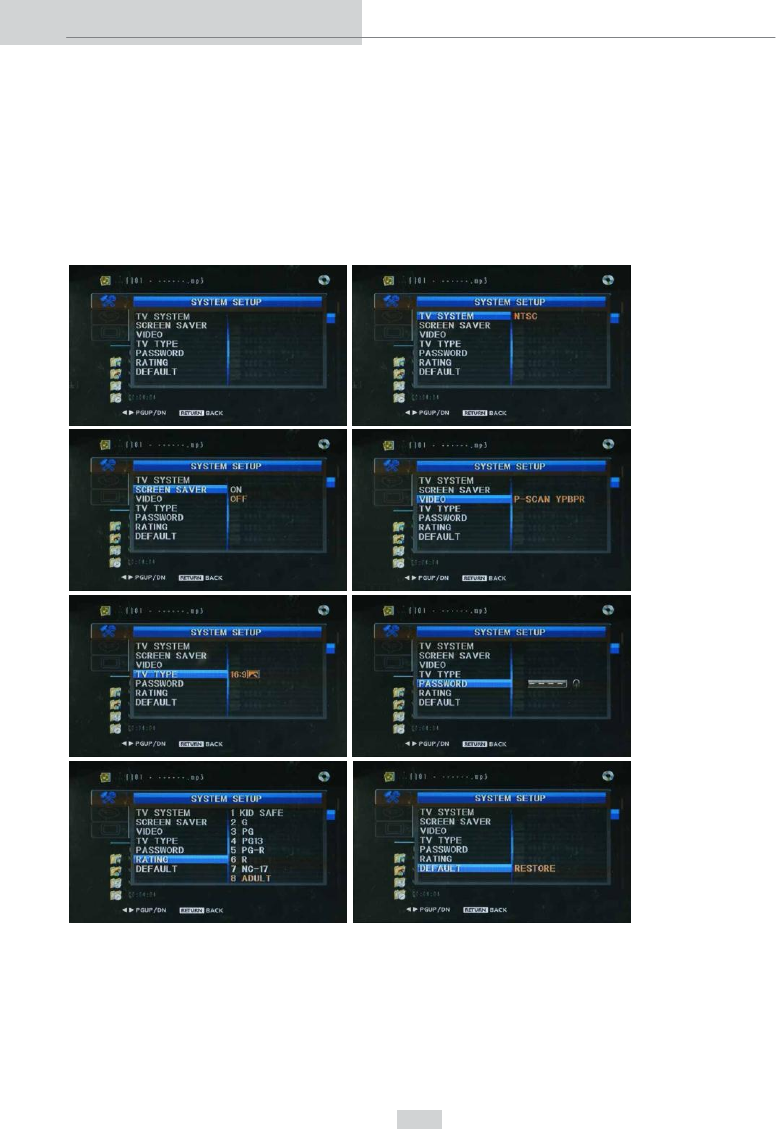
Status Settings
To run this setting, it must be operated under disc mode.
Press STATUS on the remote control to enter setting sections, system setup,
language setup, or video setup.
1.
System setup
Select SYSTEM SETUP and press OK. After entering the mode, there are
seven options on the screen, TV system, screen saver, video, TV type,
password, rating and default. You can choose the sections you would like to
modify.
General Operations
14
General Operations
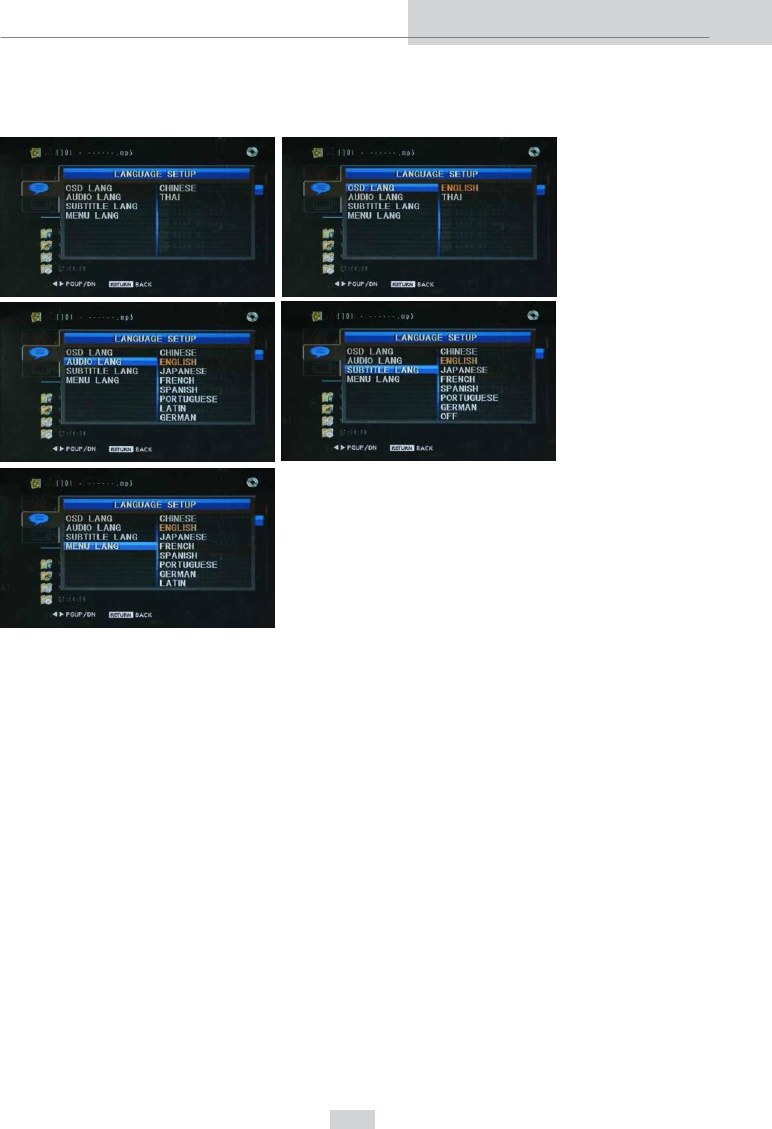
2.
Language Setup
Move downward and select LANGUAGE SETUP on the screen. In language
setup, there are four options, OSD language, audio language, subtitle language
and menu language.
15
3.
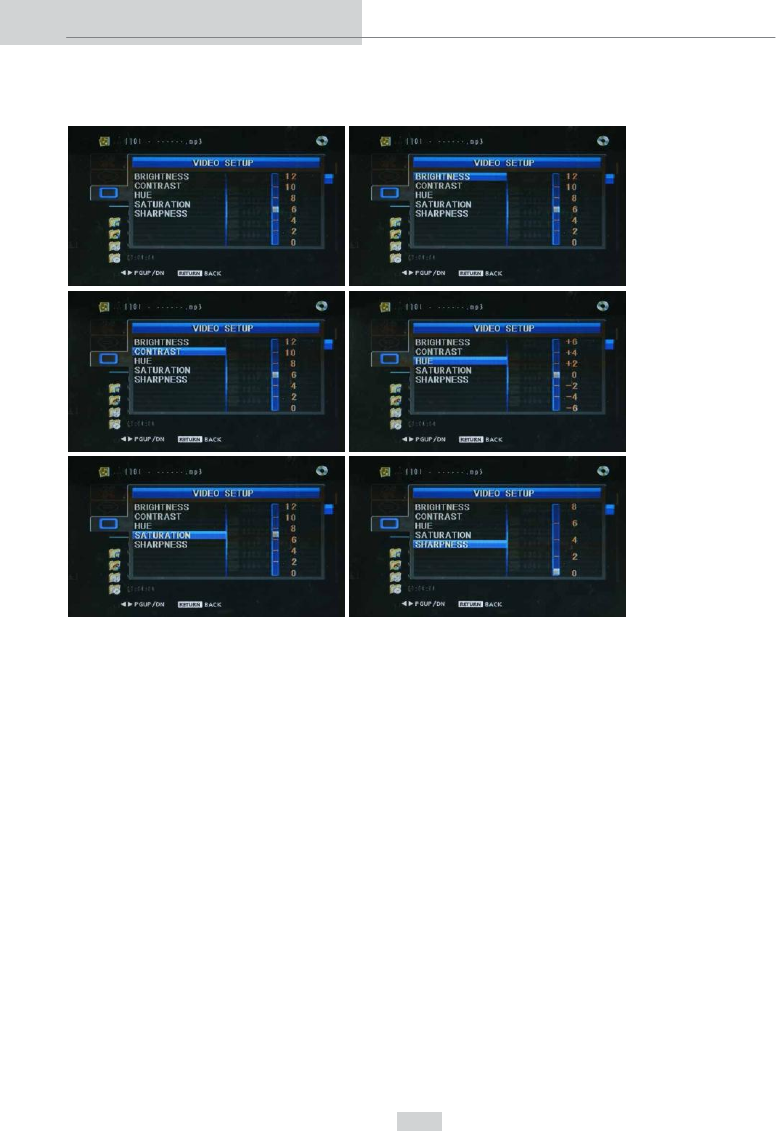
Video Setup
Move downward and select VIDEO SETUP on the screen. In video setup, you
can adjust brightness, contrast, hue, saturation and sharpness.
General Operations
16
General Operations
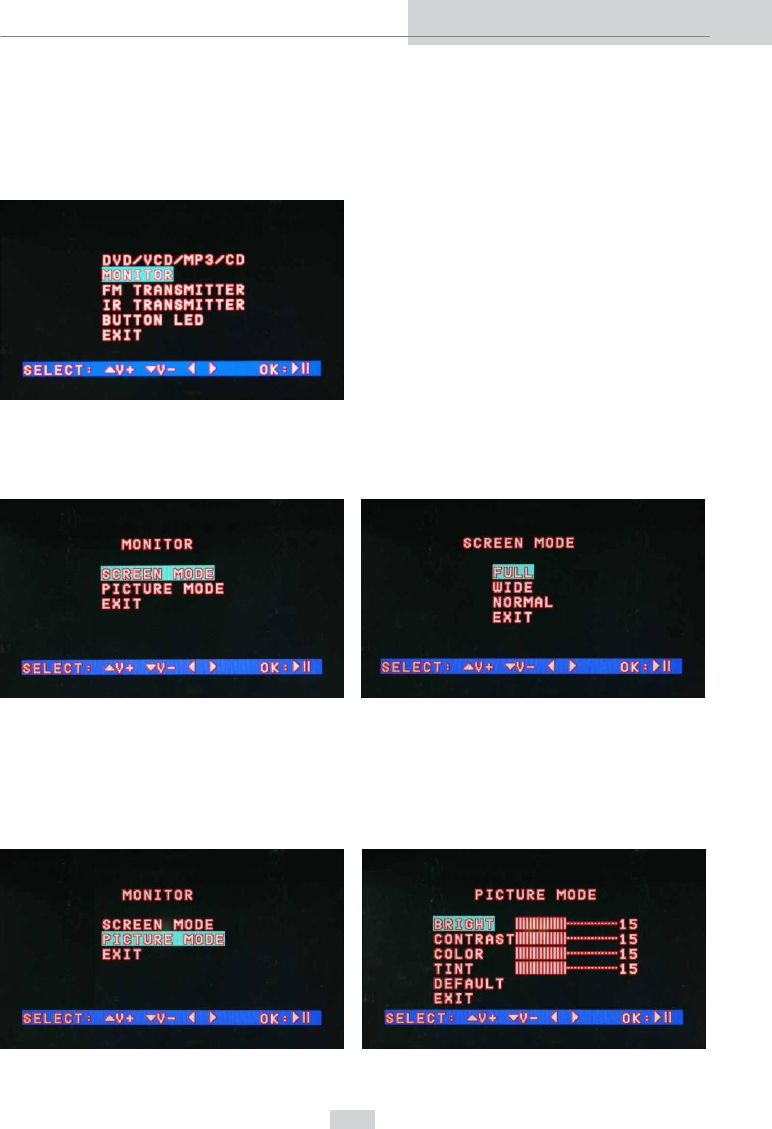
MONITOR
-
Press MENU to open OSD setting menu.
-
Select MONITOR .
1.
Screen Mode
- Press the SCREEN MODE to display the screen modes: full, wide and
normal.
- Choose EXIT to Exit.
2.
Picture Mode
-
Press PICTURE MODE to display picture modes; brightness, contrast,
color, tint and default.
-
Choose EXIT to Exit.
17
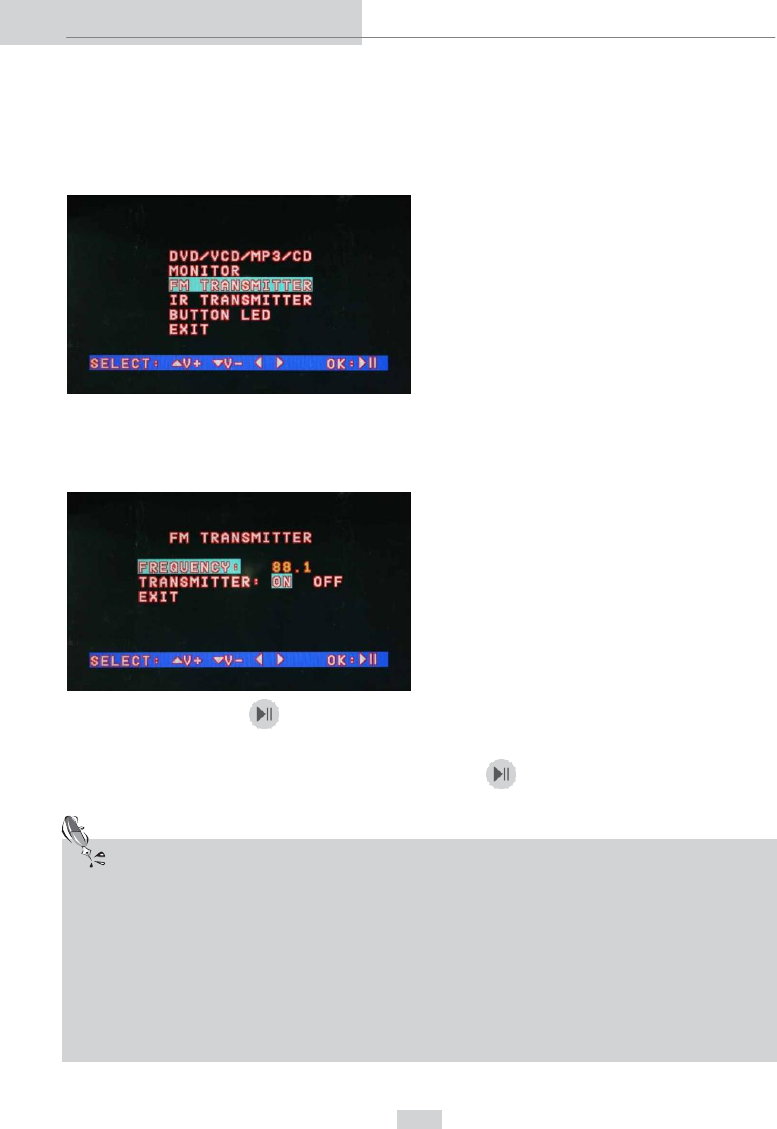
FM TRANSMITTER
-
Press MENU to open OSD setting menu.
-
Select FM TRANSMITTER option.
-
Select "FREQUENCY" to set the channel that you would like to interact
with the main head unit by using navigation arrows on the panel or on the
remote control.
-
Press “OK” or “ play/pause” on the panel to confirm.
- Select “ON” of Transmitter option to turn this function on.
- Select “OK” on the remote control or use “ play/pause” on RSE panel.
- Choose EXIT to exit.
Note
•
If users must transmit the audio from the roof-mounted monitor, use FM
Transmitter to transmit the signal to the front car radio device.
•
Normally, while playing media files via FM transmitter function, sound
quality is equivalent to the radio.
•
If the environmental FM frequency is too strong, the signal could be
interfered.
General Operations
18
General Operations
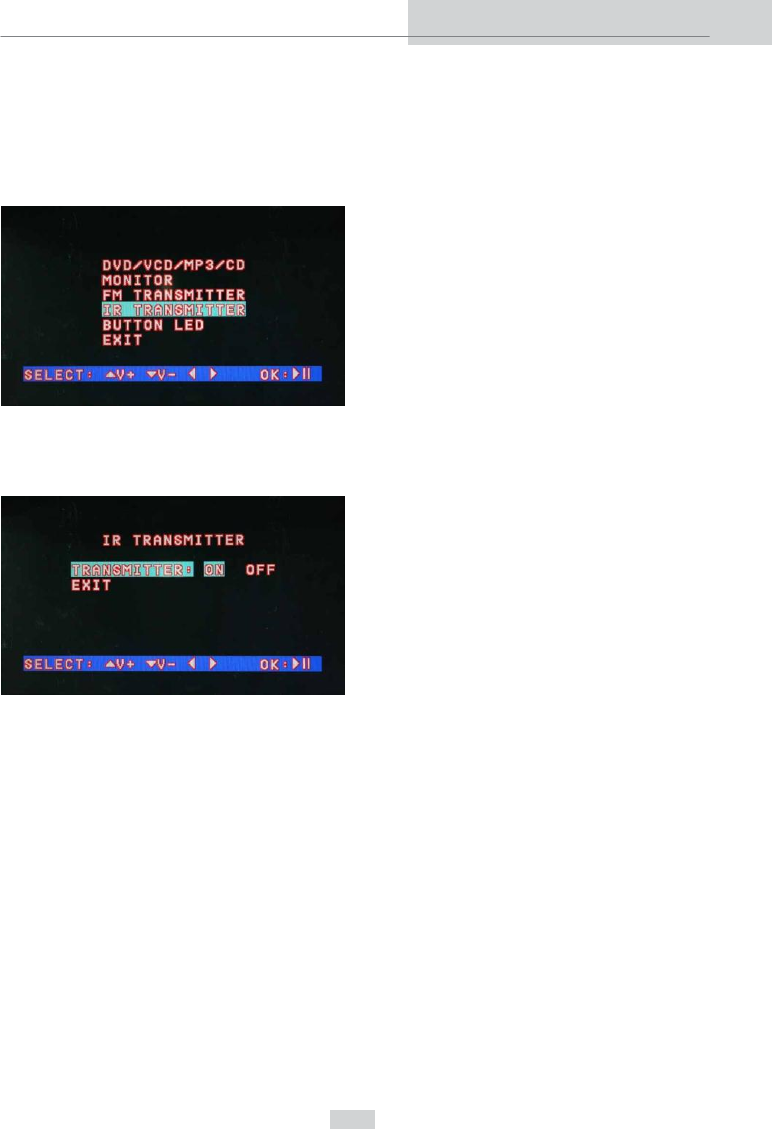
IR TRANSMITTER
-
Press MENU to open OSD setting menu.
-
Select IR TRANSMITTER.
-
Select "ON" of Transmitter option to transmit the sound to the IR
earphones.
- Select “OK” on the remote control or press “play/pause” on RSE panel.
-
Choose EXIT to exit.
19
LED BUTTON
-
Press MENU to open OSD setting menu.
-
Select “BUTTON LED”
-
Select setting
AUTO: LED will be automatically on. It will be automatically off within 10
seconds
ON: LED will be always on.
OFF: LED will be always off.
- Select “OK” on the remote control or use “play/pause” on RSE panel.
- Choose EXIT to exit.
General Operations
Note
•
Default setting of LED is ON.

20
Disc Playback
DVD/VCD Video Disc Playback
Turn the monitor on (ACC ON) and press the SRC or MODE button on the
panel to go to DVD/VCD mode, or users press SOURCE or MODE button on
the remote control.
Basic Operations of DVD/VCD Video Discs
1. Press DVD MENU on the remote control to select the required menu
options. If the DVD/VCD has a menu, the menu will be displayed.
2. Press MENU → DVD/VCD/MP3/CD → TRACK to select the chapters by
entering the numbers directly.
3.
Pause the DVD/VCD Video Disc Playback
The pause function enables you to pause while the disc is playing.
• When
the
DVD/VCD
disc
is
playing,
press
►
║
on
the
panel
or
remote
control. The playback on the screen will be paused.
•
T
o
retrieve
playback,
press
►
║
again
on
the
panel
or
remote control, it
will
return to the playback.
4. To fast forward or fast rewind, press and hold the ►► or ◄◄ on the remote
control.
•
If you press the ►► or ◄◄, ►► X2 or ◄◄ X2 will show on the upper left
screen. It means that the fast forward or fast rewind is at 2X speed.
•
Press again on ►► or ◄◄. ►► X4 or ◄◄ X4 will show on upper left
screen. It means that the fast forward or fast rewind is at 4X speed.
•
Press ►► or ◄◄ for the third time, ►► X8 or ◄◄ X8 will show on upper
left screen. It means that the fast forward or fast rewind is at 8X speed.
•
Press ►► or ◄◄ for the fourth time, ►►X16 or ◄◄ X16 will show on
upper left screen. It means that the fast forward or fast rewind speed is at
16X speed. (The fastest speed)
5.
To enter or return
the
other
chapters,
press
►►
│
or
│
◄◄
on
the remote
control or press
>
or
<
on
the
panel.
Press
►►
│
to
skip
to the starting
place
of next
chapter.
Then,
press
│
◄◄
to turn to the starting
place
of current
chapter. Press again to skip to the previous chapter.

21
6. To stop playing, press ■ on the remote control.
•
If you press ■ to stop DVD/VCD playback, the stop scene on the screen
will be memorized. ►■ will be shown on upper left screen. When you play
the disc next time, you may play from the scene that you stopped last time.
•
T
o
retrieve
playback,
press
►
║
.
•
To clear the memory, press ■ again. ■ will be shown on upper left screen.
•
T
o
play
from the
beginning,
press
►
║
.
Disc Playback
Note
•
The ways for the menu display differ from disc to disc. Please refer to
additional description on discs for more details.
22
Disc Playback
CD/MP3 Disc Playback
Turn the monitor on (ACC ON) and press the MODE or SRC button on the
panel to go to CD/ MP3 mode, or users press MODE or SOURCE button on
the remote control.
Basic Operations of CD/MP3 Video Discs
1. Press MENU → DVD/VCD/MP3/CD → TRACK to select the tracks by
entering the numbers directly.
2.
Pause the CD/MP3 Video Disc Playback
The pause function enables you to pause while the disc is playing.
• When
the CD/MP3
disc
is
playing,
press
►
║
on
the
panel
or
remote control.
The playback on the screen will be paused.
•
T
o
retrieve
playback,
press
►
║
again
on
the
panel
or
remote control, it
will
return to the playback.
3. To fast forward or fast rewind, press and hold the ►► or ◄◄ on the remote
control.
•
If you press the ►► or ◄◄, ►► X2 or ◄◄X2 will show on the upper left
screen. It means that the fast forward or fast rewind is at 2X speed.
•
Press again on ►► or ◄◄. ►► X4 or ◄◄ X4 will show on upper left
screen. It means that the fast forward or fast rewind is at 4X speed.
•
Press ►► or ◄◄ for the third time, ►► X8 or ◄◄ X8 will show on upper
left screen. It means that the fast forward or fast rewind is at 8X speed.
•
Press ►► or ◄◄ for the fourth time, ►►X16 or ◄◄X16 will show on upper
left screen. It means that the fast forward or fast rewind speed is at 16X
speed. (The fastest speed)

23
4. T
o
enter
or
return
the
other
track,
press
►►
│
or
│
◄◄
on
the remote
control
and press > or < on the panel.
•
Press
►►
│
to
skip
to the starting
place
of next track. Then,
press
│
◄◄
to
turn to the starting place of current track. Press again to skip to the
previous track.
5. To stop playing, press ■ on remote control.
•
If you press ■ to stop CD/MP3 playback, the stop playback will be
memorized. ►■ will be shown on upper left screen. When you play the disc
next time, you may play from the playback that you stopped last time.
•
T
o
retrieve
playback,
press
►
║
.
•
To clear the memory, press ■ again. ■ will be shown on upper left screen.
•
T
o
play
from the
beginning,
press
►
║
.
Disc Playback
Note
•
The ways for the menu display differ from disc to disc. Please refer to
additional description on discs for more details.

24
A/V Source
1.
Enter A/V mode (AV1 & AV2) by SRC button on the panel
-
Press SRC button until AV1 or AV2 shows on the screen.
2.
Enter A/V mode (AV1 & AV2) by SOURCE button on the remote control
-
Press SOURCE button until AV1 or AV2 shows on the screen.
3.
Enter A/V mode (AV1 & AV2) by MODE button on the panel or on the remote
control
-
Press “MODE”
-
Select AV1 or AV2
Note
•
AV1: The connection of audio and video from main unit via connector.
AV2: The connection of audio and video from main unit via port of the roof
monitor.
•
NTSC/PAL are supportable on A/V source.
25
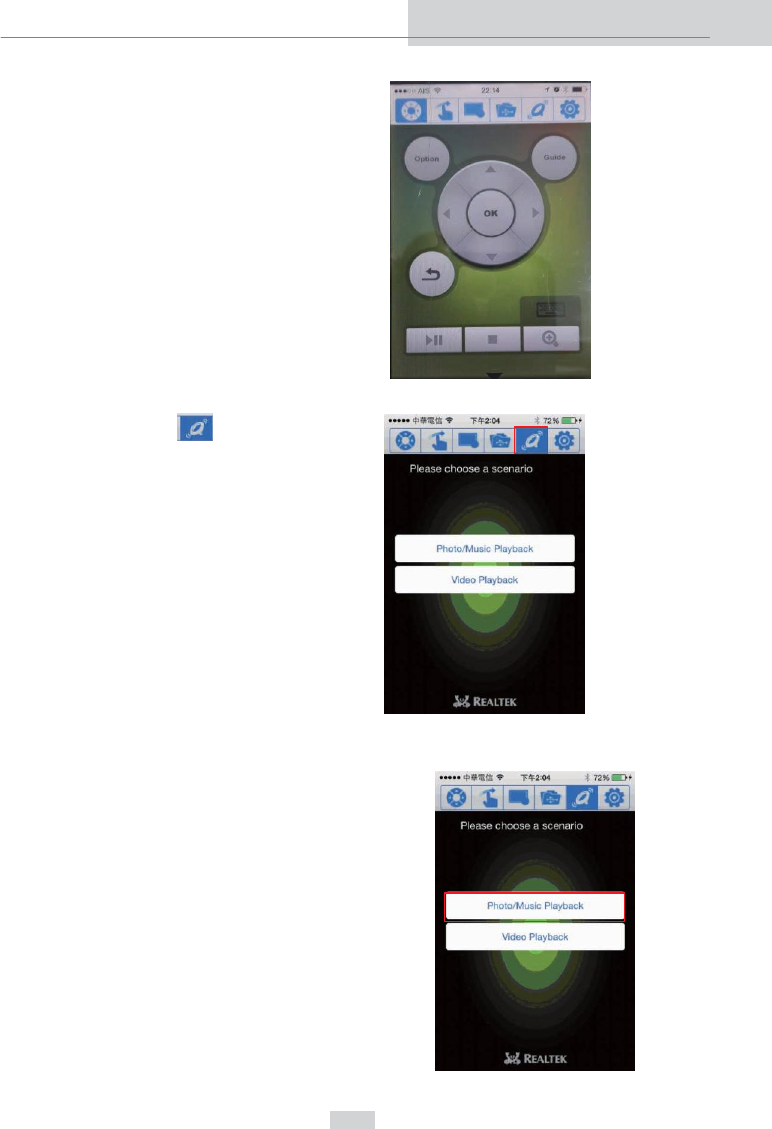
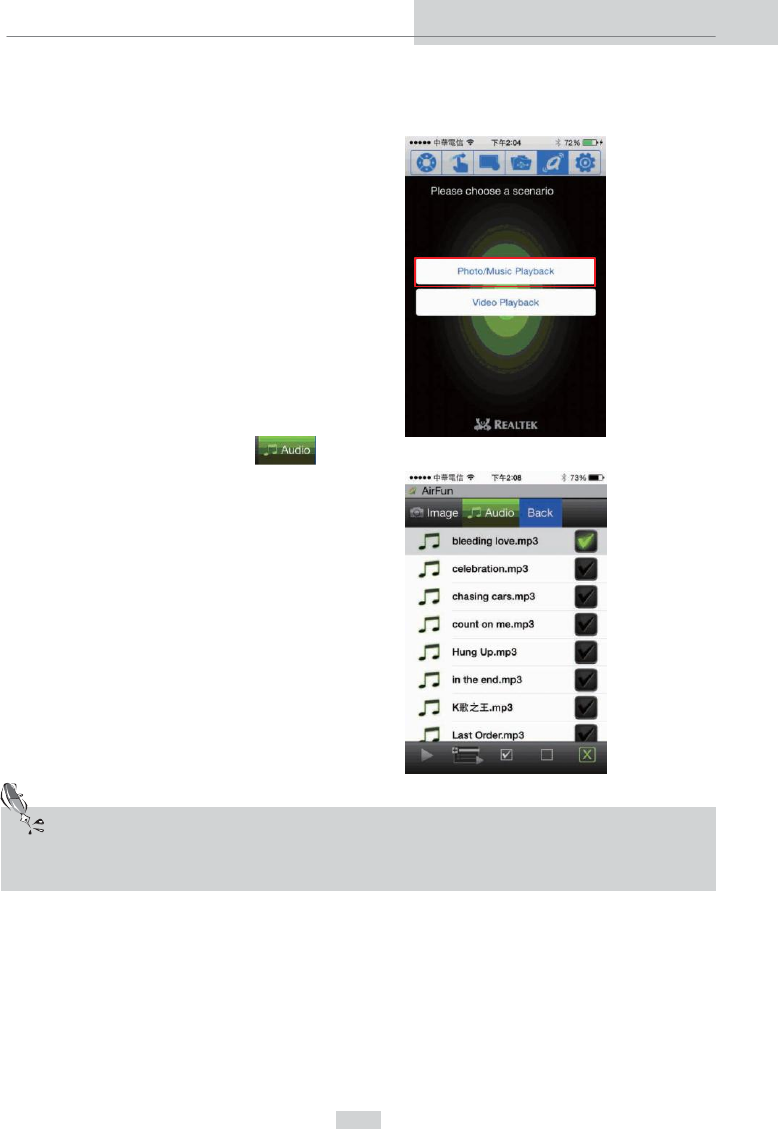
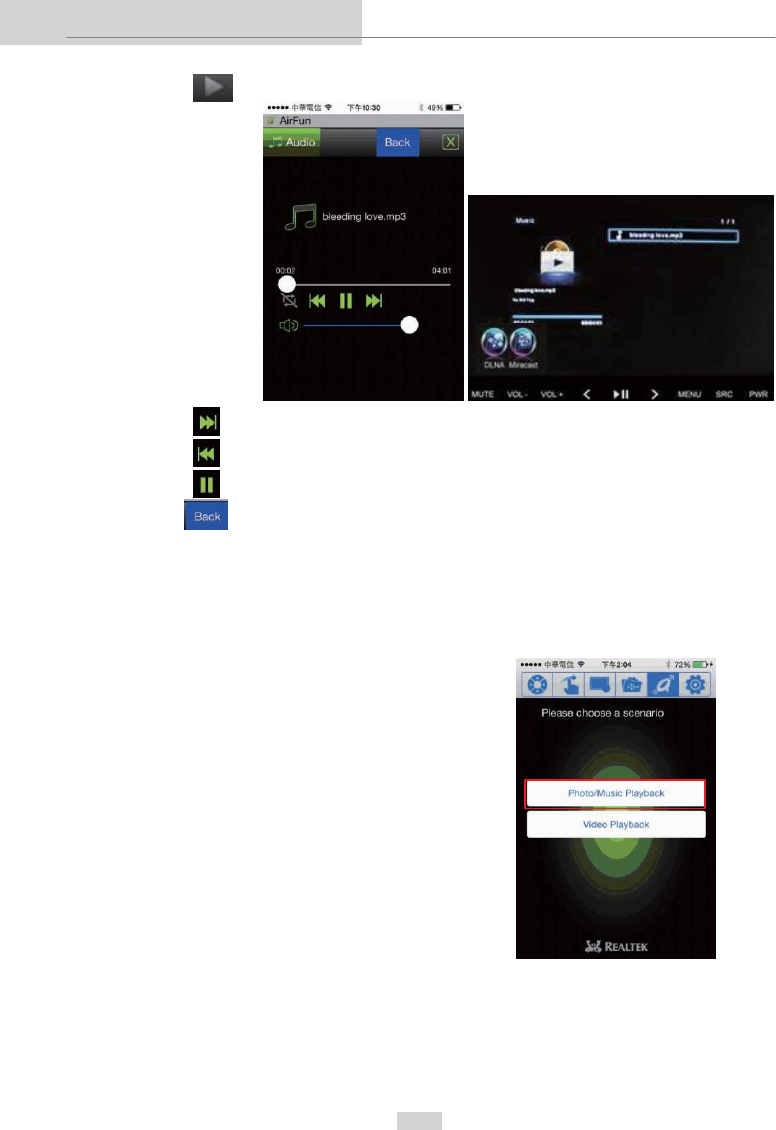
DLNA (Digital Living Network Alliance) Function
Prior to using DLNA function on the 10.2" Roof-Mounted Monitor, please install
APP(Airfun) to your mobile phone first.
Attention : For APP installation, please refer to user's manual of mobile phone.
1.
Enter DLNA by SRC button on the panel.
1.1 Press “SRC” until DLNA/ Miracast show on the monitor.
2.
Enter DLNA by MODE button on the remote control.
2.1
Press Mode on the remote control.
2.2
Select DLNA/Miracast.
3.
Enter DLNA by SOURCE button on the remote control.
3.1 Select the channel until DLNA/ Miracast show on the screen.
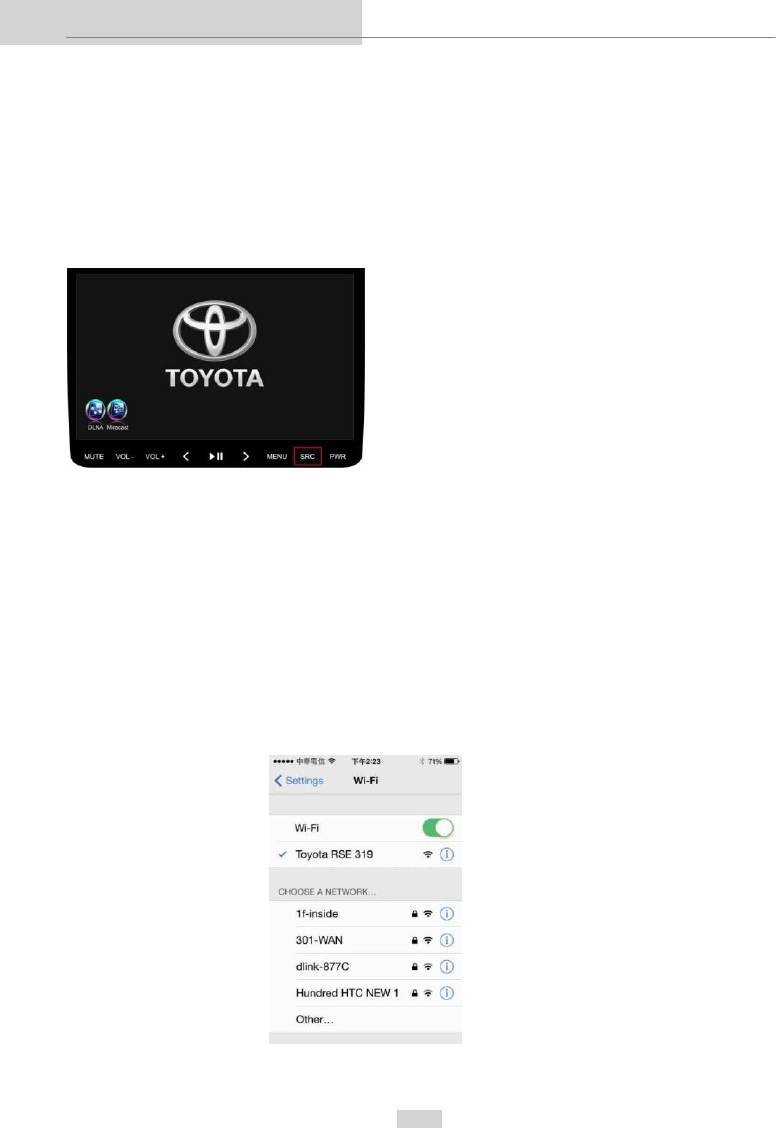
4. Turn “Wi-Fi” on your mobile phone and it is connected with 10.2"
Roof-Mounted Monitor. Make sure the 10.2" Roof-Mounted Monitor has
already connected successfully. Wifi name will be Toyota RSE XXX.
DLNA
26
DLNA
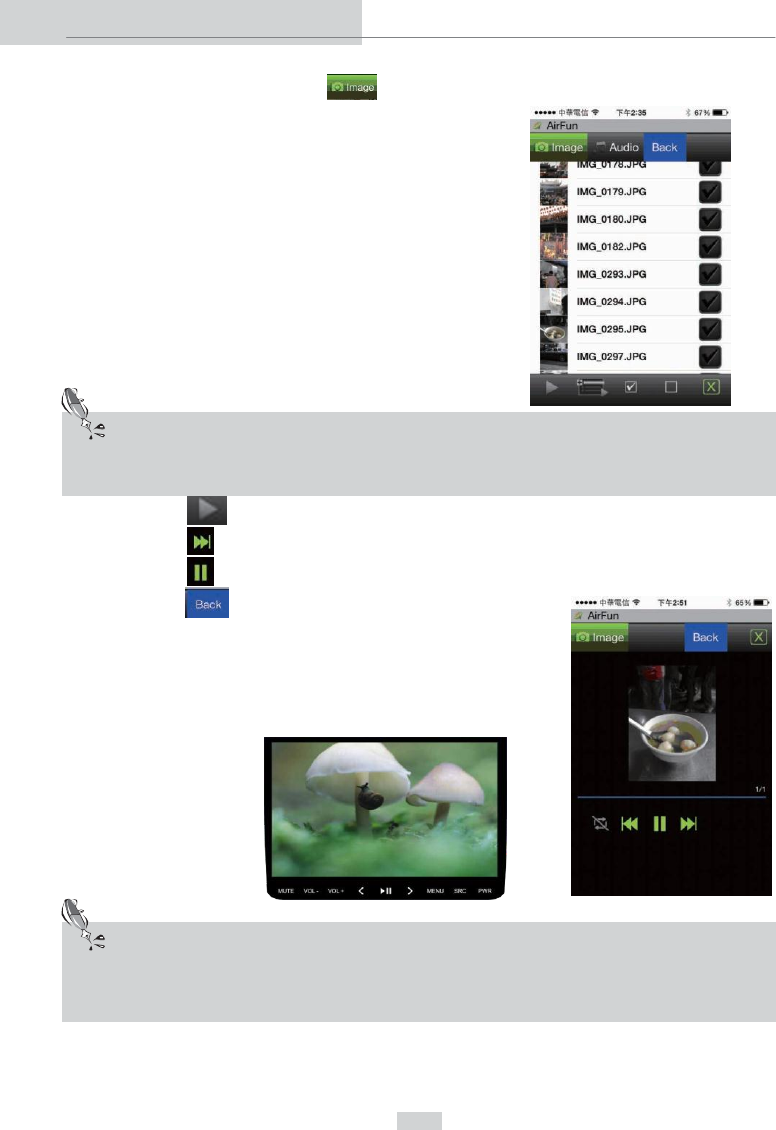
5. Open Airfun on mobile as below photo.
6. Select the icon as below photo.
7.
Picture playback in DLNA
7.1 Choose Photo/Music/Playback on mobile.
27
7.2 Select photo display mode and select the photo you want to show
7.3 Press to play the photo on the screen as the slide show.
7.4 Press on mobile for the next photo immediately.
7.5 Press on mobile to pause photo slide show.
7.6 Press on mobile to back to the former layer.
Note
•
When slideshow runs and reaches the last photo, it will be back to the
former layer.
DLNA
on the monitor screen.
Note
•
You can select more than 1 photo(s) to show on the roof monitor.
28
DLNA
8.
Audio Playback for DLNA Mode
8.1 Select Photo/Music playback option on the mobile phone.
8.2 Select Audio option and select the song you want.
Note
•
You can select more than 1 music file(s) to play.
29
8.3
Press on Screen to play the song.
8.4
Press on mobile for next song.
8.5 Press on mobile for previous song.
8.6 Press on mobile to pause the song.
8.8 Press on mobile to back to music former layer.
9.
Video Playback in DLNA mode
9.1
Select Video playback option on the mobile phone and select video you
want to show on the roof monitor screen.
DLNA

30
DLNA
9.2
Press to auto play on the roof monitor screen. (slide show)
9.3
Press on Screen to play video.
9.4
Press on mobile for next video.
9.5
Press on mobile for previous video.
9.6
Press on mobile to pause video.
9.7
Press on mobile to back to video former layer.
Note
•
You can select more than 1 video file(s) to play.

31
Note
-
The current demonstration is using an iOS phone, please note that the
iOS phones and Android phones are different in operation interfaces.
Moreover, the name of the device will not be the same, according to the
model of the roof monitor.
-
The connection quality depends on Wifi signal stability.
-
Only mobile phones with Android version 4.2 or above are supported
DLNA function
-
Only mobile phones with iOS version 6 or above are supported DLNA
function
-
The roof monitor can connect only 1 mobile via Wifi. In case, you want to
connect roof monitor with another device. Please stop connection of the
current using phone with the roof monitor firstly.
DLNA
32
Miracast
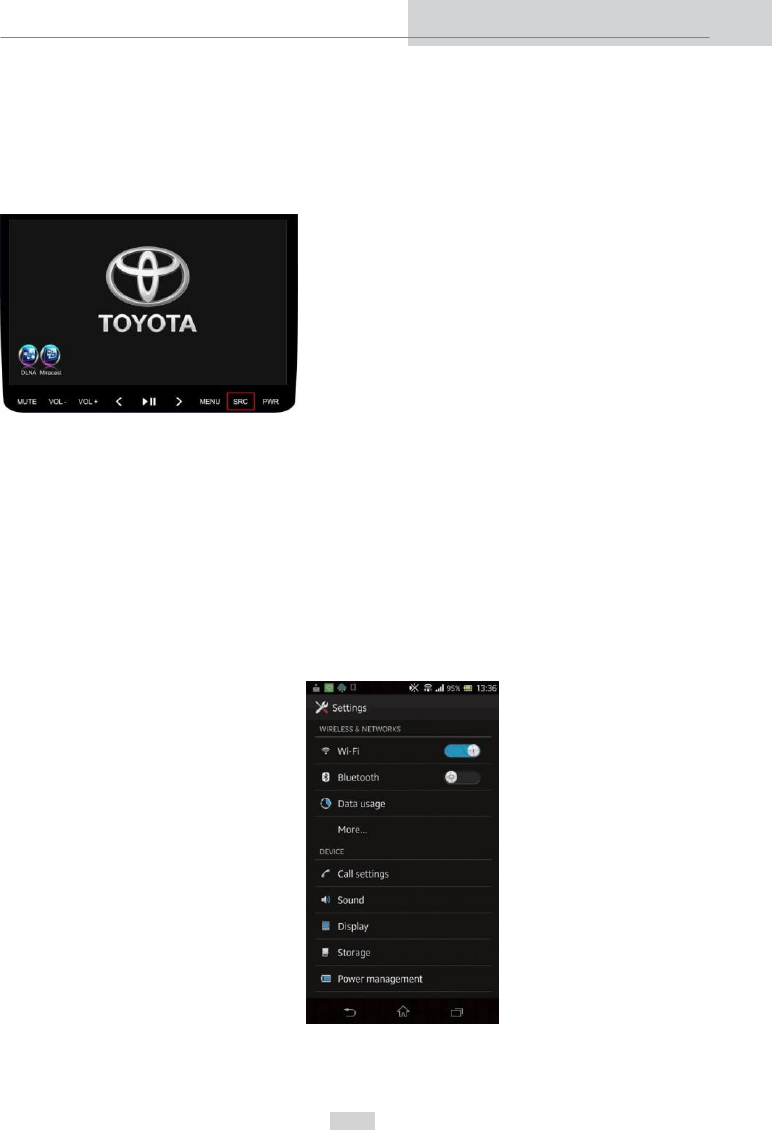
Miracast Function
1.
Enter Miracast by “SRC” button on the panel.
1.1 Press “SRC” button until DLNA/ Miracast show on the screen.
2.
Enter Miracast by “MODE” button on the remote control
2.1
Press the button to select the channel until DLNA/ Miracast show on the
screen.
3.
Enter Miracast by SOURCE button on the remote control
3.1
Press the button to select the channel until DLNA/ Miracast show on the
screen.
4.
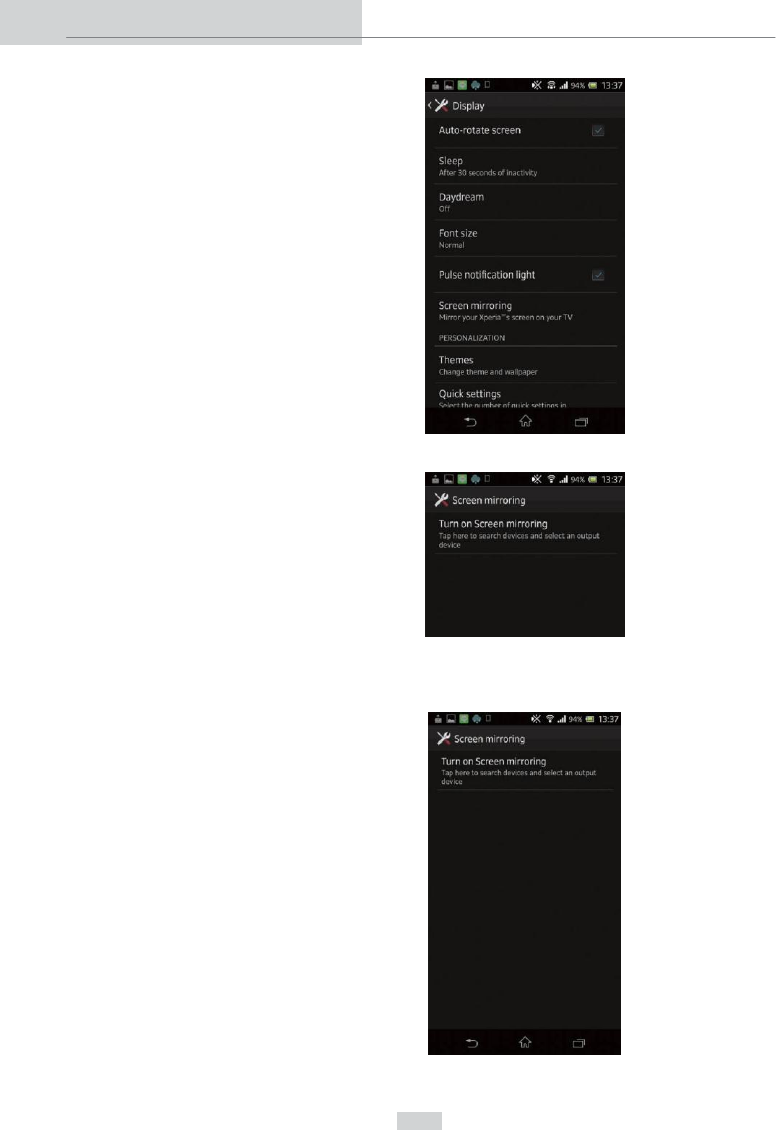
Go to Settings on phone.
4.1
Select Display.
33
4.2
Select Screen mirroring.
4.3
Open “Screen mirroring” on mobile to connect roof monitor “Toyota RSE
XXX”.
4.4
Select Screen mirroring function to turn on Screen mirroring function.
This is to connect with roof monitor, TOYOTA RSE XXX.
Miracast
34
Miracast
(The current demonstration is using an Sony Xperia ZL. The phones are
different in operation interfaces. Please read and understand it from your
mobile manual.)
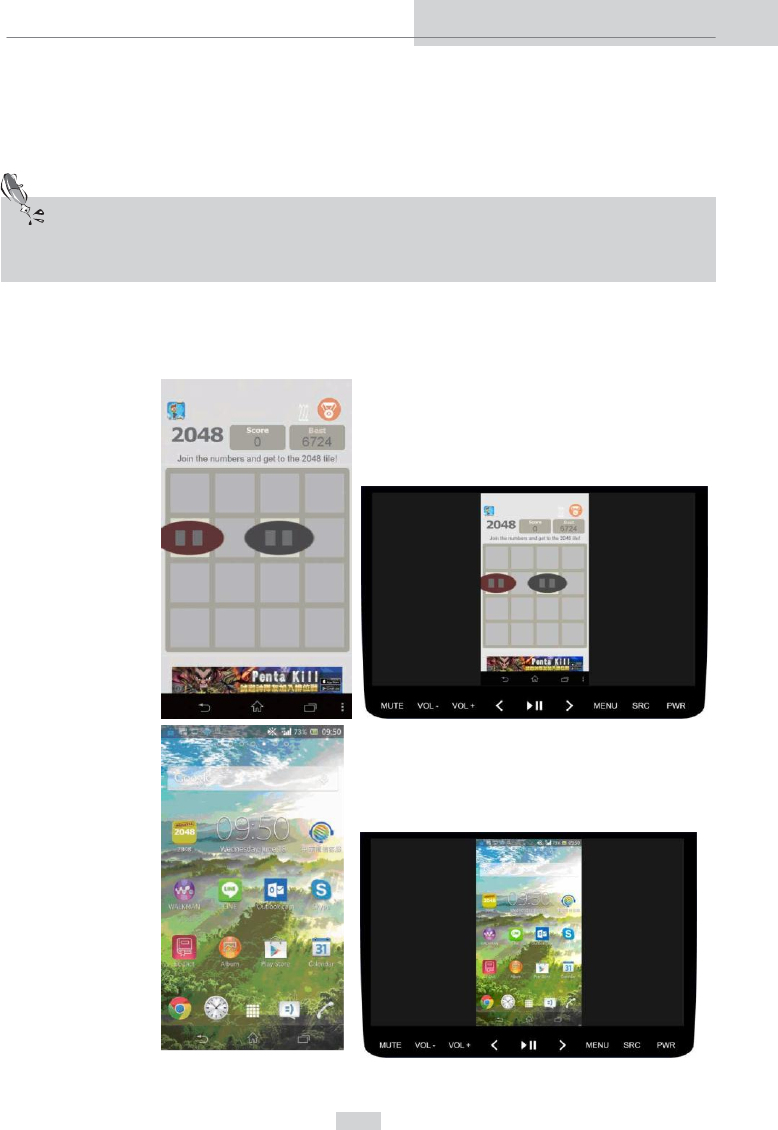
4.5. When connecting to Miracast successfully, the screen of the mobile will
display on screen on roof monitor.
Example:
Note
•
The device name "Toyota RSE XXX" will show under Toyota Logo.
35
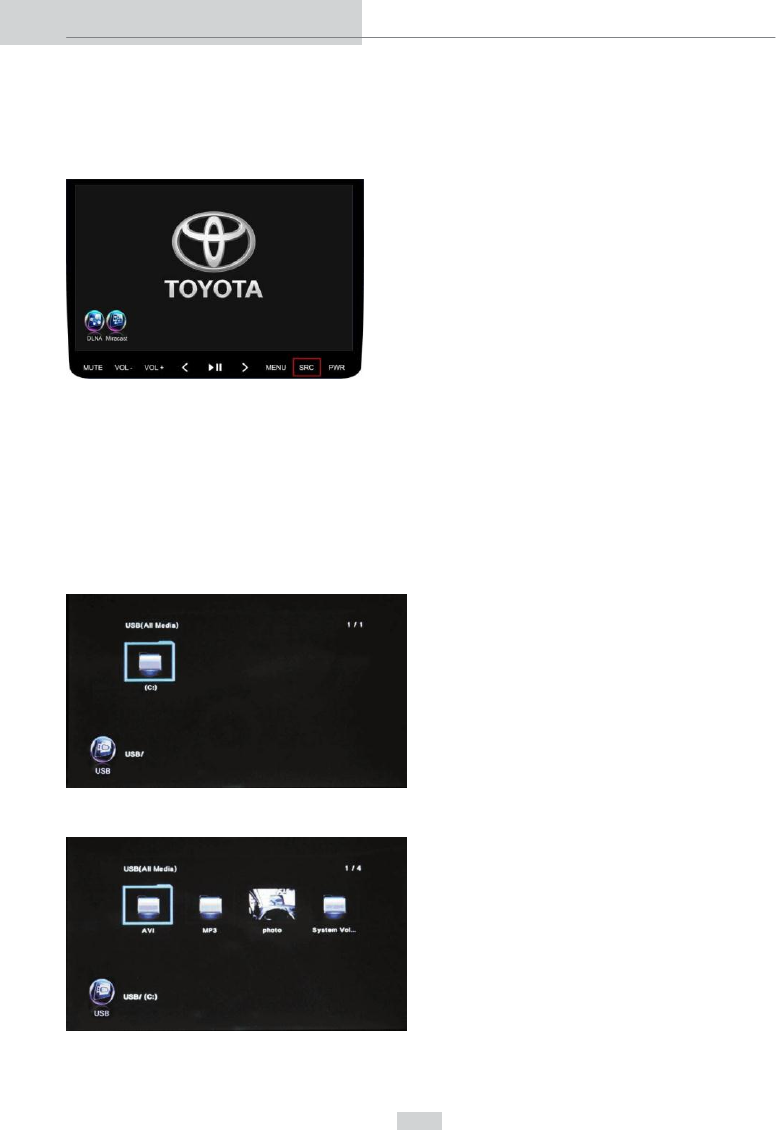
USB Input playback
1.
Enter USB by “SRC” button on the panel.
1.1 Press “SRC” button until USB shows on the screen.
2.
Enter USB by “MODE” button on the remote control.
2.1
Press MODE button on the screen.
2.2
Select USB.
3.
Enter USB by SOURCE button on the remote control.
3.1 Press the button to select the channel until USB shows on the screen.
4.
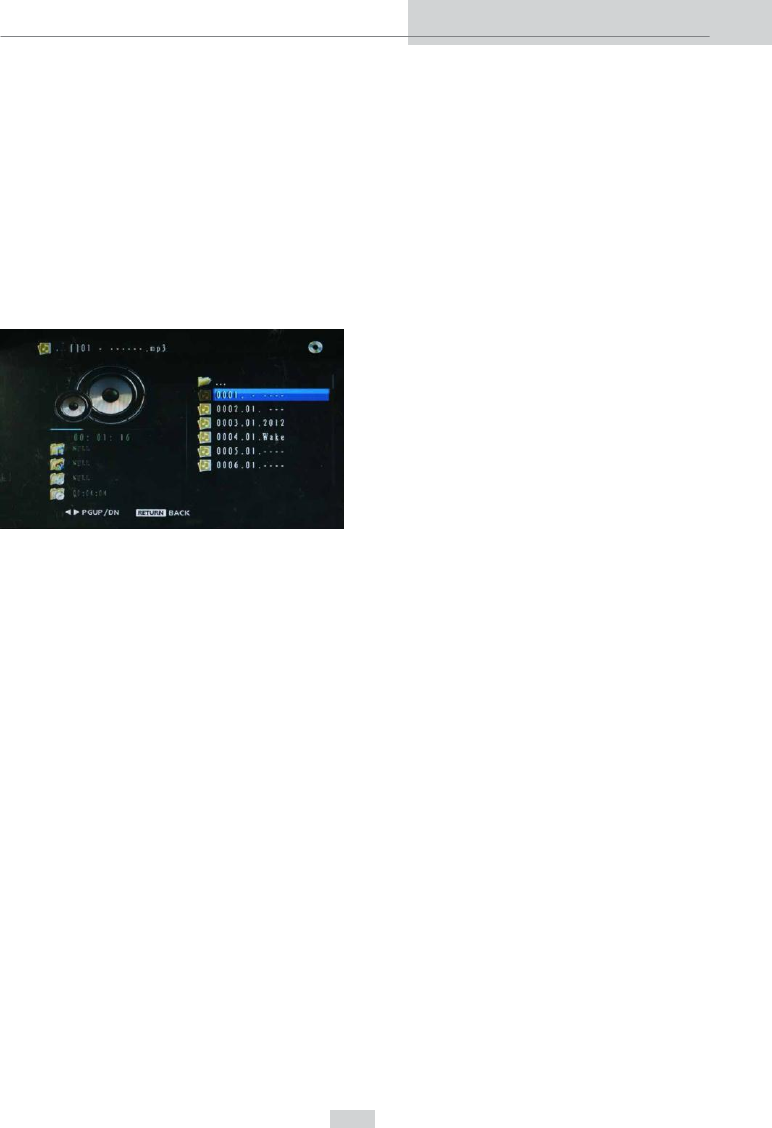
Files or Folder Selection for Playing
USB
36
USB
Note
1. You can play the next file by pressing on the remote control twice or
press on the panel once.
2. You can play the previous file by pressing on the remote control twice
or press on the panel once.
Note
•
If the USB is encrypted, it cannot be read on RSE.
•
iPod is not supportive.

37
1. Applicable voltage: D/C10.5V~16 V
2.
Storage temperature:-40℃ ~85℃
3.
Operating temperature: -20℃ ~ 70℃
4. Main unit weight : 2040g.±50g.(not include accessories)
5.
External dimensions: 340.5X 254.5X86.1mm
6.
Video system: NTSC / PAL / AUTO
7.
Audio Signal input (max) Analog input 1.5 V p.p (Volume 30).
8.
Audio Signal output (max) Analog output 1.5 V p.p (Volume 30).
9.
Connection port: Image port → Video input X1(connector) 、Video input
X1(RCA terminal)
Audio port → Analog input L / R X1 (RCA terminal)
10. Power consumption: < 33W.
LCD monitor
1.
Dimension: 10.2 inches (16: 9)
2.
Display Resolution: 800 (W) X 480 (H)
3.
Brightness: 250cd/m2.
Remote control
1.
IR remote control
2.
IR function key: 24 keys
3. Affective range: <= 3 meters
4. Battery: Lithium (3V).
Supportable File Type for USB
Format
Video File Types
RMVB、VOB、MP4(480P、720P、1080P)、
3PG、AVI、FLV、F4V、MKV、MOV、MPG
Audio File Types
OGG、MP3、M4A、AAC
Photo File Types
BMP、JPG
Specifications
38
Supportable Mobile Phones and Setting
Brand
Model Name
How to Access Miracast Function
Asus
Padfone Infinity 8
Setting→Display→Wi-Fi Mirror Share
Coolpad
YL-9960
Setting→Display→Wi-Fi Mirror Share
HTC
New One, Butterfly
Settings→Media output
Sony
Electronics
Inc.
Xperia AX, Xperia TL,
Xperia ZL, Xperia TX,
Xperia T, Xperia V, Xperia Z
Settings→Display→Screen Mirroring
Samsung
Galaxy S3, Galaxy Note 2,
Galaxy Tab 10.1, Galaxy S4
Settings→More→AllShare Cast
(The software should be version
4.1.2 or above version)Mirroring
Google Inc.
Nexus 4
Settings→Display→Wireless dispaly
LG
Electronic
Inc.
OptimusG,F200L/S/K(Vu2,)
240K(G Pro)
Settings→More→Miracast
Oppo
TD, X909
Setting→Display→Wi-Fi Mirror Share
Pantech
IM-A860K/S/L
Setting→Display→Wi-Fi Mirror Share
Sharp
SH-10D, SH-02E, SH-04E,
SH-09D, SH-10D, 203SH
Settings→Wireless Output
Xiaomi
MI-2,MI-2A,MI-2S
Wlan display settings→Menu→Wlan
Display
* If Miracast application is not provided in your android phone, it means your
mobile does not support Miracast function.
*
Miracast using method depends on each mobile
Turning off the machine
Turn off the car’s power so that the roof monitor is completely turned off (ACC
OFF when dashboard lamp is extinguished)
Note
•
After turning off the power of the car, playback will completely stop.
Specifications

39
•
MP3
MP3 is an abbreviation for “MPEG AUDIO Layer 3” and established by ISO
(International Standard Organization) MPEG working group. It is a standard
format for storing compressed music. The audio data can be compressed to
about one tenth of the original size.
•
Title
A DVD video disc has a higher data capacity and several movies can be
recorded on single DVD disc. For example, if a disc contains three movies,
they are marked as Title 1, Title 2, and Title 3. This allows you to use the
convenient title search function and other functions.
•
Region Code
The DVD player and DVD disc have their region codes specifying the place of
purchase. Playback is not allowed unless the region codes of the DVD disc
and DVD player are identical.
•
Linear PCM (LPCM)/ Pulse Code Modulation
Linear pulse code modulation is used in the recording signal system for the
audio CD and DVD. DVD is usually encoded in a higher sampling rate and bit
rate than CD. Therefore, DVD offers higher sound quality.
•
Multi-session data
A session refers to the complete recorded data written into CD-ROM and
CD-R/CD-RW during the span of single recording. Multi-session data refers to
data from two sessions or more on a disc.
•
ID3 Tag
ID3 tag is a method of storing the information about audio in a MP3 file. The
information that can be stored includes the track name, artist, and album
name. The content can be freely edited using ID3 editing software.
Glossary
40
Glossary
•
DVD Region Code
The current protection measure for DVD films (region code restrictions) is
proposed by the 8 major film studios in U.S. The main goal is to protect the
rights of the dealers and agents and prevent the grey products from being
imported. The DVD region codes are classified into six different regions as
below.
DVD Region Code List
Region 1
United States, Canada, Eastern Pacific Islands
Region 2
Japan, West Europe, North Europe, South Africa, Middle East, Egypt
Region 3
Taiwan, Hong Kong, South Korea, Thailand, South Asian countries
Region 4
Australia, New Zealand, Latin America and South America, Oceania
Region 5
Russia, Indian Peninsula, North Africa, North Korea, Mongolia, East
Europe, Central and North West Asia
Region 6
People’s Republic of China
※The malfunction of the machine and relevant legal responsibilities arising
from unauthorized modification of the DVD region code are not covered by
the warranty provided by the manufacturer, dealer, and vehicle
manufacturers.
41
Problem and Resolution
Situation
Cause
Countermeasure
Unable to turn
device on
The cables do not connect
to each other firmly.
Check the connection of the
cables
The fuse blew.
Please contact your dealer for
replacement.
Malfunction or noise occur
Turn off the machine then turn
it on. If problem still occurs
please contact dealers to
In-stall new batteries.
Unable to operate
the remote control
The battery has too little or
no power.
Install new batteries.
The screen is
stretched and the
aspect ratio is not
correct
The settings of the aspect
ratio are not correct for the
dis-play.
Select the settings fit for the
display
Sound distorted
The volume is possibly too
high.
Decrease the volume.
Color difference
The color settings may
incorrect.
Reset Color Setting.
Black/White image
The playback source is not
the correct.
Confirm that the appropriate
mode of image signals is
correctly switched on (AUTO,
NTSC or PAL, according to
different video)
No audio from IR
earphone
The status of MUTE is set
as ON.
During video playback, check
that the power LED indicator of
IS ear-phone lights on. Check
MUTE status and set it to OFF.
The video
/audio export is
not correct under
AV IN
The connector is not
correctly connected.
Confirm whether each
connector is correctly
connected. Refer to user’s
guide for more details.
Basic Trouble Shooting
Note
•
When you flip up the DVD display, the force point should be in the middle
of the TFT edge. Otherwise, it may not close properly.
Federal Communication Commission Interference
Statement
This equipment has been tested and found to comply with the limits for a
Class B digital device, pursuant to Part 15 of the FCC Rules. These limits
are designed to provide reasonable protection against harmful
interference in a residential installation. This equipment generates, uses
and can radiate radio frequency energy and, if not installed and used in
accordance with the instructions, may cause harmful interference to radio
communications. However, there is no guarantee that interference will
not occur in a particular installation. If this equipment does cause harmful
interference to radio or television reception, which can be determined by
turning the equipment off and on, the user is encouraged to try to correct
the interference by one of the following measures:
Reorient or relocate the receiving antenna.
Increase the separation between the equipment and receiver.
Connect the equipment into an outlet on a circuit different from
that to which the receiver is connected.
Consult the dealer or an experienced radio/TV technician for help.
FCC Caution: Any changes or modifications not expressly approved by the
party responsible for compliance could void the user's authority to
operate this equipment.
This device complies with Part 15 of the FCC Rules. Operation is subject to
the following two conditions: (1) This device may not cause harmful
interference, and (2) this device must accept any interference received,
including interference that may cause undesired operation.
FCC RF Radiation Exposure Statement:
This equipment complies with FCC radiation exposure limits set forth for
an uncontrolled environment. End users must follow the specific
operating instructions for satisfying RF exposure compliance. This
transmitter must not be co-located or operating in conjunction with any
other antenna or transmitter.

52171900001-00
There will be some discrepancy in the contents of this user's
manual due to the technical evolution and the software
improvement. Please follow the actual function display. This
manual is only for users' operating reference.