ELANsat Technologies VC-105 2.4GHz Wireless Baby Monitor User Manual 6060401501 10
ELANsat Technologies Inc. 2.4GHz Wireless Baby Monitor 6060401501 10
Users Manual
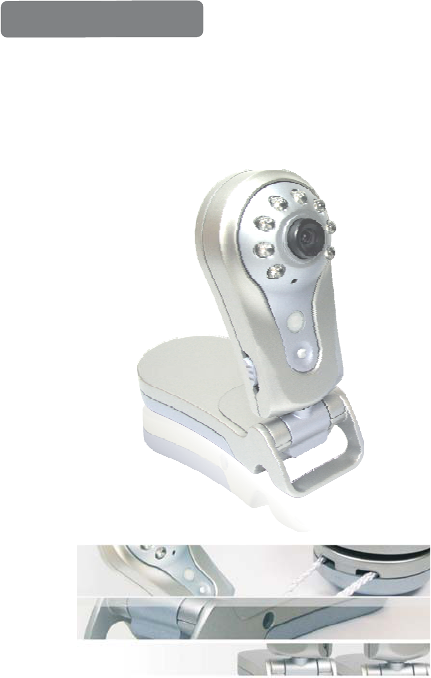
2.4GHz Wireless2.4GHz Wireless
Baby Monitor Camera
Users Manual
CAUTION
RISK OF ELECTRONIC
SHOCK DO NOT OPEN
CAUTION:
DO NOT REMOVE THE COVER FOR REDUCING
THE RISK OF ELECTRIC SHOCK.
NO USER-SERVICEABLE PARTS INSIDE REFER SERVICING TO
QUALIFIED SERVICE PERSONNEL.
GENERAL SAFETY SUMMARY
WARNING
To prevent fire or shock hazard , do not expose the unit
to rain or moisture.
IMPORTANT SAFETY INSTRUCTIONS
All the safety and operating instructions should be read
before the product is operated.
The safety and operating instructions should be retained
for future reference.
All warnings on the product and in the operating instructions
should be adhered to.
All operating and use instructions should be followed.
Unplug this products from the wall outlet before cleaning.
Do not use liquid cleaners or aerosol cleaners.
Use a damp cloth for the cleaning.
Do not use attachments not recommended by the products
manufacturer if they may cause hazards.
Do not use this product near water - for example, near a bath
tub, wash bowl, kitchen sink, or laundry tub, in a wet
basement, or near a swimming pool; and the like.
1.
2.
5.
3.
4.
6.
7.
8.
Any mounting of the product should follow the
manufacturer's instructions, and should use a mounting
accessory recommended by the manufacturer.

For added protection for this product during a lightning
storm, or it is left unattended and unused for long periods
of time, unplug it from the wall outlet and disconnect cable
system. This will prevent damage to the product due to
lightning and powerline surges.
11.
Never push objects of any kind into this product through
openings as they may touch dangerous voltage points or
short-out parts that could result in a fire or electronic shock.
Never spill liquid of any kind on the product.
12.
Do not overload wall outlets, extension cords, or integral
convenience receptacles as this can result in a risk of fire
or electric shock.
13.
Unplug this product from the wall outlet and refer servicing
to qualified service personnel under the following conditions.
When the power- supply cord or plug is damaged.
If liquid have been spilled, or objects have fallen into
the products
14.
If the product does not operate normally by following
the operating instructions, adjust only those controls
that are covered by the operating instructions as an
improper adjustment of other control may result in
damage and will often require extensive work by a
qualified technician to restore this product to its
normal operation.
Power supply cord should be routed so that they are not
likely to be walked on or pinched by items placed upon or
against them, paying particular attention to cords at plugs,
or other sources, refer to the operating instructions.
10.
This product should be operated only from the type of
power source indicated on the marking label. If you are
not sure of the type or power supply to your home, consult
your product dealer or local Power Company.
For products intended to operate from battery power,
or other sources, refer to the operating instruction.
9.

When the product exhibits a distinct change in
performance - this indicates a need for service.
If the products has been dropped or damaged in any
way.
When replacement parts are required, be sure the service
technician has used replacement parts specified by the
manufacturer or that have the same characteristics as the
original part. Unauthorized substitutions may result in fire,
electric shock, or other hazards.
15.
16. Upon completion of any service or repair to this product ask
the service technician to perform safety checks to
determine that the product is in proper operating condition.
The product should be situated away from heat sources
such as radiators, heat registers, stoves, or other products
including amplifiers that produce heat.
17.
18. Power adaptor should use standard accessories to avoid
voltage and electric current not compatible.
19. As follows objects may interfer our 2.4GHz products:
a. Microwave
b. WLAN
c. Bluetooth
d. 2.4GHz Codeless phone
e. Other products are in the same frequency

Overview
Features
Package Contents
Names of parts
Setting up
Charging the batteries
TableofContents
1
1
2
3
7
5
...................................................................
.................................................................
...................................................
.....................................................
.................................................................
........................................
Specification ......................................................
Trouble Shooting
10
......................................................
Operation 4
9
.................................................................

The Wireless Surveillance System with CMOS
Images and four channels available is just as your
home and company monitoring. Special design
for home and office surveillance demands with
IR LED Illuminator to enhance night vision can
secure your surroundings all day long. 2 AA
rechargeable batteries adequately supply 4 hours
long working time, power supply and charging
circuit design help you to charge the battery or
make the camera proper working without interrupt.
Easy to install, unequal quality and reliability make
Overview
Features
Operating frequency of ISM band 2.4 ~2.4835 GHz
With 8 IR LED Illuminator
Photo Transistor sensor for lighting detection
Built-in Microphone for Audio Monitoring
4 channels selectable
Both of Ni-MH/Ni-Cd rechargeable battery and
power adaptor 8V/300mA
2xAA rechargeable batteries up to 4 hours
Charging circuit designed
Two direction hinge at the camera base to easily
watch over
Range up to 100m (L.O.S.)
Charging circuit design
you have delighted and secure life.

Package Contents
Check the package according to what you bought.
Camera (X1)
Power Adaptor (X1)
Users Manual (X1)
Red:Charging
Yellow:Power On
Microphone
IR LED
Lens
Lighting Sensor
Two direction
hinge
Strap eyelet
for wall mounting
Channel
Selector
Power Switch
Power Jack
Names of parts
1.5V AAALKALINE battery (X2)
+
_
+
_
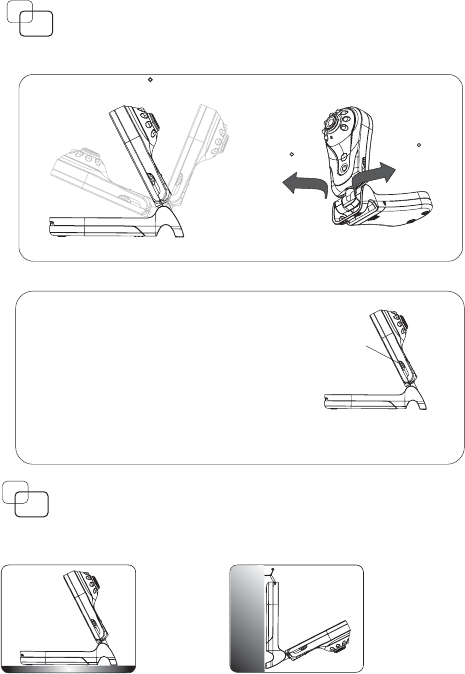
Swivel-design at camera base
Right 30 Left 30
Front and back 135
Installing the Wireless Camera
Setting up
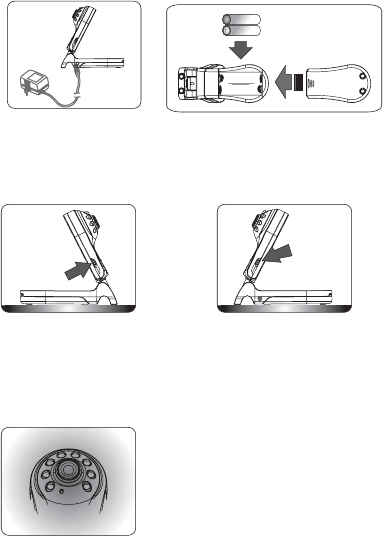
Power Switch at Four Mode
Power Switch
Up to Down
1. Charging mode(only in charging)
2. Camera with IR LED
function (night vision)+charging
< In this mode, only can use power
adaptor to supply the power>
3. Camera+charging
4. Power off
Operation
Power on
Setting
channel
3. Turn on the power of camera, and the power LED
will light up in green.
4. Set up the channel.(one to four channel)
5. The wireless camera has designed in
eight IR LED illuminators turned on
by Photo Transistor brightness
detecting to catch clear images in the
unlit environment. This warm-hearted
design is to assist the requests of both
the night vision and power-saving.
1.Putthecameraonaflatorhangonthewall.
AB
+
_
+
_
2. Simply supply the camera power by power adaptor
or 2x AA batteries.
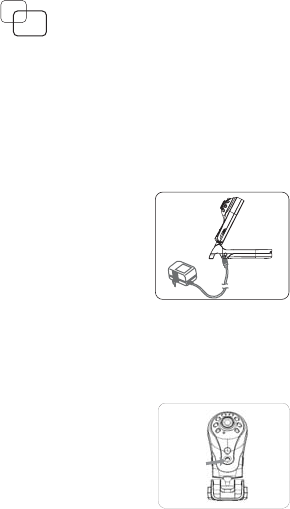
PlugpoweradaptorintoDCjacktocharge
rechargeable batteries when batteries' power
is at low level.
LED
The LED will light up in red when the batteries
are being charged.
Charging the batteries
The camera is made to work by power from
2*AA size batteries(1.5v) or a power adaptor.
Rechargeable batteries are always chosen the
level of 1.2V/2000mAh.

Please read this users manual carefully before using the
Wireless Camera. If you still have difficulties to use the
product, consult the following syndrome, which will
guide you to solve most common problems.
No picture or sound
Check the power supply.
1.
Ensure the product is properly connected and set.
Ensure that product power indicator is illuminate.
2.
3.
4.
5.
Check volume level is set properly for desire.
Make sure the batteries have been inserted into
product's battery compartment.
Check both of the product is surely turned on.
Make sure the power cables are connected rightly if
you use power adaptor.
Make sure the batteries are full charged.
6.
Trouble Shooting
Unclear picture reception
1.
2.Shorten the transmission range/distance between the
transmitter and receiver.
Check to ensure the receiver channel is set properly
for the desired video camera.
Shorten the transmission range/distance between
the transmitter and receiver and/or adjust the video
camera.
7.
8. Make sure if the sender and receiver are in the same
channel.

Specification
Item Description
Scanning System
Image Sensor
Number of Pixels
Efficiency Pixels
Horizontal Scan Frequency
Vertical Scan Frequencyl
Synchronize
Resolution
Min. Illumination
S/N Ratio
Auto Electronic Exposure
White Balance
Supply Voltage
Operation Environment
Lens (Optional)
Internal
More than 300 TV Lines
2:1 Interlace
More Than 45dB
Auto
IR LED ON/OFF State
Wave-Length
Power Consumption
LED Number
IR LED illuminate Range
Output power of Tx module
Battery
6m
+10 dBm (min.)
Ni-MHAAx2
2:1 Interlace
NTSC
PAL
1/3"CMOSImage Sensor
250K
365K
510(H) x 492(V) 628(H) x 582(V)
15750Hz 15625Hz
60Hz 50Hz
3 LUX (F1.2)
1/60 ~ 1/2000 seconds 1/50 ~ 1/2000 seconds
1.0Vpp/600 load for MonoΩ
8
ON: Under 10Lux
OFF: Over 15Lux
8VDC
850nm
100mA(camera only), 180mA(camera+IR LED),
280mA(camera+IR+battery charge)
-10 C ~ 50 C
Federal Communication Commission Interference Statement
This equipment has been tested and found to comply with the limits for
a Class B digital device, pursuant to Part 15 of the FCC Rules. These
limits are designed to provide reasonable protection against harmful
interference in a residential installation.
This equipment generates, uses and can radiate radio frequency energy
and, if not installed and used in accordance with the instructions, may
cause harmful interference to radio communications. However, there is
no guarantee thatinterference will not occur in a particular installation.
If this equipment does cause harmful interference to radio or television
reception, which can be determined by turning the equipment off and
on, the user is encouraged to try to correct the interference by one of
the following measures:
. Reorient or relocate the receiving antenna.
.Connecttheequipmentintoanoutletonacircuitdifferentfrom
that to which the receiver is connected.
. Consult the dealer or an experienced radio/TV technician for help.
FCC Caution :To assure continued compliance, any changes or
modifications not expressly approved by the party responsible for
compliance could void the user's authority to operate this equipment.
(Example - use only shielded interface cables when connecting to
computer or peripheral devices).
This device complies with Part 15 of the FCC Rules.
Operation is subject to the following two conditions:
(1) This device may not cause harmful interference, and
(2) This device must accept any interference received,
including interference that may cause undesired operation.
. Increase the separation between the equipment and receiver.
6060401501-10