Contents
- 1. Installation Manual
- 2. User Guide
- 3. Users Manual
Users Manual

ポータブル IWB 無線セット CRB-2
かんたんスタートガイド
日本語:P2-P11 English:P13-P23
日本語:P2-P11
製品の取扱説明書は、下記ウェブサイト上でご覧ください。
http://www.elmosolution.co.jp/products/download/dl_shoga.html
For details about specifications and instruction manual of the product, refer to the following official website.
Contact one of our sales departments whose details are provided at the end of this manual.
http://www.elmousa.com
http://www.elmoeurope.com/download
2
安全にお使いいただくために-必ずお守りください
この「安全上のご注意」は、本機を安全に正しくお使いいただき、あなたや他の人々への危害や財産
への損害を未然に防止するために守っていただきたい事項を示しています。
ご使用前によく読んで大切に保管してください。
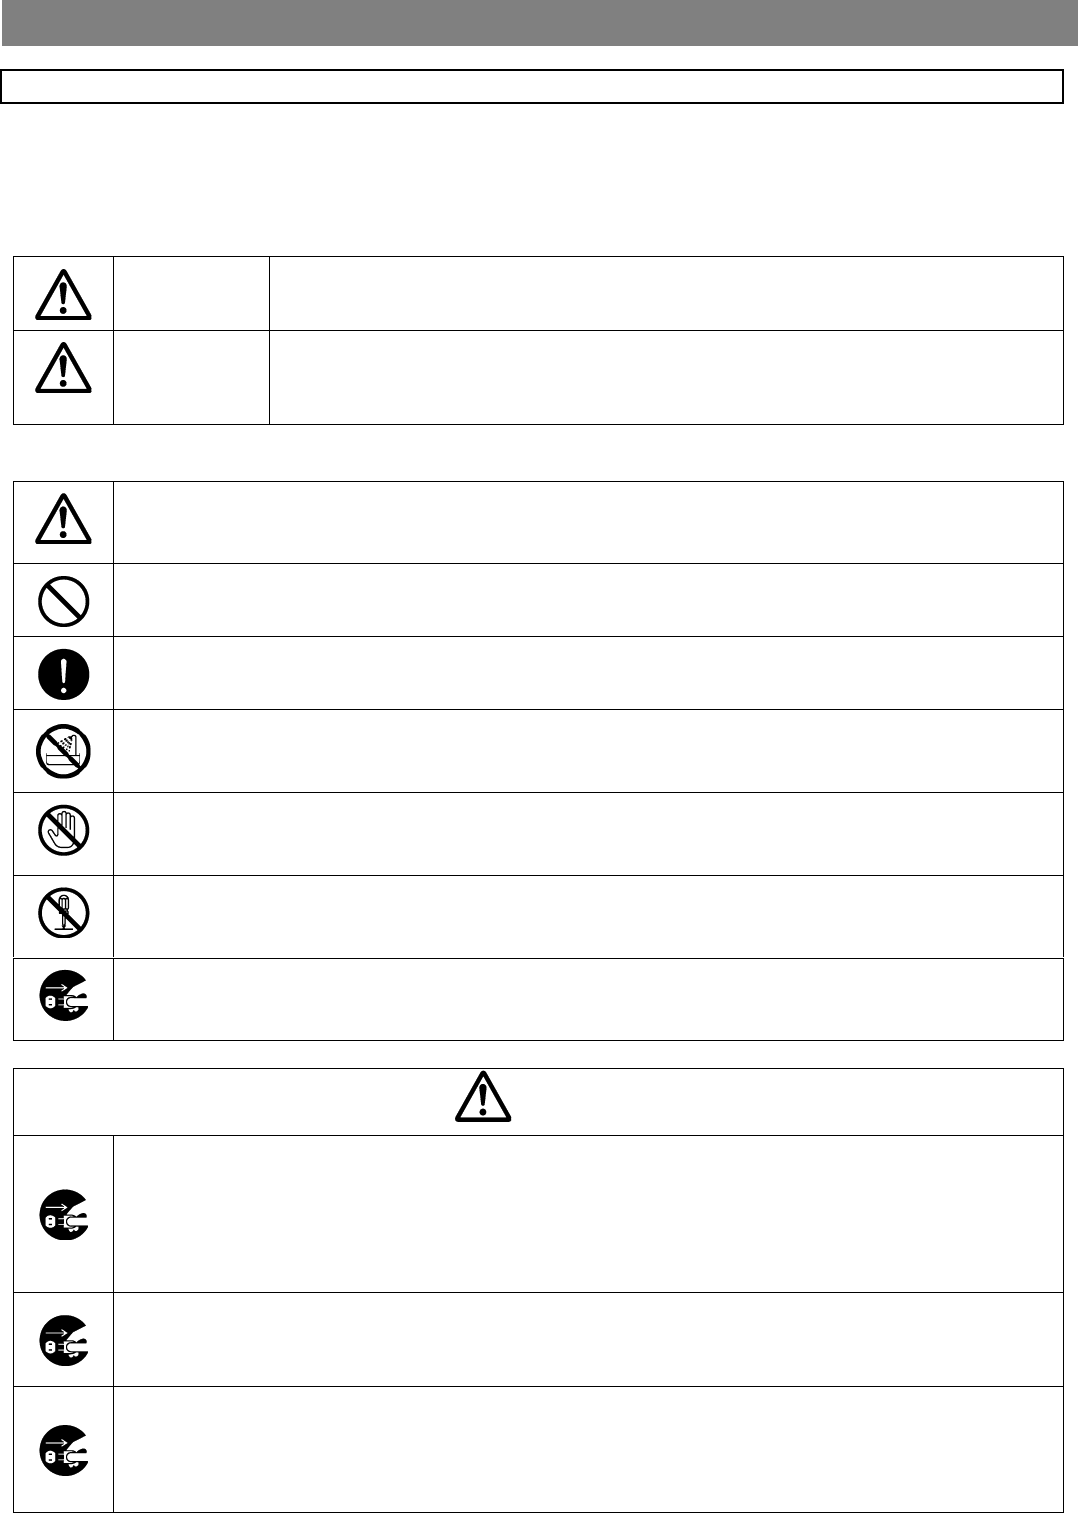
次の表示と図記号の意味をよく理解してから本文をお読みください。
警告
この表示を無視して、誤った取り扱いをすると、人が死亡または重傷を
負う可能性が想定される内容を示しています。
注意
この表示を無視して、誤った取り扱いをすると、人が傷害を負う可能性
が想定される内容および物的損害のみの発生が想定される内容を示して
います。
図記号の意味
名称:注意
意味:注意(しなければならないこと)を示すもので、具体的な注意内容は近くに文章や絵で示し
ます。
名称:禁止
意味:禁止(してはいけないこと)を示すもので、具体的な注意内容は近くに文章や絵で示します。
名称:強制
意味:強制(必ずすること)を示すもので、具体的な注意内容は近くに文章や絵で示します。
名称:風呂場・シャワー室での使用禁止
意味:製品を風呂場やシャワー室で使用することで火災・感電などの損害が起こる可能性を示すも
ので、図の中に具体的な禁止内容が描かれています。
名称:接触禁止
意味:接触すると感電などの傷害が起こる可能性を示すもので、図の中に具体的な禁止内容が描か
れています。
名称:分解禁止
意味:製品を分解することで感電などの傷害が起こる可能性を示すもので、図の中に具体的な禁止
内容が描かれています。
名称:電源プラグ・AC アダプタをコンセントから抜け
意味:使用者に AC アダプタをコンセントから抜くよう指示するもので、図の中に具体的な指示内
容が描かれています。
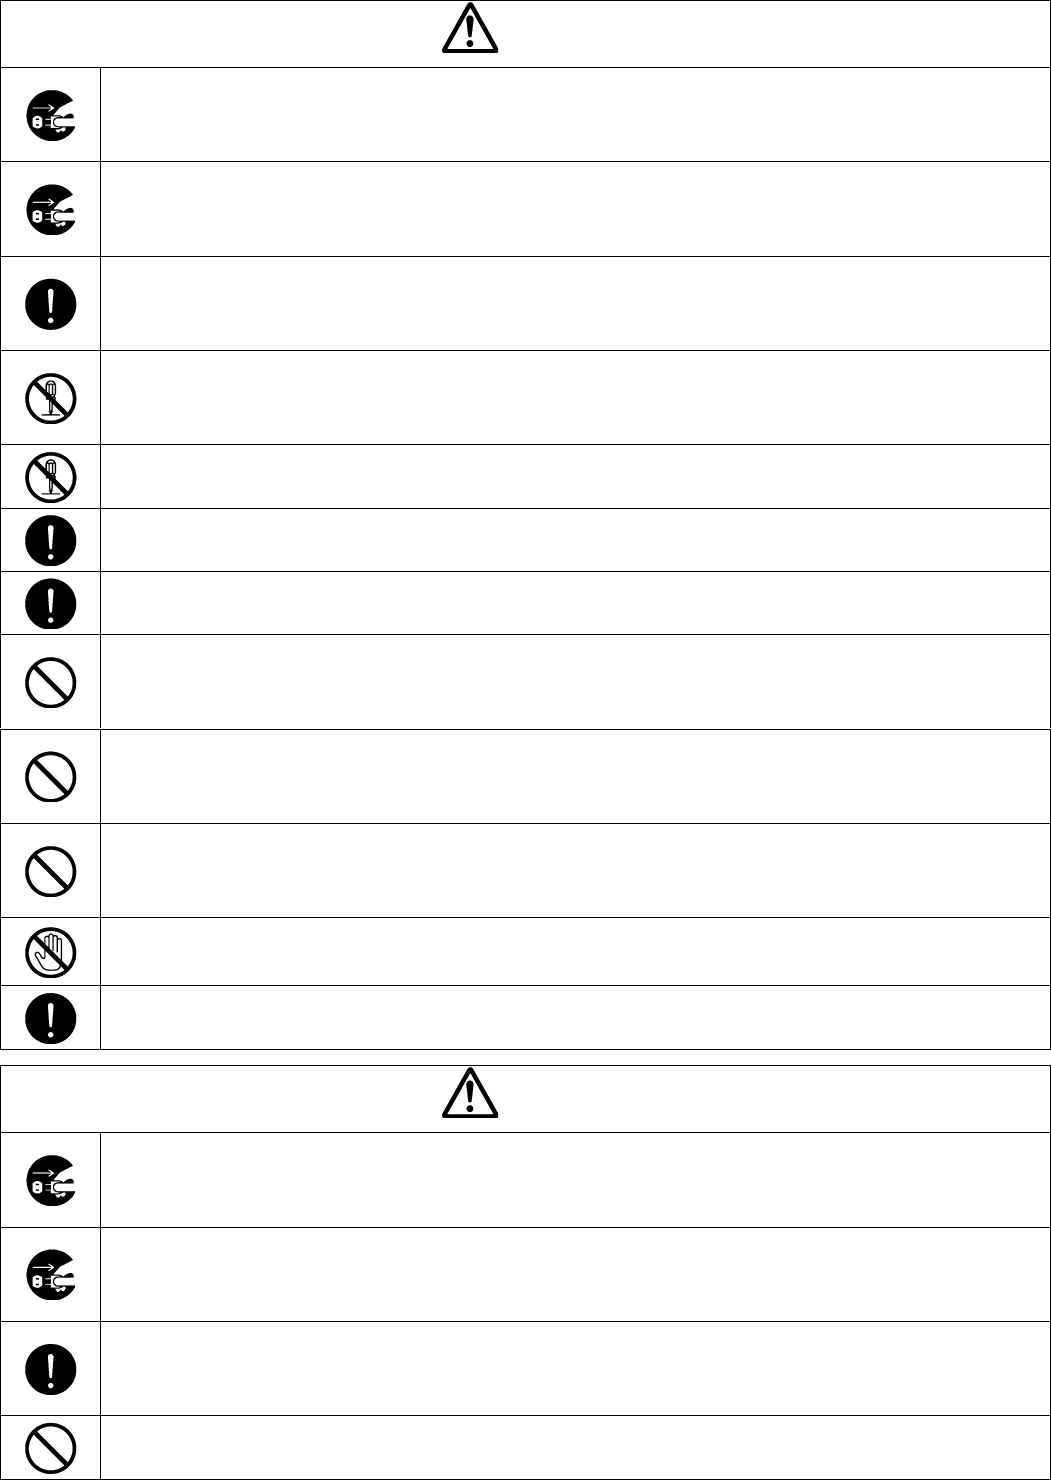
警告
万一、煙が出ている、変なにおいや音などがするとき、すぐにAC アダプタをコンセン
トから抜き、ワイヤレスアダプタを接続機器から外す。
異常状態のまま使用すると、火災・感電の原因となります。
煙などが出なくなるのを確認して、販売店に修理をご依頼ください。
お客様による修理は危険ですから絶対おやめください。
万一、機器の内部に水などが入った場合は、まずAC アダプタをコンセントから抜き、
ワイヤレスアダプタを接続機器から外し、ただちに販売店にご連絡ください。
そのまま使用すると火災・感電の原因となります。
万一、異物が機器の内部に入った場合は、まずAC アダプタをコンセントから抜き、ワ
イヤレスアダプタを接続機器から外す、ただちに販売店にご連絡ください。
そのまま使用すると火災・感電の原因となります。
(特にお子様のいるご使用環境ではご注意ください。)
安全上のご注意
3
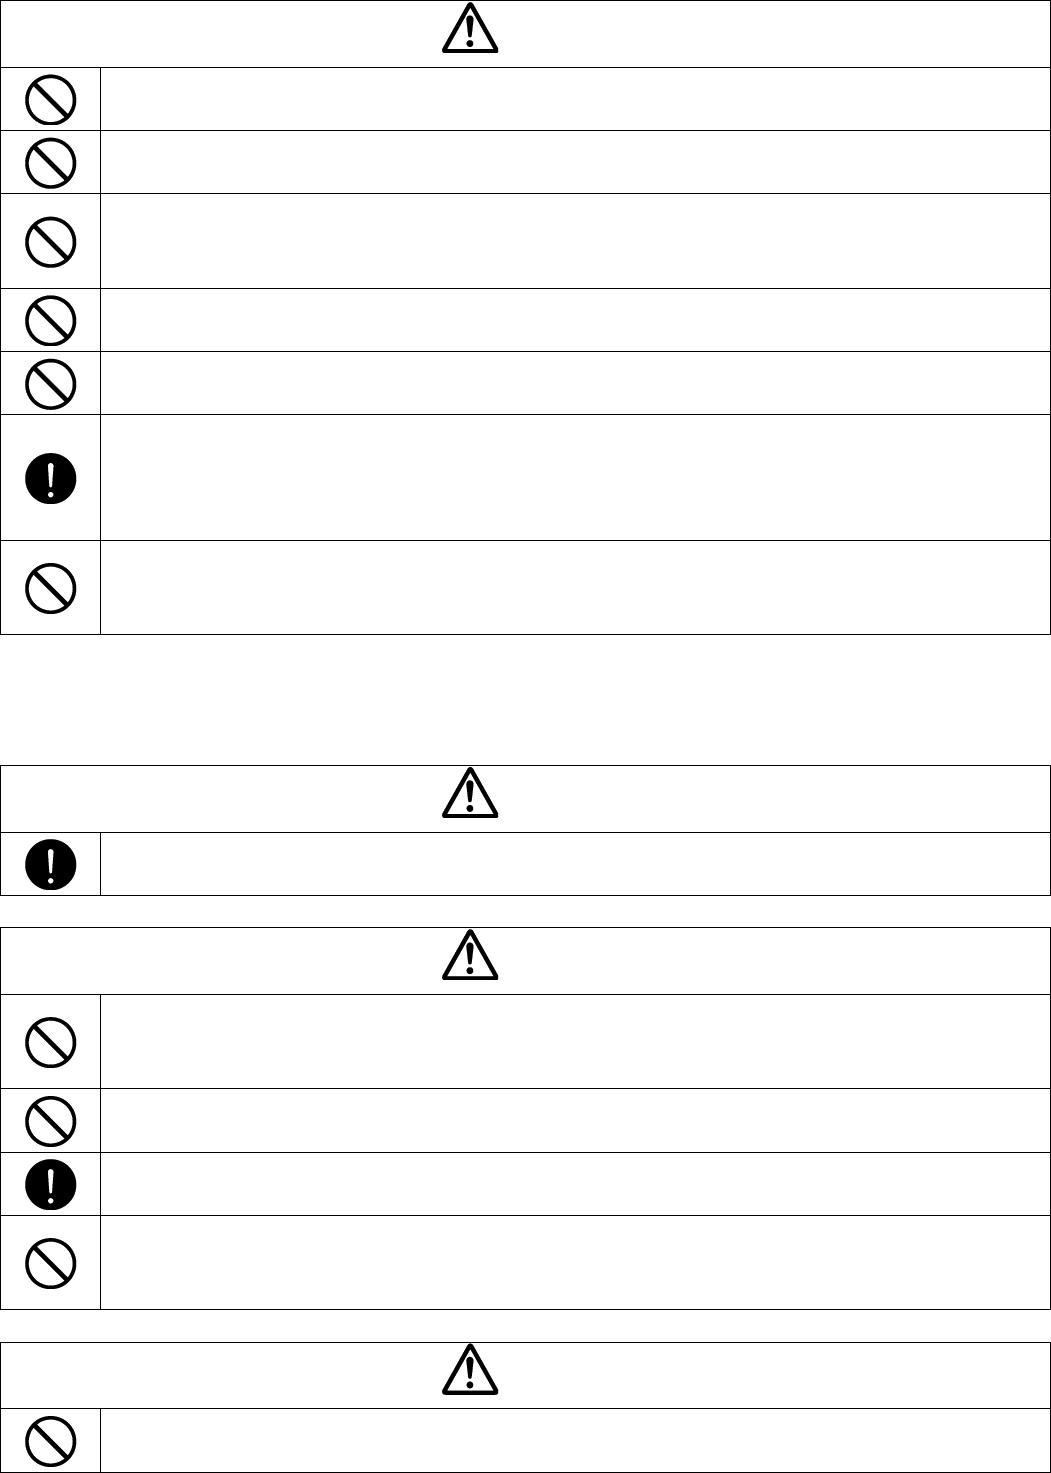
警告
万一、画面が映らないなどの故障の場合には、AC アダプタをコンセントから抜き、ワ
イヤレスアダプタを接続機器から外し、それから販売店に修理をご依頼ください。
そのまま使用すると火災・感電の原因となります。
万一、機器を落とし、キャビネットなどを破損した場合は、AC アダプタをコンセント
から抜き、ワイヤレスアダプタを接続機器から外し、それから販売店にご連絡ください。
そのまま使用すると火災・感電の原因となります。
AC アダプタのコードが傷んだら(芯線の露出、断線など)販売店に交換をご依頼くだ
さい。
そのまま使用すると火災・感電の原因となります。
本製品の裏ぶた、キャビネット、カバーは外さない。
内部には電圧の高い部分があり、感電の原因となります。
内部の点検・整備・修理は、販売店にご依頼ください。
本製品を改造しない。
火災・感電の原因となります。
電源プラグ・AC アダプタは必ず付属品を使用する。
火災・感電の原因となります。
付属の電源プラグ・AC アダプタは本機専用です。
他の機器には使用しないでください。
本製品やUSBケーブルのコネクタ部に水や異物を入れたり、濡らしたりしない。
火災・感電の原因となります。
雨天、降雪中、海岸、水辺での使用は特にご注意ください。
AC アダプタの上に重いものを乗せない。
コードが傷ついて、火災・感電の原因となります。
コードを敷物などで覆うことにより、気付かず重い物を乗せてしまうことがあります。
AC アダプタを傷つけたり、加工したり、無理に曲げたり、ねじったり、引っ張ったり、
加熱したりしない。
コードが破損して、火災・感電の原因となります。
雷が鳴り出したら本体、接続ケーブル、AC アダプタなどには触れない。
感電の原因となります。
本製品の部品をお子様の手の届くところに置かない。誤って飲み込むと、身体に悪影響
を及ぼします。万一飲み込んだと思われる時は、ただちに医師にご相談ください。
注意
移動させる場合は、必ずAC アダプタをコンセントから抜く。
外部の接続コードを外したことを確認のうえ、行ってください。
コードが傷つき、火災・感電の原因となることがあります。
本製品を長時間、ご使用にならないときは、安全のため必ずAC アダプタをコンセント
から抜く。
火災の原因となることがあります。
AC アダプタを抜くときは、コードを引っ張らない。
コードが傷つき、火災・感電の原因となることがあります。
必ず電源プラグ・AC アダプタを持って抜いてください。
キャスター付きの台に機器を設置する場合にはキャスター止めをする。
動いたり、倒れたりしてけがの原因となることがあります。
4
注意
湿気やほこりの多い場所に置かない。
火災・感電の原因となることがあります。
調理台や加湿器のそばなど、油煙や湯気・水滴が当たるような場所に置かない。
火災・感電の原因となることがあります。
本製品に乗ったり、重いものを乗せたりしない。
特に、小さなお子様のいるご使用環境ではご注意ください。倒れたり、こわれたりして
けがの原因となることがあります。
AC アダプタのコードを熱器具に近づけない。
コードの被ふくが溶けて、火災・感電の原因となることがあります。
ぬれた手でAC アダプタを抜き差ししない。
感電の原因となることがあります。
ACアダプタはコンセントに根元まで確実に差し込む。
差し込みが不完全ですと発熱したり、ほこりが付着して火災の原因となることがありま
す。
また、電源プラグの刃に触れると感電することがあります。
ACアダプタは根元まで差し込んでもゆるみがあるコンセントに接続しない。
発熱して火災の原因となることがあります。
販売店や電気工事店にコンセントの交換を依頼してください。
■電池について
電池の使い方を誤ると、電池が漏液、発熱、破裂、ケガや機器故障の原因となるので、
次のことを必ず守ること。
危険
アルカリ液が目に入ったときは、失明など障害のおそれがありますので、こすらずにす
ぐに水道水など多量のきれいな水で充分に洗ったあと、医師の治療を受けてください。
警告
電池を火の中に入れる、加熱、分解、改造しないでください。
絶縁物やガス排出弁などを損傷させたりして、漏液、発熱、破裂させるおそれがありま
す。
外傷がある、または変形した乾電池を使用しない。
液漏れ、発熱、発煙、破裂、発火の原因となります。
乾電池の漏液が体に付着した場合、こすらずきれいな水で十分に洗った後、ただちに医
師の治療を受ける。放置すると体に障害を与える原因となります。
乾電池の(+)と(-)を逆にして使用しない。
乾電池内部で異常な化学反応が起こり、液漏れ、発熱、発煙、破裂、発火の原因となり
ます。
注意
電池の外装ラベルをはがしたり、傷つけたりしないでください。
5
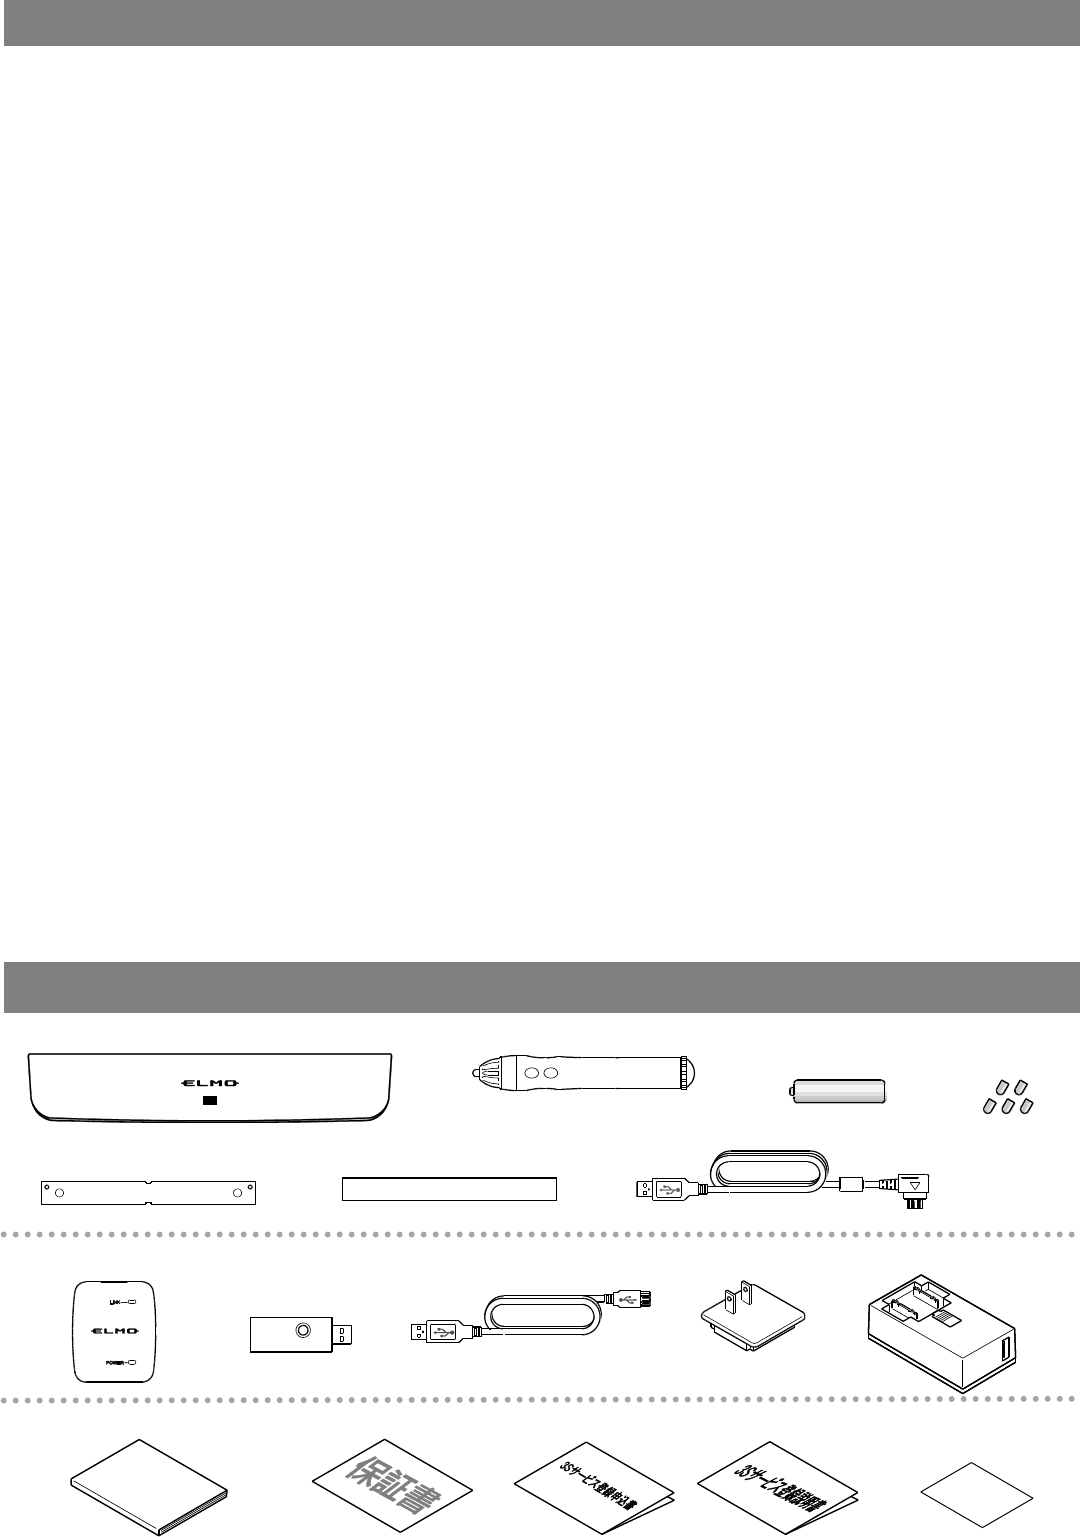
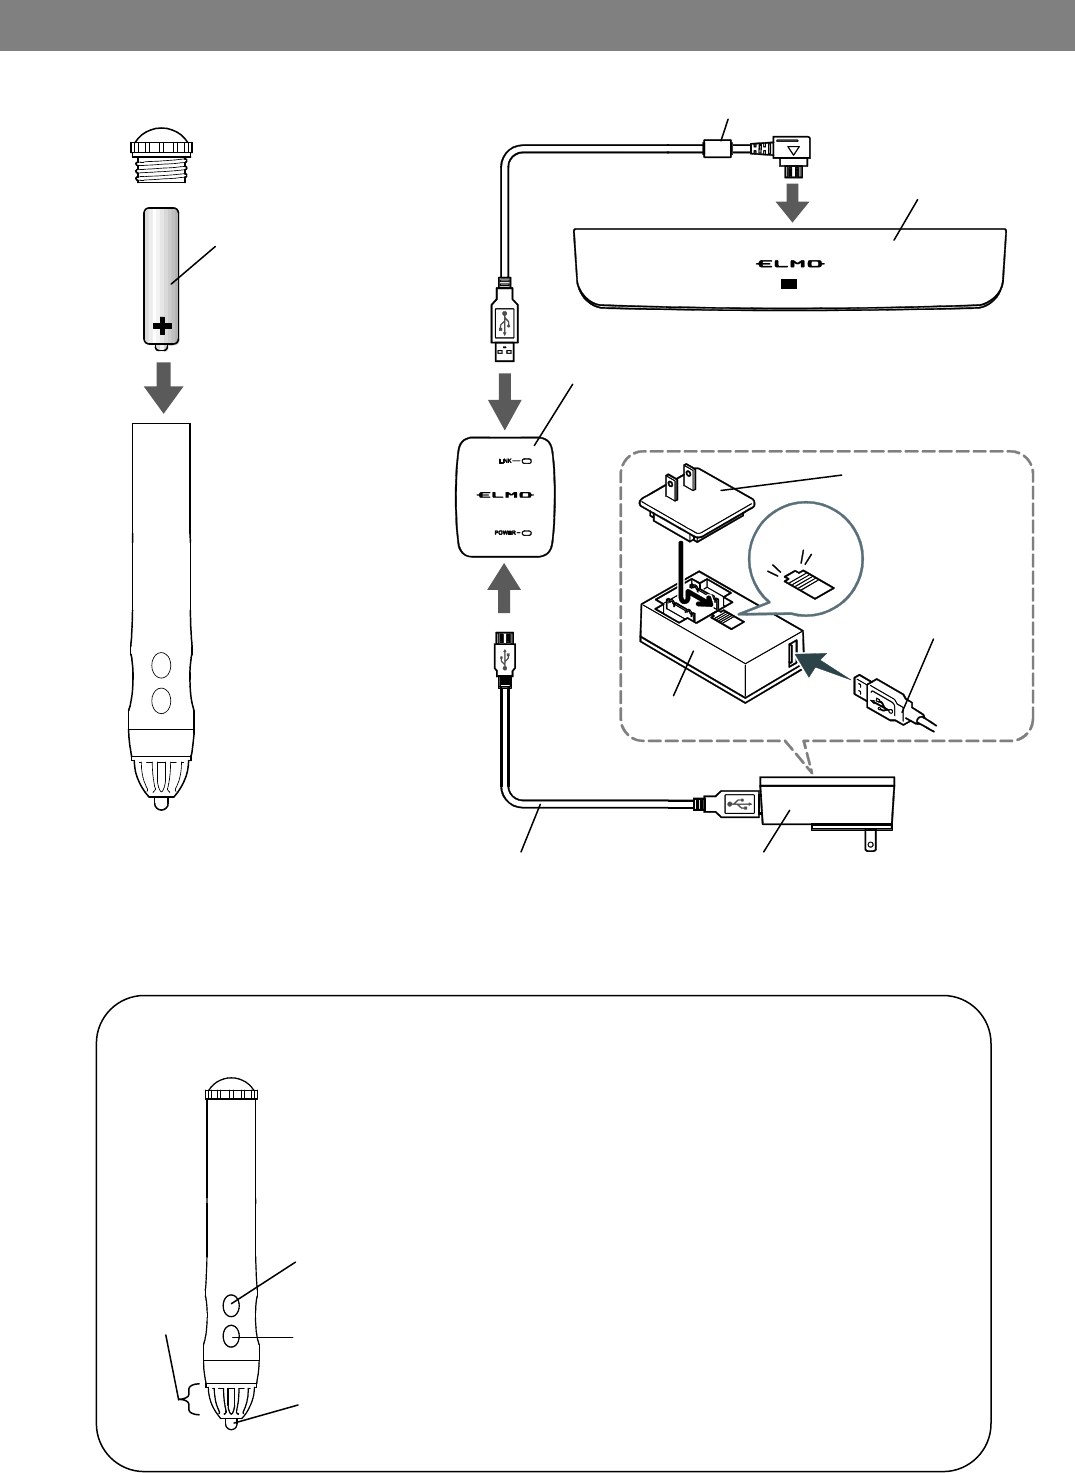
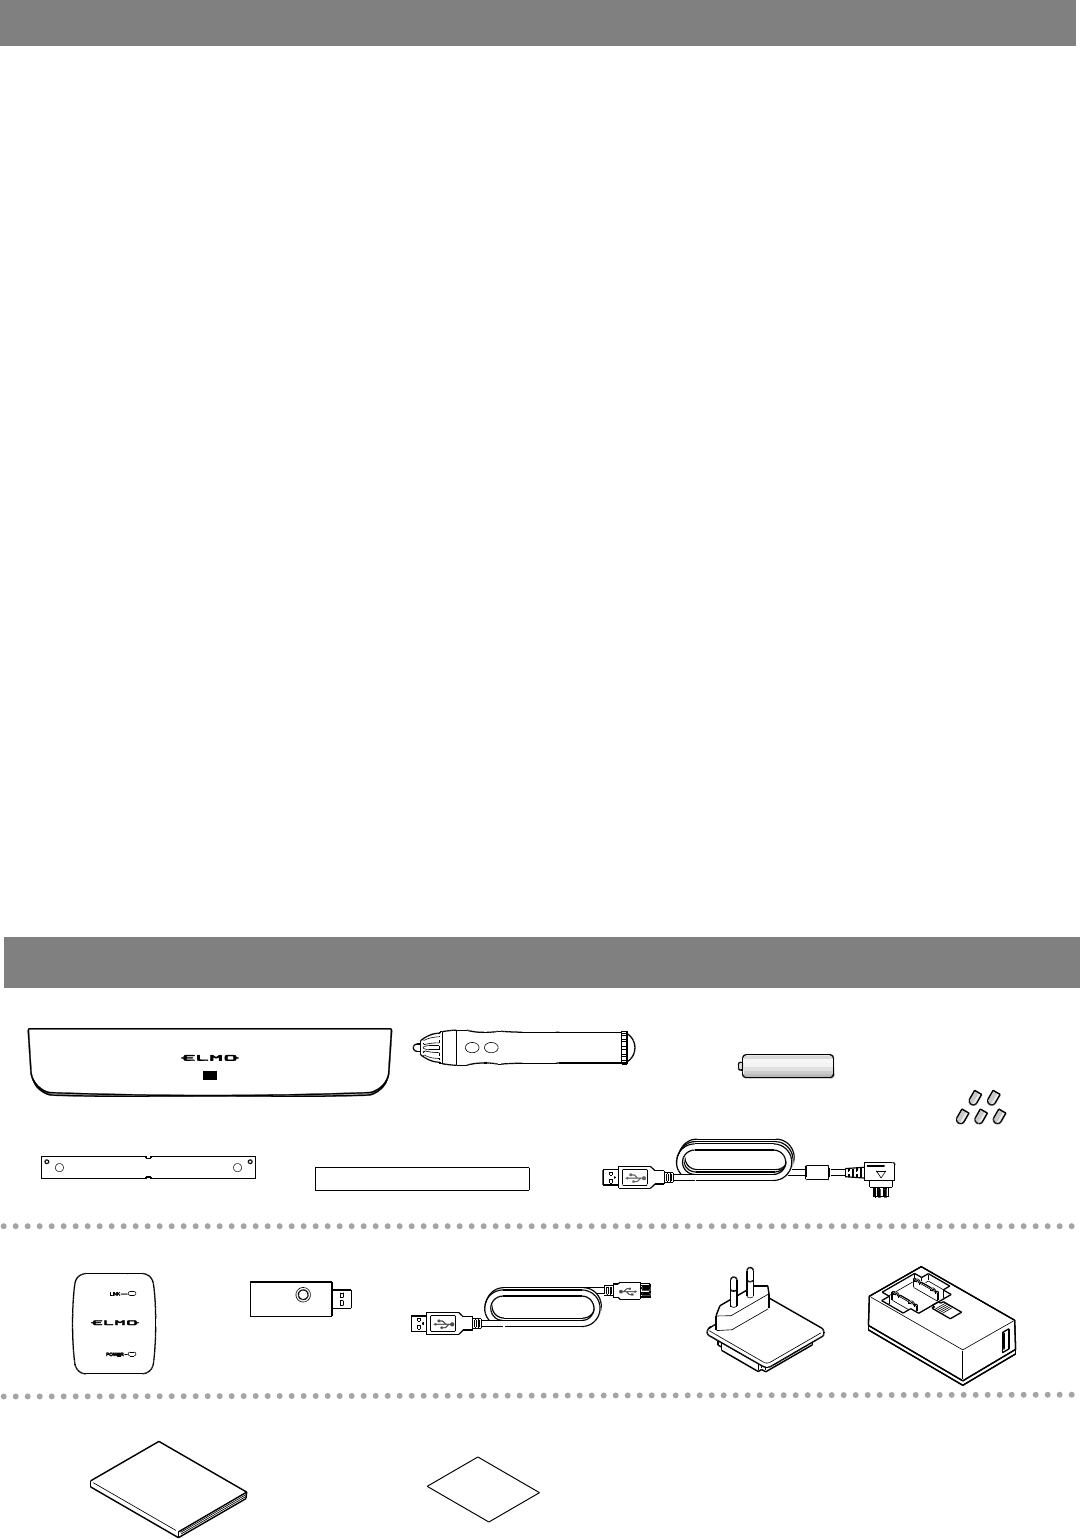
同梱品
●センサー
●ペン
●USBケーブル(白)
■電源プラグ
■ACアダプタ
■USBケーブル(黒)
■ワイヤレスユニット
■ワイヤレス
アダプタ
■ 本機の使用に際しては、必ず付属のACアダプタをご使用ください。
■ 付属のAC アダプタは本機専用です。他の機種に使用しないでください。
■ 電源プラグは、販売した国に合わせたものが付属されています。
日本国内で販売された製品に付属のACアダプタは必ず、AC100V 50Hzまたは60Hzで
お使いください。
■ 保管にあたっては直射日光のあたる所、暖房器具の近くに放置しないでください。
変色、変形、故障の原因となることがあります。
■ 湿気やほこりの多い場所、潮風の当たる場所、振動の多い所には置かないでください。
使用上の環境条件は次のとおりです。
温度:10℃~ 40℃ 湿度:10%~ 80%以下(結露しないこと)
■ 本機の清掃は、乾いたやわらかい布で拭いてください。
シンナーやベンジンなど揮発性のものは使用しないでください。
■ 落下防止のため次のことをお守りください。
・ 使用に際し、ACアダプタなどのコード類が引っ張られないよう配置、配線をしてください。
■ 保証期間を超えて本製品を長時間お使いになられるとき、部品の寿命によって、性能、品質
が劣化する場合があります。 有償にて部品交換致しますので、お買い上げの販売店か、
最寄の弊社営業部までご相談ください。
■ 乾電池についてのご注意
・ 長時間使用しないときは、ペンから乾電池を取り出してください。
・ 充電式電池は使用しないでください。
・ 充電したりショートさせたりしないでください。
・ 廃棄の際は、各自治体の指示に従ってください。
・ 極性(+/-の向き)には十分注意して入れてください。
・ 乾電池は必ず単3形・アルカリ乾電池を使用してください。
・ 電池の液が皮膚や服に付いたら、きれいな水で洗い流してください。
万一、目に入った場合は、すぐにきれいな水で洗い流して、医師の診察を受けてください。
■ ペン先は飲み込むおそれがあるため、ペン、同梱品のペン先(替え芯 5個)は乳幼児の手の届
くところに置かないでください。万が一、飲み込んだ場合は、窒息や胃などへの障害の原因
となりますので、ただちに医師の診察を受けてください。
使用上のご注意
●アルカリ乾電池
(単3形 / ペン用)
●取付板
●ペン先 5個
(替え芯)
●両面テープ(取付板用)
◆かんたんスタートガイド
(本書)
◆保証書
◆3Sサービス登録申込書/説明書
◆ライセンスキー
(シール)
6
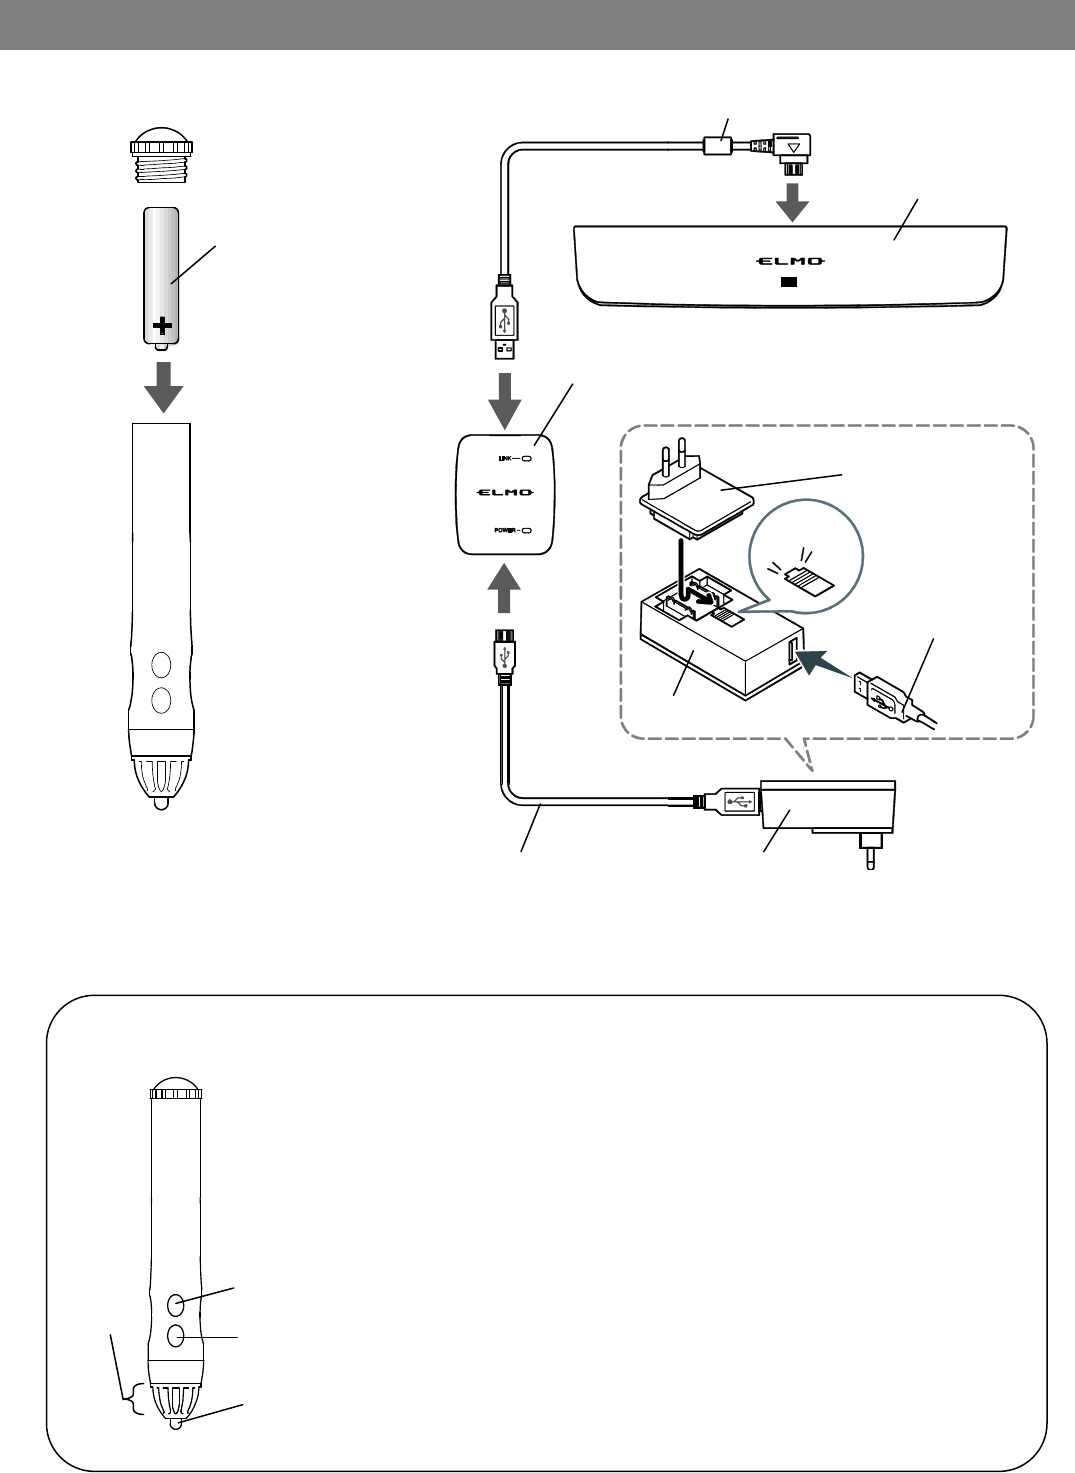
準備
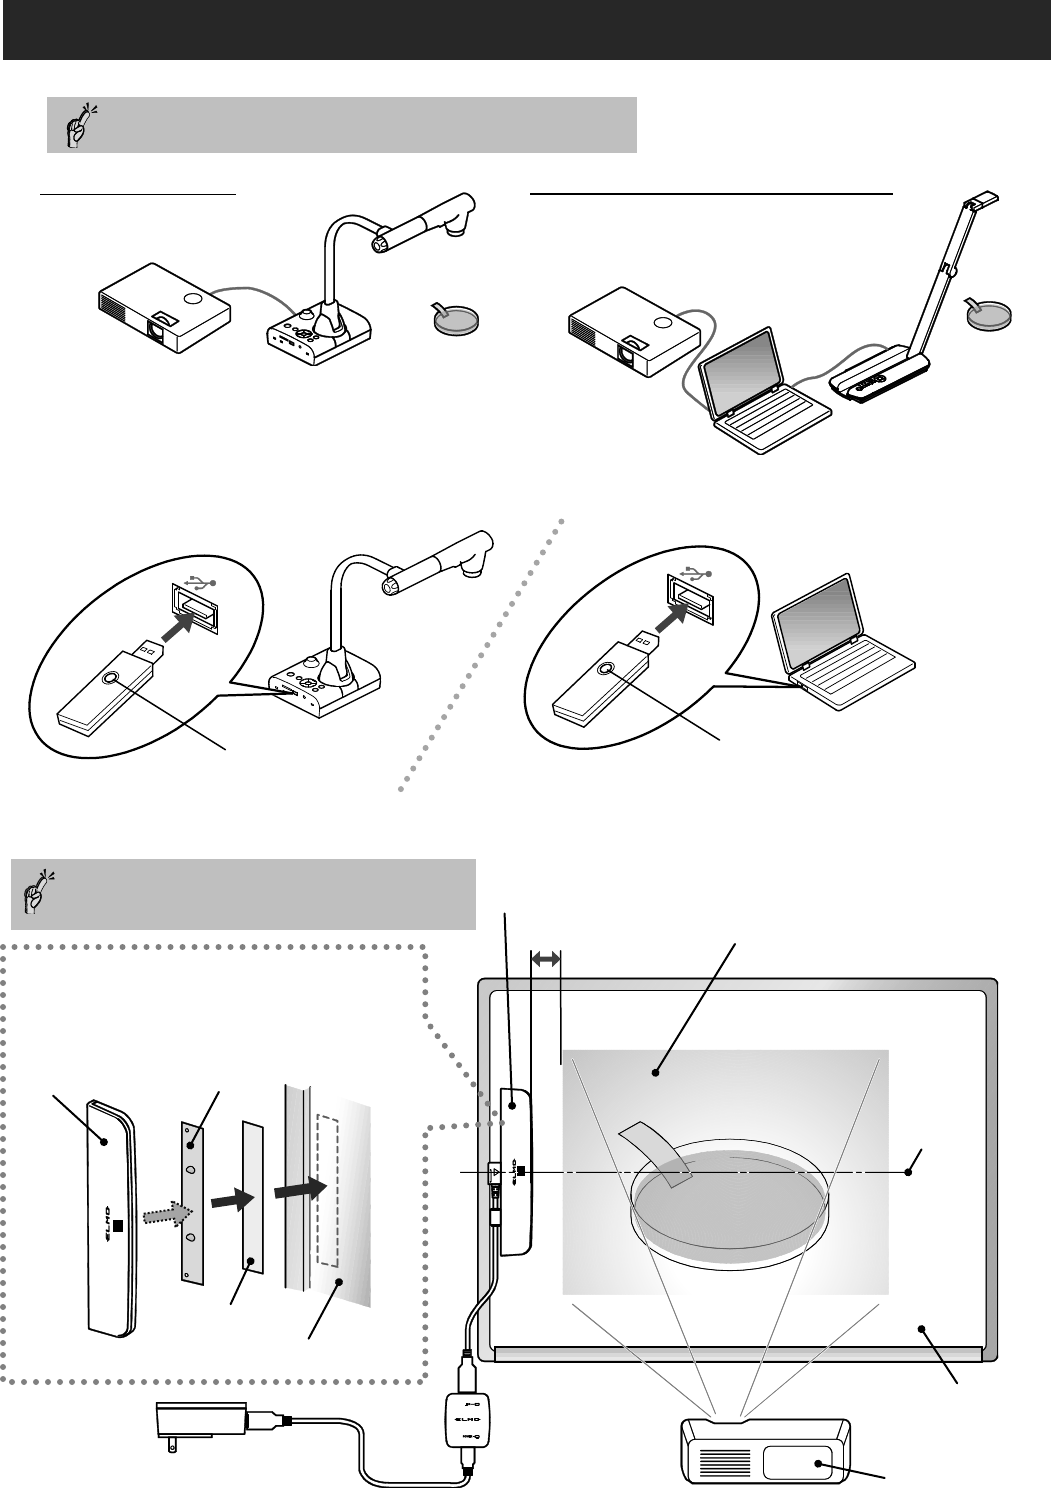
●各機器の接続
USBケーブル(白)
ワイヤレスユニット
カチッ
USBケーブル(黒)
●ペンの準備
センサー
ACアダプタ
※極性を間違えないように
電池を入れる
・ペンを持つ時に、A部を手で覆わないでください。
位置情報の検知障害となります。
・ペンは画面に対し垂直にして書き込んでください。
傾きが大きいと書込みに不具合が発生します。
・『ペン先』や『ペンボタン1』『ペンボタン2』を、
2分30秒押し続けると、ペン電源が自動OFFします。
一筆で2分30秒以上連続する書込みはできません。
・ペンの電池に充電式電池は使用しないでください。
A部
ペン先
ボタン2
ボタン1
◆ペンについて
電源プラグ
ACアダプタ
アルカリ乾電池
(単3形)
USBケーブル(黒)
7
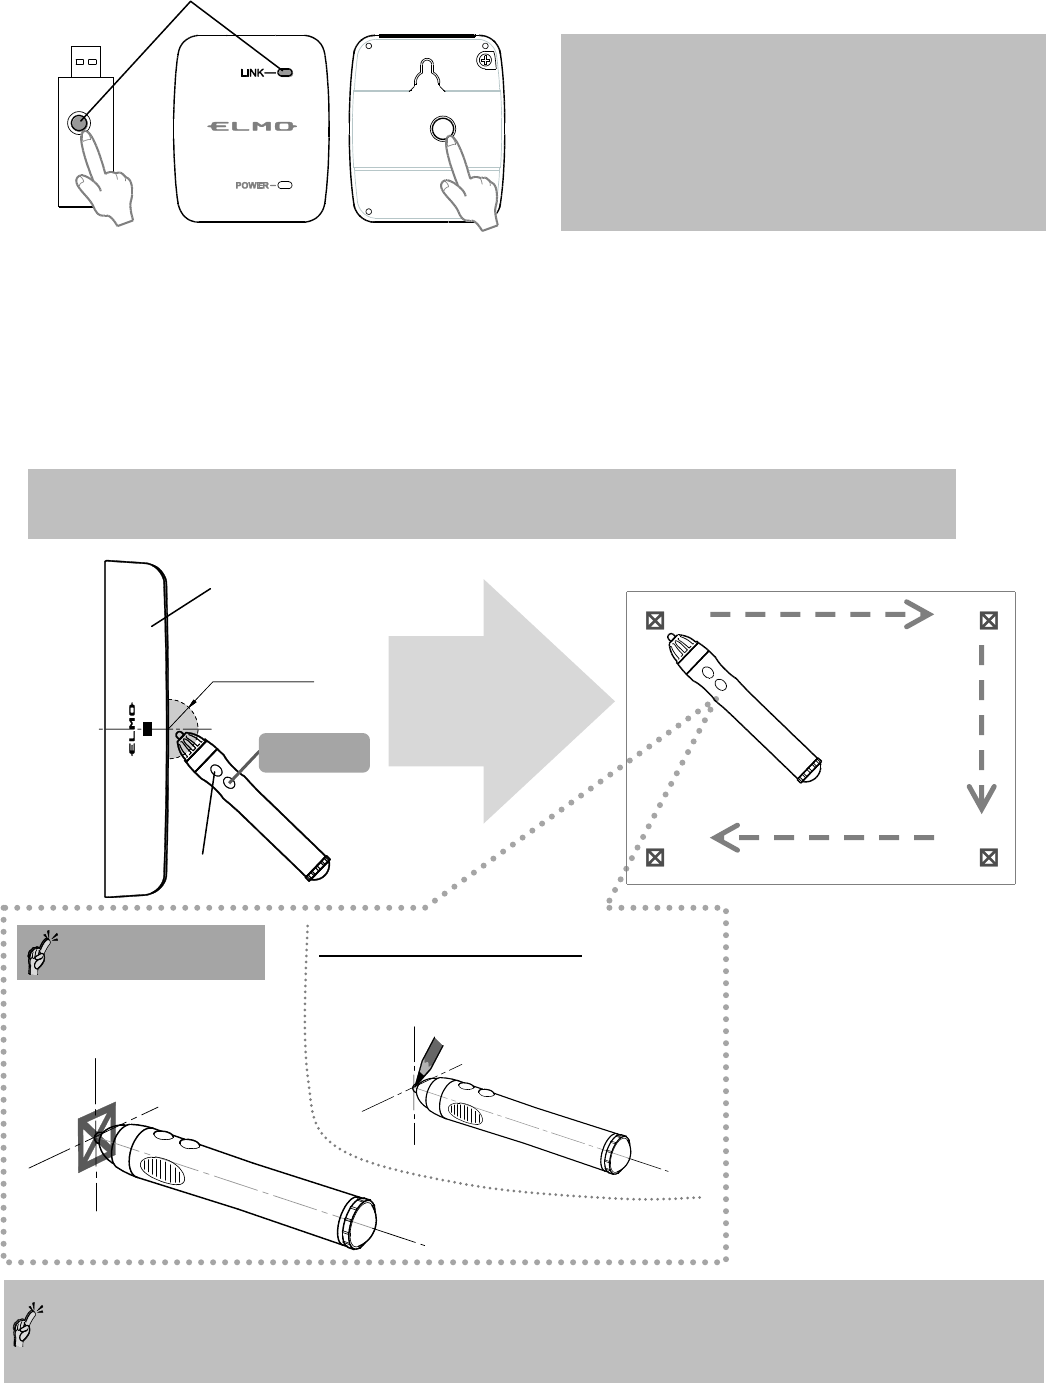
センサーとプロジェクタ投影画面は
平行 / 中心を合わせて取付けてください
投影面がマグネットに非対応の場合、
付属の取付板に両面テープを貼って、
投影面へ貼り付けてください
センサー
取付板
両面テープ
投影面
9cm
センサー
プロジェクタ投影画面
(縦1.38m×横1.83m以内)
中心
黒板/ホワイトボード等
プロジェクタ
●L-12iDと使う場合
使い方
1.書画カメラやパソコン、プロジェクタをセッティングする
3.プロジェクタ投影面にセンサーをセッティングする
◆パソコン / 書画カメラと使う場合
※事前にパソコンへ
ELMO Interactive Toolbox を
インストールしてください ( ⇒ P10 )
各機器の接続方法は、各取扱説明書をご覧ください。
2.ワイヤレスアダプタを 『L-12iD』 または 『パソコン』 へ接続する
ワイヤレスアダプタ・ボタンが青色に点滅します
青色発光(点滅)
青色発光(点滅)
8
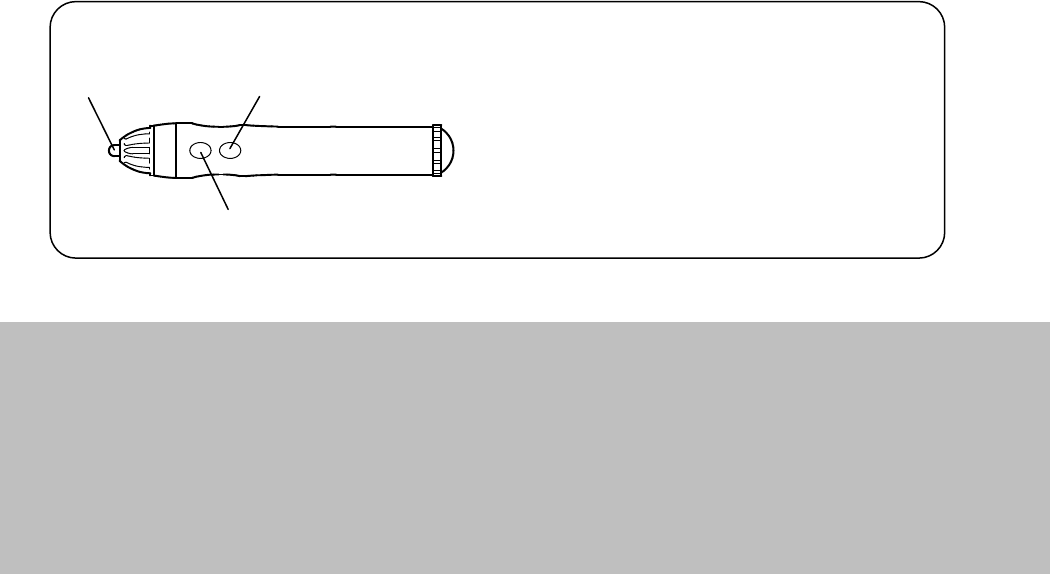
ワイヤレスアダプタ・ボタンとワイヤレスユニット(表)LINKが、消灯していればペアリングされています。
5.位置合わせ(キャリブレーション)をする
・センサーの中心(半径2cm内)で、ペンボタン1を3秒以上押すと“ピィーッ”と音が鳴り、
投影画面左上①にカーソルが現れます。
・ペン先でカーソルをクリックすると”ピッ”と音が鳴り、番号順にカーソルが移動します。
・4ヶ所全てクリックし、”ピピピッ”と鳴ったら位置合わせ(キャリブレーション)完了です。
・カーソルとズレた位置をクリックした場合、ペンボタン2を2秒以上押し、項目5からやり直してください。
・キャリブレーション中、30秒以上ペン操作がなかった場合、“ピピッ”と音が鳴り、
自動的にキャリブレーションモードが解除されます。
4.ワイヤレスアダプタ と ワイヤレスユニット のペアリングを確認する
①
②
④
③
投影画面
半径2cm
ボタン2
センサー
ボタン 1
ペンの操作ポイント
① 投影面に対し垂直に!
② アイコン中心をクリック!
●『L-12iD』と使った場合
アイコンは『えんぴつ』画像になりますので、
えんぴつの先端をクリックしてください
注. シリアルNo.1800001~1803305までの L-12 は位置合わせ(キャリブレーション)できません。
お買い上げの販売店か、最寄の弊社営業部までご連絡ください。
※青色のLEDが点滅している場合は、
ペアリングされていません!
・ワイヤレスユニット(裏)ボタンを5秒長押しすると、
LED点滅が速くなります。
・その後ワイヤレスアダプタのボタンを押すと、
LEDが消灯しペアリングされます。
消灯 : ペアリング済み
表
裏
9
◆使用中の注意事項
・ペンの位置と書込み位置がズレている場合、上記項目5の設定をしてください。
・センサーの位置や画面サイズ(※)の変更はしないでください。 ペンの位置情報の取得が出来ず、
書込みに不具合が発生します。
※画面サイズ・・・プロジェクタの投影距離の変更に伴うもの。
またモニタ/プロジェクタ/書画カメラの解像度変更も対象です。
・ペンが書込み領域の外にある場合、またペンの電池が切れた場合、センサーのLEDが赤く点灯します。
・複数のペンの使用は出来ません。
6.設定が完了し、画面操作ができます
●L-12iD と使っている場合・・・
画面に表示されたアイコン操作 / 書込みができます。
◆パソコン / 書画カメラ と使っている場合・・・
パソコンのマウス操作ができます。
ELMO Interactive Toolboxを起動すると書込みができます。
ペン先 : マウス・左ボタン動作
ボタン1 : マウス・右ボタン動作
ペン先
ボタン2
ボタン1
◆ペンでのパソコン操作
10
◆ソフトの起動
デスクトップ上にあるELMO Interactive Toolboxショートカットのダブルクリック、
またはアプリケーションメニューに表示されるELMO Interactive Toolboxの選択などをして起動します。
初回起動時に、ライセンス認証の画面が表示されます。
ライセンスキーが書かれたシール(同梱品)を見て入力してください。
※正しいキーが入力された場合は、次回起動以降、ライセンス認証の画面は表示されません。
※ライセンスキーはアプリケーションの再インストール時などにも入力が必要になります。
キーが書かれたシールは、取扱説明書に貼り付ける等、紛失しないよう大切に保管してください。
ELMO Interactive Toolbox・インストールマニュアル
※ソフトウェアをインストールする前に、使用する PC が動作環境を満たしているかをお調べください。
対象機種
Windows:IBM PC/AT 互換機
Mac:Intel CPU 搭載 Mac
オペレーティングシステム(OS)
Windows 7 32/64bit
Windows 8、8.1 32/64bit
Windows 10 32/64bit
CPU
Intel Core i5 2GHz 同等以上
メモリ
1GB RAM の空き(推奨 2GB の空き)
ハードディスク
基本インストール用に 200MB 以上の空き容量
画面解像度・表示色
1024×768 ピクセル以上・1600 万色以上
USB
USB 2.0 以上(書画カメラ接続用)
対象書画カメラ
L-12iD / TT-12iD / L-12i / TT-12i / L-12 / TT-12 / P100HD / P30HD / P10HD
MO-1 / MO-1w / L-1ex / TT-02RX / L-12tx / TX-1 / LX-1
・サウンドデバイスが使用できない場合、一部の機能が動作しない場合があります。
・全てのパソコン環境での動作を保証するものではありません。
・弊社「Image Mate Accent for SRS」をお使いの方は、先に「Image Mate Accent for SRS」の
アンインストールを行ってください。
注意
■Windows の場合
●インストール
①下記の弊社 Web ページにアクセスし、「ELMO Interactive Toolbox」を取扱上のご注意に同意いただいた上、
インストーラをダウンロードします。
http://www.elmosolution.co.jp/products/download/driver_soft.html
②ダウンロード完了後、ファイルを実行し、「ELMO Interactive Toolbox」インストール画面の指示に従って操作して
ください。※1
③インストール完了後、パソコンのデスクトップに、「ELMO Interactive Toolbox」アイコンが表示されます。※2
※1:ダウンロードしたファイルが見つからない場合、お客様のパソコンのダウンロードフォルダをご確認
ください。
※2:ご使用のパソコンによって、再起動を促す場合があります。その場合は『はい』ボタンを押して
パソコンを再起動させてください。
■ELMO Interactive Toolbox 取扱説明書ダウンロード
『ELMO Interactive Toolbox 取扱説明書』も上記インストーラと同様に、上記の弊社 Web ページよりダウンロードし
てください。
ELMO Interactive Toolbox は、Image Mate Accent for SRS(弊社 SRS に付属)、Image Mate Accent 2(弊社ポータブ
ルIWB に付属)を進化させて、総合ソフトウェアとなりました。
11
◆Mac の場合
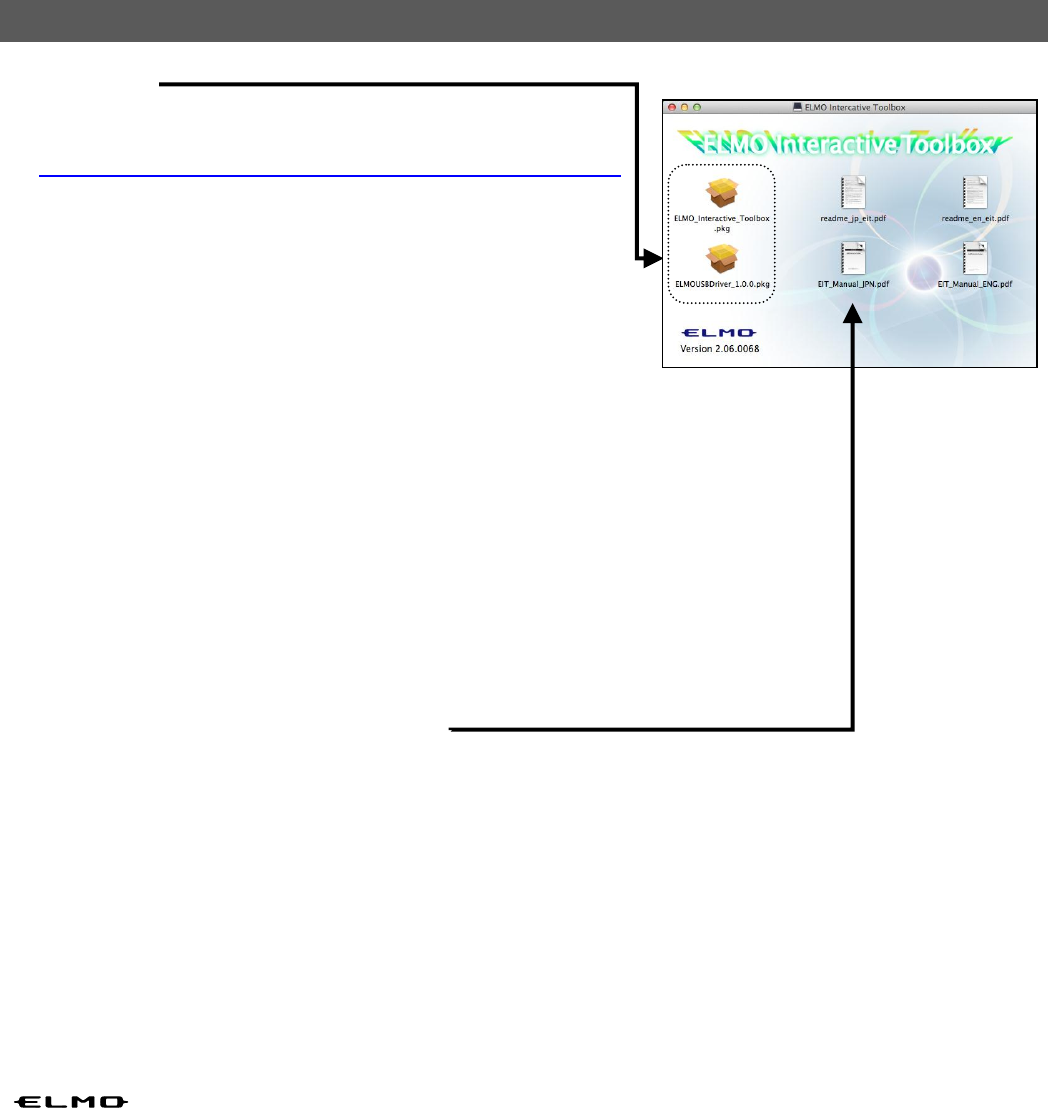
●インストール
① 下記の弊社 Web ページにアクセスし、「ELMO Interactive Toolbox」
を取扱上のご注意に同意いただいた上、ダウンロードします。
http://www.elmosolution.co.jp/products/download/driver_soft.html
② ダウンロード完了後、“ELMO_EIT.dmg”を実行します。
③ “ELMO_Interactive_Toolbox.pkg”を実行します。
④ インストール時は指示に従ってください。
⑤ ”ELMOUSBDriver_1.0.0.pkg”を実行します。
⑥ インストール時は指示に従ってください。
■ELMO Interactive Toolbox 取扱説明書の閲覧
メニューから『EIT_Manual.pdf』を選択してください。
◎免責事項
本書の内容、およびELMO Interactive Toolboxは、将来予告無しに変更することがあります。
お客様のコンピュータにインストールされておりますソフトウェアまたは周辺機器の影響により、当社のソフトウェアの動作に
支障をきたす事があります。
当社のソフトウェアのご使用により生じた直接および間接の損害につきましては、当社は一切責任を負いかねますので、あ
らかじめご了承下さい。
◎商標について
本書には以下の商標・登録商標が使用されています。
は株式会社 エルモ社の登録商標です。
Intel はIntel Corporation の登録商標です。
Windows® 7の正式名称は、Microsoft® Windows® 7 operating system です。
本文中では、OS名称を略記しています。
Windows® 8の正式名称は、Microsoft® Windows® 8 operating system です。
本文中では、OS名称を略記しています。
Windows® 8.1の正式名称は、Microsoft® Windows® 8.1 operating system です。
本文中では、OS名称を略記しています。
Windows® 10の正式名称は、Microsoft® Windows® 10 operating system です。
本文中では、OS名称を略記しています。
Microsoft 、Windowsは、米国Microsoft Corporation の米国およびその他の国における登録商標です。
Apple、Apple ロゴ、Mac、Mac OS、Macintoshは、米国およびその他の国で登録されたApple Inc. の商標です。
Mac は、Apple Inc. のサービスマークです。
その他、本書に記載されている会社名、製品名は、各社の商標または登録商標です。
◆ソフトの起動
アプリケーション/ELMO_Interacitive_Toolbox/ELMO_Interactive_Toolboxを実行します。
初回起動時に、ライセンス認証の画面が表示されます。
ライセンスキーが書かれたシール(同梱品)を見て入力してください。
※正しいキーが入力された場合は、次回起動以降、
ライセンス認証の画面は表示されません。
※ライセンスキーはアプリケーションの再インストール時などにも
入力が必要になりますので、キーが書かれたシールは、
取扱説明書に貼り付ける等、紛失しないよう大切に保管してください。
12
13
Portable IWB Wireless set CRB-2
Quick Start Guide
English:P13-P23
日本語:P2-P11
14
IMPORTANT SAFEGUARDS
●Read Instructions
All the safety and operating instructions should be read before the appliance is operated.
●Retain Instructions
The safety and operating instructions should be retained for future reference.
●Heed Warnings
All warnings on the product and in the operating instructions should be adhered to.
●Follow Instructions
All operating and use instructions should be followed.
●Cleaning
Unplug this product from the wall outlet before cleaning. Do not use liquid cleaners or aerosol cleaners. Use a
damp cloth for cleaning.
●Attachments
Do not use attachments not recommended by the product manufacturer as they may cause hazards.
●Water and Moisture
Do not use this product near water - for example, near a bath tub, wash bowl, kitchen sink, or laundry tub, in a wet
basement, or near a swimming pool, and the like.
The connector of this unit and the USB cable into the water or foreign matter, or not wet.
This could cause a fire or electric shock.
●Placement
Do not place this product on an unstable cart, stand, tripod, bracket, or table. The product may fall, causing serious
injury to a child or adult, and serious damage to the product. Use only with a cart, stand, tripod, bracket, or table
recommended by the manufacturer, or sold with the product. Any mounting of the product should follow the
manufacturer’s instructions, and should use a mounting accessory recommended by the manufacturer.
●Ventilation
Slots and openings in the cabinet are provided for ventilation and to ensure reliable operation of the product and to
protect it from overheating, and these openings must not be blocked or covered. The openings should never be
blocked by placing the product on a bed, sofa, rug, or other similar surface. This product should not be placed in a
built-in installation such as a bookcase or rack unless proper ventilation is provided or the manufacturer’s
instructions have been adhered to.
●Power Sources
This product should be operated only from the type of power source indicated on the marking label. If you are not
sure of the type of power supply to your home consult your appliance dealer or local power company. For products
intended to operate from battery power, or other sources, refer to the operating instructions.
●Grounding or Polarization
This product may be equipped with either a polarized 2-wire AC line plug (a plug having one blade wider than the
other) or a 3-wire grounding type plug, a plug having a third (grounding) pin. The 2-wire polarized plug will outlet,
try reversing the plug. If the plug still fails to fit, contact your electrician to replace your obsolete outlet. Do not
defeat the safety purpose of the polarized plug. The 3-wire grounding type plug will fit into a grounding type power
outlet. This is a safety feature. If you are unable to insert the plug into the outlet, contact your electrician to
replace your obsolete outlet. Do not defeat the safety purpose of the grounding type plug.
●Power-Cord Protection
Power-supply cords should be routed so that they are not likely to be walked on or pinched by items placed upon or
against them, paying particular attention to cords at plugs, convenience receptacles, and the point where they exit
from the product.
●Lightning
For added protection for this product during a lightning storm, or when it is left unattended and unused for long
periods of time, unplug it from the wall outlet and disconnect the antenna or cable system. This will prevent
damage to the product due to lightning and power-line surges.
●Overloading
Do not overload wall outlets, extension cords, or integral convenience receptacles as this can result in a risk of fire
or electric shock.
15
CAUTION:
TO REDUCE THE RISK OF ELECTRIC SHOCK,
DO NOT REMOVE COVER (OR BACK).
NO USER-SERVICEABLE PARTS INSIDE.
REFER SERVICING TO QUALIFIED SERVICE PERSONNEL.
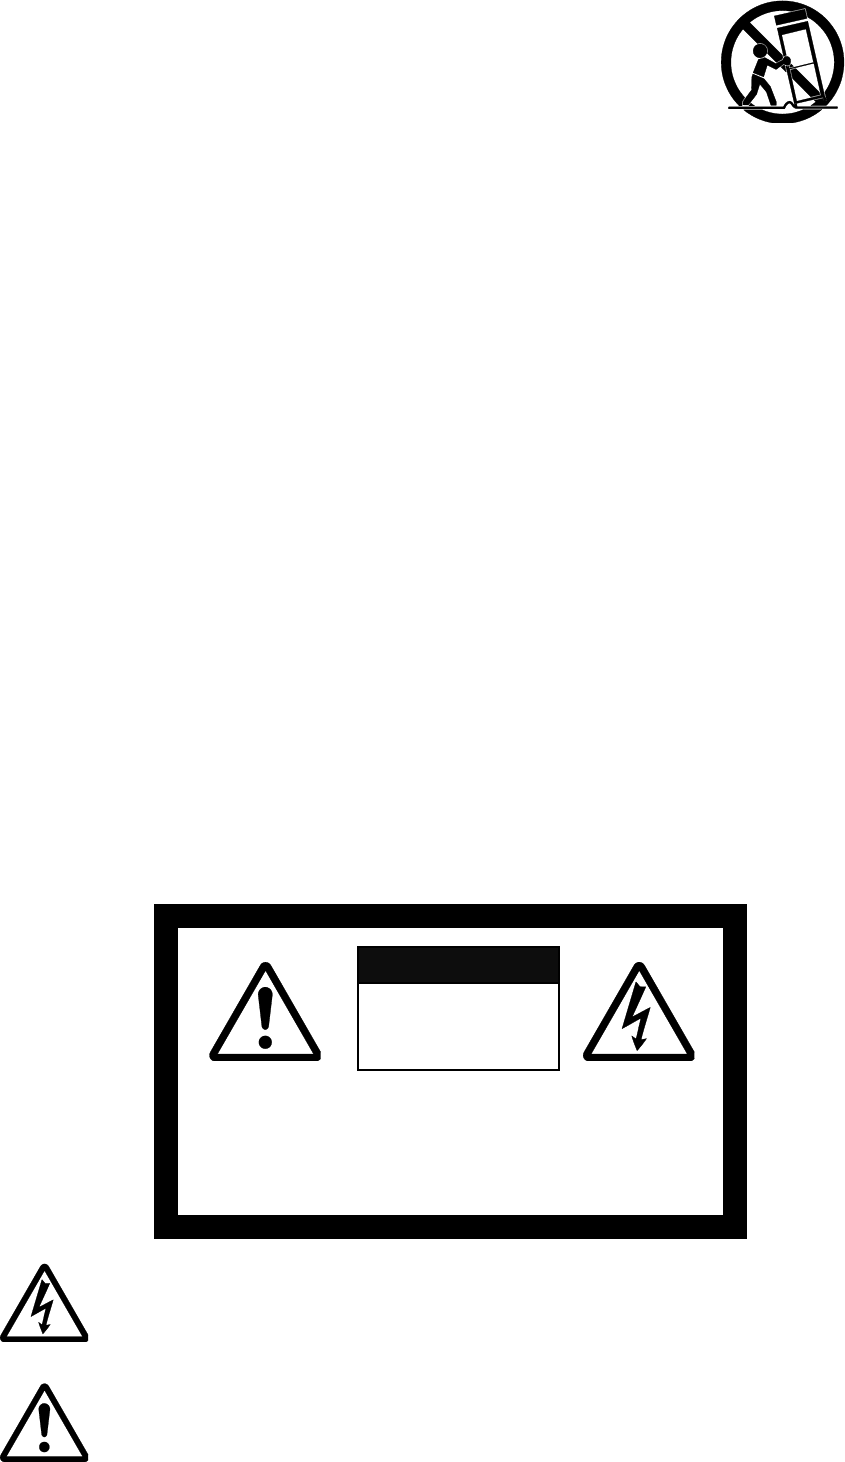
●A product and cart combination should be moved with care.
Quick stops, excessive force, and uneven surfaces may cause the product and
cart combination to overturn.
●Object and Liquid Entry
Never push objects of any kind into this product through openings as they may touch dangerous voltage points or
short-out parts that could result in a fire or electric shock. Never spill liquid of any kind on the product.
●Servicing
Do not attempt to service this product yourself as opening or removing covers may expose you to dangerous
voltage or other hazards. Refer all servicing to qualified service personnel.
●Damage Requiring Service
Unplug this product from the wall outlet and refer servicing to qualified service personnel under the following
conditions:
・When the power-supply cord or plug is damaged.
・If liquid has been spilled, or objects have fallen into the product.
・If the product has been exposed to rain or water.
・If the product does not operate normally by following the operating instructions. Adjust only those controls that
are covered by the operating instructions as an improper adjustment of other controls may result in damage
and will often require extensive work by a qualified technician to restore the product to its normal operation.
・If the product has been dropped or damaged in any way.
・When the product exhibits a distinct change in performance - this indicates a need for service.
●Replacement Parts
When replacement parts are required, be sure the service technician has used replacement parts specified by the
manufacturer or have the same characteristics as the original part. Unauthorized substitutions may result in fire,
electric shock or other hazards.
●Safety Check
Upon completion of any service or repairs to this product, ask the service technician to perform safety checks to
determine that the product is in proper operating condition.
●Heat
The product should be situated away from heat sources such as radiators, heat registers, stoves, or other products
(including amplifiers) that produce heat.
RISK OF
ELECTRIC SHOCK
DO NOT OPEN
CAUTION
The lightning flash with arrowhead symbol, within an equilateral triangle, is intended to alert
the user to the presence of uninsulated “dangerous voltage” within the product’s enclosure
that may be of sufficient magnitude to constitute a risk of electric shock to persons.
The exclamation point within an equilateral triangle is intended to alert the user to the
presence of important operating and maintenance (servicing) instructions in the literature
accompanying the product.
SA 1965
SA 1966

This symbol [crossed-out wheeled bin WEEE Annex IV] indicates
separate collection of waste electrical and electronic equipment in the
EU countries.
Please do not throw the equipment into the domestic refuse.
Please use the return and collection systems available in your country
for the disposal of this product.
17
■When using this device, be sure to use the supplied AC adapter.
■Be sure to use the AC adapter attached to this product.
■Be sure to use the power plug applicable to your local power specifications.
■When storing the product, do not leave it under direct sunlight or by heaters.
It may become discolored, deformed, or damaged.
■Do not place this product in any humid, dusty, salt bearing wind, or vibrating locations.
Only use it under the following environmental conditions:
Temperature: 10°C - 40°C (50°F - 104°F)
Humidity: 10% - 80% (No condensation)
■Use a soft, dry cloth for cleaning.
Do not use any volatile solvent such as thinner or benzene.
■Follow the guidelines below to prevent the unit from dropping or overturning.
Place or wire the unit to prevent the AC adapter cord or video cable from pulling.
■If this product is used for longer than the warranty period, its performance and
quality may deteriorate due to the lifetime of its parts. To purchase replacement parts,
consult the dealer from whom you purchased this product or our branch/office near your location.
■Battery precautions:
・If this product is not going to be used for a long time, take the batteries out of the pen.
・Do not use rechargeable batteries.
・Do not try to recharge or short-circuit the batteries.
・When disposing of used batteries, follow the instructions of your local government.
・Insert from one side and pay particular attention to the polarity (+/- directions).
・Be sure to use AA alkaline battery.
・If any liquid from a battery leaks onto your skin or clothes, flush the area with clean water immediately.
If it gets into your eye, flush immediately with clean water and then contact a doctor.
■Nib there is a possibility that the swallow. Therefore, the tip of the pen and the bundled products
(extra lead five) please do not place out of reach of infants. By any chance, if swallowed, it will be the
cause of the failure to suffocation or stomach, please immediately consult a doctor.
BEFORE YOU USE
Bundled items
●Sensor
●Pen
●USB cable (White)
■Power plug
■AC adapter
■USB cable(Black)
■Wireless unit
■Wireless adapter
●AA alkaline battery
(for the pen)
●Attachment plate
●Extra pen tip x 5
●Double-sided tape
(for the attachment plate)
◆Quick Start Guide(this book)
◆License key(seal)
18
Preparations
●Connecting the devices
USB cable(White)
Wireless unit
Click
USB cable(Black)
●Installing the Battery into the Pen
Sensor
AC adapter
※Make sure that the polarity (+/-)
of the battery is correct.
・Do not cover [A] with your hand when you hold the pen.
The pen position data may not be recognized correctly.
・If the pen is used at an acute angle, you may not be able to draw correctly.
・The power of the pen turns off automatically after one of either "Pen tip",
"Button 1", or "Button 2" is pressed for 2 minutes and 30 seconds.
The maximum time that you can draw in one stroke is 2 minutes and 30 seconds.
・Do not use a rechargeable battery.
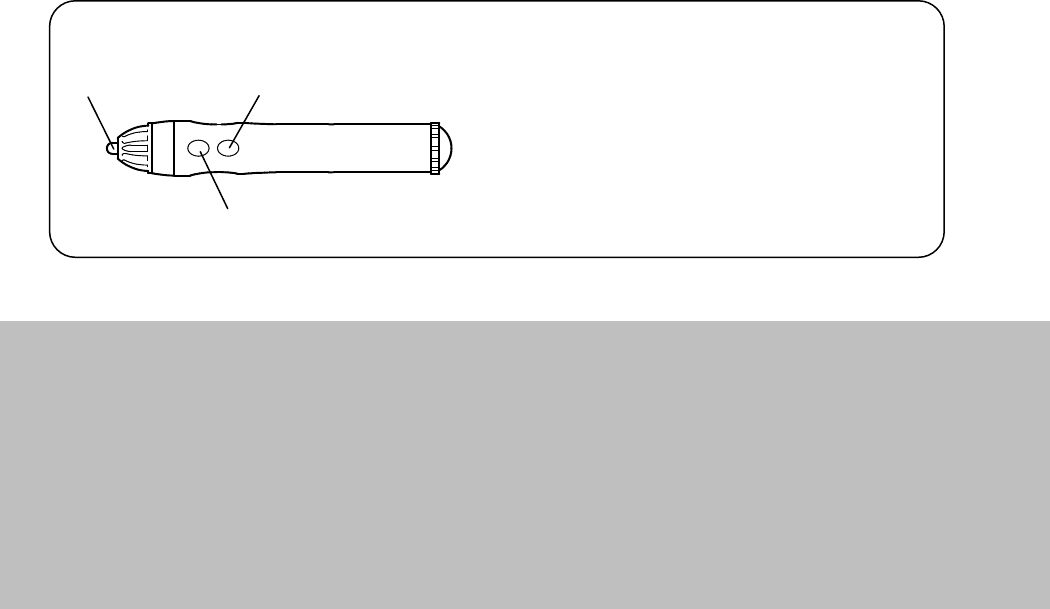
[A]
Pen tip
Button 2
Button 1
◆About the Pen
Power plug
AC adapter
AA alkaline battery
USB cable(Black)
19
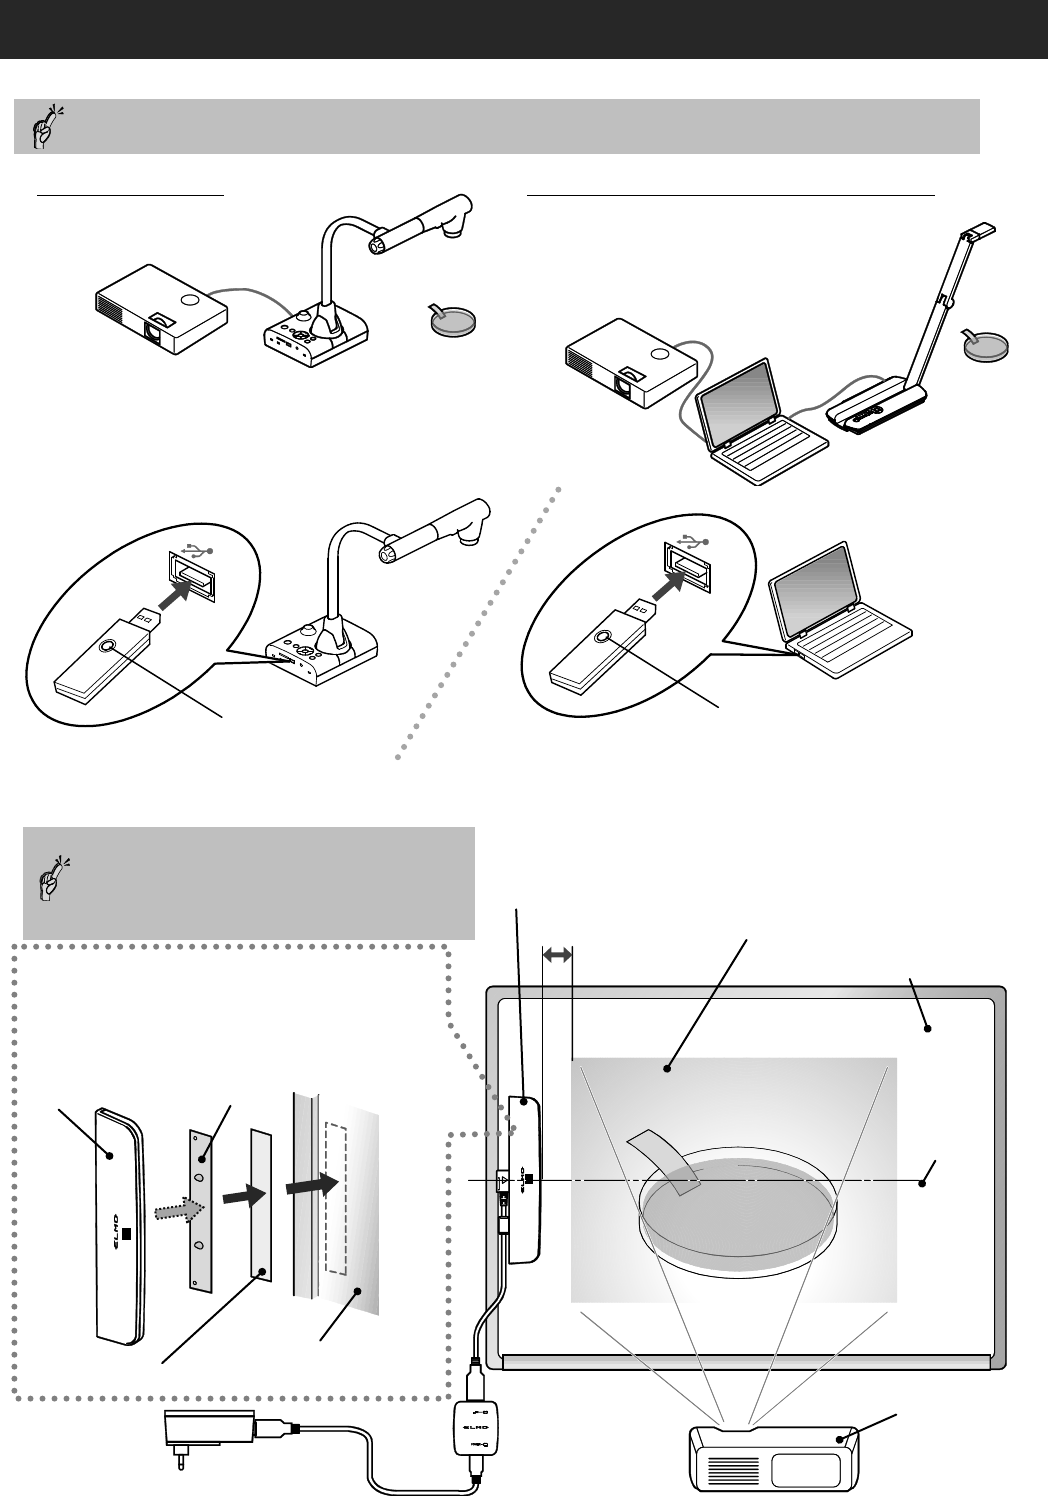
Make sure to attach the sensor in parallel
with the projection surface, aligning the
center of the sensor with the center of the
projection surface.
If the magnet does not stick to the
projection surface, use the attachment
plate and the double-sided tape to attach
the sensor as shown in the figure.
Sensor
Attachment plate
Double-sided tape
Projection surface
9cm
Sensor
Projection surface
(Max. H 1.38m x W 1.83m)
Blackboard/Whiteboard etc
Center
Projector
●Using with L-12iD
How to Use
1.Connect the Document Camera, Computer and Projector.
3.Attach the sensor to the projection surface.
◆Using with Computer / Document Camera
※ELMO Interactive Toolbox needs to be installed
on your computer in advance. ( ⇒ P21 )
For information on how to connect them together, refer to the user’s manuals of the respective devices.
2.Connect the wireless adapter to L-12iD or computer.
A wireless adapter button flashes in blue.
Flashes in blue
Flashes in blue
20
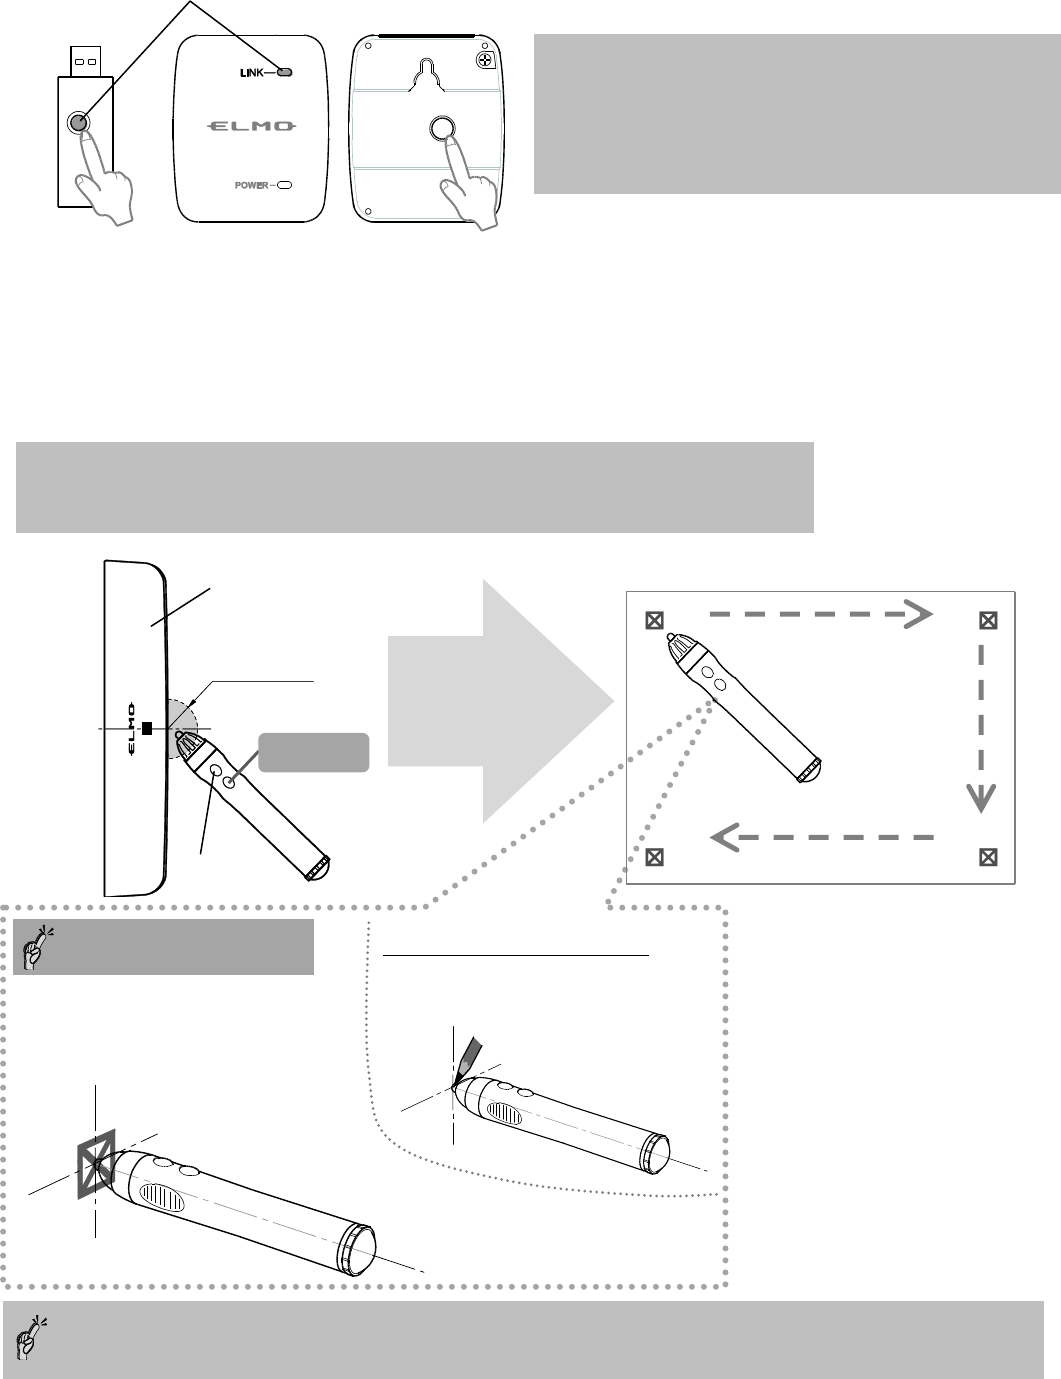
If the LED of the wireless adapter button and the wireless unit LINK are off, the pairing is successfully completed.
5.Perform the pen calibration.
・Point the pen to the center of the sensor (within 2cm radius) and press the button 1 for over 3 seconds.
An icon appears on the left top of the projection surface [①] with a beep sound.
・Each time the icon is touched with the pen, the icon moves to the next position with a short beep in the
order described in the figure.
・When you hear 3 short beeps after touching all 4 positions, the pen calibration is successfully completed.
・If you failed to touch the icon correctly, press the button 2 for over 2 seconds and try again from the step 5.
・If no operation is performed for over 30 seconds, the calibration mode is released automatically with 2 short beeps.
4.Verify the pairing of the wireless adapter and the wireless unit.
①
②
④
③
Projection surface
Tips for the pen operation
① Keep the pen at a right (90°)
angle to the projection surface.
② Touch the center of the icon.
●When using with L-12iD
The pencil icon appears.
Touch the tip of the pencil icon.
Note: The pen calibration cannot be performed for L-12 with a serial number
between 1850001 and 1850662 / 1880001 and 1880327.
Contact your dealer for further information.
※If the LED flashes in blue, the pairing is not completed.
・The LED begins to flash quickly after the wireless unit
button is pressed for 5 seconds.
・When the wireless adapter button is pressed in this
condition, the LED turns off and the pairing is completed.
※
※
OFF : Pairing completed
2cm radius
Sensor
Button 1
Button 2
table
back
21
◆Caution
・When there is misalignment of the projected image and the pen's position, perform the pen calibration of step 5
・Do not change the position of the sensor or the screen size(※). Doing so may cause failure of proper
detection of the pen position and you may not be able to draw correctly.
※Screen size changes according to the change of the projection distance.
The screen size also changes when the resolution of monitor, projector or Document Camera is changed.
・The LED of the sensor turns red when the pen position is out of the drawing area or the battery of the pen
is run out.
・A multiple number of pens cannot be used.
6.The pen calibration is completed and the pen operation is ready.
●When using with L-12iD
The drawing operation and the operation of icons displayed on the screen are now possible.
◆When using with computer/ Document camera
The mouse operation of the computer is now possible.
The drawing operation is possible by starting ELMO Interactive Toolbox.
Pen tip: Left button of the mouse
Button 1: Right button of the mouse
Pen tip
Button 2
Button 1
◆Mouse operation of the computer with the pen
22
ELMO Interactive Toolbox・Installation manual
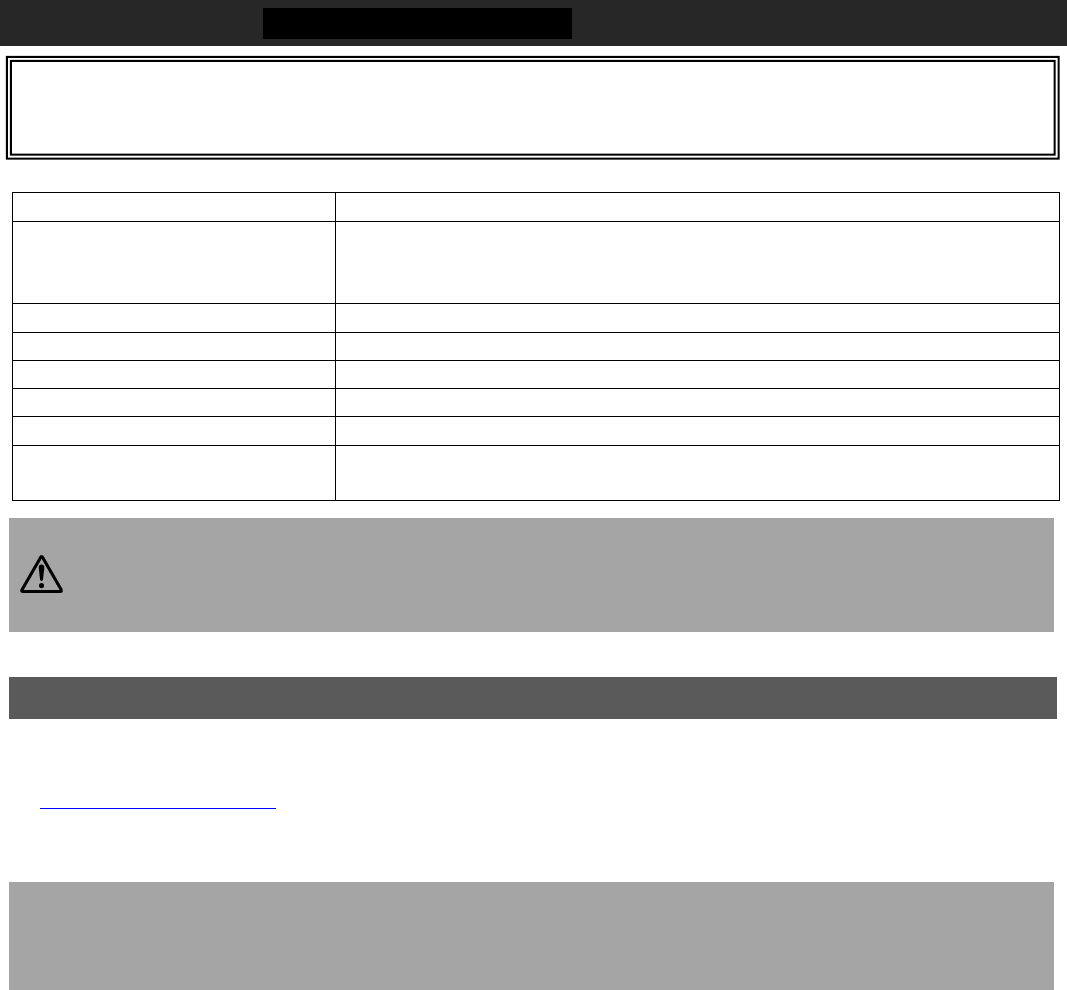
※The ELMO Interactive Toolbox can be used in the following computer environments.
Computer model
IBM PC/AT compatible, Intel CPU Mac
Operating system(OS)
Windows 7 32/64bit
Windows 8、8.1 32/64bit
Windows 10 32/64bit
CPU
Intel Core i5 2GHz equivalent or higher
Memory
RAM free of 1GB(free of recommended 2GB)
Hard disk
200MB or more of free space for basic installation
Screen resolution / Display Color
1024×768 pixcels or higher / millions of colors
USB
USB 2.0 HI-SPEED
Compatible Document Cameras
L-12iD / TT-12iD /L-12i / TT-12i / L-12 / TT-12 / P100HD / P30HD / P10HD
/ MO-1 / MO-1w / L-1ex / TT-02RX / L-12tx / TX-1 / LX-1
・If a sound device cannot be used, some of the functions may not operate.
・Operation is not guaranteed for all computer environments.
・If Image Mate Accent for SRS is already installed in your computer, uninstall it before installing
Image Mate Accent2.
Caution
■When using Windows
●Installation
①Access the Web page, Agree to the attention of handling and download the "ELMO Interactive Toolbox" installer.
http://www.elmoeurope.com
②After the download is complete, run the file. Please operate according to the instructions on the installation screens. ※1
③When the installation is complete, you will see the ELMO Interactive Toolbox」 icon on your desktop PC. ※2
※1:If you can not find the downloaded file, please check the download folder on your computer.
※2:Depending on your computer, you may be asked to restart the computer. In that case, press “YES” to
restart the computer.
◆Launching ELMO Interactive Toolbox
Launch ELMO Interactive Toolbox by double-clicking the shortcut icon created on the desktop of your
computer or selecting ELMO Interactive Toolbox from the application menu.
When ELMO Interactive Toolbox is launched for the first time, the Product Activation window appears.
Enter the license key. (The license key(seal) is accessories..)
※After valid license key is entered, the Product Activation window will not appear next time when ELMO
Interactive Toolbox is launched.
※The license key will be needed for reinstallation of ELMO Interactive Toolbox. Keep the sticker in a safe
place.
■Reading the User's Guide
As well as the installer, please download it from the web also User's Guide.
ELMO Interactive Toolbox is, evolved Image Mate Accent for SRS (included with our SRS) and the Image Mate
Accent 2 (included with our portable IWB), became a comprehensive software.
23
◆When using Mac
●Installation
①Access the Web page, Agree to the attention of handling and
download the "ELMO Interactive Toolbox".
http://www.elmoeurope.com
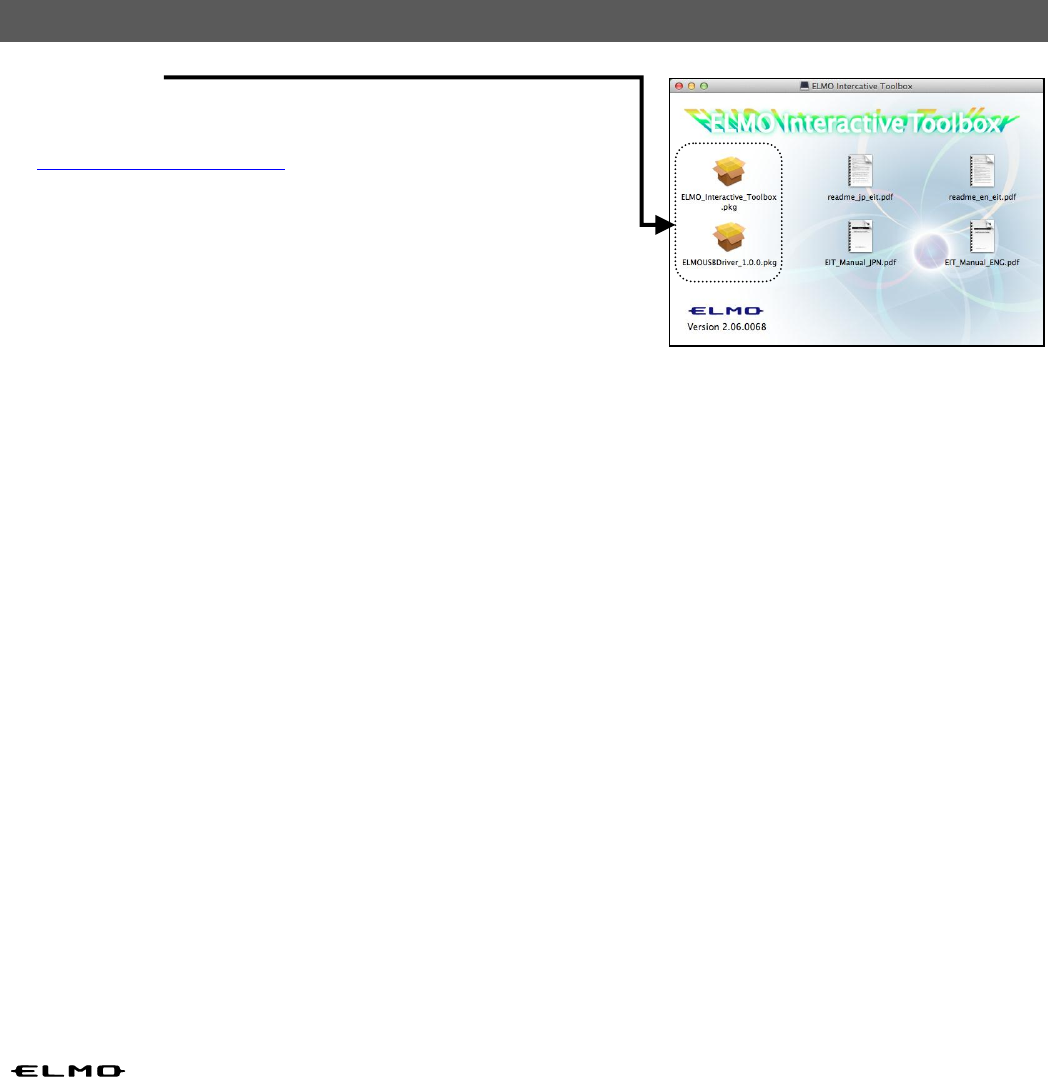
②After the download is complete, run the "ELMO_EIT.dmg" file.
③Run the "ELMO Interactive Toolbox.pkg"file.
④Please follow the instructions on the installation.
⑤Run the "ELMOUSBDriver_1.0.0.pkg"file.
⑥Please follow the instructions on the installation.
■Reading the User's Guide
Please select the "EIT_Manual.pdf" from the menu.
◎Disclaimer
The information on this manual and ELMO Interactive Toolbox are subject to change without prior notice.
The software already installed in your computer or other devices connected to your computer may affect the performance
of ELMO Interactive Toolbox.
ELMO is not liable for any direct or indirect damages resulting from the use of ELMO Interactive Toolbox.
◎About Trademarks
is a registered trademark of ELMO Co., Ltd.
Intel is registered trademarks of Intel Corporation.
The full title for Windows® 7 is the Microsoft® Windows® 7 operating system.
The shortened form of the OS name is used in the text.
The full title for Windows® 8 is the Microsoft® Windows® 8 operating system.
The shortened form of the OS name is used in the text.
The full title for Windows® 8.1 is the Microsoft® Windows® 8.1 operating system.
The shortened form of the OS name is used in the text.
The full title for Windows® 10 is the Microsoft® Windows® 10 operating system.
The shortened form of the OS name is used in the text.
Microsoft and Windows are registered trademarks of the Microsoft Corporation in the U.S. and other countries.
Apple, the Apple logo, Mac, Mac OS and Macintosh are trademarks of Apple Inc., registered in the United States and other
countries.
Mac is a service mark of Apple Inc.
All other company/product names described in this manual are trademarks or registered trademarks of their respective
companies.
◆Launching ELMO Interactive Toolbox
Run the application / ELMO Interactive Toolbox / ELMO Interactive Toolbox.
When ELMO Interactive Toolbox is launched for the first time, the Product Activation window appears.
Enter the license key. (The license key(seal) is accessories..)
※After valid license key is entered, the Product Activation window will not appear next time when ELMO
Interactive Toolbox is launched.
※The license key will be needed for reinstallation of ELMO Interactive Toolbox. Keep the sticker in a safe
place.

製品のお問い合わせは、下記営業部へ
株式会社エルモ社
エルモソリューションカンパニー
http://www.elmosolution.co.jp
□ 北海道営業部 〒001-0021 札幌市北区北21条西8丁目3番8号 バックスビル TEL.011-738-5811
□ 江別オフィス 〒069-0825 江別市野幌東町17番地5 TEL.011-391-8800
□ 東北営業部 〒980-0802 仙台市青葉区二日町13-18 ステーションプラザビル406号室 TEL.022-266-3255
□ 首都圏営業部 〒108-0073 東京都港区三田3丁目12番16号 山光ビル4階 TEL.03-3453-6471
□ ラーニングシステム営業部 〒108-0073 東京都港区三田3丁目12番16号 山光ビル4階 TEL.03-3453-6471
□ セキュリティ営業部 〒108-0073 東京都港区三田3丁目12番16号 山光ビル4階 TEL.03-3453-6471
□ 中部営業部 〒467-8567 名古屋市瑞穂区明前町6番14号 TEL.052-811-5261
□ 西日本営業部 〒550-0014 大阪市西区北堀江3丁目12番23号 三木産業ビル9階 TEL.06-6541-0123
□ 広島オフィス 〒730-0012 広島市中区上八丁堀7-1ハイオス広島505 TEL.082-221-2801
□ 近畿ソリューション営業部 〒550-0014 大阪市西区北堀江3丁目12番23号 三木産業ビル9階 TEL.06-6531-2125
□ 九州営業部 〒812-0039 福岡市博多区冷泉町2番8号 朝日プラザ祇園2階 TEL.092-281-4131
□ 福岡オフィス 〒812-0039 福岡市博多区冷泉町2番8号 朝日プラザ祇園2階 TEL.092-281-5658
□ 熊本オフィス 〒861-2104 熊本市東区秋津3丁目11-7 TEL.096-282-8338
ELMO CO., LTD.
6-14, Meizen-cho, Mizuho-ku
Nagoya, 467-8567, Japan
OVERSEAS SUBSIDIARY COMPANIES
ELMO USA CORP.
Headquarters
1478 Old Country Road
Plainview, NY 11803, U.S.A.
Tel. (516) 501-1400 Fax.(516) 501-0429
E-mail: elmo@elmousa.com
Web: http://www.elmousa.com
West Coast Branch
5555 Garden Grove Boulevard.
Suite 375
Westminster, CA 92683Tel. (714) 828-8457
Fax. (714) 823-8429
ELMO Europe SAS
Headquarters
12 place de la Défense
Maison de la Défense
92974 Paris la Défense Cedex FRANCE
Tel. 33 (0) 1 73 02 67 06
Fax. 33 (0) 1 73 02 67 10
E-mail: info@elmoeurope.com
Web: http://www.elmoeurope.com
German Branch
Hansaallee 201, Haus 1
40549 Düsseldorf Germany
Tel. 49 (0) 211 544756 40
Fax. 49 (0) 211 544756 60
Middle East (Branch)
5WA-129, Dubai Airport Free Zone
P.O. Box 371556, Dubai
United Arab Emirates
TEL. +971-(0)4-260-2390
FAX. +971-(0)4-260-2392
6X1IWBB01 R1-Qjx

Portable IWB Wireless set
Wireless unit CRB-1W
IWB = Interactive whiteboard
CAUTION
FEDERAL COMMUNICATIONS COMMISSION INTERFERENCE STATEMENT
This equipment has been tested and found to comply with the limits for a Class B digital device,
pursuant to part 15 of the FCC Rules. These limits are designed to provide reasonable protection
against harmful interference in a residential installation. This equipment generates, uses and can
radiate radio frequency energy and, if not installed and used in accordance with the instructions,
may cause harmful interference to radio communications. However, there is no guarantee that
interference will not occur in a particular installation. If this equipment does cause harmful
interference to radio or television reception, which can be determined by turning the equipment off
and on, the user is encouraged to try to correct the interference by one or more of the following
measures:
-Reorient or relocate the receiving antenna.
-Increase the separation between the equipment and receiver.
-Connect the equipment into an outlet on a circuit different from that to which the receiver is connected.
-Consult the dealer or an experienced radio/ TV technician for help.
CAUTION:
Any changes or modifications not expressly approved by the grantee of this device could void the
user's authority to operate the equipment.
This device complies with Part 15 of the FCC Rules. Operation is subject to the following two
conditions: (1) this device may not cause harmful interference, and (2) this device must accept
any interference received, including interference that may cause undesired operation.
RF exposure warning
This equipment must be installed and operated in accordance with provided instructions and the
antenna(s) used for this transmitter must be installed to provide a separation distance of at least 20
cm from all persons and must not be co-located or operating in conjunction with any other antenna
or transmitter. End-users and installers must be provide with antenna installation instructions and
transmitter operating conditions for satisfying RF exposure compliance.
Canada, Industry Canada (IC) Notices
This Class B digital apparatus complies with Canadian ICES-003 and RSS-247. Operation is
subject to the following two conditions: (1) this device may not cause interference, and (2) this
device must accept any interference, including interference that may cause undesired operation of
the device.
Canada, avis d'Industry Canada (IC)
Cet appareil numérique de classe B est conforme aux normes canadiennes ICES-003 et
RSS-247. Son fonctionnement est soumis aux deux conditions suivantes : (1) cet appareil ne doit
pas causer d'interférence et (2) cet appareil doit accepter toute interférence, notamment les
interférences qui peuvent affecter son fonctionnement.
Radio Frequency (RF) Exposure Information
The radiated output power of the Wireless Device is below the Industry Canada (IC) radio
frequency exposure limits. The Wireless Device should be used in such a manner such that the
potential for human contact during normal operation is minimized. This device has also been
evaluated and shown compliant with the IC RF Exposure limits under mobile exposure conditions.
(antennas are greater than 20cm from a person's body).
Informations concernant l'exposition aux fréquences radio (RF)
La puissance de sortie émise par l’appareil de sans fil est inférieure à la limite d'exposition aux
fréquences radio d'Industry Canada (IC). Utilisez l’appareil de sans fil de façon à minimiser les
contacts humains lors du fonctionnement normal. Ce périphérique a également été évalué et
démontré conforme aux limites d'exposition aux RF d'IC dans des conditions d'exposition à des
appareils mobiles (antennes sont supérieures à 20 cm à partir du corps d'une personne).
6X1IWBB08 R0-Xxx