ENTERMEDIA HARMONY Personal Karaoke User Manual
ENTERTECH CO., LTD. Personal Karaoke
User Manual

(User’s Manual is Inside)
How to Install
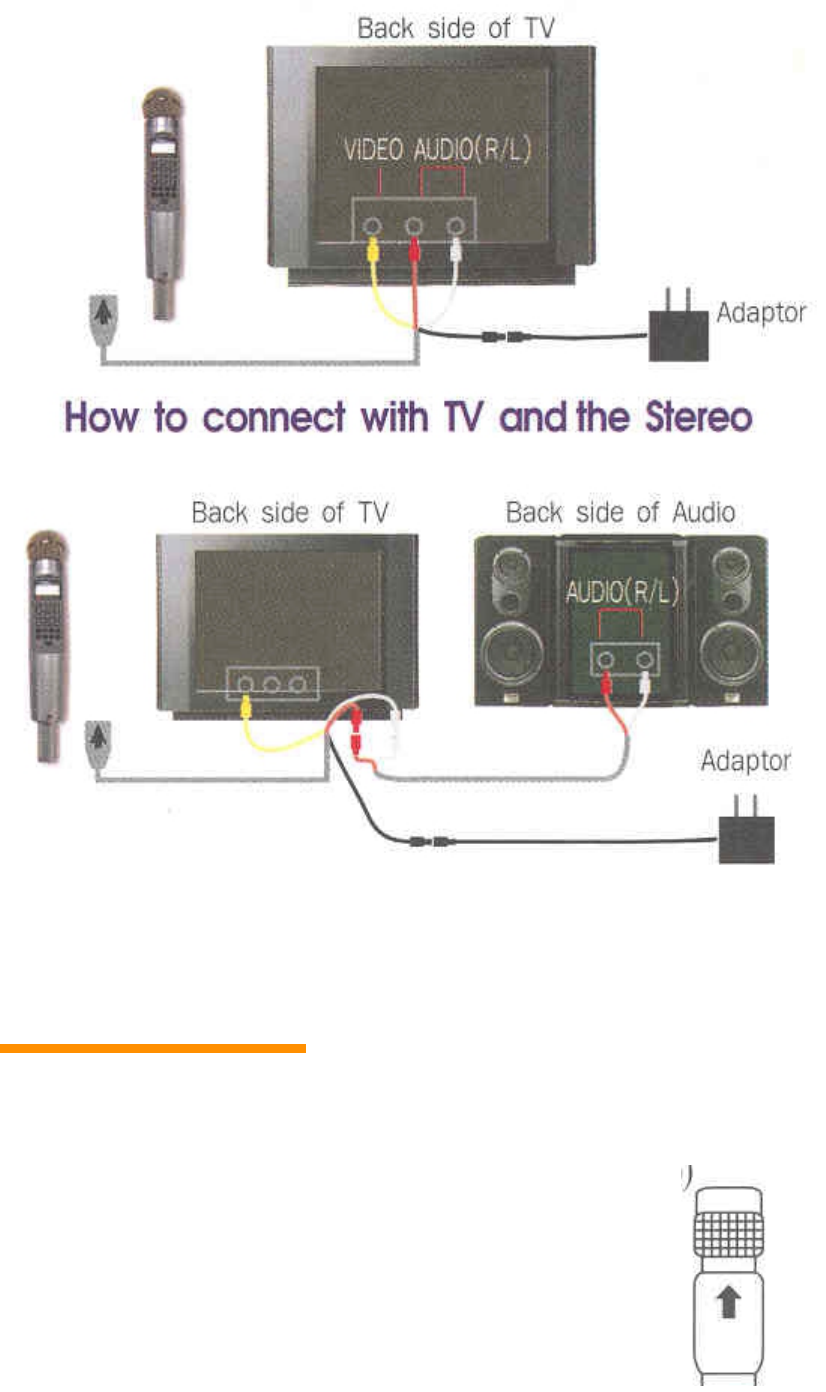
How to Connect with TV
How to connect with TV and the Stereo
How to Operate
1. Connect cable to TV (refer to “How To Install”)
2. Connect cable to this Product (when you connect cable make sure the arrow on the cable points to the
top)
3. When you use an Adapter :
Connect Adapter to cable adapter jack
When using the battery microphone :
Open the Back cover of the microphone,
then insert 4 AA batteries (use Alkaline batteries)
4. Turn on the TV and set the channel to video
(external input)

5. Turn microphone power ON.
6. When the TV shows the picture, select the number of the song, and then it will start to play the music.
When you press the start/stop button once, it will start.
When you press the button again, it will stop.
7. The product summary page will explain the microphone functions.
8. If there are only two holes for the external input in you TV (mono TV), put the yellow jack into the
yellow hole and put the red or the white jack into the other hole.
Basic Items
Option Items Additional Pack
Song List Book
Portable music accompaniment
Main cable (5M)
Adapter
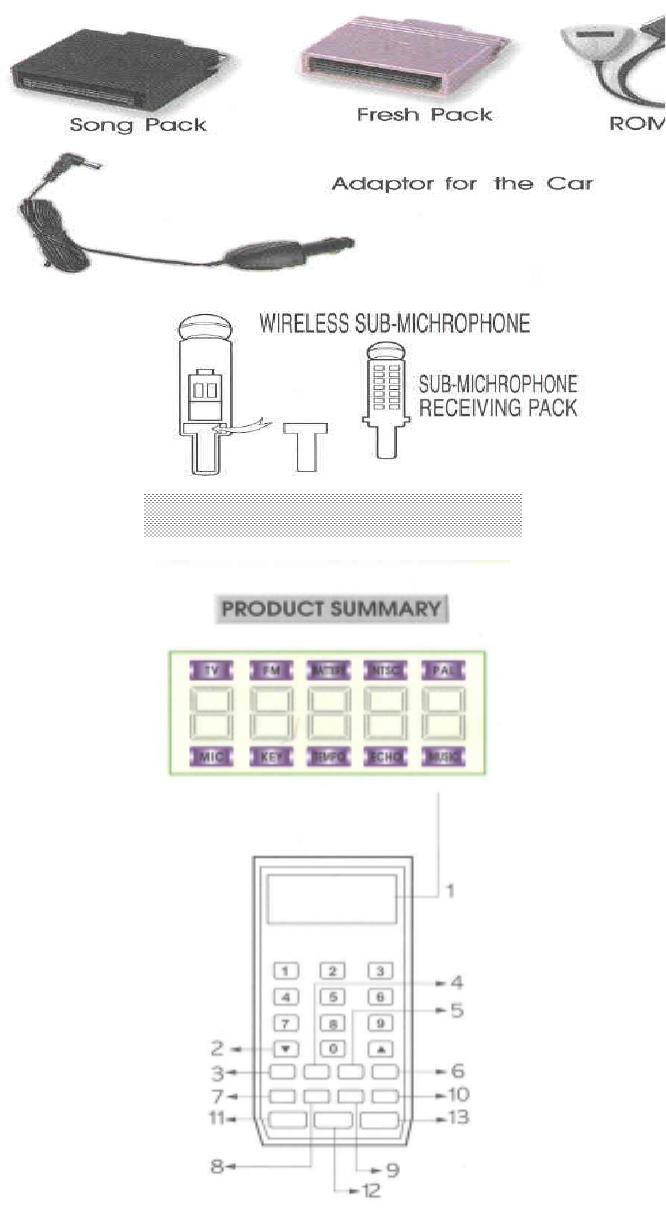
PRODUCT SUMMARY
1. LCD display will show song selection number with the function icon.

2. / Up / Down button :
When you press the up/down button, the song list will show on the screen.
It is used to select the microphone, key, tempo, echo, and music sound, picture, musical instrument
change and value.
3. MIC Microphone adjustment
This button is also used to adjust the volume of the microphone.
4. RAN Random
It is used to select a song at random.
5. F M FM radio channel set-up
Press the FM key once, the LCD will show FM 106.3 and the TV monitor will show 106.3.
Press the FM key twice, the LCD will show FM 106.7 and TV monitor will show 106.7.
Press the FM key three times, the LCD will show FM 107.1 and TV monitor will show 107.1.
Press the FM key four times, the LCD will show FM 107.5 and TV monitor will show 107.5.
Press the FM key five times, this will remove the LCD FM icon and will show OFF on the TV monitor
Set your FM Radio channel according to the LCD and the TV monitor.
6. MUS Music
It is used to adjust the volume of the music by pressing the up/down button.
The LCD will display the number ( 0-15 ) and the bar graphics.
7. TMP Tempo
It is used to adjust the tempo of the music by the up/down button. The LCD will show (-07 ~ +08 )
beginning with the value(00) and a bar graphic on the TV monitor.
8. RES Reservation
It is used to pre-select the song. Select the song number first, then press the reservation key (can
reserve up to 10 songs).
9. KEY Key
It is used to adjust the vocal tone by pressing the up/down button.
The LCD will display the numbers (-06 ~ +06) beginning value(00) and a bar graphic on the TV
monitor.
10. Hold
During the performance, pressing the HOLD button will temporarily stop the music, pressing it again
will resume the performance.
11. MODE Mode
Press this function change key, and then select a number(1-10-0).
MODE ++ 1 Score on/off
Pressing it once will show the score ON to your TV monitor
and at the end of song, it will show the score.
If no need for your score, press again to remove it. The score will
Show how well the tempo was kept.

MODE ++ 2 Reservation Save
After you reserve the favorite songs by using #8 of the reservation
Function key, press the Mode key +2 to show it on the TV monitor :
1. Save reserved song 2. Remove reserved song 3. Play the reserved song 4. The End icon
will show.
Ending, if you press #1 & #4, the song will be saved. Even if the Power is off, the song stays
in the system. To play the saved song, press the Mode key +2 & 3 for recall, then 4.
• It can be saved up to 20 songs by the Reservation function.
MODE ++ 3 Wireless Sub-microphone
Designed for the additional microphone. Please refer to the wireless Sub-microphone
Summary Sheet for details in this book.
MODE ++ 4 Language selection
Select the language that you desire, the message will change automatically.
MODE ++ 5 Echo Volume
The volume can be adjusted by using the up/down button. The basic echo is set for 10 at the
beginning.
MODE ++ 6 Melody ON/OFF
The song will start to play with the Melody OFF, without melody.
When it is turn ON, it will play with the melody.
MODE ++ 7 Game
The team will be divided into group A & B. When press the start button, the game will start
with the music randomly selected.
To stop the game, press the random button.
MODE ++ 8 Continuous Play
With this mode, the songs will be played automatically in sequence of the selections made.
MODE ++ 9 Manual Display
This function will allow you to select the picture you desire with manual adjustment. By
pressing the up/down button for 3 seconds the picture will change. If longer then the 3
seconds, it will switch to the automatic feature.
MODE ++ 0 Musical Instrument Change
You can select the desired instrument by pressing the up/down button.
13. PLAY/STOP
Select the song and press the play button. If you press it again, it will stop during the play.

TROUBLE SHOOTING
¢À When the Pow er doesn’t com e on
Using the Adapter
! Please confirm w hether the pow er sources are 100V or 200V .
! C heck the contact point of the cable jack and the adapter jack.
! Reconnect the adapters.
Using th e b a tte ries
! Did you insert 4 AA batteries?
! M ake sure the inserted batteries ( + - ) a re positioned in th e c o rre ct dire c tion.
! C heck the elasticity o f th e s ta inless steel in the battery case.
! C heck if th e b a tte ries are in good condition.
¢À If th e microphone doesn¡¯t w o rk
! Press the m icrophone button and check th e volum e.
! C heck for the battery wear.
¢À If th e T V does not show the pictures or sound
! M ake sure the connectors are properly connected (the right colors)
! C heck if th e T V is in the video m ode
! C heck for the battery wear.
¢À W h e n th e T V screen is still and it doesn¡¯t tu rn off
! Press the pow er O N button for 3 seconds or longer. This w ill reset the unit.
! R e s ta rt th e p o w e r O N . It w ill function norm ally.
¢À If there is any doubt about the product perform ance,
! T u rn o ff th e s w itch. Set the buton o n th e # 0 p o s ition and continue to press.
T h e n tu rn th e p o w e r O N .
It will re tu rn to th e form er, norm al condition sent from the m anufacture.
CAUTION
1. Do not store it in direct sunlight, high temperature, or moisture area.
2. Do not drop it or apply heavy impact.
3. When you cleaning, do not use alcoholic liquids or chemical solutions.
Use only soft cloths.
4. Do not press hard on the LCD parts.
5. Never use sharp object on the keyboard.
6. Make sure to allow sufficient time for the unit to cool down before you play the instrument when you
store it in the heated trunk(180F)of a car.
7. Do not disassemble the product.
8. Please remove the batteries when not using the product for a prolonged period.
SPECIFICATIONS
1. Voice Frequency Range :
200 ~ 15,000 Hz(-68dB)
2. Battery : 1.5V x 4ALKALINE
3. Life of battery : 4 hours
4. FM Frequency Channel
5. TY Channel : Video Channel
6. Specification : 40 x 40 x300
7. Weight : 292g
8. Voltage : 7V
9. Wattage : 500Ma
10. Dot : 516 x 256(INTERLACE)
11. Image Color INDEX 256Color
12. Overflow Protection Circuit for Reverse Voltage
13. Operation temperature :
-20°C+65°C
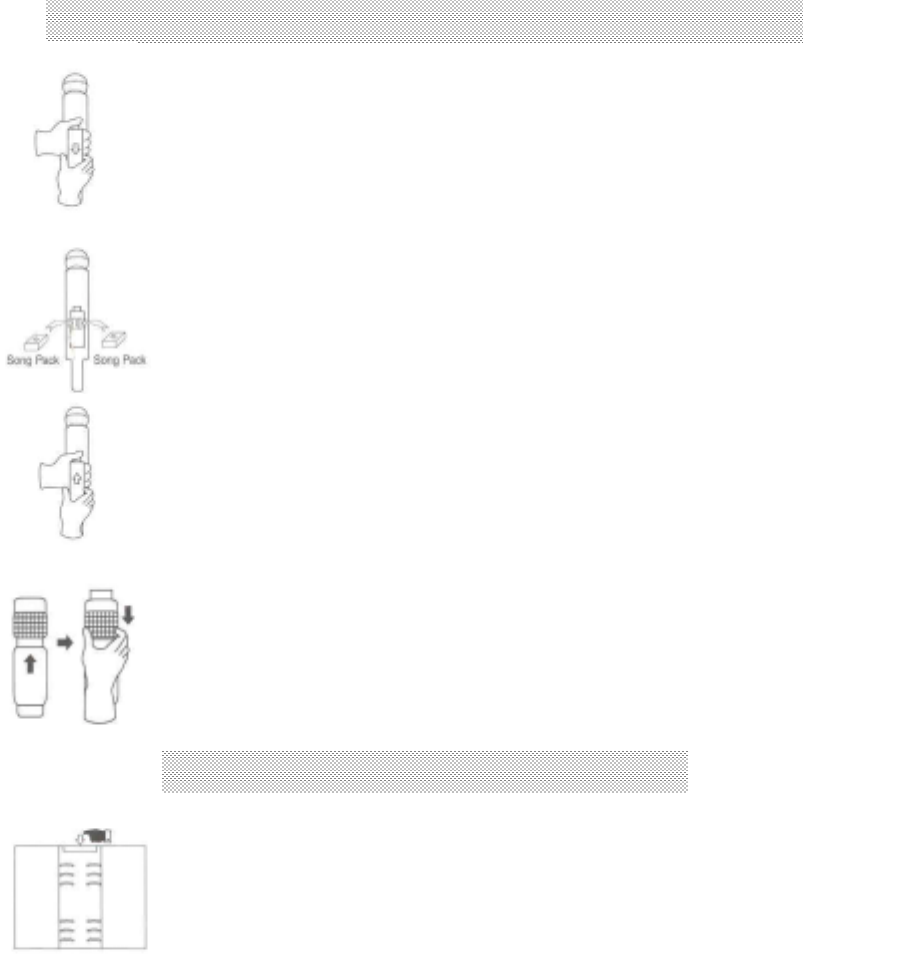
HOW TO SET UP THE SONG PACK(OPTION)
HOW TO ADD THE SONG LIST
1. Πρεσσ τηε βυττον ον τηε τοπ οφ τηε χοϖερ ανδ
πυλλ δοων τηε βυττον οφ τηε χοϖερ οφ τηε βαχκ
οφ τηε µιχροπηονε.
2. Αφτερ ψου τυρν οφφ τηε ποωερ, πλαχε τηε σονγ παχκ ασ
σηοων
(τηε αρροω ποιντσ τοπ ποσιτιον).
3. α) Ματχη τηε βοττοµ οφ τηε χοϖερ ωιτη τηατ οφ τηε
µιχροπηονε βψ υσινγ τηε ριγητ ηανδ.
β) Χλοσε τηε χοϖερ πυσηινγ σλιγητλψ ον τοπ οφ τηε
µιχροπηονε.
; Ηοω το ρεµοϖε τηε χαβλε :
Βρινγ δοων τηε ταβ ανδ πυλλ ιτ το σεπαρατε τηε χαβλε.
∆ο νοτ πυλλ τηε χαβλε αλονγ.
1. Πρεσσ τηε ταβ ον τηε τοπ οφ τηε βινδερ.
2. Πλαχε α νεω σονγ λιστ βετωεεν τηε βινδερ
ρινγσ.
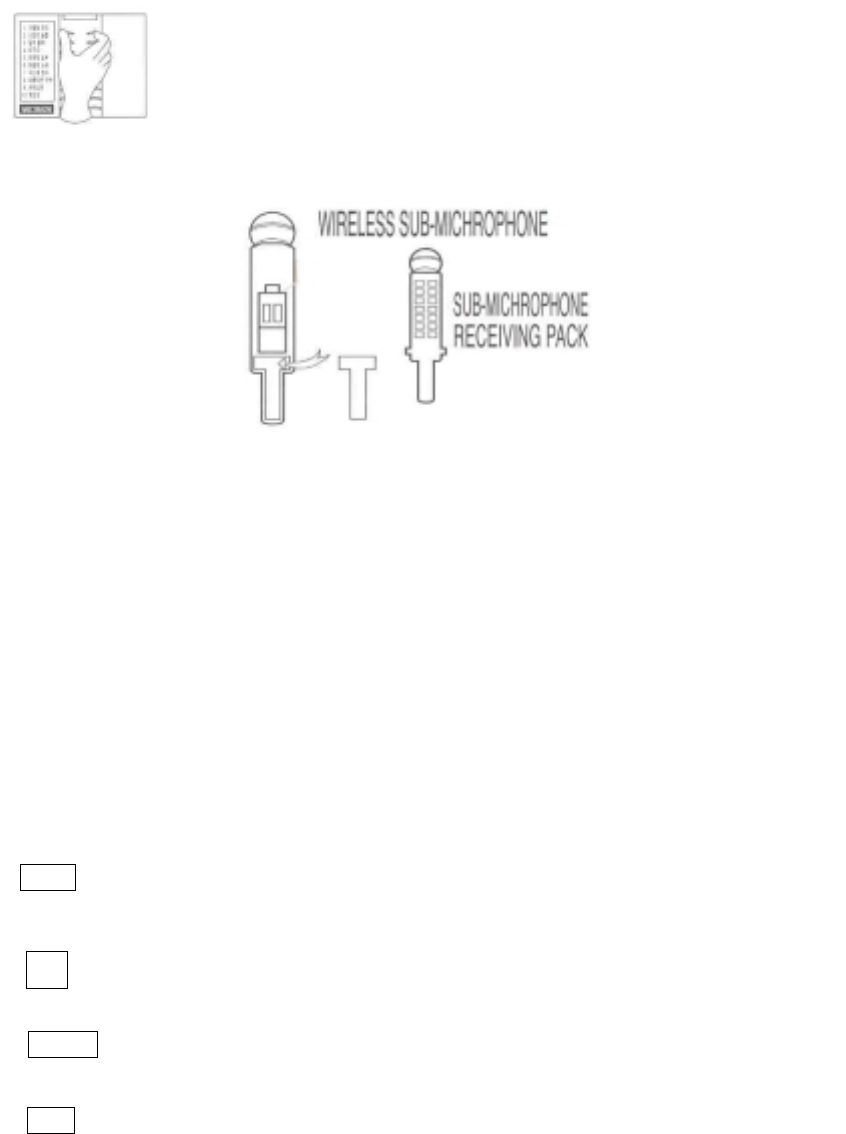
WIRELESS SUB-MICROPHONE USER MANUAL (OPTION)
1. Open the back cover, then plug the receiving pack as the diagram shown above
2. When pressing the Function Change + 3 button of the Main Microphone, the monitor will display the
Sub-Microphone ON, and it will begin to function the channel.
3. Open the back cover of the Sub-Microphone, insert two AA batteries and press the power button.
The Green LED light will be on and, it will start to function.
When you insert the batteries, make sure the + - is pointed in the right direction.
4. / Button
It is used to select the songs. As you press the button, the monitor will show 10
songs list.
By pressing the button up and down, you can choose the desired song, then press the
START button to play.
When you press the button during the operation, it will show each song on the list.
5. RES Reservation Button
Select the desired dong number, and then press the Reservation Button.
6. Hold
During the performance, pressing the HOLD button will temporarily stop the music, pressing it again
will resume the performance.
7. PWR Power Button
It is used to turn the Power ON for the Sub-Microphone.
8. PLAY/STOP
It is a start/stop button. It will start to play when you press it, and it will stop when you press it again.
When the Red LED light appears the batteries need to be replaced.
If you want to stop using the sub microphone, press the Function Change + 3.
The monitor will show the sub-microphone OFF sign, and it will stop the play.
3. Χλοσε τηε βινδερ ρινγ.

INFORMATION TO THE USER
This equipment has been tested and found to comply with the limits for a Class B digital device,
pursuant to part 15 of the FCC Rules. These limits are designed to provide reasonable protection
against harmful interference in a residential installation. This equipment generates, uses and can
radiate radio frequency energy and, if not installed and used in accordance with the instructions,
may cause harmful interference to radio communications. However, there is no guarantee that
interference will not occur in a particular installation. If this equipment does cause harmful
interference to radio or television reception, which can be determined by turning the equipment
off and on, the user is encouraged to try to correct the interference by one more of the following
measures:
-. Reorient or relocate the receiving antenna.
-. Increase the separation between the equipment and receiver.
-. Connect the equipment into an outlet on a circuit different from that to which the receiver is
connected.
-. Consult the dealer or an experienced radio/TV technician for help.
WA RN ING
Changes or modifications not expressly approved by the manufacturer could void the user’s
authority to operate the equipment.