ESPRESSIF SYSTEMS ESP32WROOM32U Wi-Fi & Bluetooth Internet of Things Module User Manual ESP32 WROOM 32U User Guide EN pages
ESPRESSIF SYSTEMS (SHANGHAI) PTE LTD Wi-Fi & Bluetooth Internet of Things Module ESP32 WROOM 32U User Guide EN pages
Users Manual

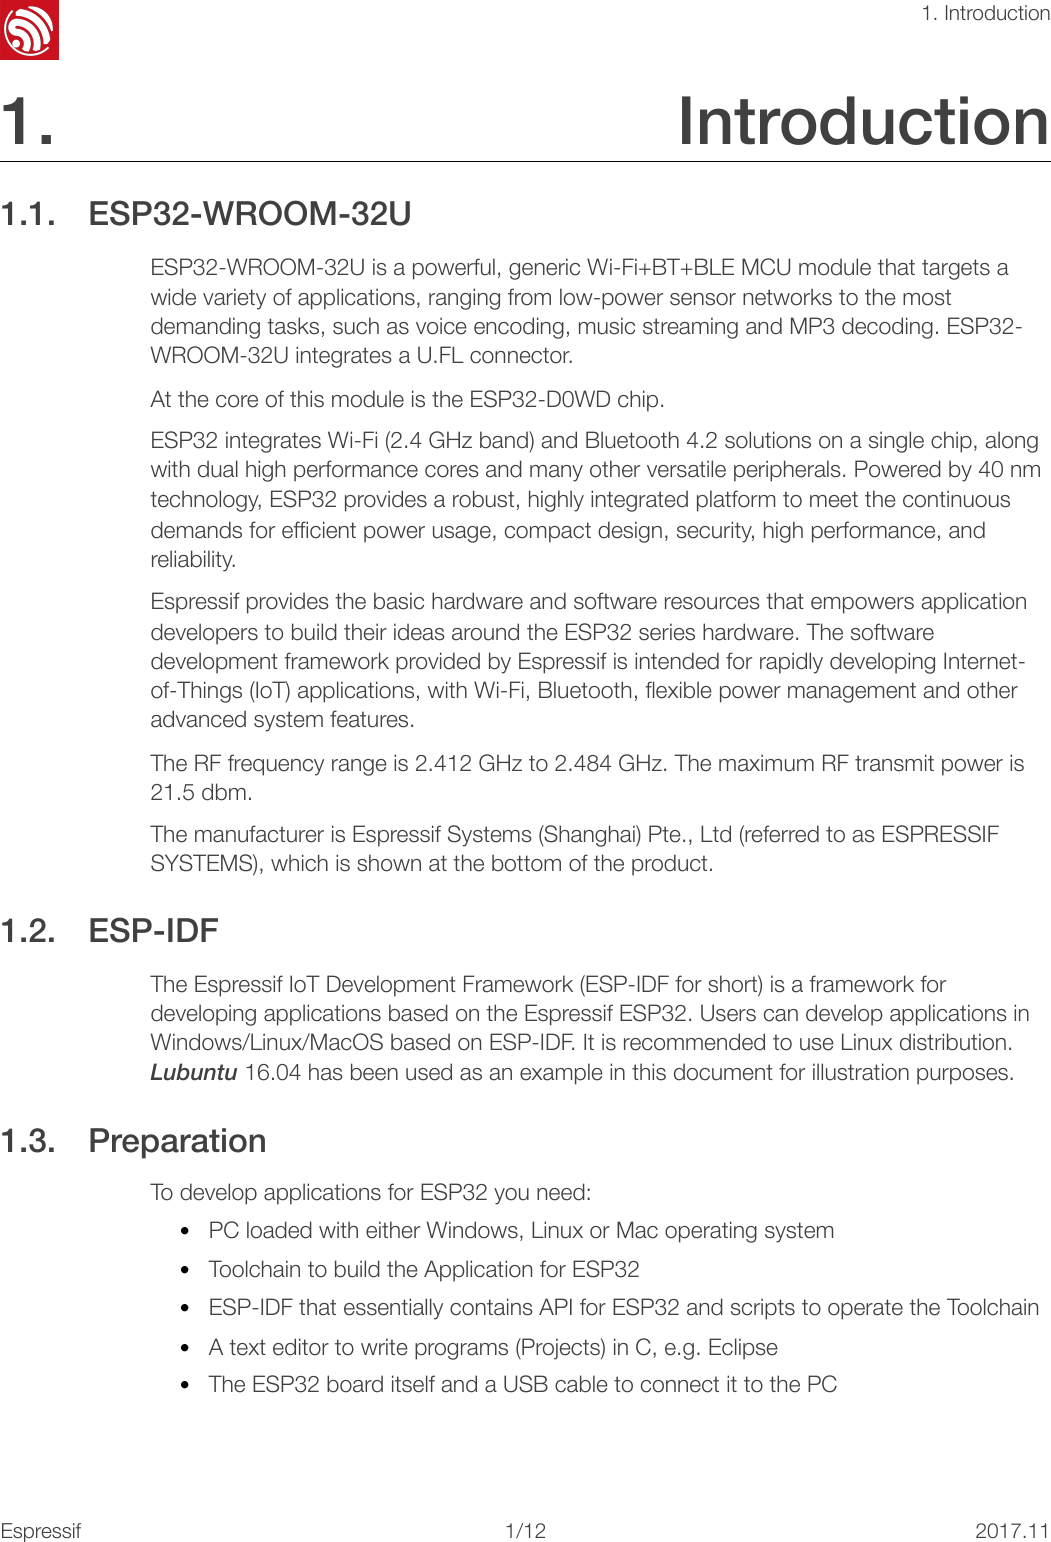
![!4. Configure 5. Configure Being in terminal window, go to directory of hello_world application by typing cd~/esp/hello_world. Then start project configuration utility menuconfig: cd~/esp/hello_worldmakemenuconfigIf previous steps have been done correctly, the following menu will be displayed: ! In the menu, navigate to Serial flasher config > Default serial port to configure the serial port, where project will be loaded to. Confirm selection by pressing enter, save configuration by selecting < Save > and then exit application by selecting < Exit >. Here are couple of tips on navigation and use of menuconfig: •Use up & down arrow keys to navigate the menu. •Use Enter key to go into a submenu, Escape key to go out or to exit. •Type ? to see a help screen. Enter key exits the help screen. •Use Space key, or Y and N keys to enable (Yes) and disable (No) configuration items with checkboxes “[*]“. •Pressing ? while highlighting a configuration item displays help about that item. •Type / to search the configuration items. 📖 Notes: •On Windows, serial ports have names like COM1. On MacOS, they start with /dev/cu.. On Linux, they start with /dev/tty. (See :doc:`establish-serial-connection` for full details.) •If you are Arch Linux user, navigate to SDK tool configuration and change the name of Python 2 interpreter from python to python2. •Most ESP32 development boards have a 40 MHz crystal installed. However, some boards use a 26 MHz crystal. If your board uses a 26MHz crystal, or you get garbage output from serial port after code upload, adjust the :ref:`CONFIG_ESP32_XTAL_FREQ_SEL` option in menuconfig.Espressif!/1262017.11](https://usermanual.wiki/ESPRESSIF-SYSTEMS/ESP32WROOM32U/User-Guide-3717250-Page-9.png)
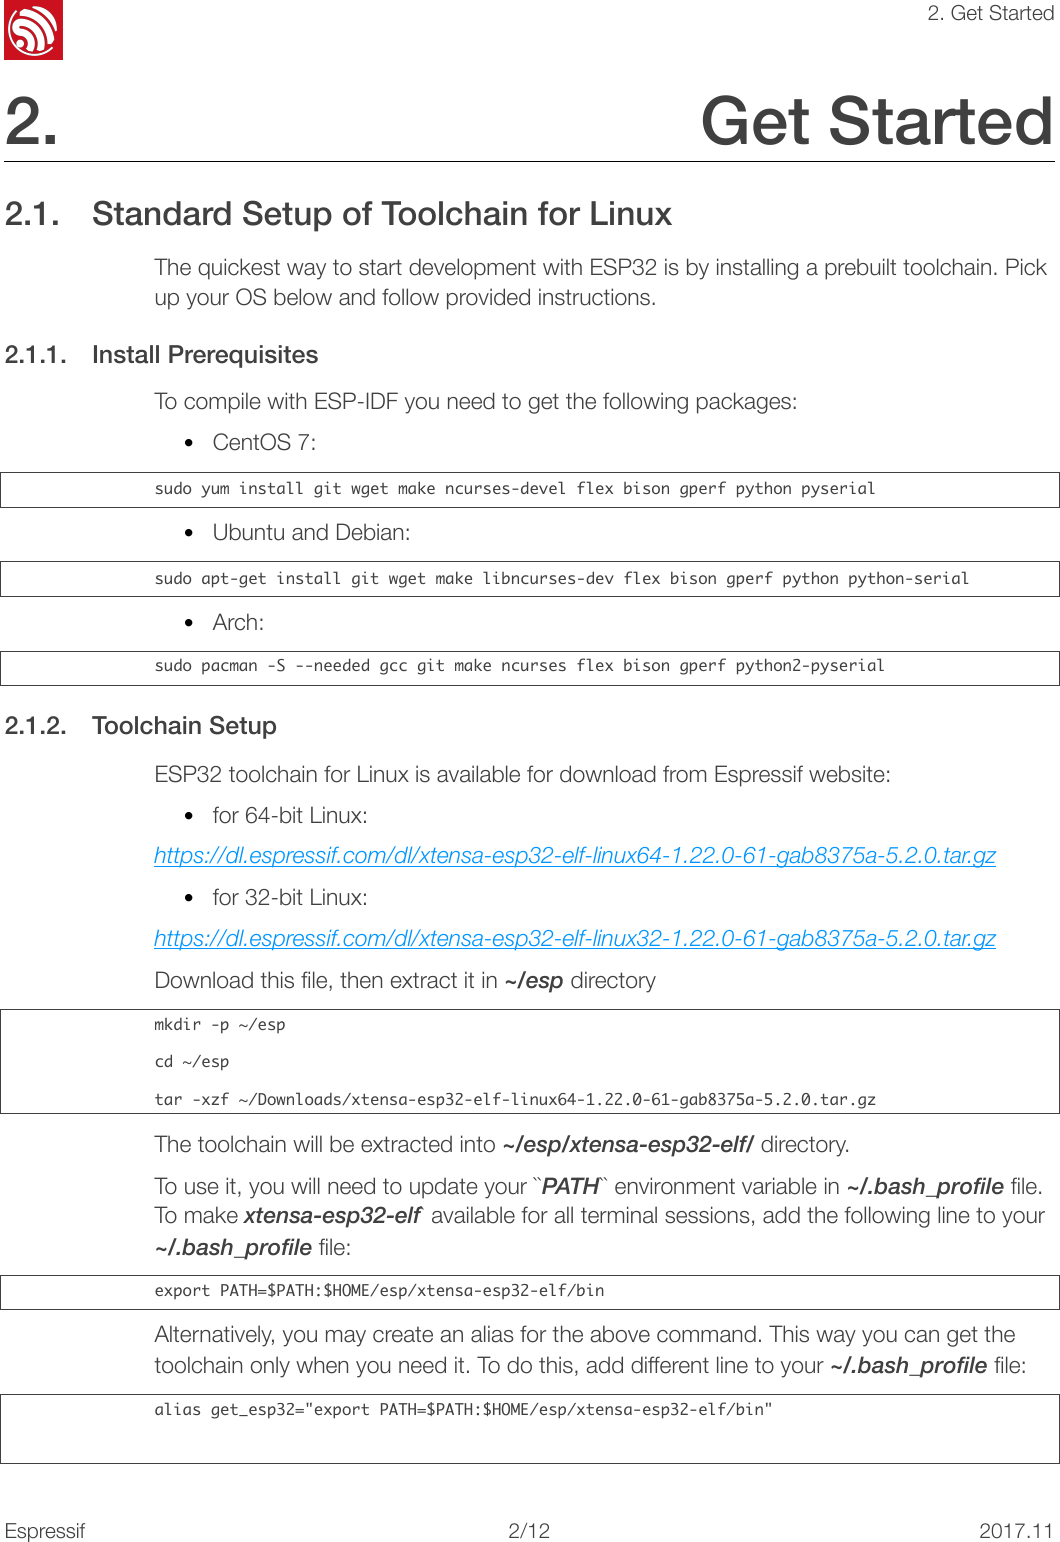
![!5. Build and FlashIf there are no issues, at the end of build process, you should see messages describing progress of loading process. Finally, the end module will be reset and “hello_world” application will start. If you'd like to use the Eclipse IDE instead of running make, check out the :doc:`Eclipse guide <eclipse-setup>`. 6.2. Monitor To see if “hello_world” application is indeed running, type makemonitor. This command is launching :doc:`IDF Monitor <idf-monitor>` application: $makemonitorMONITOR---idf_monitoron/dev/ttyUSB0115200------Quit:Ctrl+]|Menu:Ctrl+T|Help:Ctrl+TfollowedbyCtrl+H---etsJun8201600:22:57rst:0x1(POWERON_RESET),boot:0x13(SPI_FAST_FLASH_BOOT)etsJun8201600:22:57...Several lines below, after start up and diagnostic log, you should see “Hello world!” printed out by the application. ...Helloworld!Restartingin10seconds...I(211)cpu_start:StartingscheduleronAPPCPU.Restartingin9seconds...Restartingin8seconds...Restartingin7seconds...To exit monitor use shortcut Ctrl+]. To execute makeflash and makemonitor in one shoot type makeflashmonitor. Check section :doc:`IDF Monitor <idf-monitor>` for handy shortcuts and more details on using this application. That's all what you need to get started with ESP32! Now you are ready to try some other :idf:`examples`, or go right to developing your own applications. Espressif!/1282017.11](https://usermanual.wiki/ESPRESSIF-SYSTEMS/ESP32WROOM32U/User-Guide-3717250-Page-11.png)
![!6. SSC Command Reference 7. SSC Command Reference Here lists some common Wi-Fi commands for you to test the module. 7.1. op Description op commands are used to set and query the Wi-Fi mode of the system. Example op-Qop-S-owmodeParameter 7.2. sta Description sta commands are used to scan the STA network interface, connect or disconnect AP, and query the connecting status of STA network interface. Example sta-S[-sssid][-bbssid][-nchannel][-h]sta-Qsta-C[-sssid][-ppassword]sta-DParameter Table 6-1. op Command ParameterParameterDescription-QQuery Wi-Fi mode.-S Set Wi-Fi mode.wmodeThere are 3 Wi-Fi modes: •mode = 1: STA mode •mode = 2: AP mode •mode = 3: STA+AP modeTable 6-2. sta Command ParameterParameterDescription-S scanScan Access Points.Espressif!/1292017.11](https://usermanual.wiki/ESPRESSIF-SYSTEMS/ESP32WROOM32U/User-Guide-3717250-Page-12.png)
![!6. SSC Command Reference 7.3. ap Description ap commands are used to set the parameter of AP network interface. Example ap-S[-sssid][-ppassword][-tencrypt][-nchannel][-h][-mmax_sta]ap–Qap–LParameter 7.4. mac Description mac commands are used to query the MAC address of the network interface. Example mac-Q[-omode]-s ssidScan or connect Access Points with the ssid.-b bssidScan the Access Points with the bssid.-n channelScan the channel.-hShow scan results with hidden ssid Access Points.-QShow STA connect stutus.-DDisconnected with current Access Points.ParameterDescriptionTable 6-3. ap Command ParameterParameterDescription-SSet AP mode.-s ssidSet AP ssid.-p passwordSet AP password.-t encryptSet AP encrypt mode.-hHide ssid.-m max_staSet AP max connections.-QShow AP parameters.-LShow MAC Address and IP Address of the connected station.Espressif!/12102017.11](https://usermanual.wiki/ESPRESSIF-SYSTEMS/ESP32WROOM32U/User-Guide-3717250-Page-13.png)
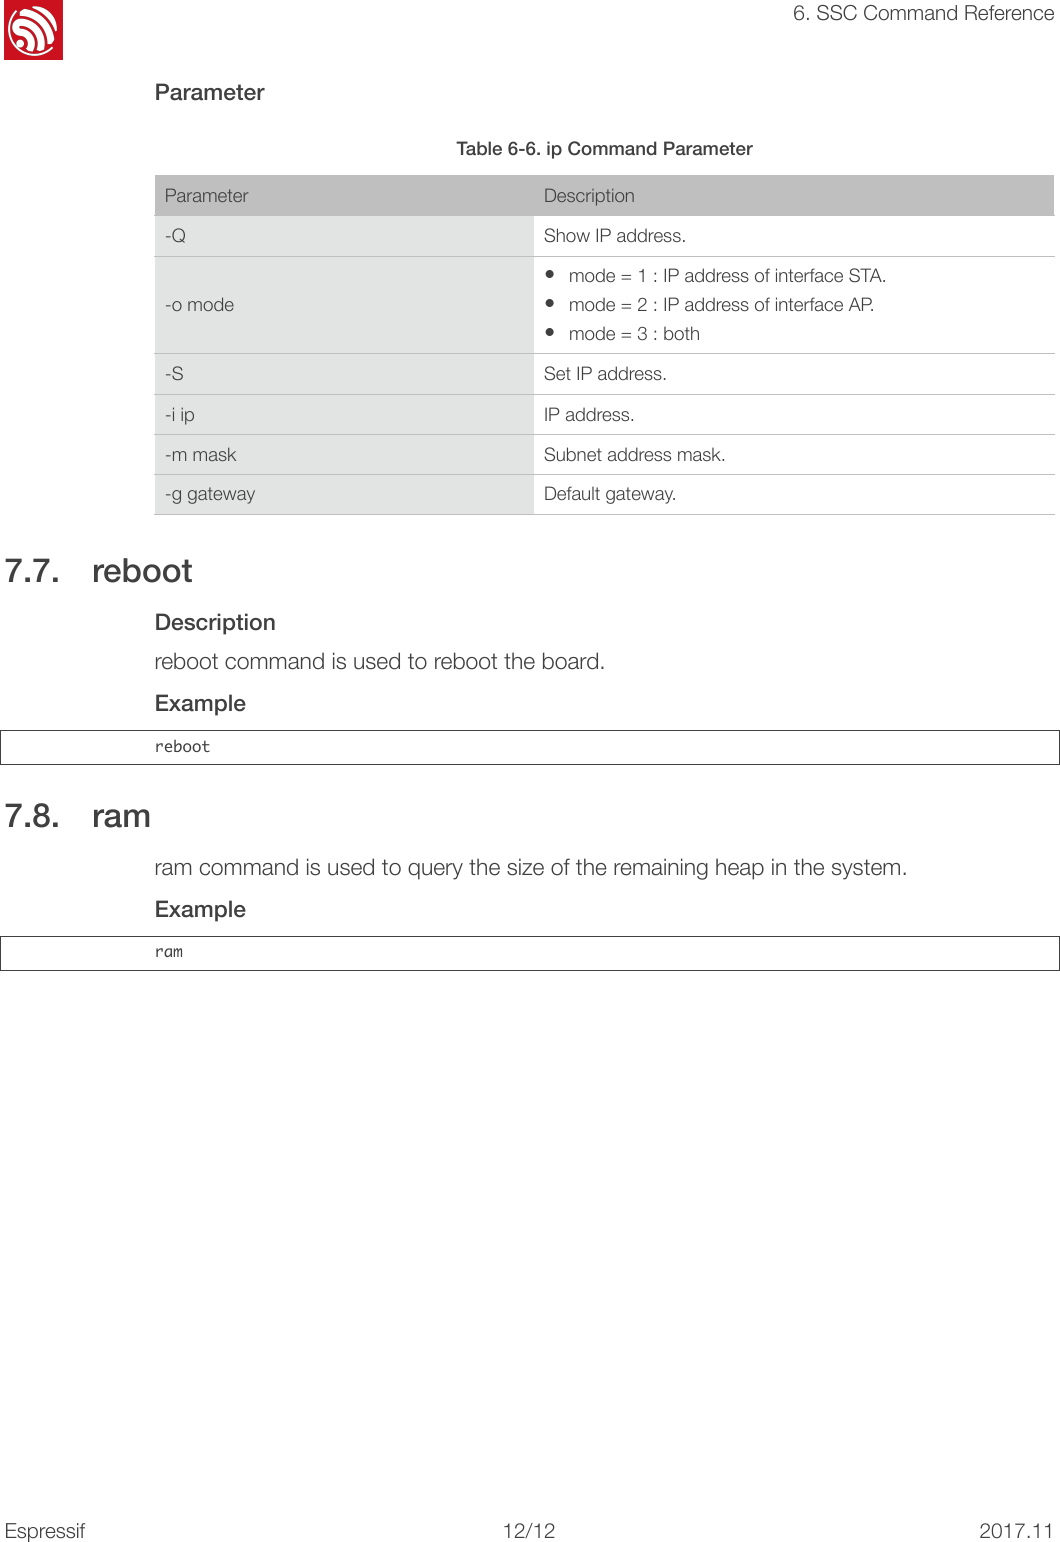
![!6. SSC Command Reference Parameter 7.5. dhcp Description dhcp commands are used to enable or disable dhcp server/client. Example dchp-S[-omode]dhcp-E[-omode]dhcp-Q[-omode]Parameter 7.6. ip Description ip command are used to set and query the IP address of the network interface. Example ip-Q[-omode]ip-S[-iip][-omode][-mmask][-ggateway]Table 6-4. mac Command ParameterParameterDescription-QShow MAC address.-o mode•mode = 1: MAC address in STA mode. •mode = 2: MAC address in AP mode.Table 6-5. dhcp Command ParameterParameterDescription-SStart DHCP (Client/Server).-EEnd DHCP (Client/Server).-Qshow DHCP status.-o mode•mode = 1 : DHCP client of STA interface. •mode = 2 : DHCP server of AP interface. •mode = 3 : both.Espressif!/12112017.11](https://usermanual.wiki/ESPRESSIF-SYSTEMS/ESP32WROOM32U/User-Guide-3717250-Page-14.png)