ETI Solid State Lighting 5540312018 LED Horticultural Luminaire User Manual
Elec-Tech International Co., Ltd. LED Horticultural Luminaire Users Manual
User Manual

Elec-Tech International Co., Ltd.
Product Instruction Manual
500W
Product Name: LED Grow Light
Model No.: 55403161
Manufacturer: Elec-Tech International Co., Ltd.
Address: No.1 Jinfeng Road, Tangjiawan Town, Xiangzhou Dist, Zhuhai City, Guangdong Province,
China
Tel:0756-3390990
Fax:0756-3390778
Web:www.etissl.com.cn
Content
1.ProductIntroduction‐‐‐‐‐‐‐‐‐‐‐‐‐‐‐‐‐‐‐‐‐‐‐‐‐‐‐‐‐‐‐‐‐‐‐‐‐‐‐3
1.1ProductDescription‐‐‐‐‐‐‐‐‐‐‐‐‐‐‐‐‐‐‐‐‐‐‐‐‐‐‐‐‐‐‐3
1.2SchematicDiagram‐‐‐‐‐‐‐‐‐‐‐‐‐‐‐‐‐‐‐‐‐‐‐‐‐‐‐‐‐‐3
2.ProductFeature‐‐‐‐‐‐‐‐‐‐‐‐‐‐‐‐‐‐‐‐‐‐‐‐‐‐‐‐‐‐‐‐‐‐‐‐‐‐‐‐‐‐‐‐‐‐‐2
2.1Productcharacteristic‐‐‐‐‐‐‐‐‐‐‐‐‐‐‐‐‐‐‐‐‐‐‐‐‐‐‐‐2
2.2Specification‐‐‐‐‐‐‐‐‐‐‐‐‐‐‐‐‐‐‐‐‐‐‐‐‐‐‐‐‐‐‐‐‐‐‐‐‐‐‐‐3
2.3LightDistribution‐‐‐‐‐‐‐‐‐‐‐‐‐‐‐‐‐‐‐‐‐‐‐‐‐‐‐‐‐‐‐‐‐‐‐4
3.Methodofapplication‐‐‐‐‐‐‐‐‐‐‐‐‐‐‐‐‐‐‐‐‐‐‐‐‐‐‐‐‐‐‐‐‐‐‐‐‐4‐7
4.FunctionkeysInstruction‐‐‐‐‐‐‐‐‐‐‐‐‐‐‐‐‐‐‐‐‐‐‐‐‐‐‐7
5.Controlerpairinginstruction‐‐‐‐‐‐‐‐‐‐‐‐‐‐‐‐‐‐8‐10
6.MaintenanceInstruction‐‐‐‐‐‐‐‐‐‐‐‐‐‐‐‐‐‐‐‐‐‐‐‐‐‐‐‐‐‐‐‐‐‐10
7.Environmentalrequirement‐‐‐‐‐‐‐‐‐‐‐‐‐‐‐‐‐‐‐‐‐‐‐‐‐‐‐‐‐‐‐11
8.Productcarriedstandard‐‐‐‐‐‐‐‐‐‐‐‐‐‐‐‐‐‐‐‐‐‐‐‐‐‐‐‐‐11
9.Packageinstruction‐‐‐‐‐‐‐‐‐‐‐‐‐‐‐‐‐‐‐‐‐‐‐‐‐‐‐‐‐‐‐‐‐‐‐‐‐‐‐‐‐‐11
1. Product Introduction
1.1. Product Description
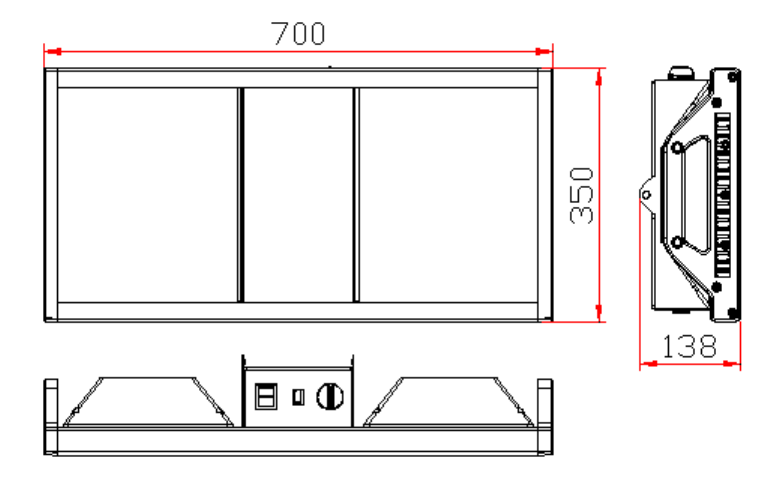
1 Out Size:700x350x138mm;
2
Frame:AL+ABS,Drivebox:SPCCPowderspray,lampcover:Temperedglass
3
built‐indrivedrivebox
4RadiatingSystim:AL+Airfan
5 Samsung‐LED‐2835;OSRAM‐LED‐3030‐Red;OSRAM‐LED‐3030‐Blue
1.2.Product schematic diagram:
2. Product Featuers:
2.1. Product characteristics :
ٛ a. Long lifetime (above 50,000hrs) ;
ٛ b. High efficiency, energy saving,
ٛ c. Promote the growth and development of plants, increase the production and income of agricultural
industry, and advance the time of agricultural products market; It is suitable for planting fields such as planting and lighting
in agricultural greenhouses, artificial solar light source in plant factories, etc.
2.2 Specification

3 Installation Instructions
Item/Parameter
Electronicratings
WRatedPower/W500W
VRatedInputvoltage/VAC120‐277V
HzFrequency/Hz60Hz
%RatedPowerefficiency85%
(PF)RatedPowerFactor0.95
ARatedInputcurrent/A4.15A
RatedI‐THD<20%
Photometricratings
LEDtype/Qty.
Samsung‐2835/1W/280PCS
Osram‐3030‐R/3W/84PCS
Osram‐3030‐B/3W/60PCS
/PPF800umol/s
Red/Blue/5000K
BeamAngle≥100
Physicalinformation
MaterialPC+SPCC+AL
operatingtemperature‐0~45℃
storagetemperature‐10~50℃
IPratingIP20
(L×W×H)/mmLuminairedimension(L×W×H)/mm700x350x138
gNetweight13980g
hrsLifetime/hrs50000h
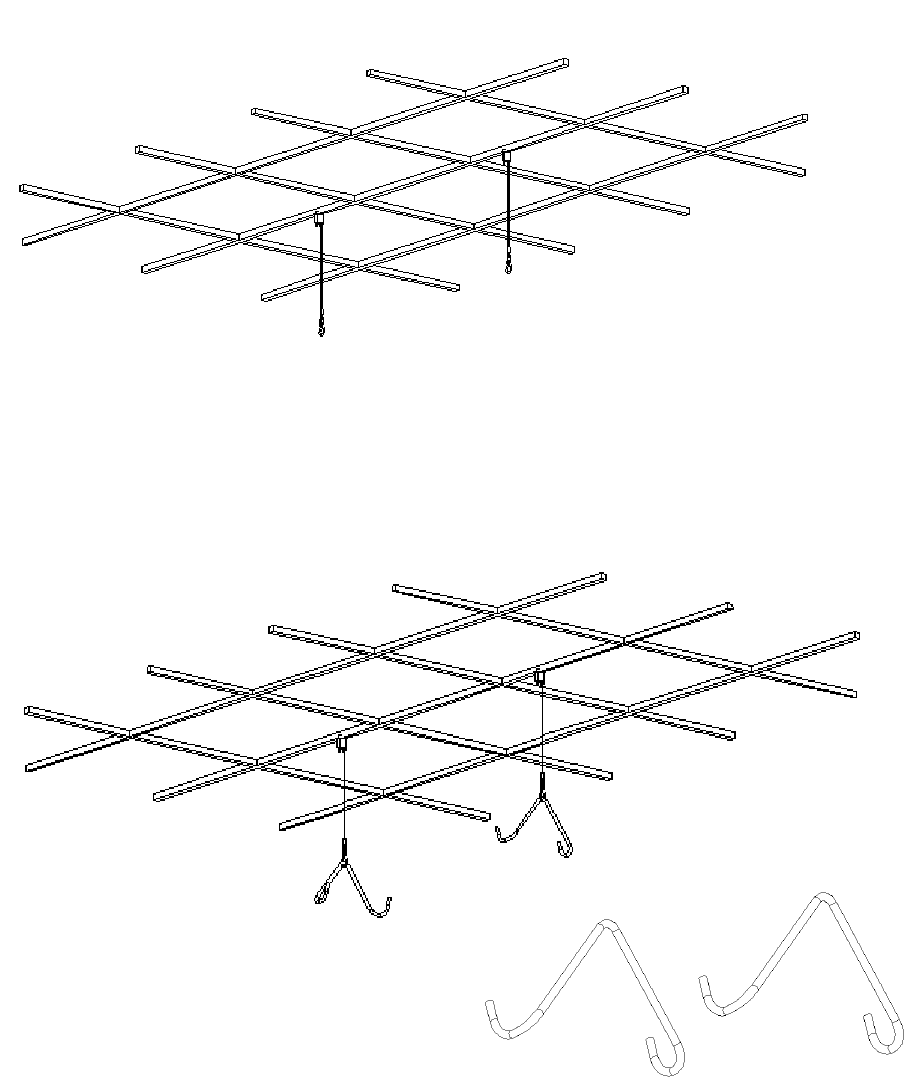
Hanging Mount
3.1Attached two rope hangers to the ceiling or the structure that can support the weight of grow light
plus some extra for power cords and rope hanger,etc.
3.2 Place the provided V type hook over the hook of each rope hanger.Ensure both end of rope hanger
are secure.
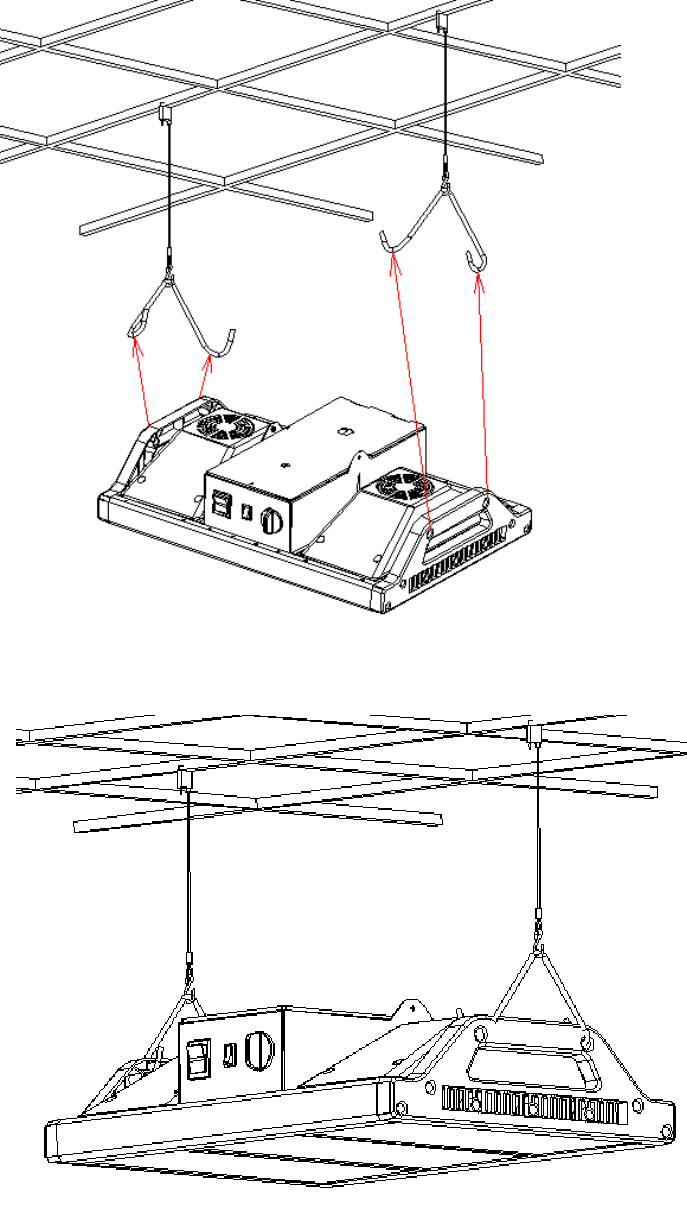
3.3 Hold the fixture body by hands, and hang the fixture body by placing one V type hook over each hole on
both side of the fixture, adjust the rope hanger to level light.
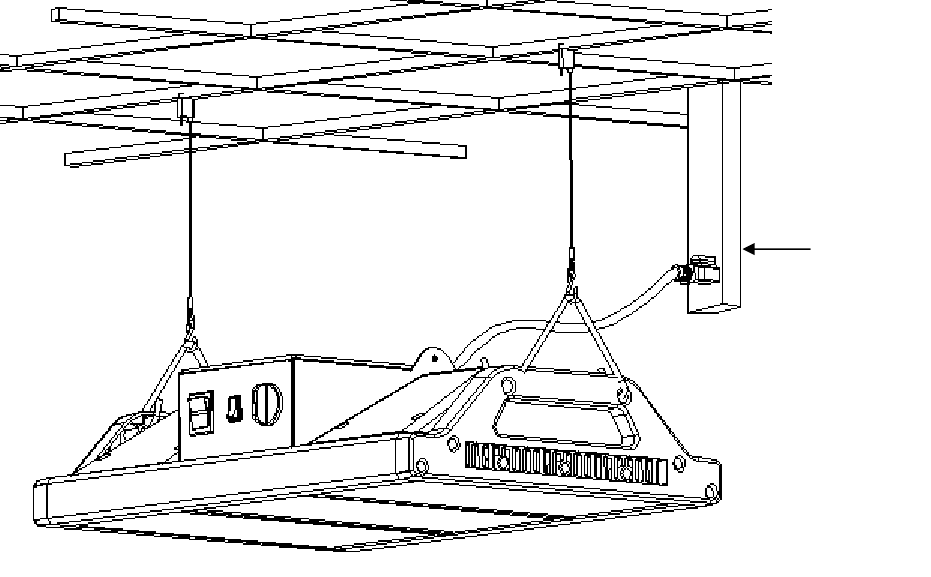
3.4 Insert one end of the provided power cord into to back of the fixture, and plug the other end of power
cord into an electrical outlet. Press the “NO” button to activate the fixture.
4. Operation Instruction for Control Panel Button and Knob on The Fixture
4.1. (Power Switch, “I /O”button, “I”represents power on , “O” represents power off)
4.2. (Spectrum Switch, “I /O/II”button, “I”represents full spectrum, “O”represents “Flower” spectrum,
“II”represents “Veg”spectrum)
4.3.(Timerknob,spintheknobpointingtothedesiredposition,thenitstartsthetimer:“OFF”representstimer
isoff;“2Hs”representslightwillbeoffin2hours;“4Hs”representslightwillbeoffin4hours;“6Hs”representslight
willbeoffin6hours;“8Hs”representslightwillbeoffin8hours.)
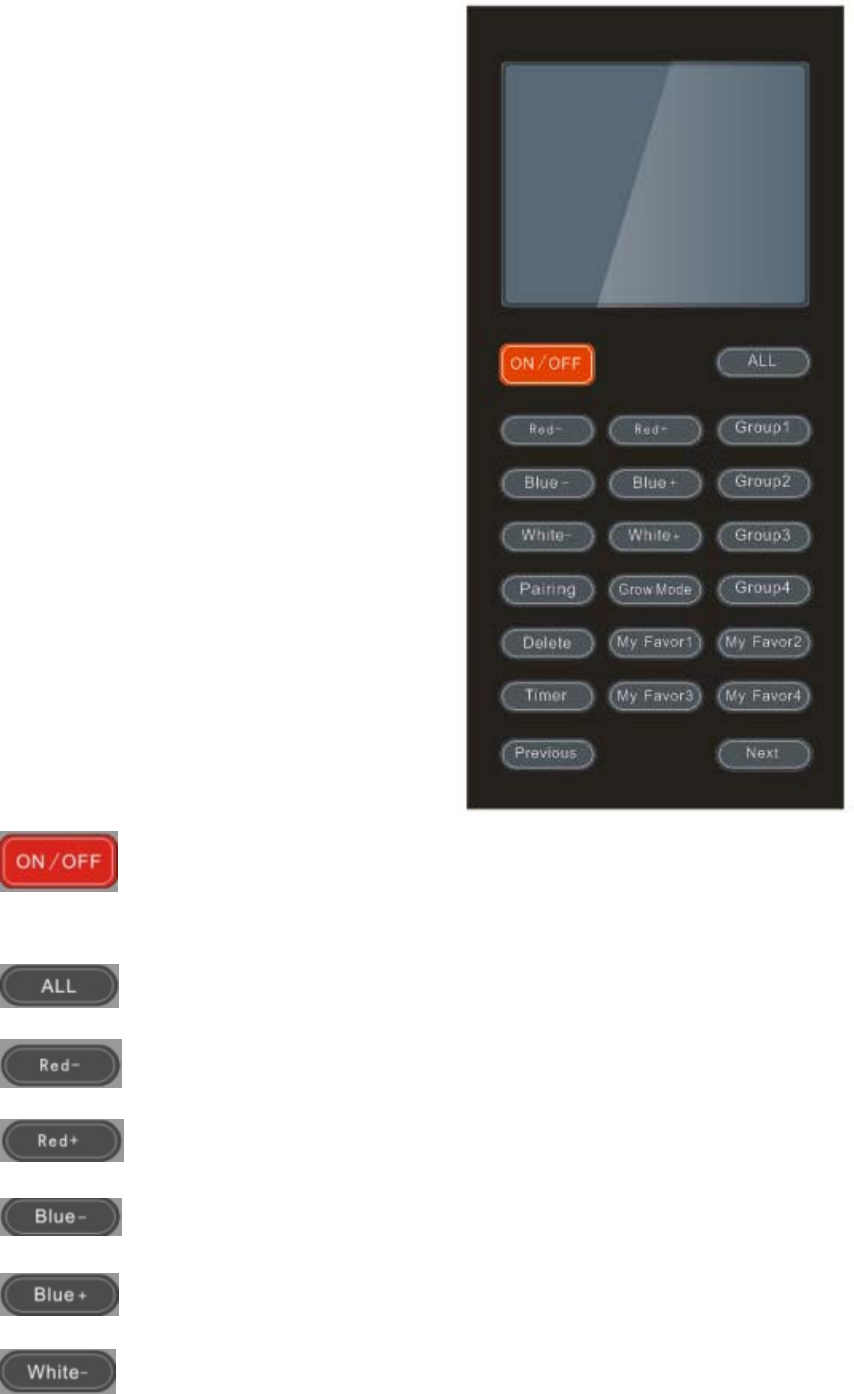
5.(Guidelinetoremotecontroller)
(ON/OFF Button: When light is on press this button, the light will be off; when light is off press
ON/OFF button the light will be on.)
( Select ALL button: Press this button, all the light will be on.)
(Press Red- button, red light reduces.)
(PressRed+button,redlightincreases.)
(PressBlue‐button,bluelightreduces.)
(PressBlue+button,bluelightincreases.)
(PressWhite‐button,white‐lightreduces.)

(PressWhite+button,white+lightincreases.)
(Previousrepresentsselectthepreviouslight.)
(Nextrepresentsselectthenextlight.)
(Group1: When a grow light is selected, within 5 seconds press this button in short time, this grow light
will be added to group1. The light flash indicates the grow light is added successfully.)
(Group2: When a grow light is selected, within 5 seconds press this button in short time, this grow light
will be added to group2. The light flash indicates the grow light is added successfully.)
(Group3: When a grow light is selected, within 5 seconds press this button in short time, this grow light
will be added to group3. The light flash indicates the grow light is added successfully.)
(Group4: When a grow light is selected, within 5 seconds press this button in short time, this grow light
will be added to group4. The light flash indicates the grow light is added successfully.)
(Pairthegrowlighttoremotecontroller:PressParingbuttonwhenthefixtureispoweronin60s,the
growlightwillflashtoindicatethefixtureisconnected.)
(Deletebutton:deletetheconnectionwithgrowlight.Whengrowlightisconnected,pressthisbutton,
theremotecontrollerdisconnectwiththefixture.)
(Myfavor1:Savethecurrentcolorcombinationbypressingthisbuttonforlongtimeabout4s;display
thesavedcolorcombinationbypressingthisbuttoninshorttime.)
(Myfavor2:Savethecurrentcolorcombinationbypressingthisbuttonforlongtimeabout4s;display
thesavedcolorcombinationbypressingthisbuttoninshorttime.)
(Myfavor3:Savethecurrentcolorcombinationbypressingthisbuttonforlongtimeabout4s;display
thesavedcolorcombinationbypressingthisbuttoninshorttime.)
(Myfavor4:Savethecurrentcolorcombinationbypressingthisbuttonforlongtimeabout4s;display
thesavedcolorcombinationbypressingthisbuttoninshorttime.)
(GrowMode:Switchthegrowmode:Flower,Veg,Fullspec,White.Pressthebuttoninshorttimeone
growmodewillswitch.)

(Timer:Pressthebuttoninshorttimelightingtimewillswitch:0h,2h,4h,6h,8h,totalfivekindoflight
time.Whenlightingtimeisover,thelightgoesoff,andthelighton/offcycleis24hours.)
(Pair the grow light to remote controller: When the fixture is power on within 60s, switch to “remote
control” mode ,
press Paring button, the grow light will flash to indicate the fixture is connected. Grow light is controlled by pressing
the -/+ and on/off buttons on the remote controller. The light changes to indicate the grow light is controlled
successfully.)
(Delete connection: Select the grow light which is needed to be deleted by pressing Previous/Next
Button, within 5 seconds, press Delete button, the light flash three times represents disconnection is successful. Once
the selected grow light is deleted, this grow light will not be controlled any more.)
( Group Set Up: Select the grow light which is needed to be deleted by pressing Previous/Next Button, within 5
seconds, press any one of the buttons Group1, Group2,Group3, Group4, then the selected grow light will be group into
the related group.)
(Group Controll: Press any one of the buttons Group1, Group2,Group3, Group4 or ALL button, then press +/-、
ON/OFF button, the group of grow lights can be controllerd. The light changes to indicate the grow light is controlled
successfully.)
(Notice: Above operation is based on “remote control” mode. The grow light can be controller when it is in
“remote control” mode. When timer points “OFF” mode, the timer on the remote controller can be set up.)
6. Maintenance instruction
6.1 Do Not use volatile solvent such as alcohol to clean the troffer.
6.2 Use soft cotton cloth with suds to clean the troffer .
6.3 Non-profecssional Do not attempt to take apart and repair the troffer .
6.4 Please use the constant-current driver exclusively adaptive to the troffer, do not
change the driver without permission .
7. Environment requirement
Operating temperature :-10~40℃;Storage temperature :-20~50℃。

8. Product carried standard UL-1598/UL8750
9. Package Instruction
9.1 Packing Specification
9.2 Package list
Package size
Lamp Qty./box 1 PCS
Net weight 13.98 Kgs
Gross weight 14.5 Kgs
Item Qty.
Grow lamp 1
Instruction manual 1
Pothook 2
Power Line 1
FCC STATEMENT
1. This device complies with Part 15 of the FCC Rules.
Operation is subject to the following two conditions:
(1) This device may not cause harmful interference, and
(2) This device must accept any interference received, including interference that may
cause undesired operation.
2. Changes or modifications not expressly approved by the party responsible for
compliance could void the user’s authority to operate the equipment.
FCC Radiation Exposure Statement:
This equipment complies with FCC radiation exposure limits set forth for an uncontrolled
environment. In order to avoid the possibility of exceeding the FCC radio frequency
exposure limits, Human proximity to the antenna shall not be less than 20cm (8 inches)
during normal operation.
NOTE: This equipment has been tested and found to comply with the limits for a Class B
digital, pursuant to Part 15 or the FCC Rules. These limits are designed to provide
reasonable protection against harmful interference in a residential installation. This
equipment generates, uses and can radiate radio frequency energy and, if not installed and
used in accordance with the instructions, may casue harmful interference to radio
communications, However, there is no guarantee that interference will not occur in a
particular installation. If the equipment does cause harmful interference to radio or
television reception, which can be determined by turning the equipment off and on, the user
is encouraged to try to correct the interference by one or more of the following measures:
--- Reorient or relocate the receiving antenna.
--- Increase the separation between the equipment and receiver.
--- Connect the equipment into an outlet on a circuit different
from that to which the receiver is connected.
--- Consult the dealer or an experienced radio/ TV technician for help.