Users Manual
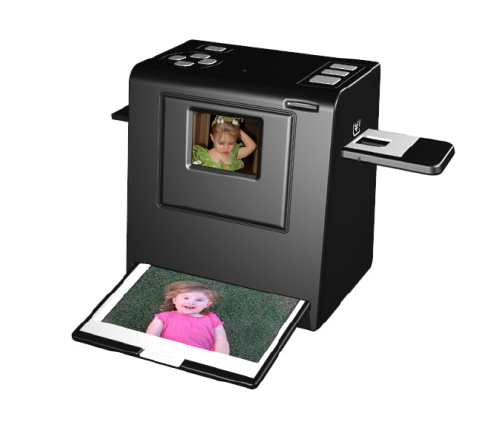
ComboScannerII
ComboScannerII‐5M‐3.0
UserManual
Version 1.02
January 2011
Index
I.UnpackComboScannerII…………………................................2
II.Installfilmintothefilmholder…………..……………………........3
III.QuickStart.........................................................................6
IV.OperationGuide..............................................................14
V.Specification....................................................................33
‐1‐
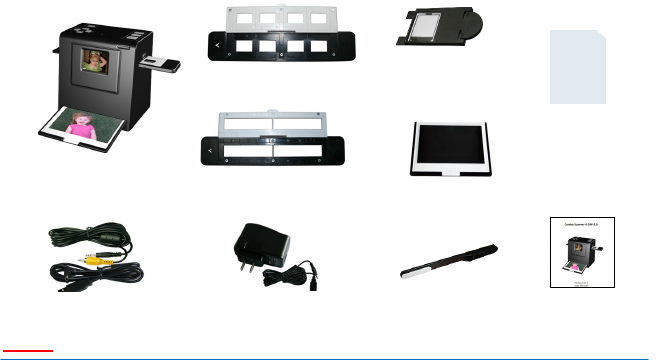
I.UnpackComboScannerII
ComboScanner II NegativeFilmHolder Photo/BusinessCardHolder
Note
We strongly suggest using a clean, dry, non-alcohol cotton swab to clean the glass surface
on the back-light holder and the business card fixture periodically to produce a clear
image.
Make sure all negative films, slide films, cover trays and photos are free of dust and dirt
before inserting into the Combo Scanner as this may affect the image quality when
scanning.
When cleaning films, please use a professionally recommended purger from a photo store
to avoid damaging old or precious films.
‐2‐
USB/VideoCablePowerCore
&
Cable UserManual
SlideFilmHolderBacklightHolder
CleanBrush
BusinessCardFixture
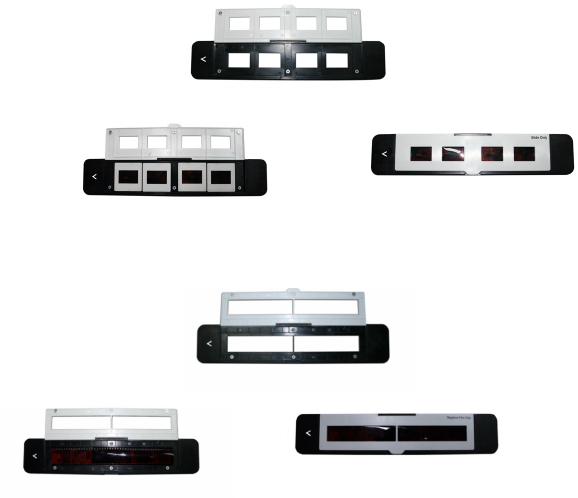
II.Installfilmintothefilmholder
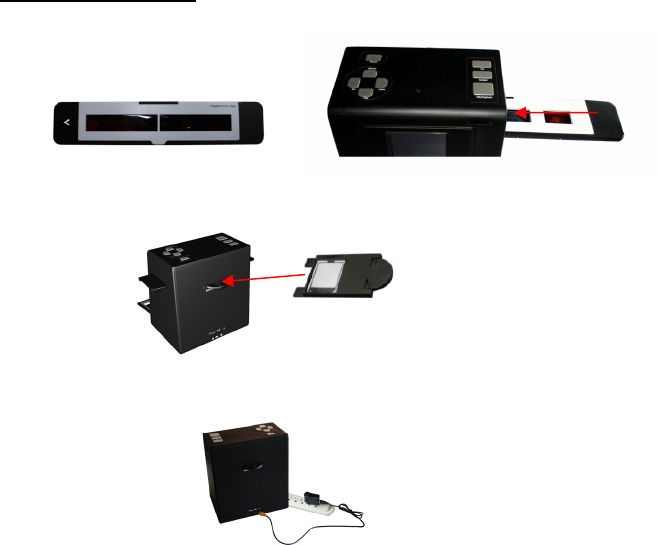
● Installslidefilmintotheholderentitled“SlidesOnly”
1.Opentheslideholderasillustrated
● InstallNegativeFilmintoholderentitled“NegativeFilmOnly”
1.Openthefilmholderasillustrated
2.Installfilmintonegativefilmslot3.Closethefilmholder
‐3‐
2.Placeslideinrecessedslotinholder 3.Closetheslide holder
Note
Toavoidmirrorimage,followtheserialnumbers(fromlefttoright)ontopoffilm
wheninstallnegativefilmintoholder
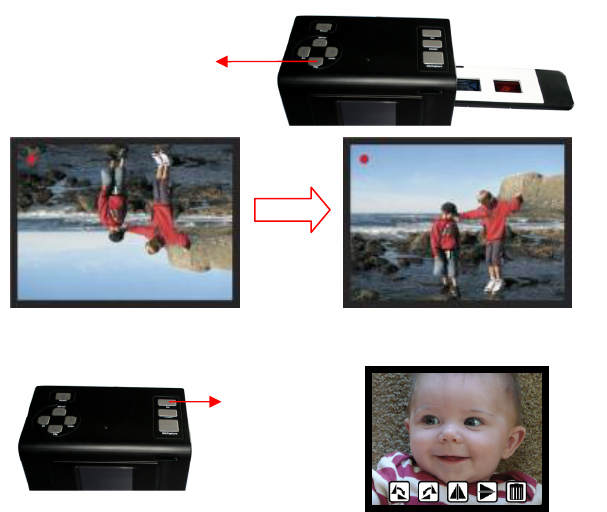
Iftheimageisupsidedown[Figure2.2],theimagecanbecorrectedbypressing
Down/Flipbuttonbeforecapturing[Figure2.3].Alternative,entertheplayback
modeandpressModebuttontoselectFlipfunction[Figure2.4]
‐4‐
Figure2.1
Figure2.2
●
Presshardkeyontopofdeviceinliveview[Figure2.3]
● PressPlaybackbuttonMode/SettingtoselectFlipfunction(RefertoP.25)
[Figure2.4]
‐5‐
Down/Flipbutton
(Fliphardkey)
Flip
Playback
button
Photo/Business
Cardslot
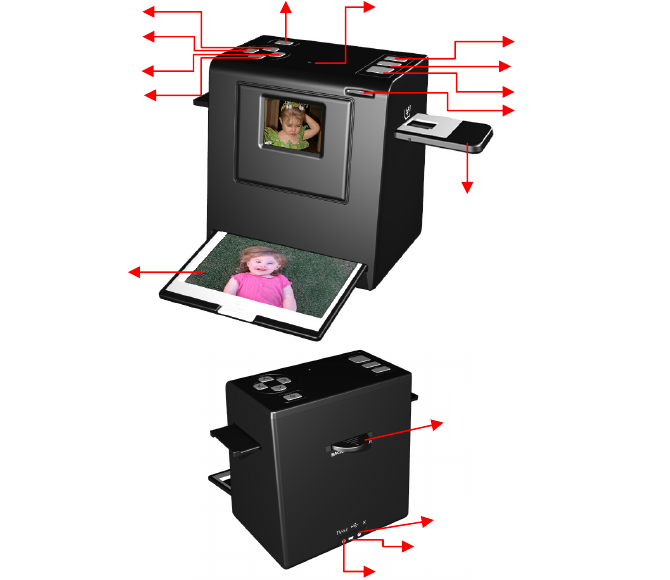
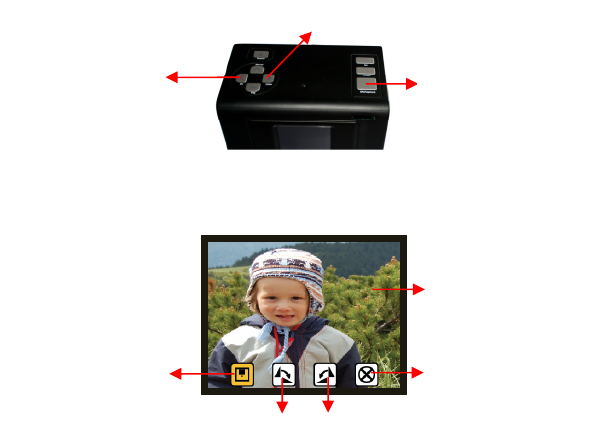
III.QuickStart
‐6‐
Up/Mirror
OK/Capture
Down/Flip
Powerbutton
PowerstatusLED
Film/Slideslot
SlotforBacklight
holder
USBPort(Fordataonly)
TVoutjack
Powercoreport
Pla
y
back
Mode/Setting
Left/EV
Right/Color
SDcardslot
HowtouseComboScannerII
ScanningFilm/Slide
1. PutFilmintoFilmholder,andInsertthefilmholderintotherightsideoftheunit.
2. Insertthebacklightholderattherearsideoftheunit.
3. Pluginpowercabletothepowerportontheunitandoneendtothepoweroutlet
(Figure3.1).
‐7‐
Figure3.1
4.PressPowerbuttontopowerontheunit.Entermediatypemenutoselectthecorrect
mediaforscanning.(RefertoP.29)
5.PressOK/Capturebuttontocapturetheimage.
6.PressonPlaybackbuttontoplaybackthesavedimages.
‐8‐
Power
button
OK/Capture
button
Playback
button
Media
Type

7.Aftercapturing,takeouttheSDcardwhichstoredthesavedimages.
8.Alternativeto7,savedpicturecanbereaddirectly,withouttakingouttheSDcard,
fromPCbyenteringMSDCmode.(RefertoP.31)
‐9‐
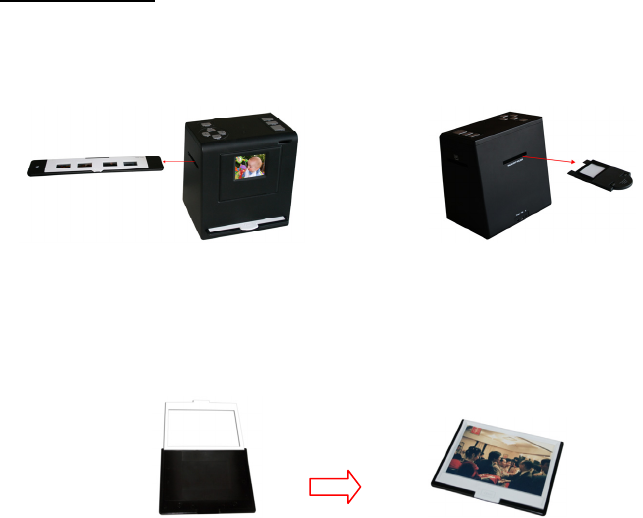
ScanningPhoto
1. Removethefilm/slideholderaswellasthebacklightholderfromtheunitifeither
oneisattached.
2. Openthephotoholderframeasillustrated,placethephotoonthebaseofthephoto
holderandclosethephotoholderframe.
‐10‐
Removefilm/slideholderbyexiting
theslidingtothelefthandside.
Removebacklightholderbypressing
downthehandleandpullitout.
3. Insertthephotoholderintothephotoslotoftheunit.
4. EnterMediaTypeModetoselectthecorrectmediaforscanning.(RefertoP.29)
5. PressOK/Capturebuttontocapturetheimage.
‐11‐
OK/Capture
button
Media
Type
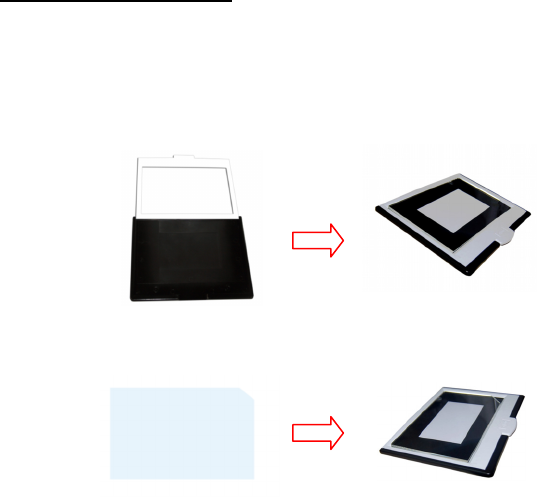
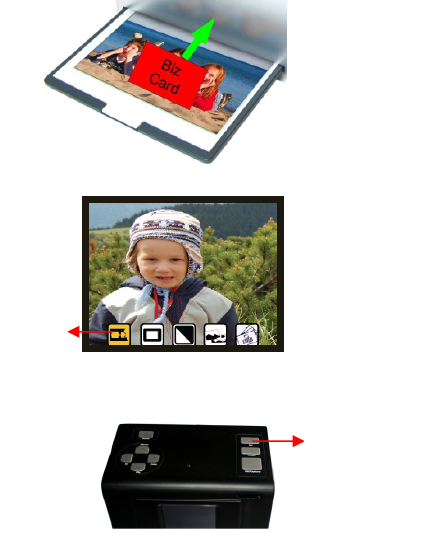
ScanningBusinessCard
1. Followstep1fromscanningphototoremovethefilm/slideholderaswellasthe
backlightholderinthepreviouspages.
2. Openthephotoholderframeandplacethebusinesscardonthebaseofthephoto
holderfollowingtheengravedguideline.
3. Putthebusinesscardfixtureonthetopofphotoholder.
‐12‐
4. Insertthephotoholderwithbusinesscardfixtureintothephotoslotoftheunit.
5. Entermediatypemenutoselectthecorrectmediaforscanning.(RefertoP.29)
6. PressOK/Capturebuttontocapturetheimage.
‐13‐
OK/Capture
button
Media
Type
IV.OperationGuide
‐14‐
Capture Mode
Setting Mode
PlaybackMode
LiveViewMode

1.LiveViewMode
Afteraquickdisplayofwelcomepage,systemwillentertheLiveViewmode.Aflashing
reddotappearsonthetoplefthandcornerindicatingthestateinLiveView.(Note:
selectcorrectmediatype(RefertoP.29)beforecapturing.Bydefaultthesettingisat
NegativeFilm.Unitwillresetbacktothedefaultsettingafterpoweroff)
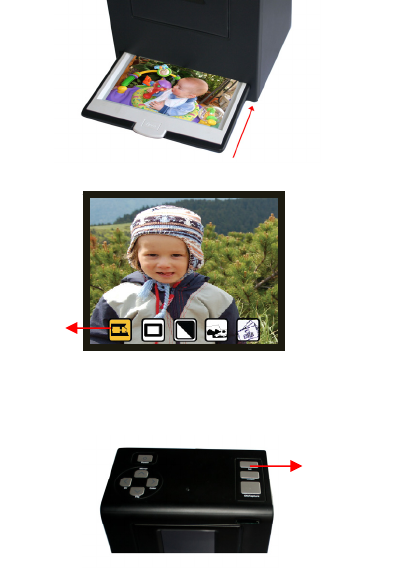
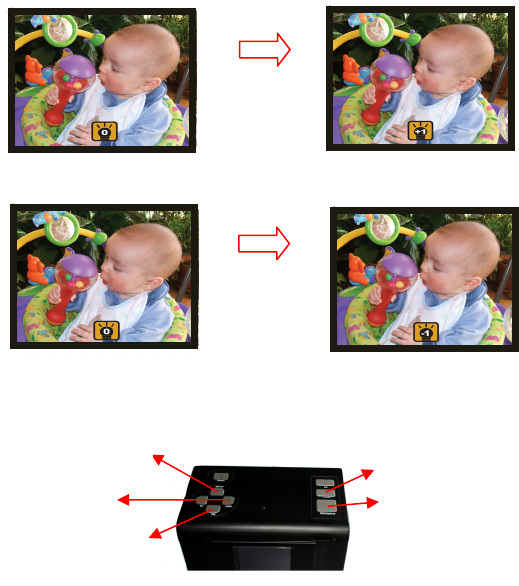
1.1Mirror(HardKey)
● PressUp/Mirrorbuttontoturntheimagelefttoright,pressagainviceversa
‐15‐
Up/Mirror
Up/Mirror
button
OK/Capture
LiveViewindicator
(flashingat0.5secrate)
Save&Exit
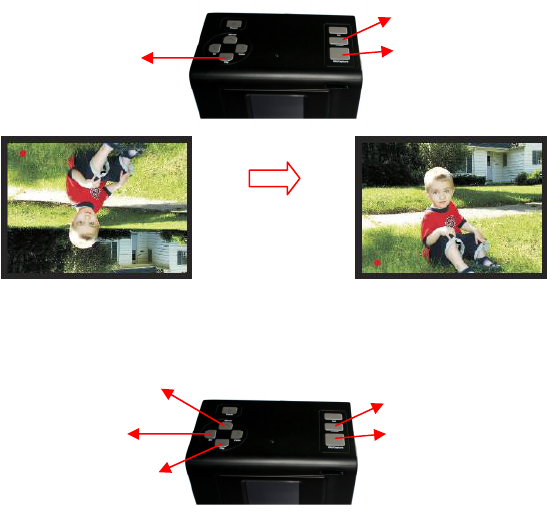
1.2Flip(HardKey)
● PressDown/Flipbuttontoturntheimageupsidedown,pressagainviceversa
1.3EV(HardKey)
● PressLeft/EVbuttontoenterEV(Brightness)control
‐16‐
Down/Flip
button
Down/Flip OK/Capture
Save&Exit
Left/EV OK/Capture
Save&Exit
Up/+
Down/‐
● PressUp/+buttontoincreaseexposure(brightness)withrangesof‐3to3
● PressDown/‐buttontodecreaseexposure(brightness)withrangesof‐3to3
1.4Color(HardKey)
● PressRight/Colorbuttontoentercolorcontrol
‐17‐
Up /+
b
utton
Down/-
button
Right/Color OK/Capture
Save&Exit
Up/+
Down/‐
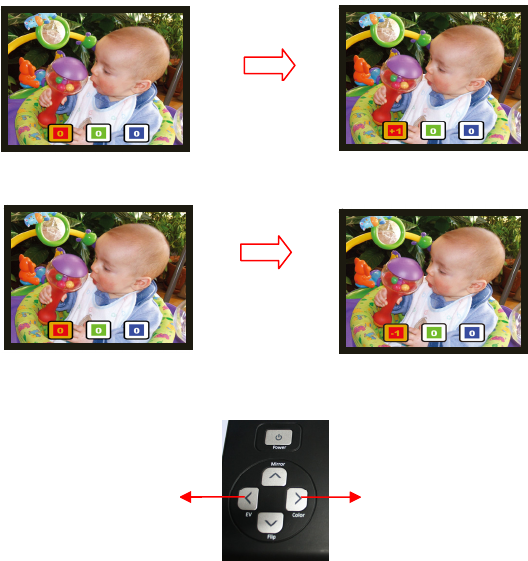
● PressUp/+buttontoincreaseColorwithrangesof‐3to3
● PressDown/‐buttontodecreaseColorwithrangesof‐3to3
● PressarrowhardkeyLeftandRighttomovebetweenR,G,B
‐18‐
Up /+
button
Down /-
button
Left/GoPrevious Right/GoNext
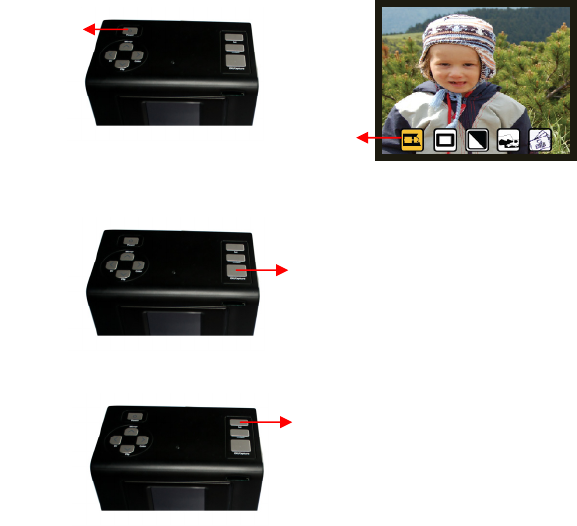
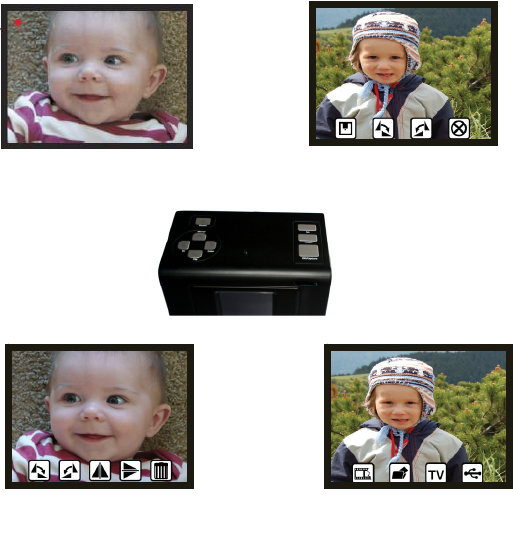
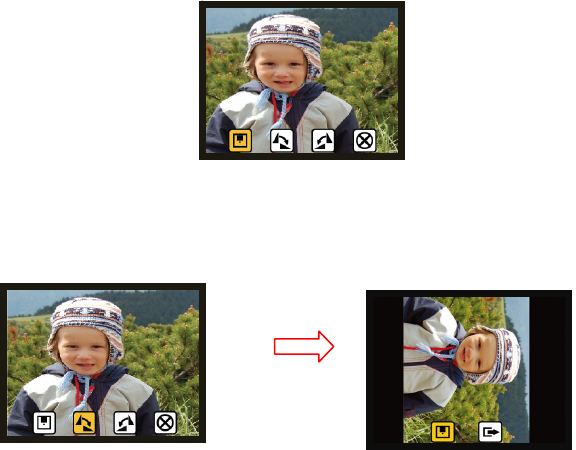
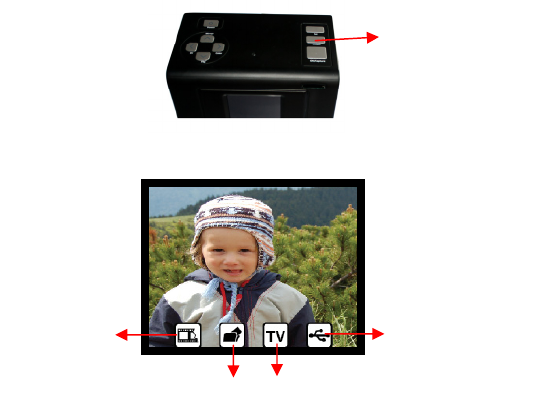
2.CaptureMode
OnceuserpressestheOK/Capturehardkey,theliveviewimageisselectedandwaitfor
2‐3secondstoentertheCapturemodeshownwithfouriconsonthedisplay.
● SavetoMemory:saveselectedimagetomemory
● Rotate+90:rotate+90degrees
● Rotate‐90:continuerotate‐90degrees
(thisisforadjustingtheuserwhotooktheportraitpicture)
● Cancel:cancelallactionandreturntoLiveView
‐19‐
OK/Capturemode
SavetoMemory
Rotate+90
Cancel
Rotate‐90
Selectedimage
Left/GoPrevious
Right/GoNext
2.1SavetoMemory
SaveiconwillbehighlightedforusertoconfirmthesavingbypressingtheOK/Capture
button.AftersaveactionthedisplayreturnsbacktoLiveView.
2.2Rotate+/‐90degrees
Usercanmanipulaterotate+90orrotate‐90withtheLeftorRightbuttontohighlight
ontherotate+90/‐90icon.PressOK/Capturebuttontodoaclockwiseoranti‐clockwise
rotationandmovetoSaveandExitscreenpage.PressagaintheOK/Capturebuttonto
savetherotatedimageorexitwithoutsave.ThescreenwillreturnbacktoLiveView.
‐20‐
OK
button
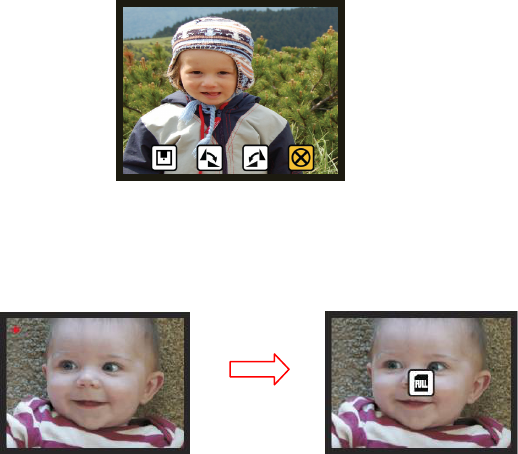
2.3Cancel
WithCanceliconhighlighted,pressingtheOK/Capturebuttontocancelallactionand
returnbacktothestateofLiveView.NothingwillbesavedontotheSDcard.
2.4Memoryfull
OncetheinternalmemoryorSDcardisfull,usercanseeaFULLiconshowingonthe
display.UsercaneitheruploadthesavedimagestoPCorreplacewithanotherSDcard
forcontinuingcapture.
‐21‐
OK
button
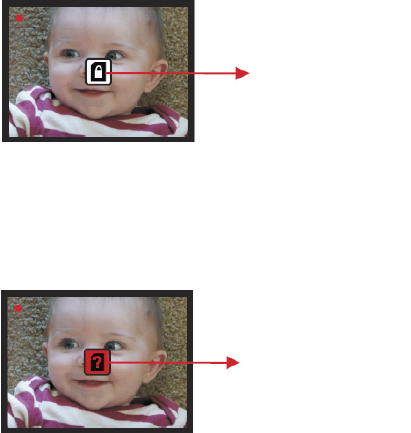
2.5SDcardlocked
IftheSDcardislocked,presstheOK/CapturebuttonwillshowupaSDCardLockedicon
atthecenterofscreen.UnlocktheSDcardbyswitchingthebartounlockpositionto
continueuseoftheSDcard.
2.6SDcarderror
IfscannercannotdetectagoodworkingSDcardintheSDslot,awarningiconwith
questionmarkwillappearatthecenterofscreen.EitherformattheSDcard(Referto
P.30)orreplacewithanothergoodSDcardforcontinueoperation.
‐22‐
SDcardlockedicon
SDcarderror
indicator
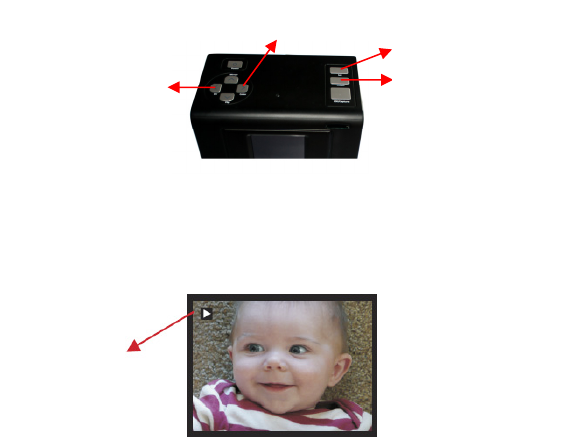
3.PlaybackMode
PressthePlaybackbuttontoenterthePlaybackMode.
3.1PlaybackAutoSlideShow
SlideShowIndicator
Onceuserenterstheplaybackmode,aslideshowindicatorisshowingatthetopleft
handcornerofscreen.ThedisplaywillstartplayingallimagesstoredinSDcardor
internalmemorywith2secondsintervalbetweensavedimages.Usercanpausethe
slideshowbypressingeithertheLeftorRightorModehardkey.
‐23‐
Playback
Mode/Setting
Left/GoPrevious
Right/GoNext
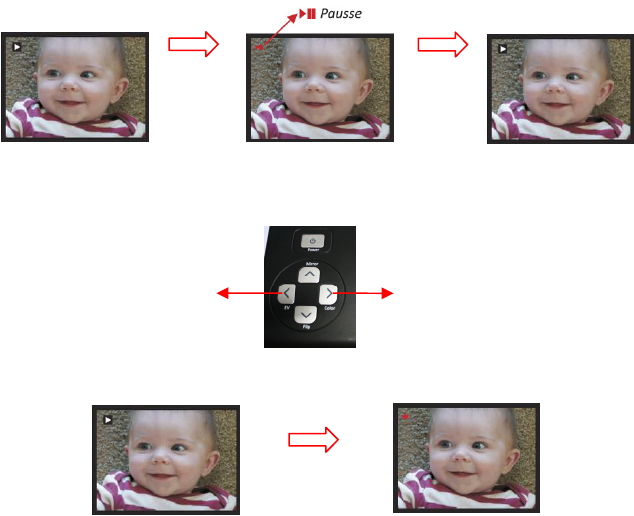
3.2PlaybackManualControl
AutoSlideShowAutoSlideShow
3.3PlaybackExit
PressthePlaybackbuttontoexitthePlaybackModetoreturntoLiveViewMode.
‐24‐
Pausse
Left
OR
Right
Left
AND
Right
SinglePicture
PressLeftORRight
buttontoscrollpicture
PressLeftANDRightbutton
togethertoresumetoSlideShow
Left Right
Playback
button
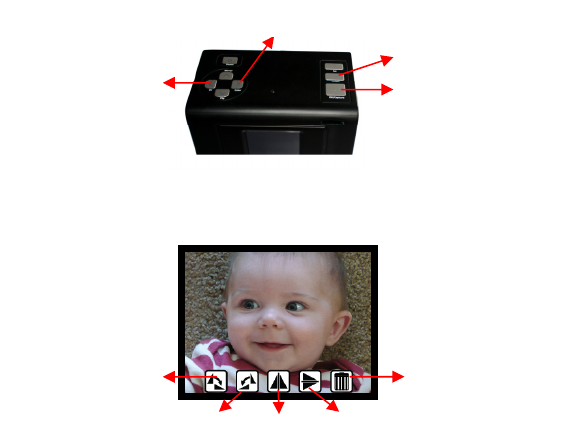
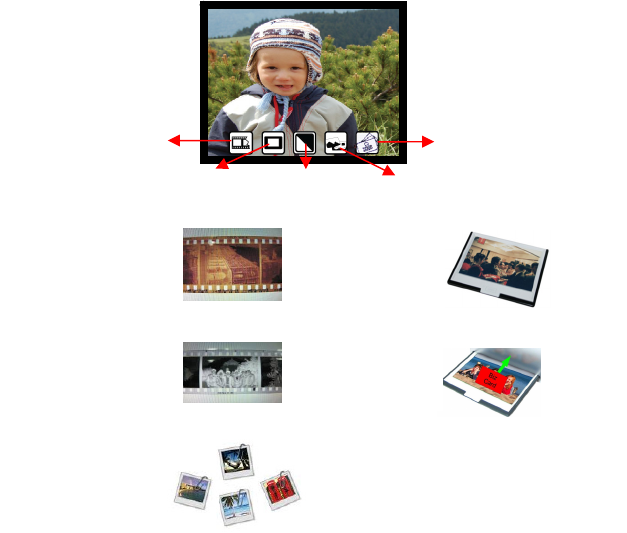
3.4PlaybackEdit:Rotate+90/Rotate‐90/Mirror/Flip/Delete
WhileatthePlaybackMode,presstheModebuttontoenterPlaybackManualControl
Mode.PresstheModebuttononemoretimetoenterPlaybackEdit.UseLeftandRight
buttontomovetothedesirediconsandpressOKbuttontoconfirmtheaction.
● Rotate+90:rotateimage+90degrees
● Rotate‐90:rotateimage‐90degrees
● Mirror:turnimagelefttoright
● Flip:turnimageupsidedown
● Delete:deleteselectedimagestoredinmemory
PresstheModebuttontoresumebacktoPlaybackManualControlMode.
‐25‐
Rotate+90 Delete
Rotate‐90 Mirror Flip
Mode/Setting
Left/GoPrevious
Right/GoNext
OK/Capture
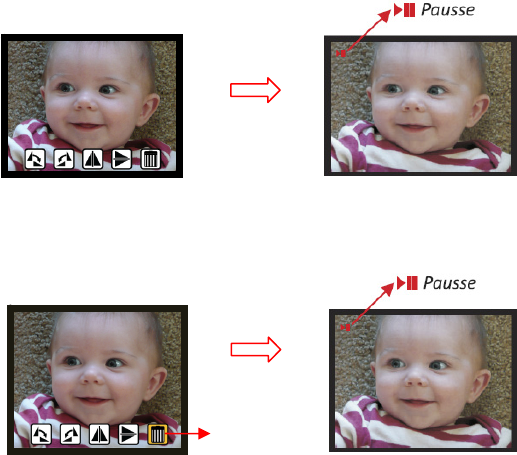
3.5PlaybackEditExit
PresstheModebuttonwhileatthePlaybackEditModethedisplaywillgobackto
PlaybackManualControlModeoncurrentselectedpicture.
3.6Playback:Delete
WithhighlightontheDeleteiconpressOKbuttonwilldeletethecurrentselectedpicture
andresumebacktoPlaybackManualControlMode.Ifuserintendstocontinuetodelete
theimages,repeattheprocessbypressingtheModebuttonandmovetodeleteicon
againandpressOKbuttontoconfirm.
‐26‐
Mode
button
OK
button
Delete

3.7Playback:NoPicture
IfthereisnopictureinsidetheinternalmemoryorSDcardwhenpressingthePlayback
button,apagewithQuestionMarksymbolatthescreencenterwillshowup.Thepage
willremainfor2secondsandresumebacktoLiveViewMode.
‐27‐
Playback
button
4.SettingMode
WhileinLiveViewMode,presstheModehardkeytoentertheSettingMode.
● MediaType:Selectthetypeofmedialoadedinholder
● Format:FormatInternalmemoryorSDcard
● TVout:selectNTSCorPALaccordingtoTVsystem
● USBmode:MSDC(MassStorageDeviceClass)
‐28‐
Mode(HardKey)
MediaType USBMode
Format TVOut
4.1Setting:MediaType
‐29‐
Slidefilm B&WNegative
ColorNegativefilm
ColorNegativefilm
B&WNegativefilm
Slide
Business/Plasticcard
Photo
Photo
BusinessCard
PlasticCard
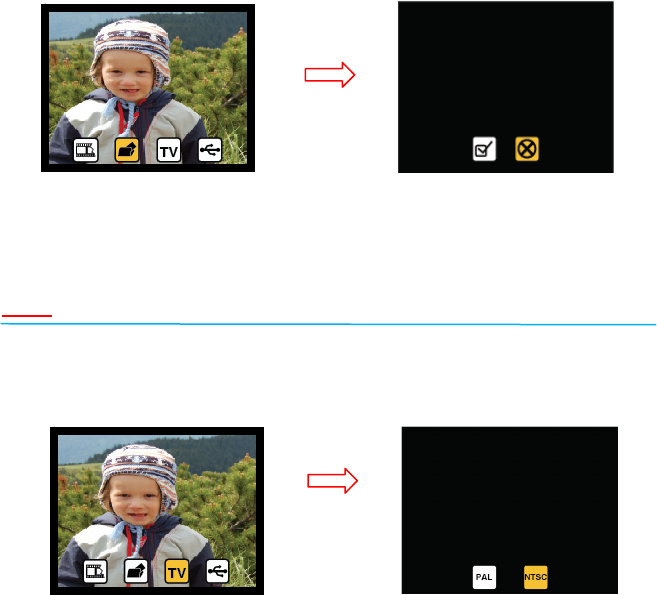
4.2Setting:Format
IftheinternalmemoryorSDcardrequiresformatbyscanner,usercanenterFormat
ModebypressingtheModebuttonwhileundertheLiveViewMode.Scrolltothe
secondiconfromtheleftandpressOKbuttontoenterformatconfirmationpage.The
highlightisattheCanceliconbydefault.UsercanpressLeftorRightbuttontomoveto
ConfirmorCanceliconandpresstheOKbutton.
Note
IfthereisnoSDcardinsidetheunit,theinternalmemorywillbeformattedonce
processingtheFormattingaction.Viceversa,theSDcardwillbeformatted
4.3Setting:TVout
‐30‐
OK
button
OK
button

UserisabletoviewtheimagesfromaTVdisplayinsteadoftheunit’sownLCDdisplay
forbiggerviewingpleasure.ByconnectingtheAVcabletounit’sTVoutjetandoneend
toTV,confirmbypressingOKbuttontoselectPALorNTSCmatchingtoTVsystem.The
TVisnowworkingasanalternativedisplaytoperformalltaskslikescan,capture,edit
andplayback.
4.4Setting:USBMode
AftercaptureusercanuploadthesavedimagesfrominternalmemoryorSDcardtoPC
byselectingUSBMode.MakesuretheUSBcableisconnectedbetweentheunitandPC.
ScrolltotheUSBModeiconandpresstheOKbutton.ThedisplayisshowingaUSBstatus
iconatthecenterofscreenconfirmingtheunitisnowbecomingamassstoragedevice.
Usercanrevieworeditimagesontheexternalstoragedevice.OrjusttakeouttheSD
cardfromdeviceintoPCtoreadtheimagesdirectly.
‐31‐
OK
button

Goodbyepage
‐32‐

V.Specification
ImageSensor:5megaCMOSsensor
Lens:Fno.=2.0,4Glasselements,
LCD:3.0’’ColorTFTLCD
Internalmemory:24MBNANDFlash(forsavingimages)
FocusRange:2xPredefinedFocuses
ExposureControl:6levelsofcontrol
ColorBalance:6levelsofcontrol
ScanQuality:1,800dpi
DataConversion:10bitspercolorchannel
ScanMethod:Singlepass
LightSource:Film/Slidescanning:
Lightbar(3whiteLEDs)
Photo/BusinessCardscanning:
Lightbar(8whiteLEDs)
Interface:USB2.0,TV‐out(video3.5mmjack)
USBConfiguration:MassStorageDeviceClass/MSDC
Power:ACadapterpower
Dimensions:190x145x205mm
Weight:0.90kg
Externalmemory:SD/MMCcompatible
‐33‐
This equipment has been tested and found to comply with the limits for a Class B digital
device, pursuant to Part 15 of the FCC Rules. These limits are designed to provide reasonable
protection against harmful interference in a residential installation. This equipment generates,
uses and can radiate radio frequency energy and, if not installed and used in accordance with the
instructions, may cause harmful interference to radio communications. However, there is no
guarantee that interference will not occur in a particular installation. If this equipment does
cause harmful interference to radio or television reception, which can be determined by turning
the equipment off and on, the user is encouraged to try to correct the interference by one or more
of the following measures:
-- Reorient or relocate the receiving antenna.
-- Increase the separation between the equipment and receiver.
-- Connect the equipment into an outlet on a circuit different from that to which the
receiver is connected.
-- Consult the dealer or an experienced radio/TV technician for help.
FCC ID: WFZSCND503H1231
This device complies with Part 15 of the FCC Rules.
Operation is subject to the following two conditions:
(1) this device may not cause harmful interference, and
(2) this device must accept any interference received,
including interference that may cause undesired operation.