EZMAX EZMP-4100T Digital Audio Player User Manual EZMP 4100 Manual English
EZMAX Co.,Ltd. Digital Audio Player EZMP 4100 Manual English
EZMAX >
Users Manual
Copyright © 2005 EZMAX. All rights reserved.
Advance permission of EZMAX is required to use User’s Guide, photos,
the related documents and software of the product. Any violation may
follow the legal measures.
The contents of the User’s Guide are subject to change without prior
notice for further improvement of the product.
EZMAX
http://www.ezmax.co.kr
1
Table of Contents
Before Use
Product & Accessories ............... ..............2
PC System Requireme nts .......... ..............3
Safety Pre cautions ... .................. ..............4
Features . .................. ................. ...............5
Designation of Parts
Front/Rear View of the Product ... ..............7
Side View of the Produ ct ............ ..............8
Function Ic ons in Display............. ..............9
Preparation
Installing USB Driver.. .................. ............10
Connecting Player to P C ........................12
Manually In stalling US B Driver.... .............13
Using Rem ovable Disk................. ............16
Disconnec ting USB Ca ble............ ............19
Upgrading Firmware... .................. ............21
Installing L DB Manage r ............. .............23
Using LDB Manager . .................. ............24
Basic Functions
Basic Ope ration ........ .................. ............29
Power On/ Off ........... .................. ............32
Playback Music File .. .................. ............33
Using Navigation ................. .................. 36
Voice Recording/ Listening ... .................. 37
MP3 E ncoding/Listening .. .................. 38
Listening to FM R adio ......... .................. 41
Reco rding/Playba ck FM Radio ............. .45
Using FM Transm itter .......... .................. 46
Function Menu
Menu Setting .... .................. .................. 47
Music File Playback ............ .................. 48
Mana ging File . .................. ................. .49
Detai led Menu S etting ......... .................. 52
Playb ack Mode S etting ....... .................. 53
Soun d Setting ... .................. .................. 54
Displa y Setting .. .................. .................. 56
Timer Setting .... .................. .................. 58
Enco ding Setting ................. .................. 60
Settin g ............. .................. ................... 61
Others
Built-i n Battery Charging .... .................. .64
HOLD Setting Ho ld ............. .................. 65
Troubleshooting .................. .................. 66
Speci fications .... .................. .................. 68
Servic e (A/S) ...................... .................. 69
Warra nty ........... .................. .................. 70
2
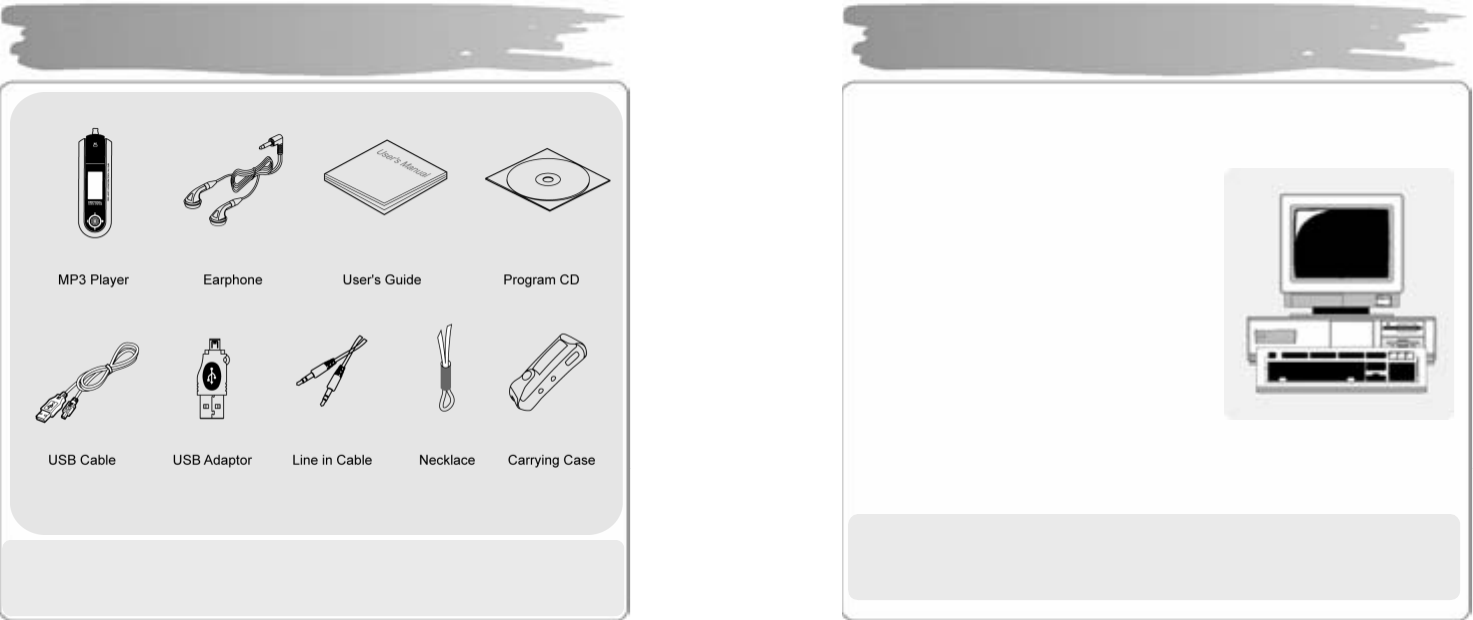
!N OT E: Acc essori es ar e su bject to c hang e wit ho ut a p rior n otic e for f urt her
impro ve m ents i n of th is prod uc t.
Products & Accessories
3
Basic req uirements sho uld be s atisfie d t o us e t his pl a yer o n yo ur PC.
Make sure to c hec k the f ollowi ng recom men datio n s bef or e it s use:
Penti um 20 0M HZ or a bo ve
Windows 98SE / ME / 2000 / XP
(Wi ndo ws 98 S E - I nstall Driver)
Ma c OS 9.0 / 1 0.0
US B Port (2.0 support ed)
(Requires PC with a c ap acit y of m ore t han
Pen ti um3 1 G. Co ul d n’t b e su pp orte d
dep en ding on a mai nb o ar d. Isn’t s up por t ed
with out Ser vic e Pac k 1 und er Wi n do ws XP.)
CD-ROM Drive
Hard Disc Space 20MB or above
(an a dditio nal c apacit y m ay b e r eq uir e d to s a ve the musi c files.)
64M B RAM o r ab o ve
Dir ect X 8. 0 o r ab o ve
!N OT E : Memory sp aces availa ble may be less tha n those indicated above since the
fi r mware us es s o me portio ns o f th e memor y a vaila bl e to you r PC f or t he
operation b y its system.
PC System Requirements

4
Listening Cautions…
The ou tp ut of t he p r oduc t gu aran te es the best s ounds at its pr oper vol ume. As
listening with a vol ume set a t a hig h p ositio n fo r a long t i me may d amag e y our
sense of h e ar ing , m ake s ur e t o liste n t o t he music at a pr o pe r volu me.
Avoid Strong Impact or Vibration
Be c aref u l in ha ndlin g t he pro duct a nd i ts access o ries sinc e t heir f alli n g on t he fl oor
or giving an impact on them may result i n their serious damages.
Storage
Avoid t he plac es e x pos ed t o h ea t, hu mid i t y or mag netic fi eld
Cleaning
Wiping t h e pla yer with ch e micals may result i n d isc olor atio ns or da mag es o n its
surface.
Wipe ou t th e pla yer with a s of t clo th.
W arning: The batt er y of thi s player i s r ech arg eable wit h a possible risk o f a
fire or explosion.
- Do not place it ne ar a fire, flame or heating devices.
- Do no t r epl ace t h e ba tter y at your di s pos al.
(r efer to or see k p i ec es o f a d vice f or m its d ealers (man ufact urers).)
Warranty period of the battery is 6 months from the dat e of it purchase.
!N OT E : N ever try to dissembl e, repair or remodel it.
Safety Precautions
5
Multi-Codec Player
Multi- code c pla yer s upp orting MP3, WM A, A SF(au dio), O GG, WAV f or ma t.
FM Transmitter Function(My FM Station)
If you sel ect th e e mb ed ded F M Trans mitter mod e , yo u can enjo y a h i g h sensiti vit y
of music wireless th ro ug h d e vice wit h FM radi o(e x. C ar au dio , h ome a u di o, ordin ar y
FM radio) .
High Quality 3D Sound, MEX (Magic EXpander)
Exper ie nc e a pr ofo un d so un d d ue to a n intro duc ti on of ME X which allo ws you to
feel 3D e xpansio n e ffects with ri chn ess while ke ep i ng th e or ig inal an d s tabl e s ou nd
of th e pla yer . 3D S oun d M EX is a n ew 3D effec t that d oes n ot ma ke you fe el t i red
even if yo u listen to it for a long time.
EL Di sp l ay
With its in tr oduc tion of Blue/ Yello w 2 C olor E L Sc r e en Gra phic Displa y, t he pla yer
can c omma nd mor e lu xur ious and fanc y imag es.
Firmware Upgrade
Upg rade F ir mware t o a dd/c ha nge/impro ve fu nctio n s and p er formanc e o f t he Pla y er.
Always en j o y t he music wit h it s lat est ve r sion of perfor mance .
Voice Recording
A func tion of hig h q uality voic e rec ordin g allo ws a cl ear r ec ordi ng for con fer e n ces
and lectur es.
Features
6
FM Radio
Con ve nie ntl y enj o y th e FM radi o wit h a var iet y of f u ncti ons s uch as t he
ma nual/ au to matic fr eq ue nc y sear c h, au tomatic tu ne t o the ra dio stati on, a nd t he
station pre s et.
Easy Navigation
Tr ee struc ture allo ws you to ma nag e an d se arch a sp ecific s o ng more co n veni entl y.
Lyric Di splay(LDB)
You ca n easil y e dit , s a ve a nd displa y t h e l yrics o f a song i n 3 lines on th e la rg e
displa y.
Time Di splay(Clo ck) Fun ction
A functi on of cloc k d ispl ay sh o w th e c urr ent ti me .
Removable Disk Device
You can fr eel y upload and d ownload files without a separate manager program
since t he pla yer is r ec og nized as a re mo vable dis k when it is con nec ted to th e PC .
Direct E ncoding
You can record an external sound you hear through LINE-IN port of the player, as
from FM r adio br oadc asting .
Rechargeable Battery and USB Charging
With an i ntro ducti on of r ech a rg eable b atter y i nsid e t he pro d uct, it re ali zes a lo ng
time playback, allo wing an easy charging through USB. (Chargeable with an
ada ptor s p ecialized for EZMP -41 00 whil e pla ying . A us er s houl d s epar atel y buy t he
ada ptor .)
Features
7
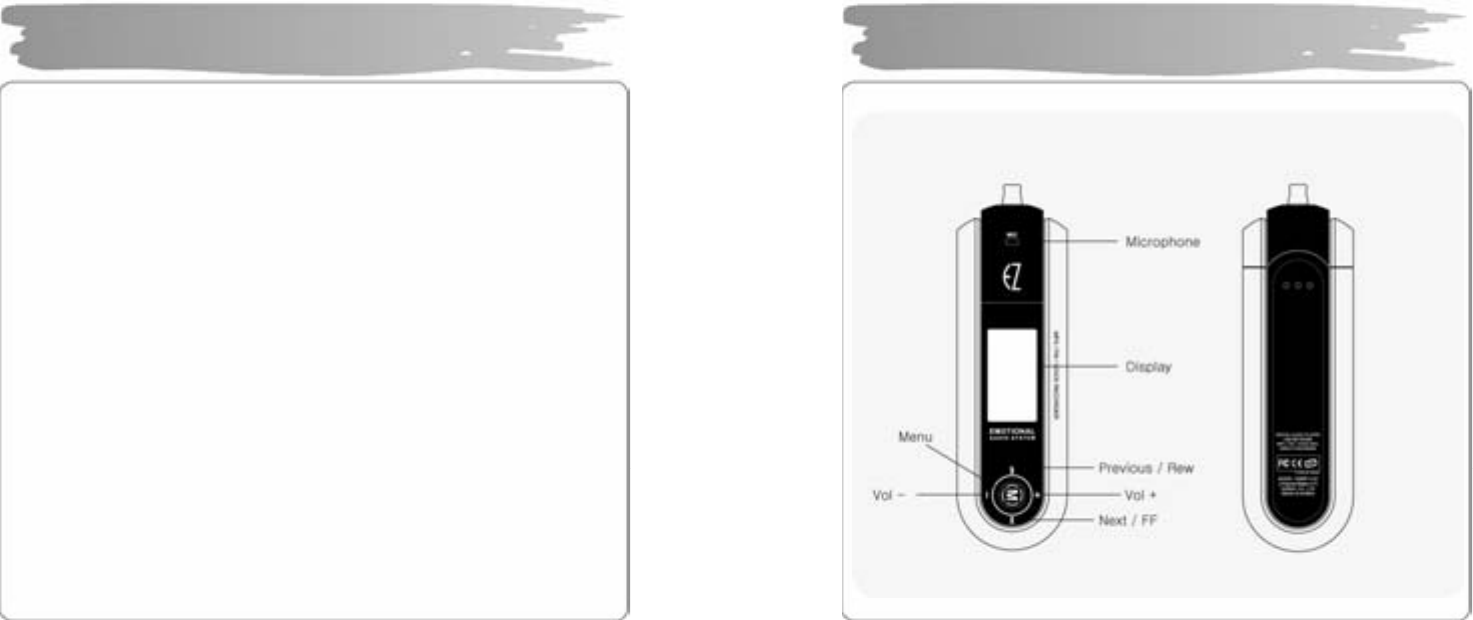
Front/Rear View of the Product
8
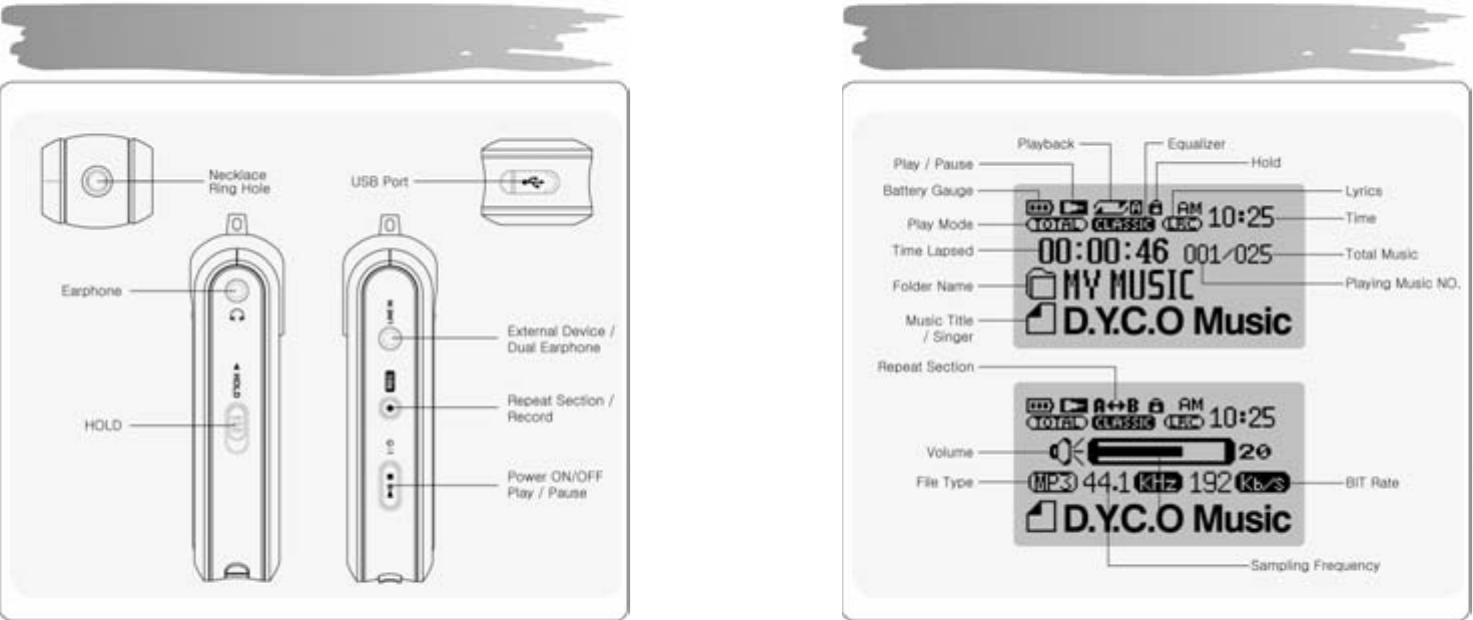
Side View of the Product
9
Function Icons in Display
10
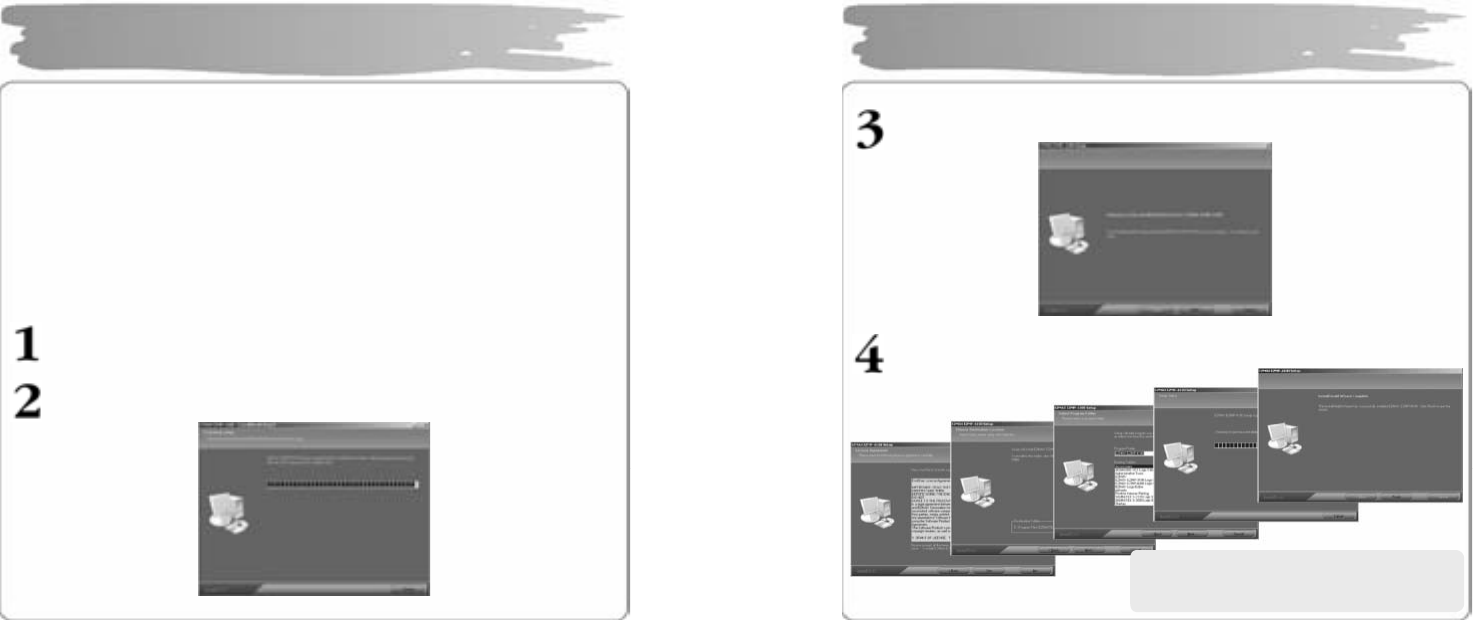
Make sure to i nstall t he US B d ri ver bef or e c on nect ing it to t h e PC.
When t here ap pe a rs “Add Ne w Hard wa r e Wiz ard ”, pr ess th e “Canc e l ” but to n a nd
install Upg rade M anag er.
If yo u inst all Upg rad e Ma nag e r, t he US B dri ver wil l be au to matic ally i ns talle d.
► The dr i ver is r ec og nized wi t ho ut inst a llatio n of a sep ar at e prog ra m u nder
Windows ME, 2000, XP, but make sure to install it if Firmware Upgrade is
req uir ed.
► If Upg r ad e Ma na g er is not inst alled u n der Win do ws 98 S E, t he pla yer ca nno t be
recog nized as a remo va ble disk. Ma ke sure to i nstall Upg rad e Man ag er .
Inse rt I nstalla t ion CD int o CD- ROM Drive an d t hen cli ck set up. e xe in t he
folder of Upgrade Manager.
.
The installatio n will start.
Installing USB Driver
11
Clic k “Next”.
Click ‘Next’ or ‘Yes” in subsequent windows.
Installing USB Driver
When t he i nstallati on has be en do ne ,
conn ect it to the PC as sh own in the n e xt
pag e
.
12
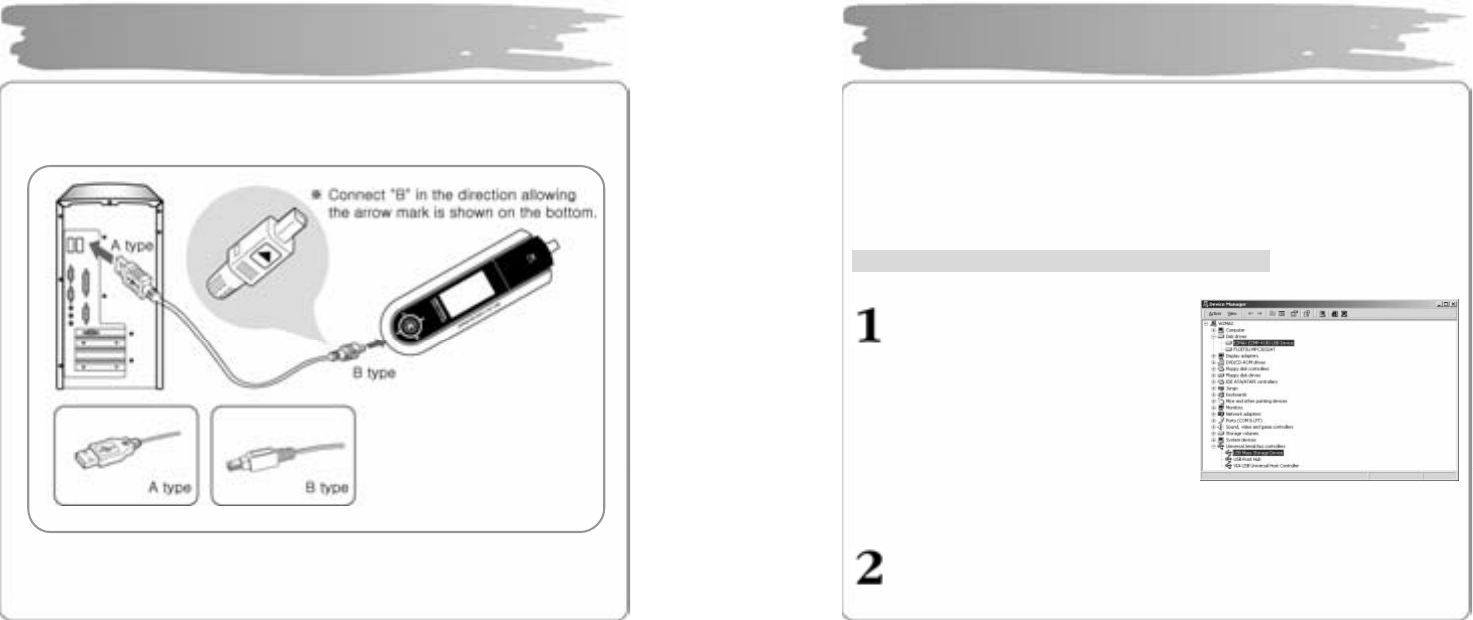
To download music files (M P3/WMA/ ASF/ OGG ) from the PC, use USB cable
to connect the MP3 Player to the USB port of the PC.
(Make sure to use only USB cab le suppl ied with the MP3 Player. )
Connect ‘A’ of the cable to the USB port on the part of the PC.
Open the cover of the USB port on the part of the player and connect
‘B’(a smaller part) of the cable to the USB port.
Connecting Player to PC
13
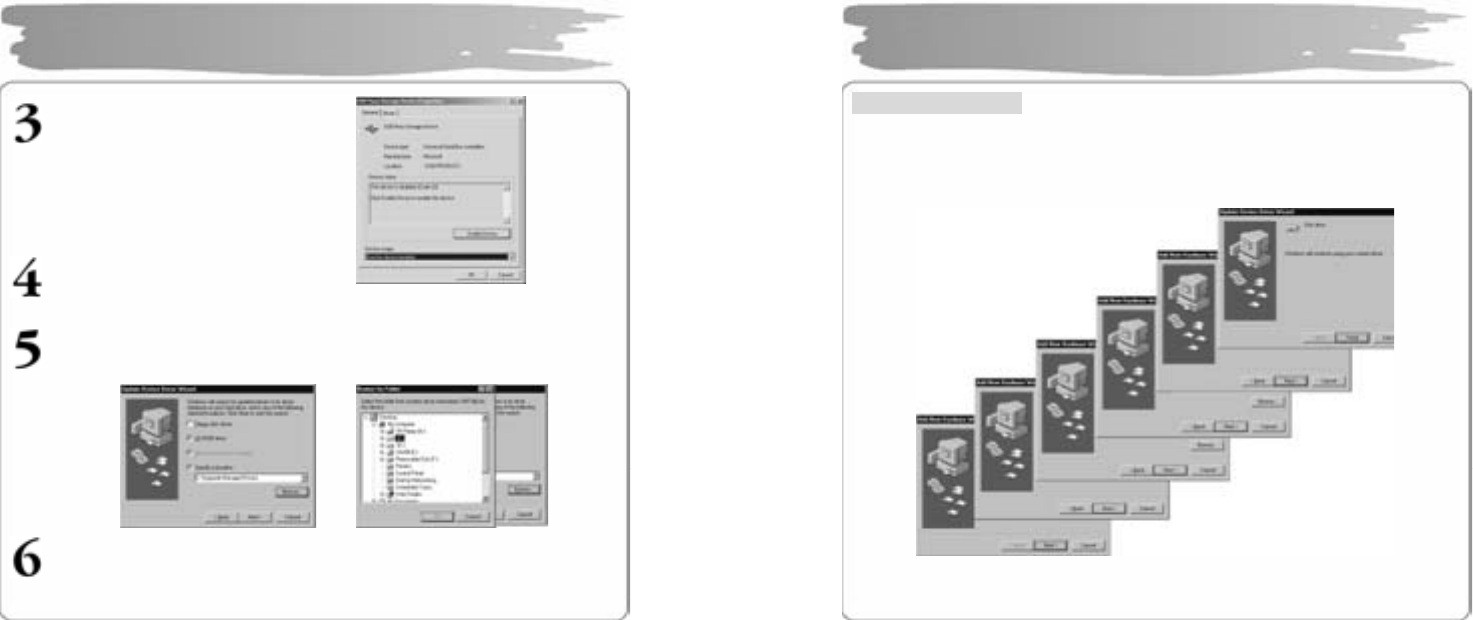
Install th e USB driver in the following way wh en it is not reco gnized a s a
removab le disk.
If there doesn’t appear “EZMAX EZMP-4100 USB Device" in “Disk Dr ive” of Device
Manag er or “ USB M ass Storage D evice”(Except Window 9 8SE) in Uni versal Serial
Bus Controller, or if there does a yellow exclamation mark or “Unknown Device”, the
driver has not b een pr o per l y i nst all ed. In this c ase , manu ally i nstall t he dri ver .
If an error has occurr ed while in stalling USB dr iver
Check Device Manager.
▪Wind ows 9 8 SE/ME
C ontrol Pane l →System→Device M anag er
▪Windows 2000 (Professional )
C ontrol Pane l →System→Hardwar e
→Device Manager
▪Wind ows XP (Pr ofess io nal )
C ontrol Pane l →Performance and
M ai ntenance →System
→Hardware→Device M anag er
Ch ec k wh et h er ther e are an y d e vice wit h a e xcla mati on mar k or q uest i on
mark(unknown device or USB de vice) in De vice Manager.
Manually Installing USB
14
Double click the device with a
excl amatio n o r q u estion m ark.
Pres s “Inst all D r iver Ag a in”..
Click ‘Next’ in the subsequent wind ows. When searching driver files as sho wn
belo w, click th e “ Br o wse ” to s el ec t C: \Win n t\ Inf or C:\ Wind o ws\ Inf and pr ess
“OK”.
Press “Next”: in the subsequent windows to complete the installation of the
USB dr i ver .
Manually Installing USB
15
For W indows 98 SE
Click ‘Ne xt’ in t he s u bs eq uen t wind o ws.
Desig nate th e p ath for sear c hing th e d river file t o \Upgrade Manager\Drivers of
CD Drive.
Make sur e to r estart your system after installati on i s completed.
Manually Installing USB (Win 98SE)
16
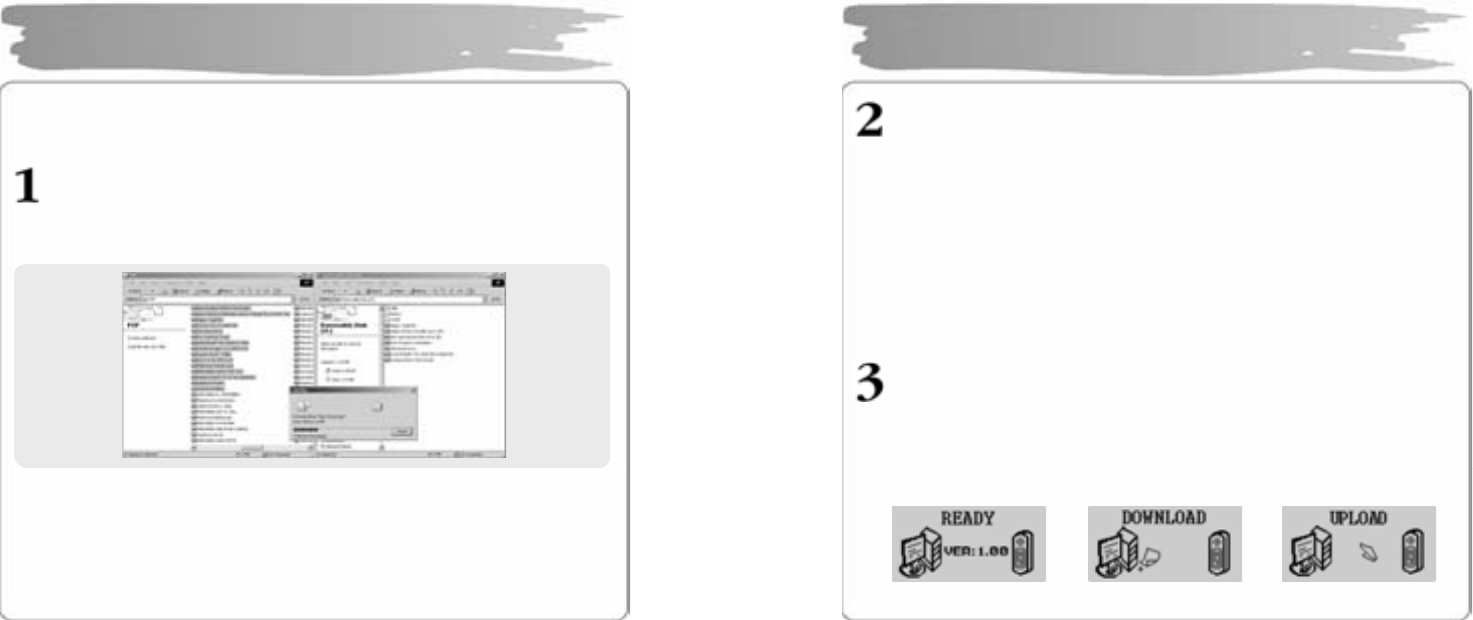
Since th e pla yer is de tect ed a s a r e mov abl e disk on th e par t o f PC, y ou ca n eas il y
uplo ad, d ownloa d, or delet e music files or fol der s in Wi ndo ws E xpl o rer withou t a
separa te ma nag er p r og ram.
Cop ying files t o Pla yer (D ownloa d)
1) W h en you c on nect th e pla yer to the U SB c able , it is r eco g nize d as a
removable dis k in Wi n do ws E x plorer .
2) C lick t he r e movabl e d is k t o ent e r into a me mor y ar e a of th e pl a yer .
3) R un on e mo re Wind o ws e xplore r.
4) Selec t the fi le to s ave ,
① Drag and drop it to th e r e mova ble dis k.
② Or, right-click to select Copy. Designate the removable di sk and rig ht-
click to sel ect Paste.
5) T hen, ther e will app ear a file transfers window, indicating that the file is
being co pi ed to th e r emova ble dis k.
Using Removable Disk
17
Export File(Upload)
1) Connecting the USB cable to the Player allows the Player to be
recognized as a removable disk in the Windows Explorer.
2) Select the removable disk to have access to the memory area of
the Player.
3) Run one more Windows Explorer.
4) Select a file you want to export from the removable disk, and
then:
① Drag & drop to the disk to which you want to export.
② Or right-click the mouse to select Copy, and select a folder
to which you want to export, and then right-click the mouse
to select Paste.
You can add or delete a folder in the Windows Explorer.
Whe n you d ow nloa d a music file t o th e pl aye r , wai t u nt il th er e ap pe ars Ready
on the dis pla y as s ho wn b elow. If yo u di sc onn ect th e US B ca ble dur ing
DOW NLOAD or UP LOA D, the fil e ma y not be pr op e rl y do wnl o a ded . Ch e c k
the displa y(RE ADY) an d t hen disc o nn ect t he cabl e.
READY Status DOWNLOAD UPLOAD
Using Removable Disk
18
Format Player
1) Formatting in the Windows
① Select the removable disk, and then right-click the mouse to
select Format(Select “FAT” as a file system).
② Click Start. (If you remove the USB cable while formatting, the
player could be damaged. Be sure to remove it after the
formatting has been done.)
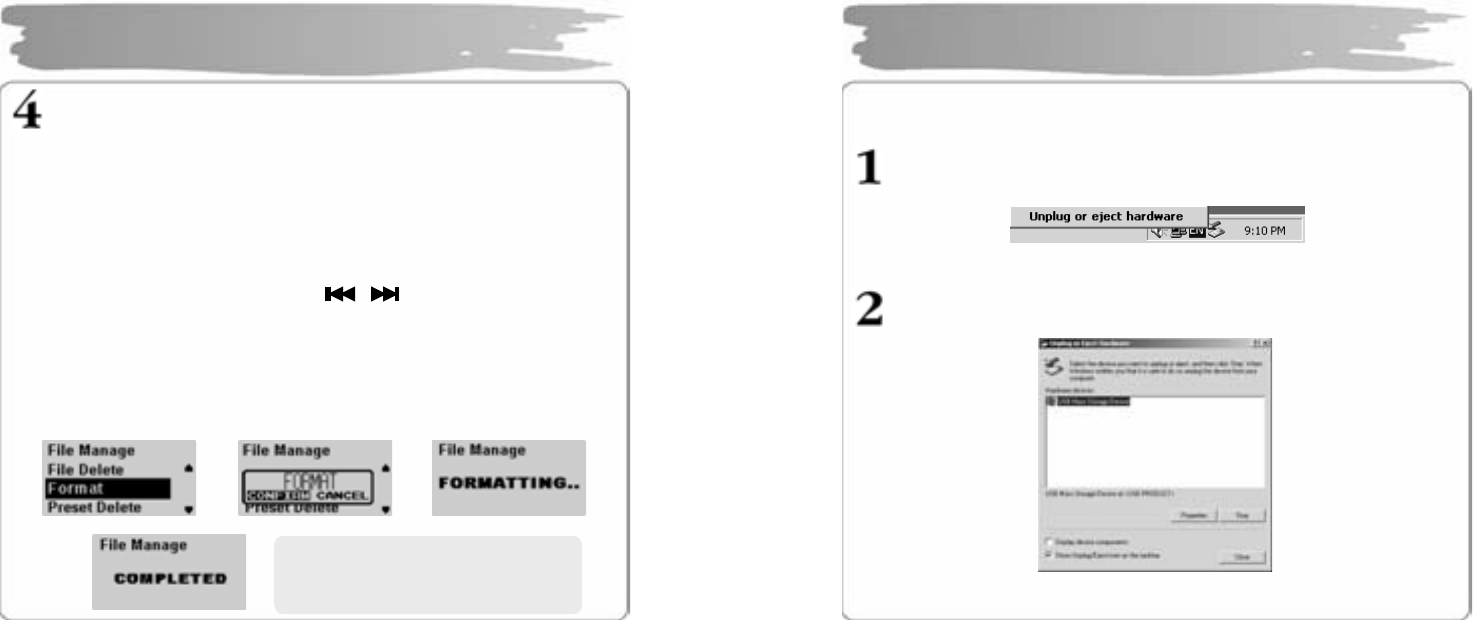
2) Formatting in the Player
① Press th e MENU b utt on t o en t er int o th e me nu mo de.
② Select t he File Manager with butt o n an d t he n press t he
MEMU button to enter into File Manage menu.
③ Select F ormat me n u wit h V O L +/- b u tto n a nd t he n pr es s the ME NU
butt on.
④ After s e lecti ng “C onfir m”, pr ess t he M ENU b ut t on on e more to s tart
formatting.
Using Removable Disk
Î Î
Î ※ Be car eful since formatting will
delet e al l c ont ents p er mane n tl y.
19
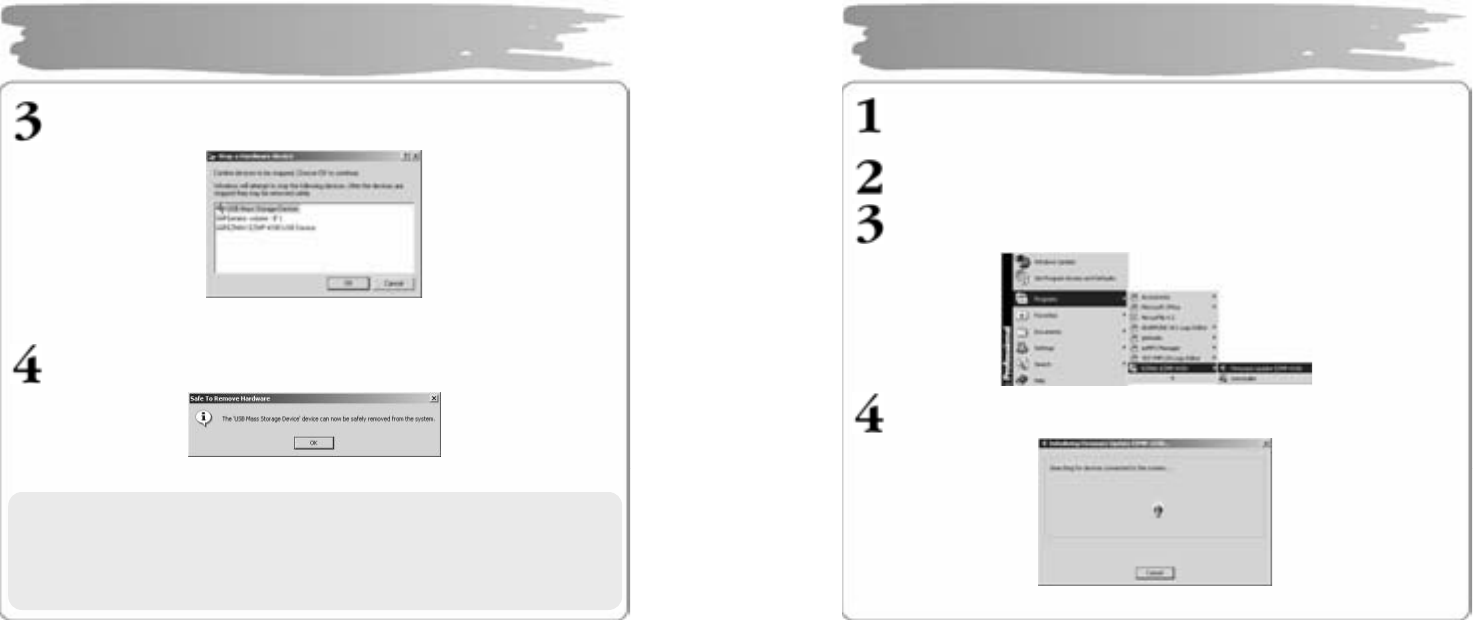
After co m pleting file transf er , d isco nn ect t he US B c a ble i n th e f oll o wing wa y.
Rig ht-click the r emo va bl e har d war e i con on t h e t as kbar of t he des kto p,
and then s elec t “Re mov e Har d war e S af ely”.
After sel ecting the device to disconnec t, clic k “Stop” .
Disconnecting USB Cable
20
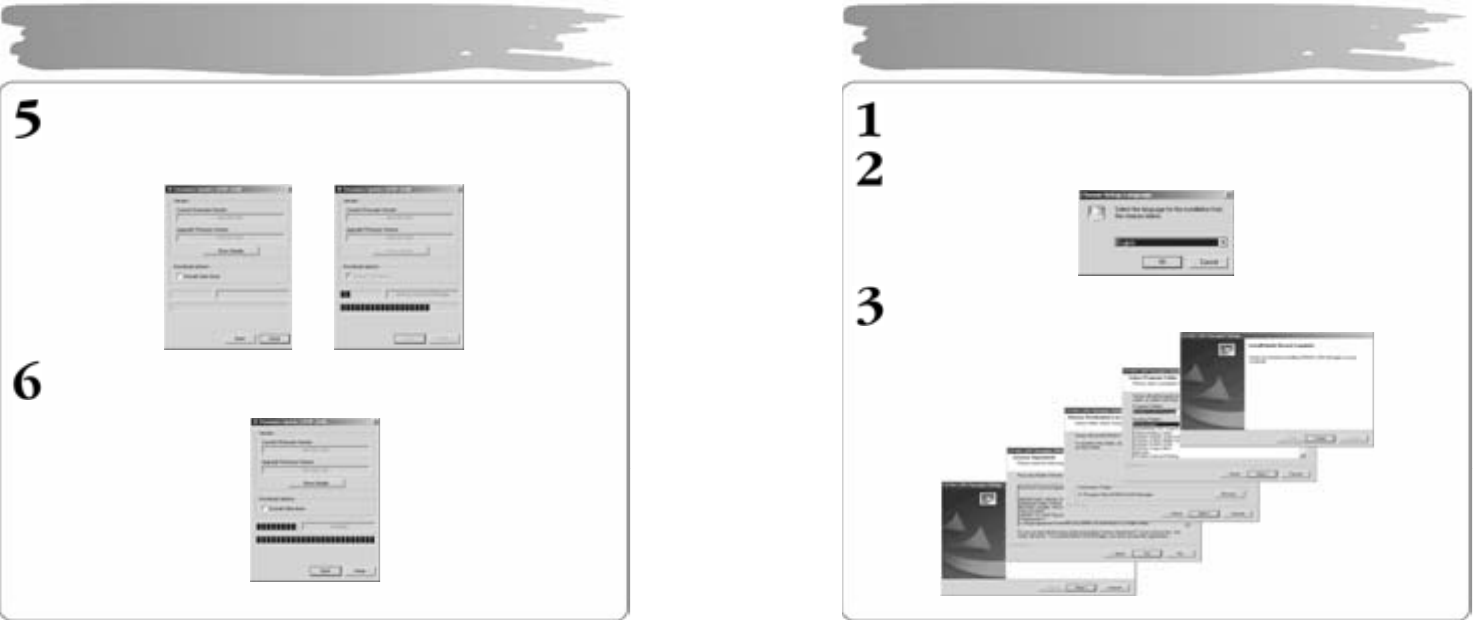
Clic k “OK” to c onfirm t he device to stop.
Clic k “OK” to r emove U SB c able.
Disconnecting USB Cable
※ Abnormally disconnecting the USB cable m ay result in damages or a
failure to the p layer.
The order of music files that app ears wh en you select a rem ovabl e
disk in Windows Explorer has nothing to do with the actual
sequ ence in ac cordance with the playb ack.
21
Downl oa d th e la test ver s ion of fir mware at our website ( www. ezm a x.co . kr)
and unzi p it ( u nzipp ed to 4 files .)
Cop y t he unzi p pe d lat es t fir mware files int o
C:\P rog ram Fi les\ EZMA X\EZMP- 4 10 0 f older .
Exe cut e Fir mwar e Upg r ade man ag er pr og r a m.
Wai t f or the d e vice t o s e arch. Con nect USB c able .
Upgradi ng Fir mware
22
Cl i ck ” Start” t o pr oce ed Fi rmwar e Upg rad e. Select “Da ta Are a Fo r mat ting ”
to d elete all t he files in the system.
Di sconnec tin g the USB ca ble du ring Firmw ar e U pg r ade may r esult in mal-
functi ons of t he pla yer or th e PC.
Whe n t he firm ware u pg rade has b ee n co mpl eted, cli c k “Cl ose” an d r e mo ve
the US B ca ble (Ref er to Disco nn ec ting USB Cabl e).
Upgradi ng Fir mware
23
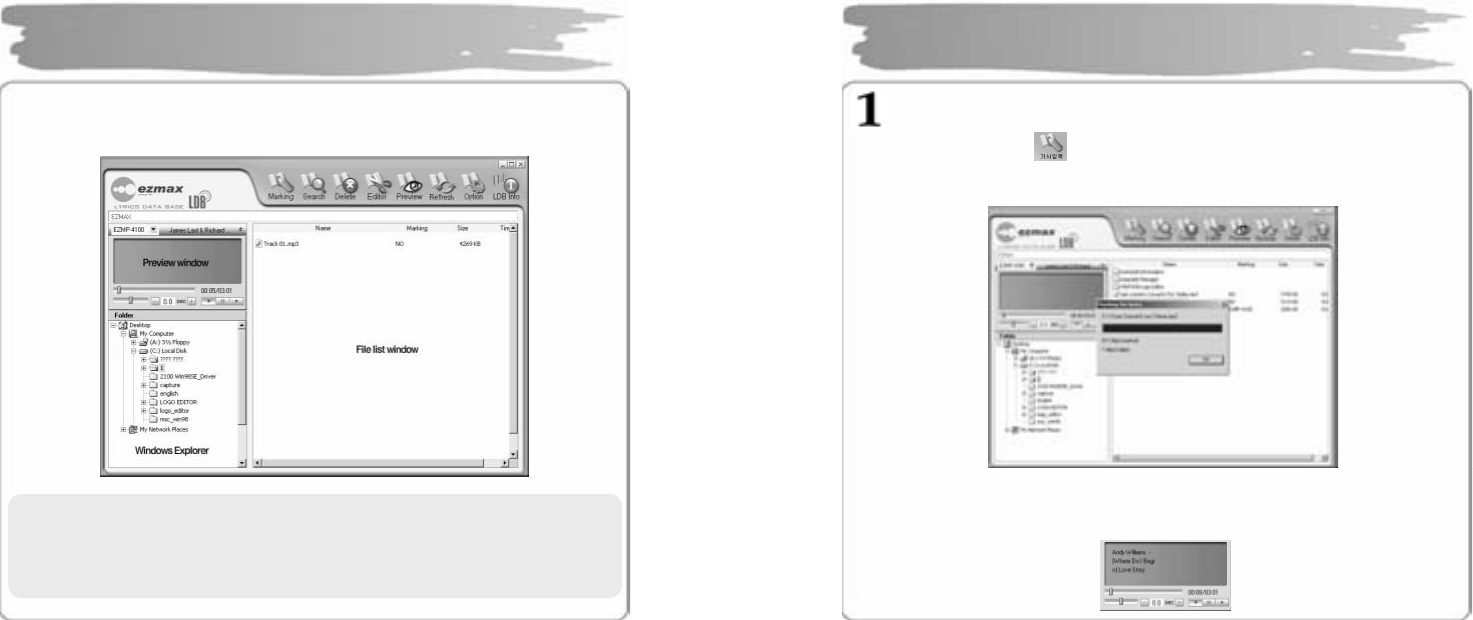
Insert the Inst allation CD into CD- ROM Driv e and clic k s etup.exe i n t he fol der
of LD B Man ag er.
Sele ct a la ng u ag e t o us e.
Clic k “Next’ or ‘Yes” in t h e s ubs eq u en t wind o ws .
Installing LDB Manager
24
LDB Man ag er is a prog ra m t h at aut om aticall y e n t er s the lyri cs i n MP 3 music f iles
and can b e us ed wit hout co nn ecting t he pla yer t o PC.
Using LDB Ma nager
▪The Internet should be av ailable so that it c an get inf ormation about a
lyric from the l yric server.
▪Lyr ics are not m ar ked for the VBR file sin ce time info rmation d oes not
match.
25
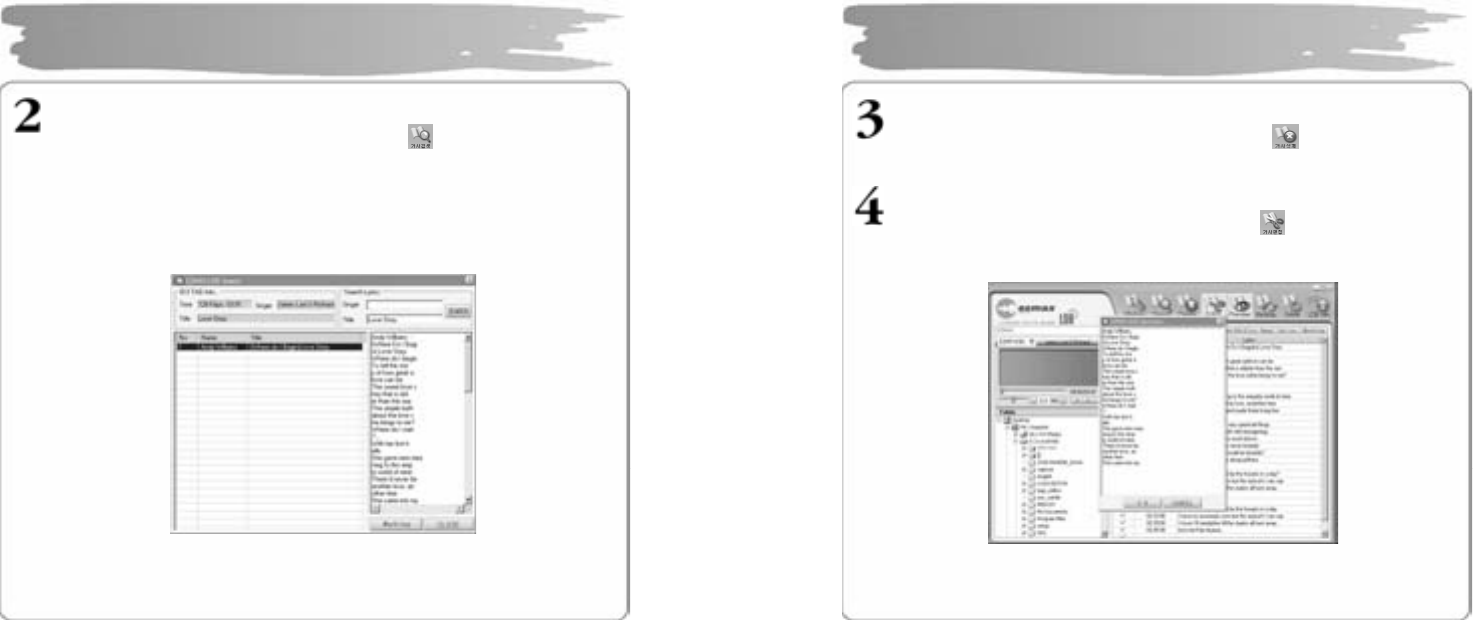
Enter Lyrics(Auto Search)
① Select the MP 3 file to enter the lyrics in the file list windo w, and pr ess
“Enter L yrics” on th e to p menu.
② The l yric s er ver s ea rch es f or infor mati on ab out the l yrics accor di ng to
informatio n a bo ut t he rel eva nt f iles to au t o matic all y ent er th e l yrics.
③ After th e l yr ics ha ve be en en t er ed in , yo u can c hec k t he l yric marki ng
informatio n is displa yed in the file list wind ow.
④ Pla y bac k in the pre vie w win do w to c hec k i nfor mati o n ab out th e l yri cs.
Using LDB Ma nager
26
Enter Lyrics (Manual Search)
① Select the file t o ent e r th e l yrics an d cli c k th e b utt on on th e top me n u.
② Enter t he na me of s i ng er or ti tle of so ng to s ear ch f or in E n t er & S ea r ch
Lyric wi nd ow and pre ss t he Se ar ch b utt o n.
③ The songs matching the ti me i nfor matio n, singer i nformation and title will
be displa ye d.
Click the M P3 file to chec k t he l yrics to e nter in the right wind ow.
④ Press the Lyrics Marking button on the right bottom of the LDB search
window t o compl ete entering th e l yrics.
Using LDB Ma nager
27
Delete Lyr ics
Select the MP3 file to del ete lyric s and press the butt on t o dele te th eir
infor mation.
Manually Enter Lyrics
① Select th e fil e to en te r t he l yrics a nd press th e butto n o n t he to p me nu.
② Pr ess Text Edit or, en t er th e l yri cs you wan t a nd the n clic k O K.
Using LDB Ma nager
28
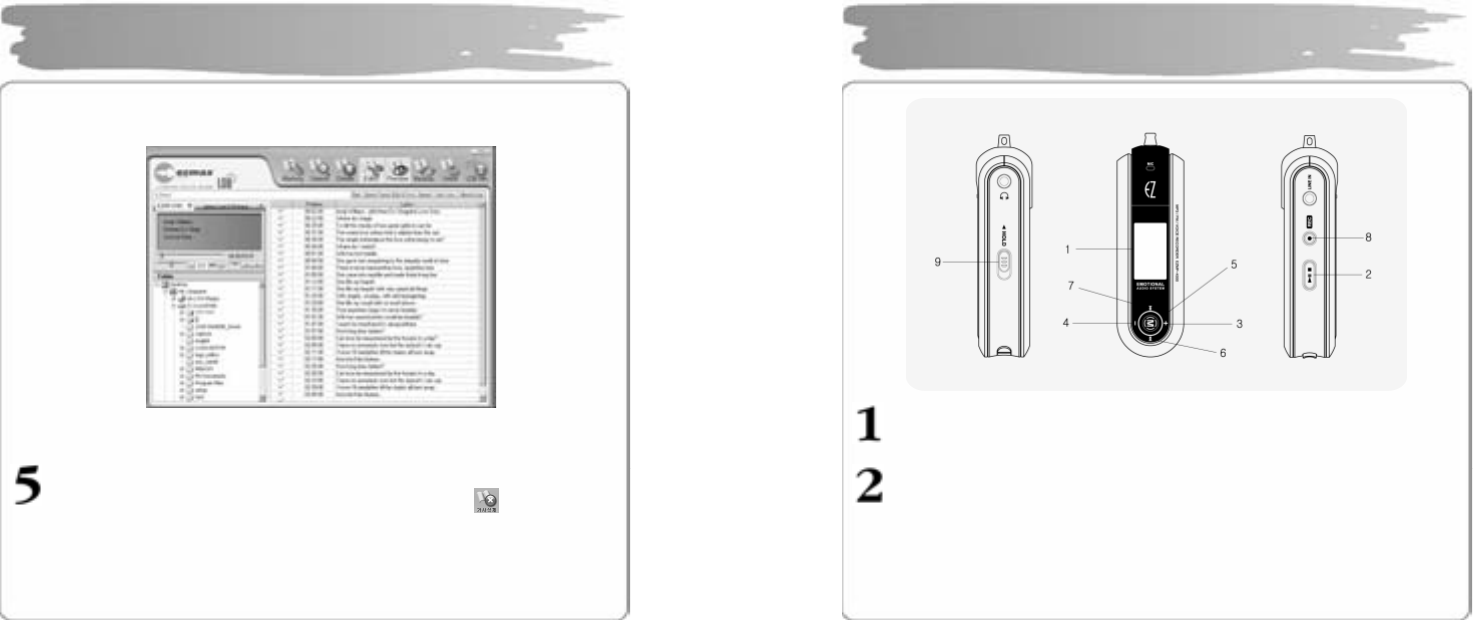
③ Press Playbac k in the preview window and press the SYNC setting button at
the poin t wh er e t her e s h o uld ap pea r on e li ne of l yr ics e diting wi nd ow.
④ When SYNC setting has been c ompleted , press the Lyrics Marking window.
Modify Lyrics
① Select the MP3 file t o modif y lyr ics a nd th en press t he but ton.
② Double clic k th e are a to mo dif y l yr ics so that you can mo dif y the l yr ics or
time.
Using LDB Ma nager
29
Display
- Displays the operating status of the product..
PLAY
- Press short to turn the power ON.
- When listening to the music or the recorded file, press short to
pause the music, and then do so again to resume the music.
- When listening to the FM radio broadcasting, press short to save
the current station to the PRESET.
- In any mode, press and hold to turn the power OFF.
Basic Operation

30
VOL +
- Each press on the button will increase the volume step by step.
(c an b e a dju st ed i n 0- 3 0 le vels.. )
VOL –
- Each press on the button will decrease the vol ume st ep by step.
MENU
- Press short to enter int o the menu screen.
- Pr ess an d hold to ent e r i nt o t he n a vig atio n scr e en.
- Pr ess shor t t o s elect th e rele vant ite m on t h e menu sc ree n.
- W h en li st eni ng t o a music or a r e c or de d file , pr ess sh ort t o mo v e t o the n e xt
mu sic while kee p pr ess ing to fast mo ve wit h in t he c ur rent pla yed file.
- Pr ess it shor t to move to the next menu scr een.
- Pr es it sh or t in FM rad i o mode to incre ase th e ra dio freq ue nc y st ep b y st e p,
an d pr ess an d h old t o a ut omatica l l y s earch for t he ne xt br o adca s ting stati on.
- Pr ess it to m ove to the next PRE SET numb er in t he F M PRESET mode.
- W h en listen i ng to a music or a r ec orde d file, press sh ort t o mo ve to t he
p re vious music while ke ep pr es sing to f as t mo ve withi n th e c urren t pla y ed
fi le.
- O n th e MEN U scree n, press s ho rt t o move t o th e pr e vious men u item.
Basic Operation
31
- When listening to the FM radio, press short to move to the
previous frequency while keep pressing to automatically search for
the previous station.
- In the PRESET mode, press short to move to the next PRESET
number.
REC/A-B
- During the playback, press short to specify the section ‘A’ and do
so again to specify the section ‘B’ for the Repeat Section. And
then another pressing short will cancel the Repeat Section.
- When listening to the FM radio, press and hold to record the radio
station.
- Pr ess it sho rt in FM R adio mod e to e xecu t e AUTO PRES ET an d to se a rch
for a r a dio fr equenc y a u tomatic a ll y.
- Pr ess an d h ol d in t he FM Radi o mod e to s tart FM b ro adcas ti ng recordi ng ,
and press and hold it again to complete recording.
HOLD
- In th e HO LD stat us, op eratio n o f al l b utt ons ar e loc ke d do wn.
- If yo u pr ess an y bu tto n while it is i n t he HO LD st atus and th e p la yer is be i ng
played, it displays the message “HOLDING!”, sticking to its pre vious status.
- If you press any button while it is in the HOLD status and the pl ayer is turned
off, it displa ys the mes sage “HO LDING! ”, s ticking t o i ts power-off status.
Basic Operation
32
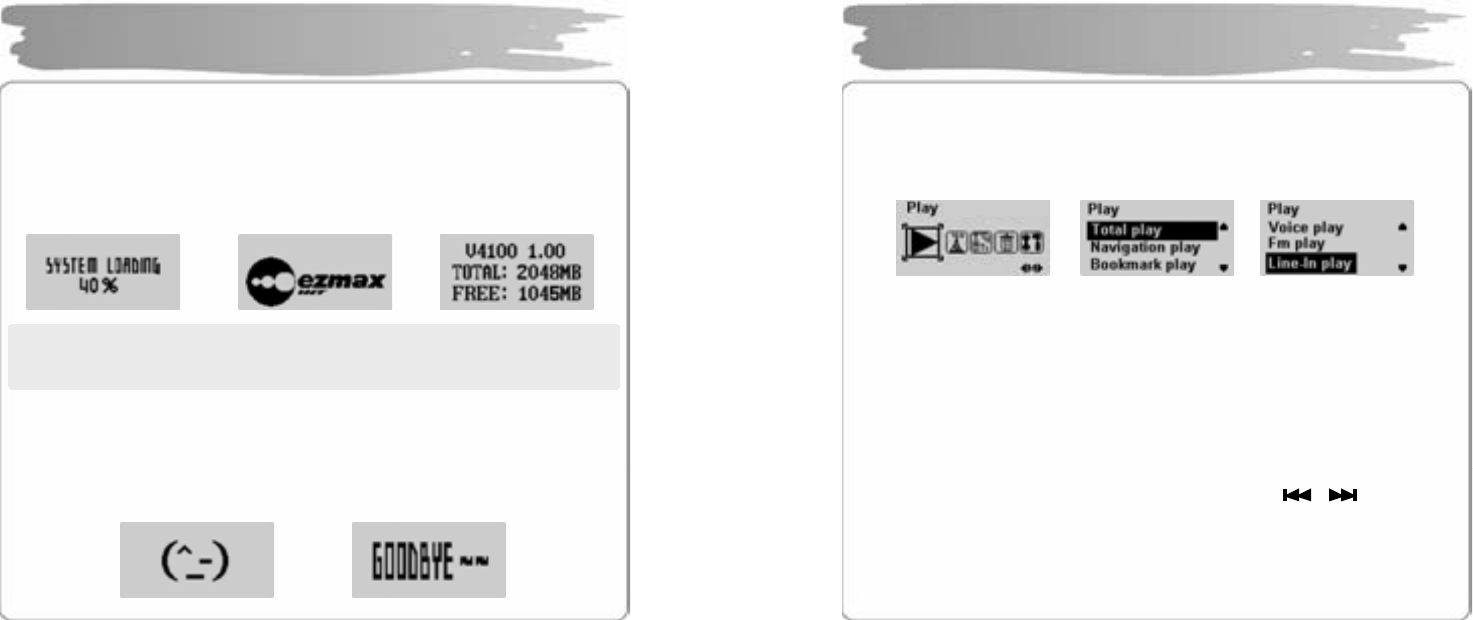
Power ON
Press PLAY short to turn the power ON, and there will appear the logo on
the display, followed by which there appears a version of firmware, a
total memory and the memory available to the Player.
!NOTE: A total of memory an initial booting shows may be less than its
default memory s ince som e part of it is used t o drive the system b y
the firmware.
Power Off
Press a nd hold PL AY to turn th e power O FF while th e log o G OODBY E is displ aye d.
If you pr ess PLAY during th e playback, it will enter i nto its pause. It will be
aut omatic all y r ele as e d in t he t ime yo u s e t in ad van c e if you d o not pres s an y bu tt o n.
Î Î
Power ON/OF
Î
33
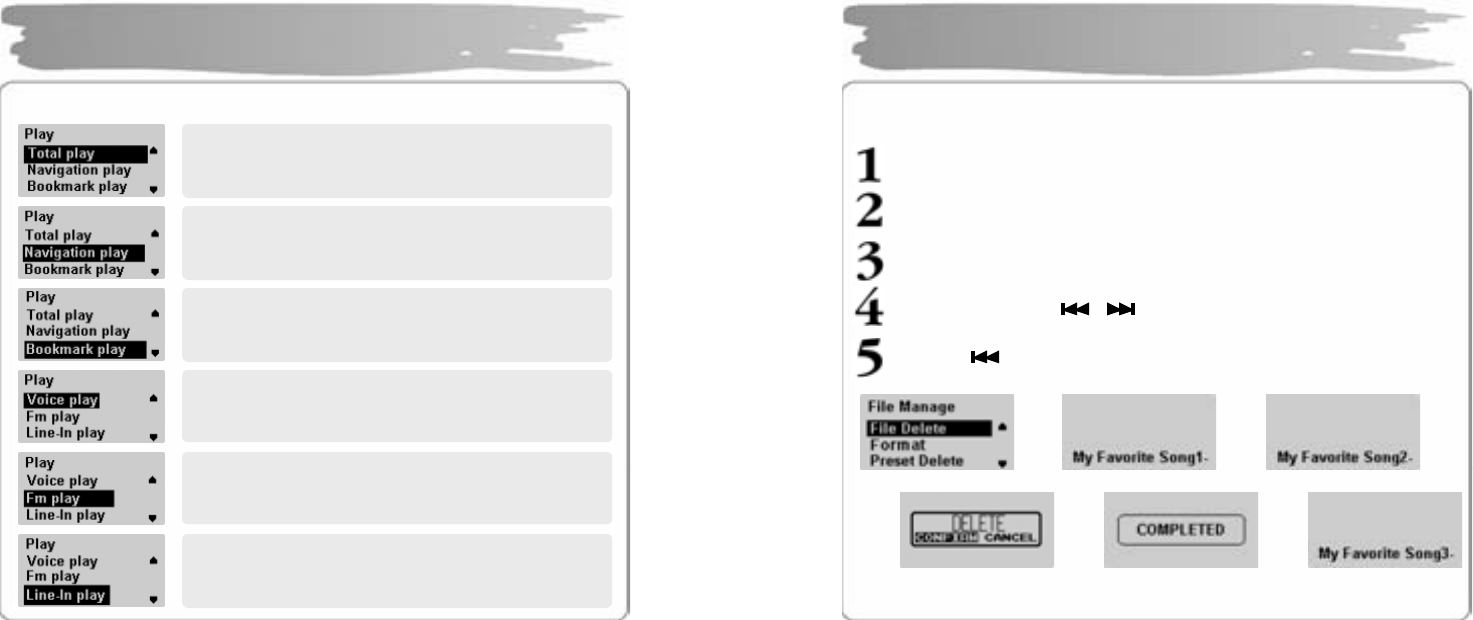
◎ You c a n pla y b ac k a musi c fil e or fil es rec orde d in th e pl a yer in the PLAY me nu.
Press MENU s hor t to m o ve to t he menu m od e. S ele ct the PL AY menu a nd
press MENU ag ain to mo ve t o t he me nu .
You c an sel ect TOTA L P L AY, N AVIG ATION PL AY, BO OKMARK
PLAY, VOICE PLAY, FM PLAY, LIN E -IN PLAY using VOL+/- button.
Press MENU to ent er int o a rele va n t pla yb ac k mood.
(1) TOTAL PLAY
- TOTA L P LAY pla ys bac k a ll music file s i n t he me mor y.
(2) NAVIGATION PLAY)
- Press MENU to enter i nto NAVIG ATI ON PLAY where you c an see all the fol ders
and m usic files i n the memor y.
- Select the folder or file you want to play back using the butt on.
- Press PL AY to p la y bac k th e fol der o r file yo u h a ve s elect ed.
Playback Music File
34
(3) BOOKMARK PLAY
- Press MENU t o ent er int o BOO KMA RK P L AY wher e yo u ca n s ee t h e bo o km ar k
files.
- Press PL AY to p la y bac k B OO KMAR K fil es alo n e.
▪How t o Set BOOKMAR K
- While listening t o music o r i n t he p aus e stat u s, pr ess a n d h old M ENU to e nter
into t he N AVIG ATION mode.
- Selec t th e file f o r BOOKM ARK an d pr ess ME NU short t o boo kmar k it. A not her
press ing it sh or t to r eleas e t he bo o km ar k.
(4) VOICE PLAY
- Plays back voice-recording files.
(5) FM PLAY
- Plays b ac k files in which F M ra dio br oa dcasting is r ec ord e d.
(6) LINE-IN PLAY
- Plays b ac k all fil es wit h L IN E- IN enc od ed.
Playback Music File
35
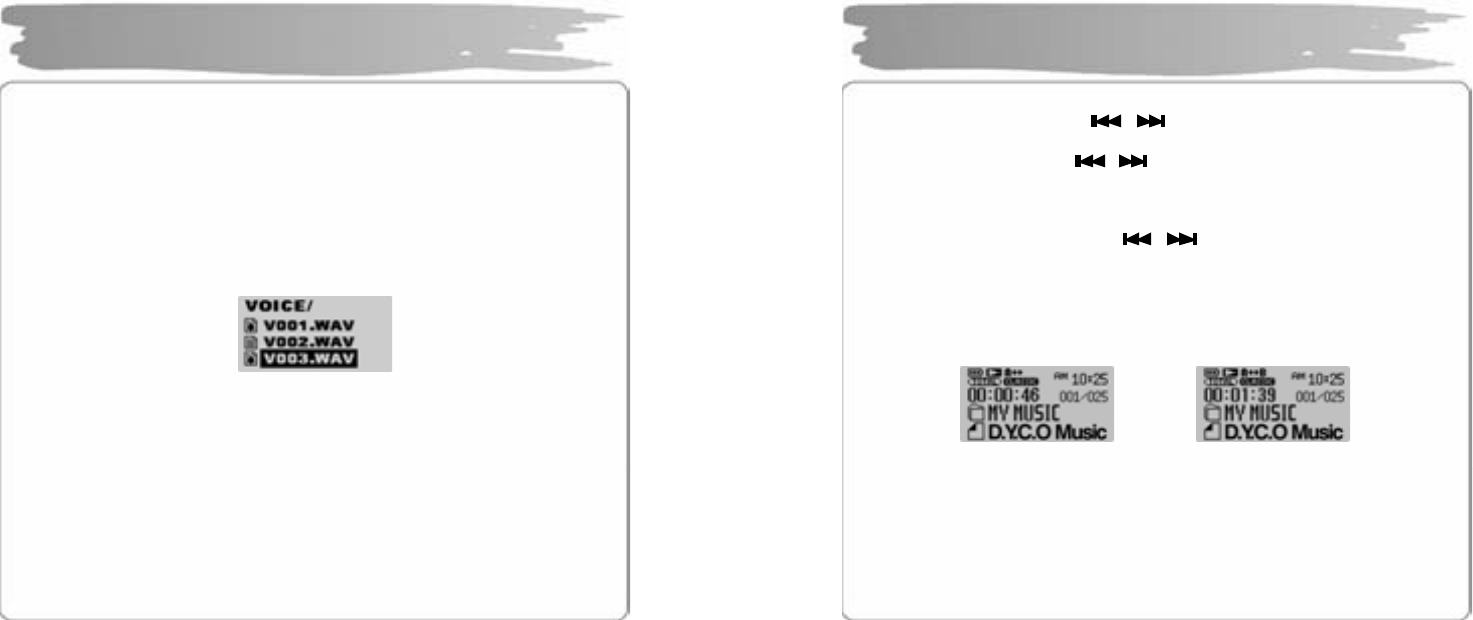
Searching For File
During th e pla ybac k, pr ess t he butto n t o pla y bac k t he pr e vio us/n e xt
file.
In t he pau s e st atus , press the but ton to move to t he previo us/ next fil e.
(If a f uncti on of St ud y is s et, it mo ves in acc or da nc e wit h t he time yo u h a ve s et.)
Searching for Part
During th e pla ybac k, press an d hold butt on to q uickl y mo ve to th e ar ea
yo u want. R eleas e i t t o pla y b ac k nor ma ll y.
Setting Repetition Section
During th e pla yb ac k of music/ rec orde d f i les , press REC/A-B on the beginning of the
section you want to listen to repeatedly.
Press REC/A-B again on the ending of the section .
The section will be r epeatedly played back.
Press REC/A-B again to release the sectional repetition.
Adjusting Volume
Press the V OL +/- b utt on sh o r t to adjus t b y 1 le ve l, a nd pr e ss an d ho l d it to ad just
conti n uo u sl y. T he v olu me c an be adj ust e d fro m 0 to 3 0 le vel s.
Playback Music File
Î
36
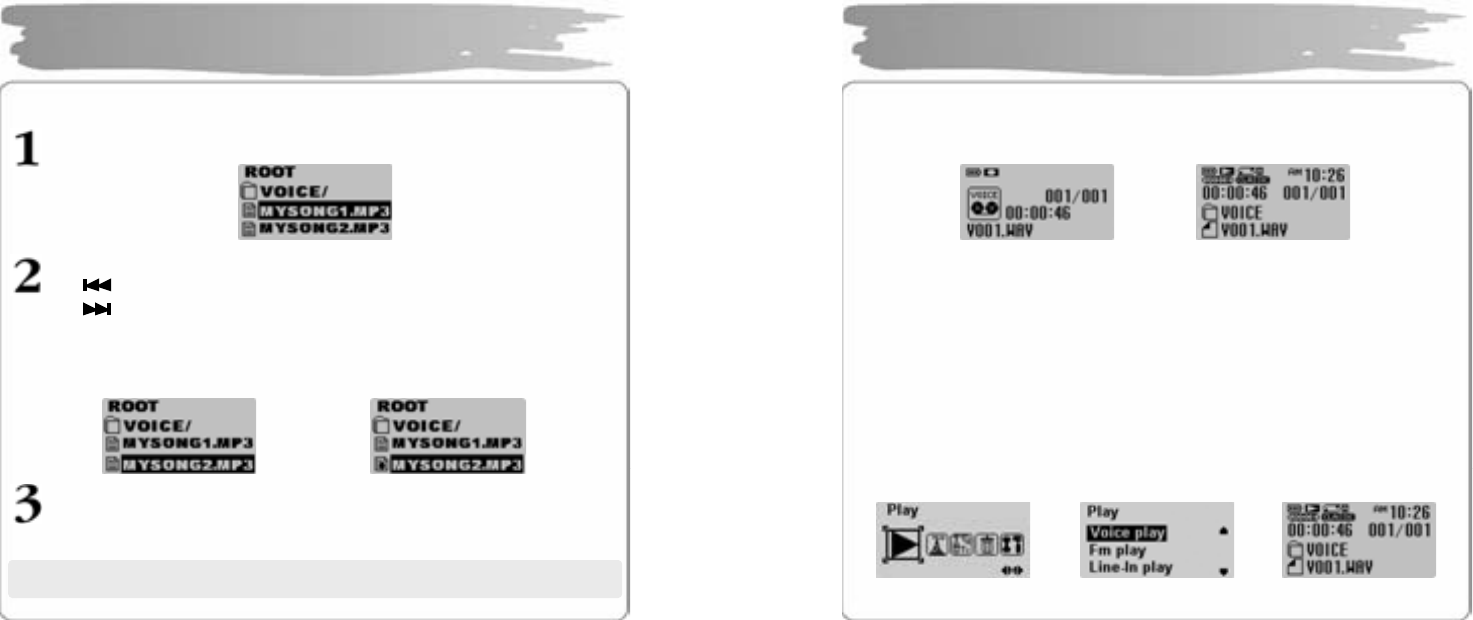
Use the fu nction of Navigation t o easily searc h for the file you want.
Pres s a nd hold MENU to move t o t he N a vig a tion mode .
Sele ct th e fol d er or file yo u want t o pl ay b ac k.
▪ button : move to a upper folder
▪ button : move to a lower fold er
▪VOL+/- b utton : move to a file or a fold er in the same folder
▪MENU button : move to a lower folder in the case of folder
set BOOKMARK in the case of file
Pres s PL AY to pla y bac k a s el ect ed file .
Using Navigation
Î
※ Press and hold MENU in the Navigation mode to rele ase.
(click MENU button)
37
Recording Voice
During th e pla yb ac k or in th e p aus e st atu s, press a n d h old REC to record voice.
Press it ag ain to sto p recor ding.
Press PLAY to listen to the voi ce file you have just rec orded.
▪It wi ll be r ecord ed in an order of V001, V002, … an d saved in the VOICE
folder as W AV file after its recording.
▪Voice recording will not work if it is in the FM RADIO mode or if the line-In
cable is not co nnected.
▪Voice recording will aut omatically stop if the memor y is full.
Listening to Voice Recording File
In the PL AY menu, sel ect th e VOICE PLAY using the VOL+/- but t o n an d pr ess
PLAY to p la y bac k t h e voic e re cor ding fi le.
Voice Recording/Listening
Î
Î Î
38
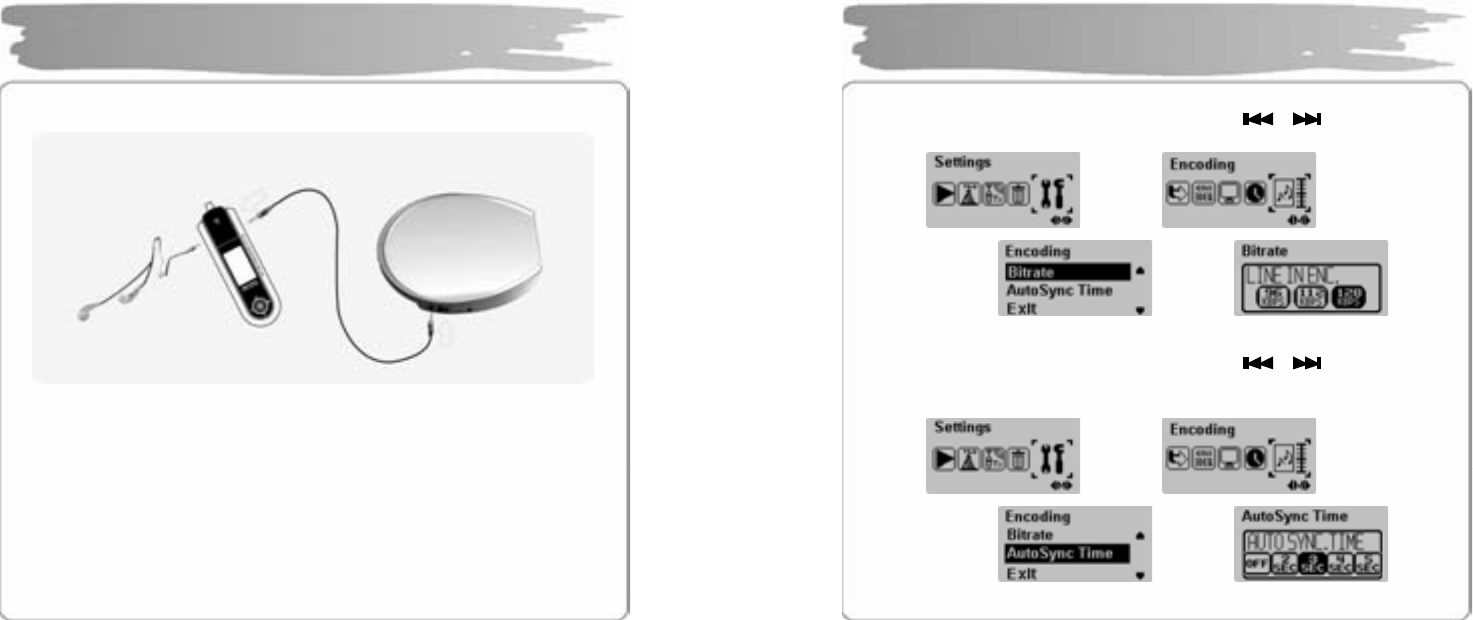
Conn ect t he lin e- in por t of t he pla yer an d t he o utpu t port of a n e xter nal audi o de vice
to t he lin e -in ca ble.
▪Do not listen to FM during the recording from an external device since it
may cause a n oise.
▪If you want to record from a hom e audio device, our line-in cable may not
work, and you need to s eparatel y pur chase a lin e-in cab le.
▪Encoding ma y not be perform ed if the line-In cable ha s not been
conn ected.
▪Encoding after setting the volume of an external audio device properly.
Too high or lo w volume may deteriorate the encoding sound qualit y.
MP3 Encoding/Listening
39
Bit Rate Setting
In th e M ENU mod e, use t h e MENU b utto n a nd butt o n to s el ect
SETTING S → ENC ODING → B ITRAT E an d s ele ct on e of 9 6/ 112/128 kbps.
Auto Sync. Setting
In th e M ENU mod e, use t h e MENU b utto n a nd butt o n to s el ect
SETTING S → EN CODING → AUTO SYNC TIM E an d se lec t on e o f OFF/2/ 3/ 4 /5
SEC.
MP3 Encoding/Listening
Î
Î Î
Î
Î Î
40
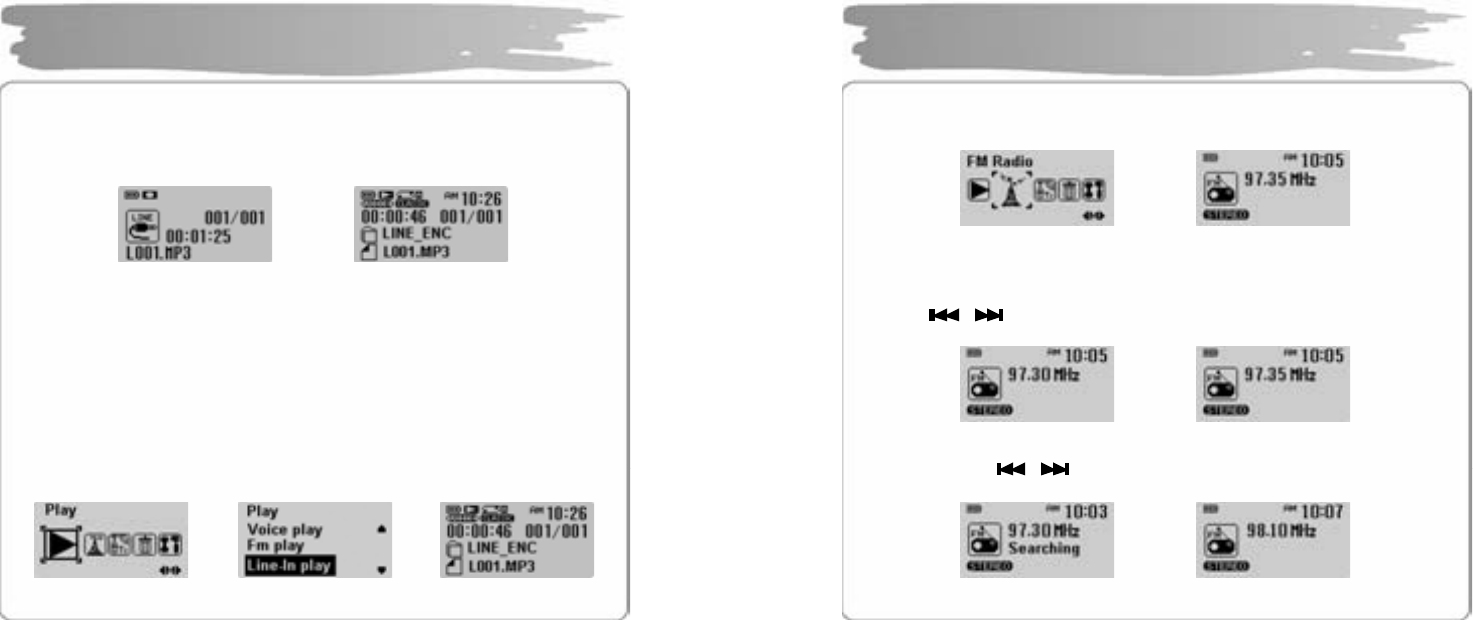
Encoding
When the music for encoding is played back from an external device, press a nd
hold the R EC b utt on on th e p a rt of th e p l ayer t o start enc odin g .
Press and hold it ag ain to stop encoding .
▪It will be recorded in an order of L001, L002, L003,… and saved in the
folder of LINE_ENC as M P3 file after its recording.
▪Encoding stops if you disconnect the line-in cable.
▪Encoding may not work if there isn’t sufficient in the battery g auge.
Listening to Encoded Music File
In th e PL AY me nu, use t he VOL+/- but ton to sel e ct LINE-IN P L AY a n d t he n pr ess
the PL AY b utt on to pla y bac k enc od ed f iles.
MP3 Encoding/Listening
Î Î
Î
41
In th e ME NU mod e , sel ect FM RADIO menu a nd press th e MENU bu tt on t o m o ve
to FM RA DIO mode.
▪MONO/STEREO will be automatically selected.
Manual Tune In
Press the butto n sh or t to in creas e/ dec re ase t he freq ue nc y.
Au t o Tu n e In
Press and hold the but ton t o tune i n th e frequenc y r ecei ve d.
Listening to FM Radio
Î
Î
Î
42
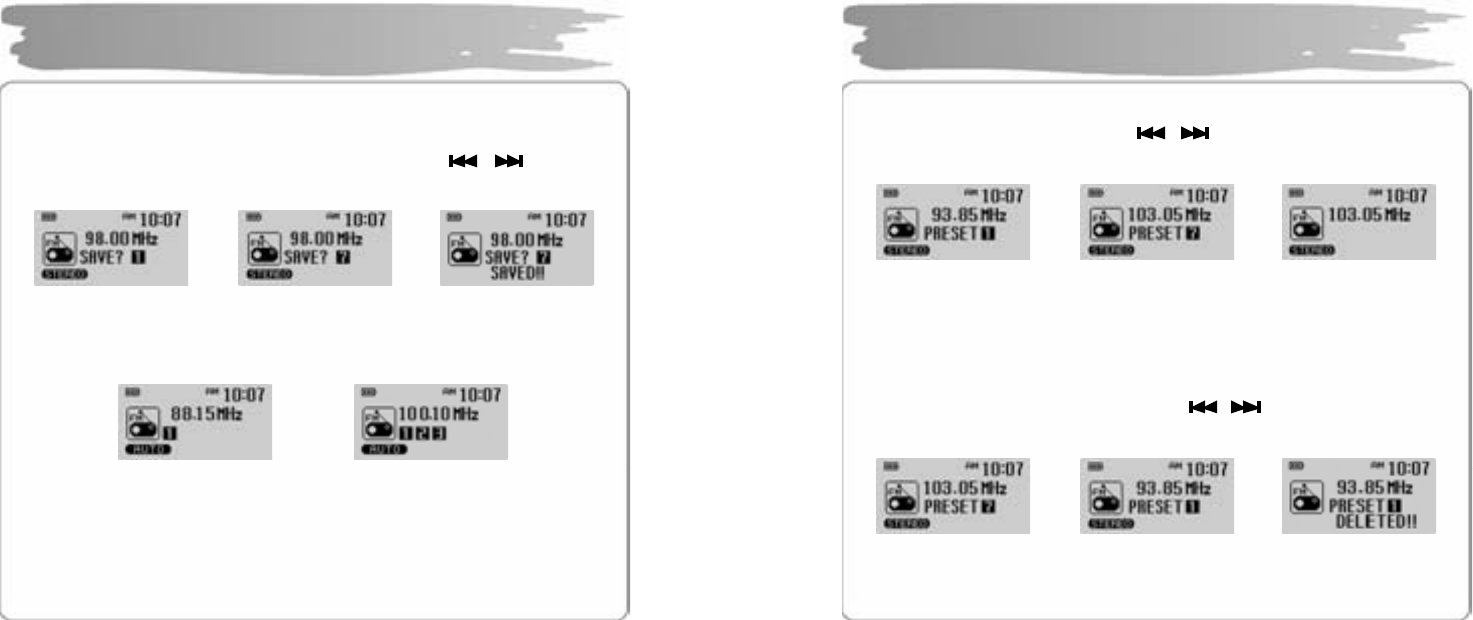
Manuall y Save Frequency
After finding the frequency you want, press and hold the MENU b utt on t o disp la y
the freq ue nc y sa ving scr e en.
Select t he fr eq uenc y s a ving nu mber y ou wa nt u si ng the butto n a nd
press th e MENU button.
Automatically Save Frequency
Press and hold the REC button to s ave t he frequenc y that is recei ved fr om the fir st.
▪Up to 20 frequ ency can b e saved.
▪The broadcasting status may not be smooth in the weak current area with
weak reception sensitiv it y.
▪Ear phone ring works as a FM radio antenna. Mak e sure to connect the
earphone to the earphone jack wh en searching for the frequen cy.
Listening to FM Radio
Î Î
Î
43
Search for Saved Frequency(PRESET mode)
Press the PL AY button to display the PRESET screen.
Move to th e freq u en c y you wa nt using but ton .
Press it ag ain to hide the PRESET screen.
▪PRESET MODE : it s a ves th e freq u encies in ad vanc e so t hat yo u d on’ t h a ve to
search for frequency whenever you listen to FM radio.
▪If th e re is no fr eq uenc y sa ved, “NO PRESET N UMBER!” will be di spl ayed.
Delete Saved Frequency One by One
In th e PR E SET mod e, press a nd hold th e bu t ton to s e ar ch for th e
freq uenc y to dele te, an d t he n pr ess a nd hold th e M ENU b utt o n.
Listening to FM Radio
Î Î
Î Î
44
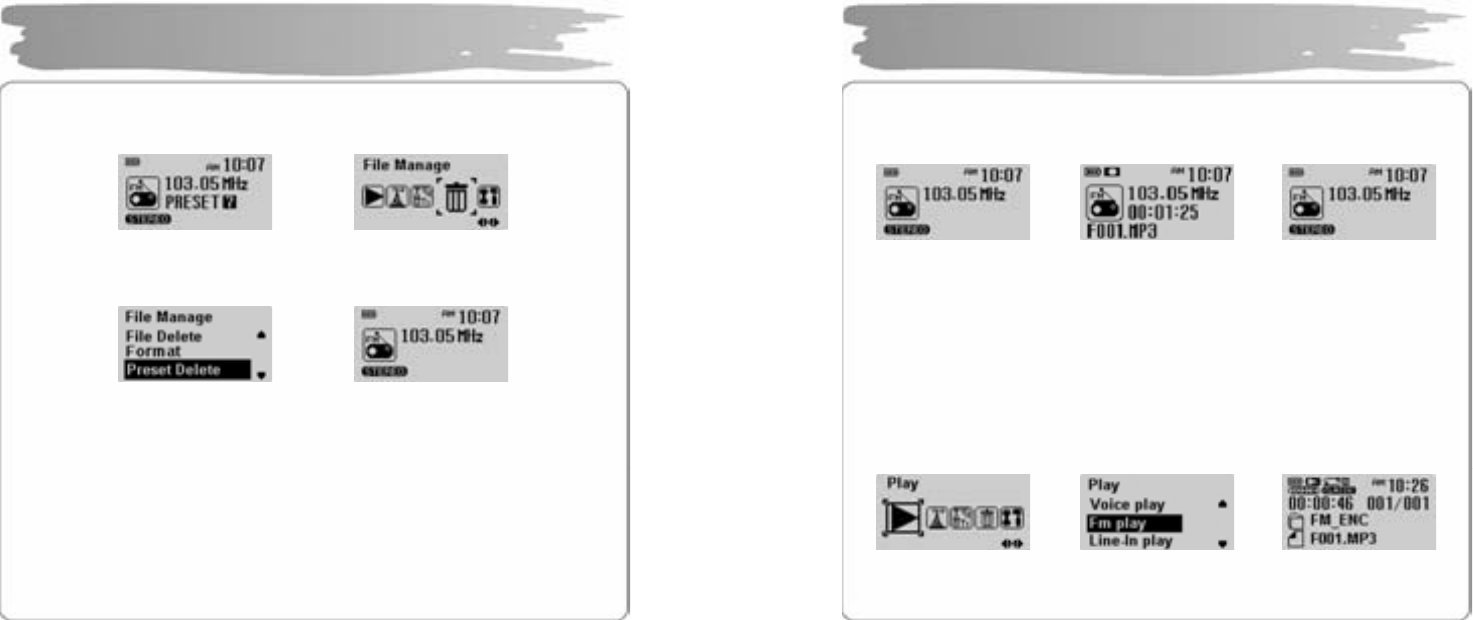
Deleting All Saved Frequencies
In t he ME NU mode, s elect FIL E MANAG E a nd pr e ss t he ME NU butt on .
Use the V OL+/- bu t ton to sel e ct th e PR ES ET DE LETE , an d th en pres s th e ME NU
butt on ag ain t o dele t e all the f req ue ncies s a ve d.
▪If all f r eq u encie s s a ve d ar e d elet ed, and when you press the PL AY butto n,
“NO PRESET N UMBER !” is displayed, not moved to the PRESET mode.
Listening to FM Radio
Î
Î
45
Recording FM R adio
During th e FM re cei ving , pr ess a nd hold th e REC b ut t on t o st art FM r a dio
broadc ast ing .
Press th e REC butt o n ag ain to s top FM radi o r ecor ding .
▪It wil l be recor d ed in th e order o f F001, F 002, F003,… and saved in the
folder of FM_ENC as MP 3 file after its reco rding.
Listening to Recorded FM Radio Broadcasting
In t he PL AY menu, us e th e VOL+/-but ton to sele ct FM PL AY, a nd th e n pr ess t he
PLAY b ut to n t o pl ay b ac k t he r ecor d ed F M ra dio br oadc astin g .
Recording/Playbac k FM Radio
Î Î
Î Î
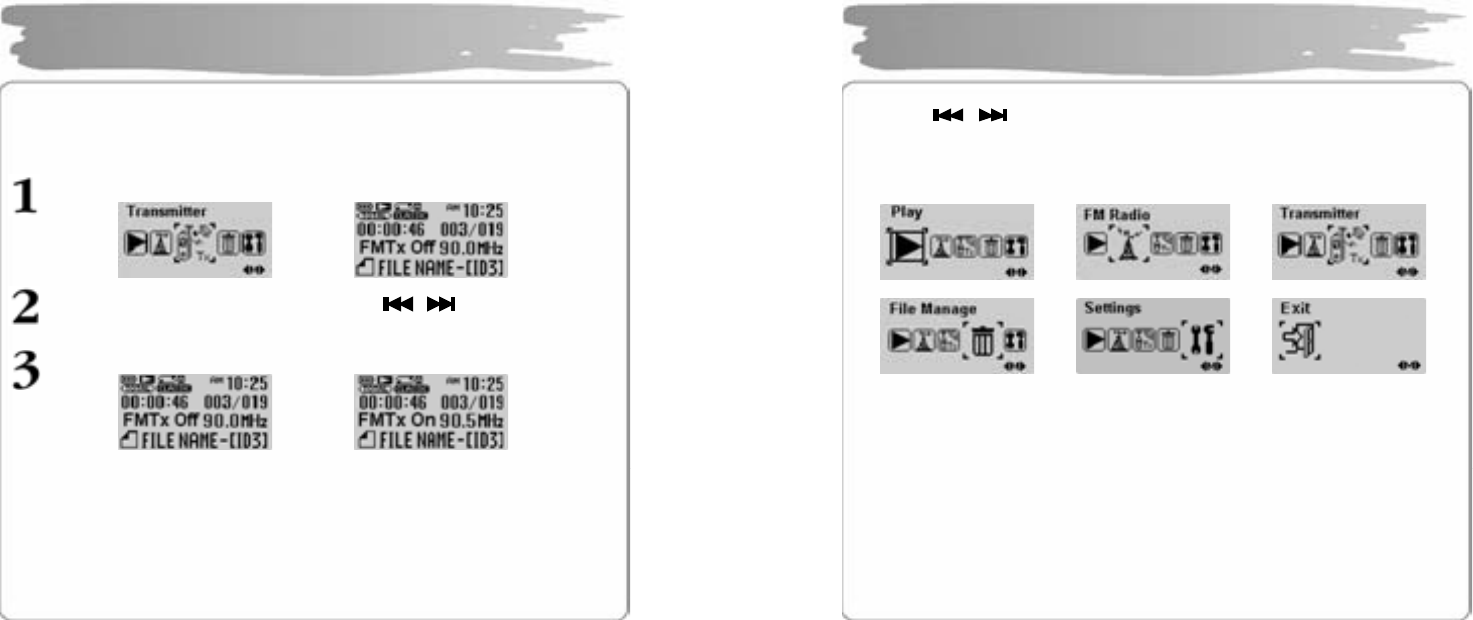
46
The function of FM Transmitter is a function in which you can listen to the
music pla yed in ot her players with the function of FM Transmitter at other
audio dev ices embedded with FM receiver without connecting an external
device separ atel y.
In t he MENU mode, s elect the FM TRANSM ITTER menu.
Set t he FM tra ns mission freq ue nc y using t he but to n.
Pres s the REC butt on short to set the functio n of FM Tr ans mitter to ON.
▪Do no t set th e f uncti on of FM Tr ans mitt er while dr iving s inc e it may res ult in a n
accident.
▪Avoid t he functi on of FM T r ans mitte r at t he tim e of th un d er b olt and lig hting .
▪You c an not us e th e f unc ti on of FM T ra nsmitt e r if yo u s e t t he FM tr ans mi tter
freq u enc y wit h a s ky wa ve on e.
▪When you listen t o the FM radio, the function o f FM trans mitt er can’t be
selec ted.
Using FM Transmitter
Î
Î
47
Press th e MENU b u tt on s hort t o move t o t he MENU mode.
Press the button to move MENU ite m and press the MENU button
short t o s el ect t he me nu you w an t.
Press a nd hold MEN U but to n ag ain to re leas e MEN U mod e.
▪Play : Select the MUSIC playback mode
▪FM Radio : Listen to FM radio
▪FM Transmitter : Use the function of FM Transmitter
▪File Manage : Use such functions, as d eleting or formatting a file, or
deleting t he pr eset
▪Settings : Set the detailed settings
▪Exit : Exit the menu
Menu Setting
48
In t he ME NU mode, s elect th e P LAY men u
Music File Playback
Plays bac k all t he music files in the memor y.
Easily search es for and plays back a file or a folder .
Plays back bookmarke d files alone.
Plays back voice-recording file a lone.
Plays back only the files in which FM radio
br o a dca st in g is r ec o rd ed.
Plays back files encoded from an external device.
49
Deleting File
In t he File Manage menu , sel ect Fi le Del ete and press t he MENU button.
Use th e VO L+ /- bu tto n t o sel ect t h e file t o d e let e.
Pres s th e MEN U b utt on.
Select CONFIR M with butt on an d th en pre ss the ME NU bu tton .
Pres s th e button t o move to the FILE M ANAGE menu.
Managing File
Î Î
Î Î Î
50
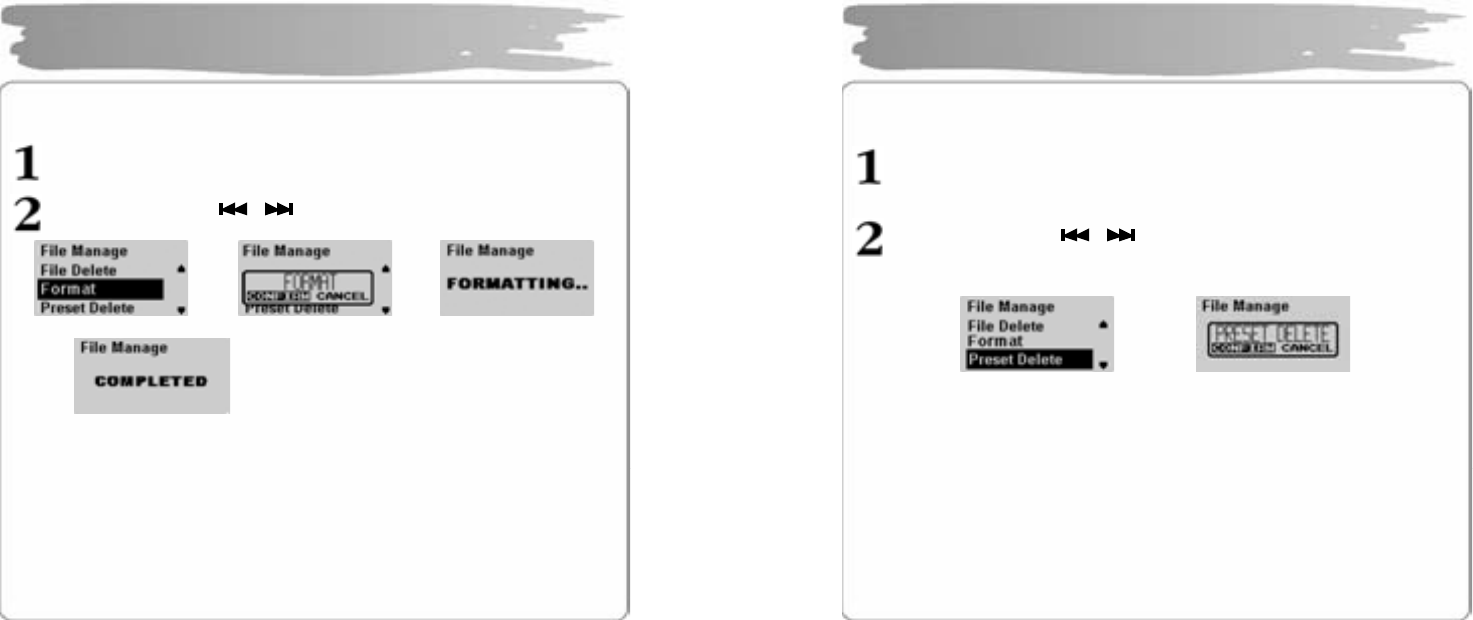
Formatting
In t h e File Ma n ag e menu , sel ect t h e F or mat a nd pr ess the MENU bu tton.
Select CONFIR M with butt on an d pr ess th e MENU b utto n.
▪Be careful since formatt ing will d elet e all files.
▪If you format in the menu, it may take long to complete.
Managing File
Î Î
Î
51
Deleting Saved F M Radio Frequency
In t h e File Ma nag e men u, selec t Pr eset De let e, a nd th en pr es s the MEN U
butt on.
Select CONFIR M with butt on, an d pr ess th e MENU b utt on.
Managing File
Î
52
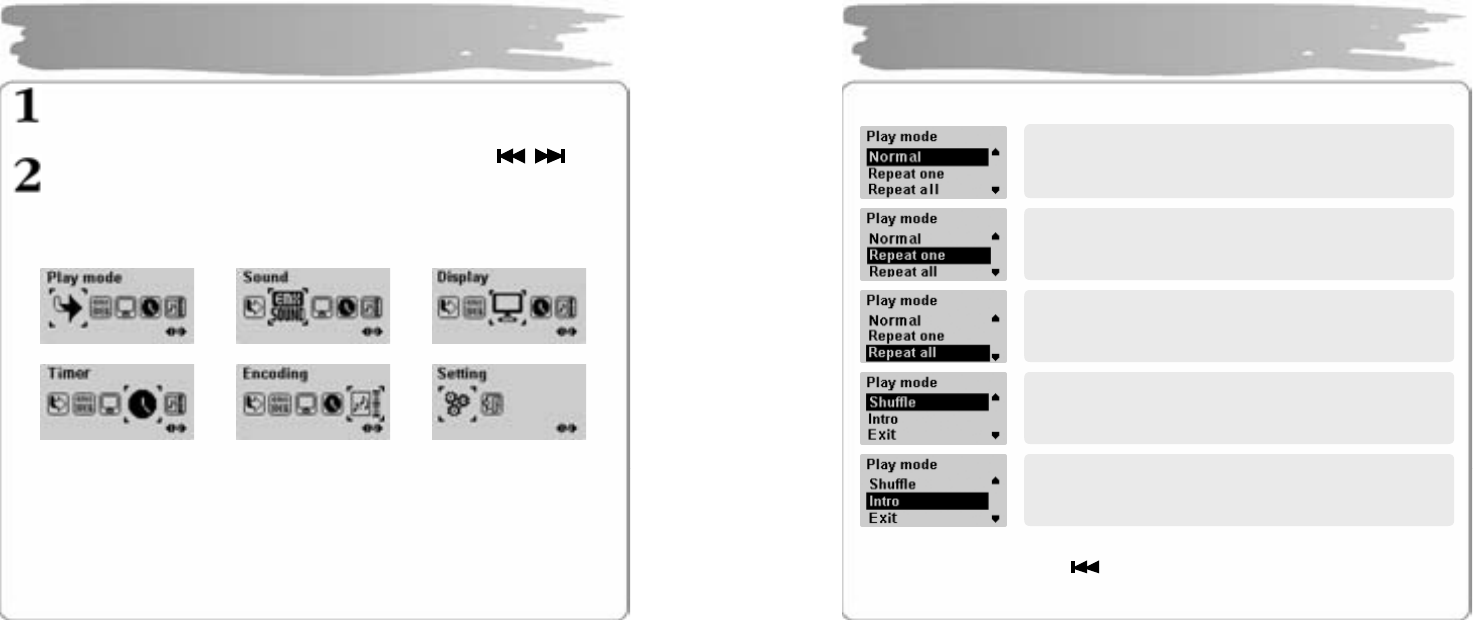
In t he MENU mode, s elect the S ettings.
Sele ct th e d et aile d men u t hat you wan t to m o ve usin g th e button
and then press t he MEN U but to n.
▪Pres s the VOL+ button to move t o an upper menu.
Detailed Menu Setting
53
Select the Play Mod e in the Se ttings.
▪Select Exit or press the but ton to move to an upper menu.
Playback Mode Setting
Pla ys b ac k all t he s ong s in or der o nl y onc e
Plays back only select ed songs repeatedly.
Plays back al l the songs repeatedly in ord er.
Randomly plays back a ll the songs in the memory
repeatedly
Play s all the songs in the mem ory for 10 second s
from the beginning in order, and moves to the next
song .

54
In the SETTINGS menu, sel ect SOUND.
Sele ct t he s ou n d m od e you want with t he V OL+/- bu tt o n, a nd t h e n press t he
MEN U butt on.
▪Select Exit or press the button to move to an upper menu.
Sound Setting
55
◎ A user can adjust up to 8 l e vels for each frequency depending on its 5 areas.
◎ MEX is a term r ef er ring to 3 dim ensio n st ere o so un d eff ect d e velo pe d at
EMER SIS, c ons isti ng of de t ailed f unc tions such as LITE, BA SS an d PRO.
► LITE : gives a light and wide stereo image.
► BASS : g ives a pr ofo un d so un d with rei nf orce ment of l ow sou nd r ang e.
► PRO : g ive s a rich a nd st abl e lo w so und r ang e o f fe eling with s tabl e a nd
wid e ster e o i mag es.
▪Select a proper volume si nce the so und will be louder at MEX.
▪It ca n b e s up po rted onl y i f sa mpling freq u enc y r e fers t o 32K hz, 44 .1K hz, 48 K hz.
▪The f uncti on of MAX is n o t se t f or th e voic e- re cor ding W AV file.
Sound Setting
Use butt o n t o move h orizont a lly an d
–VOL, VO L+ butt on to mo ve v erticall y.
56
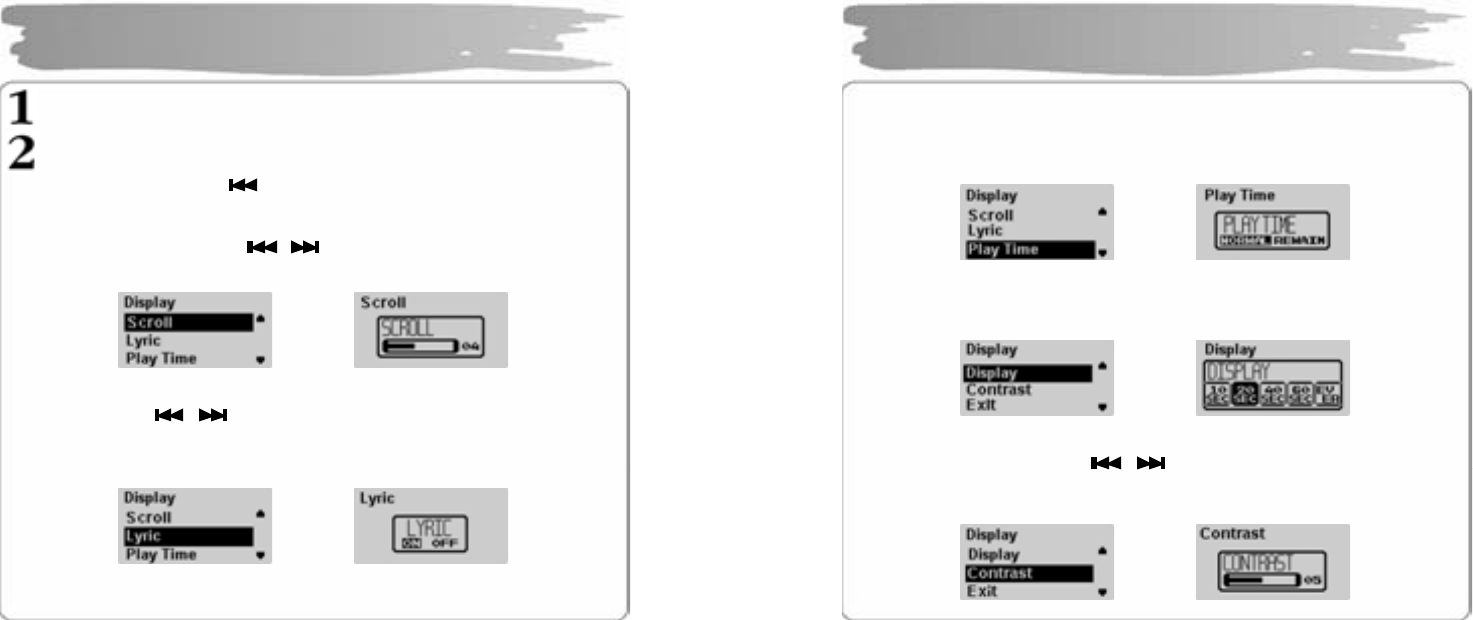
Select the DIS PLAY in th e SETTIN GS.
Sele ct th e d eta il e d se ttin g wit h VO L+/- b utt on an d pre ss th e ME NU b utto n .
▪Select Exit or press the button to move to upper menu.
Adjusting Scroll Speed
Select the scroll s pe ed with th e butt o n. Scroll s pe ed at which so ng t i tle
flows c an be set fr o m 0 to 10.
Lyrics Support S etting
Select On, Off with butt on .
ON : disp la ys the l yrics of a s o ng in 3 li nes when music i s p la yed bac k.
OFF: do es n ot dis pla y th e sc r ee n e ven if l yr ics ar e s a ved .
▪Refer to 3.8 Using LDB M anager t o save lyrics in a music file.
Display Setti ng
Î
Î
57
Play Time Setting
Set t he tim e t hat the re a pp ear s on t he d ispla y wit h t he VOL+ /- but ton .
NORMAL TIME : dis pla ys t h e c urr ent pla ybac k t ime.
REMAIN TIME : displays the remaining pl aybac k time.
Display-out Time Setting
Sets the ti me whe n t he displ a y is aut o maticall y turn ed off af ter t he last time y ou
push a bu t ton .
Adjusting Contrast
Set the di splay contrast wit h th e butto n.
The contr ast can be set from 0 to 10.
The bigger the number, the brighter the display.
Display Setting
Î
Î
Î
58
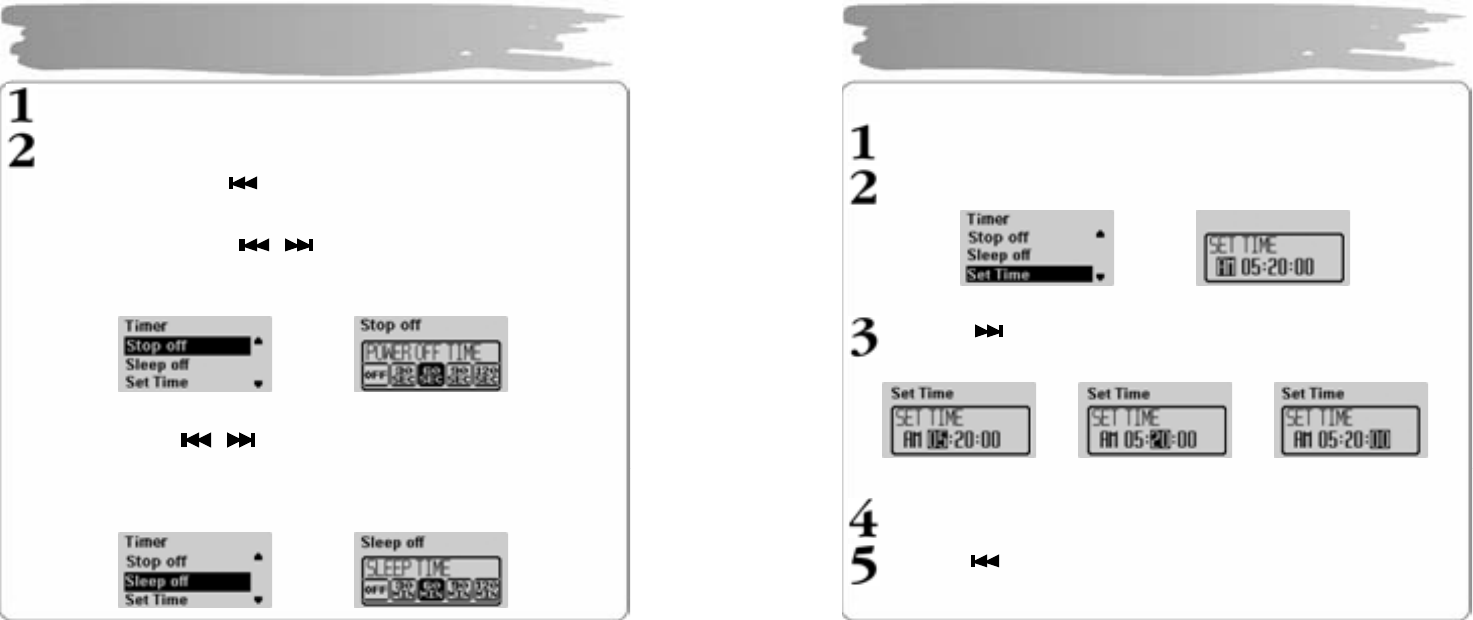
Select Timer in the Settings.
Sele ct th e d eta il e d ite ms with VO L +/- bu tto n a nd th en p r ess t he M ENU but t on .
▪Select Exit or press the button to move to upper menu.
Power-Off Time Setting
Set t he po wer-off ti me wit h the button.
30, 60, 90 , 1 20 sec on ds are a vailable. But f or a s ep ar ate p ushi ng of but to n aft e r it
have stopped, the p ower will automaticall y turn off after the ti me you se t.
▪If you set it to OFF, power will not automatically turn off.
Sleep Ti me Setti ng
Set t he sl eep ti me with butt on.
30, 60, 90 , 1 20 sec on ds are a vailable. But f or a s ep ar ate p ushi ng of but to n aft e r it
have stopped, the p ower will automaticall y turn off after the time you se t.
▪If you set it to OFF, the po wer will not automatically t urn off.
Timer Setting
Î
Î
59
Current Time Se tting
Pres s the MEN U button t o display t he time se tting screen.
Set t he AM/ PM using VO L+/- button.
Pres s th e butt on t o move t o th e ti me you wa nt a nd s et t he ho u r /
mi nu tes / sec onds wit h V OL+/- b ut t on.
Pres s the MEN U button t o c omplet e time s etting.
Pres s th e button to move to an upper menu.
Timer Setting
Î
60
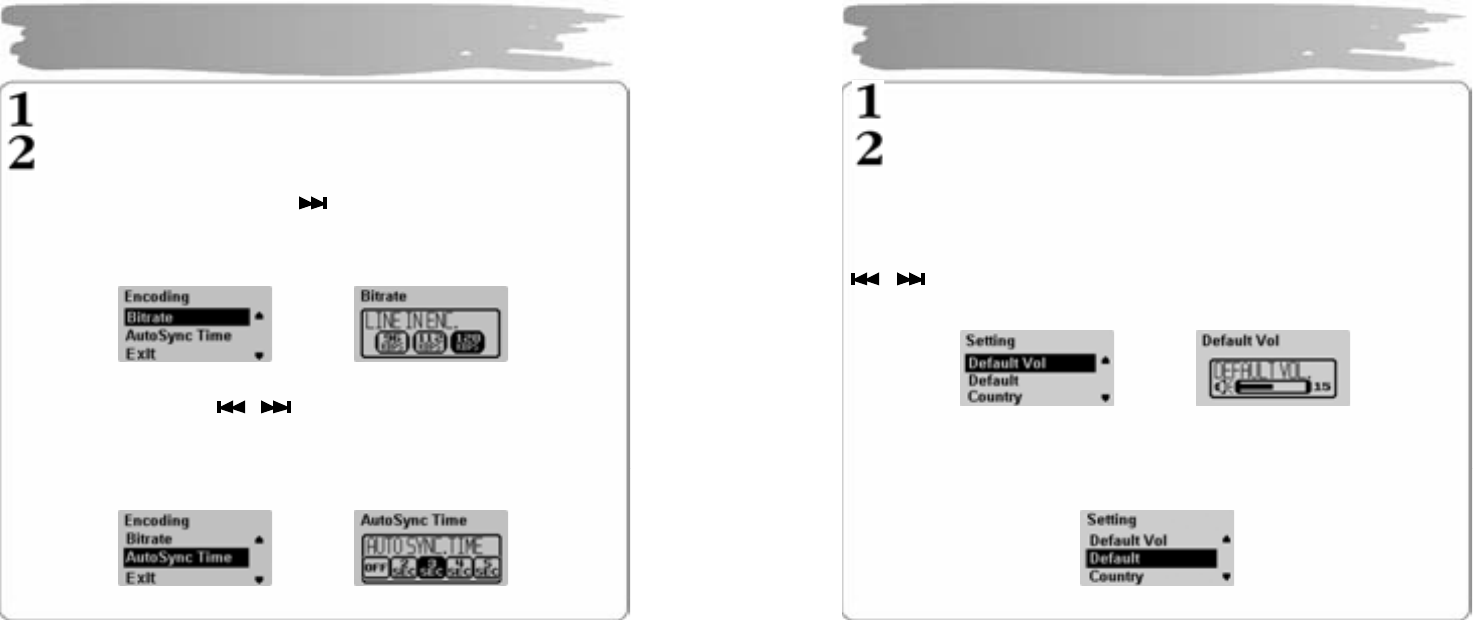
In t he Setti ngs , select th e Encoding .
Sele ct th e d eta il e d se ttin g wit h VO L+/- b utt on an d pr es s th e MEN U b utt on.
Bit Rate Setting
Set t he en c odi ng bi t rat e yo u want with butt on.
If you set the bit rate low, it can be recorded for a longer time while the sou nd
quality wi ll be deter iorated. If you set it high, the sound quality will get better while
the recording ti me will be shor tened.
Auto Syn c Time Setting
Set t he A u t oS ync Ti me with butt on.
Auto S ync is a fu nct io n to s ep ar a te a nd sa ve a MP 3 file i f t h er e is no s ou nd d ur ing
the time s et in M P3 e ncodi ng.
If you set it to OFF, encoding will not sto p even if there is no sound between songs
recorded in MP3 encoding, but it is save d as one file.
Encoding Setting
Î
Î
61
In t he Setti ngs , select th e Mode Set ting.
Sele ct th e d eta il e d ite m with VO L+ /- bu tto n a nd th en pr ess t he M ENU but ton .
DEFAULT VOLUME Setting
This func t ion is to s et the volu me for the time when the power is turned on.
When yo u turn o n, the volu me value s a ved wh en you tur ne d off last i s hig her th an
the defaul t volume, it will be the default volume. If it is lower than the d efault volu me,
the volume s aved when you turn off is set to default vol ume. Set proper volume with
butto n.
The d ef ault volu me c an be s et from 0 to 30.
DEFAULT Value Setting
If it’s sel ecte d, all the s ettin g s c onc erning t he volu me a nd the pl a y mode ar e
initialized t o t he def a ult of th e pl a yer.
Setting
Î
62
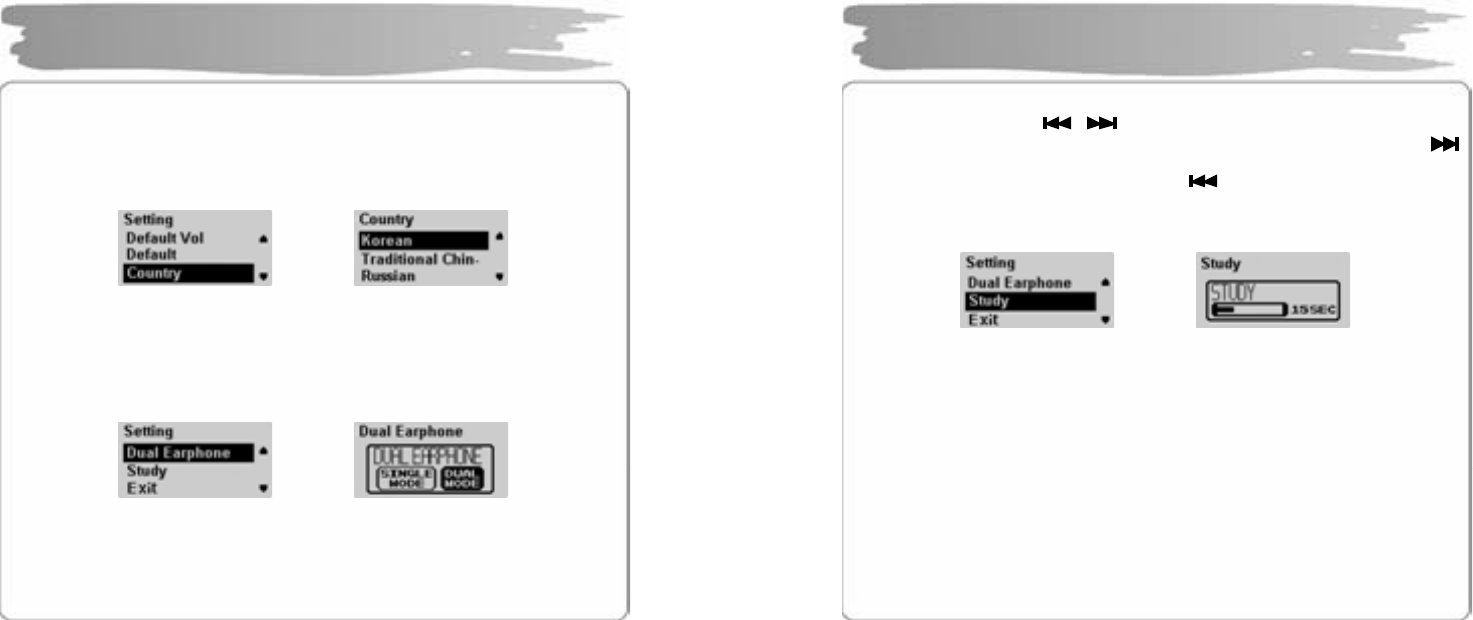
Country Setting
Set a la ng uag e o f a n appli ca b le c ou ntr y.
Select a l a ng uag e y ou want wit h V OL+/- butt on.
If yo u s e t a la ng u ag e, th e b an d width of FM r a di o freq u enc y of th e a pplica ble
country will be changed too.
Dual Earphone Setting
This func t ion conc er ns listenin g to th e music si mul ta ne ousl y with 2 ear p ho nes.
If you se t it to DUA L MODE, you ca n co nnec t the oth er par t of an e a r ph on e to t he
LINE-IN jack.
Dual Ear p ho ne i s no t su pp orte d d ur ing t he FM r ad io list ening .
Setting
Î
Î
63
STUDY Function Setting
You ca n t he ti me wit h t he button.
15, 30, 45 , 60 s eco n ds are a vaila ble. Wh en the tim e is s et an d if yo u p r ess t he
butt on du ring pl a y, it will be pl ayed bac k from the time adding the time set i n the
current pl a ybac k ti m e. When yo u pr ess th e button, it will be moved to the
time as muc h as the time s et i n the curre nt pl ay bac k.
▪If you set it to 0 second, STUDY function is not supported.
Î
Setting
64
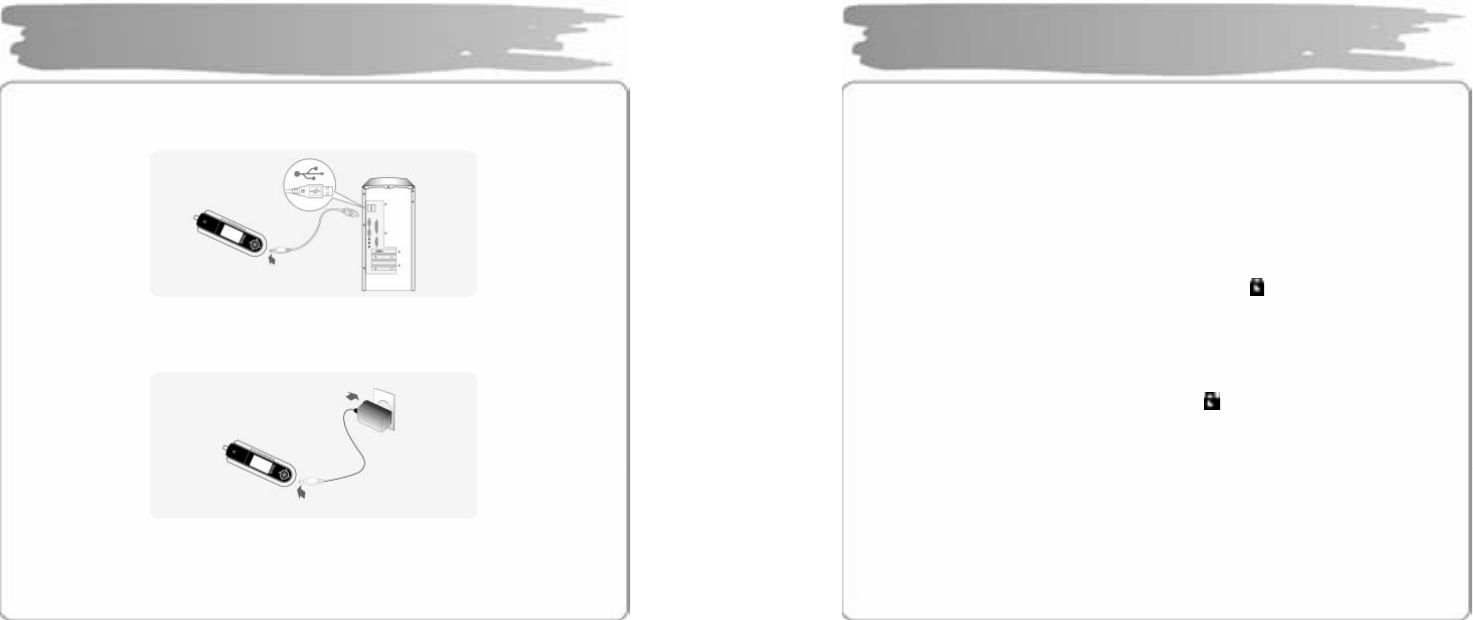
(1) Charge with USB Cable
If you connect the PC to th e player with the U SB cable, it will be automaticall y
charg e d r eg ar dles s of th e o per a tion s tat us o f t he pla yer .
(2) Charge with USB - AC Adapter
Use the USB – A C ada pt er to con nec t its USB co nn ector t o the pla yer, an d th en
conn ect t he AC ou tlet.
▪Sep a r atel y pur c h ase U SB - AC a da p ter.
▪If there is no bu tton pushed further during charging the player, its display will be
turne d of f in 30 s eco nds.
▪It will t a kes ab o ut 3 hour s to c har g e t he pl a yer ( full y c har g ed / stop st atus)
Built-in Battery Charging
65
◎ If you us e t he f un cti on of h old, yo u c an pr e ven t a mal-fun cti on b y a b utt on w hile
the pl a yer is p la ye d du r ing pla y er op er at io n, inclu di ng an u nnec ess ar y
consu mp tion of b uilt-in bat ter y.
To Set to HOLD Status
Push the HOLD s wi tch o n th e sid e of t he pla yer at t he dir ecti on o f t he a rrow(HOL D) ,
and t he n there will flicker “ H OLDING! ! " for abou t 1-2 s ec o nds o n t h e DISP L AY,
which means that it has been set to the hold status as ap pears.
To Releas e Hold Status
Move th e HO LD swi tc h t o t he dir ection o pp osite t o t he arr ow.
The h old s t at us is re l e ased as th ere dis a pp ear s on t he DI SP LAY.
HOLD Setting Method

66
◎ If yo u t hi n k t he p la yer f ails, ch ec k t he follo wing s :
Power m ay be not turned on.
•Charg e using th e US B ca bl e si nc e t he built-in ba t ter y may be discha r g ed .
•Chec k wh eth er th e HOLD s witc h of th e pla yer is s et a t ON .
(Set it t o t he direc tion opposite to the arrow(OFF ) if it is set at ON.)
Unrecognizable characters may be shown in the display.
•Check if the language is properly set in the LANGUAGE menu.
•Since the ID3 Tag of a so ng may be incorrect, you should fix it using such an
audi o p la yer pr og r a m as Wi n amp.
Radio s tation makes su ch a no ise as “boooo~” or “Ssaaaa~”, or
its reception is bad.
•Change the direction of the Player and its earphone.
Please turn the power of the electric appliances OFF near the Player.
If the noise is reduced, use the Player away from them.
•As an earphone plays a role as an antenna to the player when listening
to the radio station, no earphone may cause a poor reception.
Troubleshooting
67
No sound or noise is heard during the playback.
•Check if the music file is stored in the memory.
•Check if an earphone is properly plugged in.
Or check if its jack is contaminated by foreign substances.
•Check if the volume is set to “0”.
•Damaged data makes noise or breaks off the sound from the MP3 and
WMA files. Replace it with other file to check if the data has been
damaged.
Cannot download files.
•Check if the USB cable is properly connected between the Player and
PC.
•Check if the USB driver is properly installed.
•Check if the memory is sufficient.
Buttons has been locked down.
•Check if the player is set at HOLD.
!N OTE: if the p layer sto ps due to an un expected p roblem o r the “En d”
button does not operate at all, press “MEN U” and “ REC” at the
same time to turn off the pl ayer. Then, set the clock ag ain.
Troubleshooting

68
Memory In-built me mor y 25 6MB / 51 2 MB / 1GB / 2GB
DISPLAY 128x6 4 O LED Two C olor (Blue , Yellow)
MP3 Encoding MPEG 1/ 2/ 2.5 Laye r 3, WMA, A SF(Audi o o nl y) ,
OGG Q 9
Compatible File Format 8 Kb ps ~ 3 20 Kb ps (WMA/ AS F: 32 ~ 19 2 K bps)
Frequency 20 Hz ~ 2 0 KHz
Headphone
Output 6 mW + 6 mW (16 o hm)
Audio
S/N Ratio > 85 d B
FM Frequency 87. 5 MHz ~ 10 8 MH z
76. 0MHz ~ 108MHz (JA PAN)
Headphone
Output 6 mW + 6 mW (16 o hm)
S/N Ratio > 55 d B
FM
Radio
Antenna Earphone Antenna
Language Multi-Language
USB USB 2. 0
Maximum Playback Time Approx. 20 hours (Company standard)
Distortion Rate < 0.1%
Size 28.0(W) x 89.0( L) x 21.6(H) mm
Battery LI-Pol ymer rech arg eabl e b att ery
Weight 39g (with batter y)
* The specification and exterior of the product are subject to change
without a prior notice for further improvements of the player.
Specifications
69
Visit o ur we bsite to ch ec k th e l atest pie ce of in for matio n, g e tting up da t ed o n a n e w
versio n o f so ft ware for t he pla yer.
Webs it e: www. e zma x.c o. kr / www. ez oli ver.co m
Addr e ss : # 50 4 , 5 th Floor, Hanlim Human Power, 1-40, Geu mjeong-dong,
Gunpo-si, Gyeonggi-do, K orea.
Tel: + 82-3 1-47 9 -71 80
Fax : +8 2- 31-4 7 9- 7 18 8
e-mai l : web mas t er@ez ma x.c o. kr
!N O T E : I f you want to recei ve A/S, visit our comp any in per son. You may send the
p la yer b y r eg istered mai l or by a deli ver y s ervic e) . But , plea s e no te t h at
h o me del i ve r y ser vice is no t a va ilable .
Service A/S

58
5.FCC Compliance Statements
7
Note: This equipment has been tested and found to
comply with the limits for a Class B digital device,
pursuant to part 15 of the FCC Rules. These limits are
designed to provide reasonable protection against
harmful interference in a residential installation. This
equipment generates, uses and can radiate radio
frequency energy and, if not installed and used in
accordance with the instructions, may cause harmful
interference to radio communications. However, there
is no guarantee that interference will not occur in a
particular installation. If this equipment does cause
harmful interference to radio or television reception,
which can be determined by turning the equipment off
and on, the user is encouraged to try to correct the
interference by one or more of the following measures:
• Reorient or relocate the receiving antenna
• Increase the separation between the equipment and receiver.
• Connect the equipment into an outlet on a circuit different from that
to which the receiver is connected.
• Consult the dealer or an experienced radio / TV technician for help.

59
7
Warning : Your are cautioned that any change or modifications to the
equipment not expressly approved by the party responsible for
compliance could void your authority to operate such equipment.
NOTE: This unit was tested with shielded cables on the peripheral device .
Shield cables must be used with the unit to insure compliance.