Eastech Electronics PT8051 2.4G wireless speakers (FHSS) User Manual 809517
Eastech Electronics (Taiwan) Inc. 2.4G wireless speakers (FHSS) 809517
UserManual.wiki
>
Eastech Electronics
>
PT8051 User Manual
Users manual
Navigation menu
Upload a User Manual
Namespaces
Wiki Guide
HTML
PDF
Info
Views
User Manual
Discussion / Help
Navigation
![Project: Altec Lansing PT8051 User Guide (US Version) 1 Project: Altec Lansing PT8051 Manual User’s Guide (US Version) Revision as of June 8, 2007 Product Management: Don Milks Program Management: Merchandising Management: Christopher King Revision 1.0 Date 6-18-2007 [Part Numbers] [HEADLINE] Thank you for purchasing the Altec Lansing PT8051 Wireless Surround Sound System. The PT8051 is designed to replace the traditional A/V receiver and separate speakers and provide a complete, multi-channel surround system sound from just two components using DTS and Dolby Digital decoding to faithfully reproduce your favorite music and movie soundtracks. The PT8051 system’s NXT Digital flat-panel driver technology accurately reproduces the full frequency range and delivers all the subtleties and spatial depth that today’s digital formats are capable of. In addition, the PT8051’s advanced wireless transmission means it’s easy to experience theater quality surround effects without the need to run wires to the rear speakers. The PT8051’s design is well suited for use with today’s large format LCD and plasma flat panel displays and both components can be wall mounted with them using the supplied brackets. A universal remote control is included that allows you to consolidate remote controls from various devices such as your TV, DVD player and VCR. [HEADLINE] Contents Refer to the PT8051 Quick Connect Card to identify these items. • PT8051 main and rear surround units • Remote control and batteries • A/V Cable • Wall mount brackets (hardware not included) • User’s guide and quick connect instructions](https://usermanual.wiki/Eastech-Electronics/PT8051/User-Guide-809517-Page-1.png)
![Project: Altec Lansing PT8051 User Guide (US Version) 2[HEADLINE] Controls and Connections for your PT8051 Front Panel (Main Unit) [Illustration of front panel] 1. VOLUME +/- Controls the volume level of all audio channels. 2. LEDs Displays information about the operational status. 3. INPUT Press to switch between input sources (DVD, TV/SAT, AUX, DVD digital, TV/SAT digital or AUX digital). 4. MODE Press to select virtual or stereo mode. 5. POWER Press to power on the system or switch to standby. Rear Panel (Main Unit) [Illustration of rear panel] 1. Power ON/OFF Switches power on or off. 2. AC Power Cord Connect to standard AC outlet. Refer to frequency and voltage range for Power Source as indicated on rear panel. 3. CONNECT Press this button to manually synchronize the wireless audio link between the main and rear surround units. Under most circumstances it is not necessary to use this button as the units automatically synchronize when powered on. 4. VIDEO OUT Used to display on-screen display information. Connect to composite video input of TV. 5. SUBWOOFER OUT Use to connect an optional subwoofer if additional bass is required from the system. 6. DIGITAL INPUT: Use to connect a DVD player that has a coaxial digital output. COAXIAL (DVD IN) OPTICAL (TV/SAT IN) Use to connect a digital satellite tuner or cable TV tuner that has an optical audio output. OPTICAL (AUX IN) Use to connect to an auxiliary sound source such as a PVR or second TV tuner that has an optical audio output. Can also be used to connect a DVD player that has an optical output but not a coaxial output. 7. AUDIO ANALOG INPUT: DVD IN Use to connect to a DVD player with audio an analog output. TV/SAT IN Use to connect to a TV or satellite tuner with audio analog output.](https://usermanual.wiki/Eastech-Electronics/PT8051/User-Guide-809517-Page-2.png)
![Project: Altec Lansing PT8051 User Guide (US Version) 3Front Panel (Rear Surround Unit) [Illustration of front panel of rear surround unit] 1. WIRELESS Illuminates in a steady state when the main and rear surround speakers are synchronized to indicate the wireless audio link is operating normally. Flashes when the wireless connection between the main and rear surround speaker has become unsynchronized. 2. STANDBY Illuminates when unit is plugged in and the POWER ON/OFF switch on the rear panel is in the ON position. Rear Panel (Rear Surround Unit) [Illustration of rear panel of rear surround unit] 1. Power ON/OFF Switches power on or off. 2. AC Power Cord Connect to standard AC outlet. Refer to frequency and voltage range for Power Source as indicated on rear panel.](https://usermanual.wiki/Eastech-Electronics/PT8051/User-Guide-809517-Page-3.png)
![Project: Altec Lansing PT8051 User Guide (US Version) 4 Remote Control This section describes the function of each control on the remote control used to control the PT8051. Note: You can also control other components using the remote control once you set the appropriate remote control codes. See the “Programming device remote control codes” section of this manual. [Illustration of remote] 1. POWER Use to toggle between On and Standby modes. 2. VOL +/- Increases or decreases the overall volume level of the unit. 3. and OK Move to highlight items in the on-screen display (OSD) setup menu. Press OK to confirm. 4. AUDIO Sets the remote’s shared keys to control the PT8051 as opposed to DVD, TV, SAT/CAB or AUX devices. 5. INPUT Press to cycle through inputs - DVD, TV/SAT, AUX, DVD digital, TV/SAT digital and AUX digital. 6. MUTE Press to turn off or restore sound. 7. FRONT, CENTER, REAR +/- LEVELS Increases or decreases the volume level of the individual channels for the main and rear surround units. 8. BASS Enhances low frequency or bass output of the system. 9. MODE Use to select between DTS, Dolby Digital, Dolby Pro Logic II or stereo mode of the system depending on the sound modes available from your audio source. 10. OSD Press to enter or exit the on-screen display (OSD) setup menu. [HEADLINE] Installing the PT8051 This section provides guidelines for locating and installing your new PT8051. The PT8051 creates a realistic surround sound experience from just two units. Usability is further enhanced by utilizing an advanced 2.4 GHz wireless transmission system that eliminates the need to run wires to the rear surround speakers. While placement is less critical than similar systems, the following general guidelines should be followed where possible to ensure best sound quality; • Avoid placement where furniture or other items would obstruct the grill area. • Center the PT8051 below the TV so that dialogue appears to be coming from it. • The maximum allowable distance between the main and rear surround units is approximately 40 feet (12 meters)](https://usermanual.wiki/Eastech-Electronics/PT8051/User-Guide-809517-Page-4.png)
![Project: Altec Lansing PT8051 User Guide (US Version) 5• The rear surround unit should be placed behind the primary listening position to maximize the surround sound effects from the system. For maximum sound quality it should be placed at or near ear level when they are seated in the listening position. • Avoid placing the PT8051 on or near surfaces that may vibrate. Locating the PT8051 The PT8051’s front and rear units can be placed on suitable level surfaces or mounted on the wall using the supplied wall mounting brackets. Safety Notes: [Illustration of ventilation] • Be sure to leave adequate ventilation space – at least 2 inches (50mm) above both the main and rear surround units. • We do not recommend installing this unit so that it is directly on the floor. • The main unit of the PT8051 weighs approximately (18.1 lbs.) (8.2 kg) and the rear surround unit weighs approximately 9.8 lbs. (4.4 kg.). Be sure to secure it where it will not fall and where it is out of the reach of children. • Do not install the main or rear surround units directly above a cathode-ray tube (CRT) TV as stray magnetic fields may distort the TV.](https://usermanual.wiki/Eastech-Electronics/PT8051/User-Guide-809517-Page-5.png)

![Project: Altec Lansing PT8051 User Guide (US Version) 7 [HEADLINE] Setting up the PT8051 Warning: Do not insert the PT8051’s power plugs into a wall outlet until you connect other sources such as your TV, DVD player, satellite tuner or alternate audio source. Also, turn off audio sources before connecting them to the PT8051. The PT8051 is designed to connect external components such as your DVD player, satellite TV tuner, cable TV tuner, VCR, game console and TV. The PT8051 can be connected to the source equipment (DVD, VCR, etc.) using either a digital (coaxial or optical) or analog connection. In cases where there are both digital and analog outputs such as a DVD player we recommend using the digital output to ensure best sound quality and optimal surround sound reproduction. Connecting devices equipped with a digital audio output (DVD player, DVR, etc.) The PT8051 can accept digital input signals using standard, commercially available optical or coaxial cables. Typical digital connections [Illustration of digital connections] To connect a digital audio source: • Use a coaxial cable to connect the COAXIAL IN (DVD) jack on the PT8051 to the coaxial output jack on the DVD player. • Use an optical cable to connect the OPTICAL IN (AUX) jack on the PT8051 to the optical output jack on a digital audio source such as a game console or digital video recorder. • Use an optical cable to connect the OPTICAL IN (TV/SAT) jack on the PT8051 to the optical output jack on the satellite tuner or cable TV tuner. Note: When connecting a DVD player we recommend using the coaxial input found on the rear of the PT8051. However, if your DVD player only has an optical output it can be connected to the AUX input. Connecting devices equipped with an analog audio output (VCR or similar device). To connect the PT8051 to a VCR or similar analog audio device, connect the cables as shown in the diagram below. Analog audio connections [Illustration of analog connections]](https://usermanual.wiki/Eastech-Electronics/PT8051/User-Guide-809517-Page-7.png)
![Project: Altec Lansing PT8051 User Guide (US Version) 8 To connect audio from an analog (VCR, etc.) audio device: • Use a standard stereo audio cable to connect the AUDIO IN (AUX) jacks on the PT8051 to the audio output jacks on the VCR or similar audio source. Ensure that the cables are connected correctly observing left (white) and right (red) connections at both the PT8051 and the source device. • Use a standard stereo audio cable to connect the AUDIO IN (TV/SAT) jacks to the audio output jacks on the satellite TV or cable TV tuner. If your satellite TV or cable TV tuner has a digital output this input can be used for another device. • Use a standard stereo audio cable to connect the AUDIO IN (DVD) jack to the audio output jack on the DVD player. If you have connected your DVD player using an optical or coaxial digital cable you can use this input for another device. Video connection [Illustration of video connections] To connect the video out: • Using the supplied A/V cable, connect one yellow end to connect the VIDEO OUT on the PT8051 and the other yellow end to the video input jack on the TV. This connection allows you to view the on-screen display (OSD) on your TV screen when the corresponding input is selected.](https://usermanual.wiki/Eastech-Electronics/PT8051/User-Guide-809517-Page-8.png)
![Project: Altec Lansing PT8051 User Guide (US Version) 9 Connecting a Subwoofer [Illustration of subwoofer connection] To connect an optional subwoofer: • Use an optional commercially available mono audio cable to connect the SUBWOOFER OUT jack on the rear of the PT8051 to the SUBWOOFER INPUT jack on the subwoofer. [HEADLINE] Setting up the Remote Control Installing batteries • Depress the latch on the back of the remote as shown to remove the battery cover. • Insert two AAA batteries. • Close the battery cover. Notes: • Change all of the batteries if you notice that the operation range of the remote decreases or the indicator does not blink or its light becomes dim. • Do not use old batteries together with new ones. • Do not use different types of batteries such as alkaline and manganese batteries together. Read the packaging carefully as these different types of batteries may have the same shape and color. • Exhausted batteries may leak. If the batteries have leaked, dispose of them immediately. Avoid touching the leaked material or letting it come into contact with skin or clothing. Clean the battery compartment thoroughly before installing new batteries.](https://usermanual.wiki/Eastech-Electronics/PT8051/User-Guide-809517-Page-9.png)
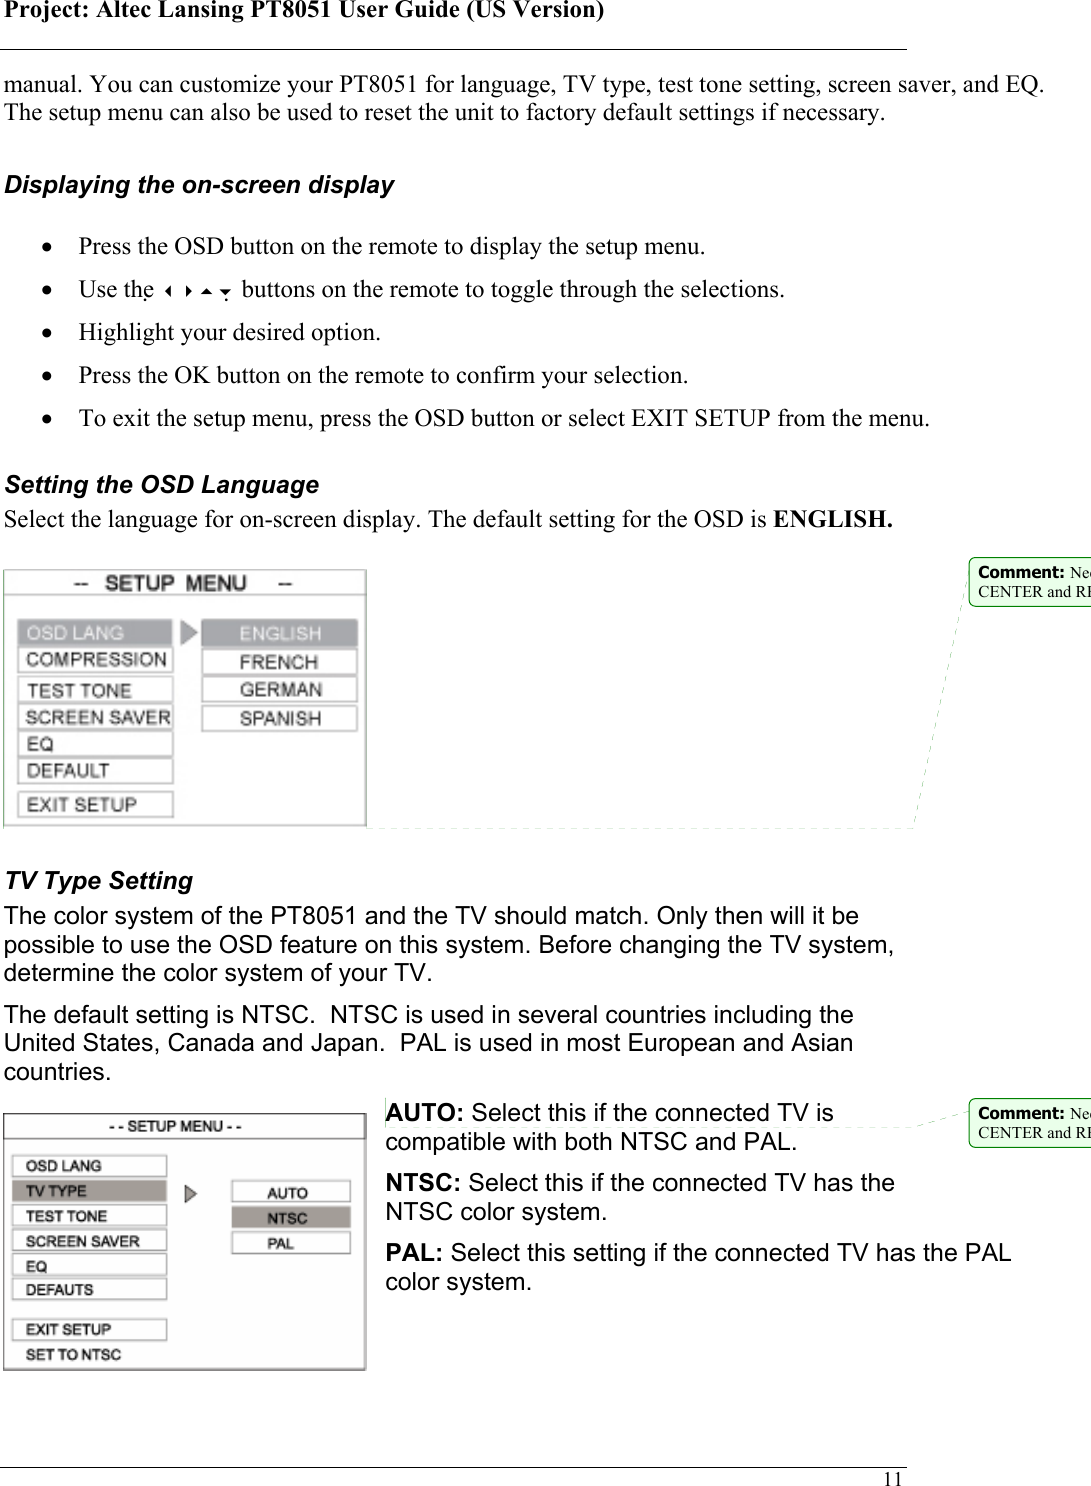
![Project: Altec Lansing PT8051 User Guide (US Version) 10• Do not throw away batteries with general house waste. Dispose of them correctly according to local regulations. [HEADLINE] Basic Operation • After all audio and video connections are secure; you can plug in the PT8051’s AC cords into a suitable AC outlet. • Turn on the power switch on the rear panel of the PT8051’s main and rear surround units to the on position. The PT8051 will enter into STANDBY mode. The power LED on front panel will turn red indicating that the unit is in standby mode. • Press the POWER button on the front panel to power on the PT8051. The power LED will switch from red to green indicating the unit is on. The LED on the rear unit will illuminate once the main unit has been powered on. • Begin playback on the DVD player or other device that you want to listen to. • Select the desired input using the INPUT button on the front panel or remote control. The corresponding LED will illuminate to indicate the input that has been selected • Select the desired audio mode by using the MODE button on the front panel or remote control. For most devices you can choose between surround sound or stereo modes. • Adjust the system volume using the VOL + / - buttons on the remote control or front panel. [HEADLINE] Advanced Operation Setting Channel (Speaker) Levels Individual levels can be set for front, center and rear or surround channels by using the corresponding +/- level buttons on the remote. These levels should be adjusted so that all channels are at a similar volume when the listener is seated using the Test Tone function as described in the Setup Menu section that follows. Adjustments are made by; • Pressing LEVEL (Front +/-, Center +/- and Rear +/-) for each channel to be set. The level of the channel will appear on the TV screen. • The range for each level is -10 dB to +10 dB, in 1 dB steps. The initial volume is 00 dB. Setup Menu The setup menu is displayed on your TV screen using the On-Screen Display (OSD). The OSD will only work if a video connection has been established as described in “video connection” section of this](https://usermanual.wiki/Eastech-Electronics/PT8051/User-Guide-809517-Page-10.png)
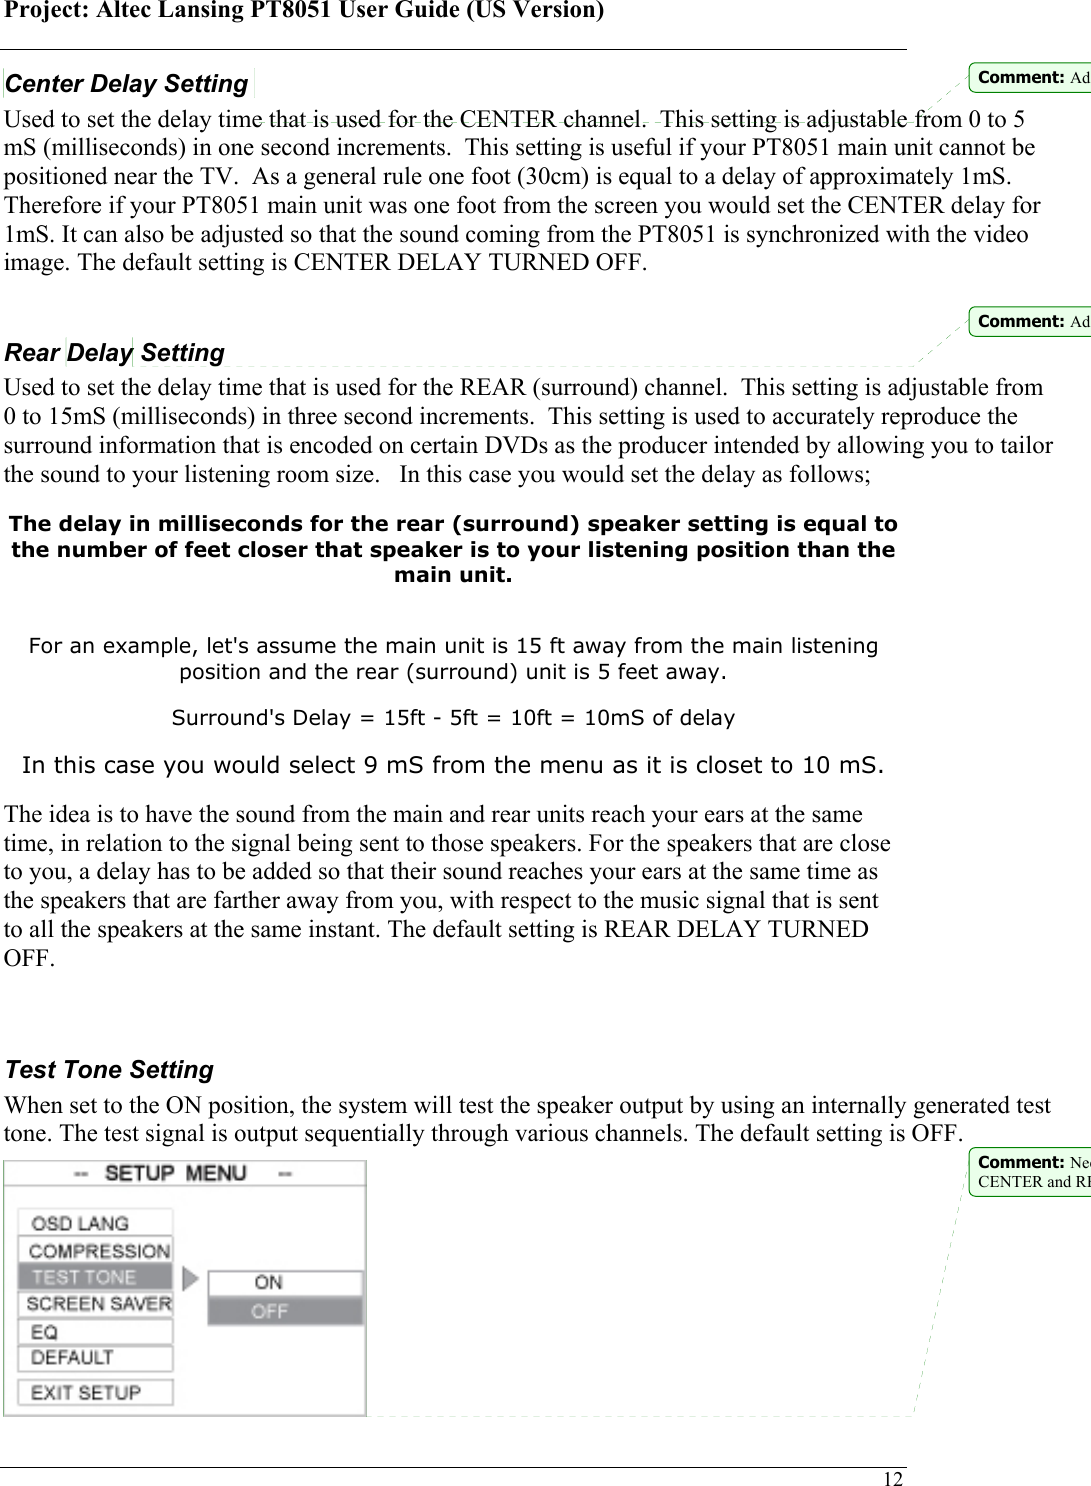
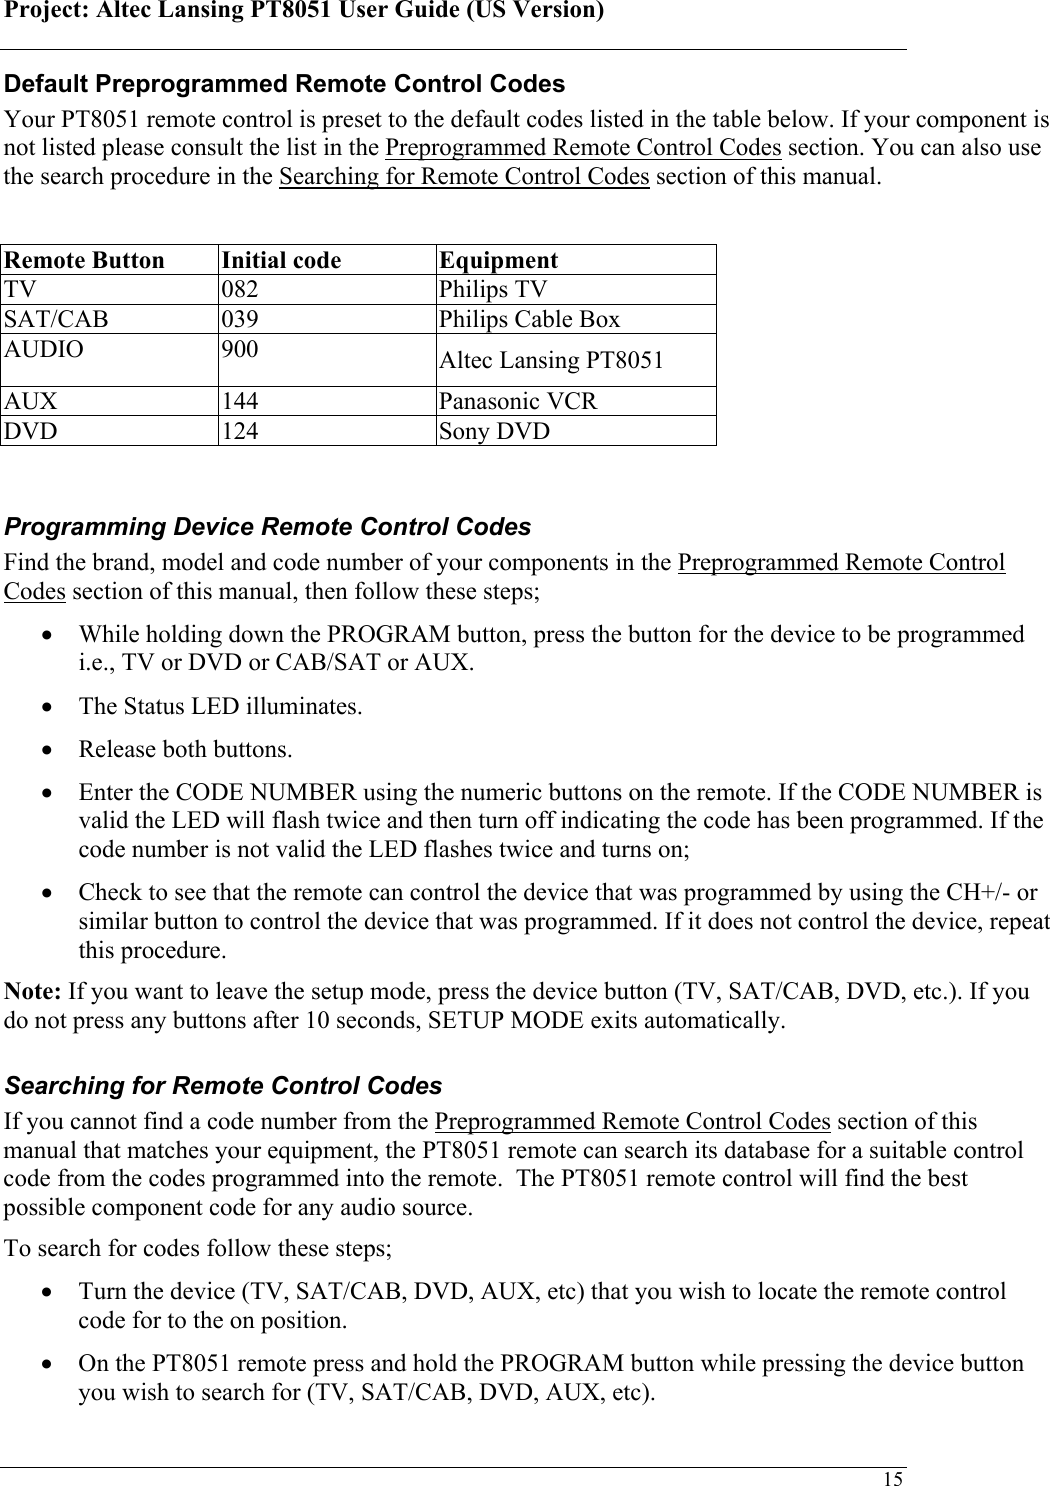
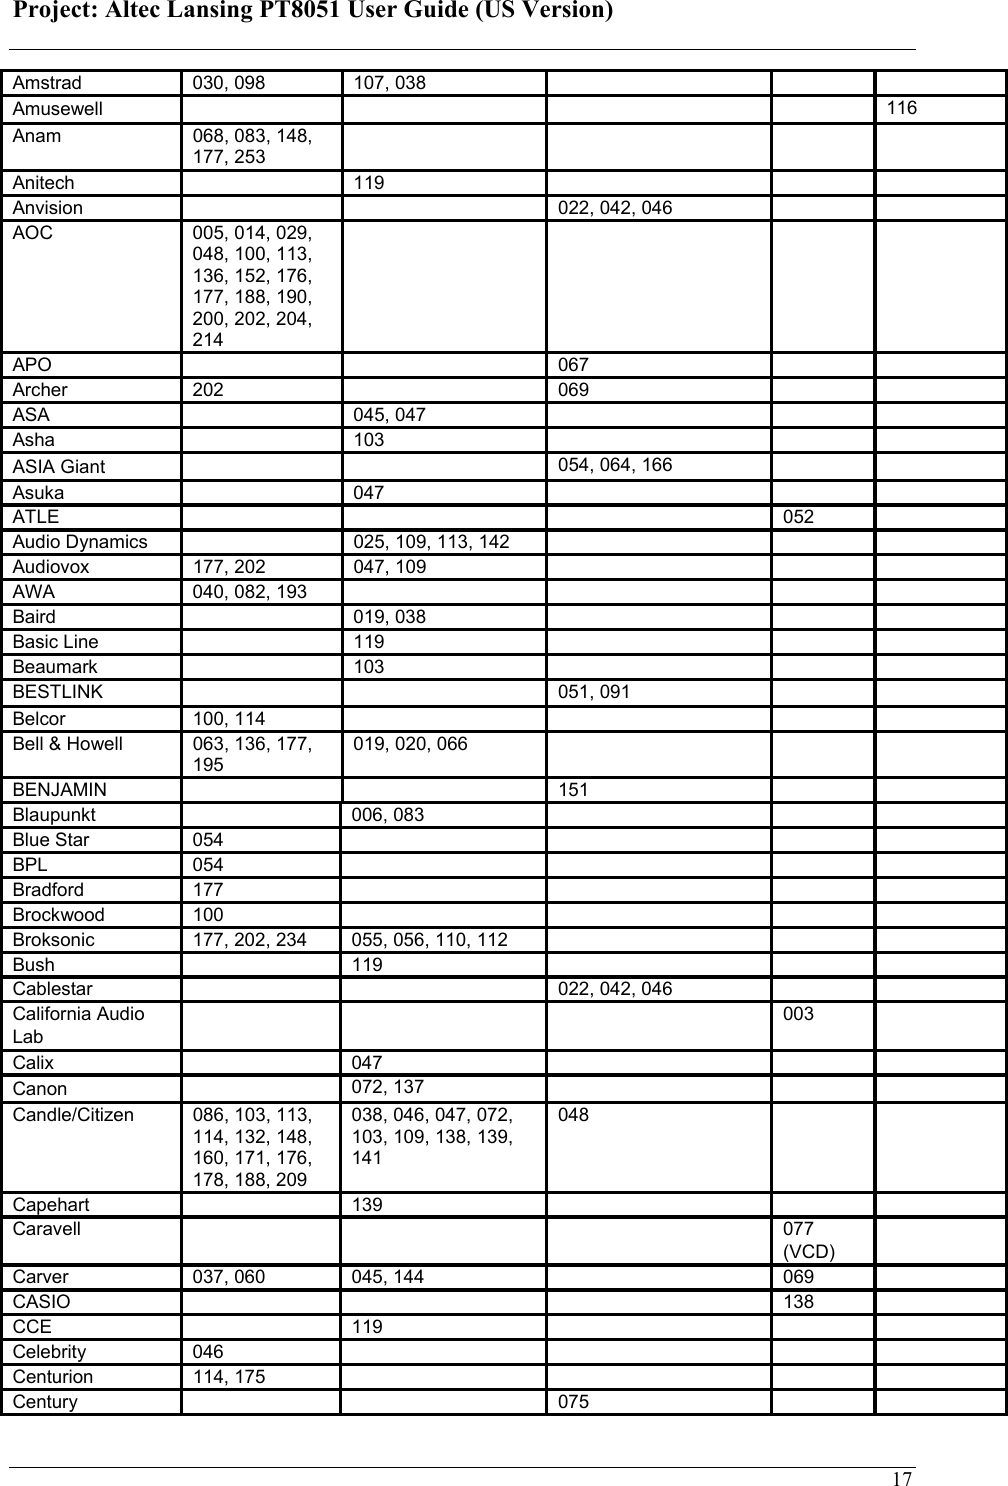
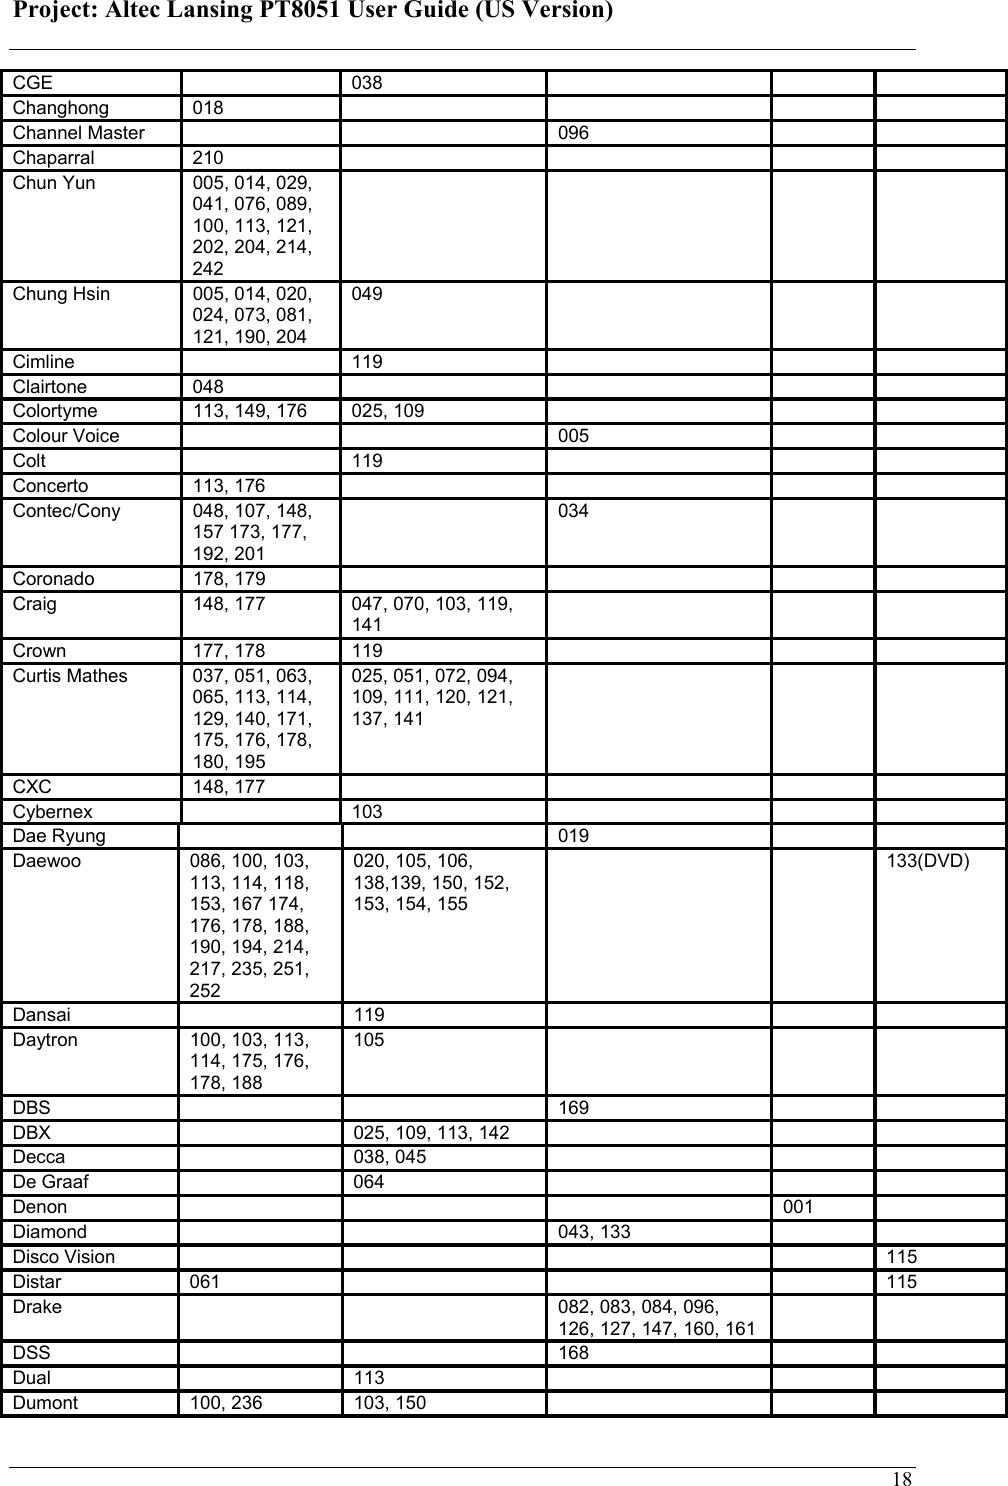
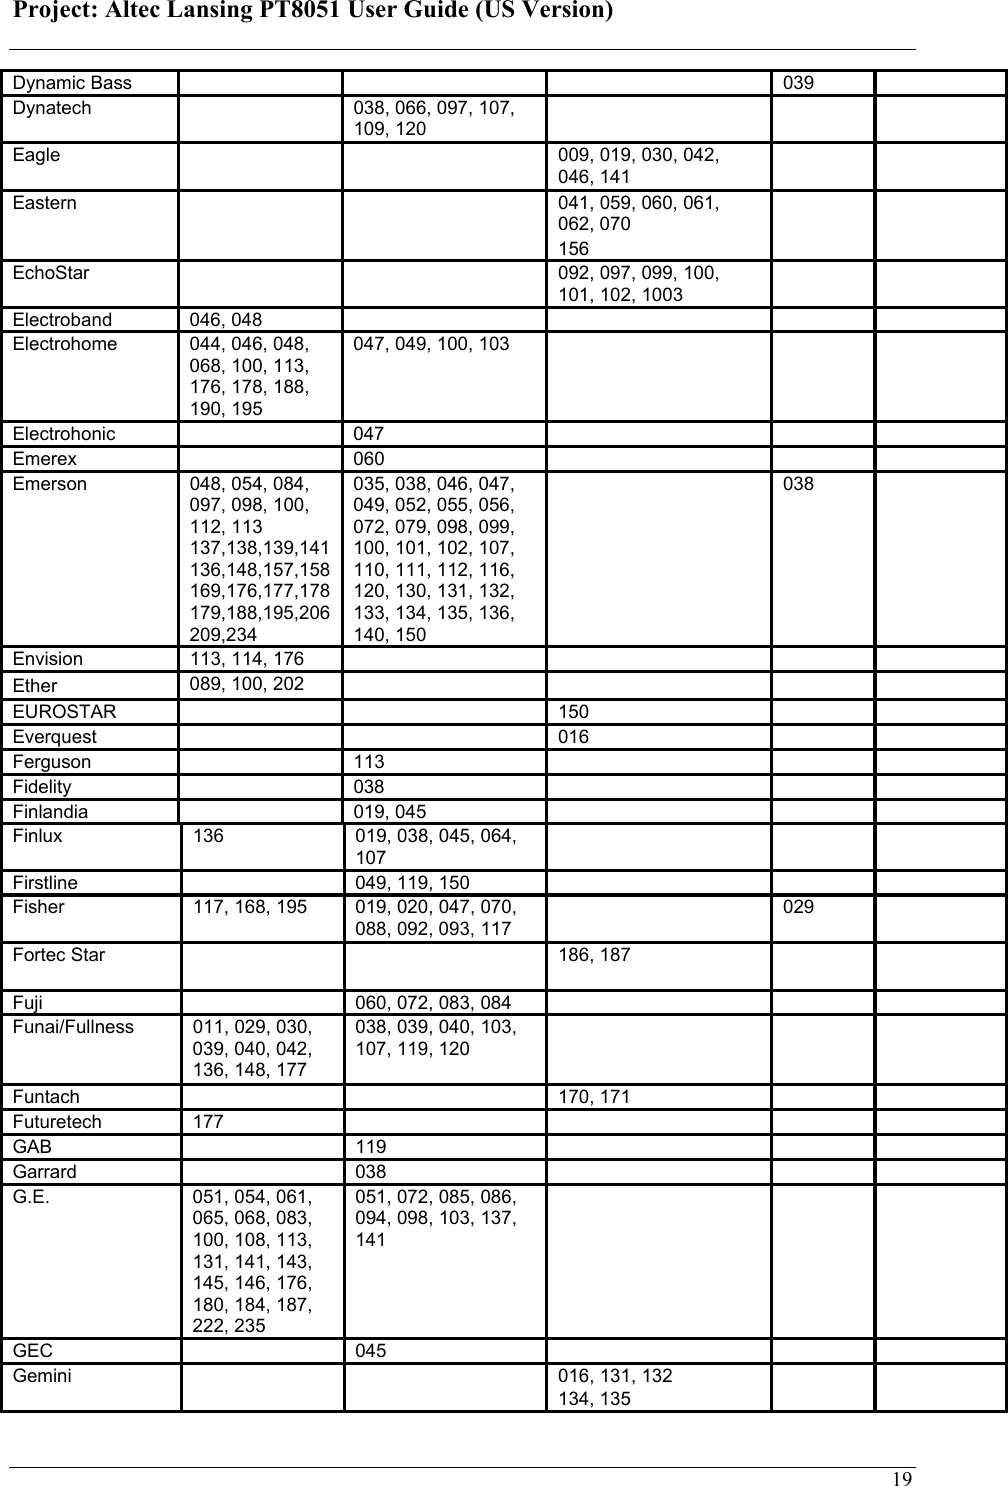
![Project: Altec Lansing PT8051 User Guide (US Version) 14 [HEADLINE] Operating the PT8051 Remote Control In addition to controlling your PT8051 you can program the remote control to operate audio/video components from other manufacturers. [Illustration of part of remote] Codes can be set up for each device to be controlled: TV, SAT/CAB, AUDIO, DVD, and AUX. 1. STATUS Indicates operation of remote when specific buttons are pressed. Illuminates continuously to indicate remote is in program mode. 2. NUMERIC BUTTONS Use to enter preprogrammed remote codes for other devices. 3. DEVICE BUTTONS Use to program or switch remote modes for operating other devices. 1. STATUS Indicates operation of remote when specific buttons are pressed. Illuminates continuously to indicate remote is in program mode.](https://usermanual.wiki/Eastech-Electronics/PT8051/User-Guide-809517-Page-14.png)