Eastech Electronics PT8051 2.4G wireless speakers (FHSS) User Manual 809517
Eastech Electronics (Taiwan) Inc. 2.4G wireless speakers (FHSS) 809517
Users manual

Project: Altec Lansing PT8051 User Guide (US Version)
1
Project: Altec Lansing PT8051 Manual User’s Guide (US Version)
Revision as of June 8, 2007
Product Management: Don Milks
Program Management:
Merchandising Management: Christopher King
Revision 1.0
Date 6-18-2007
[Part Numbers]
[HEADLINE]
Thank you for purchasing the Altec Lansing PT8051 Wireless Surround Sound System.
The PT8051 is designed to replace the traditional A/V receiver and separate speakers and provide a
complete, multi-channel surround system sound from just two components using DTS and Dolby Digital
decoding to faithfully reproduce your favorite music and movie soundtracks. The PT8051 system’s
NXT Digital flat-panel driver technology accurately reproduces the full frequency range and delivers all
the subtleties and spatial depth that today’s digital formats are capable of. In addition, the PT8051’s
advanced wireless transmission means it’s easy to experience theater quality surround effects without
the need to run wires to the rear speakers.
The PT8051’s design is well suited for use with today’s large format LCD and plasma flat panel
displays and both components can be wall mounted with them using the supplied brackets. A universal
remote control is included that allows you to consolidate remote controls from various devices such as
your TV, DVD player and VCR.
[HEADLINE]
Contents
Refer to the PT8051 Quick Connect Card to identify these items.
• PT8051 main and rear surround units
• Remote control and batteries
• A/V Cable
• Wall mount brackets (hardware not included)
• User’s guide and quick connect instructions

Project: Altec Lansing PT8051 User Guide (US Version)
2
[HEADLINE]
Controls and Connections for your PT8051
Front Panel (Main Unit)
[Illustration of front panel]
1. VOLUME +/- Controls the volume level of all audio channels.
2. LEDs Displays information about the operational status.
3. INPUT Press to switch between input sources (DVD, TV/SAT, AUX,
DVD digital, TV/SAT digital or AUX digital).
4. MODE Press to select virtual or stereo mode.
5. POWER Press to power on the system or switch to standby.
Rear Panel (Main Unit)
[Illustration of rear panel]
1. Power ON/OFF Switches power on or off.
2. AC Power Cord Connect to standard AC outlet. Refer to frequency
and voltage range for Power Source as indicated on
rear panel.
3. CONNECT Press this button to manually synchronize the
wireless audio link between the main and rear
surround units. Under most circumstances it is not
necessary to use this button as the units
automatically synchronize when powered on.
4. VIDEO OUT Used to display on-screen display information.
Connect to composite video input of TV.
5. SUBWOOFER OUT Use to connect an optional subwoofer if additional
bass is required from the system.
6. DIGITAL INPUT: Use to connect a DVD player that has a coaxial
digital output.
COAXIAL (DVD IN)
OPTICAL (TV/SAT IN) Use to connect a digital satellite tuner or cable TV
tuner that has an optical audio output.
OPTICAL (AUX IN) Use to connect to an auxiliary sound source such as
a PVR or second TV tuner that has an optical audio
output. Can also be used to connect a DVD player
that has an optical output but not a coaxial output.
7. AUDIO ANALOG INPUT:
DVD IN Use to connect to a DVD player with audio an
analog output.
TV/SAT IN Use to connect to a TV or satellite tuner with audio
analog output.

Project: Altec Lansing PT8051 User Guide (US Version)
3
Front Panel (Rear Surround Unit)
[Illustration of front panel of rear surround unit]
1. WIRELESS Illuminates in a steady state when the main and rear surround
speakers are synchronized to indicate the wireless audio link is
operating normally. Flashes when the wireless connection
between the main and rear surround speaker has become
unsynchronized.
2. STANDBY Illuminates when unit is plugged in and the POWER ON/OFF
switch on the rear panel is in the ON position.
Rear Panel (Rear Surround Unit)
[Illustration of rear panel of rear surround unit]
1. Power ON/OFF Switches power on or off.
2. AC Power Cord Connect to standard AC outlet. Refer to frequency
and voltage range for Power Source as indicated on
rear panel.

Project: Altec Lansing PT8051 User Guide (US Version)
4
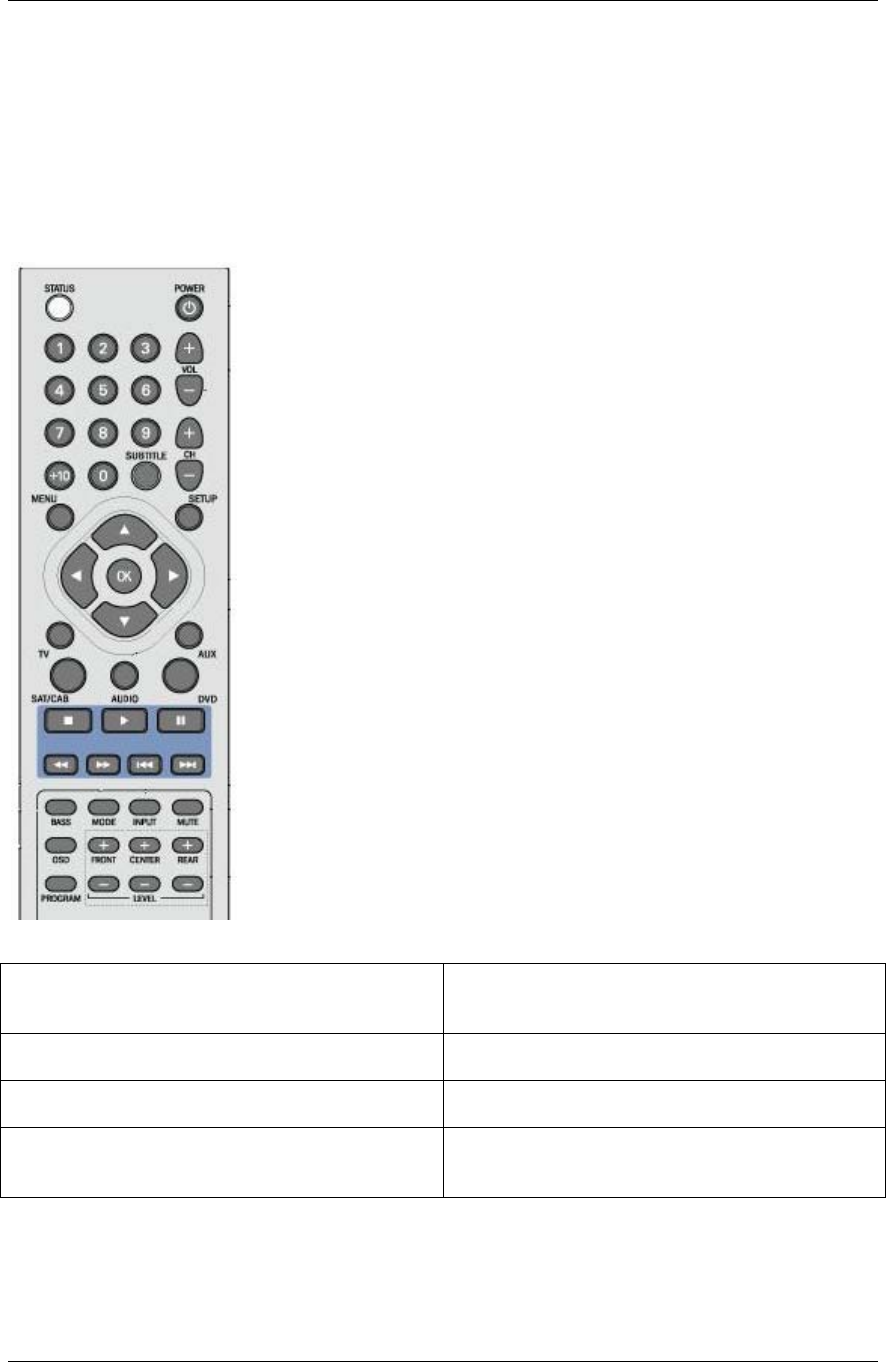
Remote Control
This section describes the function of each control on the remote control used to control the PT8051.
Note: You can also control other components using the remote control once you set the appropriate remote control codes. See
the “Programming device remote control codes” section of this manual.
[Illustration of remote]
1. POWER Use to toggle between On and Standby modes.
2. VOL +/- Increases or decreases the overall volume level of
the unit.
3. and OK Move to highlight items in the on-screen display
(OSD) setup menu. Press OK to confirm.
4. AUDIO Sets the remote’s shared keys to control the PT8051
as opposed to DVD, TV, SAT/CAB or AUX
devices.
5. INPUT Press to cycle through inputs - DVD, TV/SAT,
AUX, DVD digital, TV/SAT digital and AUX
digital.
6. MUTE Press to turn off or restore sound.
7. FRONT, CENTER, REAR +/- LEVELS Increases or decreases the volume level of the
individual channels for the main and rear surround
units.
8. BASS Enhances low frequency or bass output of the
system.
9. MODE Use to select between DTS, Dolby Digital, Dolby
Pro Logic II or stereo mode of the system
depending on the sound modes available from your
audio source.
10. OSD Press to enter or exit the on-screen display (OSD)
setup menu.
[HEADLINE]
Installing the PT8051
This section provides guidelines for locating and installing your new PT8051.
The PT8051 creates a realistic surround sound experience from just two units. Usability is further
enhanced by utilizing an advanced 2.4 GHz wireless transmission system that eliminates the need to run
wires to the rear surround speakers. While placement is less critical than similar systems, the following
general guidelines should be followed where possible to ensure best sound quality;
• Avoid placement where furniture or other items would obstruct the grill area.
• Center the PT8051 below the TV so that dialogue appears to be coming from it.
• The maximum allowable distance between the main and rear surround units is approximately 40
feet (12 meters)

Project: Altec Lansing PT8051 User Guide (US Version)
5
• The rear surround unit should be placed behind the primary listening position to maximize the
surround sound effects from the system. For maximum sound quality it should be placed at or
near ear level when they are seated in the listening position.
• Avoid placing the PT8051 on or near surfaces that may vibrate.
Locating the PT8051
The PT8051’s front and rear units can be placed on suitable level surfaces or mounted on the wall using
the supplied wall mounting brackets.
Safety Notes:
[Illustration of ventilation]
• Be sure to leave adequate ventilation space – at least 2 inches (50mm) above both the main and
rear surround units.
• We do not recommend installing this unit so that it is directly on the floor.
• The main unit of the PT8051 weighs approximately (18.1 lbs.) (8.2 kg) and the rear surround
unit weighs approximately 9.8 lbs. (4.4 kg.). Be sure to secure it where it will not fall and where
it is out of the reach of children.
• Do not install the main or rear surround units directly above a cathode-ray tube (CRT) TV as
stray magnetic fields may distort the TV.

Project: Altec Lansing PT8051 User Guide (US Version)
6
Wall Mounting
If you are mounting the PT8051 on the wall please follow these steps;
1. Determine a suitable wall location for mounting each speaker unit within reach of its AC cord.
2. Position and level the supplied metal mounting brackets in the desired location on the wall.
3. Being careful to avoid any items (wires, pipes, etc.) hidden inside the wall secure the metal
mounting bracket using appropriate fasteners for the application. If you are unsure which type of
fasteners to use or are unable to determine if there are items within the wall that could be
damaged please consult a licensed contractor.
4. Place the speaker on the mounting bracket by aligning the two buttonholes on the rear of the
speaker with the posts on the mounting bracket. Check to make sure the wall mount bracket and
speaker are securely fixed in place.
Caution: The wall-mounting bracket should be installed only by qualified personnel. The mounting
bracket can be installed on many different types of walls. When installed, the mounting bracket must
support at least 100 lbs. (45 kg.). The installer must be sure that the installing surface can support the
100 lb. (45 kg.) weight requirement. The qualified installer must also determine and use the proper
hardware to obtain the weight requirements for the wall.
Placing the PT8051 on a Stand
You can mount your TV on a commercially-available stand and place the main unit of the PT8051 under
your TV. Ensure that the stand being used can support the weight of the TV, the PT8051 and any other
items it will be required to support.
Note: Consult the instructions supplied with the stand for details on how to install the stand and how to
mount the PT8051 and the TV on the stand.
Note: Placement of this product on wood surfaces with certain types of finishes, such as clear varnish,
may result in damage to the finish. Consult the furniture manufacturer’s care instructions for direction as
to the types of objects that may safely be placed on the wood surface. Altec Lansing shall not be
responsible for any damage to wood surfaces from contact with this product.

Project: Altec Lansing PT8051 User Guide (US Version)
7
[HEADLINE]
Setting up the PT8051
Warning: Do not insert the PT8051’s power plugs into a wall outlet until you connect other sources
such as your TV, DVD player, satellite tuner or alternate audio source. Also, turn off audio sources
before connecting them to the PT8051.
The PT8051 is designed to connect external components such as your DVD player, satellite TV tuner,
cable TV tuner, VCR, game console and TV. The PT8051 can be connected to the source equipment
(DVD, VCR, etc.) using either a digital (coaxial or optical) or analog connection. In cases where there
are both digital and analog outputs such as a DVD player we recommend using the digital output to
ensure best sound quality and optimal surround sound reproduction.
Connecting devices equipped with a digital audio output (DVD player, DVR, etc.)
The PT8051 can accept digital input signals using standard, commercially available optical or coaxial
cables.
Typical digital connections
[Illustration of digital connections]
To connect a digital audio source:
• Use a coaxial cable to connect the COAXIAL IN (DVD) jack on the PT8051 to the coaxial output
jack on the DVD player.
• Use an optical cable to connect the OPTICAL IN (AUX) jack on the PT8051 to the optical output
jack on a digital audio source such as a game console or digital video recorder.
• Use an optical cable to connect the OPTICAL IN (TV/SAT) jack on the PT8051 to the optical output
jack on the satellite tuner or cable TV tuner.
Note: When connecting a DVD player we recommend using the coaxial input found on the rear of the
PT8051. However, if your DVD player only has an optical output it can be connected to the AUX input.
Connecting devices equipped with an analog audio output (VCR or similar device).
To connect the PT8051 to a VCR or similar analog audio device, connect the cables as shown in the
diagram below.
Analog audio connections
[Illustration of analog connections]
Project: Altec Lansing PT8051 User Guide (US Version)
8
To connect audio from an analog (VCR, etc.) audio device:
• Use a standard stereo audio cable to connect the AUDIO IN (AUX) jacks on the PT8051 to the
audio output jacks on the VCR or similar audio source. Ensure that the cables are connected
correctly observing left (white) and right (red) connections at both the PT8051 and the source
device.
• Use a standard stereo audio cable to connect the AUDIO IN (TV/SAT) jacks to the audio output
jacks on the satellite TV or cable TV tuner. If your satellite TV or cable TV tuner has a digital
output this input can be used for another device.
• Use a standard stereo audio cable to connect the AUDIO IN (DVD) jack to the audio output jack on
the DVD player. If you have connected your DVD player using an optical or coaxial digital cable
you can use this input for another device.
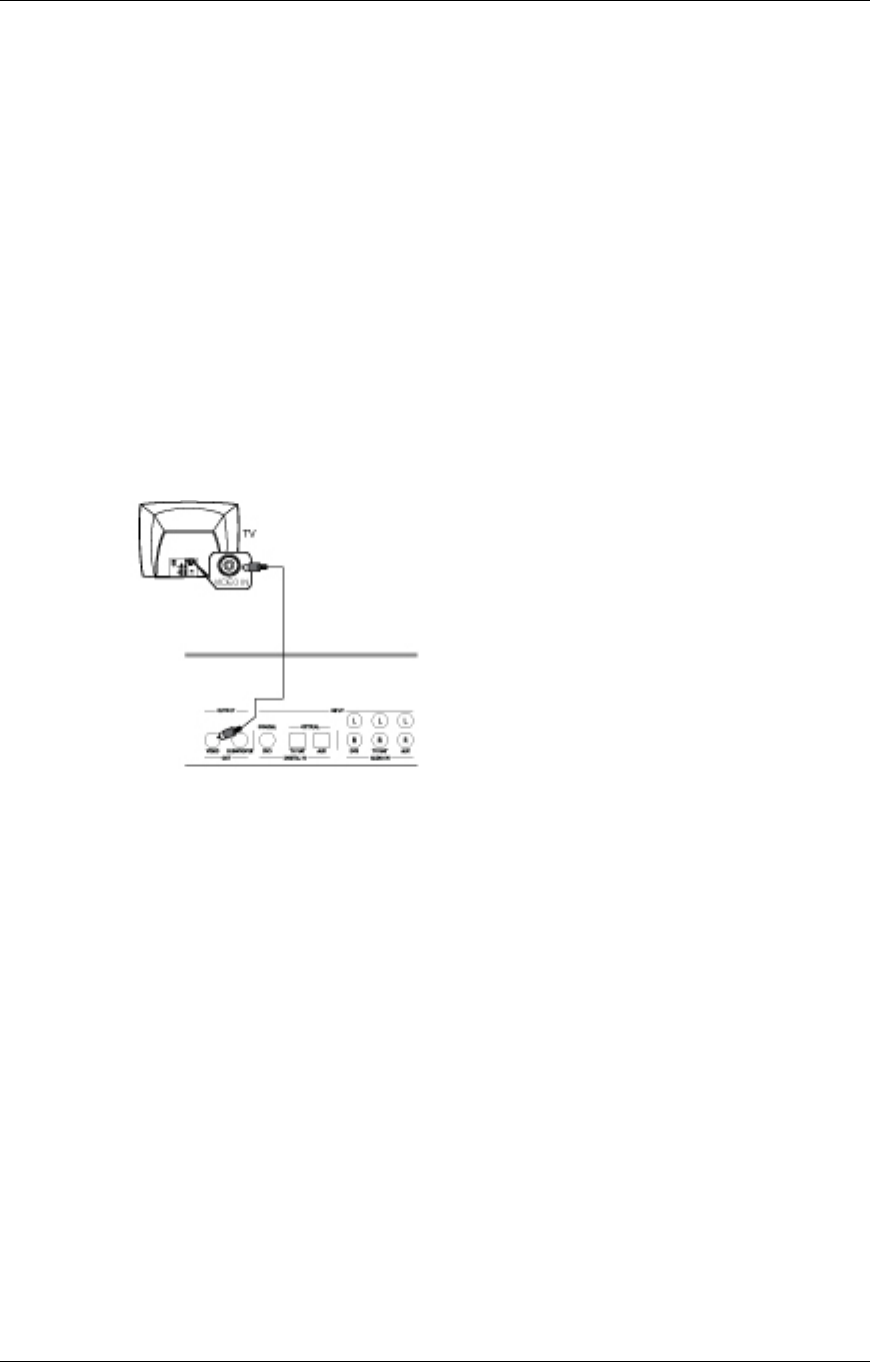
Video connection
[Illustration of video connections]
To connect the video out:
• Using the supplied A/V cable, connect one yellow end to connect the VIDEO OUT on the PT8051
and the other yellow end to the video input jack on the TV. This connection allows you to view the
on-screen display (OSD) on your TV screen when the corresponding input is selected.
Project: Altec Lansing PT8051 User Guide (US Version)
9
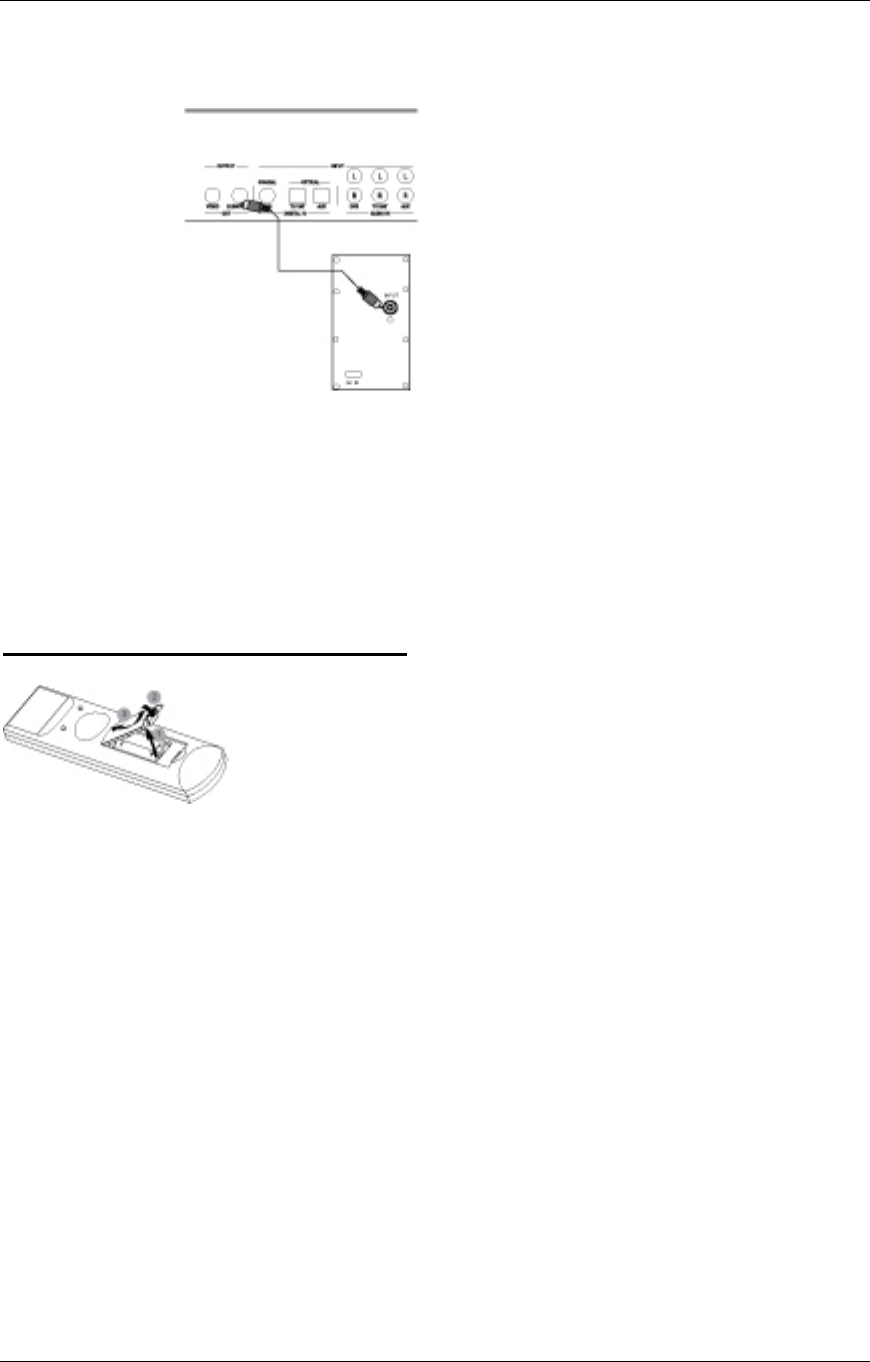
Connecting a Subwoofer
[Illustration of subwoofer connection]
To connect an optional subwoofer:
• Use an optional commercially available mono audio cable to connect the SUBWOOFER OUT jack
on the rear of the PT8051 to the SUBWOOFER INPUT jack on the subwoofer.
[HEADLINE]
Setting up the Remote Control
Installing batteries
• Depress the latch on the back of the remote as shown to remove the battery cover.
• Insert two AAA batteries.
• Close the battery cover.
Notes:
• Change all of the batteries if you notice that the operation range of the remote decreases or the
indicator does not blink or its light becomes dim.
• Do not use old batteries together with new ones.
• Do not use different types of batteries such as alkaline and manganese batteries together. Read
the packaging carefully as these different types of batteries may have the same shape and color.
• Exhausted batteries may leak. If the batteries have leaked, dispose of them immediately. Avoid
touching the leaked material or letting it come into contact with skin or clothing. Clean the
battery compartment thoroughly before installing new batteries.

Project: Altec Lansing PT8051 User Guide (US Version)
10
• Do not throw away batteries with general house waste. Dispose of them correctly according to
local regulations.
[HEADLINE]
Basic Operation
• After all audio and video connections are secure; you can plug in the PT8051’s AC cords into a
suitable AC outlet.
• Turn on the power switch on the rear panel of the PT8051’s main and rear surround units to the on
position. The PT8051 will enter into STANDBY mode. The power LED on front panel will turn red
indicating that the unit is in standby mode.
• Press the POWER button on the front panel to power on the PT8051. The power LED will switch
from red to green indicating the unit is on. The LED on the rear unit will illuminate once the main
unit has been powered on.
• Begin playback on the DVD player or other device that you want to listen to.
• Select the desired input using the INPUT button on the front panel or remote control. The
corresponding LED will illuminate to indicate the input that has been selected
• Select the desired audio mode by using the MODE button on the front panel or remote control. For
most devices you can choose between surround sound or stereo modes.
• Adjust the system volume using the VOL + / - buttons on the remote control or front panel.
[HEADLINE]
Advanced Operation
Setting Channel (Speaker) Levels
Individual levels can be set for front, center and rear or surround channels by using the corresponding
+/- level buttons on the remote. These levels should be adjusted so that all channels are at a similar
volume when the listener is seated using the Test Tone function as described in the Setup Menu section
that follows.
Adjustments are made by;
• Pressing LEVEL (Front +/-, Center +/- and Rear +/-) for each channel to be set. The level of the
channel will appear on the TV screen.
• The range for each level is -10 dB to +10 dB, in 1 dB steps. The initial volume is 00 dB.
Setup Menu
The setup menu is displayed on your TV screen using the On-Screen Display (OSD). The OSD will only
work if a video connection has been established as described in “video connection” section of this
Project: Altec Lansing PT8051 User Guide (US Version)
11
manual. You can customize your PT8051 for language, TV type, test tone setting, screen saver, and EQ.
The setup menu can also be used to reset the unit to factory default settings if necessary.
Displaying the on-screen display
• Press the OSD button on the remote to display the setup menu.
• Use the buttons on the remote to toggle through the selections.
• Highlight your desired option.
• Press the OK button on the remote to confirm your selection.
• To exit the setup menu, press the OSD button or select EXIT SETUP from the menu.
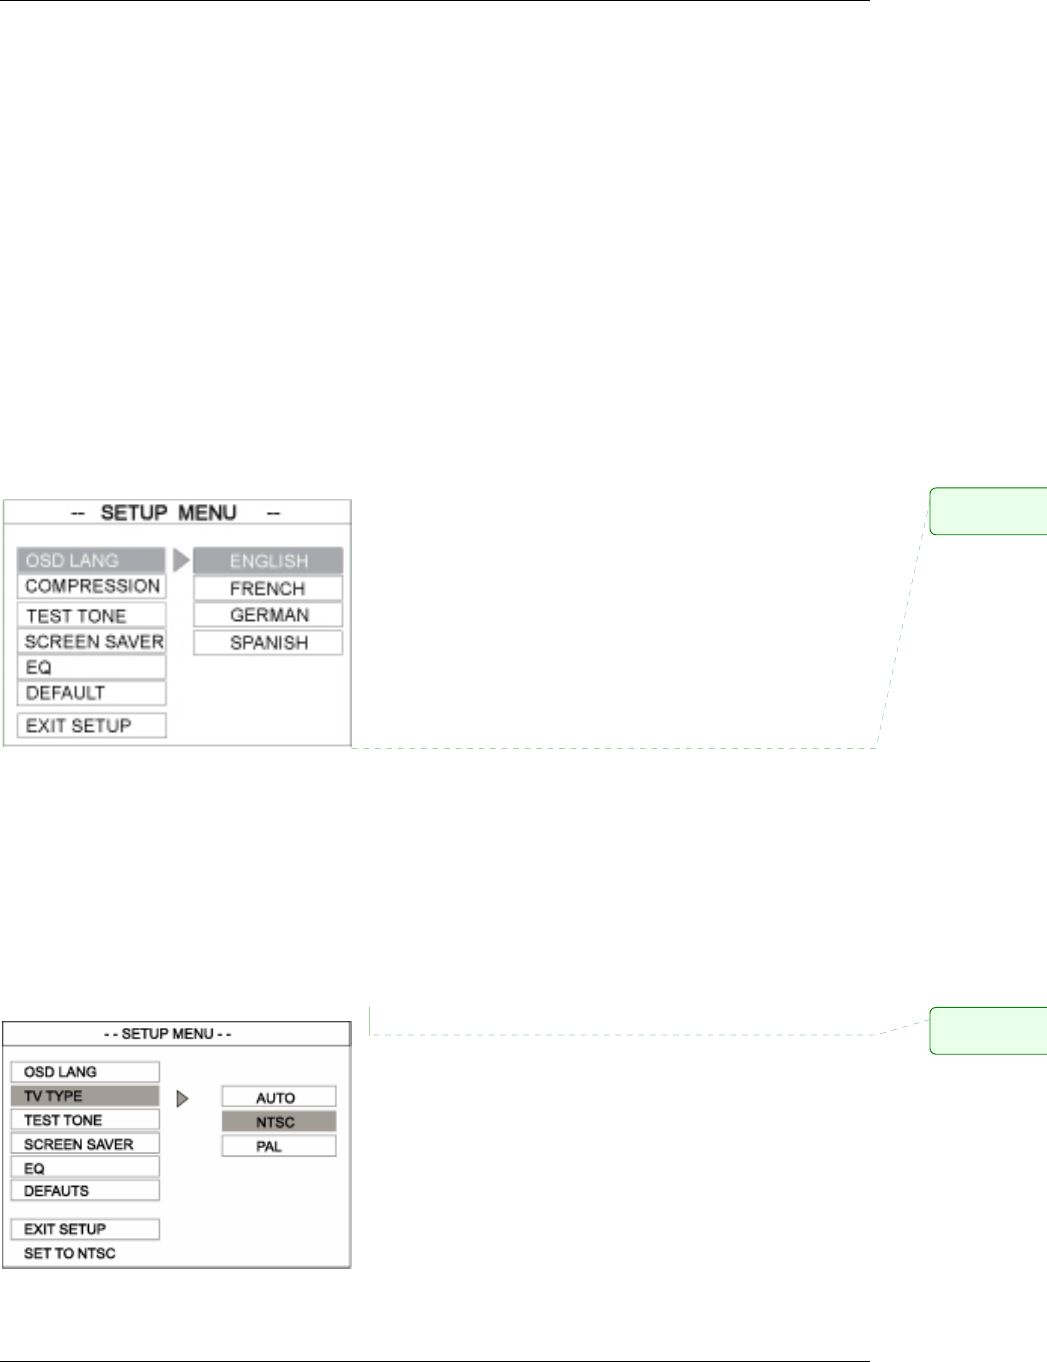
Setting the OSD Language
Select the language for on-screen display. The default setting for the OSD is ENGLISH.
TV Type Setting
The color system of the PT8051 and the TV should match. Only then will it be
possible to use the OSD feature on this system. Before changing the TV system,
determine the color system of your TV.
The default setting is NTSC. NTSC is used in several countries including the
United States, Canada and Japan. PAL is used in most European and Asian
countries.
AUTO: Select this if the connected TV is
compatible with both NTSC and PAL.
NTSC: Select this if the connected TV has the
NTSC color system.
PAL: Select this setting if the connected TV has the PAL
color system.
Comment: Ne
e
CENTER and R
E
Comment: Ne
e
CENTER and R
E

Project: Altec Lansing PT8051 User Guide (US Version)
12
Center Delay Setting
Used to set the delay time that is used for the CENTER channel. This setting is adjustable from 0 to 5
mS (milliseconds) in one second increments. This setting is useful if your PT8051 main unit cannot be
positioned near the TV. As a general rule one foot (30cm) is equal to a delay of approximately 1mS.
Therefore if your PT8051 main unit was one foot from the screen you would set the CENTER delay for
1mS. It can also be adjusted so that the sound coming from the PT8051 is synchronized with the video
image. The default setting is CENTER DELAY TURNED OFF.
Rear Delay Setting
Used to set the delay time that is used for the REAR (surround) channel. This setting is adjustable from
0 to 15mS (milliseconds) in three second increments. This setting is used to accurately reproduce the
surround information that is encoded on certain DVDs as the producer intended by allowing you to tailor
the sound to your listening room size. In this case you would set the delay as follows;
The delay in milliseconds for the rear (surround) speaker setting is equal to
the number of feet closer that speaker is to your listening position than the
main unit.
For an example, let's assume the main unit is 15 ft away from the main listening
position and the rear (surround) unit is 5 feet away.
Surround's Delay = 15ft - 5ft = 10ft = 10mS of delay
In this case you would select 9 mS from the menu as it is closet to 10 mS.
The idea is to have the sound from the main and rear units reach your ears at the same
time, in relation to the signal being sent to those speakers. For the speakers that are close
to you, a delay has to be added so that their sound reaches your ears at the same time as
the speakers that are farther away from you, with respect to the music signal that is sent
to all the speakers at the same instant. The default setting is REAR DELAY TURNED
OFF.
Test Tone Setting
When set to the ON position, the system will test the speaker output by using an internally generated test
tone. The test signal is output sequentially through various channels. The default setting is OFF.
Comment: Ad
Comment: Ad
Comment: Ne
e
CENTER and R
E
Project: Altec Lansing PT8051 User Guide (US Version)
13
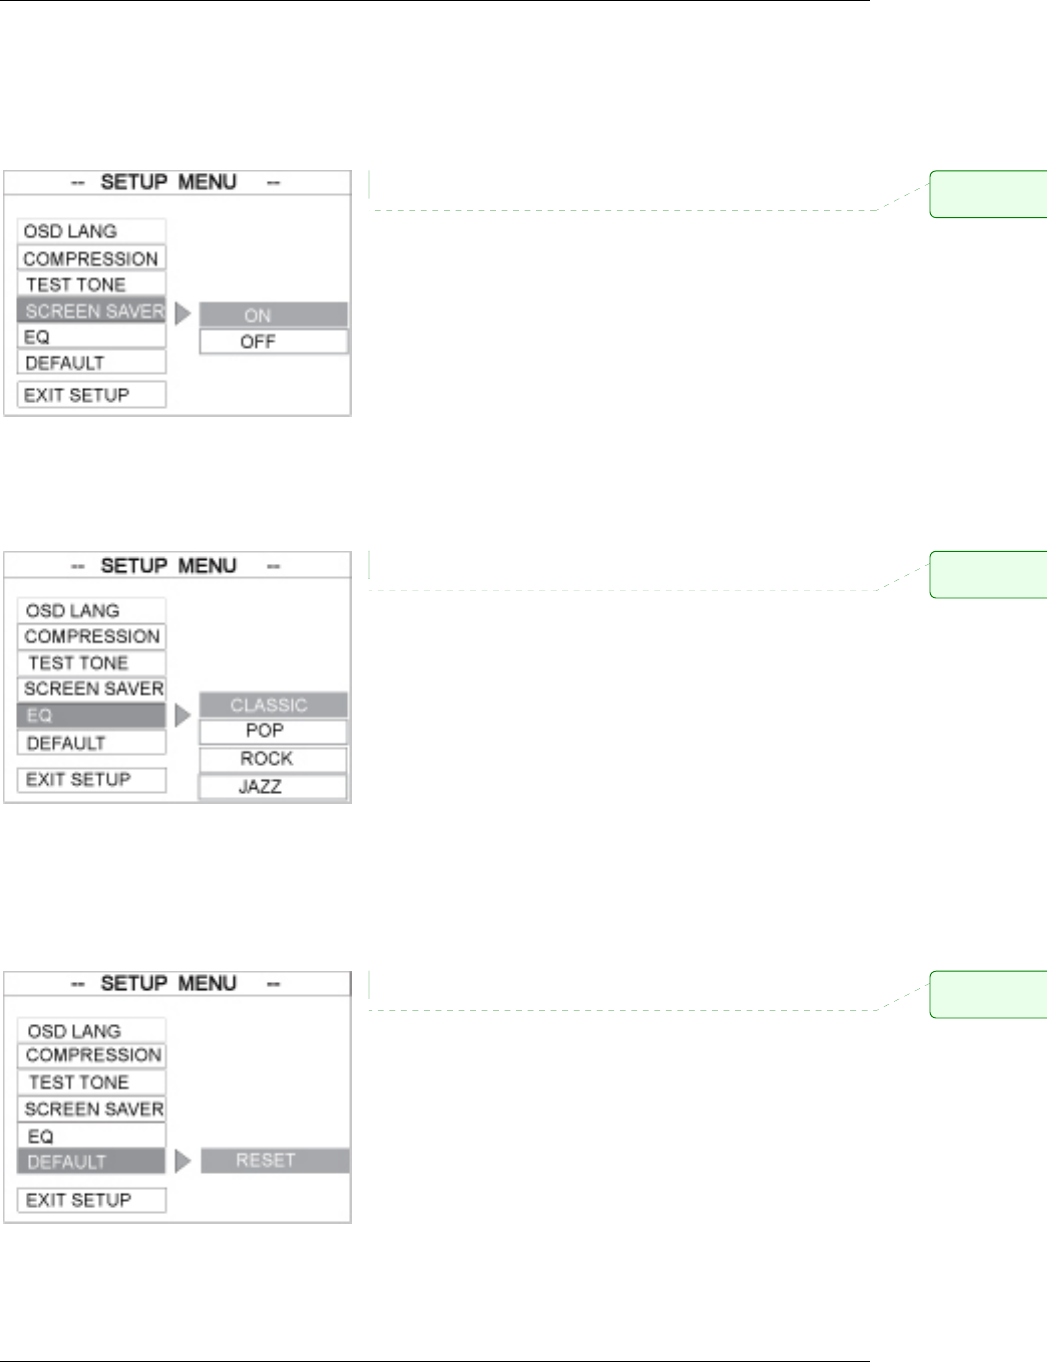
Screen Saver Setting
When set to ON the PT8051 will automatically enter the screen saver mode when no changes have been
made after five minutes. This is useful for preventing image burn from occurring that can damage
certain plasma TVs. The default setting is ON.
EQ (Equalizer)
Use this function to select equalizer settings. Choose from; CLASSIC, POP, ROCK, or JAZZ. The
default setting is CLASSIC.
Default Setting
If RESET is selected, all the items in the setup menu will be reset to the factory default settings as
previously indicated.
Comment: Ne
e
CENTER and R
E
Comment: Ne
e
CENTER and R
E
Comment: Ne
e
CENTER and R
E
Project: Altec Lansing PT8051 User Guide (US Version)
14
[HEADLINE]
Operating the PT8051 Remote Control
In addition to controlling your PT8051 you can program the remote control to operate audio/video
components from other manufacturers.
[Illustration of part of remote]
Codes can be set up for each device to be controlled: TV, SAT/CAB, AUDIO,
DVD, and AUX.
1. STATUS Indicates operation of remote when specific buttons
are pressed. Illuminates continuously to indicate
remote is in program mode.
2. NUMERIC BUTTONS Use to enter preprogrammed remote codes for other
devices.
3. DEVICE BUTTONS Use to program or switch remote modes for
operating other devices.
1. STATUS Indicates operation of remote when specific buttons
are pressed. Illuminates continuously to indicate
remote is in program mode.

Project: Altec Lansing PT8051 User Guide (US Version)
15
Default Preprogrammed Remote Control Codes
Your PT8051 remote control is preset to the default codes listed in the table below. If your component is
not listed please consult the list in the Preprogrammed Remote Control Codes section. You can also use
the search procedure in the Searching for Remote Control Codes section of this manual.
Remote Button Initial code Equipment
TV 082 Philips TV
SAT/CAB 039 Philips Cable Box
AUDIO 900 Altec Lansing PT8051
AUX 144 Panasonic VCR
DVD 124 Sony DVD
Programming Device Remote Control Codes
Find the brand, model and code number of your components in the Preprogrammed Remote Control
Codes section of this manual, then follow these steps;
• While holding down the PROGRAM button, press the button for the device to be programmed
i.e., TV or DVD or CAB/SAT or AUX.
• The Status LED illuminates.
• Release both buttons.
• Enter the CODE NUMBER using the numeric buttons on the remote. If the CODE NUMBER is
valid the LED will flash twice and then turn off indicating the code has been programmed. If the
code number is not valid the LED flashes twice and turns on;
• Check to see that the remote can control the device that was programmed by using the CH+/- or
similar button to control the device that was programmed. If it does not control the device, repeat
this procedure.
Note: If you want to leave the setup mode, press the device button (TV, SAT/CAB, DVD, etc.). If you
do not press any buttons after 10 seconds, SETUP MODE exits automatically.
Searching for Remote Control Codes
If you cannot find a code number from the Preprogrammed Remote Control Codes section of this
manual that matches your equipment, the PT8051 remote can search its database for a suitable control
code from the codes programmed into the remote. The PT8051 remote control will find the best
possible component code for any audio source.
To search for codes follow these steps;
• Turn the device (TV, SAT/CAB, DVD, AUX, etc) that you wish to locate the remote control
code for to the on position.
• On the PT8051 remote press and hold the PROGRAM button while pressing the device button
you wish to search for (TV, SAT/CAB, DVD, AUX, etc).

Project: Altec Lansing PT8051 User Guide (US Version)
16
• The STATUS LED on the PT8051 will illuminate and remain on.
• Release both buttons.
• Press and release the PROGRAM button again. The LED will flash to indicate that the remote
has entered the search mode.
• Aiming the PT8051 remote at the device you want to control repeatedly and slowly press and
release the POWER button. The PT8051 will send a different POWER code to the device each
time the POWER button is pressed.
• Once the device you wish to control powers off, immediately stop pressing the POWER button
and press the device (TV, SAT/CAB, DVD, AUX, etc) button again.
• The PT8051 should now be programmed to control your device.
• You can verify this by turning the device on, and entering other applicable commands such as
PLAY or STOP for a DVD player or CHANNEL +/- for a SATELLITE TV box.
Note: While the POWER button was used for searching here, you can use other commands such as
the PLAY button for devices that do not have a POWER button. In this case the PT8051 uses the
PLAY button to search. Simply use the PLAY button instead of the POWER button as described
below ensuring that the device you wish to control is ready to enter the play mode and has a DVD or
tape loaded, is on, etc.
Preprogrammed Remote Control Codes
TV AUX SAT/CAB DVD/CD/VCD
Brand/Device TV VCR SATELLITE/CABLE CD DVD/VCD
ABC 008, 017, 018, 019,
023, 032 040, 049, 130,
140
Acre 135(DVD)
Acoustic Research 044
ADC 045, 046
ADCOM 038
Addsion 081
Admiral 063, 136, 177,
180, 206, 207
066
Adventura 160 038
Aelanta 089
AEON 055
Aiko 103
Aiwa 006, 007, 008 032, 034, 035, 036,
038, 107, 108, 120
050, 069 109
Akai 113, 114, 164,
181, 190
033, 057, 084, 100,
111, 112, 113, 114,
115, 143
016, 139
Akiba 119
Alfa Gold 185
Alleron 136
Amark 178, 179, 202
Ambassador 098
American High 045, 072

Project: Altec Lansing PT8051 User Guide (US Version)
17
Amstrad 030, 098 107, 038
Amusewell 116
Anam 068, 083, 148,
177, 253
Anitech 119
Anvision 022, 042, 046
AOC 005, 014, 029,
048, 100, 113,
136, 152, 176,
177, 188, 190,
200, 202, 204,
214
APO 067
Archer 202 069
ASA 045, 047
Asha 103
ASIA Giant 054, 064, 166
Asuka 047
ATLE 052
Audio Dynamics 025, 109, 113, 142
Audiovox 177, 202 047, 109
AWA 040, 082, 193
Baird 019, 038
Basic Line 119
Beaumark 103
BESTLINK 051, 091
Belcor 100, 114
Bell & Howell 063, 136, 177,
195
019, 020, 066
BENJAMIN 151
Blaupunkt 006, 083
Blue Star 054
BPL 054
Bradford 177
Brockwood 100
Broksonic 177, 202, 234 055, 056, 110, 112
Bush 119
Cablestar 022, 042, 046
California Audio 003
Lab
Calix 047
Canon 072, 137
Candle/Citizen 086, 103, 113,
114, 132, 148,
160, 171, 176,
178, 188, 209
038, 046, 047, 072,
103, 109, 138, 139,
141
048
Capehart 139
Caravell 077
(VCD)
Carver 037, 060 045, 144 069
CASIO 138
CCE 119
Celebrity 046
Centurion 114, 175
Century 075

Project: Altec Lansing PT8051 User Guide (US Version)
18
CGE 038
Changhong 018
Channel Master 096
Chaparral 210
Chun Yun 005, 014, 029,
041, 076, 089,
100, 113, 121,
202, 204, 214,
242
Chung Hsin 005, 014, 020,
024, 073, 081,
121, 190, 204
049
Cimline 119
Clairtone 048
Colortyme 113, 149, 176 025, 109
Colour Voice 005
Colt 119
Concerto 113, 176
Contec/Cony 048, 107, 148,
157 173, 177,
192, 201
034
Coronado 178, 179
Craig 148, 177 047, 070, 103, 119,
141
Crown 177, 178 119
Curtis Mathes 037, 051, 063,
065, 113, 114,
129, 140, 171,
175, 176, 178,
180, 195
025, 051, 072, 094,
109, 111, 120, 121,
137, 141
CXC 148, 177
Cybernex 103
Dae Ryung 019
Daewoo 086, 100, 103,
113, 114, 118,
153, 167 174,
176, 178, 188,
190, 194, 214,
217, 235, 251,
252
020, 105, 106,
138,139, 150, 152,
153, 154, 155
133(DVD)
Dansai 119
Daytron 100, 103, 113,
114, 175, 176,
178, 188
105
DBS 169
DBX 025, 109, 113, 142
Decca 038, 045
De Graaf 064
Denon 001
Diamond 043, 133
Disco Vision 115
Distar 061 115
Drake 082, 083, 084, 096,
126, 127, 147, 160, 161
DSS 168
Dual 113
Dumont 100, 236 103, 150

Project: Altec Lansing PT8051 User Guide (US Version)
19
Dynamic Bass 039
Dynatech 038, 066, 097, 107,
109, 120
Eagle 009, 019, 030, 042,
046, 141
Eastern 041, 059, 060, 061,
062, 070
156
EchoStar 092, 097, 099, 100,
101, 102, 1003
Electroband 046, 048
Electrohome 044, 046, 048,
068, 100, 113,
176, 178, 188,
190, 195
047, 049, 100, 103
Electrohonic 047
Emerex 060
Emerson 048, 054, 084,
097, 098, 100,
112, 113
137,138,139,141
136,148,157,158
169,176,177,178
179,188,195,206
209,234
035, 038, 046, 047,
049, 052, 055, 056,
072, 079, 098, 099,
100, 101, 102, 107,
110, 111, 112, 116,
120, 130, 131, 132,
133, 134, 135, 136,
140, 150
038
Envision 113, 114, 176
Ether 089, 100, 202
EUROSTAR 150
Everquest 016
Ferguson 113
Fidelity 038
Finlandia 019, 045
Finlux 136 019, 038, 045, 064,
107
Firstline 049, 119, 150
Fisher 117, 168, 195 019, 020, 047, 070,
088, 092, 093, 117
029
Fortec Star 186, 187
Fuji 060, 072, 083, 084
Funai/Fullness 011, 029, 030,
039, 040, 042,
136, 148, 177
038, 039, 040, 103,
107, 119, 120
Funtach 170, 171
Futuretech 177
GAB 119
Garrard 038
G.E. 051, 054, 061,
065, 068, 083,
100, 108, 113,
131, 141, 143,
145, 146, 176,
180, 184, 187,
222, 235
051, 072, 085, 086,
094, 098, 103, 137,
141
GEC 045
Gemini 016, 131, 132
134, 135

Project: Altec Lansing PT8051 User Guide (US Version)
20
General (Fujitsu) 033, 136 043 017, 023, 093, 120, 130
General
Instrument /
Jerrold
001, 003, 011, 012,
013, 014, 016, 017,
023, 050, 093, 125,
128, 129, 130, 135,
140, 163, 180
Gibralter 100, 114
Gintai 205
GMI 052, 071, 073, 142, 155
Golden 030
Goldstar 096, 100, 113,
157, 171, 175,
176, 178 179,
184, 188, 190,
191, 223
025, 046, 047, 091,
109
030 015
Goodmans 136 037, 038, 047, 119
Go Video 103
Gradiente 038
Graetz 113
Granada 164 066, 072
Grandin 054, 177 038, 047, 119
Grundig 045 069
Grunpy 136, 177
Haitai 105
Hallmark 100, 113, 136,
176
Hamlin 010, 019, 020, 123, 133
Harley Davidson 038
Harman Kardon 025, 109
Harvard 100, 136, 177 119
Harwood 119
Hawaii 117
HCM 054
Head Quarter 020
Hinari 136 103, 119
Hi-Q 070
Hisawa 054
Hitachi 004, 014, 019,
034, 069, 086,
095, 099, 100,
107, 113, 157,
162, 164, 173,
176, 178, 179,
184, 188, 201,
203, 204, 207,
214, 224, 225,
238
011, 038, 064, 065,
069, 095, 107, 113,
120
023, 032, 119, 121 017, 038 115
Hwalin 124, 164
Hypson 054
Hyundai 118
IEEC 009, 058, 065, 066, 141
Ima 177
IMC 173

Project: Altec Lansing PT8051 User Guide (US Version)
21
Imperial 038
Infinity 037, 082, 167
Inkei 007
Instant Replay 067, 072
Interfunk 045
ITT 019, 020, 103, 113
Janeil 160
Jasco 048, 069
JBL 037, 082, 160,
167
078, 079
JCB 046
JCL 072
JC. Penney 047, 050, 051,
065, 100, 101,
113, 114, 131,
141, 145, 171,
175, 176, 178,
180, 184, 187,
190, 201, 202
006, 025, 047, 064,
067, 072, 088, 095
103, 109, 127, 128,
137, 141, 142
Jean 014, 057, 089,
100, 202, 204,
205, 214
JEBSEE 047, 068
Jensen 113, 176 062, 113
JVC
022, 023, 024,
067, 075, 081,
093, 107, 129,
157, 165, 166,
187, 201
016, 017, 018, 020,
025, 030, 046, 062,
087, 088, 096, 109,
113, 127, 139, 142,
151
008, 027,
031
129(DVD)
Kaisui 054 119
Kale vision 134
Kawasho 113, 176
KEC 171, 177 047
Kenwood 100, 113, 114,
176
020, 025, 030, 062,
088, 096, 109, 113,
127, 139, 142
018, 019,
028, 051
059,060,
130(DVD)
KLH 119
Kloss Novabeam 060, 109, 114,
160
KMC 178, 179, 188
Kodak 047, 072
KOKA 055, 057, 118, 144
Kolin 005, 014, 020,
024, 041, 073,
081, 121, 190,
204
KONKA 243
Krell 069
KTV 048, 113, 114,
128, 177, 178,
179, 188, 209
Kyocera 046
Legend 099
LEON 052

Project: Altec Lansing PT8051 User Guide (US Version)
22
LG 114, 156, 179,
223, 248
046 052
Lloyd 038, 107, 109, 116,
119, 120
Lloytron 178
Loewe 082
Lodgenet 063
Logik 063, 177 119
Luxman 113, 176 032
Luxor 019, 020, 037, 049
LXI 037, 057, 065,
082, 100, 101,
175, 195, 206
038, 046, 047
Macom 081, 096, 119, 120
Magnavox 037, 060, 082,
100, 109, 113,
114, 127, 131,
132, 162, 163
167, 175, 176,
178, 179
045, 047, 072, 075,
123, 137, 144
004, 005, 006, 007,
008, 037, 038, 039,
042, 046
022, 056,
069
059
Magnin 103
Majestic 063, 236
Marantz 037, 060, 082,
109, 113, 114,
125, 176, 190
025, 045, 072, 088,
109, 127, 129, 142,
144
003, 040,
069
Marta 025, 046, 047
Matsui 098,178 055, 116 069
Matsushita 045, 072
MCS 003
Megatron 100, 164, 202
MEI 048 072
Memorex 063, 100, 195 019, 020, 038, 046,
047, 066, 070, 072,
103, 107, 108, 120
024
Metz 006
MGA/Mitsubishi 005, 020, 021,
044, 090, 097,
100, 113, 114,
117, 136, 141,
175, 176, 188,
190, 206, 226,
227
014, 015, 029, 030,
049, 062, 063, 064,
087, 089, 090, 096,
100
158 025 131(DVD)
MGN Technology 103
Micro Formula 107
Midland 065, 178, 187,
236
085
Mina 157
Minolta 064, 095
Mission 069
Motorola
037, 083, 187,
206
066, 072
Montgomery Ward 066, 097
Movie Time 016
Minutz 131, 184
MTC 048, 100, 113,
114, 171, 176,
190
038, 103, 107, 120,
141

Project: Altec Lansing PT8051 User Guide (US Version)
23
MultiTech 136, 177 038, 085, 107, 119,
120, 141
Multivision 124
Myland 119, 120
NAD 057, 092, 100,
101
NEC 031, 032, 041,
061, 068, 079,
080, 100, 113,
114, 160, 175,
176, 187, 190
019, 020, 025, 026,
030, 041, 042, 046,
062, 088, 096, 109,
113, 121, 126, 127,
129, 139, 142
033
Nesco 136
Newave 089, 106, 205,
206
046
Nikko 100, 103, 114 047
Noblex 103
Nokia 019, 020, 103 188
Novavision 019, 040, 089
Nordmende 113
NSC 036, 134
NSM 069
NTC 103
OAK 033, 034, 139
Olympus 072
Omega 016
Onking 209
Onkyo 010, 011,
012, 013
Onwa 177
Optimus 092, 195, 207 019, 047, 066 019, 039,
041, 042,
043
125(DVD)
Optonica 206, 207 037
ORBIT 095
Orion 136, 177, 234 035, 055, 110, 112,
116
PACE 500 183
PACE 5000 184
PACIFIC 178
Panasonic 010, 015, 016,
017
006, 007, 008, 012 003, 019, 024 003, 020 061, 062,
112
(National) 028, 037, 050,
058, 068, 082,
083, 088, 089,
094, 108, 122,
130, 145, 159,
161, 167, 187,
247
027, 028, 031, 050,
067, 072, 112, 118,
137
114, 148, 175 121(DVD)
122
Panda 108
Pansat 094
Paragon (Zenith) 021, 024, 117
PATHER 009
PBI 107
Pentax 064, 095

Project: Altec Lansing PT8051 User Guide (US Version)
24
Philco 037, 060, 068,
082, 100, 109,
113, 114, 127,
132, 154, 157,
162, 163, 167,
176, 178, 179,
190
045, 072, 075, 123,
137
Philips 036, 037, 056,
060, 068, 082,
100, 109, 113,
114, 122, 132,
154, 156, 157,
162, 163, 167,
176, 179, 198,
215, 216
037,045,067,072
144,145,146
004, 005, 006, 007,
008, 037, 038, 039,
042, 046, 122, 152
068
(Tuner),
070
(REC)
071
(VCD)
022, 052,
069
071(DVD)
Pilco 072
Pilot 114, 171, 178 047
Pioneer 074, 092, 100,
108, 113, 123,
176, 187, 228
030, 044, 062, 064,
074, 091, 123, 139,
142
002, 022, 115,116 004, 020,
140
059, 064,
065, 098,
115,
125(DVD)
Polestar 103
Popular Mechanic 068
Portland 100, 103, 113,
176, 178, 179,
188, 190
105, 138, 139
Praxis 211
Premier 035
Priceclub 171
Primestar 093
Proline 038
Prosat 088
Protec 119
Proton 014, 041, 076,
100, 104, 113,
126, 157, 176,
178, 188, 196,
202, 204, 205,
214
006, 067 069
Prism 083, 187
Pulsar 100, 103, 236 047, 103 024, 030
Pulser 100, 103, 236
QED 069
Quarter 020
Quartz 020, 088
Quasar 050, 068, 083,
108, 146, 187
006, 072, 137 003, 020
RAMPAGE 174
Randex 047
Radio Shack 051, 065, 087,
107, 114, 148,
157, 175, 177,
178, 195, 207
037, 038, 047, 066,
070, 072, 088, 093,
097, 100, 103, 107,
120
023
Radix 047
Randtek 042, 046
RCA 047, 051, 065,
066, 068, 100,
051, 064, 066, 067,
069, 071, 072, 086,
044, 086, 114, 168, 182 029,038 058,
127(DVD)

Project: Altec Lansing PT8051 User Guide (US Version)
25
105, 113, 143,
152, 176, 180,
190, 206, 213,
222, 229, 230
094, 095, 103, 118,
120, 124, 141, 148,
149
132(DVD)
RC-AK 095
Realistic 100, 107, 114,
169, 175, 177,
178, 195, 207
019, 020, 037, 038,
046, 047, 066, 070,
072, 088, 093, 097,
100, 103, 107, 120,
137
110 038, 039,
040, 041
Regal 019, 020, 123, 133
Regency 037, 041, 123
Rembrandt 017, 134
Rhapsody 048
Ricoh 072, 083
ROTEL 047, 048
Runco 114, 171, 236 047 024
SABA 113
SAE 069
Saisho 098 101
Salora 089
Sampo 024, 041, 042,
052, 073, 086,
100, 106, 113,
114, 142, 175,
176, 178, 205,
206, 214
023, 066, 097
Samsung 070, 100, 107,
113, 114, 140,
144, 157, 167,
170, 171, 175,
176, 178, 179,
188, 189, 190,
197, 200, 214,
237, 240, 249,
250
059, 085, 086, 103,
104, 111, 115, 133,
141, 150
004, 022, 030, 098, 134 110,113
128(DVD)
Samsux 178
Sanky 066
Sansui 062, 113, 119, 122,
142
021, 035,
069, 137
Sanyo 014, 024, 025,
026, 027, 034,
035, 040, 041,
049, 051, 110,
117, 120, 168,
173, 175, 186,
195, 204, 214,
218, 231, 232,
241
019, 020, 021, 022,
068, 070, 088, 103
022, 036,
039, 055
Schaub Lorenz 113
Scientific Atlanta 013, 019, 040, 089,
112, 113, 172
Scimitsu 100
Scotch 100
Scott 100, 114, 136,
137, 148, 157,
175, 177, 178
049, 063, 079, 089,
101, 110, 112, 132,
134, 150

Project: Altec Lansing PT8051 User Guide (US Version)
26
Sears 030, 037, 051,
057, 065, 067,
100, 101, 110,
111, 113, 117,
136, 168, 171,
175, 176, 178,
179, 195, 201,
235
019, 020, 046, 047,
064, 070, 072, 088,
092, 093, 095, 117
Sega 115
SEI 045
SET 098
Sharp 009, 038, 043,
059, 087, 106,
113, 133, 157,
173, 176, 178,
179, 188, 192,
206, 207, 208
024, 037, 058, 066,
097, 100, 138
137 019, 040 111
Sherwood 007 ,023,
040, 053,
54
Shinco 107
Shintom 038, 064, 083, 084,
103, 119
Shogun 100 103
Sigma 034
Signal 016, 030
Signature 037, 063, 065,
100
017, 023
Simpson 060, 114, 132
Singer 187 047, 103, 119
Sinudyne 098
Sky Giant 063, 075, 138, 153
SL Marx 030
Sony 000, 001, 012,
013, 014, 024,
045, 046, 073,
097, 181, 198,
202, 204, 214,
232, 244, 245,
246
000, 001, 002, 003,
004, 005, 060, 072,
081, 082, 083, 084
169 000, 037,
049, 136
049, 063,
114
124(DVD)
Soundesign 100, 113, 132,
136, 176, 177
Sowa 005, 014, 024,
057, 068, 072,
073, 172, 199,
200, 204, 214
Space TV 035
Spectricon 100, 114, 177,
202
Sprucer 114, 148
Squareview 030
SSS 100, 113, 177
Standard 134
Starcom 016, 023, 130
Stargate 016, 030
Starlite 100, 177

Project: Altec Lansing PT8051 User Guide (US Version)
27
Starquest 016
STS 064 080
Sun Moon Star 181
2400
Supra 178
Supre-Macy 132, 160, 178
Supreme 046
Sylvania 037, 060, 082,
085, 100, 109,
113, 114, 127,
131, 132, 162,
163, 167, 175,
176
045, 049, 067, 072,
075, 089, 120, 123,
137
031, 032 022, 069
Symphonic 030, 136, 137,
148, 177
038, 107, 120
Synco 014, 024, 073,
198, 202, 204,
206, 214
TADA 053, 162
TADIRAN 030
Taicom 055
Tai Wah 064, 212
Tandy 065, 178, 206,
207
088, 120
Tashiko 205 046
Tatung 005, 010, 014,
020, 024, 037,
041, 057, 068,
072, 073, 083,
101, 172, 187,
199, 200, 202,
204, 214
013, 038, 062, 113,
127
134(DVD)
Tay Shoen 058, 154
Teac 038, 107, 113, 120,
127
002, 006,
014, 030,
040
Technics 050, 083, 108,
187
006, 072 003, 030
TECHNOSAT 149
TECHNOVISION 151
Techwood 050, 083, 113,
176, 187, 202
Teco 002, 014, 028,
029, 061, 077,
078, 079, 086,
091, 183, 187,
204
Tedelex 104
Teknika 037, 055, 063,
100, 103, 113,
132, 136, 157,
160, 167, 171,
176, 177, 178,
179, 188, 190,
201
038, 043, 046, 047,
072, 080, 107, 120
025
Telecaption II 136, 147, 178
Telefunken 113

Project: Altec Lansing PT8051 User Guide (US Version)
28
Telerent 063, 178
Teleview 030
Tera 014, 076, 100,
113, 176, 204,
205, 214
Texscan 029, 031, 032
Theta Digital 114
Thomson/ProScan 051, 065, 180 051, 113 126(DVD)
Thorn 113
TMK 098, 101, 113,
176
098, 103, 111, 116
Tocom 000, 001, 008, 111
Tomashi 054
Toshiba 003,010, 018,
020, 024, 041,
057, 101, 102,
147, 150, 168,
171, 172, 195,
199, 200, 201,
207, 214
009, 010, 013, 048,
049, 061, 064, 089,
093, 113, 117, 134,
150
024, 074, 078, 081, 105 024, 026 059, 064
123(DVD)
Tosonic 048
Totevision 178 046, 047, 103, 141 112
Trans PX 048, 069, 072, 075,
112, 117, 136, 179
Tri-vision 011, 109, 125 , 137
Tri-Lex 071(MPEG Card)
Triumph 098 116
Tuntex 100
Tusa 016
TV 86 030
U-MEN 187
Uniden 079
Unika 004, 006, 028
Unitech 103, 141
United Cable 130
United Satellite 077, 079
Universal 065, 131, 184 026, 027
UPMOST 155 (MPEG
Card)
Veccom 107
Vector Research 114 025, 063, 089, 109
142
Victor 067, 081, 165 063, 142, 150
Videocon 003, 018
Video Concepts 025, 100, 109, 142,
150
Videosonic 038, 103, 119, 141
Videotronic 072
Videoway 024, 108
Vidikron 037
Vidtech 100, 113, 190
Viewstar 004, 005, 006, 007,
008, 037, 038, 039,
042, 046

Project: Altec Lansing PT8051 User Guide (US Version)
29
Viking 160
Visa 115
Vortec 098
Walmart 068
Warner Amex 022
Wards 037, 051, 060,
063, 082, 087,
100, 109, 113,
114, 116, 131,
132, 136, 137,
162, 163, 175,
176, 178, 184,
190, 207
037, 038, 046, 064,
066, 070, 072, 094,
097, 100, 103, 107,
119, 120, 125, 141
Warton 081
Winer 054, 087, 090
WISO 026, 056, 145
XR-1000 038, 072, 103, 119
Yamaha 100, 113, 114,
176, 190
025, 088, 109, 113,
127, 142
005, 009,
034
Yorx 114, 175
Zenith 062, 063, 103,
219, 233, 236
047, 062, 083, 084 021, 024, 076, 082,
083, 084, 106, 117,
126, 147
080 057
Zentek 068
Zonda 202
Others 053, 054, 119,
151, 182, 185,
209, 220, 221
052, 053, 054, 055,
056, 073, 076, 077,
078
045, 047, 085, 143,
146, 159, 176, 177
072, 073,
074, 097,
100, 101

Project: Altec Lansing PT8051 User Guide (US Version)
30
Troubleshooting
Symptom Possible Problem Solution
One or both power cords are not
connected or the main or rear
surround units have not been
turned on.
Plug the PT8051’s AC cords into
a suitable AC outlet. Then, turn
on the PT8051 by pushing the
on/off switch in the rear of the
unit for both the main and rear
surround units..
Power switch on the back panel is
not turned on for one or both
units.
Turn it on.
No power.
A safety mechanism powered
down the PT8051.
Unplug the PT8051 from the AC
outlet briefly and then plug it in
again so it will reset itself.
The volume is set too low. The “+ / -” buttons on the top of
the PT8051 remote are the master
volume controls. Press and hold
the “+” button to increase the
volume.
Loose or no cable connections on
the PT8051 or source equipment.
Check that the cables are
correctly and firmly seated on
both the PT8051 and the source
equipment.
No sound comes from the
PT8051.
MUTE is on. Be sure mute function is not
activated.
Video cable is loose or not
connected.
Check that the video cable is
connected and properly seated at
both the PT8051 VIDEO
OUTPUT and the TV input.
No On Screen Display.
The wrong input is selected on
the TV.
Select the correct input on the
TV, the one that corresponds to
where the VIDEO OUT cable
from the PT8051 is connected.
No sound is coming from the rear
surround unit.
Power switch on the back panel is
not turned on for one or both
units.
Turn it on.
There is no surround information
on the DVD soundtrack.
It is normal not to have surround
sound information present at all
times.
The REAR +/- level is set too
low.
Increase the REAR +/- level by
using the remote control.

Project: Altec Lansing PT8051 User Guide (US Version)
31
Specifications
Power Supply Rating ..................................................................................120 VAC / 60 Hz
Power Consumption ..........................................25W (Main Unit) 20W (Rear Surround Unit
Signal-to-Noise Ratio.............................................................................(A-weighted) >75dB
Dimensions (W x H x D) ............................. 40” x 6-3/4” x 6” (1016mm x 170mm x 152mm)
22” x 6-3/4” x 6” (560mm x 170mm x 152mm) (Rear Surround Unit)
Weight...................................................................................... 18.1 lbs. (8.2 kg) (Main Unit)
9.8 lbs. (4.4 kg.) (Rear Surround Unit)
Output Power................................................ 75 Watts (3 x 25) Continuous Average Power
Drivers ..............Three NXT Digital 2” x 8“ (50mm x 200mm) Flat Panel Drivers(Main Unit)
2” x 4“ (50mm x 100mm) (Rear Surround Unit)
Digital Audio Inputs......................................................................Two Optical / One Coaxial
Analog Audio Inputs ............................................................................................. Stereo x 3
Analog Audio Outputs.....................................................................................Subwoofer x 1
Video Output...................................................................................................Composite x 1
Frequency response.......................................................................... 70 Hz -20 kHz +/- 3dB
Wireless Transmission Frequency ...........................................................................2.4 GHz
Wireless Transmission Range (Maximum)......................................... 40 Feet (12.2 Meters)
Specifications are subject to change without notice.
Trademark of New Transducers Limited.
FCC statement
Formatted
Formatted
Deleted: 
Deleted: 

Project: Altec Lansing PT8051 User Guide (US Version)
32
This equipment has been tested and found to comply with the limits for a Class B digital device, pursuant
to Part 15 of the FCC Rules. These limits are designed to provide reasonable protection against harmful
interference in a residential installation.
This equipment generates, uses and can radiate radio frequency energy and if not installed and used in
accordance with the instructions, may cause harmful interference to radio communications. However, there
is no guarantee that interference will not occur in a particular installation. If this equipment does cause
harmful interference to radio or television reception, which can be determined by turning the equipment off
and on. The user is encouraged to try to correct the interference by one of the following measures:
Reorient or relocate the receiving antenna.
Increase the separation between the equipment and receiver.
Connect the equipment into an outlet on a circuit different from that to which the receiver is
connected.
Consult the dealer or an experienced radio/TV technician for help.
To assure continued compliance, any changes or modifications not expressly approved by the party
responsible for compliance could void the user’s authority to operate this equipment. (Example- use only
shielded interface cables when connecting to computer or peripheral devices).
FCC Radiation Exposure Statement
This equipment complies with FCC RF radiation exposure limits set forth for an uncontrolled environment.
This equipment should be installed and operated with a minimum distance of 20 centimeters between the
radiator and your body.
This equipment complies with Part 15 of the FCC Rules.Operation is subject to the following two
conditions:
(1) This device may not cause harmful interference, and
(2) This device must accept any interference received, including interference that may cause undesired
operation.
This transmitter must not be co-located or operating in conjunction with any other antenna or transmitter.
The antennas used for this transmitter must be installed to provide a separation distance of at least 20 cm
from all persons and must not be co-located or operating in conjunction with any other antenna or
transmitter
Channel
This equipment marketed in USA is restricted by firmware to only operate on 2.4G channel 1-11.
Formatted
Formatted: B
u