Eastman Kodak 08001 Hand Held Remote User Manual urg 00874
Eastman Kodak Company Hand Held Remote urg 00874
Contents
- 1. Users Manual Part 1
- 2. Users Manual Part 2
- 3. Users Manual Part 3
Users Manual Part 2
Overview of the main portals
www.kodak.com/go/HDplayersupport 35
Backdrop &
Screensaver*
Backdrop Choose a backdrop from provided background images,
either as a Themed Slideshow or Single Picture (default is
Single Picture)
Screensaver Choose the type of screensaver: Picture Slideshow, Picture
Folder, or Random Photos (default is the first photo album
found)
Screensaver
Start
Choose the delay before the screensaver starts: 1, 5, 10,
15, 30, or 60 minutes (default is 10 minutes)
*Music currently playing continues while the screensaver runs. Use of the pointer remote
deactivates the screensaver. If the screensaver options are set to Photo Folder or Slideshow,
but a network connection is not available, and if local media is connected (USB storage device
or SD card, but not an EASYSHARE Camera), the contents of the local media play as a
slideshow. If there is no local media, the screensaver defaults to a built-in screensaver.
urg_00874.book Page 35 Wednesday, July 16, 2008 9:03 AM
Overview of the main portals
36 www.kodak.com/go/easysharecenter
Settings Description
Pictures Slideshow Transition
Delay
Choose between 3 and 10 seconds (default is 5
seconds)
Transition
Type
Choose from Immediate, crossfade, or corners,
(default is Immediate)
Repeat Choose On or Off to repeat your slideshows
(default is Off)
Shuffle Choose On or Off to view your pictures in random
order (default is off)
Default
Slideshow
Music
Choose music from a Playlist or Album, or choose
None to play no music during a slideshow (default
is Album)
Display Picture
Display
Choose Fit to display the entire picture, or Fill to
make the picture fill the entire screen (cropping
may occur; default is Fit)
Simplified
Folder View
Choose On to see all your picture folders on one
screen, or Off to browse folders within folders
(default is On)
urg_00874.book Page 36 Wednesday, July 16, 2008 9:03 AM
Overview of the main portals
www.kodak.com/go/HDplayersupport 37
CAUTION:
Displaying static images (such as still pictures or paused videos) on
screen for long periods of time can cause “burn in” on certain
displays. Use the screensaver to make sure that a static image is
not on the display for extended periods.
Settings Description
Gallery Username User name for your KODAK Gallery account
Password Password for your KODAK Gallery account
Country Choose your country (default is U.S.)
Auto-receive Choose Yes or No for receiving automatic notification that
Gallery albums/Picture Mail that have been shared with you
(default is Yes)
About Current firmware version, legal information
urg_00874.book Page 37 Wednesday, July 16, 2008 9:03 AM
38 www.kodak.com/go/easysharecenter
3Using the HD player
Viewing pictures and videos
NOTE:
■Only one memory card can be active at a time.
■To switch to another computer on your network, from the Home screen select
Settings > Network > Content > Content Source. Select the name of the computer
to which you want to switch, then click Done. If the source to which you want to
switch is not listed, click the Refresh button to rescan your network. You can only
select one computer at a time as a source.
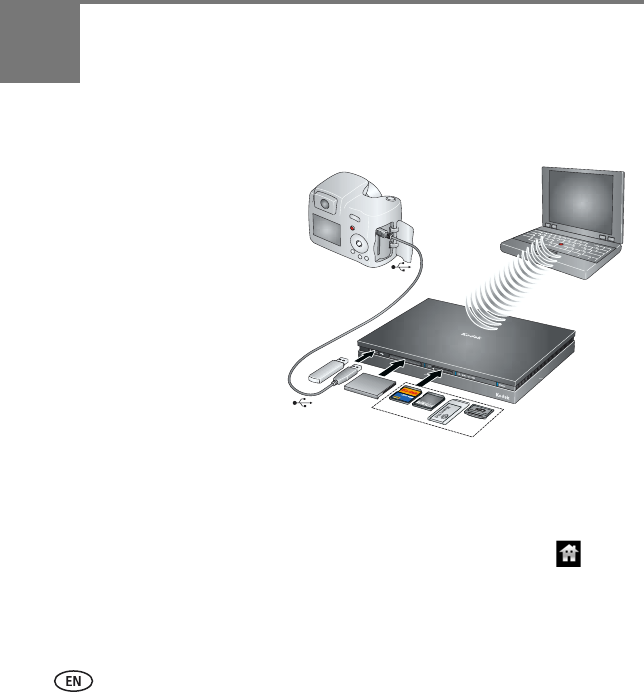
You can view pictures and videos stored
on any computer on your network.
You can also connect a USB storage
device or KODAK EASYSHARE Camera,
or insert a memory card into the built-in
card reader (see page 4 for compatible
memory cards); a slideshow
automatically plays.
urg_00874.book Page 38 Wednesday, July 16, 2008 9:03 AM
Using the HD player
www.kodak.com/go/HDplayersupport 39
■KODAK EASYSHARE Digital Display Software must be installed on each computer on
your home network in order to view the content from those computers through the
HD player.
1From the Home screen , click Pictures & Videos and choose how you’d like to
view the content—by Timeline (date), Folders, Ratings, or Slideshows.
NOTE: The Devices button appears dimmed and is unselectable until you connect an EASYSHARE
Camera, USB storage device, or memory card to the HD player.
2Click a picture, video, or slideshow to view it. (If you are viewing by folder, click a
folder to see its contents first.)
A indicates a picture is in panoramic format.
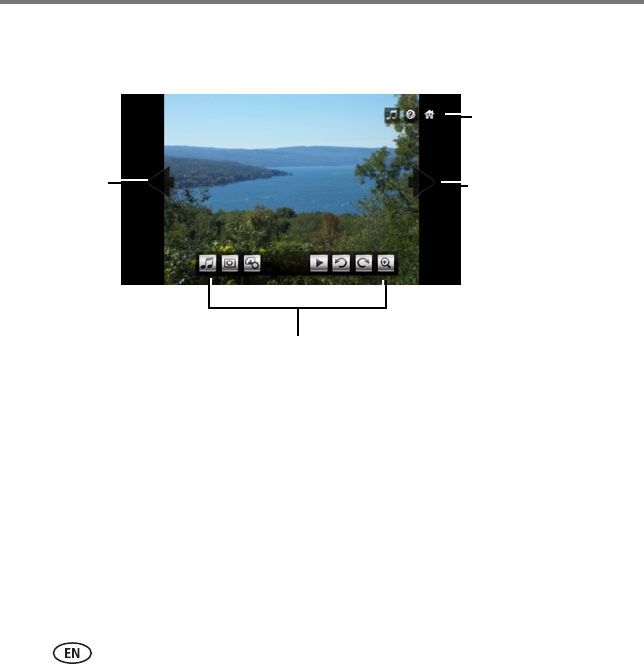
When you move the cursor as shown below, the hidden slideshow/video controls
appear. They disappear when you move the cursor away from them, or after a few
seconds of inactivity.
urg_00874.book Page 39 Wednesday, July 16, 2008 9:03 AM
Using the HD player
40 www.kodak.com/go/easysharecenter
Move the
cursor to the
left side of the
screen, and
click to go to
the previous
picture*
Move the cursor to
the upper right of
the screen, and
Music controls,
Help, and Home
buttons appear.
Move the cursor to
the right side of the
screen, and click to
go to the next
picture*
Move the cursor to the bottom of the screen, and the
slideshow or video controls appear (depending on what you
are viewing); see next section for details.
* You can also use the pointer remote’s scroll wheel to see
the previous/next picture.
urg_00874.book Page 40 Wednesday, July 16, 2008 9:03 AM
Using the HD player
www.kodak.com/go/HDplayersupport 41
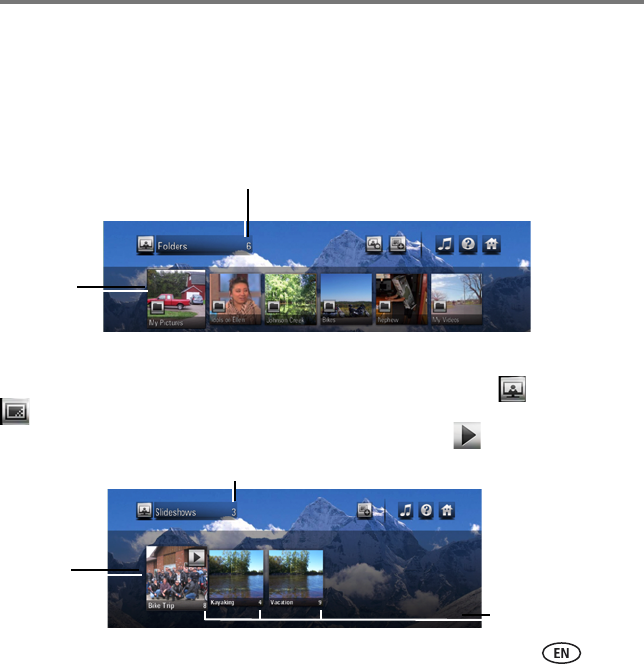
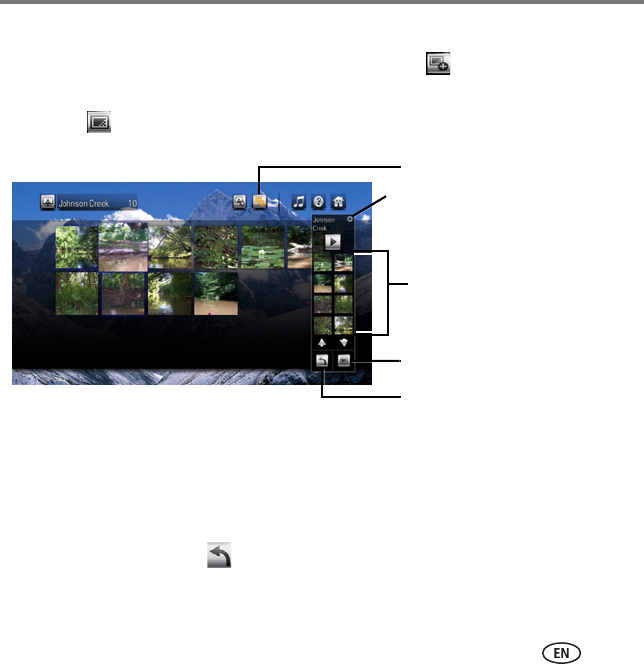
Quick Folder preview
To see a quick preview of the pictures in a folder when browsing in Timeline or Album
view, hold the cursor over one of the folder thumbnails. A slideshow begins playing in
thumbnail size, showing you the contents of that folder.
You can also see quick folder previews when browsing your KODAK Gallery content.
Quick slideshow preview
To see a quick preview of your slideshows, select Pictures & Videos > Slideshows
. Hold the cursor over one of the slideshow thumbnails. A slideshow begins playing
in thumbnail size. To play the slideshow in full size, click Play .
Total number of folders
Quick
preview
Total number of slideshows
Quick
preview
Number of
pictures in each
slideshow.
urg_00874.book Page 41 Wednesday, July 16, 2008 9:03 AM
Using the HD player
42 www.kodak.com/go/easysharecenter
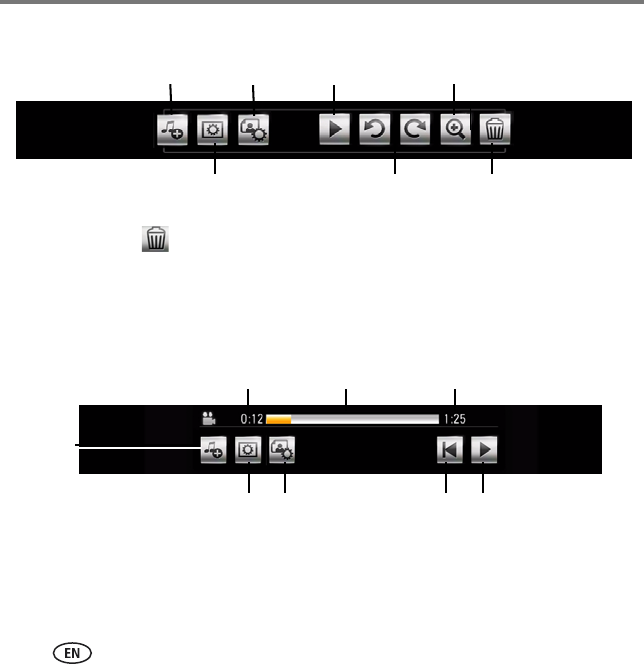
Slideshow controls
NOTE: A Delete button appears only when viewing pictures from a USB storage device or EASYSHARE
Camera, enabling you to delete pictures from those devices. You cannot delete pictures or videos that
reside on your computer.
Video controls
Add or change music Actions Play/Pause Zoom
Slideshow settings Rotate left/right Delete
Elapsed time
Add or
change
music
Progress bar Video length
Slideshow settings Play/pause
Go to StartActions
urg_00874.book Page 42 Wednesday, July 16, 2008 9:03 AM
Using the HD player
www.kodak.com/go/HDplayersupport 43
Viewing pictures from an EASYSHARE Camera or storage device
Insert a memory card, or connect an EASYSHARE Camera or USB storage device
containing pictures to the HD player. A slideshow automatically begins playing. To see
thumbnails of all the pictures, click the Back button on the pointer remote.
To access a memory card, EASYSHARE Camera, or storage device from the Home screen
:
1Select the Pictures & Videos portal .
2If you have only one device connected, click Devices to see the contents of that
device. If you have more than one device connected, click Devices , then click the
button of the device you want to access.
urg_00874.book Page 43 Wednesday, July 16, 2008 9:03 AM
Using the HD player
44 www.kodak.com/go/easysharecenter
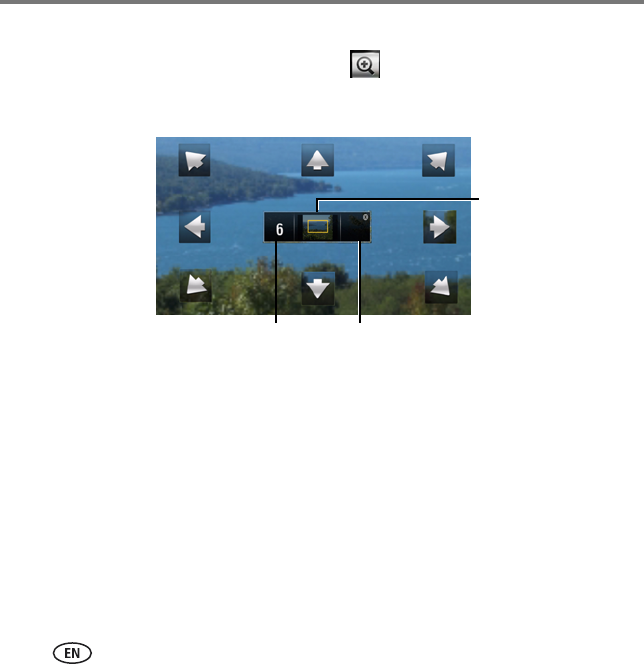
Zooming and panning
To zoom in on a picture, click the Zoom button in the Slideshow controls. To
change the zoom factor (incrementally up to 10X), use the scroll wheel on the pointer
remote. Scroll up to increase the zoom factor, and scroll down to decrease it.
Move the cursor to
a side or corner of
the screen, and
panning arrow
appears. Click the
edge or corner that
you want to bring
into view.
The arrows
disappear when
you move the
cursor away from
them.
Zoom factor—use
scroll wheel to
increase/decrease
Close Zoom and
return to 1X view
You can also pan
your picture by
clicking anywhere on
the center
thumbnail.
The yellow box
shows where you
are relative to your
picture.
urg_00874.book Page 44 Wednesday, July 16, 2008 9:03 AM
Using the HD player
www.kodak.com/go/HDplayersupport 45
Creating a slideshow
1In any picture view, click the Add to Slideshow button .
NOTE: If you previously created a slideshow, it may appear in the Slideshow tray. Click the New Slideshow
button to clear it and begin a new slideshow.
2In the dialog window that appears, click OK to accept the default slideshow name,
or click Rename to enter a name using the on-screen keyboard, then click Done.
3Browse through your pictures/videos (you can switch to different views and folders
while the Slideshow tray is open) and click the ones you want in the slideshow. They
appear in the Slideshow tray. To remove the last picture added to the Slideshow tray,
click the Remove button . (Click the Remove button multiple times to remove
more than one picture in the tray, one at a time.)
NOTE: At least one picture must be in a slideshow before it can be saved.
Add to Slideshow button
Play button
Slideshow tray
New Slideshow button
Remove last picture in tray
urg_00874.book Page 45 Wednesday, July 16, 2008 9:03 AM