Eastman Kodak 8E1587 Modular 13.56 MHz RF Tag Reader Board User Manual urg 00123
Eastman Kodak Company Modular 13.56 MHz RF Tag Reader Board urg 00123
Contents
- 1. manual 1
- 2. manual 2
- 3. manual 3
manual 3

Operation and Maintenance
June 12, 2003 5E6155 3-18
Returned cartridges are carefully inspected. Only components that meet
strict quality standards are reused. Components that do not meet the
standards are sent to recycling centers for reclamation.
This program is part of Kodak’s commitment to reduce the environmental
impact of our products.
To recycle your empty film cartridges:
1. Replace your empty film cartridges in their original packages. Return
as few or as many as you like each time. You can tape up to three
packages together and return them with a single label.
2. Apply a prepaid bar-coded shipping label to each package. Kodak
labels are free of charge.
3. Call FedEx Ground at 1-800-463-3339 (U.S. only). Mention this
program, and arrange for pickup the next working day. Include a
signed “Return Pickup Record” with the packages when they are
picked up. You will find one on the back of each shipping label.
To get your Kodak mailing labels, contact your authorized Kodak
distributor.
For additional information on the Kodak Recycling Program in the U.S. and
Canada, visit the Kodak Web Site: www.kodak.com/go/KES
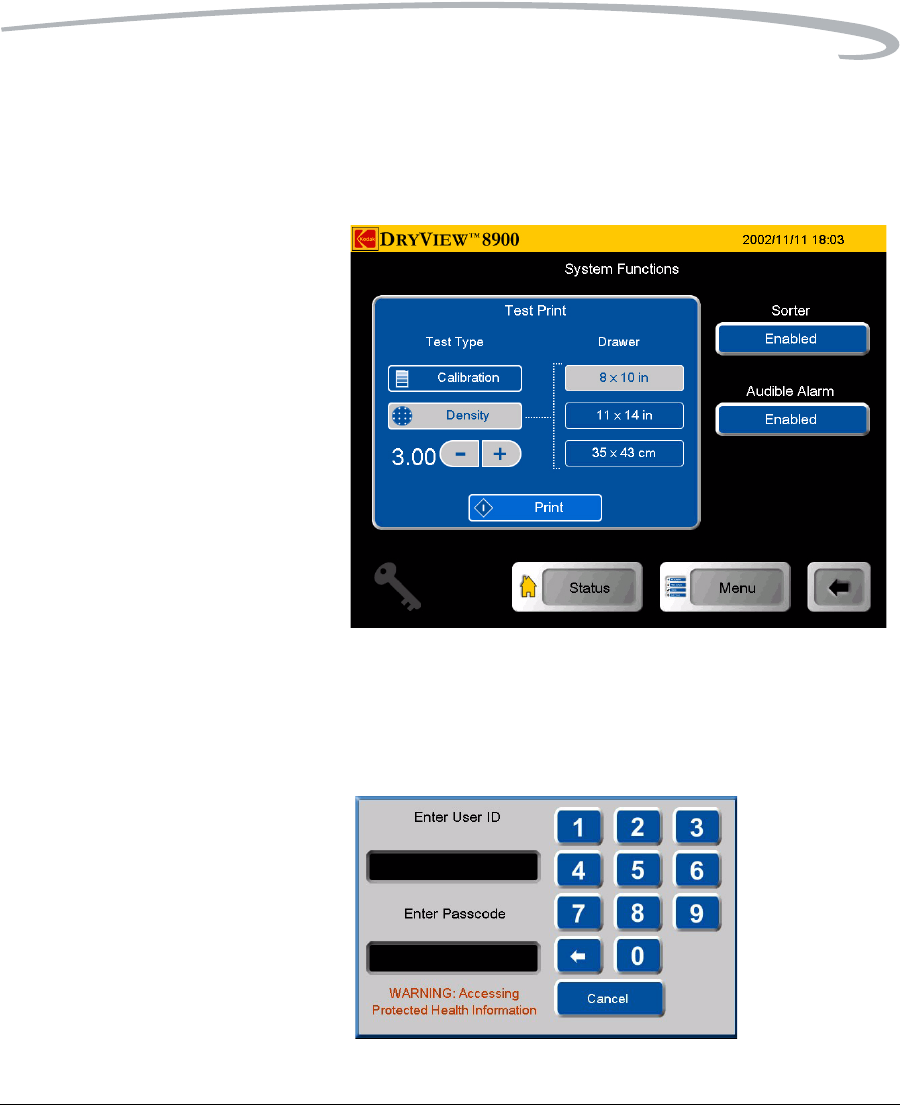
Requesting a Calibration
Test Print To request a calibration print (step wedge):
NOTE: The system will interrupt a multi-sheet print job to produce the
calibration print.
1. On the System Functions screen, touch the Calibration button.
2. Touch the desired Drawer button.
3. Touch the Print button.
Requesting a Density Test To request a Density test print:
1. On the System Functions screen, touch the Density button.
2. Touch the desired Drawer button.
3. Touch the Print button.
Automatic Image Quality
Control (AIQC) The built-in densitometer is a key component in the patented Automatic
Image Quality Control (AIQC) process. The AIQC feature allows the laser
imager to automatically monitor and adjust density, contrast, and other
FCC ID: PA48E1587 User Manual Part 3

Operation and Maintenance
June 12, 2003 5E6155 3-19
image quality parameters to ensure optimum image quality by monitoring
the density patch printed on each film.
The laser imager adjusts the parameters each time the laser imager prints a
calibration film to ensure image consistency from film-to-film and lot-to-
lot. A calibration film is printed whenever:
• AIQC detects that a new film lot number has been loaded.
• You request a calibration test from the local panel.
• A calibration has not been performed on a film cartridge for 7 days.
Operating in Manual Mode Under normal conditions, the AIQC is running to maintain consistent
image-quality parameters. If errors occur, such as calibration failure, you
will have the option to operate in manual mode until the error is corrected.
A film calibration failure is often film related. If you load a new film
cartridge, the error is usually corrected. If the error reoccurs with a new
film cartridge, call for support (see “Calling for Support” on page 4-25).
Until the condition is corrected, you can run the laser imager in manual
mode, without AIQC.
Operator Maintenance
Cleaning the Laser Imager Clean the outside surfaces of the laser imager as necessary. Use a soft cloth
with warm water and mild soap.
CAUTION:
Do not use isopropyl alcohol to clean the exterior surfaces
of the laser imager. Isopropyl alcohol can dissolve the
exterior paint on the laser imager.
Installing New Charcoal
Filters Two charcoal filters are in a filter holder that is mounted on the back of the
laser imager.
Install new filters after every 20,000 film cycles.
NOTE: Kodak Field Engineers routinely install new filters during the
20,000 film cycle Preventive Maintenance procedure. You only
need to change filters if you do not have a Kodak Preventive
Maintenance Plan.
CAUTION:
Filters are considered to be non-hazardous waste by the US
Operation and Maintenance
June 12, 2003 5E6155 3-20
EPA Resource Recovery Act. Under RCRA, you may dispose of
the filters in a landfill or incinerator with energy recovery in
a municipal, commercial or industrial facility. Contact your
state or local government to determine if additional
disposal requirements apply.
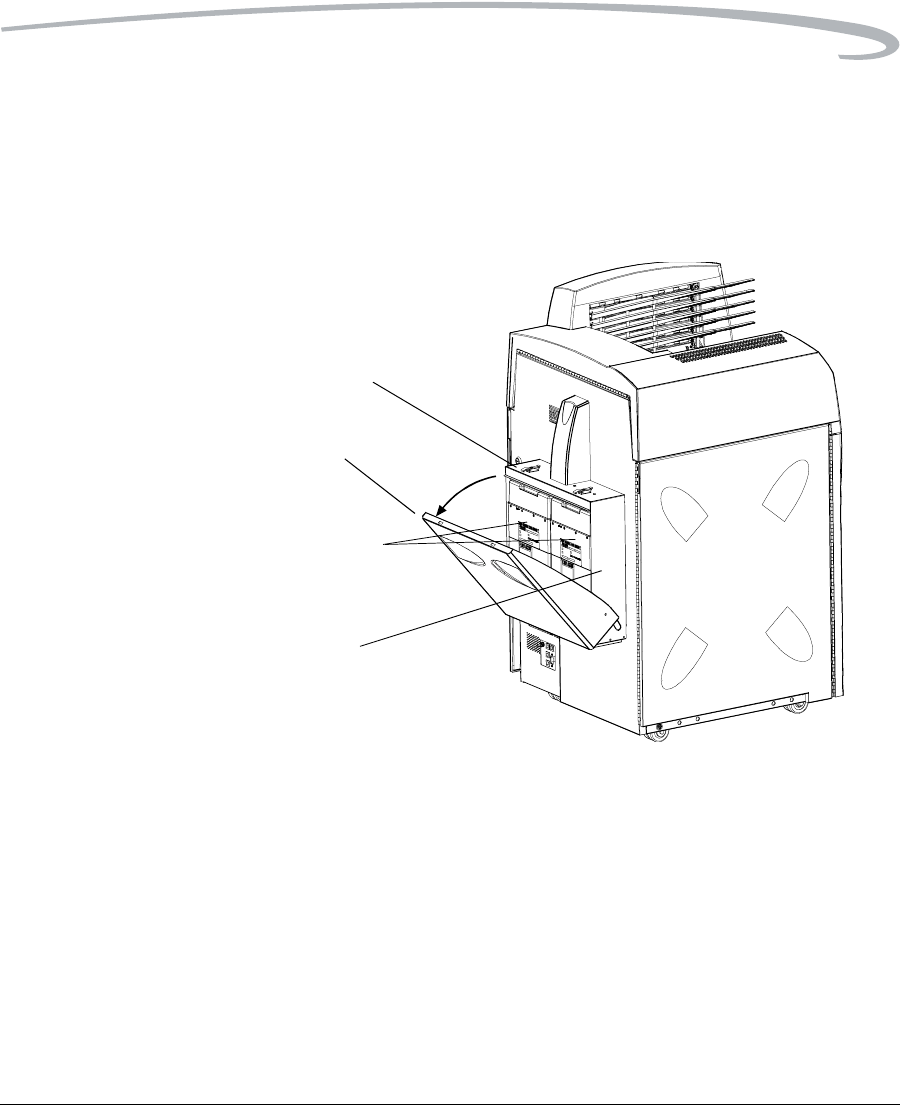
Replacing the Charcoal Filters
To install new filters:
1. Open the 2 latches and pull the filter holder forward.
2. Remove the two used charcoal filters.
3. Vacuum the filter holder, if necessary.
4. Record on the label of each of the new filters:
• Cycle count
•Date
5. Install the two new filters.
6. Close the filter holder and the 2 latches.
Filter
holder
Charcoal
filters
Filter
cover
Latches

Operation and Maintenance
June 12, 2003 5E6155 3-21
7. Discard the 2 used filters.
Preventive Maintenance To maintain optimum performance from the laser imager, Kodak
recommends that preventive maintenance is completed by a Kodak
authorized Service Provider after every 20,000 film cycles.
The Status screen displays a “Preventive Maintenance” icon when the film
count reaches 20,000 sheets of film. You can also monitor the “Prints to
PM” line on the System Information screen.
Preventive Maintenance includes:
• Installation of new charcoal filters
• Image assembly cleaning
• Film processor cleaning
Call Service to schedule preventive maintenance (see “Calling for Support”
on page 4-25).
Operation and Maintenance
June 12, 2003 5E6155 3-22
Key Operator Information
A Key Op icon appears on every screen where Key Operator access is
possible. This icon indicates when the Key Operator level is active. When
active, the icon is hightlighted.
Key Operator access remains until any of the following conditions occurs:
• The system times out (xx minutes) and returns to the Status screen.
• You use the Key Op icon to cancel the access level.
Up to 10 Key Operator accounts are allowed. Accounts are identified by a
number between 1 and 10.
Passcodes are determined by the customer and activated by Kodak
Authorized Service Providers.
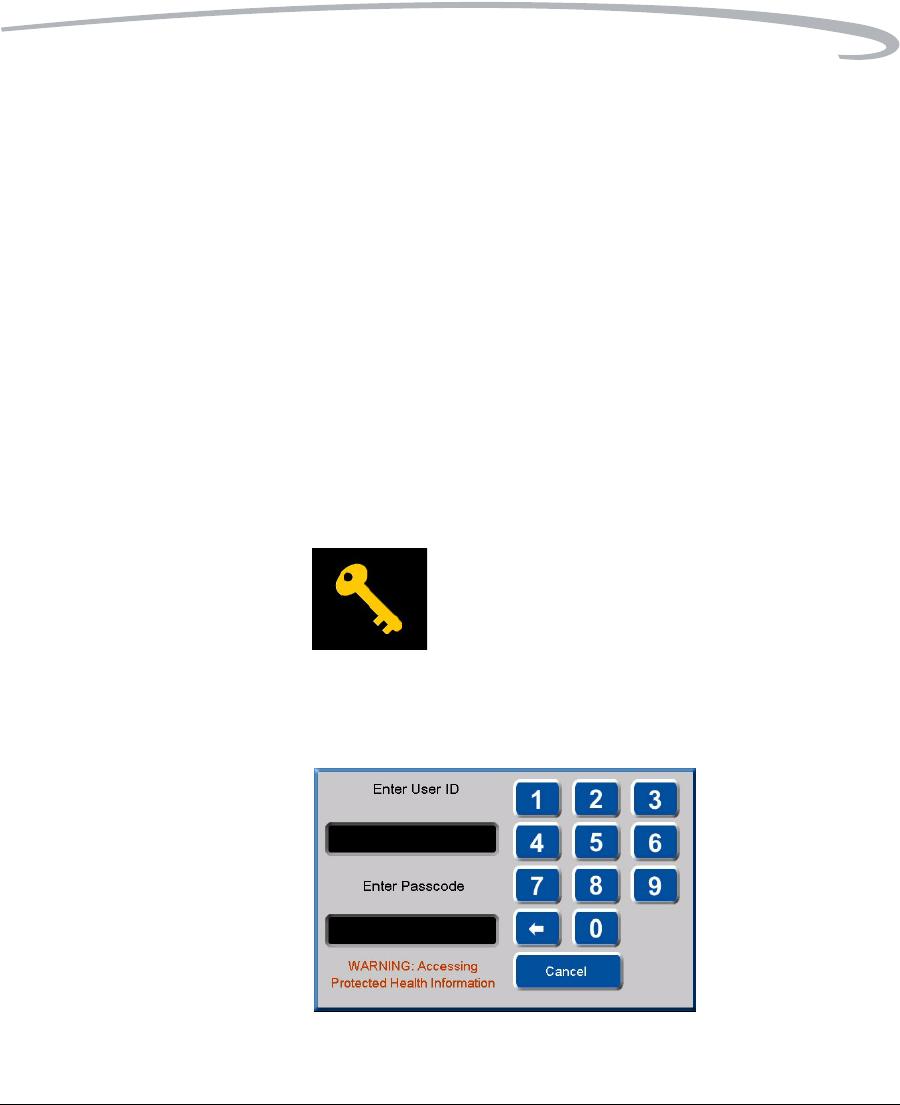
Key Operator Passcode To access the Key Operator Login screen, touch the Key Op icon or
select a screen that requires Key Operator access.
To enter your passcode:
1. Touch the Key Op icon on the local panel. The Key Op Login screen
appears.
2. Enter your ID and touch the Enter Passcode box.
Operation and Maintenance
June 12, 2003 5E6155 3-23
3. Enter your passcode. Touch OK.
When the Key Op access is activated, the icon appears highlighted.
Key Op access deactivates if the laser imager times out and returns to the
Status screen or if you cancel the access level.
To deactivate Key Op access:
• Touch the Key Op icon.
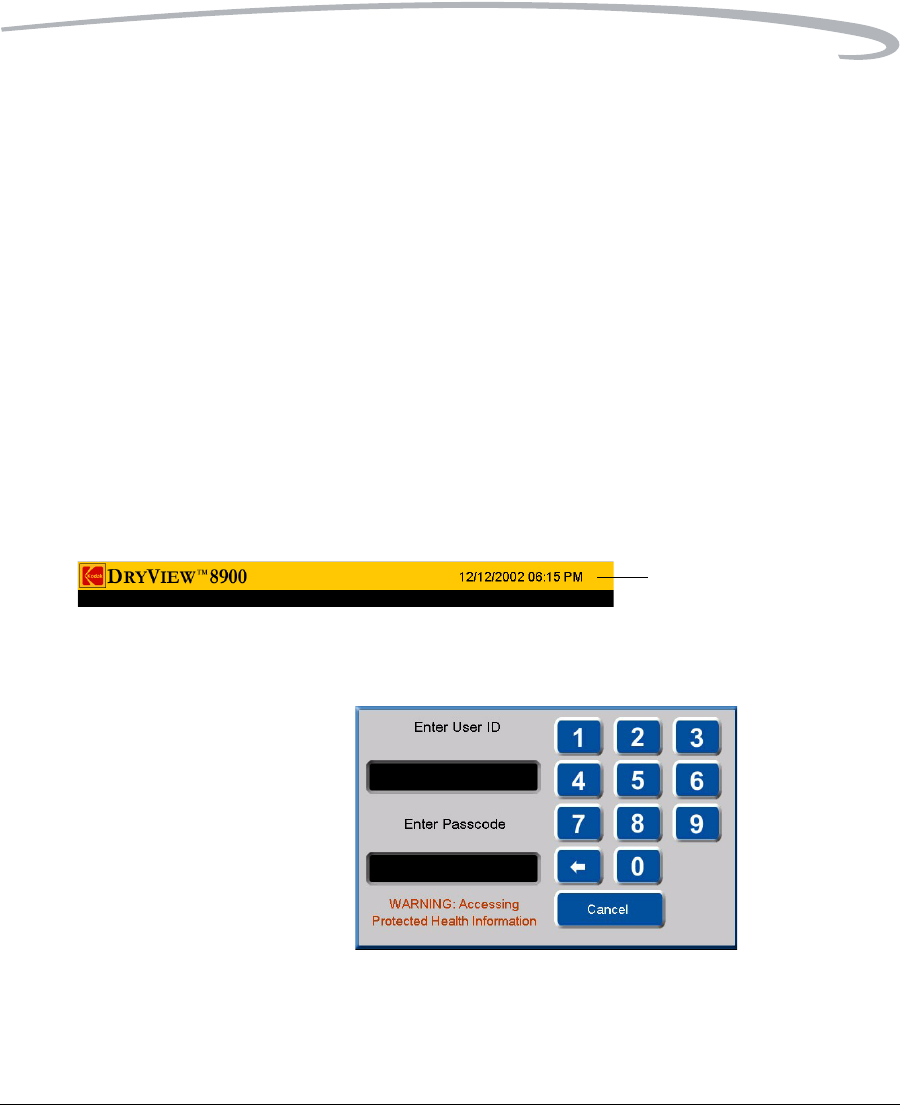
Setting Time and Date The time and date appears in the right side of the title bar.
Key Operators have the ability to set the time, time format, and date format.
• Formats for time include AM/PM or 24-hour (military).
• Formats for date include
– MM_DD_YYYY
– DD_MM_YYYY
– YYYY_MM_DD
To change the time and time format or date format:
1. Touch the time and date display on the title bar. The Key OP Login
screen appears.
2. Enter your ID and touch the Enter Passcode box.
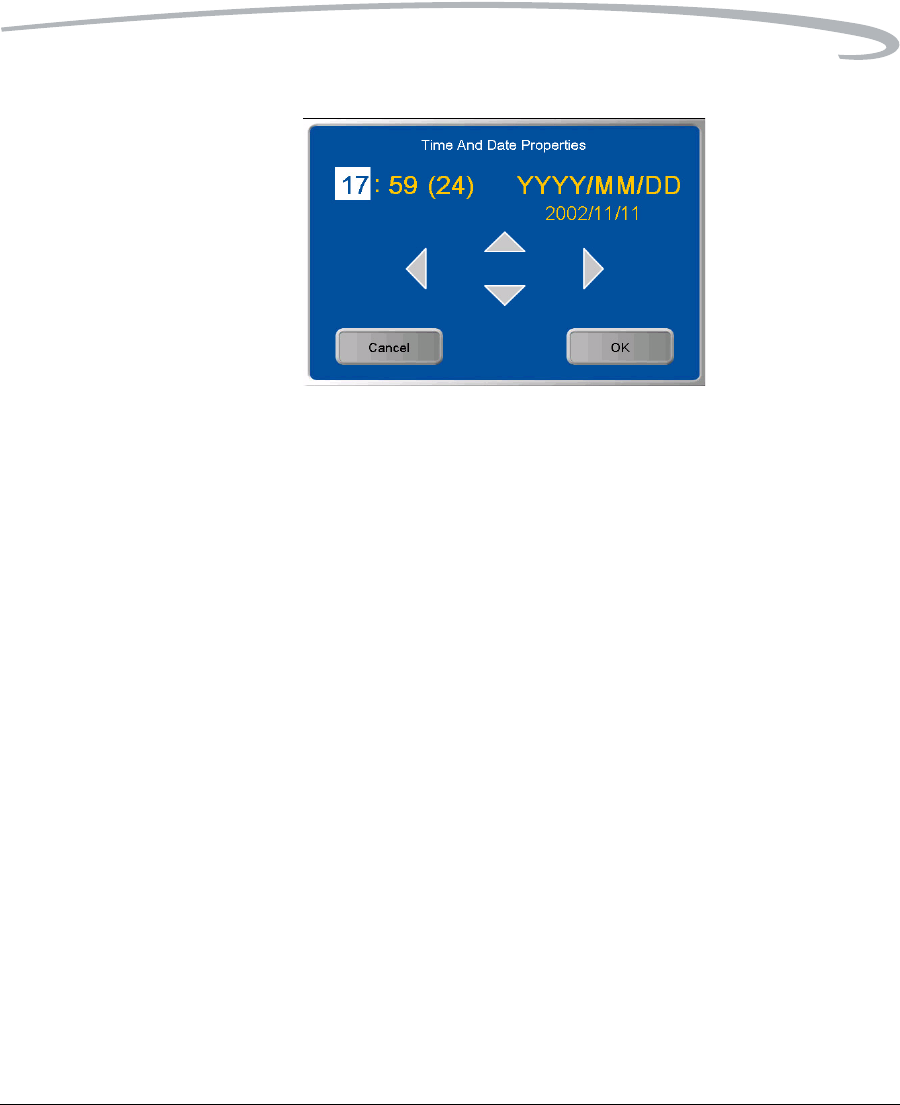
3. Enter your passcode. Touch OK. The Time and Date Properties
screen appears.
Date and time display
Operation and Maintenance
June 12, 2003 5E6155 3-24
4. Use the left and right arrows to navigate to your desired time or date
value.
5. Use the up and down arrows to change the time or date values.
6. Touch OK.
Operation and Maintenance
June 12, 2003 5E6155 3-25
Audible Alarm (On/Off) An audible alarm alerts operators when an error message or notice
appears on the local panel. Key Operators have the ability to disable or
enable the audible alarm function.
To enable or disable the audible alarm:
1. At the Main Menu screen, touch the System Function button.
2. At the System Functions screen, touch the Audible Alarm button.
The Key OP Login screen appears.
3. Enter your ID and touch the Enter Passcode box.
Operation and Maintenance
June 12, 2003 5E6155 3-26
4. Enter your passcode. Touch OK.
5. At the System Function screen, touch the Audible Alarm button.
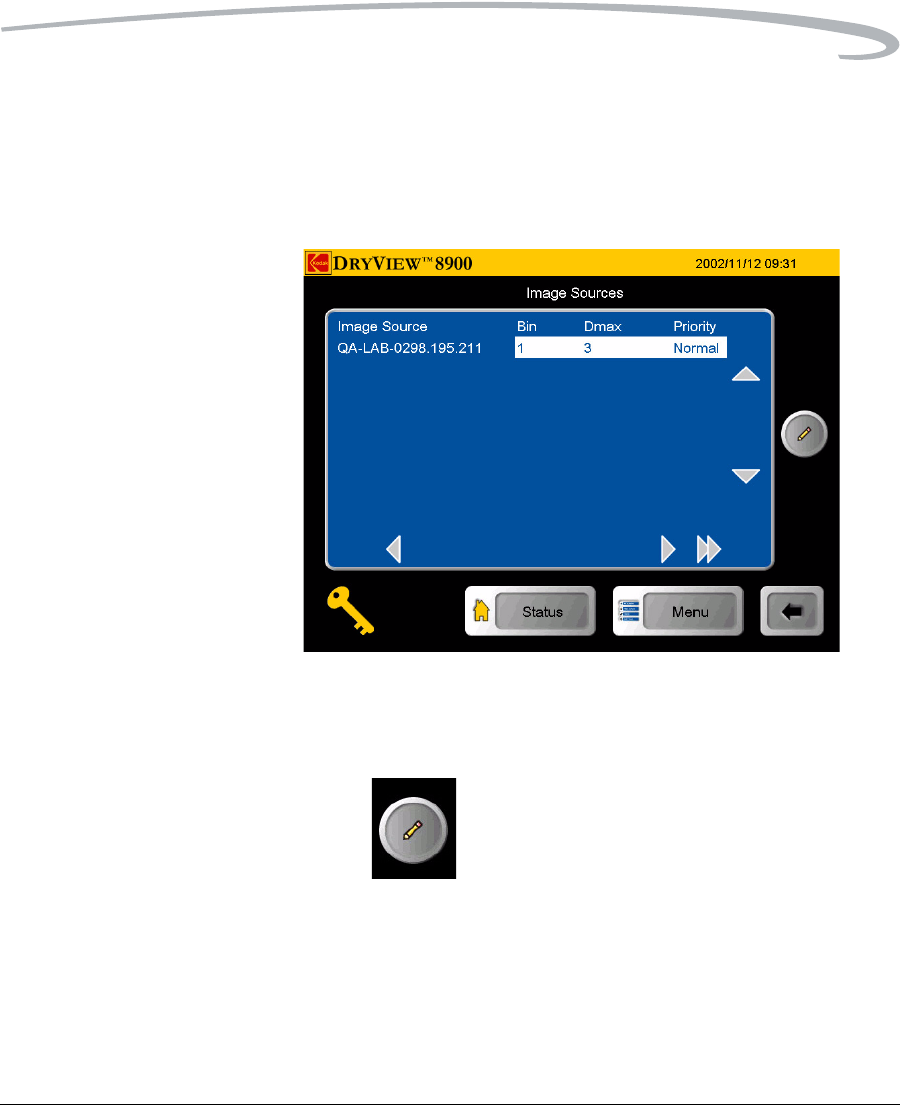
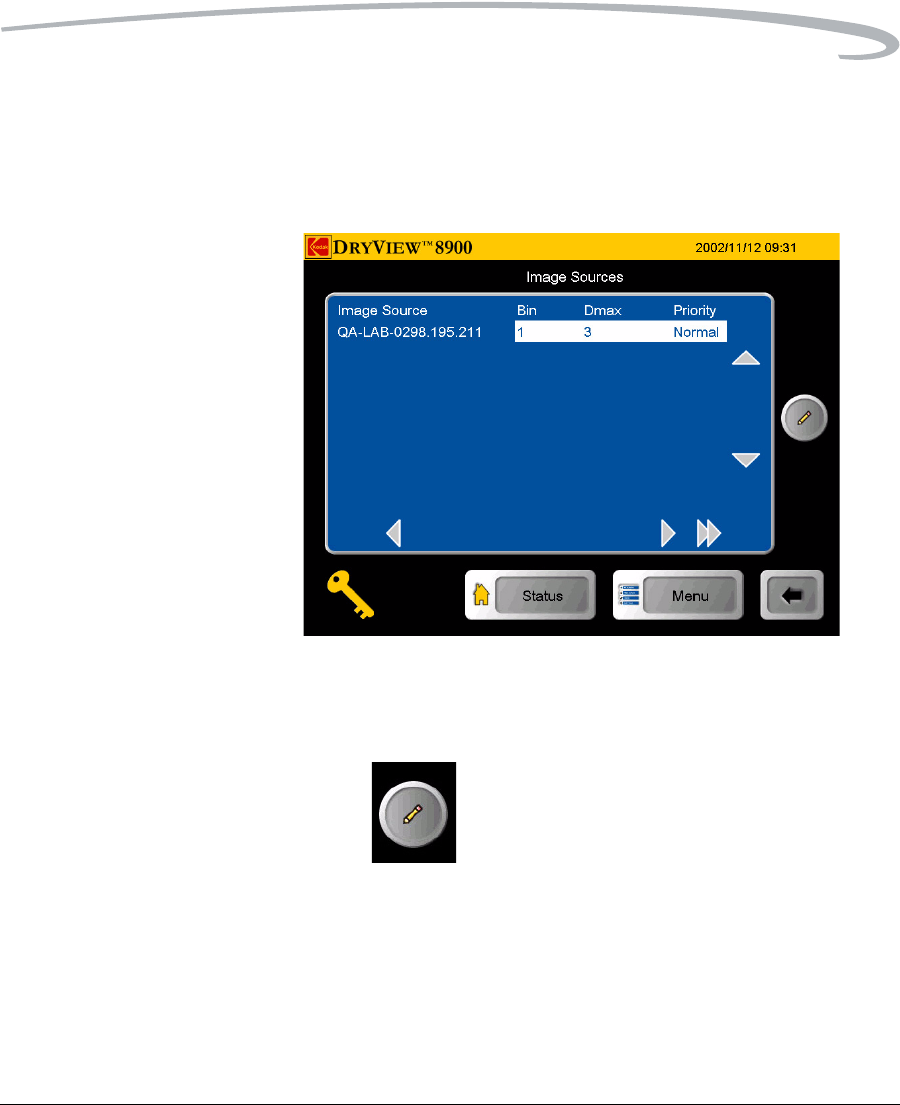
Selecting Bins Key Operators have the ability to select bins for each available modality.
To assign a modality to a bin:
1. At the Image Sources screen, use the up and down arrow icons to
select a modality.
2. Touch the Edit button. The Key Op Login screen appears.
Operation and Maintenance
June 12, 2003 5E6155 3-27
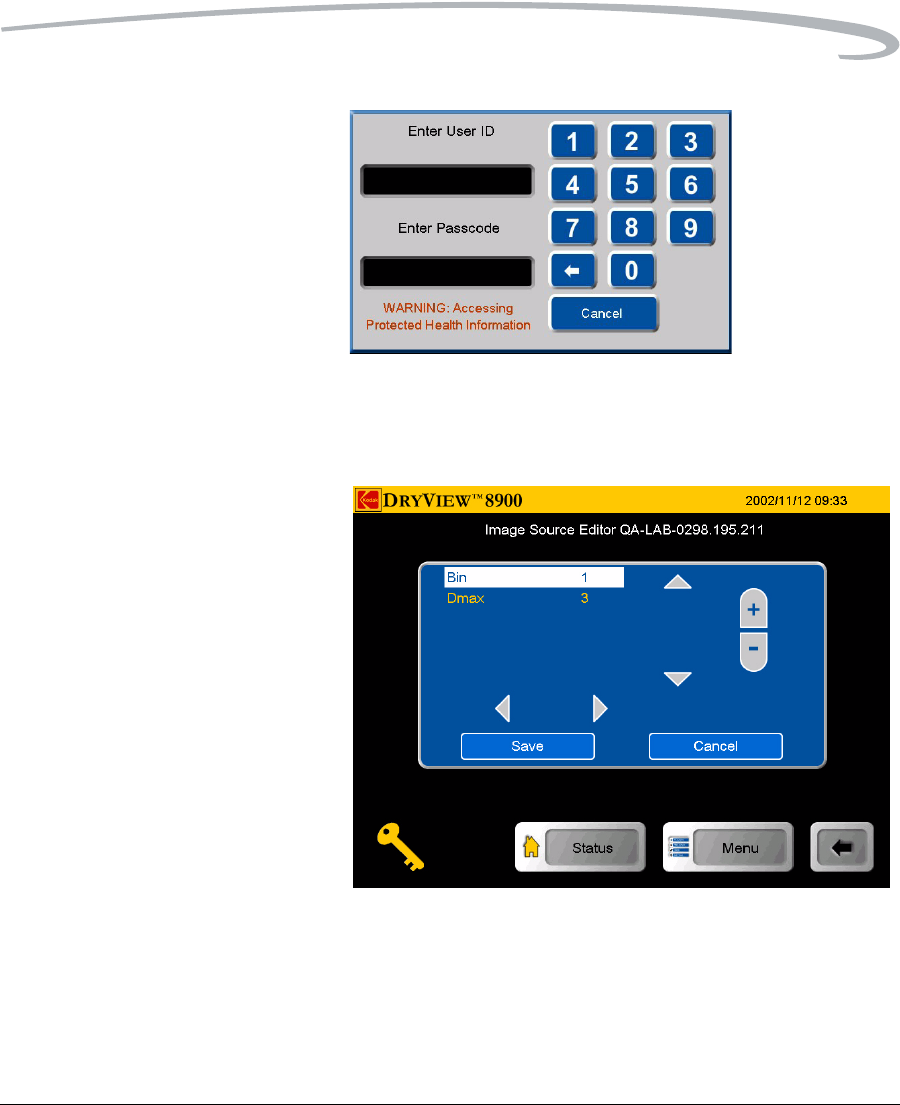
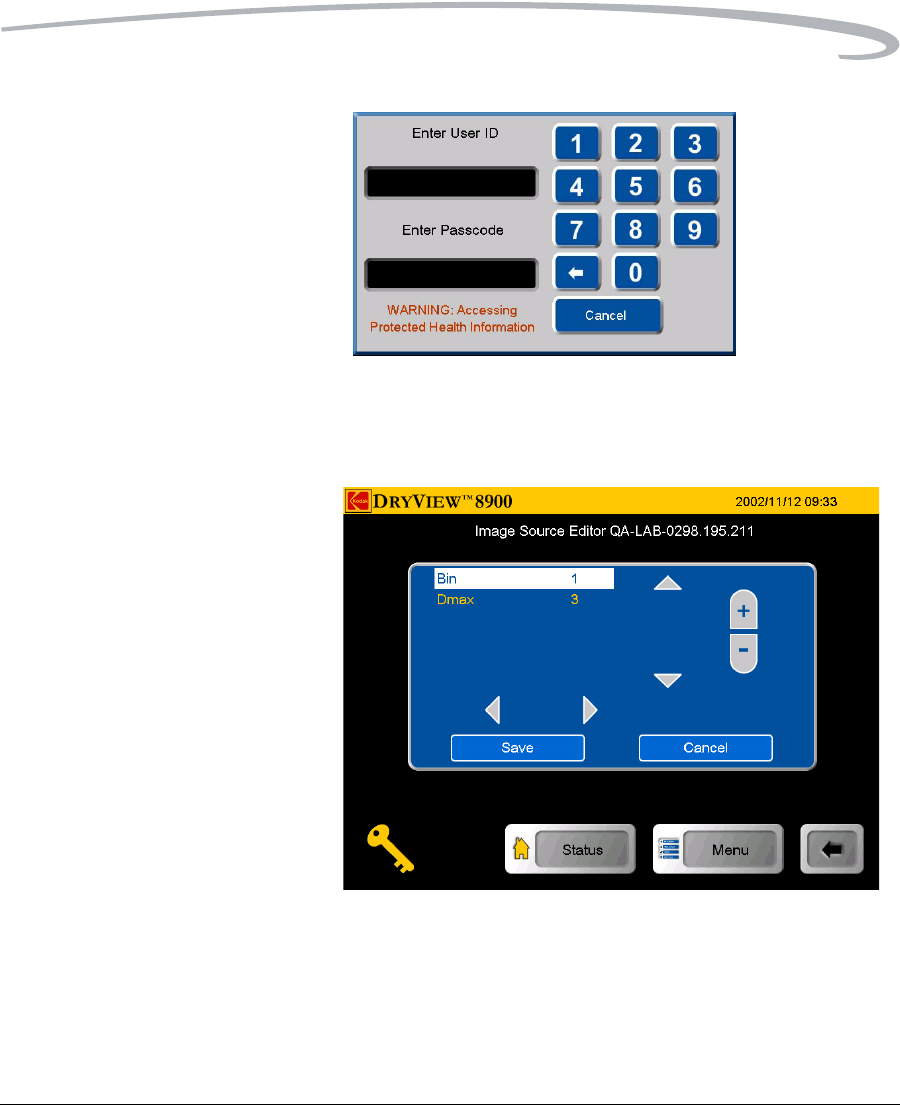
3. Enter your ID and touch the Enter Passcode box.
4. Enter your passcode. Touch OK. The Image Source Editor screen
appears.
5. Touch the up or down navigation icons to hightlight Bin.
6. Touch the + or - icon to select your desired bin.
7. Touch the Save icon.
Operation and Maintenance
June 12, 2003 5E6155 3-28
Changing Dmax Key Operators have the ability to change the Dmax value for each for each
available modality.
To change a Dmax value:
NOTE: Modality settings may override these settings.
1. At the Image Sources screen, use the up and down arrows to select
a modality.
2. At the Image Sources screen, touch the Edit button. The Key Op
Login screen appears.
Operation and Maintenance
June 12, 2003 5E6155 3-29
3. Enter your ID and touch the Enter Passcode box.
4. Enter your passcode and touch OK. The Image Source Editor
screen appears.
5. Use the up and down arrow icons to hightlight Dmax.
6. Touch the + or - icon to select your desired Dmax value.
7. Touch the Save icon.
Operation and Maintenance
June 12, 2003 5E6155 3-30
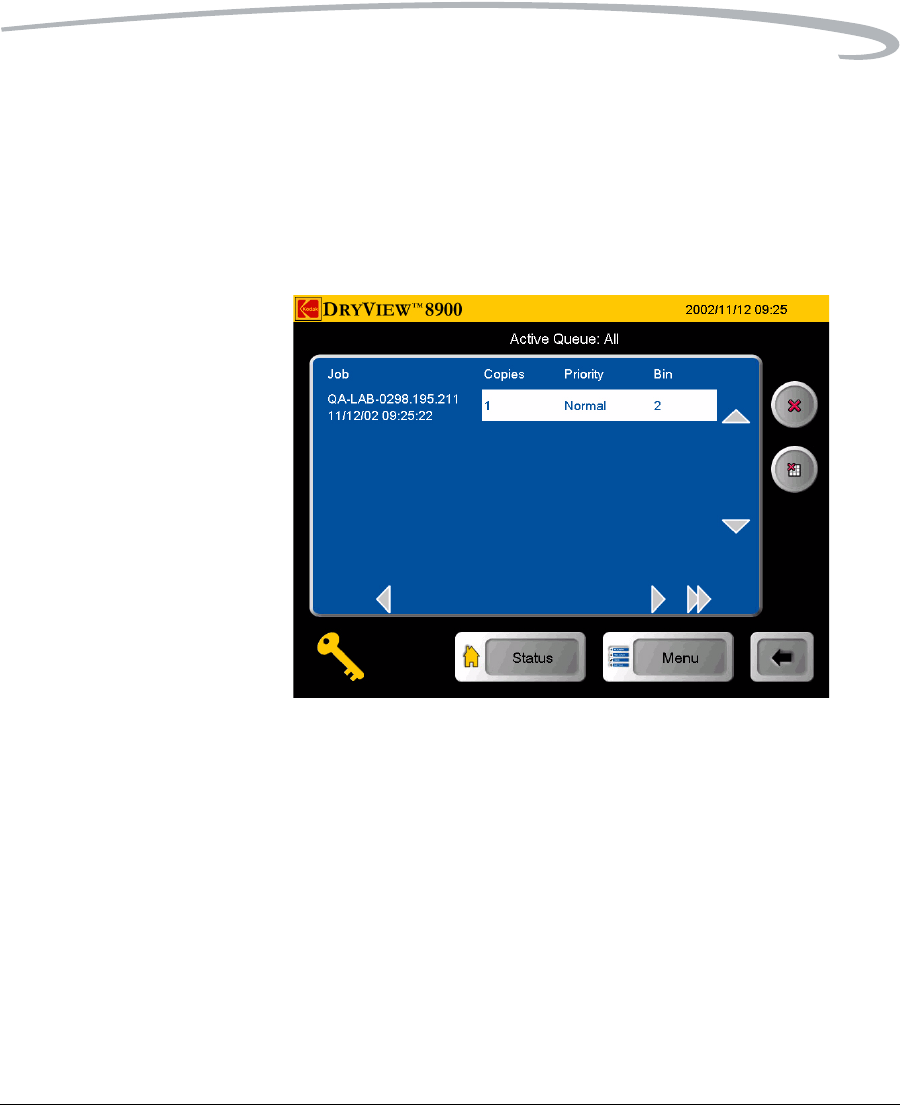
Deleting Print Jobs Key Operators have the ability to delete one or all print jobs in the print
queue.
To delete a print job or all jobs in the queue:
1. At the Job Management screen, use the up and down arrow icons to
select Active, No Media or Undelivered - print queue.
2. Touch the View List button. The Selected Queue: screen appears.
3. Use the up or down arrow icons to navigate to your desired print job.
NOTE: Jobs can be deleted from the active queue as long as the delivery
of that job has not started. After selecting a job(s) to delete from
the Active Queue screen, there is no indication of deletion until
the jobs which are currently printing are completed. When the
current job is finished printing, the Status screen and Job
Management screens show the selected jobs have been
deleted.
Operation and Maintenance
June 12, 2003 5E6155 3-31
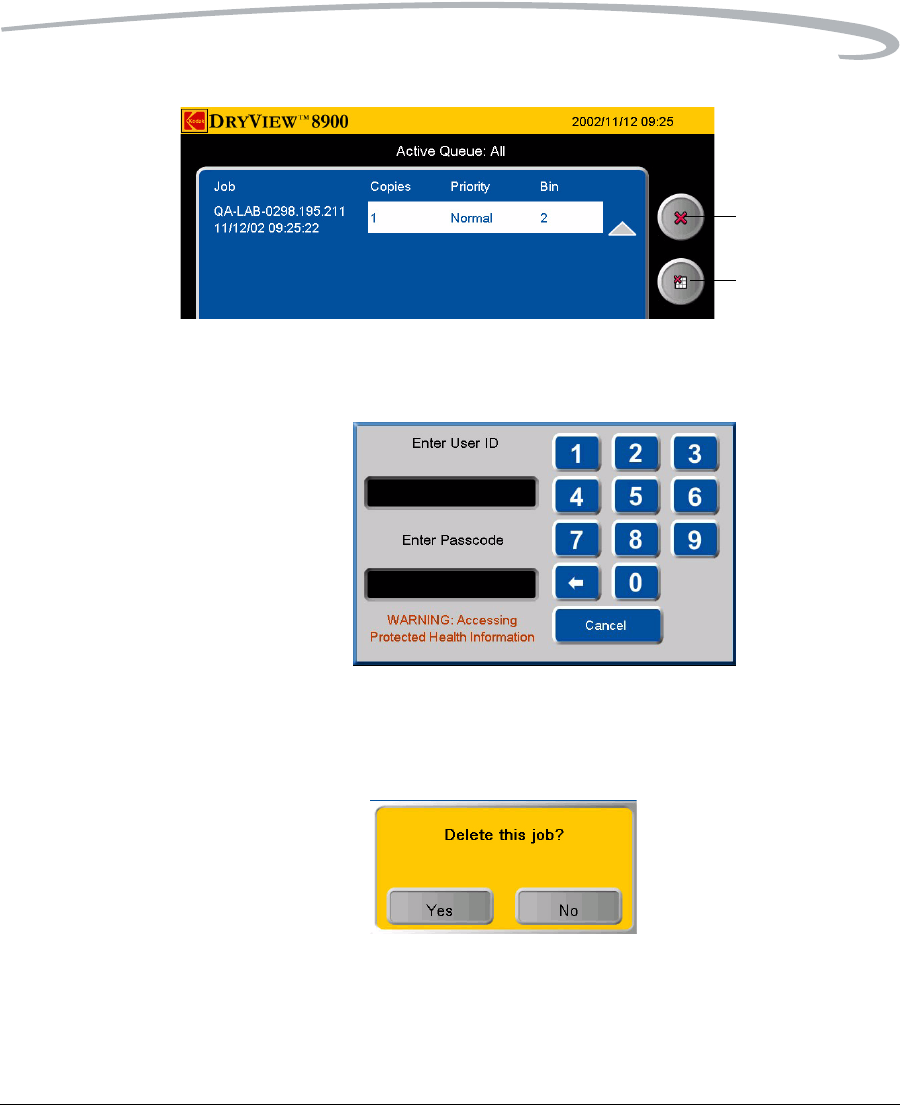
4. Touch the Delete icon or the Delete all Jobs icon. The Key Op
Login screen appears.
5. Enter your ID and touch the Enter Passcode box.
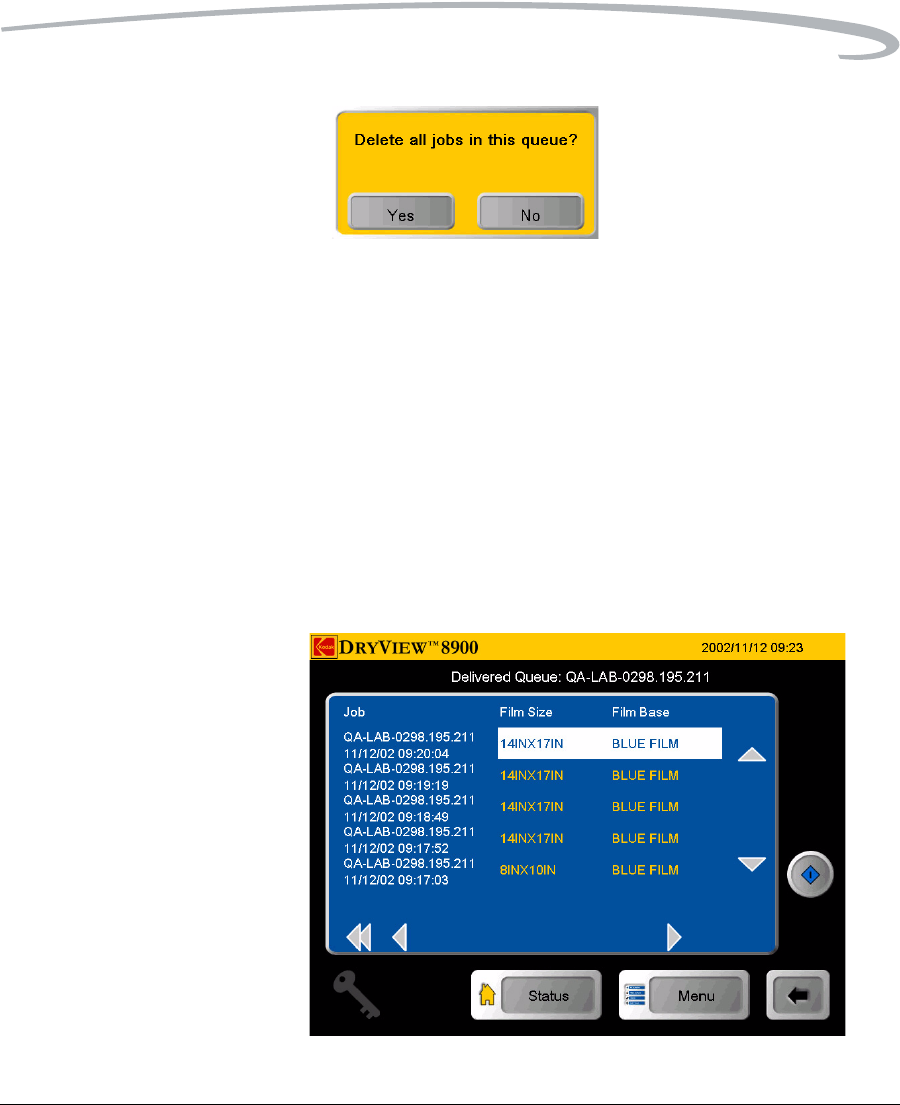
6. Enter your passcode and touch OK. The Delete this job or the
Delete all jobs in the queue pop up menu appears.
Delete job
Delete all jobs
Operation and Maintenance
June 12, 2003 5E6155 3-32
7. Touch Yes.
Reprinting Print Jobs Key Operators have the ability to reprint completed print jobs.
To reprint a print job:
NOTE: The reprint capability of the laser imager enables Levels 2, 3, and
4 operators to command reprinting of images that may contain
patient-identifiable data. Therefore, operation of the laser imager
by operators at these levels is controlled by a login procedure that
can assist operators in meeting requirements to control access to
such information.
1. At the Job Management screen, use the up and down arrow icons to
select Delivered.
2. Touch the View List button. The Delivered Queue: screen appears.
3. Use the up or down arrows to navigate to your desired print job.

Operation and Maintenance
June 12, 2003 5E6155 3-33
4. Touch the Reprint icon. The Key Op Login screen appears.
5. Enter your ID and touch the Enter Passcode box.
6. Enter your passcode and touch OK. The Print Requested pop up
menu appears.
7. Touch OK.
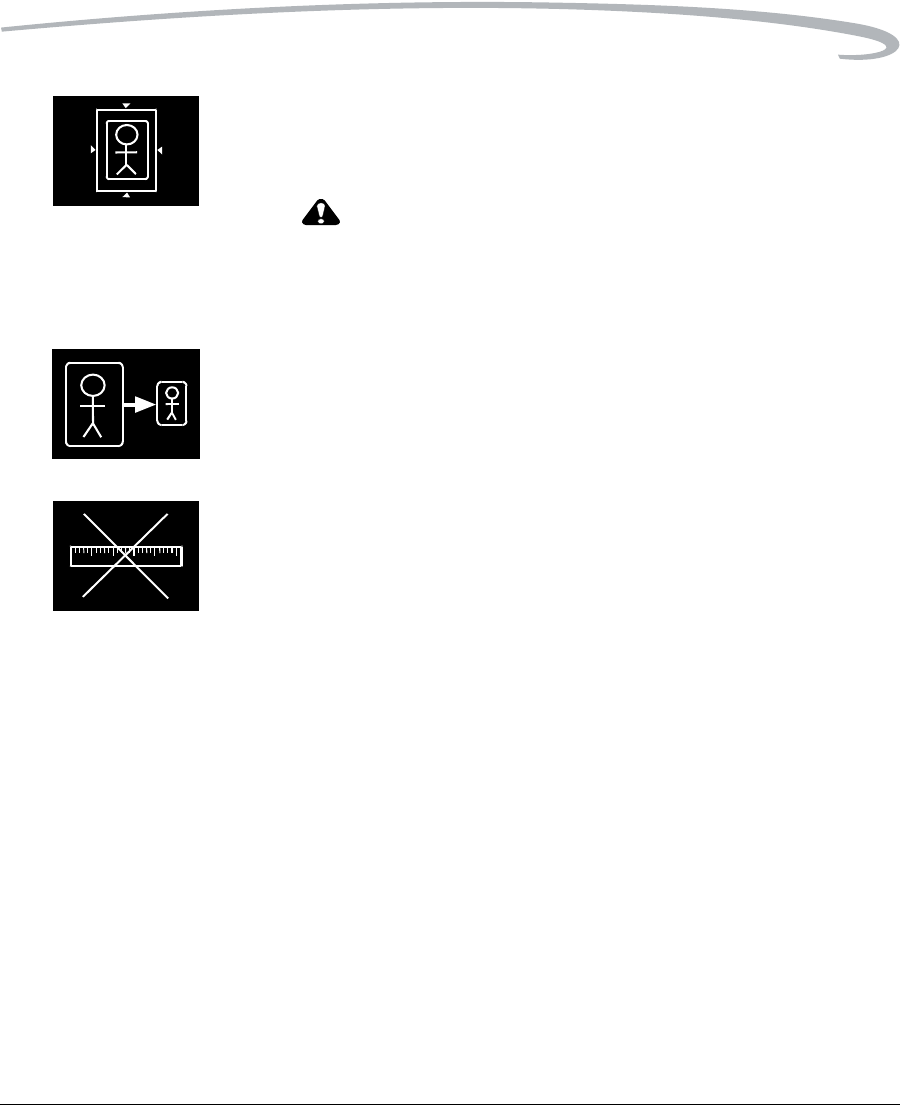
Image Resizing Icons If an image has been resized or cropped, an icon appears on the bottom
corner of the film. There are three types of icons that appear.
Operation and Maintenance
June 12, 2003 5E6155 3-34
•Crop. The image perimeter is removed to allow the image to fit on the
film and print at the same scale as the anatomical area of interest.
An image might be cropped if it is too large to print on the selected film
size, and the size of the area of interest is important to retain.
CAUTION:
If anatomical areas of interest are near an outer edge of the
image, they might be removed from the image when it is
printed.
•Minify. The image file is reduced by the removal of pixel data.
An image might be minified if the image size is larger than the media in
the imager. For example, a computer radiography (CR) image is
requested to print 35 x 43 cm at the imager with 8x10 in. (20.32x25.4
cm) film selected. The image is minified and printed.
•Scale. The image file is reduced in scale.
An image file is reduced in scale if it is sent from an image source with a
requested image size that is not supported by the imager. The full image
is printed, but the size of the image is reduced to allow it to print on the
media size that is closest to the requested size.

June 12, 2003 5E6155 4-1
4
Troubleshooting
Status, Error Messages, and Notifications
Occasionally, you may have to correct minor problems. If more serious
malfunctions occur, you must contact a trained Kodak Authorized Service
Provider. See “Calling for Support” on page 4-25 for more information.
To determine the operator action required, you should monitor imager
operation and note the imager status and error messages.
Local Panel Status
Messages The local panel Status screen displays messages to provide information on
the overall status and activities of the laser imager. The Status screen also
displays more detailed information on each film drawer.
Main Status Screen Details
Self Test Occurs when the power is first applied
to the machine control system.
Ready The printer is online and the processor
has reach operating temperature.
Warning = xx The processor is currently warming. xx
represents the number of minutes
estimated until ready.
Stopped An error has occurred that prevents
printing.
Printing The imager is currently printing.
Door Open The front or back door is open.
Hood Open The hood is open.
Printer Offline Printing has been suspended.
Service Mode On The Service Override switch is enabled.

4-2 5E6155 June 12, 2003
Troubleshooting
Local Panel Error
Messages or Notices The following table lists the error messages displayed on the local panel.
When an error message is displayed, perform the operator action listed in
the table for that message.
When an error message occurs, an audible alarm will sound.
To silence the audible alarm:
Preventive Maintenance
indicator Call Service to schedule Preventive
Maintenance.
Film Drawer Status
Messages Details
Opening... Please wait The film cartridge is currently opening.
Open The film supply door is open.
Calibrating... Please wait A calibration is in progress for this film
cartridge.
Not Calibrated The film cartridge is not calibrated.
Fail An error has occurred, affecting normal
operation.
No Cartridge There is currently no cartridge in the
film supply drawer.
Open Requested ...
Please Wait A request to open the film supply drawer
is pending.
Job Manager Status
Message Details
Active The imager can accept job requests and
film is available.
No Media The imager can accept job requests, but
film is not available for at least 1 current
job.
Offline The imager will not accept any DICOM
job requests.
Main Status Screen Details

Troubleshooting
June 12, 2003 5E6155 4-3
1. When an error message appears, touch anywhere in the error popup
menu.
2. When a no-media message appears, touch any tray button or the Job
Management button on the Status screen.
NOTE: The laser imager prints a job only with the specified size/media
base type requested. If the size/base is not loaded, the print
request is put into the “No Media” queue and the laser imager
waits for the correct type to be loaded.
If this action does not clear the error message, call for service. When you
make a service call, be prepared to give the error message and message
number to the call taker (See “Calling for Support”).
Preventive Maintenance Icon
NOTE: The laser imager displays a local panel icon when preventive
maintenance and cleaning are recommended. Preventive
maintenance and cleaning ensure optimum imager performance.
The preventive maintenance message will not interfere with
normal operation and is intended to let you schedule a convenient
time for preventive maintenance and cleaning performed by a
Kodak authorized Service Provider.
Restart the Laser Imager The action “Restart the laser imager” means to shut down and power up
the laser imager. To shut down the laser imager:
1. Touch the Power icon on the local panel.
2. Touch the Shut Down icon.
3. When the laser imager has completely shut down, power up by
holding the power switch to the ON position for two seconds.
The action to “open door manually” is described in “Film Drawers and
Front Door Manual Override Latches” on page 3-14. The action to “close
the film cartridge” is described in “Manually Closing the Film Cartridge

4-4 5E6155 June 12, 2003
Troubleshooting
Lid” on page 4-17.
Number Message display Message Details Operator Action
02-104 Inadequate Disk Space for
New Job Too many undelivered jobs
are queued. 1. Delete jobs in the
Undelivered Queued.
2. Load requested media for
jobs in Pending Queue.
03-111 Undelivered Job due to
Rendering Error Job failed because of bad
image data. 1. Delete job from the
Undelivered Queue.
20-208 Front Door Failed to Open Jobs will continue to be
queued. Film affected by the
error will be reprinted.
1. Open the door manually.
2. If the error persists, call
Service.
20-914 Internal Image Data
Transfer Failed Jobs will continue to be
queued. Film affected by the
error will be reprinted.
1. Restart the laser imager.
2. If the error persists, call
Service.
20-915 Internal Image Data
Transfer Failed Jobs will continue to be
queued. Film affected by the
error will be reprinted.
1. Restart the laser imager.
2. If the error persists, call
Service.
21-116 Film Jam in Area 1: Film
Pickup Jobs will continue to be
queued. Printing will continue
from any other supply drawer.
1. Open the drawer.
2. Close the cartridge to
prevent film from fogging.
3. Remove any film.
4. Close the drawer.
21-118 Internal Hardware Failure:
Film Pickup Jobs will continue to be
queued. Printing will continue
from any other supply drawer.
1. Restart the laser imager.
2. If the problem persists,
call Service.
21-119 Internal Hardware Failure:
Film Pickup Jobs will continue to be
queued. Printing will continue
from any other supply drawer.
1. Restart the laser imager.
2. If the error persists, call
Service.
21-120 Internal Hardware Failure:
Film Pickup Jobs will continue to be
queued. Printing will continue
from any other supply drawer.
1. Restart the laser imager.
2. If the error persists, call
Service.

Troubleshooting
June 12, 2003 5E6155 4-5
21-125 Internal Hardware Failure:
Feed Rollers Jobs will continue to be
queued. Printing will continue
from any other supply drawer.
1. Restart the laser imager.
2. If the error persists, call
Service.
21-126 Film Jam in Area 1: Feed
Rollers Jobs will continue to be
queued. Film affected by the
error will be reprinted.
1. Open the drawer.
2. Close the cartridge to
prevent film from fogging.
3. Remove any film.
4. Close the drawer.
21-135 Drawer Failed to Open Jobs will continue to be
queued. Film affected by the
error will be reprinted.
1. Open the drawer manually.
2. If the error persists, call
Service.
21-139 Unable to Identify Film
Cartridge Jobs will continue to be
queued. Printing will continue
from any other supply drawer.
1. Try a new film cartridge.
2. If the error persists, call
Service.
21-145 Unsupported Media Type Jobs will continue to be
queued. Printing will continue
from any other supply drawer.
1. Try a new film cartridge.
2. If the error persists, call
Service.
21-146 Unsupported Media Size Jobs will continue to be
queued. Printing will continue
from any other supply drawer.
1. Try a new film cartridge.
2. If the error persists, call
Service.
21-175 Rollback failed to Engage
Cartridge Jobs will continue to be
queued. Printing will continue
from any other supply drawer.
1. Try a new film cartridge.
2. If the error persists, call
Service.
21-176 Film Cartridge Failed to
Fully Open Jobs will continue to be
queued. Printing will continue
from any other supply drawer.
1. Try a new film cartridge.
2. If the error persists, call
Service.
21-177 Film Cartridge Failed to
Close Jobs will continue to be
queued. Printing will continue
from any other supply drawer.
1. Open the drawer.
2. Close the cartridge to
prevent film from fogging.
3. Close the drawer.
4. If the error persists, call
Service.
Number Message display Message Details Operator Action

4-6 5E6155 June 12, 2003
Troubleshooting
21-178 Film Cartridge Failed to
Open Jobs will continue to be
queued. Printing will continue
from any other supply drawer.
1. Try a new film cartridge.
2. If the error persists, call
Service.
21-179 Film Cartridge Failed to
Close Jobs will continue to be
queued. Printing will continue
from any other supply drawer.
1. Open the drawer.
2. Close the cartridge to
prevent film from fogging.
3. Close the drawer.
4. If the error persists, call
Service.
21-631 Calibration Failed: Film
Dmin Outside Target Jobs will continue to be
queued. Printing will continue
from any other supply drawer.
1. Try a new film cartridge.
2. If the error persists,
disable the AIQC for this
film cartridge.
21-632 Calibration Failed: Film
Dmax Outside Jobs will continue to be
queued. Printing will continue
from any other supply drawer.
1. Try a new film cartridge.
2. If the error persists,
disable the AIQC for this
film cartridge.
21-624 Calibration Failed: Film
Density Readings not
Monotonic
Jobs will continue to be
queued. Printing will continue
from any other supply drawer.
1. Try a new film cartridge.
2. If the error persists, call
Service.
22-116 Film Jam in Area 1: Film
Pickup Jobs will continue to be
queued. Printing will continue
from any other supply drawer.
1. Open the drawer.
2. Close the cartridge to
prevent film from fogging.
3. Remove any film.
4. Close the drawer.
22-118 Internal Hardware Failure:
Film Pickup Jobs will continue to be
queued. Printing will continue
from any other supply drawer.
1. Restart the laser imager.
2. If the error persists, call
Service.
22-119 Internal Hardware Failure:
Film Pickup Jobs will continue to be
queued. Printing will continue
from any other supply drawer.
1. Restart the laser imager.
2. If the error persists, call
Service.
Number Message display Message Details Operator Action

Troubleshooting
June 12, 2003 5E6155 4-7
22-120 Internal Hardware Failure:
Film Pickup Jobs will continue to be
queued. Printing will continue
from any other supply drawer.
1. Restart the laser imager.
2. If the error persists, call
Service.
22-125 Internal Hardware Failure:
Feed Rollers Jobs will continue to be
queued. Printing will continue
from any other supply drawer.
1. Restart the laser imager.
2. If the error persists, call
Service.
22-126 Film Jam in Area 1: Feed
Rollers Jobs will continue to be
queued. Film affected by the
error will be reprinted.
1. Open the drawer.
2. Close the cartridge to
prevent film from fogging.
3. Remove any film.
4. Close the drawer.
22-135 Drawer Failed to Open Jobs will continue to be
queued. Film affected by the
error will be reprinted.
1. Open the drawer manually.
2. If the error persists, call
Service.
22-139 Unable to Identify Film
Cartridge Jobs will continue to be
queued. Printing will continue
from any other supply drawer.
1. Try a new film cartridge.
2. If the error persists, call
Service.
22-145 Unsupported Media Type Jobs will continue to be
queued. Printing will continue
from any other supply drawer.
1. Try a new film cartridge.
2. If the error persists, call
Service.
22-146 Unsupported Media Size Jobs will continue to be
queued. Printing will continue
from any other supply drawer.
1. Try a new film cartridge.
2. If the error persists, call
Service.
22-175 Rollback Failed to Engage
Cartridge Jobs will continue to be
queued. Printing will continue
from any other supply drawer.
1. Try a new film cartridge.
2. If the error persists, call
Service.
22-176 Film Cartridge Failed to
Open Jobs will continue to be
queued. Printing will continue
from any other supply drawer.
1. Try a new film cartridge.
2. If the error persists, call
Service.
Number Message display Message Details Operator Action

4-8 5E6155 June 12, 2003
Troubleshooting
22-177 Film Cartridge Failed to
Close Jobs will continue to be
queued. Printing will continue
from any other supply drawer.
1. Open the drawer.
2. Close cartridge to prevent
the film from fogging.
3. Close the drawer.
4. If the error persists, call
Service.
22-178 Film Cartridge Failed to
Open Jobs will continue to be
queued. Printing will continue
from any other supply drawer.
1. Try a new film cartridge.
2. If the error persists, call
Service.
22-179 Film Cartridge Failed to
Close Jobs will continue to be
queued. Printing will continue
from any other supply drawer.
1. Open the drawer.
2. Close the cartridge to
prevent film from fogging.
3. Close the drawer.
4. If the error persists, call
Service.
22-631 Calibration Failed: Film
Dmin Outside Target Jobs will continue to be
queued. Printing will continue
from any other supply drawer.
1. Try a new film cartridge.
2. If the error persists,
disable the AIQC for this
film cartridge.
22-632 Calibration Failed: Film
Dmax Outside Target Jobs will continue to be
queued. Printing will continue
from any other supply drawer.
1. Try a new film cartridge.
2. If the error persists,
disable the AIQC for this
film cartridge.
22-624 Calibration Failed: Film
Density Readings not
Monotonic
Jobs will continue to be
queued. Printing will continue
from any other supply drawer.
1. Try a new film cartridge.
2. If the error persists, call
Service.
23-116 Film Jam in Area 1 Jobs will continue to be
queued. Printing will continue
from any other supply drawer.
1. Open the drawer.
2. Close the cartridge to
prevent film from fogging.
3. Remove any film.
4. Close the drawer.
Number Message display Message Details Operator Action

Troubleshooting
June 12, 2003 5E6155 4-9
23-118 Internal Hardware Failure:
Film Pickup Jobs will continue to be
queued. Printing will continue
from any other supply drawer.
1. Restart the laser imager.
2. If the error persists, call
Service.
23-119 Internal Hardware Failure:
Film Pickup Jobs will continue to be
queued. Printing will continue
from any other supply drawer.
1. Restart the laser imager.
2. If the error persists, call
Service.
23-120 Internal Hardware Failure:
Film Pickup Jobs will continue to be
queued. Printing will continue
from any other supply drawer.
1. Restart the laser imager.
2. If the error persists, call
Service.
23-125 Internal Hardware Failure:
Feed Rollers Jobs will continue to be
queued. Printing will continue
from any other supply drawer.
1. Restart the laser imager.
2. If the error persists, call
Service.
23-126 Film Jam in Area 1: Feed
Rollers Jobs will continue to be
queued. Film affected by the
error will be reprinted.
1. Open the drawer.
2. Close the cartridge to
prevent film from fogging.
3. Remove any film.
4. Close the drawer.
23-135 Drawer Failed to Open Jobs will continue to be
queued. Film affected by the
error will be reprinted.
1. Open the drawer manually.
2. If the error persists, call
Service.
23-139 Unable to Identify Film
Cartridge Jobs will continue to be
queued. Printing will continue
from any other supply drawer.
1. Try a new film cartridge.
2. If the error persists, call
Service.
23-145 Unsupported Media Type Jobs will continue to be
queued. Printing will continue
from any other supply drawer.
1. Try a new film cartridge.
2. If the error persists, call
Service.
23-146 Unsupported Media Size Jobs will continue to be
queued. Printing will continue
from any other supply drawer.
1. Try a new film cartridge.
2. If the error persists, call
Service.
23-175 Rollback Failed to Engage
Cartridge Jobs will continue to be
queued. Printing will continue
from any other supply drawer.
1. Try a new film cartridge.
2. If the error persists, call
Service.
Number Message display Message Details Operator Action

4-10 5E6155 June 12, 2003
Troubleshooting
23-176 Film Cartridge Failed to
Open Jobs will continue to be
queued. Printing will continue
from any other supply drawer.
1. Try a new film cartridge.
2. If the error persists, call
Service.
23-177 Film Cartridge Failed to
Close Jobs will continue to be
queued. Printing will continue
from any other supply drawer.
1. Open the drawer.
2. Close the cartridge to
prevent film from fogging.
3. Close the drawer.
4. If the error persists, call
Service.
23-178 Film Cartridge Failed to
Open Jobs will continue to be
queued. Printing will continue
from any other supply drawer.
1. Try a new film cartridge.
2. If the error persists, call
Service.
23-179 Film Cartridge Failed to
Close Jobs will continue to be
queued. Printing will continue
from any other supply drawer.
1. Open the drawer.
2. Close the cartridge to
prevent film from fogging.
3. Close the drawer.
4. If the problem persists,
call Service.
23-631 Calibration Failed: Film
Dmin Outside Jobs will continue to be
queued. Printing will continue
from any other supply drawer.
1. Try a new film cartridge.
2. If the error persists,
disable the AIQC for this
film cartridge.
23-632 Calibration Failed: Film
Dmax Outside Target Jobs will continue to be
queued. Printing will continue
from any other supply drawer.
1. Try a new film cartridge.
2. If the error persists,
disable the AIQC for this
film cartridge.
23-624 Calibration Failed: Film
Density Readings not
Monotonic
Jobs will continue to be
queued. Printing will continue
from any other supply drawer.
1. Try a new film cartridge.
2. If the error persists, call
Service.
24-931 Internal Communications
Failure: Film Cartridge
Controller
Jobs will continue to be
queued. Printing will continue
from any other supply drawer.
1. Restart the laser imager.
2. If the error persists, call
Service.
Number Message display Message Details Operator Action

Troubleshooting
June 12, 2003 5E6155 4-11
24-154 Internal Communications
Failure: Film Cartridge
Controller
Jobs will continue to be
queued. Film affected by the
error will be reprinted.
1. Restart the laser imager.
2. If the error persists, call
Service.
25-154 Internal Communications
Failure: RF Tag Jobs will continue to be
queued. Film affected by the
error will be reprinted.
1. Restart the laser imager.
2. If the error persists, call
Service.
25-922 Internal Diagnostic
Failure: RF Tag Jobs will continue to be
queued. Film affected by the
error will be reprinted.
1. Restart the laser imager.
2. If the error persists, call
Service.
25-931 Internal Communications
Failure: RF Tag Jobs will continue to be
queued. Film affected by the
error will be reprinted.
1. Restart the laser imager.
2. If the error persists, call
Service.
26-164 Film Jam in Area 2: Platen Jobs will continue to be
queued. Film affected by the
error will be reprinted.
1. Open the front door.
2. Remove any film.
3. Close the door.
26-165 Film Jam in Area 3:
Transport Jobs will continue to be
queued. Film affected by the
error will be reprinted.
1. Open the front door.
2. Remove any film.
3. Close the door.
26-166 Film Jam in Area 4:
Transport Jobs will continue to be
queued. Film affected by the
error will be reprinted.
1. Open the front door.
2. Remove any film.
3. Close the door.
26-167 Film Jam in Area 2:
Transport Jobs will continue to be
queued. Film affected by the
error will be reprinted.
1. Open the front door.
2. Remove any film.
3. Close the door.
26-169 Film Jam in Area 3: Platen Jobs will continue to be
queued. Film affected by the
error will be reprinted.
1. Open the front door.
2. Remove any film.
3. Close the door.
26-542 Film Jam in Area 4:
Processor Jobs will continue to be
queued. Film affected by the
error will be reprinted.
1. Open the hood.
2. Remove any film.
3. Close the hood.
Number Message display Message Details Operator Action

4-12 5E6155 June 12, 2003
Troubleshooting
26-543 Film Jam in Area 5:
Processor Jobs will continue to be
queued. Film affected by the
error will be reprinted.
1. Open the hood.
2. Remove any film.
3. Close the processor cover
and hood.
26-544 Film Jam in Area 5:
Densitometer Jobs will continue to be
queued. Film affected by the
error will be reprinted.
1. Open the hood.
2. Remove any film.
3. Close the hood.
26-545 Film Jam in Area 5: Sorter Jobs will continue to be
queued. Film affected by the
error will be reprinted.
1. Open the hood.
2. Remove any film.
3. Close the hood.
26-546 Film Jam in Area 6: Sorter Jobs will continue to be
queued. Film affected by the
error will be reprinted.
1. Open the hood.
2. Remove any film.
3. Close the hood.
27-121 Internal Hardware Failure:
Optics Jobs will continue to be
queued. Film affected by the
error will be reprinted.
1. Restart the laser imager.
2. If the error persists, call
Service.
27-123 Internal Hardware Failure:
Optics Jobs will continue to be
queued. Film affected by the
error will be reprinted.
1. Restart the laser imager.
2. If the error persists, call
Service.
27-124 Internal Hardware Failure:
Platen Jobs will continue to be
queued. Film affected by the
error will be reprinted.
1. Restart the laser imager.
2. If the error persists, call
Service.
27-127 Internal Hardware Failure:
Platen Jobs will continue to be
queued. Film affected by the
error will be reprinted.
1. Restart the laser imager.
2. If the error persists, call
Service.
27-128 Internal Hardware Failure:
Platen Jobs will continue to be
queued. Film affected by the
error will be reprinted.
1. Restart the laser imager.
2. If the error persists, call
Service.
27-154 Internal Hardware Failure:
Optics Jobs will continue to be
queued. Film affected by the
error will be reprinted.
1. Restart the laser imager.
2. If the error persists, call
Service.
Number Message display Message Details Operator Action

Troubleshooting
June 12, 2003 5E6155 4-13
27-601 Calibration Failed: Optics Jobs will continue to be
queued. Film affected by the
error will be reprinted.
1. Restart the laser imager.
2. If the error persists, call
Service.
27-602 Calibration Failed: Optics Jobs will continue to be
queued. Film affected by the
error will be reprinted.
1. Restart the laser imager.
2. If the error persists, call
Service.
27-603 Calibration Failed: Optics Jobs will continue to be
queued. Film affected by the
error will be reprinted.
1. Restart the laser imager.
2. If the error persists, call
Service.
27-604 Calibration Failed: Optics Jobs will continue to be
queued. Film affected by the
error will be reprinted.
1. Restart the laser imager.
2. If the error persists, call
Service.
27-605 Calibration Failed: Optics Jobs will continue to be
queued. Film affected by the
error will be reprinted.
1. Restart the laser imager.
2. If the error persists, call
Service.
27-606 Calibration Failed: Optics Jobs will continue to be
queued. Film affected by the
error will be reprinted.
1. Restart the laser imager.
2. If the error persists, call
Service.
27-607 Calibration Failed: Optics Jobs will continue to be
queued. Film affected by the
error will be reprinted.
1. Restart the laser imager.
2. If the error persists, call
Service.
27-611 Internal Hardware Failure:
Optics Jobs will continue to be
queued. Film affected by the
error will be reprinted.
1. Restart the laser imager.
2. If the error persists, call
Service.
27-640 Internal Hardware Failure:
Optics Jobs will continue to be
queued. Film affected by the
error will be reprinted.
1. Restart the laser imager.
2. If the error persists, call
Service.
27-641 Internal Diagnostic
Failure: Optics Jobs will continue to be
queued. Film affected by the
error will be reprinted.
1. Restart the laser imager.
2. If the error persists, call
Service.
Number Message display Message Details Operator Action

4-14 5E6155 June 12, 2003
Troubleshooting
27-642 Internal Hardware Failure:
Optics Jobs will continue to be
queued. Film affected by the
error will be reprinted.
1. Restart the laser imager.
2. If the error persists, call
Service.
27-643 Internal Diagnostic
Failure: Optics Jobs will continue to be
queued. Film affected by the
error will be reprinted.
1. Restart the laser imager.
2. If the error persists, call
Service.
27-644 Internal Communications
Failure: Optics Jobs will continue to be
queued. Film affected by the
error will be reprinted.
1. Restart the laser imager.
2. If the error persists, call
Service.
27-645 Internal Hardware Failure:
Optics Jobs will continue to be
queued. Film affected by the
error will be reprinted.
1. Restart the laser imager.
2. If the error persists, call
Service.
27-646 Internal Hardware Failure:
Optics Jobs will continue to be
queued. Film affected by the
error will be reprinted.
1. Restart the laser imager.
2. If the error persists, call
Service.
27-914 Internal Image Transfer
Failure: Optics Jobs will continue to be
queued. Film affected by the
error will be reprinted.
1. Restart the laser imager.
2. If the error persists, call
Service.
27-915 Internal Image Transfer
Failure: Optics Jobs will continue to be
queued. Film affected by the
error will be reprinted.
1. Restart the laser imager.
2. If the error persists, call
Service.
27-916 Internal Diagnostic
Failure: Optics Jobs will continue to be
queued. Film affected by the
error will be reprinted.
1. Restart the laser imager.
2. If the error persists, call
Service.
27-931 Internal Communications
Failure: Optics Jobs will continue to be
queued. Film affected by the
error will be reprinted.
1. Restart the laser imager.
2. If the error persists, call
Service.
28-154 Internal Communications
Failure: Processor Jobs will continue to be
queued. Film affected by the
error will be reprinted.
1. Restart the laser imager.
2. If the error persists, call
Service.
Number Message display Message Details Operator Action

Troubleshooting
June 12, 2003 5E6155 4-15
28-155 Internal Communications
Failure: Processor Jobs will continue to be
queued. Film affected by the
error will be reprinted.
1. Restart the laser imager.
2. If the error persists, call
Service.
28-501 Internal Hardware Failure:
Processor Jobs will continue to be
queued. Film affected by the
error will be reprinted.
1. Restart the laser imager.
2. If the error persists, call
Service.
28-506 Internal Communications
Failure: Processor Jobs will continue to be
queued. Film affected by the
error will be reprinted.
1. Restart the laser imager.
2. If the error persists, call
Service.
28-509 Processor Warm-up
Failure Jobs will continue to be
queued. Film affected by the
error will be reprinted.
1. Restart the laser imager.
2. If the error persists, call
Service.
28-551 Processor Heater Failure Jobs will continue to be
queued. Film affected by the
error will be reprinted.
1. Restart the laser imager.
2. If the error persists, call
Service.
28-554 Processor Over
Temperature Jobs will continue to be
queued. Film affected by the
error will be reprinted.
1. Restart the laser imager.
2. If the error persists, call
Service.
28-931 Internal Communications
Failure: Processor Jobs will continue to be
queued. Film affected by the
error will be reprinted.
1. Restart the laser imager.
2. If the error persists, call
Service.
29-154 Internal Communications
Failure: Densitometer Jobs will continue to be
queued. Film affected by the
error will be reprinted.
1. Restart the laser imager.
2. If the error persists, call
Service.
29-924 Internal Diagnostic
Failure: Densitometer Jobs will continue to be
queued. Film affected by the
error will be reprinted.
1. Restart the laser imager.
2. If the error persists, call
Service.
29-925 Internal Diagnostic
Failure: Densitometer Jobs will continue to be
queued. Film affected by the
error will be reprinted.
1. Restart the laser imager.
2. If the error persists, call
Service.
Number Message display Message Details Operator Action

4-16 5E6155 June 12, 2003
Troubleshooting
29-926 Internal Diagnostic
Failure: Densitometer Jobs will continue to be
queued. Film affected by the
error will be reprinted.
1. Restart the laser imager.
2. If the error persists, call
Service.
29-927 Internal Diagnostic
Failure: Densitometer Jobs will continue to be
queued. Film affected by the
error will be reprinted.
1. Restart the laser imager.
2. If the error persists, call
Service.
29-931 Internal Communications
Failure: Densitometer Jobs will continue to be
queued. Film affected by the
error will be reprinted.
1. Restart the laser imager.
2. If the error persists, call
Service.
30-154 Internal Communications
Failure: Sorter Jobs will continue to be
queued, but new film will not
be initiated.
1. Restart the laser imager.
2. If the error persists, call
Service.
30-930 Internal Hardware Failure:
Sorter Jobs will continue to be
queued, but new film will not
be initiated.
1. Restart the laser imager.
2. If the error persists, call
Service.
30-931 Internal Communications
Failure: Sorter Jobs will continue to be
queued, but new film will not
be initiated.
1. Restart the laser imager.
2. If the error persists, call
Service.
31-931 Internal Communications
Failure: FPGA Jobs will continue to be
queued, but new film will not
be initiated.
1. Restart the laser imager.
2. If the error persists, call
Service.
10-001 Delivery Server Internal
Error 1. Restart the laser imager.
2. If the error persists, call
Service.
10-003 Delivery Server Image
Datapath Error 1. Restart the laser imager.
2. If the error persists, call
Service.
10-910 MCS Communication
Down Jobs will continue to be
queued, but new film will not
be initiated.
1. Restart the laser imager.
2. If the error persists, call
Service.
Number Message display Message Details Operator Action
Troubleshooting
June 12, 2003 5E6155 4-17
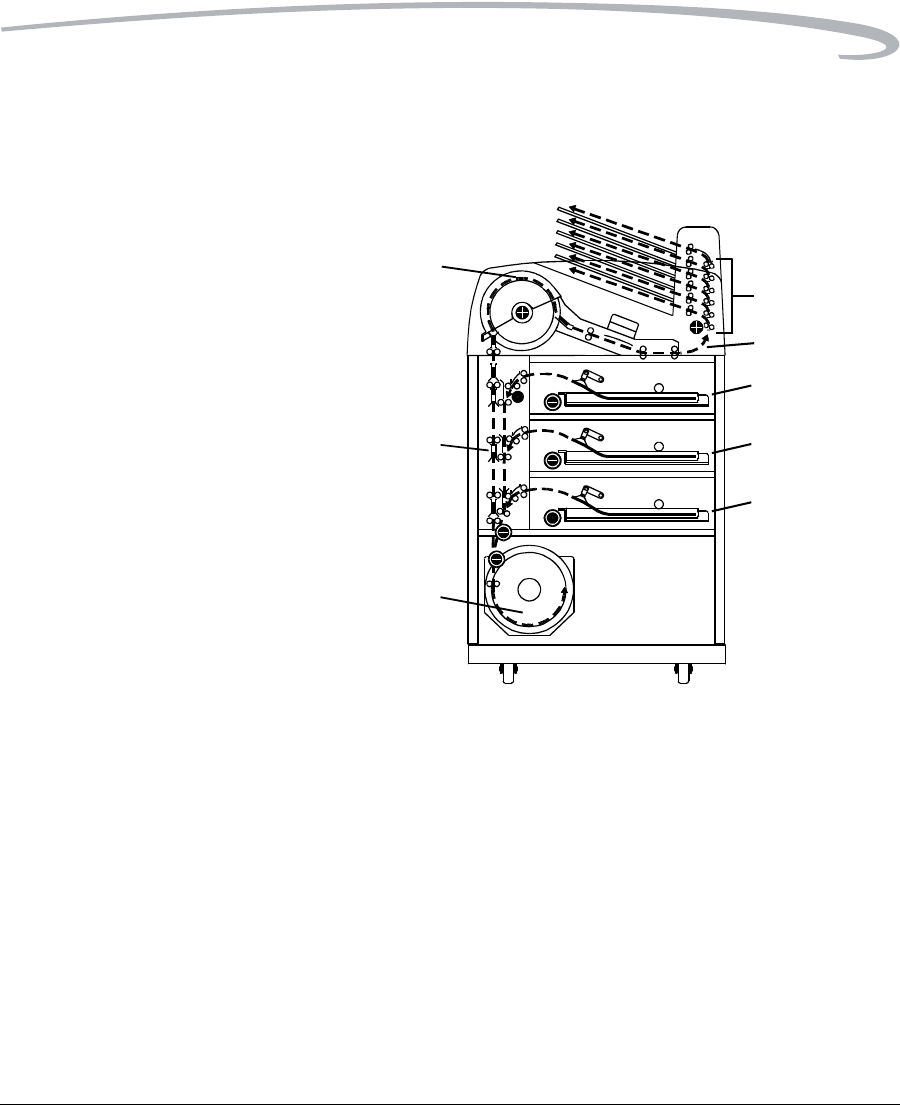
Clearing Film Jams The numbers in the illustration identify key areas on the path from film
pickup to exposure, through development and onto the film sorter.
Jam Areas
Manually Closing the Film
Cartridge Lid Film cartridges need to be closed manually if the drawers are opened
without the film cartridge closing automatically.
4
3
2
6
5
1U
1M
1L
1Film pickup from the cartridge.
2Vertical film path between the film pickup area and the film platen,
and between the film platen and the processor drum.
3Exposure platen.
4Film processor drum.
5Film feed through the densitometer and onto the sorter.
6Film feed within the sorter.
4-18 5E6155 June 12, 2003
Troubleshooting
NOTE: If the drawers are opened without the film cartridge closing,
several sheets of film at the top of the cartridge will be exposed
(fogged) and should be discarded. Before opening the drawer,
make the room as dark as possible to minimize exposure.
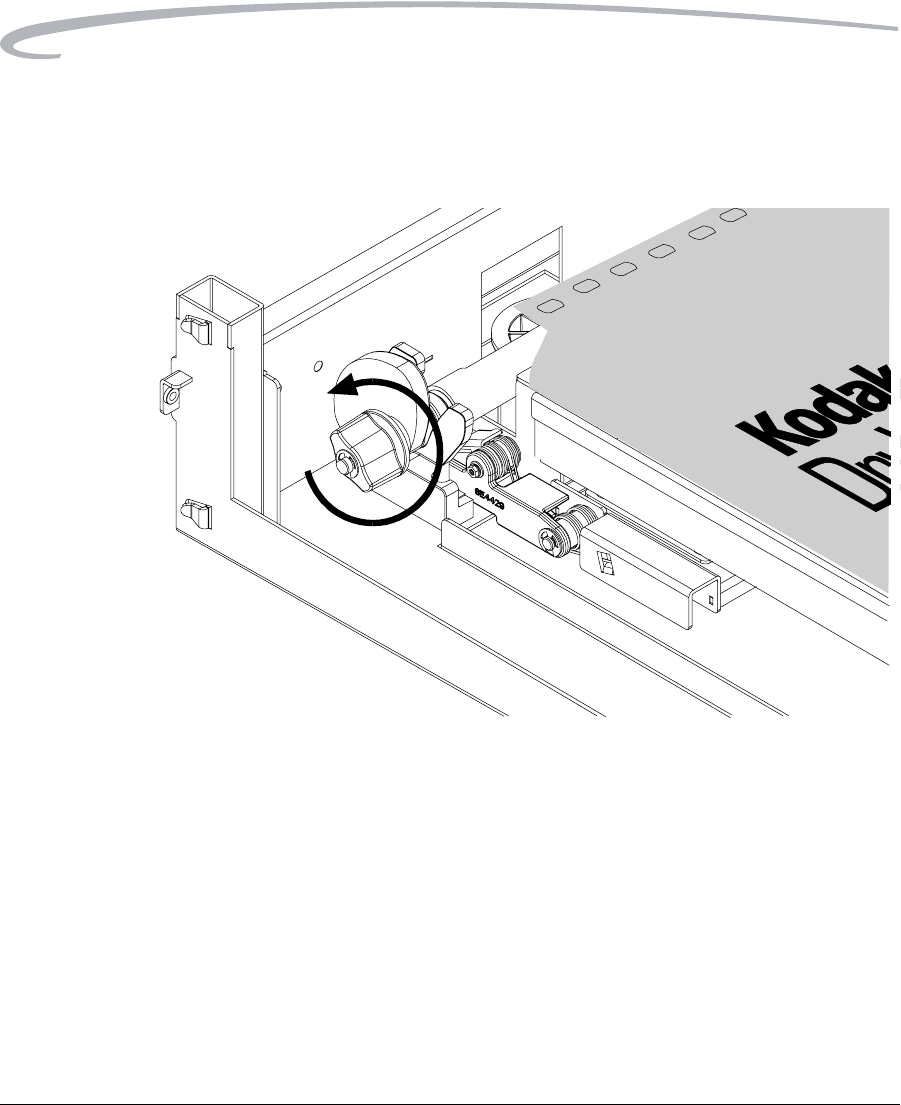
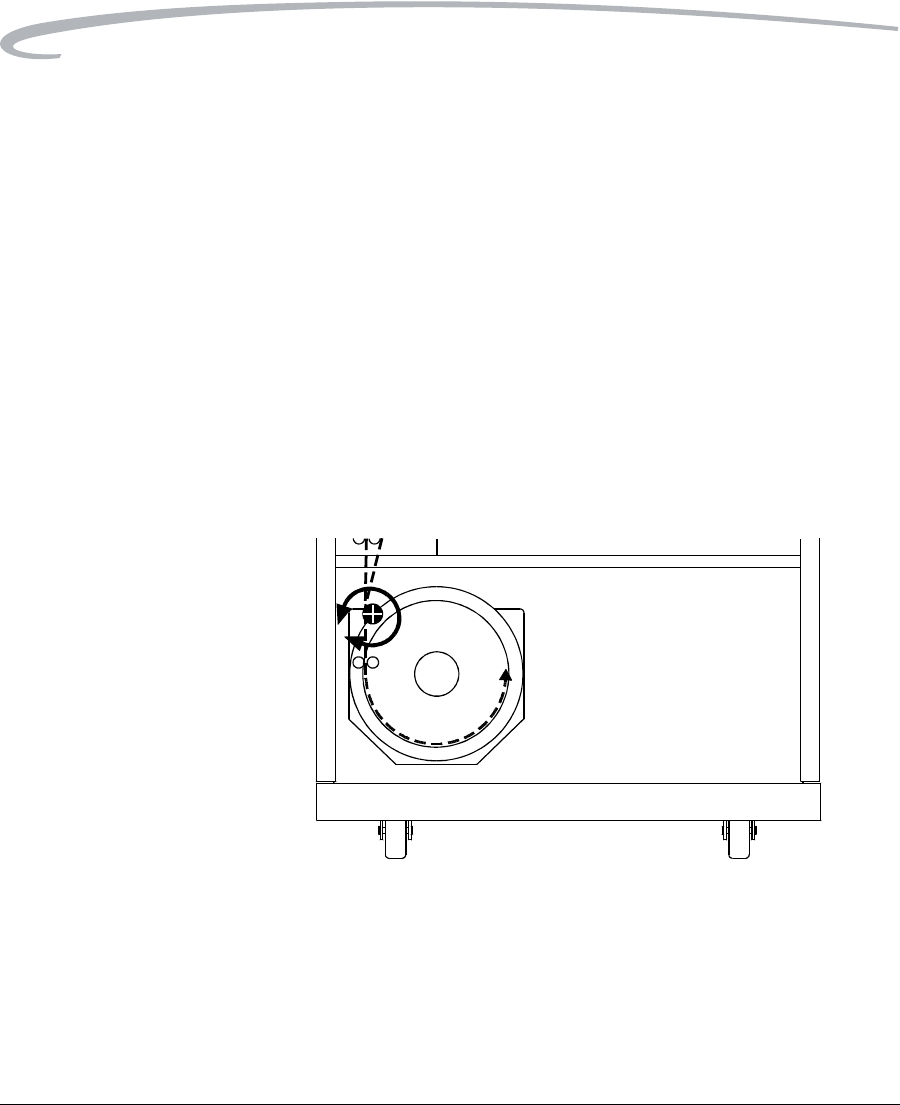
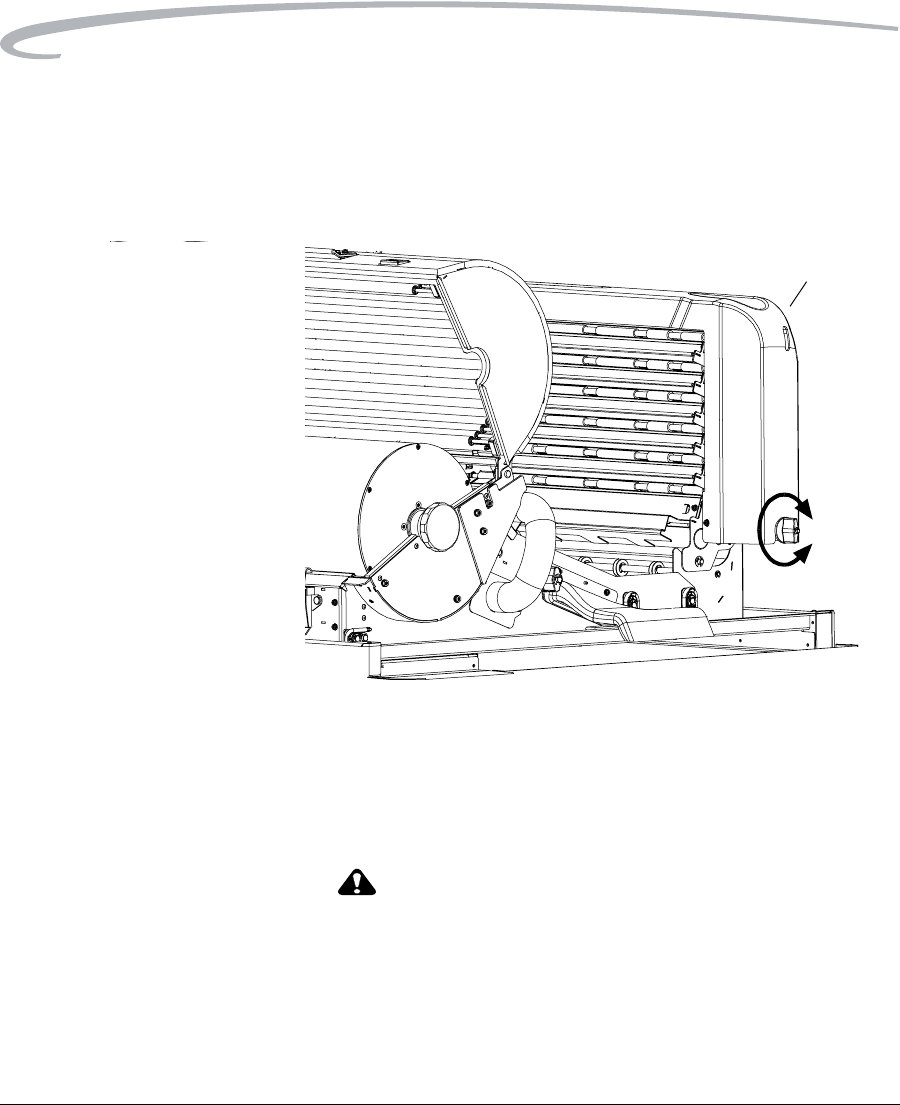
Film Cartridge Rollback Knob
To manually close the film cartridge:
1. Lift up the desired drawer override latch.
2. Pull the film drawer out to its furthest extension.
3. Turn the rollback knob counterclockwise until the film cartridge lid is
closed. Continue turning the rollback knob until it cannot be rotated
further.
Film Pickup Problems in
Area 1U, 1M, or 1L The area where the film is removed from the film cartridge and positioned
to the drive rollers is Area 1. If the laser imager cannot properly pick up a
sheet of film and position the film to the drive, an error message occurs on
Troubleshooting
June 12, 2003 5E6155 4-19
the local panel.
NOTE: When problems occur in Area 1, the film cartridge remains open.
When you open the drawer, the top sheets of film in the cartridge
will be exposed (fogged). Before opening the drawer, make the
room as dark as possible to minimize exposure. Discard any
fogged film.
1. The Film Jam in Area 1: message appears.
2. Touch the Show Jam button. The Door Control screen appears and
the affected drawer is highlighted.
3. Touch the affected drawer icon. The drawer opens.
4. Pull the drawer out to its furthest extension.
5. Remove any film outside the cartridge box and then turn the rollback
knob counterclockwise to manually close the cartridge lid (see
“Manually Closing the Film Cartridge Lid” on page 4-17).
6. If you cannot resolve the problem, call Service.
7. Close the drawer.
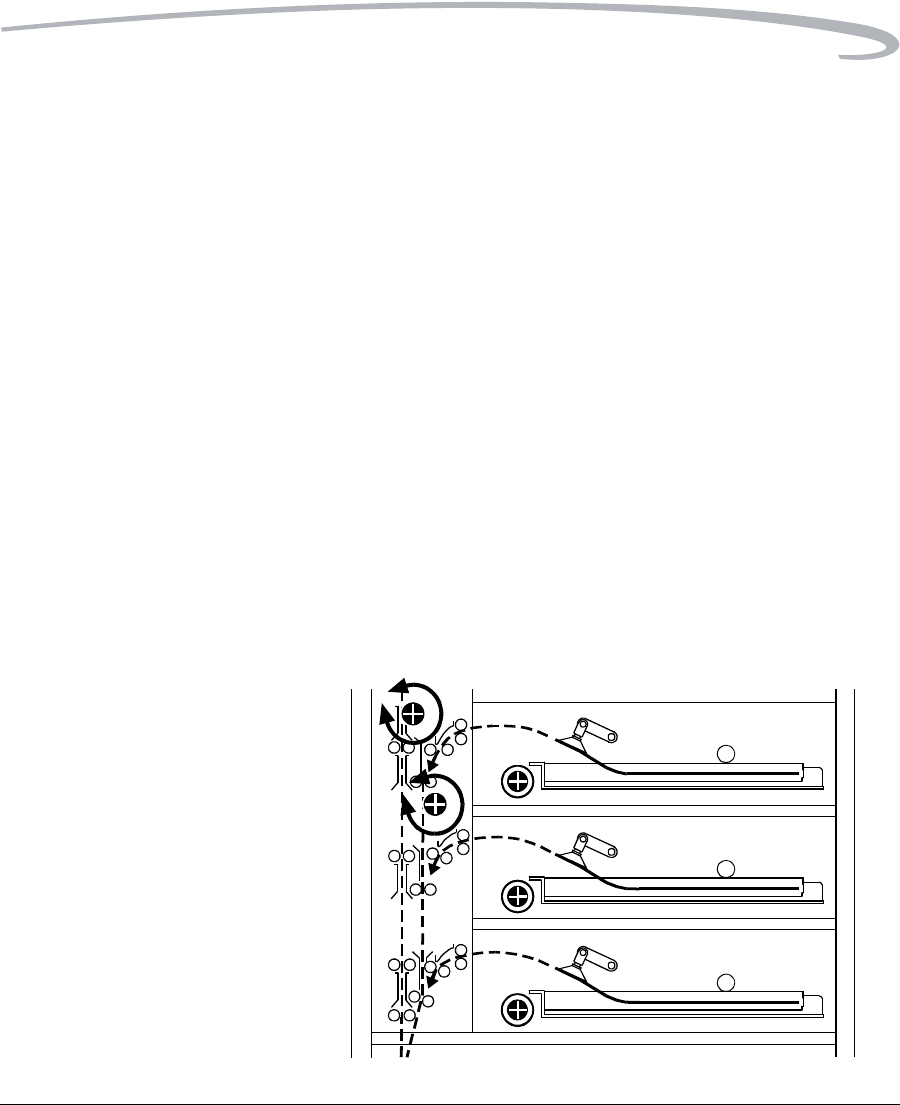
Clearing Film Jams from
Area 2 The vertical transport between the film pickup area and the film platen, and
between the film platen and the processor drum is Area 2. If film stalls in
this area, an error message appears on the local panel.
4-20 5E6155 June 12, 2003
Troubleshooting
Vertical Transport Rollback Knobs
1. The Film Jam in Area 2: error message appears.
2. Touch the Show Jam button. The Door Control screen appears and
the affected area is highlighted.
3. Touch the front door icon. The front door opens.
4. Locate the jammed film in the vertical transport.
5. Remove the jammed film. If the film is jammed in one of the feed
roller sets, turn the rollback knob in the appropriate direction to free
the film.
6. Close the front door.
7. If you cannot clear the jammed film, call Service.
Clearing Film Jams from
Area 3 The exposure platen is Area 3. If film stalls in this area, an error message
appears on the local panel.
Clearing Film Jam Area 3
1. The Film Jam in Area 3: error message appears.
2. Touch the Show Jam button. The Door Control screen appears and
the affected area is highlighted.
Troubleshooting
June 12, 2003 5E6155 4-21
3. Touch the front door icon. The front door opens.
4. Locate and remove the jammed film in the platen or vertical transport.
5. If the film is jammed in one of the feed roller sets, turn the rollback
knob in the appropriate direction to free the film.
6. Close the front door.
7. If you cannot clear the jammed film, call Service.
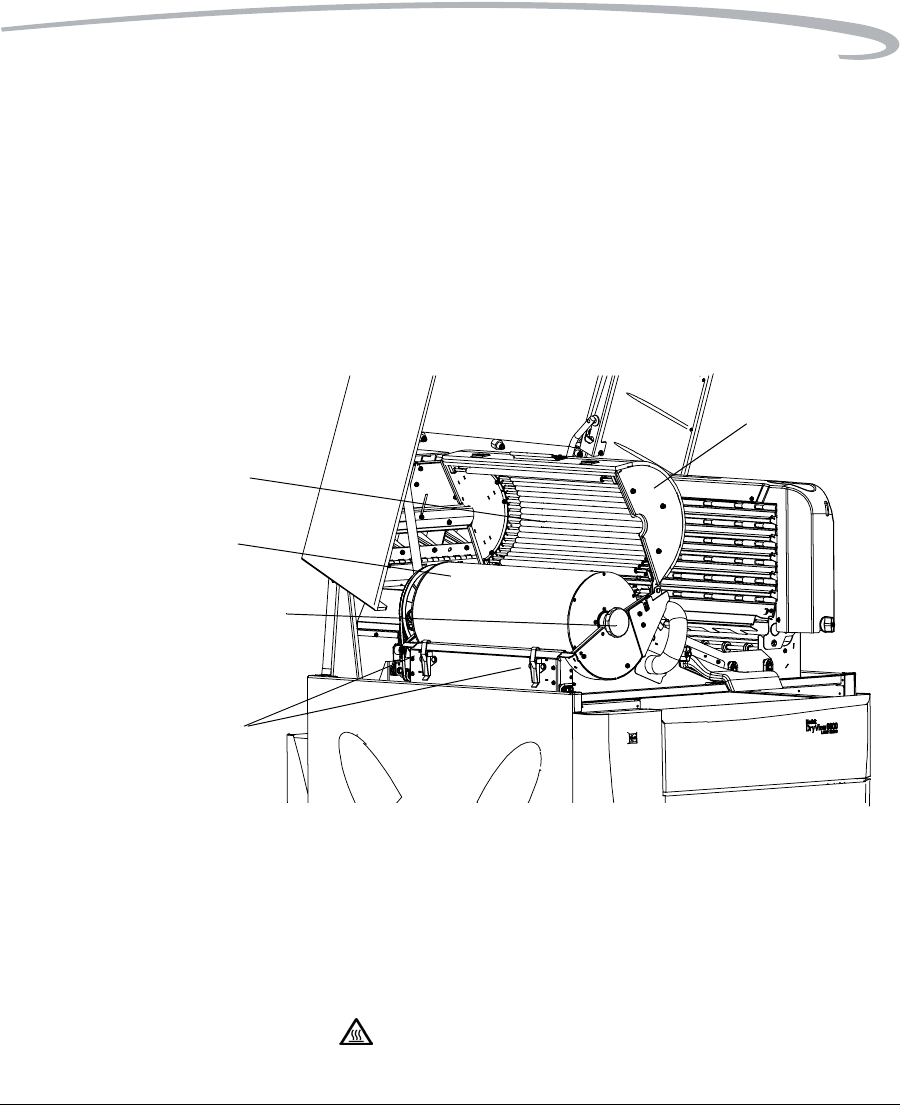
Clearing Film Jams from
Area 4 The film processor drum is Area 4. If film stalls in this area, an error
message occurs on the local panel.
Clearing Film Jam Area 4
1. The Film Jam in Area 4: error message appears.
2. Touch the Show Jam button. The Door Control screen appears and
the affected area is highlighted.
3. Open the upper hood to its first locking position.
CAUTION:
Hot Surface. Drum and rollers inside the processor are hot.
Cover
Rollers
Drum
Lift handle
Clamps
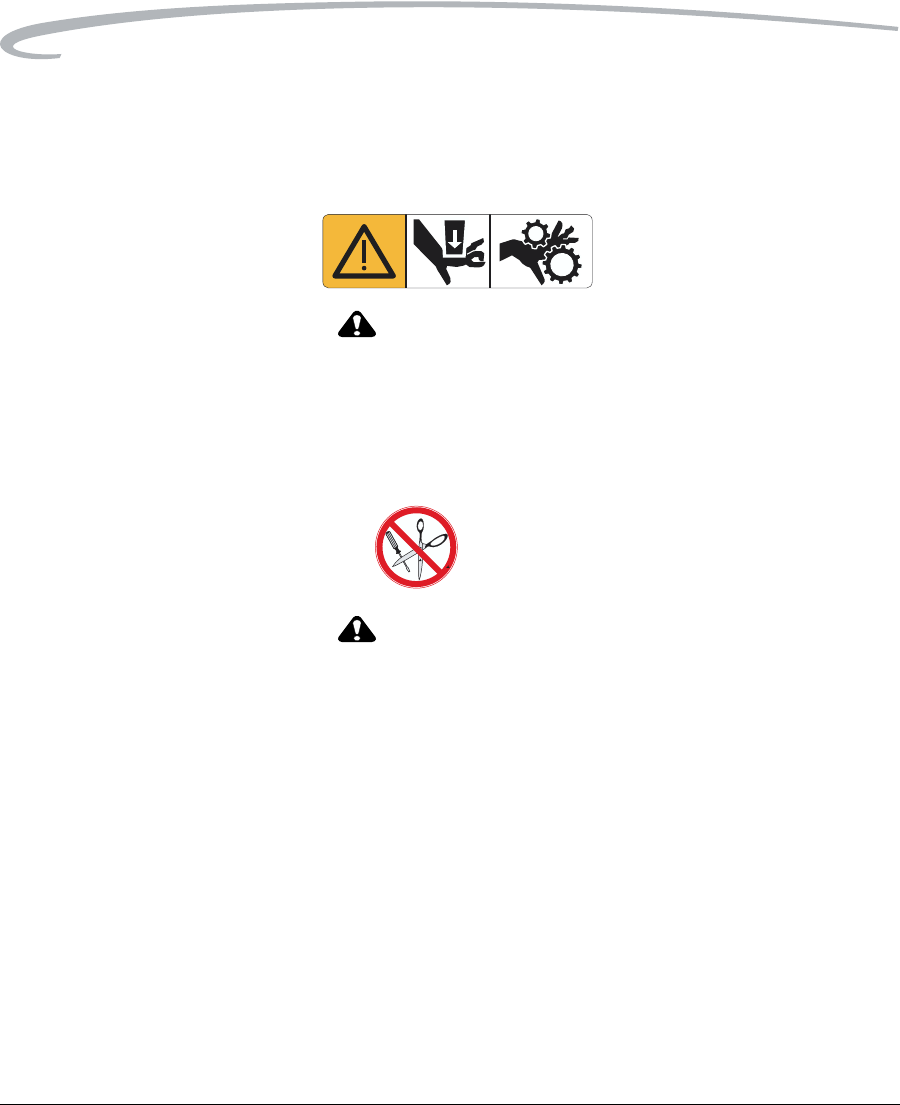
4-22 5E6155 June 12, 2003
Troubleshooting
Exercise caution when removing jammed film from the
processor.
4. Release the two clamps at the left of the processor.
CAUTION:
Whenever you raise or lower the drum cover, grasp the
cover only on the lift handle to avoid the possibility of
pinching your fingers.
5. Open the drum cover.
CAUTION:
To prevent damage to the surface of the processor drum, do
not use any type of tool to remove jammed film.
6. Clear the jammed film from the processor area. There may be more
than one sheet.
NOTE: If the film is jammed in the lower section of Area 4, you will need
to open the front door to remove the film (see “Clearing Film
Jams from Area 2” on page 4-19).
7. Close the drum cover and secure it with the two clamps.
8. Close the upper hood.
9. If you cannot clear the jammed film, call Service.
NOTE: The processor has to warm up to operating temperature before
the processor can print.
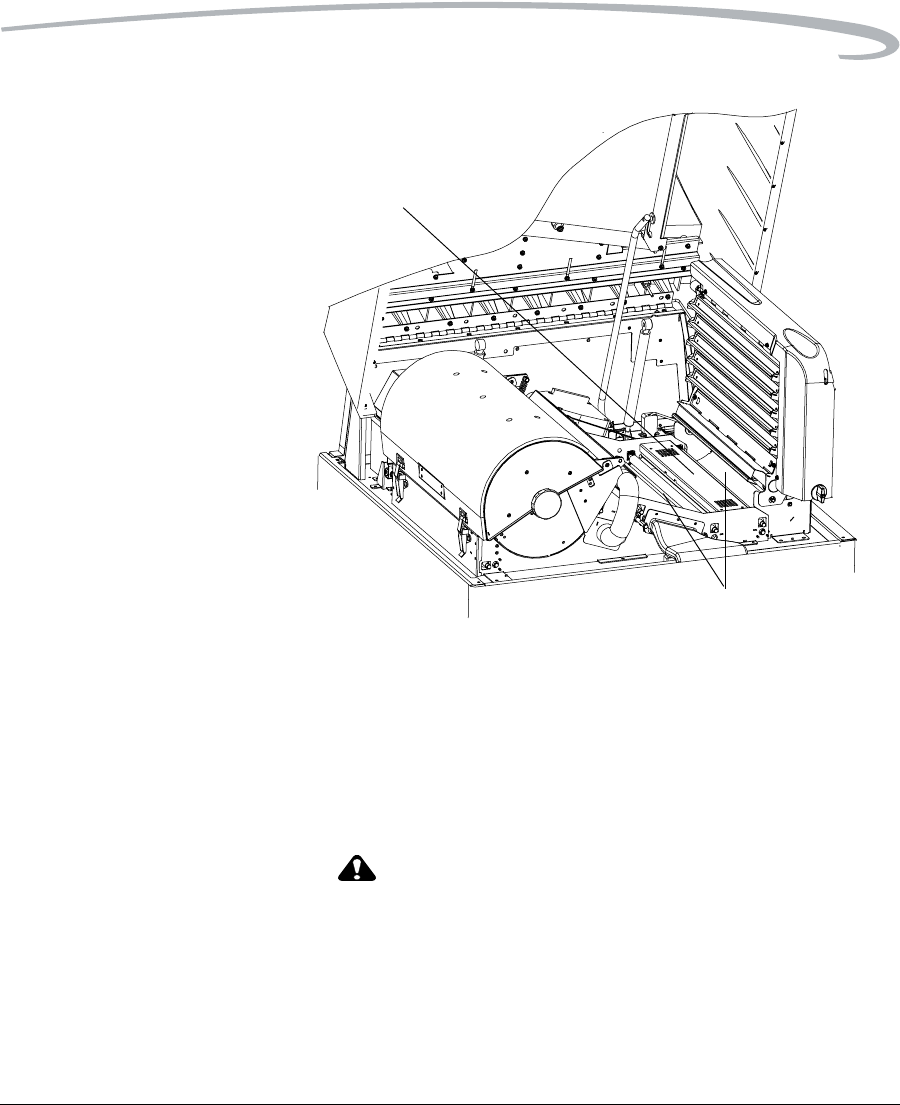
Clearing Film Jams from
Area 5 The drive rollers prior to the sorter is Area 5. If film stalls in this area, an
error message occurs on the local panel.
Troubleshooting
June 12, 2003 5E6155 4-23
Clearing Film Jam 5
1. The Film Jam in Area 5: error message appears.
2. Touch the Show Jam button. The Door Control screen appears and
the affected area is highlighted.
3. Open the upper hood to its first locking position.
CAUTION:
Hot Surface. Drum and rollers inside the processor are hot.
Exercise caution when removing jammed film from the
processor.
4. Remove the jammed film in the film path from the processor to the
sorter.
5. Grasp the film and pull at 90°.
Densitometer
Transport rollers before
and after the densitometer
4-24 5E6155 June 12, 2003
Troubleshooting
6. Close the upper hood.
7. If you cannot clear the jammed film, call Service.
Clearing Film Jams from
Area 6 The sorter is Area 6. If film stalls in this area, an error message appears on
the local panel.
Sorter Knob
1. The Film Jam in Area 6: error message appears.
2. Touch the Show Jam button. The Door Control screen appears and
the affected area is highlighted.
3. Open the upper hood to its first locking position.
CAUTION:
Hot Surface. Drum and rollers inside the processor are hot.
Exercise caution when working in the drum area.
4. Inspect the sorter rollers on the left side of the sorter. Remove any
film. If the film is jammed in one of the feed roller sets, turn the sorter
knob in the appropriate direction to free the film.
5. Tilt the sorter backward to access the inside area of the sorter:
Release button

Troubleshooting
June 12, 2003 5E6155 4-25
a.Hold the sorter with one hand.
b.Press down on the release button.
c.Carefully tilt the sorter to the left until it is in a resting position.
6. Remove any jammed film. If the film is jammed in one of the feed
roller sets, turn the sorter knob in the appropriate direction to free
the film.
7. Carefully tilt the sorter back to its locked position.
8. If you cannot clear the jammed film, call Service.
Calling for Support If you cannot repair the machine and need help, you should call for
support. Before you call, have the following information ready:
• Model number: 8900
• K-number:
• Phone Support number: 1-800-328-2910 (U.S. only)

4-26 5E6155 June 12, 2003
Troubleshooting

June 12, 2003 5E6155 5-1
5
Specifications
Dimensions
Height: 60 in. (152 cm)
Width: 32 in. (81 cm)
Depth: 39 in. (99 cm)
Weight: 1028 lb (466 kg)

5-2 5E6155 June 12, 2003
Specifications
Electrical
Voltage: 120 V ±10%, 60 Hz ±3 Hz
230 V ±10%, 50 Hz ±3 Hz
100 V ±10%, 50/60 Hz ±3 Hz
Current Draw: 120 V: less than 12 A
240 V: less than 7 A
100 V: less than 15 A
Power Consumption: • 1440 W peak for line voltages
between 90 V and 106 V (and tapped
at 100 V)
• 1150 W peak for line voltages
between 108 V and 127 V (and
tapped at 120 V)
• 1450 W peak for line voltages
between 180 V and 212 V (and
tapped at 200 V)
• 1530 W peak for line voltages
between 198 V and 233 V (and
tapped at 220 V)
• 1530 W peak for line voltages
between 233 V and 254 V (and
tapped at 240 V)

Specifications
June 12, 2003 5E6155 5-3
Laser Specifications
Operating Environment
Storage Environment
Environmental Effects
Film Sizes The 8900 Laser Imager processes the following film sizes:
Wavelength: 810 nm
Power: 100 mW
Class: 3B
Type Diode
Temperature: 15° to 35° C (59° to 95° F)
Humidity: 20% to 75% RH, non condensing
Airflow 0.5 cubic feet per minute of fresh
outside air, per square foot of floor
area, assuming a maximum
occupancy of 10 persons/1000
square feet in the room where the
laser imager is located.
Magnetic Field: < 50 Gauss
Temperature: -35° C to 60° C (-31° F to 140° F)
Humidity: 10% to 90% RH, non condensing
Heat Dissipation: 3000 BTU/hour (average)
Acoustical Noise: Less than 55 dB at one meter (70 dB
momentary)
Less than 80 dB, non-repetitive tasks
such as door open/close

5-4 5E6155 June 12, 2003
Specifications
• 8 x10 in. DryView Film
• 10 x 12 in. DryView Film
• 11 x 14 in. landscape DryView Film
• 14 x 14 in. DryView Film
• 14 x 17 in. DryView Film
Film Types The 8900 Laser Imager processes the following film types:
•DryView Blue Film
•DryView Clear Film
Film Throughput The film throughput is approximately 180 films per hour.
Agency Compliance See “Safety and Related Information” on page 1-1 in this manual.

Specifications
June 12, 2003 5E6155 5-5

5-6 5E6155 June 12, 2003
Specifications

June 12, 2003 5E6155 6-1
6
Film Technical Information
General Description This section describes the characteristics of Kodak DryView Laser Imaging
Film, not the operation of the 8900 laser imager.DryView Laser Imaging
Film is a high-resolution, infrared-sensitive, photothermographic film
designed specifically for the family of DryView Laser Imagers.
DryView Laser Imaging Film is packaged in daylight load packages,
available in blue or clear, 7-mil polyester base, and is available in the
following five sizes:
• 8 x 10 in.
•10 x 12 in.
•11 x 14 in.
•14 x 14 in.
•14 x 17 in.
Spectral Sensitivity DryView Laser Imaging Film is infrared sensitive and has been sensitized to
the infrared laser diode of DryView Laser Imagers. When handled
according to instructions on the daylight-load film package, safelights are
not needed. It is not recommended, but if you remove undeveloped film
from the daylight load package, you will need a darkroom setting and a
green safelight.
Film Technical Information
June 12, 2003 5E6155 6-2
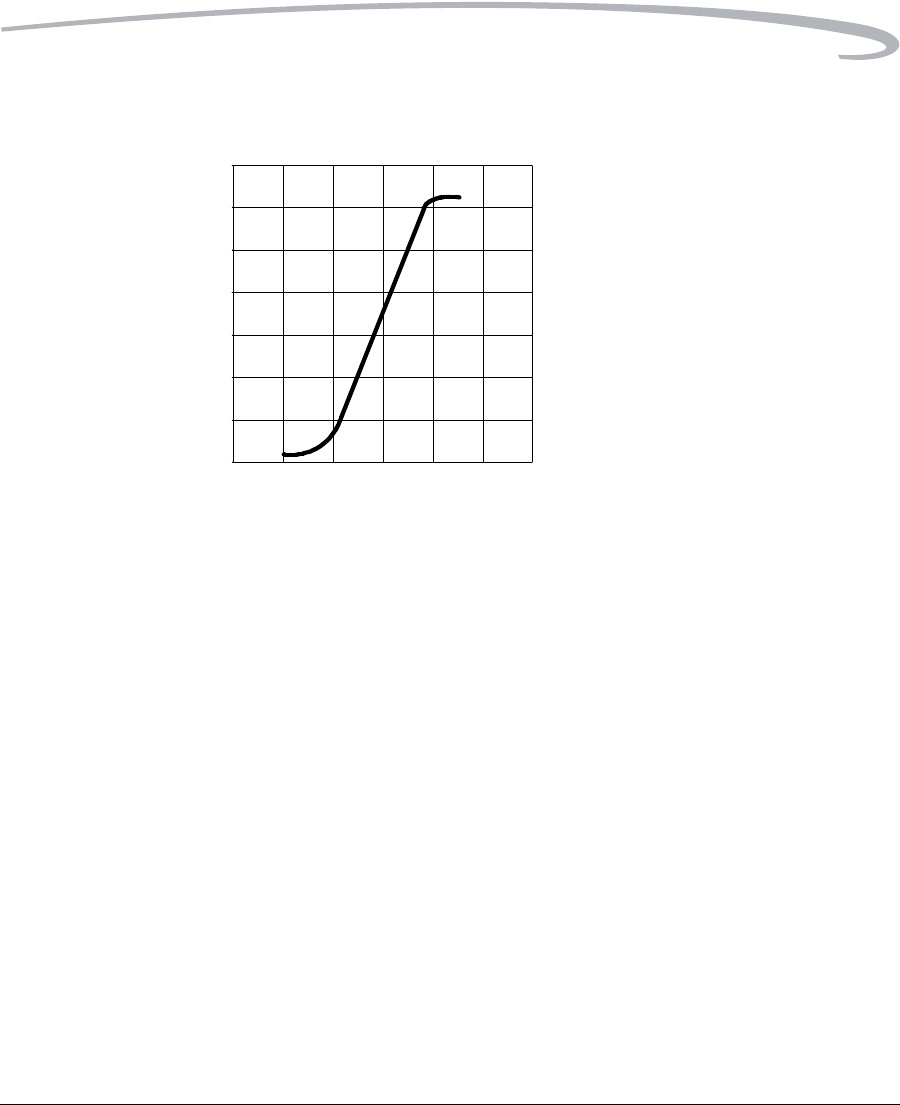
Relative Log Exposure
Image Quality DryView Laser Imaging Film delivers diagnostic-quality, continuous-tone
images along with sharp alphanumerics and optimum contrast. This high-
quality, silver-based film provides radiologists with the same diagnostic
information they are accustomed to viewing - including the spatial
resolution, contrast and grey levels. Because it is a totally dry imaging
process, there is no image quality variability due to “wet” chemistry.
Automatic Image Quality
Control
DryView Laser Imaging Film is system-matched for the Kodak patented
Automatic Image Quality Control (AIQC) technology. This fully automated
system, which is a standard feature of DryView Laser Imagers, is designed
to ensure that contrast, density and other image quality parameters meet
preset user preferences, film-to-film, lot-to-lot.
An RF-TAG mounted on each film cartridge lets the laser imager
automatically determine film type, the number of sheets remaining, and the
film manufacturing lot. The AIQC uses this information to automatically
calibrate the imager's electronics and optimize image quality without
operator intervention.
The AIQC system reads a special density patch printed on each sheet of
DryView Laser Imaging Film as it passes through a built-in densitometer.
0 0.5 1 1.5 2 2.5 3
0
0.5
1
1.5
2
2.5
3
3.5
Sensitometric Characteristics
Density
Film Technical Information
June 12, 2003 5E6155 6-3
Slight density variations are corrected automatically.
Environmental Impact Tests show that DryView Laser Imaging Film is not considered hazardous to
the environment. As a result, you can develop, recycle, and dispose of film
with less impact on the environment than if you were using wet-developed
silver halide films.
Storing and Handling
Undeveloped Film To achieve consistent results up to the expiration date indicated on the film
package, DryView Laser Imaging Film must be stored in a cool, dry place
(41° F/5° C to 77° F/25° C) and protected from radiation and chemistry
fumes.
The film can withstand short-term temperature spikes (up to 95° F/35° C)
for several hours during transit without any significant effect on film quality
or performance. Transit temperatures above 95° F/35° C will gradually
diminish shelf life. If the AIQC encounters film that has been damaged by
improper handling, the AIQC will automatically alert system operators.
Handling Developed Film Handling DryView Laser Imaging Film requires reasonable care. Spills,
humidity and other moisture typically have no significant effect on
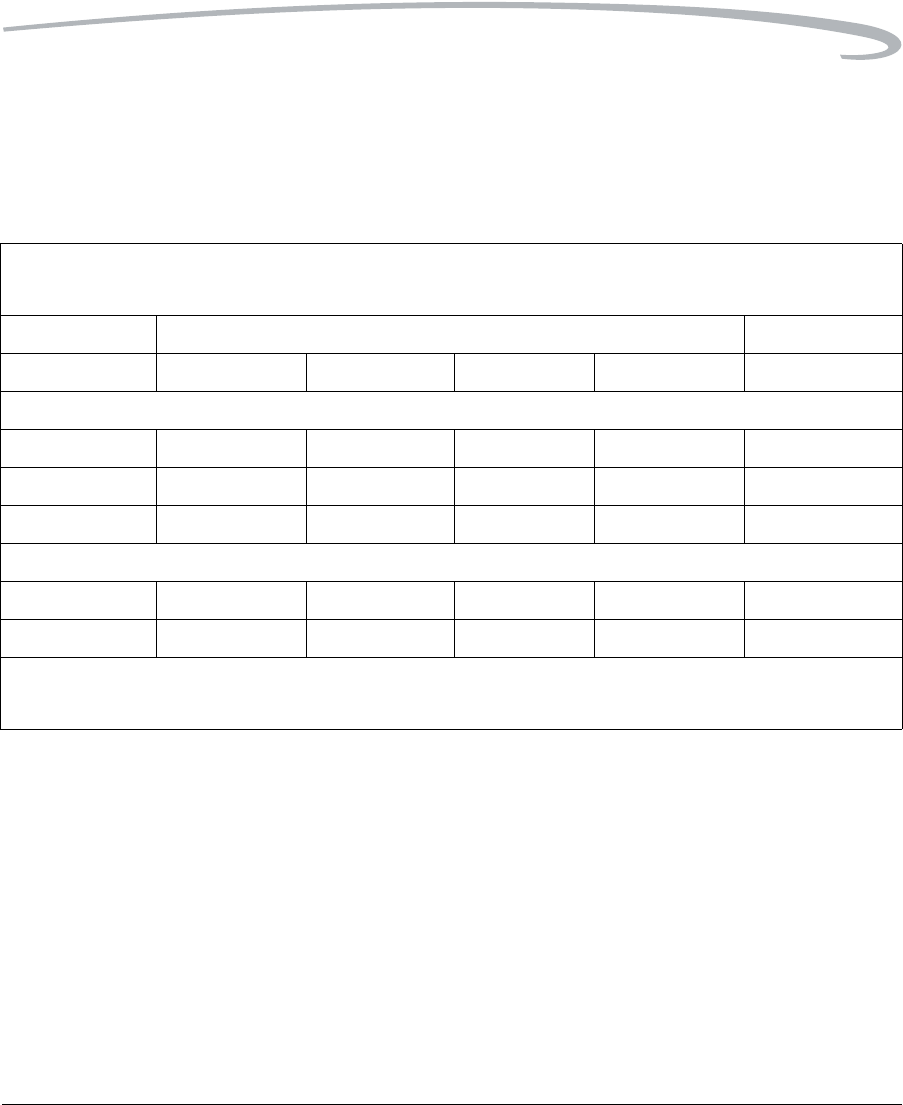
DryView Laser Imaging Film
US Environmental Regulations Comparison
Wet Silver Halide DryView
Developer Fixer Wash Film Film
Product Regulations
OSHA MSDS Required Required Not required Not required Provided
DOT Hazardous Hazardous No limits No limits No limits
Use permits Local Local None None None
Disposal* Regulations
EPA Hazardous Hazardous No No No
DOT Hazardous Hazardous No No No
Note: There is not SUPERFUND liability with DryView Laser Imaging Film.
* State and local laws vary. Consult appropriate regulations or authorities prior to disposal.

Film Technical Information
June 12, 2003 5E6155 6-4
developed films. However, prolonged exposure to intense light or excessive
heat (130° F/54.4° C) for more than 3 hours, may cause some gradual
darkening of images. Leaving films in vehicles in hot climates for extended
periods of time is not recommended.
For best results, store film in sleeves when not being reviewed. DryView
Laser Imaging Film can be left on a light box for more than 24 hours; in
extreme cases in which light boxes are exceptionally hot (120° F/49° C),
Kodak recommends removing them prior to 8 hours of continuous
exposure.
Take care when using spotlight viewing for more than 30 seconds because
temperatures near the light source may exceed 180° F/82.2° C. Use in slide
projectors is not recommended due to the high temperatures generally
found in these devices.
With DryView technology, a small amount of final development occurs
when the film exits the laser imager and is initially exposed to ambient or
view-box lighting. This is virtually undetectable and has no effect on image
quality (i.e., typically 0.02 change in density). This small density increase is
uniform and permanent upon full exposure of the film under normal
handling conditions (i.e., room light or view box).
Archiving Developed Film DryView Laser Imaging Film has been tested and can be archived for more
than 100 years when stored at American National Standards Institute
(ANSI) recommended storage conditions (77° F/25° C). Developed films
may be stored at higher temperatures; however, that may reduce the
number of years the film can be stored. For example, storing films at a
constant elevated temperature of 90° F/32.2° C may reduce archive
capability to 30 years.
Exposing to Moisture DryView Laser Imaging Films typically withstand humidity, spills and other
forms of water without any significant effect on image quality or film
integrity. If needed, film can be cleaned with a clean, damp cloth.
Dissipating Odor DryView technology eliminates virtually all unpleasant odors. While some
low-level odors are produced during the development process, they pose
no known adverse health risks. Processing odor levels are further reduced
by a non-hazardous, recyclable filter in the laser imager. This filter traps
most low-level odors and prevents them from dissipating into the work
environment. To help maintain optimum performance, the filter requires

Film Technical Information
June 12, 2003 5E6155 6-5
periodic replacement. DryView Laser Imagers require no special venting.
Dissipating Heat DryView Laser Imagers use controlled heat to develop DryView Laser
Imaging Film. The heat has virtually no effect on the air temperature of the
work area. The amount of heat dissipated into an area during a day is
typically less than the heat generated by four 100-watt light bulbs.
Recycling Film According to the Environmental Protection Agency (EPA) standards,
DryView Laser Imaging Film is not considered hazardous and requires no
special disposal procedures. However, the film does contain silver and
polyester that may be recovered by using one of several recycling
processes.
Call your local Kodak sales representative or go to the Kodak website
www.kodak.com/go/KES
Refer to Publication J700 and see “End of Life Management' section.

Film Technical Information
June 12, 2003 5E6155 6-6

June 12, 2003 5E6155 Glossary-7
Glossary
AIQC Automatic Image Quality Control.
CR Computed Radiography, the process of creating digital radiographic images.
CT Computed Tomography, the process of creating digital tomographic images.
Restart the laser imager Restart means to shut down and restart the laser imager.
DICOM Digital Imaging and Communications in Medicine. A TCP/IP-based protocol
for transmitting and receiving medical imaging and related data over a
network.
Dmax Dmax means maximum density. Dmax is the density of an area on the film
which has received maximum exposure.
Dmin Dmin means minimum density. Dmin is the density of an unexposed area on
the film.
dPatch dPatch means density patch. A small patch of specified density in the trailing
edge of each film that AIQC uses to monitor density change on film.
DR Digital radiography, the process of creating digital radiographic images.
DRE DICOM rastor engine.
DSA Digital Subtraction Angiography.
DVB DryView Blue Film.
DVC DryView Clear Film.
FAZ Fatty acids (FAZ). A by-product from the processing of DryView Film. As
film is processed (heated), solvents in the film emulsion are let go as a gas.
Some of these gases condense into FAZ.
Film model The film model defines the print characteristics for a particular lot of film.
Key operator The person(s) designated by the department manager to receive
applications training and allowed access to password-protected areas to
make system changes.
LED Light Emitting Diode.
MCS Machine Control System. A microprocessor system on a printed circuit
board that runs code to control the subsystems with the laser imager.
Modality Medical equipment that actually generates medical images (for example, an

Glossary-8 5E6155 June 12, 2003
MRI).
Monotonic Continuously increasing. When a calibration sheet, which consists of strips
of increasing density (Dmin) to maximum density (Dmax), is read by the
densitometer, the density values must be monotonic (continuously
increasing). If they are not, an error message is generated.
MR Magnetic Resonance.
GSM Gray Scale Manager.
N/A Not available or not applicable
PACS Link (MIM) Picture Archiving Communication System Link - Medical Image Manager. A
family of store-and-forward software applications that is developed by
Kodak.
Platen The metal surface on which the film rests as it is exposed.
RF Tag Radio frequency tag.
Service image An image used by service personnel for troubleshooting.
Shutdown The process of exiting current tasks and applications and turning the
power off.
SMPTE test pattern A Society of Motion Picture and Television Engineering monitor test pattern
that is used for analyzing image-quality problems.
SST Synergy Service Tool.
Test type The type of test film that will be printed. Two film test types are available: a
density test film (SMPTE pattern) and a calibration film.
TFT Transfer Function Tables.
Undelivered queue The queue of jobs that cannot be printed because of problems with the job
description.
UPS Uninterruptible Power Supply. This device provides power to the computer
during periods of power outage to provide power during a controlled
shutdown.
Version A different rendition of an image. A second version of an image is
processed using a second set of image processing parameters.

-2 5E6155 June 12, 2003

EASTMAN KODAK COMPANY
343 State Street
Rochester, N.Y. 14650
Kodak and DryView are trademarks of Eastman Kodak Company.
© Eastman Kodak Company, 2002