Eastman Kodak 8E1587 Modular 13.56 MHz RF Tag Reader Board User Manual urg 00123
Eastman Kodak Company Modular 13.56 MHz RF Tag Reader Board urg 00123
Contents
- 1. manual 1
- 2. manual 2
- 3. manual 3
manual 2
2-2 5E6155 June 12, 2003
Overview
System Components
System Components
9
7, 8
2
4
5
6
1
3
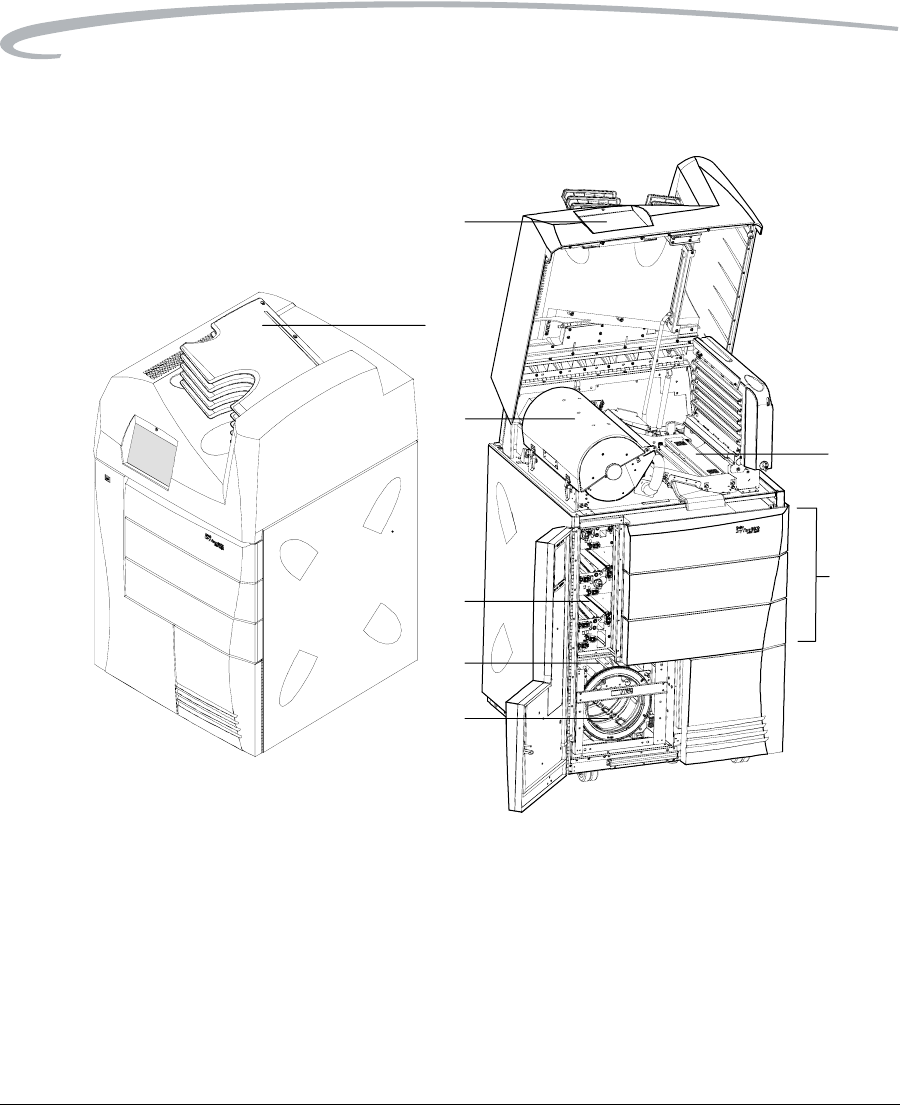
1 Touch screen local panel. The local panel is the interface
between the user and the laser imager. The panel accepts
commands from the user and provides status information to the
user about imager functions.
2 Film drawers. Each of the three film drawers can hold any of five
different sizes of DryView film. You can select the film cartridge in
any drawer for printing.
FCC ID: PA48E1587 User Manual Part 2

Overview
June 12, 2003 5E6155 2-3
How the Laser Imager
Works When the laser imager receives a print request and image data from the
modality (image capturing device), the system determines the requested
film size from the information included with the image data. The system
then selects the appropriate film cartridge.
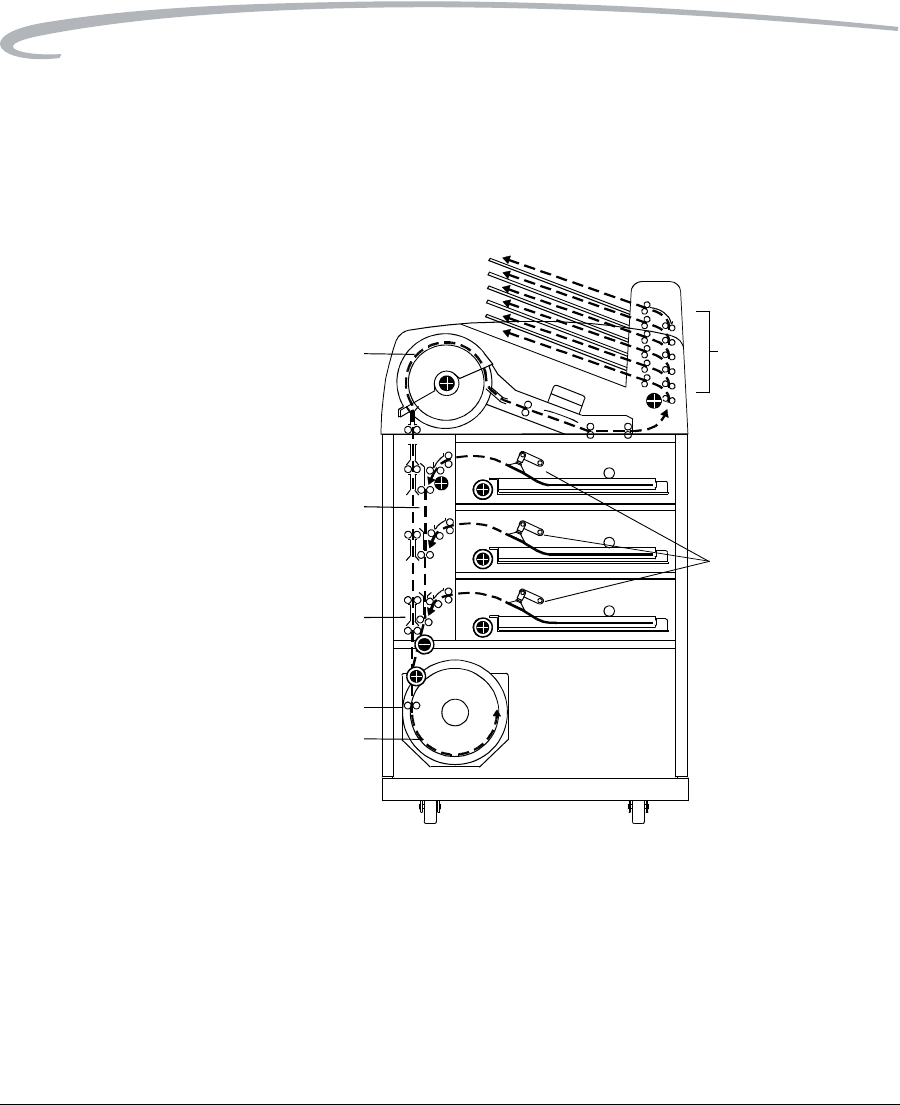
Each time a print request occurs by a modality, the following print
sequence occurs.
1. Suction cups in the pickup areas lift a single sheet of film out of the
supply cartridge and feed the film into the vertical transport rollers.
2. The vertical transport rollers move the film down to the film platen
(exposure area).
3. The platen rollers move the film into the film platen.
4. The platen holds the film in a stationary position while the scanner
writes the image onto the film.
5. The platen rollers move the film into the vertical transport rollers,
3Film transport. The film transport moves the film through the
laser imager from the film cartridge to the film platen, then to the
film processor and to the film sorter.
4Film platen. The film platen positions the film and holds the film
stationary for imaging.
5Optics module. The optics module writes (exposes) the image
onto the film while the film is positioned on the film platen.
6 Film processor. The film processor uses heat to develop the
image exposed onto the film by the laser in the optics module.
7 Densitometer. The densitometer receives the film after it passes
through the processor and performs a density check to confirm
image quality. The densitometer is the key component of the
Automatic Image Quality Control (AIQC) system.
8AIQC. The AIQC system ensures that contrast, density, and other
image-quality parameters meet preset user preferences.
9 Film sorter. The film sorter receives the processed film after the
film passes through the densitometer and transports the film to the
selected film bin on top of the laser imager. The bottom bin holds
125 sheets of film. Each of the top five bins holds 30 sheets of film.
2-4 5E6155 June 12, 2003
Overview
which move the film up into the film processor.
6. As the film passes over the processor drum, the heat generated by the
drum develops the film.
7. The film transport rollers move the exposed film through the
densitometer and out to one of the six bins.
Print Sequence
1
2
3
4
5
67

June 12, 2003 5E6155 3-1
3
Operation and Maintenance
System Power Up and Power Down
Power Up To power up the laser imager, push and hold the power switch to the ON
position for about 2 seconds.
The power up process takes approximately 3 minutes. After power up, the
laser imager begins accepting and queueing print jobs. At this point, you
can determine cartridge status and load new cartridges if necessary.
Film will not begin processing until the laser imager is completely warmed
up (approximately 45 minutes).
Power Switch (press for two seconds)
Operation and Maintenance
June 12, 2003 5E6155 3-2
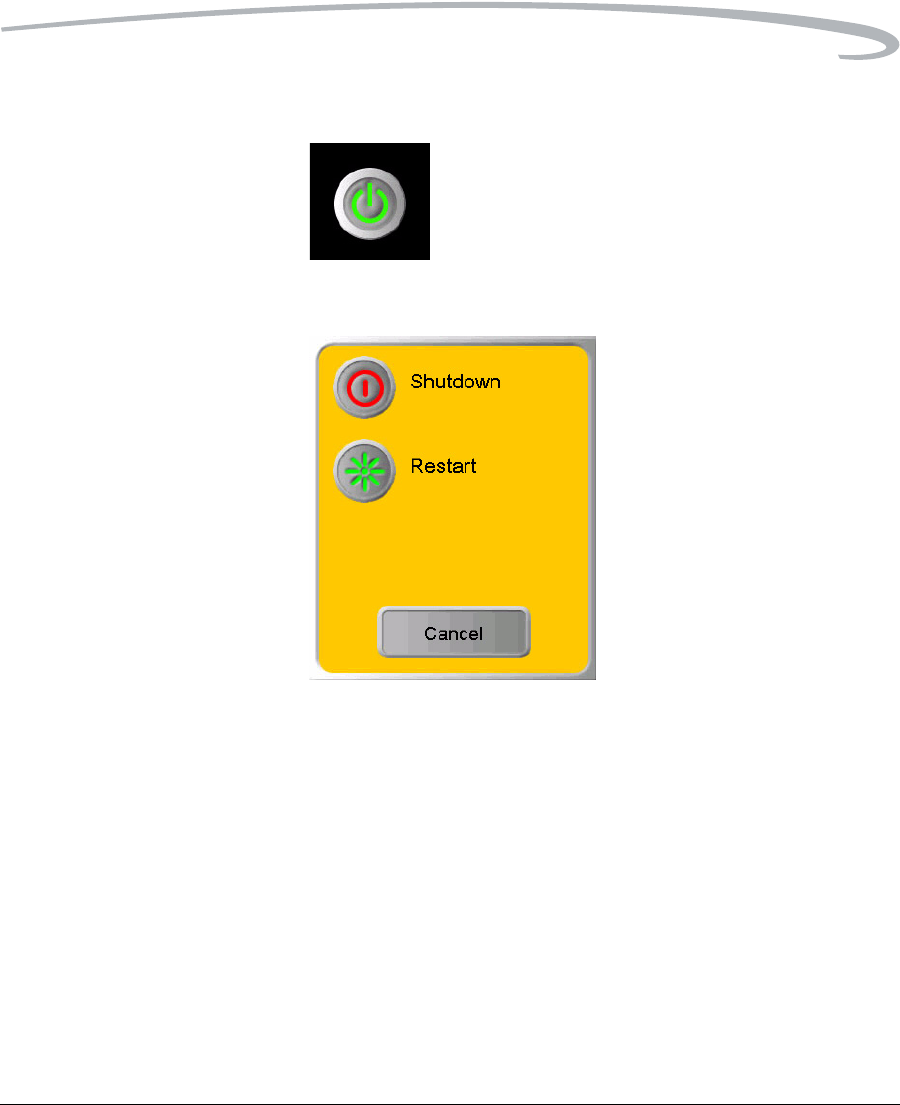
Shut Down To shut down the laser imager:
1. Touch the Power icon on the local panel.
2. Touch the Shut Down button.
NOTE: If the laser imager is not expected to be used for an extended
period of time (three days or longer), shut down the laser imager.
Levels of Operation The laser imager has four levels of operation:
NOTE: The reprint capability of the laser imager enables Levels 2, 3, and
4 users to command reprinting of images that may contain
patient-identifiable data. Therefore, operation of the system by
users at these levels is controlled by a login procedure that can
assist users in meeting requirements to control access to such
information.
Level 1 Operator Activities include printing, clearing of some errors,
and removing film jams.

Operation and Maintenance
June 12, 2003 5E6155 3-3
Power Failures In the event of a power loss, the laser imager shuts down. To restore power,
push and hold the power switch to the ON position for about 2 seconds.
Level 2 Operator
(Key Operator) Activities include printing, clearing of some errors,
and removing film jams. Also perform minor setup,
deleting, and reprinting jobs. Access to Level 2
requires a Key Operator ID and passcode. Refer to
“Key Operator Information” on page 3-22 for Key
Operator information.
Level 3 First Call First Call providers are Kodak-trained and certified
self-maintenance customers. Level 3 First Call
provides access to all Level 1 and 2 features and
functions. Activities include Preventive
Maintenance with the ability to reset some of the
parameters. Access to Level 3 requires a Level 3 ID
and passcode.
Level 4 Full
Service Full Service providers are Kodak Health Imaging
Field Engineers and Kodak Technical Support staff.
Level 4 Full Service requires licensing for a
specified time interval. Full Service providers have
access to all Level 1, 2, and 3 service features. The
providers can also access the laser imager through
a service computer or through a remote computer
connected to the network. Access to Level 4
requires a Service ID and passcode.
Operation and Maintenance
June 12, 2003 5E6155 3-4
Using the Touch Screen Local Panel
The local panel provides touch-screen controls. To select a menu choice,
touch the center of the button.
NOTE: Use only your finger when selecting buttons on the screen. Using
hard objects, such as pens or pencils, can damage the surface of
the touch screen.
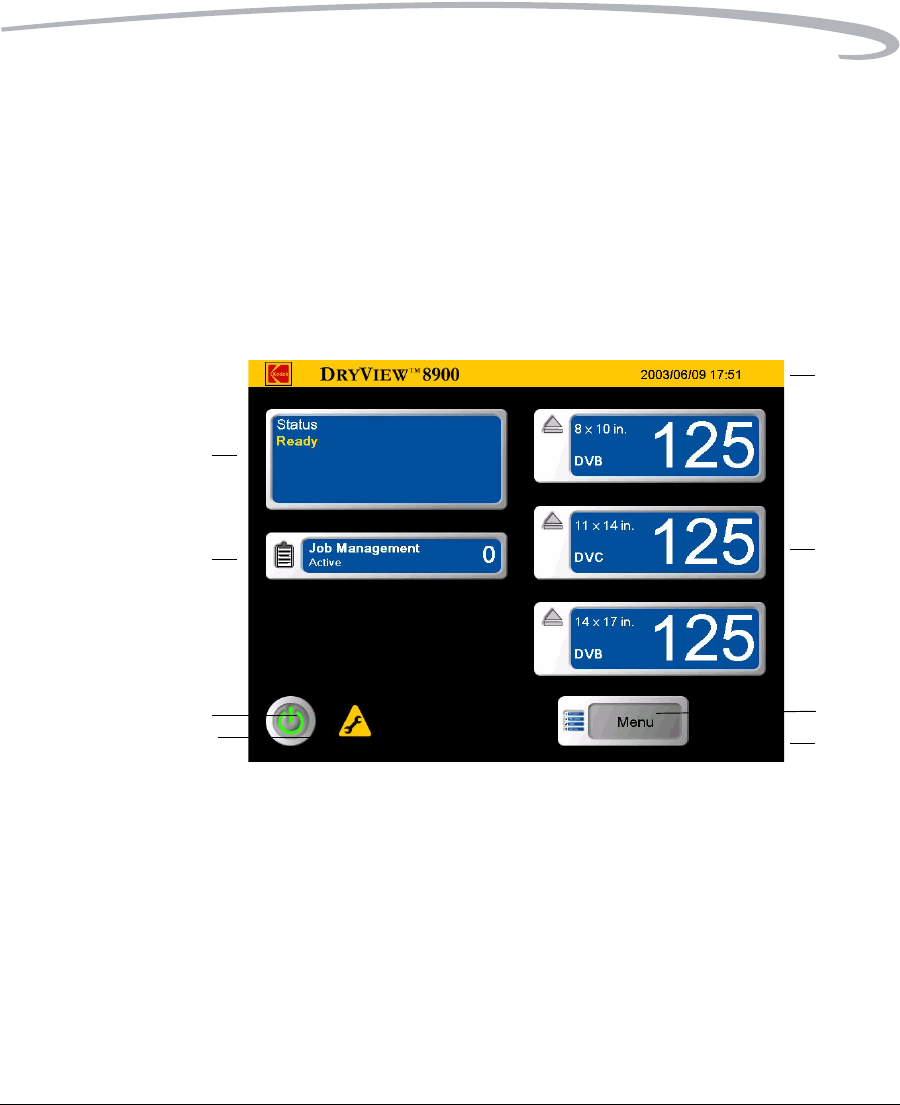
Status Screen The Status Menu is the first screen you see when the laser imager is
completely powered up.
Status
2
1
8
5
3
6
4
7
1 Date and Time.

Operation and Maintenance
June 12, 2003 5E6155 3-5
2 Film supply drawers. There are three film supply drawers
accessed from the front of the laser imager. Touch menu buttons
to close the film cartridge and open the drawers. The buttons also
provide film information related to the currently installed
cartridge:
• Film size appears in the upper left corner.
• Film base type appears in the lower left corner.
• Current number of film sheets available appears on the right
3 Main Menu button. When touched, the local panel displays the
Main Menu (see “Main Menu” on page 3-6).
4 Back Navigation icon. When touched, the local panel displays the
last previously displayed screen.
5Preventive Maintenance icon. When on, Preventive
Maintenance is needed (call Service).
6 Power button. When touched, the local panel displays the Power
display.
7 Job Management. When touched, the local panel displays the
Job Management screen (see “Job Management Screen” on
page 3-10).
8 Status display area. Displays system status messages.
Operation and Maintenance
June 12, 2003 5E6155 3-6
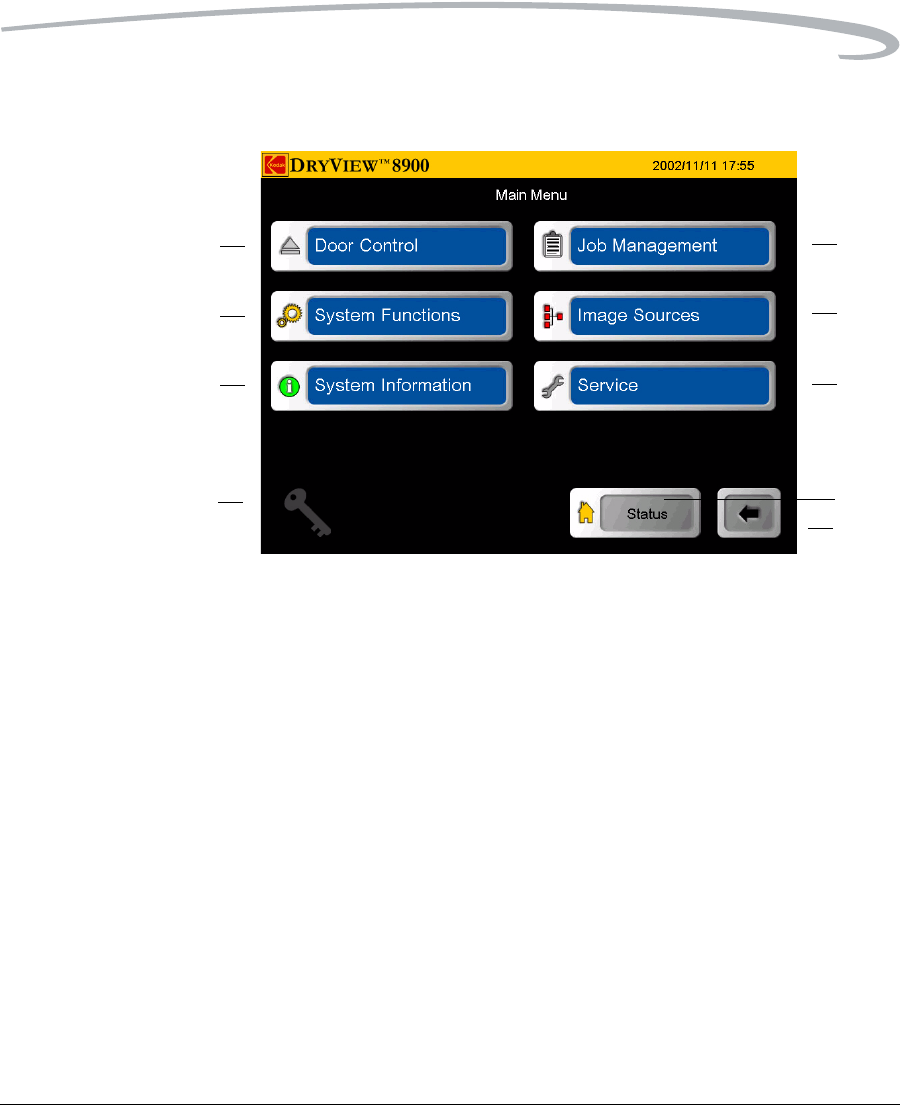
Main Menu
Main Menu
1
2
3
4
5
6
7
8
9
1 Job Management. When touched, the local panel displays the
Job Management screen (see “Job Management Screen” on
page 3-10).
2 Image Sources. When touched, the local panel displays the Image
Sources screen (see “Image Sources Screen” on page 3-12).
3Service. When touched, the local panel displays the Service
screen. The Service screen is only available to Level 4 Service.
4Status. When touched, the local panel displays the Status screen
(see “Status Screen” on page 3-4).
5 Back Navigation. When touched, the local panel displays the
previously displayed screen.
6Key Operator Login. When touched, the local panel displays the
Key Operator Login screen (see Key Operator screen, page “Key
Operator Passcode” on page 3-22).
Operation and Maintenance
June 12, 2003 5E6155 3-7
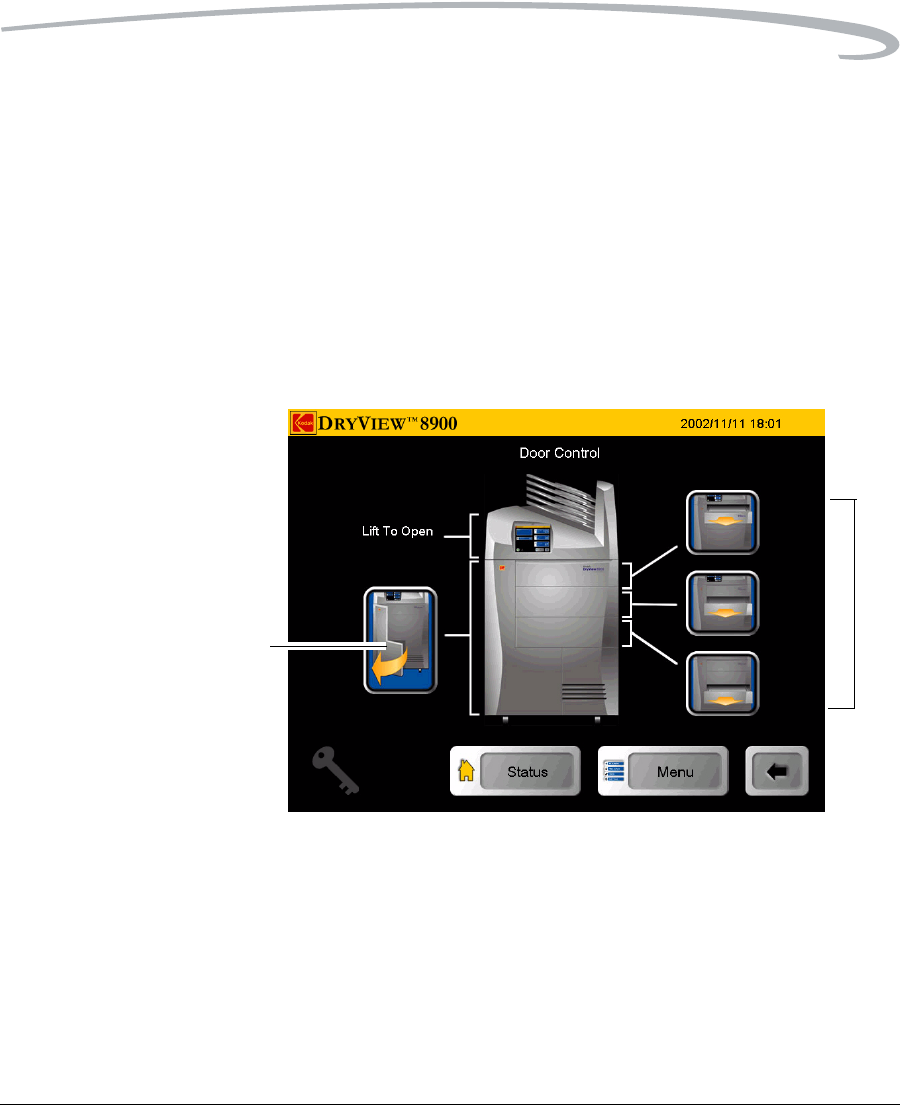
Door Control Screen
Door Control
7System Information. When touched, the local panel displays the
System Information screen (see “System Information Screen”
on page 3-9).
8 System Functions. When touched, the local panel displays the
System Functions screen (see “System Functions Screen” on
page 3-8).
9 Door Control. When touched, the local panel displays the Door
Control screen (see “Door Control Screen” on page 3-7).
1
2
1Film Drawer icons. When touched, the corresponding film
drawer opens (see “Opening the Film Drawers” on page 3-13).
2 Front Door icon. When touched, the front door opens (see
“Opening the Front Door” on page 3-13).
Operation and Maintenance
June 12, 2003 5E6155 3-8
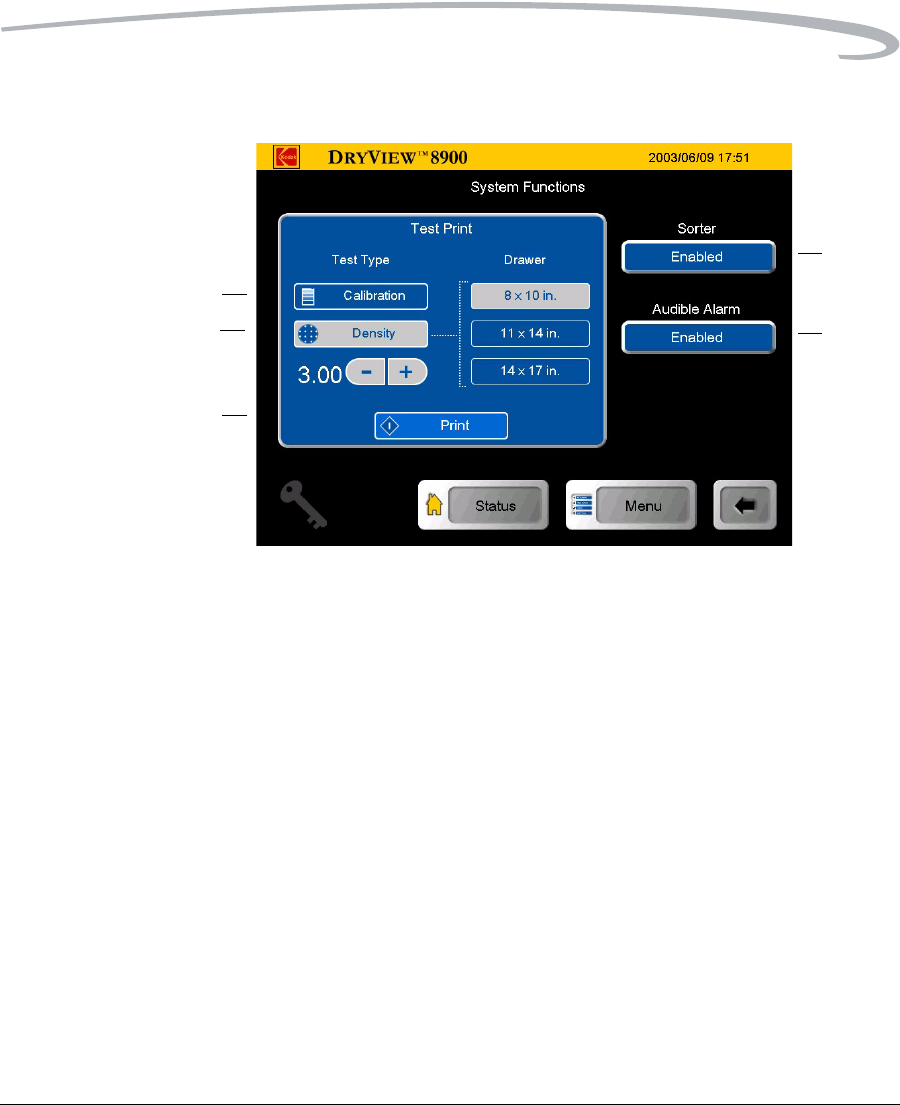
System Functions Screen
System Functions
2
1
3
4
5
1 Sorter (Enabled/Disabled). When touched, the sorter is
enabled or disabled. When disabled, the laser imager sends all film
to bin 1.
2 Audible Alarm (Enabled/Disabled). When touched, the
audible alarm for error and status messages is enabled or disabled.
3Print. When touched, the system prints the selected test print
(Calibration test print or Density test print).
4Density test print. When touched, the laser imager prints a Density
test print from the selected film drawer and at the selected density
(default 3.0).
5 Calibration test print. When touched, the laser imager prints a
Calibration test print from the selected film drawer.
Operation and Maintenance
June 12, 2003 5E6155 3-9
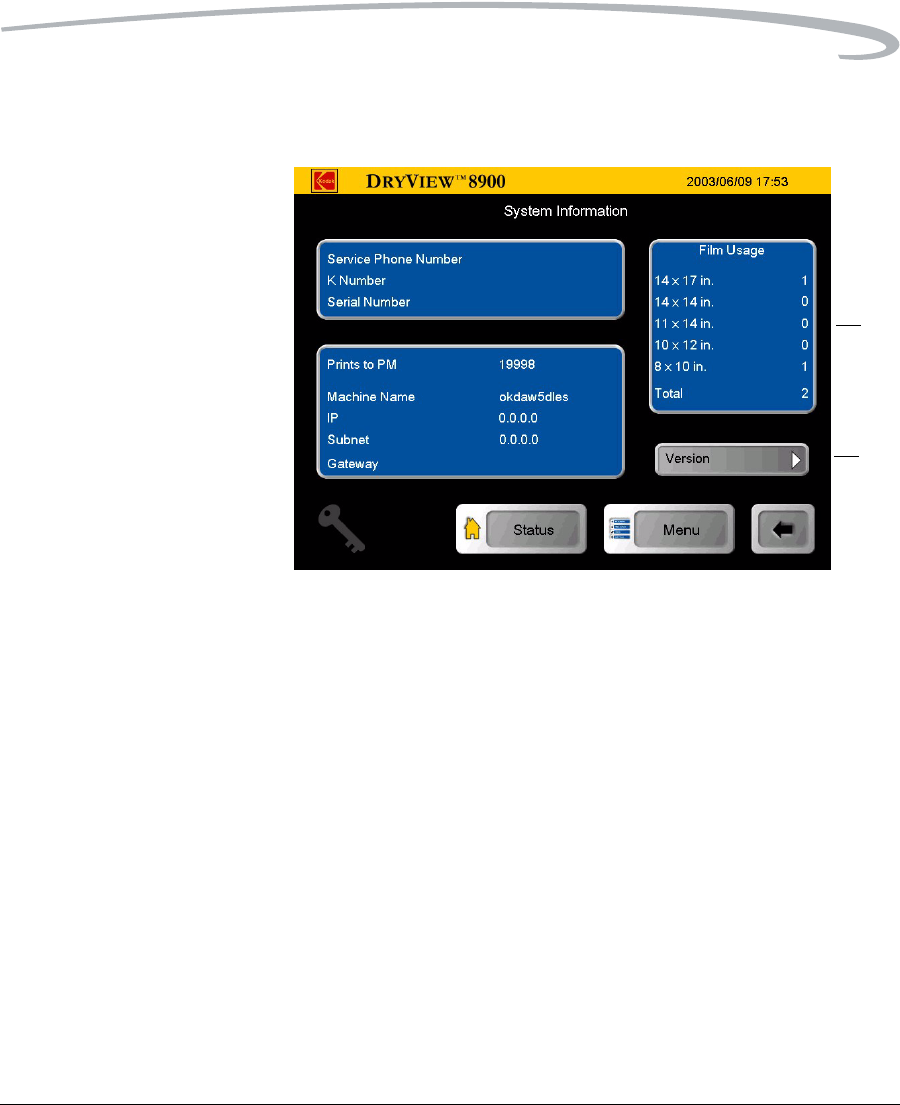
System Information
Screen
System Information
1
2
3
4
5
6
7
8
9
10
1Film Usage. The display area provides print counts for each film
size and the total number of prints.
2 The laser imager software version.
3The laser imager Gateway.
4The laser imager Subnet.
5 The laser imager IP address.
6The laser imager name.
7 Prints to PM: The number of prints before a Preventive
Maintenance is due.
8 Serial #: The laser imager serial number.
9K #: The laser imager Kodak number.
10 Service Phone: The Kodak Service telephone number.
Operation and Maintenance
June 12, 2003 5E6155 3-10
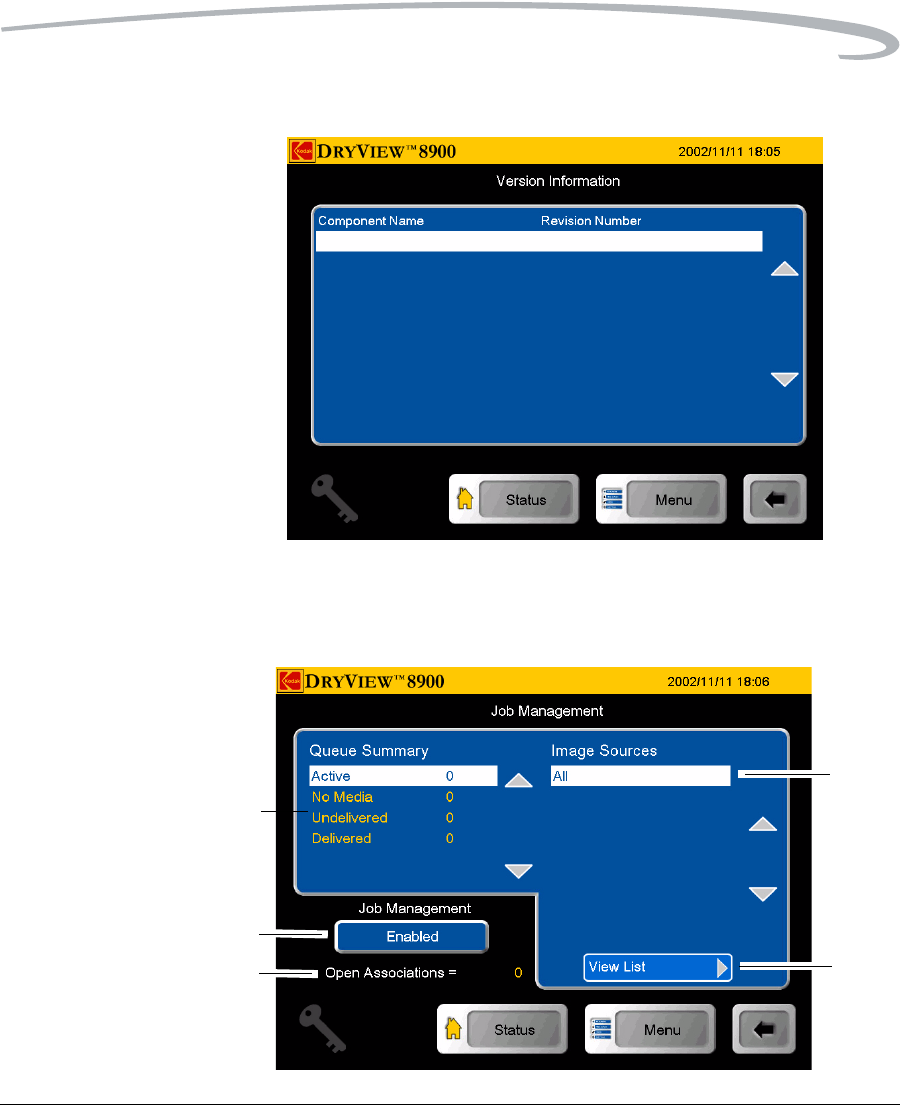
Version Information
Version Information
Job Management Screen
1
2
5
3
4
Operation and Maintenance
June 12, 2003 5E6155 3-11
Job Management
View List
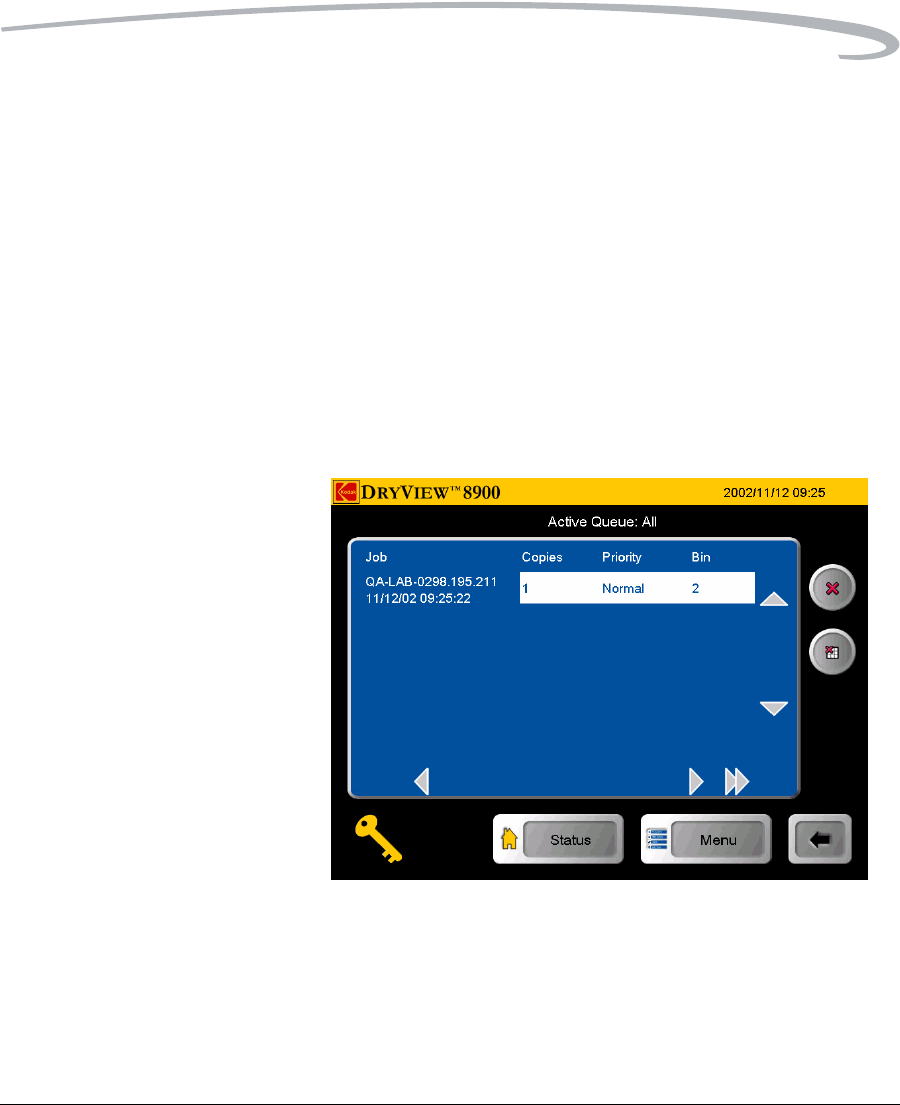
Active Queue View List
1List of modalities that have active print jobs in the queue.
2View List. When touched, the Active Queue screen displays all
print jobs currently in the queue (see “View List” on page 3-11).
3 Open Associations. Represents the number of modalities
currently communicating actively with the laser imager.
4When touched, the Job Management is enabled or disabled
which prevents the spooling or storage of DICOM jobs.
5Identifies the status of a print job currently in the queue.
Operation and Maintenance
June 12, 2003 5E6155 3-12
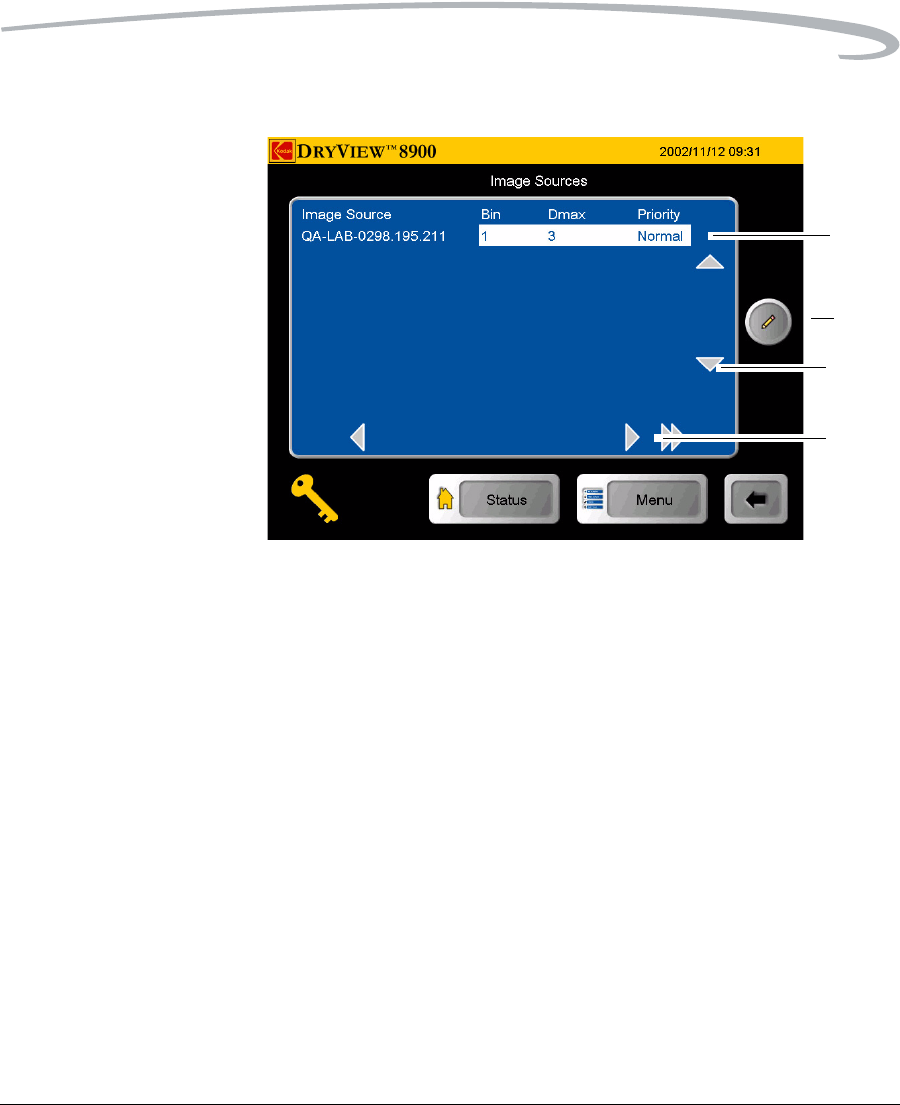
Image Sources Screen
Image Sources
1
2
3
4
5
1List of all modalities currently connected to the laser imager. The
list identifies the sorter bin, Dmax, and priority designation that the
modality is associated.
2When touched, the Image Source Editor screen is displayed.
3Navigation arrows.
4Navigation arrows
Operation and Maintenance
June 12, 2003 5E6155 3-13
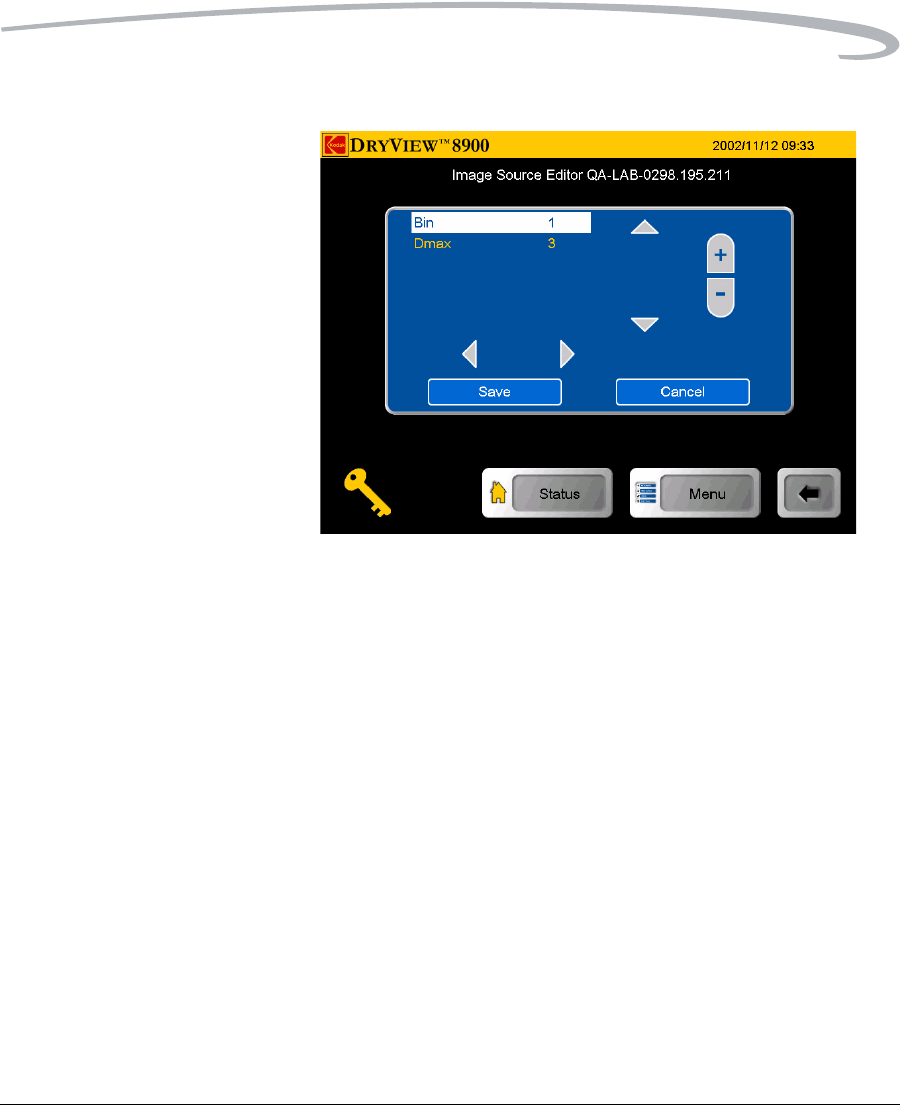
Image Source Editor
Image Source Editor
The Image Source Editor screen allows you to identify and select a
modality and determine respective modality Dmax value and sorter bin.
When touched, the bottom right navigation button scrolls to the right to
reveal film border, film size, film base, and Dmin information.
Operation
Opening the Front Door When open, the front door provides access to areas 2 and 3. Use the Door
Control screen on the local panel to open the front door in normal
situations (see “Door Control Screen” on page 3-7). If the Door Control
screen fails to open the door, use the manual door override latch (see
“Film Drawers and Front Door Manual Override Latches” on page 3-14).
1. Minimize film exposure by making the room as dark as possible.
2. At the Door Control screen, touch the front door icon.
3. If necessary, close any film cartridges to prevent the film from fogging:
Opening the Film Drawers The open film drawer controls on the local panel are available on two
display screens: Door Control screen and Status screen. If a film drawer

Operation and Maintenance
June 12, 2003 5E6155 3-14
fails to open, use the manual drawer override latch (see “Film Drawers and
Front Door Manual Override Latches” on page 3-14).
NOTE: If the drawer is opened without the film cartridge closed, several
sheets of film at the top of the cartridge will be exposed (fogged)
and should be discarded.
1. Minimize film exposure by making the room as dark as possible.
2. At the Door Control screen or Status screen, touch the desired
drawer icon.
3. If necessary, close any film cartridge lid to prevent the film from
fogging (see “Manually Closing the Film Cartridge Lid” on page 4-17).
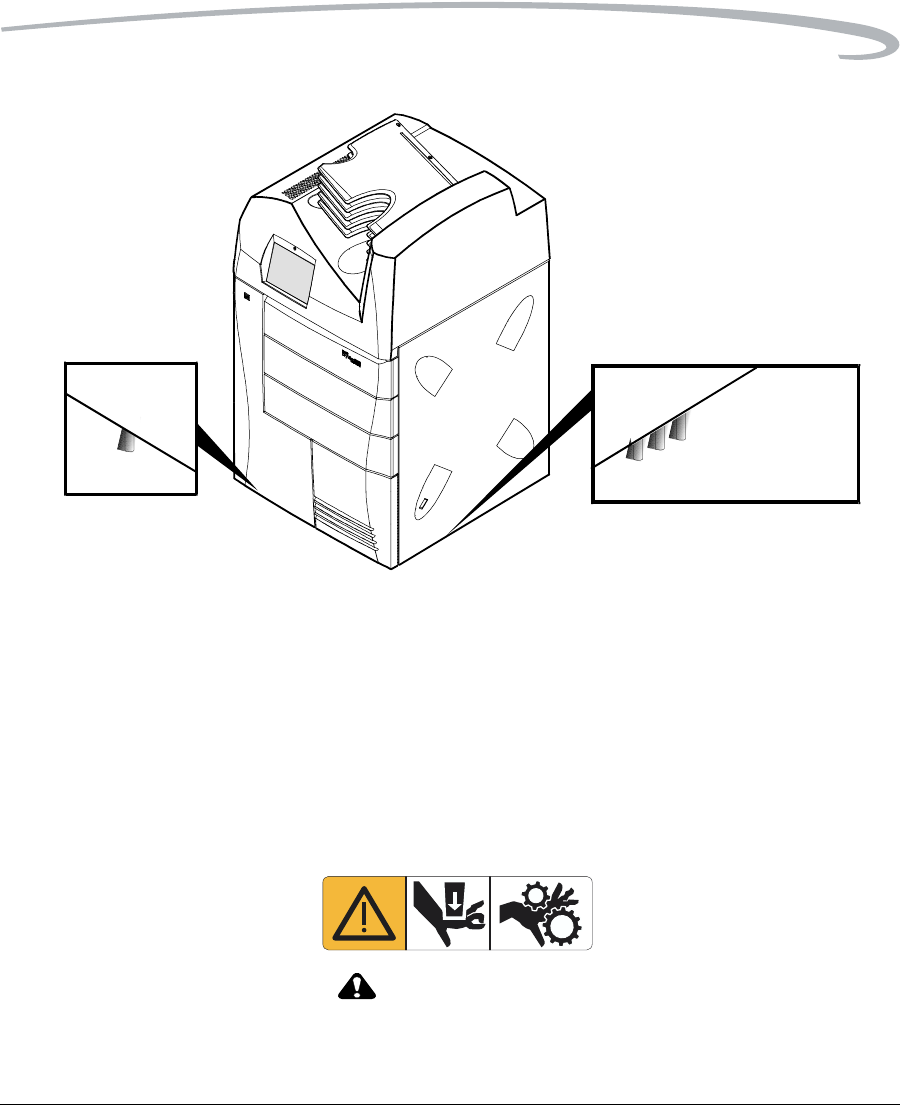
Film Drawers and Front
Door Manual Override
Latches
If the laser imager is powered down or if the Door Control screen fails to
open the drawers or door, use the manual override latches.
The door override is under the front of the imager. The drawer overrides
are under the right of the imager.
NOTE: If the drawers or door are opened without the film cartridge
closing, several sheets of film at the top of the cartridge will be
exposed (fogged) and should be discarded.
Operation and Maintenance
June 12, 2003 5E6155 3-15
Manual Override Latches
To manually open the drawers and front door:
1. Minimize film exposure by making the room as dark as possible.
2. Lift up the desired override latch.
3. If necessary, manually close any film cartridges to prevent the film
from fogging.
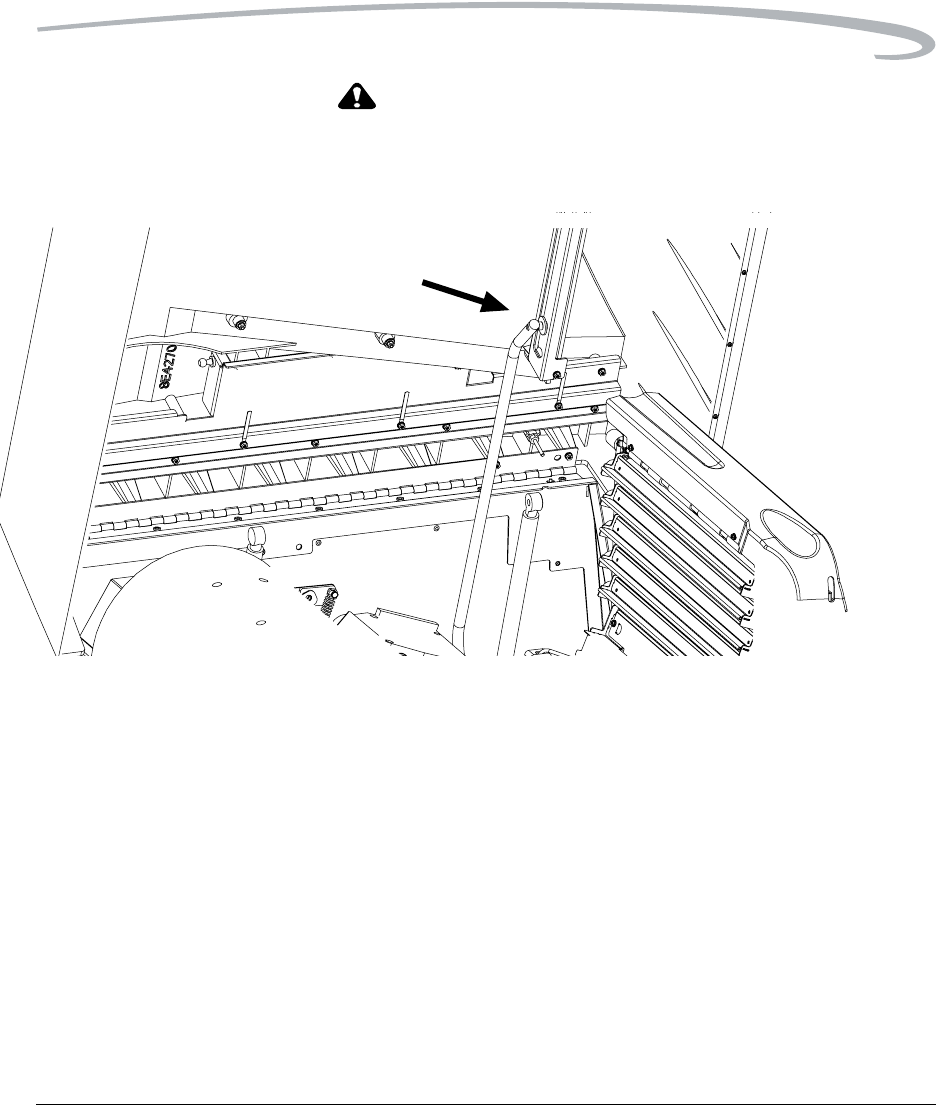
Opening the Hood Opening the hood provides access to film jam areas 4 and 5.
CAUTION:
Whenever you raise or lower the hood, grasp the hood only
in the area of the recessed slot below the local panel to
avoid the possibility of pinching your fingers.
Upper
Middle
Lower
Door
Drawer manual
override latches
Door manual
override latch
Operation and Maintenance
June 12, 2003 5E6155 3-16
CAUTION:
Close the hood carefully. Releasing and dropping the hood
could damage the laser imager.
Recessed Slot
To open the hood:
1. Grasp the hood at the recessed slot below the local panel.
2. Raise the hood until the support rod locks into the first slot.
To close the hood:
1. Raise the hood slightly to lift the support rod out of its slot and push
the rod slightly to the rear from the slot.
2. Gently lower the hood to its closed position.
Loading Film Cartridges You can monitor the number of sheets left in a film cartridge by looking at
the film drawer icon on the Status screen. When a film cartridge runs out
of film, an audible alarms sounds, the appropriate film drawer icon flashes,
and a large zero appears in the drawer icon.
Operation and Maintenance
June 12, 2003 5E6155 3-17
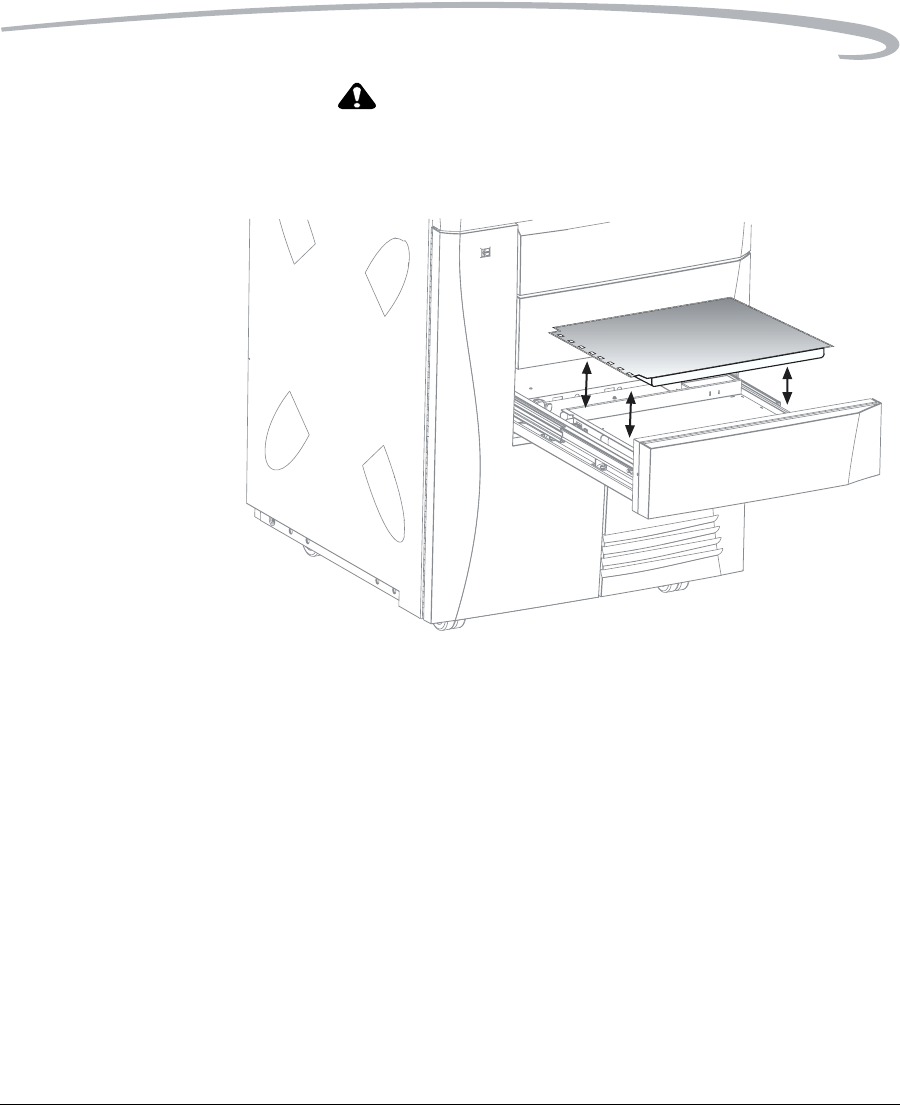
CAUTION:
To avoid injury, do not leave the laser imager unattended
when the film drawers are open.
To load or unload a film cartridge:
1. At the Door Control or Status screens, touch the desired film
drawer icon. The laser imager closes the cartridge and partially opens
the drawer.
2. Pull the film drawer out to its furthest extension.
3. To remove a film cartridge, hold the edge of the cartridge and lift the
cartridge out of the drawer.
4. To load a new or different cartridge, insert the cartridge into the film
drawer with the perforations to the left.
5. Slide the drawer into the laser imager.
Recycling Empty Film
Cartridges Return your empty Kodak DryView film cartridges to Kodak for reuse and
recycling.