Eaton HHB1BASE Home Security Base Station Transceiver User Manual hhb users guide 05 dec indd
Eaton Corporation Home Security Base Station Transceiver hhb users guide 05 dec indd
Eaton >
Manual

User’s Guide

3
Contents
Contents
Introduction
..............................................................
5
Getting to Know Home Heartbeat
™
...................................
7
Home Heartbeat Starter Pack Components
.........................
8
Getting Started
.........................................................
1
1
1.
Set Up the
Base Station and
Home Key
™
..................
1
1
2. Set Up the
Open/Closed Sensor
............................
1
7
3. Place the
Open/Closed Sensor
.............................
2
4
4
. Set Up
Remote Alerts
.........................................
2
7
5
.
Monitor Your Home
...........................................
31
Getting the Most Out of
Home Heartbeat
..........................
3
7
Troubleshooting
........................................................
4
7
Sensor and Component Options
....................................
54
Message Glossary
....................................................
5
8
Support
..................................................................
6
3
© 2005 Eaton Corp. All Rights Reserved.

5
4
Introduction
Welcome to Home Heartbeat
™
—the world’s fi rst personal
wireless Home Awareness System!
Home Heartbeat provides a new perspective on your home
environment. The system helps you keep a watchful eye on
the comfort and safety of your home. It can be extended
to monitor the vital, yet often overlooked parts of your home,
giving you peace of mind that all is secure. The compact,
portable visual display—the Home Key
™
—organizes and
presents you with the information you care about most. It can
even automatically shift to alert you via your cell phone or email
when you are away from home.
This User’s Guide will introduce you to the Home Heartbeat
system, assist you with initial setup, and explain how you can
use it to monitor your home.
Introduction

7
Getting to Know Home Heartbeat
The Home Heartbeat Starter Pack includes the following three
essential components of a Home Heartbeat system:
• Base Station
• Sensor
• Home Key
You can expand your Home Heartbeat system any time by
adding additional accessories, such as more sensors or
Range Extenders. (Visit
www.homeheartbeat.com
for more
information on the latest introduction of sensors.)
The next two pages provide more details about the components
you will fi nd in the Home Heartbeat Starter Pack, and how they
work together. This product is designed for in-home use only.
Getting to Know Home Heartbeat
6
8
9
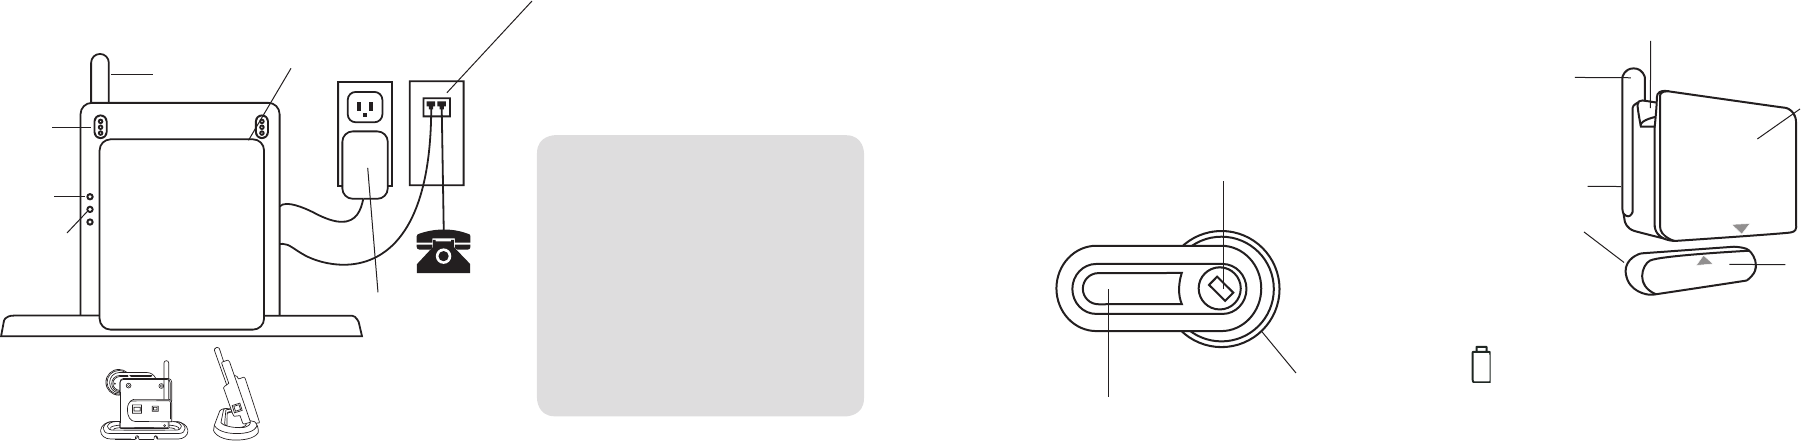
Base Station
The Base Station is the heart of the system. It communicates
with the Home Key
and all sensors and accessories
wirelessly
and maintains constant awareness of the state of your home.
Place the Base Station in a central location in your home, at least
one foot away from any other wireless devices you may have.
Power Adapter
The power adapter
allows the Base
Station to be
plugged into a
nearby wall outlet.
Home Key
Use the Home Key to:
• Set up the Base Station the fi rst time you use the
system and set up individual sensors.
• Determine whether system components are in range.
• Visually monitor the status of your home while you
are at home.
• Get a snapshot of the current state of your home as
you are leaving.
• Automatically set the system to send cell phone
text messages and email alerts after you have left home.
Sensor Battery
Each sensor is powered by one CR123A 3V lithium
battery, included in the packaging.
Phone Cord and Phone
Cord
Splitter
The phone cord and splitter are included
so that you can set up and receive cell phone
text message and email alerts
when you are
away from home
.
*
Home Heartbeat Starter Pack Components
Home Heartbeat Starter Pack Components
Home Heartbeat Starter Pack Components
Antenna
Digital
Screen
Thumbwheel
Keychain
Antenna
Home Key
Slide
Channel
Magnet
Enclosed
adhesive
should be
attached
on back for
placement
Home Key
Slide
Channel
Open/Closed Sensor for
Doors, Windows and Cabinets
This sensor monitors the state of a door, window,
or cabinet, letting you know if it is open or closed.
The sensor body and magnet must be installed within
1/2 inch of each other to register as closed (as shown).
Sensor Body
Home Key
Battery
Charging
Contacts
Red System
Error Light
* Note:
When you plug in the
Base Station,
it will make an
initial call to the server. The
call will last less than a minute.
Each time
an alert is sent to your cell phone or email,
the Base Station will make a quick call
to the server. If your
phone line is in use,
Home Heartbeat will not send a
message
until
the line is free.
Eaton does not take responsibility for the
transmission time required for alerts to
contact your cell phone or email, as this
is regulated by your service provider.
Green
Charging
Status Light

11
Getting Started
Follow
these easy steps to set up your system for the fi rst time:
1. Set Up the Base Station and Home Key
2. Set Up the Open/Closed Sensor
3. Place
the Open/Closed Sensor
4
. Set Up Remote Alerts
5
. Monito
r
Your
Home
1. Set Up the Base Station and Home Key
Place and Power Up the Base Station
The Base Station communicates with your Home Key and any
sensor
within range. Place it in a convenient location in your
home, near a phone jack and a power outlet (for example, in your
kitchen or near your bed). To avoid interference, please place the
Base Station at least a foot away from any other wireless devices
you may have (such as cordless phones).
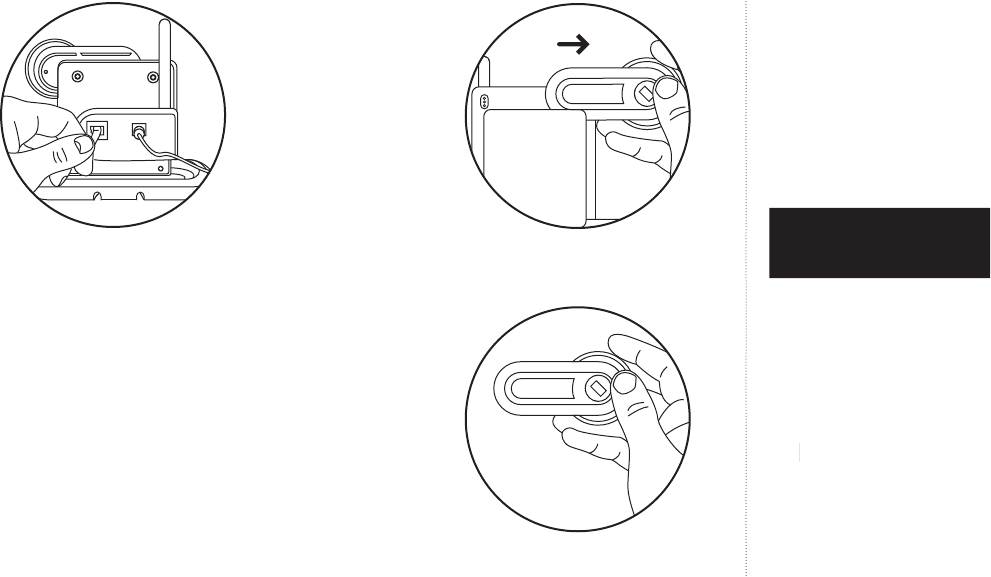
PLUG
the pow
er cord into the back of the Base Station and
into the wall outlet.*
Getting Started
Range may vary, depending on location and
home construction.
10
*
For optional single receptacle and telephone surge protection, we recommend
*For optional single receptacle and telephone surge protection, we recommend *
using the Eaton SGXMICRONET1 Surge Strip (not included)
.
12
13
A red light on the front of the Base Station will fl ash while the
unit is starting up. When the Base Station is ready, the red light
will go out, and a green light will appear. The Home Key should
still be docked to the Base Station, and the green light will blink
to indicate that the key is charging. For best results, charge the
Home Key for three hours b
efore use. (If it is not blinking, slide
the Home Key out and slide it ba
ck in until it clicks).
PLUG
the enclosed phone cord into the back of the Base
Station and into a phone jack.
If the Base Station needs to share
the phone line, a 2-in-1 phone jack splitter is enclosed in the
packaging for your convenience.*
When you plug the phone cord into the
phone
jack, the Base
Station will make an initial
call
to the server
to check in
. The
call will last
less than a minute
.
If there is no long-distance
service on the line, the Base Station may or may not complete
calls to the server. For additional phone/remote alert setup
instructions please see page 27
.
Plug the included phone cord and power
cord into the back of the Base Station.
Getting Started
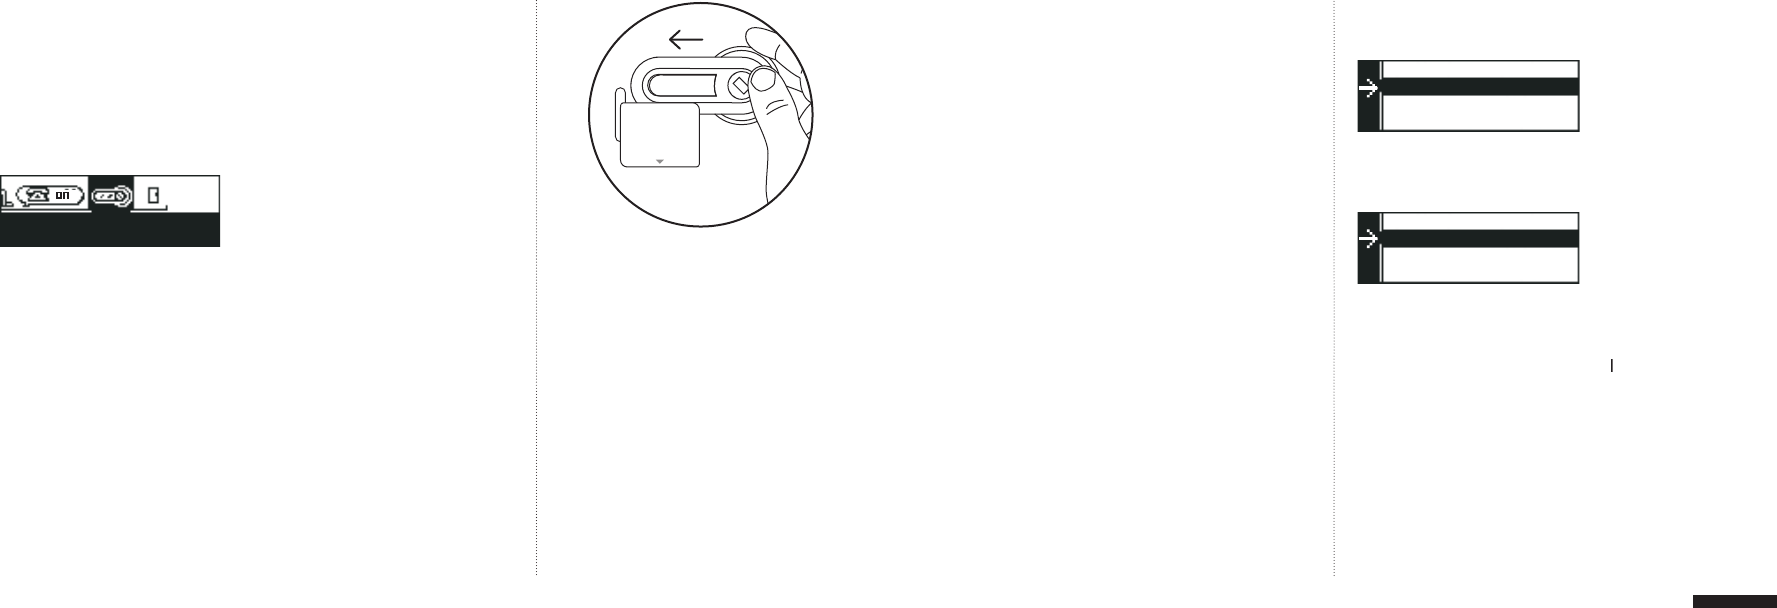
Join the Home Key to the System
Your kit includes a Home Key that comes docked to the
Base Station. When the Home Key is fully charged,
SLIDE
it
out of the Base Station
.
CLICK
the Home Key thumbwheel once to “wake it up”, and
follow the on-screen instructions.
When you see
p
ress to continue
,
click the thumbwheel
again.
SLIDE
the Home Key into the Slide Channel on the top of the
Base Station as far as it will go, from the left or right. (The Home
Key
will automatically fl ip so it orients the screen
Key will automatically fl ip so it orients the screen Key
correctly,
w
hether you are right- or left-handed. It will remember
the
orientation you choose when you dock it to the
Base
Station.)
Getting Started
Slide the Home Key out of the Base Station.
Click the thumbwheel to “wake up” the screen.
*
If you are plugging the Base Station into a phone jack with DSL service,
use a DSL fi lter to isolate the signals and ensure unaffected service
.
14
15
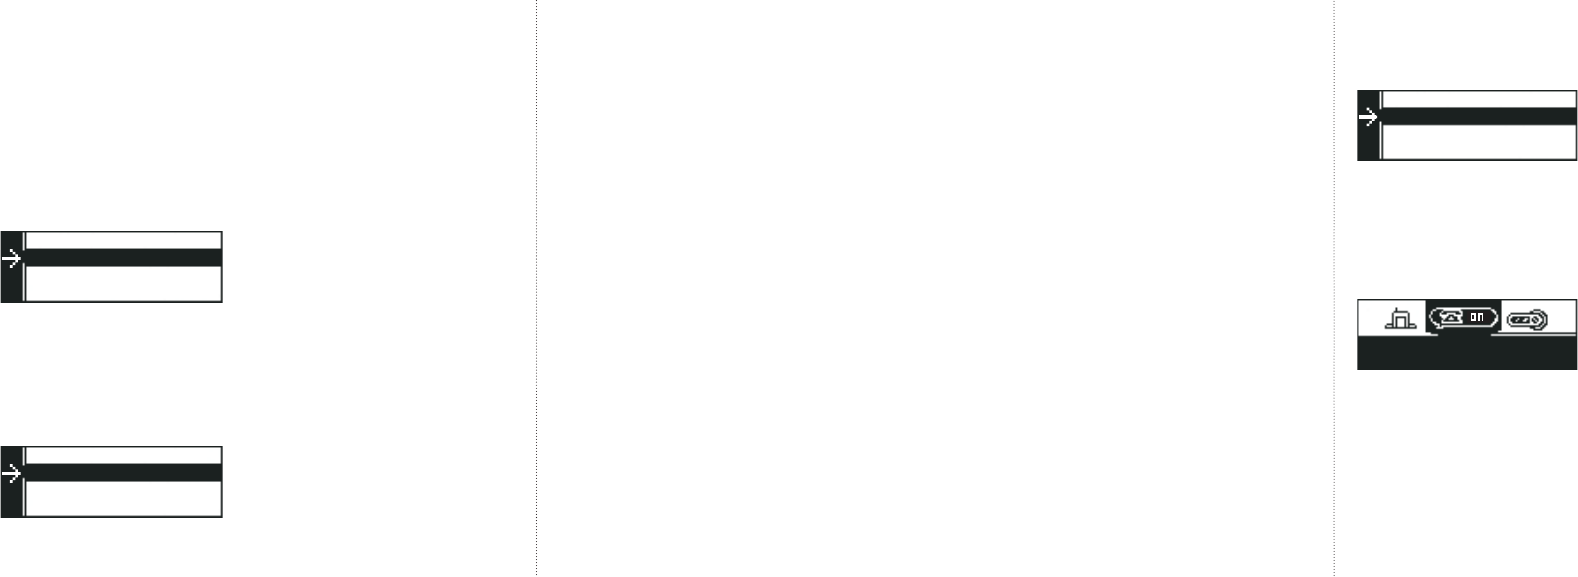
When the Home Key has successfully joined the system, you
will see a message that says,
Key is now joined to
system
.
Name the Home Key
REMOVE
the Home Key from the Base Station. It will prompt you
to choose a name…
CLICK
once on this question to see a list of names for your
Home Key.
SCROLL
down through the list of names and
CLICK
once to set the name.
Getting Started
When you click to set the name, the screen will automatically
highlight
Do
n
e,
g
o back?
CLI
CK
once to fi nish setting up the
Home Key.
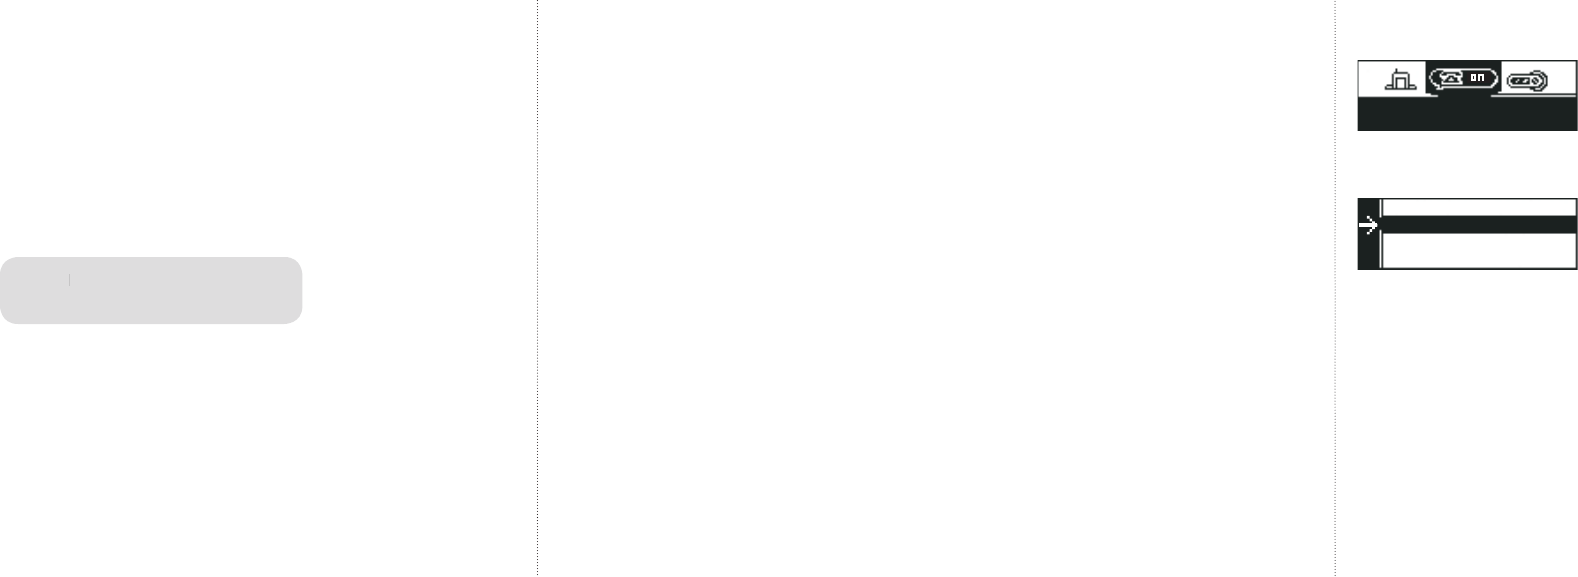
Your Home Heartbeat system displays information visually as
a horizontal list of icons on the Home Key. Each part of your
system has an icon associated with it so you can check on your
home at a glance.
If the Home Key screen dims while you are reading, it has gone
into Powersave Mode.
CLICK
the thumbwheel to activate the
screen again.
Getting Started
Global "CallMe"
Call me always
��
�
16
17
After a few seconds of inactivity the screen will go to sleep
and go into “Heartbeat” mode. In this mode it will check in
every minute (default) for updates from the Base Station.
ROLL
the thumbwheel and
HIGHLIGHT
the Home Status icon.
This icon, which shows the Base Station, is always fi rst in the
list of icons.
ROLL
the thumbwheel and highlight the Home Key icon.
Getting Started
CLICK
the thumbwheel once to see additional details about
the Home Key.
2. Set Up the Open/Closed Sensor
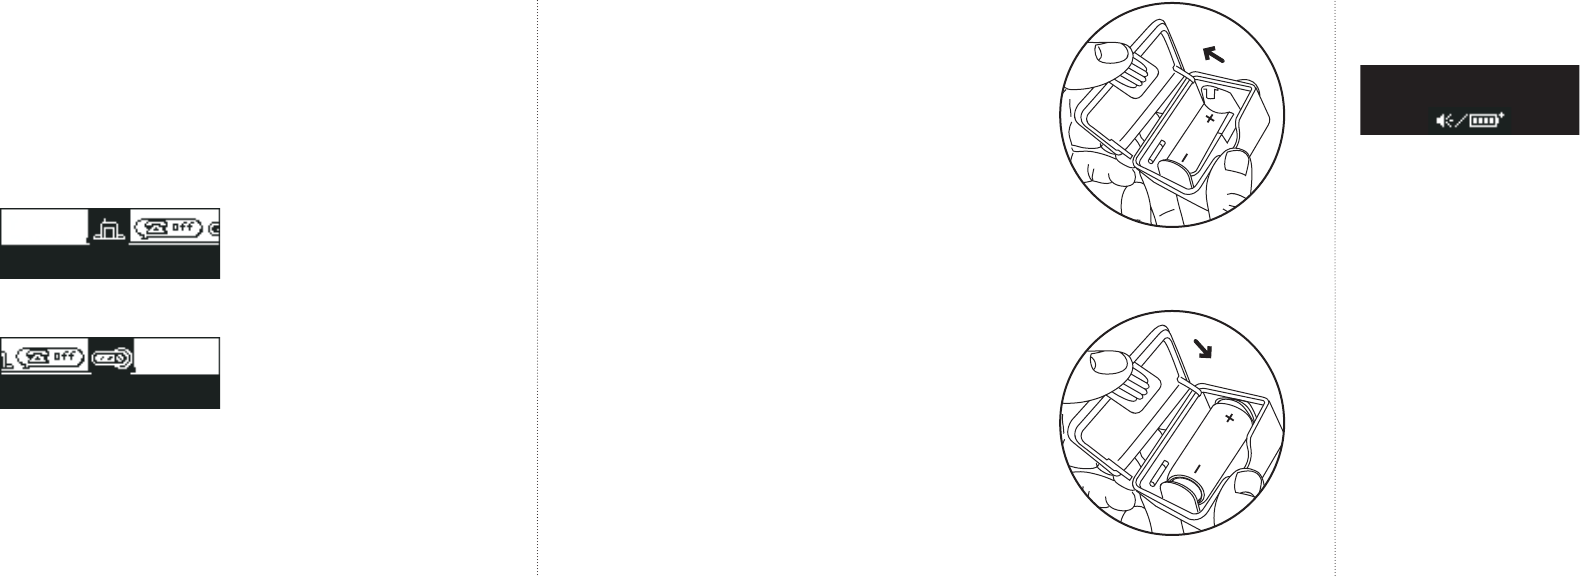
Install Sensor Battery
To start the setup of your Open/Closed sensor, you must install
one lithium CR123A 3V battery into your sensor (included).
OPEN
the sensor by pressing on the battery cover tab on the
bottom and pivoting the cover off. Insert the battery, being sure
to orient it correctly in the battery clip.
The green light inside the sensor below the battery clip should
fl ash four times if the battery is okay and installed properly.
Close the sensor cover.
Getting Started
Open the
sensor
cover.
Insert the battery into the sensor.
�
�
�
18
19
Join the Sensor to the System and Set Options
Now, you are ready to join your Open/Closed Sensor to the
system. When you have completed this step, you will see a
new icon for the Open/Closed Sensor on your Home Key screen.
Every time you add a sensor to the system, a new icon will
appear on your Home Key.
�
If the Home Key is not “awake,”
CLICK
the thumbwheel once
to wake it and slide the Home Key into the Slide Channel
(located on the top of the sensor).
Wait a moment for the key to respond to the connection.
The screen will show,
D
e
v
i
c
e
f
ou
n
d
...
o
k
a
y
t
o
remo
v
e
ke
y
.
REMOVE
the Home Key from the sensor and follow the
on-screen instructions.
Getting Started
Choose Name?
is the fi rst question that will be highlighted.
CLICK
once to see a list of sensor names.
SCROLL
down the names and
CLICK
once to select one from
the list.
Next, it will ask you to set
In-Home Awareness?
This
setting works when you are home and in range of the Base
Station. However, you might
not
want to get alarms every
not want to get alarms every not
time you open or close your front door when you are at home.
Home Heartbeat lets you set options for each sensor to fi t your
lifestyle, and you can change them any time.
�
Getting Started
Slide the Home Key into the channel on the
top of the sensor.
20
21
When you see this screen,
CLICK
once and choose from the
following
In-Home
Awa
re
n
ess
options:
Don't alert
If you choose this, the sensor icon will show an update but
the system will not beep or blink to indicate an alarm.
Alarm on Close
d
, Alarm on O
p
ene
d
If you choose either of these options, the sensor icon will
show an update
and
the Home Key screen will blink red
and the Home Key screen will blink red and
when the sensor is opened or closed, respectively.
Getting Started
Set
"
CallMe" Awareness?
is the next question. When you
leave home and take your Home Key with you, Home Heartbeat
can automatically switch to a higher level of awareness and
send all
"
CallMe"
level alerts to your cell phone or email.
When you see this screen,
CLICK
once and choose from the
following options:
Don't call me
If you choose this option, you will not receive a text
message or email alert regarding the status of this sensor.
Call me on Closed,
Call me on
Opened
If you choose one of these options and set up remote alerts
in Step 4 on page 27, you will receive a cell phone text
message or email alert about the status of your sensor.
Getting Started
�
�
Note:
So that you can test your sensor
later in the instructions,
select
Alarm on
Opened
(you can always change it later).
22
23
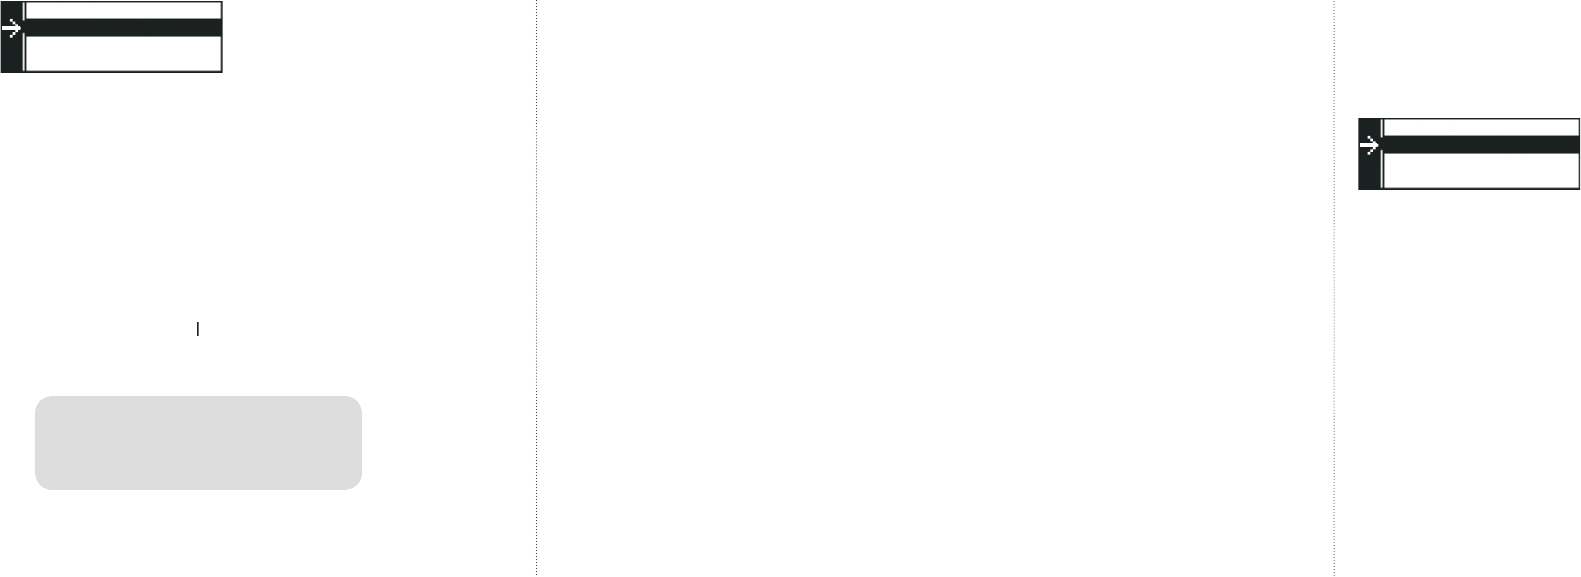
Your Home Key should now show an Open/Closed icon beside
the Home Key icon.
Test the Sensor
Take a moment to test your Open/Closed sensor.
If you set
In-Home Awareness
to
Don't Alert
:
Put the two parts of the sensor together and roll over the icon
for the Open/Closed Sensor. It will show the sensor as closed.
Getting Started
Now, pull them apart. The icon will show the sensor as open.
F
ront
D
oor
O
p
en
ed
for
5
min
s
If you set In-Home Awareness to
Alarm when Opened
or
Alarm when Closed:
Depending on which option you chose, when you put the two
parts of the sensor together or pull them apart, the Home Key
will fl ash red and show a full screen alert.
When you click the thumbwheel once, the screen will switch
over to the alerting icon.
If the Home Key is asleep, it will blink red each time the Home
Key gets an update (the default setting is once per minute) to
let you know there is an alarm. If you click the thumbwheel the
screen will show the alert message.
Open: Sensor parts are away from each other.
Getting Started
Closed: Sensor parts are within 1/2 inch of
each other.
Front Door
Closed for 45mins
S
o that you can test the sensor later in the
instructions, select
Call me on Opened
.
T
hen, click
Done, Go back?
�
�
�
24
25
If you do not see the feedback you expect on the screen,
check your settings by highlighting the Open/Closed Icon
and
DOUBLE-CLICK
the thumbwheel. You will see the training
questions again. Select
In-Home
A
w
areness?
Select
Al
arm on O
p
e
n
ed
and then
CLICK
on
Do
n
e,
g
o back?
Repeat the sensor test again.
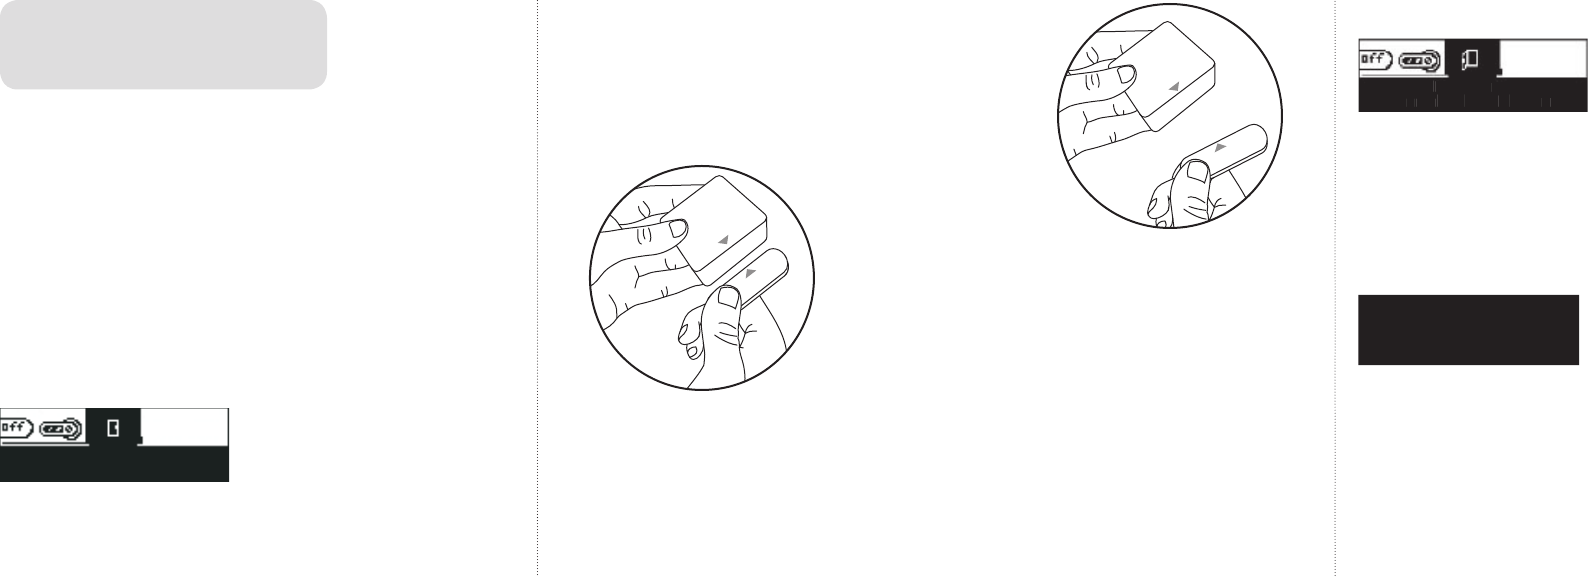
3. Place the Open/Closed Sensor
Check the Sensor Range
It is important to check if the location where you want to place
your sensor is within range of the Base Station. Carry your
Home Key and the sensor to the location where you want to
install it.
Hold the Home Key right next to the intended location.
SCROLL
to the Base Station icon and
DOUBLE-CLICK
the thumbwheel.
Getting Started
Take the Home Key along with the sensor
to the location where you want to install
the sensor.
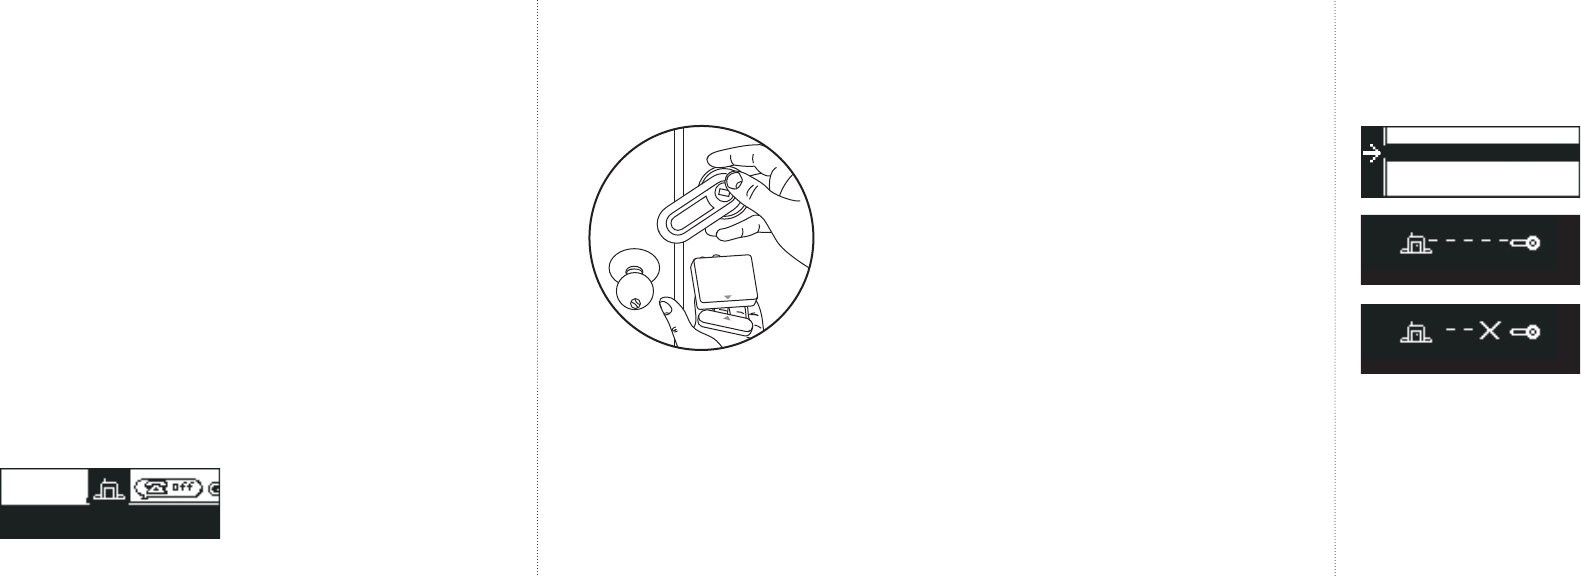
HIGHLIGHT
and
HIGHLIGHT andHIGHLIGHT
CLICK
Check Range?
to go to the Range
Finder. After a few moments, the screen will automatically
report the range. If you are within range, scroll up to
Do
n
e,
g
o back?
and move to the next step.
If the sensor is out of range, you should select a sensor location
that is closer to the Base Station, or add a Range Extender to
increase the coverage (see page 45 for more information). After
checking the range,
CLICK
Do
n
e,
g
o back?
Getting Started
�
�
�
��
��

26
27
Attach
the Open/Closed Sensor
Once you are sure that the sensor is within range, you can
place the sensor on your door, cabinet, or window.
Check its position on your closed door and door frame. The
two sensor parts must be positioned within 1/2 inch of each
other to register as closed. The Open/Closed icon on your Home
Key will
show if it is registering as open or closed.
T
ake the enclosed adhesive and remove the backing from one
Take the enclosed adhesive and remove the backing from one T
side
and stick it to the back of
each part of the
Open/Closed Sensor.
Remove the remaining backing from the adhesive, and place one
part onto the door and one onto the frame, both within 1/2 inch
of each other.
If you prefer, you can mount the sensor with two
#4 wood screws (not included). Remove the cover of the sensor
to locate the holes that are positioned below the battery clip.
If you would like to add, test, and place additional sensors
or accessories (such as a Water Sensor, Reminder Sensor,
or
ad
ditional Open/Closed Sensor), you can do so now.
Instructions for the setup of each sensor are included with
their packaging.
Getting Started
4
. Set Up Remote Alerts
During this step, you will be completing the setup so that the
system can send you cell phone text message or email alerts.
When you plug the phone cord into the phone jack, the Base
Station will make an initial call to the server to check in. This
call will last less than a minute. After you register and choose
a
Global
"
CallMe"
option on the Home Key to send remote
alerts (see page 28), the Base Station will make a call each time
an alert is initiated.
If there is no long-distance service on the line, the Base Station
may or may not complete calls to the server.
After setup is
complete, if you don’t receive remote alerts as expected, call
Home Heartbeat Support at
1-800-813-2199
for assistance.
PLUG
the enclosed phone cord into the back of the Base Station
and into a nearby phone jack.*
*
If you are plugging the Base Station into a wall jack with DSL service,
use
a DSL fi lter to isolate the signals and ensure unaffected service
.
Getting Started
When you position the parts of the
sensor, make sure they are within 1/2
inch of each other when they are closed.
Depending on
the
design of your
molding,
you may
want to place
“Part B” on either
the door or the
molding itself.
28
29
Getting Started
Using your Home Key,
ROLL OVER
and
DOUBLE-CLICK
at the
Global
"
CallMe
"
icon.
HIGHLIGHT
S
et G
lobal
"
CallMe
"?
a
nd
CLICK
once.
The following options will be listed:
Don't call me
If you choose this option, you will not receive cell phone text
messages or email alerts about anything, even if you set sensors
to send
"
CallMe
"
alerts during the initial set up. This setting
overrides any individual sensor settings.
Getting Started
Register your cell phone or email
To register for cell phone text message or email alerts,
c
all
Home Heartbeat Support at
1-800-813-2199
and a friendly
operator will assist you.
You will be asked to provide the 16-digit
serial number on the back of the Base Station, your cell phone
number and service provider, or your email address
.
There is an annual activation fee to enable remote alerts
with Home Heartbeat.
Choose
Global
"
CallMe
"
options on your Home Key
The system is preset to
Call me al
w
a
y
s
so that you can try
out the system during initial setup. You can change this setting
anytime you would like by
DOUBLE-CLICKING
the thumbwheel
on the
Global
"
CallMe
"
icon.
Note:
Y
our service provider may apply
Your service provider may apply Y
a charge for individual text messages.
�

30
31
Test t
he System
To test the system, try changing various settings (you can
always change them back).
Set
Global "CallMe"
to
Call
me al
w
a
y
s?
and
CLICK
Done,
g
o back?
to return to the
main screen.
Set
the
Set the Set
Open/Closed sensor to
"
Call me on Opened
"
.
Now,
go
and open th
e
door, window,
or
cabinet
wh
ere your sensor is
located. You should receive a text message on your cell phone
within a few minutes.
5. Monitor Your Home
I
n-Home Awareness
In-Home Awareness allows you to monitor your home status
via
your Home Key while you are at home, when the Home Key
is
your Home Key while you are at home, when the Home Key is your Home Key while you are at home, when the Home Key
within range. To check on any sensor you installed, simply
roll
over the icon for that sensor and you will be able to see its
status.
For example, the icon on your Home Key for the
Open/Closed
Sensor changes visually to show you that the door,
window, or
cabinet you have chosen to monitor is open or closed:
C
all me always
If you choose this option, you will receive cell phone text
message alerts or email alerts about the sensors you have set
to send
"
CallMe
"
alerts, whether you are within range of the
Base Station or not. This is a good setting if you would like to
leave your Home
Key docked all the time or if you are installing
this system in a location that you visit less frequently.
Automatic call me
If you set your sensor to
"
CallMe
"
and you choose this option,
the system will automatically sense when your Home Key is out
of range and will send you a cell phone text message or an email
alert if the status of the sensor changes.
When your Home Key is within range, it will automatically
switch back to your In-Home
Awareness
settings, and will not
send an alert.
Getting Started
Getting Started
Note: If your phone line is in use, Home Heartbeat will not send a message
until the line is free.
Front Door
Closed for 45mins

32
33
If you have set a sensor
In-Home
Aw
areness
to alert
and the status of the sensor changes while your Home Key is
“awake” it will beep, blink red, and show you a full-screen
alert message.
If you click the thumbwheel once, it will jump to the alerting
icon. If the Home Key is “asleep” when it receives an alert, the
screen will blink red, and when you click the thumbwheel it will
show the full-screen alert message.
If you highlight a sensor icon and the screen backlight turns
amber and shows the battery icon, it may mean that the battery
for that sensor is low.
CLICK
once on the icon to check battery
status. It should normally read:
Battery OK.
If it says,
Batter
y
LOW
, replace the (CR123A 3V lithium) battery in
this sensor.
Getting Started
If the battery is okay and the screen shows an amber backlight
and a fl ashing question mark (?), this means that the sensor is
out of range.
When your Home Key is not docked, the screen will go to sleep
after a few seconds of inactivity. However, the screen will
blink green every time it gets an update (the default is once
per minute) to let you know the system is continuing to monitor
your home. If the status of a sensor changes while the Home
Key is asleep, the screen will blink red (within a minute) to let
you know of the change. To change the default settings, see
Home Key Power Save Options on page 38.
Getting Started
�
�
�

34
35
As You Are Leaving
As you leave your home, bring your Home Key with you. It will
automatically do two things once you exit the Base Station range:
1. It will freeze the last system update that it received from the
Base Station. This snapshot of the system is based on the
last “heartbeat” the Home Key receives and can be adjusted.
(For more information, see page 38, Home Key Power Save
Options). You'll be able to check at a glance if you left the
front door open, for example. Snapshot mode is indicated
with brackets [ ] that surround the sensor icon messages.
2. If you have set your system to
A
utomatic call me,
it will
utomatic call me, it will utomatic call me,
shift the system to send cell phone text messages or email
alerts for sensors set to
"CallMe" A
w
areness.
Getting Started
Getting Started
"CallMe" Awareness
Outside Your Home
If you set the system to
Automatic call me
, bringing the
Home Key with you when you leave your home automatically
signals the system to shift to a higher level of awareness
called
"CallMe" Awareness
. When this occurs you will
automatically receive cell phone text message or email alerts,
unless you have confi gured the system not to call you about a
given sensor or sensors.
If you set your system to
Call me always
, you will get
cell phone text message or email alerts for all sensors set to
"CallMe" A
w
areness.
You will receive these alerts both
at home and away, whether the Home Key is within range of
the Base Station or not.

37
Getting the Most Out
of Home Heartbeat
Check Home Key Battery Status
The Home Key has a rechargeable battery that will provide
about 5–7 days of use under normal conditions. To check the
status of the Home Key battery:
1.
ROLL OVER
to the Home Key Icon and
CLICK
the thumbwheel
once.
2.
You will see a battery icon. Four bars inside the icon indicate
the battery is fully charged. For best results, charge the Home
Key whenever two bars or less are showing.
Getting the Most Out of Home Heartbeat
36
�

38
39
Charge Your Home Key
To charge your Home Key, just slide it into the Base Station
Slide Channel until it clicks. If the Home Key needs charging, the
green light on the left side of the Base Station will blink. When
the green light no longer blinks, the Home Key is fully charged.
It takes about three hours for a full charge.
Home Key Power Save Options
The Home Key shows you the status of your home on its screen
because it receives periodic wireless updates from the Base
Station. When it is “awake” and in range it constantly checks
for updates. When sleeping, the default setting is
1min
u
p
dates
.
The Home Key will fl ash green each time it gets
an update. Customizing how often your key requests updates
when asleep can extend how long your Home Key lasts before
needing recharging. Quick updates give you a more responsive
system, but use more battery power. Hourly updates use less
battery power.
Getting the Most Out of Home Heartbeat
Getting the Most Out of Home Heartbeat
To choose a Home Key Battery Life option:
1.
HIGHLIGHT
the Home Key icon.
2.
DOUBLE-CLICK
the thumbwheel and choose
Battery
life?
to reveal the options:
•
Short, 10sec updates
•
30sec u
pdates
•
1min updates
(default setting)
•
2
min updates
•
15min updates
•
Long, 1hr updates
3. Select the desired setting and
CLICK
Done, Go back?
to save your changes.
�

40
41
Setting Home Key Alert Options
In addition to blinking red, the Home Key can be set to beep
or vibrate to alert you when there is a change in sensor status.
To set this option:
1.
ROLL OVER
the Home Key icon and
DOUBLE-CLICK
the
thumbwheel to reveal the options.
2.
ROLL OVER
and
CLICK
on
Beep
Options
.
3.
HIGHLIGHT
either
Silent
, Beep,
or
Vibrate
and
CLICK
once to select.
If at any time you do not want your Home Key to beep or vibrate,
select
Silent.
Adjusting Sensor Options
After you have set up a sensor you can easily change its
settings.
(
Name, In-Home A
w
areness
,
or
"
CallMe"
A
w
areness
)
To do so, use your Home Key any time that you
are at home and within range.
Getting the Most Out of Home Heartbeat
For example, you may wish to change your Open/Closed sensor
to alert you when a door is closed rather than open. To change
any setting:
1. Using your Home Key, either:
A. Roll over to the icon you want to change and
DOUBLE-
CLICK
. The screen will roll up to reveal the sensor options.
–or–
B. Slide the Home Key into the Slide Channel on the
sensor to reveal the sensor options.
2.
ROLL
and
HIGHLIGHT
the option you would like to adjust
and
CLICK
once.
3. Roll through the options, choose the new setting, and
CLICK
once.
4.
HIGHLIGHT
Done,
g
o back?
and
CLICK
once to save
your changes and exit.
Getting the Most Out of Home Heartbeat

42
43
Choosing Identical Sensor Names
If you choose the same name when adding a second sensor
of the same kind to the system, the Home Key will show the
following message:
A
nothe
r
de
v
ice has this name.
The Home Key will then show the following options:
Add a letter?
Pic
k
a ne
w
name?
Use name an
y
w
a
y
?
ROLL OVER, HIGHLIGHT
and
ROLL OVER, HIGHLIGHT and ROLL OVER, HIGHLIGHT
CLICK
one of the options to amend
CLICK one of the options to amend CLICK
the name with a letter, choose a new name, or use the same name.
Removing a Sensor From the System
You can remove a sensor from the system any time you are
within range of the Base Station. To remove a sensor:
1
.
ROLL OVER
the sensor icon you want to remove and
DOUBLE-
CLICK
the Home Key thumbwheel.
2. The screen will scroll up to reveal the sensor options.
3. Scroll through, select
Fo
r
g
et
de
v
ice
,
and
CLICK
to
select.
Getting the Most Out of Home Heartbeat
4. The screen will give you two options:
No, Go back
or
Y
es,
for
g
et it
.
5.
CLICK
once to choose
Y
es,
for
g
et it
.
The sensor icon is
now
removed from the Home Key screen.
Reusing a Sensor in a Different Location
If a sensor has been placed in one location in your home, it can
be reused.
To reuse a sensor, remove the sensor from its current location
and place it in the new location.
*
Use your Home Key to adjust
settings
(
Name, In-Home A
w
areness
and
"
CallMe"
A
w
areness
):
1.
ROLL OVER
the icon of the sensor you have relocated.
2.
DOUBLE-
CLICK
the Home Key thumbwheel to reveal the
sensor options.
3.
ROLL,
HIGHLIGHT
and
CLICK
on the options you would like to
adjust for the new sensor placement, just as you did during
the initial setup.
*Do not forget to check range before placing your sensor!
Getting the Most Out of Home Heartbeat
44
45
Moving the Base Station to a Different Location
If you would like to move the Base Station to a new location
after initial installation, it will remember your settings after you
power it up again. However, you will need to check that the
new position is within range of your sensors. After you move
the Base Station and plug it in, wait 30 minutes for all of the
sensors to “report in.” Then, use your Home Key and roll over
each sensor icon. If the screen is amber and shows a “?”, the
sensor is out of range. If the sensor is out of range, you may
need to relocate the Base Station, or use a Range Extender
(not included) to expand its range.
Managing Power Outages in Advance
You can add battery back-up capabilities to your Base Station by
installing two lithium CR123A 3V batteries (not included). Make
sure that the Home Key is not docked on the Base Station. Then,
open the Base Station front cover by pressing on the white tab on
the bottom and swinging the cover out. Insert the two batteries,
making sure to orient them correctly in the battery clips. Replace
the front cover.
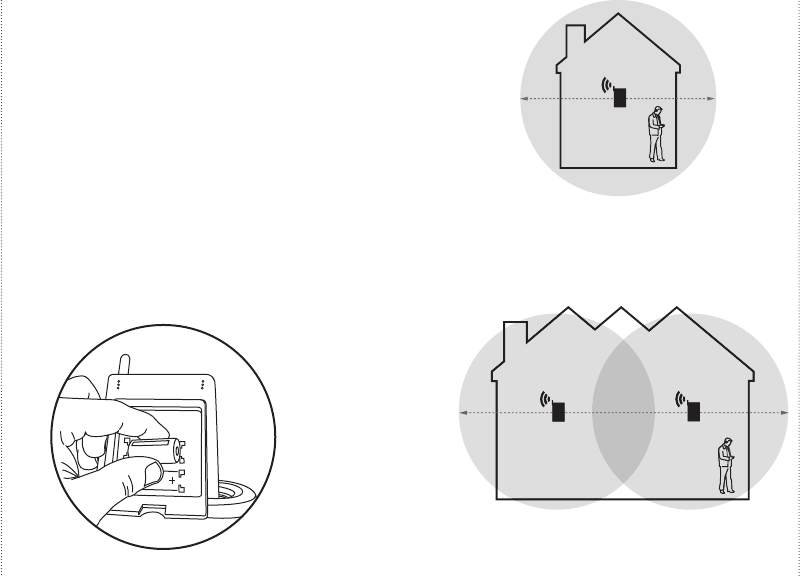
Using Range Extenders
The Base Station communicates with your Home Key and all
sensors within range. Depending on the construction and size of
your home, you may need to use one or more Range Extenders
(not included) to extend the transmission zone of the Base Station.
If you are using the
Automatic call me
option, the system
is programmed to send a cell phone text message or email alert
when the Home Key is outside the range of the Base Station.
This option works best if you are in range until you actually
leave the confi nes of your home. Add a Range Extender for
best results.
Extending Your System
The Home Heartbeat system can accommodate up to 32 total
devices, including the Base Station, Home Keys, and sensors
such as the Open/Closed, Reminder, Water, and Range Extenders.
Getting the Most Out of Home Heartbeat
Getting the Most Out of Home Heartbeat
Large home size with two Range Extenders
Average home size with one Range Extender
Range Extender

46
47
Troubleshooting
If you experience diffi culty with your Home Heartbeat system,
the tips in this section may help you diagnose and fi x them
yourself. If you need assistance, please call
1-800-813-2199
to speak with a Home Heartbeat expert.
If a sensor gives unexpected feedback on the
Home Key screen
Check your initial settings by rolling over the sensor icon.
DOUBLE
-C
LICK
to c
heck your options for
In-Home
A
w
areness
.
If an icon on the Home Key shows a
“
?
”
and
displays an amber backlight
The sensor may be out of range. Check the range of the sensor
by holding the Home Key near it, highlighting the Home Status
icon, and
DOUBLE-CLICKING. CLICK
Check Ran
g
e?
to
go to the Range Finder.
If the screen shows that the sensor
is
O
ut of ran
g
e
, you may need to move the Base Station
closer to the sensor or add a Range Extender to widen the
Troubleshooting
Managing System Updates
Future Home Heartbeat remote devices will make use of
this option, which is accessed by double-clicking under the
G
lobal
"
CallMe
"
icon and highlighting
Send S
y
stem
Info?
This option gives you the choice to send a sensor-wide
update at different daily intervals, to manage instances when
no alerts are generated in a 24-hour period.
Getting the Most Out of Home Heartbeat

48
49
range of your system (see page 45, Using Range Extenders). If
you relocat
e
your Base Station, the sensors take a few minutes
to check
in after you plug it in. Until they do, they will display a
“
?
”
and report state unknown for the icon.
If an icon on the Home Key shows a fl ashing battery
icon and displays an amber backlight
The sensor or the Base Station battery may be running low. If it
is a sensor icon,
CLICK
once to check the battery status on the
CLICK once to check the battery status on the CLICK
bottom line of the screen. If it says
Batter
y
lo
w
, replace the
sensor battery with one CR123A 3V battery. If it is the Home Status
icon and it shows a
Batter
y
lo
w
message below the icon,
replace the two Base Station batteries with CR123A 3V batteries.
If you do not see any feedback about a sensor
on your Home Key screen
Check to see if the sensor is within range of the Base Station.
Go to the location where your sensor is installed and
ROLL
OVER
the Base Station icon.
DOUBLE-CLICK
the thumbwheel
and
CLICK
Check Ran
g
e?
The screen will show a
Range
Finder
to help you determine whether the sensor is within range.
Troubleshooting
If the screen shows that the sensor is not in range, you may
need to move the Base Station closer to the sensor, or add
a Range Extender to extend the range of your Base Station
(see page 45, Using Range Extenders).
Check that the battery in the sensor is not low by rolling over
the sensor icon. If the screen is amber in color and shows a
fl ashing battery icon, the sensor battery is low. Remove it and
replace it with one lithium CR123A 3V battery.
If the Home Key is not responding
The Home Key might need to be charged.
SLIDE
it into the
Base Station and check the green light on the left side. When
the Home Key needs charging, the light blinks. When the light
no longer blinks, the Home Key is fully charged
.
Troubleshooting
�

50
51
If the Home Key does not initiate setup when you
slide it into a sensor
Be sure to
CLICK
the thumbwheel on the Home Key once to
“wake it up” before sliding it into the sensor. Also, check that
the sensor battery is installed.
If you slide the Home Key into a sensor and start
setup, but do not complete it before getting an alert
or the screen goes dim
To return to the sensor options, either:
•
ROLL OVER
and highlight the sensor icon and
DOUBLE-CLICK
the thumbwheel; or,
•
CLICK
the thumbwheel to “wake up” the Home Key and
SLIDE
it back into the sensor. Then roll to highlight and
CLICK
to select each option and make your choices.
Troubleshooting
If you are not receiving alerts on your cell phone,
as expected
In addition to setting up your sensors for
"
CallMe"
Aw
areness
(such as
Call me on Opened
for the
Open/Closed Sensor) and either
Call me al
w
a
y
s
or
A
utomatic call me
under the
Global
"CallMe"
icon,
to enable cell phone text message alerts you must register
your cell phone or email.
You can call Home Heartbeat Support
at
1-800-813-2199
and a friendly operator will assist you. If
you are already registered, check to see that you received a
confi rmation cell phone text message or email alert. If you have
not, your service provider should be contacted. Also, make sure
a phone line is plugged into the back of the Base Station and
into a phone jack.
If your DSL service is affected by Home Heartbeat
If you are plugging the Base Station into a phone jack with DSL
service, use a DSL fi lter (not included) to isolate the signals and
ensure unaffected service.
Troubleshooting

52
53
If the Home Key is awake but not working correctly
Reset the Home Key by using a paperclip and inserting one end
into the small pinhole on the backside. Gently press once—you
will feel the switch depress slightly.
CLICK
the thumbwheel
CLICK the thumbwheel CLICK
once
.
If you are in range of the Base Stati
on it should automatically
rejoin the network.
If you would like to perform a total “factory reset”
of the system, restoring it to its pre-purchase state
With the Base Station turned on, insert the end of a paperclip
into the small pinhole on the back lower right corner of the
Base Station. Gently press once—you will feel the switch
depress slightly. A red light will fl ash on the front of the Base
Station. This will reset the entire system to the factory default.
All sensors, devices, and Home Keys will need to be added to
the system again.
What if I lose my Home Key?
Individual Home Keys are available for purchase. To initialize a
new Home Key so that it will display all of your existing sensors,
simply slide it into your Base Station to add it to the system. You
Troubleshooting
Troubleshooting
do not need to slide the new Home Key into each of the sensors
in your system.
To remove the lost Home Key, roll over to the smaller Home Key
icon on your new Home Key (it will show that it is missing by
blinking and showing a “?”.)
DOUBLE-CLICK
the thumbwheel.
Scroll down to
Forget device?
and
CLICK
once. Select
Yes, forget it
to exit and save your settings.
How many components can the Base Station
support?
The system can support up to 32 components, which include
the Base Station, sensors, and multiple
Home Keys.
If Your Home Key Does Not Hold a Charge
Over time, the ability of the lithium-ion battery to hold a charge
will diminish. If you notice that your Home Key, after charging,
is not holding the charge for the expected
5–7
days, it may
be time to replace the rechargeable battery. Please contact
1-800-813-2199
for battery replacement information.

54
55
Sensor and Component Options
The following options are accessed by rolling over the icon on
the Home Key and
DOUBLE-CLICKING
.
Open/Closed Sensor
Done, Go back?
Choose name?
Door
Window
Back door
Etc.
In-Home Awareness?
Don’t alert
Alarm on Closed
Alarm on Opened
“CallMe” Awareness?
Don’t call me
Call me on Closed
Call me on Opened
Forget device?
No, go back
Yes, forget it
Water Sensor
Done, Go back?
Choose name?
Water Sensor
Basement Floor
Bathroom Floor
Etc.
In-Home Awareness?
Don’t alert
Don’t alert
Alarm on Wet
Alarm on Wet
Alarm on Dry
Alarm on Dry
“CallMe” Awareness?
Don’t call me
Don’t call me
Call me on Wet
Call me on Wet
Call me on Dry
Call me on Dry
Forget device?
No, go back
Yes, forget it
Sensor and Component Options
Sensor and Component Options
Home Status
Done, Go back?
Check Range?
Global “CallMe”
Done, Go back?
Set Global "Call
Me"
Don’t call me
Call me always
Automatic call me
Send System Info?
No Daily Updates
Once a Day
Twice a Day
Four Times a Day
Home Key
Done, Go back?
Choose name?
Home Key
Dad’s Key
Mom’s Key
Etc.
Beep options?
Silent
Beep
Vibrate
Battery life?
Short, 10 sec update
30 sec update
1 min updates (default)
2
min updates
15 min updates
Long, 1 hr updates
Forget device?
No, go back
Yes, forget it

56
57
Power Sensor
Done, Go back?
Choose name?
Appliance
Child Monitor
Coffee Maker
Etc.
Change sensitivity?
Very sensitive
Default sensitivity
Less sensitive
Least sensitive
Don’t change
In-Home Awareness?
Don’t alert
Alarm on Off
Alarm on On
“CallMe” Awareness?
Don’t call me
Call me on Off
Call me on On
Forget device?
No, go back
Yes, forget it
Attention Sensor
Done, Go back?
Choose name?
Attention Sensor
Call Home
Doorbell
Etc.
In-Home Awareness?
Don’t alert
Alarm on Requested
Alarm on Standby
“CallMe” Awareness?
Don’t call me
Call me on Requested
Call me on Standby
Forget device?
No, go back
Yes, forget it
Reminder Sensor
Done, Go back?
Choose name?
Reminder Sensor
Change Air Filter
Change Batteries
Etc.
Change time?
15 Seconds (demo)
1 hour Timer
2 Hour Timer
Etc.
In-Home Awareness?
Don’t alert
Alarm on Started
Alarm on Time’s Up!
“CallMe” Awareness?
Don’t call me
Call me on Started
Call me on Time’s Up!
Forget device?
No, go back
Yes, forget it
Range Extender
Done, Go back?
Choose name?
Range Extender
1st Floor Extender
2nd Floor Extender
Etc.
In
-
Home Awareness
?
Don’t alert
Alarm on Off Mesh
Alarm on Bad Mesh
Alarm on Okay Mesh
Alarm on Good Mesh
“CallMe” Awareness?
Don’t call me
Call me on Off Mesh
Call me on Bad Mesh
Call me on Okay Mesh
Call me on Good Mesh
Forget device?
No, go back
Yes, forget it
Sensor and Component Options
Sensor and Component Options

58
59
Message Glossary
Another device has this name
Another sensor or device in the system has the name you have
just chosen, so the Home Key allows you to pick a new name,
add a letter, or use the name anyway.
Battery low
The Base Station, sensor, device, or second Home Key on the
system is running low on battery power. When the Base Station
battery is low, this message appears under the Home Status
icon. When a sensor, device, or additional Home Key battery
is low, the message is shown when you
CLICK
once on the
thumbwheel to reveal more detail.
Can’t add device; You have reached the system limit
You cannot add another sensor or device, because the system
supports only 32 total components, which include the Base
Station, multiple Home Keys, and sensors.
Charge Home Key!
The Home Key is very low and needs charging. This is a full-
screen message and is displayed right before the Home Key
loses power.
Control problems, Please check: (sensor or device name)
The action you have asked the sensor or device to carry out
(such as open or close a water valve, for example) has not
been
completed, or the sensor that you have connected to a
controllable device as the trigger has changed status but has
not carried out the intended action (i.e., the water sensor is wet,
but the water valve has not closed).
Could not save new settings
The Home Key is out of range with the Base Station, so changes
made to the sensor or device settings could not be saved. Move
within range of the Base Station and reattempt.
Just updated
The Base Station has just checked in with the Home Key. This
message appears under the Home Key icon.
Loading device
A sensor or device is joining the system for the fi rst time.
Modem
Pro
blems
The Base Station modem is not functioning. Call Home
Heartbeat Support (
1-800-813-2199
).
This message appears
under the
Global
"CallMe"
icon.
Message Glossary
Message Glossary

60
61
No phone line
The phone cord is not plugged into the Base Station and phone
jack. This message appears under the
Global
"CallMe"
icon.
OK to register
After the phone line has been plugged in, the Base Station has
made the initial call to the server, and the system is now ready
to be registered to get remote alerts. Call Home Heartbeat
Support (
1-800-813-2199
) to register. This message appears
under the
Global
"CallMe"
icon.
Pending call
A
"CallMe"
alert is waiting to be sent out; the Base Station is
attempting to dial out to the server. This message appears under
the
Global
"CallMe"
icon.
Registered
T
his message appears under the
Global
"CallMe"
icon after:
1)
the
phone line has been plugged in,
2) the Base Station has called out to the server, and
3) you have registered for remote alerts by calling Home
Heartbeat Support (1-800-813-2199).
Remove key...Please try again
The Home Key cannot communicate with the sensor or device
you are attempting to set up. Check to see that the battery is
working and installed correctly in the battery clip. (The sensor
light below the battery clip will fl ash when you insert the
battery). If it does not fl ash, the sensor may be malfunctioning.
Also, check that the Base Station is plugged in.
Remove key…Can’t set up now, Key out of range
The Home Key can not communicate with the Base Station,
so no changes can be made to sensor or device settings. Move
within the range of the Base Station and reattempt setup. Also,
check that the Base Station is plugged in.
Running on battery
The Base Station is running on battery power. This message
appears under the
Home Status
icon.
State unknown; waiting for update
A sensor, which has been separated from the system (because
you have relocated the Base Station, for example), is in the
process of checking in with the Base
Station. This message
appears under sensor icons.
Sent alert (x seconds, minutes, hour) ago
The Base Station sent out an alert to your cell ph
one or email
in the recent past. This message appears under the
Global
"CallMe"
icon.
Message Glossary
Message Glossary

62
63
Sent update (x seconds, minutes, hour) ago
Once a day, t
he Base Station reports the status of your
system to the server. This message appears under the
Global
"CallMe"
icon.
Server processing
After a call is tried, the server has received the alert from the
Base Station and is processing it. This message appears under
the
Global
"CallMe"
icon.
Trying Call
The Base Station is attempting to call out to the server to send an
alert.
This message appears under
the
Global
"CallMe"
icon.
Warning! Battery Low
The Home Key battery is low and needs to be charged. This
message appears as a full-screen alert. Slide the Home Key into
the Base Station and charge until the green light on the left stops
fl ashing.
(#) Missing Device
This message will appear under the Home Status icon w
hen a
sensor or device has been separated from the system because it
is out of range with the Base Station or the battery is dead.
This
message may also appear to indicate that a second Home
Key on
the system has left the range of the Base Station (such as when one
family member is home with their Home Key and another leaves).
Message Glossary
Support
Support
If you need help setting up or using Home Heartbeat, there are
two easy ways to get help.
Visit
www.homeheartbeat.com
to learn more about the
Home Heartbeat system and read or download additional
product support materials.
To speak directly with someone who can help you, call
1-800-813-2199
and one of our friendly Home Heartbeat experts
will provide assistance.
FCC Statement
(Compliance Statement, Part 15.19): This device complies with Part 15 of the FCC Rules. Operation is subject
to the following two conditions: (1) this device may not cause harmful interference, and (2) this device must
accept any interference received, including interference that may cause undesired operation.
WARNING (Part 15.21): Changes or modifi cations not expressly approved by the party responsible for
compliance could void the user’s authority to operate this equipment.
To comply with FCC’s RF exposure limits for general population/uncontrolled exposure, the antenna(s) used
for this transmitter must be installed to provide a separation distance of at least 20 cm from all persons and
must not be co-located or operating in conjunction with any other antenna or transmitter.
Industry Canada Statement
The term “IC” before the certifi cation/registration number only signifi es that the Industry Canada technical
specifi cations were met.
Interference
This equipment has been tested and found to comply with the limits for a Class B digital device, pursuant
to Part 15 of the FCC rules. These limits are designed to provide reasonable protection against harmful
interference in a residential installation. This equipment generates, uses, and can radiate radio frequency
energy and, if not installed and used in accordance with the instructions, may cause harmful interference
to radio communications. However, there is no guarantee that interference will not occur in a particular
installation. If this equipment does cause harmful interference to radio or television reception, which
can be determined by turning the equipment off and on, then the user is encouraged to try to correct the
interference by one or more of the following measures:
• Reorient or relocate the receiving antenna
• Increase the separation between the equipment and the receiver
• Connect the equipment into a power source on different cir
cuit than the receiver.

Eaton Electrical Inc.
1000 Cherrington Parkway
Moon Township, PA 15108
www.homeheartbeat.com
© 2005 Eaton Corporation
All Rights Reserved
Assembled in the U.S.A.
IM00416001E Rev. 2
Part No.: 67A5002H01