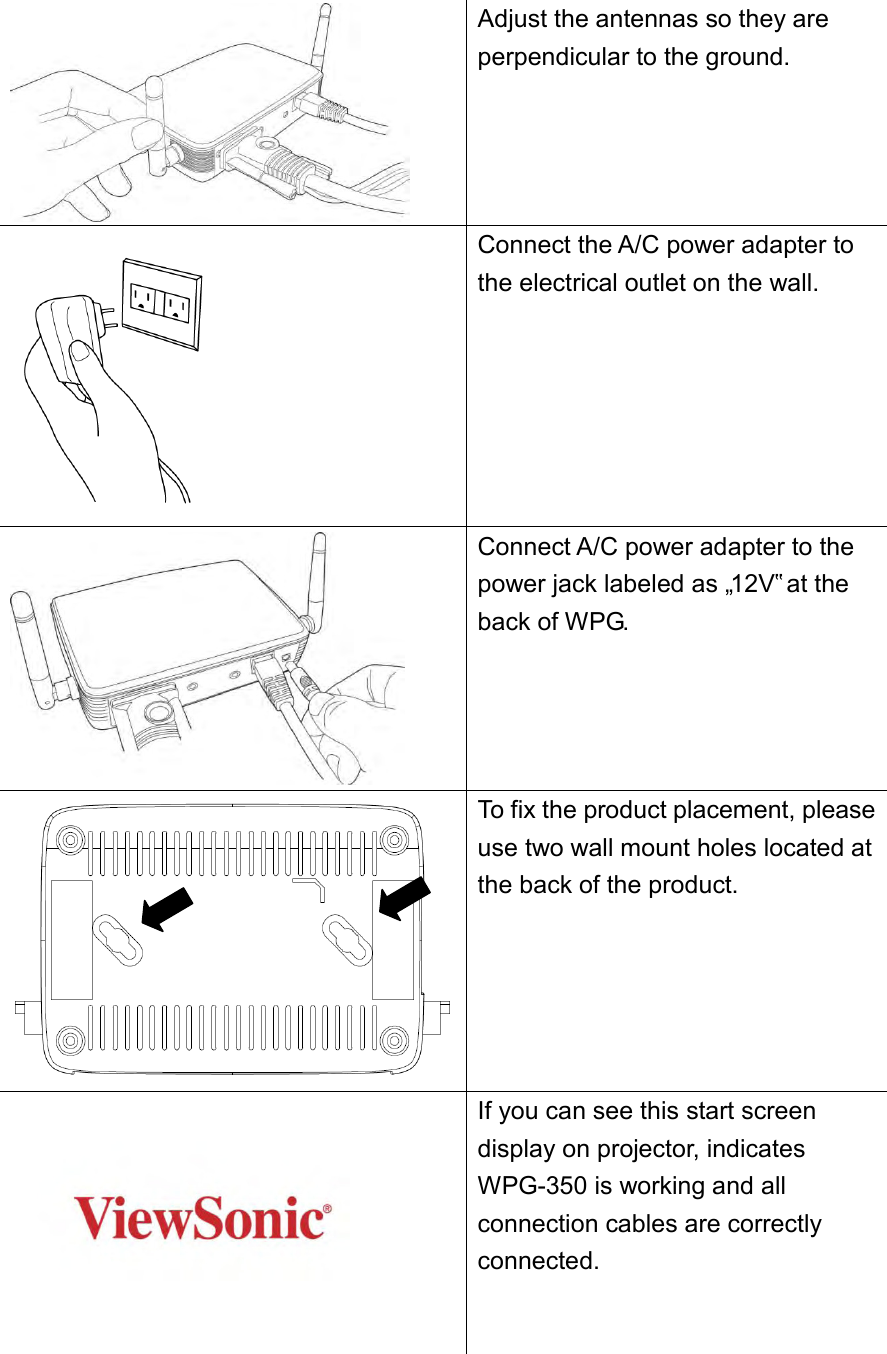
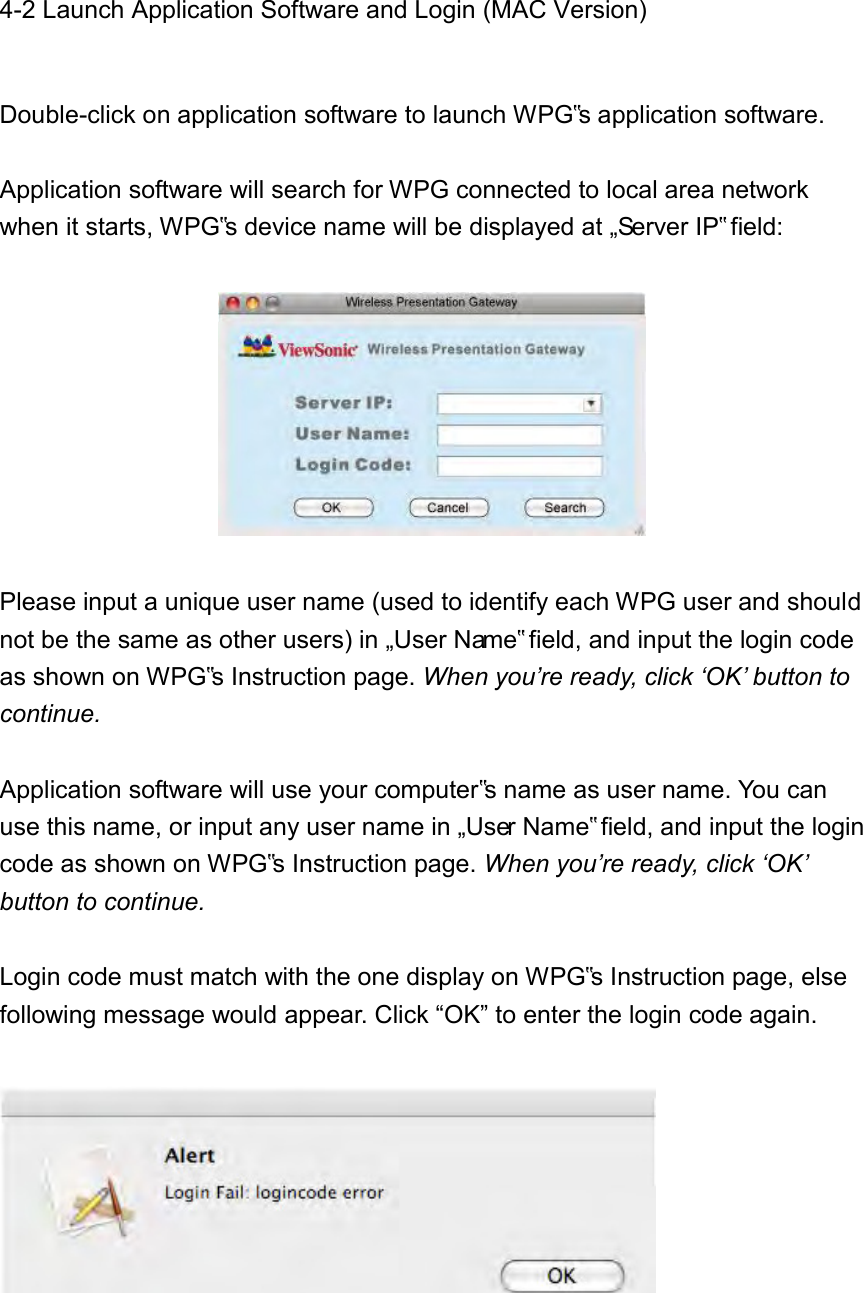
Edimax Technology Co 9513001020 Wireless Projector Server User Manual Wireless presentation gateway

Edimax Technology Co Ltd Wireless Projector Server Wireless presentation gateway

user manual

   WP-S1301 UM           Wireless presentation gateway User Manual Version 0.1 Draft
Federal Communication Commission Interference Statement This equipment has been tested and found to comply with the limits for a Class B digital device, pursuant  to  Part  15  of  the  FCC  Rules.    These  limits  are  designed  to  provide  reasonable protection against harmful interference in a residential installation.    This equipment generates, uses and can radiate radio frequency energy and, if not installed and used in accordance with the instructions, may cause harmful interference to radio communications.    However, there is no guarantee that interference will not occur in a particular installation.    If this equipment does cause harmful interference to radio or television reception, which can be determined by turning the equipment off and on, the user is encouraged to try to correct the interference by one or more of the following measures:   Reorient or relocate the receiving antenna.  Increase the separation between the equipment and receiver.  Connect the equipment into an outlet on a circuit different from that to which the receiver is connected.  Consult the dealer or an experienced radio/TV technician for help.  FCC Caution: Any changes or modifications not expressly approved by the party responsible for compliance could void the user's authority to operate this equipment.  This device complies with Part 15 of the FCC Rules. Operation is subject to the following two conditions:  (1)  This  device  may  not  cause  harmful  interference,  and  (2)  this  device  must accept any interference received, including interference that may cause undesired operation.  This  device  and  its  antenna(s)  must  not be  co-located  or  operating  in conjunction  with  any other antenna or transmitter.  For  product  available  in  the  USA/Canada  market,  only  channel  1~11  can  be  operated. Selection of other channels is not possible.  IMPORTANT NOTE: FCC Radiation Exposure Statement: This  equipment  complies  with  FCC  radiation  exposure  limits  set  forth  for  an  uncontrolled environment. This equipment should be installed and operated with minimum distance 20cm between the radiator & your body.
 IMPORTANT NOTE: IC Radiation Exposure Statement: This equipment complies with IC RSS-102 radiation exposure limits set forth for an uncontrolled environment. This equipment should be installed and operated with minimum distance 20cm between the radiator & your body.  "Operation is subject to the following two conditions: (1) this device may not cause interference, and (2) this device must accept any interference, including interference that may cause undesired operation of the device."  This device and its antenna(s) must not be co-located or operating in conjunction with any other antenna or transmitter.  This Class B digital apparatus complies with Canadian ICES-003. Cet appareil numérique de la classe B est conforme à la norme NMB-003 du Canada.  The Country Code Selection feature is disabled for products marketed in the US/Canada
Table of Contents  Chapter I Product Introduction .................................................................................. 5 1-1 Package Contents ........................................................................................ 5 1-2 Requirements ................................................................................................ 6 1-3 Highlights ....................................................................................................... 7 1-4 Part Names.................................................................................................... 8 1-5 Initial Setup .................................................................................................. 11 Chapter II Using WPG .............................................................................................. 14 2-1 Check the IP address of WPG ................................................................. 14 2-2 Connect to WPG by wireless network ..................................................... 15 2-3 Manual Network Connection Setting ....................................................... 16 2-3-1 Windows XP IP address setup: ........................................................... 17 2-3-2 Windows Vista IP address setup: ........................................................ 17 2-3-3 Macintosh IP address setup: .............................................................. 19 Chapter III Using Application Software (PC Version) .......................................... 20 3-1 Download and Install Application Software ............................................ 20 3-2 Launch Application Software and Login.................................................. 23 3-2-1 Use icon on application software .................................................. 24 3-2-2 Menu List .......................................................................................... 25 3-3 Video playback (PC Version) .................................................................... 26 3-4 Quarter Split Screen ................................................................................... 27 Chapter IV Using Application Software (MAC Version) ....................................... 28 4-1 Download and Install Application Software ............................................ 28 4-2 Launch Application Software and Login (MAC Version) ...................... 29 4-2-1 Use icon on application software .................................................. 30 4-2-2 Menu List .......................................................................................... 31 4-3 Video playback ............................................................................................ 32 4-4 Quarter Split Screen (MAC Version) ....................................................... 33 Chapter V Configure WPG ...................................................................................... 34 5-1 Conference Control .................................................................................... 34 5-2 Connect to Web Configuration Menu ...................................................... 36 5-3 Status & Info ................................................................................................ 37 5-4 Network Settings ........................................................................................ 37 5-5 Wireless Settings ........................................................................................ 39 5-5-1 ‘Basic’ Settings ................................................................................... 39
5-5-2 ‘Advanced’ Settings ............................................................................ 41 5-5-3 ‘Security’ Settings ............................................................................... 42 5-5-4 ‘WPS’ Settings .................................................................................... 47 5-6 Projection Setting ....................................................................................... 49 5-7 Password Setting ....................................................................................... 50 5-8 Configuration Tools .................................................................................... 51 5-8-1 Configuration Tools ............................................................................ 51 5-8-2 Firmware Upgrade ............................................................................. 52 5-9 Restart .......................................................................................................... 53 5-10 Logout ........................................................................................................ 55 Chapter VI    Appendix .............................................................................................. 56 6-1 Hardware Specification .............................................................................. 56 6-2 Troubleshooting .......................................................................................... 58
Important Safety Instructions  1. Do not place the product near water or in humid and / or hot environment, like bathroom or kitchen. Please refer to the specification of the environment.  2. This product is designed to be used indoor.  3. Avoid swallowing any parts, components, or accessory of this product.   4. If this product is dropped into water when it‟s powered on, DO NOT ATTEMPT TO RETRIEVE BACK BY YOURSELF! Switch the electrical power switch off first, and call a qualified electrical technician for help.  5. If to hang this product, please make sure placement is properly secured. Misplacement would cause falling and damage this product and injury to people!  6. Do not drag any connected cord with force; the terminal and cord will be damaged.  7. Only use dry cloth with water to clean this product; do not use alcohol or other chemical solution to clean this product.  8. Do not repair, disassemble, or modify the product; if the product is not working properly, please contact the dealer of purchase.  9. Do not put the product and / or A/C adapter directly on paper, cloth, or other flammable materials. After hours of use, this product will become hot, and may cause flammable materials placed under it to burn.  10. Do not cover the product with cloth or any material; the product will become overheat and cause malfunction, even cause fire.  11. When the product is powered on, do not connect or disconnect any connection cable.  12. If not using the product for a long time, please unplug A/C adapter from wall socket, and remove the battery inside remote controller.
Chapter I Product Introduction  Congratulations on your purchase of ViewSonic Wireless Presentation Gateway WPG-350. This section introduces you to the WPG-350 (referred to as the WPG in this user guide).    1-1 Package Contents           (1) WPG-350 (2) AC adapter (3) Remote controller (4) IR receiver extension cord (5) AC adapter extension cord (6) VGA cord (7) Quick Installation Guide (8) Software CD-ROM (9) USB CABLE
1-2 Requirements  PC CPU Speed Intel Pentium 4/1.5 GHz or higher (Recommend Intel Core 2 Duo CPU For Video Playback Mode)  Memory 512 MB of RAM or higher (Recommend 1GB of RAM For Video Playback Mode)   Operating System Windows XP 32 bit or above (Recommend Windows XP 32 bit) MAC OS X 10.4 and 10.5 (Both PowerPC / Intel Version)  Network 100Mbps Wired Fast Ethernet / 11Mbps 802.11b wireless Ethernet (Recommend 54Mbps 802.11g wireless Ethernet)
1-3 Highlights  Thanks again for choosing the product. This product allows multiple users to connect to the same projector by wired or wireless network and avoiding the hassle of using VGA cable.  Features  1.  802.11 b/g/n Wireless compatibility. 2.  Supports both Wireless and Ethernet connectivity 3.  VGA connections 4.  Conference control 5.  Supports multiple users at the same time with Quarter split screen   6.  WPS (Wi-Fi Protected Setup) 7. Output Resolution: 1024x768 or 800x600. 8.  Upgrade software via the Internet. 9.  Network security. 10.  Presentation remote 11. Video capture, to capture screen image for projection*    *This function will be available in Q4, 2009 via upgrade through Internet.
1-4 Part Names  Front View     Back View      Item No. Description 1 WPS: Single Click when the device is ON. Turn On: Single Click when the device is OFF. 2 „POWER‟ LED 3 „LAN‟ LED 4 „WIRELESS‟ LED 5 „PC IN‟ LED Name Description 12V Connect to A/C adapter / ViewSonic projector’s D/C power outlet(device need to be “ON” when plug the power) LAN 10/100/1000Mbps fast Ethernet port IR IN Connect to IR receiver Audio Out Stereo audio output VGA OUT VGA video output Antenna Receives wireless signal. USB 1 USB TYPE MINI B With USB Cable display(may not ready on MAC when 1st MP) 1 2 - 5
      Side View         USB 2 USB TYPE A With Mouse Control Function(will add PC less function in the future) Name Description PC IN Connect to computer‟s VGA output port Item No. Description 1 Power Stand-by mode on/off 2 Login   Show user list: Single Click. 2   WPS: Press and hold for 3 seconds. 3 Prev.user Move up to select user for presentation 4 Next user Move down to select user for presentation 5 Page up Go to previous page 6 Page down Go to next page 7 Confirm Confirm selected user for presentation 8 Battery Lid Press battery lid and push it Note:    1) WPS stands for Wi-Fi Protected Setup.
Remote Controller                   downward by your thumb to open battery compartment 9 IR LED Infrared signal transmitter 1 2    3 5    7    6    4 8 9 Note:    1) Remote controller effective distance is 7 meters. This distance will be shortened in some environments, or when the battery is low.  2) If there’s strong light source near WPG and / or remote controller, remote controller may not be able to function properly.
1-5 Initial Setup   Step-by-step setup instructions   Connect one end of the VGA cable to the external display, and the other to WPG VGA-out port locates at back.  Connect the Ethernet cable to the LAN port    Connect audio cable to WPG Audio-out Port locate at the back, and the other end to an external amplifier / speaker.  Connect the IR receiver extending cable to „IR IN‟ port located at the back of WPG, and place the IR receiver at a place where you can point the remote controller to it easily
 Adjust the antennas so they are perpendicular to the ground.    Connect the A/C power adapter to the electrical outlet on the wall.  Connect A/C power adapter to the power jack labeled as „12V‟ at the back of WPG.  To fix the product placement, please use two wall mount holes located at the back of the product.     If you can see this start screen display on projector, indicates WPG-350 is working and all connection cables are correctly connected.
    Note:   DO NOT USE VELCRO STICKER ALONE TO FIX THE PRODUCT ON THE WALL!   2) If there’s strong light source near WPG and / or remote controller, remote controller may not be able to function properly.
Chapter II Using WPG  2-1 Check the IP address of WPG  When WPG is powered on, check the connected display, you can find the IP address and login code Instruction Page:      You can connect to WPG by the IP address of the connection type you‟re using (wired / wireless). The IP Address (Wireless / Wired Ethernet) of the device.
2-2 Connect to WPG by wireless network  Use your computer‟s Wireless Network Connection window to access an available wireless network. Select the device from the list. Click Connect. The default device name is WPG-350.    Note: If using a wireless client other than Windows, the screen above may look differently. For more details, see your PC user guide.
2-3 Manual Network Connection Setting  If there‟s no DHCP server available on your LAN, please follow the following instructions to set the IP address of the computer.  If the operating system of your computer is….     Windows XP      - please go to section 2-3-1       Windows Vista    - please go to section 2-3-2       Macintosh      - please go to section 2-5-4
2-3-1 Windows XP IP address setup:   Click „Start‟ from windows toolbar locate at bottom, open control panel, then select Network and Internet Connections, click Network Connections, and then double-click Local Area Connection, Local Area Connection Status window will appear, and then click „Properties‟   Select „Use the following IP address‟, then input the following settings in respective field:  IP address: 192.168.0.x (where x is an integer greater or less than 200, if there‟s more than one computer need to use this WPG on the same network, each computer should use an unique number) Subnet Mask: 255.255.255.0 Click „OK‟ when finish.         2-3-2 Windows Vista IP address setup:
  Click „Start‟ from windows toolbar locate at bottom to select control panel. Click View Network Status and Tasks, then click Manage Network Connections. Right-click Local Area Netwrok, then select ‘Properties’. Local Area Connection Properties window will appear, select „Internet Protocol Version 4 (TCP / Ipv4), and then click „Properties‟  Select „Use the following IP address‟, then input the following settings in respective field:  IP address: 192.168.0.x (where x is an integer greater or less than 200, if there‟s more than one computer need to use this WPG on the same network, every computer should use an unique number) Subnet Mask: 255.255.255.0 Click „OK‟ when finish.
2-3-3 Macintosh IP address setup:   Select „System Preferences‟, and double-click „Network‟.  Select „Manually‟ in „Configure‟ field, then input the following settings in respective field:  IP address: 192.168.0.x (where x is an integer greater or less than 200, if there‟s more than one computer need to use this WPG on the same network, every computer should use an unique number) Subnet Mask: 255.255.255.0
Chapter III Using Application Software (PC Version)  3-1 Download and Install Application Software  Before any computer can use the WPG, application software must be installed first. Please follow instructions to download and install WPG application software:   Use the web browser to connect to the IP address shown on WPG (Wireless / Wired IP address)  WPG‟s IP address is shown at the Instruction page.   Click „For Windows‟ button to download application software.    A window is prompted, to execute, please check “run”, or “save” to save application software for future usage.
 Please be patient when your computer is downloading application software:  After application software download is complete, click „Run‟.  Click „Next‟ to continue.  A new icon will appear.
 Double click the icon to launch login window, „Server IP‟ will be determined automatically, please input a user name (login window uses your computer‟s name by default), and input login code as displayed on upper-right of WPG-350‟s display.  If login code is correct, application software will appear.
3-2 Launch Application Software and Login  Double-click on application software to launch WPG‟s application software.    Application software will search for WPG connected to local area network when it starts, WPG‟s device name will be displayed at „Server IP‟ field:    Please input a unique user name (used to identify each WPG user and should not be the same as other users) in „User Name‟ field, and input the login code as shown on WPG‟s Instruction page. When you’re ready, click ‘OK’ button to continue.  Application software will use your computer‟s name as user name. You can use this name, or input any user name in „User Name‟ field, and input the login code as shown on WPG‟s Instruction page. When you’re ready, click ‘OK’ button to continue.  Login code must match with the one display on WPG‟s Instruction page, else following message would appear. Click “OK” to enter the login code again.
3-2-1 Use icon on application software     No. Name Function Description 1 Menu Access menu list.   2 Play / Pause Start / pause presentation. When pausing a progressing presentation, the displaying image will freeze; press play button again to resume 3 Minimize Minimizes Application Software window 4 Close Closes Application Software window 5 Stop Stop a progressing presentation 6 Present Switches to present mode 7 Login code / Signal Displays login code (4-digit number) and wireless signal strength 8 Video playback Starts video playback mode 9 VGA switch Switch display source (display the image from your computer‟s display or from „VGA IN‟ connector) 10    „1‟ to „4‟ Quarter split display control. Click number 1 to 4 to start / stop presentation of corresponding quarter split display area.  1 2 3 4
3-2-2 Menu List    Besides the buttons, you can also click „Menu‟ button to access menu list.    Item Name Function Description Administrator Go to „ADMIN‟ page of web menu Open File Open a video file for video playback (in video playback mode) Status System / IP Address: check the system status and the IP address of WPG. Signal Status: check the status of wireless connection. About: check the version of application software: Control VGA1: Displays your computer‟s display content on projector VGA2: Display „VGA IN‟ port‟s display content on projector Search**: Automatically select an active content source  The content source being used currently will have a check mark in front of it. Log Out Stop using application software and logout. Play / Projection Play: start presentation Pause: Pause presentation Stop: stop a progressing presentation Blank: blank displaying image (all black) Repeat: Repeat video playback (in video playback mode) Minimize: minimizes application software Display Display: Show the name / SSID of WPG Output resolution: changes display resolution and you can check “Follow Desktop” to equivalent to output based on original user desktop resolution setting. The resolution being used currently will have a   check mark in front of it. Exit Close menu list
3-3 Video playback (PC Version)  When you click „Video‟ button in application software, the user interface will change and look as follow:    To start video playback:  1. Click „Video‟ button 2. Click (7)    to open video file. 3. Video will start playing automatically. 4. Click (4)    to stop playing video. No. Description 1 Playback / Pause 2 Volume up 3 Fast forward (for 10 seconds) 4 Stop video play 5 Volume down 6 Rewind (for 10 seconds) 7 Open video file
3-4 Quarter Split Screen    When there is more than one presenter, you can use this function to display up to 4 presenter‟s content to present on display screen simultaneously.  To use Quarter Split Function, please login to WPG, and select a key (1 to 4) to present:    Number 1 to 4 correspond to different area of display screen: 1 2 3 4 When you click a number, your content will be displayed in corresponding Quarter-Split display area  To show content in full-screen mode, simply click „Play‟ button; to resume to Quarter-Split display, simply click number key 1 to 4.    NOTE: When ‘Presentation Lock’ is checked, no one will be able to interrupt a progressing presentation.
Chapter IV Using Application Software (MAC Version) 4-1 Download and Install Application Software Before any computer can use the WPG, application software must be installed first. Please follow instructions to download and install WPG application software:   Use safari or IE web browser to connect to the IP address shown on WPG (Wireless / Wired IP address)  WPG‟s IP address is shown at the Instruction page.   Click „For MAC‟ button to download application software.    Double-click application software icon to launch application software.  You‟ll see application software now. „Server IP‟ will be determined automatically, please input a user name (login window uses your computer‟s name by default), and input login code as displayed on upper-right of WPG-350‟s display.  If login code is correct, application software will appear.
4-2 Launch Application Software and Login (MAC Version)  Double-click on application software to launch WPG‟s application software.    Application software will search for WPG connected to local area network when it starts, WPG‟s device name will be displayed at „Server IP‟ field:    Please input a unique user name (used to identify each WPG user and should not be the same as other users) in „User Name‟ field, and input the login code as shown on WPG‟s Instruction page. When you’re ready, click ‘OK’ button to continue.  Application software will use your computer‟s name as user name. You can use this name, or input any user name in „User Name‟ field, and input the login code as shown on WPG‟s Instruction page. When you’re ready, click ‘OK’ button to continue.  Login code must match with the one display on WPG‟s Instruction page, else following message would appear. Click “OK” to enter the login code again.
4-2-1 Use icon on application software       No. Name Function Description 1 Play / Pause Start / pause presentation. When pausing a progressing presentation, the displaying image will freeze; press play button again to resume 2 Stop Stop a progressing presentation 3 Login code / Signal Displays login code (4-digit number) and wireless signal strength 4 Present Switches to present mode 5 Video playback Starts video playback mode 6 Menu Access menu list 7 „1‟ to „4‟ Quarter split display control. Click number 1 to 4 to start / stop presentation of corresponding quarter split display area.  1 2 3 4  8 VGA Switch Switch display source (display the image from your computer‟s display or from „VGA IN‟ connector)
4-2-2 Menu List    Besides the buttons, you can also click „Menu‟ button to access menu list.    Item Name Function Description Administrator Go to „ADMIN‟ page of web menu Open File Open a video file for video playback (in video playback mode) Status System / IP Address: check the system status and the IP address of WPG. Signal Status: check the status of wireless connection. About: check the version of application software: Control VGA1: Displays your computer‟s display content on projector VGA2: Display „VGA IN‟ port‟s display content on projector Search**: Automatically select an active content source  The content source being used currently will have a check mark in front of it. Log Out Stop using application software and logout. Play / Projection Play: start presentation Pause: stop presentation Stop: stop a progressing presentation Blank: blank displaying image (all black) Repeat: Repeat video playback (in video playback mode) Minimize: minimizes application software Display Display: Show the name / SSID of WPG. Change resolution: changes display resolution. The resolution being used currently will have a check mark in front of it. Exit Close menu list
4-3 Video playback  When you click „Video‟ button in application software, the user interface will change and look as follow:     To start video playback:  1. Click „Video‟ button 2. Click (7)    to open video file. 3. Video will start playing automatically. 4. Click (4)    to stop playing video. No. Description 1 Playback / Pause 2 Volume up 3 Volume down 4 Stop video play 5 Fast forward (for 10 seconds) 6 Rewind (for 10 seconds) 7 Open video file
4-4 Quarter Split Screen (MAC Version)  When there is more than one presenter, you can use this function to display up to 4 presenter‟s content to present on display screen simultaneously.  To use Quarter Split Function, please login to WPG, and select a key (1 to 4) to present:    Number 1 to 4 correspond to different area of display screen:       When you click a number, your content will be displayed in corresponding Quarter-Split display area 1 2 3 4  To show content in full-screen mode, simply click „Play‟ button; to resume to Quarter-Split display, simply click number key 1 to 4.    NOTE: When ‘Presentation Lock’ is checked, no one will be able to interrupt a progressing presentation.
Chapter V Configure WPG 5-1 Conference Control  When there is more than one presentation login to WPG, you can control the content from different presenter via Conference Control webpage.   Use the web browser to connect to the IP address of WPG (Wireless / Wired IP address). WPG‟s IP address can be found at the lower-left corner of Instruction page (refer to chapter 2-1).   Click „Conference Control‟ from WPG‟s web user interface.  All users currently logged in will be displayed here. To select a user‟s display content in certain area of Quarter-Split Display, click number 1 to 4; to display in full-screen, click      button of the presenting user. To stop a progressing presentation, click  █
 To select user by remote controller:  When there is more than one connected application software, you can also use remote controller to select one of them to display the content (same as „Conference control‟ function described in last chapter). Press „Login‟ button on remote control.     You can use „Prev.‟ and „Next‟ button on the remote controller to move the bar, then click      button to select the presenting user.
5-2 Connect to Web Configuration Menu   Use the web browser to connect to the IP address of WPG (Wireless / Wired IP address). WPG‟s IP address can be found at the lower-left corner of Instruction page (refer to chapter 2-1).   Click „Administrator Login‟ link on the left.   Please input „admin‟ as username. For 1st time login you don‟t have to input password, just click „OK‟ to continue. You can change password after login.  If you set password before, please input password in „Password‟ field.
5-3 Status & Info  Displays system information, like system software version and IP address. Many useful information can be obtained here when you need help about system configuration and firmware upgrade.    5-4 Network Settings
Displays and configures the network settings.    Item Description Obtain an IP address automatically WPG will obtain an IP address from DHCP server automatically.   Use the following IP address Set WPG IP address manually. Fill the fields below to setup IP address. DNS Server Please input the IP address of the DNS (Domain Name Service) server.    Click „Apply‟ button to save the settings.  NOTE: When the configuration settings are changed, you must restart the network connection. You can restart the network connection by clicking “Restart” on the web configuration menu.
5-5 Wireless Settings     Configures wireless network settings.  5-5-1 ‘Basic’ Settings    Displays and configures the wireless settings.  Item Description Wireless Function Select „Enable‟ to enable wireless network function;
„Disable‟ to disable it. Mode Select wireless mode. Only AP (Access Point) mode is supported. Band Select the wireless band. Available options are:  2.4GHz (B) - 802.11b clients only. 2.4GHz (N) - 802.11 Draft-n clients only. 2.4GHz (B+G) - 802.11b and 802.11n clients. 2.4GHz (G) - 802.11g clients only. 2.4GHz (B+G+N) - 802.11b, 802.11g, and 802.11n clients. Device Name (SSID) Input the Device Name of presentation gateway here. Default is „WPG-350”. Channel Number Select the wireless channel number: 1 to 13. (1 to 11 in certain version of product) Associated Client Shows all connected wireless clients (wired clients will not be displayed here).    Click „Refresh‟ button to reload list.  Click „Apply‟ button to save the settings.  NOTE: When the configuration settings are changed, you must restart the network connection. You can restart the network connection by clicking “Restart” on the web configuration menu.
 5-5-2 ‘Advanced’ Settings    Display and configures the advanced settings.  Item Description Fragment Threshold Set the Fragment threshold of wireless radio.     Default value is 2346. RTS Threshold Set the RTS threshold of wireless radio. Default value is 2347. Beacon Interval Set the beacon interval of wireless radio. Default value is 100. DTIM Period Set the DTIM period of wireless radio. Default value is 3. Data Rate Change data transfer rate. Default value is ‘Auto’ and it‟s recommended to use default setting. N Data Rate Same as above, but only for 802.11n clients. Channel Width Set channel width of wireless radio. Default setting is ‘Auto 20/40 MHz’.
Preamble Type Set the type of preamble of wireless radio, Default setting is ‘Short Preamble’. Broadcast Device Name (SSID) Decide if the product will broadcast its own device name or not. You can hide the device name of this product (set the option to „Disable‟) CTS Protect Enable to reduce the chance of radio signal collisions between 802.11b and 802.11g wireless access points. It‟s recommended to set this option to „Auto‟ or „Always‟.   Tx Power You can set the output power of wireless radio.   Turbo Mode Enhances the data transfer rate of network. Default setting is “Enable”. WMM Wi-Fi MultiMedia Quality of Service is a set of features for Wi-Fi networks that improve the user experience for audio, video, and voice applications by prioritizing data traffic. Default setting is “Disable”.    Click „Apply‟ button to save the settings.  NOTE: When the configuration settings are changed, you must restart the network connection. You can restart the network connection by clicking “Restart” on the main menu.  5-5-3 ‘Security’ Settings  5-5-3-1 Encryption: Disabled  Disables wireless encryption. Other people may intercept the content of presentation if wireless data is not encrypted, and this will allow everyone to connect to this product, unless 802.1x authentication is enabled.
Display and configures the encryption settings.  Item Description Enable 802.1x Authentication Check this box to enable 802.1x authentication. RADIUS Server IP address IP address of RADIUS authentication server here. RADIUS Server Port Port number of radius server here. RADIUS Server Password Password of radius server.  Click „Apply‟ button to save the settings.    NOTE: When the configuration settings are changed, you must restart the network connection. You can restart the network connection by clicking “Restart” on the main menu.   5-5-3-2 Encryption: WEP  Enable WEP encryption. Wireless clients must support WEP encryption and know the encryption key you set here.
 Display and configures the encryption settings.  Item Description Key Length Select WEP key length (64 bit or 128 bit), longer WEP key provides better security. Recommend to select „128-bit‟ for better security. Key Format Select key format: ASCII or Hex.  ASCII: 5 characters (64 bit key length) / 13 characters (128 bit key length) HEX: 10 characters (64 bit key length) / 26 characters (128 bit key length) Default Tx Key You can set up to four sets of WEP key and decide which key is being used by default here. Default setting is „1‟ Encryption Key 1 to 4 Input WEP key characters here. Use any alphanumerical characters (0-9, a-z, and A-Z) if you select „ASCII‟ key format, and use characters 0-9, a-f, and A-F for HEX Enable 802.1x Authentication Enables 802.1x authentication. You don‟t have to check this box if you don‟t have 802.1x authentication server. RADIUS Server IP IP address of RADIUS authentication server.
address RADIUS Server Port Port number of radius server, from 1 to 65535. Default setting is 1812. RADIUS Server Password Password of radius server, up to 64 characters.  Click „Apply‟ button to save the settings.    NOTE: When the configuration settings are changed, you must restart the network connection. You can restart the network connection by clicking “Restart” on the main menu.   5-5-3-3 Encryption: WPA pre-shared key  Enable WEP encryption. Wireless clients must support WPA encryption and know the encryption passphrase you set here.    Display and configures the encryption settings.  Item Description WPA Unicast Cipher Suite Select the type of WPA cipher suite. Select „WPA (TKIP) for maximum compatibility and WPA2 (AES) / WPA2 Mixed for better security. Pre-shared Key Format Select the type of pre-shared key: Passphrase or HEX characters. Pre-shared Key Input WPA Passphrase here.   Passphrase: 8 or more alphanumerical characters, up to 63 characters Hex: 64 characters (0-9, a-f, and A-F)
Click „Apply‟ button to save the settings.    NOTE: When the configuration settings are changed, you must restart the network connection. You can restart the network connection by clicking “Restart” on the main menu.  5-5-3-4 Encryption: WPA RADIUS  Enable WPA encryption with RADIUS authentication support. The client must support WPA encryption and you need to provide the setting of RADIUS server here.    Display and configures the encryption settings.  Item Description WPA Unicast Cipher Suite Select the type of WPA cipher suite. Select „WPA (TKIP) for maximum compatibility and WPA2 (AES) / WPA2 Mixed for better security. RADIUS Server IP address IP address of your Radius authentication server. RADIUS Server Port Port number of your Radius authentication server. Default setting is 1812. RADIUS Server Password Password of your Radius authentication.  Click „Apply‟ button to save the settings.    NOTE: When the configuration settings are changed, you must restart the network connection. You can restart the network connection by clicking “Restart” on the main menu.
5-5-4 ‘WPS’ Settings  In this menu, you can use WPS (Wi-Fi Protected Setup) to setup secure wireless connections quickly and easily with WPS-compatible wireless clients.    Display and configures the WPS setting. Item Description Enable WPS Check this box to enable WPS functionality; uncheck to disable WPS. WPS Status Displays WPS configuration status: Configured (WPS ready), or Unconfigured. If you set wireless security as described in previous section already, WPS status will be „Configured‟. Self PinCode Displays WPS self pin code. This code will be used when pin-style WPS pairing mode is being used, and WPS wireless clients will need to know this code. Device Name (SSID) Displays the device name of this WPG. Authentication Mode Displays current wireless authentication mode. Passphrase Key Here uses asterisk mark ( * ) to show WPA passphrase key. Config Mode Select WPS configuration mode: „Registrar‟ and
„Enrollee‟. Default and recommend setting: Registrar. Configure via Push Button Click “Start PBC” to handshake with other device with WPS function.    NOTE 1: When WPG is in „Registrar mode‟, another wireless device must set to „Enrollee‟ mode; and vice versa.  NOTE 2: When no WPS connection is established within 2 minutes, this mode will be turned off.  NOTE 3: You can also press „WPS‟ button located on the front of wireless presentation gateway to enter WPS mode, too. Configure via Client PinCode Input the PIN code (up to 8 characters) of the WPS-enabled device here, then click „Start PIN‟ button, then WPG will establish connection with it automatically.
5-6 Projection Setting   Displays and configures the projection setting.    Item Description Instruction Page Language Selection Select the displaying language. Output Resolution Select output resolution for projection. Presentation lock Check this box to prevent other users to interrupt current presentation.  Click „Apply‟ button to save the settings.  NOTE: When the configuration settings are changed, you must restart the network connection. You can restart the network connection by clicking “Restart” on the main menu.
5-7 Password Setting    Displays and configures the password setting.    Item Description Current Password Input current password here.  New Password /   Confirmed Password New Password: Enter new password. Confirmed Password: Confirmed the new entered password.    Click „Apply‟ button to save the settings.  NOTE: When the configuration settings are changed, you must restart the network connection. You can restart the network connection by clicking “Restart” on the main menu.
 5-8 Configuration Tools  5-8-1 Configuration Tools    Allows you to backup / restore the setting of WPG.     Displays and configures the configuration tools.  Item Description Backup Settings Click „Save…‟ button to save wireless presentation gateway‟s current setting as a file and store it on your computer.   Restore Settings Click „Browse…‟ button to select a previously-saved configuration file stored in your computer‟s folder. Reset Reset all settings of wireless presentation gateway back to factory default settings.
5-8-2 Firmware Upgrade  Upgrade the firmware of this WPG.    If WPG connects to Internet and you wish it to upgrade firmware automatically, select „Auto‟; WPG will download latest firmware and upgrade automatically. When you set this setting to „Manual‟, WPG will detect new firmware on Internet automatically, and you‟ll see a prompt message on OSD menu. If you wish to upgrade firmware, you can click „Check Now‟ button to proceed.    Note: it’s recommended to use wired Ethernet connection to perform firmware upgrade.  When firmware is upgrading, you‟ll see the following message:   WPG will restart automatically after upgrade is complete, please be patient.
5-9 Restart  Restart WPG when the device is not working properly or to apply changes made on web configuration menu.      Note: Restart takes about 60 seconds.
Click „Apply‟ to restart the WPG.    (PC)    (MAC)  Click „OK‟ to restart the WPG, or click „Cancel‟ to abort.
5-10 Logout    If you wish to logout from web configuration menu, click „Logout‟.
Chapter VI    Appendix 6-1 Hardware Specification  Product name WPG-350 Power Supply External power supply (12V DC, 1A) Dimensions 133.4 x 92.4 x 31.08mm Weight 200g Connectivity VGA Connector : VGA OUT ------ D-sub 15 pin mini x 1(Black) x 1 PC IN ------------D-sub 15 pin mini x1(Blue) x 1 Audio Output Interface: 3.5mm jack x 1 Wired Network Interface : 10/100Mbps auto-sensing/auto-cross-over Ethernet port x 1 Wireless Network Interface : Built-in 802.11b/g/n   Output Resolution 1024 x 768, 800x600 Environmental Requirements Operating Temperature: 0 ~ 40°C Operating Humidity: 5 ~ 85%, non-condensing Storage Temperature: 0 ~ 50°C Storage Humidity: 5 ~ 85%, non-condensing Operating System Supported OS : 1.  Windows XP 32/63-bit (SP2 or higher) 2.  Windows Vista 32/63-bit (SP1 or higher) 3.  MAC OS 10.4 / 10.5 (Both Power PC / Intel Version) Supported Web browsers : 1.  Microsoft Internet Explorer 6.0 (SP2) or higher 2.  Mozilla‟s Firefox 3.0 or later 3.  Safari Approvals CE, FCC, IC, UL/cUL, NCC, C-TICK, RoHS-compliant Software Wireless Presentation Gateway software application
Support Format Support Format (For Windows) Category Format Video   Audio*   AVI MPEG4 PCM, ADPCM H.261 H.263 Microsoft MPEG-4 v1/v2 MPG MPEG1 MPEG MPEG1 ISO MPEG1 MKV MPEG4 WMV WMV7** WMVA1**, WMVA2** ASF WMV8** * Audio: Does not support AAC and MP3 ** Supported by Windows Media Player 10 or above Support Format (For MAC) Category Format Video   Audio*    AVI MPEG4 PCM, ADPCM * Audio: Does not support AAC and MP3
6-2 Troubleshooting  Scenario: Can‟t connect to wireless presentation gateway  Solution:  1. Check the LED lights located at the front of WPG. If „Power‟ LED does not light, do the following check:    Check the connection of A/C adapter, and if the electrical outlet you used with A/C adapter is functioning properly.   Press „Power‟ button on remote controller to see if „Power‟ LED lights now.  2. Check the network connection.  3. Make sure you connected to correct IP address.  4. If you‟re using wireless network, make sure you connected to correct device.  5. If you‟re using wireless network, check the WEP / WPA password.  Scenario: Remote controller does not work  Solution: 1. Replace the battery of remote controller with a new one (CR-2032 lithium battery).  2. Please point the IR transmitter (located at the top of remote controller) to the IR receiver of WPG.  3. Make sure the IR receiver of WPG (labeled as „Remote‟) is not blocked by any object.  4. If there‟s strong / fluorescent light source near IR transmitter / receiver, remote controller may not be able to function properly.  5. If the distance between IR transmitter / receiver is longer than 7 meters, remote controller may not working properly.
6. Make sure the IR extending cable is correctly inserted to „IR IN‟ jack at the back of WPG, not „AUDIO OUT‟ jack.  Scenario: No image displayed on WPG‟s display  Solution:   1. Check the connection between video display and WPG.  2. Make sure the video display you‟re using supports the video output mode you selected (in VGA mode).    3. Make sure the video display is switched on.  Scenario: I hear noise when WPG is operating.  Solution: If you smell something strange or even see smoke come out from WPG, unplug the A/C adapter (if possible), and return the WPG back to dealer of purchase immediately.

Navigation menu