Electronic Warfare Associates SRCEDFB Remote Control Electronic Door Lock FOB User Manual UserManualBooklet111010 3
Electronic Warfare Associates, Inc. Remote Control Electronic Door Lock FOB UserManualBooklet111010 3
Contents
- 1. Users Manual 1
- 2. Users Manual 2
Users Manual 2
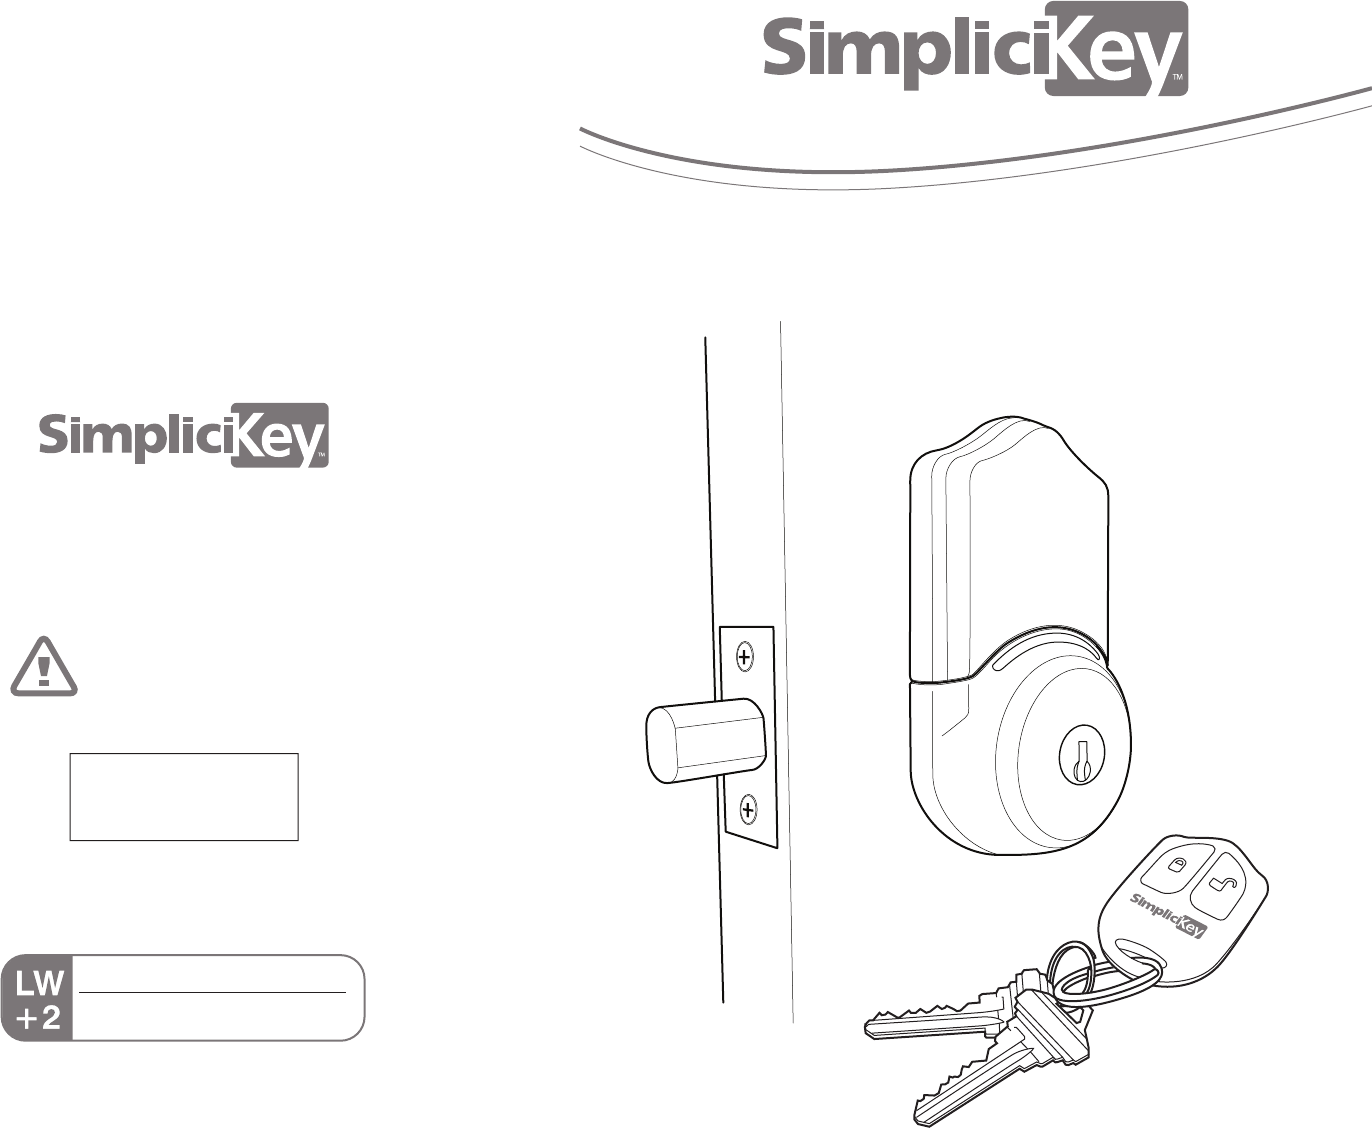
REMOTE CONTROL ELECTRONIC DEADBOLT
www.SimpliciKey.com
1 (800) 785-6595
Keep this code safe
Place Label Here
Default Admin Code
(See www.simplicikey.com for more details.)
© SimpliciKey 2010, 2011
Lifetime limited finish and mechanical warranty
2-year electronic warranty
Garantía limitada de por vida para el acabado y el
sistema mecánica
Garantía de 2 años para el sistema electrónico
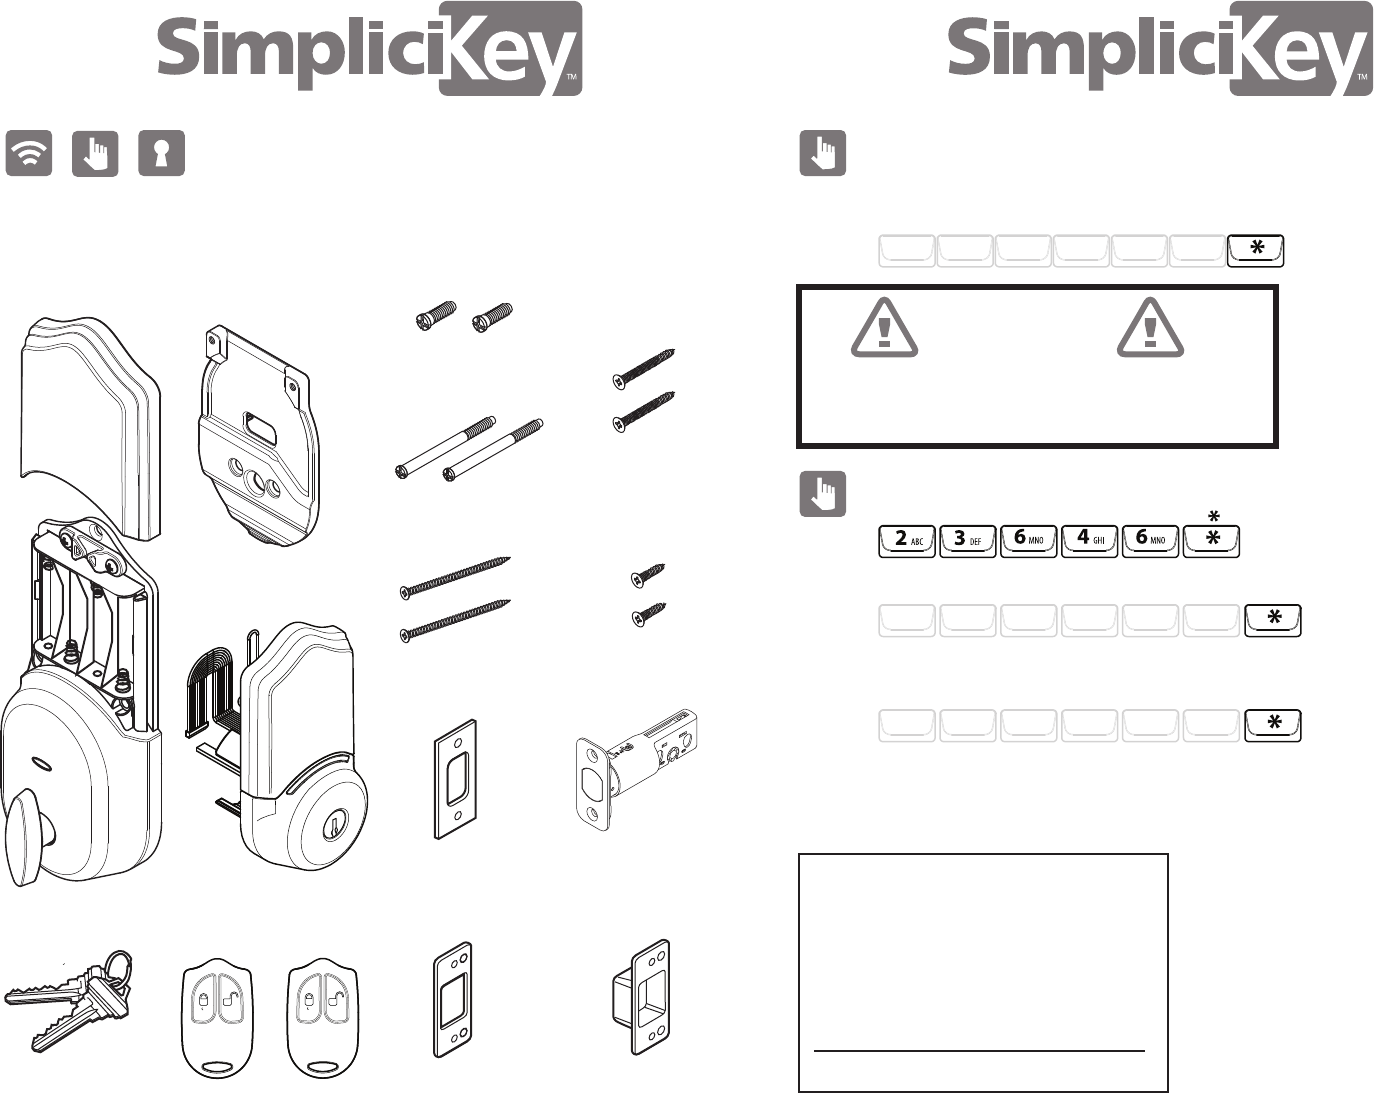
Parts List
1 interior plate
First things rst—make sure you have all of the necessary components in
your SimpliciKey package.
2 remote control
keyfobs
1 deadbolt lock
1 strike plate
1 reinforcement
plate
1 strike box
2 keys
2 short
wood
screws
2 long
wood
screws
2 long bolts
2 strike wood screws
2 short bolts
1 interior lock
1 exterior lock
211
Changing Your User Admin Code
Enter your Default Admin Code (see below) or the existing User
Admin Code and press the * key to begin Admin mode.
Next, enter ADMIN (23646) on the keypad and press the * key.
Next, enter a new 4–6 digit Admin Code and then press the * key.
Finally, repeat your entry of your new 4–6 digit Admin Code
and then press the * key.
We recommend that you write down
your new Admin Code here and keep
this manual in a safe place.
New Admin Code
You will then receive the nal conrmation tone and the keypad
will ash twice to let you know that the User Admin Code has
been changed.
Default Admin Code
If the keypad ashes and a multi-tone alert goes o
at any point in admin mode, you have taken too
long and will have to start over from the rst step.
Critical Point
New Admin Code
New Admin Code
New Admin Code
A - D - M - I - N -
WARNING: SimpliciKey submits that no
lock, by itself, can provide complete
security. As with other mechanical and
electronic locking devices, the security of
this lock has the potential to be compro-
mised. We remind all our customers to
exercise good safety procedures as part
of your home security plan. SimpliciKey
locks are manufactured to ANSI Grade 2
specifications. For added levels of
security, consult a qualified locksmith or
security expert.
3
Your administration code (Admin Code) can be found
on the back of this booklet. The Admin Code can be
changed by following instructions on page 11.
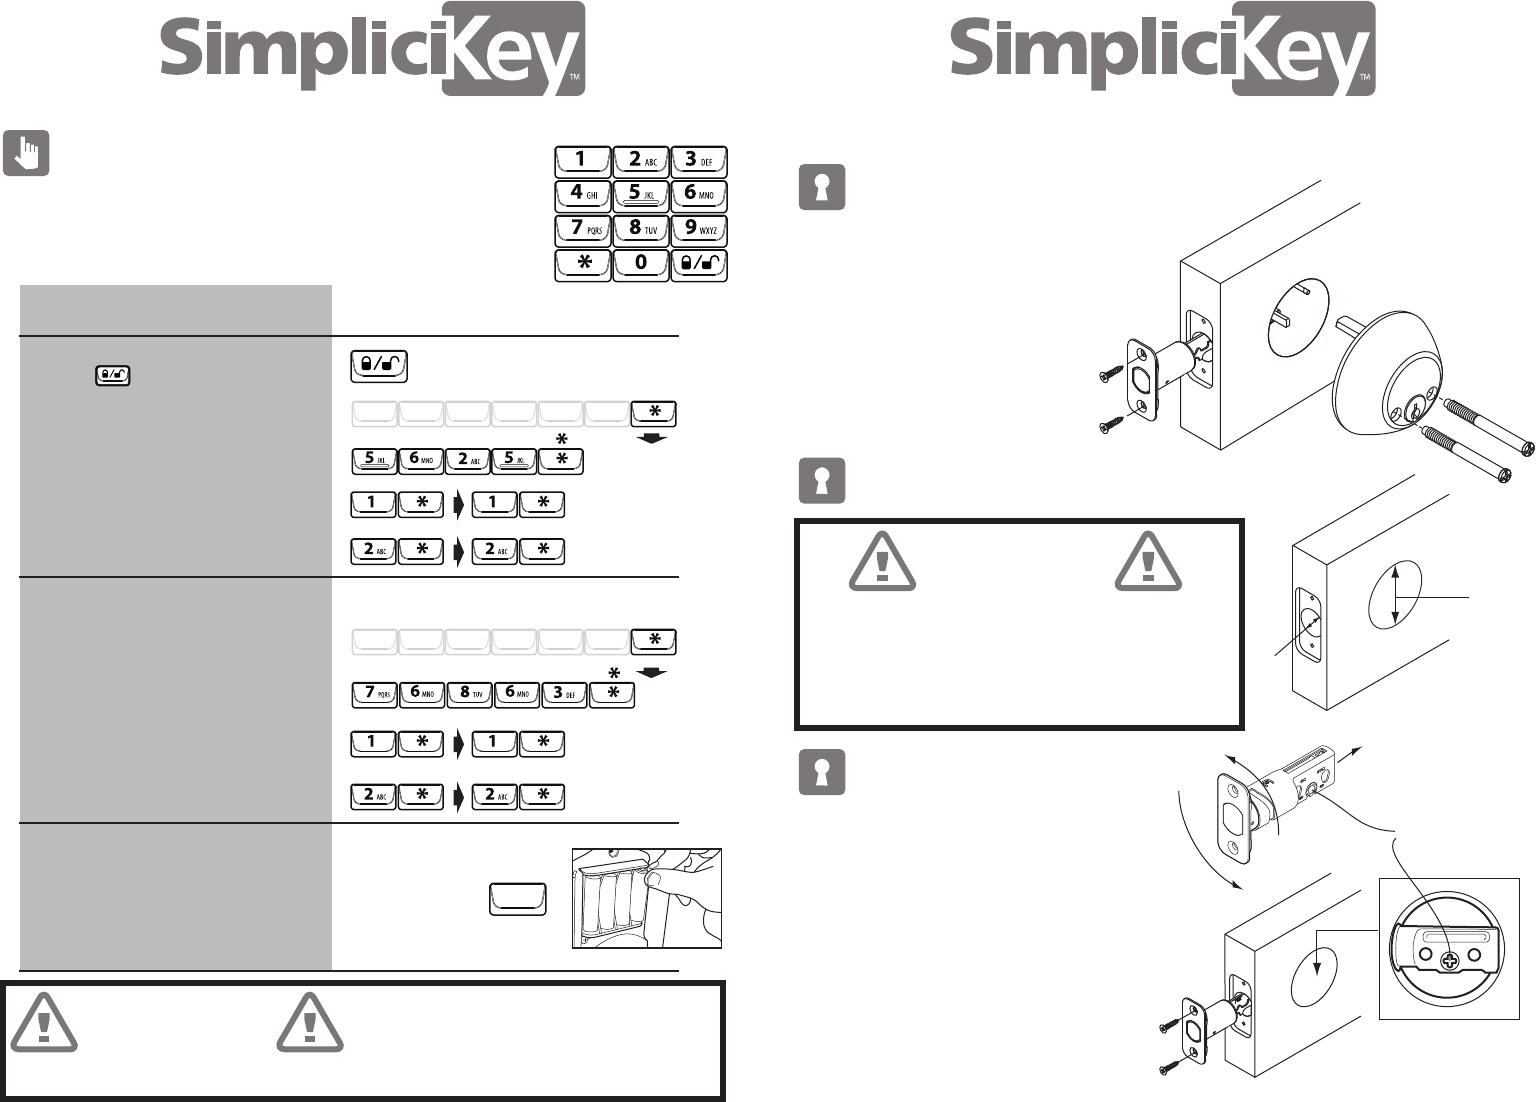
10
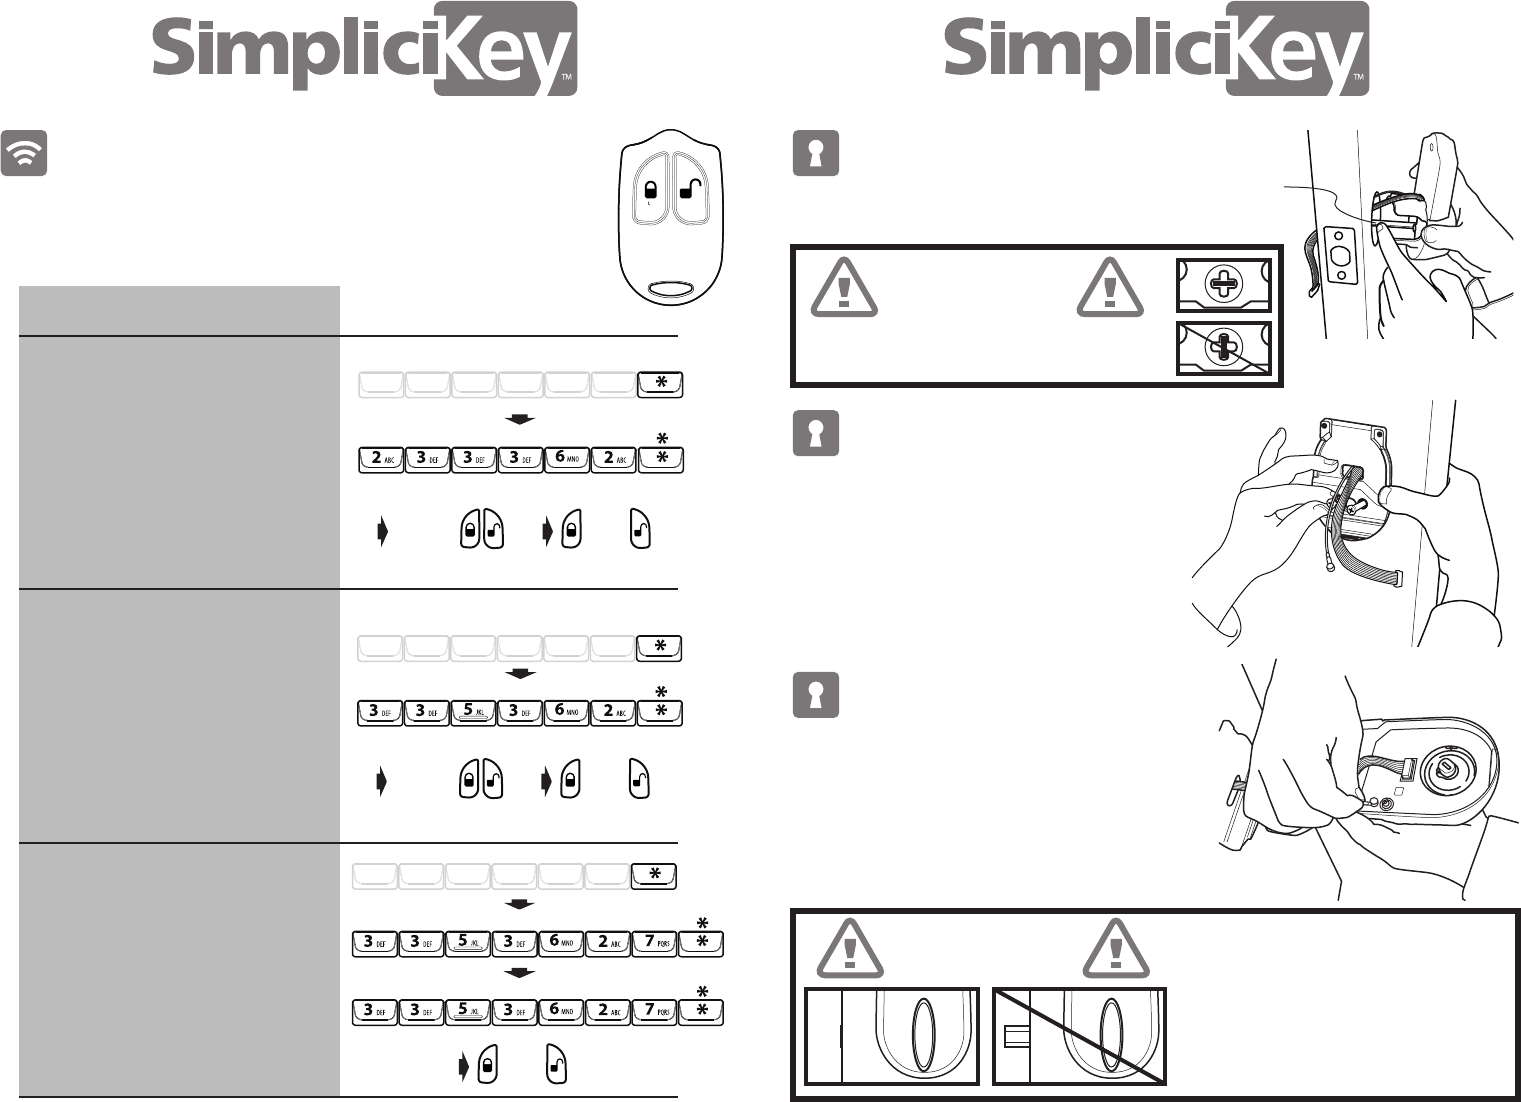
1. Remove Existing Deadbolt
LOCK INSTALLATION INSTRUCTIONS
2. Check Cutout Size
2 1/8”
1”
3. Install New Deadbolt
First, remove the two interior
screws securing the lock.
Next, remove the interior and
exterior lock components.
Finally, take out the existing
deadbolt slide assembly.
Place deadbolt into door, check to
see if cross-hairs are centered.
To adjust the deadbolt length,
twist the deadbolt slide assembly
to extend and center in cutout.
Make sure cross-hairs are on the
lower part of the assembly.
Check that the plate sits ush
with the door.
Secure the deadbolt plate to the
door with two short wood screws.
Cross-hairs
180°
Stop to measure the cutouts for the lock
components. If the main cutout is 2-1/8 inches
in diameter, and latch cutout is 1 inch, you're
ready to go. If not, you may need to use the
template to adjust the hole size.
Critical Point
Critical Point
Keypad Instructions
Command Press
Quiet Lock Feature
Simple Lock Feature
Master Reset Feature
2. Enter “LOCK” and press *
To turn simple lock ON, press 1,*
and repeat
To turn simple lock OFF, press 2,*
and repeat
2. Enter “SOUND” and press *
To turn sounds ON, press 1,*
and repeat
To turn sounds OFF, press 2,*
and repeat
Simultaneously
press and hold
any button and
insert the 4th
AA battery.
Enables to lock
without entering a Key Code.
Clears all stored codes
and settings.
1. Enter Admin Code
1. Enter Admin Code
Turns on/off keypad sounds
To turn off simple lock
To turn on simple lock
Enter Admin Code
L - O - C - K -
To turn off sounds
To turn on sounds
Enter Admin Code
S - O - U - N - D -
If the keypad flashes and a multi-tone alert
goes off at any point while in admin mode,
you have taken too long and will have to
start over from the first step.
L/UL Button (used for locking only)
Your administration code (Admin Code) can be found
on the back of this booklet. The Admin Code can be
changed by following instructions on page 11.
9
4. Remove Existing Strike Plate
4
First, remove the two existing strikeplate screws.
Remove the strike plate and any other hardware
behind the plate.
Install strike box, reinforcement plate, and strike
plate, then tighten screws.
5. Install New Strike Plate
Place strike plate into door frame
to check that the plate sits ush
with the frame.
Make sure the deadbolt freely
slides into the strike plate when
the door is closed by inserting a
Phillips head screwdriver into the
cross-hairs, then twist to extend.
For help aligning the strike plate,
please refer to the template.
Once aligned, secure the
strike plate to the door with two
long wood screws.
Deadbolt
Strike plate
Strike plate
Strike box
Strike plate
Strike wood screw
Long wood screw
Keypad Instructions
Command Press
Add Key Code
Delete a Key Code
Delete all Key Codes
2. Enter “ADD CODE”, press *
1. Enter Admin Code
1. Enter Admin Code
1. Enter Admin Code
2. Enter “DEL CODE”, press *
2. Enter “DL CODES”, press *
3. Repeat “DL CODES”, press *
3. Enter the new Key Code, press *
4. Repeat the new Key Code, press *
5. Test the new Key Code, press
3. Enter the Key Code to be deleted,
press *
4. Repeat the Key Code to be deleted,
press *
4. Test the deleted Key Codes,
press
Repeat
Enter
Enter Admin Code
New Key Code
New Key Code
Test
New Key Code
A - D - D - C - O - D - E -
Repeat
Key Code to Delete
Enter
Key Code to Delete
Test
Deleted Key Code
Enter Admin Code
D - E - L - C - O - D - E -
Test
Deleted Key Code
Enter Admin Code
D - L - C - O - D - E - S -
D - L - C - O - D - E - S -
Reinforcement plate
5. Test the deleted Key Code,
press
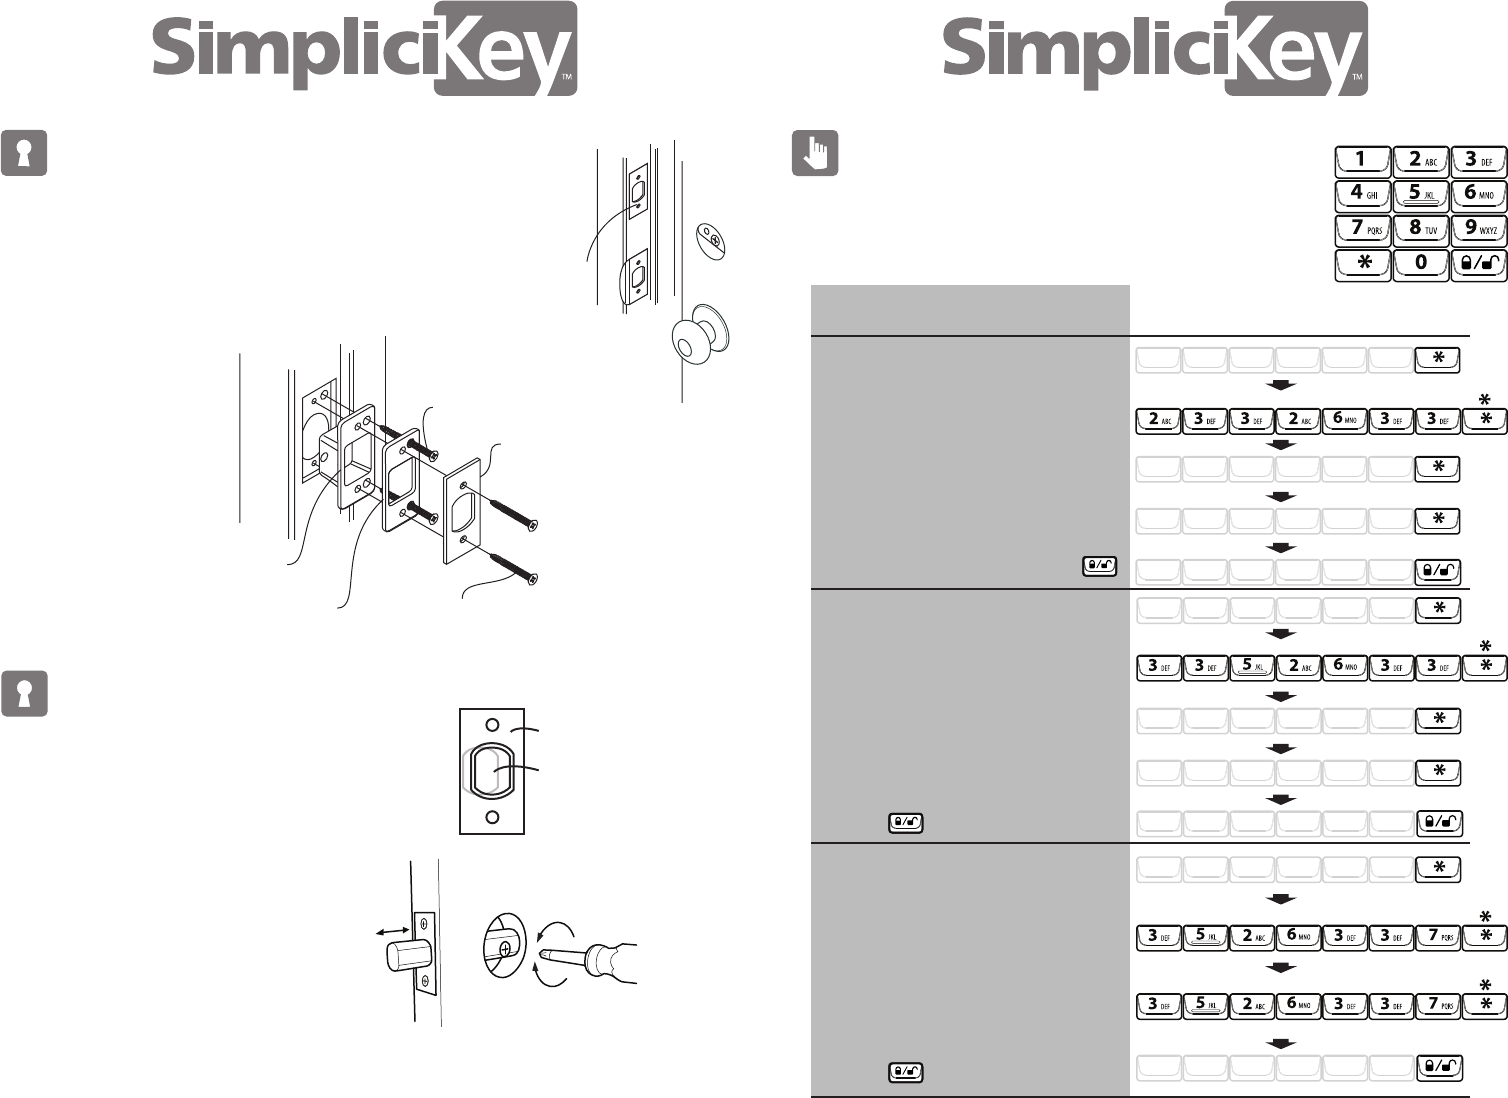
5
Slide the wires above the
deadbolt slide assembly.
Insert the at bar horizontally into the
cross-hairs of the deadbolt slide assembly.
Slide wires through wire hole of
interior lock plate.
Insert two long bolts through
plate, latch, and thread into
external lock, securing all pieces
snugly.
Your administration code (Admin Code) can be found
on the back of this booklet. The Admin Code can be
changed by following instructions on page 11.
Critical Point
Critical Point
Do not skip this step or the lock
will not operate correctly.
Conrm that the deadbolt is
retracted. Note that the thumbturn at
the bottom of the interior lock is in a
horizontal position rotated away
from the deadbolt / edge of door.
6. Install Exterior Lock
7. Install Interior Plate
Attach 12-pin connector to the top of the
port on the green circuit board with the
white rectangle around it.
Attach gold tip wire connector to the gold
port on the green circuit board with the
white circle around it.
8. Attach Wires
8
Horizontal
at bar
Remote Control Keyfob Instructions
Command Press
Add Remote Control Keyfob
1. Enter Admin Code
1. Enter Admin Code
Delete an Individual Remote Control
Keyfob
Delete all Remote Control Keyfobs
2. Enter “ADD FOB”, press *
2. Enter “DEL FOBS”, press *
3. Press and hold both keyfob buttons
4. Test the keyfobs to confirm
A - D - D - F - O - B -
Press
and hold
Test
both
Enter Admin Code
Press
and hold
either
Test
both
Enter Admin Code
D - E - L - F - O - B -
Enter Admin Code
D - E - L - F - O - B - S -
4. Test the keyfob
1. Enter Admin Code
2. Enter “DEL FOB”, press *
3. Press and hold either keyfob button
4. Test the keyfob
3. Repeat “DEL FOBS”, press *
Test
both
D - E - L - F - O - B - S -

7
6
Guide excess wires into cavity above the green
circuit board.
Align thumbturn with crank bar to mount to
interior plate.
Attach interior lock to interior plate with the
two short bolts through holes under battery
case.
Be careful not to pinch the wires as you install
the lock.
9. Install Interior Lock
Insert key into cylinder and turn to extend
deadbolt to locked position. If the deadbolt
will not extend, double-check that all previous
steps have been completed successfully.
If the deadbolt still will not extend, call
Technical Support at 1-800-785-6595.
10. Test the Manual Deadbolt
Install four AA batteries in the compartment
on interior lock.
Slide battery cover into place, concealing the
battery compartment.
You are now ready to program SimpliciKey!
11. Install Batteries
Make sure the door is open and the deadbolt
is free to auto-congure. Do not press any
buttons until lock activity stops.
Critical Point
1. Remote Control Keyfob
DAILY USE INSTRUCTIONS
SimpliciKey comes factory programmed with the keyfobs included in the
package. To add additional keyfobs (up to the maximum limit of 8), please see
the instructions on page 8.
2. Keypad Key Codes
For your security, SimpliciKey requires that you enter your own Key Codes to
activate this feature. Please see the instructions on page 9 to add up to 16
Key Codes.
For your convenience, the keypad has options for quiet operation and faster
locking, with instructions on page 10.
SimpliciKey offers the latest bump-resistant 6-pin keyway should you choose
to use a metal key for entry.
3. Keypad Settings
4. Manual Key Use
Press to Lock
Enter Key Code and L/UL button ( ) to lock
When Unlocked:
When Locked:
Press to Unlock
When simple lock is ON, pressing the L/UL button ( ) will lock the door.
When simple lock is OFF, the user will have to enter the Key Code
and press the L/UL button ( ) to lock the door as shown above in Step 2.
When quiet lock is OFF, the keypad will emit softer tones during operation.
Key Code
Key Code
Enter Key Code and L/UL button ( ) to unlock