Electronics ESU ESU Enrollment Station User Manual LIT 6045680 2 D2c Prox Enrollment Station
International Electronics Inc. ESU Enrollment Station LIT 6045680 2 D2c Prox Enrollment Station
Users Manual

FCC Statement
15.21 Information to User
Any changes or modifications not expressly approved by the party responsible for
com
p
liance could void the user’s authorit
y
to o
p
erate the e
q
ui
p
ment.
Access System – Proximity Card
Enrollment Station Installation Instructions
Specifications/Requirements:
Mechanical: Card Compatibility
2.74” W x 4.6” L x 1.4” H HID Format, 125 KHZ Cards Only (up to 40 bits)
Environmental: Software:
Environment: For indoor use only Hub Manager Professional 6 (or higher) – Serial COM Port only
Temperature Tolerance: 32º F to 120º F (0º – 49ºC) Hub Manager Professional version 7.1.3 (or higher) – USB or Serial
COM Port
Electrical: PC Connections:
Operating Voltage: 12 VDC USB Port (v1.1 or v2.0) or serial COM port
Current Draw: 38mA
Description
The Enrollment Station is used to enroll HID format proximity cards (up to 40 bits) directly into the Hub Manager Professional
Access Control PC software, by presentation. This provides a convenient way to enroll cards whether you know the weigand card
format or not. The raw card data is read from the card and then stored in the Hub Manager Professional database.
Software Compatibility
The Enrollment Station is compatible with Hub Manager Professional 6 (or higher) when using with a serial COM Port. Hub Manager
Professional version 7.1.3 (or higher) supports both a USB and serial COM port connection. To use the Enrollment Station with a
USB port you must install the USB drivers, which is discussed later on in this manual.
If you do not have the latest software you can download the latest version at www.ieib.com or update your existing software through
iUpdate (version 7.1.1.15 or higher contains the drivers).
Packing List
(1) Enrollment Station
(1) Installation Instructions
(1) 12VDC, 300mA Transformer
(1) USB Cable
(1) COM Port Connection Kit (DB9, DB25 and 6-Foot Cord)
Document # 6045680 Rev. 2.0, D2c Page 1 of 10
Enrollment Station Installation Instructions
Operation
To operate the Enrollment Station simply connect power and connect it to your PC as shown in the diagrams in the following sections.
Once it’s connected to your PC you are now ready to enroll your cards using the Hub Manager Professional PC software. Please refer
the Hub Manager Professional documentation for further details regarding software operation. When data is transmitting between the
PC and the Enrollment station the yellow and green transmit and receive LED's blink rapidly.
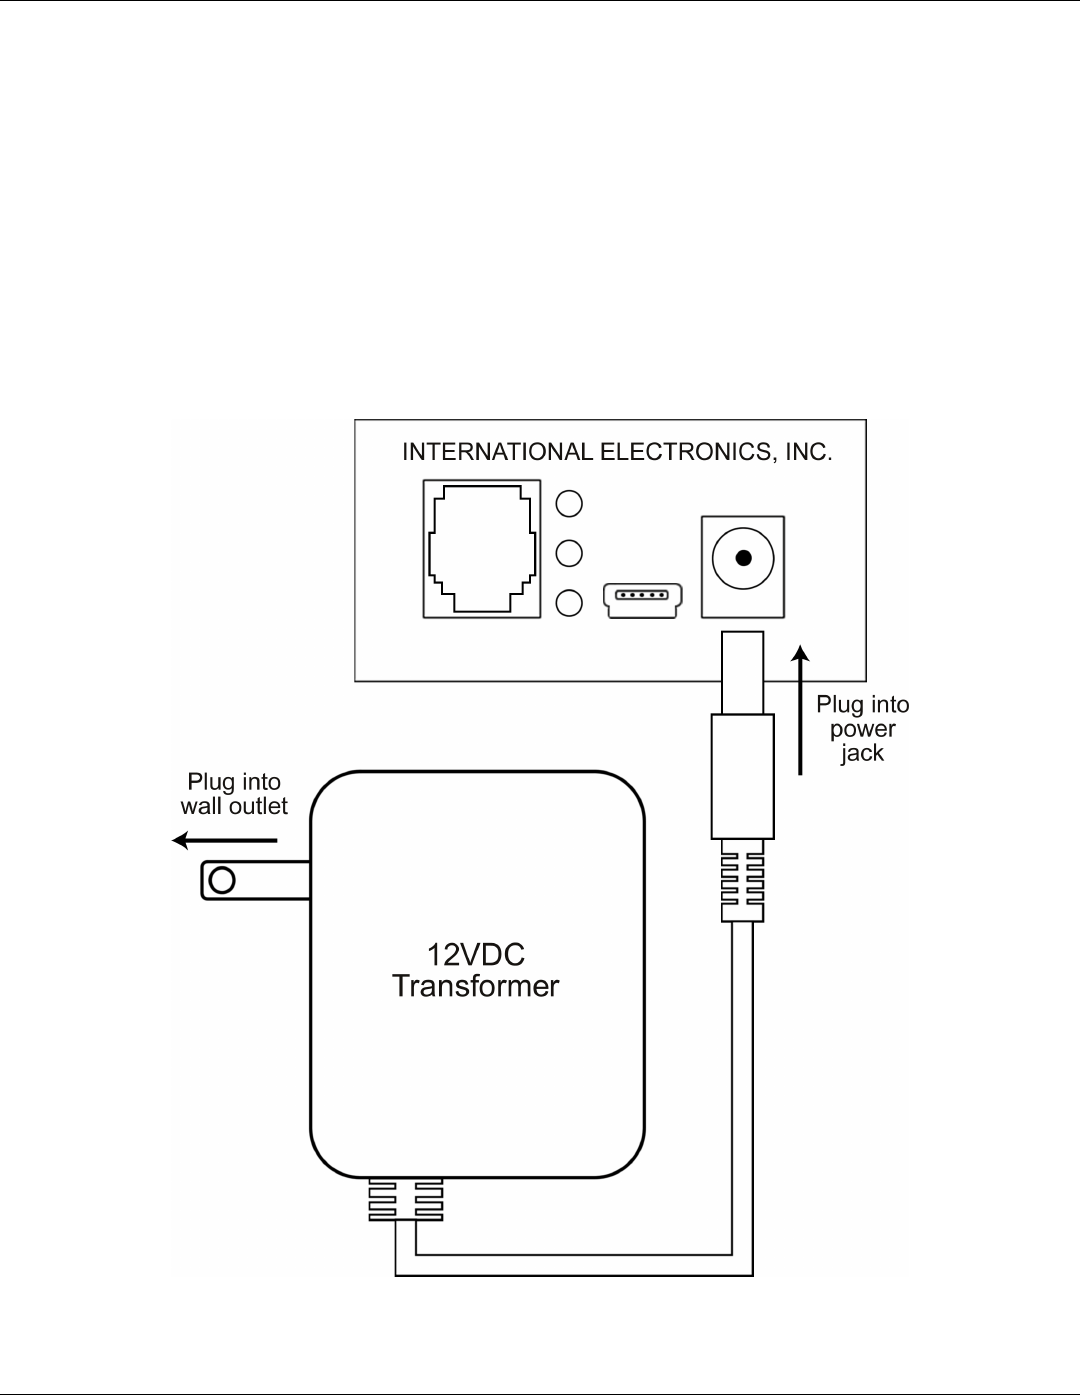
Connecting the Transformer to the Enrollment Station
The Enrollment Station is shipped with a 12VDC, 300mA plug-in transformer. To power the unit just plug the connector from the
transformer into the power jack on the Enrollment Station. Then plug the transformer into a 120VAC wall outlet. If the unit is
powered properly the red LED at the top turns on solid.
Page 2 of 10 Document # 6045680 Rev. 2.0, D2c
Figure 1: Connecting the Transformer to the Enrollment Station
Enrollment Station Installation Instructions
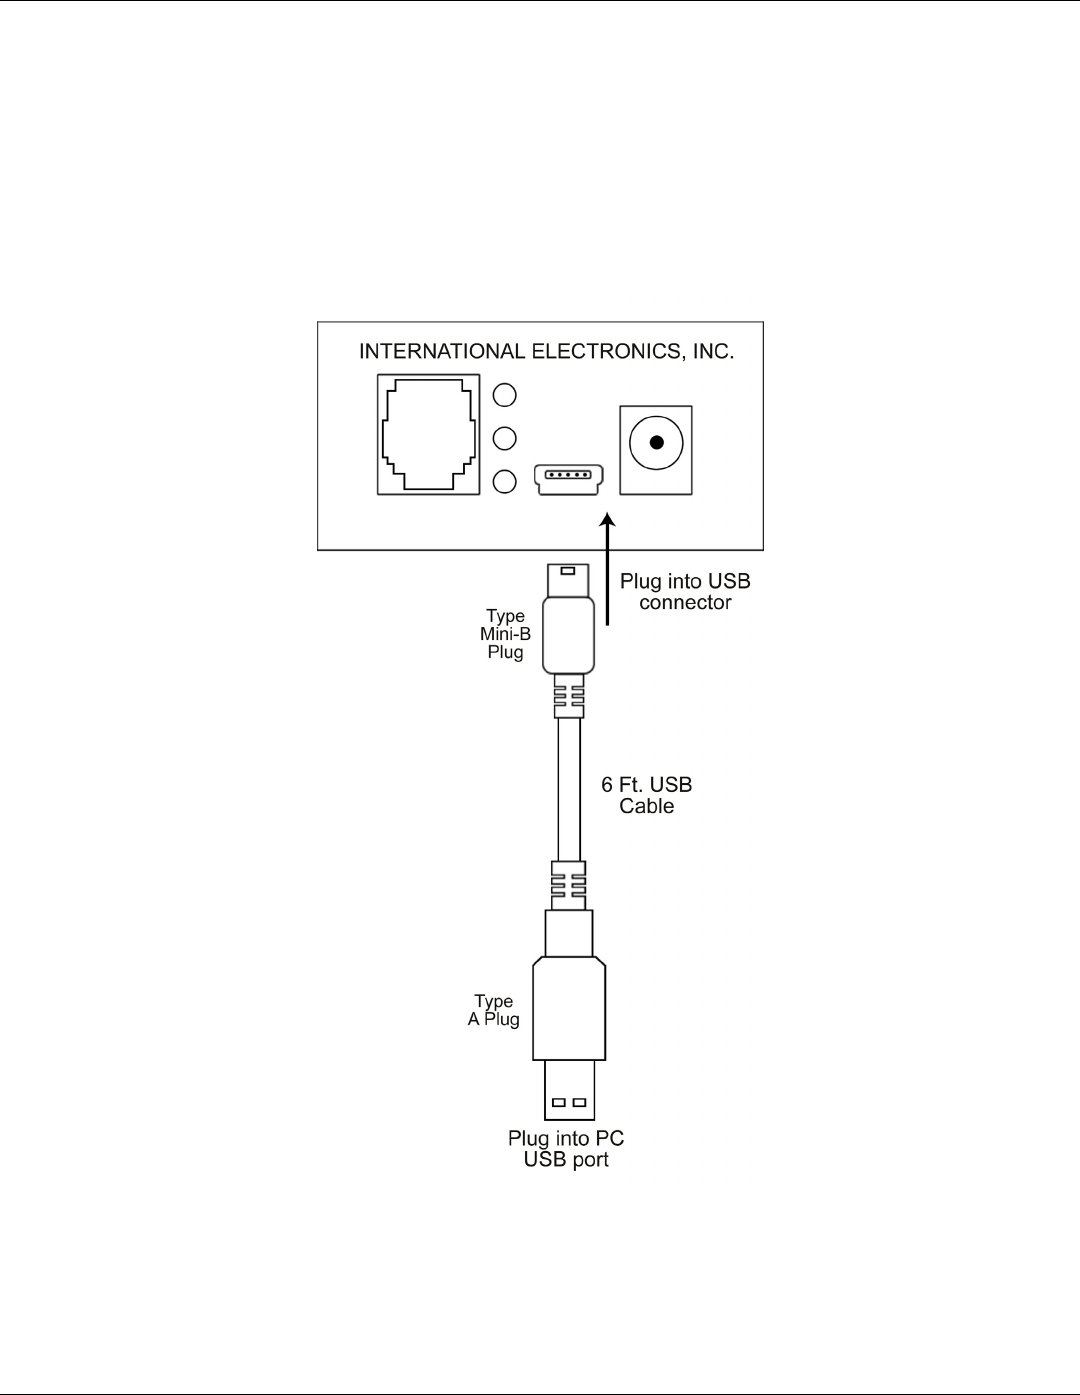
Connecting the Enrollment Station to a PC USB port:
To connect the Enrollment Station to your PC USB port, first plug the small end (Type Mini-B) of the 6-foot USB cable into USB
connector on the front. Then plug the large end (Type A) of the 6-foot USB cable into your PC's USB port. Figure 2 below shows this
connection.
Document # 6045680 Rev. 2.0, D2c Page 3 of 10
Figure 2: Connecting the Enrollment Station to
a PC USB port
Enrollment Station Installation Instructions
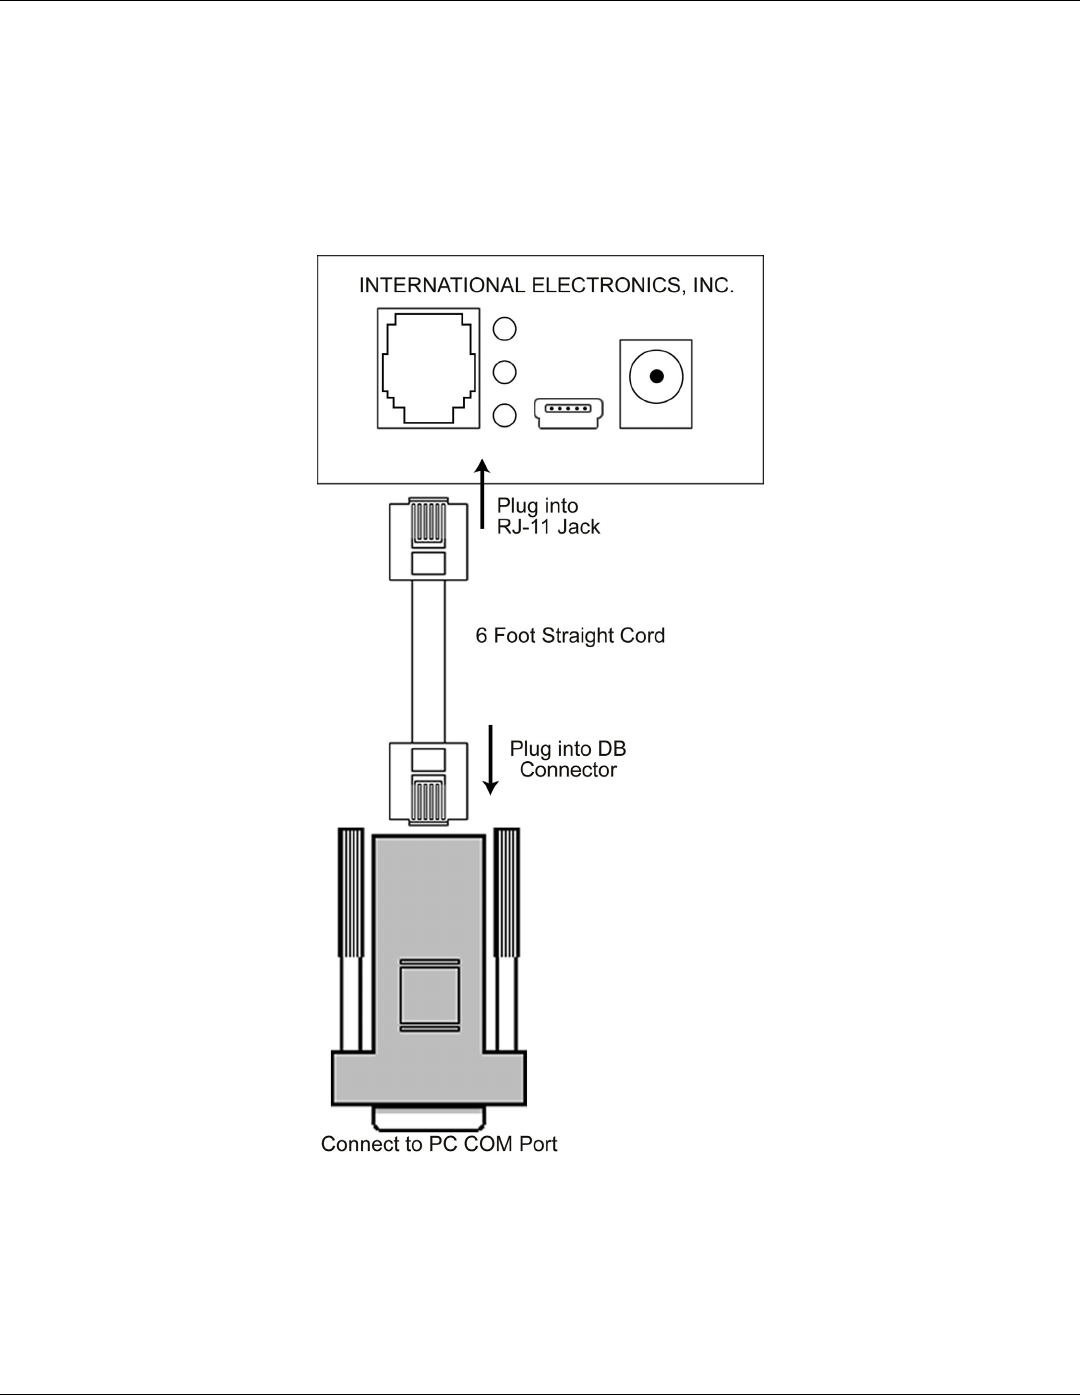
Connecting the Enrollment Station to a PC COM port:
To connect the Enrollment Station to your PC COM port, first plug the 6-foot straight cord into the RJ-11 jack on the front. Then plug
the straight cord into the DB connector. Next, connect the DB connector to your COM port. You can use either the DB-9 or DB-25
connector, depending on your COM port. Figure 3 below shows this connection.
Page 4 of 10 Document # 6045680 Rev. 2.0, D2c
Figure 3: Connecting the Enrollment Station to
a PC COM port
Enrollment Station Installation Instructions
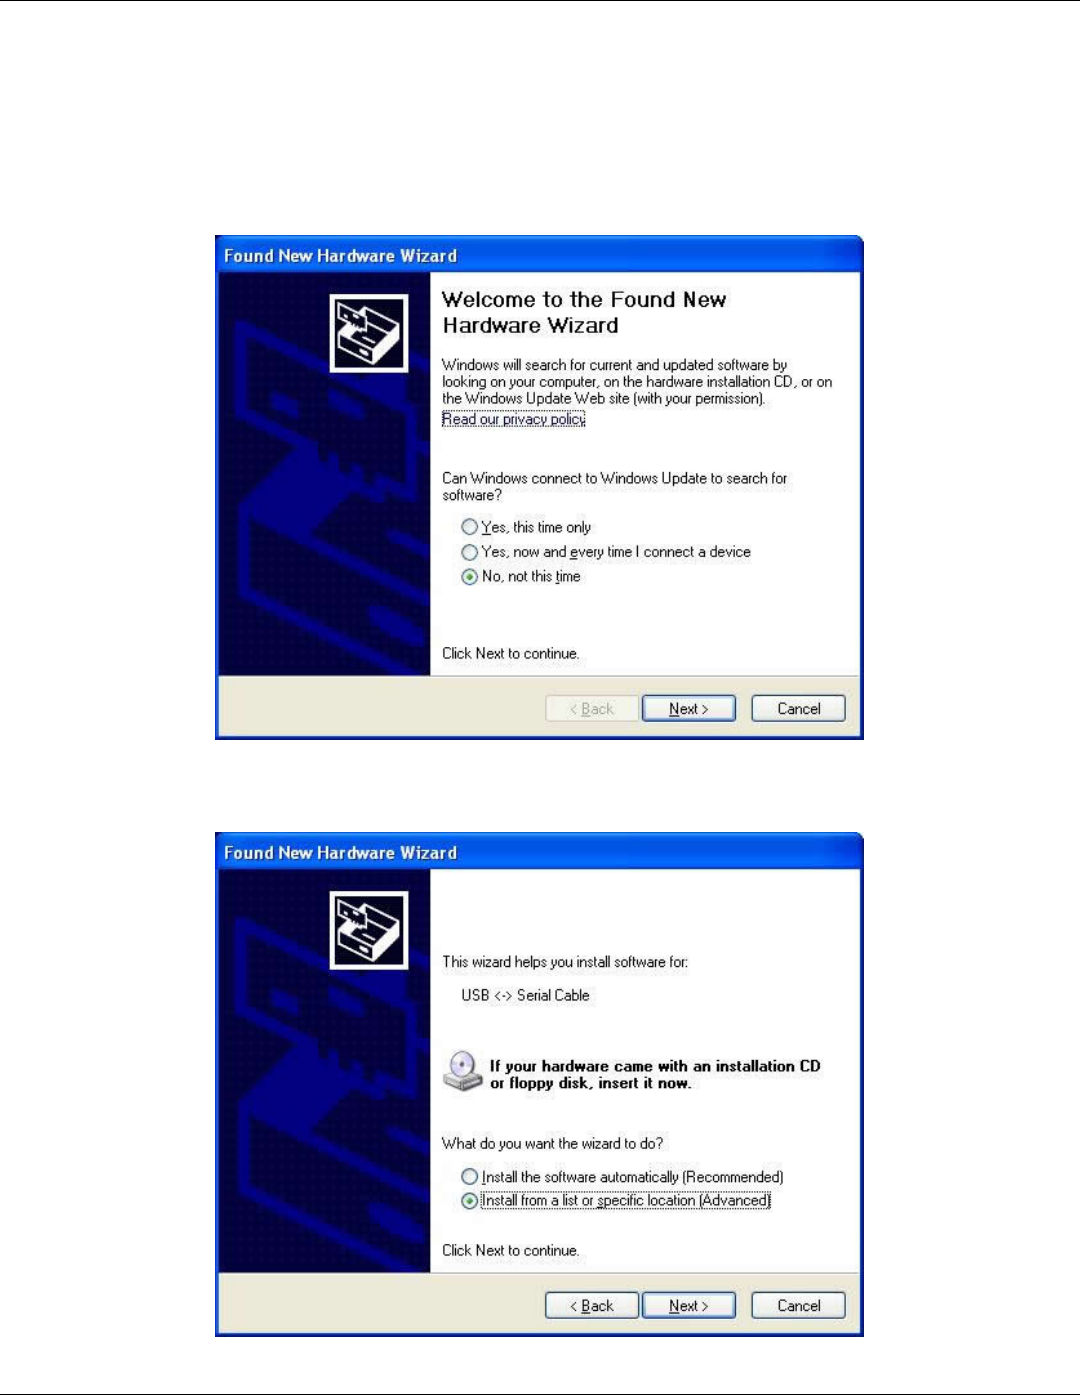
Installing the USB Drivers
To use the Enrollment Station you must install the USB drivers on the PC. The Enrollment Station is plug and play, so when you plug
it in, your PC should recognize the new hardware and launch the Found New Hardware Wizard as shown below. Please note that this
hardware wizard runs twice. Follow the same steps both times. Note: These instructions are for a typical Windows XP system. If
you are using a different operating system, or these steps do not match your PC, please refer to the instructions for your system.
On the first screen of the wizard select “No, not this time.” then click the Next button.
After clicking the Next button, choose the option that says “Install from a list or specific location (Advanced)” and click the Next
button.
Document # 6045680 Rev. 2.0, D2c Page 5 of 10
Enrollment Station Installation Instructions
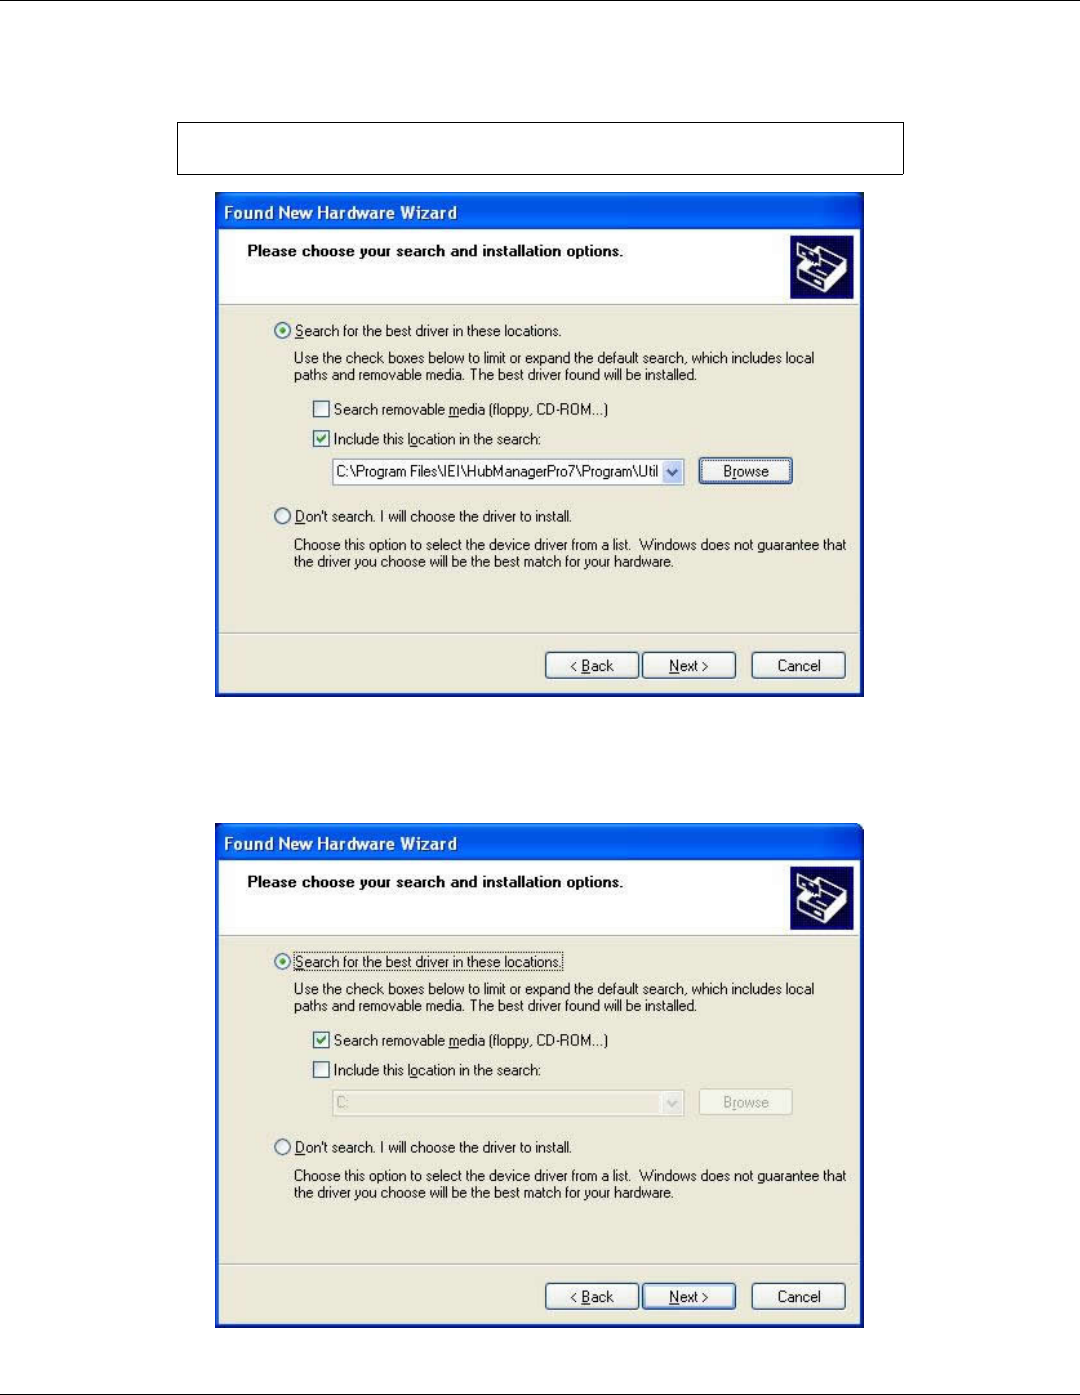
On the next screen select “Search for the best driver in these locations.” at the top. If you've already installed Hub Manager
Professional onto the PC, select “Include this location in the search” and browse to the following path:
C:\Program Files\IEI\HubManagerPro7\Program\Utilities\USB_Driver\FTDI_XP-2K-2003
If you haven't installed Hub Manager Professional, the USB drivers are also located on the CD. Choose the option “Search removable
media (floppy, CD-ROM...).” For reference, the USB drivers are located in the following folder on the CD:
E:\Driver_USB\FTDI_XP-2K-2003. (Note: This folder path is an example; Your CD drive letter may not be E.) Click Next to
continue.
Page 6 of 10 Document # 6045680 Rev. 2.0, D2c
Note: The path above is for Hub Manager Professional 7. If you are using a different
version, browse to the folder for that version. For example: HubManagerPro8.

Enrollment Station Installation Instructions
Next a screen appears indicating the files are being copied, then you're presented with the following screen to indicate the process is
finished. Click on the Finish button to close the Found New Hardware Wizard. Please note that this hardware wizard runs twice.
Follow the same steps both times.
Document # 6045680 Rev. 2.0, D2c Page 7 of 10
Note: The second time through the Found New Hardware Wizard, the
final screen indicates the wizard has completed installing the software
for: USB Serial Port.
Enrollment Station Installation Instructions
Determining the USB COM port number
When you connect the Enrollment Station to your computer's USB port, the PC automatically assigns it a COM port number. You
must then select this COM port in the software to communicate to your Enrollment Station. Follow the instructions below to
determine the USB COM port number and refer to the Hub Manager Professional documentation for details about selecting the COM
port in the software. Note: These instructions are for a typical Windows XP system. If you are using a different operating system, or
these steps do not match your PC, please refer to the instructions for your system.
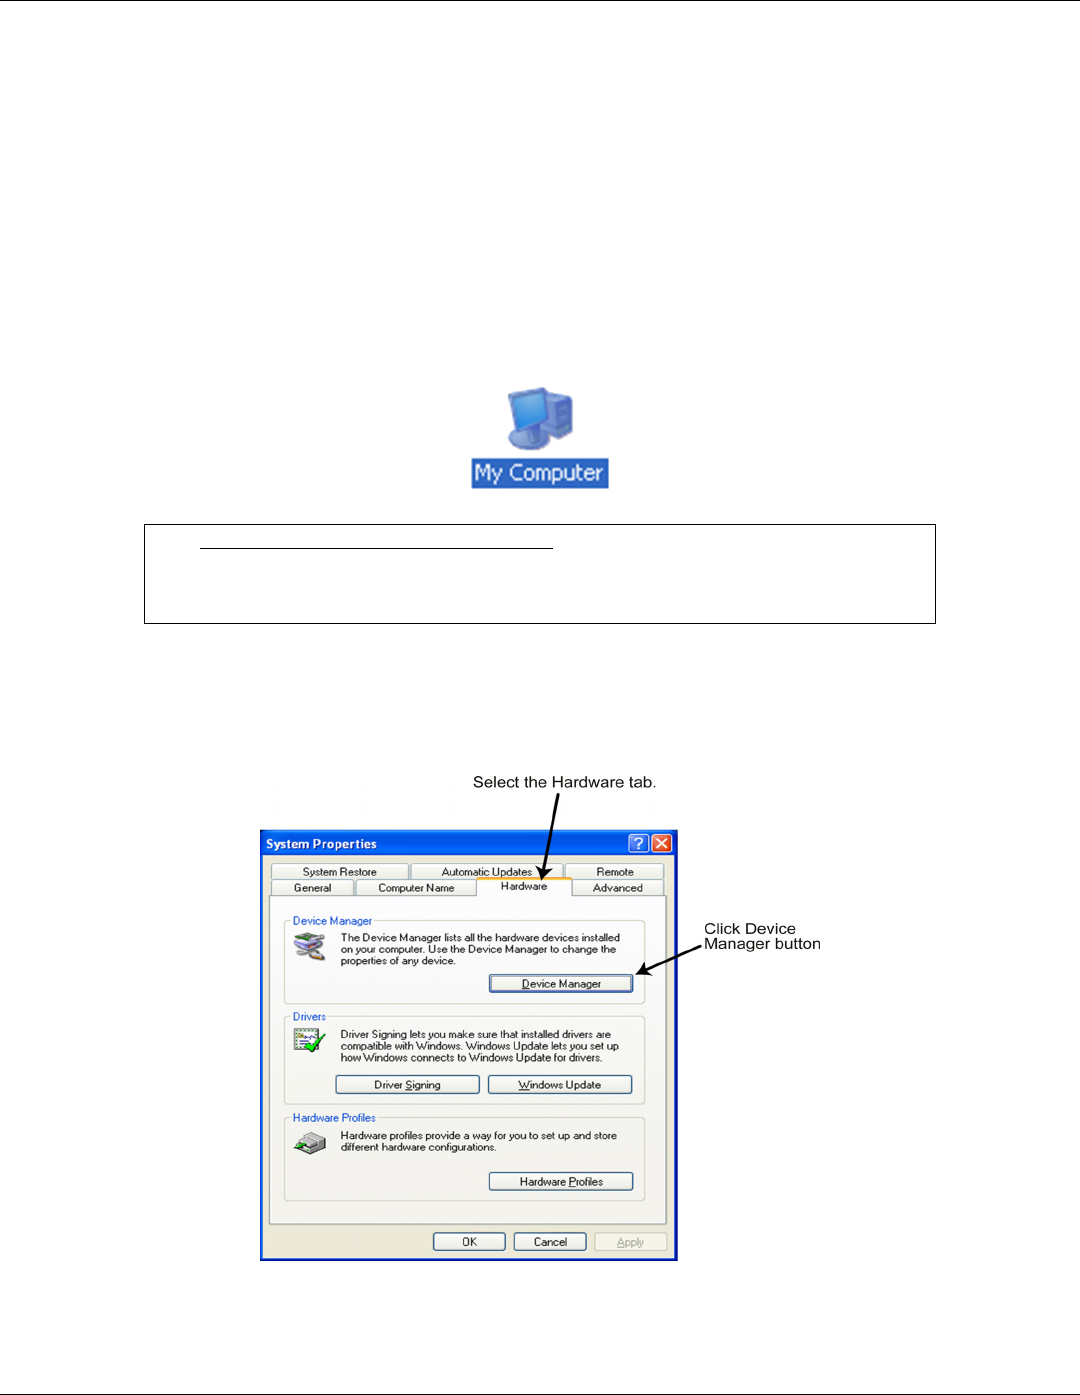
1. Right click on the My Computer icon on your desktop and select properties from the drop down list.
2. When the System Properties screen opens select the Hardware tab, then click on the Device Manager button.
Page 8 of 10 Document # 6045680 Rev. 2.0, D2c
Note: If you do not have the My Computer icon on your desktop, you can access the System
Properties by going to Control Panel. Click on the Windows Start Menu and choose Settings,
then Control Panel. When the Control Panel menu opens, scroll down to System. Double-click on
System to open. Follow the rest of the instructions in this section.

Enrollment Station Installation Instructions
3. When the device manager list opens, expand Ports (COM & LPT) by clicking the + symbol. Under this is a list of the COM
ports on your PC. Look for USB Serial Port (COMx) in the list. The COM port is shown to the right. The example below
shows the Enrollment Station is assigned to COM4.
Note: If you are unsure of which device it is, unplug the USB cable and the screen will refresh. Take note of which devices
are in the list. Then plug the cable back in and notice which device re-appears in the list.
Document # 6045680 Rev. 2.0, D2c Page 9 of 10
Important Note:
If you unplug the Enrollment Station from the USB port and plug it into a different physical port on the
PC or on a USB Hub, the COM port number may change. If you do change USB ports, you must verify
the COM port number, using the instructions above, prior to enrolling users through the software.

Enrollment Station Installation Instructions
Page 10 of 10 Document # 6045680 Rev. 2.0, D2c
International Electronics, Inc.
427 Turnpike St.
Canton, MA 02021 U.S.A.
Phone: 800-343-9502, 781-821-5566
Fax: 781-821-4443
Website: www.ieib.com