Elk ELK-6010 KEY FOB TRANSCEIVER User Manual 6010 Keychain Remote Instruction pmd
ELK Products, Inc. KEY FOB TRANSCEIVER 6010 Keychain Remote Instruction pmd
Elk >
Contents
- 1. Keychain Remote Instruction
- 2. KEYCHAIN REMOTE INSTRUCTION
KEYCHAIN REMOTE INSTRUCTION
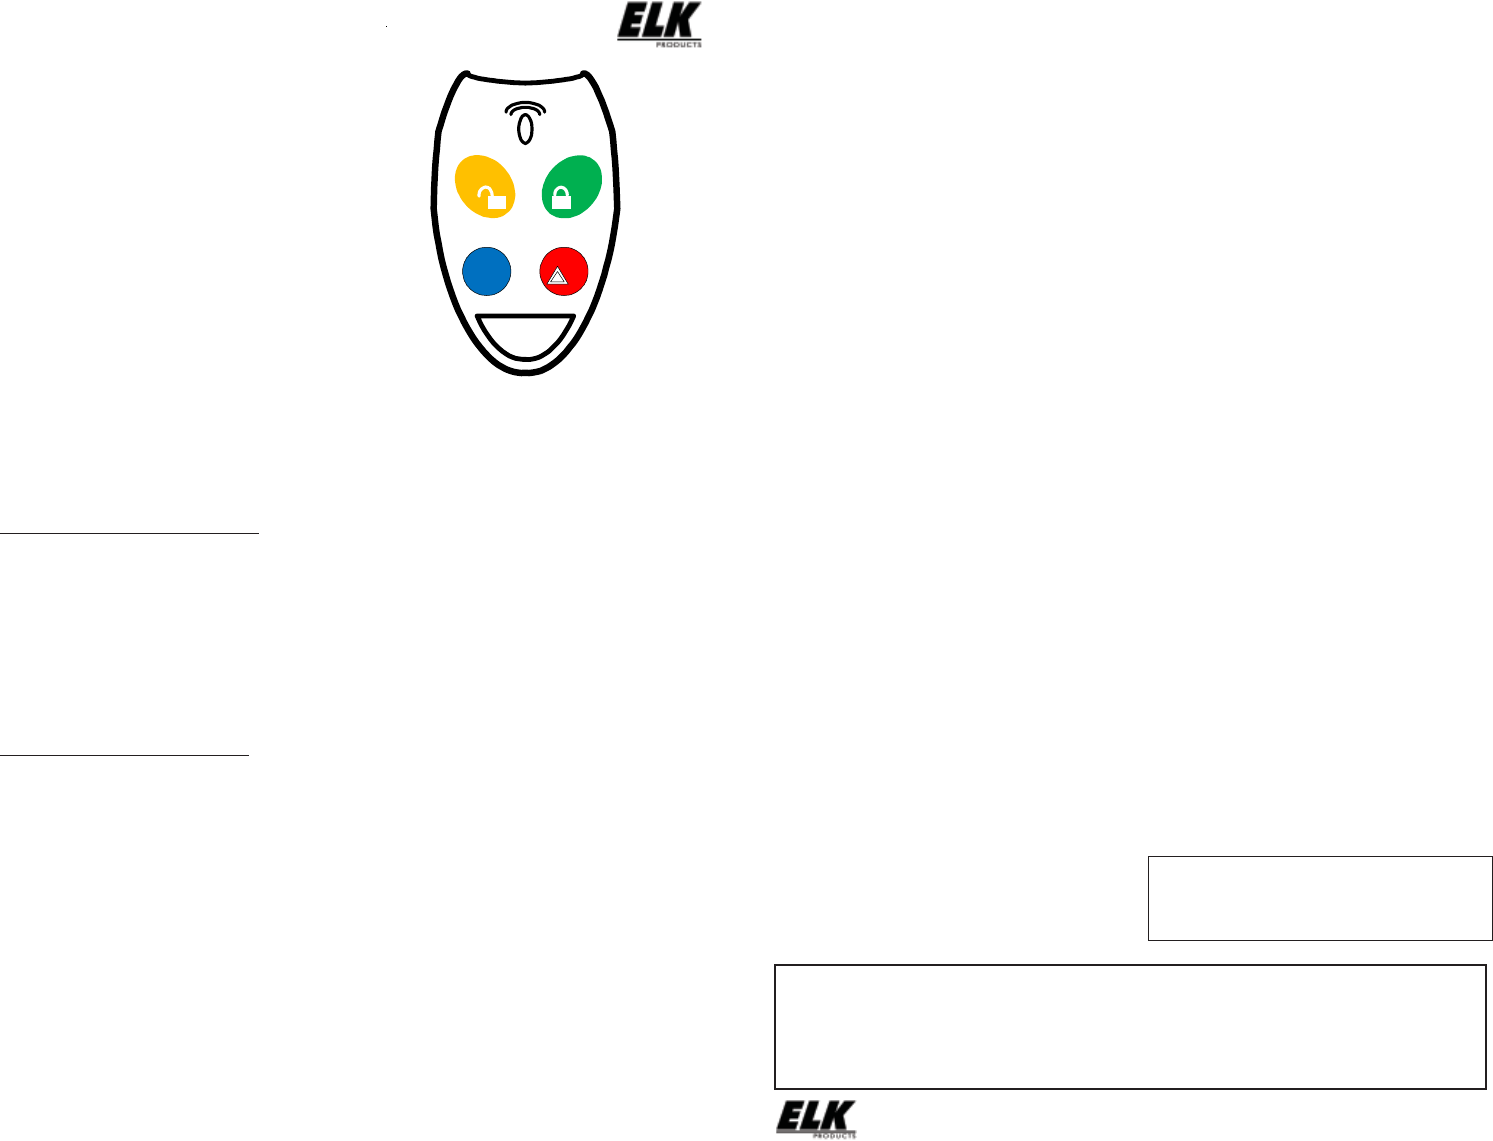
ELK-6010 Wireless Keychain Remote (FOB)
Battery
The 6010 has a non-replaceable battery. When the battery
reaches its end-of-life it will be necessary to replace the sensor.
Enrolling from ElkRP Software
1. Launch ElkRP and open the desired Customer Account file.
2. RP requires wireless zones to be defined in groups of 16.
Wireless can begin at Zone 17 (Group 2) but CANNOT go
beyond Zone 160 (Group 10). In the Folders column right
click on > Zones (Inputs) to create a group of 16 wireless
zones. Then click New Wireless Zones. Place a check
mark in the box beside the desired group, then click OK.
Repeat if additional wireless groups are required.
NOTE: Only Zones 17 to 160 can be used for wireless
zones (max. of 144 wireless sensors). If a large number
of wireless zones are expected, AVOID conflict with
existing or future Hardwired Zones in the range of zones
17 to 160 by NOT enrolling any Hardwired Zone Expanders
(M1XIN) at data bus addresses 2 thru 10.
3. With ElkRP it may be more efficient to program the Zone
Definitions (name, type, and options) before moving to the
Wireless Setup to enter the TXID and Loop number. In the
Folders column click on > Wireless - Group X (the group
just added), then double click one zone at a time to define a
name, type, and options. Repeat for each wireless zone.
4. From the Folders column click on > Wireless Setup to enroll
the wireless sensors by typing in their TXIDs.
4a. Click the > Transmitters tab, then double click a zone.
4b. Place a check mark in the Enabled box.
4c. Set Supervision type as: 0=Non Supervised (Keyfobs),
1=Normal “Burg” Supervision, or 2=Fire Supervision
4d. Skip to the TXID box and enter the Sensor TXID found
stickered on the sensor.
4e. Skip to the LOOP box and enter a 2.
4f. Click Save. Repeat the entire step 4 for each additional
Wireless Sensor.
FCC COMPLIANCE STATEMENT:
This device complies with Part 15 of the FCC Rules. Operation is subject to the following two conditions:
(1) this device may not cause harmful interference, and
(2) this device must accept any interference received, including interference that may cause undesired operation.
ELK-6010 Wireless Keychain Remote (FOB) FCC ID: TMA ELK-6010
NOTE: ELK PRODUCTS IS NOT RESPONSIBLE FOR ANY CHANGES OR MODIFICATIONS NOT EXPRESSLY APPROVED BY THE PARTY
RESPONSIBLE FOR COMPLIANCE. SUCH MODIFICATIONS COULD VOID THE USER’S AUTHORITY TO OPERATE THE EQUIPMENT.
Printed In USA
12/1/2011
PO Box 100 3266 US Hwy 70 West
Hildebran, NC 28637
Ph 828-397-4200 Fax 828-397-4415 http://www.elkproducts.com
Front Page Back Page
Operational Testing
Operating the 6010 Keychain Remote (FOB) is very straightforward:
1. Select the desired button.
2. Press and hold the button for at least 1 full second.
3. You should receive the following feedbacks:
a. The operation to which the button is programmed should occur.
b. The bi-color LED on the 6010 will illuminate as part of the two-way feedback from the control and receiver.
4. In most cases the definition or meaning of the bi-color LED on the 6010 will depend on the button pressed:
Button 1 (Top left side) Symbol = Unlock
This button is used to DISARM the Alarm System. Press and hold for approximately 1 second. If the Control is currently in
Alarm this button should also silence the Alarm. In this event it may be necessary to press this button twice to both silence and
disarm. Shortly after the button is pressed you should receive a solid GREEN as indication that the system is DISARMED.
Button 2 (Top right side) Symbol = Lock
This button is used to ARM the Alarm System. Press and hold for approximately 1 second. While this button is held and for
a brief time afterwards you should receive a solid RED as indication that the system is ARMED.
Button 3 (Lower right side) Symbol = *
This button may be used for one of several functions or which must be programmed in the M1 Control.
Button 4 (Lower right side) Symbol = Triangle
This button is for Status Inquiry. Pressing and holding for approximately 1 second will send a query to the Control. While the
button is held, and for a brief time afterwards, the LED will be solid RED if the system is ARMED, solid GREEN if the system
is DISARMED, or flashing RED if the Control is currently in alarm.
A complete system test and Walk Test of all wireless zones using the prescribed M1 Keypad Menu 3 - Walktest Area feature
should be performed a least once a year.
BATTERY CAUTION: Risk of fire, explosion and burns.
Do not attempt to recharge or dissassemble. Do not
incinerate or expose to heat above 212° F (100° C).
Dispose of used batteries properly. Keep away from
children.
APPLICATION
The ELK-6010 Wireless Keychain Remote (FOB) features 4
pushbuttons; one for Arm, Disarm, System Status Inquiry, and
1 that may be programmed for various system functions such
as panic, lights, garage door, etc. the 6010 is compatible with
Wireless Receivers and Controls that accept Elk’s ‘RFTW’ two-
way technology; such as, the ELK-M1XRFTW. The 6010 sends
a unique TXID identifier and Loop number when it transmits to
the receiver. The Loop number should be programmed as a 2
for the wireless zone where a 6010 is enrolled.
The 6010 features Elk’s Industry Leading Two-Way Technology,
capable of on-demand status updates as well as extended range
and extremely long battery life.
SPECIFICATIONS:
Frequency: 902 Mhz - 928 Mhz frequency hopping
Dimensions: 1.37”W x 2.44”L x .52”D
Operating Temperature: 32° to 120° F (0° to 49° Degrees C)
Relative Humidity: 5-95% Non-Condensing
Battery: Permanent 5 Yr Life - Non Replaceable
Unique TXID Code: Over 1 million combinations
Enrolling from M1 Keypad Installer Programming
1. Enter M1 Keypad Installer Programming and scroll or
navigate to Menu: 14-Wireless Setup
2. Press right arrow and scroll up to Sub-Menu: 3:Learn Sel
3. Press right arrow and pick a WZone (wireless zone) number.
4. Press right arrow to Lrn (Enroll) a new sensor.
5. Press and hold the Lock and Unlock buttons together as
soon as the keypad displays Push Transmitter Button.
This will transmit a signal for enrollment.
6. If enrollment is successful the M1 Keypad will chime a single
time and briefly display the 6 digit TXID code found stickered
on the sensor. For a Keychain Remote the 1st digit is “A”
followed by 5 digits (0 to F). e.g. A9AB4C. Repeat Step 5
if enrollment fails and a TXID does not display. In extreme
cases it may be necessary to repeat steps 3 - 6.
7. The M1 Rapid-Enroll feature advances to the next zone in
sequence and waits for an enroll signal. Just repeat step 5
for each additional wireless sensor. The M1G voice will
speak; “Press Transmitter button for zone xx” (next zone).
8. To end Rapid-Enroll press the ELK key one time AFTER all
wireless zones (sensors) have been enrolled.
9. Set the Loop Number - VERY IMPORTANT. Scroll up or
down to the desired M1 wireless zone and press the left
arrow. The screen will display a 9 digit number (the TXID in
decimal) followed by Loop=. Press the right arrow and move
cursor over to Loop=. Set the Loop to 2.
Press the ELK key twice to return to the Zone select display.
Scroll to each of the other wireless zones and set or verify
their Loop number. NOTE: A sensor will not operate if
the Loop number is not set correctly. Loop=2 is always
the setting for the built-in reed input.
IMPORTANT! Once all wireless zones have been enrolled the
next step is to exit Menu 14 and proceed to Menu: 5 - Zone
Definitions. Locate each zone and program a name, zone
type, and any required options. Repeat for each wireless zone
that was enrolled. For the 6010 program the zone definition as
15-Keyfob.
43*
21