Eltel Group R520 LTE Desk Router User Manual chenzhan

Eltel Group Inc. LTE Desk Router chenzhan

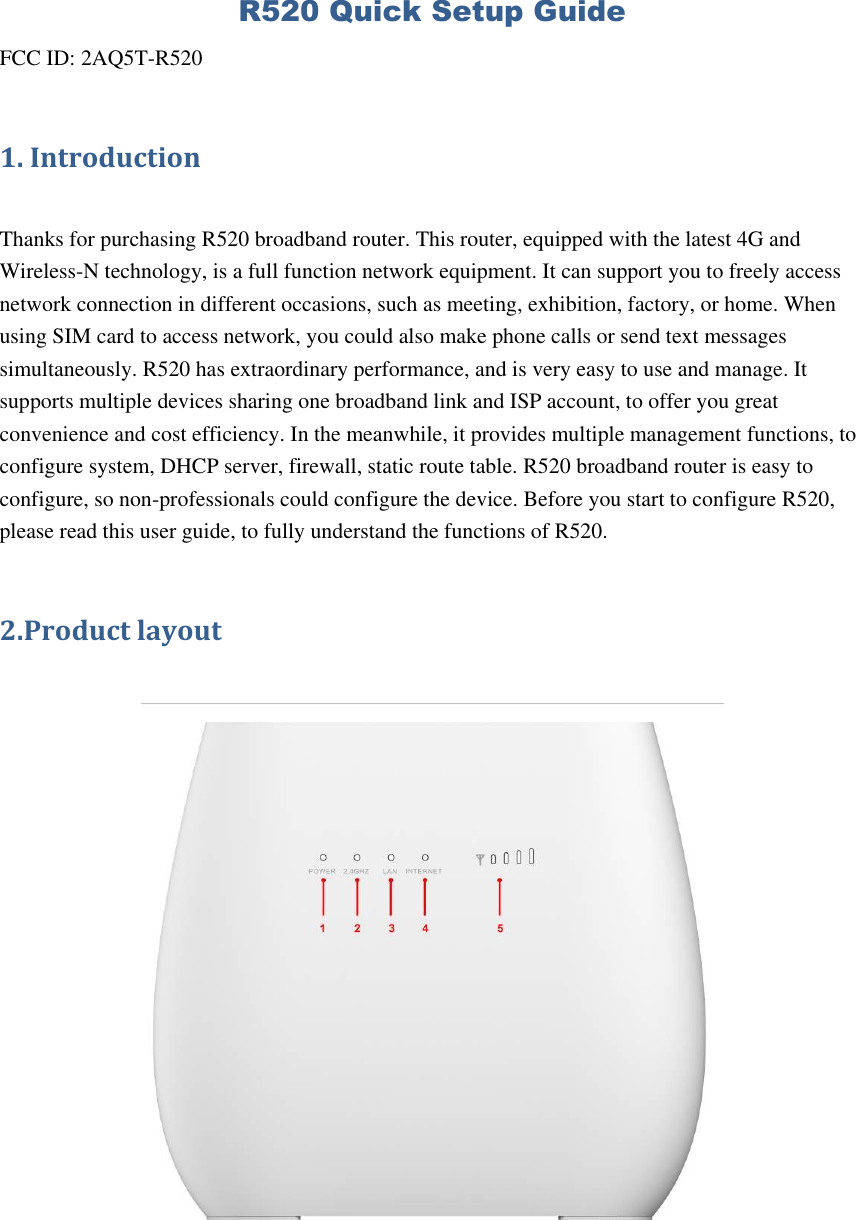
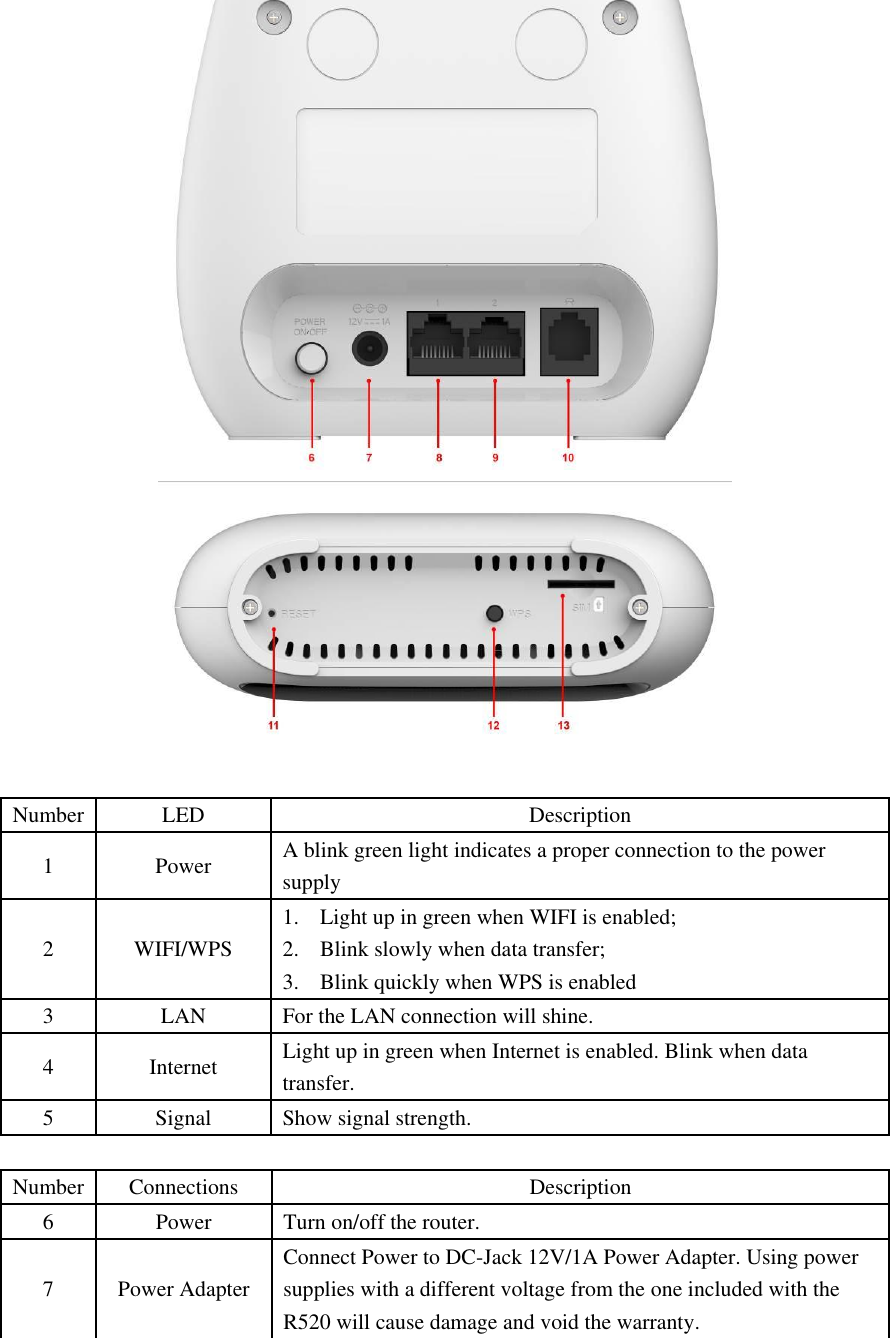
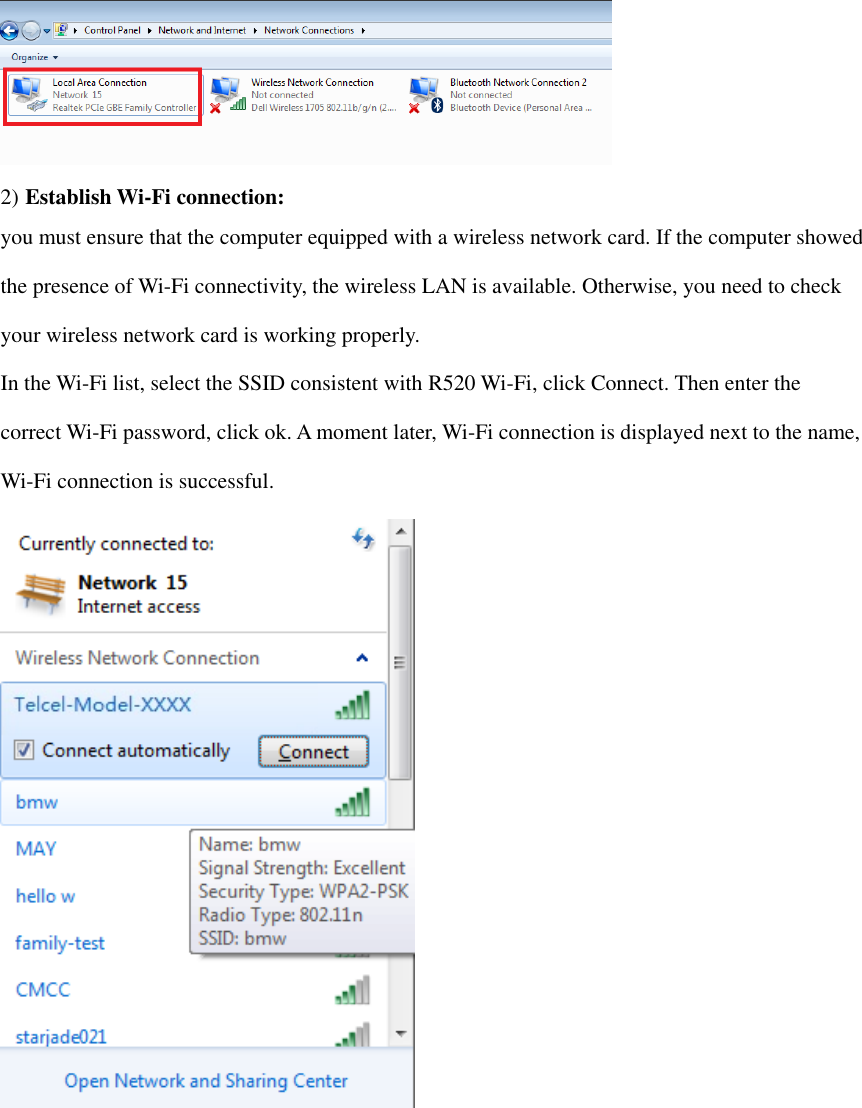
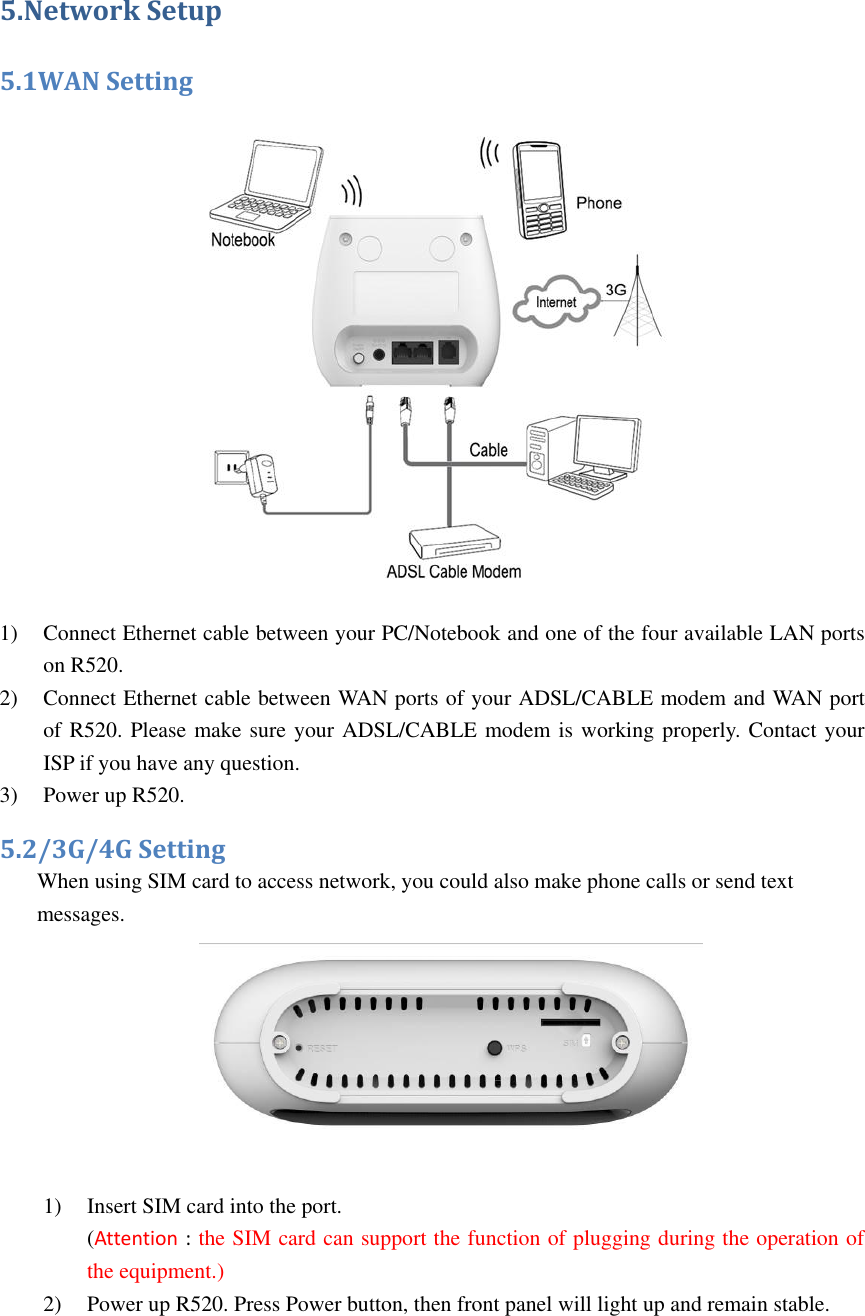
R520 Quick Setup Guide_V1 0_0914

R520 Quick Setup Guide FCC ID: 2AQ5T-R520 1. Introduction  Thanks for purchasing R520 broadband router. This router, equipped with the latest 4G and Wireless-N technology, is a full function network equipment. It can support you to freely access network connection in different occasions, such as meeting, exhibition, factory, or home. When using SIM card to access network, you could also make phone calls or send text messages simultaneously. R520 has extraordinary performance, and is very easy to use and manage. It supports multiple devices sharing one broadband link and ISP account, to offer you great convenience and cost efficiency. In the meanwhile, it provides multiple management functions, to configure system, DHCP server, firewall, static route table. R520 broadband router is easy to configure, so non-professionals could configure the device. Before you start to configure R520, please read this user guide, to fully understand the functions of R520. 2.Product layout
   Number LED Description 1 Power A blink green light indicates a proper connection to the power supply 2 WIFI/WPS 1. Light up in green when WIFI is enabled;   2. Blink slowly when data transfer; 3. Blink quickly when WPS is enabled 3 LAN For the LAN connection will shine. 4 Internet Light up in green when Internet is enabled. Blink when data transfer. 5 Signal Show signal strength.  Number Connections Description 6 Power Turn on/off the router. 7 Power Adapter Connect Power to DC-Jack 12V/1A Power Adapter. Using power supplies with a different voltage from the one included with the R520 will cause damage and void the warranty.
8 LAN LAN ports provide connections to Ethernet enabled devices. 9 WAN/LAN If the WAN is set to the WAN Mode, will be as the WAN interface, you can dial the DSL module; If WAN set to LAN MODE, will be a LAN interface 10 TEL Connect the telephone  Number Connections Description 11 RESET Press the reset button 3 seconds to restore the device to its factory default settings. 12 WPS Click this button to start WPS encryption. 13 SIM Insert SIM card to automatically identify registration  3.Led Indication Feature Colour Working Stauts Remark Power Green,Solid Power on  Dark Power off   LAN Green,Blink- 0.5s RJ45 cable connected   Dark no RJ45 cable connected   Internet Blue,Solid Regiester to LTE(not connect)   Blue,Blink- 0.5s Connected to LTE network   Green,Solid Regiester to 3G/2G network    Green,Blink- 0.5s Connected to 3G/2G network    Red,Solid No SIM card or No network Service   SIGNAL Green(1-4 bar) Indicate signal strength   4.Connection the Device 1) Ethernet Connection: Connect Ethernet cable between your PC/Notebook and one of the four available LAN ports on R520
 2) Establish Wi-Fi connection: you must ensure that the computer equipped with a wireless network card. If the computer showed the presence of Wi-Fi connectivity, the wireless LAN is available. Otherwise, you need to check your wireless network card is working properly. In the Wi-Fi list, select the SSID consistent with R520 Wi-Fi, click Connect. Then enter the correct Wi-Fi password, click ok. A moment later, Wi-Fi connection is displayed next to the name, Wi-Fi connection is successful.
5.Network Setup 5.1WAN Setting  1) Connect Ethernet cable between your PC/Notebook and one of the four available LAN ports on R520. 2) Connect Ethernet cable between WAN ports of your ADSL/CABLE modem and WAN port of R520. Please make sure your ADSL/CABLE modem is working properly. Contact your ISP if you have any question. 3) Power up R520. 5.2/3G/4G Setting When using SIM card to access network, you could also make phone calls or send text messages.   1) Insert SIM card into the port. (Attention : the SIM card can support the function of plugging during the operation of the equipment.) 2) Power up R520. Press Power button, then front panel will light up and remain stable.
6.Usage You can place R520 on a desk or other flat surface. Please keep R520 away from heating. For optimal performance, please place your R520 in the center of your home (office), in a location that is away from any potential interference source, such as metal walls or microwave oven.Computers & laptops etc may be connected to the R520 via USB cable for Internet Access. 7.Configuration 7.1 Login management page view Whenever you  want to  configure your  network  or the  R520,  you can  access the  Configuration Menu  by  opening  the  web-browser  and  typing  in  the  IP  Address  of  the  R520.  For  example, http://192.168.8.1   Note: If you changed the default IP Address assigned to the R520, make sure to enter the correct IP Address.       ●The default Account is Telcel ●The default Password is Telcel Enter the Account and Password, login administration pages  7.2 Edit WIFI Basic Enter the Wi-Fi menu, view the default SSID and Wi-Fi password ●The default SSID is Telcel-Model-XXXX (Last 4 characters corresponding to the
last digits of the MAC address) ●The default Wi-Fi Password is 1234567890  You will go to the overview and log in page. The Factory default user name and password  are admin.  It  is  recommended  to  change  the  admin  password  for  security  purpose.  Please  refer  to Administrator Settings to change the admin password.   7.3Quick access R520 via WPS If your WiFi Enabled , device supports WPS (Wifi Protected Setup) and you have forgotten or do not wish to enter your password to connect to your R520, you may use the following available procedures for quick access to R520. 1) Press the WPS key on R520, 2) Select the SSID of the device and connect         or Acctive the WPS on the WiFi equipment.
    8. Call function: This device provides call and text message functions. When you browse internet, you can keep connection with your family and friends. The steps are as follows: 1) Insert 3/4G SIM card, and open the device 2) Connect the telephone through the RJ11 port of the device 3) When phone function is booted up, your telephone's signal LED will turn on. Then you can start to use the call functions.
 Caution: 1.       Please make sure that your SIM card supports voice call service 2.       Please start to use the call functions; after call function is fully booted up (all text messages are received)  9.Antenna Choose External/Internal Antenna. R520 is equipped with internal Antenna, but you can connect External Antennal if needed.
  FAQ This Appendix provides solutions to some problems that could be seen when install and use the device. Please read the following instruction, it will help you to solve these problems. If you fail to solve your issues from this FAQ, please contact us.   Problem Solution Wireless device cannot connect to SSID.   Please make sure the wireless function of your PC is turned on. If it is already on, please refresh the network list.  Please make sure your PC is in the wireless signal coverage of the device.  Please make sure your device is away from the electromagnetic interference.   Please make sure your device’s wireless function is turned on. If the problem is still not solved, please try to reset your device to default settings. Cannot Access internet:   Please make sure your PC is in the wireless signal coverage of the device.
 Please make your device’s DHCP function is turned on.  Please make sure your firewall is turned off. If the problem is still not solved, and your PC has got connected to the network, but the wireless icon shows an yellow exclamation mark. It means your wireless card could not be allocated an IP address. Please use the static IP settings, and fill DNS and gateway according to instructions of your operator.  Input IP, but fail to login to the administration page.  Please make sure the problem is not caused by the Cache of the internet browser, please clean up the Cache.  Please make sure the network connection is good, and the light of connected ports are on.  Please make sure the username and password are correct If the problem is still not solved, and your PC already gets the IP address. You can try to use wireless connection or static IP methods to try it again. If connected via wireless connection, please try to ping 192.168.0.1 to see if there is any response. If responses are received, please check if you set an agent server for connection. If no agent server is set, then please not to set an agent server, and reset the device.   IP conflict ion when turn on the device:   Please make sure if your LAN has other DHCP servers.  Please make sure that IP address is not occupied by other computers or devices. If occupied, please change the IP address of that device to avoid the IP conflicts.   Safety warning  Stay away from interference: All the wireless devices could be possibly interfered, and it will affect the performance of the device  Turn off the device in restricted area: Please follow any instruction, turn off the device around airplanes, medical devices, gases, chemicals or explosive areas  Qualified services:
Please don’t disassemble this device yourself. Please contact professionals to repair and install the device.  Danger of explosion:  Turn off your device in any areas that explosion could possibly happen. Please follow all the notices in the areas where spark could cause fire or explosion.  FCC STATEMENT 1. This device complies with Part 15 of the FCC Rules. Operation is subject to the following two conditions: (1) This device may not cause harmful interference. (2) This device must accept any interference received, including interference that may cause undesired operation. 2. Changes or modifications not expressly approved by the party responsible for compliance could void the user's authority to operate the equipment. NOTE: This equipment has been tested and found to comply with the limits for a Class B digital device, pursuant to Part 15 of the FCC Rules. These limits are designed to provide reasonable protection against harmful interference in a residential installation. This equipment generates uses and can radiate radio frequency energy and, if not installed and used in accordance with the instructions, may cause harmful interference to radio communications. However, there is no guarantee that interference will not occur in a particular installation. If this equipment does cause harmful interference to radio or television reception, which can be determined by turning the equipment off and on, the user is encouraged to try to correct the interference by one or more of the following measures:    Reorient or relocate the receiving antenna.    Increase the separation between the equipment and receiver.    Connect the equipment into an outlet on a circuit different from that to which the receiver is connected.    Consult the dealer or an experienced radio/TV technician for help. This equipment complies with FCC’s RF radiation exposure limits set forth for an uncontrolled environment. The antenna(s) used for this transmitter must be installed and operated to provide a separation distance of at least 20 cm from all persons and must not be collocated or
operating in conjunction with any other antenna or transmitter. Installers must ensure that 20cm separation distance will be maintained between the device (excluding itshandset) and users.

Navigation menu