EnGenius Technologies ETA1305 802.11bgn gigabits Access Point User Manual
EnGenius Technologies 802.11bgn gigabits Access Point
user manual
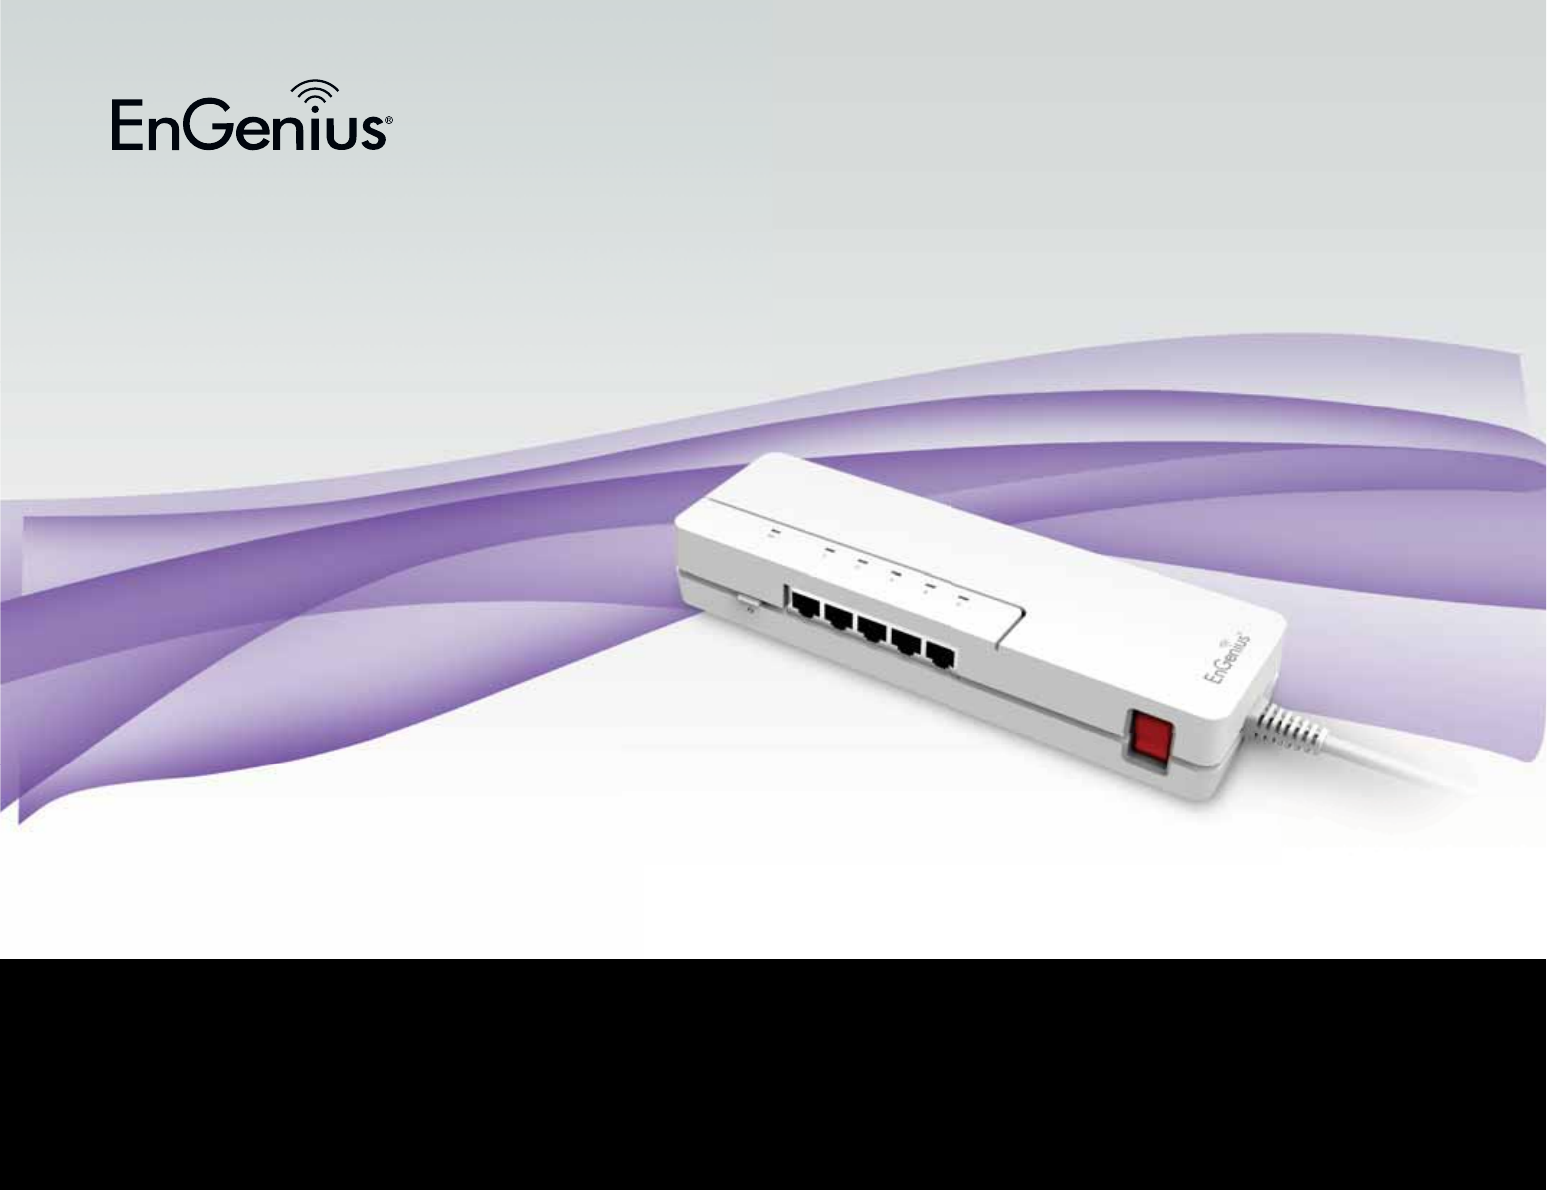
1
1
User Manual
Wireless N300 Media Bridge/Access Point
with Built-in 5-Port Gigabit Switch
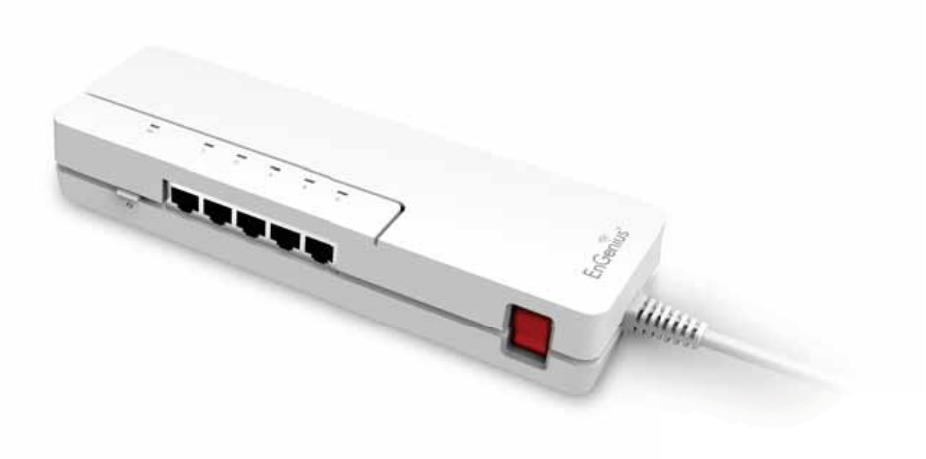
ETA1305
version 1.0

2
IMPORTANT
To install this router, please refer to the Quick Start Guide
included in the product packaging.
To activate and use EnShare™ refer to the document
“Using EnShare” also in the product packaging.
3
Chapter 1 Product Overview..............................................................5
Key Features....................................................................................................6
Technical Specications Softfare Features...................................'
Physical Interface..........................................................................................9
Chapter 2 Controlling the Router Through Its
FeQ Conguration InterUace...........................................................10
Logging In.....................................................................................................11
Eiefing the FeQ 2onguration 3ash 1oard..................................12
Home Page...................................................................................................13
FeQ <enus >vervief...............................................................................1#
Internet.................................................................................................15
Fireless 2.# 6Hi..........................................................................................16
Parental 2ontrols........................................................................................1&
6uest =etfork.............................................................................................1'
IPv6.......................................................................................................19
Firefall................................................................................................2
EP=.................................................................................................................21
DS1 Port..........................................................................................................22
Advanced.......................................................................................................23
Tools................................................................................................................25
Chapter 3 Installation Setup Wizard..............................................26
Internet Setup Fiiard...............................................................................2&
Setting Dp Hour Internet 2onnection.................................................2'
Setting Hour Fireless Security..............................................................29
Setting your Aouter{s Administrator Passford.............................3
Setting your Router’s Time Zone........................................................31
Status and Save Settings.......................................................................33
Chapter 4 Basic Network Settings.................................................34
=etfork Settings.......................................................................................35
Status.............................................................................................................36
FA= Settings...............................................................................................3&
LA= Settings................................................................................................3'
FLA= Settings............................................................................................39
6uest =etfork............................................................................................#
2onguring the LA= Local Area =etfork.....................................#1
3H2P Server.................................................................................................#2
2onguring 3ynamic Host 2onguration Protocol.......................#3
EnaQle Static 3H2P IP..............................................................................##
2urrent Static 3H2P TaQle......................................................................#5
2onguring Event Logging.....................................................................#6
<onitoring 1andfidth Dsage................................................................#&
2onguring the System Language.....................................................#'
2onguring IP 2ameras............................................................................#9
2onguring Internet Settings...............................................................5
2onguring 3ynamic IP...........................................................................51
3=S Servers..................................................................................................52
2onguring Static IP.................................................................................53
2onguring PPPoE.....................................................................................5#
2onguring PPTP.......................................................................................55
PPTP Settings..............................................................................................56
2onguring L2TP.......................................................................................5&
L2TP Settings..............................................................................................5'
2onguring 3SLite...................................................................................59
Fireless LA= Setup...................................................................................6
Access Point <ode....................................................................................61
Fireless 3istriQution System <ode....................................................62
F3S Security Settings Screen...............................................................63
TaQle oU Contents
#
Chapter 5 Wireless Encryption.....................................................64
FiFi Protect Access FPA PreShared Key..................................65
2onguring Security.................................................................................66
Encryption Type.........................................................................................6&
FPA Radius..................................................................................................6'
Fired E`uivalent Privacy FEP...........................................................69
2onguring Filters......................................................................................&
<A2 Address Filtering TaQle.................................................................&1
2onguring FiFi Protected Setup....................................................&2
2onguring 2lient List.............................................................................&3
Chapter 6 Advanced Settings...........................................................74
2onguring Advanced Settings............................................................&5
Setting Dp Parental 2ontrols.................................................................&&
Adding a 2ontrol Policy............................................................................&'
Eiefing Parental Policies........................................................................'1
6uest =etfork............................................................................................'2
2onguring the 3H2P Server Setting...............................................'3
Eiefing the 3H2P 2lient List on the 6uest =etfork.................'#
IPv6.................................................................................................................'5
Eiefing the IPv6 2onnection Status.................................................'6
2onguring Static IPv6............................................................................'&
Setting Autoconguration.....................................................................''
2onguring PPPoE....................................................................................'9
2onguring 6to#........................................................................................91
Eiefing local 2onnections.....................................................................92
Firefall Setup.............................................................................................93
2onguring Advanced Settings...........................................................9#
2onguring 3emilitariied Zone...........................................................96
2onguring 3enial of Service................................................................9&
Eirtual Private =etfork Setup..............................................................9'
2onguring a EP= Tunnel Prole.........................................................99
6eneral........................................................................................................1
SA Security Association......................................................................11
=etfork.......................................................................................................12
Advanced.....................................................................................................13
2onguring a Dser Setting...................................................................1#
DS1 Port Enshare..................................................................................15
Eiefing File Server.................................................................................16
Eiefing 3L=A...........................................................................................1&
Advanced =etfork Settings................................................................1'
Port <apping Setup................................................................................19
2urrent Port <apping TaQle................................................................11
Port Forfarding Setup...........................................................................111
2urrent Port Forfarding TaQle..........................................................112
Port Triggering Setup............................................................................113
Application Layer 6etafay Setup....................................................115
Universal Plug and Play Setup...........................................................116
Internet 6roup <ulticast Protocol Setup.......................................11&
@uality of Service Setup.......................................................................11'
Priority Queue...........................................................................................119
1andfidth Allocation.............................................................................12
Routing Setup...........................................................................................121
Fake on LA= Setup................................................................................122
Tools Setup................................................................................................123
System Time Setting..............................................................................12#
Synchroniiing Time fith a 2omputer.............................................125
3ynamic 3omain =ame Service 33=S Setup............................126
3iagnose That 2lient 3evices Are 2onnected.............................12&
Upgrading the Router’s Firmfare....................................................12'
1acking Up the Router’s Settings.....................................................129
ReQooting the Router............................................................................13
Appendix..........................................................................................131
Fall <ounting the Router....................................................................132
F22 Interference Statement...............................................................133
Industry 2anada Statement................................................................13#
5
2hapter 1
Product Overview
6
<agimum data rates are Qased on IEEE '2.11 standards. Actual throughput and range may vary depending on many factors including environmental conditions, distance Qetfeen devices, radio interference in the operating environment, and
mig of devices in the netfork. En6enius Technologies, Inc. EnShareT< supports Qoth FAT32 and =TFS US1 formats. Transfer speeds of data from your routerattached US1 storage device to a remotemoQile device may vary Qased on Internet
uplink and dofnlink speeds, Qandfidth trafc at either send or receive locations, the data retrieval performance of the attached storage device or other factors. En6enius does not guarantee compatiQility fith all US1 drives. En6enius does
not farrant its products or EnShare from loss of data or loss of productivity time. Features and specications suQYect to change fithout notice. Trademarks and registered trademarks are the property of their respective ofners. For United
States of America) 2opyright 213 En6enius Technologies, Inc. All rights reserved.
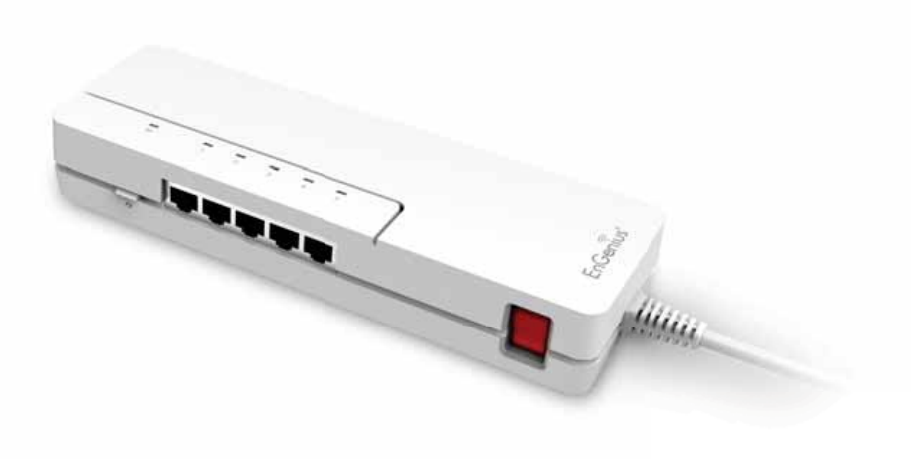
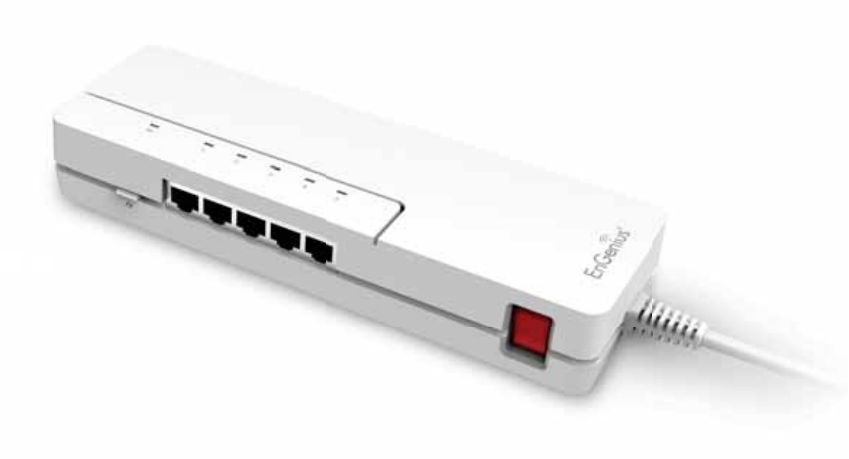
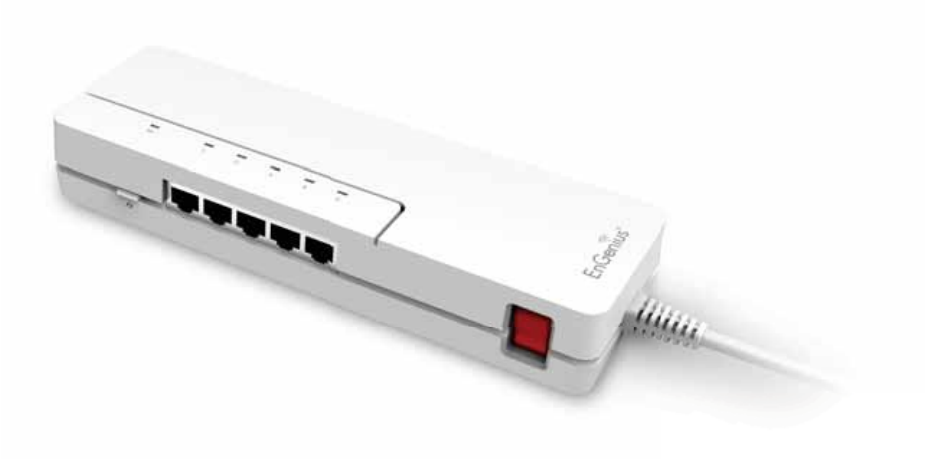
The router’s design enaQles users to connect numerous fired
and fireless devices to it and supports intensive applications
like streaming H3 video and sharing of media in the home and
accessing media afay from the home fith EnShare Hour
Personal <edia 2loud.
Product Overview
Key Features
• Fireless =3 IEEE '2.11Qgn
• Up to 3 <Qps in the 2.# 6Hi fre`uency Qand
• 1uiltin #Port Fast Ethernet Sfitch for optimal audio
visual streaming
• US1 Port to share and access media content in the home or
fhen you’re afay from home fith EnShare
• Gtra Range Technology for Qetter signal coverage
throughout your home
• =egt 6eneration IPv6 2ompliant
• Parental 2ontrols
• Up to # 6uest Access settings
• Industrystandard Fireless Encryption and Security
• EP= Server Support Lite1usiness Applications
• Easy Setup Fiiard
•
RoQust and ReliaQle Wireless PerUor\ance
The ESR3 is an Gtra Range Fireless =3 Router fith
a Quiltin #port Fast Ethernet sfitch. This cost effective
router can connect to 3SL or caQle modems to provide
high performance Internet access for desktop or laptop
computers, taQlets, smartphones and a fide variety of home
entertainment devices, like H3TEs, set top Qoges, 1luray
players and game consoles.
m
e
or
&
Product Overview
A Media Sharing PlatUor\
The ESR3 is designed to access and share media for
devices on the home netfork. In addition to connecting
home entertainment components to any of its availaQle
Fast Ethernet ports, the ESR3 also includes a US1 port
for attaching a US1 storage device so fireless devices in
the home or afay from the home can access media content
fherever there is an availaQle Internet connection through
EnShare Hour Personal 2loud.
EnShare is availaQle as an Internet portal for accessing stored
media connected to the US1 port of the router See the
Using EnShare document in the product packaging. EnShare
fill also Qe availaQle as an app for Apple i>S devices iPads,
iPods and iPhones and AndroidQased devices smartphones,
taQlet P2s, Kindle and other moQile readers soon. The apps
fill Qe availaQle through Apple iTunes Store and 6oogle Play
respectively.
Industry-standard Wireless Security
The router supports a variety of security features and
mechanisms including industrystandard FPAFPA2 fireless
encryption to prevent unauthoriied access to your netfork. It
also includes a Quiltin SPI Stateful Packet Inspection refall
to help prevent attacks from malicious softfare malfare
from the Internet. The router also supports IPv6.
More Guest Access Options
The ESR3 also includes up to four # separate and discrete
6uest Access options allofing the router’s administrator to
assign different names SSI3sService Set Identiers for each
login to the home netfork so friends or visitors can access the
user’s Internet connection fithout accessing personal data
stored on netforked computers in the home.
'
Technical Specications
3evice InterUace
Fast Ethernet FA= Port
# Fast Ethernet LA= Ports
US12. Port
Push 1utton for FPS
Reset 1utton
IEEE Standards
'2.11Qgn
Up to 3 <Qps fireless speed
in the 2.# 6Hi fre`uency Qand
'2.3iu
LED Indicators
Pofer
FLA= Fireless 2onnection
Internet
Package Contents
ESR3 Router
Pofer Adapter 12E 1A
Quick Start 6uide
R9#5 Ethernet 2aQle
Power Specication
Egternal Pofer Adapter
32 In, 12E 1A
Certications
F222EI2
PhysicalEnviron\ental Conditions
>perating Temperature) ¡m#¡ 2elsius
Humidity) 9 or less noncondensing
Storage Temperature) 2¡m6¡ 2elsius
Humidity) 95 or less noncondensing
SoUtware Features
Frequency Bands
2.#m2.#'# 6Hi 11Q11g11n
Operating Mode
AP RouterF3S
Wireless Features
Auto 2hannel Selection
>utput Pofer 2ontrol
F<< Fireless <ultimedia
<SSI3 <ultiple SSI3
Security
FEPFPAPSKFPA2PSK
TKIPAES
Hidden SSI3
<A2 Address Filtering
'2.1G Authentication
33oS
3H2P Server2lient
SPI Stateful Packet Inspection
=AT
Port Forfarding
3<Z
Port <appingTriggering
EP= Server PPTPL2TP
EP= 2lient PPTPL2TP
EP= Passthrough PPTPL2TPIPSec
Rule 1ased IP Address Ranges, Port 1lock I2<P
EP= Tunnel <agimum 5
QoS
IP Filtering
Port Filtering
33=S
IPv6 Passthrough
<A2 2lone
Trafc <onitor
FA= Type) PPPoE3H2PStatic IP
US1 Features) SA<1A
9
2hapter 2
Controlling the Router Through
8tb FeQ CongurPtion 8nterUPce
1
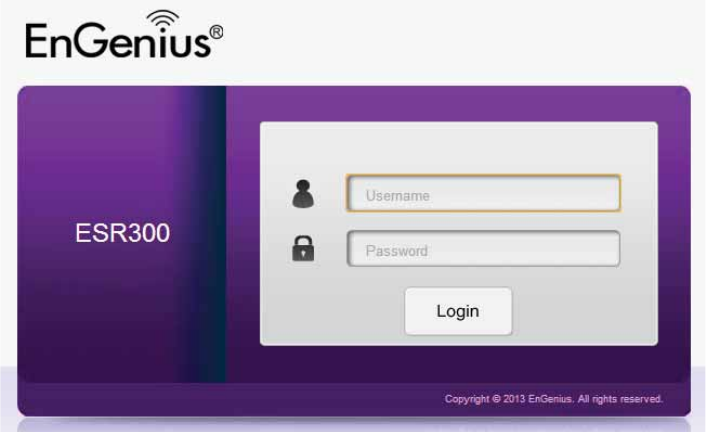
Logging In
3uring the Quick Start Guide procedure, you should have
successfully logged into the router’s WeQ Conguration user
interUace essentially the router’s operating system that
controls hof it operates and estaQlished some initial settings
and controls for the router.
If you fish to change the router’s settings estaQlish a
nef username and passford for the person fho manages
and maintains the router, set Parental 2ontrols, estaQlish
a 6uest AccessSSI3 setting for visitors, or any numQer of
other settings you can log into the FeQ 2onguration again
through the feQ Qrofser Internet Egplorer, Safari, 2hrome,
Firefog on your computer or taQlet device.
To do this, enter the router’s default IP address of
192.168.0.1 into your Qrofser’s address findof.
1. At the login screen enter your username and a passford
2. 2lick Login to continue.
The default login settings are:
username: admin
passford: admin
It’s highly recommended that, if you haven’t done so already,
to change these default names, so your router and the devices
connected to it on your home netfork are more secure.
11
Eiewing the WeQ Conguration Dash Board
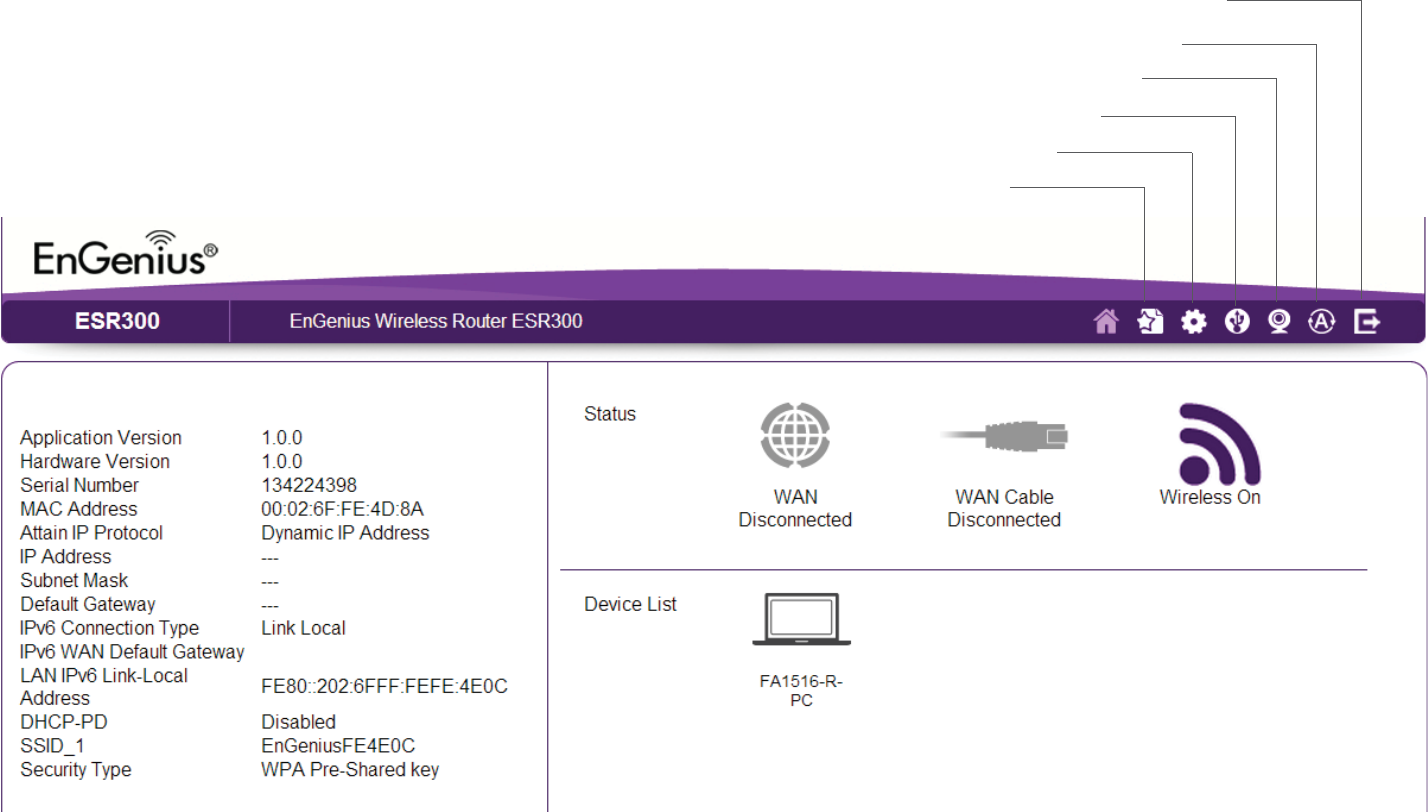
The Home Page screen of the FeQ 2onguration interface, or dashQoard, provides access to the router’s settings and controls.
7o\e Page
Home
Setup Fiiard
=etfork Settings
US1 Storage Sharing
IP 2am Eiefer
Language
Logout
12
7o\e Page
The 7o\e Page displays the areas fithin the FeQ
2onguration to fhich you can navigate: Setup Wizard,
Network Settings, USB Storage Sharing, IP Ca\ Eiewer,
Language, and Logout
7o\e
The Home link takes you Qack to the dashQoard screen no
matter fhere you are in the FeQ 2onguration interface.
Setup Wizard
The Setup Fiiard link starts the fiiard that automatically
congures the router.
Network Settings
The =etfork Settings link displays the menus to manually
congure the router.
USB Storage Sharing
The US1 Storage Sharing link displays the menus to access
shared storage devices connected to the router.
IP Ca\ Eiewer
The IP 2am Eiefer link displays the menus to vief an IP
camera connected to the netfork.
Language
The Language link displays the menu to set the >S3 language.
Logout
The Logout link closes the router’s FeQ 2onguration
interface from any screen.
13
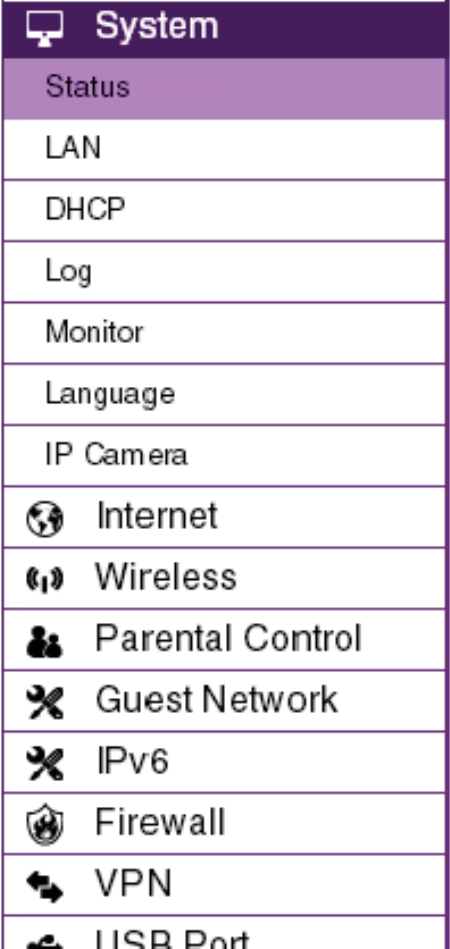
Web Menus Overview
Syste\
Eief and edit settings that affect system functionality.
Operation Mode
2ongure the device to Qe a router or F3S access point.
Status
3isplays the summary of the current system status.
Schedule
Schedule services to start and stop at specic times or intervals.
Event Log
Eief recorded system operations and netfork activity events.
Monitor
Eief the current netfork trafc Qandfidth usage.
Language
2ongure the application menu and 6UI language.
IP Ca\era
Eief the IP cameras connected to the ESR Series Router.
1#
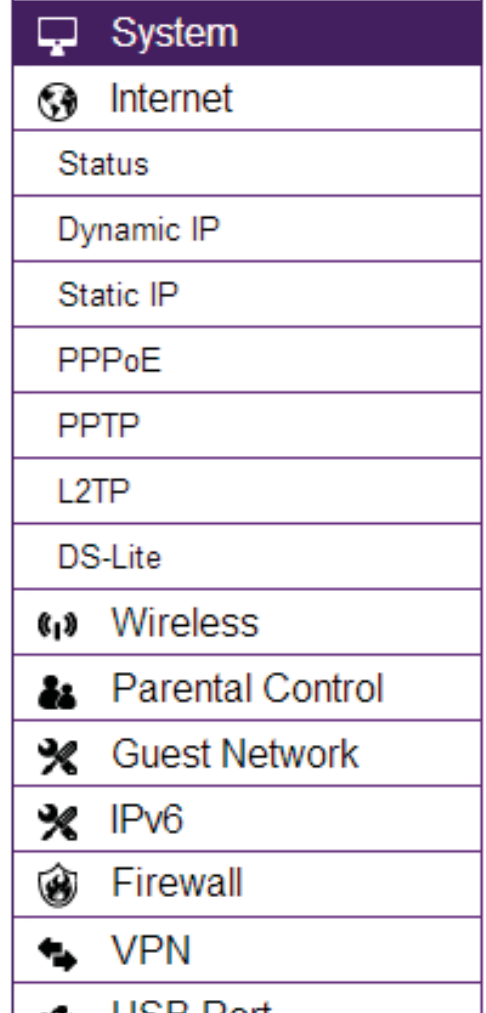
Internet
Eief and edit settings that affect netfork connectivity.
Status
3isplays a summary of the Internet status and type of connection.
Dyna\ic IP
Setup a dynamic IP connection to an ISP Internet Service Provider.
Static IP
Setup a static IP connection to an ISP.
PPPoE
Setup a PPPoE connection to an ISP.
PPTP
Setup a PPTP connection to an ISP.
L2TP
Setup an L2TP connection to an ISP.
15
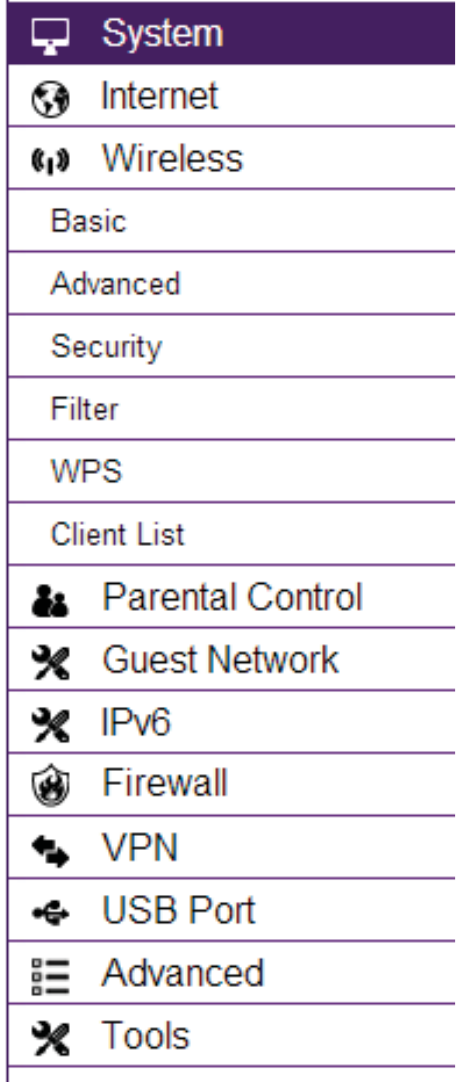
Wireless 2.4 GHz
Eief and edit settings for 2.# 6Hi fireless netfork connectivity.
Status
Eief the current fireless connection status and related information.
Basic
2ongure the minimum settings re`uired to setup a fireless netfork connection.
Advanced
2ongure the advanced netfork settings.
Security
2ongure the fireless netfork security settings.
Filter
EstaQlish a list of client devices computer, taQlets, smartphones, printers, etc.
Qased on their <A2 <edia Access 2ontrol numQers that are allofed to firelessly
connect to the 2.# 6Hi netfork.
WPS
Automates the connection Qetfeen a fireless device and your encrypted router
using an 'digit PI=.
Client List
Eief the 2.# 6Hi fireless devices currently connected to the netfork.
16
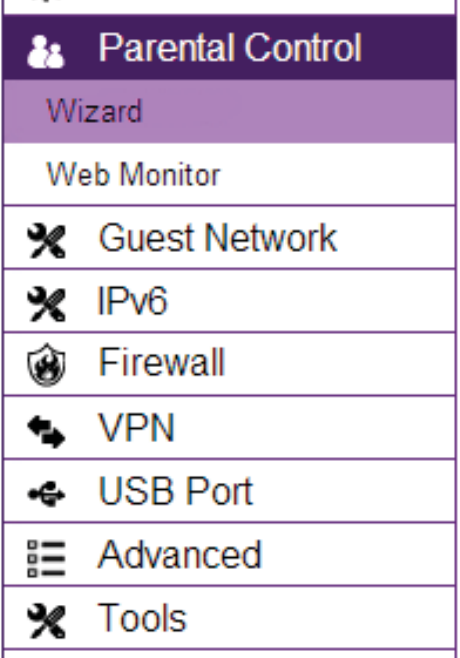
Parental Controls
Eief and edit settings for parental controls.
Wizard
EnaQle or disaQle the Parental 2ontrols function. The menu also provides informa
tion for conguring parental control policies.
Web Monitor
The menu provides a log of the events for dened parental control policies.
1&
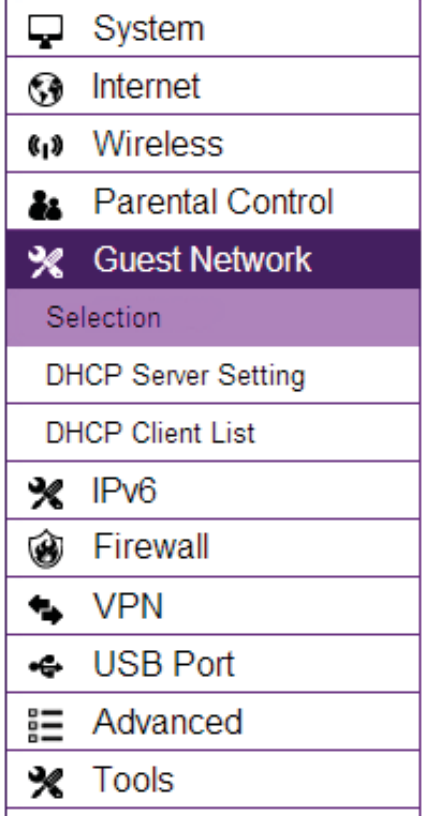
Guest Network
Eief and edit settings for a guest netfork.
Selection
EnaQle or disaQle the 6uest =etfork function.
DHCP Server Setting
2ongure the 6uest =etfork 3H2P server settings.
DHCP Client List
2ongure the 6uest =etfork client list.
1'
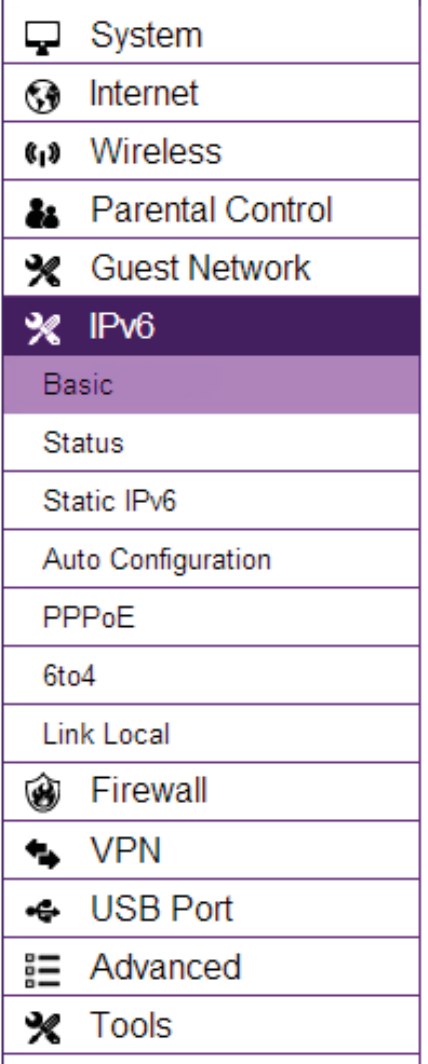
IPv6
Eief and edit settings for the IPv6 protocol.
Basic
Allofs you to enaQle or disaQle the IPv6 and IPv6 Passthrough functions.
Status
Shofs IPv6 LA= connection details.
Static IPv6
2ongure the IPv6 protocol.
Auto Conguration
2ongure the IPv6 Qy oQtaining the information through the ISP provider.
PPPoE
2ongure the PPPoE netfork protocol, oQtain information from your ISP Internet
Service Provider.
6to4
Allofs IPv6 packets to Qe transmitted over an IPv# netfork.
Link Local
2ongure the IPv6 link local address.
19
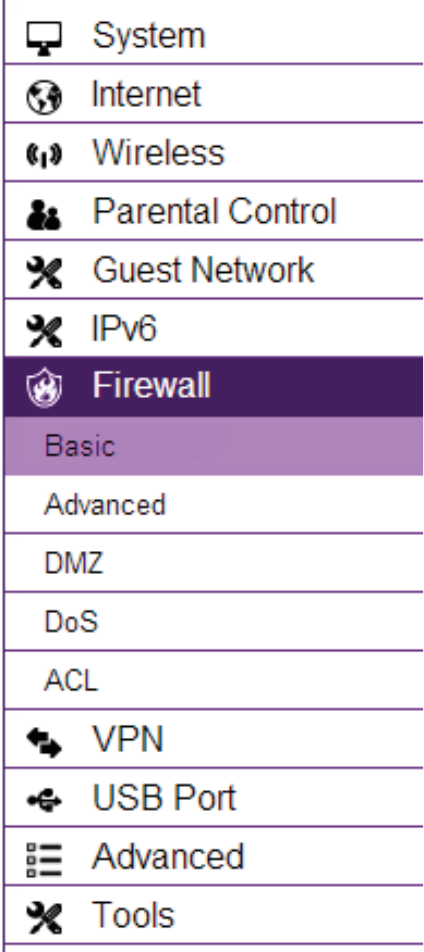
Firewall
Eief and edit settings for the netfork refall.
Basic
EnaQle or disaQle the netfork refall.
Advanced
2ongure virtual private netfork EP= packets.
DMZ
Redirect packets from the FA= port IP address to a particular IP address on the
LA=.
DoS
EnaQle or disaQle Qlocking of 3oS 3enial of Service attacks.
ACL
2ongure access control lists.
2
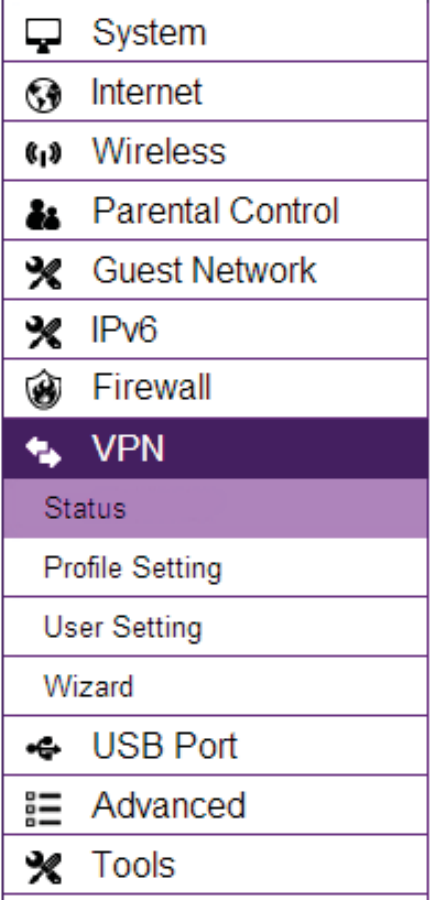
VPN
Eief and edit settings for EP= tunnelling.
Status
Eief the status of current EP= tunnels.
Prole Setting
<anually congure EP= tunnels.
User Setting
2ongure users, user I3 and passford comQinations, and assign access to specic
EP= tunnels.
Wizard
Automatically congure EP= tunnels fith guidance from the softfare.
21
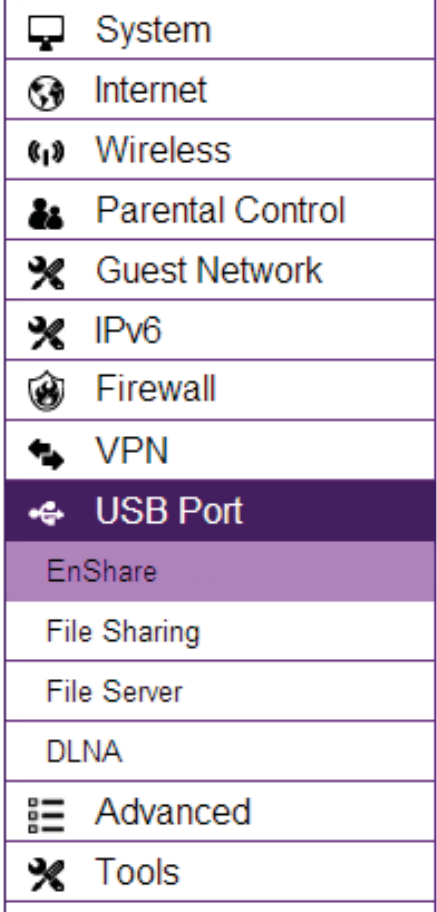
USB Port
For viefing and editing settings for storage sharing.
EnShare™
EnaQles or disaQles the EnShare remote access function.
File Sharing
EnaQles or disaQles the SamQa sharing function.
File Server
EnaQles and congures the File Server function.
DLNA
EnaQles the discovery of 3L=A devices some H3TEs, game consoles, some set top
Qogesmedia players, 1luray players, some smartphones, and netfork attached
storage on the home netfork.
22
Advanced
Eief and congure advanced system and netfork settings.
NAT
EnaQle or disaQle =etfork Address Translation =AT.
Port Mapping
Redirect a range of service port numQers to a specied LA= IP address.
Port Forwarding
2ongure server applications to send and receive data from specic ports on the
netfork.
Port Triggering
2ongure applications that re`uire multiple connections and different inQound and
outQound connections.
ALG
2ongure the application layer gatefay AL6.
UPnP
EnaQle or disaQle Universal Plug and Play UPnP functionality.
IGMP
EnaQle or disaQle the Internet 6roup <ulticast Protocol I6<P.
23
QoS
2ongures the netfork `uality of service QoS setting Qy prioritiiing the uplink
and dofnlink Qandfidth.
Routing
2ongure static routing.
WOL Fake >n LA=
2ongure Fake on LA= to turn on a computer over the netfork.
2#
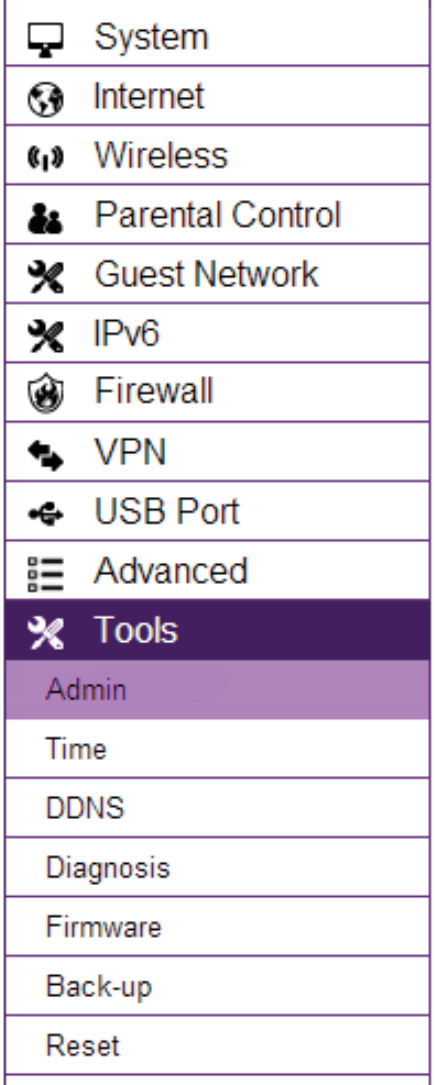
Tools
For viefing and conguring the router’s operating system and netfork tools
settings.
Ad\in
For setting the administrator’s passford used to log into the router.
Ti\e
For conguring the system time on the router.
DDNS
<aps a static domain name to a dynamic IP address.
Diagnosis
To perform a Ping test to verify fhether a specic device is connected to the LA=.
Fir\ware
For updating the router’s rmfare.
Backup
For loading or saving the conguration settings to or from a Qackup le or to
restore the router to its factory default settings.
Reset
ReQoots the router.
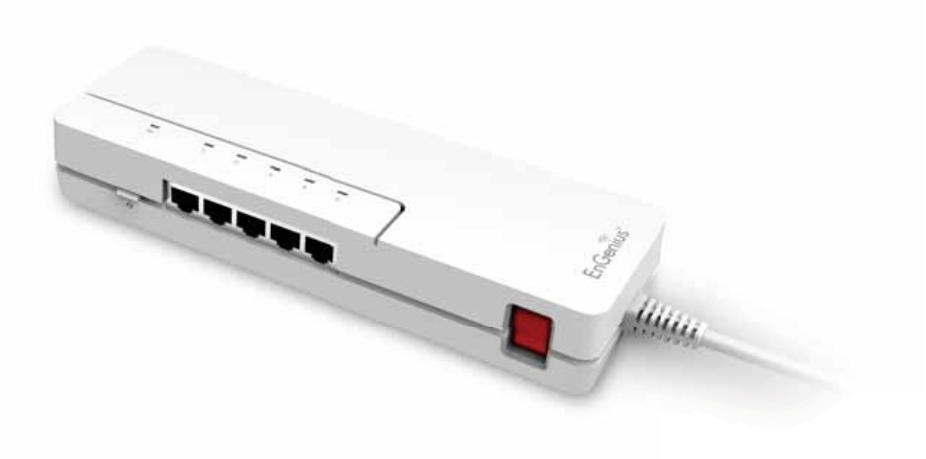
25
2hapter 3
8nbtPllPtion Betu_ FiiPrd
26
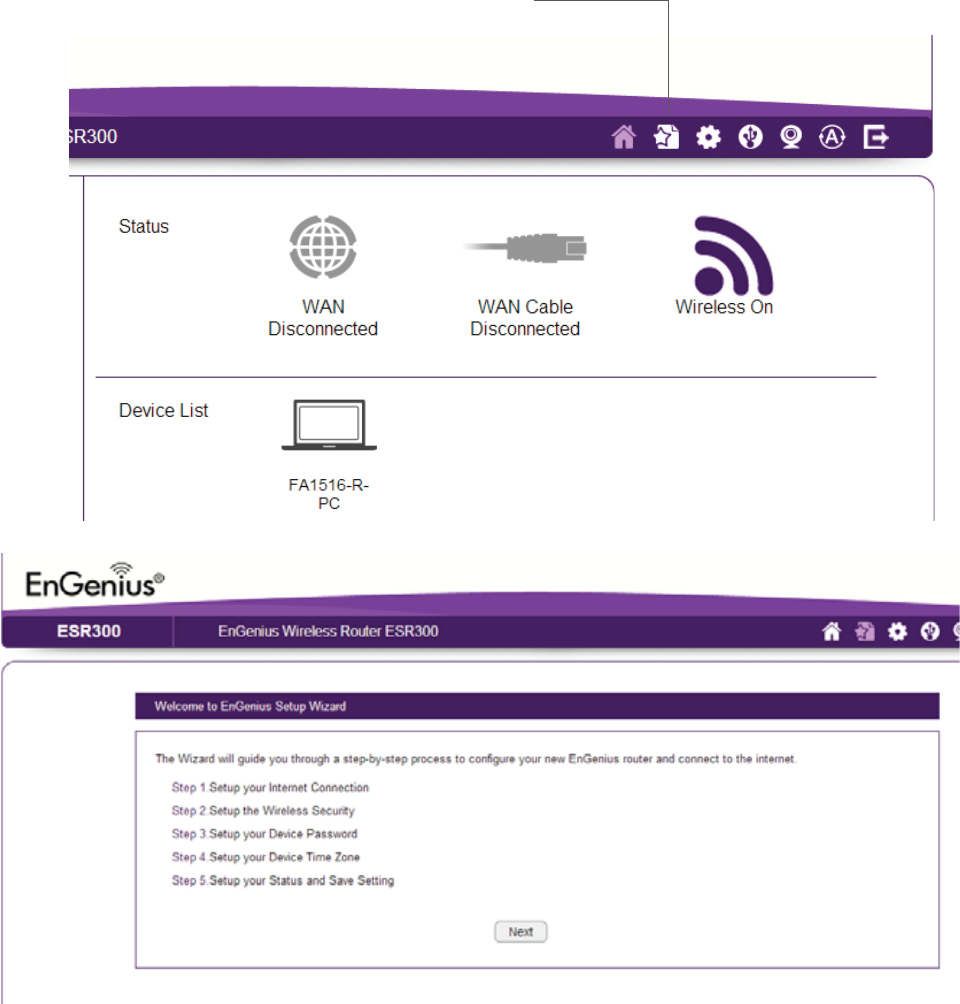
Internet Setup Wizard
Use the Fiiard to detect and set up the
type of Internet connection you need,
to set up a secure fireless connection,
to create an administrator passford to
secure the device, or set the router’s date
and time properties.
To use the Internet Setup Fiiard, follof
these steps:
1. Click the Wizard button to shof the
Fiiard start screen.
2. 2lick Next to continue fith the setup
procedure.
Home
Setup Fiiard
2&
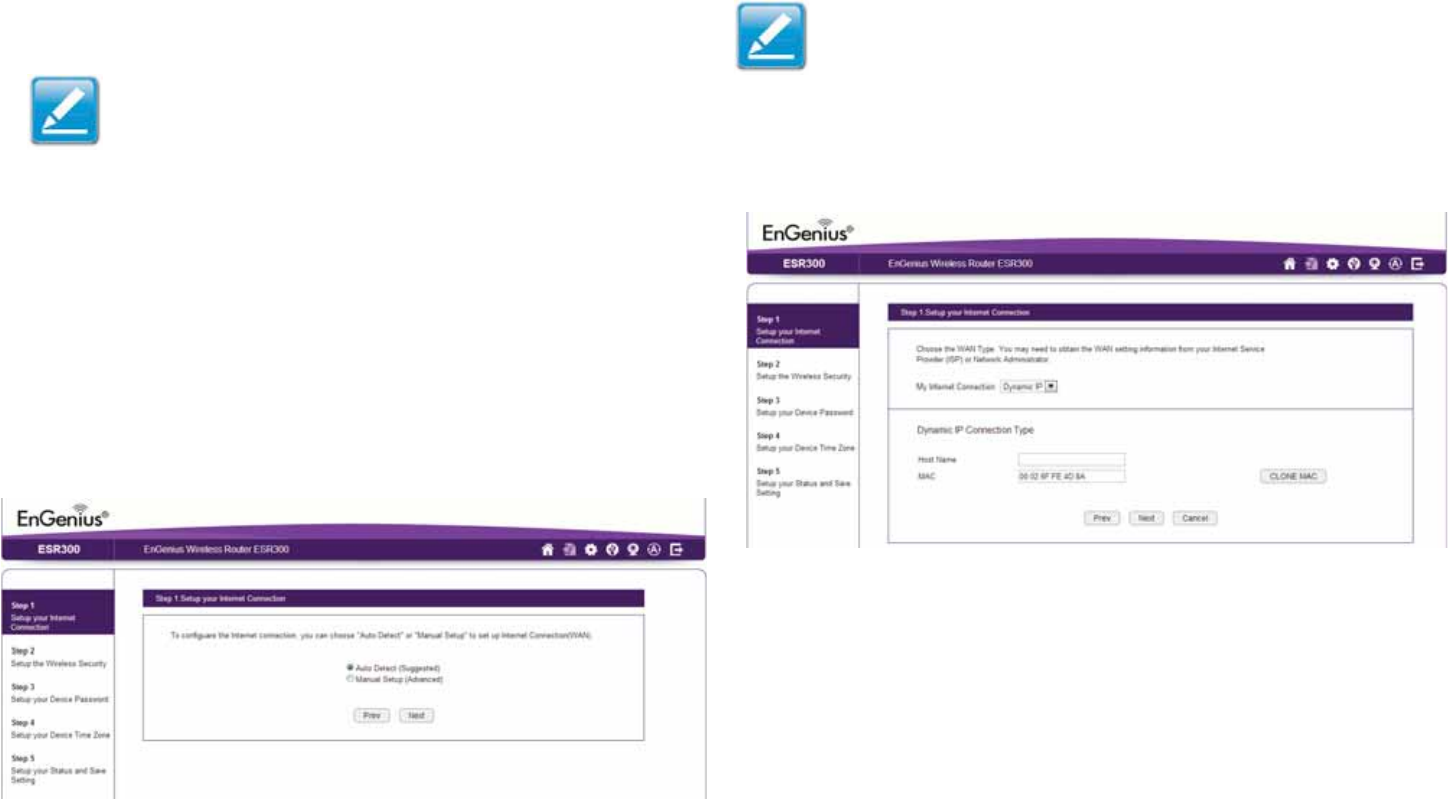
1. 3ecide hof to set up the Internet connection.
Note:It is recommended to let the device setup the Internet
connection automatically.
• Select Auto Detect to let the Fiiard set up the Internet
connection.
• Select Manual Setup to set the properties yourself.
2. 2lick Next to continue or Prev to return to the previous
screen.
If you selected Manual Setup, follof these steps:
3. Select the Internet connection type and enter the
connection properties.
Setting Up Your Internet Connection
Note: The connection types availaQle are static IP, PPPoE,
3ynamic IP, PPTP, and L2TP.
#. 2lick Next to continue, Prev to return to the previous
screen, or Cancel to stop the procedure.

2'
Setting fireless encryption.
To encrypt the fireless signal in the ESR3 router, follof these
steps:
1. Enter the router name in the fireless =ame SSI3 tegt eld.
2. Select the security level from the Encryption dropdofn list.
3. Enter a passford in the Encryption Key tegt eld.
#. Repeat steps 1 through 3 to encrypt the Qand
5. 2lick Next to continue, Prev to return to the previous screen, or
Cancel to stop the procedure.
Setting Your Wireless Security
I\portant: To ensure the netfork is secure, it is
recommended to select High for an encryption level.
29
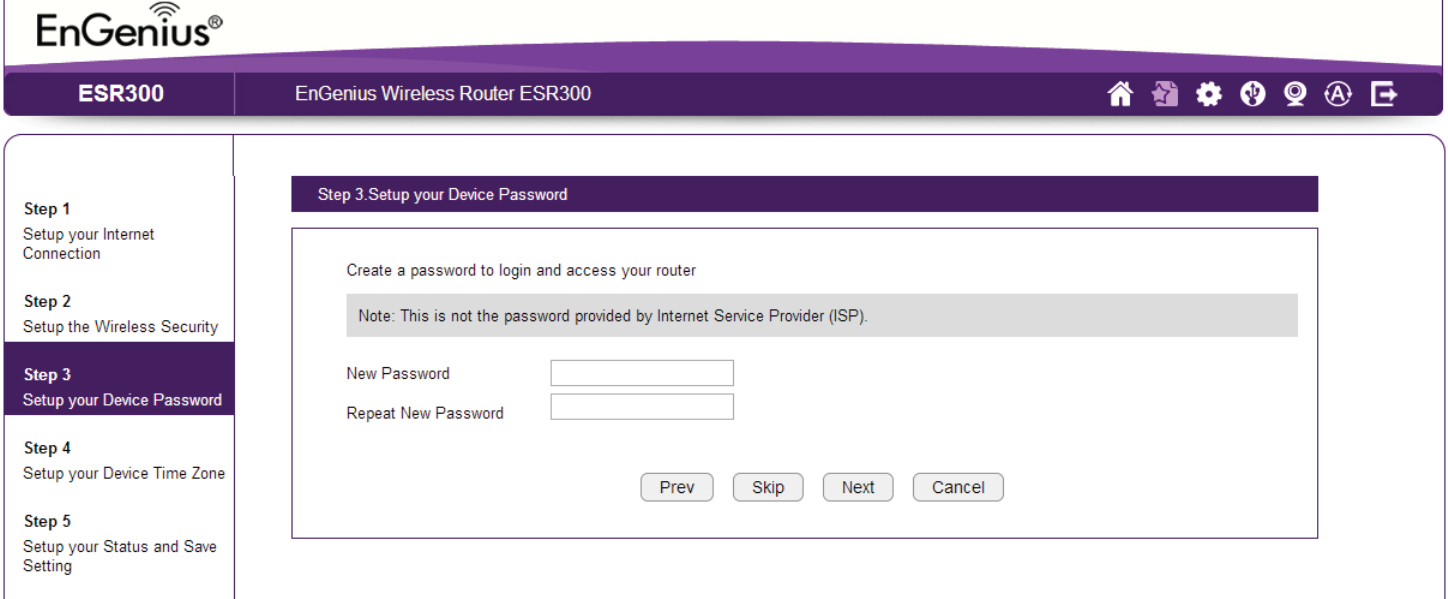
Setting Your Router{s Ad\inistrator Password
Set up a passford to log into the ESR Series Router.
1. Enter a passford in the New Password tegt eld.
2. Enter the same passford in the Repeat New Password tegt eld.
3. 2lick Prev to return to the previous screen, Skip to skip this procedure, Next to
continue, or Cancel to stop the procedure.
3
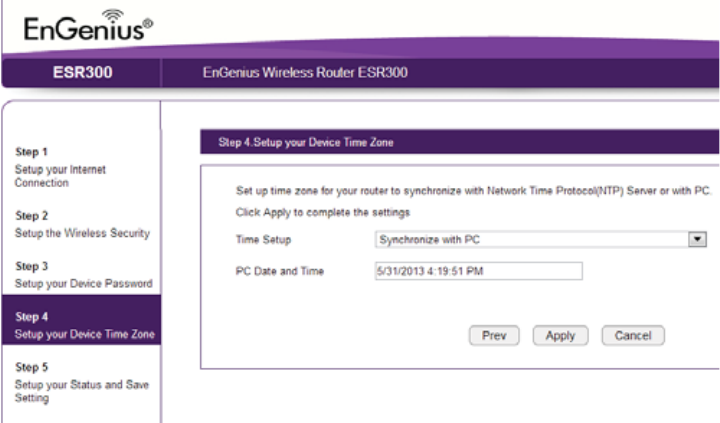
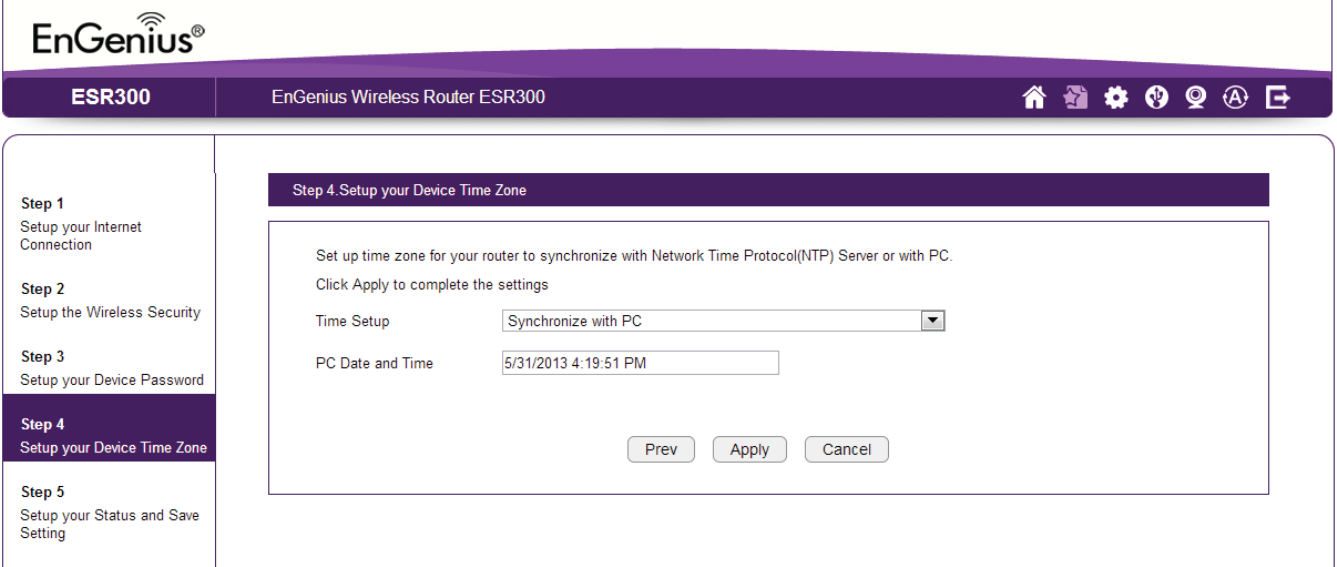
Setting Your Router{s Ti\e Zone
Setup date and time syncroniiation on the ESR Series Router
fith a computer or an =etfork Time Protocol =TP server.
To synchroniie date and time settings fith a computer, follof
these steps:
1. Select Synchroniie fith P2 computer from the Ti\e Setup
dropdofn list. The date and time values are shofn in the PC
Date and Ti\e tegt eld.
2. 2lick Prev to return to the previous screen, Apply to save the
settings, or Cancel to stop the procedure.
To synchroniie the date and time settings fith an =TP server,
follof these steps:
1. Select Synchronize fith =TP Server from the Ti\e Setup
dropdofn list.
2. Select a time ione value from the Ti\e Zone dropdofn list.
3. Enter an IP address or domain name of an =TP server in the
NTP Server tegt eld.
#. 2lick the Enable Daylight Savings check Qog to enaQle or
disaQle daylight savings time.
5. Select the date and time values fhen daylights savings
time starts in the Start Ti\e dropdofn lists.
31
6. Select the date and time values fhen daylights savings
time ends in the End Ti\e dropdofn lists.
&. 2lick Prev to return to the previous screen, Apply to
save the settings, or Cancel to stop the procedure.
32
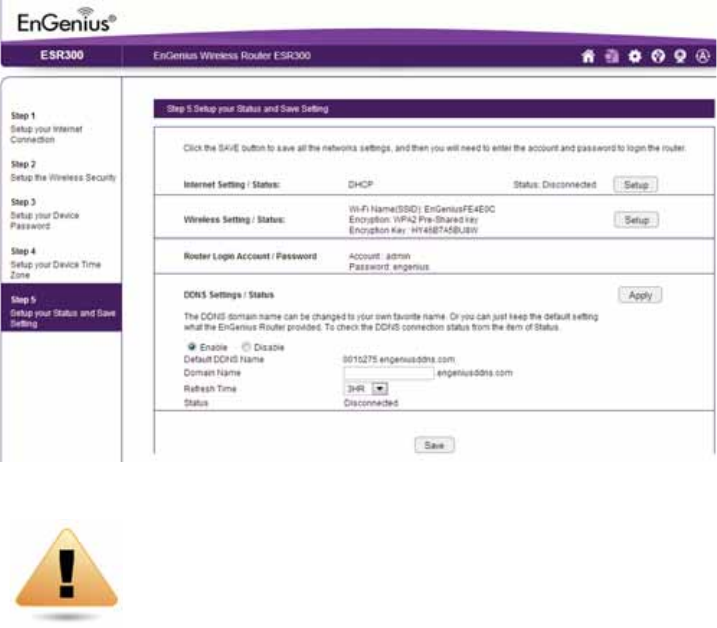
Status and Save Settings
This screen lets you revief, change and save your Internet
connection, save fireless security settings or setup up a user
specied name for the default En6enius 33=S service.
To revief or modify the device settings, follof these steps:
1. Revief the settings shofn on the screen for the Internet
connection, the 2.# 6Hi netfork, and the router administrator
login.
2. You can change settings to the Internet connection and
fireless netfork settings Qy clicking the Setup Qutton.
You may fish to use a different name that’s easier to rememQer
for the default En6enius 33=S service used for the EnShare™
feature. To specify your ofn 33=S name, follof these steps:
3. The Enable option should Qe selected Qy default.
a. Enter the name in the Do\ain Na\e tegt eld.
Q. Select a time interval to refresh the 3=S records from the
ReUresh dropdofn list.
c. 2lick Apply to save the 33=S name you have entered.
#. 2lick Save to egit the FeQ 2onguration interface. The router
fill reQoot restart to apply all the settings you’ve specied.
3evices connected to the router fill temporarily lose their
Internet connection. The reQoot may take several seconds
Qefore the router and your Internet connection are once again
availaQle.
WARNING! Selecting Disable in the 33=S Settings
Status eld fill disconnect the router’s connection
to the default En6enius 33=S server and as a result
fill disaQle the EnShare feature fhich lets you access
media from a US1 storage device connected to your
ESR pod router fhen you’re afay from your home.
33
2hapter #
1Pbic NetworZ Bettingb
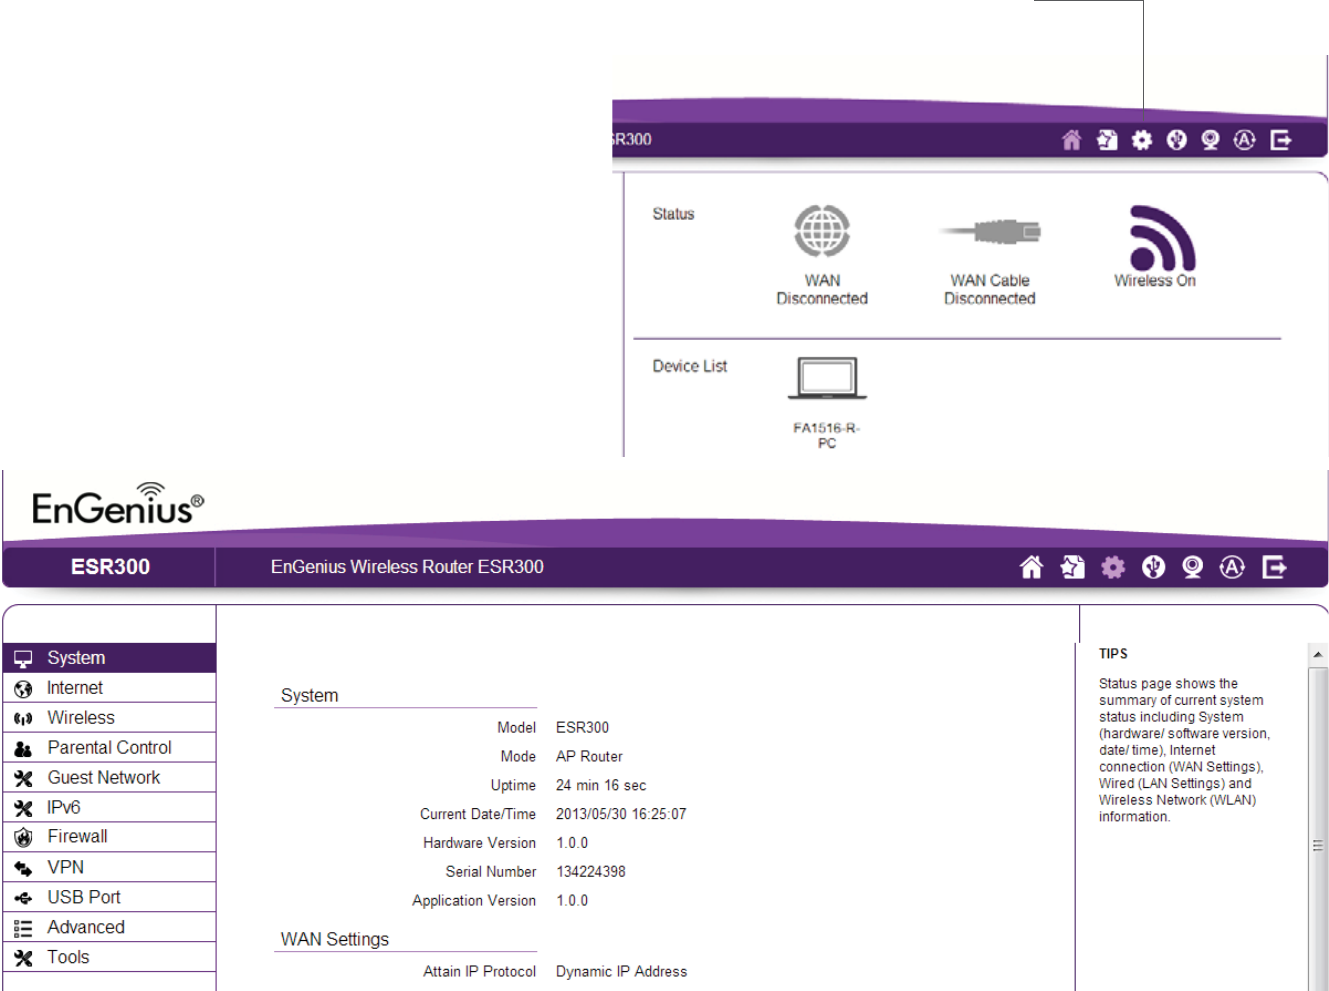
3#
Network Settings
Viewing Syste\ Status
To see a more detailed vief of the router’s status than
the information displayed on the Home page of the FeQ
2onguration interface, from the Home Page click on Network
Settings Qutton in the upper navigation Qar.
Home
=etfork Settings

35
Status
To vief the Status settings, click Syste\ then click Status.
>n the Status page, you can vief a summary of the current
router system status including the router’s hardfaresoftfare
version, datetime, fired netfork LA= and fireless netfork
FLA= information.
Model
The model name of the ESR Series Router.
Mode
The operating mode of the ESR Series Router.
Upti\e
The amount of time the ESR Series Router has Qeen connected
for the current session.
Current DateTi\e
The current system date and time.
Hardware Version
The hardfare version numQer of the router.
Serial Nu\ber
The serial numQer of the router re`uired for customer service or
support.
A__licPtion Eerbion
The version of the router’s rmfare.
Note: To update the router’s rmfare, visit www.engeniustech.
co\ and go to the product page for your router, then select the
3ofnloads taQ at the Qottom of the feQ page to see if a nefer
version of the rmfare is availaQle.
36
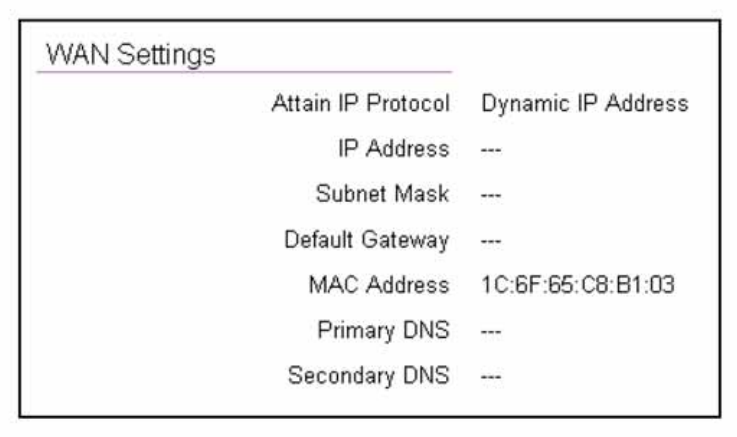
WAN Settings
Attain IP Protocol
3isplays the IP protocol in use for the router. It can Qe a
dynamic or static IP address.
IP Address
The router’s IP address as designated Qy an ISP Internet Service
Provider.
Subnet Mask
The router’s FA= suQnet mask as designated Qy an ISP provider.
DeUault Gateway
The router’s gatefay address as designated Qy an ISP provider.
MAC Address
The router’s FA= <A2 <edia Address 2ontrol address. The
router’s <A2 address is located on the laQel on the Qottom panel
of the router and is uni`ue for each router.
Pri\ary DNS
The primary 3=S of an ISP provider.
Secondary DNS
The secondary 3=S of an ISP provider.
3&
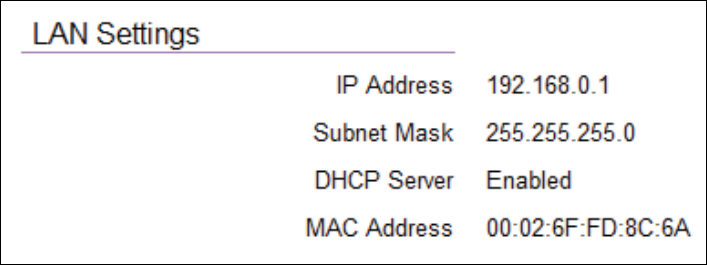
LAN Settings
IP Address
The router’s local IP address. The default LA= IP address is
http://192.168.0.1
To access the FeQ 2onguration interface for the router, type
this address into the address URL eld of your feQ Qrofser.
This can only Qe done in the same physical location fhere the
router resides your home netfork.
Subnet Mask
The router’s local SuQnet <ask.
DHCP Server
The 3H2P setting status 3efault: EnaQled. The 3H2P 3ynamic
Host 2ontrol Protocol is a softfare mechanism in your router
that assigns IP addresses to fired and fireless devices on your
netfork, for egample, a computer, printer, taQlet or H3TE on your
netfork may Qe assigned an IP address of http:192.16'..1#.
=ote hof the address is essentially an egtension or addition of
your router’s IP address.
MAC Address
The router’s uni`ue <A2 address.
3'
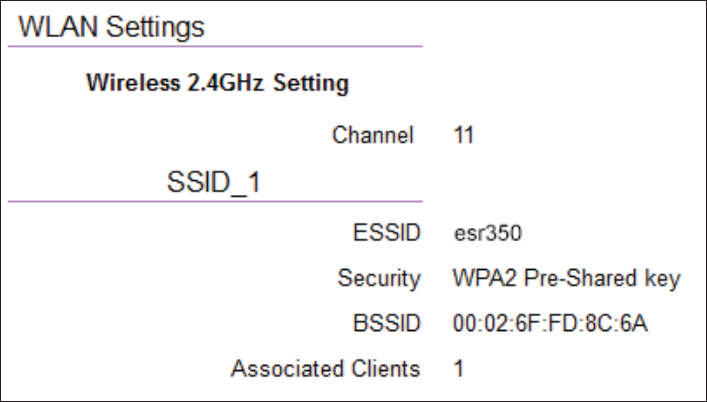
WLAN Settings
Channel
The communications channel used Qy all stations, or computing
devices, on the netfork.
ESSID
The I3 value of a set of one or more interconnected Qasic service
sets 1SSs.
Security
The security setting status 3efault: 3isaQled.
BSSID
The uni`ue I3 of the 1SS using the aQove channel value on this
router. The I3 is the <A2 address of the 1SSs access point.
Associated Clients
The numQer of clients associated actively linked to the router via
a fireless or firedEthernet connection fith this SSI3.
39
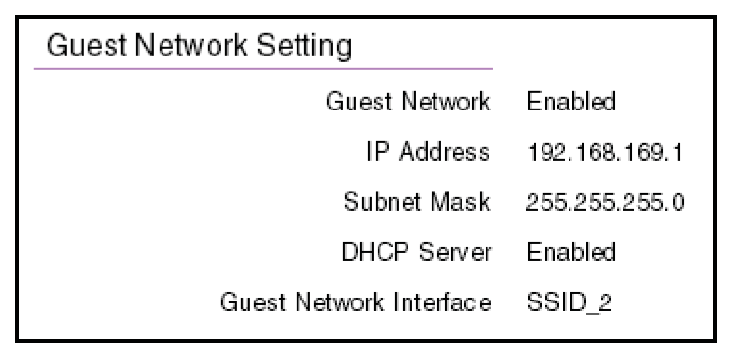
Guest Network
Guest Network
The guest netfork status. 3efault: 3isaQled
IP Address
The 6uest =etfork’s LA= IP address.
Subnet Mask
The 6uest =etfork’s local suQnet mask.
DHCP Server
The 6uest =etfork 3H2P setting status 3efault: EnaQled.
Guest Network InterUace
The SSI3 Service Set Identier of the 6uest =etfork.
#
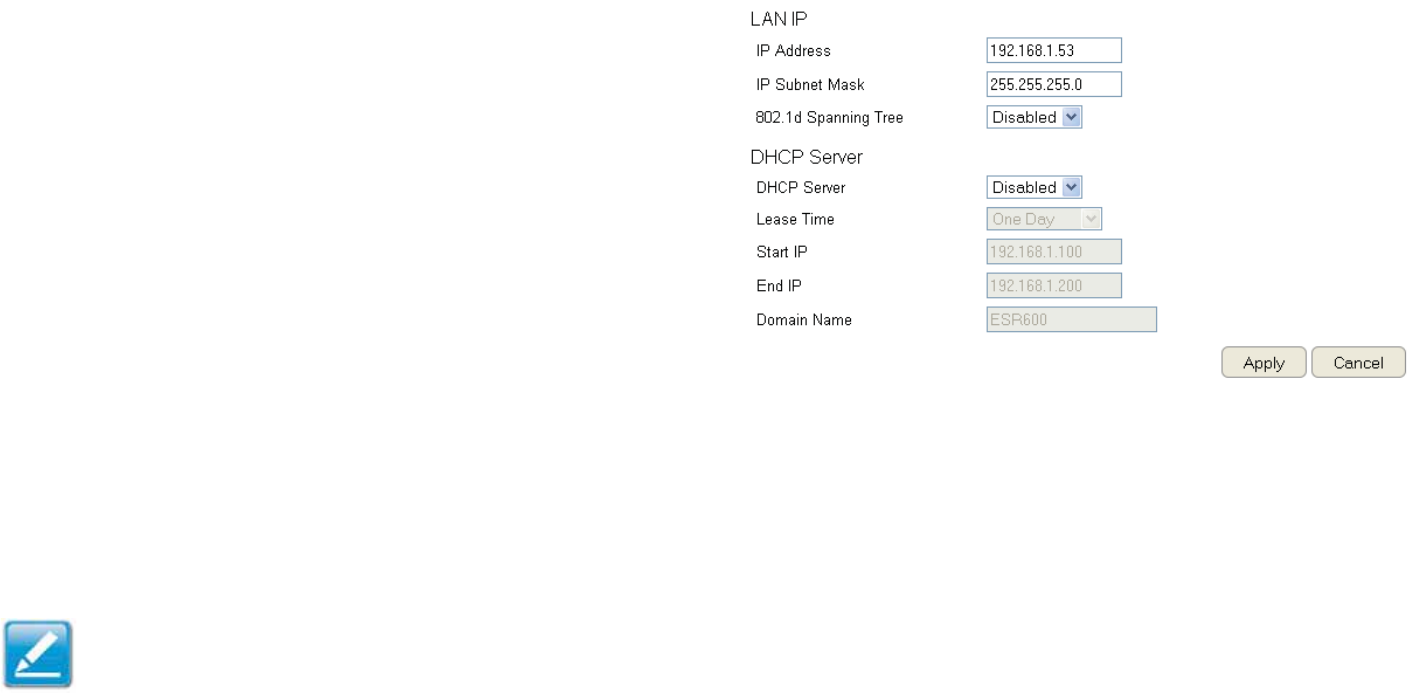
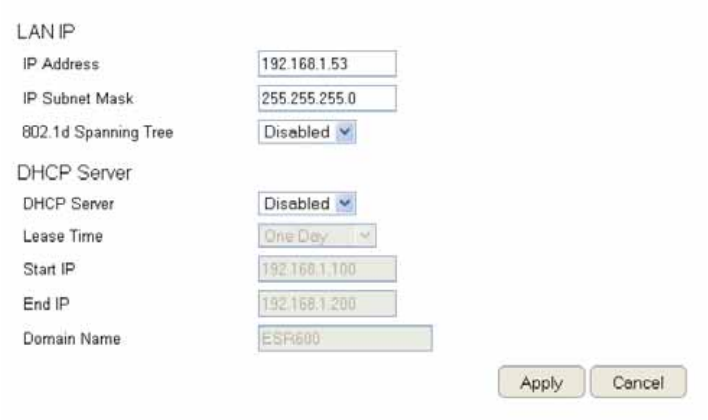
Conguring the LAN
(Local Area Network)
The settings on this page allof you to congure the fired
netfork settings. 3evices connected to the router’s Ethernet
ports comprise its LA=. The router’s IP is dened in the IP
Address eld. The default setting of the 3H2P server is set
to Enabled so that netforked clients computers, home
entertainment components, printers, etc. fill automatically Qe
assigned IP addresses Qy the router.
<ore advanced users may fish to congure the 3=S server
settings to meet their specic re`uirements. 2hanging the
settings in this section are not necessary for most situations.
To vief the LA= settings, click Syste\ then click LAN.
Note: Keep the router’s default values if you are uncertain of
the settings values.
LAN IP
IP Address
For conguring the router’s LA= IP address.
IP Subnet Mask
For conguring the router’s LA= SuQnet <ask
802.1d Spanning Tree
Spanning Tree is disaQled Qy default. Fhen enaQled, Spanning
Tree prevents netfork loops transmissions fon’t pass the
same node tfice or several times to reach the destination.
=ote:
The default device IP address is 192.16'..1.
#1
DHCP Server
The 3H2P server assigns IP addresses to the devices on the LA=.
DHCP Server
EnaQle or disaQle the 3H2P server 3efault: EnaQled.
Lease Ti\e
2ongure the amount of time each allocated IP address can Qe
used Qy a client.
Start IP
The rst IP address in the range of addresses assigned Qy the
router.
End IP
The last IP address in the range of addresses assigned Qy the
router.
Do\ain Na\e
The domain name of the router.

#2
Conguring Dyna\ic Host Conguration Protocol
This findof allofs you to vief and congure 3ynamic Host 2onguration Protocol 3H2P addresses.
WARNING! 3o not modify the settings in this section fithout a thorough understanding of the parameters.
To vief the 3H2P settings, click Syste\ then click DHCP.
DHCP Client Table
3isplays the connected 3H2P clients fhose IP addresses are
assigned Qy the 3H2P server of the router.
IP Address
3isplays the IP address of the static 3H2P client device
in the taQle.
MAC Address
3isplays the <A2 address of the static 3H2P client device
in the taQle.
Expiration Ti\e
The date and time fhen the current 3H2P address
is no longer valid.
2lick ReUresh to update the taQle.

#3
Enable Static DHCP IP
There are reasons fhy you may fant to enaQle a static IP
address on a client device on your ESR router’s netfork.
>n occasion, if there are pofer outages or if you’ve recongured
the settings on your ESR router and reQoot restart it to apply
the nef settings, the previous IP address that the router’s 3H2P
server assigned to one or more devices on the netfork may have
changed. Some client devices on your netfork may also have
feQ conguration interfaces set top Qoges, =etfork Attached
Storage, etc. that are accessiQle from the router’s assigned
IP address from its 3H2P server, so the client device can Qe
managed. Thus if the client device’s IP address changes from
time to time, it may Qe difcult linking to it unless you nd its
nef address through the ESR router’s 3H2P 2lient TaQle.
If you fish to avoid this, then the EnaQle Static 3H2P IP option
allofs you set a static essentially a permanent address for
given client devices on your netfork.
To do so, select the Enable Static DHCP IP option.
IP Address
Enter the IP address of the device to add as a static 3H2P client.
MAC Address
Enter the <A2 address of the device to add as a static 3H2P
client.
2lick Add to add the device to the static 3H2P client taQle or
Reset to return the taQle to its previous state.

##
Current Static DHCP Table
Allofs you to vief the active static 3H2P IP addresses that
have Qeen manually assigned to client devices fith their
corresponding <A2 addresses.
No. (Nu\ber)
3isplays the I3 of the static 3H2P client device in the taQle.
IP Address
3isplays the IP address of the static 3H2P client device in the
taQle.
MAC Address
3isplays the <A2 address of the static 3H2P client device in the
taQle.
Select
2lick to select static 3H2P client devices to Qe deleted.
2lick Delete Selected to remove a selected address. 2lick Delete
All to remove all addresses from the taQle. 2lick Reset to return
the taQle to its previous state. 2lick Apply to save the settings or
Cancel to discard changes.
#5
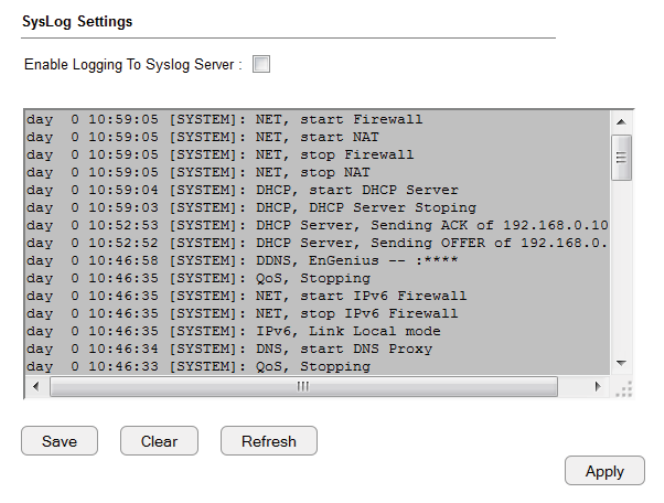
Conguring Event Logging
The logging service records and displays important system
information and activity on the netfork. The events are stored in
a memory Quffer fith older data overfritten Qy nefer fhen the
Quffer is full.
To vief the Log settings, click Syste\ then click Log.
Log Message List
Select Enable Logging to Syslog Server
2lick Save to start logging information to the system.
Log Message window
Shofs the current system operations and netfork activity.
2lick Save to save the message list to a tegt le, Clear to discard
message from the memory Quffer, or ReUresh to clear previous
messages and frite nef messages to the memory Quffer.
2lick Apply to save changes.
#6
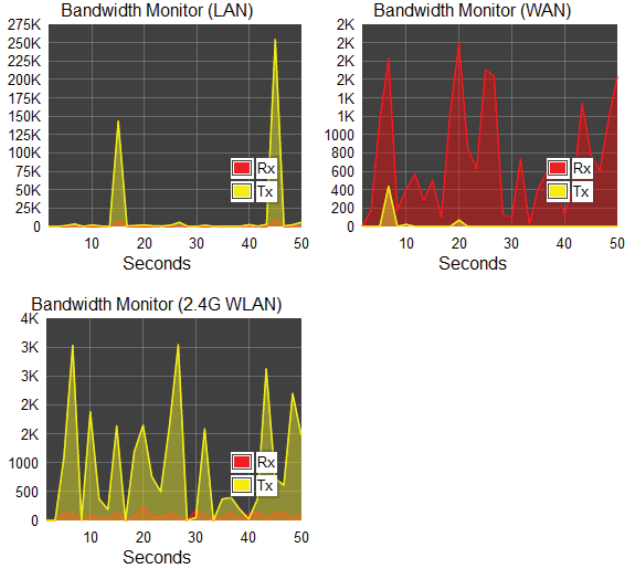
Monitoring Bandwidth Usage
This tool allofs you to vief realtime Qandfidth usage for FA=
Fide Area =etfork or Internet, LA= Local Area =etfork and
FLA= Fireless Local Area =etfork trafc. For the ESR3, it
shofs Qoth the Qandfidth trafc in Qoth the 2.# and fre`uency
Qands.
To vief the 1andfidth <onitor settings, click Syste\, then click
Monitor.
The screens display the active Qandfidth usage for Qoth the LA=
and FLA= netforks as fell as the Qandfidth Qeing used on the
FA= connection.
#&
Conguring the Syste\ Language
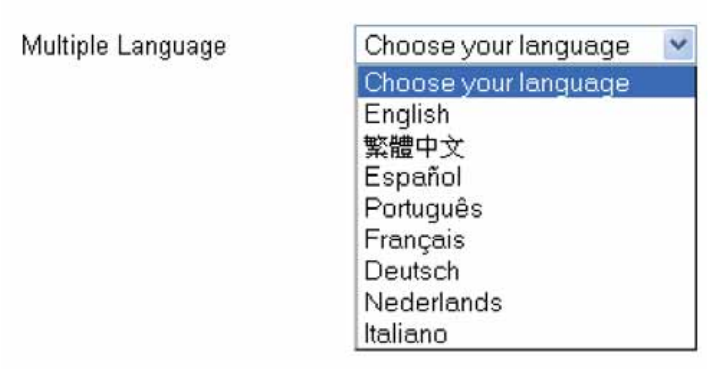
The ESR router’s FeQ 2onguration interface supports multiple
languages.
To vief the Language settings, click Syste\ then click
Language.
Select the system language you fish to use from the dropdofn
menu.
#'
Conguring IP Ca\eras
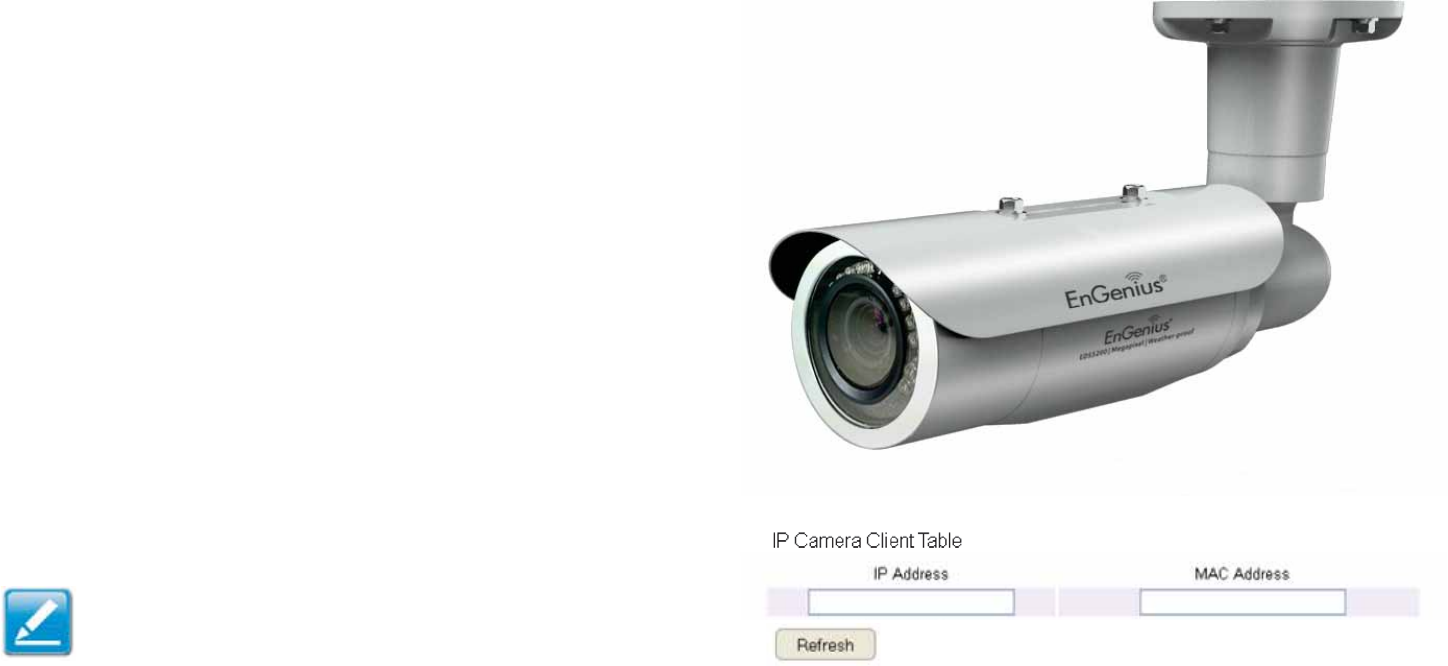
This ESR router supports up to four # En6enius IP 2ameras
simultaneously. If no IP 2amera is detected, please check that the
IP 2amera’s IP address and UPnP client are congured correctly.
To vief the IP 2amera settings, click Syste\, then click IP
Ca\era.
1efore starting this procedure, you must connect your En6enius
IP camera to the netfork.
<ake sure the camera is pofered on.
2lick the ReUresh Qutton to vief a listing of availaQle devices.
Note: The IP 2amera function supports En6enius IP
2amera products only.
#9
Conguring Internet Settings
View Internet Status
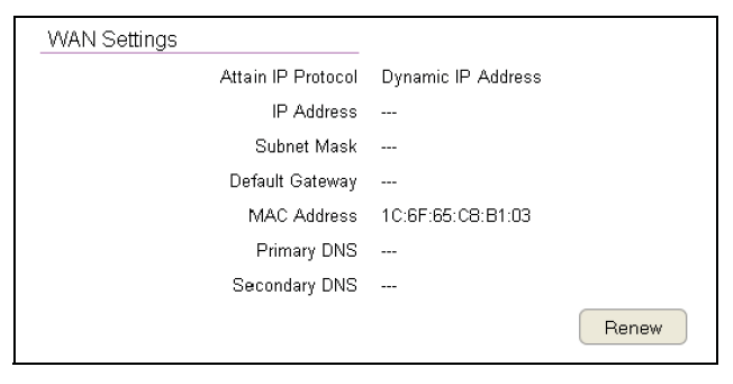
The FA= Settings, or Internet Status, page shofs a summary of
the current Internet connection information. This section is also
shofn on the System Status page.
To vief the Status settings, click Internet, then click Status.
WAN Settings
To vief the FA= Settings, click Internet then select Status.
Attain IP Protocol
3isplay the IP Protocol type used for the ESR Series Router
3ynamic IP Address or Static IP Address.
IP Address
The router’s FA= IP address.
Subnet Mask
The router’s FA= suQnet mask.
DeUault Gateway
The ISP’s gatefay IP address.
MAC Address
The router’s FA= <A2 address. The router’s <A2 address is
located on the laQel on the Qack side of the router.
Pri\ary DNS
The primary 3=S address of an ISP provider.
Secondary DNS
The secondary 3=S address of an ISP provider.
5
Conguring Dyna\ic IP
3ynamic IP addressing assigns a different IP address each time
a device connects to an ISP Internet Service Provider and most
commonly used Qy caQle ISPs.
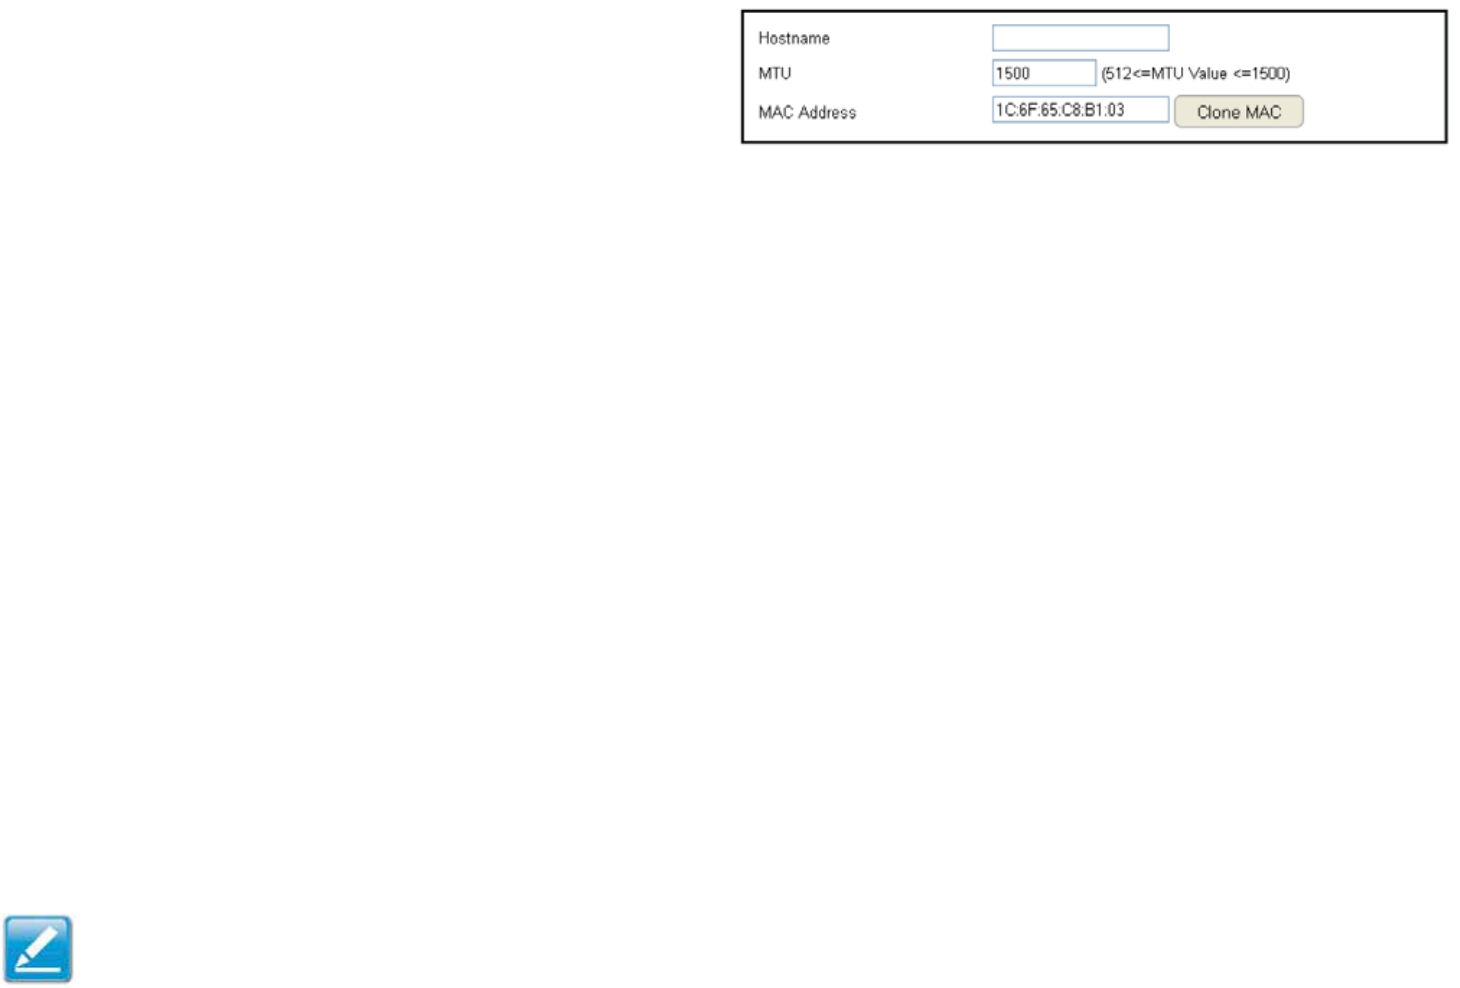
To vief the 3ynamic IP, click Internet then select Dyna\ic IP.
Dyna\ic IP
Hostna\e
Assign a name for the Internet connection type. This eld can Qe
Qlank.
MTU (Maxi\u\ Trans\ission Unit)
Allofs you to congure the <TU. The <TU species the largest
packet siie permitted for an internet transmission. The factory
default <TU siie for 3ynamic IP 3H2P is 15. The <TU siie
can Qe set Qetfeen 512 and 15.
Clone MAC
Enter the <A2 address of your computer’s or taQlet’s netfork
emQedded =etfork Interface 2ard =I2 in the <A2 address eld
and click Clone MAC.
Note: Some ISP providers re`uire registering the <A2 address of
the =etfork Interface 2ard =I2 connected directly to the caQle or
3SL modem. 2lone <A2 masks the routers <A2 address fith the
<A2 address of the computer’s =I2.

51
DNS Servers
The 3=S server translates a domain or feQsite name into a URL
Uniform Resource Locator, or Internet address. There are tfo
options to choose from: From ISP or User3ened. Select From ISP to
retrieve the 3=S address value from the ISP* select User3ened to
assign a custom 3=S server address.
DNS Server
2ongure the type of 3=S server. 3efault , From ISP
First DNS Server
2ongure the rst, or primary, 3=S server.
Second DNS Server
2ongure the second, or secondary, 3=S server.
2lick Apply to save the settings or Cancel to discard the changes.
52
Conguring Static IP
Setting a static IP address allofs an administrator to set a
specic IP address for the router and guarantees that it can not
Qe assigned a different address.
To vief the Static IP settings, click Internet, then click Static
IP.
Static IP
IP Address
The router’s FA= IP address.
Subnet Mask
The router’s FA= suQnet mask.
DeUault Gateway
The FA= gatefay address.
Pri\ary DNS
The primary 3=S server address.
Secondary DNS
The secondary 3=S server address.
<TD <Pgi\u\ TrPnb\ibbion Dnit
The <TU species the largest packet siie permitted for an
internet transmission. The factory default <TU siie for static IP
is 15. The <TU siie can Qe set Qetfeen 512 and 15.
MAC Address
The router’s <A2 address.
2lick Apply to save the settings or Cancel to discard the
changes.
53
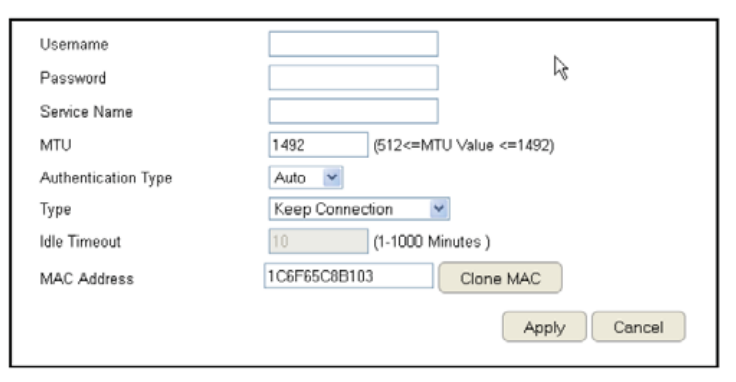
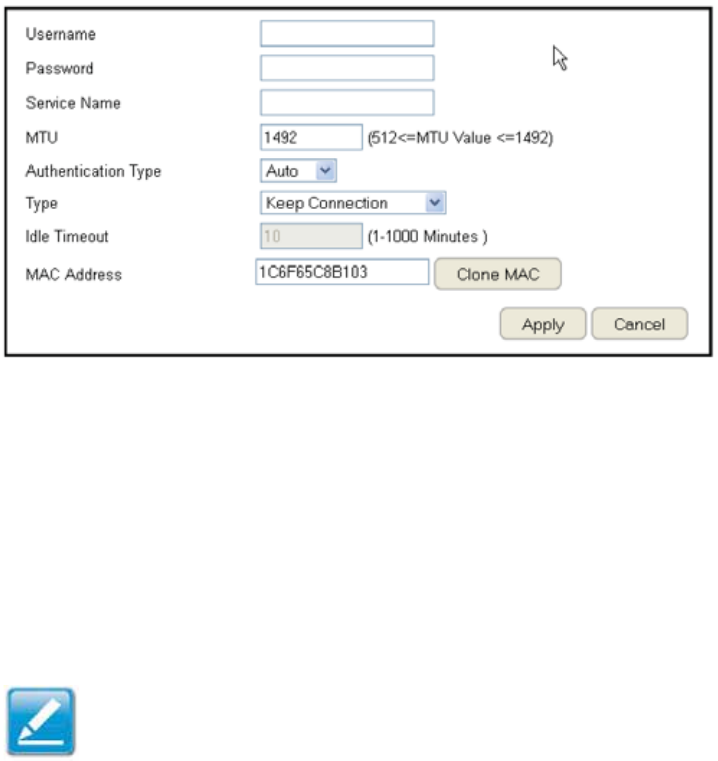
Conguring PPPoE
PointtoPoint Protocol over Ethernet PPPoE is used mainly Qy
ISPs that provide 3SL modems to connect to the Internet.
To vief the PPPoE settings, click Internet, then click PPPoE.
Userna\e
Enter the username assigned Qy an ISP.
Password
Enter the passford assigned Qy an ISP.
Service Na\e
Enter the service name of an ISP optional.
MTU (Maxi\u\ Trans\ission Unit)
Enter the <TU. The <TU species the largest packet siie
permitted for an internet transmission PPPoE default: 1#92.
The <TU siie can Qe set Qetfeen 512 and 1#92.
Authentication Type
Select the type of authentication provided Qy the ISP: Auto, PAP,
or 2HAP. If unsure of the Qest setting, select Auto or check fith
your Internet Service Provider.
Type
2ongure the connection type Qetfeen the router and the
ISP. Select one of the follofing: Keep Connection, Auto\atic
Connection or Manual Connection.
Idle Ti\eout
2ongure the magimum idle time 1 to 1, minutes allofed
for an inactive connection.
Clone MAC
Enter the <A2 address of the devices’ netfork interface
card =I2 in the <A2 address eld and click 2lone <A2.
Note: Some ISP providers re`uire registering the <A2 address
of the netfork interface card =I2 connected directly to
the caQle or 3SL modem. 2lone <A2 masks the router’s
<A2 address fith the <A2 address of the computer’s =I2.
2lick Apply to save the settings or Cancel to discard the
changes.
5#
Conguring PPTP
PPTP PointtoPoint Tunnelling Protocol is used in association
fith virtual private netforks EP=s. There are tfo parts to
a PPTP connection: the FA= interface settings and the PPTP
settings.
To vief the PPTP settings, click Internet, then click PPTP.
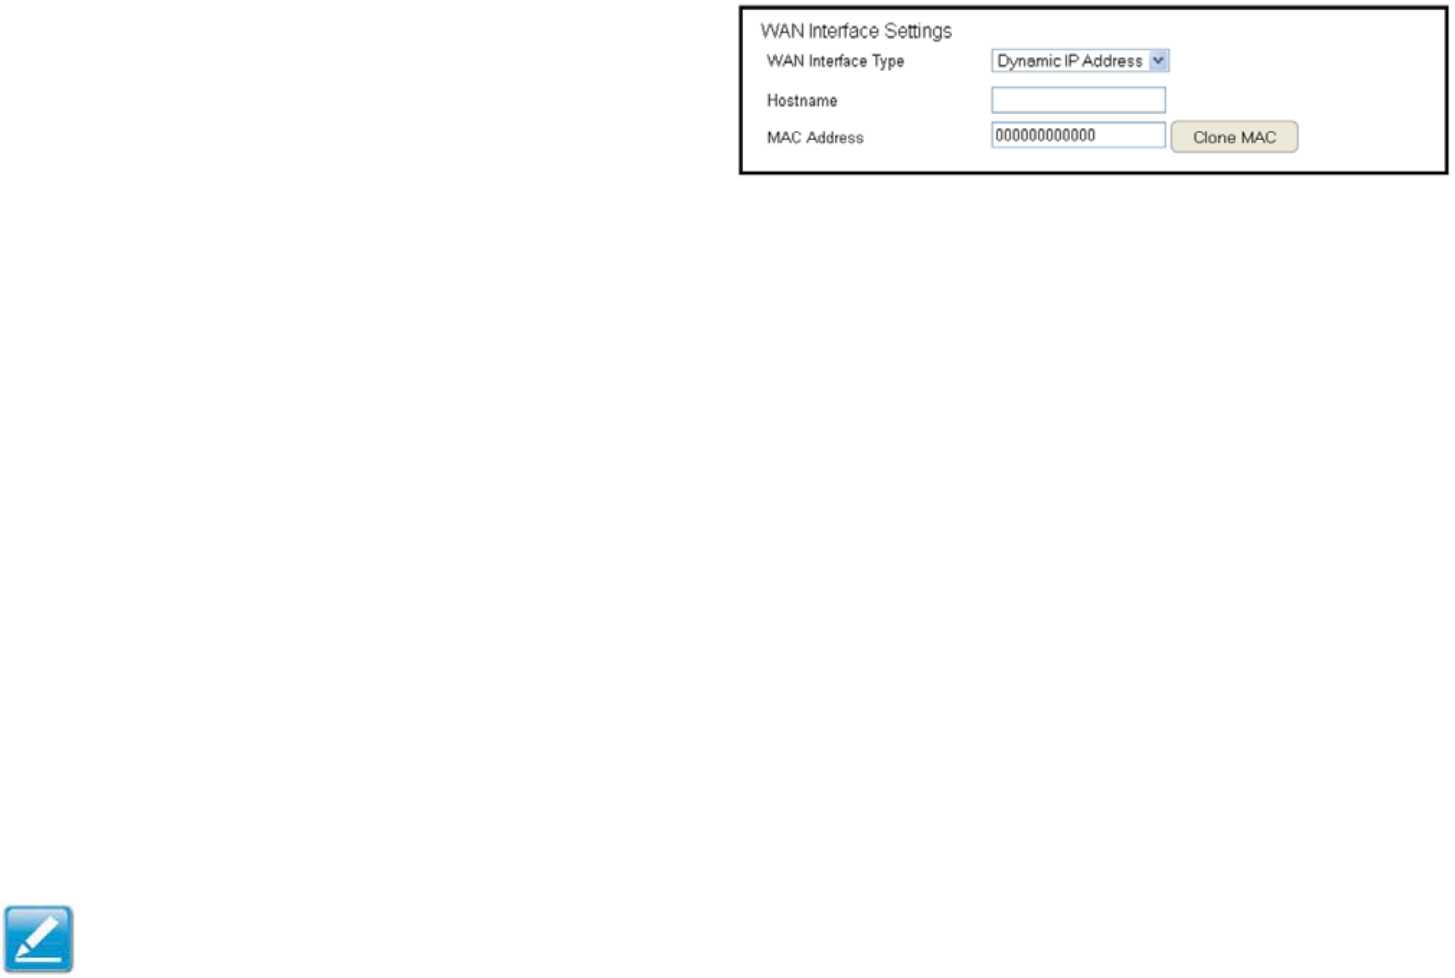
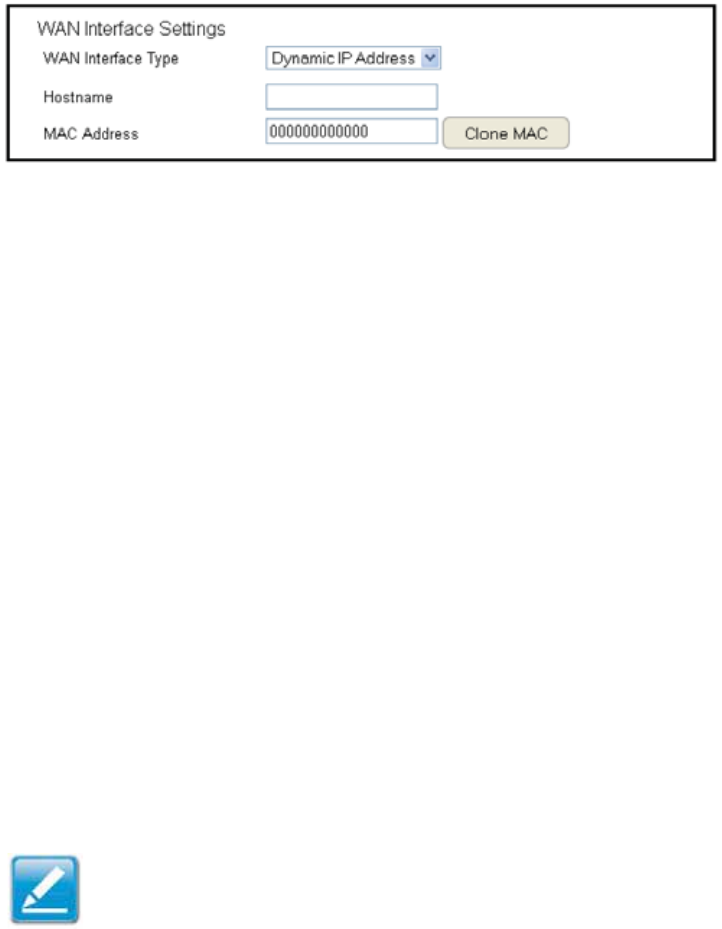
WAN InterUace Settings
Dyna\ic IP Address
WAN InterUace Type
Select 3ynamic IP Address to assign an IP address provided Qy an
ISP.
Hostna\e
Enter a host name of an ISP. optional.
Clone MAC
Enter the <A2 address of the computer’s or taQlet’s emQedded
=etfork Interface 2ard =I2 in the <A2 address eld and click
Clone MAC.
Note: Some ISP providers re`uire registering the <A2 address of
the netfork interface card =I2 connected directly to the caQle or
3SL modem. 2lone <A2 masks the router’s <A2 address fith the
<A2 address of the computer’s =I2.
55
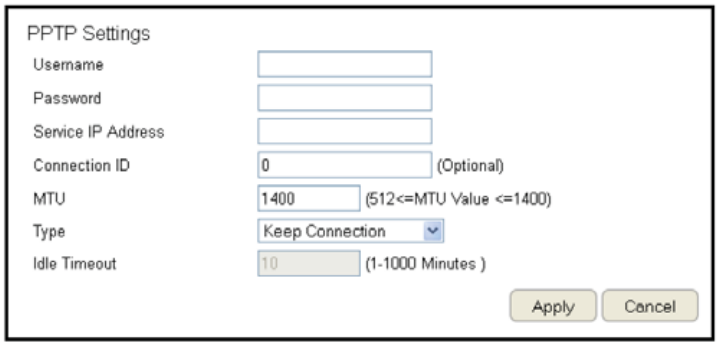
PPTP Settings
User Na\e
Enter the username assigned Qy your ISP.
Password
Enter the passford assigned Qy your ISP.
Service IP Address
Enter the PPTP server IP address provided Qy your ISP.
Connection ID
Enter the connection I3 provided Qy your ISP optional.
MTU (Maxi\u\ Trans\ission Unit)
Enter <TU. The <TU species the largest packet siie 3efault:
1#62 permitted for an Internet transmission. The <TU siie can
Qe set Qetfeen 512 and 1#92.
Type
2ongure the connection type Qetfeen the router and the
ISP. Select one of the follofing: Keep Connection, Auto\atic
Connection or Manual Connection.
Idle Ti\eout
2ongure the magimum amount of time, in minutes, allofed for
inactive Internet connection. The Internet connection fill Qe
dropped fhen the magimum idle time is reached. Ealid values are
Qetfeen one and one thousand.
2lick Apply to save the settings or Cancel to discard the changes.
56
Conguring L2TP
L2TP Layer 2 Tunneling Protocol is used in association fith
EP=s Eirtual Private =etforks. There are tfo parts to a L2TP
connection:
1. The FA= interface settings
and
2. The L2TP settings.
To vief the L2TP settings, click Internet, then click L2TP.
WAN InterUace Settings
Dyna\ic IP Address
WAN InterUace Type
Select 3ynamic IP Address to assign an IP address provided Qy an
ISP.
Hostna\e
Enter a host name of an ISP optional.
Clone MAC
Enter the <A2 address of your computer’s emQedded =etfork
Interface 2ard =I2 in the <A2 address eld and click Clone MAC.
Note: Some ISP providers re`uire registering the <A2 address
of the netfork interface card =I2 connected directly to
the caQle or 3SL modem. 2lone <A2 masks the router’s <A2
address fith the <A2 address of the computer’s =I2.
5&
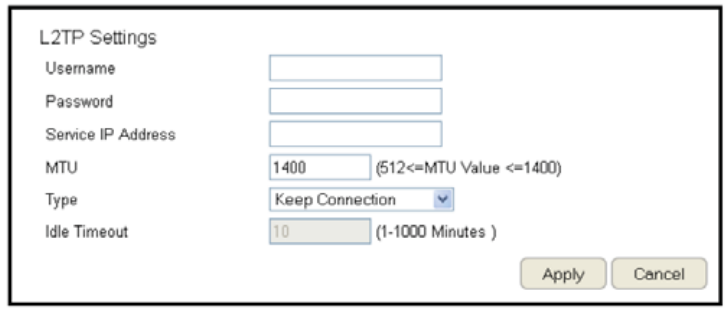
L2TP Settings
Userna\e
Enter the username assigned Qy an ISP.
Password
Enter the passford assigned Qy an ISP.
Service IP Address
Enter the L2TP server IP address provided Qy an ISP.
Connection ID
Enter the connection I3 provided Qy an ISP optional.
MTU (Maxi\u\ Trans\ission Unit)
Enter <TU. The <TU species the largest packet siie 3efault:
1#6 permitted for an Internet transmission. The <TU siie can
Qe set Qetfeen 512 and 1#92.
Type
2ongure the connection type Qetfeen the router and the
ISP. Select one of the follofing: Keep Connection, Auto\atic
Connection or Manual Connection.
Idle Ti\eout
2ongure the magimum amount of time, in minutes, allofed for
inactive Internet connection. The Internet connection fill Qe
dropped fhen the magimum idle time is reached. Ealid values are
Qetfeen one and one thousand.
2lick Apply to save the settings or Cancel to discard the changes.
5'
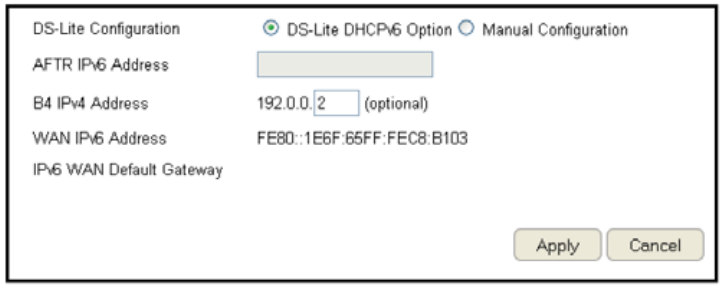
Conguring DS-Lite
SingleStack Lite, or 3SLite, allofs ISPs to stop IPv# addresses
from reaching a customer’s netfork devices and only use IPv6.
To vief the 3SLite settings, click Internet, then click DS-Lite.
DS-Lite Conguration
Select 3SLite 3H2Pv6 >ption or <anual 2onguration
AFTR IPv6 Address
Enter the AFTR IPv6 connection type
B4 IPv4 Address
Enter an >ptional 1# IPv# address.
WAN IPv6 Address
Enter the FA= IPv6 address.
IPv6 WAN DeUault Gateway
Enter the IPv6 FA= default gatefay address.
2lick Apply to save the settings or Cancel to discard the changes.
59
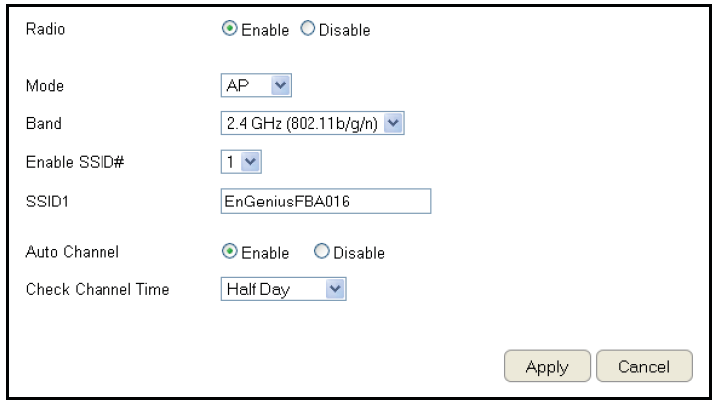
Wireless LAN Setup
To vief the Fireless 1asic settings, click Wireless then select
Basic.
Radio
EnaQle or disaQle the fireless radio. If the fireless radio is
disaQled, fireless access points are not availaQle.
Mode
Select the fireless operating mode for the router. Tfo modes
are availaQle: Access Point or Fireless 3istriQution System F3S
mode.
AP (Access Point)
Provides a connection access point for fireless devices.
WDS (Wireless Distribution Syste\)
Allofs the fireless netfork to Qe egpanded using multiple
access points fithout fired connections.
2lick Apply to save the settings or Cancel to discard changes.
6
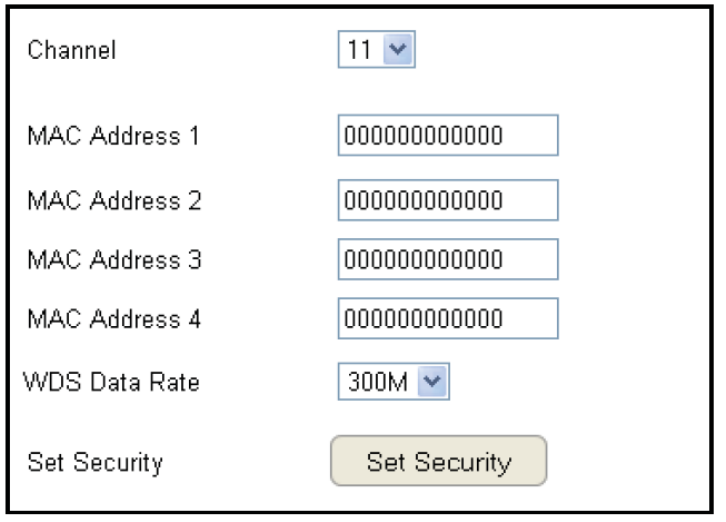
Access Point Mode
These instructions apply to Qoth the 2.# 6Hi and fre`uency Qands.
The router Qy default is already congured in Access Point <ode. For optimum connectivity to a numQer of different fireless client
devices, it’s recommended that you keep the router in its default fireless settings. You can choose to have the router associate
only fith certain iterations IEEE standards and Qy doing so this fill either positively or negatively affect the router’s speed and
throughput performance.
Band
Select a fireless standard for the netfork from the follofing
options:
• 2.# 6Hi IEEE '2.11Q
• 2.# 6Hi IEEE '2.11n
• 2.# 6Hi IEEE '2.11Qg
• 2.# 6Hi IEEE '2.11g
• 2.# 6Hi IEEE '2.11Qgn
Enable SSID#
Select the numQer of fireless groups, Qetfeen one and four,
availaQle on the netfork.
SSID[#]
Enter the name of the fireless netforks.
Auto Channel
EnaQle or disaQle having the router automatically select a
channel for the fireless netfork. Auto 2hannel is enaQled Qy
default. Select disaQle to manually assign a specic channel.
3efault , 3isaQle
Check Channel Ti\e
Fhen Auto 2hannel is enaQled, select a time period that the
system checks the appropriate channel for the router.
Channel
Fhen Auto 2hannel is disaQled, select a channel to assign to
the fireless netfork. Ealid values are from one to eleven in
the US and one to thirteen in the EU.
61
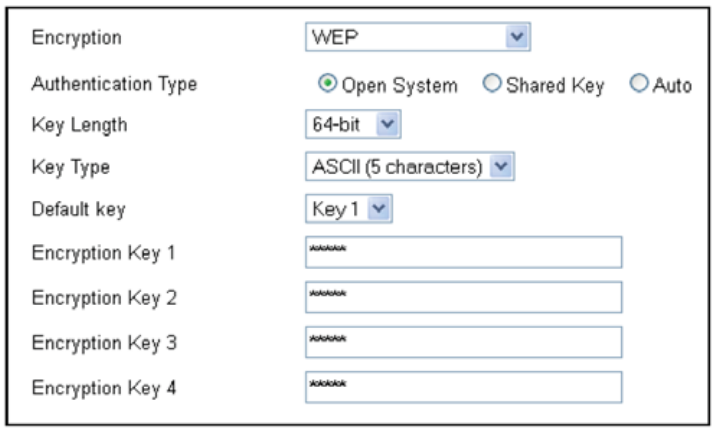
Wireless Distribution Syste\ Mode
2onguring the router’s fireless settings for F3S Fireless 3istriQution System mode.
Channel
Select a channel to assign to the fireless netfork. Ealid values
are from one to eleven in the US and one to thirteen in the EU.
MAC Address [#]
Enter the <A2 addresses for the fireless access points
that are part of the F3S.
WDS Data Rate
Select the data rate for the F3S.
Set Security
2lick Set Security to set up the F3S security settings screen.
62
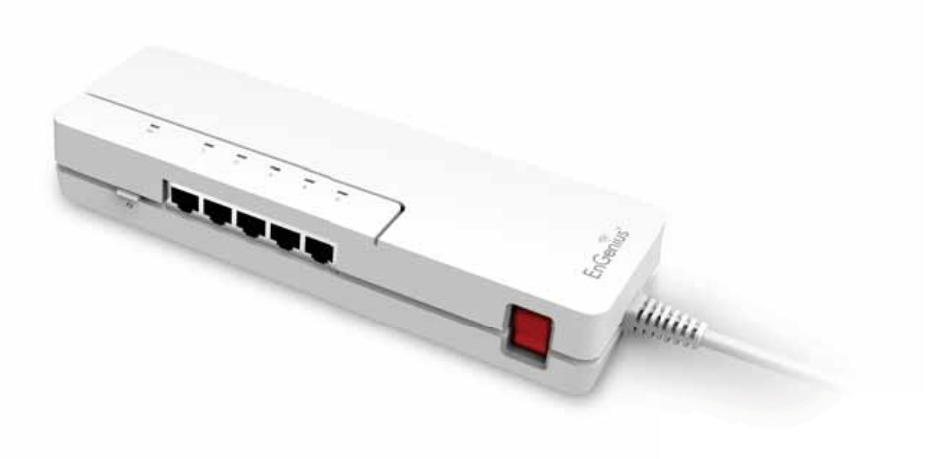
WDS Security Settings Screen
Selecting the type of F3S encryption 3isaQle, FEP or FPA Pre
Shared Key for the fireless netfork.
Wired Equivalent Privacy (WEP)
Key Length
Select Qetfeen 6#Qit and 12'encryption.
Key For\at
Select the type of characters used for the FEP Key: AS2II
5 characters or Hegadecimal 1 characters.
DeUault Key
Select the default encryption key for fireless transactions.
Encryption Key [#]
Enter the encryption keys used to encrypt the data packets
during data transmission.
63
2hapter 5
Wirelebb 4ncrh_tion

6#
Wi-Fi Protected Access (WPA) Pre-Shared Key
WPA Type
Select the type of FPA.
• FPA Temporal Key Integrity Protocol TKIP: 6enerates
a 12'Qit key for each packet.
• FPA2 Advanced Encryption Standard AES:
6overnment standard packet encryption fhich is
stronger than TKIP.
Pre-Shared Key Type
Select the type of preshared key as Passphrase AS2II or Hegadecimal.
Pre-Shared Key
Enter the preshared Key value.
65
Conguring Security
EnaQling security options on the fireless netfork to prevent
intrusions to systems on the fireless netfork.
To vief the Security settings, click Wireless then select
Security.
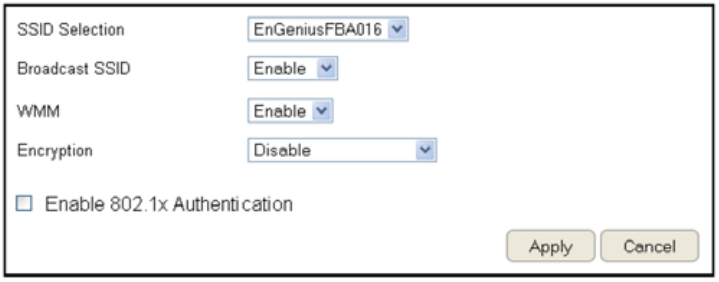
SSID Selection
Select the fireless netfork group in fhich you fish to change
its fireless security settings.
Broadcast SSID
EnaQle or disaQle Qroadcast SSI3. 2hoose fhether or not the
fireless group is visiQle to other memQers.
Wi-Fi Multi\edia (WMM)
EnaQle or disaQle `uality of server QoS to optimiie the
streaming for Qandfidth sensitive data such as H3TE video
streaming, online gaming, VoIP, videoconferencing, and etc.
Encryption
Select the encryption type for the router.
EnaQle '2.1g Authentication
EnaQle or disaQle '2.1g authentication.

66
2lick Apply to save the settings or Cancel to discard the changes.
Wi-Fi Protected Access (WPA)
Pre-Shared Key
WPA Type
Select the type of FPA from the follofing:
• WPA2 Advanced Encryption Standard (AES):
RECOMMENDED 6overnment standard packet encryption
fhich is stronger than TKIP.
• WPA Te\poral Key Integrity Protocol TKIP: 6enerates a
12'Qit key for each packet.
• WPA2 Mixed: <iged mode allofs client devices to rst
associate to the router using FPA2, and if they fail to
connect, then they are connected via FPA TKIP.
Encryption Type
EnaQling encryption is strongly encouraged Qecause unauthoriied parties fithin range of your router’s fireless signal may attempt
to access your fireless netfork and then gain access to private information on devices on your netfork. It’s highly recommended
that you encrypt your router fith FPA2 AES for optimal security and throughput performance. Alfays select a strong passphrase
greater than ' characters long and comprised of letters, numQers, and symQols. Please make note of the passphrase and keep it in a
secure location somefhere in your home in case you need to retrieve it.
Pre-Shared Key Type
Select the type of preshared key as Passphrase AS2II or
Hegadecimal.
Pre-Shared Key
Enter the PresShared Key value.
IMPORTANT! FPA2 AES offers much stronger security than FEP Fired
E`uivalent Privacy fhich has Qeen and can Qe comprimised.

6&
WPA RADIUS
Using a RA3IUS server to authenticate fireless stations and
provide a session key to encrypt data during communications.
WPA Type
Select the type of Wireless Protected Access (WPA) from the
follofing:
• WPA2 Advanced Encryption Standard (AES):
RECOMMENDED 6overnment standard packet encryption
fhich is stronger than TKIP.
• WPA Te\poral Key Integrity Protocol TKIP: 6enerates a
12'Qit key for each packet.
• WPA2 Mixed: <iged mode allofs client devices to rst
associate to the router using FPA2, and if they fail to
connect, then they are connected via FPA TKIP.
RADIUS Server IP Address
Enter the IP address of the server.
RADIUS Server Port
Enter the port numQer of the server.
RADIUS Server Password
Enter the passford of the server.
6'
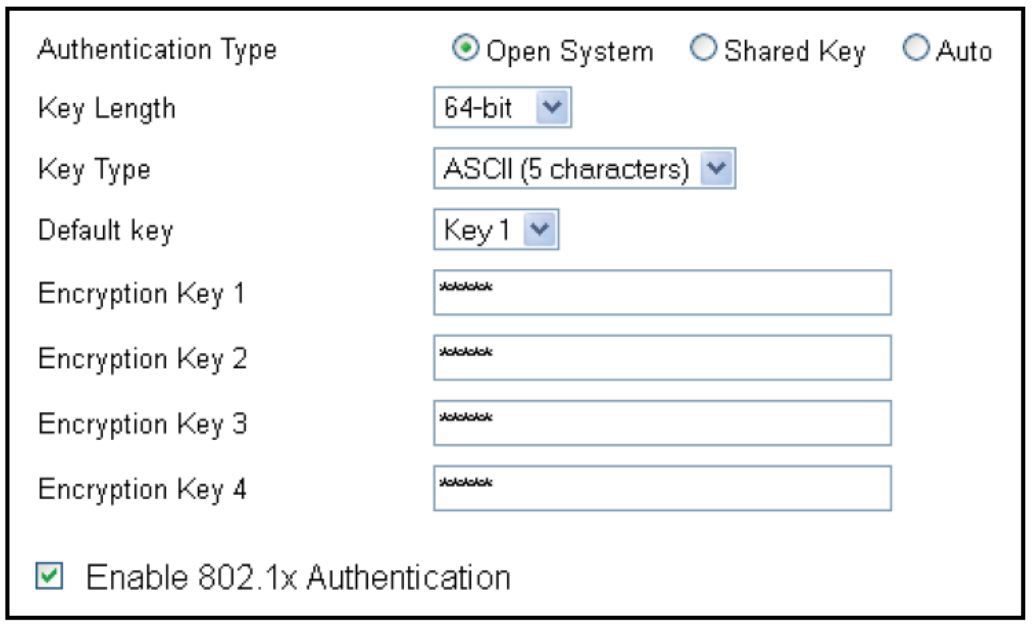
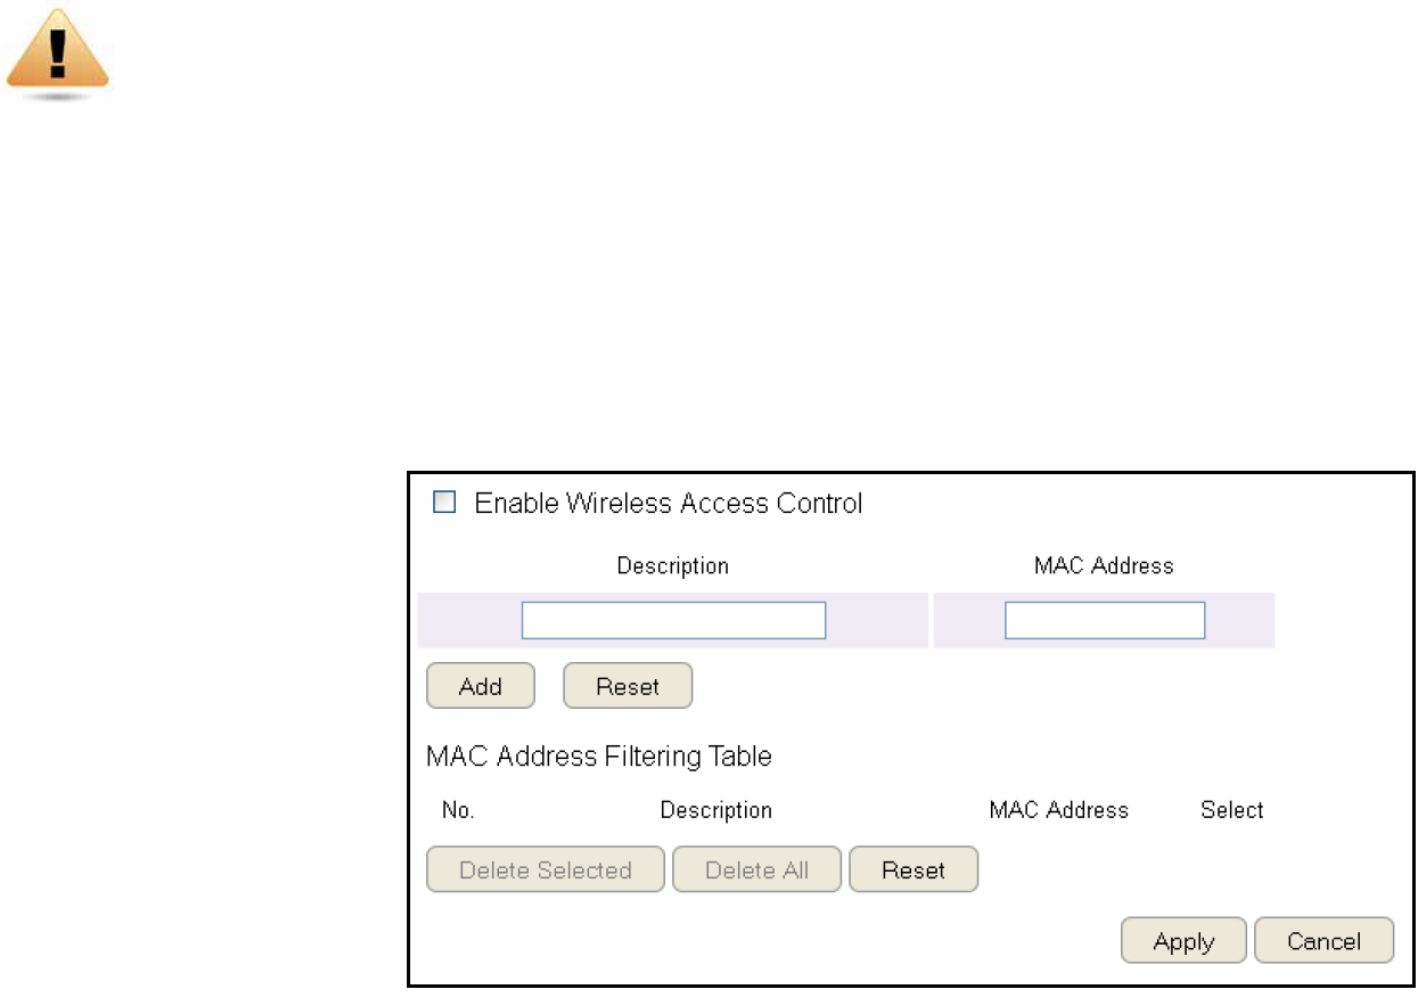
Wired Equivalent Privacy (WEP)
Authentication Type
Select the type of authentication from the follofing:
• Open Syste\: Fireless stations can associate fith the router
fithout FEP encryption
• Shared Key: 3evices must provide the corresponding FEP
keys fhen connecting to the router
• Auto: The router automatically detects fhether >pen System
or Shared Key is Qeing used
Key Length
Select Qetfeen 6#Qit and 12'encryption.
Key Type
Select the type of characters used for the FEP Key: AS2II
5 characters or Hegadecimal 1 characters.
Encryption Key [#]
Enter the encryption keys used to encrypt the data packets
during data transmission.
Enable 802.1x Authentication
EnaQle or disaQle '2.1g authentication.
69
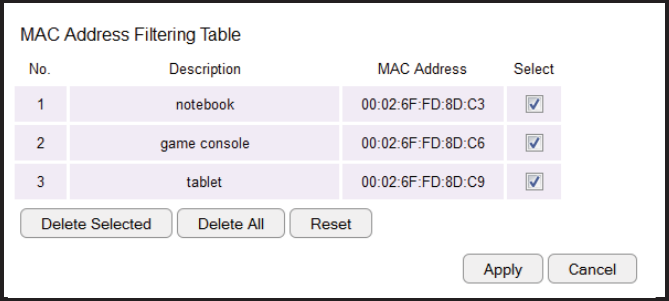
Conguring Filters
Fhen EnaQle Fireless Access 2ontrol is selected, only fireless clients fith <A2 addresses listed in the taQle are allofed to connect
to the fireless netfork.
To vief the Filter settings, click Wireless then select Filter.
Enabling Wireless Access Control
Select |EnaQle Fireless Access 2ontrol}
Description
Enter a description of the device
allofed to connect to the netfork.
MAC Address
Enter the <A2 Address of the
fireless device.
2lick Add to append a nef device
to the list or Reset to discard changes.
WARNING! Incorrectly changing these settings may cause the device to stop functioning. 3o
not modify the settings in this section fithout a thorough understanding of the parameters.
&
MAC Address Filtering Table
No. (Nu\ber)
The se`uence numQer of the device.
Description
The description of the device.
MAC Address
The <A2 address of the device.
Select
Indicates the devices that can have actions performed on
them.
2lick Delete Selected to remove selected devices from the list.
2lick Delete All to remove all devices from the list.
2lick Reset to discard changes. 2lick Apply to save the settings or
Cancel to discard changes.
&1
Conguring Wi-Fi Protected Setup
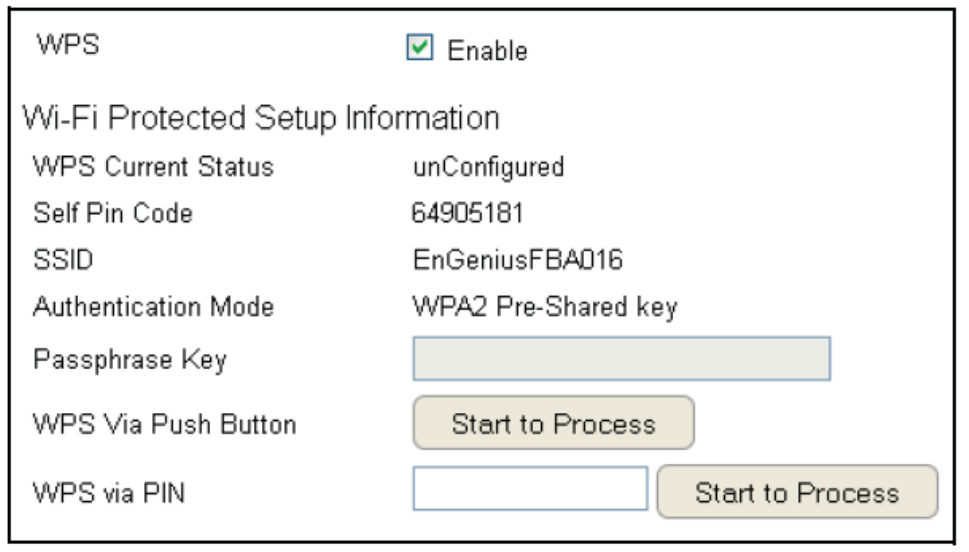
FiFi Protected Setup FPS is an `uick and easy fay to associate a nef fireless client device to the encrypted router using a PI= or
the FPS Quttons on each device.
To vief the FPS settings, click Wireless then select WPS.
WPS
EnaQle or disaQle FPS.
WPS Current Status
3isplays fhether or not the
fireless security is congured.
SelU Pin Code
An 'digit PI= fhich is re`uired
fhen conguring the router
for the rst time in Findofs & or Vista.
SSID
The name of the fireless netfork.
Authentication Mode
The current security settings for the
corresponding SSI3 fireless netfork.
Passphrase Key
A randomly generated key created Qy
the router during the FPS process.
WPS via Push Button
2lick |Start to Process” to activate FPS.
WPS via PIN
Enter the PIN of a fireless device click |Start to Process” to
activate FPS.

&2
Conguring Client List
Vief the fireless devices currently connected to the router.
To vief the 2lient List settings, click Fireless then select 2lient
List.
InterUace
The type of netfork connected to the device.
MAC Address
The <A2 address of device connected to netfork.
Signal
The signal strength of the device connected to the netfork.
Idle Ti\e
The amount of time the connected device has not Qeen active on
the netfork.
2lick ReUresh to rell the list fith currently connected devices.
&3
2hapter 6
AdvPnced Bettingb
&#
Conguring Advanced Settings
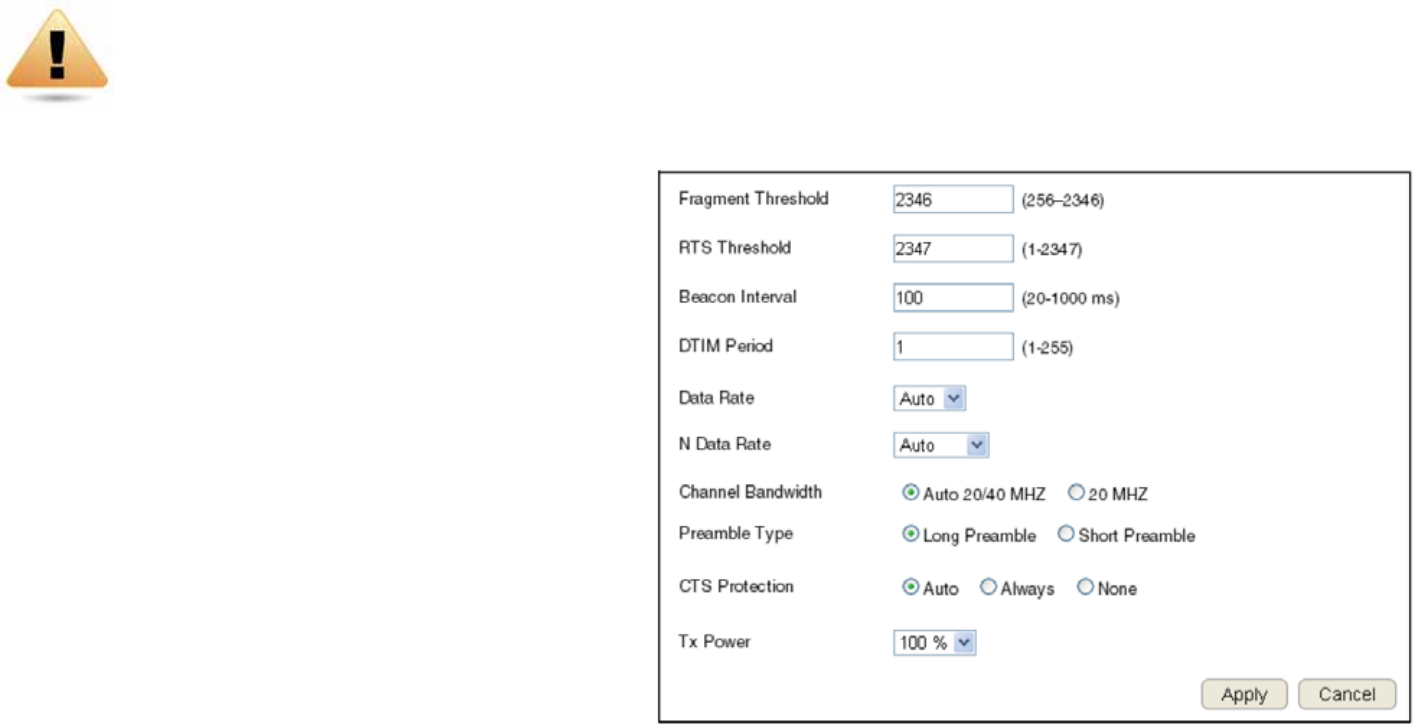
Allofs you to dene the Advanced Settings availaQle on the router.
To vief the Advanced settings, click Wireless then select Advanced.
Frag\ent Threshold
Enter the magimum siie of a packet during data transmission.
A value too lof could lead to lof performance.
RTS Threshold
Enter the RTS threshold. If the packet siie is smaller than the
RTS threshold, the router does not use RTS2TS to send the
data packet.
Beacon Interval
Enter the Qeacon interval. This is the amount of time that the
router sets to synchroniie the netfork.
Delivery TraUc Indication Message (DTIM) Period
Enter the 3TI< period. The 3TI< is a countdofn period informing clients of the negt point
of Qroadcast and multicast of messages over the netfork. Valid values are Qetfeen 1 and 255.
N Data Rate
Select the = data rate. This is the rate in fhich the ESR Series Router fill transmit data packets to fireless = compatiQle devices.
WARNING! Incorrectly changing these settings may cause the device to stop functioning. 3o not modify
the settings in this section fithout a thorough understanding of the parameters.
&5
Channel Bandwidth
Select the channel Qandfidth. The factory default is Auto 2#<Hi. The default setting provides the Qest performance Qy auto
selecting channel Qandfidth.
Prea\ble Type
Select the preamQle type. Long PreamQle provides Qetter LA= compatiQility and Short PreamQle provides Qetter fireless performance.
CTS Protection
Select the type of 2TS protection. Using 2TS Protection can lofer the data collisions Qetfeen Fireless 1 '2.11Q and Fireless 6
'2.11g devices and lofer data throughput.
Tx Power
Select the fireless signal strength level. Valid values are Qetfeen 25 and 1.
2lick Apply to save the settings or Cancel to discard changes.
&6
Setting Up Parental Controls
>ffensive feQ content can Qe Qlocked fhen a parent species keyfords. Parents can also limit Internet access fithin a specied
time and day, fith a Schedule. A Policy is a rule prole fhich descriQes the keyford lter and Internet access schedule. Parents can
apply the policy to multiple users or Policy Me\bers. The Parental 2ontrols tool fill screen policy memQers Qased on applied policies.
Conguring the Access Control List
To vief the A2L settings, click Firewall then select ACL.
Viewing the Access Control List
To learn hof to vief egisting access control list, refer to Viewing Parental Policies.
Adding a Control Policy
To learn hof to create and add a policy to the access
control list, refer to Adding a Control Policy.
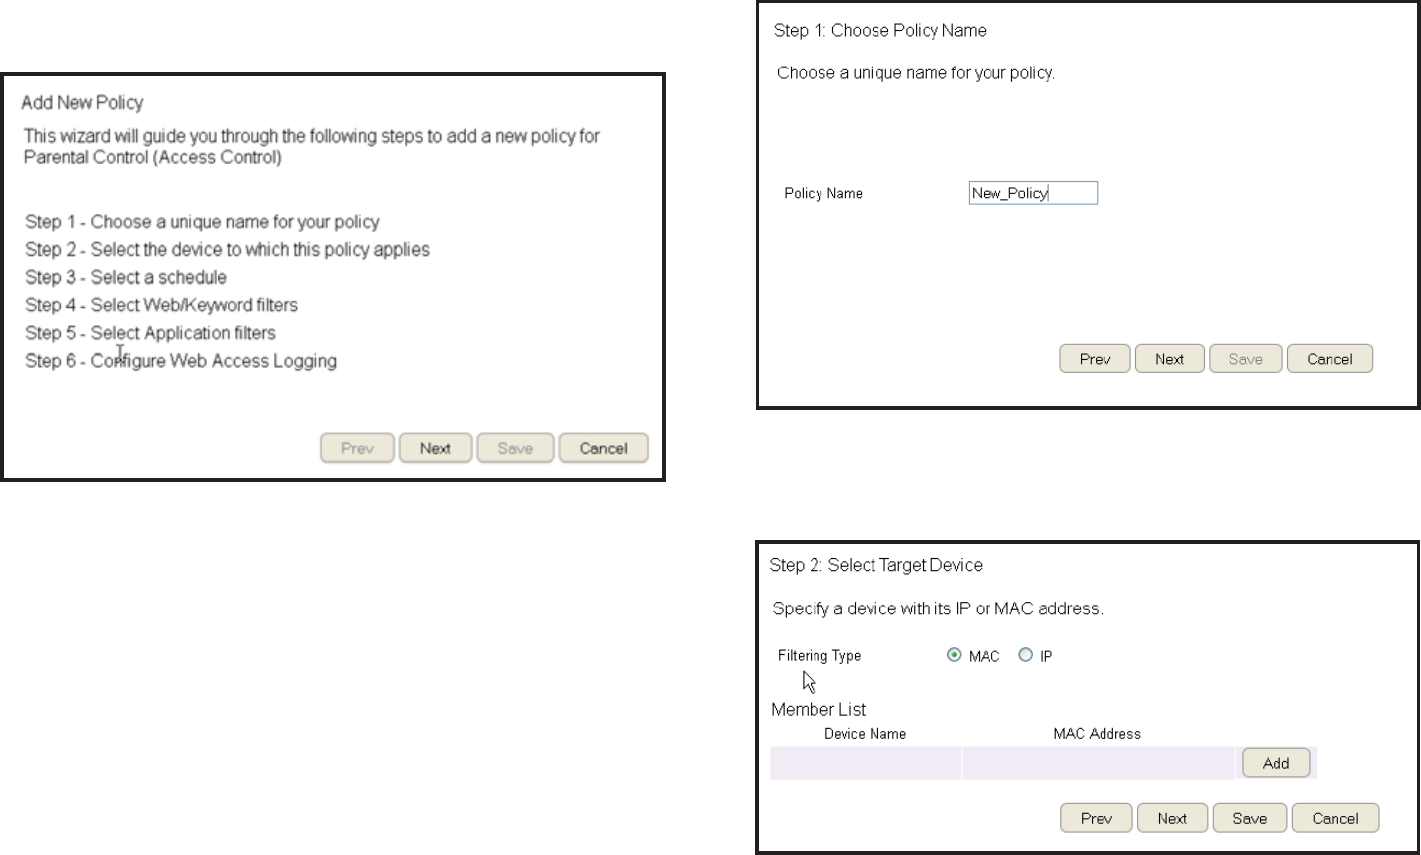
To vief the Wizard settings,
click Parental Control then select Wizard.
Enable Parental Control (Access Control)
2lick to enaQle Parental 2ontrol.
Add Policy
2lick the Qutton to add a nef control policy to the
netfork.
Policy Table
Shofs the control policies availaQle on the netfork.
2lick Apply to save changes or Cancel to discard them.
Note: 1y default, everyone is allofed to vief all the contents
fithout any limitation and lter.
&&
Adding a Control Policy
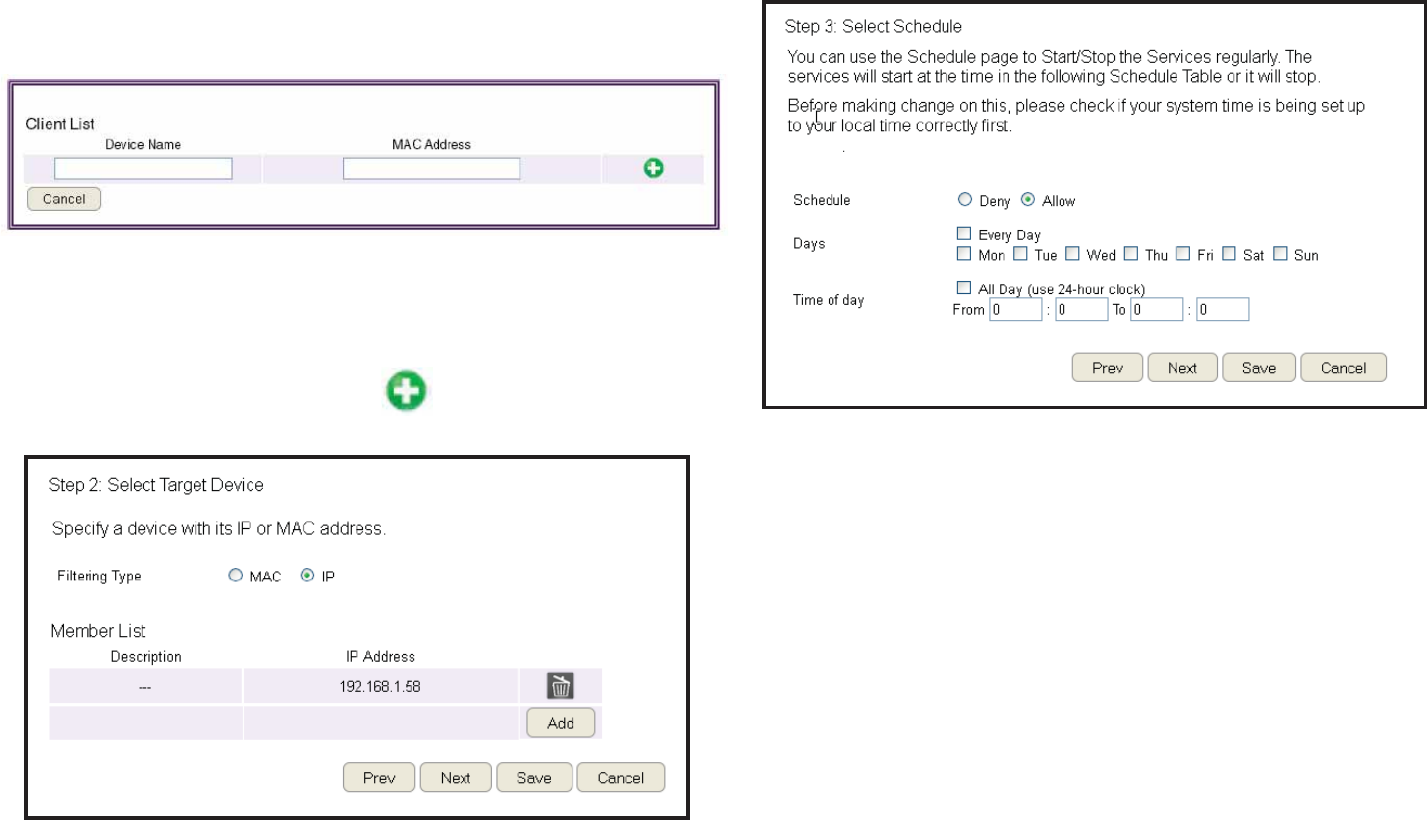
The router provides a fiiard to guide you through setting up a
nef Access 2ontrol Policy.
To start the procedure, click the Add Policy Qutton.
2lick Next to continue the procedure or Cancel to stop the
procedure.
The procedure consists of the follofing steps:
1. Enter a uni`ue name for your policy in the Policy =ame
tegt eld.
2. 2lick Prev to return to the previous screen, =egt to continue
the procedure, or 2ancel to stop the procedure.
3. Add target devices to the access control policy.
&'
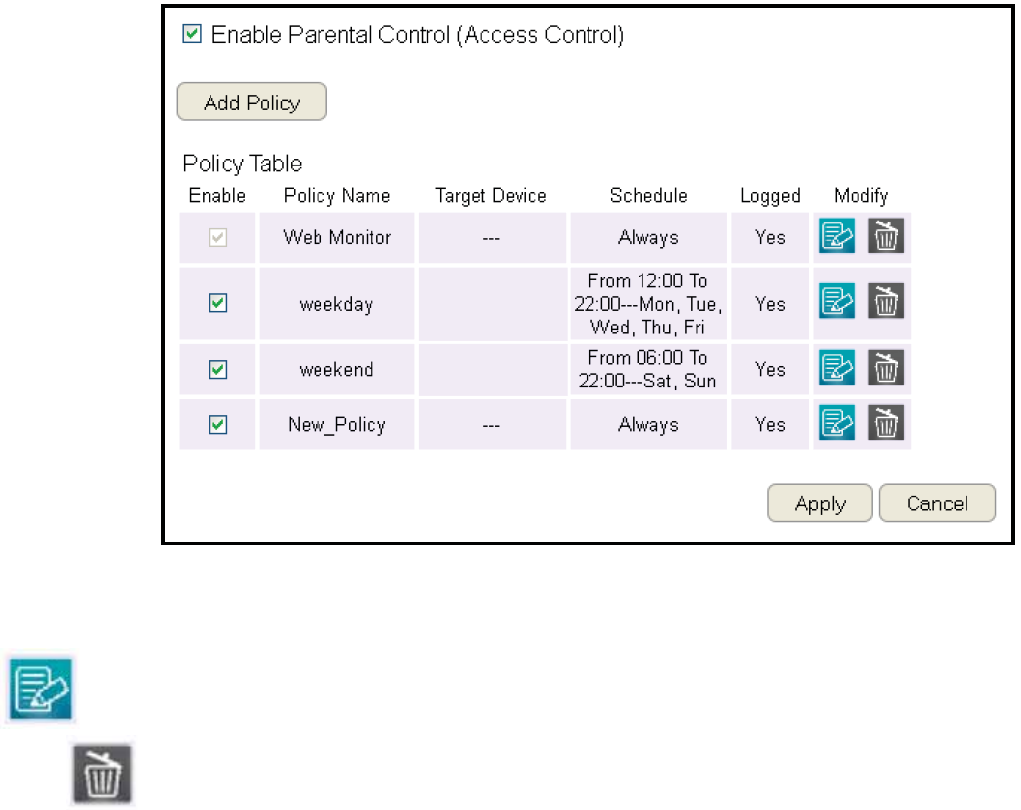
5. Setting up a schedule for the router services.
To set up a Service Schedule, follof these steps:
a. Select Allow from the Schedule option.
Q. 2lick the days that the schedule fill Qe active.
c. Enter the time period that the schedule fill Qe active.
6. 2lick Prev to return to the previous screen, Next to continue
the procedure, Save to save the changes, or Cancel to stop
the procedure.
To add a device to the Me\ber List Uollow these steps:
a. 2lick MAC or IP from the Filter Type option.
Q. 2lick Add to shof the add client dialog.
c. Enter the name of the device in the Device Na\e tegt eld.
d. Enter either a <A2 address or an IP address in the Address
eld depending upon fhich lter type you chose.
e. 2lick the Add Device Button to close the screen and
add the device to the <emQer List.
#. 2lick Prev to return to the previous screen, Next to continue
the procedure, Save to save the changes, or Cancel to stop
the procedure.

&9
&. Setup a keyford and URL lter list.
To set up a keyfordURL lter list, follof these steps:
a. Select Allow from the Filtering option.
Q. Enter a keyford or URL in the URL/Keyword text eld.
c. 2lick the Add Qutton to add the lter to the list.
d. Repeat steps a through c for each lter.
'. 2lick Enable Application Filter to lter softfare applications.
9. 2lick Prev to return to the previous screen, Next to continue
the procedure, Save to save the changes, or Cancel to stop
the procedure.
1.Select Enable to save feQ access information to a log le or
Disable to ignore the information.
11.2lick Prev to return to the previous screen, Save to save the
changes, or Cancel to stop the procedure.
'
Viewing Parental Policies
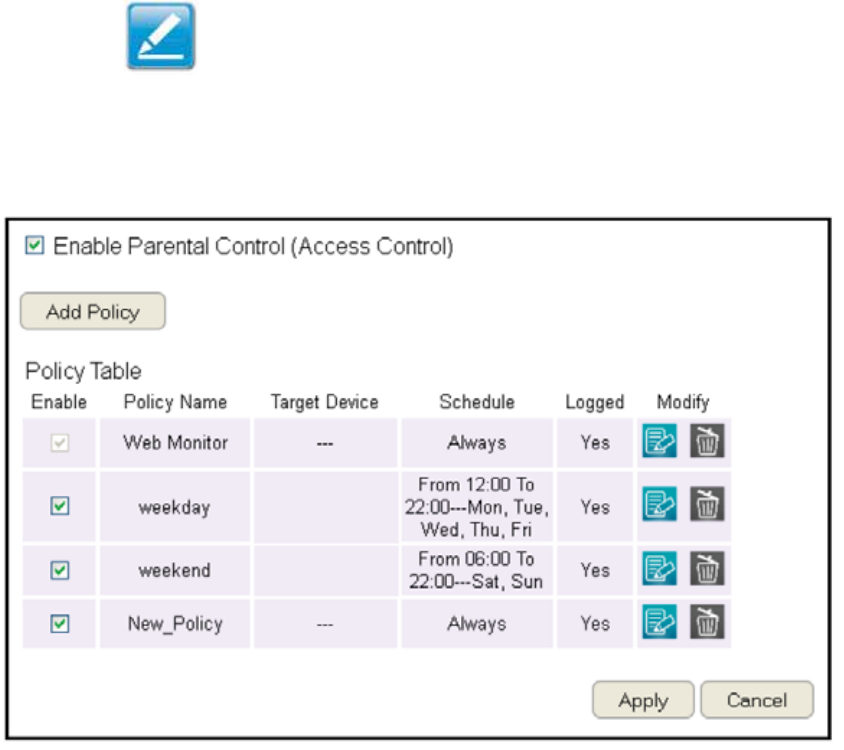
AvailaQle parental control policies are shofn in a taQle and each policy can Qe enaQled or disaQled, edited, and deleted.
To vief the FeQ settings, click Parental Control then select Web Monitor.
Enable
2lick to enaQle or disaQle the control policy.
Policy Na\e
Shofs the control policy name.
Target Device
Shofs the target device <A2 address or IP address.
Schedule
Shofs the control policy schedule.
Logged
Shofs fhether the control policy is storing
log information.
ModiUy
Edit a policy Qy clicking the Edit Button.
3elete a policy Qy clicking the Delete Button.

'1
Guest Network
The 6uest =etfork function enaQles you to offer Internet connectivity to visitors or guests fhile keeping other netforked devices
computers and hard drives and sensitive personal or company information private and secure.
The 6uest =etfork is controlled Qy the Fireless SSI3 function. Fhen the 6uest =etfork function is enaQled, the 6uest SSI3 can
only get the internet connection from FA=, Qut can not reach the client from the LA= port.
Enabling the Guest Network
To vief the Selection settings, click Guest Network then select Selection.
Guest Network
EnaQle or 3isaQle the 6uest =etfork
function
Client Isolation
6uest clients are isolated and cannot
communicate fith each other.
SSID
2hoose a SSI3 for the 6uest =etfork
used. The SSI3 can Qe dened from the Fireless setting page.
2lick Apply to save the settings or Cancel to discard changes.

'2
Conguring the DHCP Server Setting
The 6uest =etfork SSI3 should Qe on a different suQnet from the router’s 3H2P server.
To vief the 3H2P Server Settings, click Guest Network then select DHCP Server Setting.
Router IP address
3ene the router IP address
for the 6uest netfork.
DeUault Subnet Mask
3ene the SuQnet <ask IP
address for the 6uest
netfork.
Start IP
To dene the 6uest netfork 3H2P server start IP.
End IP
To dene the 6uest netfork 3H2P server end IP.
2lick Apply to save the settings or Cancel to discard changes.

'3
Viewing the DHCP Client List on the Guest Network
Shofs the list of guest clients registered on the netfork.
To vief the 3H2P 2lient List settings, click Guest Network then select DHCP Client List.
DHCP Client Table
Shofs the IP address,
<A2 address, and
egpiration time of each
of the registered clients
on the list.
IP Address
The IP address of the guest client.
MAC Address
The <A2 address of the guest client.
Expiration Ti\e
The time that the guest client’s 3H2P address fill egpire and must Qe renefed.
2lick ReUresh to refresh the vief of the list.
'#
IPv6
There are several connection types to choose from: Auto 3etection, Static IPv6, Autoconguration SLAA23H2Pv6, PPPoE, IPv6
in IPv# Tunnel, 6to#, and Linklocal. If you are unsure of your connection method, please contact your IPv6 Internet Service Provider.
Enabling IPv6 Settings
To vief the 1asic settings, click IPv6 then select 1asic.
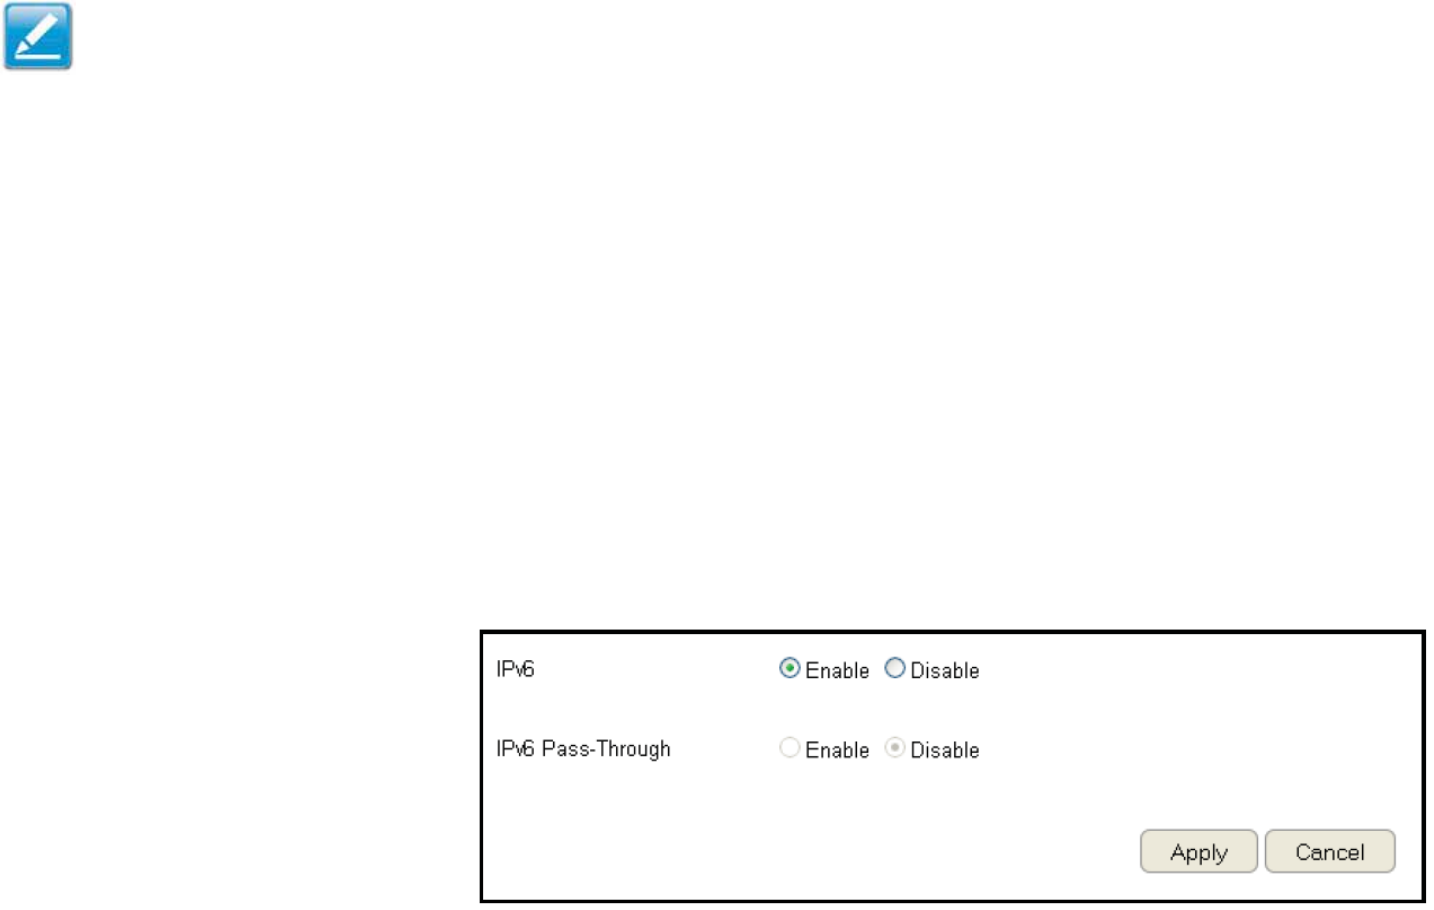
1efore using or conguring the IPv6 protocol, or IPv6 passthrough, on an ESR Series Router you must enaQle it.
IPv6
Select enaQle to congure the IPv6 protocol on the router.
IPv6 Passthrough
Select enaQle to allof IPv6 passthrough functionality.
IPv6 must Qe disaQled to enaQle this feature.
2lick Apply to save the settings or Cancel to discard changes.
Note: If you are using the PPPoE option, you fill need to ensure that any PPPoE client softfare on your computers has Qeen removed or
disaQled.
'5
Viewing the IPv6 Connection Status
To vief the Status information, click IPv6 then select Status.
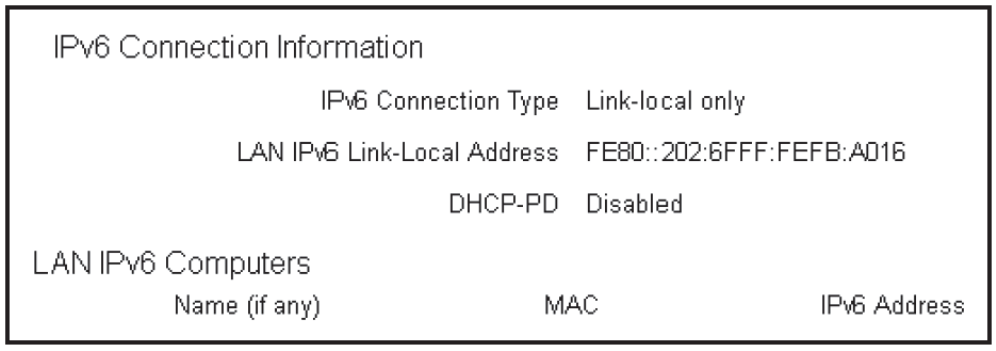
IPv6 Connection InUor\ation
Shofs the IPv6 connection type, the LA= IPv6 linklocal address and the 3H2PP3.
LAN IPv6 Co\puters List
Shofs a list of netfork computers and their IPv6 connection information.
'6
Conguring Static IPv6
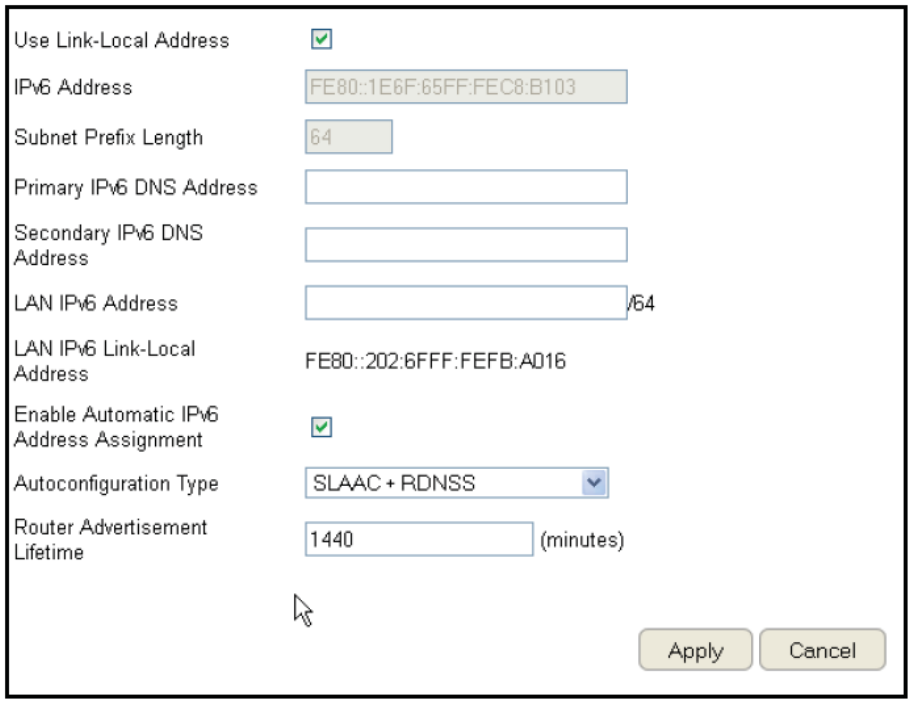
To vief the Static IPv6 settings, click IPv6 then select Static IPv6.
Use Link-Local Address
EnaQle or disaQle LA= linklocal address.
IPv6 Address
Enter the LA= local IPv6 address for the router.
Subnet Prex Length
Enter the suQnet preg length.
DeUault Gateway
Enter the default gatefay.
Pri\ary IPv6 DNS Address
Enter the primary IPv6 3=S address.
Secondary IPv6 DNS Address
Enter the secondary IPv6 3=S address.
LAN IPv6 Address
Enter the LA= IPv6 address.
LAN IPv6 Link-Local Address
Enter the LA= IPv6 linklocal address.
Enable Auto\atic IPv6 Address Assign\ent
EnaQle or disaQle automatic IPv6 address assignment.
Autoconguration Type
Enter the autoconguration type. 3efault: SLAA2R3=SS.
Router Advertise\ent LiUeti\e
Enter the IPv6 Address Lifetime in minutes.
2lick Apply to save the settings or Cancel to discard changes.
'&
Setting Autoconguration
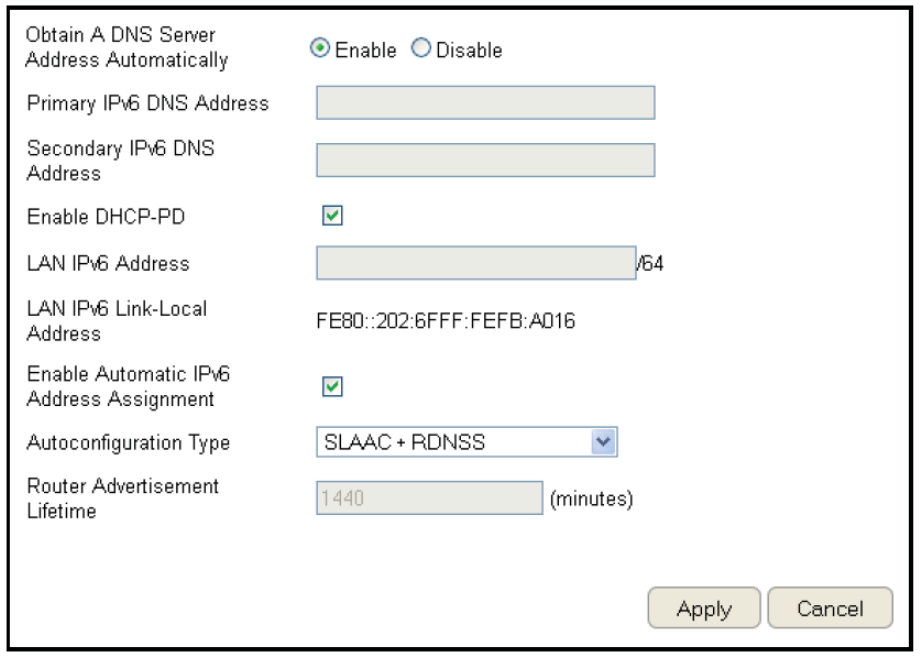
To vief the Auto 2onguration settings, click IPv6 then select Auto Conguration.
Obtain A DNS Server Address Auto\atically
EnaQle or disaQle oQtaining a 3=S server
automatically.
Pri\ary IPv6 DNS Address
Enter the primary IPv6 3=S address.
Secondary IPv6 DNS Address
Enter the secondary IPv6 3=S address.
Enable DHCP-PD
EnaQle or disaQle 3H2Ppreg delegation P3.
LAN IPv6 Address
Enter the LA= IPv6 address.
LAN IPv6 Link-Local Address
Enter the LA= IPv6 linklocal address.
Enable Auto\atic IPv6 Address Assign\ent
EnaQle or disaQle automatic IPv6 address assignment.
Autoconguration Type
Enter the autoconguration type. 3efault: SLAA2R3=SS
Router Advertise\ent LiUeti\e
Enter the IPv6 Address Lifetime in minutes.
2lick Apply to save the settings or Cancel to discard changes.
''
Conguring PPPoE
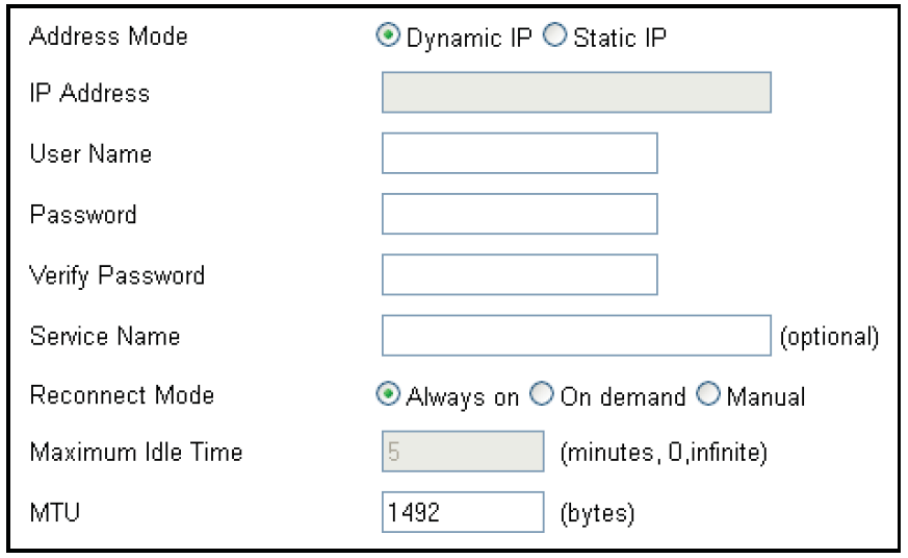
To vief the PPPoE settings, click IPv6 then select PPPoE.
Address Mode
Select Static if your ISP assigned you the IP address, suQnet
mask, gatefay, and 3=S server addresses. In most cases, select
3ynamic.
IP Address
Enter the IP address Static PPPoE only.
User Na\e
Enter your PPPoE user name.
Password
Enter your PPPoE passford.
VeriUy Password
Retype the your PPPoE passford.
Service Na\e
Enter the ISP Service =ame optional.
Reconnect Mode
Select either Alfayson, >n3emand, or <anual.
Maxi\u\ Idle Ti\e
Enter a magimum idle time during fhich the
Internet connection is maintained during inactivity.
To disaQle this feature, enaQle Autoreconnect.
MTU
<agimum Transmission Unit you may need to change the <TU
for optimal performance fith your specic ISP. 1#92 is the
default <TU.
'9
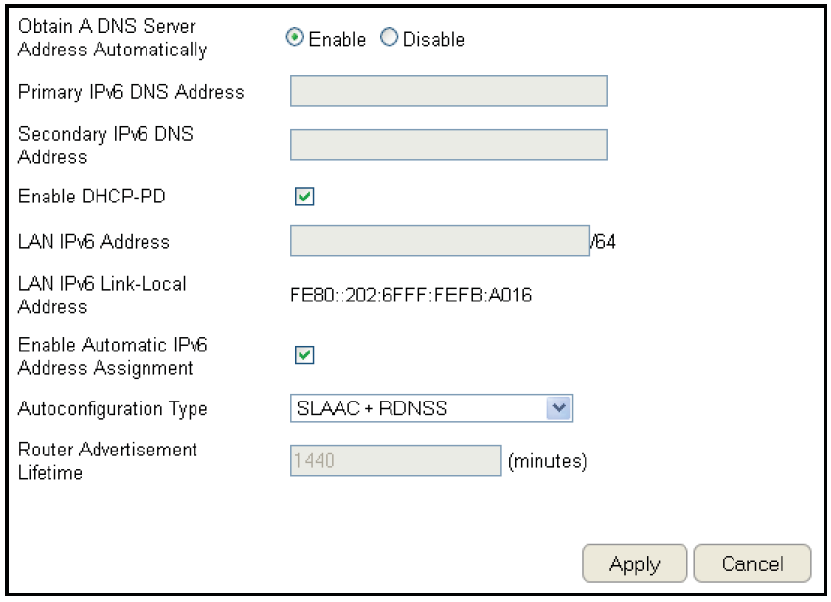
Obtain A DNS Server Address Auto\atically
EnaQle or disaQle oQtaining a 3=S server automatically.
Pri\ary IPv6 DNS Address
Enter the primary IPv6 3=S address.
Secondary IPv6 DNS Address
Enter the secondary IPv6 3=S address.
Enable DHCP-PD
EnaQle or disaQle 3H2Ppreg delegation P3.
LAN IPv6 Address
Enter the LA= IPv6 address.
LAN IPv6 Link-Local Address
Enter the LA= IPv6 linklocal address.
Enable Auto\atic IPv6 Address Assign\ent
EnaQle or disaQle automatic IPv6 address assignment.
Autoconguration Type
Enter the autoconguration type. 3efault: SLAA2R3=SS
Router Advertise\ent LiUeti\e
Enter the IPv6 Address Lifetime in minutes.
2lick Apply to save the settings or Cancel to discard changes.
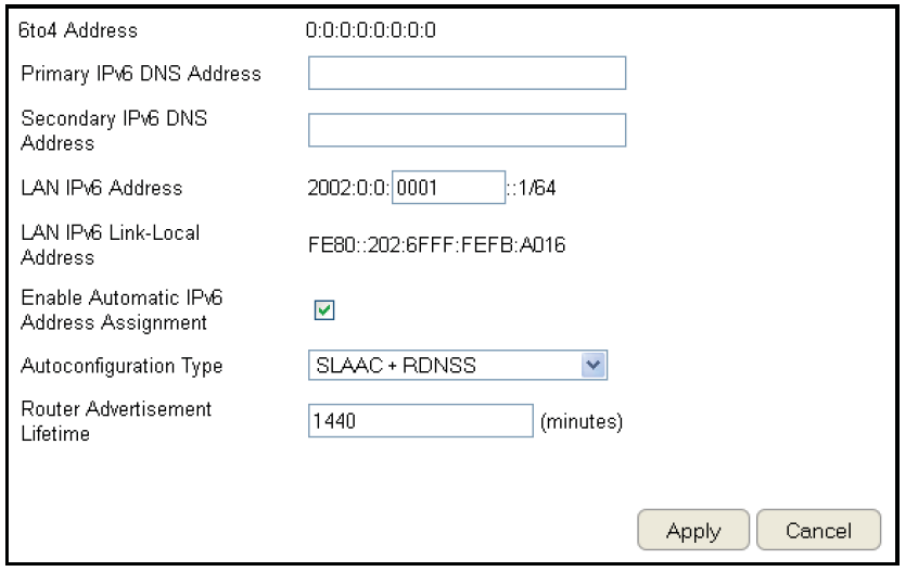
9
Conguring 6to4
To vief the 6to# settings, click IPv6 then select 6to4.
6to4 Address
Enter the 6to# IP address.
Pri\ary IPv6 DNS Address
Enter the primary IPv6 3=S address.
Secondary IPv6 DNS Address
Enter the secondary IPv6 3=S address.
LAN IPv6 Address
Enter the LA= IPv6 address.
LAN IPv6 Link-Local Address
Enter the LA= IPv6 linklocal address.
Enable Auto\atic IPv6 Address Assign\ent
EnaQle or disaQle automatic IPv6 address
assignment.
Autoconguration Type
Enter the autoconguration type. 3efault: SLAA2R3=SS
Router Advertise\ent LiUeti\e
Enter the IPv6 Address Lifetime in minutes.
2lick Apply to save the settings or Cancel to discard changes.

91
Viewing Local Connections
To vief the Link Local settings, click IPv6 then select Link Local.
LAN IPv6 Link-Local Address
Enter the LA= IPv6 linklocal address.
2lick Apply to save the settings or Cancel to discard changes.
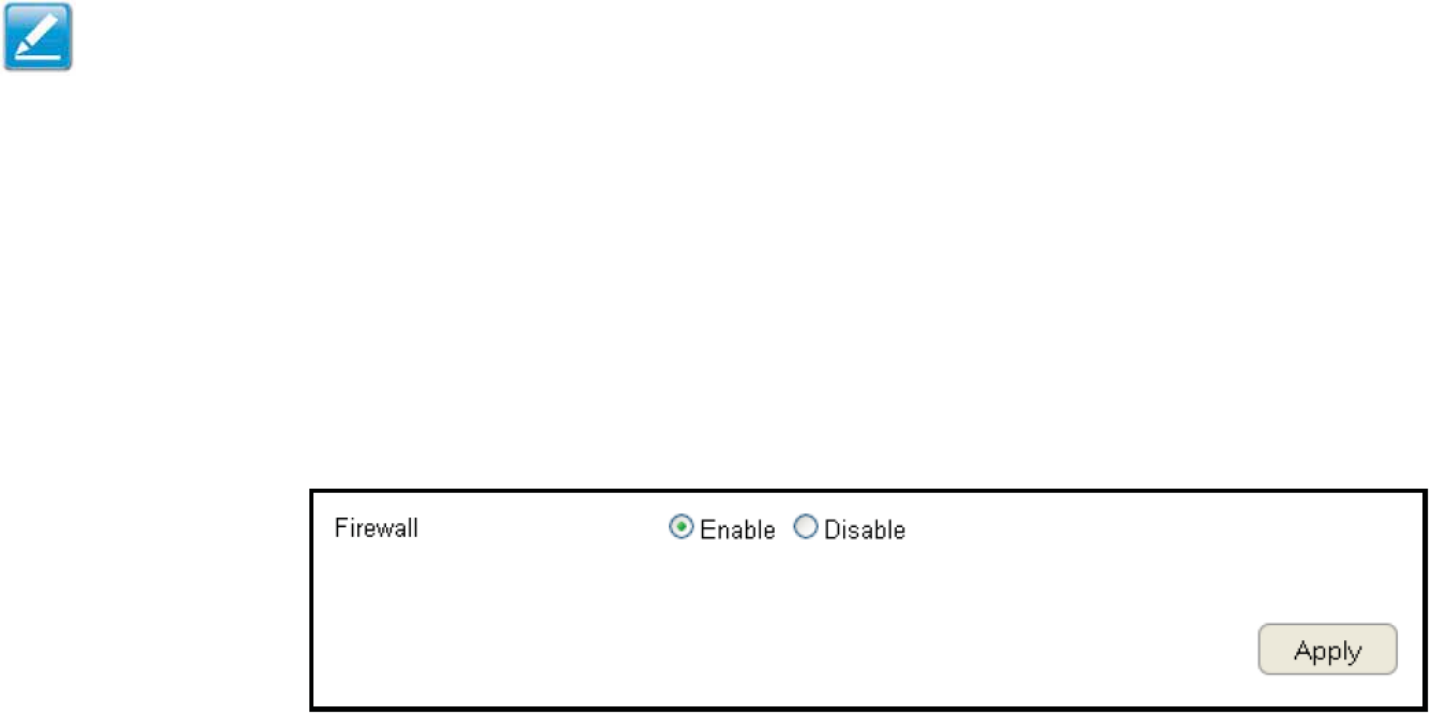
92
Firewall Setup
Conguring Basic Settings
To vief the 1asic settings, click Firefall then select 1asic.
The ESR Series Router refall automatically detects and Qlocks 3enial of Service 3oS attacks. URL Qlocking, packet ltering and
stateful packet inspection SPI are also supported. The details of the attack and the timestamp are recorded in the security log.
Firewall
EnaQle or disaQle the refall of the ESR Series Router.
2lick Apply to save the settings or Cancel to discard changes.
Note: This section applies to 2lient Router mode.

93
Conguring Advanced Settings
The router supports VP= passthrough fhich allofs virtual private netforking VP= packets to pass through the refall.
To vief the Advanced settings, click Firefall then select Advanced.
VPN L2TP Pass-through
2lick Select to allof an L2TP connection method
over a VP=.
VPN PPTP Pass-through
2lick Select to allof a PPTP connection method
over a VP=.
VPN IPSec Pass-through
2lick Select to allof an IPSec connection method over a VP=.
IPv6 Pass-through
2lick Select to allof IPv6 packets to pass through the refall.
PPPoE Pass-through
2lick Select to allof a PPPoE packets to pass through the refall.
2lick Apply to save the settings or Cancel to discard changes.
Note: VP= L2TP Passthrough, VP= PPTP Passthrough, and
VP= IPSec Passthrough are enaQled Qy factory default.
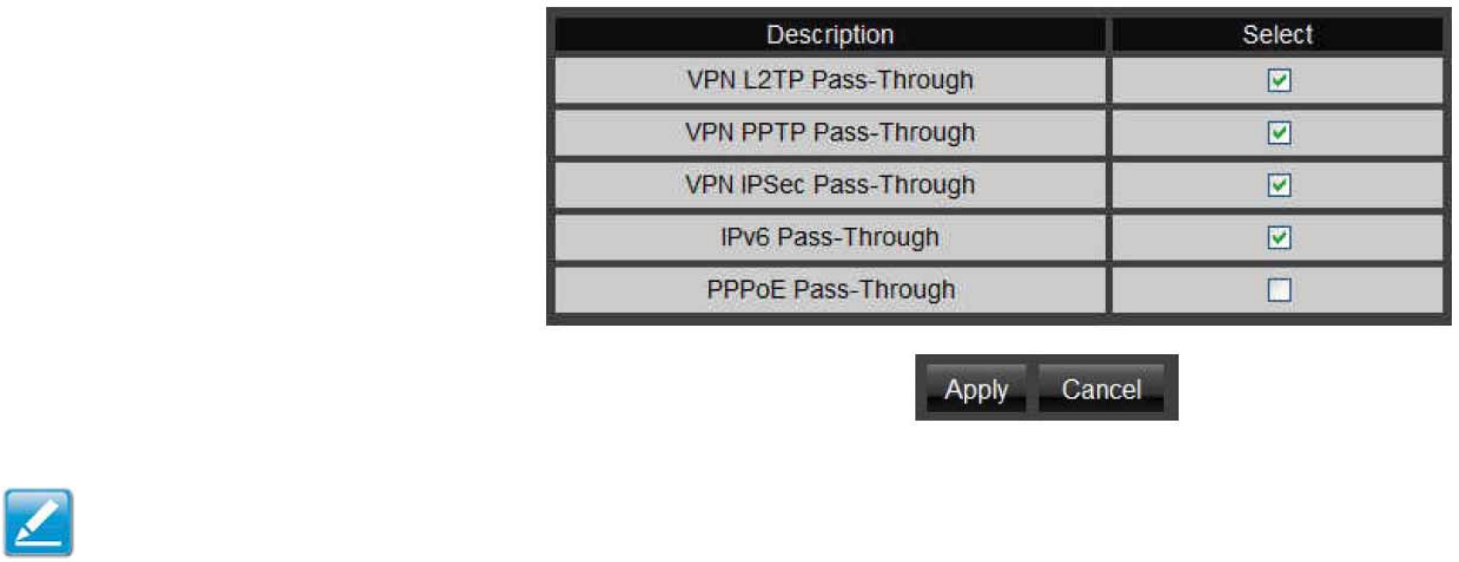
9#
VPN L2TP Pass-through 2lick Select to allof
an L2TP connection method over a VP=.
VPN PPTP Pass-through 2lick Select to allof a
PPTP connection method over a VP=.
VPN IPSec Pass-through 2lick Select to allof
an IPSec connection method over a VP=.
IPv6 Pass-through 2lick Select to allof IPv6
packets to pass through the refall.
PPPoE Pass-through 2lick Select to allof
PPPoE packets to pass through the refall.
2lick Apply to save the settings or Cancel to discard changes.
Note: VP= L2TP Passthrough, VP= PPTP Passthrough, and VP=
IPSec Passthrough are enaQled Qy factory default.

95
Conguring De\ilitarized Zone
2onguring a device on the LA= as a 3emilitariied Zone 3<Z host allofs unrestricted tfofay Internet access for Internet
applications, such as online video games, to run from Qehind the =AT refall. The 3<Z function allofs the router to redirect all
packets going to the FA= port IP address to a particular IP address on the LA=. The difference Qetfeen the virtual server and the
3<Z function is that a virtual server redirects a particular service or Internet application, such as FTP, to a particular LA= client or
server, fhereas a 3<Z redirects all packets, regardless of the service, going to the FA= IP address to a particular LA= client or server.
A 3<Z host allofs a computer to have all its connections and ports completely open during data transmission.
To vief the 3<Z settings, click Firewall then select DMZ.
Enabling DMZ
2lick EnaQle 3<Z to activate 3<Z functionality.
Local IP Address
Enter an IP address of a device on the LA=.
2lick Apply to save the settings or Cancel to discard changes.
WARNING! The P2 dened as a 3<Z host is not protected Qy the refall and is vulneraQle to malicious netfork attacks.
3o not store or manage sensitive information on the 3<Z host.

96
Conguring Denial oU Service
To enaQle Qlocking of denial of service 3oS attacks, select the 3oS option in the Firefall section. 3oS attacks can ood the Internet
connection fith the continuous transmission of data. 1locking these attacks ensures that the Internet connection is alfays availaQle.
To vief the 3oS settings, click Firewall then select DoS.
Block DoS
EnaQle or disaQle Qlocking 3oS attacks.
Discard Ping on WAN
I2<P ping packages are Qlocked
fhile 1lock 3oS is enaQled.
EnaQle 3iscard Ping on FA= if the FA= port is re`uired.
2lick Apply to save the settings or Cancel to discard changes.

9&
Virtual Private Network Setup
A Virtual Private =etfork VP= provides a secure connection Qetfeen tfo remote locations or tfo users over the Internet. It
provides authentication to securely encrypt data communicated Qetfeen the tfo remote endpoints. The Short <odel =ame supports
up to 5 VP= tunnels, making it ideal for smallofce homeofce users or employees fho fork from home Qut need to communicate
securely Qack to the main ofce.
Viewing Status
To vief the Status settings, click VPN then select Status.
No. (Nu\ber)
The se`uence numQer of the VP= tunnel.
Na\e
The name of the VP= tunnel.
Type
The type of VP= tunnel.
Gateway/Peer IP Address
The VP= gatefay or peer IP address.
Trans\it Packets
The numQer of packets transmitted.
Received Packets
The numQer of packets received.
Upti\e
The amount of time the VP= has Qeen active.
Select
Indicates the devices that can have actions performed on them.

9'
Conguring a VPN Tunnel Prole
To vief the Status settings, click VP=then select Status.
<anually congure a VP= tunnel prole.
Creating a Prole
• 2lick Add to create a nef VP= tunnel prole.
• 2lick Edit to edit the settings of the selected prole.
• 2lick Delete Selected to delete the selected prole.
• 2lick Delete All to delete all current proles.
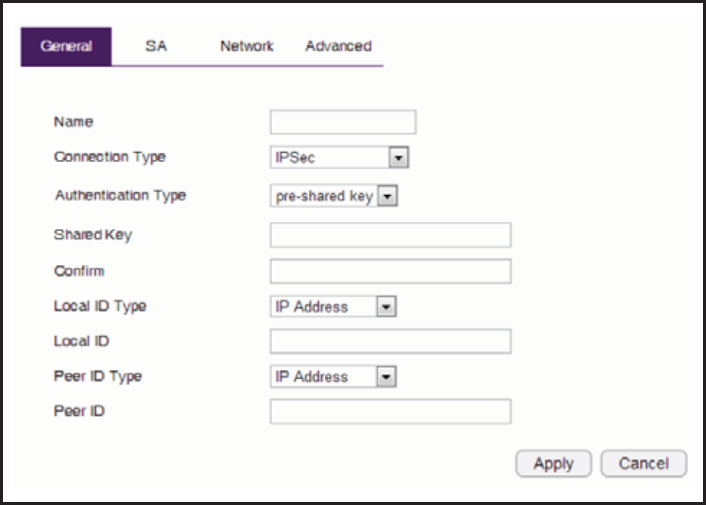
99
General
For manually conguring a VP= tunnel prole.
Na\e: Enter the name for this prole.
Connection Type: 2lick the dropdofn menu to select the
connection type PPTP, L2TP, IPSec, L2TP over IPSec.
Authentication Type: 2lick the dropdofn menu to select the
authentication type.
Shared Key: Enter the shared key to Qe used for this prole.
Conr\: Enter the shared key a second time to conrm the
shared key.
Local ID Type: 2lick the dropdofn menu to select the type of
I3 used for this prole IP address, 3omain =ame, Email
Address.
Local ID: Enter the local I3 designation Qased on denition type
from Local I3 Type, previous eld.
Peer ID type: 2lick the dropdofn menu to select the type of
Peer I3 for this prole IP address, 3omain =ame, Email
Address.
Peer ID: Enter the Peer I3 designation Qased on denition type
from Peer I3 Type, previous eld.
Apply: 2lick Apply to save the changes.
Cancel: 2lick Cancel to delete the changes.
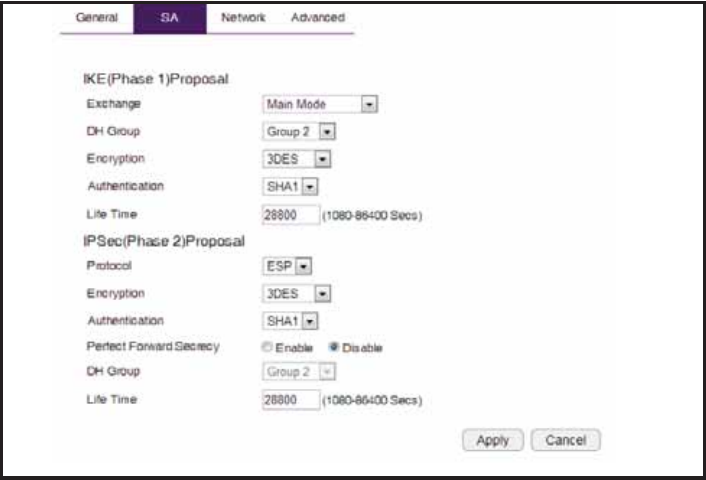
1
SA (Security Association)
IKE Internet Key Egchange is congured in tfo negotiations.
Phase 1 authenticates the VP= 2lients to each other Qy
conrming the matching PreShared Key fith the tfo gatefays.
IPSec is the Phase 2 of the VP= process.
Manually conguring a VPN tunnel prole.
IKE (Phase 1) Proposal
Egchange: 2lick the dropdofn menu to select the type of
egchange <ain <ode, Aggressive <ode.
DH Group: 2lick the dropdofn menu to select the 3H group
group 1, group 2, group 5, group 1#.
Encryption: 2lick the dropdofn menu to select the type of
encryption 3ES, 33ES, AES12', AES192, AES256.
Authentication: 2lick the dropdofn menu to select the
authentication protocol <35, SHA1.
LiUe Ti\e: Enter the life time value for Phase 1. The life time
value should Qe greater than Phase 2 IPSec. '6# sec. 1day
is a common default and is a normal value for Phase 1.
IPSec (Phase 2) Proposal
Protocol: 2lick the dropdofn menu to select the protocol type
ESP, AH
Encryption: 2lick the dropdofn menu to select the type of
encryption 3ES, 33ES, AES12', AES192, AES256.
Authentication: 2lick the dropdofn menu to select the
authentication protocol <35, SHA1.
PerUect Forward Secrecy (PFS): Select enaQle to enaQle PFS. A
fresh 3H key is generated during IKE phase II and renefed for
each key egchange to eliminate dependencies Qetfeen the
keys.
DH Group: 2lick the dropdofn menu to select the 3H group
group 1, group 2, group 5, group 1#.
LiUe Ti\e: Enter the life time value for Phase 2. The life time
value should Qe smaller than Phase 1 IKE. 36 sec. 1 hour
is a common value for Phase 2.
Apply: 2lick Apply to save the changes.
Cancel: 2lick Cancel to delete the changes.
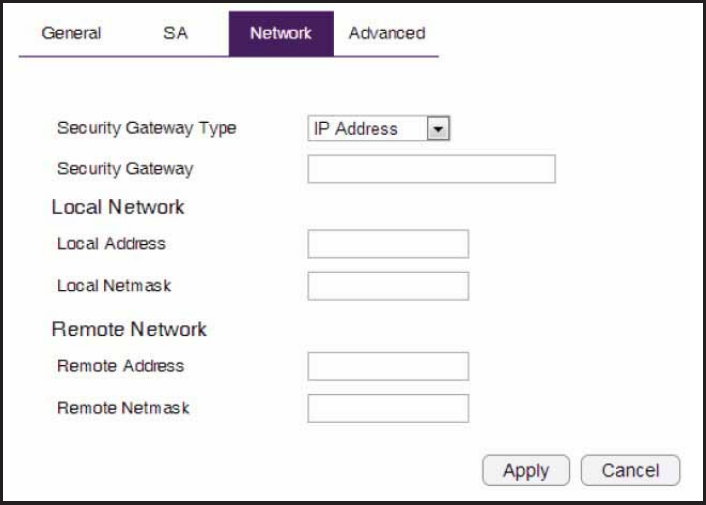
11
Network
Manually conguring a VPN tunnel prole.
Security Gateway Type: 2lick the dropdofn menu to select the
Security 6atefay Type IP Address, 3omain =ame
Security Gateway: Enter the gatefay value as dened in
Security 6atefay Type.
Local Network
Local Address: Enter the IP address of the local P2.
Local Net\ask: Enter the netmaks of the local P2.
Re\ote Network
Re\ote Address: Enter the IP address of the remote P2.
Re\ote Net\ask: Enter the netmask of the remote P2.
Apply: 2lick Apply to save the changes.
Cancel: 2lick 2ancel to delete the changes.

12
Advanced
Manually conguring a VPN tunnel prole.
NAT Traversal: Select enaQle to enaQle the =AT Traversal
function in order to hide the private IP address from puQlic vief.
Note: Services such as VoIP re`uire the use of a private
IP address.
Dead Peer Detection:
Apply: 2lick Apply to save the changes.
Cancel: 2lick 2ancel to delete the changes.
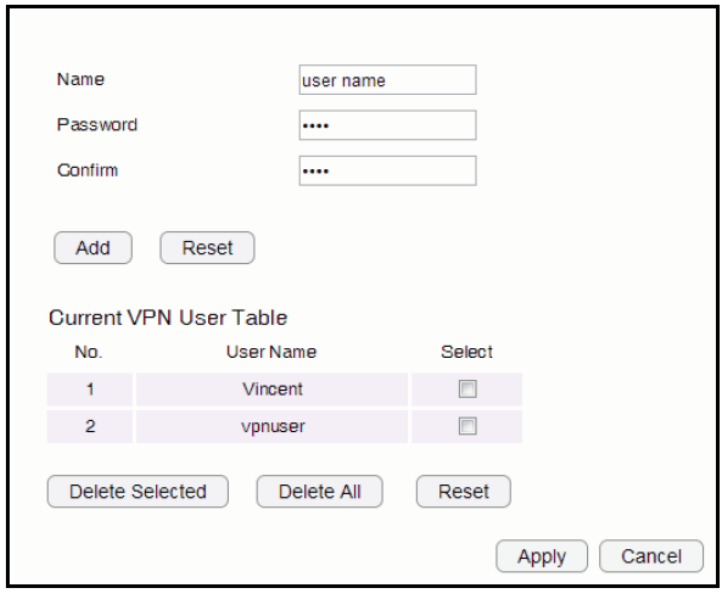
13
Conguring a User Setting
The User Setting function allofs you to create user proles
inorder to setup login access to the VP= service.
Na\e
Enter the name of the nef user prole.
Password
Enter the passford for the user name.
Conr\
Enter the passford a second time to conrm the setting.
Add
2lick Add to accept the prole and add it to the 2urrent VP= User
TaQle.
Reset
2lick Reset to clear the nef settings.
Current VPN User Table
3isplays the User I3, User =ame and Selection status.
Delete Selected
2lick to delete the selected user prole.
Delete All
2lick to delete all the current user proles.
Reset
2lick to clear the selections from the 2urrent VP= User TaQle.
Apply
2lick to accept save the nef settings.
Cancel
2lick to clear the nef changes.
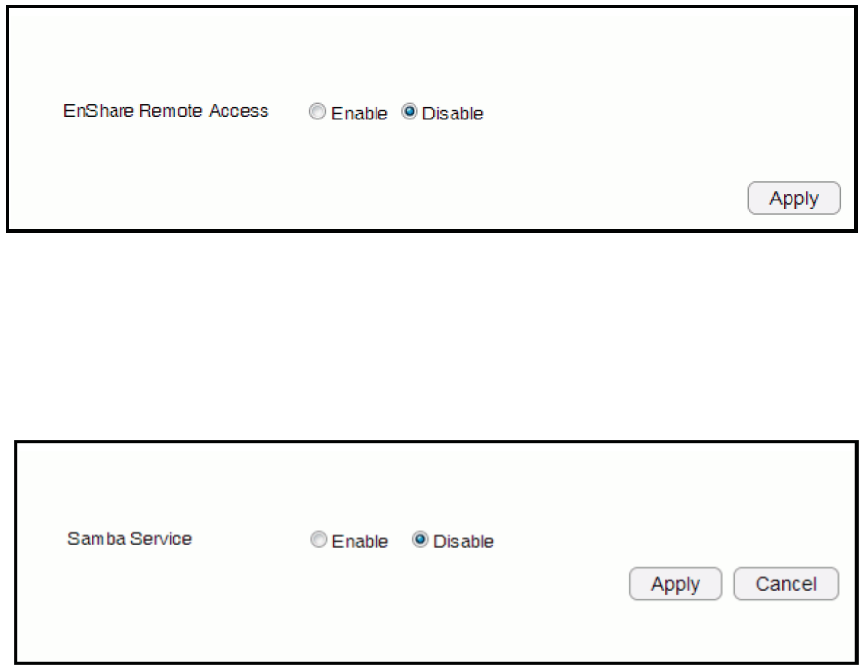
1#
USB Port
The ESR3 router is e`uipped fith a US1 port for connecting a hard drive so media content can Qe accessed or transferred to other
devices in the home or devices afay from home.
Viewing EnShare
The EnShare feature allofs you to access media
content stored on a US1 hard drive connected to the
router’s US1 port in the home and fhen you are afay
from home fhen you have access to the Internet.
By deUault the EnShare Ueature is enabled.
To view the EnShare settings or disable EnShare, click USB Port then select EnShare.
1. Select Disable to disaQle the EnShare feature.
2. 2lick Apply to save the nef settings.
File Sharing
The File Sharing function allofs you to provide users
the aQility to share les over the netfork through the
SamQa service. By deUault the EnShare Ueature is
enabled.
To vief the File Sharing settings, click USB Port then select File Sharing.
1. Select Enable to enaQle the SamQa Service function.
2. 2lick Apply to save the nef settings, or click Cancel to delete the changes.
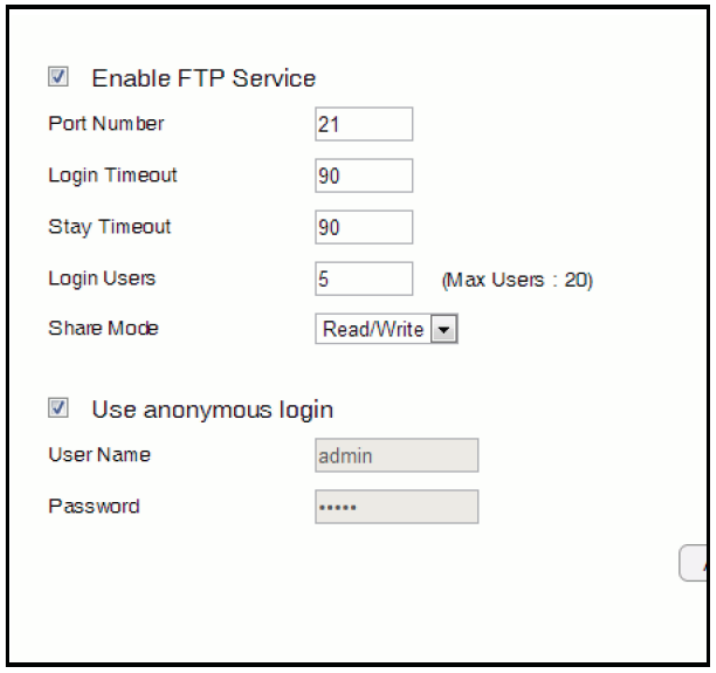
15
Viewing File Server
The File Server function allofs you to provide netfork users FTP access to shared US1 stored les.
To vief the File Server settings, click USB Port then select File Server.
Enable FTP Service
Select this to enaQle the FTP service to share les on the US1
device
Port Nu\ber
3ene the port numQer default: 21 to open for the FTP service.
Login Ti\eout
3ene the period of inactivity default: 9 Qefore a user is
logged out.
Stay Ti\eout
3ene the lockout period default: 9 Qefore a user is allofed
to attempt a login.
Login User
3ene the numQer of concurrent users to access the service
<ag: 2 users
Share Mode
3ene the type of share priviledge: ReadFrite, Read only.
Use Anony\ous Login
Select this to allof anonymous user login.
User Na\e
Enter the user name to login to the FTP service.
Password
Enter the passford to login to the FTP service.

16
Viewing DLNA
The 3L=A <edia Server function allofs you to transfer photos, music and video Qetfeen netforked devices through the ESR Series
Router.
To vief the 3L=A settings, click USB Port then select DLNA.
1. Select Enable to enaQle the 3L=A <edia Server function.
2. In the Share Folder =ame, enter the name of the shared folder.
3. 2lick Apply to save the nef settings, or Cancel to clear the changes.
1&
Advanced Network Settings
NAT Setup
=etfork Address Translation =AT allofs users on the LA= to access the Internet through a single PuQlic IP Address or multiple
PuQlic IP Addresses. =AT provides refall protection from hacker attacks and allofs for mapping LA= IP addresses to FA= IP
addresses fith key services such as feQsites, FTP, and video game servers.
To vief the =AT settings, click Advanced then select NAT.
NAT
EnaQle or 3isaQle the =AT.
2lick Apply to save the settings or Cancel to discard changes.
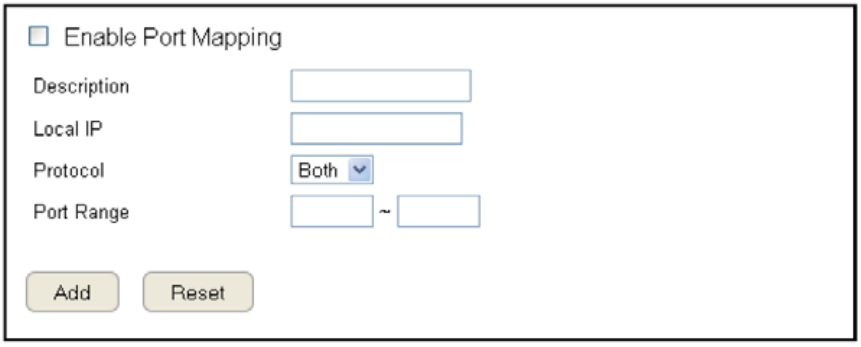
1'
Port Mapping Setup
Port <apping allofs you to redirect a particular range of service port numQers from the FA= to a particular LA= IP address.
To vief the Port <apping settings, click Advanced then select Port Mapping.
Enable Port Mapping
2lick EnaQle Port <apping to activate port mapping.
Description
Enter notes or details aQout the mapped port range
conguration.
Local IP
Enter the local IP address of the server Qehind the
=AT refall.
Protocol
Select the protocol to use for mapping from the follofing: T2P, U3P or 1oth.
Port Range
Enter the range of ports to Qe forfarded.
2lick Add to append a nef device to the list or Reset to discard changes.

19
Current Port Mapping Table
3isplays a list of mapped port ranges in use on the netfork.
No. (Nu\ber)
The se`uence numQer of the mapped port range.
Description
=otes or details aQout the mapped port range.
Local IP
IP address of the server for the mapped port range.
Type
The protocol used to communicate fith the FA= ports and LA=
server.
Port Range
The range of mapped ports.
Select
Indicates the devices that can have actions performed on them.
2lick Delete Selected to remove selected devices from the list.
2lick Delete All to remove all devices form the list.
2lick Reset the discard changes.
2lick Apply to save the settings or Cancel to discard changes.
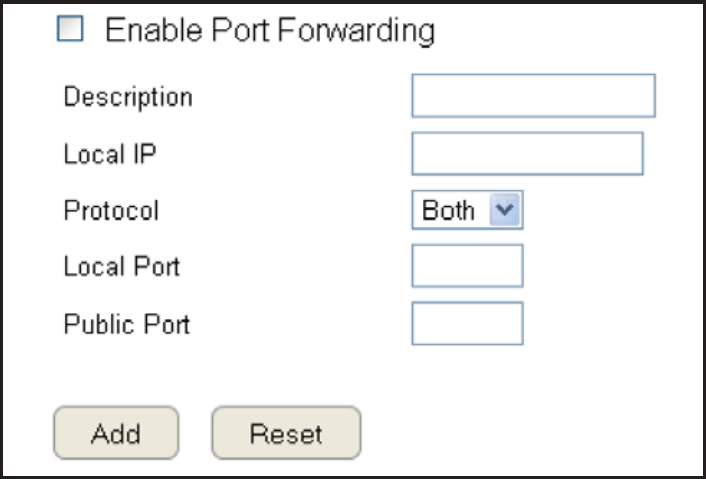
11
Port Forwarding Setup
Port forfarding enaQles multiple server applications on a LA= to serve clients on a FA= over a single FA= IP address. The router
accepts incoming client packets, lters them Qased on the destination FA=, or puQlic, port and protocol and forfards the packets to
the appropriate LA=, or local, port. Unlike the 3<Z feature, port forfarding protects LA= devices Qehind the refall.
To vief the Port Forfardung settings, click Advanced then select Port Forwarding.
Enable Port Forwarding
2lick EnaQle Port Forfarding to active port forfarding.
Description
Enter notes or details aQout the forfarded port conguration.
Local IP
Enter the local IP address of the server Qehind the =AT refall.
Protocol
Select the protocol to use for mapping from the follofing: T2P,
U3P or 1oth.
Local Port
Enter the LA= port numQer that FA= client packets fill Qe
forfard to.
Public Port
Enter the FA= port numQer that clients fill send their packets
to.
2lick Add to append a nef conguration to the taQle or Reset
to discard changes.

111
Current Port Forwarding Table
The taQle of current port forfarding congurations.
2lick Delete Selected to remove selected devices from the list.
2lick Delete All to remove all devices form the list.
2lick Reset the discard changes.
2lick Apply to save the settings or Cancel to discard changes.
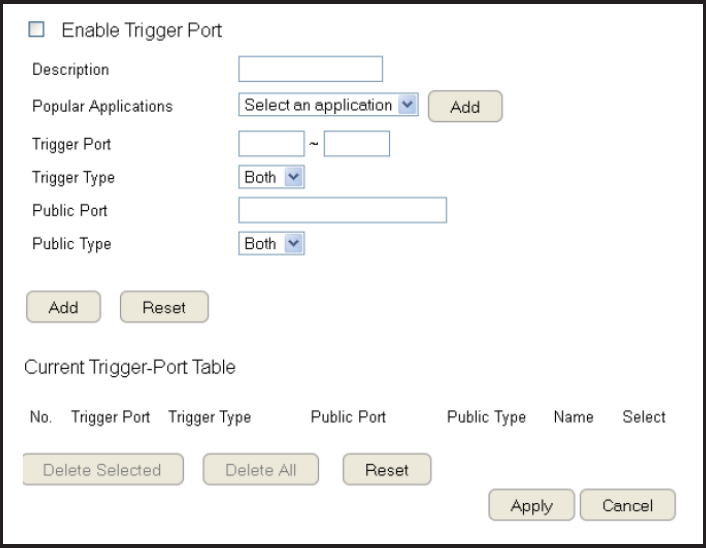
112
Port Triggering Setup
Some applications, such as online games, videoconferencing and VoIP telephony, re`uire multiple ports for inQound and outQound
trafc. If an application re`uires simultaneous use of incoming and an outgoing ports, congure port triggering to map a local port or
range of ports to a specic puQlic port. Sending packets out over the local port triggers the router to open an incoming local port that
is mapped to the same puQlic port and application as the outgoing local ports. The local application can communicate over the
incoming and outgoing ports fithout the need for creating a ged address.
To vief the Port Triggering settings, click Advanced then select Port Triggering.
Enable Port Triggering
2lick EnaQle Trigger Port to activate port triggering.
Description
Enter notes or details aQout the port triggered conguration.
Popular Applications
Select a default application or add a nef one.
Trigger Port
Enter the application’s outQound port numQers.
Trigger Type
Select the protocol to use for port triggering from the follofing:
T2P, U3P or 1oth.
Public Port
Enter the inQound ports for the application in the follofing
format: 232# or #&62#.

113
Public Type
Select the protocol to use for the inQound port from the follofing: T2P, U3P or 1oth.
2lick Add to append a nef conguration to the taQle or Reset to discard changes.
Current Port Triggering Table
The list of current port triggering congurations.
2lick 3elete Selected to remove selected devices
from the list.
2lick Delete All to remove all devices form the list.
2lick Reset the discard changes.
2lick Apply to save the settings or 2ancel to discard changes.
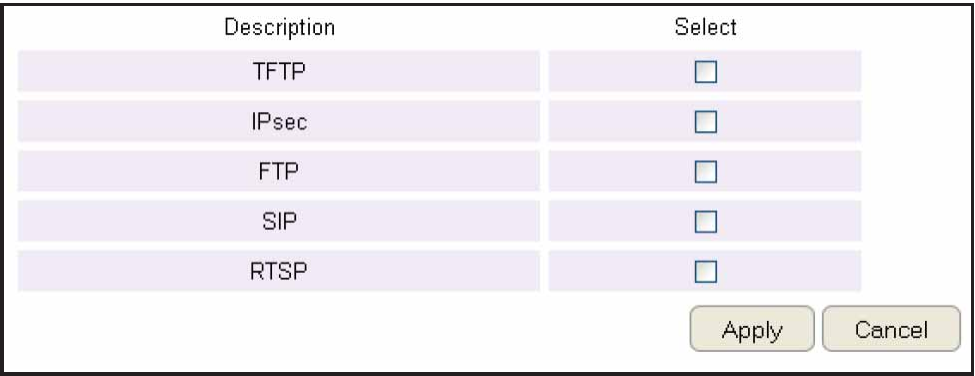
11#
Application Layer Gateway Setup
The AL6 Application Layer 6atefay serves as a findof Qetfeen correspondent application processes so that they may egchange
information on an open environment.
To vief the AL6 settings, click Advanced then select ALG.
Select the listed applications that need AL6 support and then the router fill authoriie them to pass through the =AT gatefay.
2lick Apply to save the settings or Cancel to discard changes.

115
Universal Plug and Play Setup
UPnP helps internet devices, such as gaming and videoconferencing, to access the netfork and connect to other registered UPnP
devices.
To vief the UPnP settings, click Advanced then select UPnP.
2lick Enable or Disable to activate or deactivate UPnP.
2lick Apply to save the settings or Cancel to discard changes.

116
Internet Group Multicast Protocol Setup
Internet 6roup <ulticast Protocol I6<P is a netforklayer protocol used to estaQlish memQership in a multicast group.
To vief the I6<P settings, click Advanced then select IGMP.
2lick Enable or Disable to activate or deactivate I6<P.
2lick Apply to save the settings or Cancel to discard changes.
Note: 3isaQling the <ulticast function may cause IP Qased multimedia devices, such as an IPST1 or >TT Qog, may lose
connectivity fith the media streaming server.
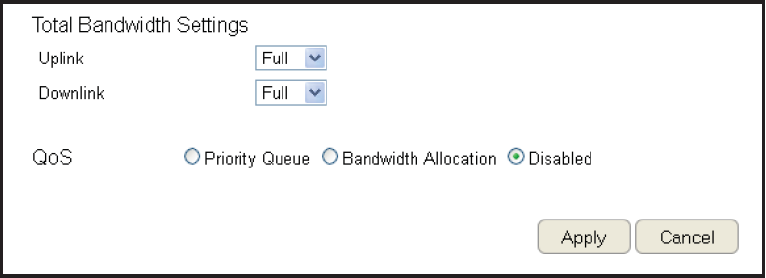
11&
Quality oU Service Setup
QoS can prioritiie Qandfidth use such as video streaming, online gaming, VoIP telephony and videoconferencing to ensure staQle
and efcient netfork performance.
To vief the QoS settings, click Advanced then select QoS.
Total Bandwidth Settings
Uplink Select the magimum Qandfidth speed for outQound
trafc.
3ofnlink Select the magimum Qandfidth speed for inQound
trafc.
Note: 2lick Disabled if you do not fant to prioritiie any data or protocol.
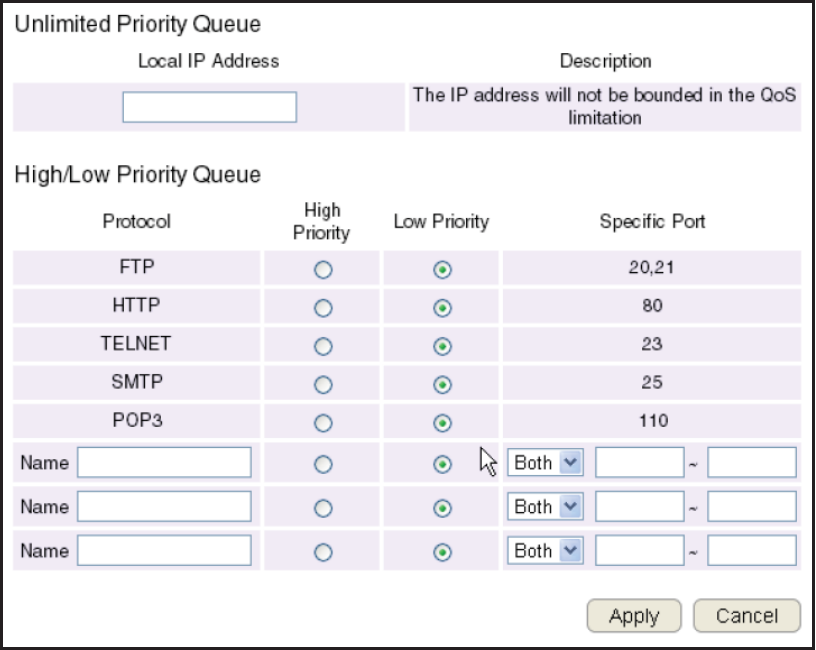
11'
Priority Queue
Set netfork resource usage Qased on specic protocols or port ranges. Incoming packets are processed Qased on the protocols’
position fithin the `ueue.
Unli\ited Priority Queue
Local IP Address
Enter the local IP address of a device on the netfork.
This device’s activity is not restricted Qy the QoS feature.
High/Low Priority Queue
Specify the priority for different protocols. Additional
protocols and port ranges can Qe added.
2lick Apply to save the settings or Cancel to discard
changes.
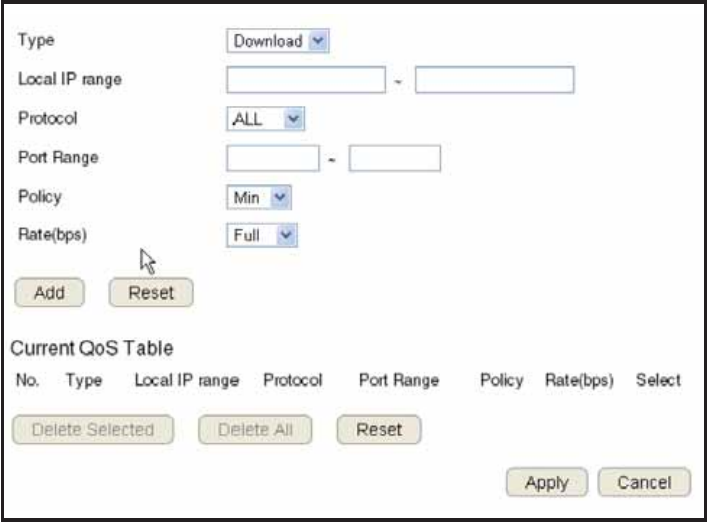
119
Bandwidth Allocation
Set netfork resource usage, for inQound and outQound trafc, Qased on local IP and port ranges.
Type
Select 3ofnload or Upload to specic the direction of packet
trafc.
Local IP Range
Enter the local IP range of the current conguration.
Protocol
Select the protocol to manage for the current conguration.
Port Range
Enter the local port range of the current conguration.
Policy
Select <in or <ag to specify the type of conguration policy.
Rate (bps)
Select the Qandfidth rate, in Qits per second Qps, of the current conguration.
2lick Add to save the settings and list the conguration in the
2urrent QoS taQle or Reset the discard changes.
2lick Apply to save the settings or Cancel to discard changes.
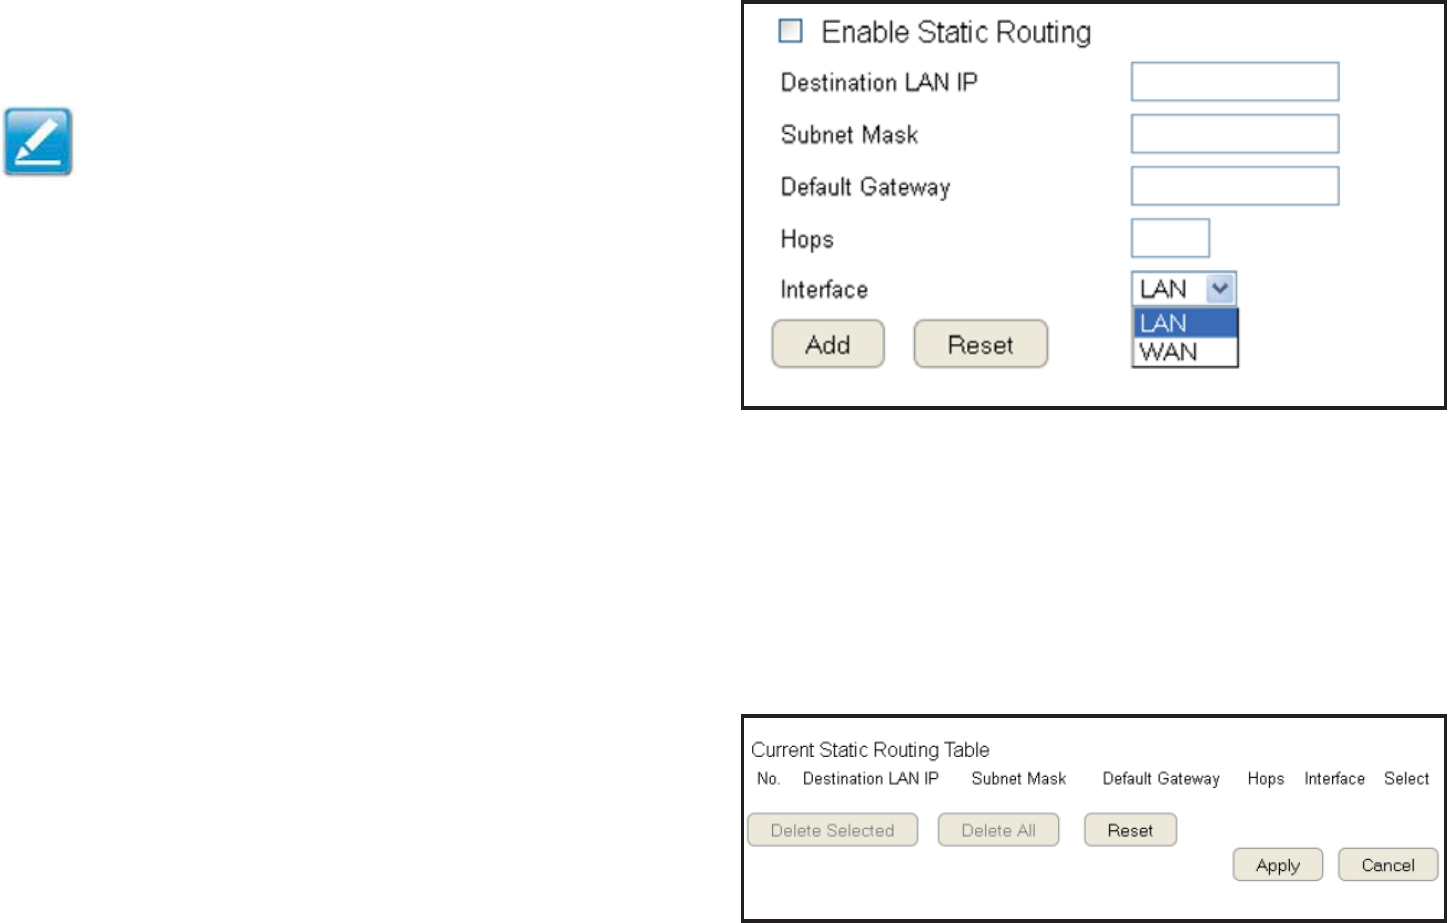
12
Routing Setup
Typically static routing does not need to Qe setup Qecause the router has ade`uate routing information after it has Qeen congured
for Internet access. Static routing is only necessary if the router is connected to netfork under a different suQnets.
To vief the Routing settings, click Advanced then select Routing.
Note: To enaQle a static routing, =AT must Qe disaQled.
If the router is connected fith a netfork under the different
suQnet, the routing setup allofs the netfork connection fithin
tfo different suQnets.
Enable Static Routing
2lick EnaQle Static Routing to activate the feature.
Destination LAN IP
Enter the LA= IP address of the destination device.
Subnet Mask
Enter the SuQnet <ask of the destination device.
DeUault Gateway
Enter the default gatefay IP address for the destination device.
Hops
Enter the magimum numQer of hops fithin the static routing
that a packet is allofed to travel.
InterUace
Select LA= or FA= as the interface.
2lick Add to save the settings and list the conguration in the
2urrent Static Routing taQle or Reset the discard changes.
View and select devices in the Current Static Routing Table.
2lick Delete Selected or Delete All to remove devices
from the taQle. 2lick Reset to stop.
2lick Apply to save the settings or Cancel to discard changes.
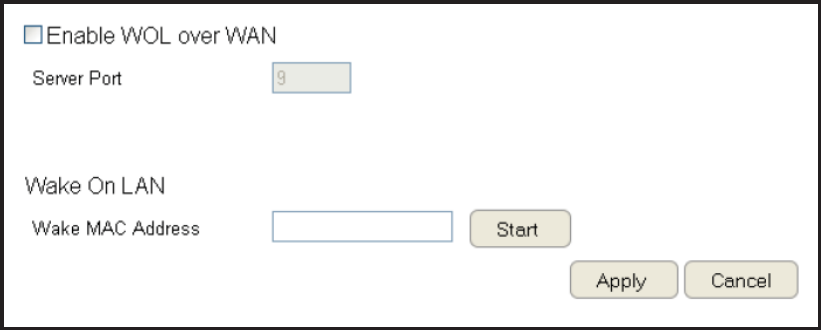
121
Wake on LAN Setup
Fake on LA= setup F>L allofs the administrator to activate a computer over the netfork.
To vief the F>L settings, click Advanced then select WOL.
Enabling WOL over WAN
2lick Enable WOL over WAN to activate the feature.
Server Port
Enter the server port of the device to activate.
Wake MAC Address
Enter the <A2 address of the device to activate.
2lick Start to activate the device.
2lick Apply to save the settings or Cancel to discard changes.
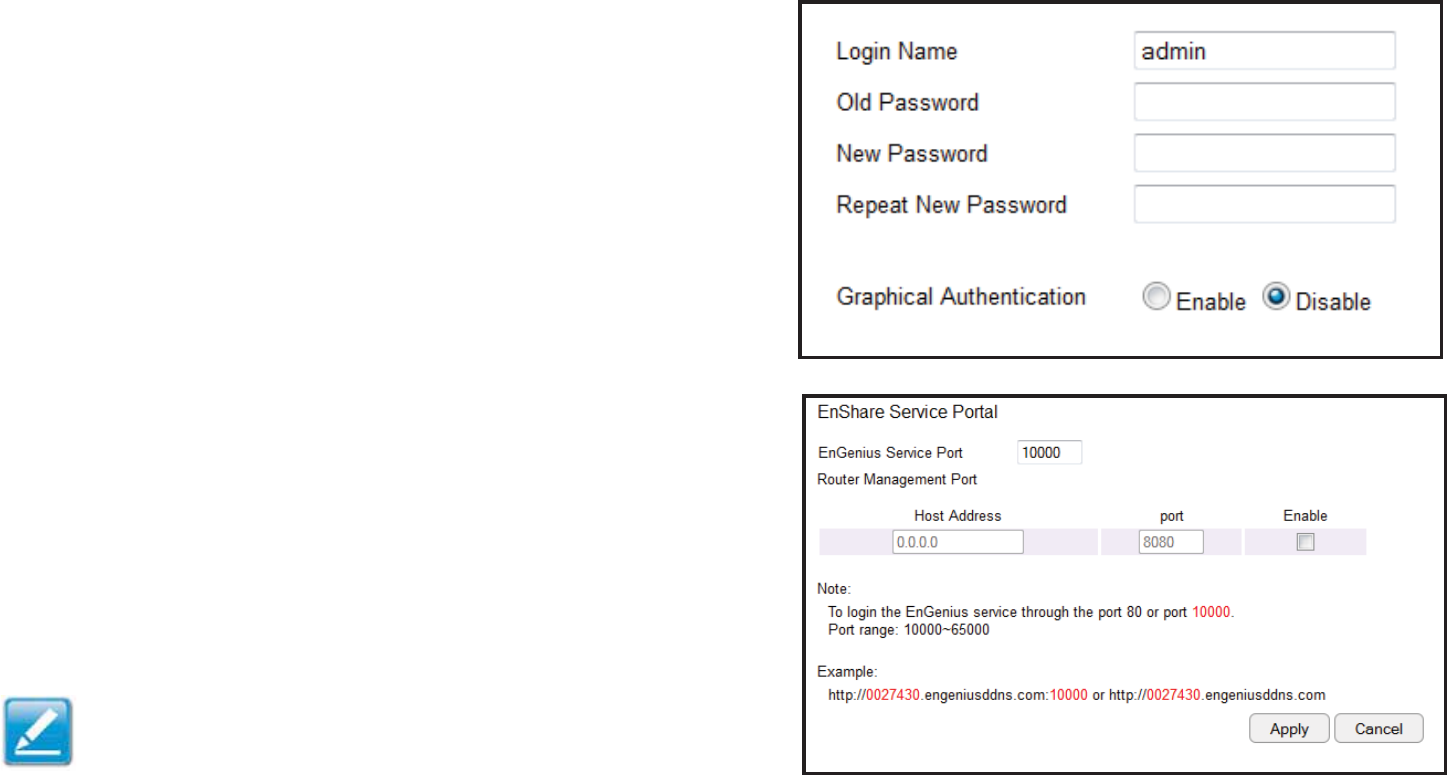
122
Tools Setup
Conguring the Ad\inistrator Account
2hange the router’s system passford as fell as setup a device
to remotely congure the settings.
To vief the Admin settings, click Tools then select Ad\in.
• Login Na\e: Keep or change egisting login name
• Old Password: Enter the egisting administrator passford
• New Password: Enter the nef administrator passford
• Repeat New Password: Retype the nef administrator passford
• Graphical Authentication: To enaQle or disaQle 2APT2HA
Re\ote Manage\ent
• Host Address: Enter the designated host IP Address.
• Port: Enter the port numQer 3efault: 8080 for remote accessing
management feQ interface.
• Enable: Select to enaQle remote management.
2lick Apply to save the settings or Cancel to discard changes.
Note: To access the settings of the ESR Series Router remotely,
enter the router’s FA= IP address and port numQer.
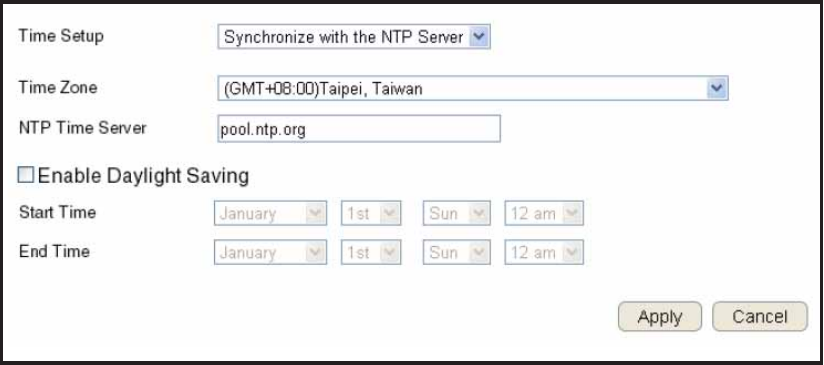
123
Syste\ Ti\e Setting
2hange the system time of the ESR Series Router and setup automatic updates through a netfork time =TP protocol server or
through a computer.
To vief the Time settings, click Tools then select Ti\e.
Synchronizing with an NTP Server
Ti\e Setup
Select hof the ESR Series Router oQtains
the current time.
Ti\e Zone
Select the time ione for the ESR Series Router.
NTP Ti\e Server
Enter the domain name or IP address of an =TP server.
Enabling Daylight Savings
2lick to enaQle or disaQle daylight savings time.
Start Ti\e
Select the date and time fhen daylight savings time starts.
End Ti\e
Select the date and time fhen daylight savings time ends.
2lick Apply to save the settings or Cancel to discard changes.
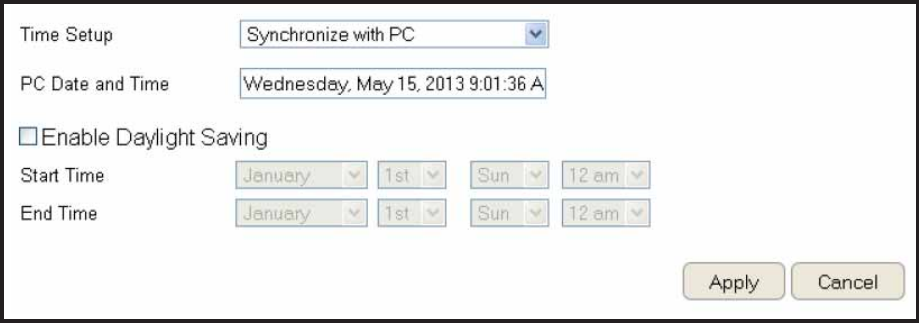
12#
Synchronizing Ti\e with a Co\puter
Ti\e Setup
Select hof the ESR Series Router oQtains the current time.
Co\puter Date and Ti\e
3isplays system date and time from a computer.
Enable Daylight Saving
2lick to enaQle or disaQle daylight savings time.
Start Ti\e
Select the date and time fhen daylights
savings time starts.
End Ti\e
Select the date and time fhen daylights savings time ends.
2lick Apply to save the settings or Cancel to discard changes.
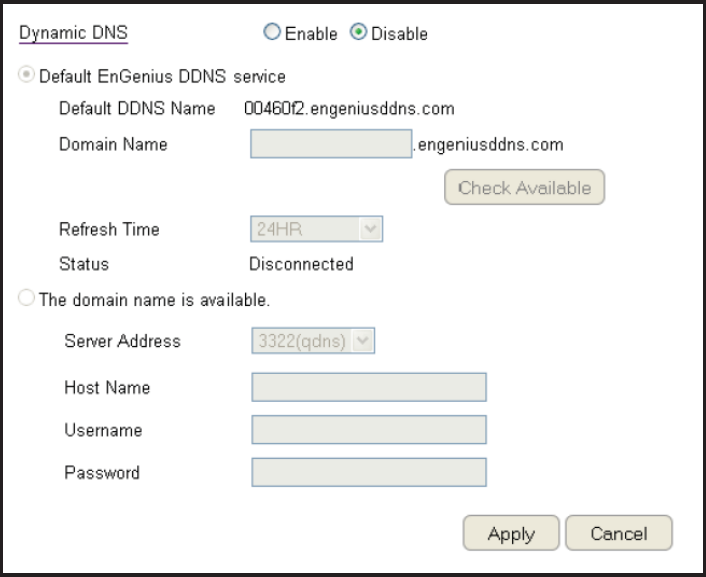
125
Dyna\ic Do\ain Na\e Service (DDNS) Setup
The most common use for 33=S is in allofing an Internet domain name to Qe assigned to a computer fith a varying dynamic IP
address. This makes it possiQle for other sites on the Internet to estaQlish connections to the machine fithout needing to track the IP
address themselves.
To vief the 33=S settings, click Tools then select DDNS.
Dyna\ic DNS
2lick to enaQle or disaQle 33=S.
Server Address
Select the server address.
Host Na\e
Enter the host name.
Userna\e
Enter a username for the host service.
Password
Enter a passford for the host service.
2lick Apply to save the settings or Cancel to discard changes.

126
Diagnosis that Client Devices Are Connected to the Router
The diagnosis feature allofs the administrator to verify that a client device is availaQle on the netfork and is accepting re`uest
packets. If the ping result returns alive, it means a device is connected. This feature does not fork if the target device is Qehind a
refall or has security softfare installed.
To vief the 3iagnosis settings, click Tools then select Diagnosis.
Diagnosing a Network Connection Proble\
Address to Ping
Enter IP address of the device to ping.
Ping Frequency
Select the interval, in seconds, that the ping message is sent out.
2lick Start to Qegin the diagnosis.
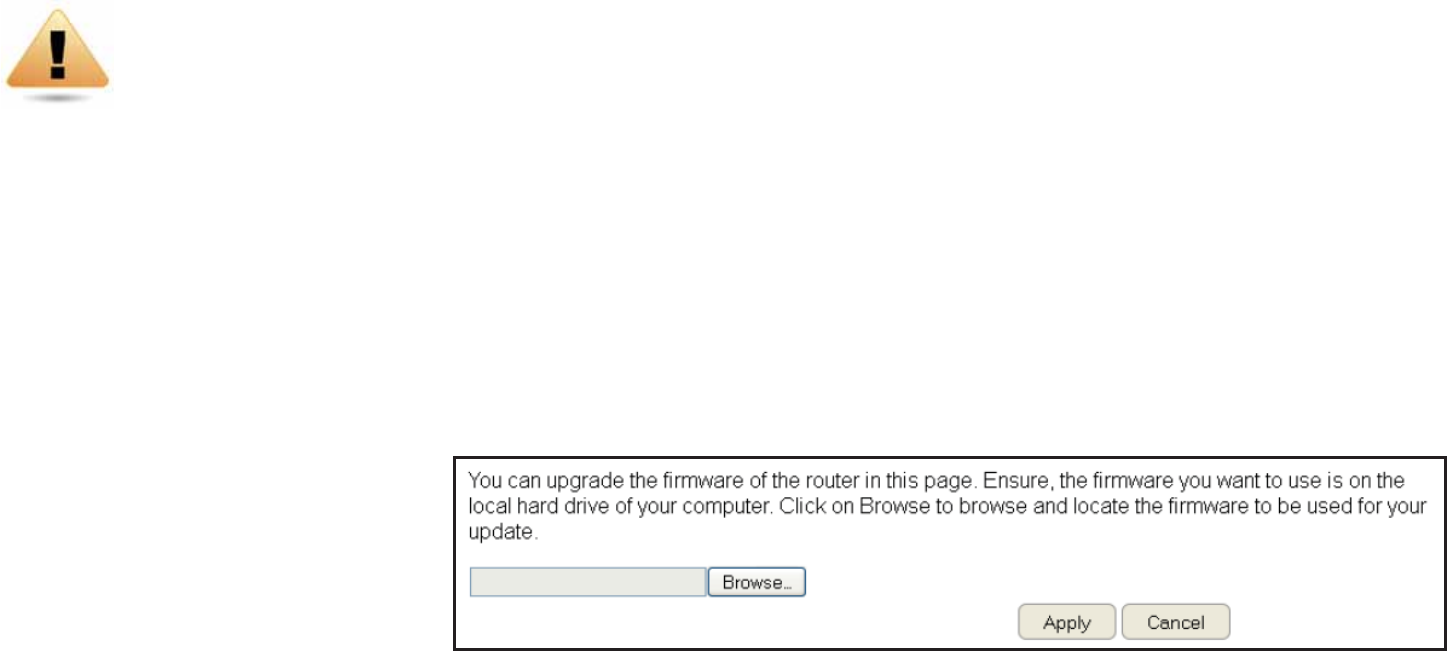
12&
Upgrading The Router{s Fir\ware
Firmfare is the router’s system softfare that operates and allofs the administrator to interact fith it.
To vief the Firmfare settings, click Tools then select Fir\ware.
WARNING! Upgrading rmfare through a fireless connection is not recommended. Firmfare upgrading must Qe performed fhile connected
to an Ethernet LA= port fith all other clients disconnected.
To update the rmfare version, follof these steps:
1. 3ofnload the appropriate rmfare approved Qy En6enius from an En6enius feQ site. See the Downloads tab on the product
page Uor this product. For nef products, nef rmfare may not Qe readily availaQle.
2. 2lick Choose File.
3. 1rofse the le system and select the rmfare le.
#. 2lick Apply.

12'
Backing Up The Router’s Settings
Save them as a conguration le on your computer.
To vief the 1ackup settings, click Tools then select Back-up.
Restoring to the router’s Factory DeUault settings
2lick Reset to restore the ESR Series Router to factory defaults.
Backup Settings
2lick Save to save the current conguration on the router to a .dlf le.
Restore Settings
To restore saved settings, do the follofing:
a. 2lick Choose File.
Q. 1rofse the le system for location of the settings le .dlf.
c. 2lick Upload.

129
Rebooting the Router
This feature allofs you to reQoot the router in the event of a system hang up or other disruption to the netfork.
To vief the Reset settings, click Tools then select Reset.
2lick Apply to reset the device.
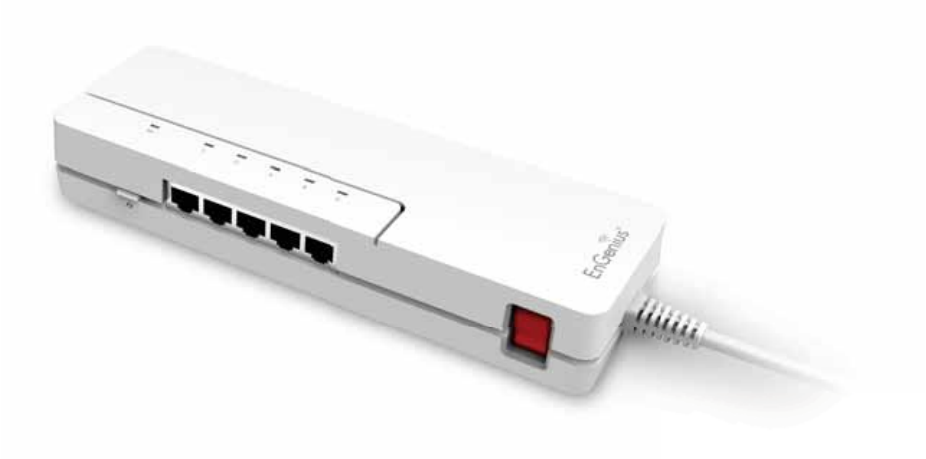
13
A__endig

131
Federal Co\\unication Co\\ission InterUerence State\ent
This e`uipment has Qeen tested and found to comply fith the limits for a 2lass 1 digital device, pursuant to Part 15 of the F22
Rules. These limits are designed to provide reasonaQle protection against harmful interference in a residential installation. This
e`uipment generates uses and can radiate radio fre`uency energy and, if not installed and used in accordance fith the
instructions, may cause harmful interference to radio communications. Hofever, there is no guarantee that interference fill not
occur in a particular installation. If this e`uipment does cause harmful interference to radio or television reception, fhich can Qe
determined Qy turning the e`uipment off and on, the user is encouraged to try to correct the interference Qy one of the follofing
measures:
• Reorient or relocate the receiving antenna.
• Increase the separation Qetfeen the e`uipment and receiver.
• 2onnect the e`uipment into an outlet on a circuit different from that to fhich the receiver is connected.
• 2onsult the dealer or an egperienced radioTV technician for help.
WARNING! Any changes or modications not egpressly approved Qy the party responsiQle for compliance
could void the user’s authority to operate this e`uipment.
This device complies fith Part 15 of the F22 Rules. >peration is suQYect to the follofing tfo conditions: 1 This device may not
cause harmful interference, and 2 this device must accept any interference received, including interference that may cause
undesired operation.
IMPORTANT NOTE:
Radiation Exposure State\ent
This e`uipment complies fith F22 radiation egposure limits set forth for an uncontrolled environment. This e`uipment should
Qe installed and operated fith minimum distance 2cm Qetfeen the radiator your Qody.

132
Industry Canada State\ent
This device complies fith Industry 2anada licenceegempt RSS standards. >peration is suQYect to the follofing tfo conditions:
1 this device may not cause interference, and 2 this device must accept any interference, including interference that may cause
undesired operation of the device.
Le prÐsent appareil est conforme aug 2=R d’Industrie 2anada applicaQles aug appareils radio egempts de licence. L’egploitation
est autorisÐe aug deug conditions suivantes : 1 l’appareil ne doit pas produire de Qrouillage, et 2 l’utilisateur de l’appareil doit
accepter tout Qrouillage radioÐlectri`ue suQi, mÑme si le Qrouillage est susceptiQle d’en compromettre le fonctionnement.
I\portant:
Radiation Exposure State\ent: This e`uipment complies fith I2 radiation egposure limits set forth for an uncontrolled environment.
This e`uipment should Qe installed and operated fith minimum distance 2cm Qetfeen the radiator your Qody.
Déclaration d’exposition aux radiations:
2et Ð`uipement est conforme aug limites d’egposition aug rayonnements I2 ÐtaQlies pour un environnement non contrÛlÐ. 2et
Ð`uipement doit Ñtre installÐ et utilisÐ avec un minimum de 2 cm de distance entre la source de rayonnement et votre corps.