Enteromedics MC2402 Maestro Rechargeable System Mobile Charger User Manual
Enteromedics, Inc. Maestro Rechargeable System Mobile Charger
User Manual

Maestro® Rechargeable System
Instructions for Use
CAUTION: Federal Law restricts this device to sale by or on the order of a physician.
Copyright 2015 by EnteroMedics Inc., St. Paul, Minnesota
All rights reserved
EnteroMedics, VBLOC and Maestro are registered trademarks of EnteroMedics Inc.
The Maestro System is protected under U.S., European, Japanese and Australian Patents, and patent
applications.
Subject to Pat. Nos.: AU2004209978; AU2009245845; AU2006280277; AU2006280278; AU2008226689;
AU2008259917; AU2011265519; US 7,167,750; US 7,672,727; US 7,822,486; US 7,917,226;
US 8,010,204; US 8,068,918; US 8,103,349; US 8,140,167; US 8,483,830; US 8,483,838; US 8,521,299;
US 8,532,787; US 8,538,542; US 8,825,164; JP 5486588; EP 1601414; EP 1603634; EP 1922109; and
EP1922111
For use in a method covered by Pat. Nos.: AU2009231601; US 7,489,969; US 7,729,771; US 7,613,515;
US 7,844,338; US 8,046,085; US 8,538,533

Maestro® Rechargeable System P01392-001 Rev K
System Instructions for Use
© EnteroMedics, Inc 2015 Page 2 of 73
Table of Contents
1. INDICATIONS FOR USE .................................................................................................................... 4
2. CONTRAINDICATIONS ..................................................................................................................... 5
3. WARNINGS ..................................................................................................................................... 6
4. PRECAUTIONS ................................................................................................................................. 8
5. DEVICE DESCRIPTION .................................................................................................................... 14
6. SYMBOLS & DEFINITIONS .............................................................................................................. 17
7. STORAGE, STERILIZATION & HANDLING ........................................................................................ 19
7.1 RE-STERILIZATION OR RE-USE OF MAESTRO RECHARGEABLE SYSTEM COMPONENTS .......................................... 20
7.2 ENVIRONMENT .................................................................................................................................... 20
8. POTENTIAL ADVERSE EVENTS ........................................................................................................ 21
9. CLINICAL STUDY ............................................................................................................................ 22
9.1 PRIMARY EFFICACY OBJECTIVES .............................................................................................................. 22
9.2 PRIMARY SAFETY OBJECTIVE .................................................................................................................. 22
9.3 SUBJECT DISPOSITION ........................................................................................................................... 22
9.4 PRIMARY SAFETY ENDPOINT ................................................................................................................... 24
9.4.1 All Serious Adverse Events ..................................................................................................... 25
9.4.2 Overview of All Adverse Events Related to Device, Therapy or Procedure ............................ 26
9.4.3 Adverse Events Leading to Study Withdrawal ....................................................................... 26
9.4.4 Surgical Removals of the Device ............................................................................................ 27
9.4.5 Surgical Revisions .................................................................................................................. 27
9.5 EFFECTIVENESS .................................................................................................................................... 27
9.5.1 Change in %EWL and %Total Body Weight Loss (%TBL) ........................................................ 28
9.5.2 Responder Analyses ............................................................................................................... 29
9.5.3 Improvements in Obesity Risk Factors ................................................................................... 29
9.6 UPDATED RESULTS THROUGH 18 MONTHS ............................................................................................... 30
10. INDIVIDUALIZATION OF TREATMENT ............................................................................................ 32
10.1 PATIENT SELECTION ......................................................................................................................... 32
10.2 USE IN SPECIFIC POPULATIONS ........................................................................................................... 32
10.3 PATIENT COUNSELING ...................................................................................................................... 32
11. OPERATING INSTRUCTIONS........................................................................................................... 33
11.1 USING THE MOBILE CHARGER ............................................................................................................ 37
11.2 MAESTRO RECHARGEABLE SYSTEM PREPARATION PRIOR TO IMPLANTATION ............................................... 39
12. IMPLANT PROCEDURE SUMMARY ................................................................................................ 43

Maestro® Rechargeable System P01392-001 Rev K
System Instructions for Use
© EnteroMedics, Inc 2015 Page 3 of 73
13. LEAD STATUS (IMPEDANCE) TEST IN SURGERY .............................................................................. 46
14. DEVICE ACTIVATION AND TREATMENT INITIATION DURING SURGERY ......................................... 49
14.1 DEVICE ACTIVATION AND THERAPY INITIATION ...................................................................................... 49
14.2 POST IMPLANT HEALING PERIOD ........................................................................................................ 51
15. MODIFYING THERAPY PARAMETERS DURING FOLLOW-UP VISITS................................................. 52
15.1 FIRST FOLLOW-UP VISIT ................................................................................................................... 52
15.2 SUCCESSIVE FOLLOW-UP VISITS ......................................................................................................... 53
15.3 MAESTRO RECHARGEABLE SYSTEM REPORTS ........................................................................................ 55
16. MAINTAINING THE MAESTRO RECHARGEABLE SYSTEM ................................................................ 56
16.1 MAINTAINING THE NEUROREGULATOR ................................................................................................ 56
16.2 MAINTAINING THE MOBILE CHARGER AND TRANSMIT COIL ..................................................................... 56
17. PATIENT OPERATING INSTRUCTIONS ............................................................................................ 57
17.1 POSITIONING THE TRANSMIT COIL OVER THE NEUROREGULATOR .............................................................. 57
17.2 CHECKING NEUROREGULATOR AND MOBILE CHARGER BATTERY CHARGE LEVELS ......................................... 58
17.3 CHARGING THE BATTERY IN THE NEUROREGULATOR ............................................................................... 59
17.4 RESTORING THE MOBILE CHARGER’S DEFAULT SETTINGS ........................................................................ 60
17.5 SYSTEM ALERTS .............................................................................................................................. 60
18. DEACTIVATING THE NEUROREGULATOR ....................................................................................... 61
19. IMPLANT REMOVAL AND DISPOSAL INSTRUCTIONS ..................................................................... 62
19.1 DEVICE REMOVAL TRAINING .............................................................................................................. 62
19.2 REMOVAL OF ALL IMPLANTABLE DEVICE COMPONENTS .......................................................................... 62
19.3 REPLACEMENT OF NEUROREGULATOR ................................................................................................. 63
19.4 DEVICE DISPOSAL ............................................................................................................................ 63
20. SPECIFICATIONS ............................................................................................................................ 64
20.1 COMPONENT AND THERAPY SPECIFICATIONS ........................................................................................ 64
20.2 ELECTROMAGNETIC COMPATIBILITY TABLES .......................................................................................... 67
21. MAESTRO RECHARGEABLE SYSTEM LIMITED WARRANTY ............................................................. 71
22. CONTACT INFORMATION .............................................................................................................. 73

Maestro® Rechargeable System P01392-001 Rev K
System Instructions for Use
© EnteroMedics, Inc 2015 Page 4 of 73
1. Indications for Use
The Maestro Rechargeable System is indicated for use in weight reduction in patients
aged 18 years through adulthood who have a Body Mass Index (BMI) of 40 to 45 kg/m2,
or a BMI of 35 to 39.9 kg/m2 with one or more obesity related co-morbid conditions, and
have failed at least one supervised weight management program within the past five
years.

Maestro® Rechargeable System P01392-001 Rev K
System Instructions for Use
© EnteroMedics, Inc 2015 Page 5 of 73
2. Contraindications
Y Patients with cirrhosis of the liver, portal hypertension, esophageal varices or an
uncorrectable, clinically significant hiatal hernia.
Y Patients for whom magnetic resonance imaging (MRI) is planned.
Y Patients at high risk for surgical complications
Y Patients who have a permanently implanted, electrical-powered medical device or
gastrointestinal device or prosthesis (e.g. pacemakers, implanted defibrillators,
neurostimulators)
Y Patients for whom shortwave, microwave, or therapeutic ultrasound diathermy is
planned
Diathermy is any treatment that uses high-frequency electromagnetic radiation,
electric currents, or ultrasonic waves to produce heat in body tissues. Patients
absolutely CANNOT be treated with any type of shortwave, microwave, or
therapeutic ultrasound diathermy device whether or not it is used to produce heat.
These treatments should not be applied anywhere on the body.

Maestro® Rechargeable System P01392-001 Rev K
System Instructions for Use
© EnteroMedics, Inc 2015 Page 6 of 73
3. Warnings
Y Certain medical therapies or procedures may cause injury to the patient,
permanent damage to the implant or may turn therapy off; particularly if used in
close proximity to the device. Therapies or procedures which may affect the
tissue/electrode interface or the neuroregulator may result in dislodgement, loss of
therapy or nerve damage. Therapies and procedures that induce current through
the lead and neuroregulator could cause nerve damage, burns, heating or pain.
These include:
Shock wave lithotripsy;
Oncologic radiation or any cobalt 60 or gamma radiation;
Mono Polar electrosurgical instruments;
Positron emission tomography (PET) scans; or
Radiofrequency ablation
Patients absolutely CANNOT be treated with any type of shortwave,
microwave, or therapeutic ultrasound diathermy device whether or not it is
used to produce heat. These treatments should not be applied anywhere on
the body. Diathermy is any treatment that uses high-frequency
electromagnetic radiation, electric currents, or ultrasonic waves to produce
heat in body tissues.
Y Patients with Twiddler’s Syndrome may move, damage or disconnect the lead
from the neuroregulator. This may interfere with therapy delivery, recharging or
may result in damage to the vagus nerves.
Y Failure to maintain adequate charge of the neuroregulator may result in additional
surgery to replace the device. The neuroregulator must be fully charged at least
once every two months. If the neuroregulator is not regularly charged, the battery
may no longer be chargeable and therapy may no longer be able to be delivered.
Y If the decision is made to stop therapy, the neuroregulator must be fully charged
prior to deactivation. Verify that the neuroregulator is fully charged before it is
turned off. A deactivated neuroregulator may be turned on with clinician
programmer.
Y Lead impedance testing should only be performed using equipment approved by
EnteroMedics since leakage current could injure the patient.

Maestro® Rechargeable System P01392-001 Rev K
System Instructions for Use
© EnteroMedics, Inc 2015 Page 7 of 73
Y Continued therapy with a fractured lead may result in conductor dissolution
resulting in pain, inflammation or nerve damage.
Y The Maestro System is MR Unsafe. Patients should register their implant
information with the MedicAlert Foundation (www.medicalert.org) or equivalent
organization.
Y MR is categorized as unsafe for patients in which the Maestro System was
explanted and not all components were removed.

Maestro® Rechargeable System P01392-001 Rev K
System Instructions for Use
© EnteroMedics, Inc 2015 Page 8 of 73
4. Precautions
Y The safety and effectiveness of this device has not been determined for patients
under the age of 18 years
Y The Maestro Rechargeable System should only be implanted by surgeons
specifically trained to perform the Maestro Rechargeable System implant
procedure.
Y The Maestro Rechargeable System may interact with implantable devices such as
cardiac pacemakers and defibrillators, implanted spinal cord and peripheral nerve
stimulators, other neurostimulators, and body worn medical devices, such as
insulin pumps. Possible effects of the system interaction with implanted cardiac
devices include that defibrillation therapy from an implanted defibrillator may
damage the RNR. Electrical pulses from the RNR may interact with the sensing
operation of an implantable or body worn device and may result in an
inappropriate response of the device.
Y If radiation therapy is required, the area over the neuroregulator should be
shielded with lead to protect the implant from damage.
Y Maestro Rechargeable System components produce small electrical currents that
may ignite flammable liquids and gasses. Do not operate the system in flammable
environments, including flammable anesthetics.
Y Use only Maestro Rechargeable System components listed in Table 1 of this
document. Only leads listed in this table should be used with the Maestro
Rechargeable System neuroregulator.
Y Handle leads with care. Avoid stretching, kinking, or handling with surgical
instruments that may cause permanent damage to lead components including the
lead body, electrode, conductor, or connector. Do not attempt to bend or modify
the electrode during implant.
Y Maestro Rechargeable System programming should be performed only by trained
personnel under physician supervision.
Y To ensure reliable operation, the AC recharger should be not connected to a
portable multiple outlet socket or extension cord.

Maestro® Rechargeable System P01392-001 Rev K
System Instructions for Use
© EnteroMedics, Inc 2015 Page 9 of 73
Y The mobile charger case may become warm during recharging of the
neuroregulator. To avoid damage to the equipment place the mobile charger in a
position that allows air circulation, do not lie in bed, sleep, sit or lie on the mobile
charger, place the mobile charger in clothing or place the mobile charger within a
carrying case.
Y To ensure reliable recharging of the neuroregulator, there must be no metal or
magnetic objects within six inches of the implanted neuroregulator and transmit
coil.
Y The mobile charger and transmit coil have limited protection from fluids and may
be damaged when immersed in liquids or used in wet environments. Patients
should not bathe, shower, or swim with the mobile charger and transmit coil.
Y Do not use any component of the Maestro System if it appears to be damaged.
Y A strong magnet, such as those found in speakers, Cathode Ray Tubes (including
television tubes), electric motors, refrigerator and freezer doors, power tools, as
well as magnets used therapeutically or worn on the body in close proximity to
the neuroregulator may inactivate the device. Patients should be cautioned to
keep such devices at least six (6) inches away from the neuroregulator. If your
device becomes inactivated because of exposure to a strong magnetic field, then
you must schedule a visit with a clinician to reactivate the neuroregulator.
Y The mobile charger should not be turned on aboard aircraft.
Y Maestro Rechargeable System components are to be returned to EnteroMedics for
safe and proper disposal. Under no circumstances should Maestro Rechargeable
System components be disposed of by incineration, including cremation.
Y The capacity of the rechargeable battery in the implanted neuroregulator will
diminish over time with use. This may require longer or more frequent charging
as the implanted neuroregulator nears the end of its useful life.
Y Electronic components of the Maestro Rechargeable System may be damaged by
therapeutic ionizing radiation; damage may not be immediately detectable.

Maestro® Rechargeable System P01392-001 Rev K
System Instructions for Use
© EnteroMedics, Inc 2015 Page 10 of 73
Y The effects on device safety, operation or performance when used within a
hyperbaric chamber are unknown. Patients implanted with the Maestro
Rechargeable System should seek medical guidance prior to entering a hyperbaric
chamber.
Y Radio Frequency Identification (RFID) systems may interfere with the
communication system in your Maestro System and may result in longer charging
times and/or a not fully charged RNR battery. The clinician should be aware that
RFID systems in close proximity to the Maestro System in the clinic may result in
difficulty with interrogation and programming of the RNR. RFID sources may be
present in health care facilities, retail stores, libraries, airports and business
environments.
Y Strong magnetic fields and sources of strong electromagnetic interference
emitted from RF emitters like those emitted by electronic article surveillance
(EAS) systems, metal detectors, other security systems, lithotripsy, computer
monitors, motorized wheel chairs, x-ray equipment and other monitoring
equipment may be present in the home, work, medical, or public environments.
The effects of these RF emitters are unknown but may be strong enough to
interfere with the function of the Maestro System and may produce the following
effects:
- Serious injury; it is possible for these sources to generate enough energy in
the Maestro leads to damage the vagal nerve and surrounding tissue.
- Damage to the Maestro System; resulting in permanent loss of therapy.
- Operational changes to the RNR; turning therapy off.
Strong magnetic fields and RF emitters, including RFID systems, may not always
be visible and could result in inadvertent exposure without your awareness. You
should move away from these sources to avoid close proximity (indicated in the
table of “Recommended separation distances between portable and mobile RF
communications equipment and the Maestro Rechargeable System”) and never
recharge your RNR in the vicinity of these sources. We recommend that you turn
the RNR off, using your MC, before you enter an area with known strong
magnetic fields or EMI. If your device becomes inactivated because of exposure
to a strong magnetic field, then you must schedule a visit with a clinician to
reactivate the RNR.
The Maestro Rechargeable System may activate EAS systems, metal detectors or
other security systems. Patients should be advised not to recharge the Maestro
Rechargeable System neuroregulator and to turn the mobile charger off in the
presence of these systems.

Maestro® Rechargeable System P01392-001 Rev K
System Instructions for Use
© EnteroMedics, Inc 2015 Page 11 of 73
Y Infections at the implant site have been observed, and severe infections could
require surgery and device explantation. Administration of appropriate broad-
spectrum antibiotics, as per standard of care, should be considered pre-, peri-, and
post-operative to the implant procedure.
Y Allergic reaction to the materials of the Maestro System components is possible.
Y The leads can become entangled or fractured, or the insulation can erode. Avoid
using excess lead length in the neuroregulator pocket.
Y The safety and effectiveness of defibrillation devices used on patients with the
Maestro Rechargeable system has not been established. If use of a defibrillator is
necessary, it is possible that defibrillation current may be conducted through the
leads, possibly reducing the effectiveness of the defibrillation and damaging the
nerves.
Y The safety and effectiveness of the Maestro Rechargeable System have not been
established for use during pregnancy. As soon as pregnancy has been confirmed,
the VBLOC therapy must be turned off and the neuroregulator must be fully
charged and deactivated by the clinician. Because the leads are implanted in the
abdomen, the position of the leads relative to the fetus should be monitored on a
regular basis. The Maestro Rechargeable System has not been tested with fetal
monitoring systems and may interfere with its operation.
Y Normal operating range of the neuroregulator is between 16°C (60°F) and 45°C
(113°F). Exposure to conditions which cause the temperature of the
neuroregulator to be out of this range should be avoided. This includes, but is not
limited to exposure to electric blankets, heating pads, and saunas which exceed
45°C (113°F). When exposed to temperatures outside this range while implanted,
the neuroregulator will turn off and the red status icon will be illuminated on the
mobile charger when communicating with the neuroregulator. The patient must
schedule a visit with a clinician to reactivate the neuroregulator.
Y Do not modify any of the components of the Maestro Rechargeable System.
Effects of component modification on the device safety, performance or operation
are unknown. Changes or modifications not expressly approved by the
manufacturer could void the user's authority to operate the equipment.

Maestro® Rechargeable System P01392-001 Rev K
System Instructions for Use
© EnteroMedics, Inc 2015 Page 12 of 73
Y Some functions of the Maestro Rechargeable System such as neuroregulator
battery charging, transmit coil positioning and device interrogation rely on a radio
frequency telemetry link between the neuroregulator and mobile charger.
Interference from radio frequency transmitters in very close proximity to the
neuroregulator and mobile charger may affect these functions. Issues may be
resolved by moving to a different location where less interference is present.
Y Interference to the radio frequency telemetry link between the neuroregulator and
mobile charger may be experienced in countries outside the United States, where
frequency allocations and radio transmission parameters may differ from those in
the USA.
Y The radio frequency telemetry link between the neuroregulator and mobile
charger may stop functioning when two or more Maestro Rechargeable Systems
are operating within 10 cm of each other. The telemetry link will be re-established
and normal operation will resume when this distance is increased to greater than
10 cm.
Y Unintended access to the neuroregulator disc is prevented by the short range of
radio telemetry link and the way the neuroregulator disc and mobile charger
communicate.
Y Patients with impaired vision may not be able to successfully operate the Maestro
System.
Y This Maestro Rechargeable System equipment has been tested and found to
comply with the limits for a Class B digital device, pursuant to part 15 of the FCC
Rules. These limits are designed to provide reasonable protection against harmful
interference when the equipment is operated in a residential setting. However,
there is no guarantee that interference will not occur. This equipment generates,
uses and can radiate radio frequency energy and, if not used in accordance with
the instructions, may cause harmful interference to radio communications. If
operation of this equipment does cause harmful interference to radio or television
reception, which can be determined by turning the equipment off and on, the user
is encouraged to try to correct the interference by one or more of the following
measures:
Increase the separation distance between the mobile charger and
transmit coil or the mobile charger and AC recharger from the affected
device.
Connect the AC recharger into a different outlet on a circuit different
from that to which the affected device is connected.

Maestro® Rechargeable System P01392-001 Rev K
System Instructions for Use
© EnteroMedics, Inc 2015 Page 13 of 73
Contact EnteroMedics for additional suggestions.
Y This transmitter must not be co-located or operating in conjunction with any other
antenna or transmitter, except in accordance with FCC multi-transmitter product
procedures.
Maestro® Rechargeable System P01392-001 Rev K
System Instructions for Use
© EnteroMedics, Inc 2015 Page 14 of 73
5. Device Description
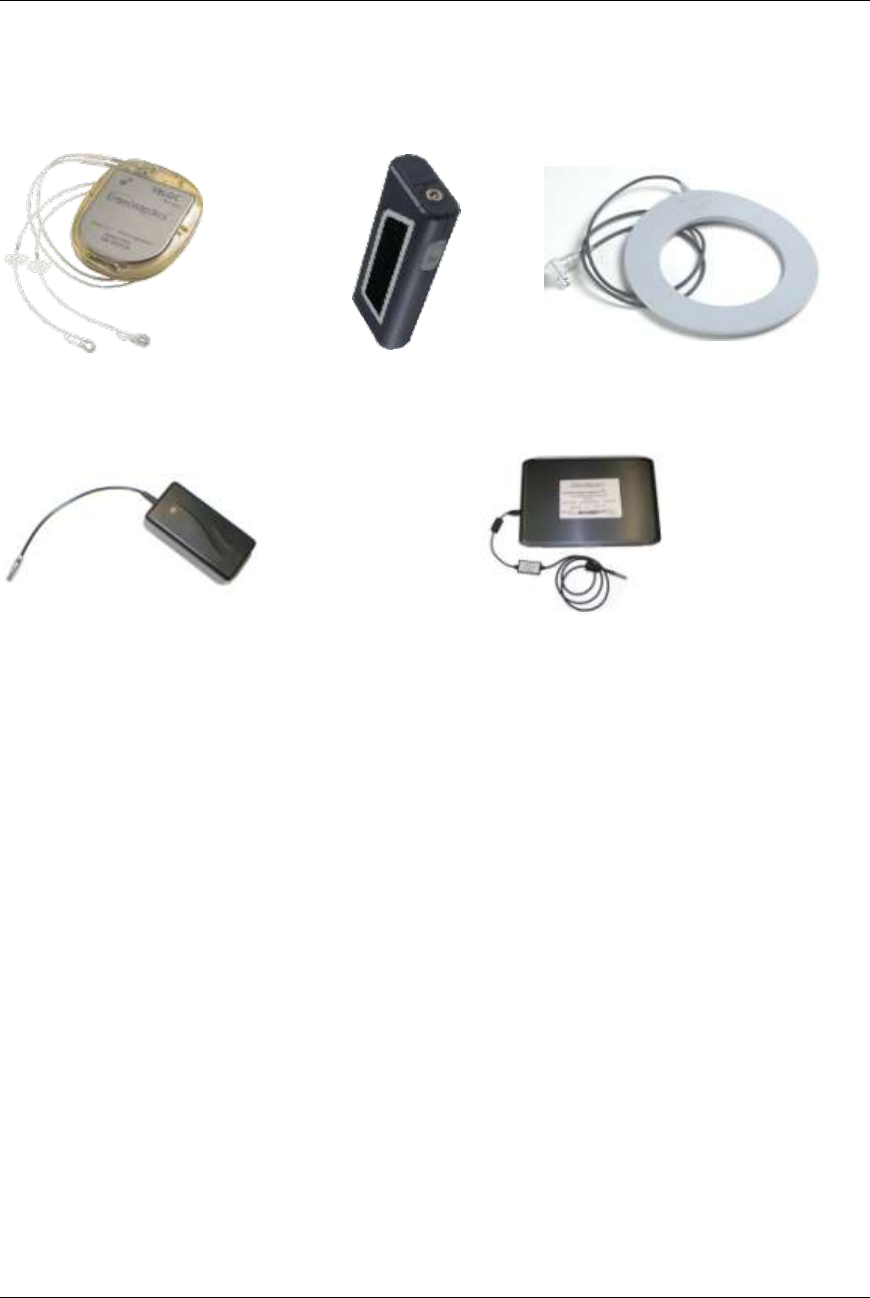
The Maestro Rechargeable System is comprised of multiple implantable and external
components. The primary components are:
Implantable components of the system include the neuroregulator and two leads.
External components of the system include a mobile charger, transmit coil, AC recharger,
and a clinician programmer.
Energy is transferred from the implanted neuroregulator to leads connected to the
patient’s anterior and posterior vagus nerves providing blocking or regulation of nerve
function. The transmit coil, when connected to the mobile charger and positioned over
the neuroregulator, is used to determine the status of the implanted device and recharge
the battery as required. The clinician programmer consists of a laptop computer with
specialized software which may be used to transmit information to, and upload data from
the neuroregulator. The data is available to the clinician to determine any changes in
treatment regimens and to monitor the performance of the Maestro Rechargeable System
and patient compliance with device charging.
The system components are listed in Table 5-1.
AC Recharger
Mobile Charger
Transmit Coil
Rechargeable
Neuroregulator
and Leads
Clinician Programmer
and Programmer Cable

Maestro® Rechargeable System P01392-001 Rev K
System Instructions for Use
© EnteroMedics, Inc 2015 Page 15 of 73
Table 5-1: Maestro Rechargeable System Components
Component
Model
Number
Sterility
Shelf Life
Single use / Multi Use
Implantable
Components
Neuroregulator
2002
Sterile
18 months from the
date of sterile
packaging
Single Use
Posterior Lead
2200P – 47E
Sterile
36 months from the
date of sterile
packaging
Single Use
Anterior Lead
2200A – 47E
Sterile
36 months from the
date of sterile
packaging
Single Use
External
Components
Mobile Charger
2402
Not
Sterile
Indefinite, no shelf
life specified
**Multiple Use
(1 patient, or 1 clinician
office with multiple
patients)
Transmit Coil
2403-60
Not
Sterile
Indefinite, no shelf
life specified
**Multiple Use
(1 patient)
AC Recharger
1620
Not
Sterile
Indefinite, no shelf
life specified
** Multiple Use (1 patient,
or 1 clinician office with
multiple patients)
*Clinician Transmit
Coil
2403-300
Not
Sterile
Indefinite, no shelf
life specified
** Multiple Use (1 clinician
office, multiple patients)
*Clinician
Programmer
2502
Not
Sterile
Indefinite, no shelf
life specified
** Multiple Use (1 clinician
office, multiple patients)
*Programmer Cable
(connects Mobile
Charger to Clinician
Programmer)
1600
Not
Sterile
Indefinite, no shelf
life specified
** Multiple Use (1 clinician
office, multiple patients)
Accessories
Belt for use with
2403-60 Transmit
Coil
1660
Not
Sterile
Indefinite, no shelf
life specified
** Multiple Use (1 patient)
Torque Wrench
1680
Sterile
18 months from the
date of sterile
packaging
Single Use

Maestro® Rechargeable System P01392-001 Rev K
System Instructions for Use
© EnteroMedics, Inc 2015 Page 16 of 73
Component
Model
Number
Sterility
Shelf Life
Single use / Multi Use
Instructions for
Use
Maestro
Rechargeable
System Instructions
for Use
P01392-001
(Available on
Model 2502
Clinician
Programmer)
NA
NA
NA
Patient Instructions
P01395-001
(Available on
Model 2502
Clinician
Programmer)
NA
NA
NA
Model 2502
Clinician
Programmer
Manual
P01394-001
(Available on
Model 2502
Clinician
Programmer)
NA
NA
NA
Surgical Implant
Procedure
P01393-001
(Available on
Model 2502
Clinician
Programmer)
NA
NA
NA
Easy Charge Guide
P01396-001
NA
NA
NA
* Note: These components are not intended for use by the patient.
** Note: Reprocessing Not Required
Maestro® Rechargeable System P01392-001 Rev K
System Instructions for Use
© EnteroMedics, Inc 2015 Page 17 of 73
6. Symbols & Definitions
D Do Not Reuse
I Device Sterilized by Ethylene Oxide
H Use By (Expiration Date)
M Manufacturer’s Identification
N Manufactured On (date of manufacture)
Y Caution, consult accompanying documents
i Consult the manual before use
h Catalog or reference number
g Batch Code
f Serial Number
P Authorized Representative
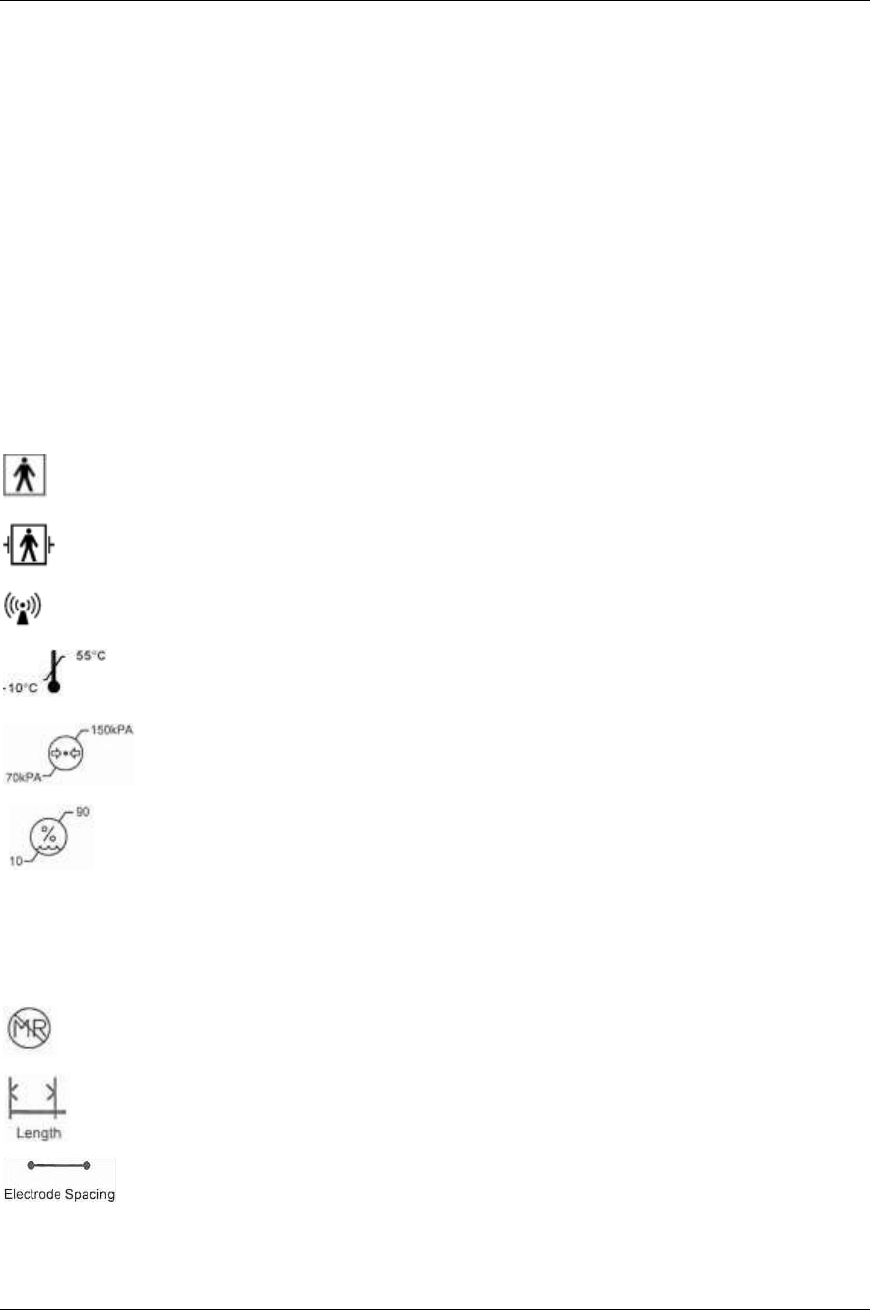
Type BF applied part
Defibrillation-proof Type BF applied part
Device incorporates an RF transmitter
Shipping and storage temperature range
Shipping and storage pressure range
Shipping and storage humidity range
IP22 Protected against access to hazardous parts with a finger, protected against
solid foreign objects of 12.5 mm in diameter and greater, and protected
against vertically falling water drops when enclosure tilted up to 15°
Magnetic Resonance Imaging Unsafe
Length of Leads
Electrode Spacing of Leads

Maestro® Rechargeable System P01392-001 Rev K
System Instructions for Use
© EnteroMedics, Inc 2015 Page 18 of 73
Trocar Size for Lead Placement

Maestro® Rechargeable System P01392-001 Rev K
System Instructions for Use
© EnteroMedics, Inc 2015 Page 19 of 73
7. Storage, Sterilization & Handling
Y Store the clinician programmer and mobile charger at room temperature. Storage
temperatures must be within -10°C (14° F) or 55° C (131° F).
Y Normal operating range for the mobile charger is from 15°C (59° F) to 40°C
(108° F) and 10% to 90% relative humidity.
Y Normal operating range of the neuroregulator is between 16°C (60°F) and 45°C
(113°F). If the neuroregulator is exposed to temperatures outside this range while
implanted, the device will turn off and the red status icon will be illuminated on
the mobile charger. If the red status icon is illuminated, the patient must schedule
a visit with a clinician during normal business hours.
Y To avoid the risk of infections or adverse reactions by the patient’s immune
system, the Maestro Rechargeable components intended for implant and the
Torque Wrench are supplied in sterile packages. Inspect the sterile package prior
to use. If the sterile package is damaged or the sterilization date has expired, do
not implant the device or components and contact EnteroMedics.
Y Do not implant a lead or neuroregulator that has been dropped or damaged after
removal from its sterile packaging. After medical adhesive has been applied to the
neuroregulator, leads should not be reinserted. Use a new neuroregulator instead.
Y The lead insulation should not be damaged. Grasp only the suture tongue and/or
the suture wing of the lead when using surgical tools. Do not tie sutures directly
around the lead. Instead use the suture fixation features provided on the lead.
Y The clinician programmer and programmer cable are not intended to be sterilized
or disinfected. The clinician programmer and programmer cable may be
periodically cleaned by wiping with a damp cloth.
Y The mobile charger and AC Recharger are not intended to be sterilized or
disinfected. The mobile charger and AC Recharger may be periodically cleaned
by wiping with damp soapy cloth.

Maestro® Rechargeable System P01392-001 Rev K
System Instructions for Use
© EnteroMedics, Inc 2015 Page 20 of 73
Y The Clinician Coil and Patient Transmit Coil are not intended to be sterilized or
disinfected. The Clinician Coil and Patient Transmit Coil may be periodically
cleaned by wiping with a damp soapy cloth.
Y Patient Transmit Coil Belt may be periodically cleaned by washing by hand or
with a machine using a cold, gentle cycle and air dry.
.
Y Do not ultrasonically clean the leads or neuroregulator.
7.1 Re-sterilization or re-use of Maestro Rechargeable
System components
Y Implanted components cannot be reused and are not designed to be re-sterilized.
Contact EnteroMedics for instructions regarding the return of any Maestro
Rechargeable System components. Before returning any devices that have been
exposed to patient bodily fluids, disinfect the device using a sterilant, such as
Cidex® or equivalent. Place in a sealed container with proper identification
including information regarding use of the device.
Y Re-use of a device carries the same risk as failure to sterilize since the complexity
of an active device design can provide sites of attachment for environmental
bacteria and/or small particulates. Additionally, there is the theoretical potential of
reactions by the recipient's immune system to proteins introduced as a
consequence of re-use.
Y The clinician transmit coil is not designed to be sterilized or disinfected.
7.2 Environment
Y The mobile charger and transmit coil are not designed to be waterproof. Do not
use or store the equipment in a wet or moist environment. The mobile charger is
rated as IP22 drip proof.

Maestro® Rechargeable System P01392-001 Rev K
System Instructions for Use
© EnteroMedics, Inc 2015 Page 21 of 73
8. Potential Adverse Events
Potential adverse effects (e.g., complications) associated with the implantation procedure
and/or use of the device are listed below. These adverse effects may or may not have
been observed in clinical studies and clinical use of the Maestro Rechargeable System.
Potential Adverse Events
Intra-operative
Post-operative
Death
Respiratory complications
Cardiovascular complications
Bleeding
Esophageal perforation
Injury to abdominal organs (gastric perforation,
ileus, etc.)
DVT/pulmonary embolus
Electrode misplacement
Electrode malfunction
Vagal nerve injury
Esophageal erosion
Organ entrapment or strangulation
Small bowel obstruction
Vagal nerve injury
Syncope
Chest pain
Wound dehiscence
Infection
Inflammation
Bloating
Cramps
Edema
Lead malfunction
Neuroregulator malfunction
Neuroregulator migration or erosion
Electric shock
Skin reaction
Delayed gastric emptying
Gastroparesis
Dumping syndrome
Heartburn
Diarrhea
Emesis
Constipation
Eructation
Nausea
Dysphagia
Energy decrease
Alopecia
Headache
Paresthesia
Pain at the neuroregulator site
Pain
Abdominal pain
Cough
Appetite changes
Flatulence
Dyspnea
Lightheadedness/Dizziness
Gallbladder disease
Steatorrhea
Vitamin deficiency
Psychosocial malfunction

Maestro® Rechargeable System P01392-001 Rev K
System Instructions for Use
© EnteroMedics, Inc 2015 Page 22 of 73
9. CLINICAL STUDY
The ReCharge Study was a randomized, double-blind, sham-controlled trial to evaluate
the safety and effectiveness of the Maestro Rechargeable System in treating obesity.
Eligible subjects were randomized in a 2:1 allocation to undergo implantation with either
an active treatment device to receive VBLOC therapy or a sham device. Subjects and
Study Coordinators were blinded until 12-month follow-up visits were completed for all
subjects, after which sham control subjects who chose to continue in the trial had the
option to have a complete Maestro Rechargeable System implanted and receive therapy.
Type 2 diabetics were limited to 10% of randomized subjects (with no more than 3
subjects per center) and once the enrollment limit was reached, the centers were notified
and type 2 diabetic enrollments were stopped.
The study was powered to assess a 20 percentage point difference in percentage Excess
Weight Loss (%EWL) between the VBLOC and sham control groups allocated in a 2:1
ratio under a “super-superiority” design. With a 10% superiority margin and an assumed
maximum 15% rate of attrition, it was determined that a minimum of 232 subjects would
be required to power the primary efficacy objective at the 85% level.
The intent-to-treat (ITT) population was the primary analysis population for this trial. If a
subject did not have primary endpoint data available at 12 months, the “last observation
carried forward” (LOCF) imputation method was applied to the missing 12-month data
points.
9.1 Primary Efficacy Objectives
The first co-primary efficacy objective was to demonstrate a mean difference of at least
10% EWL between the VBLOC treatment and sham control arms (super-superiority), as
measured by the body mass index (BMI) method, at 12 months post-randomization.
A second co-primary efficacy objective was to demonstrate a responder rate in the
VBLOC treatment arm that achieved the following at 12 months:
At least 55% of treatment subjects achieved at least 20% EWL (BMI method)
At least 45% of treatment subjects achieved at least 25% EWL (BMI method)
9.2 Primary Safety Objective
The primary safety objective was to demonstrate that the rate of serious adverse events
(SAEs) related to the implant/revision procedure, device, or therapy at 12 months was
less than 15% in the VBLOC group.
9.3 Subject Disposition
A total of 239 subjects were randomized in the ReCharge trial. One hundred sixty-two
(162) subjects were randomized to receive a Maestro Rechargeable System (active
device) and seventy seven (77) subjects were randomized to receive the sham control
device. Two hundred and thirty-three subjects (233) were implanted (157 in the active
VBLOC arm and 76 in the sham control arm). There were 15 subjects in the type 2
Maestro® Rechargeable System P01392-001 Rev K
System Instructions for Use
© EnteroMedics, Inc 2015 Page 23 of 73
diabetes mellitus cohort (9 VBLOC group, 6 sham control group). Four subjects
withdrew due to adverse events; two (1 VBLOC, 1 sham control) with pain at the
neuroregulator site, one sham control subject due to breast cancer and one sham control
subject due to anxiety. There were no withdrawals due to device malfunction. Seven
additional VBLOC subjects withdrew before 12 months. Five were prior to implant due
to the following reasons: one for discovery of cirrhotic liver at implant; three intra-
operative exclusions of Nissen fundoplication, greater than 5 cm hiatal hernia, and
extensive intra-operative dissection; and one at implant due to food discovered in the
stomach after overnight fasting. Two remaining withdrawals were due to loss to follow-
up after implant. Five additional sham subjects withdrew in the first year due to subject
decision.
Six subjects were not implanted after they were randomized. These subjects are included
in the ITT analysis.
At the 12-month visit, 89.1% of randomized subjects were available for follow-up. The
average subject was approximately 47 years of age and Caucasian (92.9%). Nearly 85%
of the subject population was female. Demographics and important baseline
characteristics are presented in the following table. No significant differences between
VBLOC and sham control subjects were observed at baseline on important demographic
characteristics.
Table 9-1: Baseline Demographic for VBLOC and Sham Control groups.
Characteristic
VBLOC
N=162
Sham Control
N=77
P-value
Gender
Female
141 (87.0%)
62 (80.5%)
0.245
Male
21 (13.0%)
15 (19.5%)
Age (years) at screening
47.1 ± 10.3
46.6 ± 9.4
0.693*
Race
Caucasian
149 (92.0%)
73 (94.8%)
0.592
African American
8 (4.9%)
3 (3.9%)
1.000
Native American
2 (1.2%)
1 (1.3%)
1.000
Asian
1 (0.6%)
1 (1.3%)
0.541
Hawaiian/Pacific Islander
1 (0.6%)
0 (0.0%)
1.000
Height (m) at screening
1.7 ± 0.1
1.7 ± 0.1
0.112*
BMI at implant (kg/m2)
40.9 ± 2.8
40.9 ± 3.1
0.969*
Weight at implant (kg)
112.6 ± 13.4
115.5 ± 14.3
0.117
Excess weight (kg) at implant
43.7 ± 8.7
44.9 ± 9.5
0.371
Waist circumference (cm) at screening
121.1 ± 11.8
123.0 ± 11.3
0.236
Type 2 diabetes mellitus
9 (5.6%)
6 (7.8%)
0.571
Hypertension
63 (38.9%)
32 (41.6%)
0.920
Maestro® Rechargeable System P01392-001 Rev K
System Instructions for Use
© EnteroMedics, Inc 2015 Page 24 of 73
Characteristic
VBLOC
N=162
Sham Control
N=77
P-value
Dyslipidemia
91 (56.2%)
46 (59.7%)
0.884
Obstructive sleep apnea
33 (20.4%)
23 (29.9%)
0.267
Note: Data are presented as mean ± SD for continuous variables. Data are presented as n (%) for categorical variables.
P-values for continuous variables were calculated using a Student's t-test (no asterisk) or a Wilcoxon rank sum test (*)
if the variable was not normally distributed based on the Shapiro-Wilk normality test. Categorical variables were
compared using Fisher's exact test.
9.4 Primary Safety Endpoint
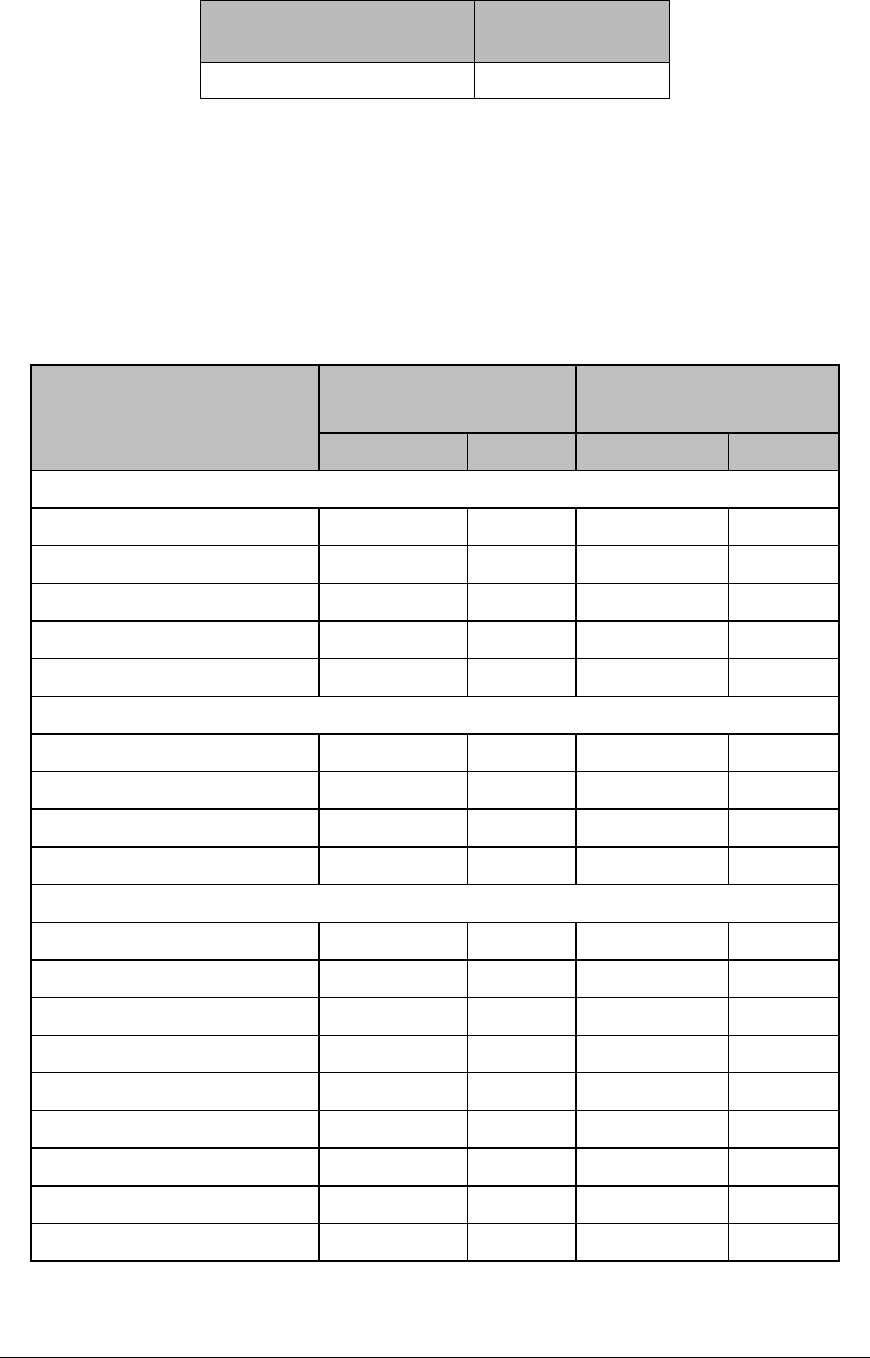
The primary safety SAE rate (Table 9-2), defined as the proportion of subjects in the
VBLOC group who experienced an implant/revision procedure, device or therapy-related
SAE through 12 months post-implant, was 3.7% (n=6; 95% CI: 1.4% to 7.9%) in the ITT
population. This rate was significantly lower than 15% (p<0.0001), so the primary safety
endpoint was met. The type, origin, and relatedness of these SAEs are shown in Table
9-3. All SAEs were adjudicated by the Clinical Events Committee (CEC).
Table 9-2: Primary Safety Endpoint
VBLOC Group
SAE Rate (95% CI) [n/N]
P-value
(SAE Rate < 15%)
3.7% (1.4, 7.9) [6/162]
<.0001
Table 9-3: Listing of Events for Primary Safety Endpoint
Subject ID
SAE Type
SAE Origin (Relatedness)
301-303-RC
Neuroregulator malfunction
Device (Definite)
301-325-RC
Pain, neuroregulator site
Device (Definite)
311-309-RC
Atelectasis
Implant/revision procedure (Definite)
311-319-RC
Neuroregulator malfunction
Device (Definite)
313-323-RC
Gallbladder disease
Therapy algorithm (Possible)
317-309-RC
Emesis (Vomiting)
Implant/revision procedure (Definite)
Considering all SAEs in the primary safety endpoint as well as those related to the
general surgical procedure (e.g., nausea), the rate was 8.6% (Table 9-4), which was also
significantly lower than 15%. These additional SAEs related to general surgical
procedure included 6 cases of post-operative nausea, cirrhosis (subject not implanted),
generalized ileus, and intra-operative oozing.
Table 9-4: Rate of SAEs in Primary Safety Endpoint and SAEs Related to General Surgical
Procedure
Maestro® Rechargeable System P01392-001 Rev K
System Instructions for Use
© EnteroMedics, Inc 2015 Page 25 of 73
VBLOC Group
SAE Rate (95% CI) [n/N]
P-value
(SAE Rate < 15%)
8.6% (4.8, 14.1) [14/162]
0.01
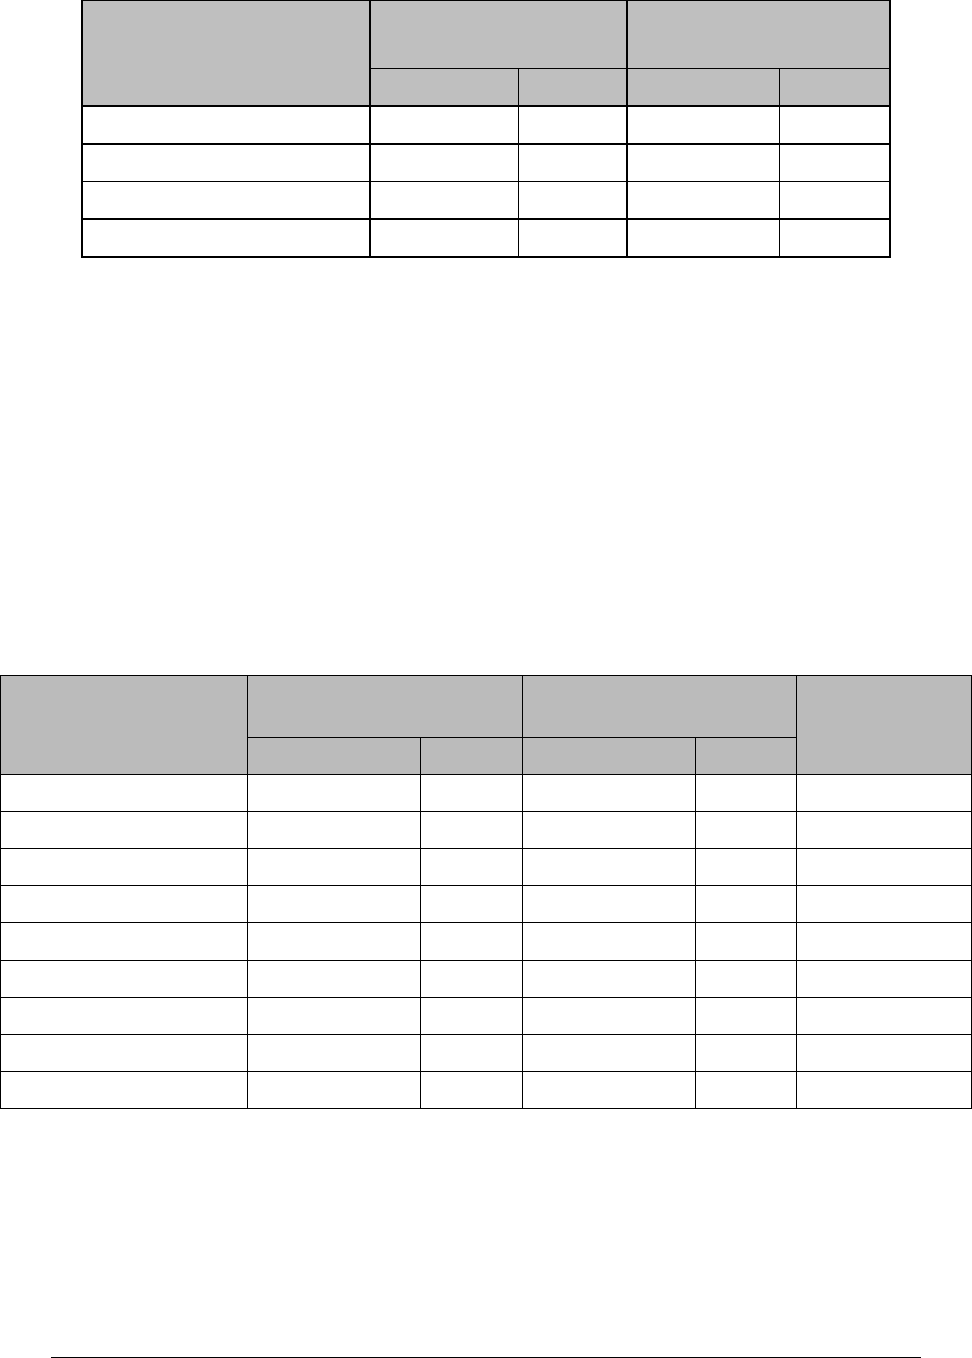
9.4.1 All Serious Adverse Events
At 12 months, there were 27 SAEs among 22 VBLOC subjects (13.6%) and 4 SAEs
among 4 sham control subjects (5.2%). All SAEs are listed by CEC-determined
relatedness (Table 9-5).
Table 9-5: Serious Adverse Events by CEC Category
Serious Adverse Event
VBLOC
N=162
Sham Control
N=77
N (%) subjects
N events
N (%) subjects
N events
SAEs related to device, implant/revision, or therapy
Neuroregulator malfunction
2 (1.2)
2
0 (0.0)
0
Atelectasis
1 (0.6)
1
0 (0.0)
0
Gallbladder disease
1 (0.6)
1
0 (0.0)
0
Emesis/vomiting
1 (0.6)
1
0 (0.0)
0
Pain, neuroregulator site
1 (0.6)
1
0 (0.0)
0
SAEs related to general surgical procedure
Nausea
6 (3.7)
6
0 (0.0)
0
Cirrhosis*
1 (0.6)
1
0 (0.0)
0
Generalized ileus
1 (0.6)
1
0 (0.0)
0
Intra-operative oozing
1 (0.6)
1
0 (0.0)
0
SAEs related to pre-existing condition or not related
Allergic reaction
1 (0.6)
1
0 (0.0)
0
Chest pain
1 (0.6)
1
0 (0.0)
0
Colitis
1 (0.6)
1
0 (0.0)
0
Gallbladder disease
1 (0.6)
1
0 (0.0)
0
Gastritis
0 (0.0)
0
1 (1.3)
1
Infection, other
1 (0.6)
1
1 (1.3)
1
Osteoarthritis
1 (0.6)
1
0 (0.0)
0
Pain, abdominal
1 (0.6)
1
0 (0.0)
0
Pain, other
2 (1.2)
2
0 (0.0)
0
Maestro® Rechargeable System P01392-001 Rev K
System Instructions for Use
© EnteroMedics, Inc 2015 Page 26 of 73
Serious Adverse Event
VBLOC
N=162
Sham Control
N=77
N (%) subjects
N events
N (%) subjects
N events
Palpitations
1 (0.6)
1
0 (0.0)
0
Pericarditis
1 (0.6)
1
0 (0.0)
0
Breast cancer
0 (0.0)
0
1 (1.3)
1
Worsening back pain
0 (0.0)
0
1 (1.3)
1
* subject not implanted
9.4.2 Overview of All Adverse Events Related to Device,
Therapy or Procedure
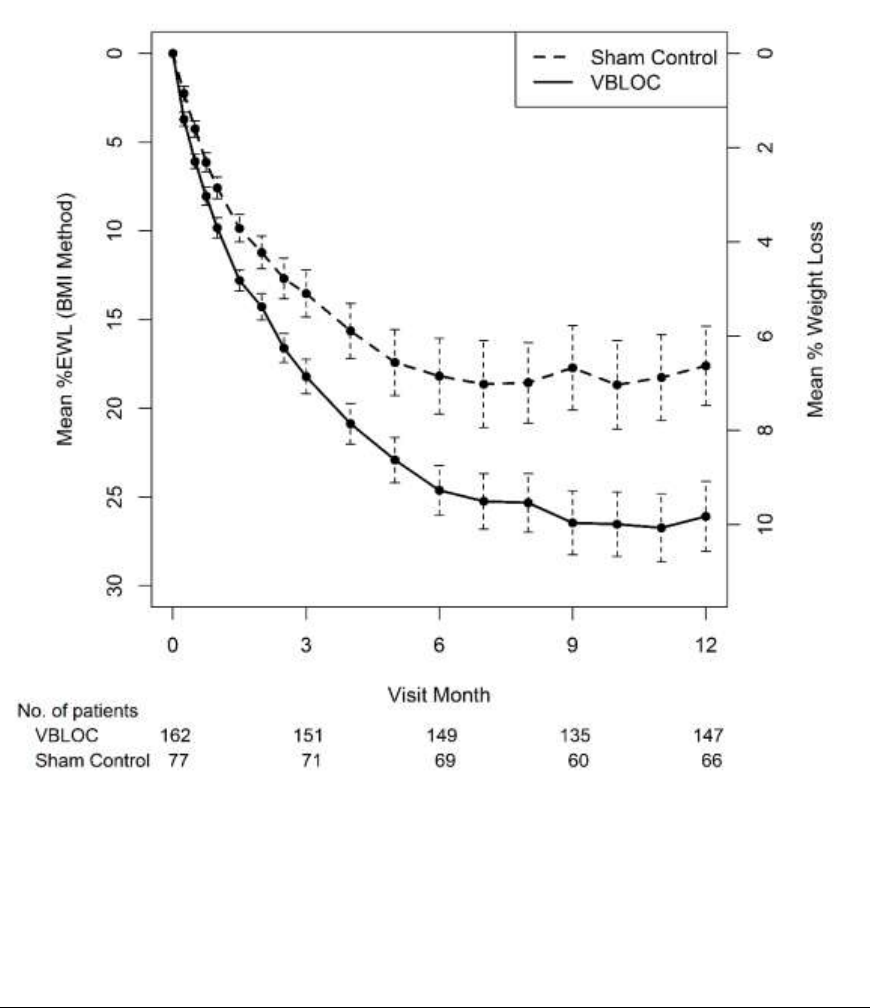
The most common non-serious related AEs through 12 months are shown in Table 9-6.
The most common AE in both groups was pain at the neuroregulator site, although there
was no statistical difference between groups. The rates of other pain and heartburn were
statistically higher in the VBLOC group. This is not unexpected considering the
differences in surgical procedure and therapy between the treatment groups.
Table 9-6: Most Common Non-Serious Adverse Events Related to Device, Implant/Revision
Procedure, or Therapy through 12 Months among Implanted Patients
AE Type
VBLOC
N=157
Sham Control
N=76
Difference
[95% CI]
N patients (%)
N events
N patients (%)
N events
Pain, neuroregulator site
60 (38.2%)
72
32 (42.1%)
35
-3.9% [-17.5, 9.8]
Other
34 (21.7%)
43
7 (9.2%)
10
12.4% [-1.4, 25.9]
Heartburn/dyspepsia
38 (24.2%)
42
3 (3.9%)
3
20.3% [6.5, 33.5]
Pain, other
38 (24.2%)
43
0 (0.0%)
0
24.2% [10.5, 37.3]
Pain, abdominal
20 (12.7%)
26
2 (2.6%)
2
10.1% [-3.7, 23.7]
Nausea
7 (4.5%)
8
1 (1.3%)
1
3.1% [-10.5, 16.8]
Dysphagia
13 (8.3%)
13
0 (0.0%)
0
8.3% [-5.4, 21.8]
Eructation/belching
13 (8.3%)
13
0 (0.0%)
0
8.3% [-5.4, 21.8]
Chest pain
9 (5.7%)
9
2 (2.6%)
2
3.1% [-10.6, 16.8]
9.4.3 Adverse Events Leading to Study Withdrawal
There were four adverse events that led to withdrawal from the study before the 12-
month visit. In the VBLOC group, one subject (0.6%) withdrew due to pain at the
neuroregulator site. Three subjects (3.9%) in the sham control group withdrew for pain at
the neuroregulator site, anxiety, and breast cancer, respectively.

Maestro® Rechargeable System P01392-001 Rev K
System Instructions for Use
© EnteroMedics, Inc 2015 Page 27 of 73
9.4.4 Surgical Removals of the Device
Five subjects (3.1%) in the VBLOC group and eight subjects (10.4%) in the sham control
group had their device explanted through the 12-month visit. In the VBLOC group, two
explants were for subject decision, one for pain at the neuroregulator site, one for pain,
other, and one for heartburn. In the sham control group, four explants were for subject
decision, one for pain at the neuroregulator site, one for a breast cancer diagnosis, one for
worsening IBS symptoms, and one in order to receive an MRI for shoulder pain. All
explanted subjects had a hospital stay of one day or less with the exception of one subject
in the sham control group who had a mastectomy at the time of explant.
An additional 16 patients in the VBLOC group had their device removed between 12 and
18 months after implant. Twelve explants were for subject decision, one for right arm
pain due to thoracic outlet syndrome, one for pain at the neuroregulator site, and two for
upper quadrant pain. An additional 9 patients in the sham control group had their device
removed between 12 and 18 months after implant. Seven explants were for subject
decision, one for need for MRI for neck and back pain, and one due to pain at the
neuroregulator site.
There were two subjects in the VBLOC group who were lost to follow-up before the 12-
month visit who did not have the device explanted.
9.4.5 Surgical Revisions
Eight subjects (4.9%) in the VBLOC arm had nine surgical revisions performed through
12 months: four for device malfunction, three for pain at the neuroregulator site, and two
for neuroregulator tilt. There were no surgical revisions in the sham control group.
9.5 Effectiveness
In the ITT analysis, the VBLOC group achieved 24.4% EWL at 12 months compared to
15.9% EWL for the sham control group. The mean difference between groups was 8.5
percentage points (95% CI, 3.1 to 13.9), which was below the pre-specified super-
superiority margin of 10% (p=0.708) so the first co-primary efficacy endpoint was not
met. The VBLOC group did achieve statistically superior weight loss compared to the
sham control group as assessed by a two-sided t-test (p=0.002). In the ReCharge Study,
all patients received weight management counseling. This counseling consisted of advice
on healthy eating, being active and how to lose weight. However, patients were not
placed on prescribed diets or exercise programs. Studies have shown that weight loss
interventions (such as pharmacotherapy or other weight loss surgeries) are more effective
when they are combined with diet and exercise.
The assumptions in the design of the trial regarding the mean %EWL in the VBLOC
group (assumed 25%; observed 24.4%), as well as the standard deviation of the
difference between groups (assumed 22%, observed 21.9%) proved to be approximately
correct, however the assumption regarding %EWL in the sham control group was
underestimated by a factor of three (assumed 5%, observed 15.9%).
Maestro® Rechargeable System P01392-001 Rev K
System Instructions for Use
© EnteroMedics, Inc 2015 Page 28 of 73
9.5.1 Change in %EWL and %Total Body Weight Loss
(%TBL)
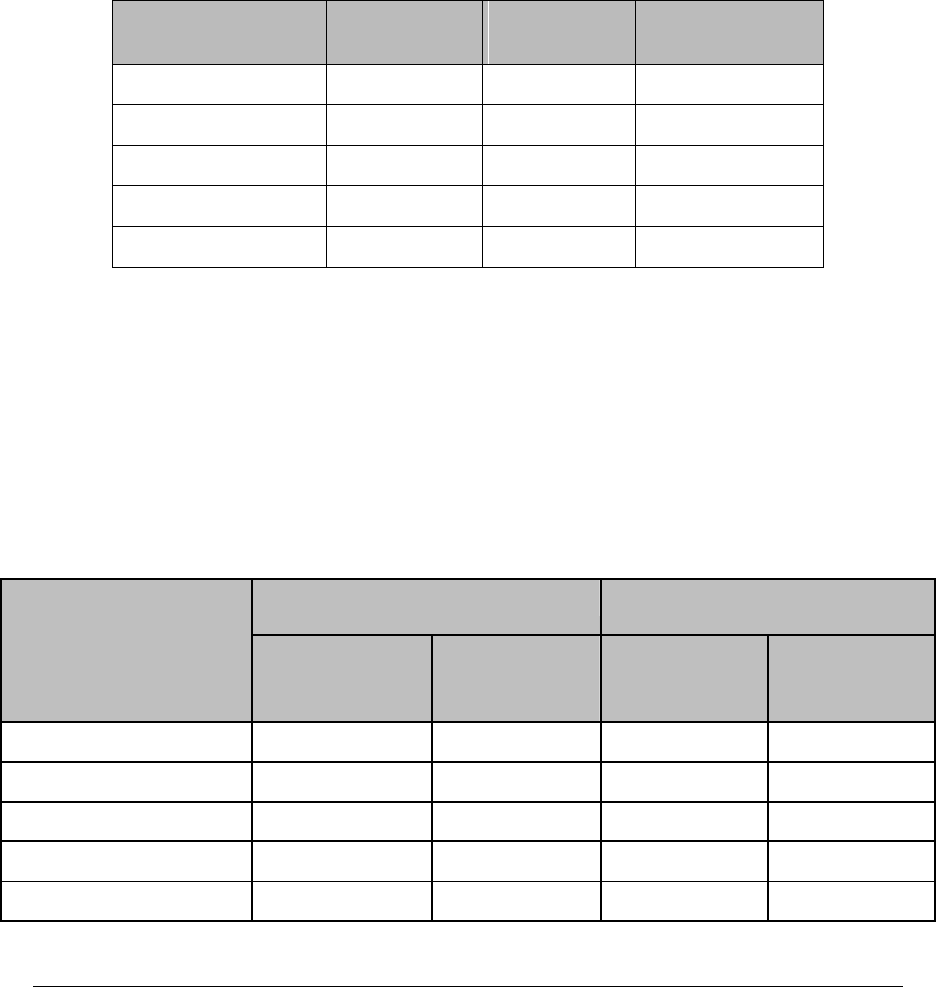
Figure 9-1 shows %EWL and %TBL over time without imputation. Subjects in the
VBLOC group achieved a mean of 9.8% TBL at 12 months and the sham control group
achieved 6.7% TBL.
These longitudinal data show greater weight loss with VBLOC therapy over sham control
throughout the first 12 months of the study. The mean differences between VBLOC and
sham control groups were statistically greater than zero at every visit from week 1
through 12 months, which demonstrates that the effect of VBLOC therapy was
demonstrated early and was sustained throughout the first 12 months of the trial.
Figure 9-1: Mean %EWL and %TBL and Standard Errors without Imputation
Maestro® Rechargeable System P01392-001 Rev K
System Instructions for Use
© EnteroMedics, Inc 2015 Page 29 of 73
9.5.2 Responder Analyses
At 12 months in the ITT population, the VBLOC group had 52.5% of subjects with 20%
or greater EWL and 38.3% of subjects with 25% or greater EWL, which did not meet the
respective performance goals of 55% and 45%. The sham control group had 32.5% of
subjects with 20% or greater EWL and 23.4% of subjects with 25% or greater EWL.
Responder analyses were conducted comparing the percentage of subjects in each group
who achieved levels of response between 20% and 50%. As shown in Table 9-7, there is
a statistically significant treatment benefit over sham surgical control at all %EWL
thresholds from 20% EWL and above. The difference in responder rates is also presented
using odds ratios. The VBLOC group has significantly higher odds of achieving higher
%EWL thresholds over sham control at every threshold from 20% and above.
Table 9-7: %EWL Thresholds from Implant in ITT Population
%EWL Achieved
VBLOC
N=162
Sham Control
N=77
OR [95% CI]
20% EWL
85 (52.5%)
25 (32.5%)
2.3 [1.3, 4.1]
25% EWL
62 (38.3%)
18 (23.4%)
2.0 [1.1, 3.8]
30% EWL
49 (30.2%)
14 (18.2%)
2.0 [1.0, 3.8]
40% EWL
35 (21.6%)
4 (5.2%)
5.0 [1.7, 14.7]
50% EWL
24 (14.8%)
1 (1.3%)
13.2 [1.8, 99.6]
9.5.3 Improvements in Obesity Risk Factors
Table 9-8 illustrates the improvements seen in obesity risk factors for the VBLOC and
sham control groups. All obesity risk factors trended toward improvement with VBLOC
therapy and in the sham control group.
Improvements in patient questionnaires (i.e., IWQoL, Three Factor Eating Questionnaire)
were also observed consistent with the weight loss.
Table 9-8: Change in Obesity Risk Factors at 12 Months
Risk Factor
VBLOC
Sham Control
Screening
Mean [95% CI]
Mean Change
from Screening
[95% CI]
Screening
Mean [95% CI]
Mean Change
from Screening
[95% CI]
Metabolic
Total Cholesterol (mg/dL)
204.2 [198.3, 210.2]
-8.7 [-13.5, -3.8]
204.8 [196.5, 213.2]
-9.7 [-16.9, -2.6]
LDL Cholesterol (mg/dL)
121.9 [116.8, 127.0]
-5.2 [-9.6, -0.9]
122.5 [115.8, 129.2]
-4.3 [-10.2, 1.7]
HDL Cholesterol (mg/dL)
54.3 [51.9, 56.6]
1.0 [-0.5, 2.5]
53.6 [49.3, 57.9]
-0.4 [-3.0, 2.3]
Triglycerides (mg/dL)
141 [131, 151]
-21 [-31, -12]
151 [127, 175]
-33 [-48, 18]

Maestro® Rechargeable System P01392-001 Rev K
System Instructions for Use
© EnteroMedics, Inc 2015 Page 30 of 73
Risk Factor
VBLOC
Sham Control
Screening
Mean [95% CI]
Mean Change
from Screening
[95% CI]
Screening
Mean [95% CI]
Mean Change
from Screening
[95% CI]
Fasting Plasma Glucose
(mg/dL)
96.6 [93.7, 99.5]
-1.5 [-4.1, 1.0]
98.4 [89.8,106.9]
-0.7 [-3.5, 2.2]
HbA1c (%)
5.66 [5.56, 5.77]
-0.33 [-0.40, -0.26]
5.85 [5.52, 6.18]
-0.31 [-0.43, -0.20]
Cardiovascular
Systolic Blood Pressure
(mmHg)
127.4 [125.4, 129.4]
-5.5 [-7.8, -3.2]
129.5 [126.3, 132.7]
-4.0 [-7.3, -0.7]
Diastolic Blood Pressure
(mmHg)
80.7 [79.2, 82.2]
-2.8 [-4.3, -1.2]
81.5 [79.1, 84.0]
-4.5 [-6.5, -2.4]
Heart Rate (bpm)
76.2 [74.7, 77.8]
-3.6 [-5.3, -1.9]
74.8 [72.3, 77.3]
-3.5 [-6.3, -0.7]
Anthropometric
Waist Circumference
(cm)
121 [120, 123]
-10 [-12, -8]
123 [120, 125]
-8 [-10, -6]
9.6 Updated Results through 18 Months
Complete data were collected on 159 subjects (117 VBLOC and 42 sham control) at 18
months. Since the trial remained blinded until all subjects had completed the 12-month
visit, most subjects remained blinded for several months after the 12-month visit. The
median time to unblinding was 16 months for both groups. Specifically, at 15 months,
84% of VBLOC subjects and 90% of sham control subjects (86% total) remained
blinded. At 18 months, 27% of VBLOC subjects and 25% of sham control subjects (26%
total) remained blinded.
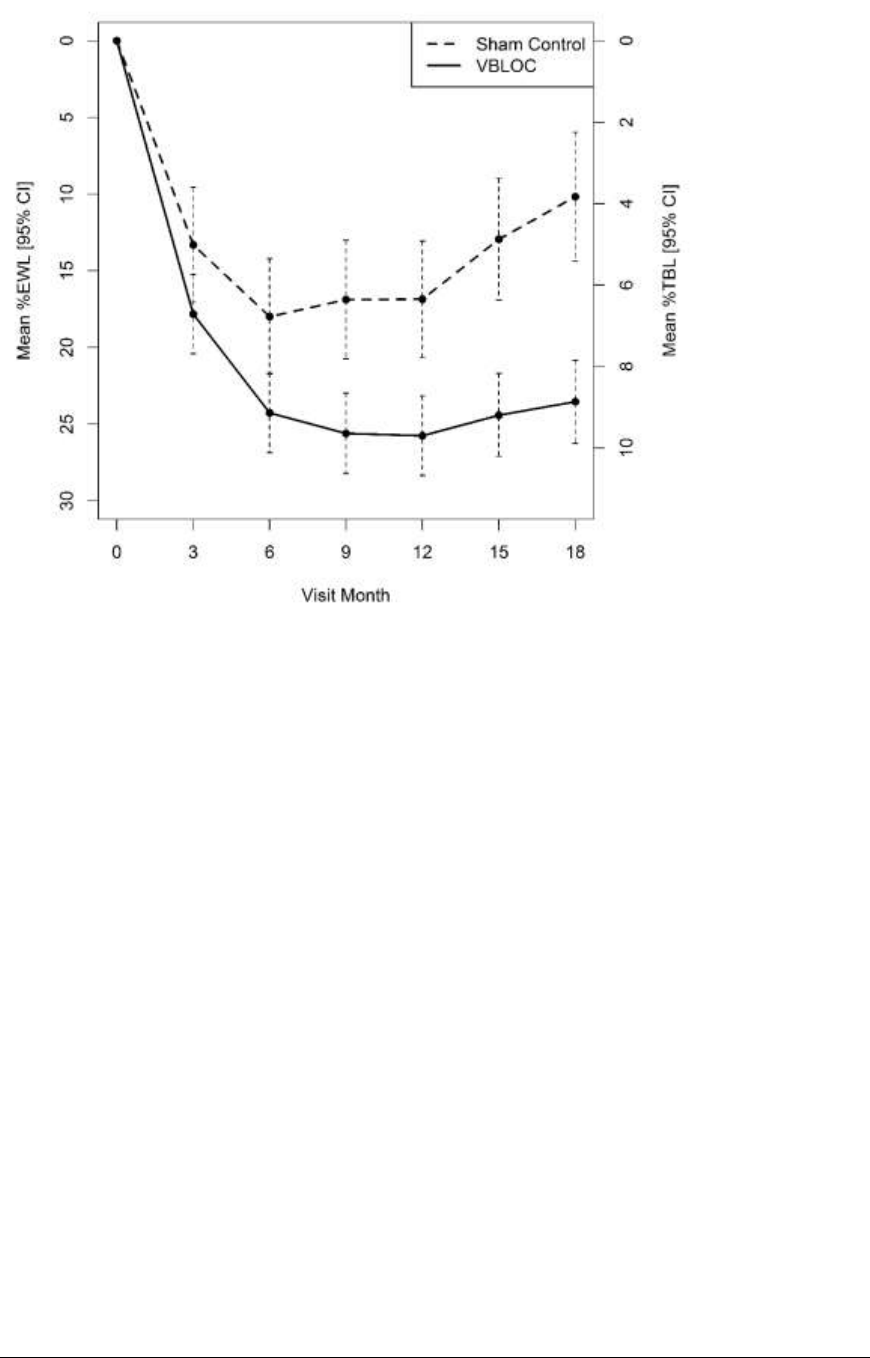
Efficacy through 18 months was assessed using three statistical techniques: a mixed-
effects regression model, the LOCF methodology, as well as without imputation. Results
from the mixed-effects model suggest that weight loss with VBLOC therapy was durable,
with an estimated mean 25.8% EWL at 12 months, 24.4% at 15 months, and 23.5% EWL
at 18 months. The sham control group regained a significant amount of weight following
the 12-month visit, with an estimated mean %EWL of 16.9% at 12 months, 12.9% at 15
months, and 10.1% at 18 months.
The treatment difference increased from 8.9 percentage points (95% CI: 4.3 to 13.5) at 12
months to 13.4 percentage points (95% CI: 8.4 to 18.4) at 18 months. This increase in
relative efficacy as a result of the sham control group gaining weight cannot be largely
attributed to unblinding since most subjects remained blinded until the 16-month visit.
Maestro® Rechargeable System P01392-001 Rev K
System Instructions for Use
© EnteroMedics, Inc 2015 Page 31 of 73
Figure 9-2: Estimated Mean %EWL and 95% CI from Mixed-Effects Model through 18 months
The related SAE rate, the proportion of subjects in the VBLOC group who experienced
an implant/revision procedure, device, or therapy-related SAE, was 4.3% (95% CI: 1.8 to
8.7) in the ITT population at 18 months. One additional related SAE was a gastric
perforation that occurred in a female subject during explant of the device when she
decided to discontinue study participation. The safety SAE rate through 18 months
including those SAEs related to general surgical procedure was 9.3% (95% CI: 5.3 to
14.8) in the VBLOC group
Through 18 months there were no deaths or unanticipated adverse device effects
(UADEs) with the Maestro Rechargeable System. The overall adverse event profile at 18
months was similar to that observed through 12 months.

Maestro® Rechargeable System P01392-001 Rev K
System Instructions for Use
© EnteroMedics, Inc 2015 Page 32 of 73
10. Individualization of Treatment
Best results are achieved when the patient is fully informed about the therapy risks and
benefits, surgical procedure, follow-up requirements, and self-care responsibilities.
Maximum benefits from the Maestro Rechargeable System require long-term
management.
10.1 Patient selection
Select patients carefully to ensure that they are:
Appropriate candidates for surgery;
Can properly operate the system; and
Have no known allergies to implantable components of the Maestro Rechargeable
System.
10.2 Use in specific populations
The safety and effectiveness of this therapy has not been established for:
Pregnancy, unborn fetus, or delivery;
Pediatric use (patients under the age of 18); or
Patients with a history of bariatric surgery, fundoplication, gastric resection or
major upper-abdominal surgery.
10.3 Patient counseling
Patients should be counseled on healthy eating, being active and how to lose weight and
should be encouraged to participate in weight management sessions that are typically
conducted in bariatric clinical settings.
Maestro® Rechargeable System P01392-001 Rev K
System Instructions for Use
© EnteroMedics, Inc 2015 Page 33 of 73
11. Operating Instructions
The Model 2200A and 2200P Leads are implanted onto the anterior and posterior vagal
trunks just above the esophago-gastric junction. The Model 2200P Lead is intended for
the posterior vagus, and is differentiated by a white suture wing and an embedded white
stripe that runs the length of the lead. The Model 2200A Lead is intended for the anterior
vagus, and has clear body tubing and a clear suture wing. Each lead is mechanically
retained within the neuroregulator by means of set screws that also assure electrical
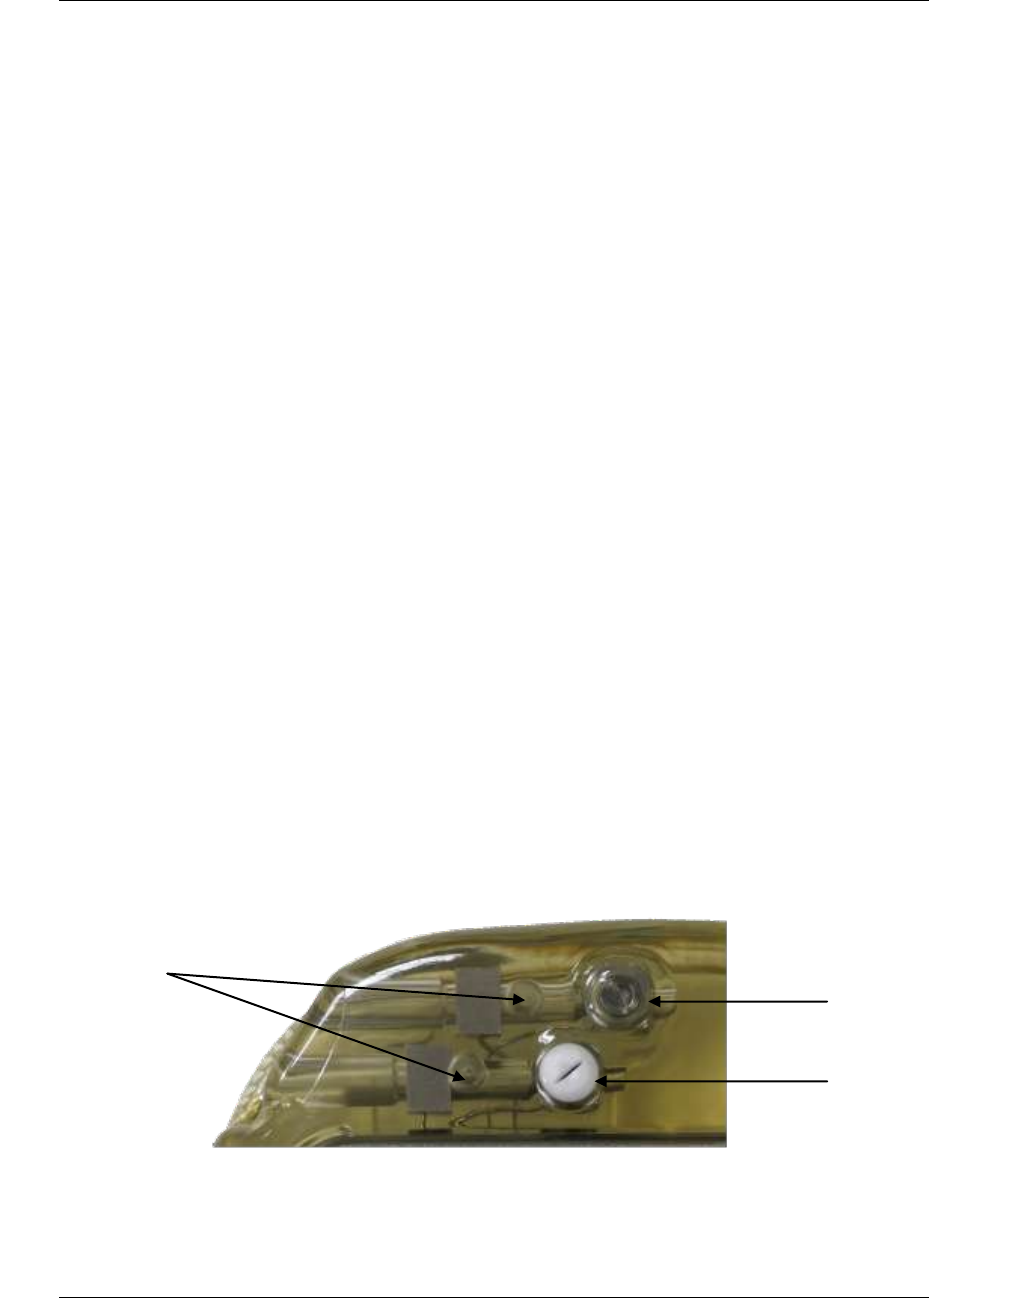
contact. As shown in Figure 11-1, the posterior lead receptacle on the neuroregulator
header with a white septum, also identified with a P on the neuroregulator enclosure, is
for connection with the white posterior lead. The neuroregulator receptacle with a clear
septum, also identified with an A on the neuroregulator enclosure, is intended for
connection with the clear anterior lead. Each lead has silicone rubber insulation, flexible
conductors, and platinum iridium electrodes. Each lead has at least two types of suture
fixation, a suture tongue at the distal end of the lead, and a suture wing on the lead body.
The Model 2002 rechargeable neuroregulator may be placed subcutaneously in one of the
following locations:
a. Mid-axillary line of the thorax
b. Location determined by the surgeon and consistent with device operation.
The neuroregulator should be implanted between 2 and 3 cm below, and parallel to, the
surface of the skin.
Note: The neuroregulator must be placed not deeper than 4 cm below the
surface of the skin to ensure efficient charging and good communication between
the mobile charger and the neuroregulator.
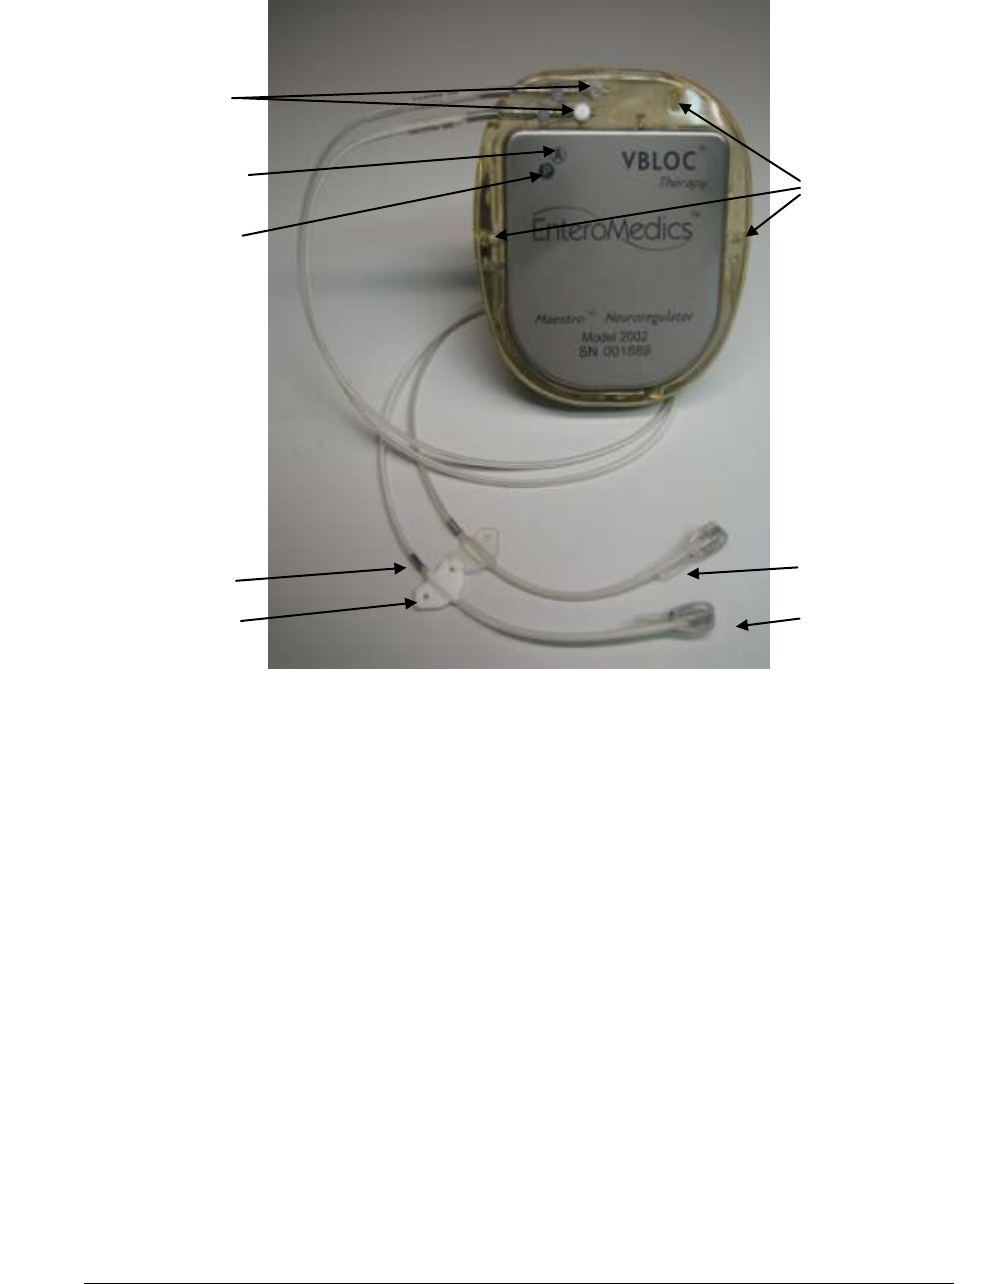
The neuroregulator can be identified by an x-ray marker (EM2). Figure 11-2 shows the
Model 2200 leads and the Model 2002 neuroregulator.
Figure 11-1: Neuroregulator Header
Anterior lead
setscrew septum
Posterior lead
setscrew septum
Pressure relief
holes
Maestro® Rechargeable System P01392-001 Rev K
System Instructions for Use
© EnteroMedics, Inc 2015 Page 34 of 73
Figure 11-2: Neuroregulator and Leads
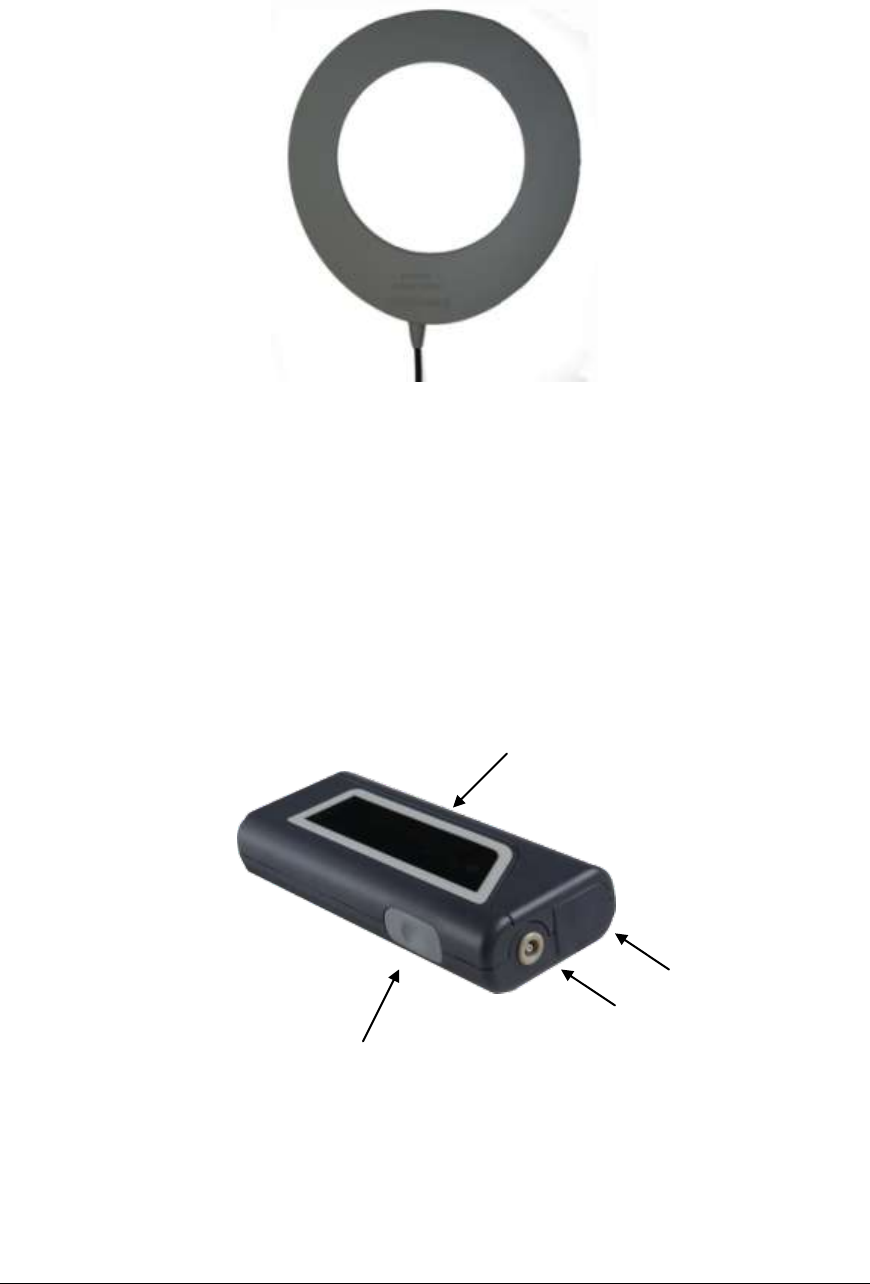
The Model 2403-60 patient transmit coil (Figure 11-3), with a cable length of 60 cm, will
be provided to the patient for daily use with the Maestro Rechargeable System. The
Model 2403-300 clinician transmit coil is used during the surgical procedure and has a
cable length of 300 cm to allow the transmit coil to be used within the sterile field using a
sterile sleeve.
Nerve electrode
Suture tongue
Suture holes (3)
Suture wing
Setscrews
Anterior lead socket
Indicator
Posterior lead socket
indicator
Ring electrode
Maestro® Rechargeable System P01392-001 Rev K
System Instructions for Use
© EnteroMedics, Inc 2015 Page 35 of 73
Figure 11-3: Model 2403-60 Transmit Coil
The Model 2402 mobile charger (Figure 11-4) is an electronic device used externally by
the patient during recharging of the neuroregulator. The major function of the mobile
charger is to provide the power necessary to recharge the battery inside the
neuroregulator and provide a communications path between the clinician programmer
and the neuroregulator. The mobile charger is also is powered by a non-replaceable
lithium ion rechargeable battery.
Figure 11-4: Mobile Charger
Display
Clinician programmer
port
Button
Transmit coil
&
AC recharger port
Maestro® Rechargeable System P01392-001 Rev K
System Instructions for Use
© EnteroMedics, Inc 2015 Page 36 of 73
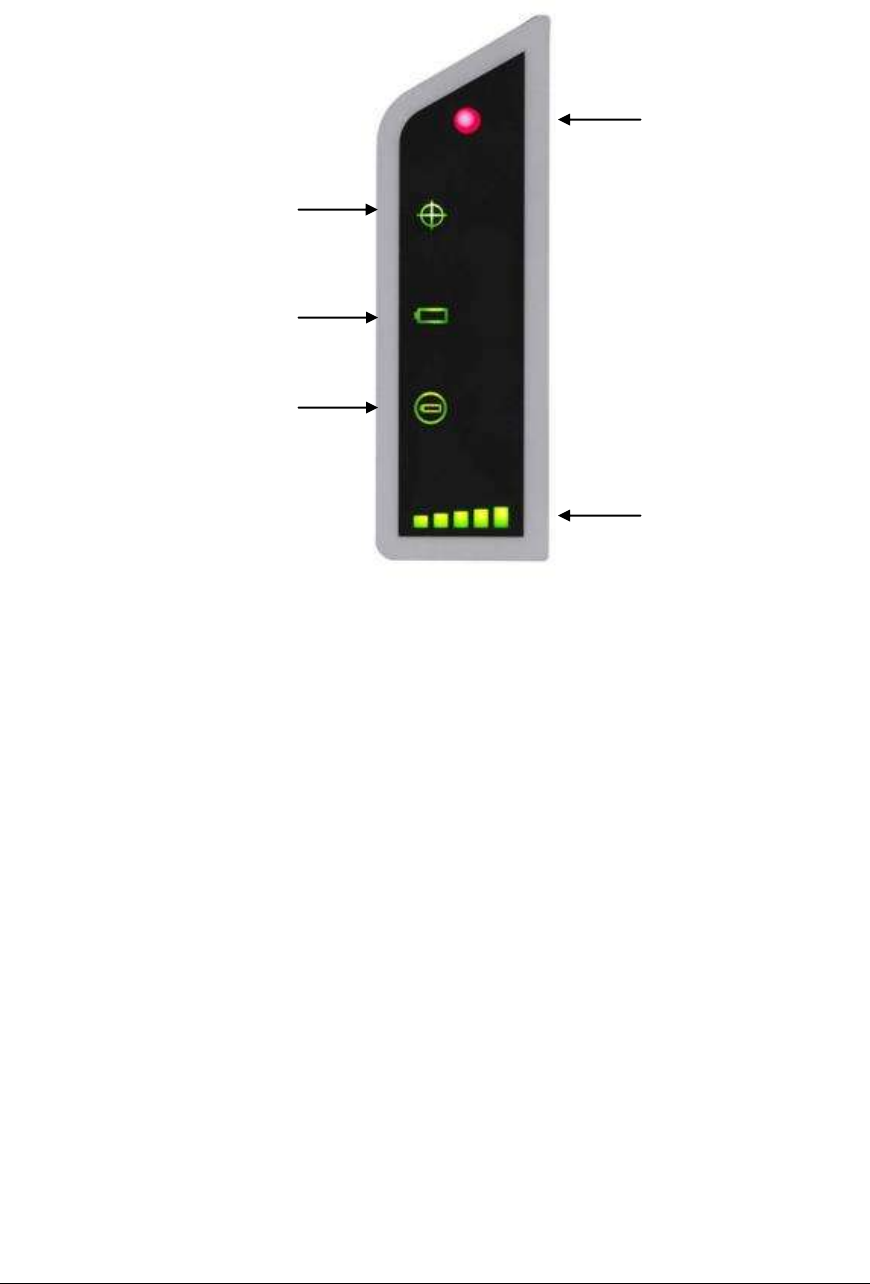
Figure 11-5: Mobile Charger – Display Detail
The Model 2502 clinician programmer enables the clinician to configure and change
therapy parameters and the treatment schedule in the neuroregulator. It provides a
graphical user interface to help the clinician monitor the performance of the Maestro
Rechargeable System and patient compliance with device charging. In addition, the
clinician programmer provides access to the Maestro Rechargeable System manuals.
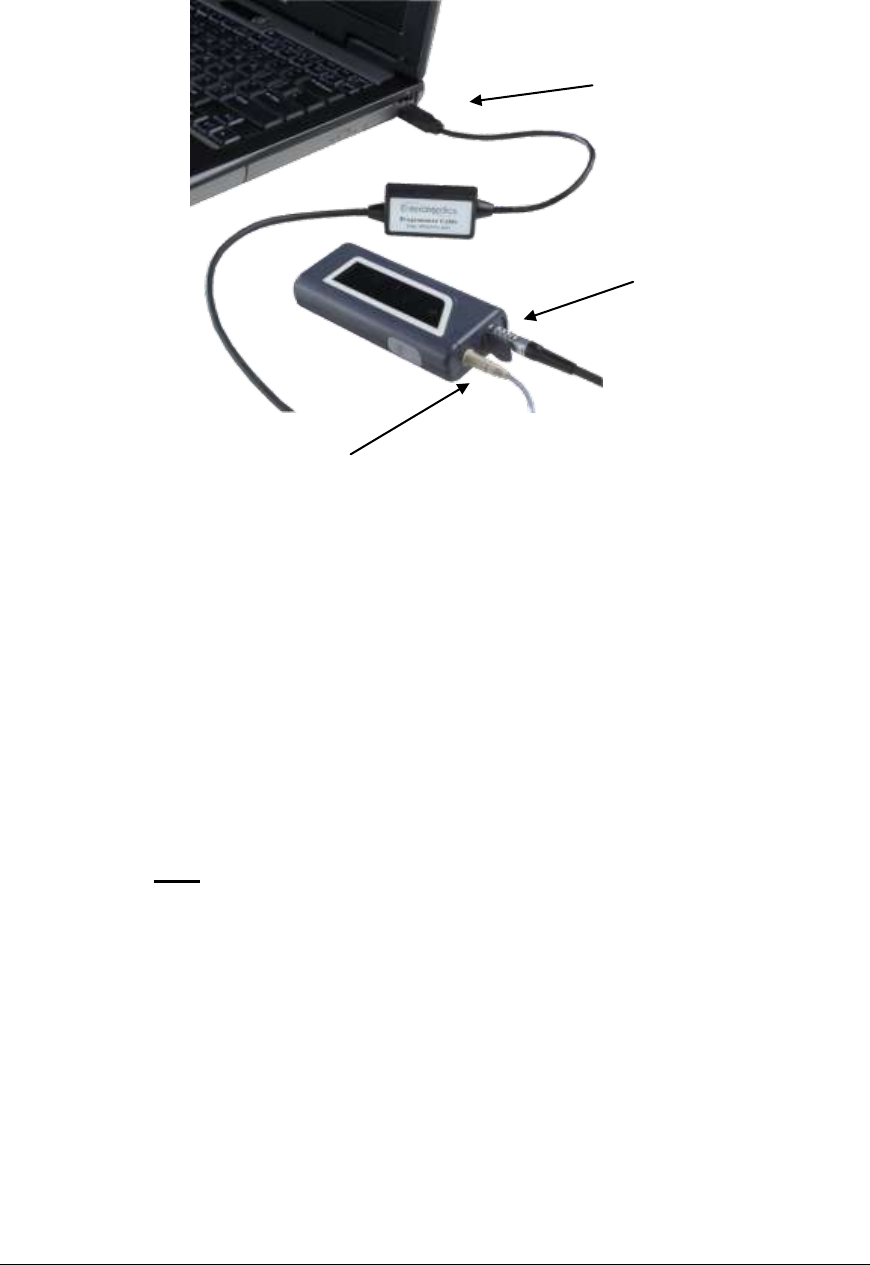
The clinician programmer is connected to the Model 2402 mobile charger with the Model
1600 programmer cable, as shown in Figure 11-6. This cable connects to a standard USB
port on the clinician programmer and the clinician programmer port on the mobile
charger.
Status Icon
Mobile Charger Battery Icon
Transmit Coil Position
Icon
Bar graph
Neuroregulator Battery Icon
Maestro® Rechargeable System P01392-001 Rev K
System Instructions for Use
© EnteroMedics, Inc 2015 Page 37 of 73
Figure 11-6: Connecting the Mobile Charger & Clinician Programmer
11.1 Using the Mobile Charger
Preparing the Mobile Charger for Initial Use
The mobile charger is shipped in an inactive state. Press and release the button on the
mobile charger once to make it operational and wait a few seconds until the display icons
illuminate in sequence. Once operational, the mobile charger will shut off after several
minutes of inactivity to preserve battery longevity. The mobile charger will automatically
turn on when the button is pressed.
The mobile charger should be charged, using the AC recharger, for a minimum of 8 hours
prior to initial use. See the “Patient Operating Instructions” section of this manual for
instructions on charging the mobile charger.
Positioning the Transmit Coil over the Neuroregulator
Clinician programmer
port
USB connection on the
clinician programmer
connection
Transmit coil
&
AC recharger port

Maestro® Rechargeable System P01392-001 Rev K
System Instructions for Use
© EnteroMedics, Inc 2015 Page 38 of 73
Finding the best position of the transmit coil over the neuroregulator is important to
ensure efficient charging and good communication between the mobile charger and the
neuroregulator.
Insert the transmit coil connector into the transmit coil port on the top side of the
mobile charger (Figure 11-4). The transmit coil position icon will be illuminated
as indicated in Figure 11-5.
With the transmit coil held away from the implanted neuroregulator, press and
hold the mobile charger button (Figure 11-4) for approximately two seconds until
the transmit coil position icon starts to flash and the bar graph is illuminated
(Figure 11-5).
Begin positioning the transmit coil by sweeping the transmit coil across the
neuroregulator in all directions, keeping the coil close to the body. The number of
illuminated bars on the bar graph indicator will increase and decrease.
Position the transmit coil to maximize the number of bars on the bar graph. One bar
indicates poor transmit coil position and five bars indicate the best transmit coil position.
Secure the transmit coil in the best position using the belt provided or another clinician
approved method. Press the button once to accept this position.
Once the transmit coil position has been accepted, the transmit coil position icon
will turn off.
Note: If the transmit coil becomes displaced, the mobile charger will
automatically illuminate the transmit coil position icon. The coil should be
repositioned as described above.
Note: Always hold on to the connector when connecting and disconnecting the
transmit coil. Do not pull on the cable to unplug the transmit coil connector from
the mobile charger.
Poor Signal
Strength
Strong Signal
Strength
Coil Position
Indicator

Maestro® Rechargeable System P01392-001 Rev K
System Instructions for Use
© EnteroMedics, Inc 2015 Page 39 of 73
11.2 Maestro Rechargeable System Preparation Prior to
Implantation
Neuroregulator Placement
It is important to assess placement of the neuroregulator prior to surgery. Assess the
placement with the patient in both the sitting and standing positions, to ensure patient
comfort, efficient charging and good communication between the mobile charger and the
neuroregulator. Discuss with the patient the device placement in the following order of
preference:
a. Mid-axillary line of the thorax.
b. Location determined by the surgeon and consistent with device operation.
Mobile Charger Preparation
The day prior to the implant procedure two mobile chargers should be fully charged
following the instructions in “Patient Operating Instructions” of this manual.
Entering Registration Information on the Clinician Programmer
On or before the day of surgery, registration information must be entered.
Note: During surgery, the lead status (impedance) test must be performed to
verify correct placement of the leads. This test cannot be performed until the
patient registration is complete.
Note: When the clinician programmer is used by a physician for the first time, it
is recommended that physician information is entered. For more information, see
the Clinician Programmer Manual.
To register a new patient:
1. Connect the clinician programmer to the patient’s mobile charger with the transmit
coil properly located over the neuroregulator.
Note: Registration may be performed with the neuroregulator in the sterile
package. Place the transmit coil over the sterile packed neuroregulator in a
position with at least four bars on the bar graph display of the mobile charger.
Note: For best communication between the clinician programmer and
neuroregulator, avoid any metal objects within three centimeters from the sterile
packed neuroregulator.
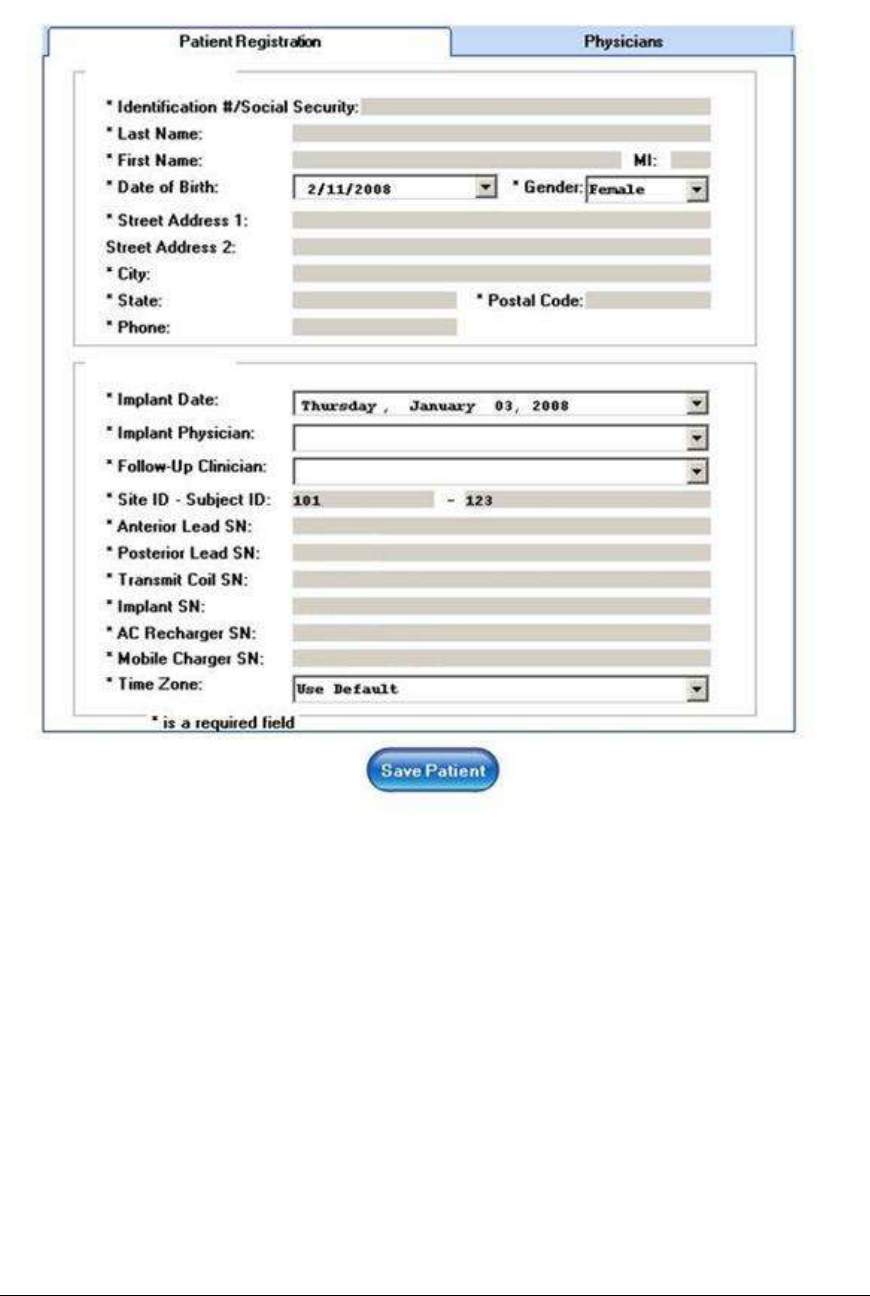
2. If the clinician programmer is communicating with the mobile charger and
neuroregulator, the “Registration” screen (Figure 11-7) will be displayed. This screen

Maestro® Rechargeable System P01392-001 Rev K
System Instructions for Use
© EnteroMedics, Inc 2015 Page 40 of 73
may also be displayed by selecting the “Registration” icon.
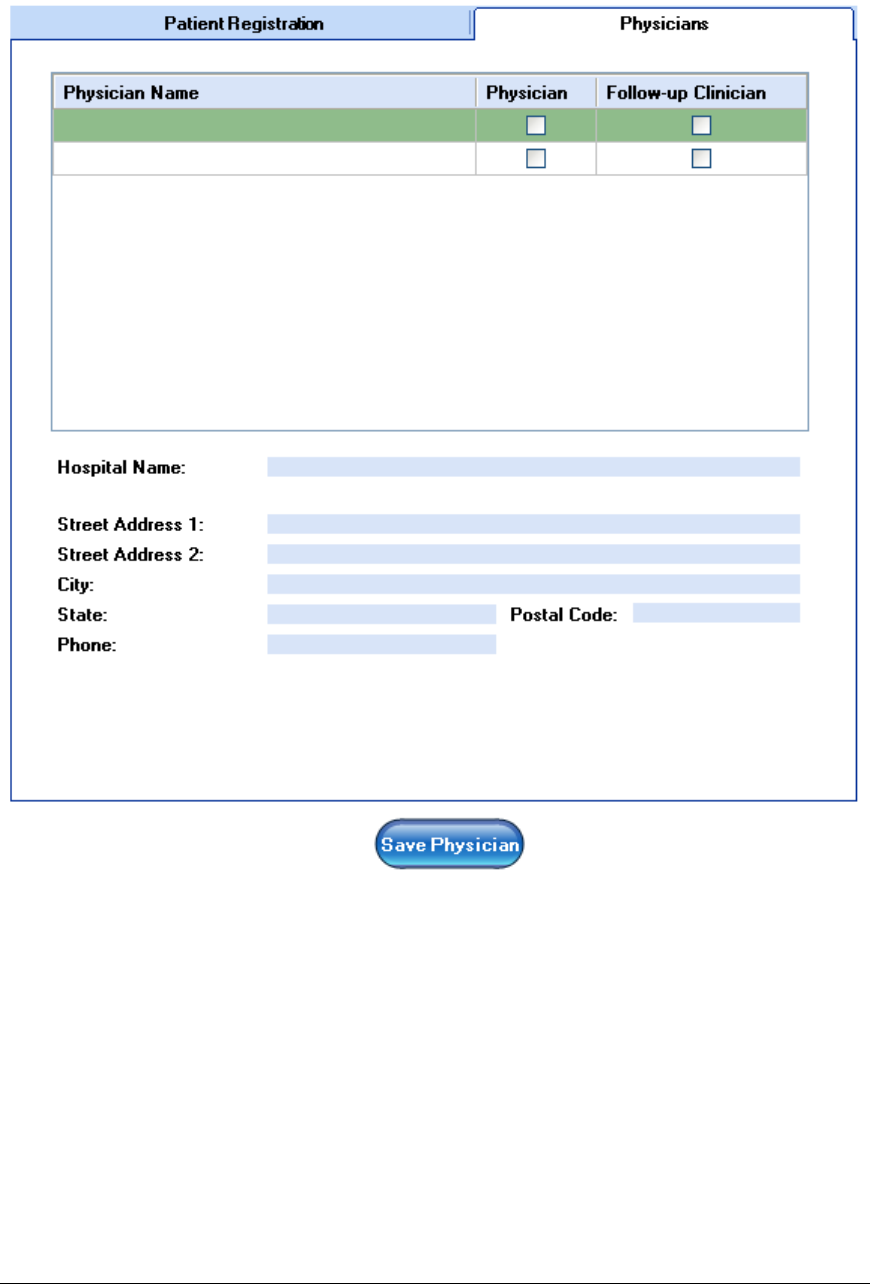
3. Select the “Physicians” tab from the “Registration” screen (Figure 11-8). Check the
appropriate name on the physician list. If the physician’s name is not on the list, enter
the required information and press “Save Physician” to record the information.
4. Select the “Patient Registration” tab from the “Registration” screen (Figure 11-7) and
enter the required information. Press “Save Patient” to record the information.
Note: The clinician programmer will automatically enter the serial numbers of the
mobile charger and neuroregulator. The serial numbers of the leads must be
entered manually and must be re-entered any time the leads are replaced.
5. Check the battery charge level of the neuroregulator and recharge if necessary. For
more information see “Charging the Battery in the Neuroregulator” section of this
manual.
Note: The clinician programmer will record the date when patient registration
data is saved for the first time as the date of implant. If the registration
information is entered before the day of surgery, the implant date must be
manually updated.
Note: For detailed instructions on how to use the clinician programmer, consult
the Clinician Programmer Manual.
Maestro® Rechargeable System P01392-001 Rev K
System Instructions for Use
© EnteroMedics, Inc 2015 Page 41 of 73
Figure 11-7: Registration Screen – Patient Registration
Maestro® Rechargeable System P01392-001 Rev K
System Instructions for Use
© EnteroMedics, Inc 2015 Page 42 of 73
Figure 11-8: Registration Screen – Physician Information

Maestro® Rechargeable System P01392-001 Rev K
System Instructions for Use
© EnteroMedics, Inc 2015 Page 43 of 73
12. Implant Procedure Summary
Note: Please see Maestro Rechargeable System Surgical Implant Procedure for
detailed instructions.
1. Prepare the patient for laparoscopic surgical placement of leads on the anterior and
posterior vagal nerve trunks.
2. Use standard laparoscopic technique to expose the intra-abdominal anterior and
posterior vagal trunks near the esophago-gastric junction.
3. During insertion through a trocar (minimum size 12 mm) the lead should be handled
without grasping or distorting the electrodes. Once inserted, grasp only the suture
tongue and/or the suture wing (Figure 11-2) of the lead. Avoid lead withdrawal
through the trocar.
4. Place the white-striped lead (2200P) on the posterior trunk. Use the suture tongue to
position the nerve electrode under the nerve. Anchor the lead by suturing the suture
tongue to the esophagus adjacent to the nerve.
5. Place the anterior lead with no stripe (2200A) on the anterior trunk. Use the suture
tongue to position the nerve electrode under the nerve. Anchor the lead by suturing
the suture tongue to the esophagus adjacent to the nerve.
6. Provide strain relief for each lead by suturing both sides of the suture wing close to
the esophago-gastric junction on the stomach. This allows for electrical contact of the
ring electrode to provide for diagnostic measurements of the system. Leave sufficient
lead length between the suture wing and suture tongue for each lead to prevent
tension on the nerve.
7. Verify that the nerves are properly seated within the electrodes.
8. Ensure that the suture through the suture hole of the suture tongue is firmly anchoring
the lead.
9. Externalize the leads by carefully withdrawing the lead connectors through a trocar
(minimum size 12 mm) adjacent to the site of lead connection. Extra lead length may
be gently pulled back into the abdominal cavity after connections to the
neuroregulator are made.
10. Create a pocket for the neuroregulator subcutaneously in the following order of
preference:
a. Mid-axillary line of the thorax.
b. Location determined by the surgeon and consistent with device operation.
The neuroregulator is positioned (with suture) at a depth between 2 and 3 cm below
the surface of the skin.

Maestro® Rechargeable System P01392-001 Rev K
System Instructions for Use
© EnteroMedics, Inc 2015 Page 44 of 73
Note: The neuroregulator must be placed not deeper than 4 cm below the
surface of the skin to ensure efficient charging and good communication between
the mobile charger and the neuroregulator.
11. Ensure that the neuroregulator lead sockets are open by using the provided torque
wrench and back the setscrews out for three or more turns.
12. Insert the posterior lead (with white markings) into the posterior neuroregulator
socket (white septum). Verify that the lead is fully inserted by visually identifying
that the lead connector extends past each setscrew septum (Figure 12-1). Tighten the
setscrew to two clicks using the provided torque wrench.
13. Insert the unmarked anterior lead into the anterior neuroregulator socket (clear
septum). Verify that the lead is fully inserted by visually identifying that the lead
connector extends past each setscrew septum (Figure 12-1). Tighten the setscrew to
two clicks using the provided torque wrench.
14. Perform a lead status (impedance) test as described in the “Lead Status (Impedance)
Test in Surgery” section and ensure that the impedance values are in the allowable
range.
15. Use medical adhesive to seal the two pressure relief holes and the two septums in the
neuroregulator header. Figure 12-1 is a picture of the neuroregulator header prior to
medical adhesive application and Figure 12-2 is a picture of the neuroregulator after
medical adhesive is applied.
16. Use all three suture holes to secure the neuroregulator to the muscular fascia. This
prevents device migration and helps to maintain position approximately parallel to the
skin surface.
17. Perform another lead status (impedance) test as described in the “Lead Status
(Impedance) Test in Surgery” section.
18. The leads should be routed straight out from the neuroregulator and should exit the
pocket without forming any loops around the neuroregulator. Do not leave any
excess lead length in the pocket. This will facilitate safe operation of the system
during charging.
19. Close all incisions.
20. Perform the final lead status (impedance) test as described in the “Lead Status
(Impedance) Test in Surgery” section.
21. Activate the device and initiate therapy as described in the “Device Activation and
Treatment Initiation during Surgery” section.
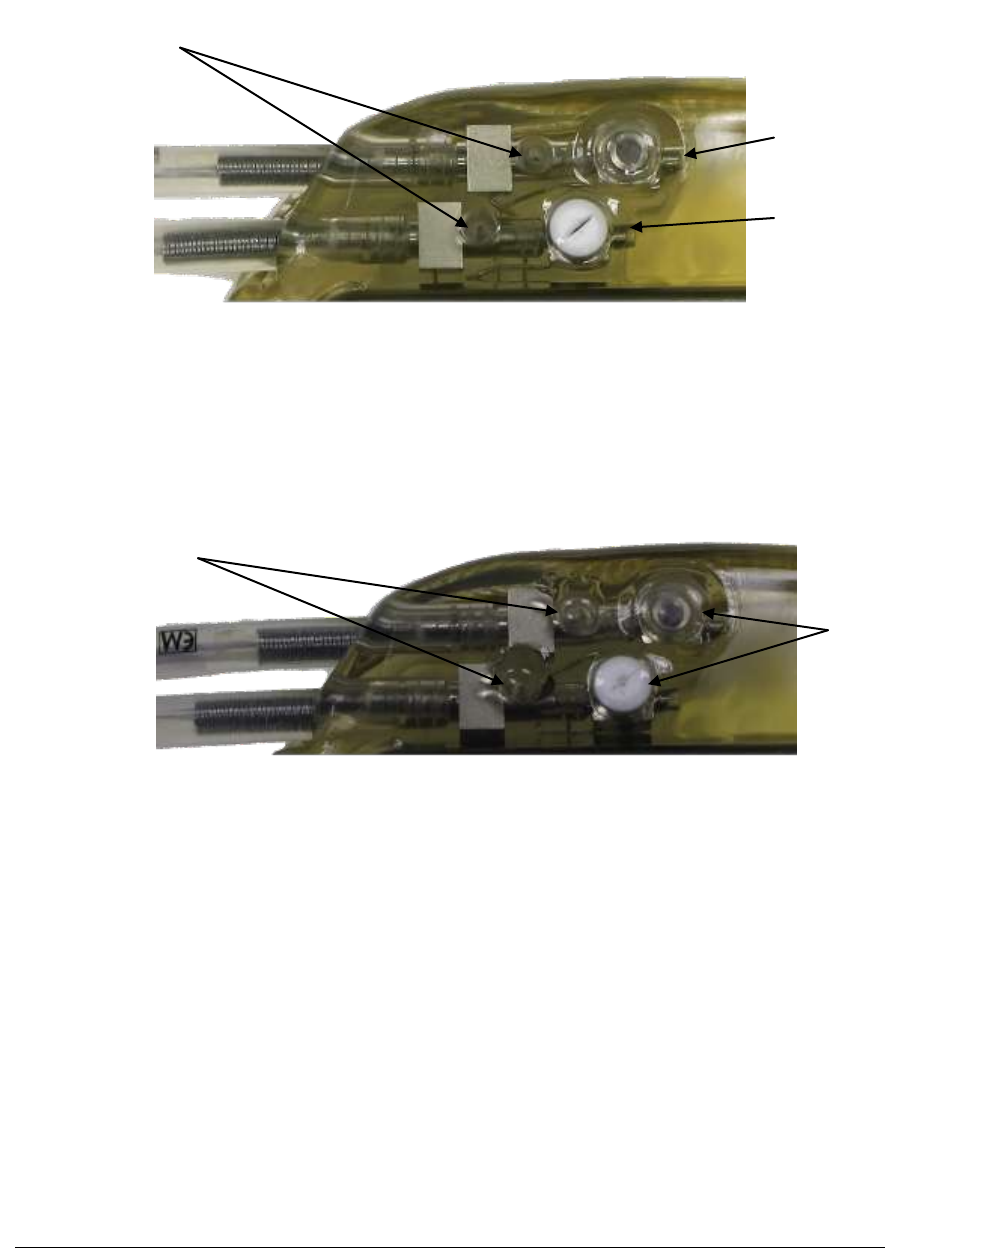
Maestro® Rechargeable System P01392-001 Rev K
System Instructions for Use
© EnteroMedics, Inc 2015 Page 45 of 73
Pressure Relief Holes
Setscrew Septums
Anterior Lead Tip
Pressure Relief Holes
Posterior Lead Tip
Figure 12-1: Lead Connection to the Neuroregulator Prior to Medical Adhesive Application
Figure 12-2: Lead Connection to the Neuroregulator after Medical Adhesive Application

Maestro® Rechargeable System P01392-001 Rev K
System Instructions for Use
© EnteroMedics, Inc 2015 Page 46 of 73
13. Lead Status (Impedance) Test in Surgery
Note: The lead status (impedance) test should be conducted only when the
retractors are removed and after carbon dioxide insufflation.
Note: The lead status (impedance) test cannot be performed until the patient
registration is complete.
Note: During surgery, the lead status (impedance) test should be conducted with
the default amplitude of 3mA. After the final test is complete the lead impedance
amplitude must be reprogrammed to1 mA and saved. During the first follow-up
visit, the lead impedance test amplitude must be reprogrammed to 3 mA and
saved.
1. Place the clinician transmit coil in a sterile sleeve.
2. Connect the clinician transmit coil to the mobile charger.
3. Connect the mobile charger to the clinician programmer using the programmer cable.
4. Properly position the clinician transmit coil over the neuroregulator.
Note: With the neuroregulator outside the pocket, the best location for the
transmit coil may be found 1 or 2 cm above the neuroregulator.
5. Use the clinician programmer to perform the lead status (impedance) test. The
“Diagnostic” screen (Figure 13-1) displays the impedance values. A green check icon
will be shown for each lead configuration if the impedance measurement is in the
therapy delivery range (Table 13-1).
Note: The desirable range for the lead impedance values directly after the surgical
procedure is between 400 and 1000 Ohms.
6. If the lead status is not acceptable or the impedance is greater than 1000 Ohms, the
following should be considered:
a. Check the setscrew connections for each lead to the neuroregulator.
b. Clear all fluids from nerve electrodes.
c. Reposition, re-suture, or replace leads as appropriate.
Note: If the lead status (impedance) test could not be performed, reposition the
transmit coil as described above and repeat the test.
Note: Therapy will not be delivered at impedance levels below 400 Ohms and
above 1500 Ohms (Table 13-1).
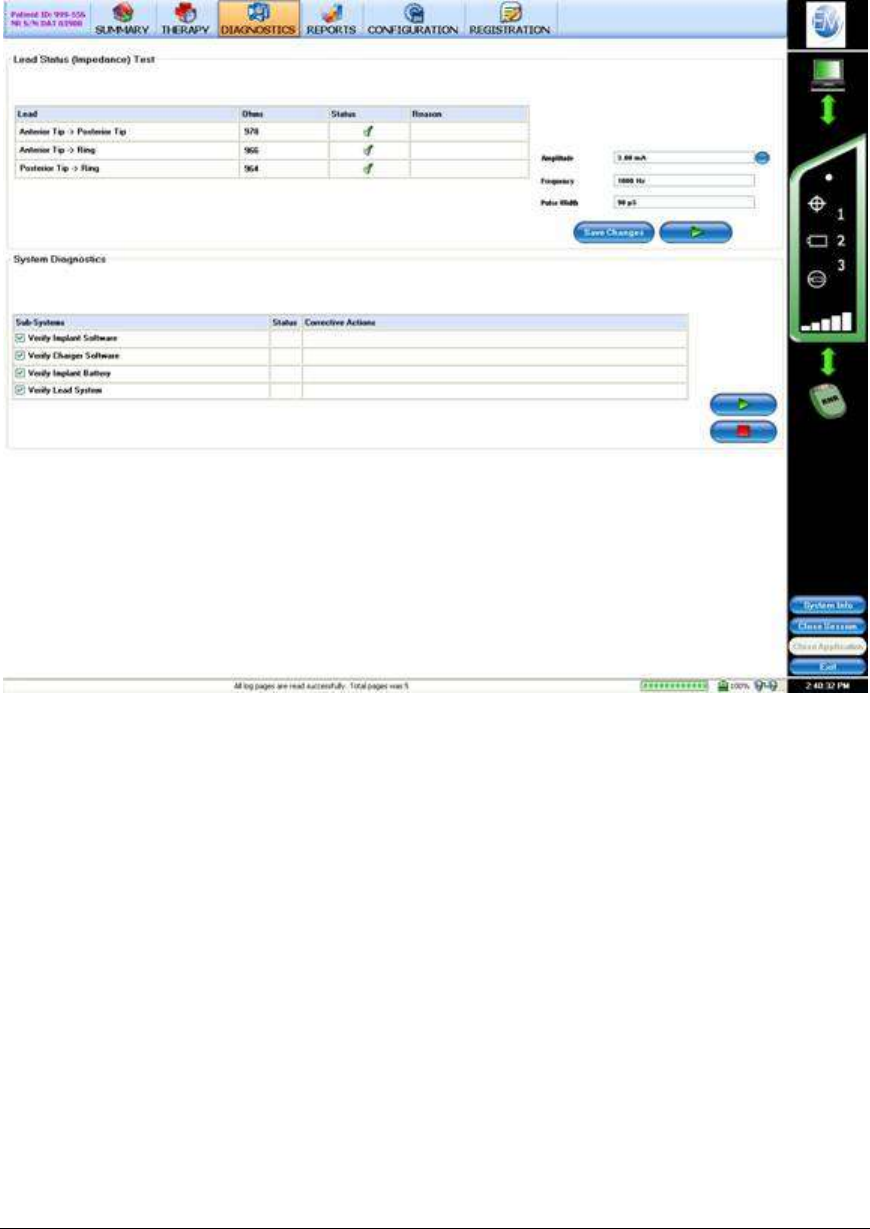
Maestro® Rechargeable System P01392-001 Rev K
System Instructions for Use
© EnteroMedics, Inc 2015 Page 47 of 73
Figure 13-1: Lead Status (Impedance) Test

Maestro® Rechargeable System P01392-001 Rev K
System Instructions for Use
© EnteroMedics, Inc 2015 Page 48 of 73
Table 13-1: Lead Impedance Measurements
Low Impedance
(Short Circuit)
Acceptable Impedance Range
High Impedance
(Open Circuit)
<400 Ohms
400 – 1500 Ohms
>1500 Ohms
Therapy Delivery
Disabled
Therapy Delivery Range
Therapy Delivery
Disabled
Electrodes may be
in contact with
each other or too
close together.
Impedances between 400 and 1000 Ohms are
desirable.
Impedances may change within the first
several days or weeks following lead
implantation.
Contact between
electrodes and the
nerve may be
insufficient or the
lead may be
damaged and
should be replaced.

Maestro® Rechargeable System P01392-001 Rev K
System Instructions for Use
© EnteroMedics, Inc 2015 Page 49 of 73
14. Device Activation and Treatment Initiation
during Surgery
14.1 Device Activation and Therapy Initiation
During surgery, the device will be activated and the initial treatment parameters set.
Note: Refer to the Clinician Programmer Manual for additional information
regarding clinician programmer functions.
The clinician programmer and the mobile charger are used to activate the device and
establish the therapy parameters and therapy delivery schedule:
1. Connect the mobile charger to the clinician programmer using the programmer cable.
2. Connect the transmit coil to the mobile charger and properly position the transmit
coil.
Note: If the clinician programmer message “Device Activation Needed”
appears, select “OK” and confirm when “Please Confirm Device Activation” is
displayed.
3. Ensure the clinician programmer is in communication with the mobile charger and the
neuroregulator by observing the dashboard on the “Summary” screen.
4. Select “Diagnostics” from the “Summary” screen to open the “Diagnostic” screen.
5. Perform a lead status (impedance) test.
6. Ensure that the Anterior to Posterior impedance is in the acceptable impedance range
(400-1500 Ohms). If the lead status test is not acceptable, contact EnteroMedics.
7. Select “Therapy” from “Summary” screen to open the “Therapy” screen.
Note: If the clinician programmer message “Device Activation Needed” appears,
select “OK” and confirm when “Please Confirm Device Activation” is displayed.
8. Ensure the therapy settings for parameter set 1 are “Enabled” and parameter sets 2
and 3 are “Disabled”.
9. The default therapy settings for parameter set 1 are the following:
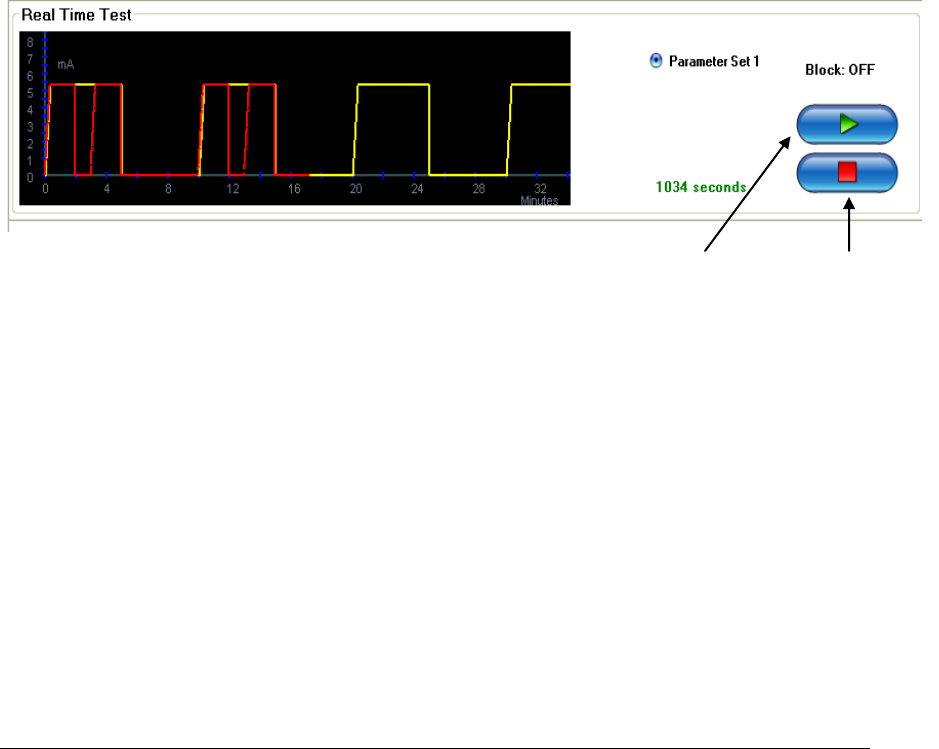
Maestro® Rechargeable System P01392-001 Rev K
System Instructions for Use
© EnteroMedics, Inc 2015 Page 50 of 73
Stop Real Time Test
Start Real Time Test
Amplitude: 1.0 mA
Frequency 5000 Hz
Pulse Width 90 uS
Ramp Up 20.0 S
Ramp Down 0.0 S
ON Time: 5.0 Min: 2 ON/1 OFF
OFF Time: 5.0 Minutes
Lead Configuration: “Ant to Post”
10. Start the Real Time Test as shown in Figure 14-1. Stop the Real Time Test after a few
minutes when therapy delivery is shown on the Real Time Test screen.
Note: When the Therapy Timing is programmed to 5 minutes ON, the actual
therapy the Maestro Programmable System will deliver consists of 2 minutes ON,
1 minute OFF, 2 minutes ON, followed by the Therapy OFF time, as shown in
Figure 14-1)
Figure 14-1: Real Time Test
11. Adjust the therapy schedule if needed to deliver the prescribed hours of therapy
(Figure 14). Select “Save Changes” after the therapy schedule and parameters have
been established.
Note: It is recommended to adjust the therapy schedule to 13 hours of therapy
delivery during hours when the patient is awake.
12 Select the “Diagnostics” Screen to change the lead impedance test amplitude to 1
mA and save the changes (Figure 14-2).
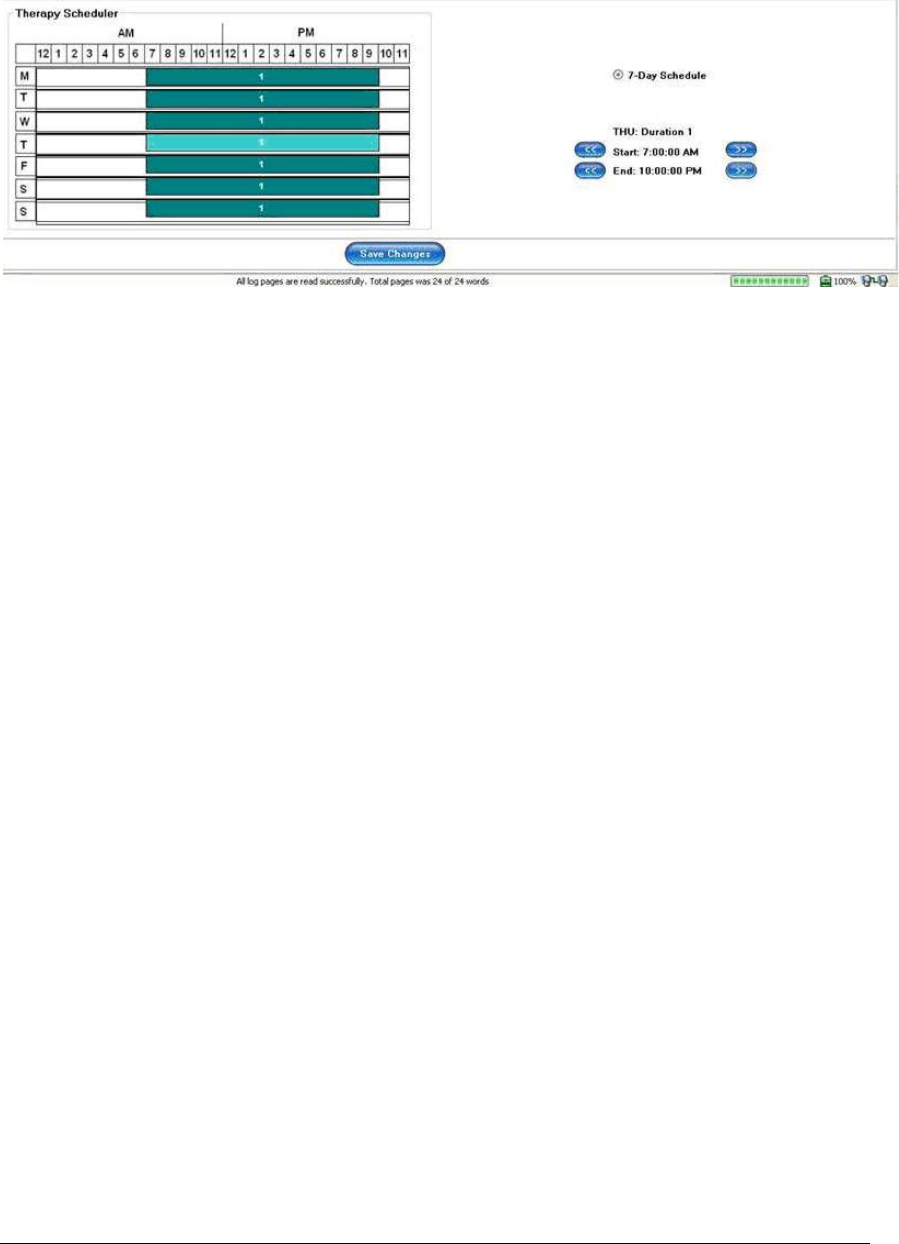
Maestro® Rechargeable System P01392-001 Rev K
System Instructions for Use
© EnteroMedics, Inc 2015 Page 51 of 73
Figure 14-2: Therapy Scheduler
Note: The patient should be instructed on the use of the mobile charger and how
to charge the mobile charger and neuroregulator before leaving the clinician’s
office. The patient should also be instructed to contact the clinician’s office if
there are any questions or unacceptable treatment related events.
14.2 Post Implant Healing Period
In the post-operative period, some patients may experience a temporary drop in lead
impedance due to the healing process. This can result in impedance related events that
can suspend scheduled therapy delivery. During the first 11 days following therapy
activation, the Maestro Rechargeable System will suppress impedance related indications
and suspend scheduled therapy if any impedance related events occur. This feature is
intended to prevent undue patient concern and unnecessary clinic visits from impedance
related events due to the healing response.
Impedance related events will be cleared and scheduled therapy will be automatically
resumed once the 11 day period has elapsed.
If a clinic follow up visit occurs within the 11 days following therapy activation,
impedance related events will be cleared and normal operation will resume for the
duration of the clinician programmer session. When the session is closed, the system
operation for the 11 days following therapy activation as described above will resume.

Maestro® Rechargeable System P01392-001 Rev K
System Instructions for Use
© EnteroMedics, Inc 2015 Page 52 of 73
15. Modifying Therapy Parameters during Follow-
Up Visits
The therapy may be adjusted during subsequent follow up visits using the mobile charger
and clinician programmer:
1. Ensure the clinician programmer is connected to the mobile charger via the
programmer cable and the patient transmit coil is in proper alignment over the
neuroregulator.
Note: The connection between the neuroregulator, mobile charger, and clinician
programmer can be verified in the dashboard on the “Summary” screen of the
clinician programmer.
2. Select “Diagnostics” from the “Summary” screen to open the “Diagnostic” screen.
3. Perform a lead status (impedance) test. If the lead status test is not acceptable,
contact EnteroMedics.
4. Select “Therapy” from the “Summary” screen to open the “Therapy” screen.
5. The clinician may adjust the following settings as necessary:
a. Amplitude
b. Ramp Up Time
c. Therapy Schedule
6. Start the Real Time Test to confirm the patient can tolerate the therapy settings.
7. Select “Save Changes” after the therapy schedule and parameters have been
established.
15.1 First Follow-Up Visit
During the first follow up visit, the lead impedance test amplitude must be changed from
1 mA programmed at surgery, to 3mA, using the “Diagnostics” Screen.
Use the “Therapy” Screen (Figure 15-1) to increase the therapy amplitude to the
maximum the patient can reasonably tolerate up to 3mA. The ramp time may be adjusted
to improve patient tolerance of the therapy. Re-run the Real Time Test to confirm the
patient can tolerate the therapy settings. Save the changes.
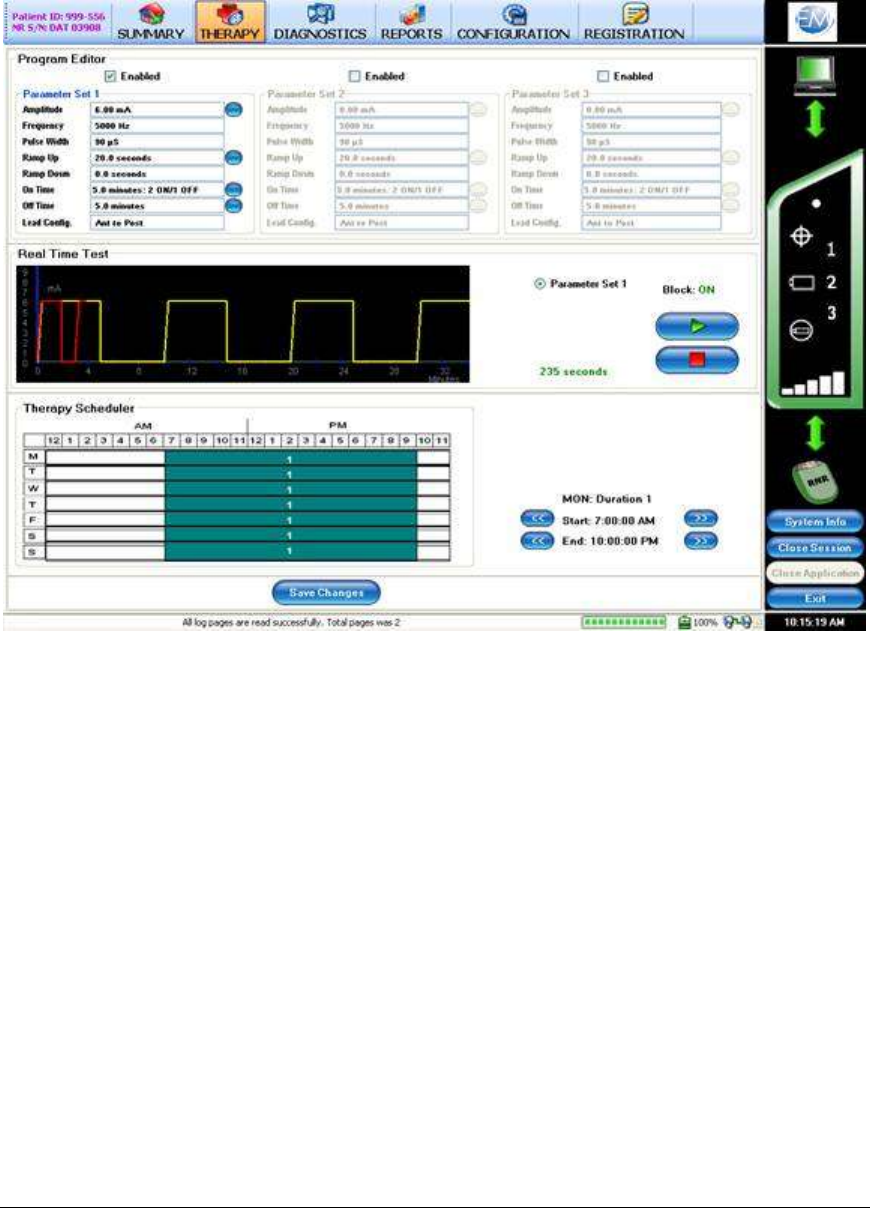
Maestro® Rechargeable System P01392-001 Rev K
System Instructions for Use
© EnteroMedics, Inc 2015 Page 53 of 73
Figure 15-1: Therapy Screen
15.2 Successive Follow-Up Visits
In order to maximize therapy, the proposed therapy setting will be at the maximum
therapy amplitude which the patient can reasonably tolerate with a therapy ON time of
five minutes. Therapy amplitude may be lowered based on patient tolerance. The ramp
time may be increased to improve patient tolerance of the therapy.
At each successive follow up, the capacity of the rechargeable battery in the
neuroregulator must be checked using the neuroregulator Battery Diagnostic Report
(Figure 15-3) and the Therapy Delivery Report (Figure 15-2). When the capacity of a
fully charged battery becomes insufficient for delivering the daily programmed hours of
therapy, the neuroregulator is approaching its end of life and replacement should be
considered. The neuroregulator Battery Diagnostic Report shows the frequency of
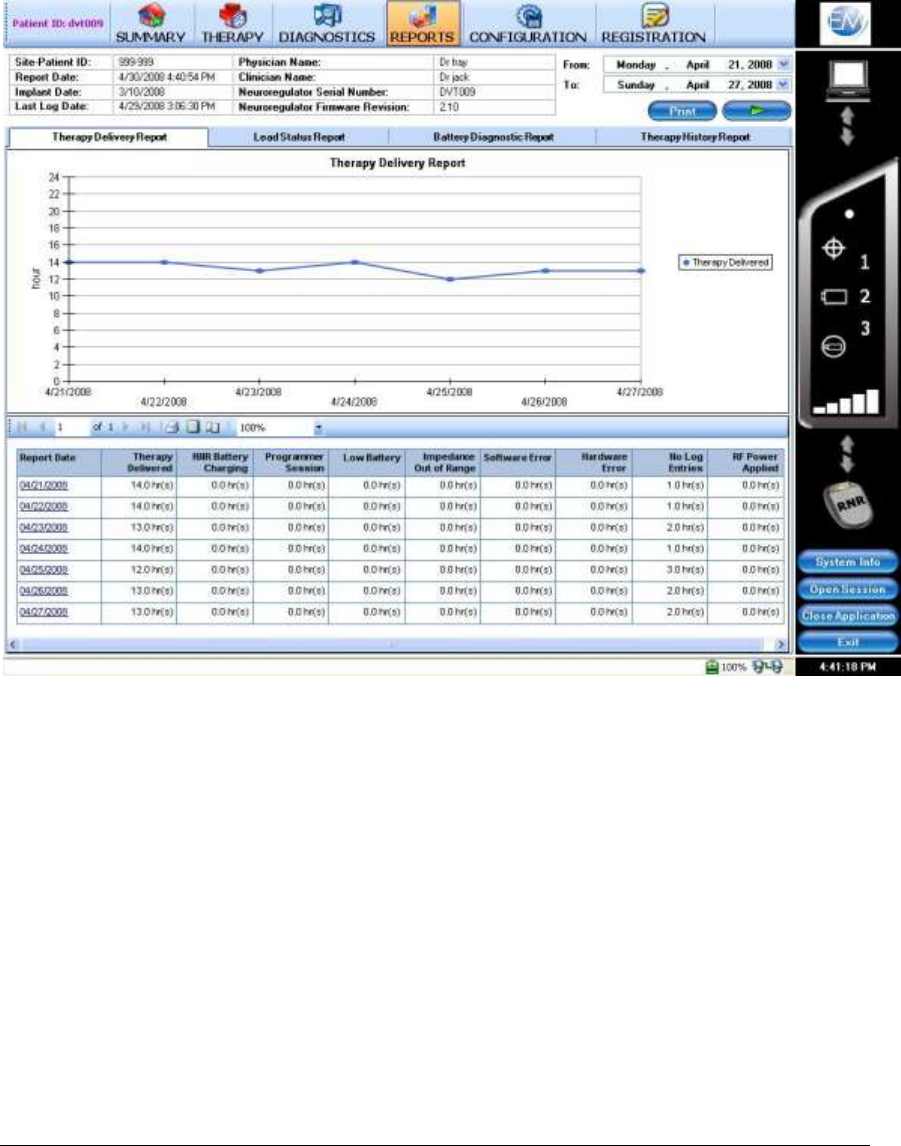
Maestro® Rechargeable System P01392-001 Rev K
System Instructions for Use
© EnteroMedics, Inc 2015 Page 54 of 73
charging the neuroregulator battery and the Therapy Delivery Report shows the delivered
hours of therapy and occurrence of a low battery status. Neuroregulator replacement
should be considered when the neuroregulator battery is fully charged once per day,
however the programmed therapy hours for one day frequently cannot all be delivered
and a low neuroregulator battery status is reported daily as indicated in the Therapy
Delivery Report.
Figure 15-2: Therapy Delivery Report
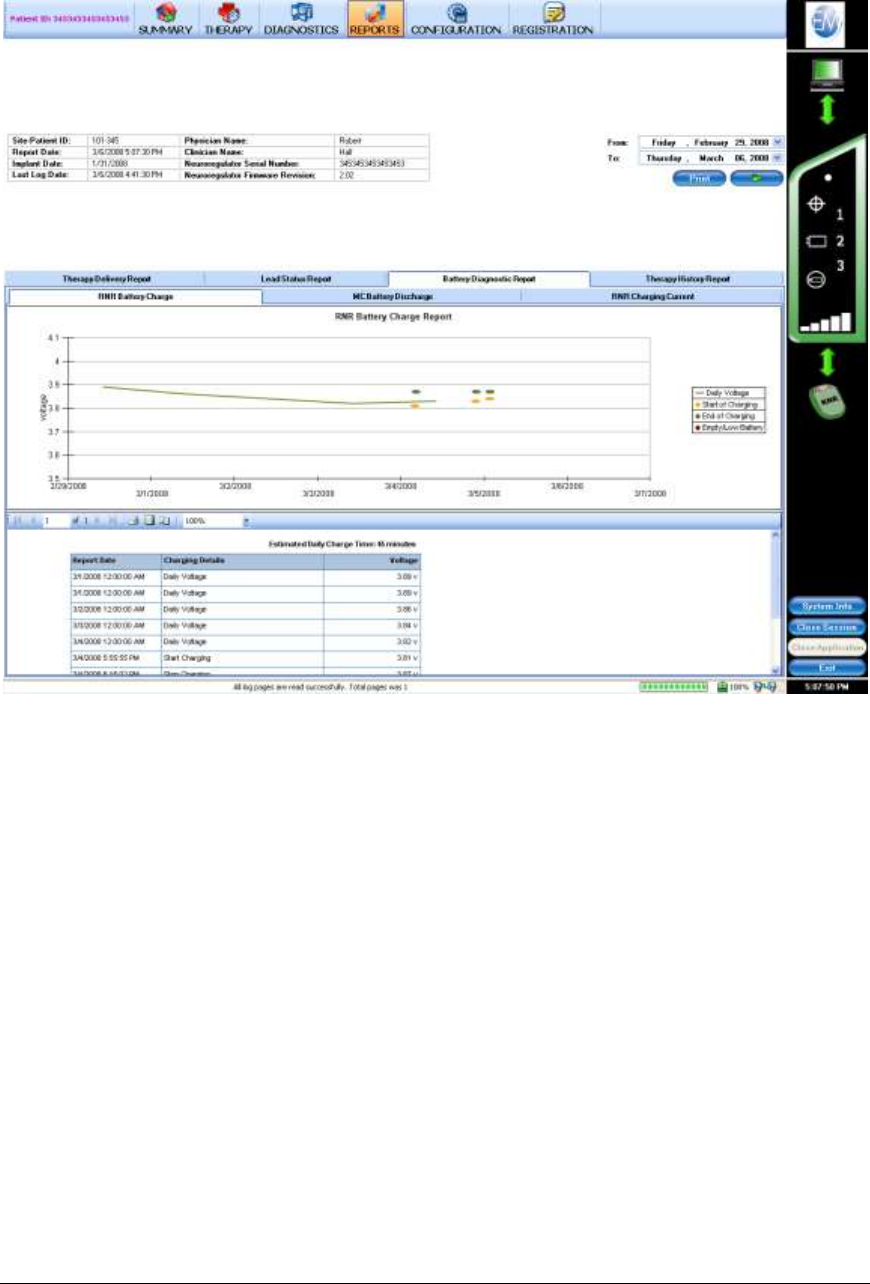
Maestro® Rechargeable System P01392-001 Rev K
System Instructions for Use
© EnteroMedics, Inc 2015 Page 55 of 73
Figure 15-3: Battery Diagnostic Report
15.3 Maestro Rechargeable System Reports
The clinician programmer may be used to display the following reports:
Therapy Delivery
Neuroregulator Battery Charge
Mobile Charger Battery Discharge
Lead Status
Therapy History
Refer to the Clinician Programmer Manual for additional information on these reports.

Maestro® Rechargeable System P01392-001 Rev K
System Instructions for Use
© EnteroMedics, Inc 2015 Page 56 of 73
16. Maintaining the Maestro Rechargeable System
16.1 Maintaining the Neuroregulator
If an activated neuroregulator is not recharged within a period of two months, the battery
within the neuroregulator may lose its capacity to be recharged and may no longer be
capable of delivering therapy.
If a patient and/or clinician make the decision to stop therapy, the neuroregulator battery
must be recharged fully. Use the clinician programmer to display the battery voltage. A
fully recharged battery will be greater than 3.85 V. The neuroregulator must then be
turned off. This can be accomplished by pressing and holding the button on the mobile
charger for more than 60 seconds until the display flashes the red status icon (Figure
11-5). A yearly visit to check the battery charge level and to recharge the neuroregulator
is required.
A deactivated neuroregulator may be reactivated by the clinician using the clinician
programmer. Please see the Clinician Programmer Manual for more details.
Note: When reactivating a neuroregulator, the clinician should check if the
mobile charger and the transmit coil of the patient are still operational. A new
mobile charger may be required if the patient has not recharged its battery during
the time of neuroregulator deactivation.
Note: The clinician should instruct patients about regularly recharging the
neuroregulator, about the risks of leaving an active neuroregulator uncharged for
more than two months and about the option to deactivate the device.
16.2 Maintaining the Mobile Charger and Transmit Coil
Clean the transmit coil and mobile charger when needed by using a damp soapy cloth.
Do not immerse the mobile charger or transmit coil in any liquid. Do not allow water to
enter into the connectors. Use a damp cloth to remove any soap residue. Allow
components to dry prior to use. One time per month, inspect the mobile charger and
transmit coil for wear or damage. Please contact Enteromedics should replacement
components be required.

Maestro® Rechargeable System P01392-001 Rev K
System Instructions for Use
© EnteroMedics, Inc 2015 Page 57 of 73
17. Patient Operating Instructions
Charging the Battery of the Mobile Charger
To charge the mobile charger, connect the AC recharger to a power outlet. Then connect
the AC recharger to the AC recharger port on the mobile charger (Figure 4). The
indicator light on the AC recharger will be illuminated (orange or green).
Note: If the indicator light on the AC recharger is not illuminated, check if the
AC recharger is connected correctly to a wall outlet and the wall outlet is
switched on.
The mobile charger battery icon will be illuminated and the bar graph (Figure 11-5) will
flash sequentially from left to right, indicating that the battery is being charged.
Note: If the bar graph on the mobile charger does not illuminate, check if the AC
recharger is connected correctly to the mobile charger and press the button.
Note: If the mobile charger has not been charged for an extended period of time,
the mobile charger battery icon may not be illuminated. Leave the mobile charger
connected to the AC recharger for half an hour, then press the button on the
mobile charger again.
During charging, the indicator light on the AC recharger will be orange and will turn
green when charging is complete. The mobile charger battery icon and the bar graph will
continue to flash sequentially from left to right even when recharging is complete. It is
recommended to leave the mobile charger connected after it is fully recharged until it is
used. This will keep the battery fully charged and will not harm the mobile charger.
Note: Use only the AC recharger provided by EnteroMedics to recharge the
mobile charger.
17.1 Positioning the Transmit Coil over the
Neuroregulator
Finding the best position of the transmit coil over the neuroregulator is important to
ensure efficient charging and good communication between the mobile charger and the
neuroregulator.
Insert the transmit coil connector into the transmit coil port on the top side of the mobile
charger (Figure 11-4). The transmit coil position icon will be illuminated as indicated in
Figure 11-5.
With the transmit coil held away from the implanted neuroregulator, press and hold the
mobile charger button (Figure 11-4) for approximately two seconds until the transmit coil

Maestro® Rechargeable System P01392-001 Rev K
System Instructions for Use
© EnteroMedics, Inc 2015 Page 58 of 73
position icon starts to flash and the bar graph is illuminated (Figure 11-5).
Begin positioning the transmit coil by sweeping the transmit coil across the
neuroregulator in all directions, keeping the coil close to the body. The number of
illuminated bars on the bar graph indicator will increase and decrease.
Position the transmit coil to maximize the number of bars on the bar graph. One bar
indicates poor transmit coil position and five bars indicate the best transmit coil position.
Secure the transmit coil in the best position using the belt provided or another clinician
approved method. Press the button once to accept this position.
Once the transmit coil position has been accepted, the transmit coil position icon will turn
off.
Note: If the transmit coil becomes displaced, the mobile charger will
automatically illuminate the transmit coil position icon. The coil should be
repositioned as described above.
Note: Always hold on to the connector when connecting and disconnecting the
transmit coil. Do not pull on the cable to unplug the transmit coil connector from
the mobile charger.
17.2 Checking Neuroregulator and Mobile Charger
Battery Charge Levels
Position the transmit coil over the neuroregulator as described above. With the transmit
coil position icon off, press the button on the mobile charger once to display the battery
level of the neuroregulator. The neuroregulator battery icon will be displayed and the bar
graph will indicate the charge level of the neuroregulator (Figure 17-1).
While the bar graph is still illuminated, press the button for a second time. The mobile
charger battery icon will become illuminated and the bar graph will indicate the charge
level of the mobile charger (Figure 17-1).
Note: When the first segment of the bar graph is flashing, the battery must be
recharged immediately.
Note: The mobile charger battery should be fully charged before attempting to
recharge the neuroregulator.
Poor Signal
Strength
Strong Signal
Strength
Coil Position
Indicator

Maestro® Rechargeable System P01392-001 Rev K
System Instructions for Use
© EnteroMedics, Inc 2015 Page 59 of 73
Figure 17-1: Battery Charge Level Examples
17.3 Charging the Battery in the Neuroregulator
Position the transmit coil over the neuroregulator and check the battery charge level of
the neuroregulator as described above. If the bar graph shows five segments, the
neuroregulator is fully charged. No further charging is possible.
Note: The battery charge levels of the neuroregulator should be checked daily. It
is recommended to charge the neuroregulator when the bar graph shows four
segments. This will take approximately 30 minutes with proper coil placement.
Note: If the neuroregulator is charged when the bar graph shows less than four
segments, charging may take up to three hours.
Before recharging the neuroregulator, check if the mobile charger is fully charged and
recharge if necessary.
To start recharging the neuroregulator battery, press and hold the button while the
neuroregulator battery charge level is displayed. Release the button when the bar graph
begins to flash sequentially. The bar graph will continue to flash sequentially while the
neuroregulator is being charged.
The battery is fully recharged when the neuroregulator battery icon illuminates and the
Neuroregulator battery
needs recharging
Mobile Charger battery
is fully charged

Maestro® Rechargeable System P01392-001 Rev K
System Instructions for Use
© EnteroMedics, Inc 2015 Page 60 of 73
bar graph flashes five segments once every five seconds. The neuroregulator cannot be
overcharged.
Note: The mobile charger case may become warm during charging of the
neuroregulator. While charging, place the mobile charger in a position that allows
air circulation, do not lie in bed, sleep, sit or lie on the mobile charger, place the
mobile charger in clothing or place the mobile charger within a carrying case.
Note: If the transmit coil becomes displaced, the mobile charger will
automatically illuminate the transmit coil position icon. The coil should be
repositioned as described above.
Note: If a neuroregulator is not charged within a period of two months, the
battery within the neuroregulator may lose its capacity to be charged and may no
longer be capable of delivering therapy.
Note: The patient must be instructed to fully charge the batteries of the
neuroregulator and mobile charger before visiting with their clinician.
17.4 Restoring the Mobile Charger’s Default Settings
The mobile charger’s default settings may be restored by pressing and holding the
button for more than 15 seconds until the display icons illuminate in sequence.
17.5 System Alerts
A status icon which is illuminated red, either continuously or intermittently, indicates that
the system is not delivering therapy (Figure 11-5). A red status icon does not indicate an
emergency condition. It just indicates that therapy is not delivered. The patient should be
instructed to contact their clinician during normal business hours to schedule an
appointment.

Maestro® Rechargeable System P01392-001 Rev K
System Instructions for Use
© EnteroMedics, Inc 2015 Page 61 of 73
18. Deactivating the Neuroregulator
If required for deactivation or in an emergency situation, the neuroregulator may be
turned off. Position the transmit coil over the neuroregulator using instructions above,
press and hold the button on the mobile charger for approximately 60 seconds until the
display flashes the red status icon. If a mobile charger is not available, the neuroregulator
may be turned off by moving a medical device magnet over neuroregulator. Medical
device magnets are commonly found in emergency rooms.
A deactivated neuroregulator may be reactivated by the clinician using the clinician
programmer; please see the Clinician Programmer Manual for more details. Therapy is
not delivered when the neuroregulator is deactivated. Deactivation should only be
performed to preserve the rechargeable battery in the neuroregulator or in an emergency
situation.
Note: When reactivating a neuroregulator, the clinician should check if the
mobile charger and the transmit coil of the patient are still operational. A new
mobile charger may be required if the patient has not charged the battery during
the time of neuroregulator deactivation.
Note: The clinician should instruct patients about regularly charging the
neuroregulator, about the risks of leaving an active neuroregulator uncharged for
more than two months and about the option to deactivate the device.

Maestro® Rechargeable System P01392-001 Rev K
System Instructions for Use
© EnteroMedics, Inc 2015 Page 62 of 73
19. Implant Removal and Disposal Instructions
19.1 Device Removal Training
Surgeons are required to complete training and receive certification on completion of the
surgical explantation of the Maestro Rechargeable System prior to explanting a Maestro
Rechargeable System.
19.2 Removal of All Implantable Device Components
Following are the general instructions for explant of the implantable device components.
Refer to EnteroMedics Surgeon Certification Training Program for detailed instructions.
1. Prepare patient for a standard laparoscopic surgical approach
2. Retract the liver
3. Identify lead bodies and follow down until the suture wings are identified on each
of the two leads.
4. Dissect along each lead towards the electrode.
5. Grasp electrodes and lift off of nerve. Rotate electrode away from nerve to expose
suture tongue.
6. Cut suture tongue to free electrode.
7. Free the suture wings.
8. Cut lead bodies as they enter abdominal cavity from the neuroregulator and remove
lead bodies from abdomen.
9. Surgically open the subcutaneous neuroregulator pocket.
10. Cut the sutures that secure the neuroregulator in position.
11. Remove the neuroregulator from pocket along with the remaining portion of the
leads that were inserted into the neuroregulator.
12. Verify that all system components have been removed.
13. Close all incisions.
Note: If removal of a lead poses a risk to the patient preventing its safe removal, the lead
may be left in situ, but only in its entirety as described below.
Surgeons are strongly recommended to remove the entire lead, including the
electrode, during an Implant Removal procedure. In the event removal of a lead
poses a patient risk, the lead should be left in place in its entirety, and covered
with a sterile silicone end cap designed for 3.2 mm diameter connector pins.
Specifically the Oscor VS-32 End Cap should be used to cap the lead according to
its instructions for use. A non-absorbable suture should be placed around the O-
ring on the cap to secure it to the lead. A suture should then be applied around the
silicone end cap and anchored in the subcutaneous pocket to secure the lead.
Please refer to the EnteroMedics Surgeon Certification Training Program for
detailed instructions.
Note: The lead should never be transected if it is to remain implanted. If a lead has been
transected it should be completely removed.

Maestro® Rechargeable System P01392-001 Rev K
System Instructions for Use
© EnteroMedics, Inc 2015 Page 63 of 73
19.3 Replacement of Neuroregulator
Following are the general instructions for removal and replacement of the
neuroregulator. Refer to EnteroMedics Surgeon Certification Training Program
for detailed instructions.
1. Prepare patient for a standard laparascopic surgical approach. Note: The
abdomen may not need to be accessed for most neuroregulator
replacement procedures.
2. Surgically open the subcutaneous neuroregulator pocket. Care should be
taken when opening the subcutaneous pocket to proceed in a lateral to
medial direction. This is to avoid damaging the lead bodies.
3. Cut the sutures that secure the neuroregulator in position.
4. Remove the neuroregulator from pocket.
5. Undo the setscrews and remove leads from neuroregulator.
6. Replace the removed neuroregulator with a new neuroregulator.
7. Repeat steps #11-21 of the Implant Procedure Summary in Section 12 of
this document.
19.4 Device Disposal
Place explanted device components in biohazard packaging and return all device
components to the corporate office of EnteroMedics, with a completed EnteroMedics
Returned Product Form (EnteroMedics document D00506-001, available from your
EnteroMedics representative) for proper analysis and disposal. Refer to EnteroMedics
Surgeon Certification Training Program materials for detailed instructions on biohazard
packaging and device return instructions. Under no circumstances should Maestro
Rechargeable System components be disposed of by incineration, including cremation.

Maestro® Rechargeable System P01392-001 Rev K
System Instructions for Use
© EnteroMedics, Inc 2015 Page 64 of 73
20. Specifications
20.1 Component and Therapy Specifications
Model 2402 Mobile Charger
Internally powered
4.2 VDC maximum voltage, 1.3 Amps
maximum current
Liquid Ingress Rating
IP22
Continuous operation
Model 2403 Transmit Coil
Maximum Voltage
86 V p-p
Power
4.05 W rms
Frequency
6.78 MHz
Type
Type BF applied part
Maximum Possible Temperature During
Charging
43 C
Model 1620 AC Recharger
Input Voltage
100-240 VAC
Input Current
0.2 A maximum
Input Frequency
50-60 Hz
Output Voltage
4.1 VDC maximum
Output Current
1.3 A
Model 2502 Clinician Programmer
Power Supply
Input Voltage
100-240 VAC
Input Current
1.6 A
Input Frequency
50-60 Hz
Output Voltage
19.5 VDC
Output Current
3.34 A

Maestro® Rechargeable System P01392-001 Rev K
System Instructions for Use
© EnteroMedics, Inc 2015 Page 65 of 73
Model 2200 Lead Series
Connector (3.2mm)
Compatible only with Maestro
Rechargeable System Neuroregulator
Pin Material
Stainless steel
Insulation
Silicone rubber
Lead Body
Insulation material
Silicone rubber with white stripe
Overall lead length (nominal)
47 cm
Lead resistance (DC)
15 ohms nominal
Lead resistance (DC-Tip)
10 – 12 ohms
Lead resistance (DC-Ring)
8 – 10 ohms
Tip and Ring Electrode
Material
Platinum Iridium
Suture Wing and Suture Tongue
Silicone rubber
Suture Sleeve(s)
Silicone rubber
Model 2002 Neuroregulator
Case Material
Titanium
Header Material
Tecothane
Setscrews
Titanium
Connector Contacts
MP35 and Stainless Steel
Seals
Silicone Rubber and Medical Adhesive
Therapy Pulse Characteristics
Pulse Amplitude (maximum)
8.00 mA maximum
Pulse Width
90.00 µs
Pulse Rate
5.00 kHz
Useful Life of Rechargeable Battery –
Nominal and Worst Case Therapy
Settings
Testing supports that the longevity of the
battery will exceed 8 years

Maestro® Rechargeable System P01392-001 Rev K
System Instructions for Use
© EnteroMedics, Inc 2015 Page 66 of 73
Maximum proven connector strength
between Model 2002 Neuroregulator and
Model 2200 Lead Series
10 N
Operational Environmental Parameters
for Model 2002 Neuroregulator
Temperature
16°C to 45°C
Humidity
10% to 90% RH non-condensing (before
implant) & 100% (after implant)
Pressure
70 to 150 kPa
Operational Environmental Parameters
for Model 2402 Mobile Charger &
Model 2403 Transmit Coil
Temperature
15°C to 40°C
Humidity
10% to 90% RH non-condensing
Pressure
70 to 150 kPa
Shipping & Storage Parameters for all
Maestro Rechargeable System
Components
Temperature
-10°C to 55°C
Humidity
10% to 90% RH non-condensing
Pressure
70 to 150 kPa

Maestro® Rechargeable System P01392-001 Rev K
System Instructions for Use
© EnteroMedics, Inc 2015 Page 67 of 73
20.2 Electromagnetic Compatibility Tables
Guidance and manufacturer’s declaration – electromagnetic emissions
The Maestro Rechargeable System is intended for use in the electromagnetic environment specified below.
The customer and or the user of the Maestro Rechargeable System should assure that it is used in such an
environment.
Emissions Test
Compliance
Electromagnetic environment – guidance
RF emissions
CISPR 11
Group 1
The Maestro Rechargeable System must emit
electromagnetic energy in order to perform
its intended function. Nearby electronic
equipment may be affected.
RF Emissions
CISPR 11
Class B
The Maestro Rechargeable System is suitable
for use in all establishments, including
domestic establishments and those directly
connected to the public low-voltage power
supply network that supplies buildings used
for domestic purposes
Harmonic emissions
IEC 61000-3-2
Not Applicable
Voltage fluctuations/flicker
emissions
IEC 61000-3-3
Not Applicable
This device complies with Part 15 of the FCC Rules with Waiver DA-09-245A1 granted
for Part 15.209.
This device complies with Part 18 of the FCC Rules.
RF Exposure Guidance: This equipment complies with FCC radiation exposure limits set
forth for an uncontrolled environment.

Maestro® Rechargeable System P01392-001 Rev K
System Instructions for Use
© EnteroMedics, Inc 2015 Page 68 of 73
Guidance and manufacturer’s declaration – electromagnetic immunity
The Maestro Rechargeable System is intended for use in the electromagnetic environment specified below.
The customer and or the user of the Maestro Rechargeable System should assure that it is used in such an
environment.
Immunity Test
IEC 60601 test level
Compliance level
Electromagnetic environment –
guidance
Electrostatic
discharge (ESD)
IEC 61000-4-2
±6 kV contact
±8 kV air
Complies
Floors should be wood, concrete or
ceramic tile. If floors are covered
with synthetic material, the relative
humidity should be at least 30%
Electrical fast
transient/burst
IEC 61000-4-4
±2 kV for power
supply lines
±1 kV for input/output
lines
Not Applicable
Mains power quality should be that
of a typical residential, commercial,
or hospital environment.
Surge
IEC 61000-4-5
±1 kV line(s) to line(s)
±2 kV line(s) to earth
Not Applicable
Mains power quality should be that
of a typical residential, commercial,
or hospital environment.
Voltage dips, short
interruptions and
voltage variations
on power supply
input lines
IEC 61000-4-11
<5% UT
(>95% dip in UT)
For 0.5 cycle
40% UT
(60% dip in UT)
For 5 cycles
70% UT
(30% dip in UT)
For 25 cycles
<5% UT
(>95% dip in UT)
For 5 sec
Not Applicable
Mains power quality should be that
of a typical residential, commercial,
or hospital environment.
Power frequency
(50/60 Hz)
magnetic field
IEC 61000-4-8
3 A/m
Complies
Power frequency magnetic fields
should be at levels characteristic of a
typical location in a typical
residential, commercial, or hospital
environment.
NOTE UT is the a.c. mains voltage prior to application of the test level
Maestro® Rechargeable System P01392-001 Rev K
System Instructions for Use
© EnteroMedics, Inc 2015 Page 69 of 73
Guidance and manufacturer’s declaration – electromagnetic immunity
The Maestro Rechargeable System is intended for use in the electromagnetic environment specified below.
The customer and or the user of the Maestro Rechargeable System should assure that it is used in such an
environment.
Immunity Test
IEC 60601 test level
Compliance
level
Electromagnetic environment – guidance
Conducted RF
IEC 61000-4-6
Radiated RF
IEC 61000-4-3
3 Vrms
3V/m
80MHz to 2.5Ghz
3Vrms
3V/m
Portable and mobile RF communications
equipment should be used no closer to any part
of the Maestro Rechargeable System, including
cables, that the recommended separation
distance calculated from the equation
applicable to the frequency of the transmitter.
d = 1.2 √P
d = 1.2√P 80MHz to 800MHz
d = 2.3√P 800MHz to 2.5GHz
where P is the maximum output power rating of
the transmitter in watts (W) according to the
transmitter manufacturer and d is the
recommended separation distance in meters
(m).
Field strengths from fixed RF transmitters, as
determined by an electromagnetic site survey,a
should be less than the compliance level in each
frequency range.b
Interference may occur in the vicinity of
equipment marked with the following symbol:
NOTE 1 At 80 MHz and 800MHz, the higher frequency range applies.
NOTE 2 These guidelines may not apply in all situations. Electromagnetic propagation is affected by absorption and reflection from
structures, objects and people.
a Field strengths from fixed transmitters, such as base stations for radio (cellular/cordless) telephones and land mobile radios,
amateur radio, AM and FM radio broadcast and TV broadcast cannot be predicted theoretically with accuracy. To assess the
electromagnetic environment due to fixed RF transmitters, an electromagnetic site survey should be considered. If the measured
field strength in the location in which the Maestro Rechargeable System is used exceeds the applicable RF compliance level
above, the Maestro Rechargeable System should be observed to verify normal operation. If abnormal performance is observed,
additional measures may be necessary, such as reorienting or relocating the Maestro Rechargeable System.
b Over the frequency range 150kHz to 80MHz, field strengths should be less than 3 V/m.

Maestro® Rechargeable System P01392-001 Rev K
System Instructions for Use
© EnteroMedics, Inc 2015 Page 70 of 73
Recommended separation distances between
Portable and mobile RF communications equipment and the Maestro Rechargeable
System
The Maestro Rechargeable System is intended for use in an electromagnetic environment in which radiated
RF disturbances are controlled. The customer of the user of the Maestro Rechargeable System can help
prevent electromagnetic interference by maintaining a minimum distance between portable and mobile RF
communications equipment (transmitters) and the Maestro Rechargeable System as recommended below,
according to the maximum power of the communications equipment.
Rated maximum output
power of transmitter
W
Separation distance according to frequency of transmitter
m
150kHz to 80MHz
d = 1.2 √P
80MHz to 800MHz
d = 1.2 √P
800MHz to 2.5 GHz
d = 2.3 √P
0.01
0.12
0.12
0.23
0.1
0.38
0.38
0.73
0
1.2
1.2
2.3
10
3.8
3.8
7.3
100
12
12
23
For transmitters rated at a maximum output power not listed above, the recommended separation distance d in meters (m) can be
estimated using the equation applicable to the frequency of the transmitter, where P is the maximum output power rating of the
transmitter in watts (W) according to the transmitter manufacturer.
NOTE 1 At 80MHz and 800MHz, the separation distance for the higher frequency range applies.
NOTE 2 These guidelines may not apply in all situations. Electromagnetic propagation is affected by absorption and reflection from
structures, objects and people.

Maestro® Rechargeable System P01392-001 Rev K
System Instructions for Use
© EnteroMedics, Inc 2015 Page 71 of 73
21. Maestro Rechargeable System Limited
Warranty
This Limited Warranty is provided by EnteroMedics, 2800 Patton Rd, St Paul, MN 55113
USA. It applies only to commercially distributed product.
This LIMITED WARRANTY covers EnteroMedics Maestro Rechargeable System
components including the Rechargeable Neuroregulator (Model 2002), Anterior and
Posterior Leads (Models 2200A-47E, 2200P-47E), Mobile Charger (Model 2402), AC
Recharger (Model 1620), Patient Transmit Coil (Model 2403-60), Clinician Programmer
(Model 2502), Programmer Cable (Model 1600) and the Clinician Transmit Coil (Model
2403-300) (individually and collectively referred to as the "Product") such that should the
Product not function to specification within the period as specified in the table below,
EnteroMedics will repair the Product (which may include firmware updates) or provide a
replacement in accordance with the specified warranty terms for any Product that does
not function to specification, provided the lack of function is not due to causes listed
below. All Indications, Contraindications, Warnings and Precautions contained in the
Product labeling are an integral part of this LIMITED WARRANTY.
To qualify for this Limited Warranty, the following conditions must be met:
(1) EnteroMedics must be notified in writing within thirty (30) days after discovery of the
lack of performance to specification. EnteroMedics may repair or replace the defective
Product at its sole discretion. If the defective Product is replaced or removed, it must be
returned to EnteroMedics within thirty (30) days.
(2) The Product must not have been repaired or altered outside of EnteroMedics control
in any way which, in the judgment of EnteroMedics, affects its stability and reliability.
(3) The Product must not have been subjected to misuse, abuse or accident.
(4) The Rechargeable Neuroregulator must not have been improperly recharged, such as
an active neuroregulator which was not fully recharged at least once per two months or a
deactivated neuroregulator which was not fully recharged prior to deactivation.
(5) The Rechargeable Neuroregulator must not have been improperly implanted, such as
silicone adhesive applied with improperly inserted lead connectors, or damaged by
implantation tools.
(6) The Leads must not have been improperly implanted, for example, suturing around
the lead body or if the lead body, electrode or connector was damaged by laparoscopic
tools.
(7) The Mobile Charger, AC Recharger, Patient Transmit Coil, Clinician Transmit Coil,
Clinician Programmer or Programmer Cable must not have been improperly used. For
example, this Limited Warranty is void if the Product is submerged in fluids, physically
damaged or used with equipment not provided by EnteroMedics.

Maestro® Rechargeable System P01392-001 Rev K
System Instructions for Use
© EnteroMedics, Inc 2015 Page 72 of 73
(8) Where applicable, the Product must have been put into use prior to its labeled “Use
Before” date.
This Limited Warranty is limited to its express terms. In particular:
(1) Except as expressly provided by this Limited Warranty, EnteroMedics is not
responsible for any direct, incidental or consequential damages based on any defect,
failure or malfunction of the Product.
(2) This Limited Warranty is made only to the purchaser of the Product. Other than this
Limited Warranty, EnteroMedics makes no other warranty, express or implied. This
limited warranty shall be the exclusive remedy available to any person.
(3) The exclusions and limitations set out above are not intended to, and should not be
construed to contravene mandatory provisions of applicable law. If any part or term of
this Limited Warranty is held to be illegal, unenforceable or in conflict with applicable
law by a court of competent jurisdiction, the validity of the remaining portions of this
Limited Warranty shall not be affected, and all rights and obligations shall be construed
and enforced as if this Limited Warranty did not contain the particular part or term held
to be invalid. This Limited Warranty gives the purchaser specific legal rights. The
purchaser may also have other rights which vary depending upon jurisdiction.
(4) No person has any authority to bind EnteroMedics to any representation, condition or
warranty except this Limited Warranty.
Maestro Rechargeable System Limited Warranty
Model
Description
Warranty Period
Warranty
2002
Rechargeable
Neuroregulator
5 years from date of original
implant
100%
2200A-47E, 2200P-47E
Anterior and
Posterior Leads
5 years from date of original
implant
100%
2402
Mobile Charger
1 year from date of original
implant
100%
1620
AC Recharger
1 year from date of original
implant
100%
2403-60
Patient Transmit
Coil
1 year from date of original
implant
100%
2403-300
Clinician
Transmit Coil
1 year from delivery date to
clinician
100%
2502
Clinician
Programmer
1 year from delivery date to
clinician
100%
1600
Programmer
Cable
1 year from delivery date to
clinician
100%

Maestro® Rechargeable System P01392-001 Rev K
System Instructions for Use
© EnteroMedics, Inc 2015 Page 73 of 73
22. Contact Information
EnteroMedics Contact Information:
Corporate:
EnteroMedics Inc.
2800 Patton Road
St. Paul, MN 55113 USA
www.EnteroMedics.com
Phone: +1 651-634-3003
Fax: +1 651-634-3212