EpiCom SUC-2000 HSUPA USB Modem User Manual SUC 2000 User Guide VerA
EpiCom Co., Ltd. HSUPA USB Modem SUC 2000 User Guide VerA
UserManual.wiki
>
EpiCom
>
SUC 2000 User Manual
Users Manual
Navigation menu
Upload a User Manual
Namespaces
Wiki Guide
HTML
PDF
Info
Views
User Manual
Discussion / Help
Navigation


![- 9 - Installing Program S/W is included in USB Modem. 1. When SUC-2000 is inserted into the USB port of the PC to use SUC-2000, the installation program is automatically run. Note: If SUC-2000 Dialer program is already installed, the program is not automatically run. If you want to reinstall the program, manually start the installation program with use of explorer. 2. When the installation is automatically started, below-shown screen is displayed. Choose the setup language and click [OK] button. Note: If the installation is not automatically run, doubleclick “setup32.exe” file in CD. (In case of Vista 64, setup64.exe) 3. To install the program, files are copied from Modem to PC.](https://usermanual.wiki/EpiCom/SUC-2000/User-Guide-1103684-Page-9.png)
![- 10 - 4. When “Welcome to the Installshield Wizard” message is displayed, click [Next] button. 5. Designate the destination folder to install the program and click [Next] button. Destination folder of the program](https://usermanual.wiki/EpiCom/SUC-2000/User-Guide-1103684-Page-10.png)
![- 11 - 6.Click [Install] button to install the program. 7. Files are copied from Modem to PC.](https://usermanual.wiki/EpiCom/SUC-2000/User-Guide-1103684-Page-11.png)
![- 12 - 8. Program is completely installed. Click [Finish] button to finish the program installation.](https://usermanual.wiki/EpiCom/SUC-2000/User-Guide-1103684-Page-12.png)
![- 13 - Deleting Program The method to delete Epivalley HSUPA Dialer installed in PC is as described below. 1. On the task bar, click [Start] - [Program] - [Epivalley] - [SUC-2000 HSUPA Dialer] - [Uninstall] in order. 2. When a popup screen is displayed and it is asked whether to delete the program, click [Yes] button.](https://usermanual.wiki/EpiCom/SUC-2000/User-Guide-1103684-Page-13.png)
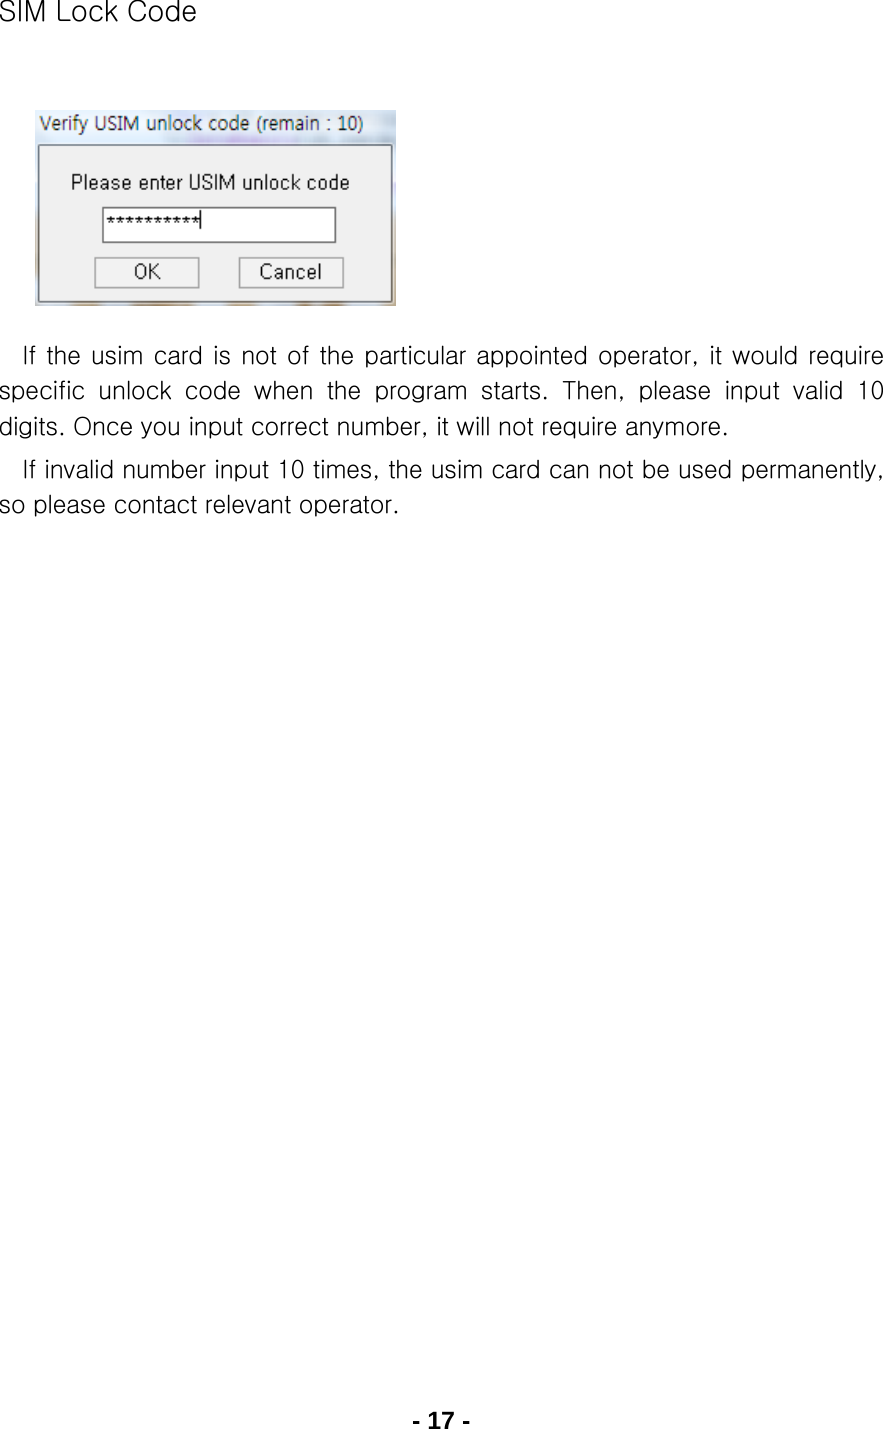
![- 15 - PIN Code PIN Code is the password to be inputted for confirmation when running the program to use SUC-2000. (If PIN Lock Option is in [ON] status, you should input the password when starting Epivalley HSUPA Dialer program.) Carefully input the password and click [OK] button; if valid password is inputted, Epivalley HSUPA Dialer program is properly run and, if invalid PIN Code is inputted, an error message is displayed as shown below. Note: If invalid PIN Code is inputted three or more times, USIM Card is blocked and cannot be used. Blocked USIM Card may be released with input of PUK Code.](https://usermanual.wiki/EpiCom/SUC-2000/User-Guide-1103684-Page-15.png)
![- 16 - PUK Code PUK Code is a pre-defined code to release blocked USIM Card. Input PUK Code and new PIN Code and click [OK] button to release blocked USIM Card. Note: PUK Code may be identified in USIM Pack when purchasing USIM and consists of 8–digit numbers. If invalid PUK Code is inputted, an error message is displayed. In this case, click [OK] button and input valid PUK Code and new PIN Code to release blocking. Note: Be careful because, if you fail in inputting valid PUK Code 10 or more times, USIM Card is blocked and cannot be used. (You have to purchase USIM Card again.)](https://usermanual.wiki/EpiCom/SUC-2000/User-Guide-1103684-Page-16.png)
![- 18 - Using SUC-2000 Running Program Run Epivalley HSUPA Dialer program be below-described method. 1. 1. Doubleclick the shortcut icon (Epivalley HSUPA Dialer) on the window. Or on the task bar, click [Start] - [Program] - [Epivalley] - [SUC-2000 HSUPA Dialer] - [SUC-2000 HSUPA Dialer] in order. 2. Epivalley HSUPA Dialer program is run.](https://usermanual.wiki/EpiCom/SUC-2000/User-Guide-1103684-Page-18.png)
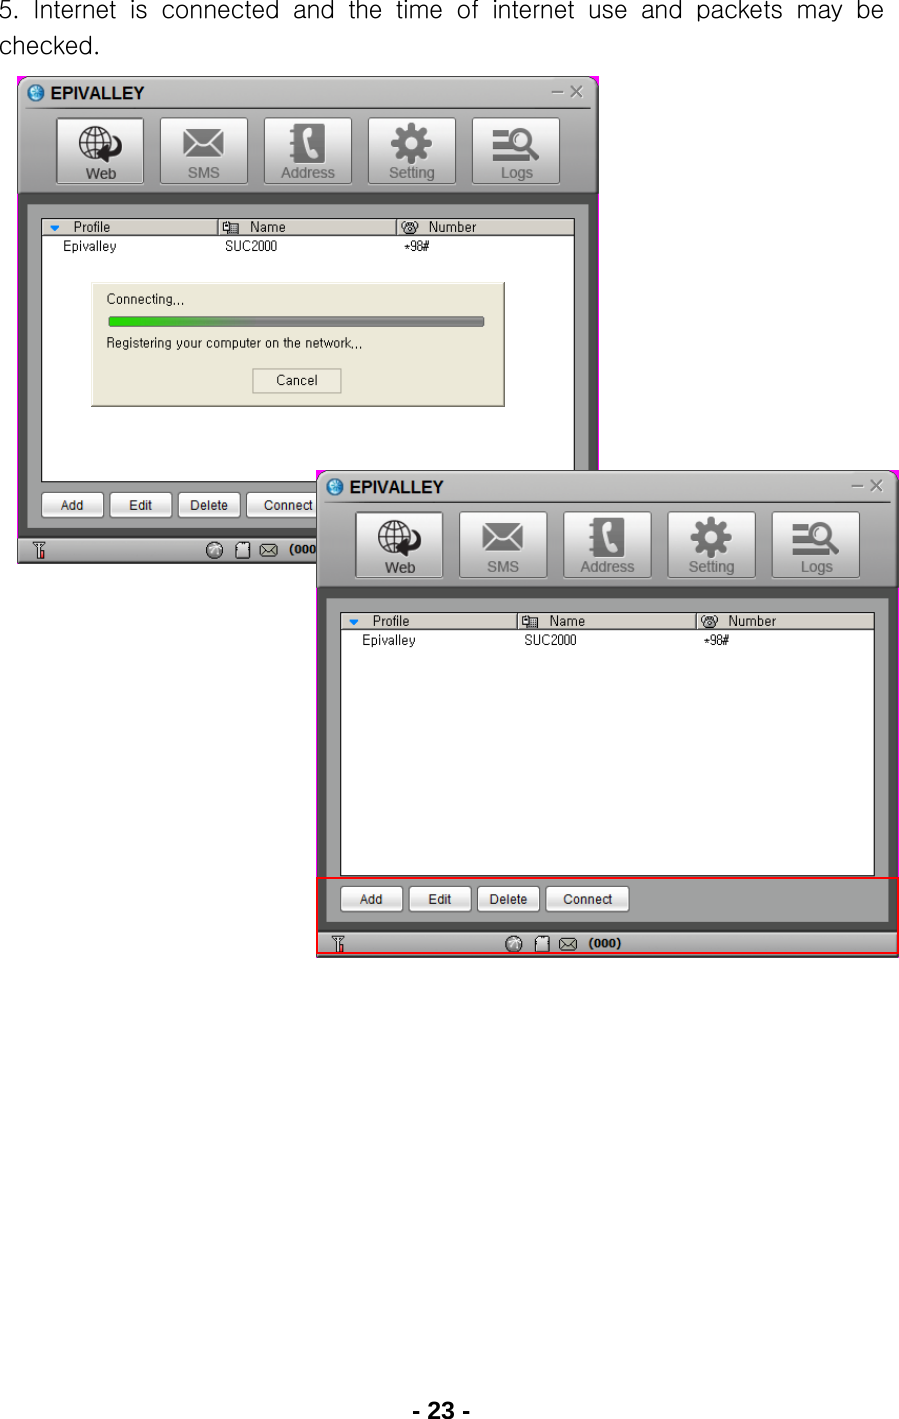
![- 21 - Epivalley HSUPA Dialer Connection with intenet or sending/receiving SMS is possible with use of Epivalley HSUPA Dialer program and the telephone numbers and addresses may conveniently be managed in the address list. Web [Web] is the menu used in connecting with internet. When using [Web] for the first time, the profile needed to connect with internet should be created and, from the next use, internet connection is possible with use of the stored profile. 1. Click [Web]. 2. Create the profile needed to connect with internet. Click [Add] or click the right button of mouse and select [Add] button.](https://usermanual.wiki/EpiCom/SUC-2000/User-Guide-1103684-Page-21.png)
![- 22 - 3. Input Profile Name to create the profile for internet connection and input the information needed to connect with profile. Click [OK] button to create a profile. 4. Select the profile created for internet connection and click [Connect] button.](https://usermanual.wiki/EpiCom/SUC-2000/User-Guide-1103684-Page-22.png)
![- 24 - SMS [SMS] is the menu that is used in sending short messages or consfirming received short messages. Short messages may be sent with setting the sending time and the short messages received from numbers for rejection are automatically classified into spam messages. · Send 1. Click [SMS] button. 2. Write the message on Editor screen. ·Clear: erase the message written on Editor screen. ·Templates: designates the templates of message ·Emoticon: inputs emoticon. ·Special: inputs special characters.](https://usermanual.wiki/EpiCom/SUC-2000/User-Guide-1103684-Page-24.png)
![- 25 - 3. Input the telephone number to receive the message and click [Add] button to designate the number as the receiver’s number. The telephone number may be added by selecting a number in the numbers registered in the address or may be designated by selecting a number in the message sending history after clicking [Log] button. 4. Click [Send] button the send the message. ·Wrong designated receiver’s number may be deleted by selecting the receiving number in the telephone number list and by clicking [Del] button. ·To send a messages with reservation, click [Reserved] button designate the time and date to send the messages.](https://usermanual.wiki/EpiCom/SUC-2000/User-Guide-1103684-Page-25.png)
![- 26 - · Inbox In [Inbox] tab, you can see the received messages. Received messages are automatically stored in Inbox. When a message is received, the receipt is noticed on the Windows popup screen and, if the program is minized, the tray icon flashes. The messages may be arranged by Date, Number, Content, Destination, and Message Status; the message may be relayed with clicking [Forward] button and a reply message may be sent with clicking [Reply] button. Note: The method to notice the receipt of a message may be set in [Incoming SMS Alert] in [Setting] menu.](https://usermanual.wiki/EpiCom/SUC-2000/User-Guide-1103684-Page-26.png)
![- 27 - · Sent In [Sent] tab, you can check the messages sent. The messages may be arranged by Date, Number, Content, Destination, and Message Status and the message may be relayed with clicking [Forward] button. Also, the destination (PC or USIM) where the messages are stored may be confirmed with the icon. Note: Click [Save] button to store the telephone number to which the message was sent or change the destination to store the message.](https://usermanual.wiki/EpiCom/SUC-2000/User-Guide-1103684-Page-27.png)
![- 28 - · Draft In [Draft] tab, you can check the reserved messages, the messages not sent, and the messages failed in sending. The messages may be arranged by Date, Number, Content, Destination, and Message Status and the message may be relayed with clicking [Forward] button. Note: Click [Resend] button to send the selected message again.](https://usermanual.wiki/EpiCom/SUC-2000/User-Guide-1103684-Page-28.png)
![- 29 - · Spam In [Spam] tab, you can check the messages received from the telephone numbers designated as Spam and the messages containing the words designated as Spam. The messages may be arranged by Date, Number, Content, Destination, and Message Status and the message may be stored with clicking [Save] button. Note • Click [Inbox] button to move or resend the selected message. • You can define the Spam messages in [Spam message Settings] in [Setting] menu.](https://usermanual.wiki/EpiCom/SUC-2000/User-Guide-1103684-Page-29.png)
![- 30 - Address [Address] menu is used to register, edit, and delete telephone numbers. · Viewing Registered Telephone Numbers You can check the stored telephone numbers with selecting All, PC, or SIM tab and you can view the registered telephone numbers in the arrangement by Name, Mobile, Address, Office, Home, Fax, E-mail, and Comments. · Searching Telephone Numbers You can search the registered telephone numbers with selecting the search type (Name, Mobile, Group, Address, Office, Home, Fax, E-mail, and Comments), inputting the search condition, and clicking [Search] button.](https://usermanual.wiki/EpiCom/SUC-2000/User-Guide-1103684-Page-30.png)
![- 31 - · Registration, Correction, and Deletion of Telephone Numbers You can register a new telephone number or correct or delete registered telephone numbers with use of the button at the lowest part of Address Menu. • Add: registers a new telephone number in the telephone book. • Edit: may correct the information on the registered telephone number. • Delete: deletes the registered telephones from the telephone book. · Sending Short Messages You can send a message to the registered telephone numbers with clicking [SMS] button at the lowest part of Address Menu. Check the telephone numbers to send the message and click [SMS] button.](https://usermanual.wiki/EpiCom/SUC-2000/User-Guide-1103684-Page-31.png)
![- 33 - · Managing Telephone Number Groups Telephone numbers may conveniently be managed with classification into groups. A group may be created with clicking the right button of mouse and clicking [Add] button. You can move the registered telephone numbers to another group with Drag & Drop and send a message to a group or groups at a time. Also, you can move or copy the registered telephone number by selecting the number and clicking the right button of mouse.](https://usermanual.wiki/EpiCom/SUC-2000/User-Guide-1103684-Page-33.png)
![- 34 - Setting In [Setting] menu, you can set the environment related with the use of Epivalley HSUPA Dialer program. · General In [General] tab, you can set the information on the language and color theme related with Windows.](https://usermanual.wiki/EpiCom/SUC-2000/User-Guide-1103684-Page-34.png)
![- 35 - · SMS In [SMS] tab, you can set the information on notice of message receipt and Spam message management. · USIM In [USIM] tab, you can set the information related with PIN Code.](https://usermanual.wiki/EpiCom/SUC-2000/User-Guide-1103684-Page-35.png)
![- 36 - · Lock In [Lock] tab, you can set the information related with lock function. · Information In [Information] tab, you can check the information related with S/W Version, Modem, and Memory.](https://usermanual.wiki/EpiCom/SUC-2000/User-Guide-1103684-Page-36.png)
![- 37 - Logs In [Logs], you can check the information on the date and time of internet connection and the quantities of sent/received data in relation to use of internet. • Prev: confirms the internet logs of previous month. • Next: confirms the internet logs of next month. • Export: The internet logs of current month are downloaded in csv file type.](https://usermanual.wiki/EpiCom/SUC-2000/User-Guide-1103684-Page-37.png)
![- 38 - Terminating Program To terminate Epivalley HSUPA Dialer program, click at the right top of the program. Or click the right button of mouse on the tray icon and click [Exit] button.](https://usermanual.wiki/EpiCom/SUC-2000/User-Guide-1103684-Page-38.png)