EpiCom SUC-2000 HSUPA USB Modem User Manual SUC 2000 User Guide VerA
EpiCom Co., Ltd. HSUPA USB Modem SUC 2000 User Guide VerA
EpiCom >
Users Manual

- 1 -
HSUPA USB Modem
SUC-2000
User Guide

- 2 -
Copyright
Epivalley Co., Ltd has the copyright for this manual.
This manual should not be reproduced or distributed with no prior written
consent by Epivalley Co., Ltd.
Registered Trademark
The registered trademark stated in this manual is the registered trademark
owned by the corresponding company.
Confidential & Proprietary
This manual is the technical property of Epivalley Co., Ltd and it is prohibited to copy or utilize the manual
with no prior consent by the technical data department.

- 3 -
Table of Contents
Cautions for Safety ....................................................................... 4
Introduction .................................................................................. 6
Specific Features ....................................................................................... 6
Configuration ................................................................................ 7
Condition for Use ....................................................................................... 7
Name of Each Part ....................................................................... 8
Installing Program ......................................................................... 9
Deleting Program ........................................................................13
Using USIM .................................................................................14
PIN Code .................................................................................................. 15
PUK Code ................................................................................................ 16
Using SUC-2000 ........................................................................18
Running Program ..................................................................................... 18
Connecting with PC ................................................................................. 19
Checkig Connection ................................................................................ 20
Epivalley HSUPA Dialer ............................................................................ 21
Web ........................................................................................................................ 21
SMS ........................................................................................................................ 24
Address .................................................................................................................. 30
Setting .................................................................................................................... 34
Logs ....................................................................................................................... 37
Terminating Program ............................................................................... 38
Trouble Shooting ........................................................................39
Specification ...............................................................................40
Warranty ......................................................................................41

- 4 -
Cautions for Safety
The cautions for safety are the contents to keep the safety of users and to
prevent possible loss in property or convenience caused by accidents. The
product should properly be used after sufficient understanding of the contents.
Warning
z Do not discretionally disassemble, modify, or repair the product.
z Do not use the product if possible at the place where the use of
handsets is prohibited.
z Use the product according to the rules and regulations of hospitals or
medical institutions when using the product in such places.
z Do not use the product in the Airplane.
z Keep the product and accessories out of children’s reach.
z Do not touch or use with wet hands.
z Do not use the product outside in the thundering or lightning weather.
Cautions
z Be careful not to give impact to the product and not to throw (or drop)
the product because the product may be broken or deformed.
z When a trouble is occurred with the product, visit a designated service
center to receive the service.
z Keep the USB port of the product clean always.
z The data to use the product is stored in USIM CARD; be careful to
avoid possible damage to USIM CARD.
z Do not use or keep the product with magnetic storage media together.
z Do not use or keep the product at the very hot or very cold place or the
place with large variation of temperature.
z If the model is disconnected from PC in switch-on status, the data may
be damaged; disconnect the model from the PC after the programs are
terminated and the power LED is turned off.
- 5 -
z When the product is used in connection with a notebook with use the
battery only, the battery of the notebook may be somewhat rapidly
discharged due to additional consumption of the power by the product.

- 6 -
Introduction
Thanks you for purchasing SUC-2000 of Epivalley Co., Ltd.
SUC-2000 is a USB Modem by
HSUPA
method to use wireless internet anytime
and anywhere with no limit in time or place.
* HSUPA (High Speed Uplink Packet Access): This is the mobile communication method
for sending/receiving data at the speed significantly faster than that of W-CDMA or CDMA.
Specific Features
* General Features
- USIM Support
- Internet, Intranet
- SMS
- Address
- Connection logs
* Mechnical Features
- Main Intenna
- UMTS Diversity Intenna (2100MHz)
- 2 Colors LED
- Dimension: 34mm(W) × 9.8mm(H) × 92.5mm(D)
- Weight: 42g
* Data Rate
- Download: Up to 7.2 Mbps
- Upload: Up to 2.0 Mbps
* Frequency Band
- GSM: 850 / 900 / 1800 / 1900 MHz
- UMTS: 850 / 1900 / 2100 MHz
* Power Consumption
- Voltage: 5V
- 7 -
Configuration
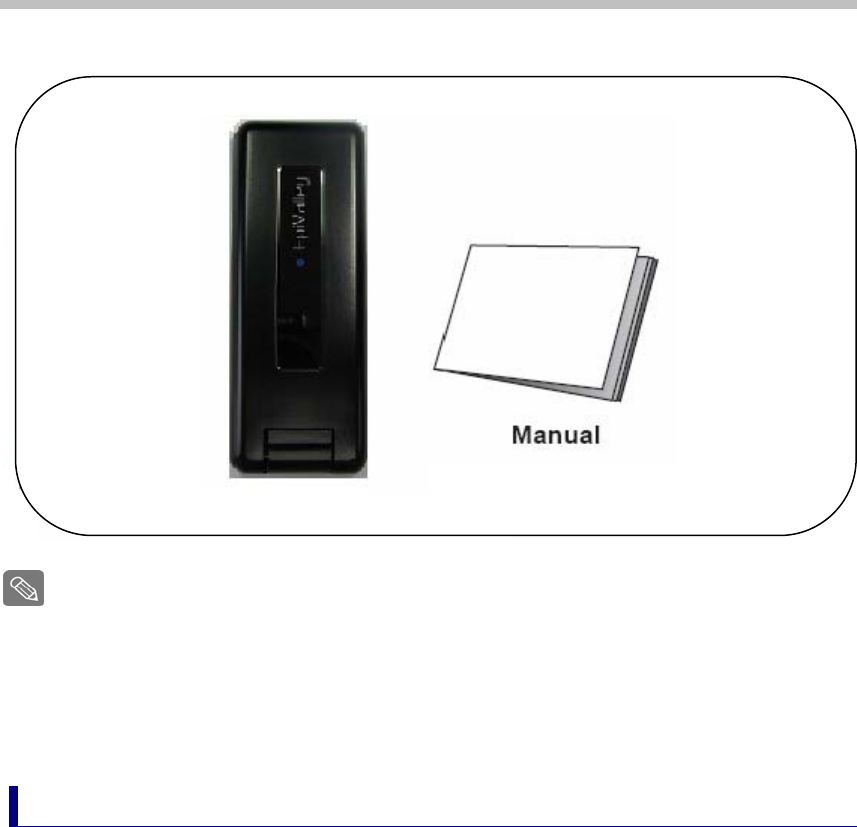
The configuration of SUC-2000 product is as shown below:
The configuration of the product may be somewhat changed wit no prior notice to improve
the functions of the product.
Condition for Use
The minimum specification of the PC to use SUC-2000 is as described below:
z Operating System: Windows® 2000, XP or Vista(32bit, 64bit), Mac® OS X
z CPU: Pentium 4, 1 GHz or above
z Memory: 128 MB RAM or above
z Hard disk space: 100 MB or above
z Connection port: USB slot A-Type
- 8 -
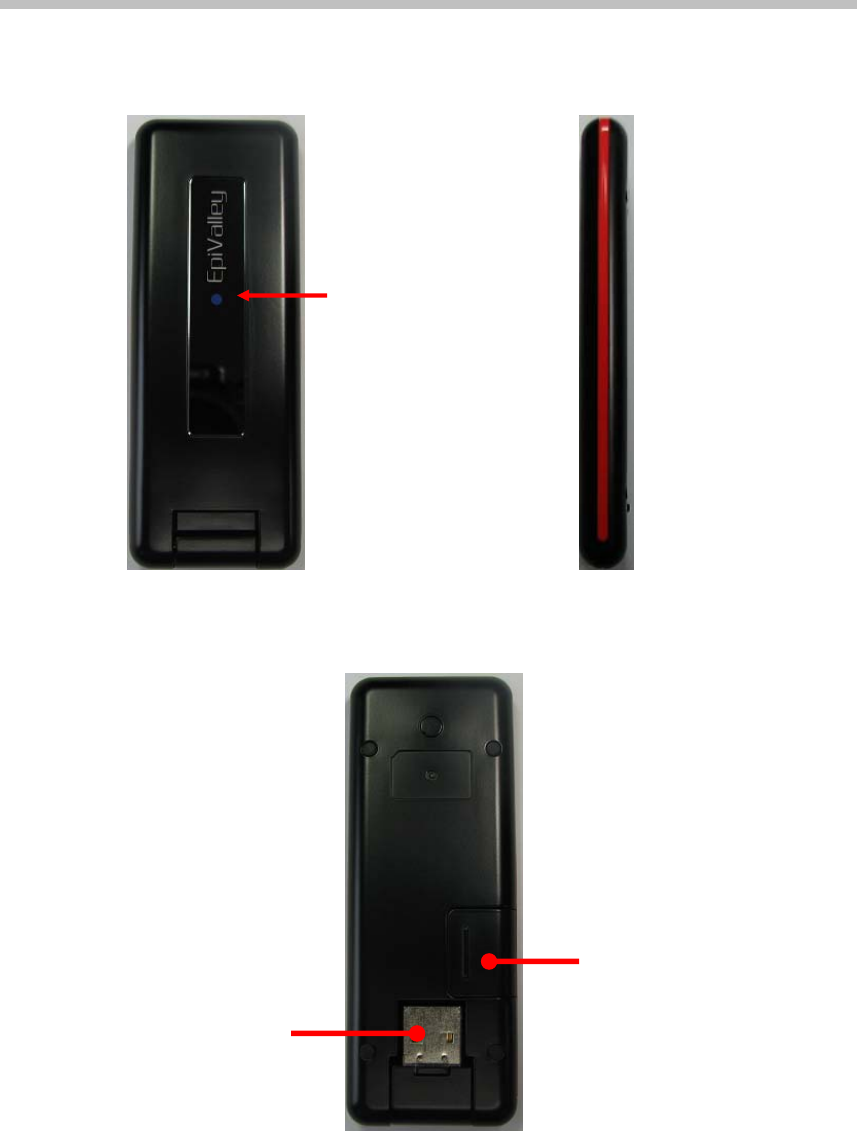
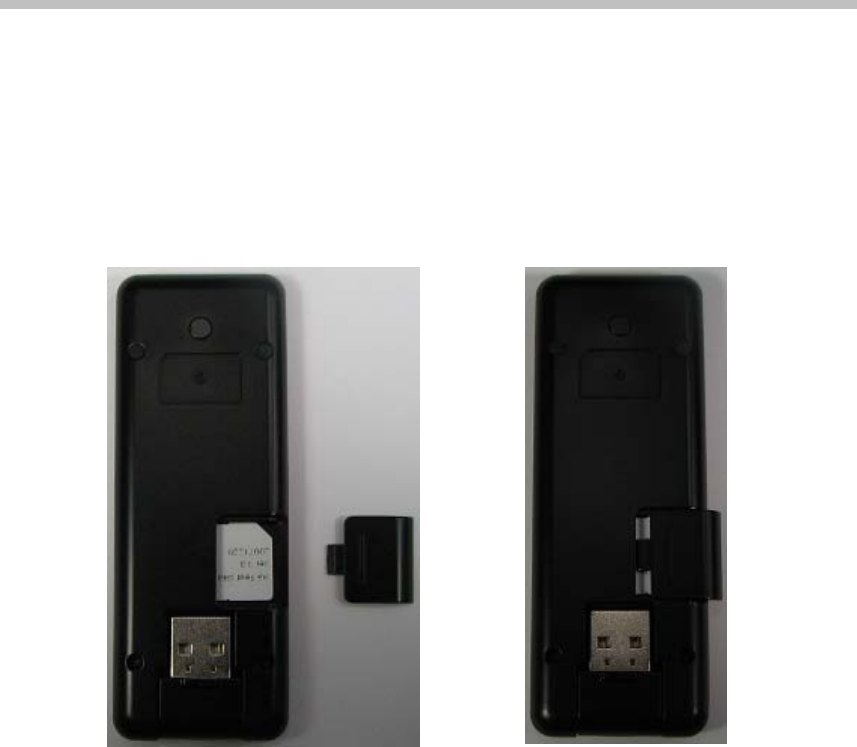
Name of Each Part
Front Part Lateral Part
Lower Part
LED
U-SIM
CONNECTOR
USB
CONNECTOR
- 9 -
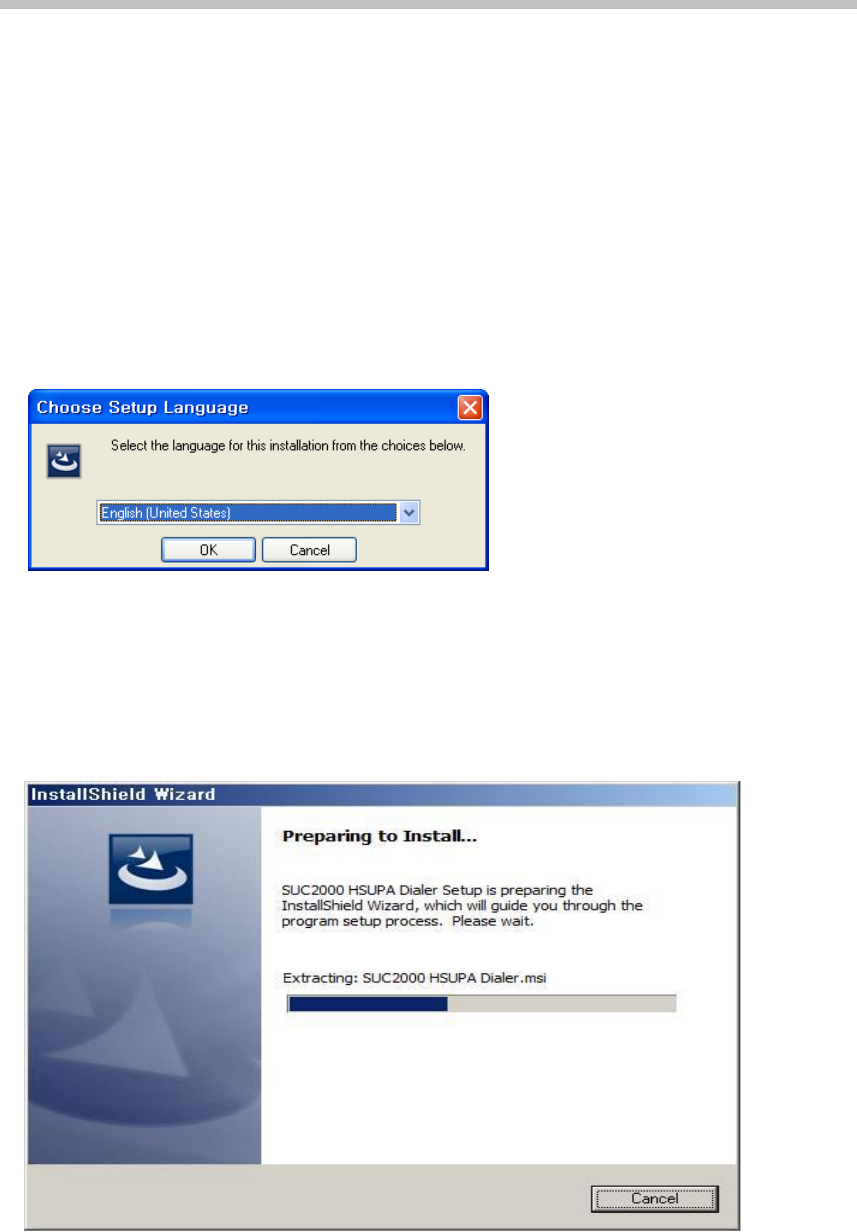
Installing Program
S/W is included in USB Modem.
1. When SUC-2000 is inserted into the USB port of the PC to use SUC-2000,
the installation program is automatically run.
Note: If SUC-2000 Dialer program is already installed, the program is not automatically run.
If you want to reinstall the program, manually start the installation program with use of explorer.
2. When the installation is automatically started, below-shown screen is
displayed. Choose the setup language and click [OK] button.
Note: If the installation is not automatically run, doubleclick “setup32.exe” file in CD. (In case of
Vista 64, setup64.exe)
3. To install the program, files are copied from Modem to PC.
- 10 -
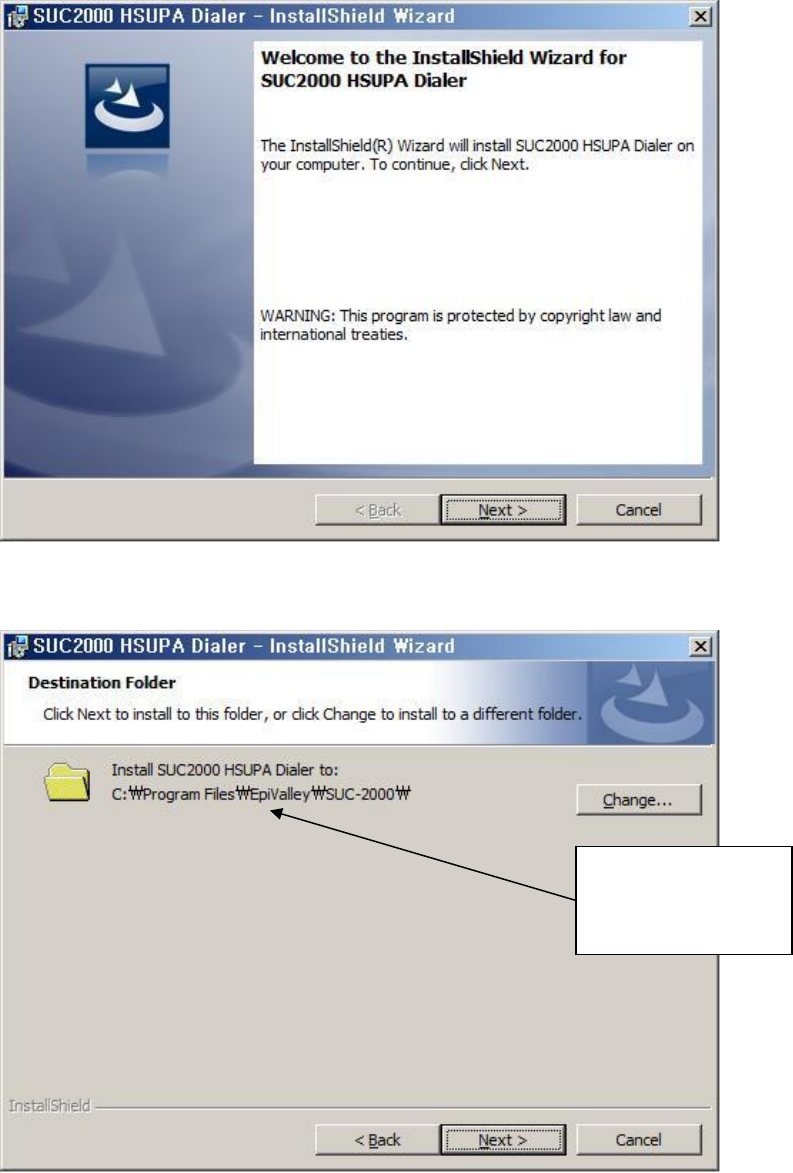
4. When “Welcome to the Installshield Wizard” message is displayed, click
[Next] button.
5. Designate the destination folder to install the program and click [Next] button.
Destination folder
of the program
- 11 -
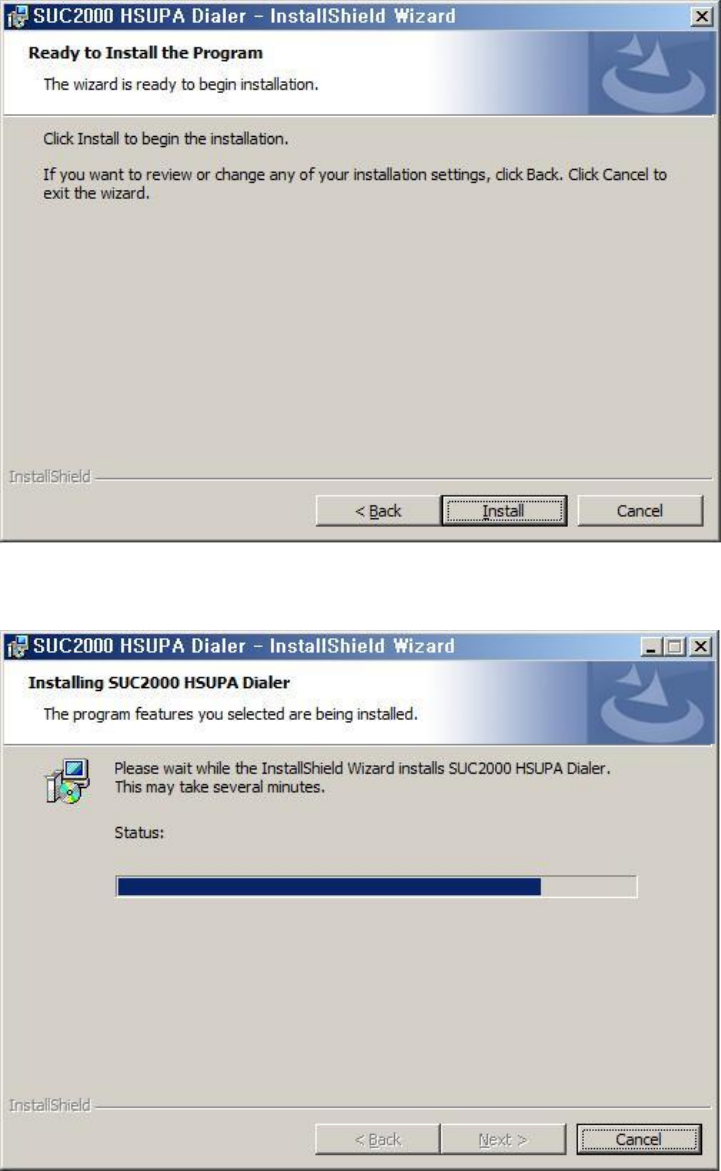
6.Click [Install] button to install the program.
7. Files are copied from Modem to PC.
- 12 -
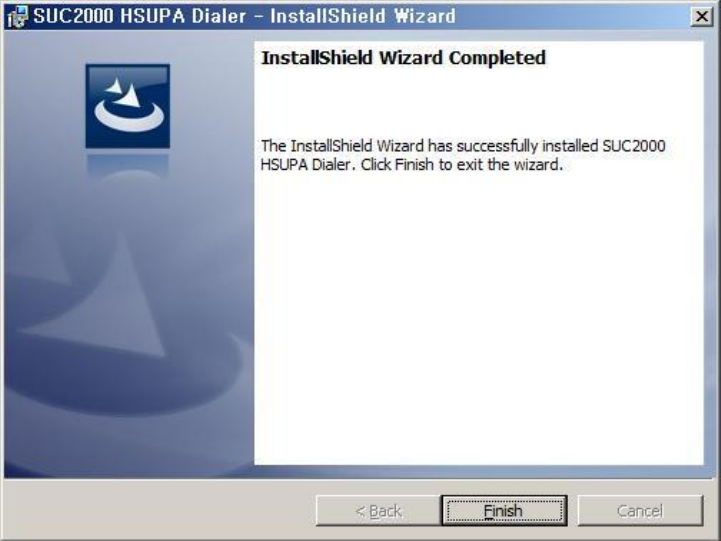
8. Program is completely installed. Click [Finish] button to finish the program
installation.
- 13 -
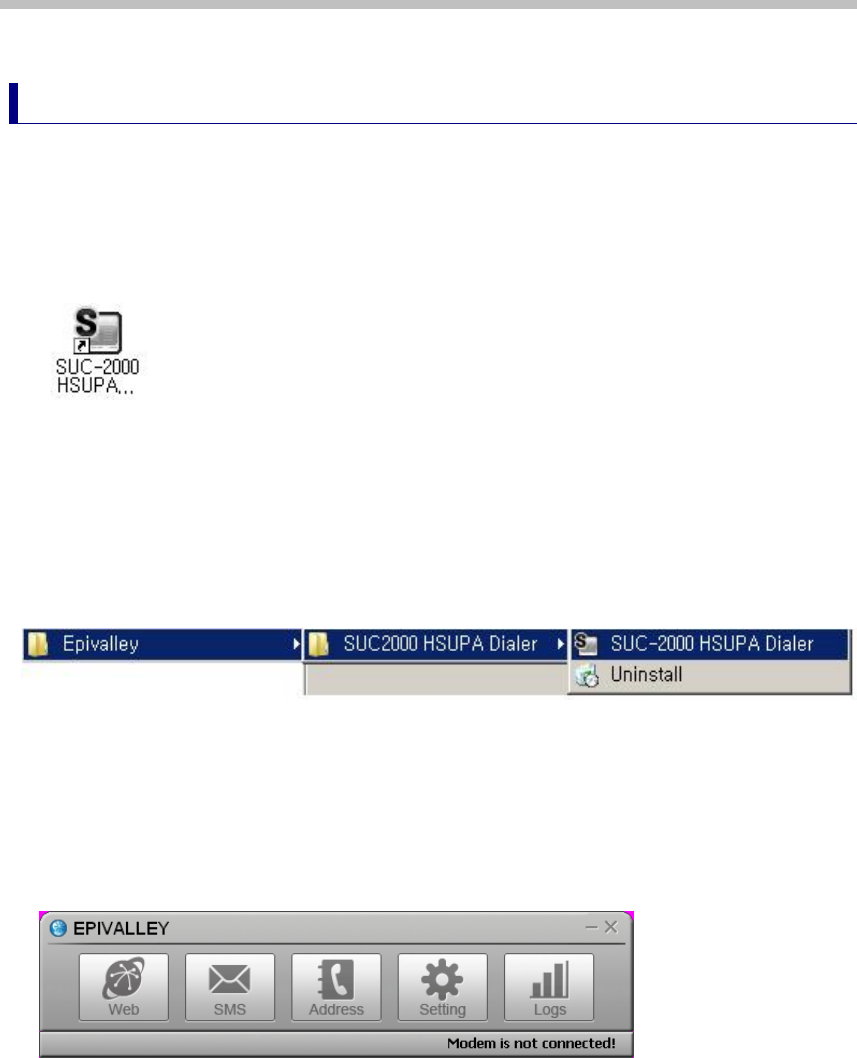
Deleting Program
The method to delete Epivalley HSUPA Dialer installed in PC is as described
below.
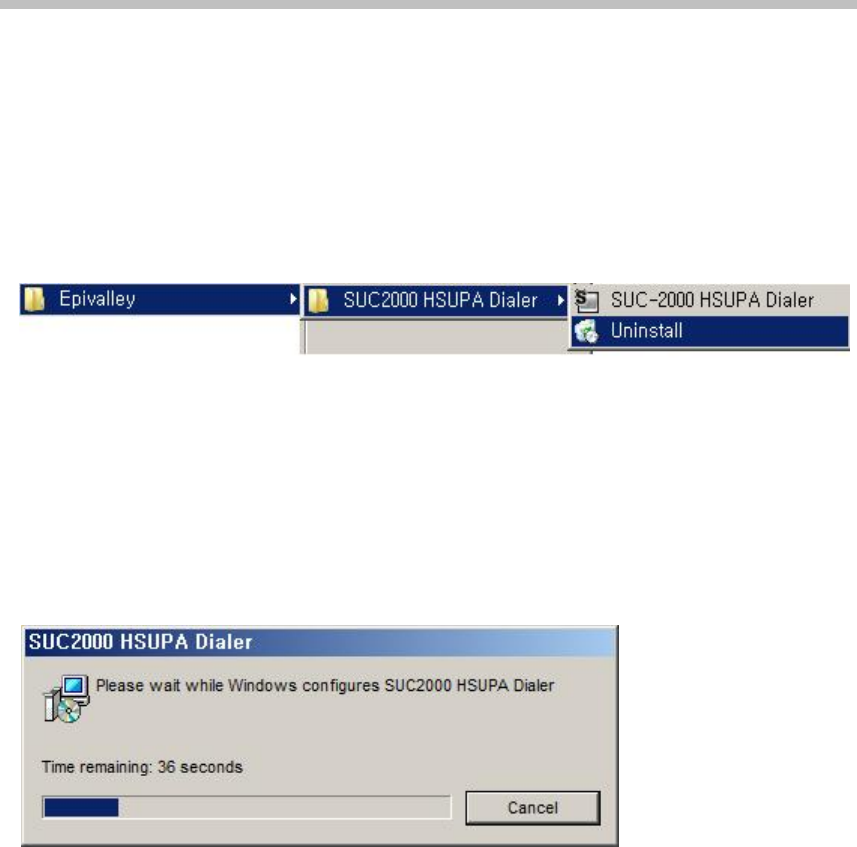
1. On the task bar, click [Start] - [Program] - [Epivalley] - [SUC-2000
HSUPA Dialer] - [Uninstall] in order.
2. When a popup screen is displayed and it is asked whether to delete the
program, click [Yes] button.
- 14 -
Using USIM
USIM (universal subscriber identity module) consists of SIM (subscriber
identity module) containing subscribers’ information and UICC (universal IC
card) and various functions including user authentication, global roaming, and
e-commerce are performed with a card.
For proper use of SUC-2000, USIM Card should be inserted.
- 15 -
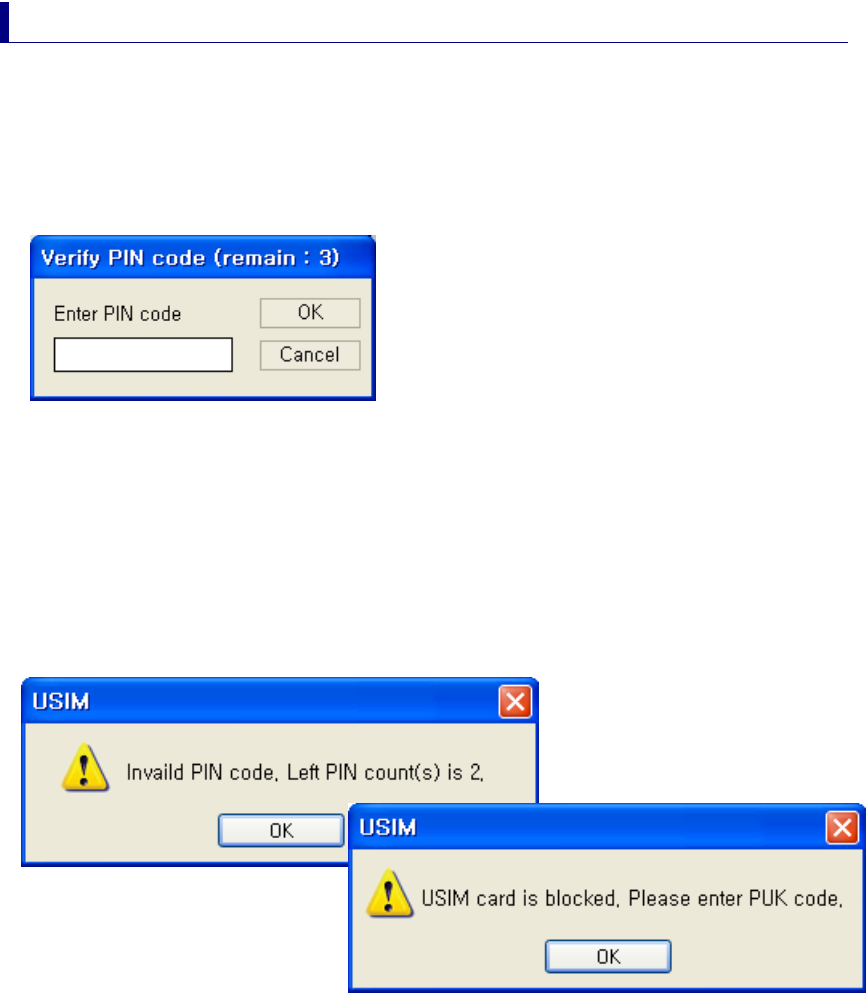
PIN Code
PIN Code is the password to be inputted for confirmation when running the
program to use SUC-2000.
(If PIN Lock Option is in [ON] status, you should input the password when
starting Epivalley HSUPA Dialer program.)
Carefully input the password and click [OK] button; if valid password is
inputted, Epivalley HSUPA Dialer program is properly run and, if invalid PIN
Code is inputted, an error message is displayed as shown below.
Note: If invalid PIN Code is inputted three or more times, USIM Card is blocked and cannot be
used.
Blocked USIM Card may be released with input of PUK Code.
- 16 -
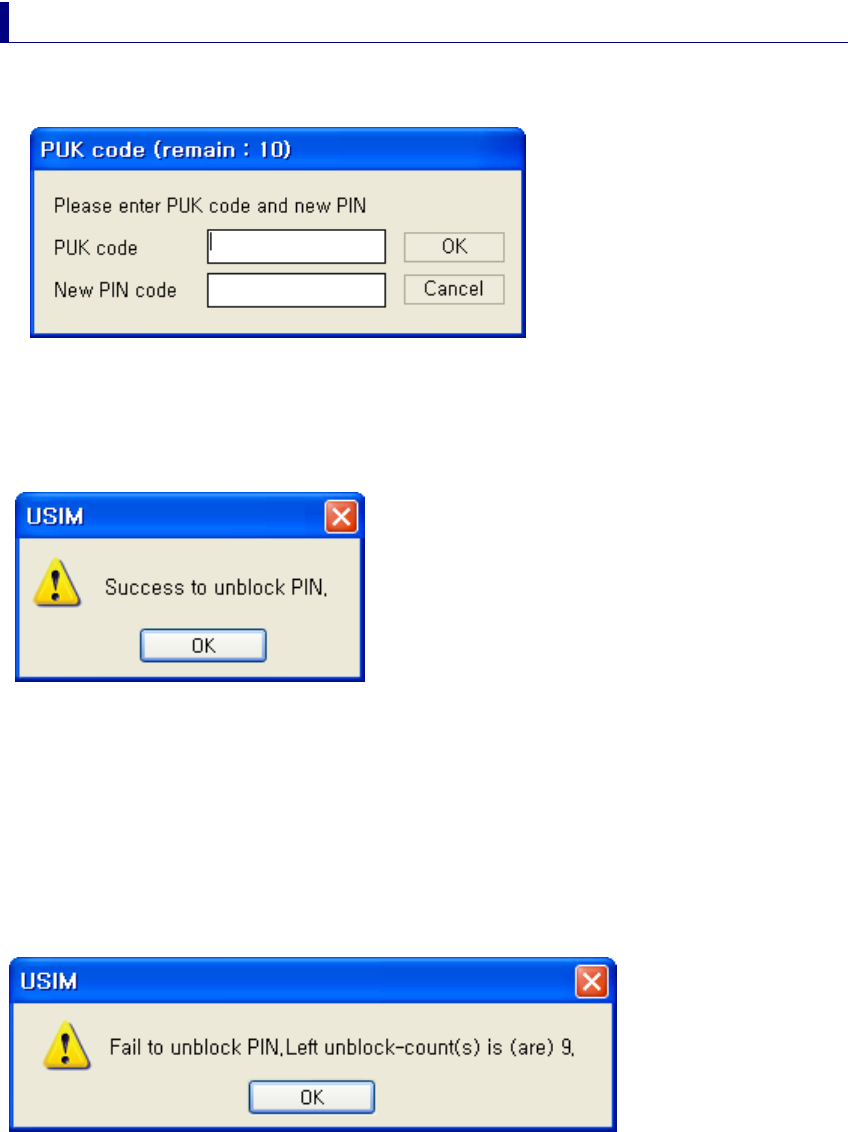
PUK Code
PUK Code is a pre-defined code to release blocked USIM Card.
Input PUK Code and new PIN Code and click [OK] button to release blocked
USIM Card.
Note: PUK Code may be identified in USIM Pack when purchasing USIM and consists of 8
–
digit
numbers.
If invalid PUK Code is inputted, an error message is displayed. In this case,
click [OK] button and input valid PUK Code and new PIN Code to release
blocking.
Note: Be careful because, if you fail in inputting valid PUK Code 10 or more times, USIM Card is
blocked and cannot be used. (You have to purchase USIM Card again.)
- 17 -
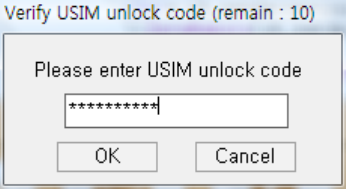
SIM Lock Code
If the usim card is not of the particular appointed operator, it would require
specific unlock code when the program starts. Then, please input valid 10
digits. Once you input correct number, it will not require anymore.
If invalid number input 10 times, the usim card can not be used permanently,
so please contact relevant operator.
- 18 -
Using SUC-2000
Running Program
Run Epivalley HSUPA Dialer program be below-described method.
1. 1. Doubleclick the shortcut icon (Epivalley HSUPA Dialer) on the window.
Or on the task bar, click [Start] - [Program] - [Epivalley] - [SUC-2000
HSUPA Dialer] - [SUC-2000 HSUPA Dialer] in order.
2. Epivalley HSUPA Dialer program is run.
- 19 -
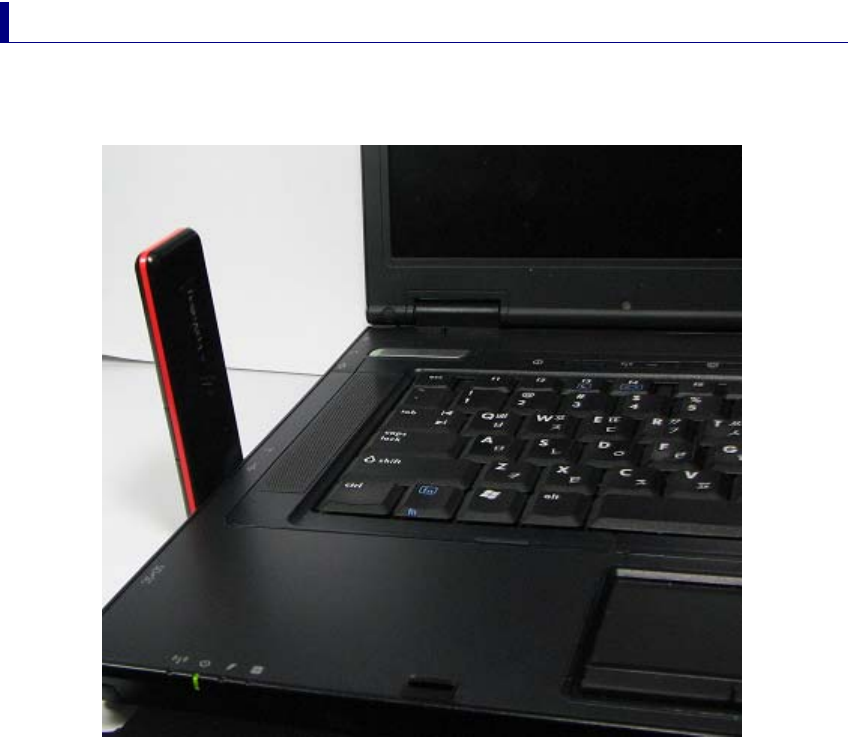
Connecting with PC
The USB Port of SUC-2000 is built in the main body. Pull out the USB Port and
connect it with PC.
Check whether LED part is lighted on.
Note: When SUC-2000 is not used, remove it from PC and push USB Port inside to be stored.
Note: When SUC-2000 is used connecting with a notebook, the receive sensitivity may be
reduced due to the electronic wave generated by LCD monitor. In this case, use it using the
USB extensible cable supplied when purchasing the product.
- 20 -
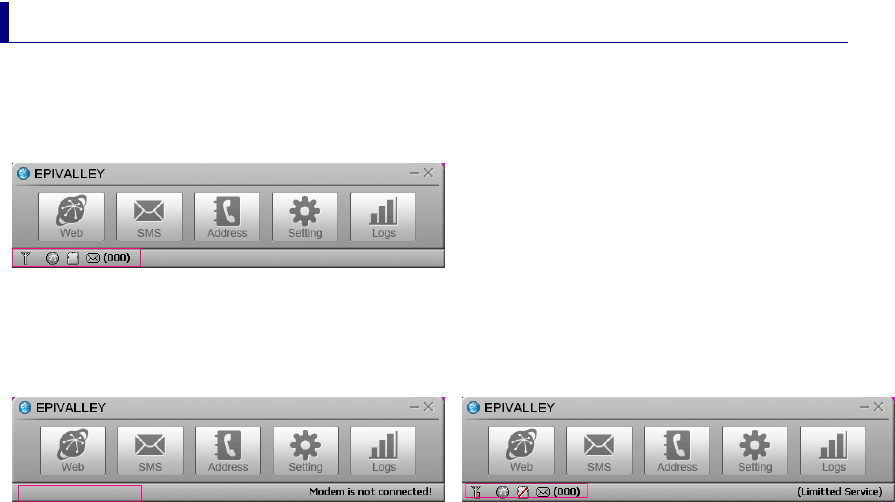
Checkig Connection
When SUC-2000 is connected with PC, the connection status may be
confirmed on the status display bar at the lowest part of the program.
When SUC-2000 is properly
When SUC-2000 is not connected When SUC-2000 is connected but USIM
Card is not inserted or is improperly insertted
Ths status of product may also be checked on the LED at the side of SUC-
2000 .
1. RED: Power On
Blink - No service
2. Yellow GREEN: In service,
Blink - Receiving SMS
3. Orange: Blink - No SIM
- 21 -
Epivalley HSUPA Dialer
Connection with intenet or sending/receiving SMS is possible with use of
Epivalley HSUPA Dialer program and the telephone numbers and addresses
may conveniently be managed in the address list.
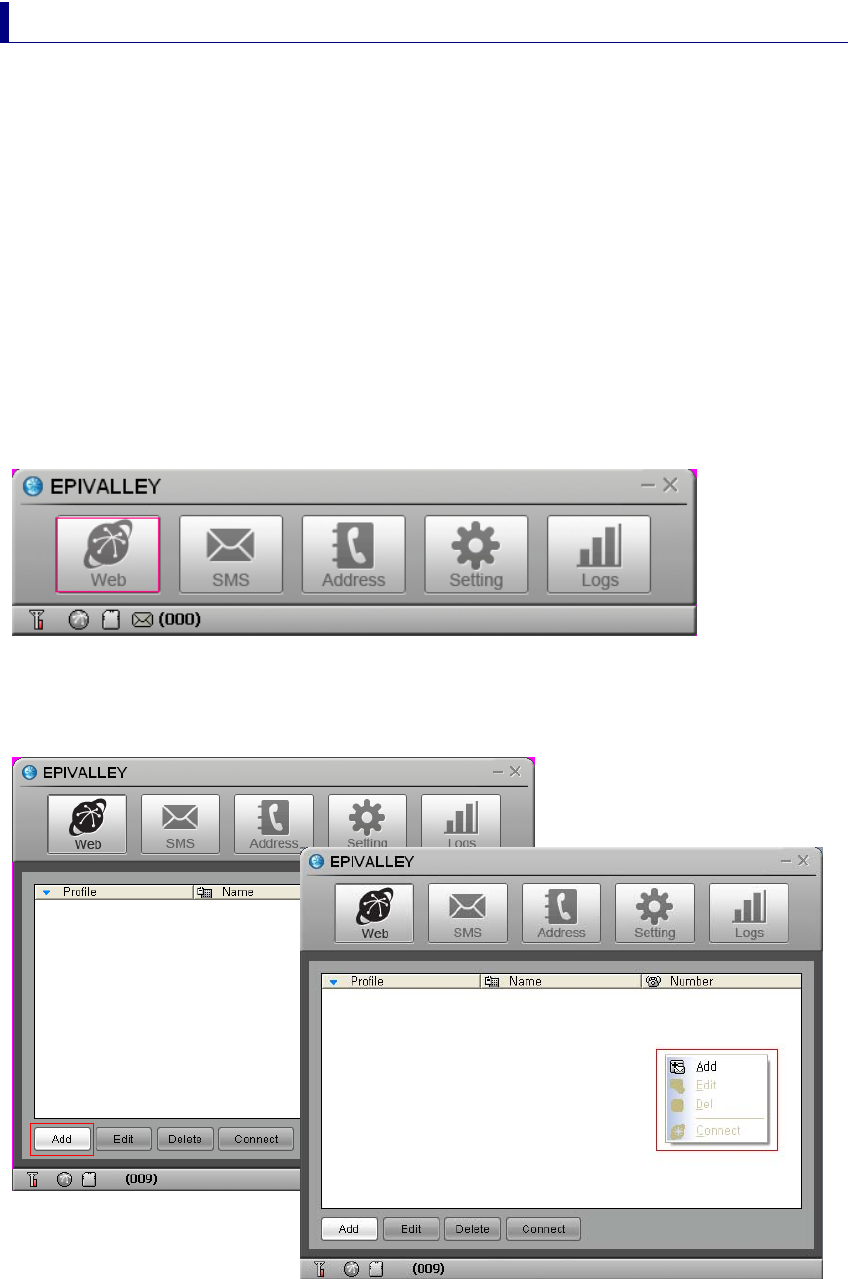
Web
[Web] is the menu used in connecting with internet. When using [Web] for the
first time, the profile needed to connect with internet should be created and,
from the next use, internet connection is possible with use of the stored profile.
1. Click [Web].
2. Create the profile needed to connect with internet. Click [Add] or click the
right button of mouse and select [Add] button.
- 22 -
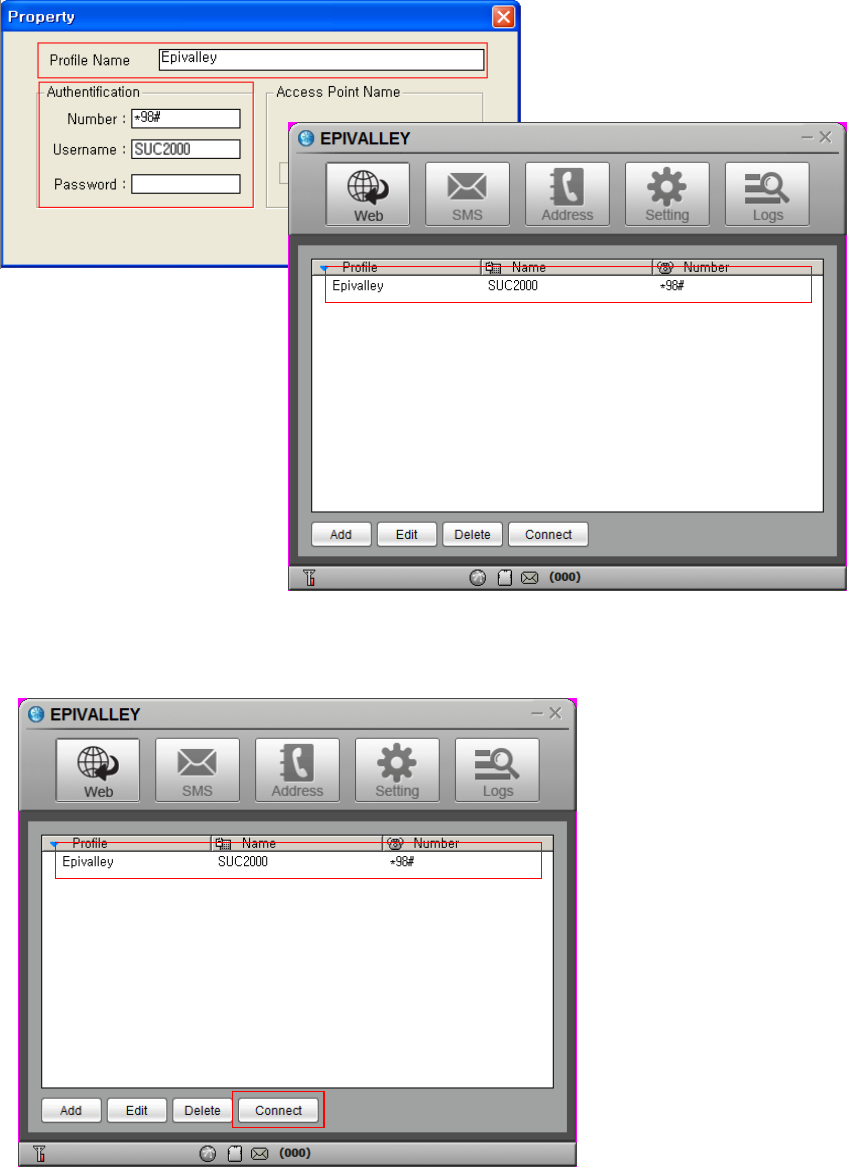
3. Input Profile Name to create the profile for internet connection and input the
information needed to connect with profile. Click [OK] button to create a
profile.
4. Select the profile created for internet connection and click [Connect] button.
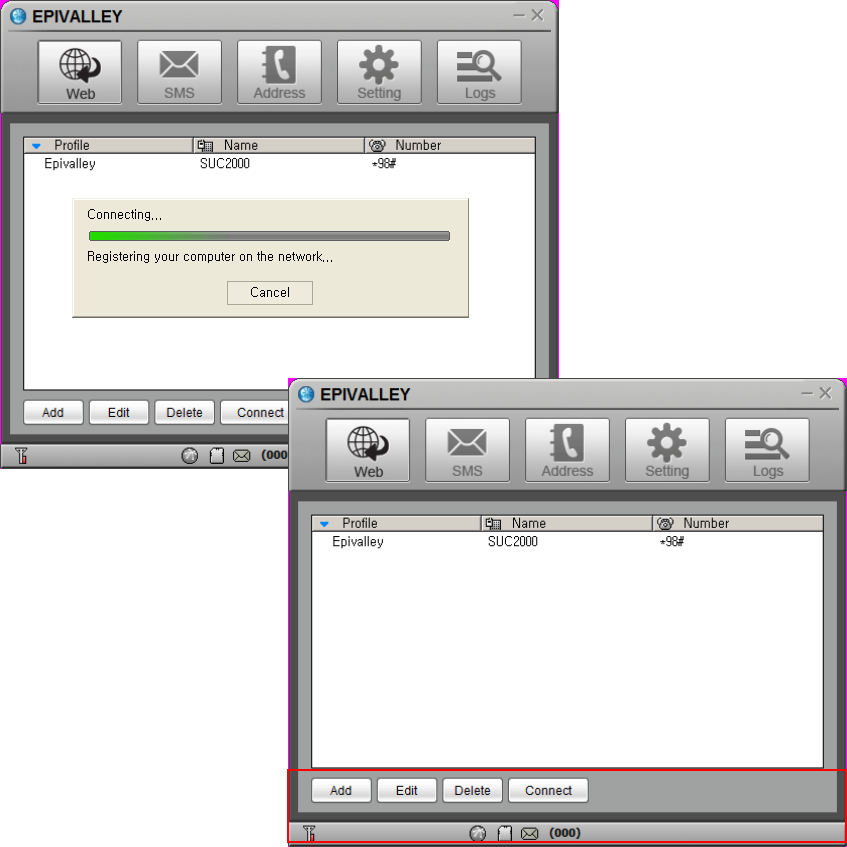
- 23 -
5. Internet is connected and the time of internet use and packets may be
checked.
- 24 -
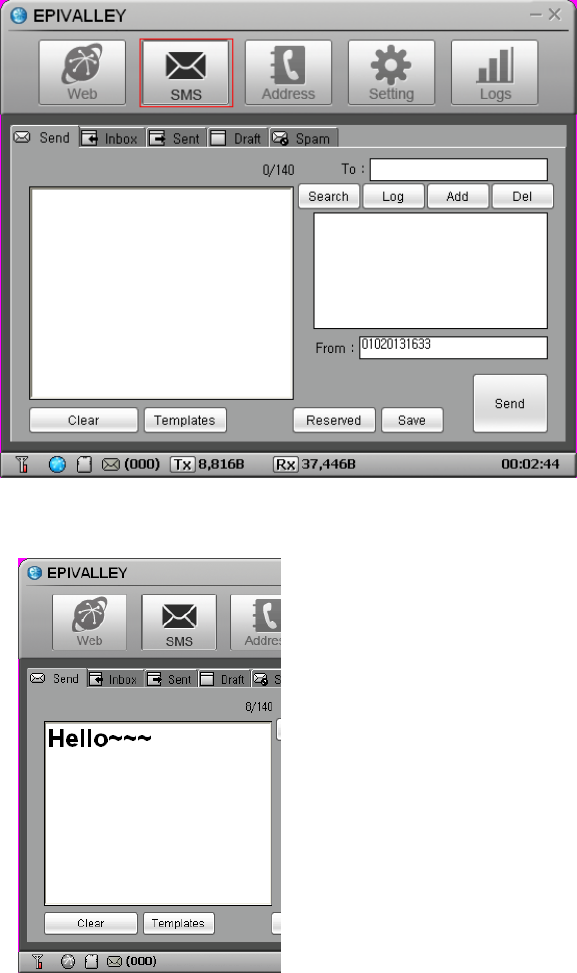
SMS
[SMS] is the menu that is used in sending short messages or consfirming
received short messages.
Short messages may be sent with setting the sending time and the short
messages received from numbers for rejection are automatically classified into
spam messages.
· Send
1. Click [SMS] button.
2. Write the message on Editor screen.
·Clear: erase the message written on Editor screen.
·Templates: designates the templates of message
·Emoticon: inputs emoticon.
·Special: inputs special characters.
- 25 -
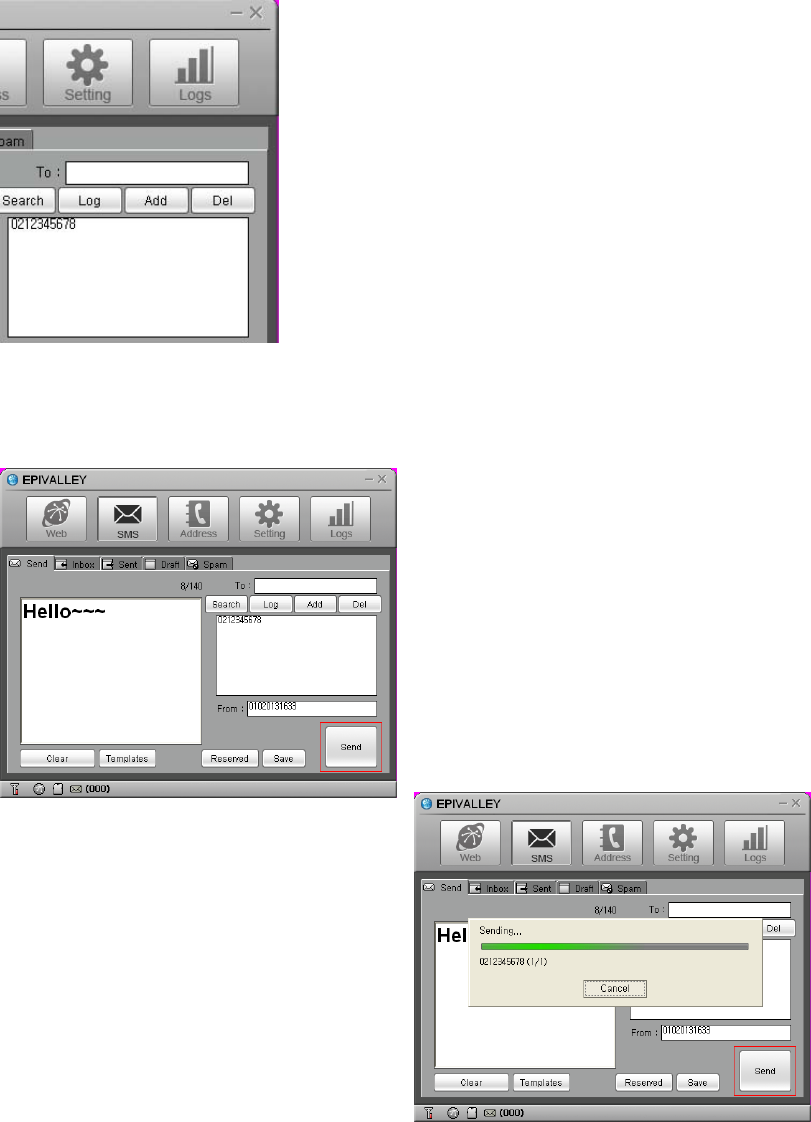
3. Input the telephone number to receive the message and click [Add] button
to designate the number as the receiver’s number. The telephone number may
be added by selecting a number in the numbers registered in the address or
may be designated by selecting a number in the message sending history after
clicking [Log] button.
4. Click [Send] button the send the message.
·Wrong designated receiver’s number may be deleted by selecting
the receiving number in the telephone number list and by clicking
[Del] button.
·To send a messages with reservation, click [Reserved] button
designate the time and date to send the messages.

- 26 -
· Inbox
In [Inbox] tab, you can see the received messages.
Received messages are automatically stored in Inbox.
When a message is received, the receipt is noticed on the Windows popup
screen and, if the program is minized, the tray icon flashes.
The messages may be arranged by Date, Number, Content, Destination, and
Message Status; the message may be relayed with clicking [Forward] button
and a reply message may be sent with clicking [Reply] button.
Note: The method to notice the receipt of a message may be set in [Incoming SMS Alert] in
[Setting] menu.
- 27 -
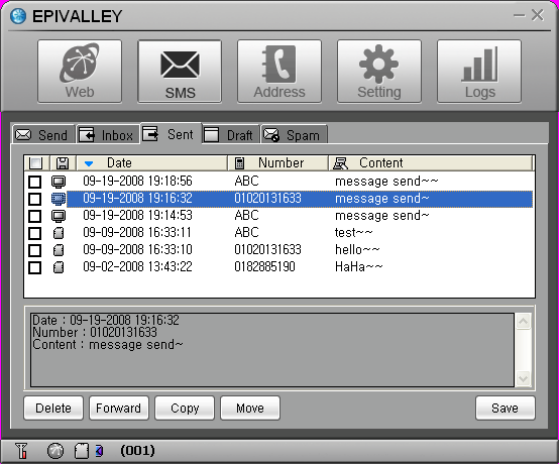
· Sent
In [Sent] tab, you can check the messages sent.
The messages may be arranged by Date, Number, Content, Destination, and
Message Status and the message may be relayed with clicking [Forward]
button.
Also, the destination (PC or USIM) where the messages are stored may be
confirmed with the icon.
Note: Click [Save] button to store the telephone number to which the message was sent or
change the destination to store the message.
- 28 -
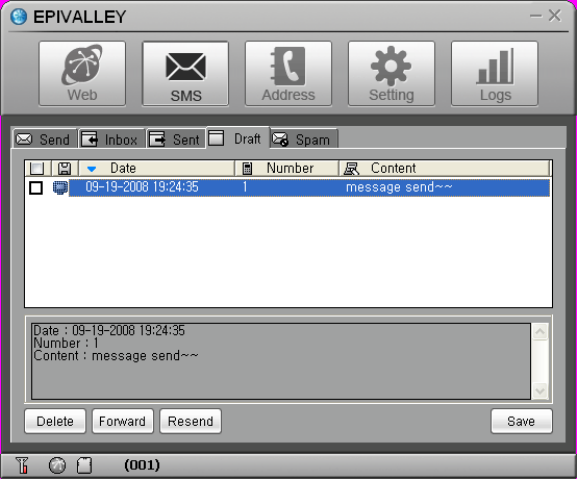
· Draft
In [Draft] tab, you can check the reserved messages, the messages not sent,
and the messages failed in sending.
The messages may be arranged by Date, Number, Content, Destination, and
Message Status and the message may be relayed with clicking [Forward]
button.
Note: Click [Resend] button to send the selected message again.
- 29 -
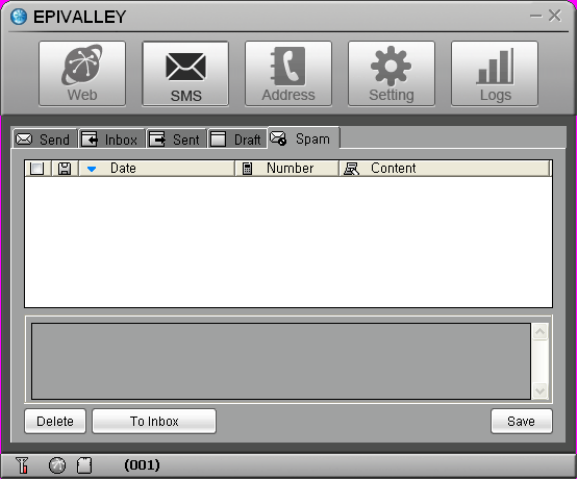
· Spam
In [Spam] tab, you can check the messages received from the telephone
numbers designated as Spam and the messages containing the words
designated as Spam.
The messages may be arranged by Date, Number, Content, Destination, and
Message Status and the message may be stored with clicking [Save] button.
Note
•
Click [Inbox] button to move or resend the selected message.
•
You can define the Spam messages
in
[Spam message Settings] in [Setting] menu.
- 30 -
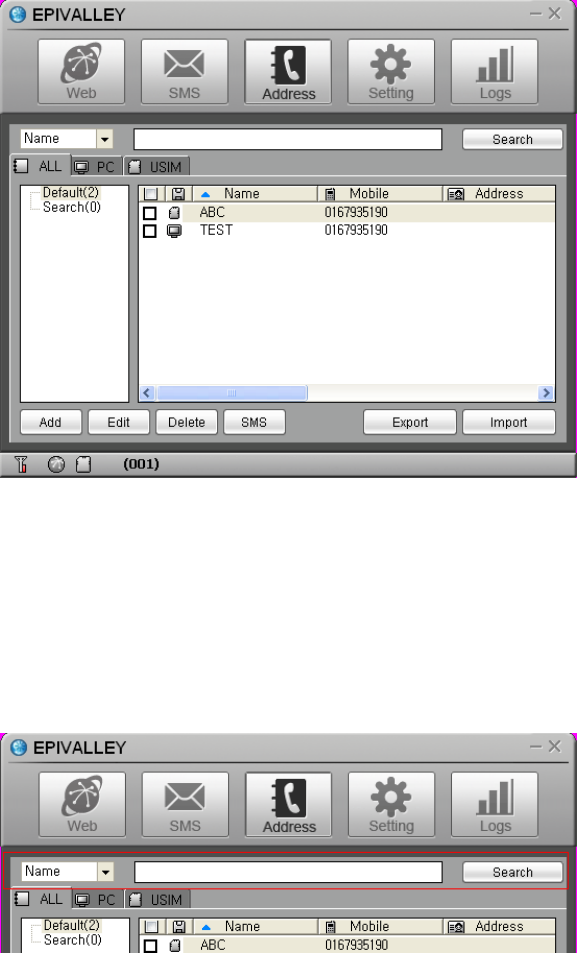
Address
[Address] menu is used to register, edit, and delete telephone numbers.
· Viewing Registered Telephone Numbers
You can check the stored telephone numbers with selecting All, PC, or SIM tab
and you can view the registered telephone numbers in the arrangement by
Name, Mobile, Address, Office, Home, Fax, E-mail, and Comments.
· Searching Telephone Numbers
You can search the registered telephone numbers with selecting the search
type (Name, Mobile, Group, Address, Office, Home, Fax, E-mail, and
Comments), inputting the search condition, and clicking [Search] button.
- 31 -
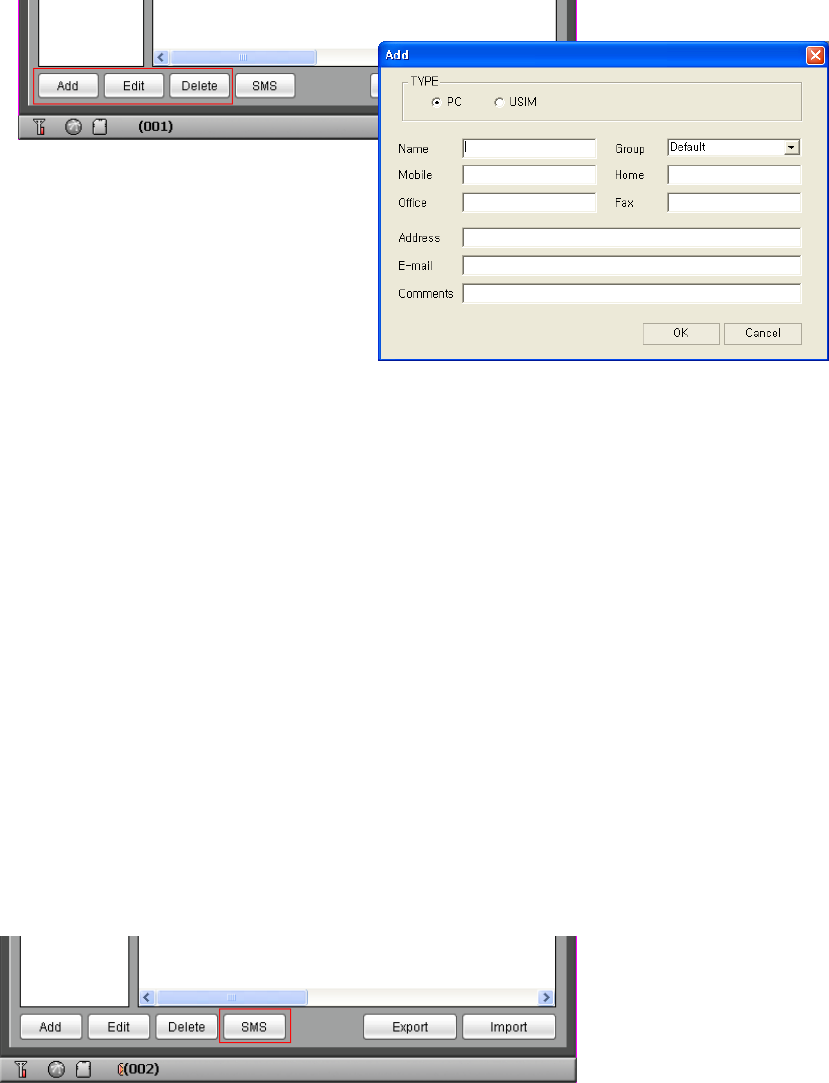
· Registration, Correction, and Deletion of Telephone Numbers
You can register a new telephone number or correct or delete registered
telephone numbers with use of the button at the lowest part of Address Menu.
• Add: registers a new telephone number in the telephone book.
• Edit: may correct the information on the registered telephone number.
• Delete: deletes the registered telephones from the telephone book.
· Sending Short Messages
You can send a message to the registered telephone numbers with clicking
[SMS] button at the lowest part of Address Menu. Check the telephone
numbers to send the message and click [SMS] button.
- 32 -
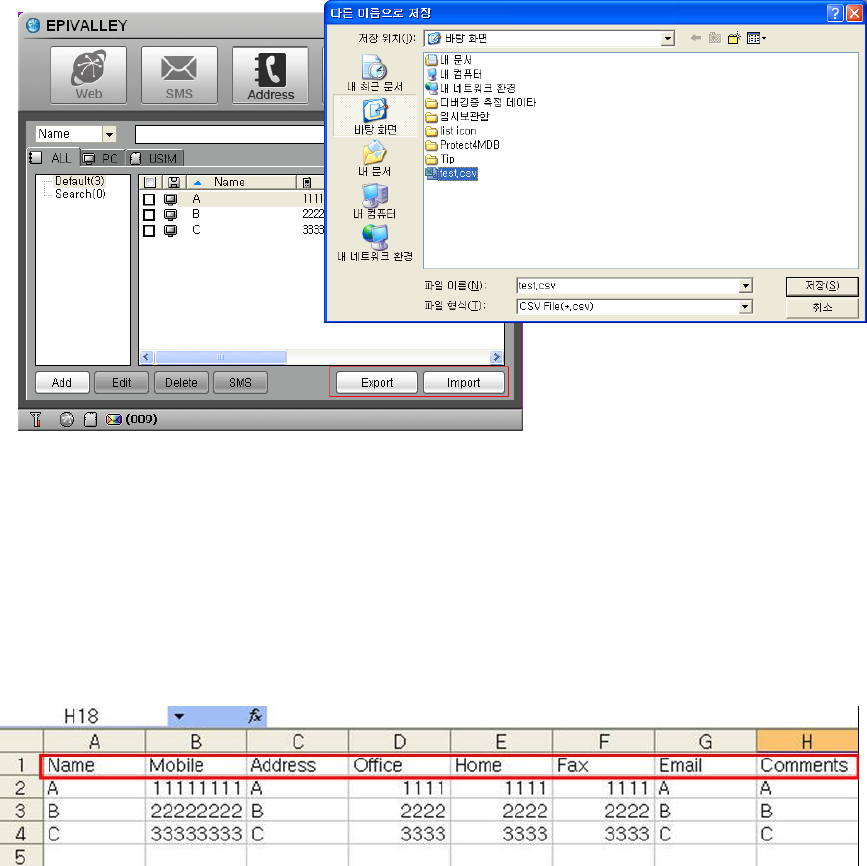
· Address list Export, Import
You can export and import a phonebook as CSV file format using export,
import button.
Before importing to make a CSV file, please input Name, Mobile, Address,
Office, Home, Fax, Email, Comments regardless of Capital letter or small letter
in the first row in order. From the second row, input contents according to the
each item stated in the first row. (If the first row is empty, please input contents
from the second row.)

- 33 -
· Managing Telephone Number Groups
Telephone numbers may conveniently be managed with classification into
groups.
A group may be created with clicking the right button of mouse and clicking
[Add] button.
You can move the registered telephone numbers to another group with Drag &
Drop and send a message to a group or groups at a time.
Also, you can move or copy the registered telephone number by selecting the
number and clicking the right button of mouse.
- 34 -
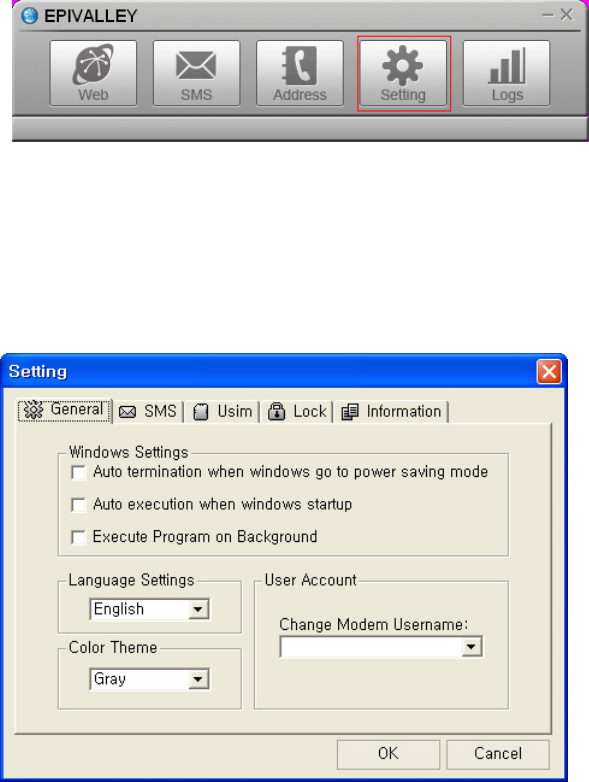
Setting
In [Setting] menu, you can set the environment related with the use of
Epivalley HSUPA Dialer program.
· General
In [General] tab, you can set the information on the language and color theme
related with Windows.
- 35 -
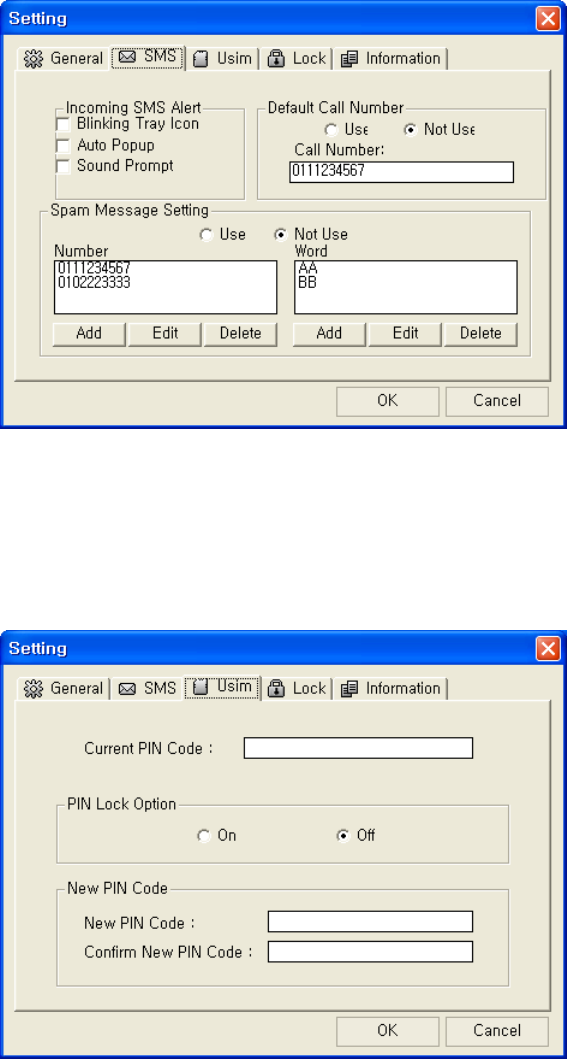
· SMS
In [SMS] tab, you can set the information on notice of message receipt and
Spam message management.
· USIM
In [USIM] tab, you can set the information related with PIN Code.
- 36 -
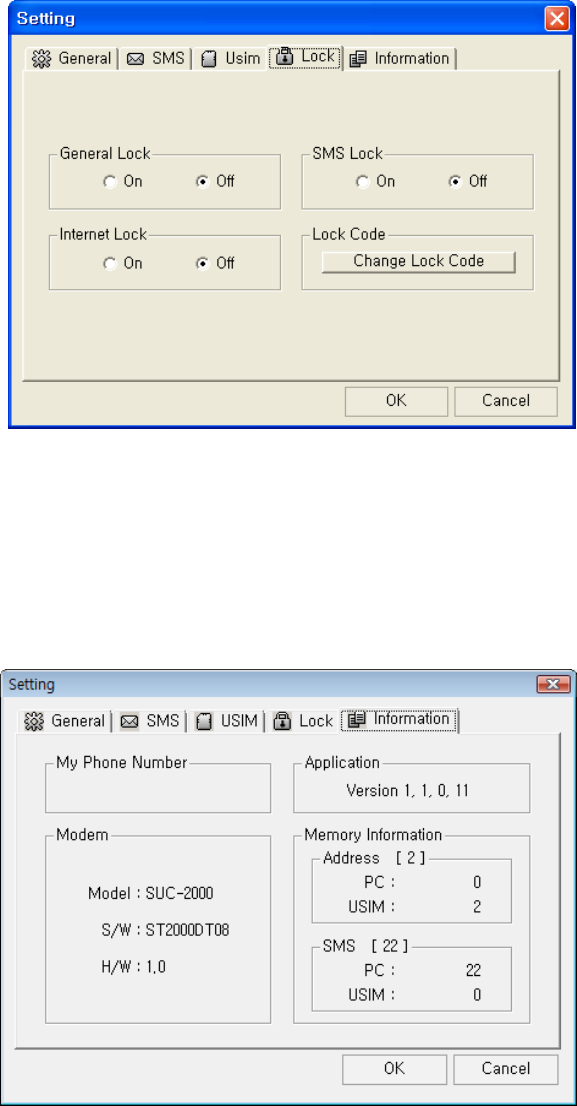
· Lock
In [Lock] tab, you can set the information related with lock function.
· Information
In [Information] tab, you can check the information related with S/W Version,
Modem, and Memory.
- 37 -
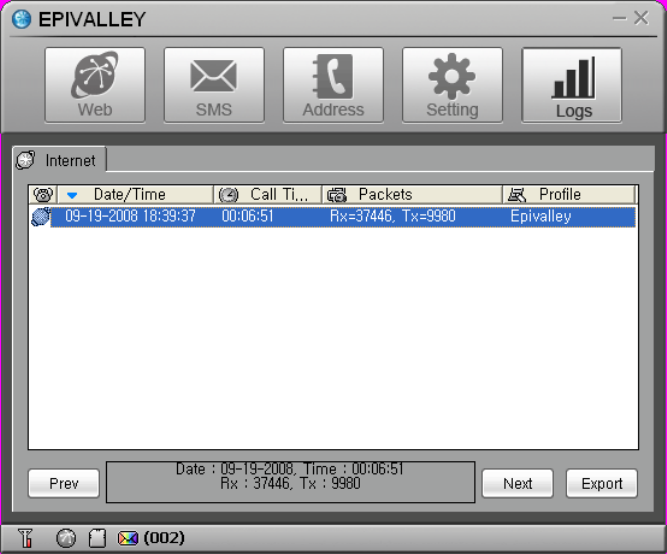
Logs
In [Logs], you can check the information on the date and time of internet
connection and the quantities of sent/received data in relation to use of
internet.
• Prev: confirms the internet logs of previous month.
• Next: confirms the internet logs of next month.
• Export: The internet logs of current month are downloaded in csv file type.
- 38 -
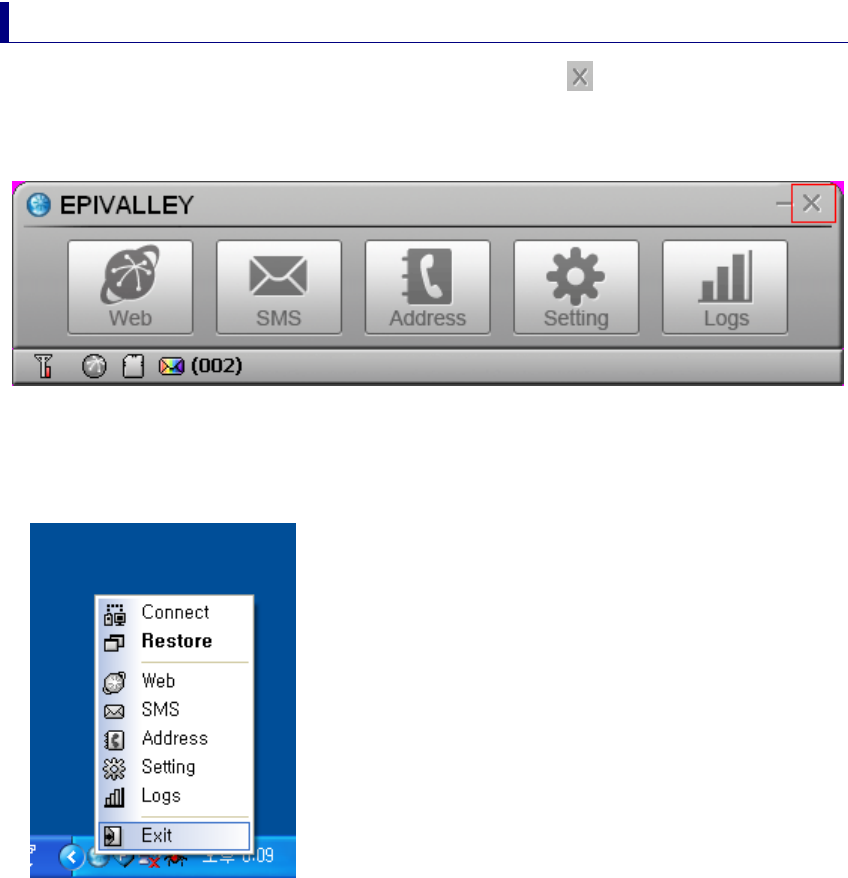
Terminating Program
To terminate Epivalley HSUPA Dialer program, click at the right top of the
program.
Or click the right button of mouse on the tray icon and click [Exit] button.

- 39 -
Trouble Shooting
If you informs the expected problems and solutions in relation to the use of
SUC-2000, the troubleshooting will be prepared with referring to the related
contents of other models.

- 40 -
Specification
Specification will be prepared after confirming the final specification.

- 41 -
Warranty
Let use be informed of the warranty policy of Epivalley.

- 42 -
FCC
The highest SAR value for this HSDPA USB MODEM is 0.837 W/kg (GSM Cellular Band) / 0.478 W/kg (WCDMA Cellular
Band) / 0.869 W/kg (GSM PCS Band) / 0.589 W/kg (WCDMA PCS Band). The FCC has granted an Equipment
Authorization for this HSDPA USB MODEM with all reported SAR levels evaluated as in compliance with the FCC RF exposure
guidelines. SAR information on this model phone is on file with the FCC and can be found under the Display Grant section of
http://www.fcc.gov /oet / fcc id after searching on FCC ID: R2NSUC-2000
Additional information on Specific Absorption Rates (SAR)can be found on the Cellular Telecommunications & Internet
Association (CTIA) web-site at http://phonefacts.net.*In the United States and Canada, the SAR limit for mobile phones used by the
public is 1.6watts/kg (W/kg)averaged over one gram of tissue. The standard incorporates a substantial margin of safety to give
additional protection for the public and to account for any agitations in measurements.
In August 1996 the Federal Communications Commission (FCC) of the United States with its action in Report and Order FCC 96-
326 adopted an updated safety standard for human exposure to radio frequency (RF) electromagnetic energy emitted by FCC
regulated transmitters. Those guidelines are consistent with the safety standard previously set by both U.S. and international
standards bodies. The design of this phone complies with the FCC guidelines and these international standards.
For more information about RF exposure, please visit the FCC website at www.fcc.gov
WARNING! Read this information before use
Caution
Modifications not expressly approved by the party responsible for compliance could void the user’s authority to operate the
equipment.
Near-Body Operation
To maintain compliance with FCC RF exposure requirements, maintain a 5mm, separation distance between the user's body and the
HSUPA USB Modem, including the antenna, whether extended or retracted.
FCC Compliance Information
This device complies with Part 15 of FCC Rules. Operation is subject to the following two conditions: (1) This device may not
cause harmful interference, and (2) This device must accept any interference received. Including interference that may cause
undesired operation.
Information to User
This equipment has been tested and found to comply with the limits for a Class B digital device, pursuant to part 15 of the FCC
Rules. These limits are designed to provide reasonable protection against harmful interference in a residential installation. This
equipment generates, uses and can radiate radio frequency energy and, if not installed and used in accordance with the instructions,
may cause harmful interference to radio communications. However, there is no guarantee that interference will not occur in a
particular installation. If this equipment does cause harmful interference to radio or television reception, which can be determined by
turning the equipment off and on, the user is encouraged to try to correct the interference by one or more of the following measures:
- Reorient or relocate the receiving antenna.- Increase the separation between the equipment and receiver.
- Connect the equipment into an outlet on a circuit different from that to which the receiver is connected.
- Consult the dealer or an experienced radio/ tv technician for help.