EpiCom SXC-1380 CDMA USB Modem User Manual SXC 1080 Cover
EpiCom Co., Ltd. CDMA USB Modem SXC 1080 Cover
UserManual.wiki
>
EpiCom
>
SXC 1380 User Manual
User Manual
Navigation menu
Upload a User Manual
Namespaces
Wiki Guide
HTML
PDF
Info
Views
User Manual
Discussion / Help
Navigation


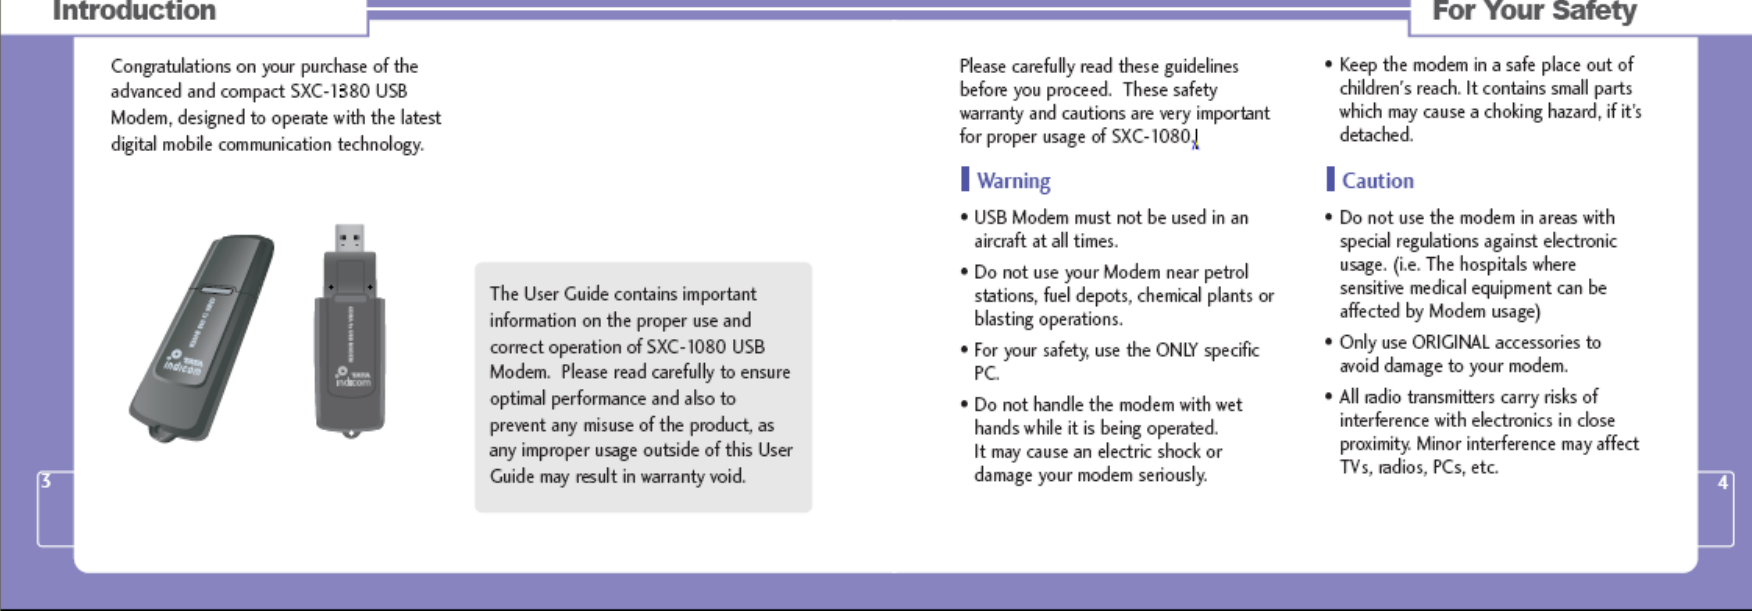
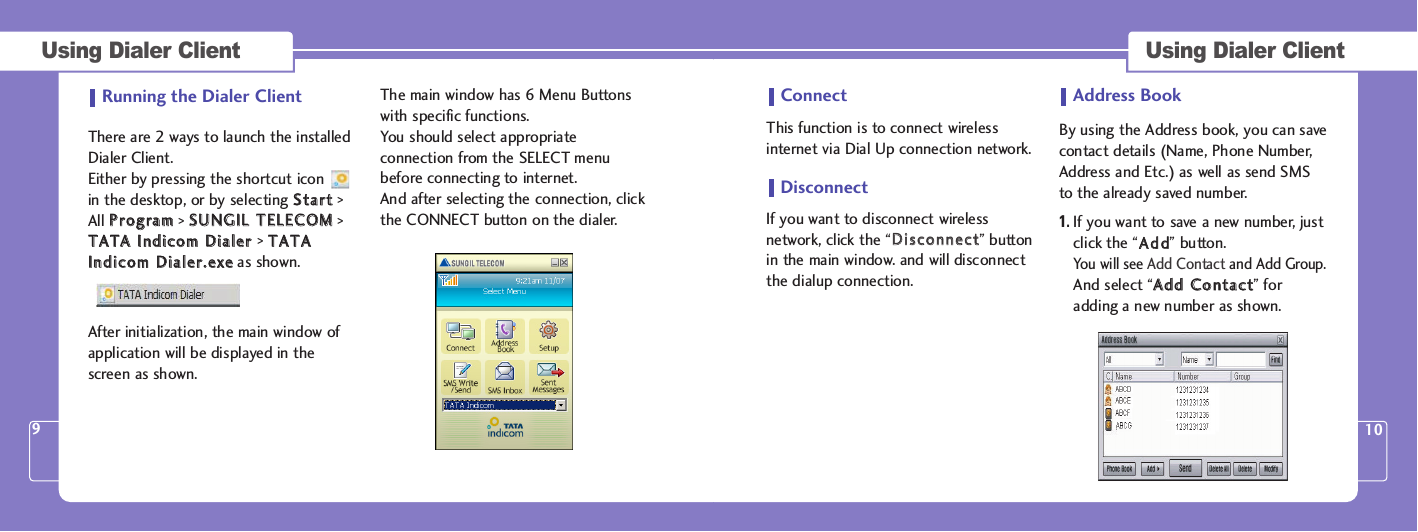
![Using Dialer Client 11Using Dialer Client 122. You can use the “FFiinndd” option to findalready saved Numbers from thePhone Book.3. You can send a message by selectinga Phone Book number from “AAddddrreessssBBooookk” and then clicking the Sendbutton.4.If you want to synchronize phonebook between PC and R-UIM Card,click the “PPhhoonnee BBooookk” button asshown.Use left, right arrow buttons to selecta phone number and use copy/moveoption to synchronize the selectednumber. SetupThis function is to customize theapplication according to yourpreferences.1. WWiinnddoowwThis is to set up the window displayfunction.]AAllwwaayyss oonn tthhee ttoopp: Displaywindow always on top.]TTrraayy iiccoonn bblliinnkk: When application receivesmessages, tray icon blinks onworking bar.]AAUUTTOO PPOOPP--UUPP: When applicationreceives messages, Message Boxwindow appears automatically.]SSoouunndd nnoottiiffyy: When applicationreceives messages, it sounds toannounce. To return main window, click the“CClloossee” button.2. NNeettwwoorrkkIn Network you can set Dial-Upconnection's Username, Password and](https://usermanual.wiki/EpiCom/SXC-1380/User-Guide-940109-Page-7.png)
![Using Dialer Client 13Using Dialer Client 14Dial Number. Also you can makemultiple profiles to access the internetand see the internet Call logs.]SShhooww IInntteerrnneett LLoogg: If you clickthis button, you can acknowledgeused data volume and time.3. CCoonnnneeccttiioonn SSeettttiinnggTo choose Profile name, please followbelow procedure.Click the “SSeettuupp ssccrreeeenn” -> Clickthe “NNeettwwoorrkk” -> Click the“CCoonnnneeccttiioonn SSeettttiinngg” Network Connection Settings screenwill be shown as below. Choose the profile name you want toset.TATA Indicom Profile Name can't be deleted, but it is able to modifyAuthentication section by clickingModify button. In order to create newprofile name, click the “New” buttonand choose the profile you want toset. Once profile setting is finished,please press OK button to close it. 4. SSeettuupp IInnffooThis function is to show theapplication version information. To return to the main window, clickthe “CClloossee” button.](https://usermanual.wiki/EpiCom/SXC-1380/User-Guide-940109-Page-8.png)
![Using Dialer Client 18Using Dialer Client 171. Fill in the number you want to send inblank box, “TToo :: ____________________” .In the “TToo :: ____________________”,] You can use Multi-Send function bydividing each recipients with asemi-colon “;;”. ] You can choose the user name inthe phonebook instead of typing arecipient number (Except forphonebook stored in R-UIM).] When you click “To”, the Addressbook window will appear and youcan select recipients from youraddress book.2. Write a message in the blank box, andclick the“SSeenndd” button.] DDeelliivveerryy aacckk: Select this functionto obtain notification when therecipients received your Message. ] PPaaggeerr MMssgg: Select this functionto transmit just the sender numberwithout the contents. 3. When the message is being sent, thefollowing window will be shown andyou will be returned to the mainwindow automatically after messagehas been sent successfully.** NNoottee::The “CCaanncceell” function willnot work when the message to besent is already in progress. But in case of multi-sending, it cancancel to send next message exceptfor message in process.SMS InboxYou will be alerted when you receive newSMS. All new SMS will be stored in the“SSMMSS IInnbbooxx” menu. In SMS Inbox, you canidentify each message by Date, Name,Number etc. 1. Select the message you want to readand double click with the left mousebutton (or click the right mousebutton) to see the whole message.You can also forward/reply/delete themessage on the "RReeaadd MMeessssaaggee"window. 2. A pop up will appear asking whetheryou want to transfer the R-UIM SMS toPC. (This menu will not appear if theSMS stored in the R-UIM is already onthe Dialer Client.] Select “YYeess” to have all SMS in theR-UIM transferred to PC.](https://usermanual.wiki/EpiCom/SXC-1380/User-Guide-940109-Page-10.png)
![Using Dialer Client 20Using Dialer Client 19] The message “PPlleeaassee ddeelleetteessttoorreedd mmeessssaaggee((ss)) iinn tthhee RR--UUIIMM ttoo rreecceeiivvee nneewwmmeessssaaggee((ss))..”will appear if theSMS inbox in the R-UIM is at itsmaximum. 3. Click the “DDeelleettee” button to erasemessage. 4. To return main window, click onthe top of the right.Sent MessageThis menu allows you to see the SMSwhich is already sent or failed to send.After sending the SMS, the message willbe moved to “SSeenntt MMeessssaaggee” menu.1. Select the sent message you want toread, and then double click the leftmouse button. You can see the wholemessage2. Click the "ffoorrwwaarrdd" button to sendthe message to new recipients andclick the "DDeelleettee" button to deletethe message.3. If the message has failed to send, the"FFaaiilleedd" comment will be shown inthe Status column. You can send itagain using "RReesseenndd" button. 4. To return to the main window, clickat the top right hand corner ofthe window.](https://usermanual.wiki/EpiCom/SXC-1380/User-Guide-940109-Page-11.png)