EpiCom SXC-1380 CDMA USB Modem User Manual SXC 1080 Cover
EpiCom Co., Ltd. CDMA USB Modem SXC 1080 Cover
EpiCom >
User Manual
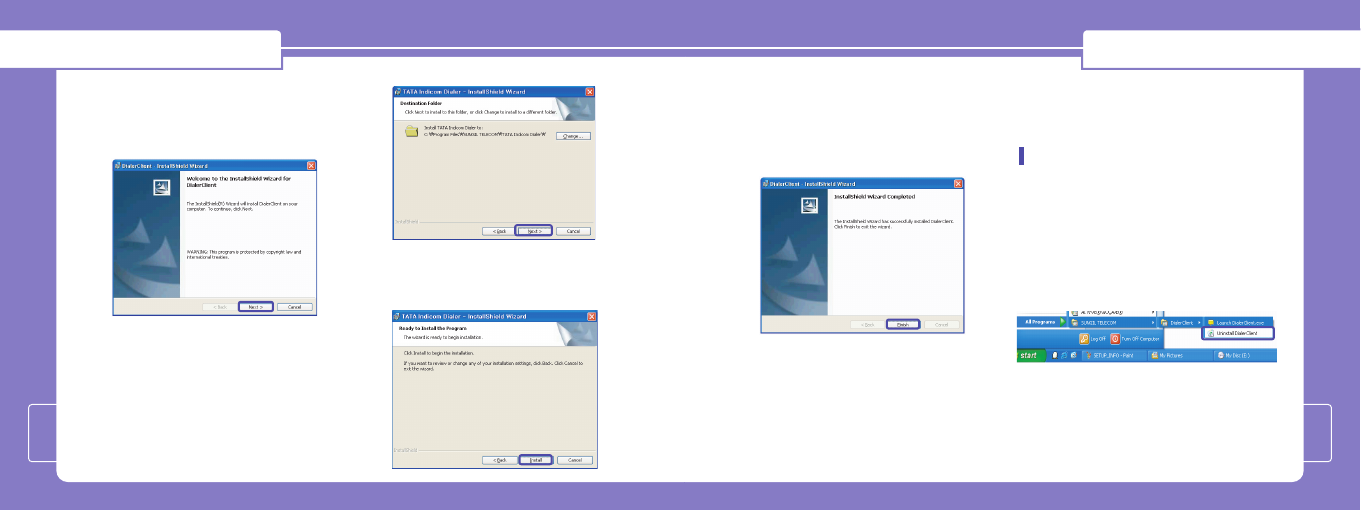
7.
A window will appear as shown to indicate
that InstallShield Wizard completed is
completed. Click “FFiinniisshh” to exit the
wizard.
NNoottee::Since Driver is to be installed
automatically, please do not unplug the
USB modem from the PC while driver
installation.
Installation time for completion can be
different up to user's PC spec.
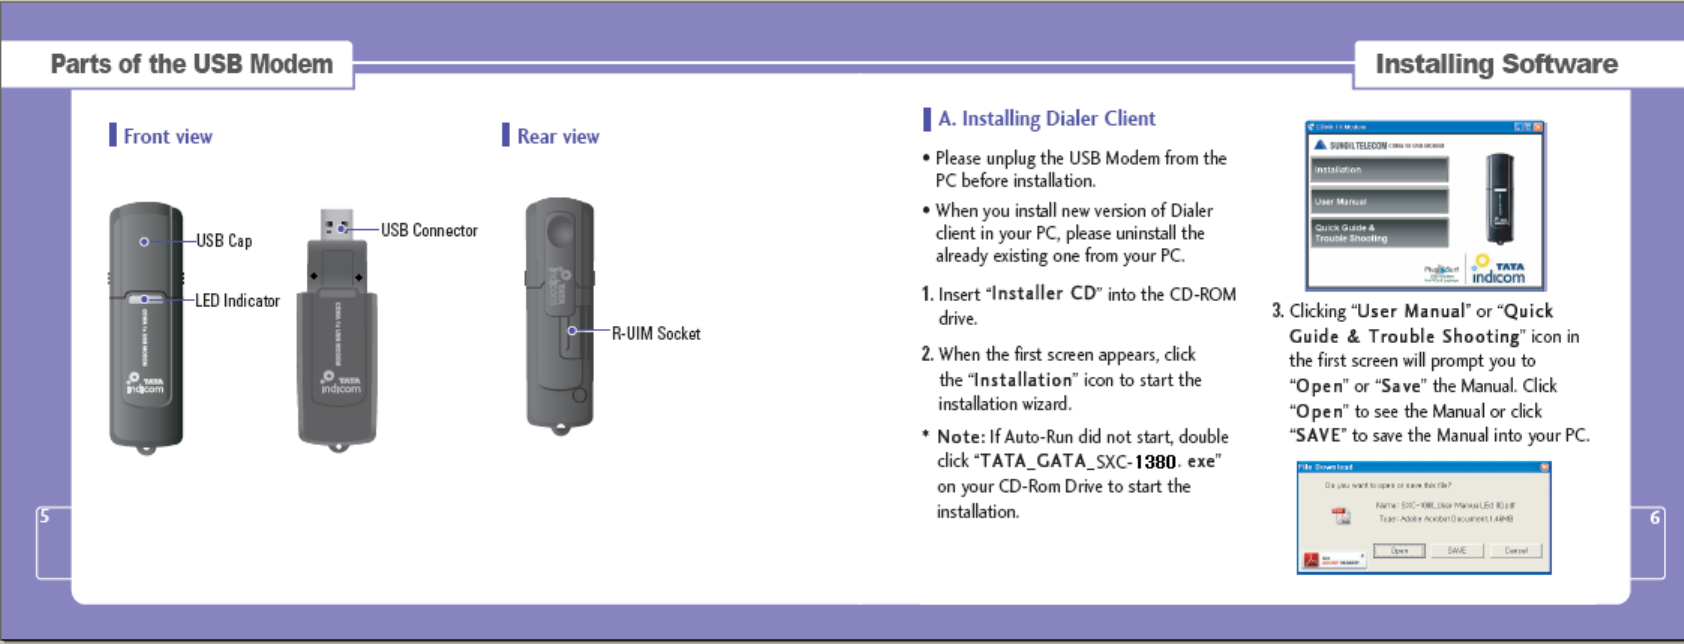
B. Uninstalling the Dialer Client
program
If you want to uninstall the Dialer Client
program, Select SSttaarrtt> AAllll PPrrooggrraamm>
SSUUNNGGIILL TTEELLEECCOOMM> TTAATTAA IInnddiiccoomm
DDiiaalleerr> UUnniinnssttaallll TTAATTAA IInnddiiccoomm
DDiiaalleerras shown.
Installing SoftwareInstalling Software
4.
When the InstallShield wizard window
appear as follow, click the “NNeexxtt” to
continue for the next step.
5. Default installation directory is
“CC::\\PPrrooggrraamm FFiilleess\\SSUUNNGGIILL
TTEELLEECCOOMM\\TTAATTAA IInnddiiccoomm DDiiaalleerr..”
which can be changed by clicking on
“CChhaannggee” button.
6. When the next screen appears, the
program is ready to be installed, click the
“IInnssttaallll” button to begin installation.
78
Using Dialer Client
10
Using Dialer Client
9
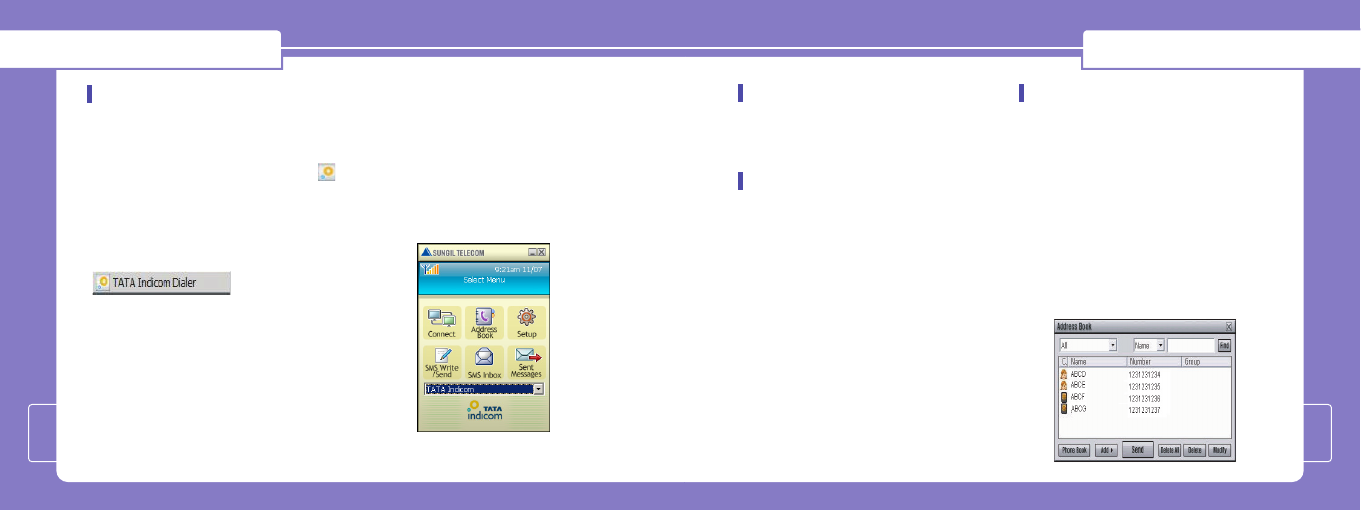
Running the Dialer Client
There are 2 ways to launch the installed
Dialer Client.
Either by pressing the shortcut icon
in the desktop, or by selecting SSttaarrtt>
All PPrrooggrraamm> SSUUNNGGIILL TTEELLEECCOOMM>
TTAATTAA IInnddiiccoomm DDiiaalleerr > TTAATTAA
IInnddiiccoomm DDiiaalleerr..eexxeeas shown.
After initialization, the main window of
application will be displayed in the
screen as shown.
The main window has 6 Menu Buttons
with specific functions.
You should select appropriate
connection from the SELECT menu
before connecting to internet.
And after selecting the connection, click
the CONNECT button on the dialer.
Connect
This function is to connect wireless
internet via Dial Up connection network.
Disconnect
If you want to disconnect wireless
network, click the “DDiissccoonnnneecctt” button
in the main window. and will disconnect
the dialup connection.
Address Book
By using the Address book, you can save
contact details (Name, Phone Number,
Address and Etc.) as well as send SMS
to the already saved number.
1. If you want to save a new number, just
click the “AAdddd” button.
You will see Add Contact and Add Group.
And select “AAdddd CCoonnttaacctt” for
adding a new number as shown.
Using Dialer Client
11
Using Dialer Client
12
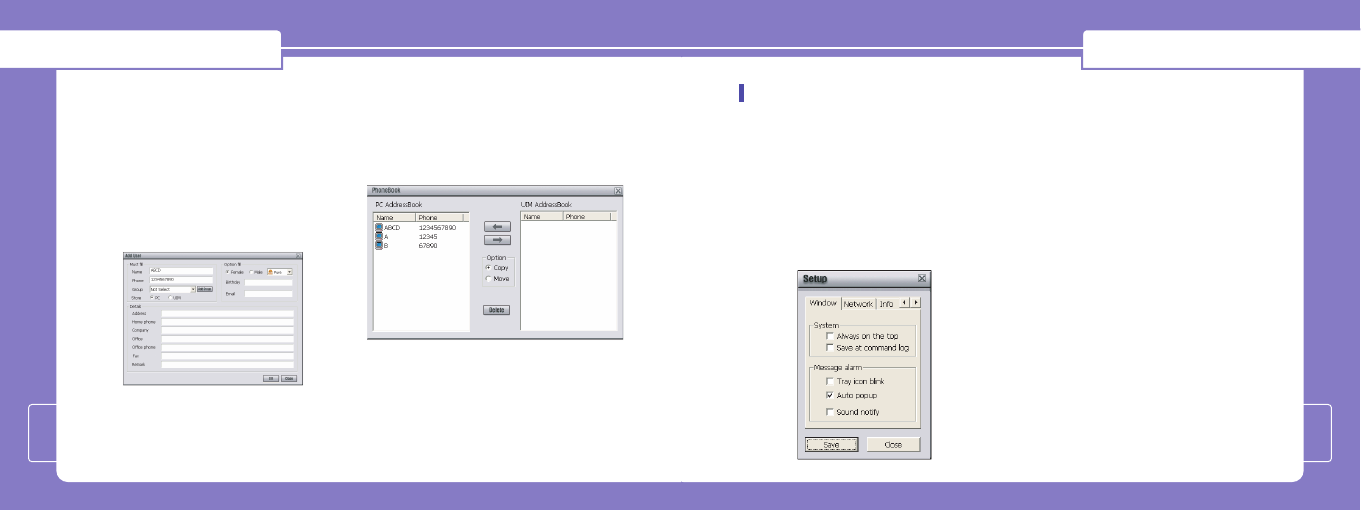
2. You can use the “FFiinndd” option to find
already saved Numbers from the
Phone Book.
3. You can send a message by selecting
a Phone Book number from “AAddddrreessss
BBooookk” and then clicking the Send
button.
4.If you want to synchronize phone
book between PC and R-UIM Card,
click the “PPhhoonnee BBooookk” button as
shown.
Use left, right arrow buttons to select
a phone number and use copy/move
option to synchronize the selected
number.
Setup
This function is to customize the
application according to your
preferences.
1. WWiinnddooww
This is to set up the window display
function.
]AAllwwaayyss oonn tthhee ttoopp: Display
window always on top.
]TTrraayy iiccoonn bblliinnkk:
When application receives
messages, tray icon blinks on
working bar.
]AAUUTTOO PPOOPP--UUPP: When application
receives messages, Message Box
window appears automatically.
]SSoouunndd nnoottiiffyy: When application
receives messages, it sounds to
announce.
To return main window, click the
“CClloossee” button.
2. NNeettwwoorrkk
In Network you can set Dial-Up
connection's Username, Password and
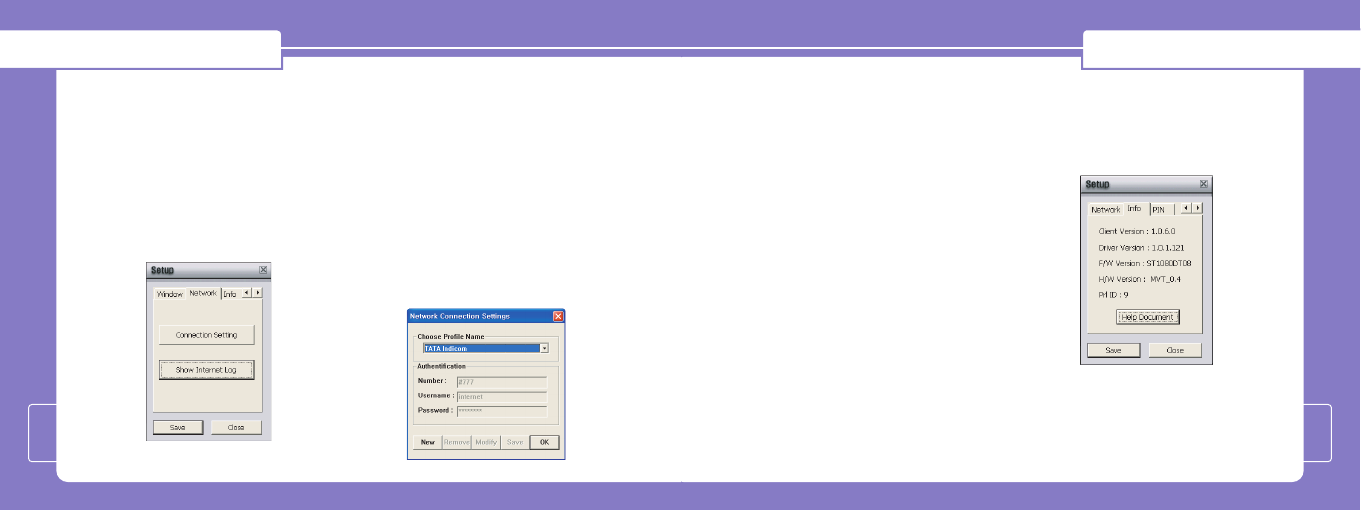
Using Dialer Client
13
Using Dialer Client
14
Dial Number. Also you can make
multiple profiles to access the internet
and see the internet Call logs.
]SShhooww IInntteerrnneett LLoogg: If you click
this button, you can acknowledge
used data volume and time.
3. CCoonnnneeccttiioonn SSeettttiinngg
To choose Profile name, please follow
below procedure.
Click the “SSeettuupp ssccrreeeenn” -> Click
the “NNeettwwoorrkk” -> Click the
“CCoonnnneeccttiioonn SSeettttiinngg”
Network Connection Settings screen
will be shown as below.
Choose the profile name you want to
set.
TATA Indicom Profile Name can't be
deleted, but it is able to modify
Authentication section by clicking
Modify button. In order to create new
profile name, click the “New” button
and choose the profile you want to
set. Once profile setting is finished,
please press OK button to close it.
4. SSeettuupp IInnffoo
This function is to show the
application version information.
To return to the main window, click
the “CClloossee” button.
Using Dialer Client
15
Using Dialer Client
16
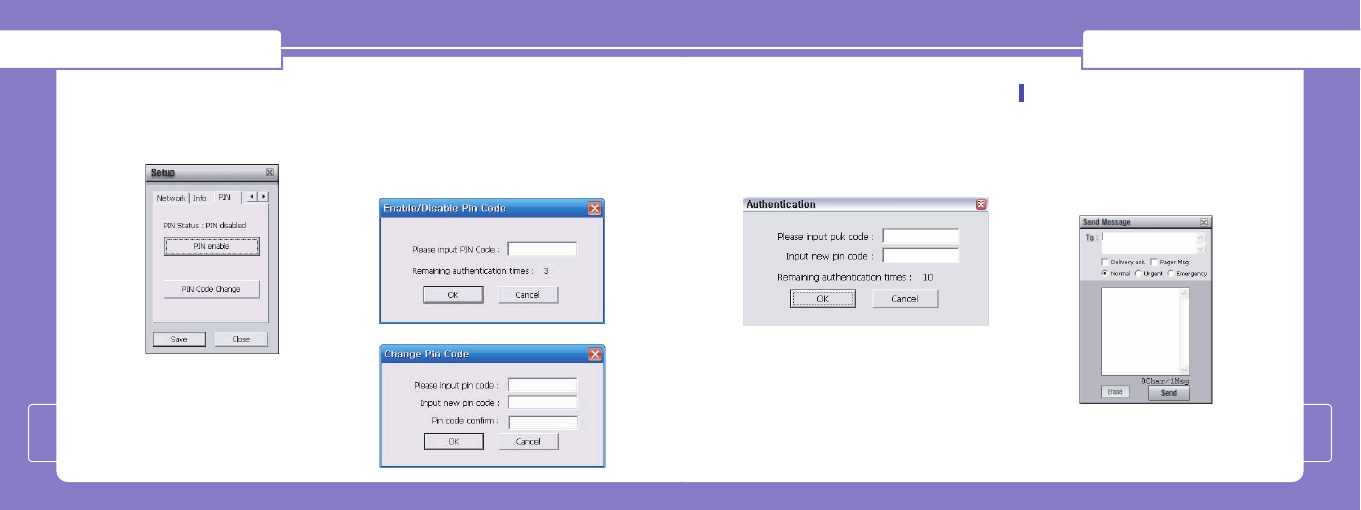
5. PPIINN CCooddee
“PIN Code Change” can only be used
when “PIN Status” is enabled.
To enable “PIN Status”, input the
original PIN Code provided. Next,
input the original PIN Code and your
new PIN Code to change the PIN
Code.
If the PIN Code is entered incorrectly
for three consecutive times, the
following window will appear
prompting you to enter your PUK
Code.
If you do not know your PUK Code,
please contact the service provider.
SMS Write/Send
If you want to write and send SMS
(Short Message Service), click the “SSMMSS
WWrriittee//SSeenndd” button in main window,
and the picture appears as shown.
Using Dialer Client
18
Using Dialer Client
17
1. Fill in the number you want to send in
blank box, “TToo :: ____________________” .
In the “TToo :: ____________________”,
] You can use Multi-Send function by
dividing each recipients with a
semi-colon “;;”.
] You can choose the user name in
the phonebook instead of typing a
recipient number (Except for
phonebook stored in R-UIM).
] When you click “To”, the Address
book window will appear and you
can select recipients from your
address book.
2. Write a message in the blank box, and
click the“SSeenndd” button.
] DDeelliivveerryy aacckk:
Select this function
to obtain notification when the
recipients received your Message.
] PPaaggeerr MMssgg: Select this function
to transmit just the sender number
without the contents.
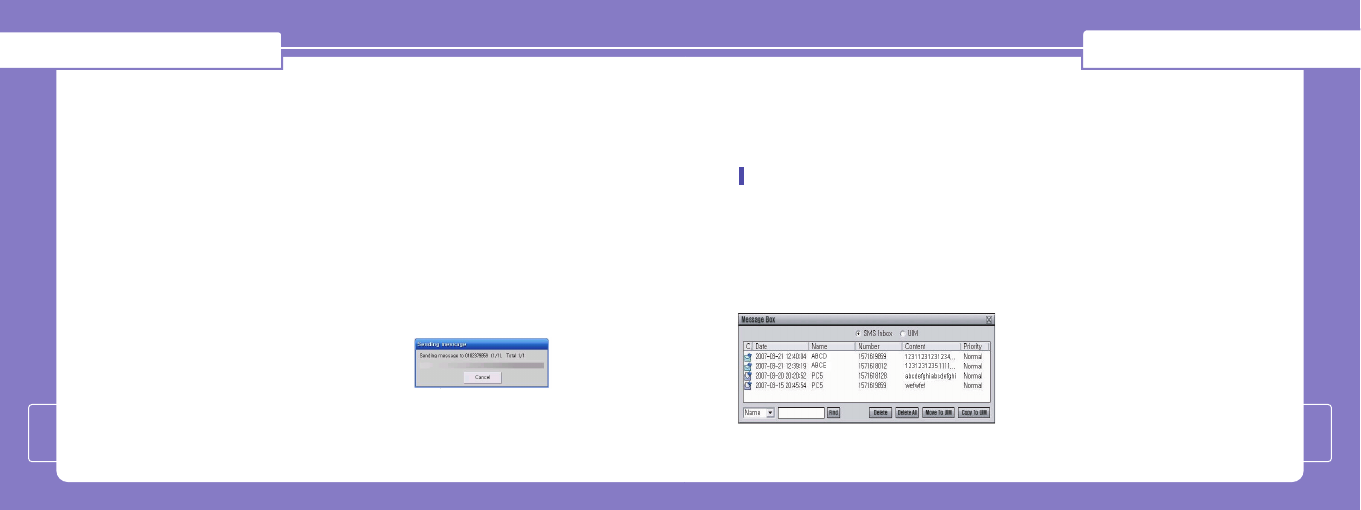
3. When the message is being sent, the
following window will be shown and
you will be returned to the main
window automatically after message
has been sent successfully.
** NNoottee::
The “CCaanncceell” function will
not work when the message to be
sent is already in progress.
But in case of multi-sending, it can
cancel to send next message except
for message in process.
SMS Inbox
You will be alerted when you receive new
SMS. All new SMS will be stored in the
“SSMMSS IInnbbooxx” menu. In SMS Inbox, you can
identify each message by Date, Name,
Number etc.
1. Select the message you want to read
and double click with the left mouse
button (or click the right mouse
button) to see the whole message.
You can also forward/reply/delete the
message on the "RReeaadd MMeessssaaggee"
window.
2. A pop up will appear asking whether
you want to transfer the R-UIM SMS to
PC. (This menu will not appear if the
SMS stored in the R-UIM is already on
the Dialer Client.
] Select “YYeess” to have all SMS in the
R-UIM transferred to PC.
Using Dialer Client
20
Using Dialer Client
19
] The message “PPlleeaassee ddeelleettee
ssttoorreedd mmeessssaaggee((ss)) iinn tthhee
RR--UUIIMM ttoo rreecceeiivvee nneeww
mmeessssaaggee((ss))..”will appear if the
SMS inbox in the R-UIM is at its
maximum.
3. Click the “DDeelleettee” button to erase
message.
4. To return main window, click on
the top of the right.
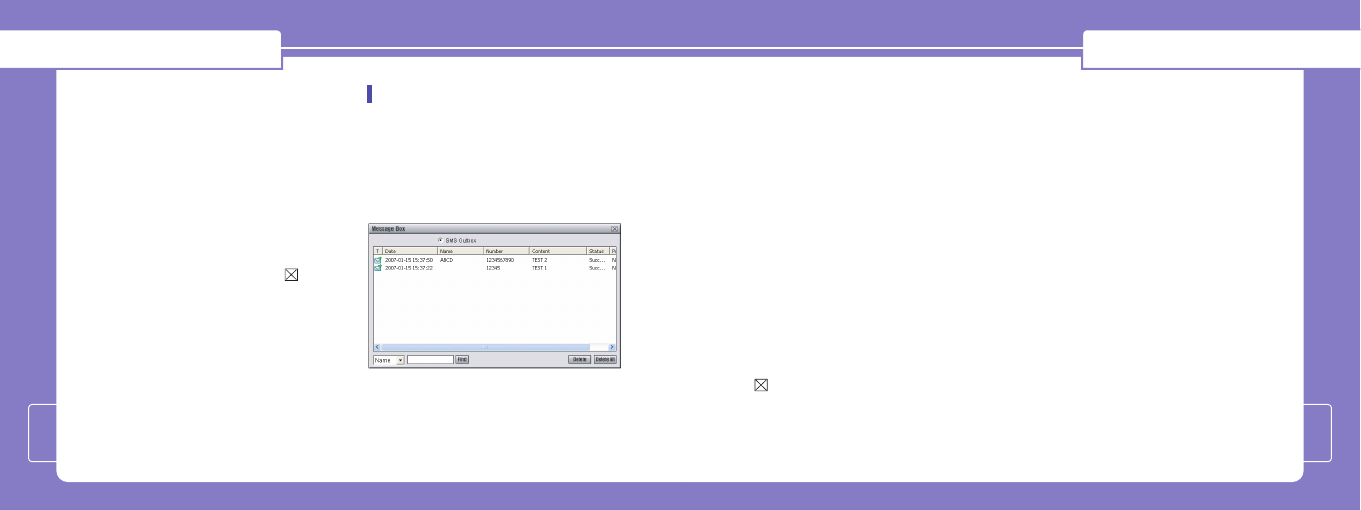
Sent Message
This menu allows you to see the SMS
which is already sent or failed to send.
After sending the SMS, the message will
be moved to “SSeenntt MMeessssaaggee” menu.
1. Select the sent message you want to
read, and then double click the left
mouse button. You can see the whole
message
2. Click the "ffoorrwwaarrdd" button to send
the message to new recipients and
click the "DDeelleettee" button to delete
the message.
3. If the message has failed to send, the
"FFaaiilleedd" comment will be shown in
the Status column. You can send it
again using "RReesseenndd" button.
4. To return to the main window, click
at the top right hand corner of
the window.
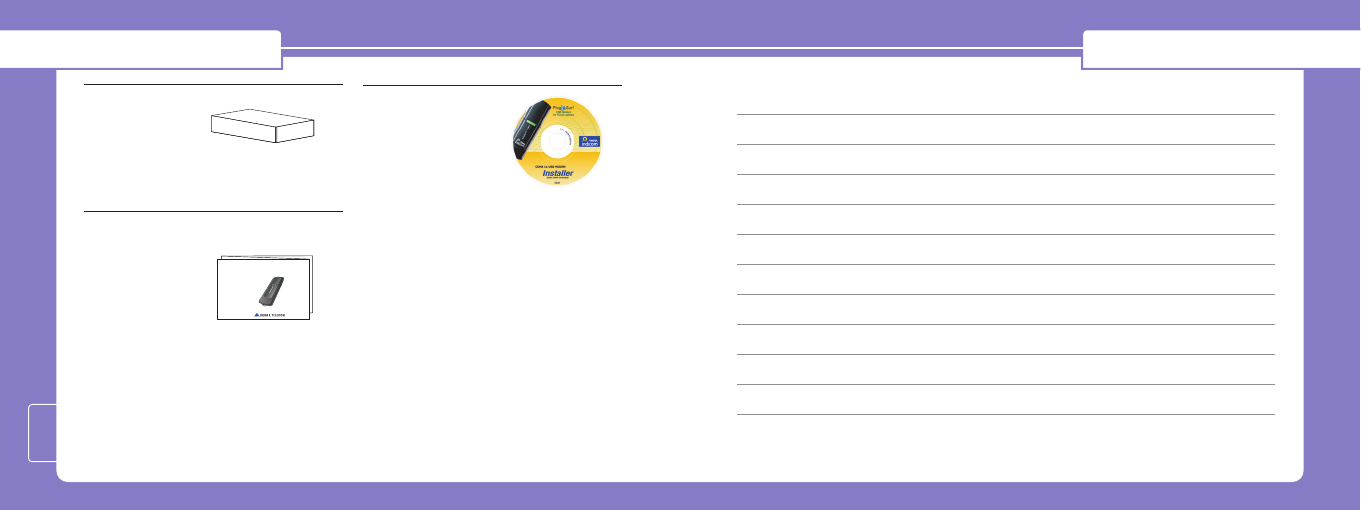
MemoSupplied Accessory
27
SXC-1080
CDMA 1x USB MODEM
Quick Installation Guide
Gift box
Quick Installation Guide
Installation CD ED : 02

RF EXPOSURE INFORMATION
RF EXPOSURE INFORMATION
THIS CDMA USB DONGLE MEETS THE GOVERNMENT ’S REQUIREMENTS FOR EXPOSURE TO RADIO WAVES.
Your CDMA USB DONGLE is a radio transmitter and receiver. It is designed and manufactured not to exceed the emission limits for exposure to
radio frequency (RF) energy set by the Federal Communications Commission of the U.S.Government. These limits are part of comprehensive
guidelines and establish permitted levels of RF energy for the general population. The guidelines are based on standards that were developed by
independent scientific organizations through periodic and thorough evaluate on of scientific studies. The standards include a substantial safety margin
designed to assure the safety of all persons, regardless of age and health.
The exposure standard for wireless devices employs a unit of measurement known as the Specific Absorption Rate, or SAR. The SAR limit set by the
FCC is 1.6 W/kg.*Tests for SAR are conducted with the device transmitting at its highest certified power level in all tested frequency bands. Although
the SAR is determined at the highest certified power level, the actual SAR level of the device while operating can be well below the maximum value.
This is because the phone is designed to operate at multiple power levels so as to use only the power required to reach the network. In general, the
closer you are to a wireless base station antenna, the lower the power output. Before a wireless device is available for sale to the public, it must be
tested and certified to the FCC that it does not exceed the limit established by the government adopted requirement for safe exposure.
The highest SAR value for this CDMA USB Dongle is 1.40 W/kg (CDMA CELLULAR) . The FCC has granted an Equipment Authorization for this
CDMA USB Dongle with all reported SAR levels evaluated as in compliance with the FCC RF exposure guidelines. SAR information on this model
phone is on file with the FCC and can be found under the Display Grant section of http://www.fcc.gov /oet / fcc id after searching on FCC ID:
R2NSXC-1380.
Additional information on Specific Absorption Rates (SAR)can be found on the Cellular Telecommunications &Internet Association (CTIA) web-site
at http://phonefacts.net.*In the United States and Canada, the SAR limit for mobile phones used by the public is 1.6watts/kg (W/kg)averaged over one
gram of tissue. The standard incorporates a substantial margin of safety to give additional protection for the public and to account for any agitations in
measurements.
In August 1996 the Federal Communications Commission (FCC) of the United States with its action in Report and Order FCC 96-326 adopted an
updated safety standard for human exposure to radio frequency (RF) electromagnetic energy emitted by FCC regulated transmitters. Those guidelines
are consistent with the safety standard previously set by both U.S. and international standards bodies. The design of this phone complies with the FCC
guidelines and these international standards.
For more information about RF exposure, please visit the FCC website at www.fcc.gov
2
WARNING! Read this information before use
Caution
Modifications not expressly approved by the party responsible for compliance could void the user’s authority to operate the equipment.
FCC Compliance Information
This device complies with Part 15 of FCC Rules. Operation is subject to the following two conditions: (1) This device may not cause harmful
interference, and (2) This device must accept any interference received. Including interference that may cause undesired operation.
Information to User
This equipment has been tested and found to comply with the limits for a Class B digital device, pursuant to part 15 of the FCC Rules. These limits are
designed to provide reasonable protection against harmful interference in a residential installation. This equipment generates, uses and can radiate radio
frequency energy and, if not installed and used in accordance with the instructions, may cause harmful interference to radio communications. However,
there is no guarantee that interference will not occur in a particular installation. If this equipment does cause harmful interference to radio or television
reception, which can be determined by turning the equipment off and on, the user is encouraged to try to correct the interference by one or more of the
following measures:
- Reorient or relocate the receiving antenna.- Increase the separation between the equipment and receiver.
- Connect the equipment into an outlet on a circuit different from that to which the receiver is connected.
- Consult the dealer or an experienced radio/ tv technician for help.