EpiCom SXP-2080 CDMA 2000 1x WLL Terminal User Manual R2NSXP 2080
EpiCom Co., Ltd. CDMA 2000 1x WLL Terminal R2NSXP 2080
UserManual.wiki
>
EpiCom
>
SXP 2080 User Manual
Users Manual
Navigation menu
Upload a User Manual
Namespaces
Wiki Guide
HTML
PDF
Info
Views
User Manual
Discussion / Help
Navigation

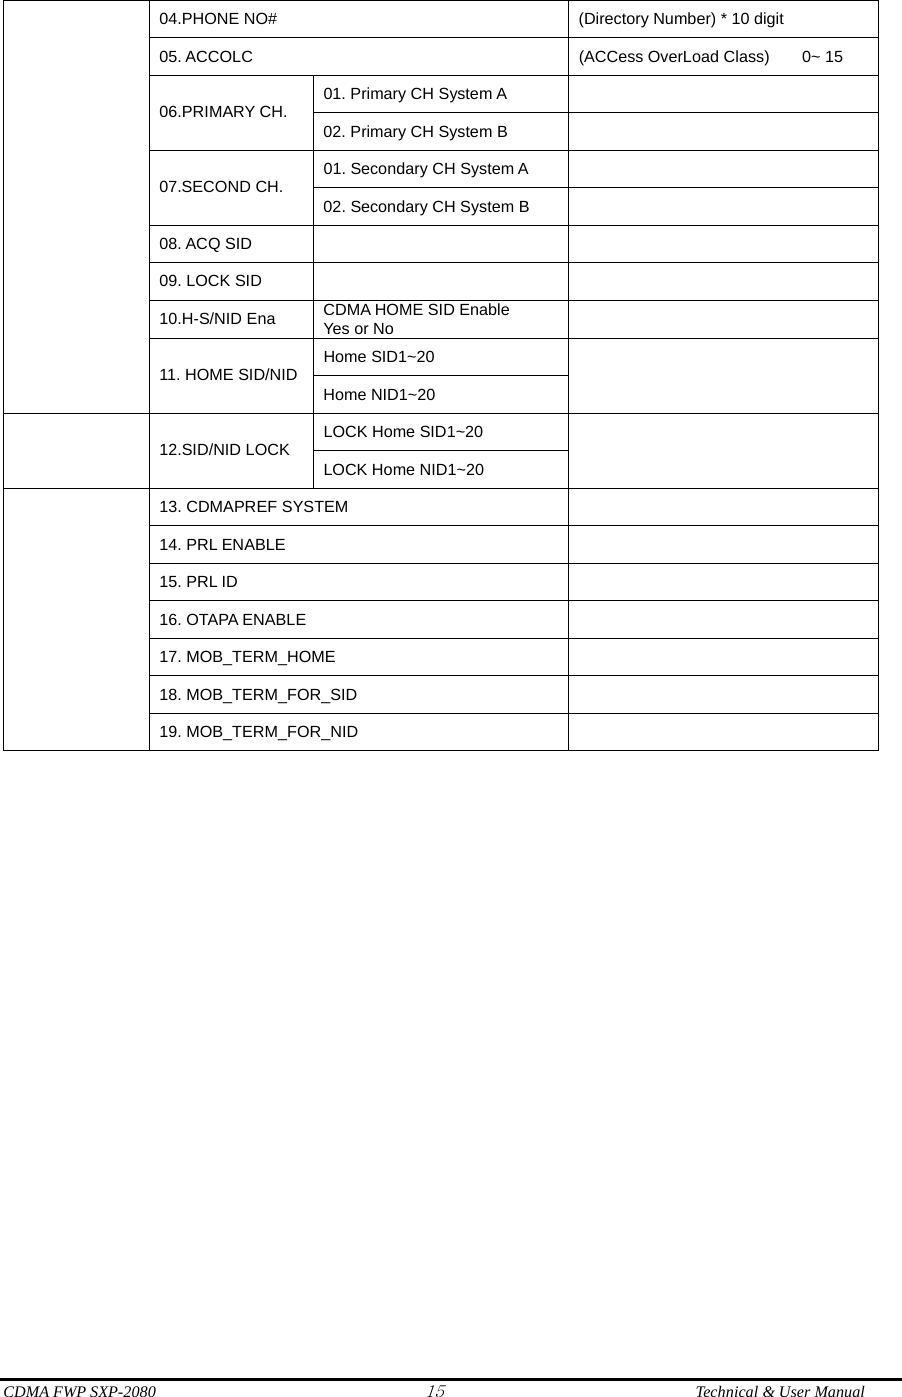
![CDMA FWP SXP-2080 14 Technical & User Manual AKey Input Menu A Key “À75259#147À359#” - Press the ‘À75259#147À359#” key - You can show to the message ( Press [Akey] to continue), and press the ‘Akey” softkey - Entering the input mode to AKey. - In the A Key menu, you can make sure that A key is valid. - Input 26 digits of A key what you want to valid. - When you finished input, press ‘Ok’. - If the A key is valid, you can show to the success message - If the Akey is invalied, you can retry input to the AKey. Ex) 26 digits (20 digits + 6 digits checksum) Service (NA Mode) Menu NA Mode “47À869#À75259#” - Press the “47À869#À75259#” key - User must input the security lock code for accessing the NA Menu (000000) CATEGORY ITEM DESCRIPTION 01. ESN (Electronic Serial Number) Read Only 02. CAI Ver (Common Air Interface) Read Only 03.SO (Service Option) EVRC (Enhanced Variable Rate Codec) MSM6000 Chip just supported the EVRC. 04. SCM (Station Control Mark) . 05. LOCK CODE Read Only 06. SLOT MODE 07. SLOT CYCLE INDEX 08. RC (Radio Configuration) For CDG2 Testing 09. SPC CHANG 1. General 10. SPC VALUE 01. Current NAM You can selection the NAM1 or NAM2 02. NAM 1 02. Setup NAM 03. NAM 2 01. MCC (Mobile Country Code) * 3 digit 02. MNC (Mobile Network Code) * 2 digit 01. NAM 1 or 02. NAM 2 03.MIN *10 digit](https://usermanual.wiki/EpiCom/SXP-2080/User-Guide-728611-Page-14.png)