Eratech Co EMP-200 Voice Recorder with MP3 Player User Manual emp200 en layout
Eratech Co, Ltd Voice Recorder with MP3 Player emp200 en layout
UserManual.wiki
>
Eratech Co
>
EMP 200 User Manual
Users Manual
Navigation menu
Upload a User Manual
Namespaces
Wiki Guide
HTML
PDF
Info
Views
User Manual
Discussion / Help
Navigation


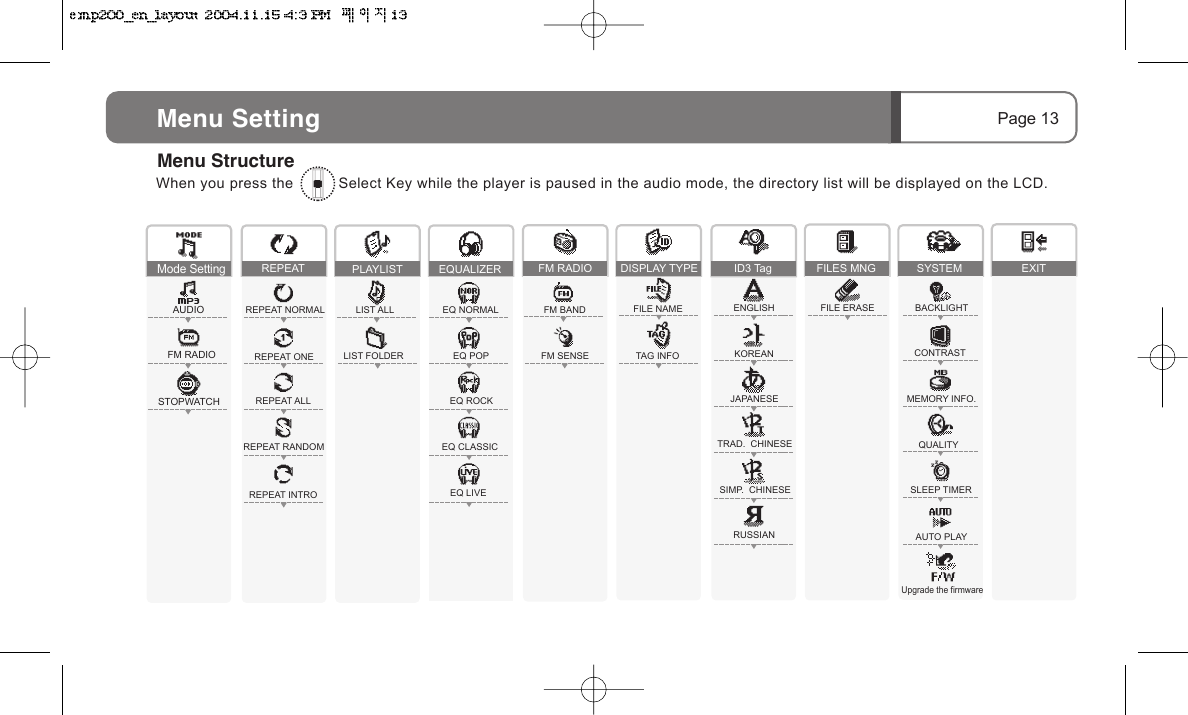
![2. Move to the intended menu item using the Vol+/Vol- button (folder playback, playback all), and press the Select Key.2. Move to the intended menu item using the Vol+/Vol- button, and press the Select Key.Page 15PLAY LISTIf you select LIST FOLDER in the PLAY LIST, only the files in theselected folder are played repeatedly.1. Select [MENU] - [ ]. REPEAT Select the play order of the list (NORMAL/ REPEAT ONE/ REPEAT ALL/ SHUFFLE/ INTRO).REPEAT REPEAT NORMAL LIST ALLPLAY LIST1. Select [MENU] - [ ].Menu Setting REPEAT: Set the repeated file playback.REPEAT NORMAL Plays back entire files sequentially once.REPEAT ONE Repeats one file selected.REPEAT ALL Plays the entire list sequentially and repetitively.REPEAT RANDOM Repeats all files randomly.REPEAT INTRO Plays the intro section of any file.PLAY LIST: Selects the scope of file playback.LIST ALL Plays back all files.LIST FOLDER Plays only files listed in the selected folder.](https://usermanual.wiki/Eratech-Co/EMP-200/User-Guide-492470-Page-15.png)
![2. Move to the intended tone using the Vol+/Vol- button, and press the Select Key.2. Move to the intended position using the Vol+/Vol- button, and press the Select Key.You can apply various tones to music.FM BANDFM SENSE Page 16Menu Setting1. Select [MENU] - [ ]. EQUALIZER FM RADIO (FM BAND)Modifies the Frequency band to listen to the radio broadcasting in Korea, U.S., Europe or Japan. Frequency band in every country except Japan is same.EQUALIZER EQ NORMAL1. Select [ ] from the [MENU] - [ ].EQ NORMAL Selects normal toneEQ POP Selects pop toneEQ ROCK Selects rock toneEQ CLASSIC Selects classic toneEQ LIVE Selects live toneModifies the radio Frequency band for each country. (Select among U.S., KR and Japan. All countries except Japan have the same frequency)Sets the radio reception sensitivity (Low/Middle/High).](https://usermanual.wiki/Eratech-Co/EMP-200/User-Guide-492470-Page-16.png)
![You can select the sensitivity from LOW/MIDDLE/HIGH. Low reception sensitivity area means the area where radio reception sensitivity is poor.1. Select [ ] from the [MENU] - [ ]. FM RADIO (FM SENSE) Sets the radio reception sensitivity when auto-scanning the frequency. Adjust reception sensitivity that best fits for your region as the number of radio stations can differ depending on the sensitivity value.1. Select [ ] from the [MENU].DISPLAY TYPE Titles that are scrolled during playback can be displayed in file name or ID3 tag.FM RADIO SENSE LOW DISPLAY TYPE FILE NAME2. Move to the intended position using the Vol+/Vol- button, and press the Select Key.FILE NAME Displays the file nameTAG INFO Displays the tag information (If the tag informationis not available, the file name will be displayed)Page 17Menu Setting2. Move to the intended menu item using the Vol+/Vol- button (File Name or TAG INFO), and press the Select Key. When the tag information consists only of ID3V1, only the file name is displayed. Only when the tag information includes ID3V2 is the TAG information displayed normally.](https://usermanual.wiki/Eratech-Co/EMP-200/User-Guide-492470-Page-17.png)
![SYSTEM BACKLIGHTBACKLIGHT :ALWAYS OFFBACKLIGHTMenu Setting You can select one of Off/3/5/10/15 Sec/BACKLIGHT1. Select [ ] from the [MENU] - [ ].2. Move to the intended po using the Vol+/Vol- butto press the Select Ke2. Select the target folder or file using , Vol+ or Vol- button. Then, press the Select Key. The "DELETE FILE ARE YOU SURE?" message will be displayed on the LCD.3. Move to the [Yes] and press the Select Key. to delete the selected file.ID3 TAGSets the language used to display the ID3 tag. : Moves between files : Moves between directories : Selects filesPage 18Menu Setting 1. Select [MENU] - [ ].ID3 TAG ENGLISH2. Move to the intended menu item using the Vol+/Vol- button, and press the Select Key.ENGLISH Sets English as a tag language.KOREAN Sets Korean as a tag language.JAPANESE Sets Japanese as a tag language.TRAD. CHINESE Sets Traditional Chinese as a tag language.SIMP. CHINESE Sets Simplified Chinese as a tag language.RUSSIAN Sets Russian as a tag language. FILE ERASE Deletes (a) file(s)FILE MNG(FILE ERASE)Use this function to delete files.1. When you select [ ] from the [MENU] - [ ], the directories will be displayed on the LCD.FILE MNG NODELETE FILEARE YOU SURE?YES Sample song 001.MP3](https://usermanual.wiki/Eratech-Co/EMP-200/User-Guide-492470-Page-18.png)
![SYSTEM BACKLIGHTBACKLIGHT :ALWAYS OFFBACKLIGHTPage 19Menu Setting You can select one of Off/3/5/10/15 Sec/Always BACKLIGHT1. Select [ ] from the [MENU] - [ ].2. Move to the intended position using the Vol+/Vol- button, and press the Select Key.CONTRAST Sets LCD brightness. SYSTEM CONTRAST1. Select [ ] from the [MENU] - [ ].2. Move to the intended position using the Vol+/Vol- button, and press the Select Key.. You can select on of -5/-4/-3/-2/-1/0/+1/+2/+3/+4/+5 step.. By default, contrast is set to "0".](https://usermanual.wiki/Eratech-Co/EMP-200/User-Guide-492470-Page-19.png)
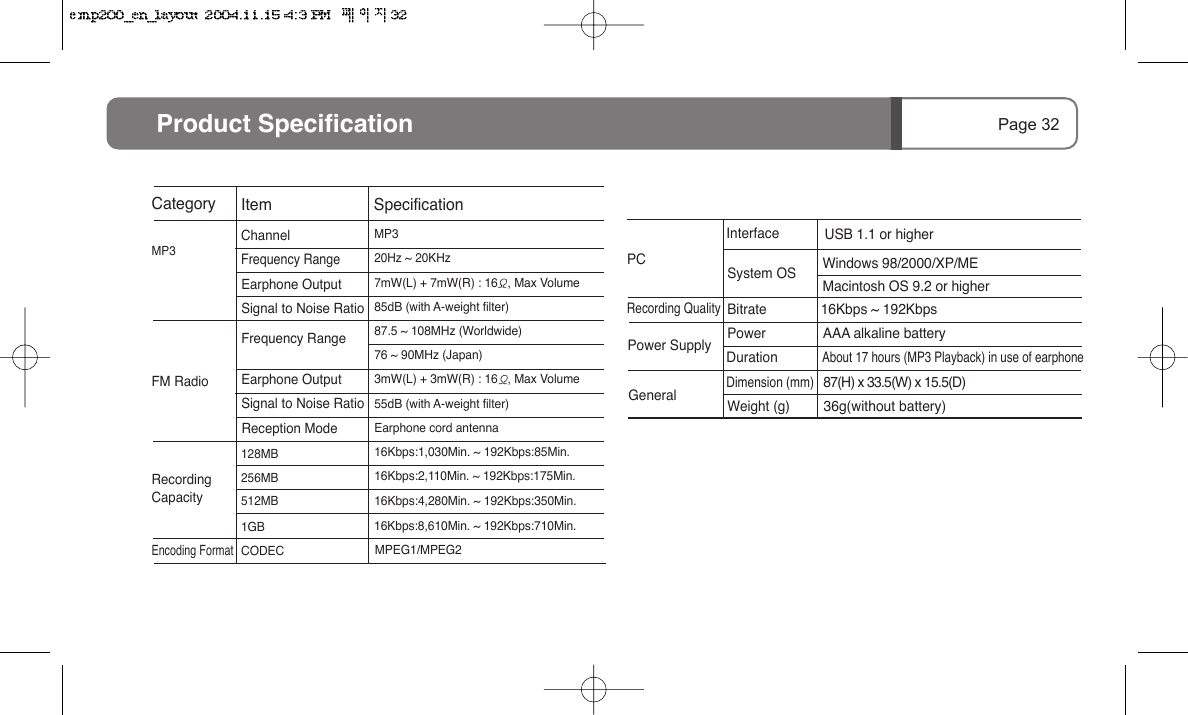
![MEMORY INFO Displays the current memory available and a total capacity of memory. 128 MB 121 MB 256 MB 248 MB 512 MB 502 MB 1,010 MB1 GBPage 202. Total and available memory will be displayed. SYSTEM MEMORY INFO Displays total and available memory .MEMORY INFOTOTAL : 119MBFREE : 90MBTotal Memory Available MemoryMenu Setting 1. Select [ ] from the [MENU] - [ ]. SYSTEM QUALITYMONO16KBPS 16KHzQUALITY1. Select [ ] from the [MENU] - [ ].MPEG 2 MPEG 1mono/stereo stereoSampling Rate 44.1128/160/19232112Bit Ratemono16 164016/24/32stereo22.0544/48/56/64/80/962. Move to the intended position using the Vol+/Vol- button, and press the Select Key.QUALITY Sets the recording quality (16 Kbps ~ 192 Kbps).Menu Setting SYSTEM SLEEP TIMERThe player will be automatically turned off on a defined peri1. Select [ ] from the [MENU] - [ ].2. Move to the intended po using the Vol+/Vol- butto press the Select KeSLEEP TIMERSLEEP :TURN OFFSLEEP TIMER The player is turn off automatically aft period of time (Off/10/20/30/60/120m](https://usermanual.wiki/Eratech-Co/EMP-200/User-Guide-492470-Page-20.png)
![Page 21Menu Setting System AUTO PLAYThe player will start playback automatically when you turn the power on.2. Select [ ].1. Select [ ] from [Menu] - [ ].AUTO PLAYAUTO PLAY Sets the playback status when the power is on (Automatic playback or stop).SYSTEM SLEEP TIMERThe player will be automatically turned off on a defined period of time.1. Select [ ] from the [MENU] - [ ].2. Move to the intended position using the Vol+/Vol- button, and press the Select Key.SLEEP TIMERSLEEP :TURN OFFSLEEP TIMER The player is turn off automatically after defined period of time (Off/10/20/30/60/120minutes).](https://usermanual.wiki/Eratech-Co/EMP-200/User-Guide-492470-Page-21.png)
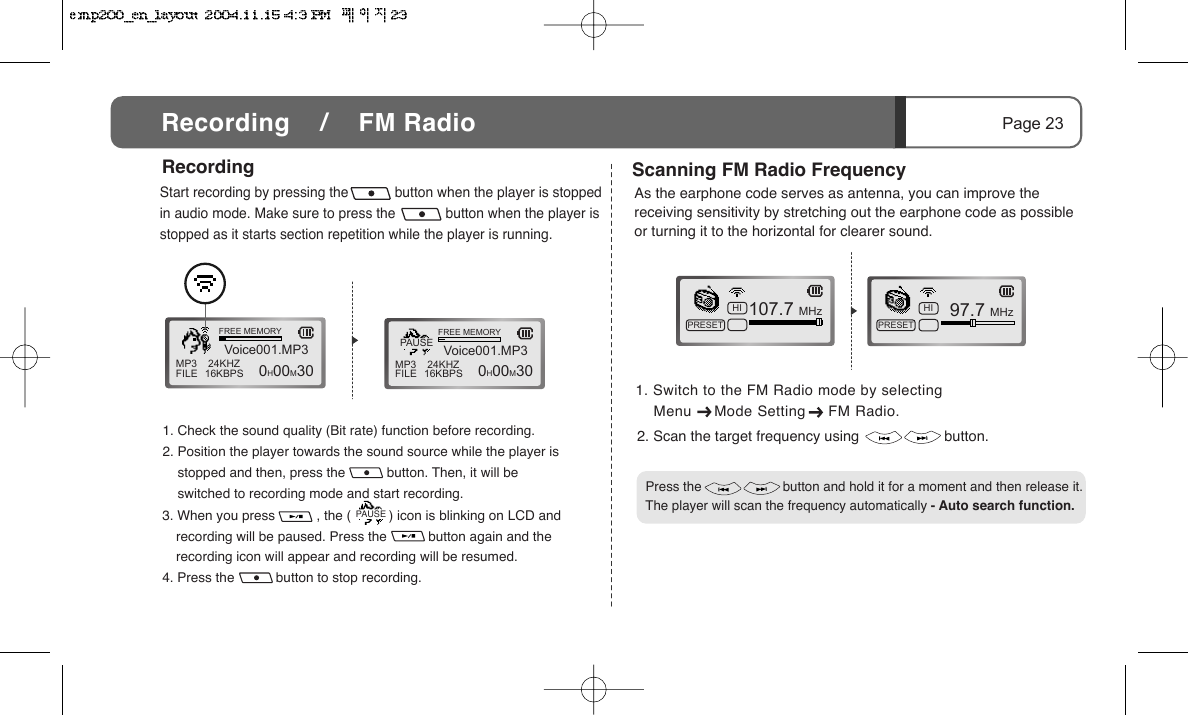
![3. Press the button to set off section repetition.2. Set the end of the section by pressing the ( ) button again. Then, the selected section will be played repeatedly.System FIRMWARE UPGRADEFIRMWAREPage 22Menu Setting 1. This feature copies the firmware from the homepage to the root directory of the digital audio player.2. Select [MENU] - [SYSTEM] - [FIRMWARE]. (Refer to the NOTICE on our homepage about FIRMWARE UPGRADES.)Verify that the remaining battery capacity is sufficient before executing a FIRMWARE UPGRADE. When the unit malfunctions during a FIRMWARE UPGRADE, quickly refer to qualified personnel about servicing the unit.< Notice > Use this function to upgrade the firmware. You can download the up-to-date firmware from the web site (www.eratech.co.kr).1. Play a file in audio mode and press to mark the beginning point ( ) for section repetition. SECTION REPETITION (A-B)Selects and repeats playing a certain section of a file during playbackPress or button to cancel section repetition.When you already selected [REPET INTRO] from [MENU] - [REPEAT], the section repetition will not be supported.1. Check the sound quality (Bit rate) function before recording.2. Position the player towards the sound source while the playe stopped and then, press the button. Then, it will be switched to recording mode and start recording.3. When you press , the ( ) icon is blinking on LCD recording will be paused. Press the button again and trecording icon will appear and recording will be resumed.4. Press the button to stop recording.Start recording by pressing the button when the player in audio mode. Make sure to press the button when thstopped as it starts section repetition while the player is runninMP3FILE 24KHZ16KBPSVoice001.MP3FREE MEMORY 0H00M30 MP3FILE 24KHZ16KBPSVoice001.MP3FREE MEMORY 0H00M30PAUSERecordingRecording / FM RadioPAUSE](https://usermanual.wiki/Eratech-Co/EMP-200/User-Guide-492470-Page-22.png)
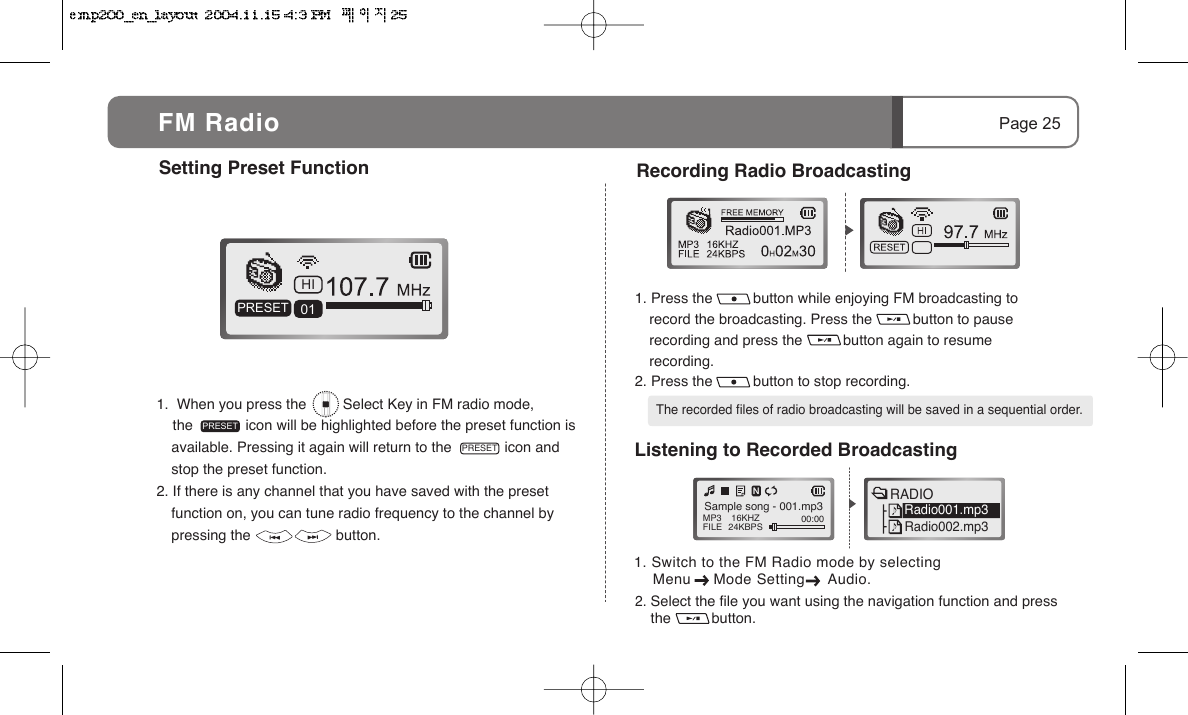
![3. The screen as shown above will appear when you press the Select Key after selecting a channel. Then select [Yes] using the VOL+/VOL- button and press the Select Key.4. Select [NO] and press the Select Key to cancel.1. If you press the button longer than 2 seconds, the player will switch to preset mode and the "ARE YOU SURE?" message will appear.107.70MHz87.50 MhzHI01200201 107.70MHzHI01 NOYES200201 AUTOSCANARE YOU SURE?200203HI01NOYES1. Find the frequency that you want to choose and press the button. The channel saving window will appear.2. Select the channel using the Select Key. 2. Move to [YES] by sliding the jog key towards Vol+/Vol- direction, and press the Select Key.3. Press the button to stop automatic saving.Saving FM ChannelPage 24FM RadioCertain areas under weak electronic field will have irregular reception sensitivity for some broadcasting service.Saving FM Channel Automatically All the channel information saved will be deleted in auto channel saving.1. When you press the Select Key in FM radio mode, the icon will be highlighted before the preset funcavailable. Pressing it again will return to the icon stop the preset function.2. If there is any channel that you have saved with the presfunction on, you can tune radio frequency to the channel pressing the button.HI01PRESETPRESETSetting Preset Function FM RadioPRESET](https://usermanual.wiki/Eratech-Co/EMP-200/User-Guide-492470-Page-24.png)

![Page 28File Upload / File DeletionFileUpload Transfer File in the Player to PC Delete File in PC'Voice' or 'Radio' folder in the audio player is regenerated automatically even if deleted.1. Connect the player to your PC.2. Select the "Removable Disk" in "My Computer".3. Select the file that you want to transfer to your PC and drag and drop it.1. Select the file that you want to delete in the player and right click it; select "Delete" in the file menu.2. Select [Yes] will show you the deletion process.FileDeletion](https://usermanual.wiki/Eratech-Co/EMP-200/User-Guide-492470-Page-28.png)
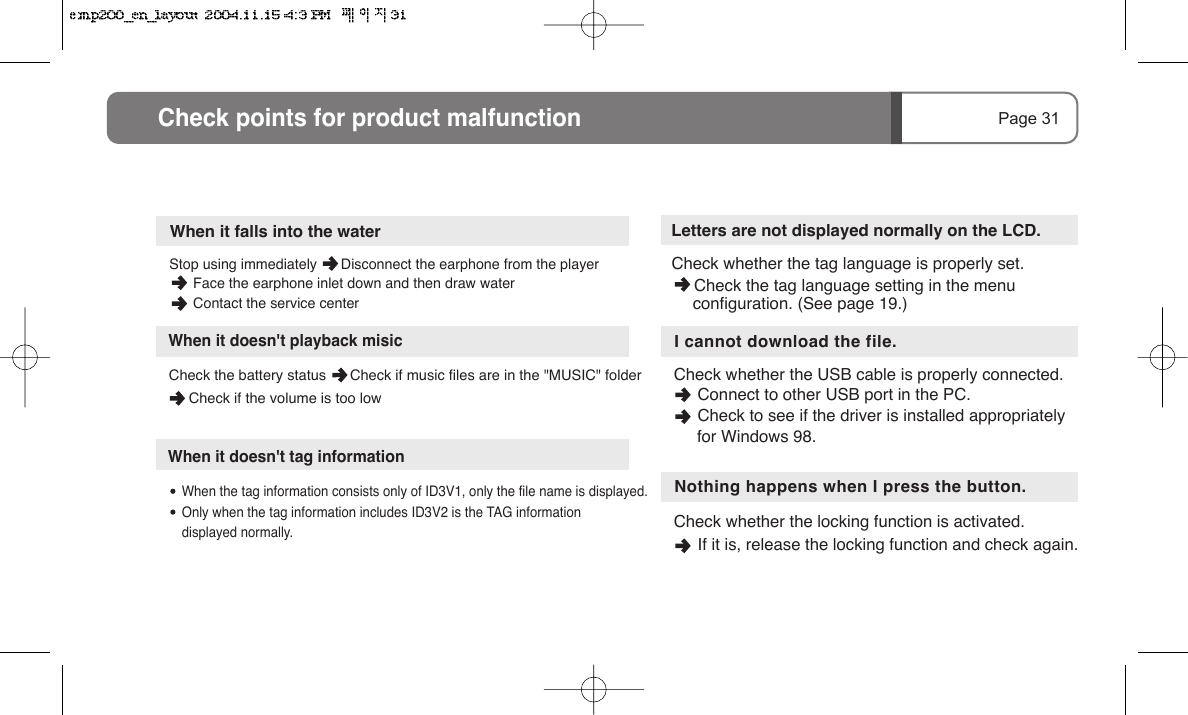
![Page 30Connect to MacDownload1. Connect the player's USB connector to the USB port of your PC. Double-click "Removable Drive".2. Select the file that you want to transfer from your PC and drag and drop it to the player.Mac OS 9.2 or higherTransfer File to Player. You can transfer data to your PC without turning on the player.. Press [Option] on your keyboard before drag-and-drop.Upload1. Connect the player to your PC.2. Select "Removable Drive" on your desktop.3. Select any file that you want to transfer to your PC.4. Drag and drop the file to the folder where you want to save.Transfer File from the player to your PCDouble ClickCheck the battery status Check if music files are in the Check if the volume is too lowCheck points for product malfuncWhen it doesn't tag information When the tag information consists only of ID3V1, only the file Only when the tag information includes ID3V2 is the TAG info displayed normally.Stop using immediately Disconnect the earphone from Face the earphone inlet down and then draw water Contact the service centerWhen it falls into the waterWhen it doesn't playback misic](https://usermanual.wiki/Eratech-Co/EMP-200/User-Guide-492470-Page-30.png)