Eratech Co EMP-200 Voice Recorder with MP3 Player User Manual emp200 en layout
Eratech Co, Ltd Voice Recorder with MP3 Player emp200 en layout
Users Manual


Page
2
Menu Setting
Menu Structure---------------------------------13
Mode Switching --------------------------------14
REPEAT----------------------------------------15
PLAY LIST--------------------------------------15
EQUALIZER------------------------------------16
FM Radio (FM BAND)------------------------16
FM Radio (FM SENSE)-----------------------17
DISPLAY TYPE--------------------------------17
ID3 Tag -----------------------------------------18
FILES MNG(FILE ERASE)-------------------18
FILES Transfer---------------------------------19
SYSTEM
- BACKLIGHT----------------------------------19
- CONTRAST-----------------------------------19
- MEMORY INFO------------------------------20
- QUALITY--------------------------------------20
- SLEEP TIMER------------------------------21
- AUTO PLAY----------------------------------21
SECTION REPETITION(A-B)---------------22
Recording---------------------------------23
FM Radio
Scanning FM Radio Frequency--------------23
Saving FM Channel---------------------------24
Saving FM Channel Automatically----------24
Setting Preset Function-----------------------25
Recording Radio Broadcasting--------------25
Listening to Recorded Broadcasting--------25
Stopwatch function-----------------26
Connect to PC--------------------------27
File Upload/File Deletion---------28
Installing device driver------------29
Connect to MAC-----------------------30
Check in malfunction--------------31
Product Specification--------------32
Product Warranty---------------------33
Before Using
Preface/Precautions ---------------------------- 3
Package Contents ------------------------------ 4
Product Features -------------------------------5
Name Components -----------------------6
Name of LCD Components -------------------7
Inserting a Battery ------------------------------7
Basic Usage
Locking/Unlocking the Player-----------------8
Power On/Off------------------------------------9
File Playback/Stop-----------------------------9
File Search/Section Search------------------10
Navigation--------------------------------------10
Using MMC/SD Card--------------------------11
Controlling Volume----------------------------12
Switching the EQ mode-----------------------12
Switching the repeat mode-------------------12
Table of Contents
Before Using

Page
Before Using 3
Page
Before Using
Preface
. Thank you for choosing this digital audio player.
. Please read this manual carefully before using the player.
. Please be noted that this user's manual is subject to change without notice for improving product performance.
Precautions
Please be sure to comply with the following instructions to avoid possible risk or physical damage from carelessness.
1. Safety precautions
1) Do not leave the player in the following places.
- Place with high temperature (over 60oC)
- Inside the window-closed vehicle
- Place with high humidity including bathrooms
- Place exposed to the direct sunlight or close to heating devices
- Place with much dust
2) Do not drop or strike a strong shock.
3) Do not disassemble, repair or modify the product at your own discretion.
4) Do not use the player in the restricted area like inside the aircraft.
5) Excessive shock on LCD panel will cause a break or malfunction.
6) Do not use the player while you are driving a car, a motorcycle, or a bicycle. It may be dangerous and may be illegal in some districts.
7) It may be dangerous to keep the volume of the headphone high while you are walking on the street.
8) Prolonged use of the headphone at a high volume level may hurt your hearing.(If you have a ringing in the ears, turn the volume down or stop using the headphone.)
2. If the battery is totally flat during recording, the player will be automatically stopped. Make sure to check the available battery capacity
before recording.

Page
Before Using 4
What is MP3? MP3 is short for MPEG1 (Motion Picture Experts
Group) Audio Layer 3. It is one of the file formats that save various
audio data with digital system. MP3 maintains the sound quality
similar to that of CD while compressing the audio data by less than
1/12 of the WAV file.
MMC/SD card usage function
Additional card (MMC/SD) can be inserted into the internal memory
slot, which enables easy memory expansion.
Large-capacity USB removable storage device
The player(EMP-200) has a built-in USB connector. Therefore, you
can use he player safely and conveniently without separate USB
cable or manager program.
Navigation (Search) function
Using the navigation function, you can search for and select the file
to playback easily and conveniently.
5-type equalizer
You can select among the following 9 tones; Normal, Pop, Rock,
Classic, Live.
Convenient file management using folder function
By default, the RADIO folder and VOICE folder are separated. You
can also create or delete the folder for your convenience in file
management.
MP3 format voice recording
Recorded voice is saved in a MP3 file format, which gives you a
repetitive playback with the clear sound quality and permanent
storage in your PC.
FM radio reception and recording
The player supports stereo radio reception, real-time recording and
playback.
17-hour continuous playback
The internal battery lasts with up to 17 hours for continuous
playback.
Multilingual support
The player supports various languages such as Korean, English,
Japanese, Chinese and European special characters.
Product Features
This Digital audio player is a multiple codec player that supports various formats such as MP3.
EMP-200
Package Contents
Before Using
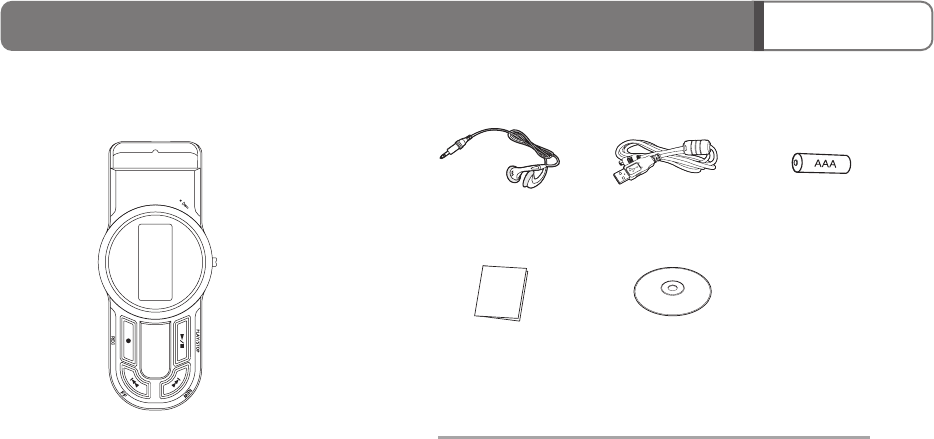
Stereo Earphone
Quick Start Guide
EMP-200
Installation CD
User's Manual
USB Cable Battery(AAA)
Options
- Necklace
- Carrying Case
Package Contents
Page 5
Before Using

Page
Before Using 6
Name of Components
Left Side Front Side
Earphone
Terminal
Volume Control Button/
Previous/Next Button
Battery Cover
Hold Switch
MMC/SD Memory Card Slot
MODE/Select Key
Necklace
hole
Microphone
Right Side
Power On/Playback/Pause
REW
FF
Record/Section Repetition
USB
Terminal
Rear Side

Page
MP3
FILE 24KHZ
16KBPS 00:00
Sample Song - 001.mp3
Mode Display
Status Display
Playlist
Equalizer Playback Mode
Sleep Display
Lock Display
Remaining Battery
Capacity
File Name/ID3 Tag
Information
Playback Time
Playback Display Bar
Sound Source Codec
Information Display
Sound Source Bit Rate / Sampling Rate
Before Using 7
Name of LCD Components
Inserting a Battery
1. Push the battery cover to the arrow
direction to open the battery cover.
2. Insert the AAA type battery to the
direction as shown in the figure.
(Check the correct polarity.)
3. Close the battery cover.
Page 8
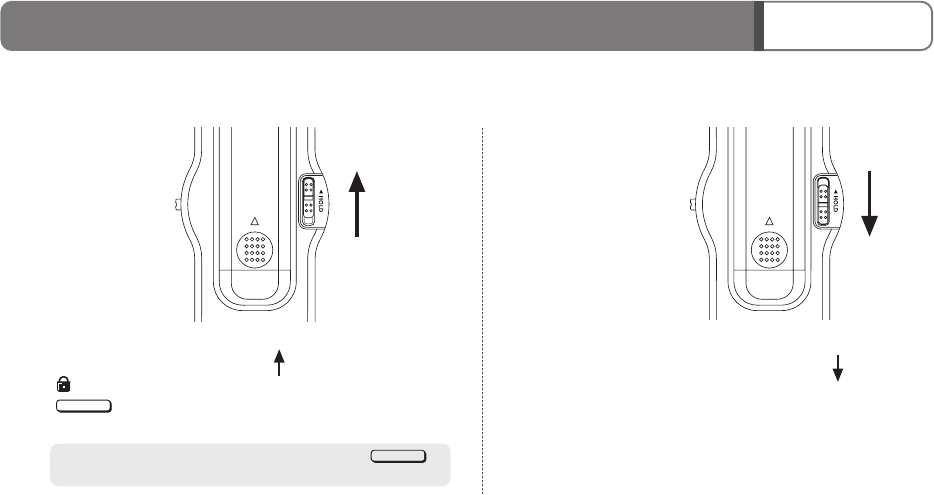
Locking/Unlocking the Player
If you lock the player, other operation buttons will be disabled.
Locking the player Unlocking the player
1. Push the HOLD switch left to the ( ) direction.
2. icon will be displayed on the upper side of the LCD and
message will appear and, in a minute, disappear at
the bottom.
If you press any button while the player is locked, the
message will appear for a moment.
1. Push the HOLD switch to the opposite direction ( ).
HOLD ON
HOLD ON
Basic Usage
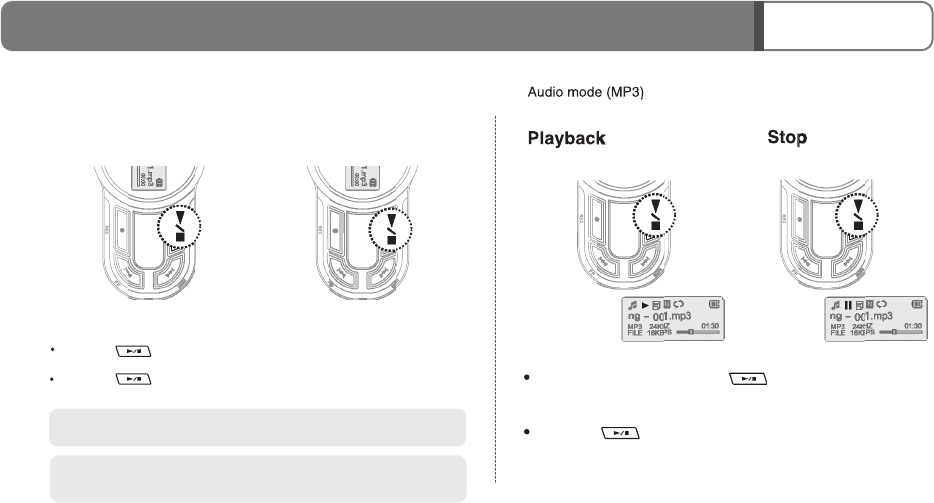
Press the button during playback to stop the player.
Press the button and hold it for a moment to turn the power off.
Press the button and hold it for a moment to turn the power on.
Page 9
Power On /
When
the power is on, the last modi
f
ied settin
g
is displayed
.
If you don't press any button in the stop mode, the power will be
automatically turned off after 3 minutes (Auto power off function).
Power Off
To playback the file, press the button while the
p
ower is on
.
File Playback / Stop
Basic Usage
9
Page 10
Select Key
2. Move to the tar
g
et
f
older o
f
f
ile usin
g
the button and then,
press the button to play back the intended music file.
If you don't want to select a file, press the Select Key to exit from
the navigation mode.
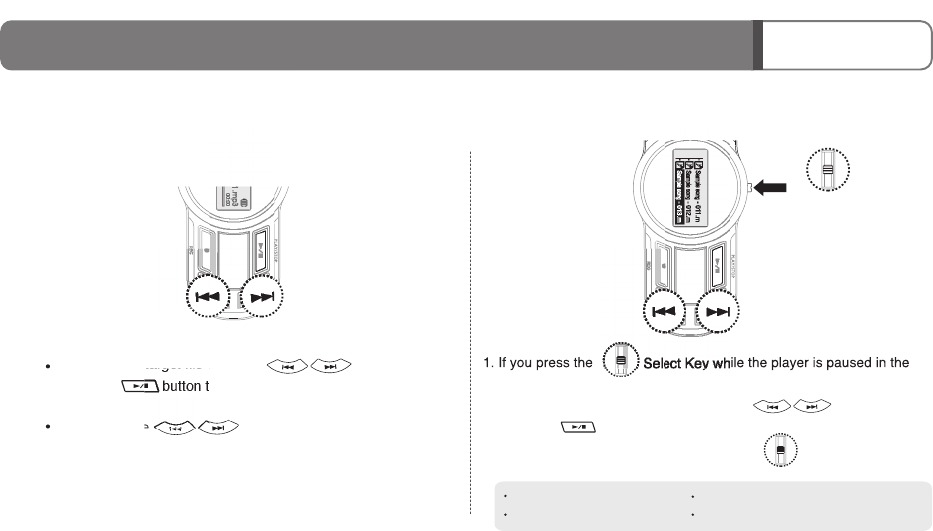
Search for the target file using the button and then,
press the button to play it back.
REW, FF : File navigation Vol+, Vol- : Directory navigation
PLAY/PAUSE : File selection
Select Key
:
Enter/Exit the navigation
If you press the button longer during playback and
release the button, playback will start from that position.
File search /
Section
Search Navigation
You can select a file conveniently using the navigation function.
audio mode, the directories will be displayed one LCD.
Basic Usage
Page 11
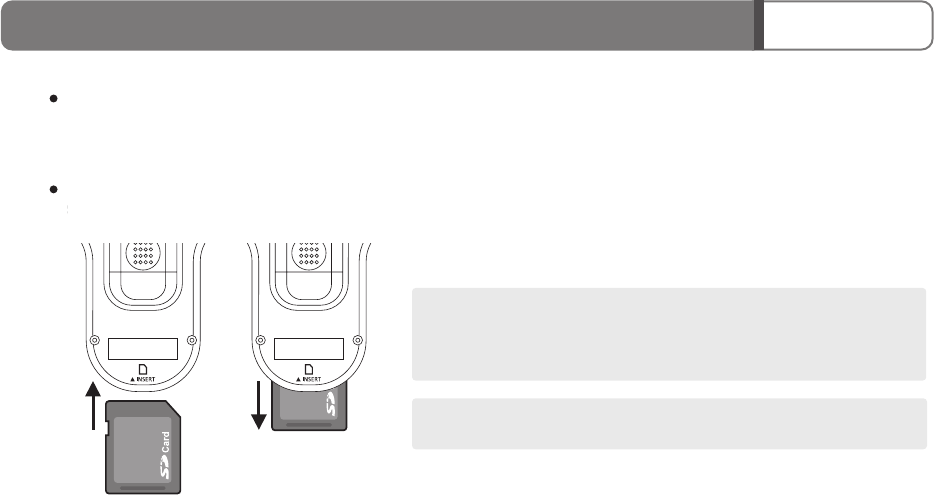
Taking out the MMC/SD card
Hold the MMC/SD card and pull down to take it out.
< Cautions >
- Make sure to turn the player off when you insert or take out the MMC/SD card.
- Do not insert or take out the MMC/SD card while playing back the music file.
- Do not contact the metal surface of the MMC/SD card to other foreign objects.
< Note >
- We bear no responsibility over the data loss caused by user's mistake.
Inserting the MMC/SD card
Insert a MMC/SD card into the MMC/SD card slot at the rear side of the player, as
shown in the figure. If the MMC/SD card is not inserted properly, try again.
(Be careful about the insertion direction.)
Using MMC/SD Card
Basic Usage
Press the MODE key shortly during playback to switch the repeat
playback mode (Repeat all once repeat one repeat all
repeat randomly Intro)
Page 12
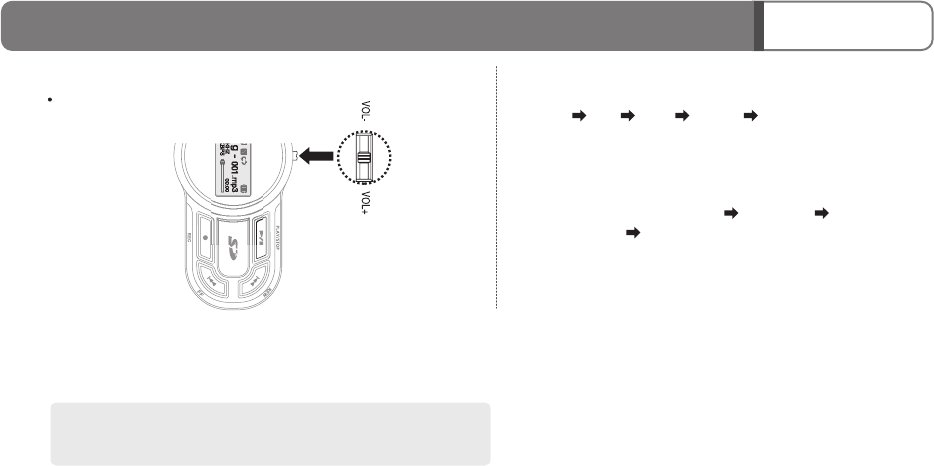
Controlling Volume
Volume Up/Down
If you press the button shortly, volume will increase by one step, whereas
it will increase continuously to the max if you press the button for longer
time. You can control the volume from 0 to 40.
1. Slide the Vol+/Vol- button up/down during playback or pausing to
adjust the sound volume.
Press the MODE key longer during playback to switch the EQ mode
(Normal Pop Rock Classic Live)
Switching the EQ mode
Switching the repeat mode
Basic Usage
Upgrade the firmware
Mode Setting
AUDIO
FM RADIO
STOPWATCH
When you press the Select Key while the player is paused in the audio mode, the directory list will be displayed on the LCD.
Page 13
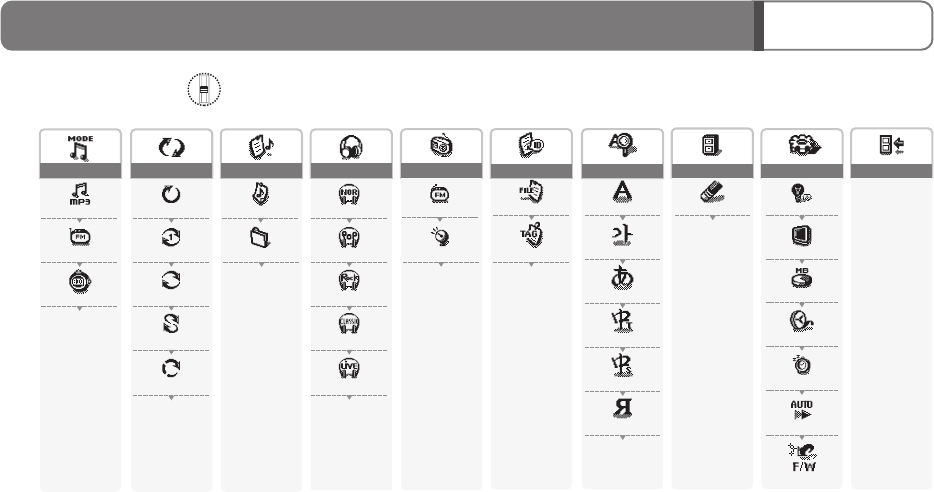
Menu Setting
Menu Structure
FM BAND
FM SENSE
FM RADIO
FILE ERASE
FILES MNG
FILE NAME
TAG INFO
DISPLAY TYPE
ENGLISH
KOREAN
JAPANESE
TRAD. CHINESE
SIMP. CHINESE
RUSSIAN
ID3 Tag
REPEAT NORMAL
REPEAT ONE
REPEAT ALL
REPEAT RANDOM
REPEAT INTRO
REPEAT
BACKLIGHT
CONTRAST
MEMORY INFO.
QUALITY
SLEEP TIMER
AUTO PLAY
EXIT
SYSTEM
LIST ALL
LIST FOLDER
PLAYLIST
EQ NORMAL
EQ POP
EQ ROCK
EQ CLASSIC
EQ LIVE
EQUALIZER
Recording Mode
Press the button to switch
to the recording mode.
Stopwatch Mode
Stopwatch function
You can use the stopwatch
function to measure the time
with simple operation.
Page 14
Menu Setting
Measurement time
Help
Lap Time
Audio Mode
In this mode, you can
playback MP3 file,
recorded FM radio
broadcasting file.
FM Radio Mode
In this mode, you can listen to the FM radio
broadcasting service. You can also save its
frequency to listen to or record any channel
you want to select.
You can record voice or the FM
radio broadcasting in the stop mode
or while listening to the FM radio.
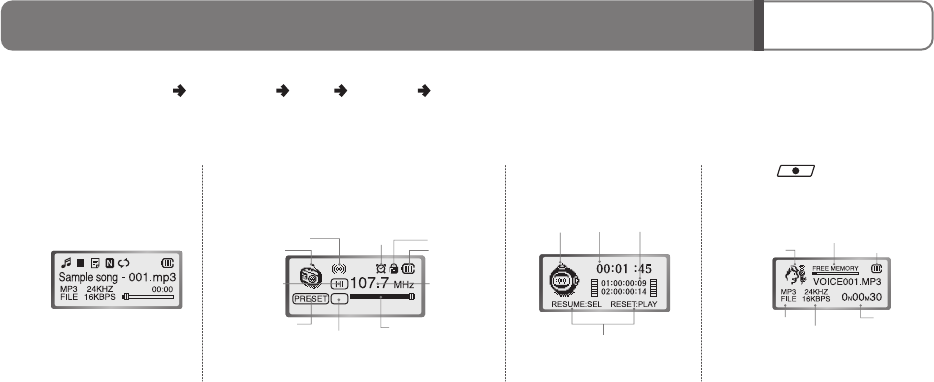
Mode Display Remaining Battery Capacity
Memory Capacity
Recording Quality
Display
Recording Time
Display
CODEC Information
Display
Mode Display
Mode Display
Frequency Reception
Sensitivity Display
Mono/Stereo Display Sleep
Available Channel Display
Preset Mode Display
Remaining Battery
Capacity
Lock Display
Frequency Display
Frequency Position Slide Bar
Mode Switching
Select one of Menu
Mode Setting
Audio
FM Radio
Stopwatch
2. Move to the intended menu
item using the Vol+/Vol- button
(folder playback, playback all),
and press the Select Key.
2. Move to the intended menu
item using the Vol+/Vol-
button, and press the
Select Key.
Page 15
PLAY LIST
If you select LIST FOLDER in the PLAY LIST, only the files in
theselected folder are played repeatedly.
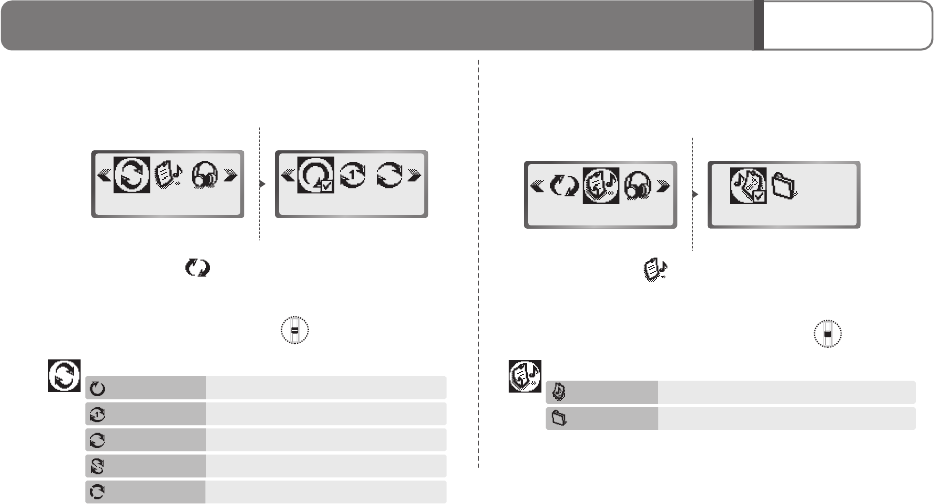
1. Select [MENU] - [ ].
REPEAT
Select the play order of the list (NORMAL/ REPEAT ONE/ REPEAT
ALL/ SHUFFLE/ INTRO).
REPEAT REPEAT NORMAL LIST ALL
PLAY LIST
1. Select [MENU] - [ ].
Menu Setting
REPEAT: Set the repeated file playback.
REPEAT NORMAL Plays back entire files sequentially once.
REPEAT ONE Repeats one file selected.
REPEAT ALL Plays the entire list sequentially and repetitively.
REPEAT RANDOM Repeats all files randomly.
REPEAT INTRO Plays the intro section of any file.
PLAY LIST: Selects the scope of file playback.
LIST ALL Plays back all files.
LIST FOLDER Plays only files listed in the selected folder.
2. Move to the intended tone using
the Vol+/Vol- button, and press
the Select Key.
2. Move to the intended position using
the Vol+/Vol- button, and press the
Select Key.
You can apply various tones to music.
FM BAND
FM SENSE
Page 16
Menu Setting
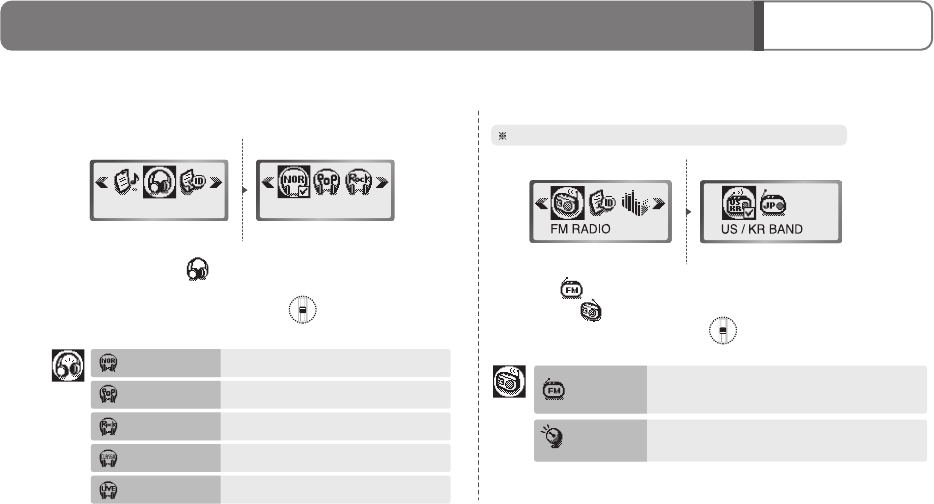
1. Select [MENU] - [ ].
EQUALIZER FM RADIO (FM BAND)
Modifies the Frequency band to listen to the radio broadcasting in Korea,
U.S., Europe or Japan.
Frequency band in every country except Japan is same.
EQUALIZER EQ NORMAL
1. Select [ ] from the
[MENU] - [ ].
EQ NORMAL Selects normal tone
EQ POP Selects pop tone
EQ ROCK Selects rock tone
EQ CLASSIC Selects classic tone
EQ LIVE Selects live tone
Modifies the radio Frequency band for each
country. (Select among U.S., KR and Japan. All
countries except Japan have the same frequency)
Sets the radio reception sensitivity
(Low/Middle/High).
You can select the sensitivity from LOW/MIDDLE/HIGH.
Low reception sensitivity area means the area where radio
reception sensitivity is poor.
1. Select [ ] from the
[MENU] - [ ].
FM RADIO (FM SENSE)
Sets the radio reception sensitivity when auto-scanning the
frequency. Adjust reception sensitivity that best fits for your region
as the number of radio stations can differ depending on the
sensitivity value.
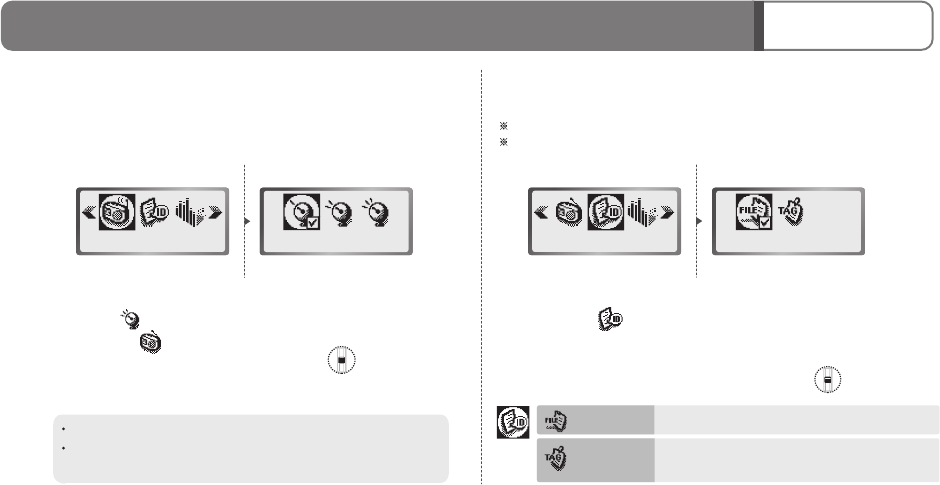
1. Select [ ] from the
[MENU].
DISPLAY TYPE
Titles that are scrolled during playback can be displayed in file name
or ID3 tag.
FM RADIO SENSE LOW DISPLAY TYPE FILE NAME
2. Move to the intended position
using the Vol+/Vol- button, and
press the Select Key.
FILE NAME Displays the file name
TAG INFO
Displays the tag information (If the tag information
is not available, the file name will be displayed)
Page 17
Menu Setting
2. Move to the intended menu
item using the Vol+/Vol- button
(File Name or TAG INFO),
and press the Select Key.
When the tag information consists only of ID3V1, only the file name is displayed.
Only when the tag information includes ID3V2 is the TAG information displayed
normally.
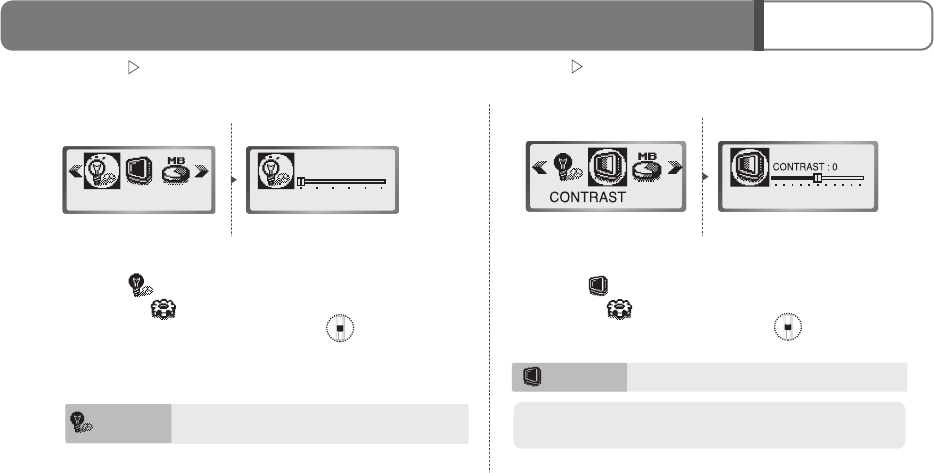
SYSTEM BACKLIGHT
BACKLIGHT :
ALWAYS OFF
BACKLIGHT
Menu Setting
You can select one of Off/3/5/10/15 Sec/
BACKLIGHT
1. Select [ ] from the
[MENU] - [ ].
2. Move to the intended po
using the Vol+/Vol- butto
press the Select Ke
2. Select the target folder or file using
, Vol+ or Vol- button. Then,
press the Select Key. The
"DELETE FILE ARE YOU SURE?"
message will be displayed on the LCD.
3. Move to the [Yes]
and press the Select Key.
to delete the selected file.
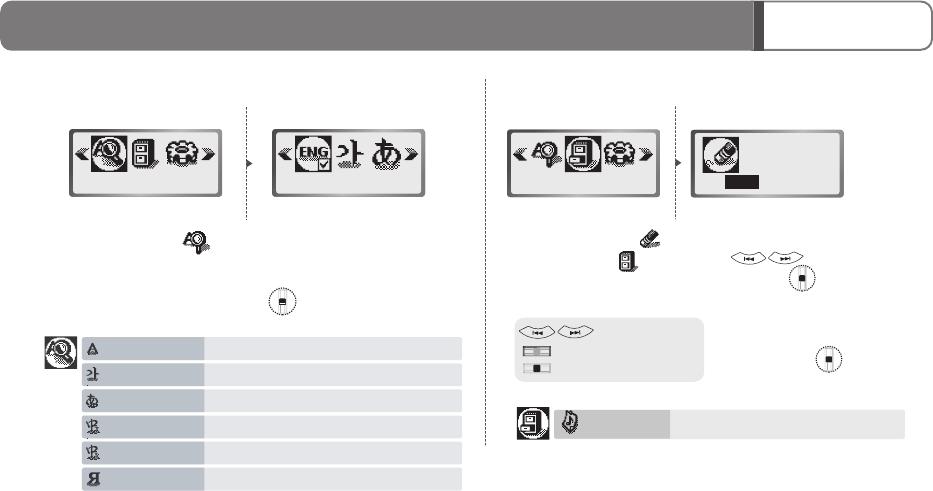
ID3 TAG
Sets the language used to display the ID3 tag.
: Moves between files
: Moves between directories
: Selects files
Page 18
Menu Setting
1. Select [MENU] - [ ].
ID3 TAG ENGLISH
2. Move to the intended menu
item using the Vol+/Vol-
button, and press the
Select Key.
ENGLISH Sets English as a tag language.
KOREAN Sets Korean as a tag language.
JAPANESE Sets Japanese as a tag language.
TRAD. CHINESE Sets Traditional Chinese as a tag language.
SIMP. CHINESE Sets Simplified Chinese as a tag language.
RUSSIAN Sets Russian as a tag language.
FILE ERASE Deletes (a) file(s)
FILE MNG(FILE ERASE)
Use this function to delete files.
1. When you select [ ] from
the [MENU] - [ ], the
directories will be displayed
on the LCD.
FILE MNG NO
DELETE FILE
ARE YOU SURE?
YES
Sample song
001
.MP3
SYSTEM BACKLIGHT
BACKLIGHT :
ALWAYS OFF
BACKLIGHT
Page 19
Menu Setting
You can select one of Off/3/5/10/15 Sec/Always
BACKLIGHT
1. Select [ ] from the
[MENU] - [ ].
2. Move to the intended position
using the Vol+/Vol- button, and
press the Select Key.
CONTRAST Sets LCD brightness.
SYSTEM CONTRAST
1. Select [ ] from the
[MENU] - [ ].
2. Move to the intended position
using the Vol+/Vol- button, and
press the Select Key.
. You can select on of -5/-4/-3/-2/-1/0/+1/+2/+3/+4/+5 step.
. By default, contrast is set to "0".
MEMORY INFO Displays the current memory available and a
total capacity of memory.
128 MB 121 MB
256 MB 248 MB
512 MB 502 MB
1,010 MB
1 GB
Page 20
2. Total and available memory will
be displayed.
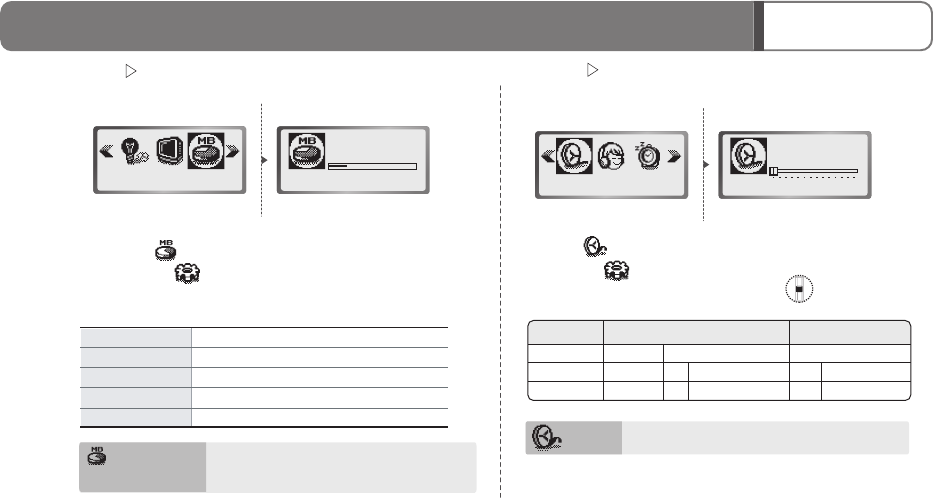
SYSTEM MEMORY INFO
Displays total and available memory .
MEMORY INFO
TOTAL : 119MB
FREE : 90MB
Total Memory Available Memory
Menu Setting
1. Select [ ] from the
[MENU] - [ ].
SYSTEM QUALITY
MONO
16KBPS
16KHz
QUALITY
1. Select [ ] from the
[MENU] - [ ].
MPEG 2 MPEG 1
mono/stereo stereo
Sampling Rate 44.1
128/160/192
32
112Bit Rate
mono
16 16
40
16/24/32
stereo
22.05
44/48/56/64/80/96
2. Move to the intended position
using the Vol+/Vol- button, and
press the Select Key.
QUALITY Sets the recording quality (16 Kbps ~ 192 Kbps).
Menu Setting
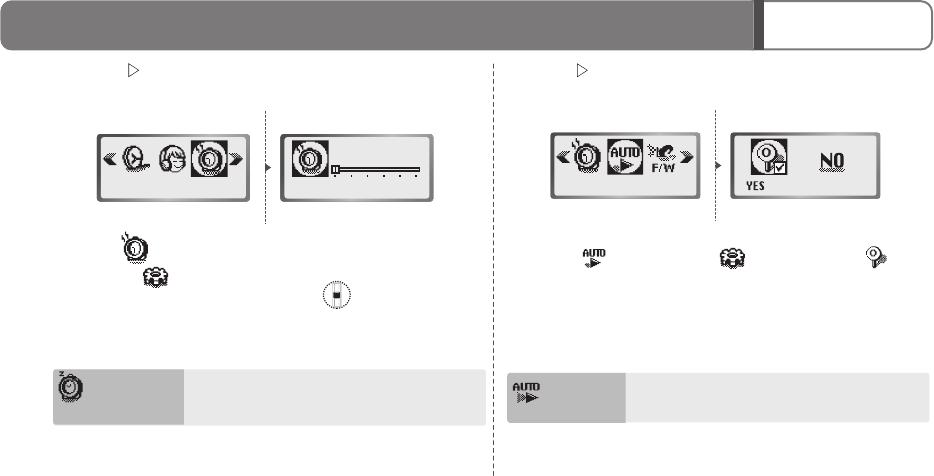
SYSTEM SLEEP TIMER
The player will be automatically turned off on a defined peri
1. Select [ ] from the
[MENU] - [ ].
2. Move to the intended po
using the Vol+/Vol- butto
press the Select Ke
SLEEP TIMER
SLEEP :
TURN OFF
SLEEP TIMER The player is turn off automatically aft
period of time (Off/10/20/30/60/120m
Page 21
Menu Setting
System AUTO PLAY
The player will start playback automatically when you turn the power on.
2. Select [ ].
1. Select [ ] from [Menu] - [ ].
AUTO PLAY
AUTO PLAY Sets the playback status when the power is on
(Automatic playback or stop).
SYSTEM SLEEP TIMER
The player will be automatically turned off on a defined period of time.
1. Select [ ] from the
[MENU] - [ ].
2. Move to the intended position
using the Vol+/Vol- button, and
press the Select Key.
SLEEP TIMER
SLEEP :
TURN OFF
SLEEP TIMER The player is turn off automatically after defined
period of time (Off/10/20/30/60/120minutes).
3. Press the button to set off section repetition.
2. Set the end of the section by pressing the ( ) button
again. Then, the selected section will be played repeatedly.
System
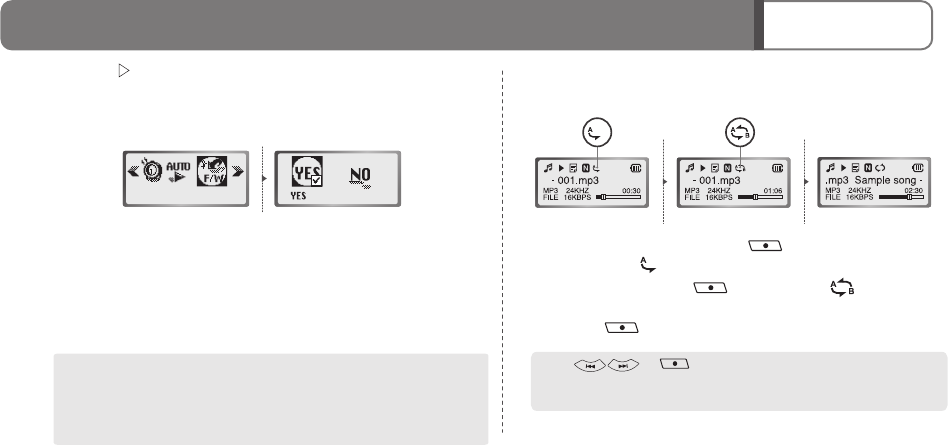
FIRMWARE UPGRADE
FIRMWARE
Page 22
Menu Setting
1. This feature copies the firmware from the homepage to the root directory
of the digital audio player.
2. Select [MENU] - [SYSTEM] - [FIRMWARE].
(Refer to the NOTICE on our homepage about FIRMWARE UPGRADES.)
Verify that the remaining battery capacity is sufficient before executing
a FIRMWARE UPGRADE. When the unit malfunctions during a
FIRMWARE UPGRADE, quickly refer to qualified personnel about
servicing the unit.
< Notice >
Use this function to upgrade the firmware. You can download the up-to-date
firmware from the web site (www.eratech.co.kr).
1. Play a file in audio mode and press to mark the
beginning point ( ) for section repetition.
SECTION REPETITION (A-B)
Selects and repeats playing a certain section of a file during playback
Press or button to cancel section repetition.
When you already selected [REPET INTRO] from [MENU] - [REPEAT],
the section repetition will not be supported.
1. Check the sound quality (Bit rate) function before recording.
2. Position the player towards the sound source while the playe
stopped and then, press the button. Then, it will be
switched to recording mode and start recording.
3. When you press , the ( ) icon is blinking on LCD
recording will be paused. Press the button again and t
recording icon will appear and recording will be resumed.
4. Press the button to stop recording.
Start recording by pressing the button when the player
in audio mode. Make sure to press the button when th
stopped as it starts section repetition while the player is runnin
MP3
FILE 24KHZ
16KBPS
Voice001.MP3
FREE MEMORY
0H00M30 MP3
FILE 24KHZ
16KBPS
Voice001.MP3
FREE MEMORY
0H00M30
PAUSE
Recording
Recording / FM Radio
PAUSE

Menu Mode Setting FM Radio.
1. Check the sound quality (Bit rate) function before recording.
2. Position the player towards the sound source while the player is
stopped and then, press the button. Then, it will be
switched to recording mode and start recording.
3. When you press , the ( ) icon is blinking on LCD and
recording will be paused. Press the button again and the
recording icon will appear and recording will be resumed.
4. Press the button to stop recording.
Start recording by pressing the button when the player is stopped
in audio mode. Make sure to press the button when the player is
stopped as it starts section repetition while the player is running.
MP3
FILE 24KHZ
16KBPS
Voice001.MP3
FREE MEMORY
0H00M30 MP3
FILE 24KHZ
16KBPS
Voice001.MP3
FREE MEMORY
0H00M30
PAUSE
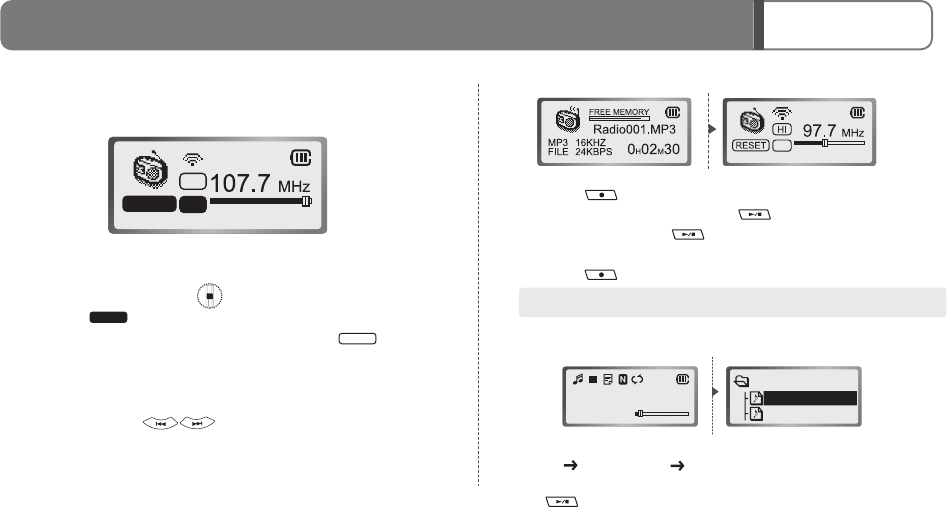
Scanning FM Radio Frequency
107.7 MHz
HI
PRESET
97.7 MHz
HI
PRESET
Recording
Page 23
Recording / FM Radio
PAUSE
2. Scan the target frequency using button.
As the earphone code serves as antenna, you can improve the
receiving sensitivity by stretching out the earphone code as possible
or turning it to the horizontal for clearer sound.
Press the button and hold it for a moment and then release it.
The player will scan the frequency automatically - Auto search function.
1. Switch to the FM Radio mode by selecting

3. The screen as shown above will
appear when you press the
Select Key after selecting a
channel. Then select [Yes] using
the
VOL+/VOL-
button and
press the Select Key.
4. Select [NO] and press the
Select Key to cancel.
1. If you press the button longer than 2 seconds, the player will
switch to preset mode and the "ARE YOU SURE?" message will appear.
107.70MHz
87.50 Mhz
HI
01
20
02
01 107.70MHz
HI
01 NOYES
20
02
01 AUTOSCAN
ARE YOU SURE?
20
02
03
HI
01
NOYES
1. Find the frequency that you
want to choose and press the
button. The channel
saving window will appear.
2. Select the channel using
the Select Key.
2. Move to [YES] by sliding the jog key towards Vol+/Vol- direction,
and press the Select Key.
3. Press the button to stop automatic saving.
Saving FM Channel
Page 24
FM Radio
Certain areas under weak electronic field will have irregular
reception sensitivity for some broadcasting service.
Saving FM Channel Automatically
All the channel information saved will be deleted in auto channel
saving.
1. When you press the Select Key in FM radio mode,
the icon will be highlighted before the preset func
available. Pressing it again will return to the icon
stop the preset function.
2. If there is any channel that you have saved with the pres
function on, you can tune radio frequency to the channel
pressing the button.
HI
01
PRESET
PRESET
Setting Preset Function
FM Radio
PRESET
Menu Mode Setting Audio.
1. When you press the Select Key in FM radio mode,
the icon will be highlighted before the preset function is
available. Pressing it again will return to the icon and
stop the preset function.
2. If there is any channel that you have saved with the preset
function on, you can tune radio frequency to the channel by
pressing the button.
1. Press the button while enjoying FM broadcasting to
record the broadcasting. Press the button to pause
recording and press the button again to resume
recording.
2. Press the button to stop recording.
HI
01
PRESET
PRESET
Setting Preset Function
Page 25
FM Radio
PRESET
Recording Radio Broadcasting
The recorded files of radio broadcasting will be saved in a sequential order.
2.
Select the file you want using the navigation function and press
the button.
Listening to Recorded Broadcasting
MP3
FILE 16KHZ
24KBPS 00:00
Sample song - 001.mp3
RADIO
Radio001.mp3
Radio002.mp3
1. Switch to the FM Radio mode by selecting
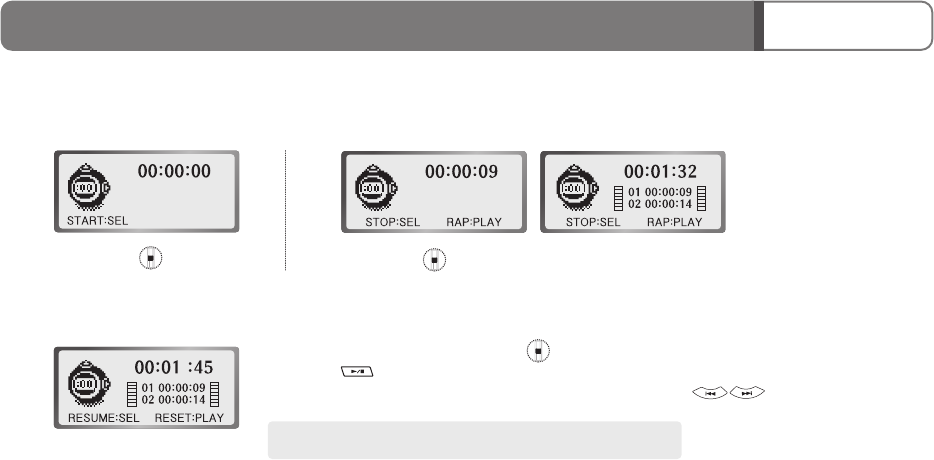
2. Press the Select Key to record the time while a stopwatch is running.
Page 26
Stopwatch function
1. Press the Select Key to
start a stopwatch.
The measured time can be faster or slower than the actual time.
3. If you want to record the time, press the Select Key while time measurement is stopped.
Press the button to return to the initial screen.
You can display saved stopwatch time in the stop screen using the button through navigation
Stopwatch function
You can use the stopwatch function to measure the time with simple operation.
Page 27
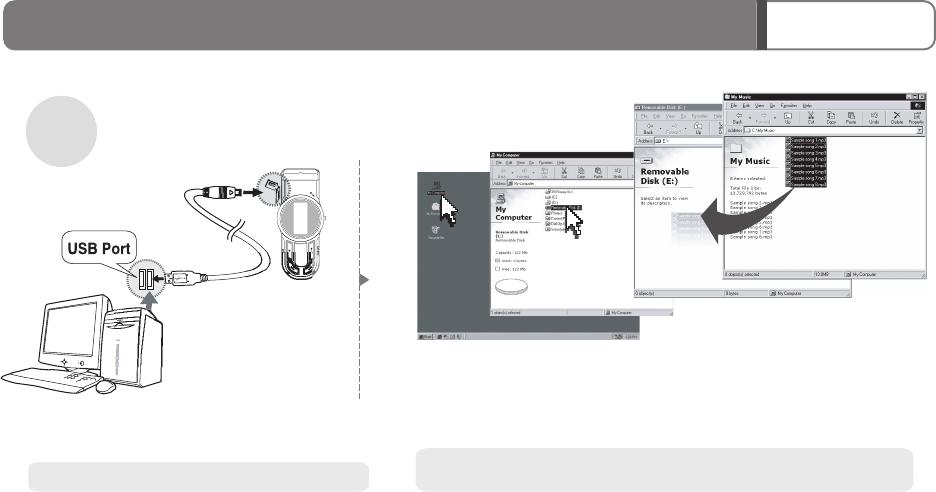
Connect to PC
Download
Transfer file to Digital Audio
Windows 98/ME/2000/XP or higher, MAC OS 9.2 or higher
You can transfer data without turning on the player.
Don't plug off the audio player when displayed "Don't Remove USB" on the
LCD; your system could be damaged and have instability.
1.
Connect the player's USB connector to the
USB port of your PC.
2. Double-click the "My Computer" icon on your desktop.
3. Double-click the "Removable Disk".
4. Select the file that you want to transfer from your PC and drag it to the player.
Double Click
Double Click
Double Click
Page 28
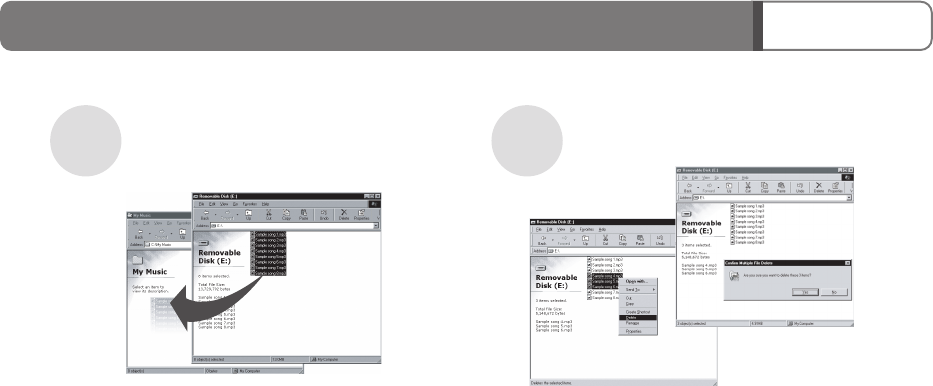
File Upload / File Deletion
File
Upload Transfer File in the Player to PC Delete File in PC
'Voice' or 'Radio' folder in the audio player is regenerated automatically even if deleted.
1. Connect the player to your PC.
2. Select the "Removable Disk" in "My Computer".
3. Select the file that you want to transfer to your PC and drag and
drop it.
1. Select the file that you want to delete in the player and right
click it; select "Delete" in the file menu.
2. Select [Yes] will show you the deletion process.
File
Deletion

1.
Do not connect the digital audio player to the PC USB port.
2. Insert the Installation CD into the CD-ROM of the PC.
3.
Run "Setup.exe" in the Win98 driver folder of the installation CD.
4.
Install the file and reboot the computer and then, connect the digital audio player to the PC USB port.
You do not need to install an additional device driver for this unit in systems
with Windows ME, Windows 2000/XP or higher, or MAC OS 9.2 or higher.
Installing a Driver in Windows 98
Page 29
Installing device driver

Page 30
Connect to Mac
Download
1. Connect the player's USB connector to the USB
port of your PC. Double-click "Removable Drive".
2. Select the file that you want to transfer
from your PC and drag and drop it to the
player.
Mac OS 9.2 or higher
Transfer File to Player
. You can transfer data to your PC without turning on the player.
. Press [Option] on your keyboard before drag-and-drop.
Upload
1. Connect the player to your PC.
2. Select "Removable Drive" on your
desktop.
3. Select any file that you want to transfer
to your PC.
4. Drag and drop the file to the folder
where you want to save.
Transfer File from the player
to your PC
Double Click
Check the battery status
Check if music files are in the
Check if the volume is too low
Check points for product malfunc
When it doesn't tag information
When the tag information consists only of ID3V1, only the file
Only when the tag information includes ID3V2 is the TAG info
displayed normally.
Stop using immediately Disconnect the earphone from
Face the earphone inlet down and then draw water
Contact the service center
When it falls into the water
When it doesn't playback misic

Check the battery status
Check if music files are in the "MUSIC" folder
Check if the volume is too low
Nothing happens when I press the button.
Check whether the locking function is activated.
If it is, release the locking function and check again.
Letters are not displayed normally on the LCD.
Check whether the tag language is properly set.
I cannot download the file.
Check whether the USB cable is properly connected.
Connect to other USB port in the PC.
Check to see if the driver is installed appropriately
for Windows 98.
Page 31
Check points for product malfunction
When it doesn't tag information
When the tag information consists only of ID3V1, only the file name is displayed.
Only when the tag information includes ID3V2 is the TAG information
displayed normally.
Stop using immediately Disconnect the earphone from the player
Face the earphone inlet down and then draw water
Contact the service center
When it falls into the water
When it doesn't playback misic
Check the tag language setting in the menu
configuration. (See page 19.)

MP3
FM Radio
Channel
Frequency Range
128MB
256MB
512MB
MP3
20Hz ~ 20KHz
7mW(L) + 7mW(R) : 16 , Max Volume
85dB (with A-weight filter)
87.5 ~ 108MHz (Worldwide)
76 ~ 90MHz (Japan)
3mW(L) + 3mW(R) : 16 , Max Volume
55dB (with A-weight filter)
Earphone cord antenna
16Kbps:1,030Min. ~ 192Kbps:85Min.
16Kbps:2,110Min. ~ 192Kbps:175Min.
16Kbps:4,280Min. ~ 192Kbps:350Min.
1GB 16Kbps:8,610Min. ~ 192Kbps:710Min.
Page 32
CODEC MPEG1/MPEG2
PC
Product Specification
Category Item Specification
Recording
Capacity
Earphone Output
Signal to Noise Ratio
Frequency Range
Earphone Output
Signal to Noise Ratio
Reception Mode
Power Supply
Recording Quality
General
Encoding Format
Interface
System OS
Bitrate
USB 1.1 or higher
Windows 98/2000/XP/ME
Macintosh OS 9.2 or higher
Power
Duration
16Kbps ~ 192Kbps
AAA alkaline battery
About 17 hours (MP3 Playback) in use of earphone
Dimension (mm)
36g(without battery)
87(H) x 33.5(W) x 15.5(D)
Weight (g)
Product Warranty
1. This product is manufactured through strict quality control and the inspection process.
2. If any defect is found under the normal condition, you can receive free repair service at the sales office or the service center during the free
warranty period.
3. If product malfunction occurs after the free warranty period, or the repair items belongs to the chargeable service even during the free warranty
period, the service can be charged.
- Malfunction due to user's carelessness.
- If the user modified the product at his/her own discretion.
- Natural disasters such as fire, damage from salty wind, flood or earthquake.
4. If you need to repair, please make sure to present this Warranty.
5. This Warranty shall not be issued again. Please keep it safely.
Product name
Model Name
Serial Number
Digital Audio Player
EMP-200
(Y /M /D )
Eratech
8F Koosan Bldg, 70-10, Nonhyeon2-dong, Gangnam-gu, Seoul, Korea
Warranty Period
Office
1 year
080-571-8859
Purchase Date
Customer
Contact
Information
Manufacturer
Distributor
Name
Phone Number
Address
Name
Address
Name
Address
FCC Compliance Statements
Note: This equipment has been tested and found to comply with the limits for a
Class B digital device, pursuant to part 15 of the FCC Rules. These limits are
designed to provide reasonable protection against harmful interference in a
residential installation. This equipment generates, uses and can radiate radio
frequency energy and, if not installed and used in accordance with the
instructions, may cause harmful interference to radio communications.
However, there is no guarantee that interference will not occur in a particular
installation. If this equipment does cause harmful interference to radio or
television reception, which can be determined by turning the equipment off and
on, the user is encouraged to try to correct the interference by one or more of
the following measures:
• Reorient or relocate the receiving antenna
• Increase the separation between the equipment and receiver.
• Connect the equipment into an outlet on a circuit different from that to
which the receiver is connected.
• Consult the dealer or an experienced radio / TV technician for help.
Warning : Your are cautioned that any change or modifications to the equipment not
expressly approved by the party responsible for compliance could void your authority
to operate such equipment.