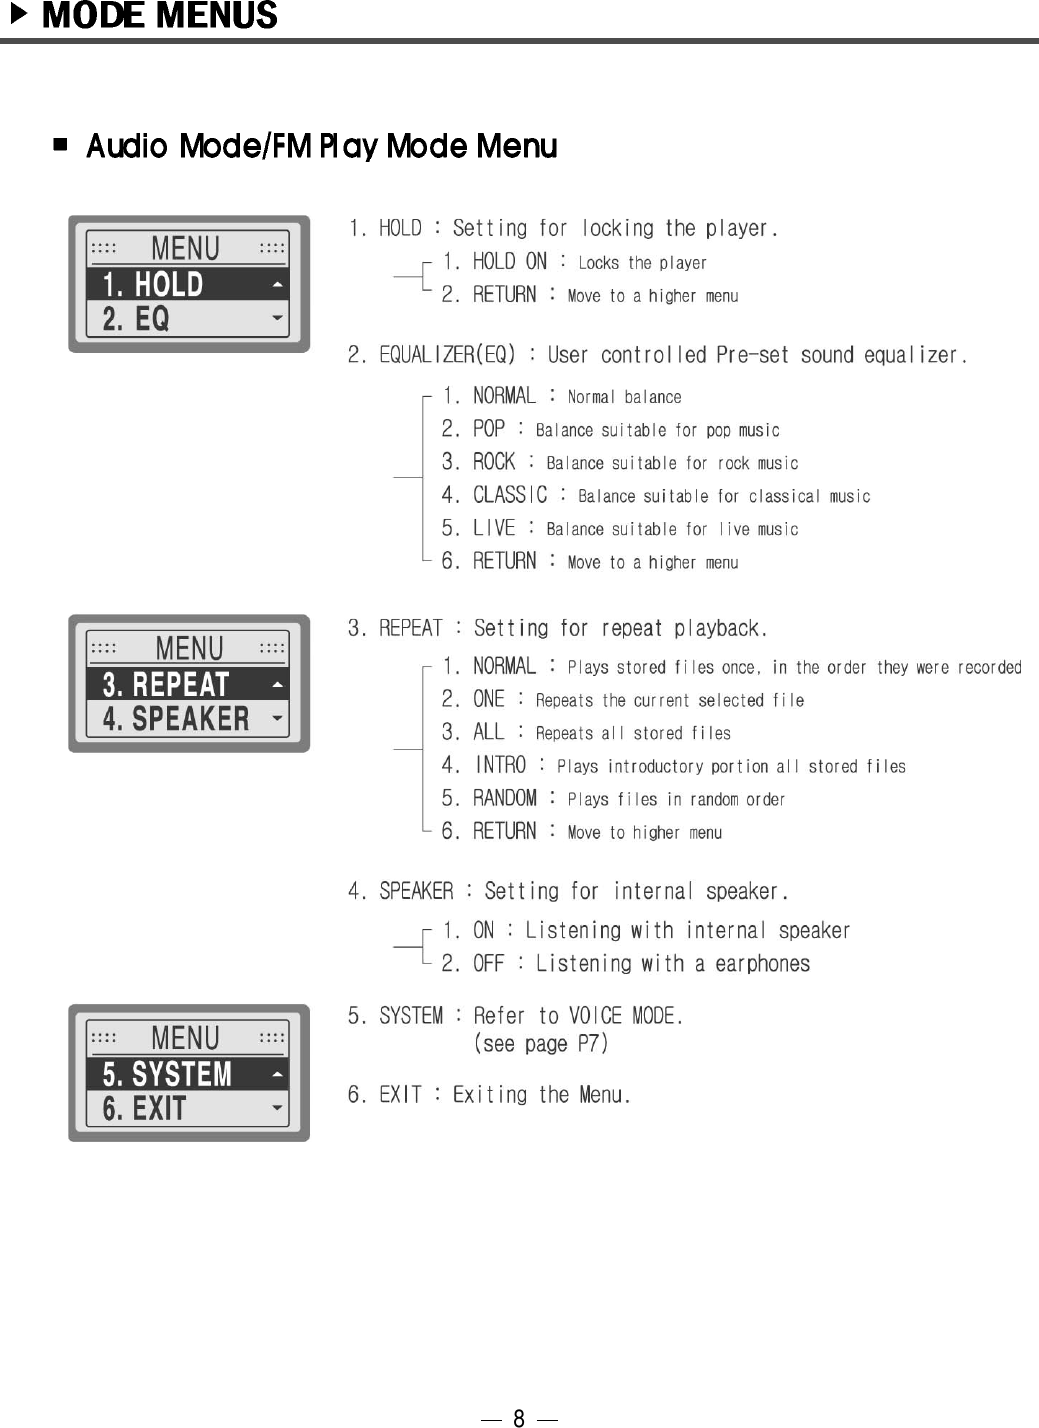
Eratech Co EVR-150 Voice Recorder User Manual 030204 EVR 150 eng
Eratech Co, Ltd Voice Recorder 030204 EVR 150 eng
UserManual.wiki
>
Eratech Co
>
EVR 150 User Manual
Users Manual
Navigation menu
Upload a User Manual
Namespaces
Wiki Guide
HTML
PDF
Info
Views
User Manual
Discussion / Help
Navigation

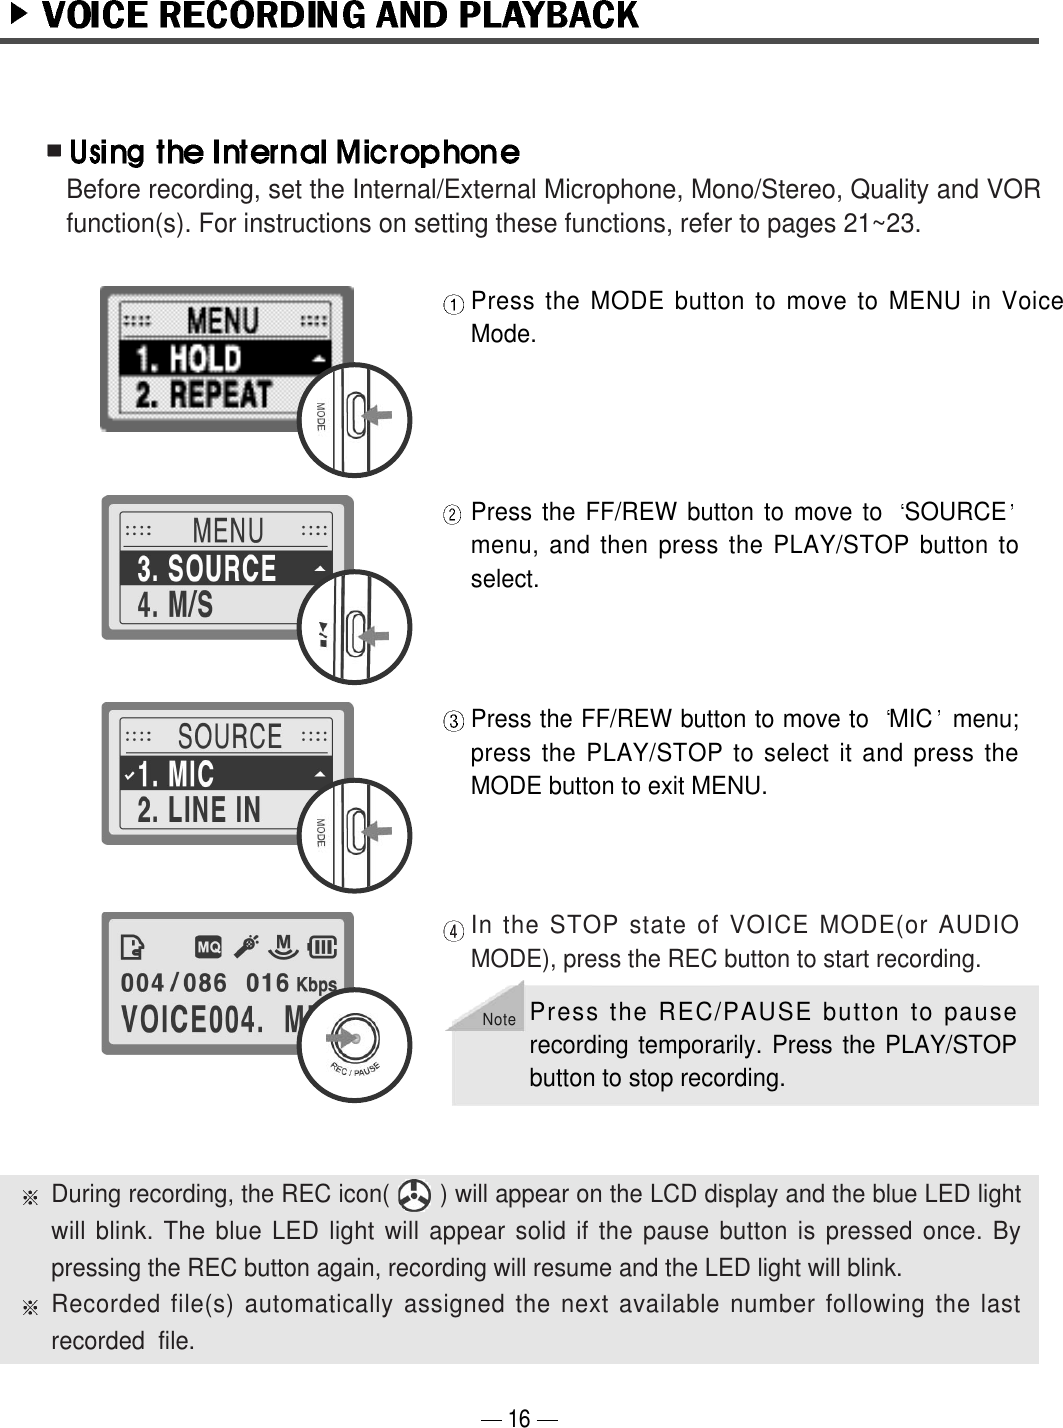
![Use the same method described for the externalmicrophone: set [MENU]-[SOURCE]-[MIC]. Connect the external microphone to external jack ofthe EVR-150 using earphone connector. In the STOP state of VOICE MODE(or AUDIOMODE), press the REC button to start recording.To pause recording, press the REC/PAUSE button.To stop recording, press the PLAY/STOP button.17( ) mark means user s current setting.](https://usermanual.wiki/Eratech-Co/EVR-150/User-Guide-303679-Page-17.png)
![Connect the " " jack of the hands freeset(optional) to the earphone jack of themobile phone . Next, connect the "-" jackof the hands free set to the microphonejack ( )the EVR-150.To record a telephone conversation inVOICE MODE(or AUDIO MODE), pressthe REC button to start recording.To pause recording, press theREC/PAUSE button. To stop recording,press the PLAY/STOP button.18Connect the audio cable to the microphonejack( ) of the EVR-150( ). Connect theother head of the audio cable to telephoneadapter( ). Connect the incomingtelephone line(a service line) to thetelephone adapter( ). Connect thetelephone cable between the telephoneand telephone adaptor( ). Use the same method as using an external microphone: set [MENU]-[SOURCE]-[MIC].To record a telephone conversation inVOICE MODE(or AUDIO MODE), pressthe REC button to start recording.NoteTo pause recording, press theREC/PAUSE button. And to stoprecording, press the PLAY/STOP button.NoteThis function is only applicable if the mobile phone has an earphone jack. Some mobilephones might not be compatible(operate properly).](https://usermanual.wiki/Eratech-Co/EVR-150/User-Guide-303679-Page-18.png)
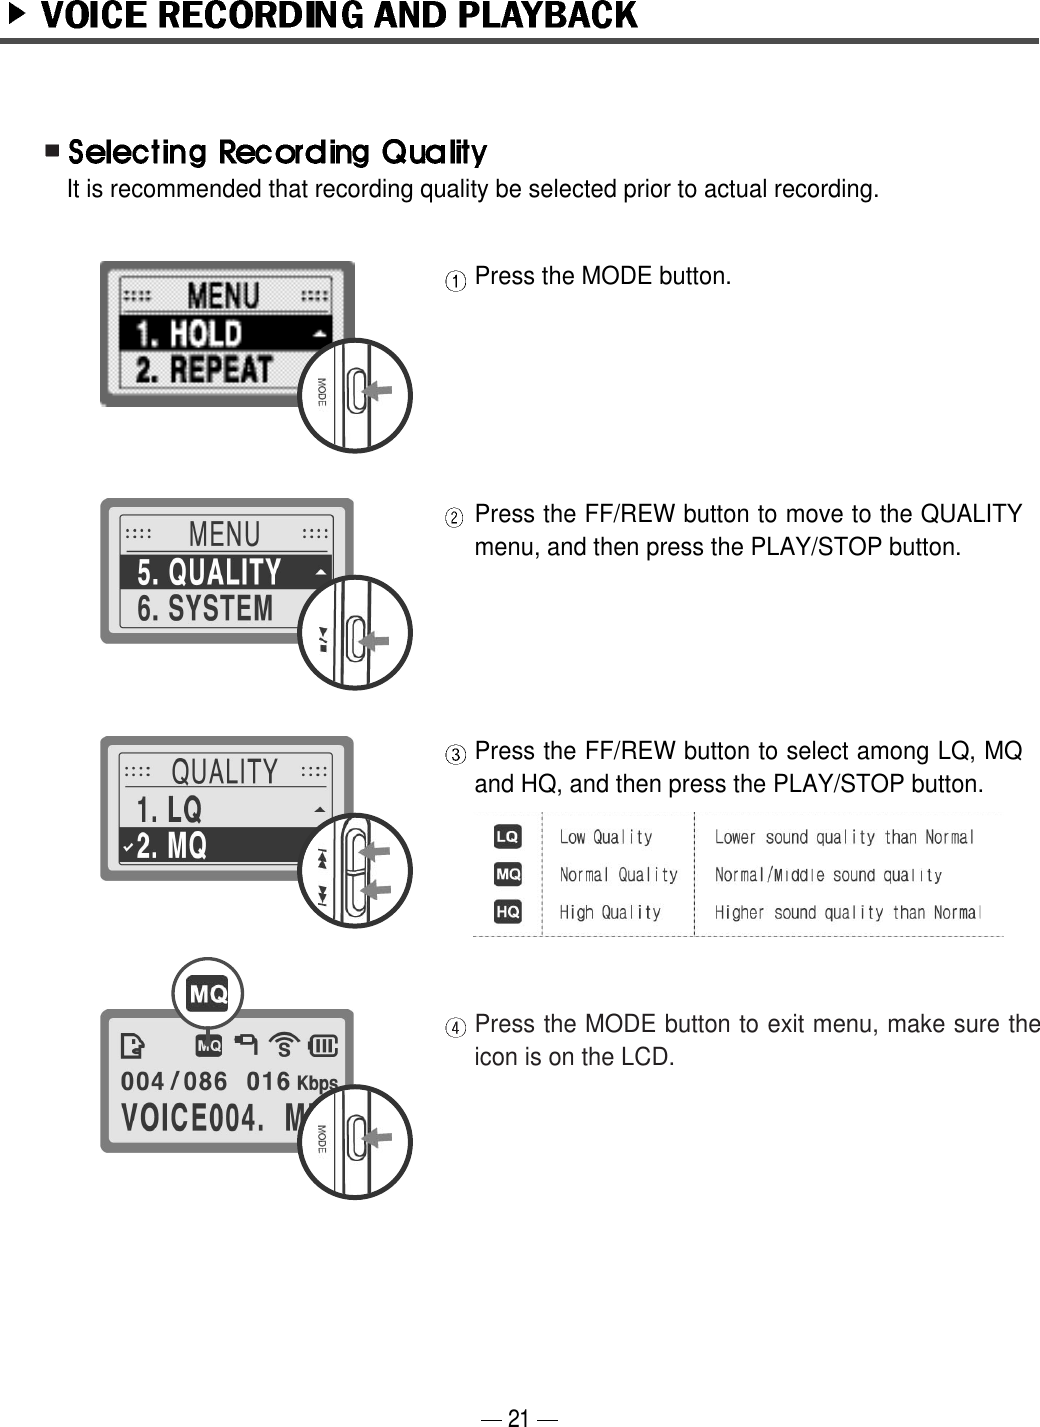
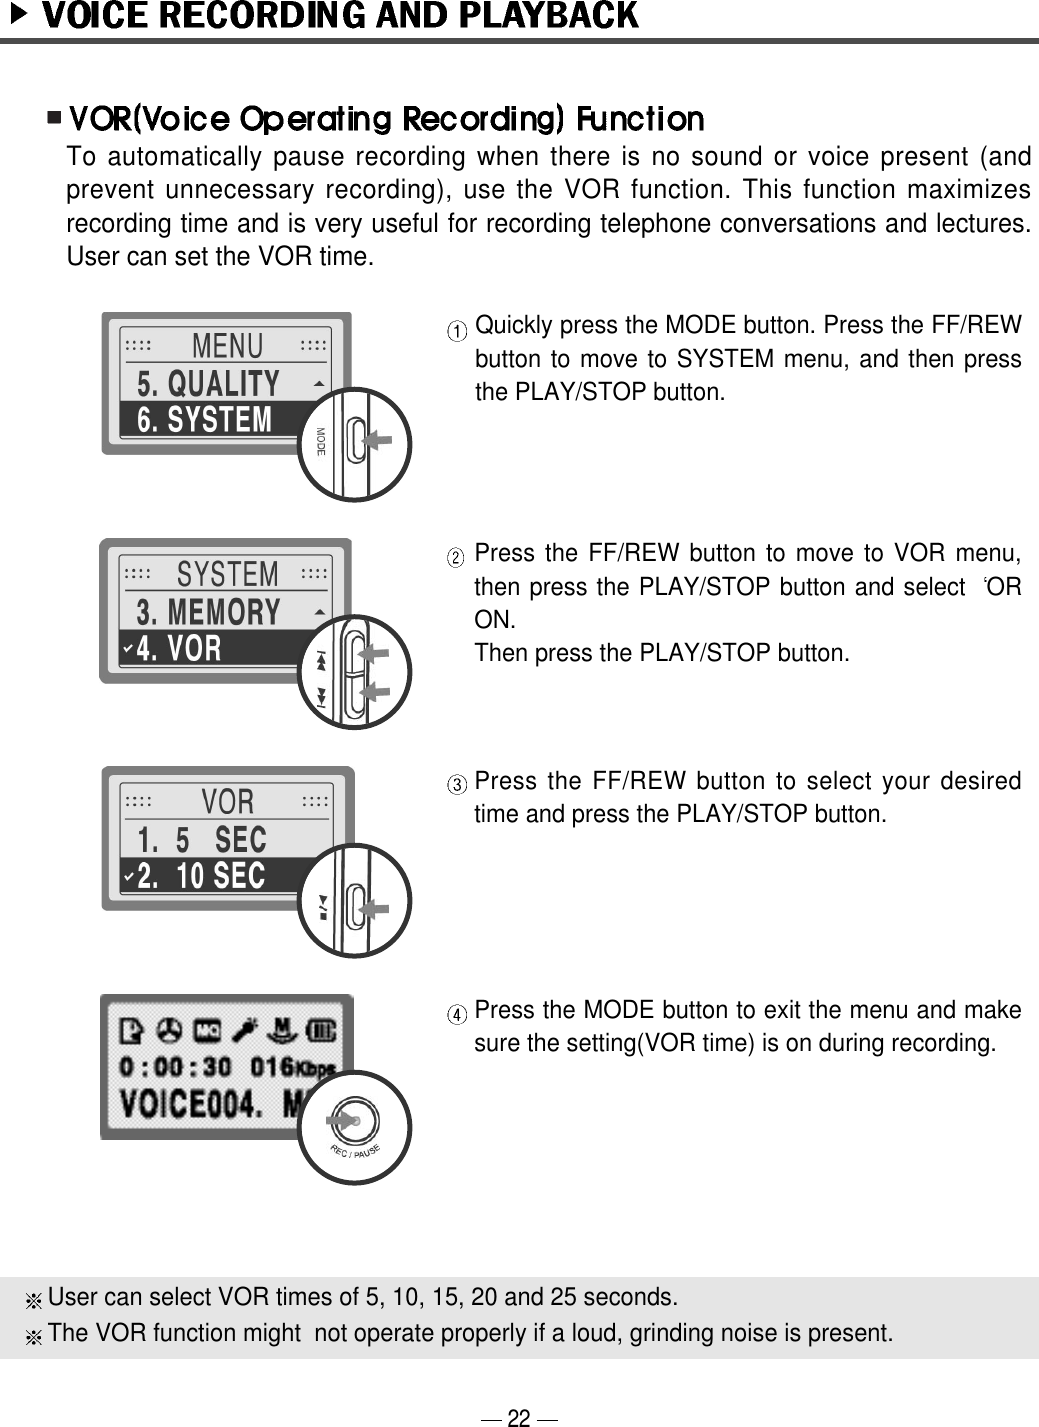
![Connect the audio cable to micro-phone jack ( )of the EVR-150 andconnect the other head of audio cableto the earphone jack of the audiodevices.Press the REC button to start recording.To pause recording, press the REC/Pause button. To stop recording, pressthe PLAY/STOP button.If the volume level of your external device is too high, it can cause some noise/distortion.Before recording, set [MENU]-[SOURCE]-[LINE IN].Recording quality and timetable (based on 128MB)LINE- INMONO8 Kbps16 Kbps32 KbpsMax.2180MinMax.1090MinMax.540MinMICMONO8 Kbps16 Kbps32 KbpsMax.2180 MinMax.1090 MinMax.540 MinSTEREO96 Kbps128 Kbps160 KbpsMax.180MinMax.130MinMax.100MinLQMQHQ19The sound quality is automatically set to MONO when the internal microphone is in use.The STEREO mode is only applicable with the external microphone or external audio devices.When recording from an external sound source, such as an audio devices, selectSTEREO/HQ mode for high quality recording sound.In this mode the recording time will be reduced.NoteNote](https://usermanual.wiki/Eratech-Co/EVR-150/User-Guide-303679-Page-19.png)
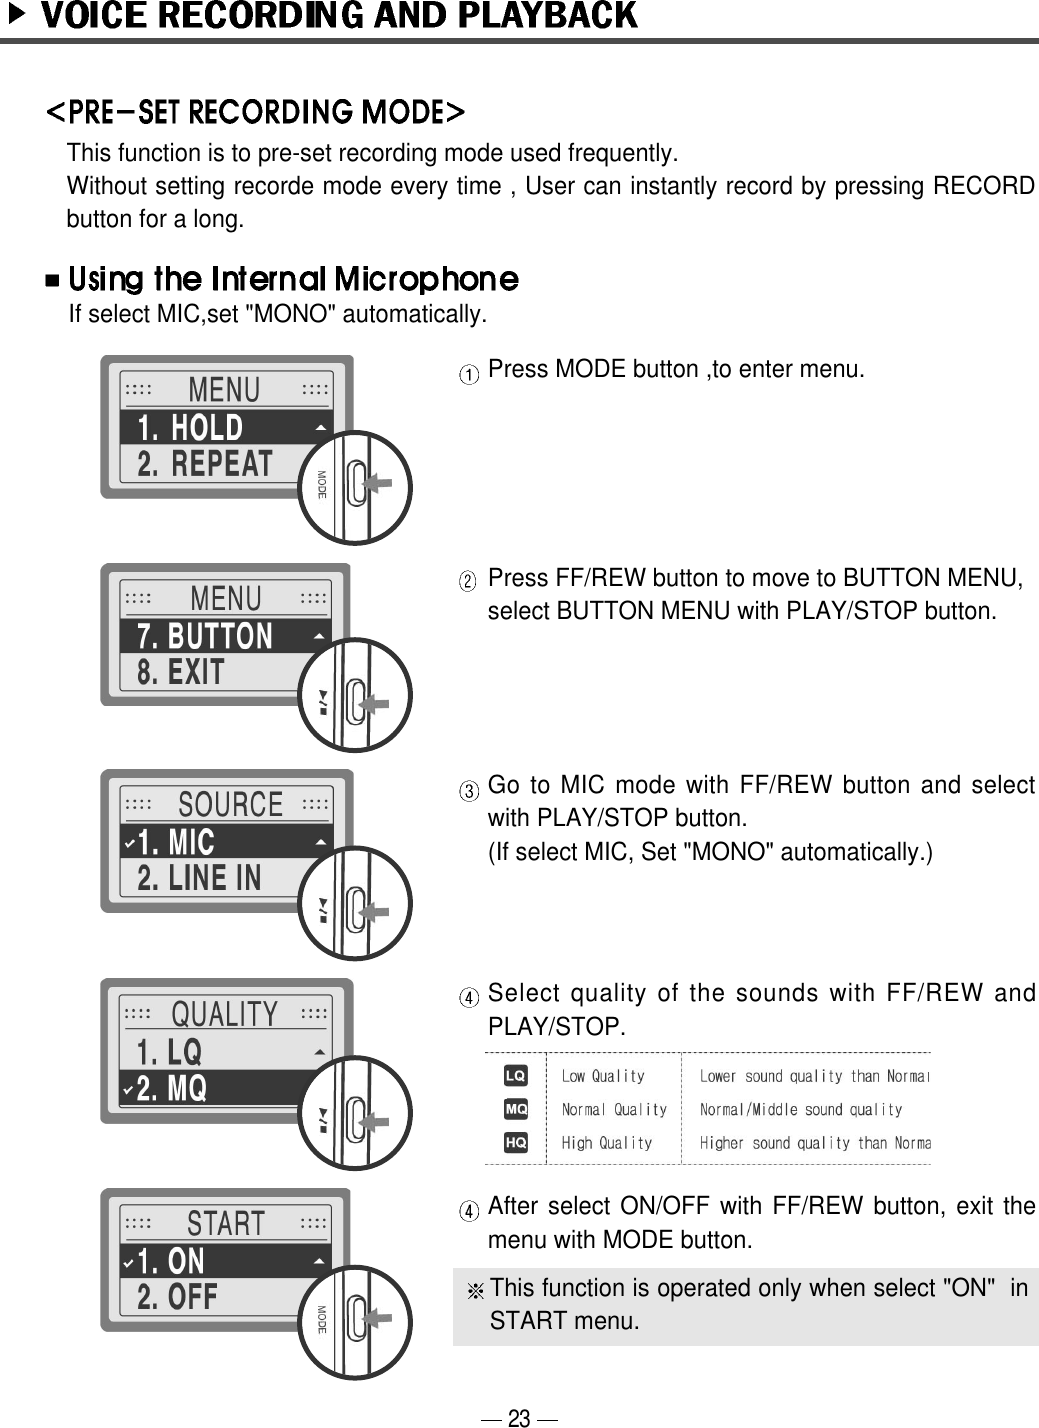
![Quickly press the MODE button.Press the FF/REW button to move to the M/Smenu and then press the PLAY/STOP button.Press the FF/REW button to choose either MONOor STEREO, and then press the PALY/STOPbutton.Press the MODE button to exit the menu. Makesure the icon on the LCD.If an audio cable will be used for recording purposes set the MODE prior to recording.If you select [MENU]-[SOURCE]-[MIC] and move to M/S MODE, MONO!! message willappear on the LCD. STEREO is only available when connecting external devices and by setting the followingMODE: [MENU]-[SOURCE]-[LINE IN].20](https://usermanual.wiki/Eratech-Co/EVR-150/User-Guide-303679-Page-20.png)
![If Select Line-in ,set STEREO automactically.As same recording from internal mic, go to [MENU]-[Button] and select LINE IN.If select [LINE IN] , set STEREO automatically.To set MONO , select MONO with FF/REW andPLAY/STOP button.Select quality of the sounds with FF/REW andPLAY/STOP.After select ON/OFF with FF/REW button, exit themenu with MODE button.If select OFF, this function isn't operated . If exit menu during setting , set the previouse recording mode.When pre-set recording mode. If press ( ) button shortly , record by the mode saved on SOURCE menu.If press ( ) button for over 3 seconds , record by mode saved on BUTTON.24](https://usermanual.wiki/Eratech-Co/EVR-150/User-Guide-303679-Page-24.png)

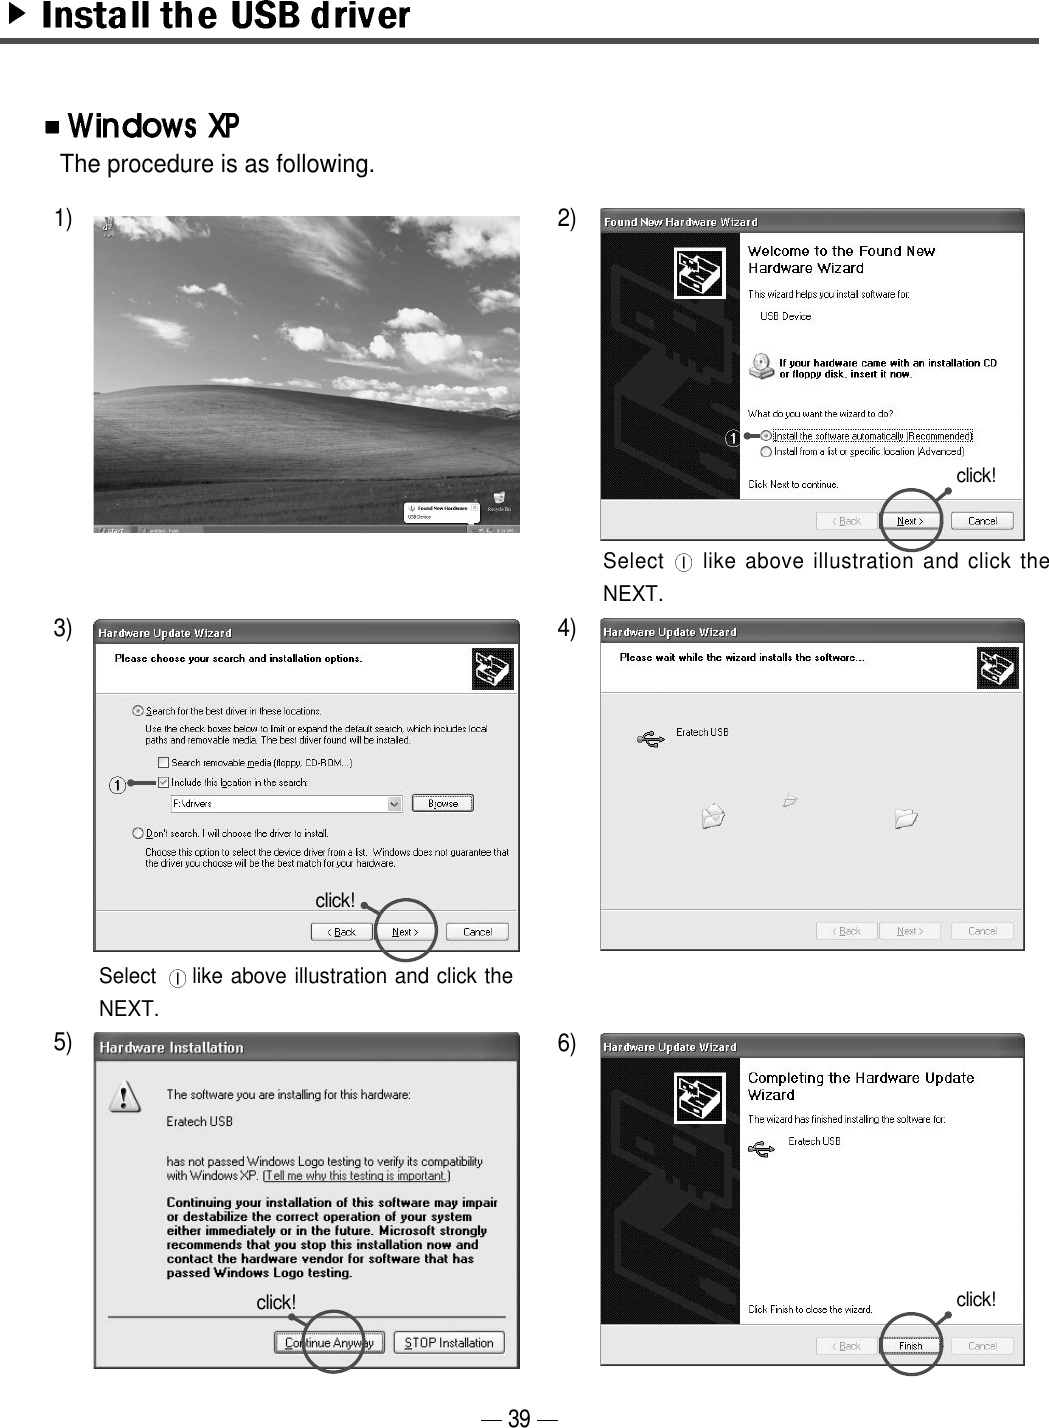
![35Place the installation CD into your CD-ROM drive. The installation dialogue box (VRManager InstallSheild Wizard) will be displayed on Monitor. If the dialogue box does not display, double click [Start]-[My Computer]-[CD-ROM]-[autorun.exe] on the PC. Reboot your PC when the installation is complete.To uninstall the VR Manager, select [Start]-[Settings]-[Control Panel]-[Add/RemovePrograms]-[VR manager].Pentium 133MHz or faster . Windows 98/ME/2000(PRO)CD-ROM drive More than 20MB free hard disk space Sound Blaster Compatible USB port](https://usermanual.wiki/Eratech-Co/EVR-150/User-Guide-303679-Page-35.png)
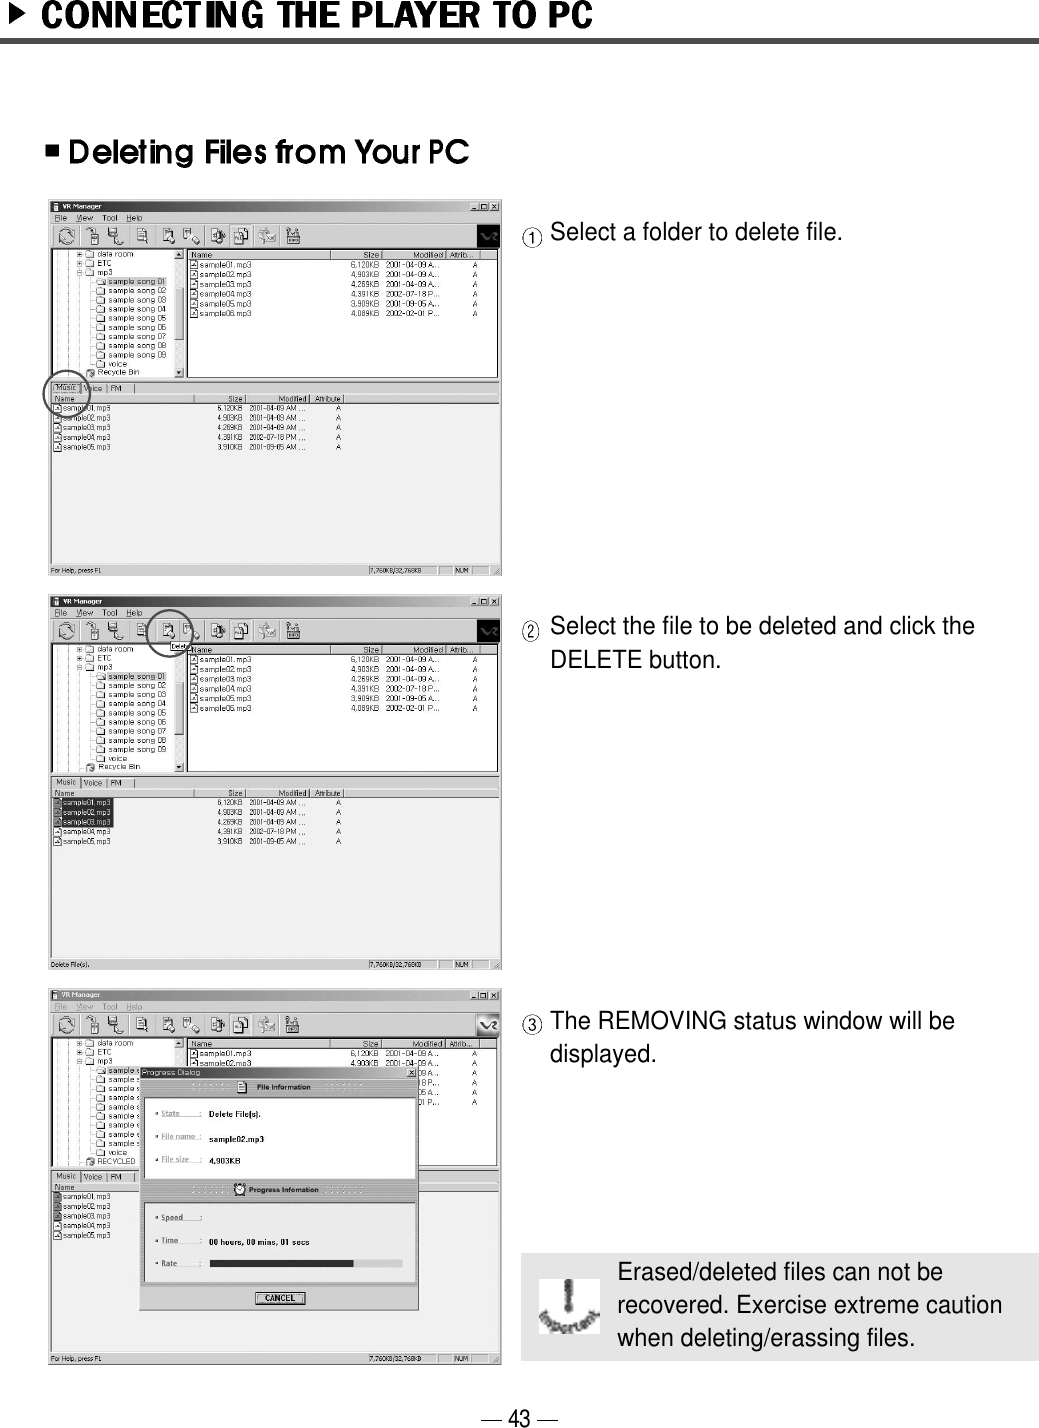
![If the internal memory is formatted, all previously downloaded fonts will be removed as well.To restore lost fonts download the fonts again from the VR Manager by following thesesteps: Select [Tool]-[Font]-[Download]. If MEMORY FULL (font capacity size is about 2MB)message appears on the LCD display, remove unnecessary files from the EVR-150 untilenough space is created to accommodate additional fonts.If the font files are deleted, dommands will appear in English only in the AUDIO MODE.40Refresh the information of the EVR-150 Manager.Download files to the EVR-150 from the PC.Upload files to the PC from the EVR-150.Change the order downloaded files for playback.Delete files from the EVR-150.Format the internal memory of the EVR-150.Display audio files only.Display all files. E-mail the file (selected from the PC).Confirm the information of the EVR-150 Manager.Double click the VR Manager Icon toexecute the manager program.Double click!Click [Tool] of toolbar and select[Format] icon.If you formate the internal memory, allfiles in the unit will be permanentlyremoved. It is imperative to back-up anyand all impotant files before formattingthe internal memory.](https://usermanual.wiki/Eratech-Co/EVR-150/User-Guide-303679-Page-40.png)
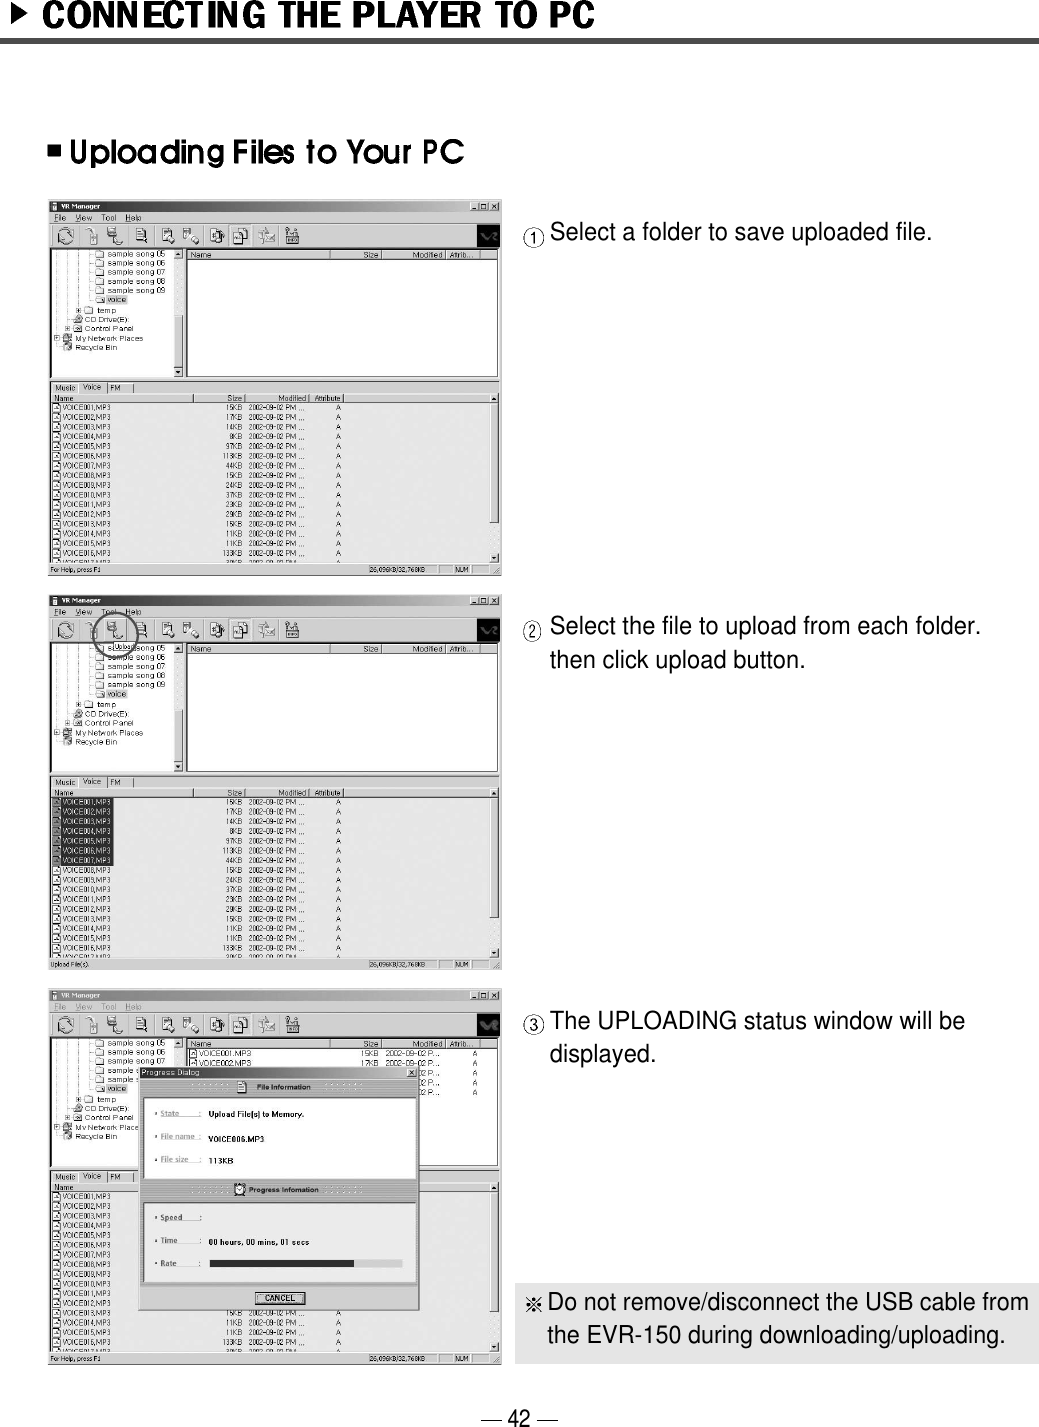
![41Select the Music folder from the VRManager.Select the file to be downloaded from thePC, then click the download button. The DOWNLOADING status window willbe displayed.filestore folderDownload filesAudio folderOXXOVoice folderXXXXFM folderXXXXXOOOUploadPCTo download a file to the player, select[File]-[Download] or select the file bydragging and dropping.Do not remove/disconnect USB cablefrom the player duringdownloading/uploading.MusicVoiceFM radioOthers](https://usermanual.wiki/Eratech-Co/EVR-150/User-Guide-303679-Page-41.png)