Ericsson LG LDP-9000BTU Key Telephone Unit User Manual
Ericsson-LG Co., Ltd. Key Telephone Unit
UserManual.wiki
>
Ericsson LG
>
LDP 9000BTU User Manual
User manual
Navigation menu
Upload a User Manual
Namespaces
Wiki Guide
HTML
PDF
Info
Views
User Manual
Discussion / Help
Navigation
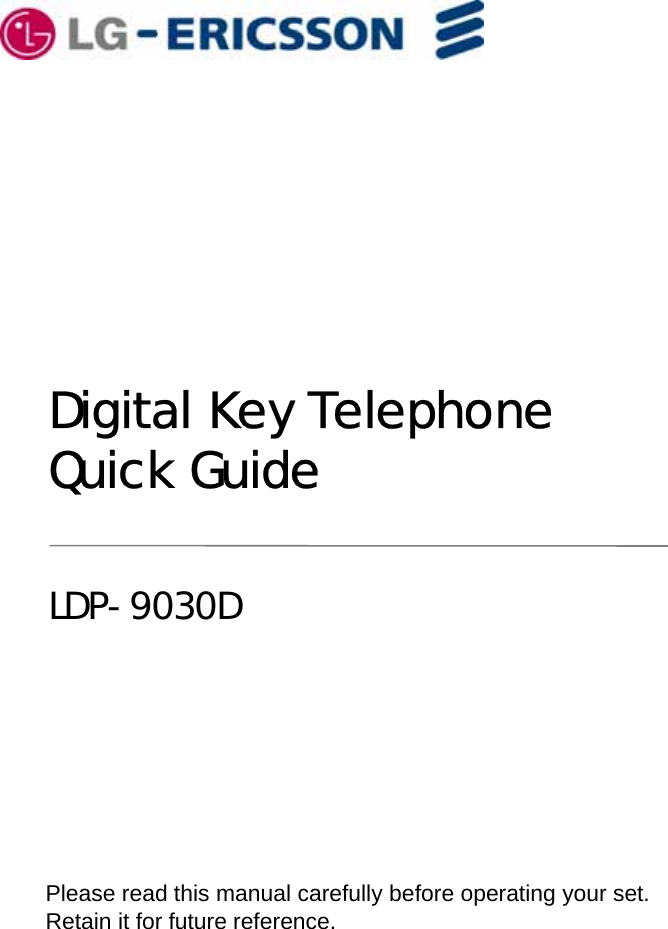
![Receiving calls _ Answering a Call While Idle :1. Lift the handset and press the flashing Flex button (as needed), the call will be connected.Responding to a Call While Busy1. Press [Hold/Save] and/or2. Press the flashing CO line button.Answering Calls to Other StationsTo answer a call ringing at another station:1. Lift the handset,2. Dial 7 (Directed Call Pick-Up code),3. Dial the Intercom Number of the ringing station; the call will be connected.To answer a call ringing at a station in your group:1. Lift the handset,2. Dial * * (Group Call Pick-Up code), the call is connected.Using Do-Not-Disturb (DND) to Block Incoming CallsTo toggle DND ON and OFF:1. Press the [DND] button.Forwarding calls to another Station or Voice MailTo activate Call Forward from your phone to another phone or internal system resource:1. Lift the handset,2. Press the [Fwd] Soft button,3. Dial the type of forward code 1-44. Dial the destination number.Placing Intercom callsTo place an Intercom call:1. Lift the handset,2. Dial the Intercom number of the desired station,3. On answer or Splash tone, speak to the called party.Using Camp-On when calling a busy station To Camp-On (wait off-hook) for a busy station:1. Press [*] and wait an answer.Using Last Number Redial (LNR) To dial the Last Number for an external call:1. Lift the handset,2. Select the [Redial] Soft button,3. Press [▼volume ▲]to select from the last 10 numbers dialed,4. Press the [Send] Soft button or [Hold/Save].Using System Speed Dial NumbersTo place a call using System Speed Dial:1. Lift the handset,2. Press the [Speed] button,3. Dial the desired System Speed Dial bin numberUsing and Entering Station Speed Dial NumbersTo place a call using Station Speed Dial:1. Lift the handset,2. Press [Speed],3. Dial the desired Station Speed Dial bin numberLDP Keyset User OperationTo enter a Station Speed Dial number with CO Line and Name:1. Press [Trans/PGM],2. Press [Speed],3. Dial the desired Station Speed Dial bin number,4. Select/dial the CO line/group,5. Dial the desired number to be stored,6. Press [Hold/Save],7. Enter the associated name if desired, using the alpha-numeric entry chart,8. Press [Hold/Save].To assign a Station Speed Dial number directly to a Flex button:1. Press [Trans/PGM],2. Press the desired [Flexible] button,3. Dial the desired number including CO Line/Group access code4. Press [Hold/Save],5. Enter the associated name if desired, using the Character Entry chart,6. Press [Hold/Save].ACNR: To retry a busy external number until answeredTo set up an ACNR, while on an outgoing call:1. Use the Navigation button to display the next menu and select the [ACNR] Soft button,2. Hang-up handset.To cancel the ACNR request:1. Press the [ACNR] Soft button.Call Transfer: Sending a call to a different destinationTo Transfer an active call:1. Press [Trans/PGM],2. Call receiving party,3. Hang-up with or without announcement.Call Hold: Placing a call in a waiting state To place a call on Hold:1. Press [Hold/Save].Joining Multiple People in a ConferenceTo establish a Conference:1. Establish call with one of the desired conference parties,2. Select the [Conf] Soft button,3. Establish call with the other conference party,4. Select the [Conf] Soft button,5. Select the [Conf] Soft button again to establish the conference.To place a Conference on Hold:1. Press the [Hold/Save] button.To retrieve the Conference:1. Select the [Conf] Soft button.To make an External-parties-only Conference:1. Establish conference with two external parties,2. Select the [Conf] Soft button to exit.To enter pre-opened Conference Room:1. Dial 5 7 X when X is the conference room number.](https://usermanual.wiki/Ericsson-LG/LDP-9000BTU/User-Guide-1352430-Page-4.png)
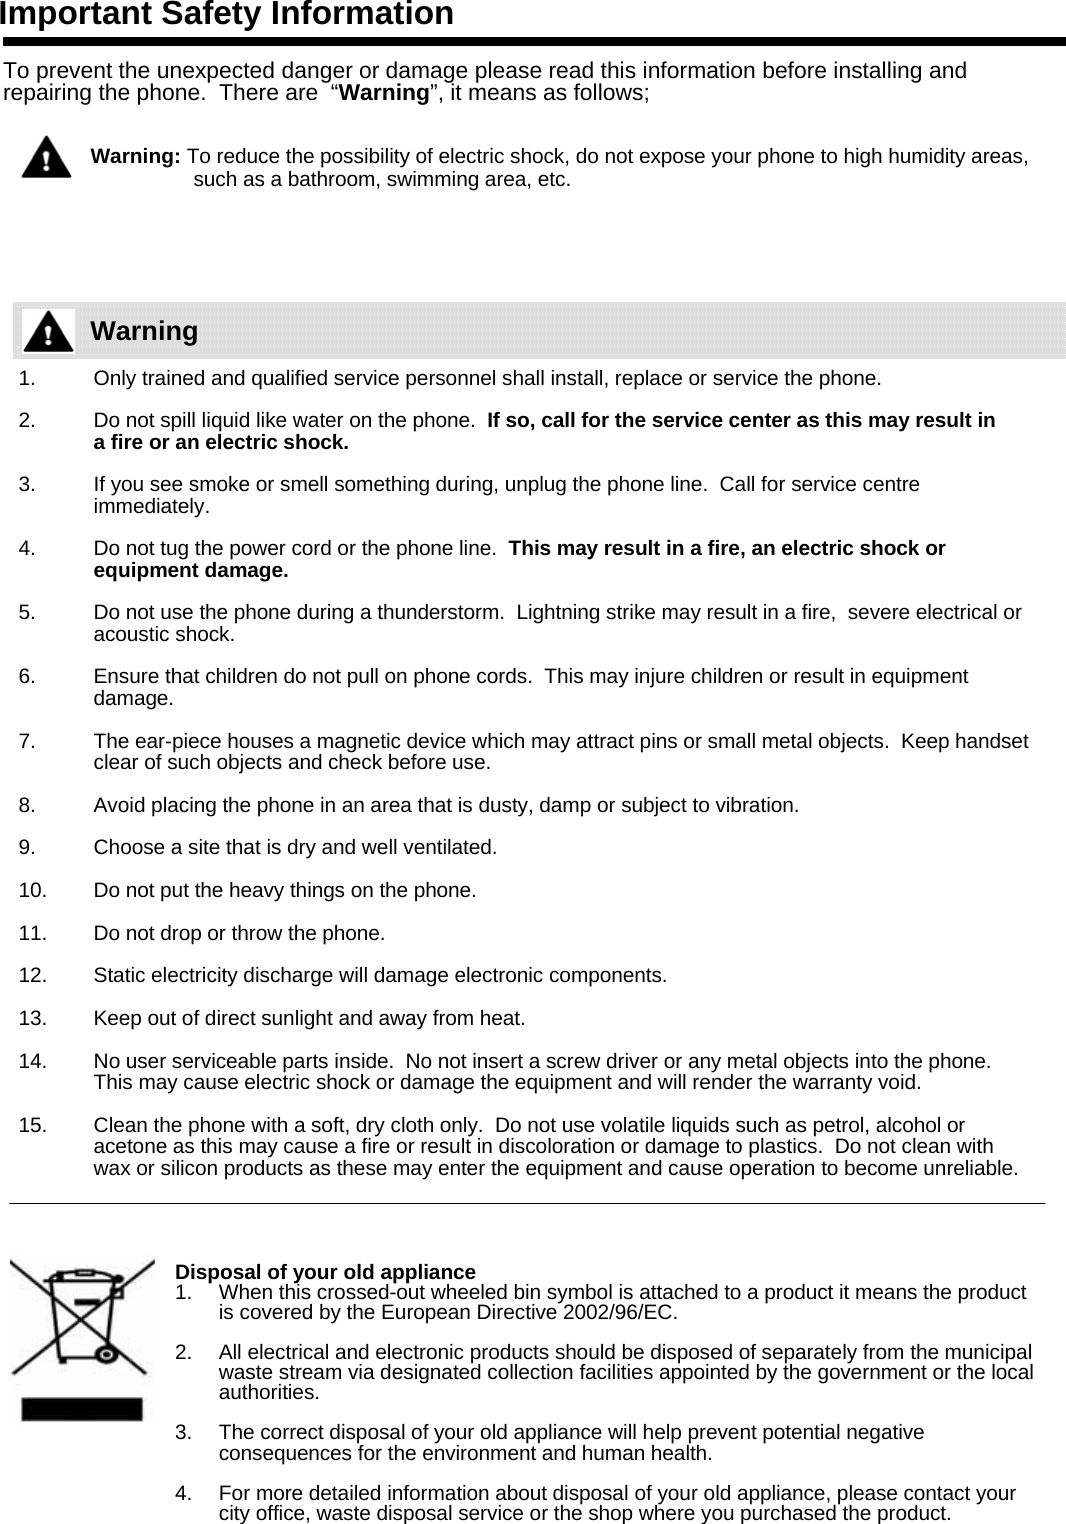
![User Program Codeshttp://www.lgericsson.com•▶Press the [Trans/PGM] button •▶Enter the desired feature code below table CODE FUNCTION CODE FUNCTION11 Answer mode (H/T/P) 56 Create Conference Room12 Station Name Program 57 Delete Conference Room13 Set Wake Up 61 Speaker/Headset PGM14 Reset Wake Up 62 Headset Ring Program15 Language Program 71 Register Station ICLID16 LCD Date Mode Change 72 View Station ICLID17 LCD Time Mode Change 73 Outcall Notification Enable18 Set Back Light 74 Outcall Notification Attempts21 ICM Ring Type Program 75 Outcall Notification Interval22 CO Ring Type Program 76 Outcall Notification Number23 Set BGM 81 View IP Address31 Temporary COS Mode 82 View Mac Address32 Retrieve COS 83 View Keyset Version33 Walking COS 91 MPB Version Display34 Register Password 92 View IP Address35 Call Log Protect36 SMS Message Protect41 Preselected MSG PGM42 Set User Message51 Mobile-Ext. Enable52 Mobile-Ext. Number PGM53 Mobile-Ext. CLI PGM54 Mobile Service By CLI55 Mobile-Ext. Service CLISpecificationInput Voltage 22 ~ 28VdcI/O port RJ11Operating Temperature 0℃~ 40℃Size 225.5 mm X 198 mm X 146 mmWeight 960 g](https://usermanual.wiki/Ericsson-LG/LDP-9000BTU/User-Guide-1352430-Page-5.png)
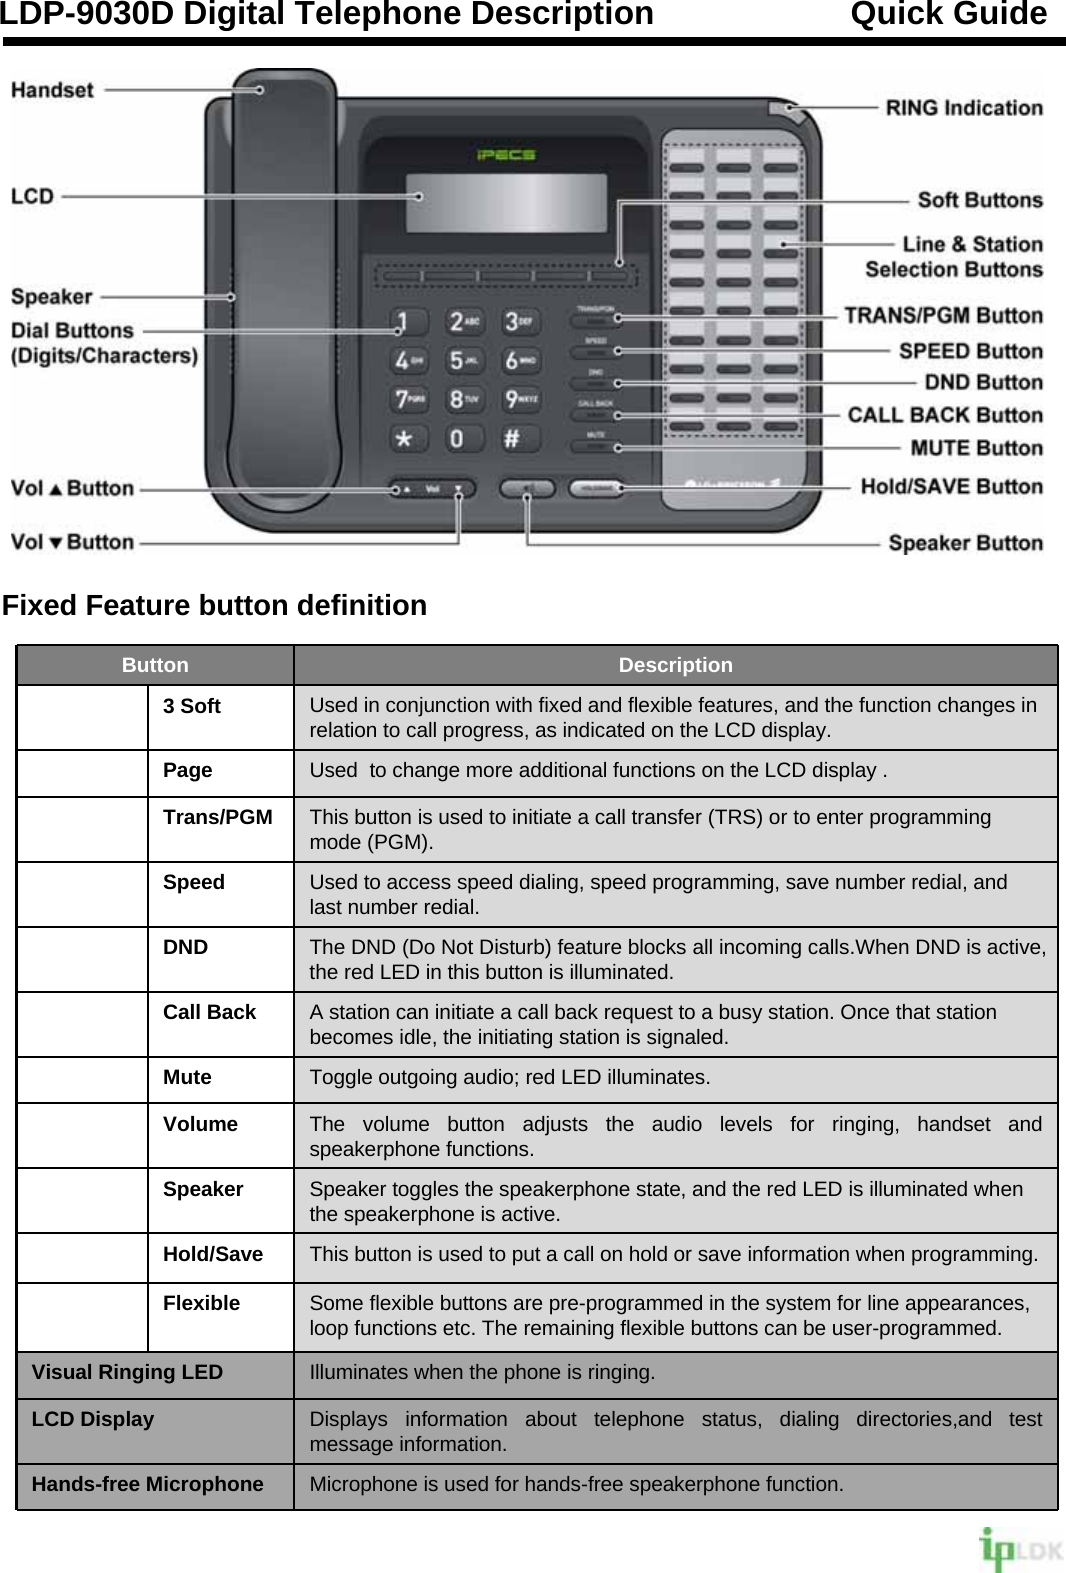
![5. Using Bluetooth menu [ PGM+ 6 + 3 ]5-1. When Blutooth Usage is enable.1. PAIRING2. UNPAIRINGEXIT NEXT OK3. PAIRED INFORMATIONEXIT NEXT OK5-2. When Blutooth Usage is disable.CAN NOT USE BLUETOOTHEXITEXIT Exit Bluetooth MenuNEXT or Volume Scroll the MenuDigit, OK or Hold/Save Select the Menu[ Using Button ]](https://usermanual.wiki/Ericsson-LG/LDP-9000BTU/User-Guide-1352430-Page-10.png)
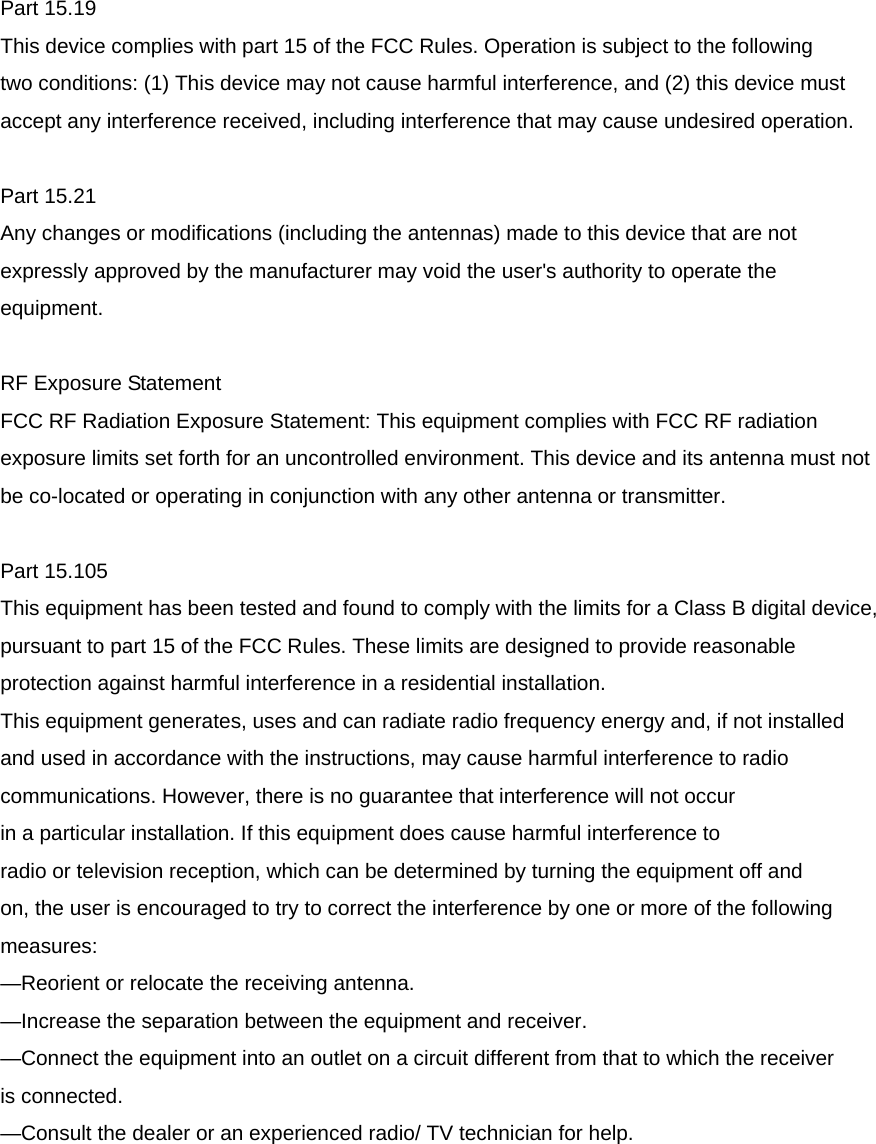
![6.3 Select device[1/2] JABRA BT25000-07-A4-04-8D-9BEXIT NEXT OK1. Devices responding to the inquiry appear on a list ofBluetooth device starting from the device found firstafter 15 seconds.2. Scroll to the device you want and press [OK] or[Hold/Save].Note : Device information[1/2] JABRA BT25000-07-A4-04-8D-9BDevice NameDevice Address[ Device No / Total No ]](https://usermanual.wiki/Ericsson-LG/LDP-9000BTU/User-Guide-1352430-Page-12.png)
![6.4 Enter device PIN CODE(PASSWORD)** ENTER PIN CODE **CODE :EXIT DEL OK1. The desired bluetooth device requests to enter thepincode of it.(The Bluetooth Passcode is a 1 to 16 character-longnumeric code. )2. Enter the pincode and send to headset by pressing[OK] or [Hold/Save].3. When the connection has been established,the device shows connected to followed by the device's name and address.( Note that you can have only one active connection at a time. )4. If the connection is failed, you can try to connectdevice again.5. Once the headset and LDP-9000BTU have successfully paired, you are ready to place and receive calls. (see section 9, 10.)7. UNPAIRINGINITIALIZE DEVICEARE YOU SURE?EXIT BACK OK1. If you want use another headset,you can erase paired information and pair with the another headset desired2. It will take a few seconds to erase paired information.3. If it is unpaired already,it will display “UNPAIRING FAILED”](https://usermanual.wiki/Ericsson-LG/LDP-9000BTU/User-Guide-1352430-Page-13.png)
![10.2 Make a call from the phoneUsing the phone’s keypad, dial the phone number inBTU mode of the phone. ( Set PGM + 6 + 1 )10.3 Make a call from the headset1. Press headset’s function button.2. You will hear dial tone.3. Dial the phone number.10.4 Ending a call from the headset1. Press headset’s function button.2. Or press the [Speaker] button of phone10.5 Transferring a call from phone to headsetIf the phone is in Handset mode, press the headset’sfunction button and replace the handset of the phone.10.6 Transferring a call from headset to phone1. Lift the handset2. The call will be transferred to the phone.10.7 Performance range1. Optimal performance range : up to 3m.2. Limited performance range : up to 5m.3. Performance range may be decrease in case of thecollision with the wireless LAN (802.11b)10.8 Restriction of the LDP-7000BTU1. If the phone goes to the speaker disable state,then Buetooth Usage will be disabled automatically.2. If the headset’s battery is running out of power while a call is inprogress, then the phone will terminatea current call automatically.](https://usermanual.wiki/Ericsson-LG/LDP-9000BTU/User-Guide-1352430-Page-15.png)