Ericsson LG WP-1000N WIRELESS PCI ADAPTER User Manual 2 of 4
Ericsson-LG Co., Ltd. WIRELESS PCI ADAPTER 2 of 4
UserManual.wiki
>
Ericsson LG
>
WP-1000N User Manual
>
User manual 2 of 4
Contents
1.
User manaul 1 of 4
2.
User manual 2 of 4
3.
User manual 3 of 4
4.
User manual 4 of 4
User manual 2 of 4
Navigation menu
Upload a User Manual
Namespaces
Wiki Guide
HTML
PDF
Info
Views
User Manual
Discussion / Help
Navigation
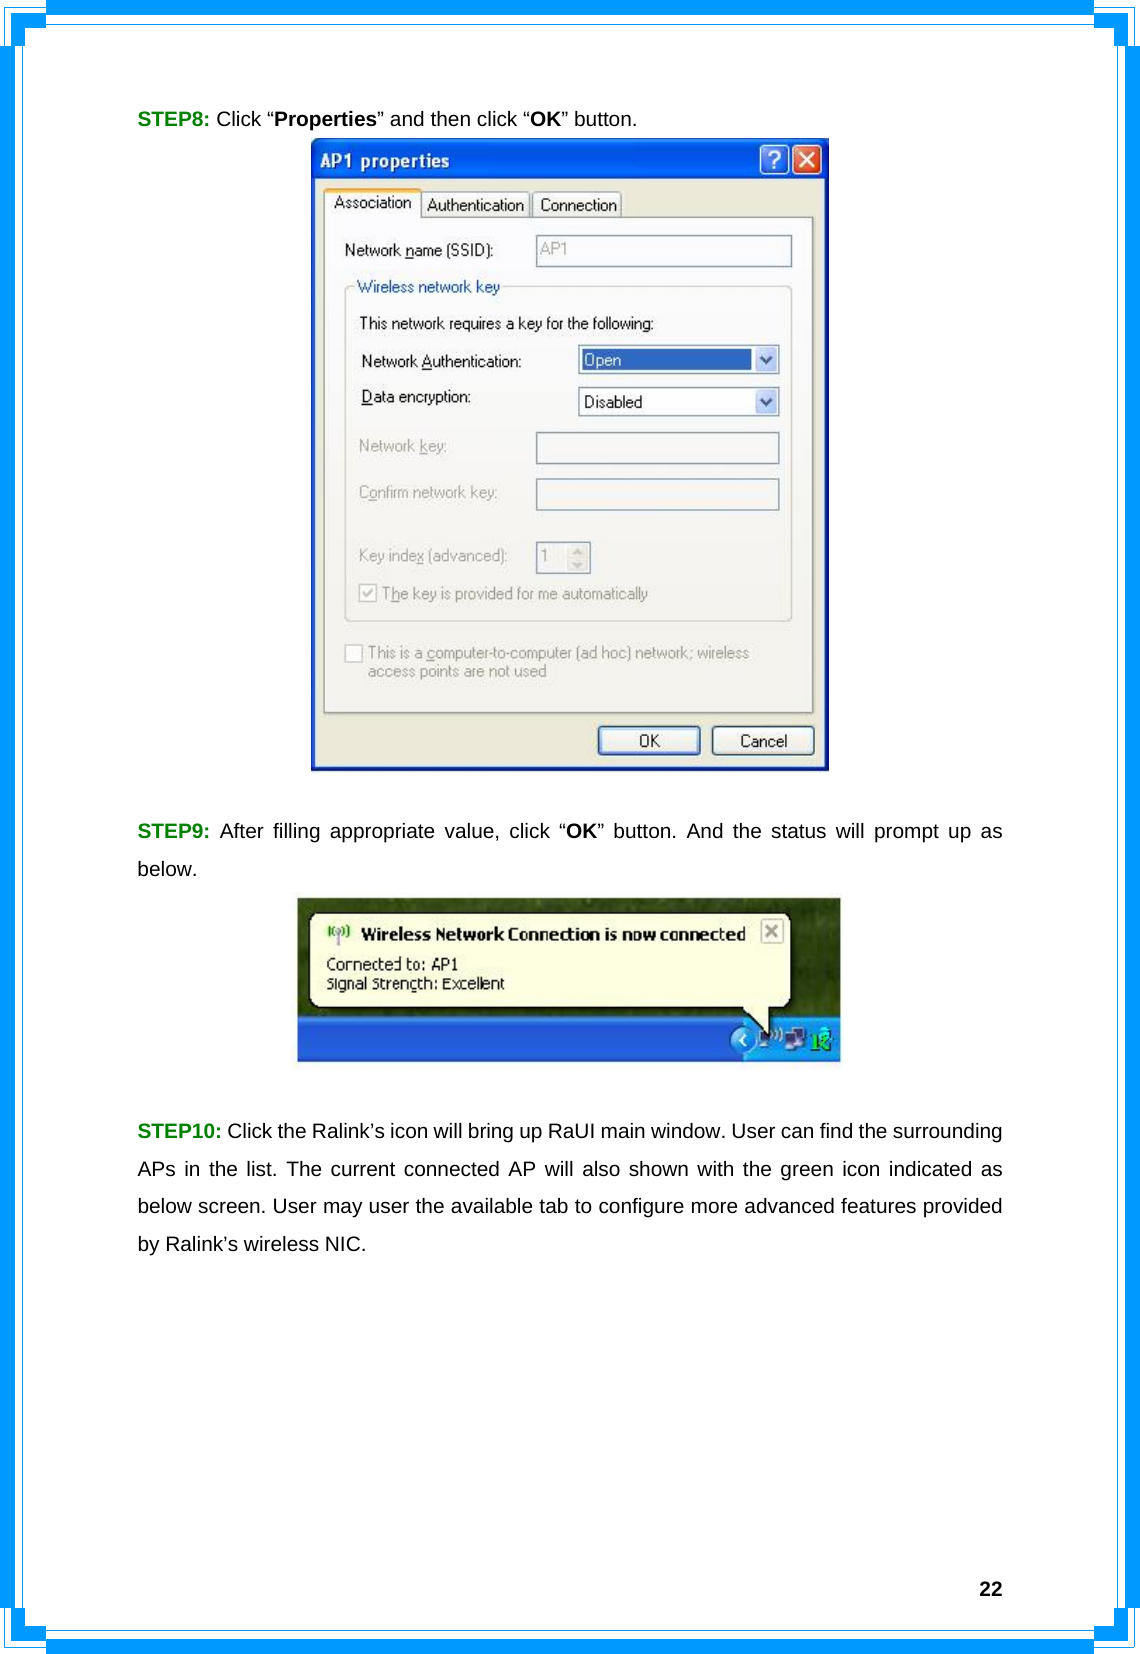
![29 ÎÎ Ralink icon in system tray. Besides, the small icon will change color to reflect current wireless network connection status. The status indicates as follow: Î -- indicate Connected and Signal Strength is Good. Î -- indicate Connected and Signal Strength is Normal Î -- indicate Wireless NIC is not connected yet Î -- indicate Wireless NIC is not detected Î -- indicate Connected and Signal Strength is Weak 3.1.2 Profile Profile can book keeping your favorite wireless setting among your home, office, and other public hot-spot. You may save multiple profiles, and activate the correct one at your preference. [Definition of each field] Profile Name: Name of profile, preset to PROF﹡(﹡indicate 1,2,3,…) SSID: AP or Ad-Hoc name Network Type: Network’s type, including infrastructure and Ad-Hoc. Authentication: Authentication mode Encryption: Encryption Type Use 802.1x: Whether or not use 802.1x feature Channel: channel in use for Ad-Hoc mode Power Save Mode: Choose from CAM (Constantly Awake Mode) or Power Saving Mode. Tx Power: Transmit power, the amount of power used by a radio transceiver to send the signal out. RTS Threshold: User can adjust the RTS threshold number by sliding the bar or key in the value directly. Fragment Threshold: User can adjust the Fragment threshold number by sliding the bar or](https://usermanual.wiki/Ericsson-LG/WP-1000N.User-manual-2-of-4/User-Guide-1072293-Page-8.png)
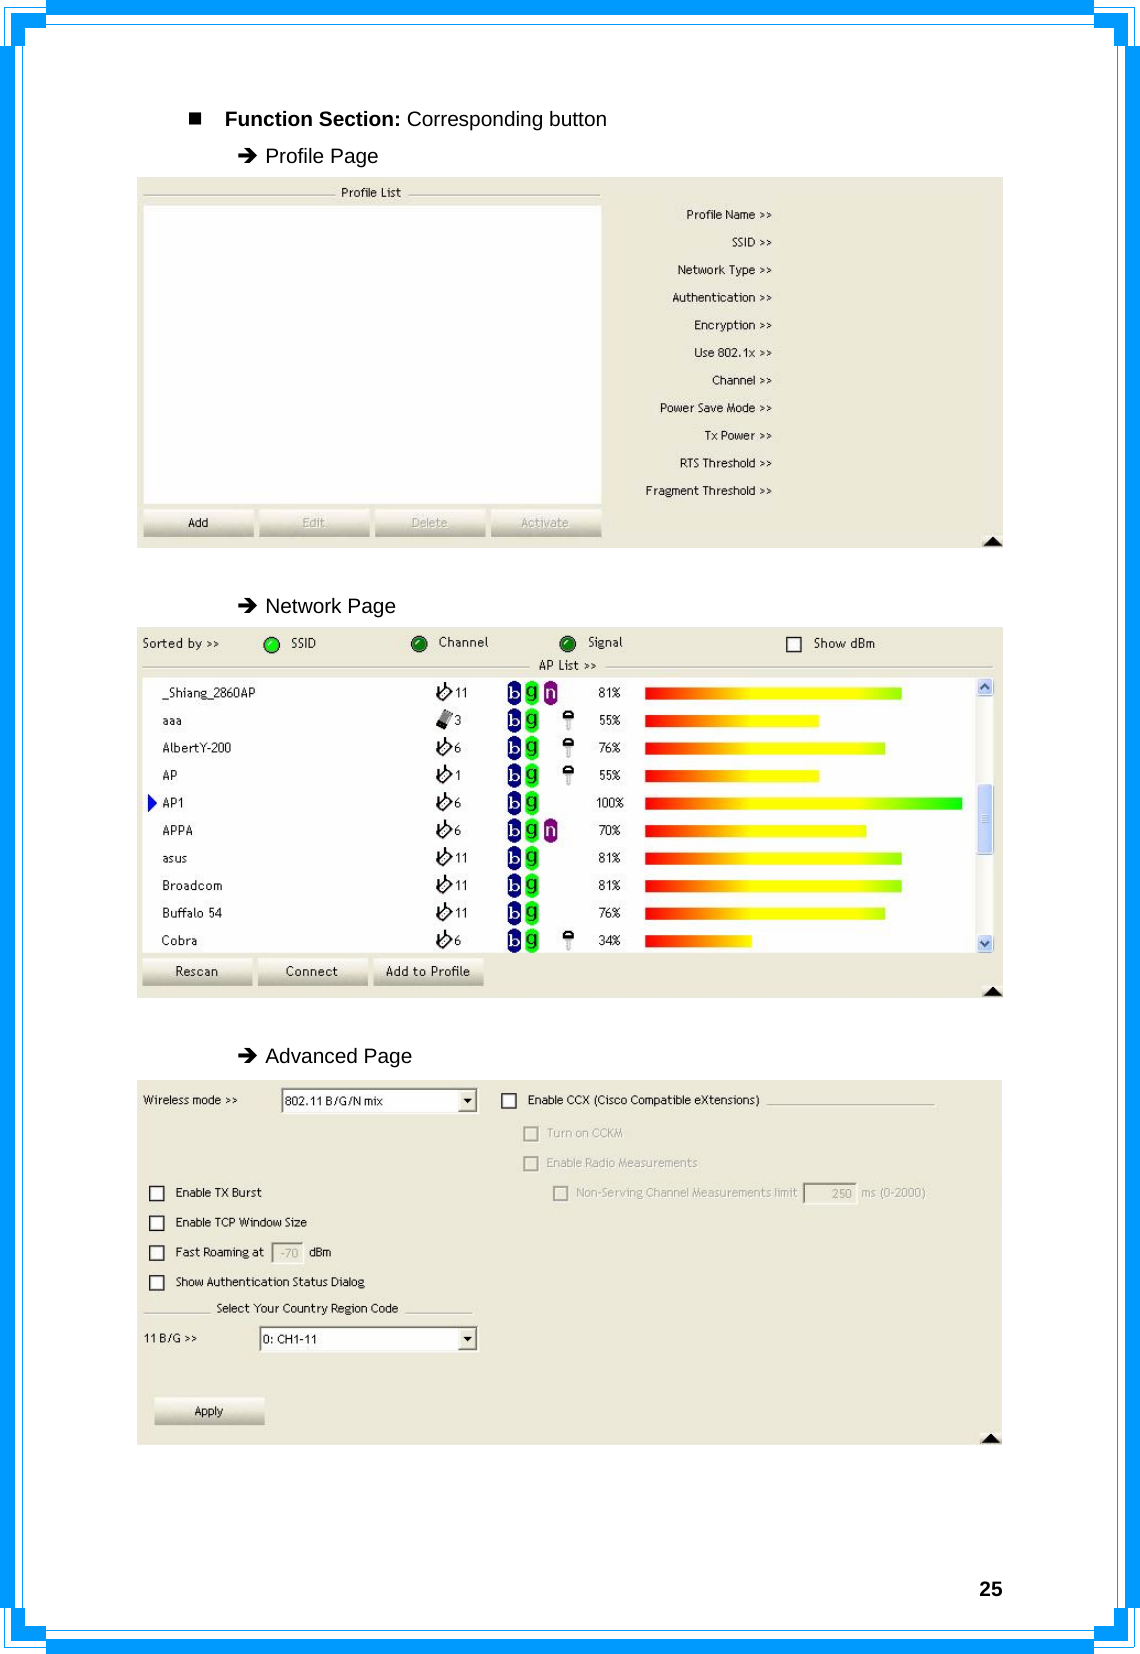
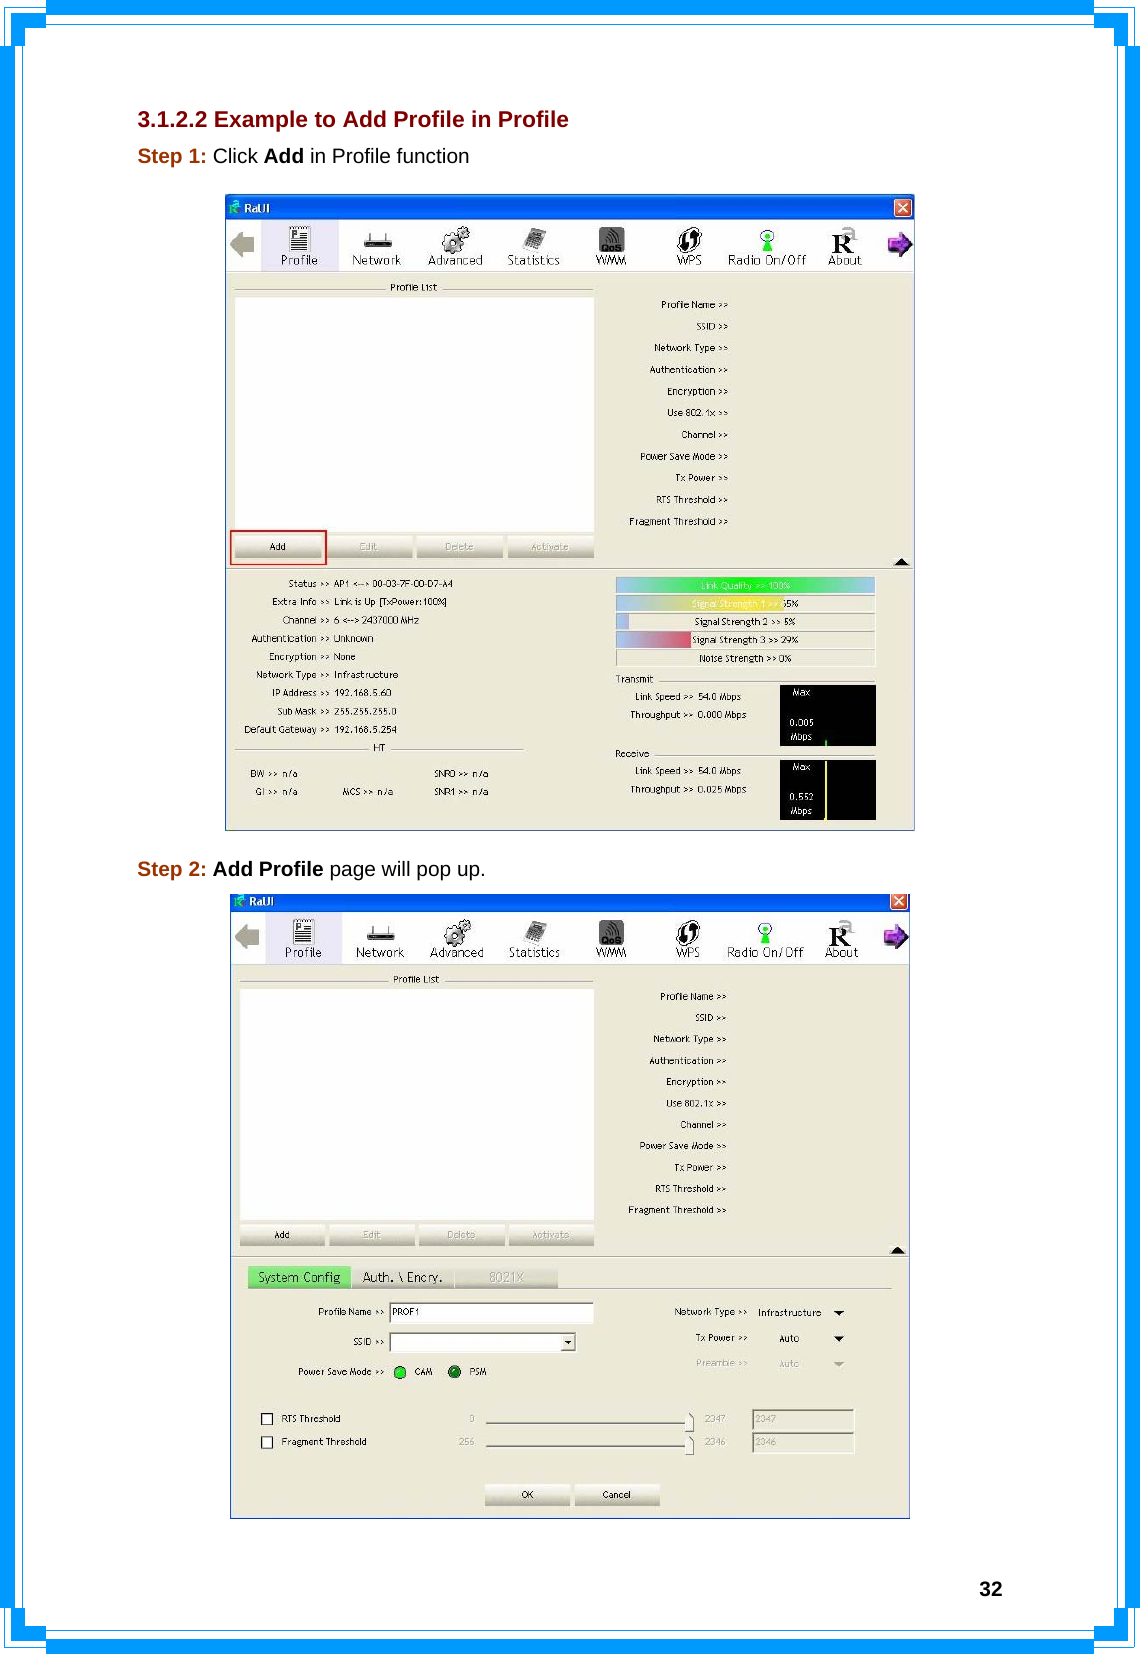
![30key in the value directly. [Icons and buttons] Î indicate connection is successful on currently activated profile Î indicate connection is failed on currently activate profile Î indicate network type is infrastructure mode Î indicate network type is Ad-Hoc Î indicate security-enabled wireless network Î Add a new profile Î Edit an existing profile Î Delete an existing profile Î Activate selected profile Î Show the information of Status Section Î Hide the information of Status Section 3.1.2.1 Add/Edit Profile There are 3 methods to open Profile Editor form: Î You can open it from “Add to Profile” button in Site Survey function Î You can open it form “Add” button in Profile function Î You can open it from “Edit” button in Profile function](https://usermanual.wiki/Ericsson-LG/WP-1000N.User-manual-2-of-4/User-Guide-1072293-Page-9.png)
![31 Profile Name: User can chose name for this profile, or use default name defined by system. SSID: User can key in the intended SSID name or use pull down menu to select from available APs. Power Save Mode: Choose from CAM [Constantly Awake Mode] or Power Saving Mode. Network Type: There are two types, infrastructure and 802.11 Ad-Hoc mode. Under Ad-Hoc mode, user can also choose the preamble type, the available preamble type includes auto and long. In addition to that the channel field will be available for setup in Ad-Hoc mode. RTS Threshold: User can adjust the RTS threshold number by sliding the bar or key in the value directly. The default value is 2347. Fragment Threshold: User can adjust the Fragment threshold number by sliding the bar or key in the value directly. The default value is 2346. Channel: Only available for setting under Ad-Hoc mode. User can choose the channel frequency to start their Ad-Hoc network. Authentication Type: There are 7 type of authentication modes supported by RaUI. They are Open, Shared, LEAP, WPA, WPA-PSK, WPA2, WPA2-PSK. Encryption Type: For open and shared authentication mode, the selection of encryption type are None and WEP. For WPA, WPA2, WPA-PSK and WPA2-PSK authentication mode, the encryption type supports both TKIP and AES. 802.1x Setting: It is an authentication for WPA and WPA2 certificate to server. WPA Pre-Shared Key: This is the shared secret between AP and STA. For WPA-PSK and WPA2-PSK authentication mode, this field must be filled with character longer than 8 and less than 32 lengths. WEP Key: Only valid when using WEP encryption algorithm. The key must matched AP’s key. There are several formats to enter the keys: Î Hexadecimal – 40bits: 10 Hex characters Î Hexadecimal – 128bits: 26 Hex characters. Î ASCII – 40bits: 5 ASCII characters Î ASCII – 128bits: 13 ASCII characters](https://usermanual.wiki/Ericsson-LG/WP-1000N.User-manual-2-of-4/User-Guide-1072293-Page-10.png)
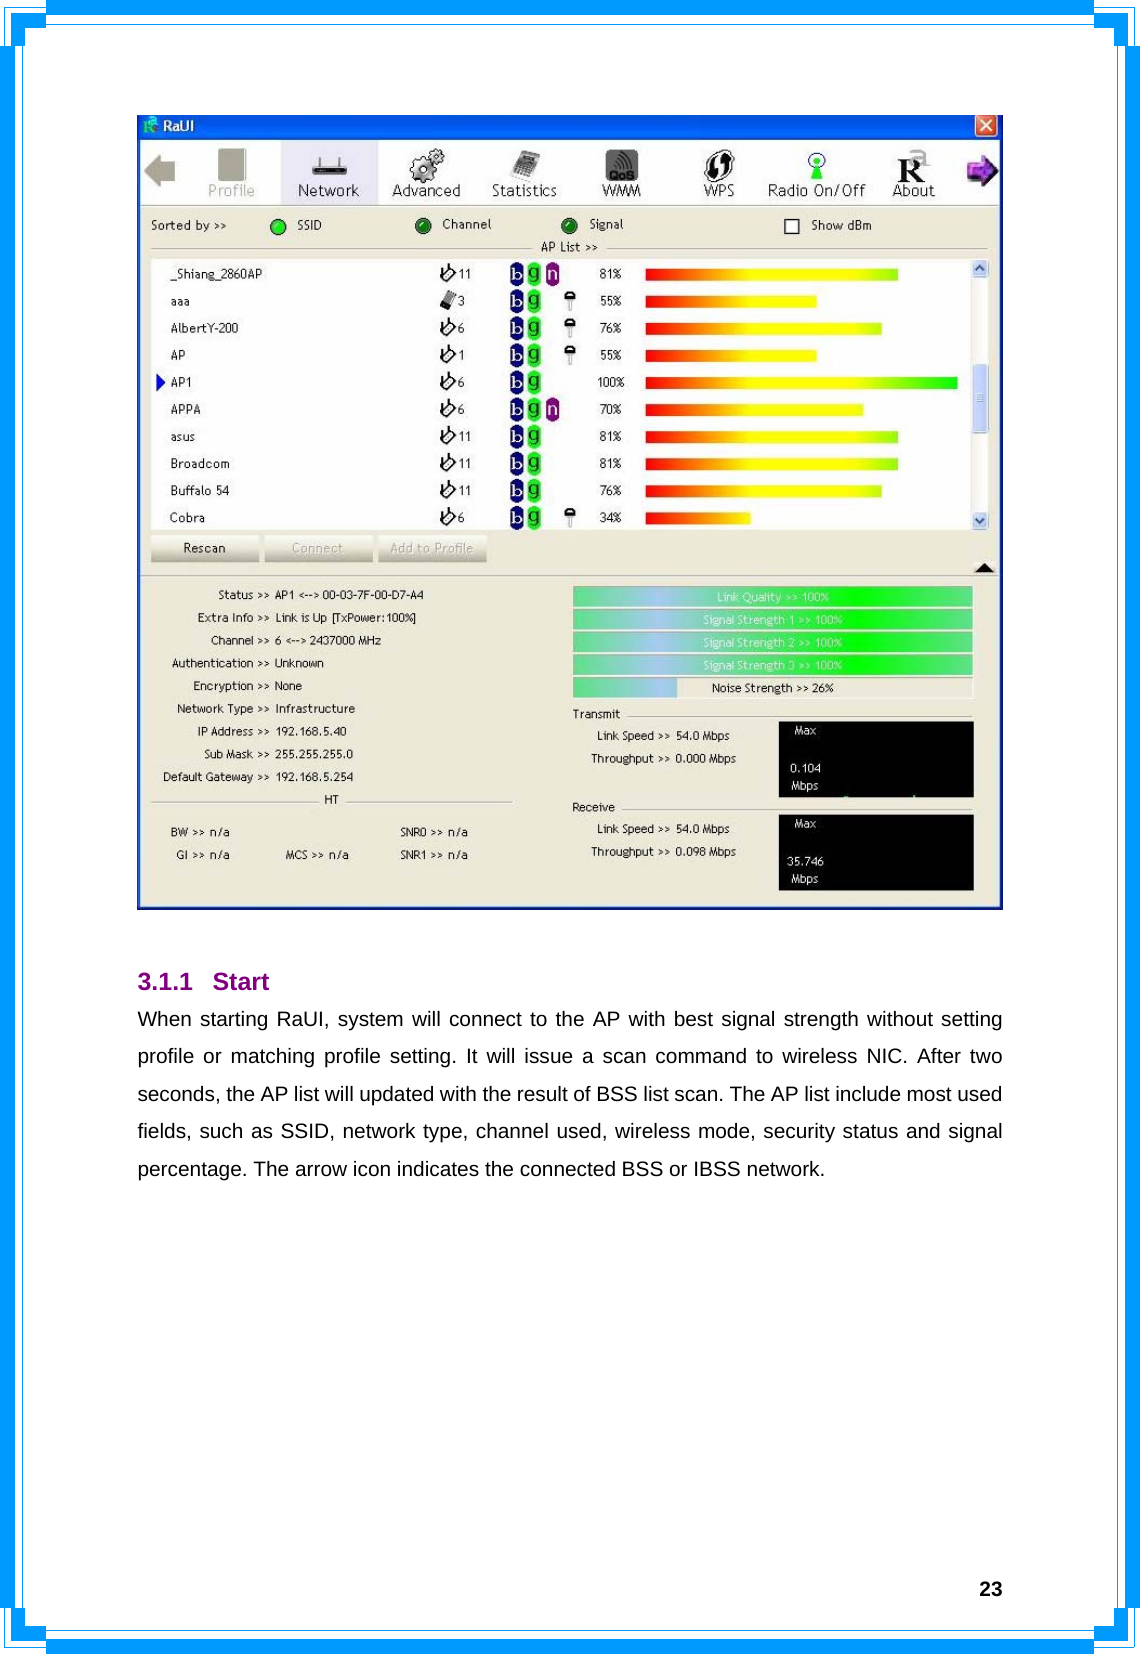
![343.1.3 Network Under the Network function, system will display the information of surrounding APs from last scan result. List information includes SSID, BSSID, Signal, Channel, Encryption algorithm, Authentication and Network type as below: [Definition of each field] SSID: Name of BSS or IBSS network Network Type: Network type in use, infrastructure for BBS, Ad-Hoc for IBSS network Channel: Channel in use. Wireless Mode: AP support wireless mode. IT may support 802.11a, 802.11b, 802.11g or 802.11n wireless mode. Security-Enable: Whether AP provides security-enabled wireless network Signal: Receive signal strength of specified network [Icons & Buttons] Î Indicate connection is successful. Î Indicate network type is infrastructure mode. Î Indicate network type is Ad-Hoc mode. Î Indicate security-enabled wireless network. Î Indicate 802.11a wireless mode Î Indicate 802.11b wireless mode. Î Indicate 802.11g wireless mode. Î Indicate 802.11n wireless mode. Î Indicate the AP lists are sorted by SSID, Channel, or Signal.](https://usermanual.wiki/Ericsson-LG/WP-1000N.User-manual-2-of-4/User-Guide-1072293-Page-13.png)
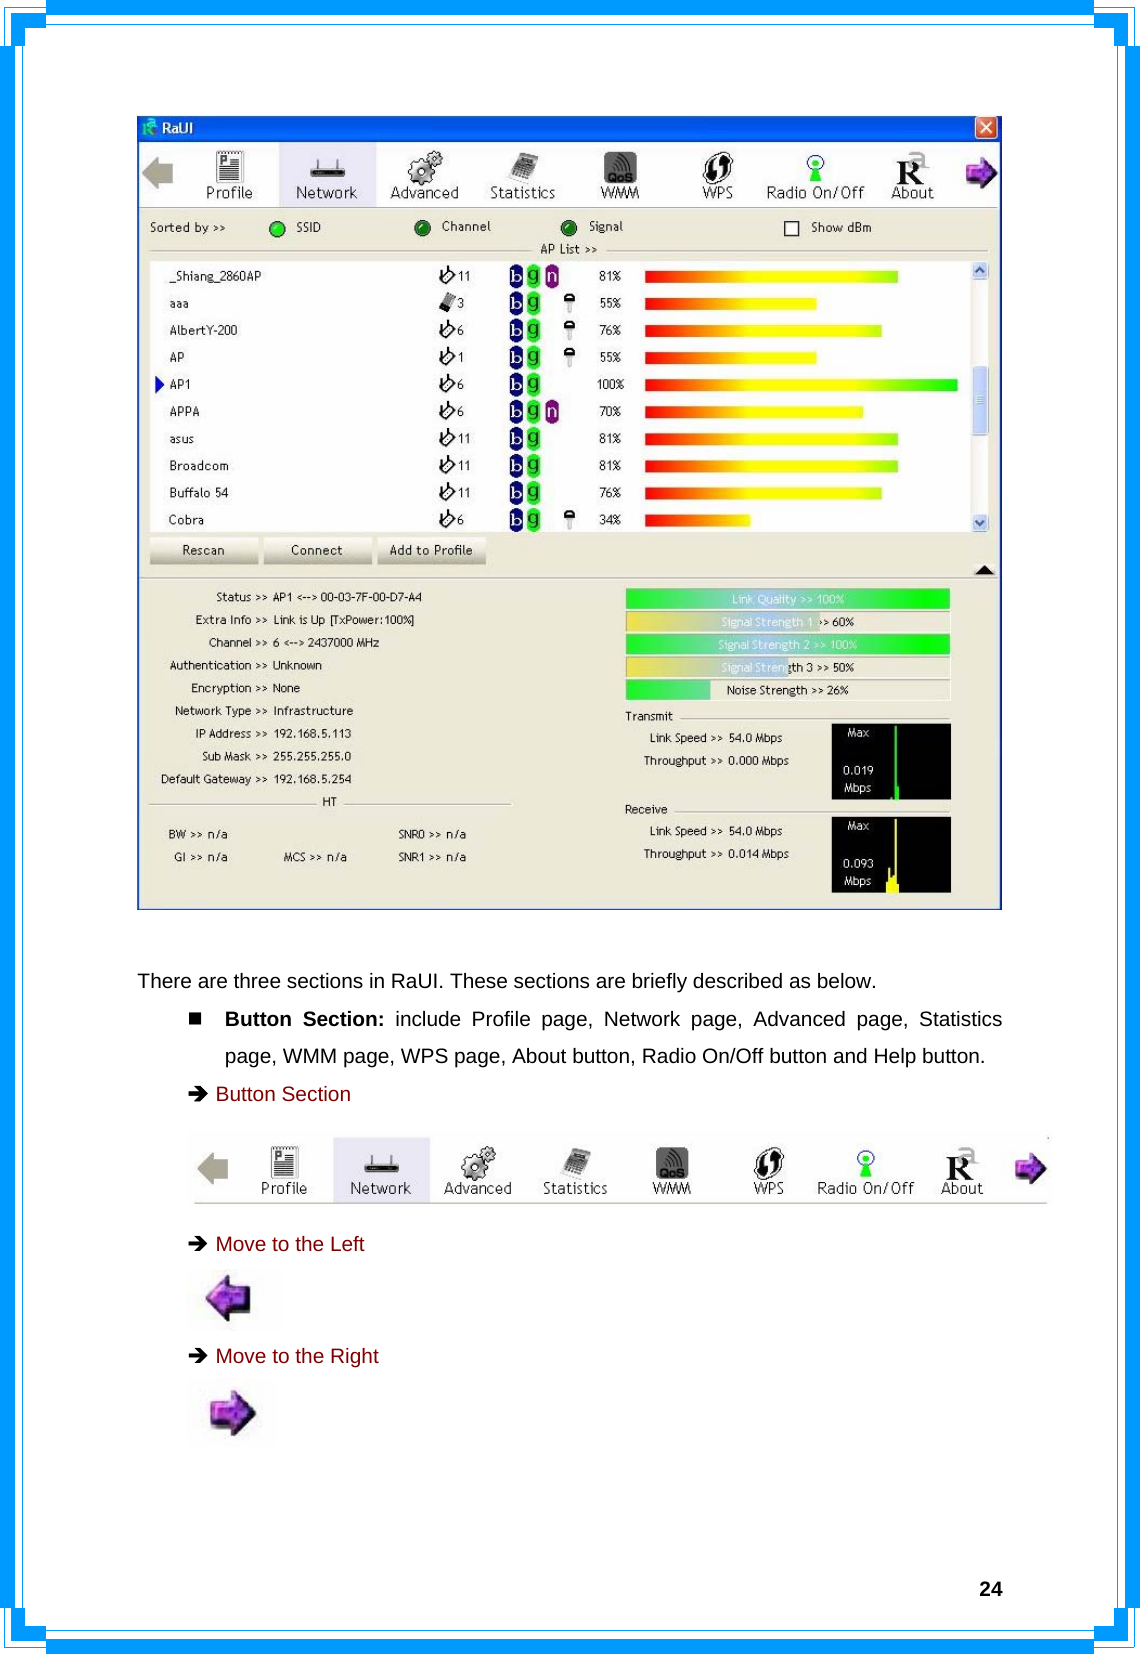
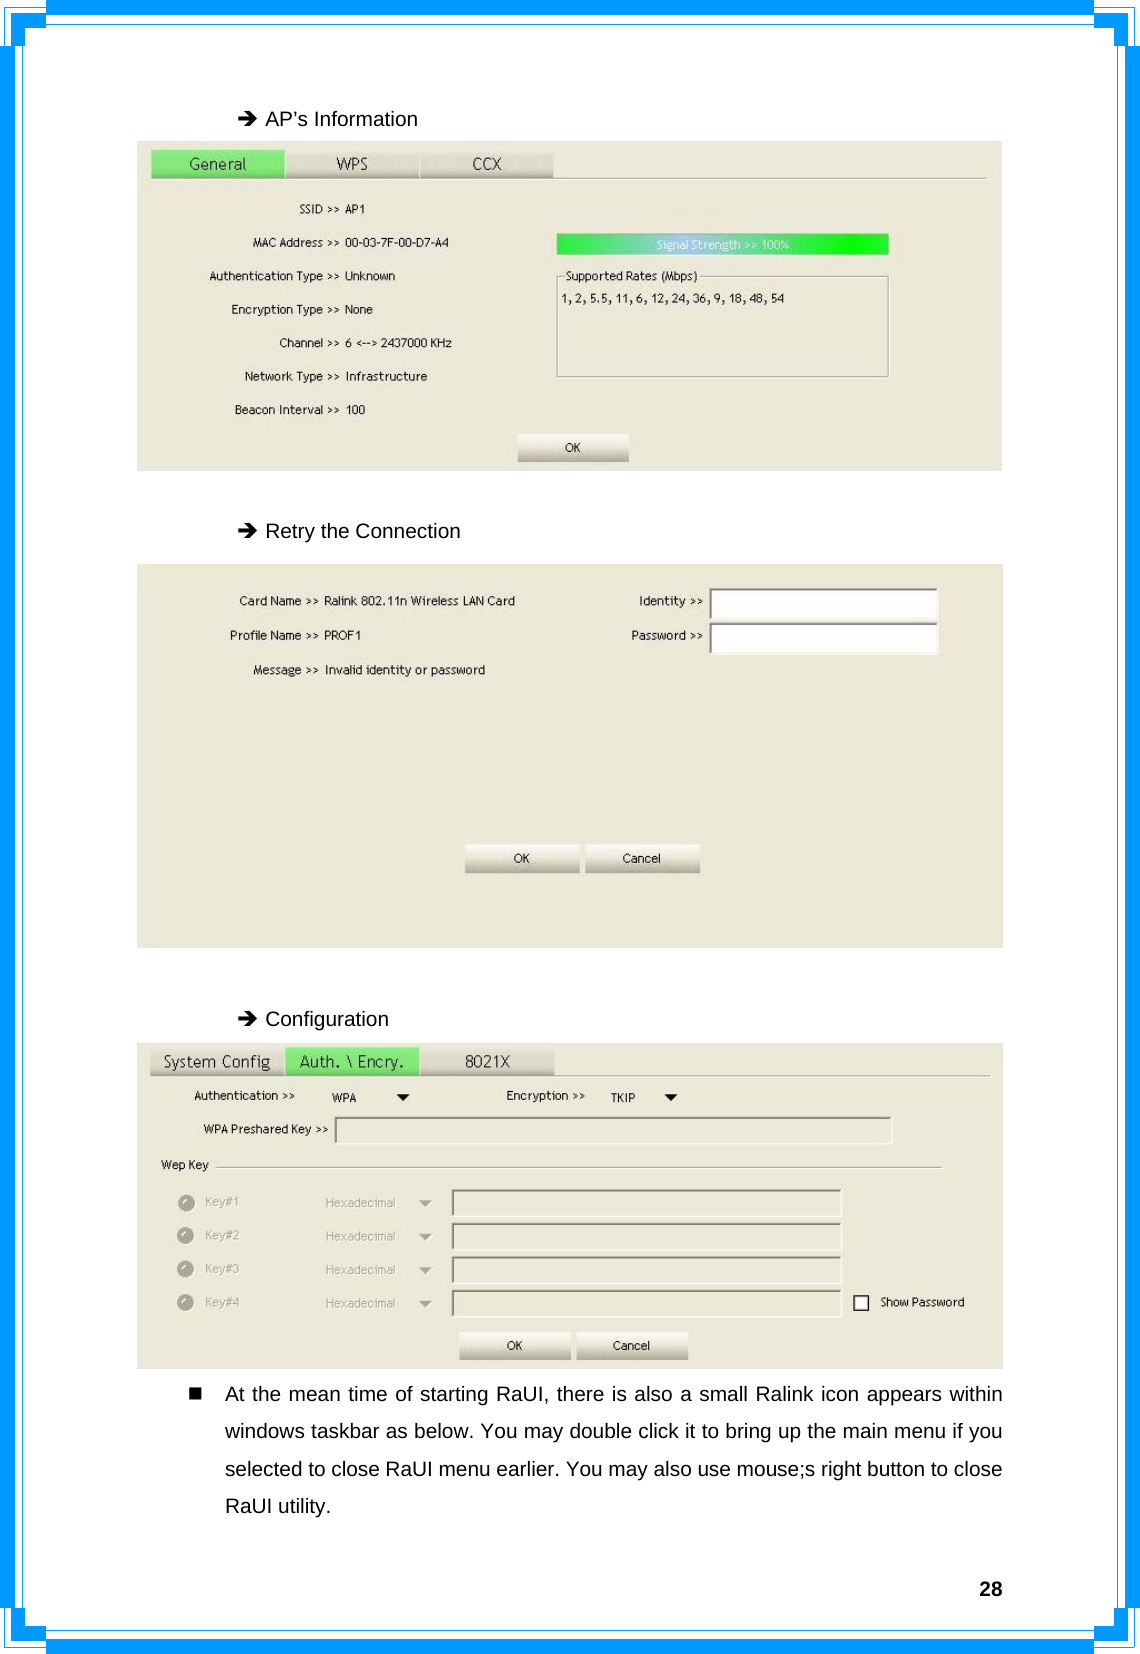
![35 Î Command to connect to the selected network. Î Issue a rescan command to wireless NIC to update information on surrounding wireless network. Î Add the selected AP to Profile setting. It will bring up profile page and save user’s setting to a new profile. [Connected Network] (1) When RaUI first ran, it will select the best AP to connect automatically. (2) If user wants to connect to other AP, He can click “Connect: button for the intended AP to make connection. (3) If the intended network has encryption other than “Not Use”, RaUI will bring up the security page appropriate information to make the connection. (4) When you double-click on the intended AP, you can see AP’s detail information. 3.1.4 Advanced Wireless Mode: Select wireless mode. 802.11B only, 802.11B/G mix, and 802.11B/G/N mix, modes are supported. (802.11 A/B/G mix selection item only exists for A/B/G adapter; 802.11B/G/N mix selection item only exists for B/G/N adapter; 802.11A/B/G/N mix selection item only exists for A/B/G/N adapter.) Wireless Protection: User can choose from Auto, On, and Off (Only 802.11n adapter don’t support) Î Auto: STA will dynamically change as AP announcement Î ON: Always send frame with protection. Î Off: Always send frame without protection.](https://usermanual.wiki/Ericsson-LG/WP-1000N.User-manual-2-of-4/User-Guide-1072293-Page-14.png)
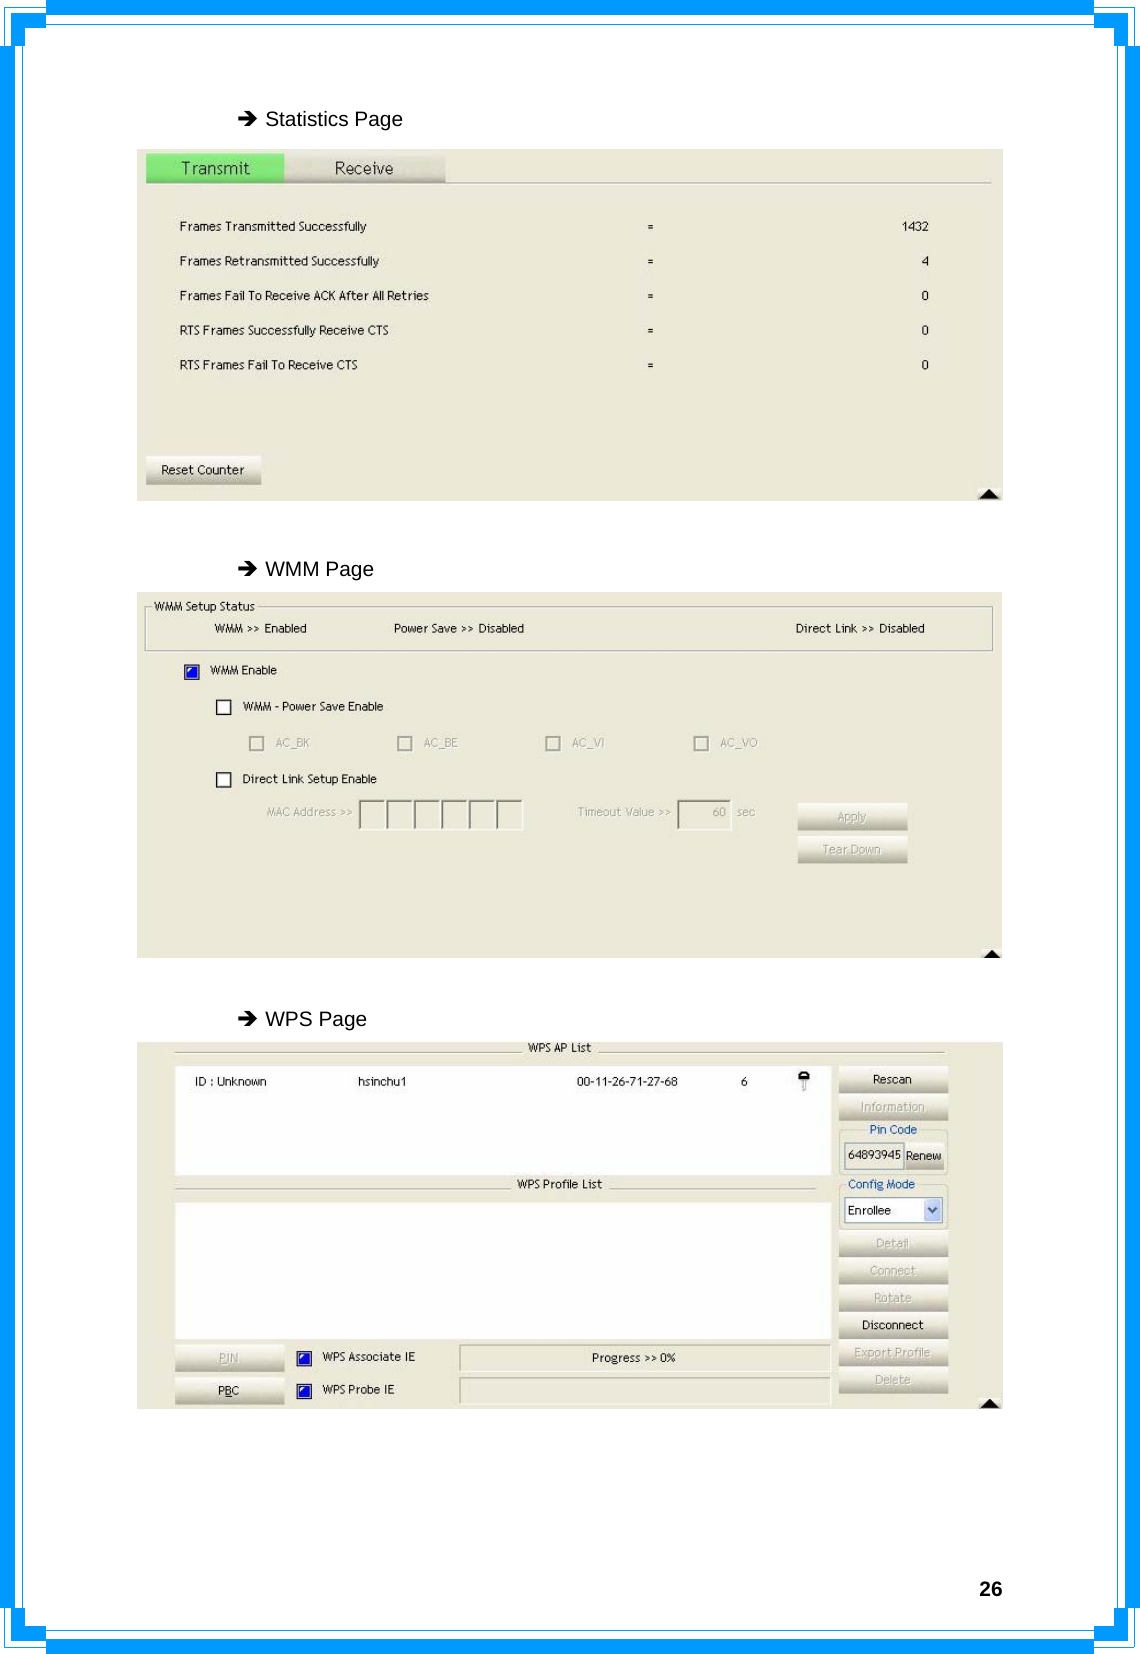
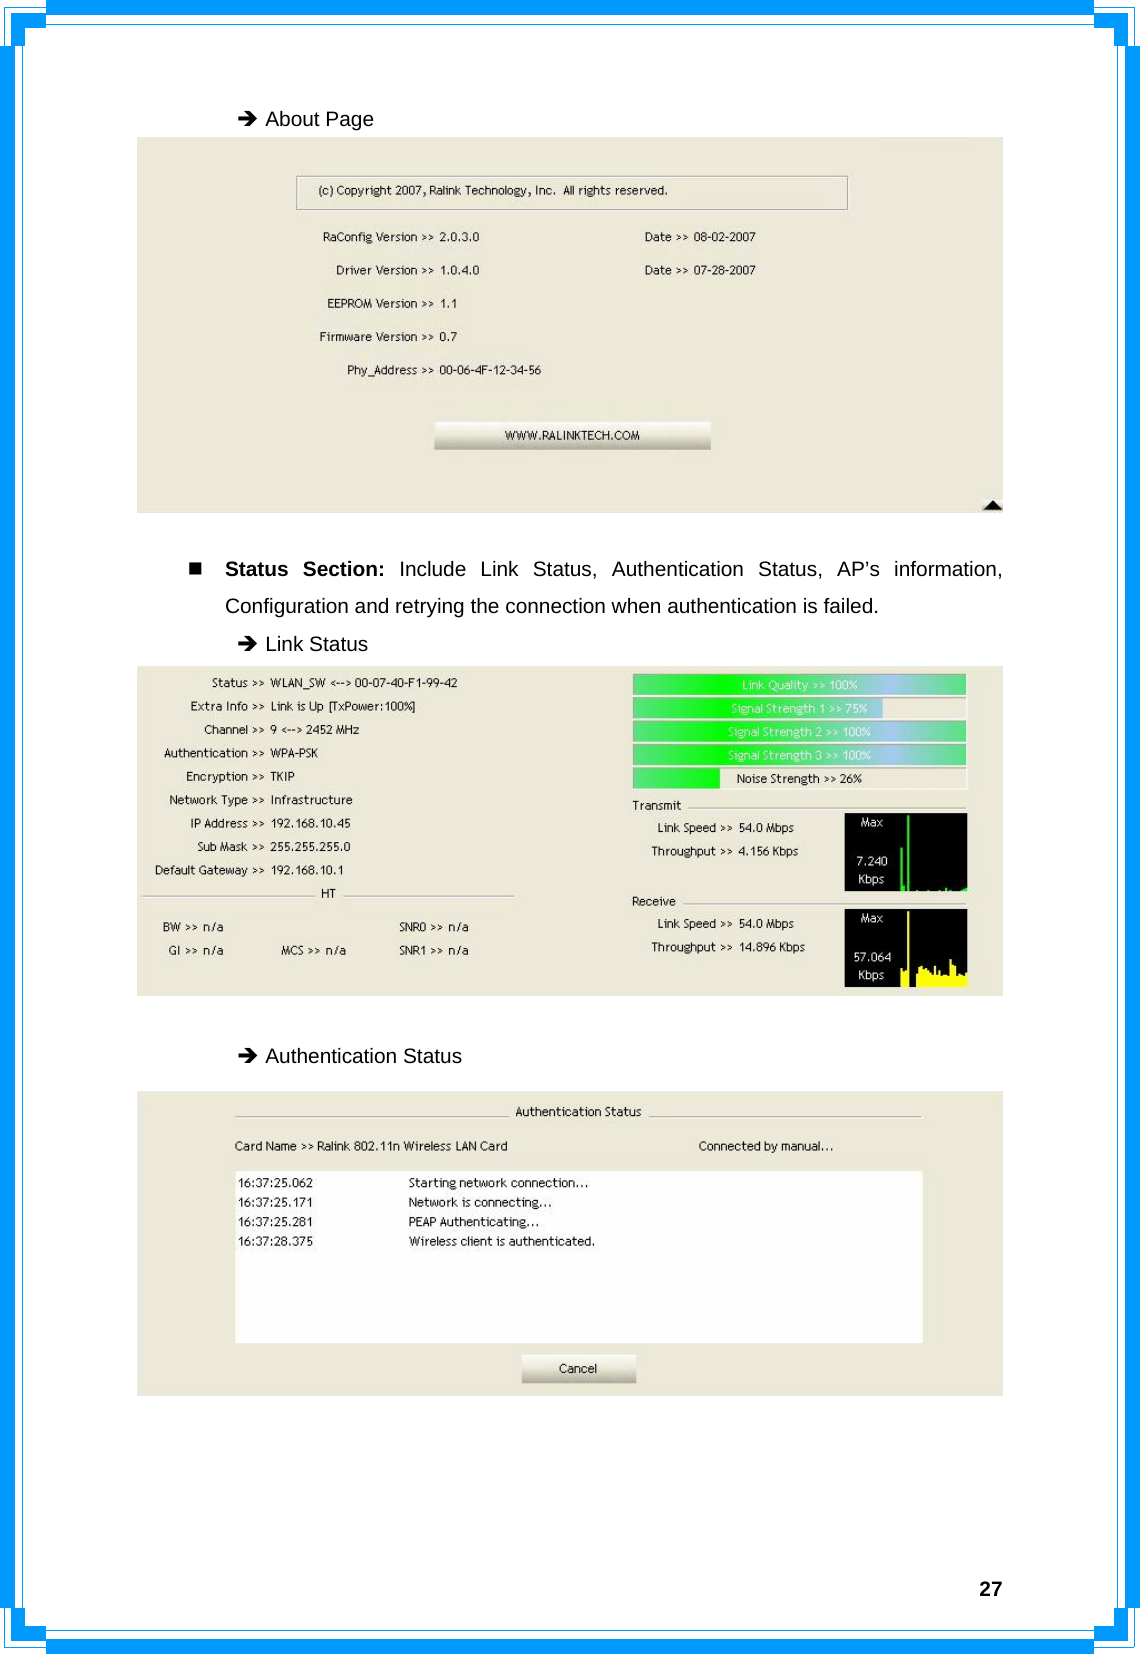
![36TX Rate: Manually force the Transmit using selected rate. Default is auto. (802.11n wireless card doesn’t support.) Enable Tx Burst: Ralink’s proprietary frame burst mode. Enable TCP Windows Size: Enhance throughout. Fast Roaming at: Fast to roaming, setup by transmit power. Select your Country Region Code: 8 countries to choose. Show Authentication Status Dialog: When you connect AP with authentication, choose whether show “Authentication Status Dialog” or not. Authentication Status Dialog display the process about 802.11x Authentication. Enable CCX (Cisco Compatible eXtensions): support Cisco Compatible Extensions function. Î LEAP turn on CCKM Î Enable Radio Measurement: can channel measurement every 0~2000 milliseconds. Apply: Save the save changes Î Show the information of Status Section Î Hide the information of Status Section 3.1.5 Statistics Statistics page displays the detail counter information based on 802.11 MIB counters. This page translates the MIB counters into a format easier for user to understand. [Transmit Statistics] Frames Transmitted Successfully: Frames successfully sent. Frames Fail To Receive ACK After All Retries: Frames failed transmit after hitting retry limit. RTS Frames Successfully Receive CTS: Successfully receive CTS after sending RTS frame. RTS Frames Fail to Receive CTS: Fail to receive CTS after sending RTS frame.](https://usermanual.wiki/Ericsson-LG/WP-1000N.User-manual-2-of-4/User-Guide-1072293-Page-15.png)
![37Frames Retransmitted Successfully: Successfully retransmitted frames numbers Reset Counter: Reset counters to zero [Receive Statistics] Frames Received Successfully: Frames received successfully. Frames Received With CRC Error: Frames receive with CRC error. Frames Dropped Due To Out-Of-Resource: Frames dropped due to resource issue. Duplicate Frames Received: Duplicate received frames. Reset Counter: Reset counters to zero Î Show the information of Status Section Î Hide the information of Status Section 3.1.6 WMM WMM function involves “WMM Enable”, “WMM-Power Save Enable” and “DSL Setup”. WMM Enable: Enabe Wi-Fi Multi-Media. WMM-Power Save Enable: Enable WMM Power Save. Direct Link Setup Enable: Enable DLS (direct Link Setup).](https://usermanual.wiki/Ericsson-LG/WP-1000N.User-manual-2-of-4/User-Guide-1072293-Page-16.png)
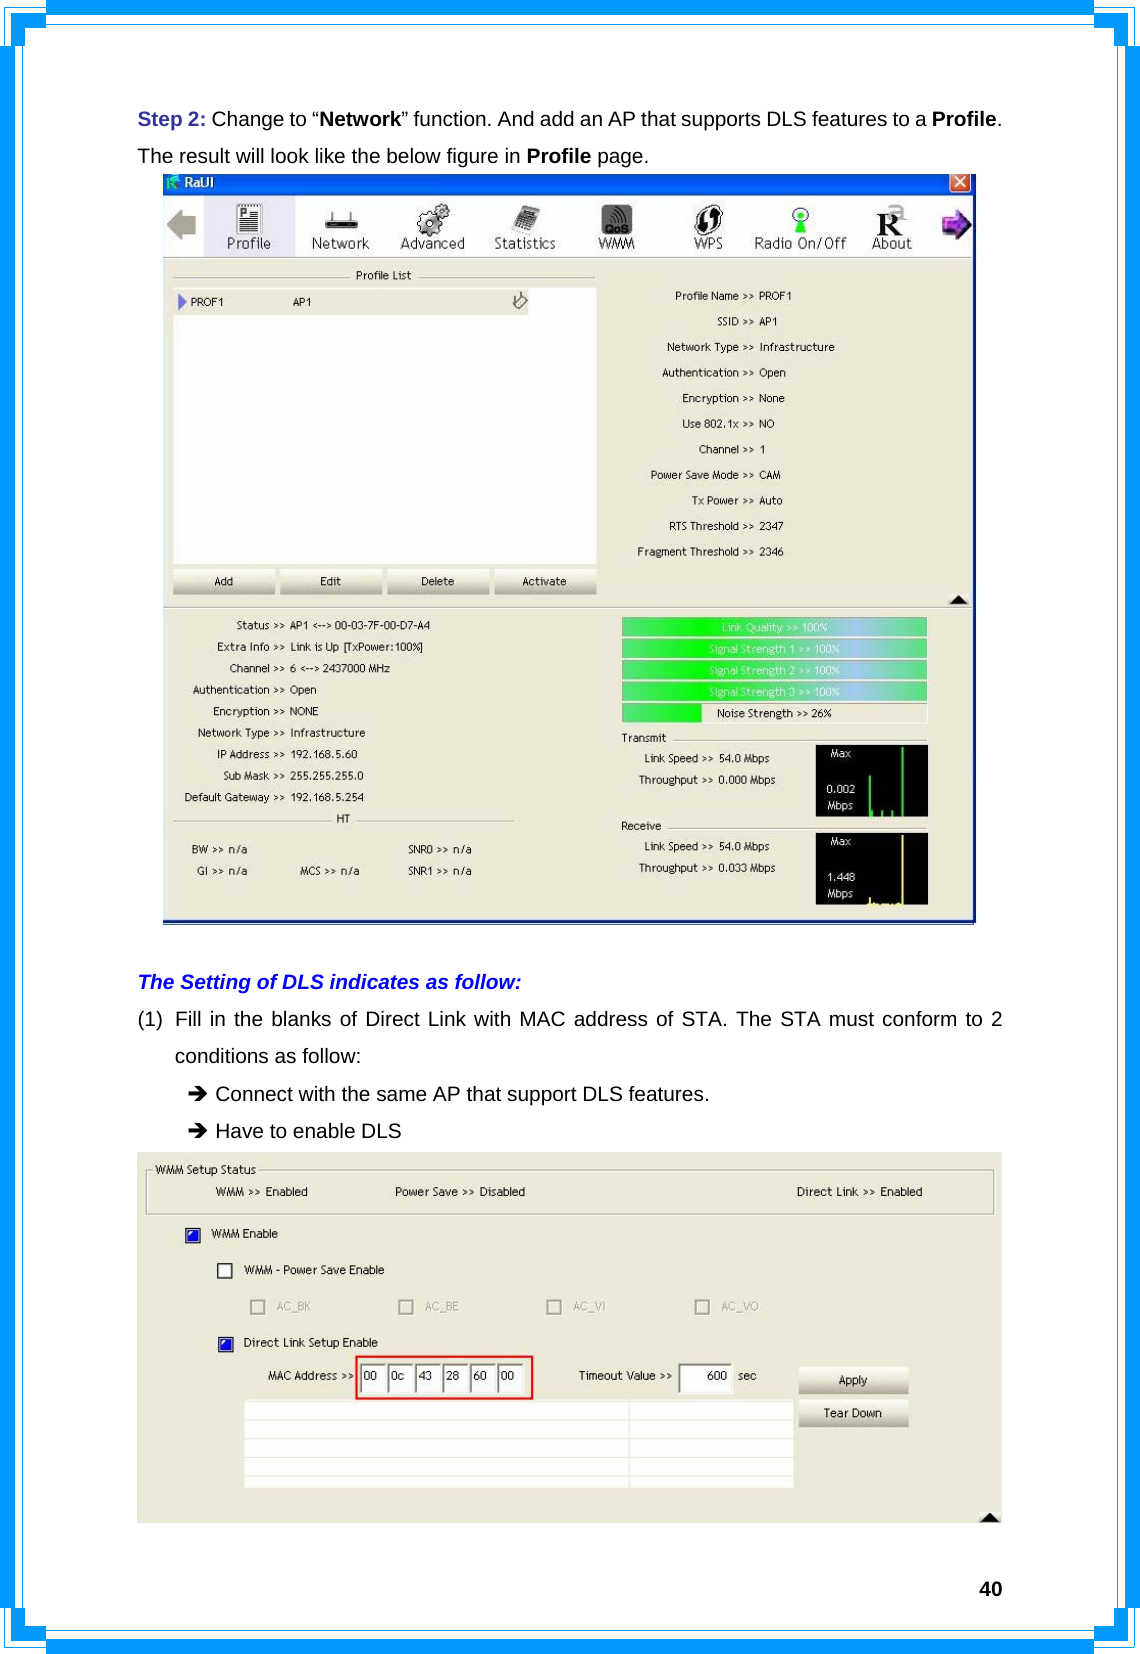
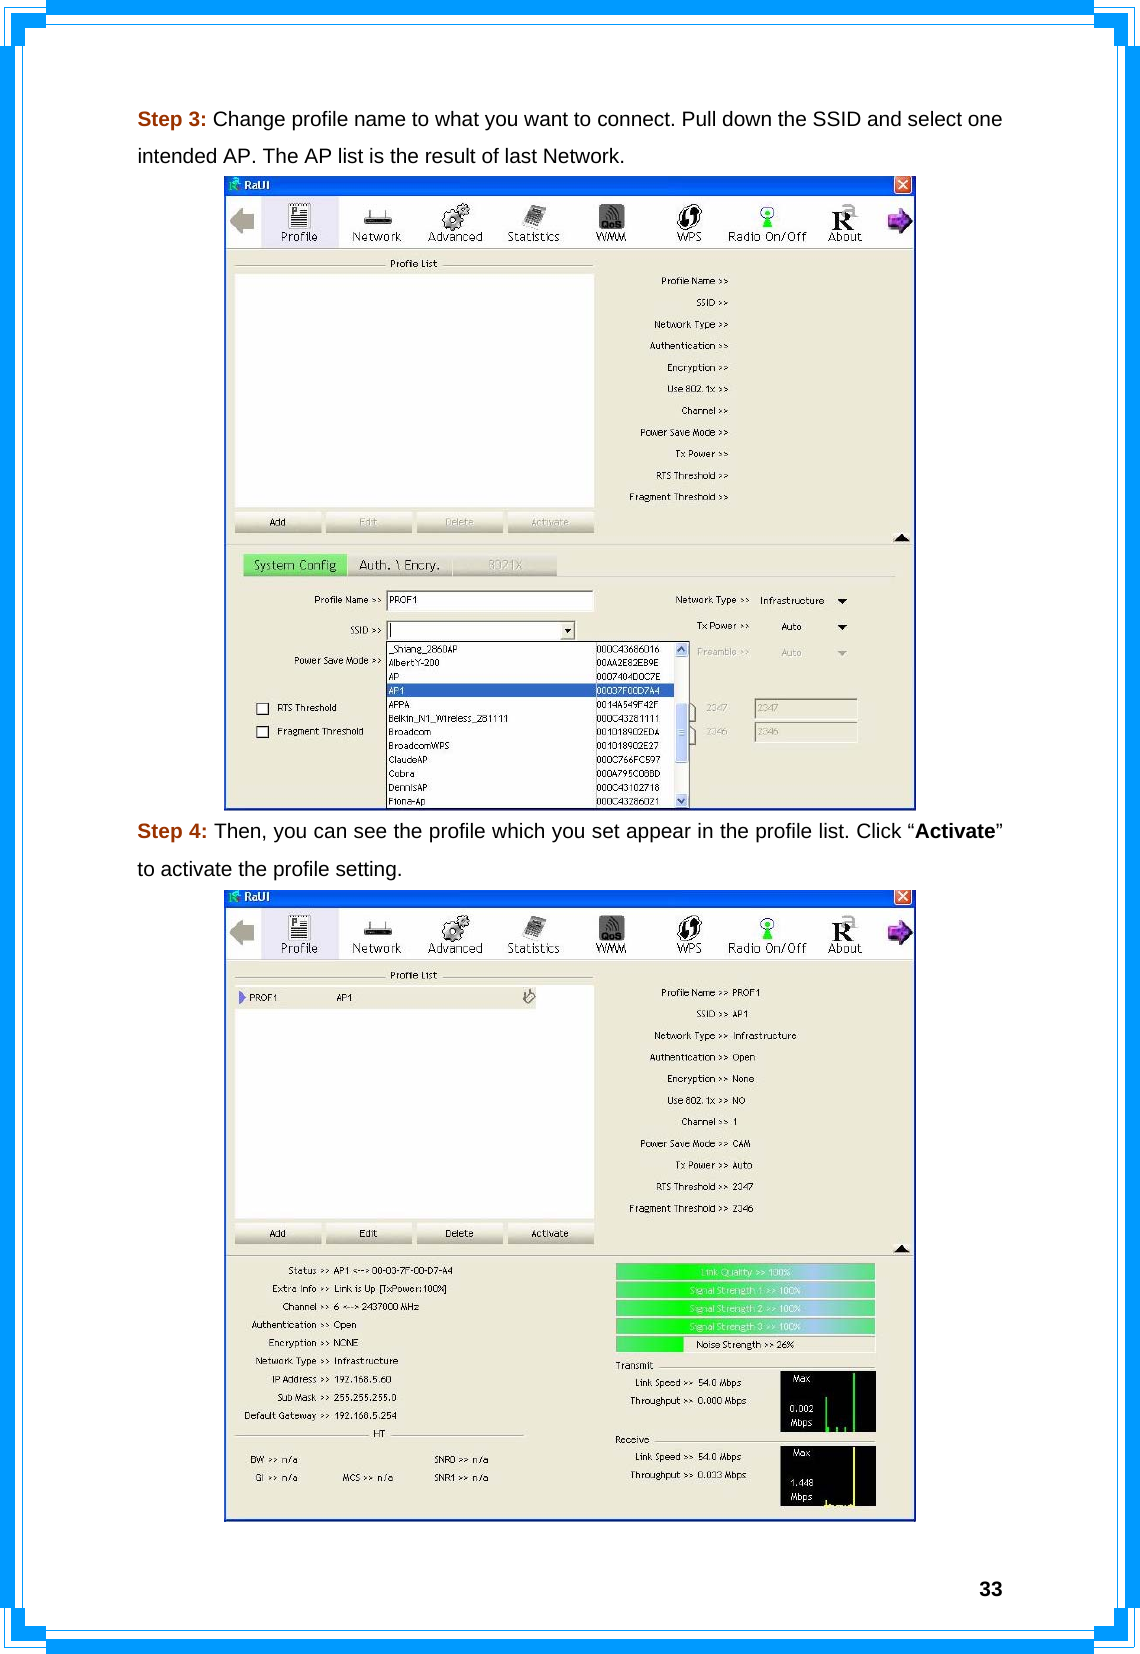
![38[WMM Enable – Enable Wi-Fi Multi-Media] If you want to use “WMM-Power Save” or “Direct Link Setup” you must enable WMM. The setting methods of enabling WMM indicating as follow: Step 1: Click “WMM Enable” Step 2: Change to “Network” function. And add an AP that supports WMM features to a Profile. The result will look like the below figure in Profile page.](https://usermanual.wiki/Ericsson-LG/WP-1000N.User-manual-2-of-4/User-Guide-1072293-Page-17.png)
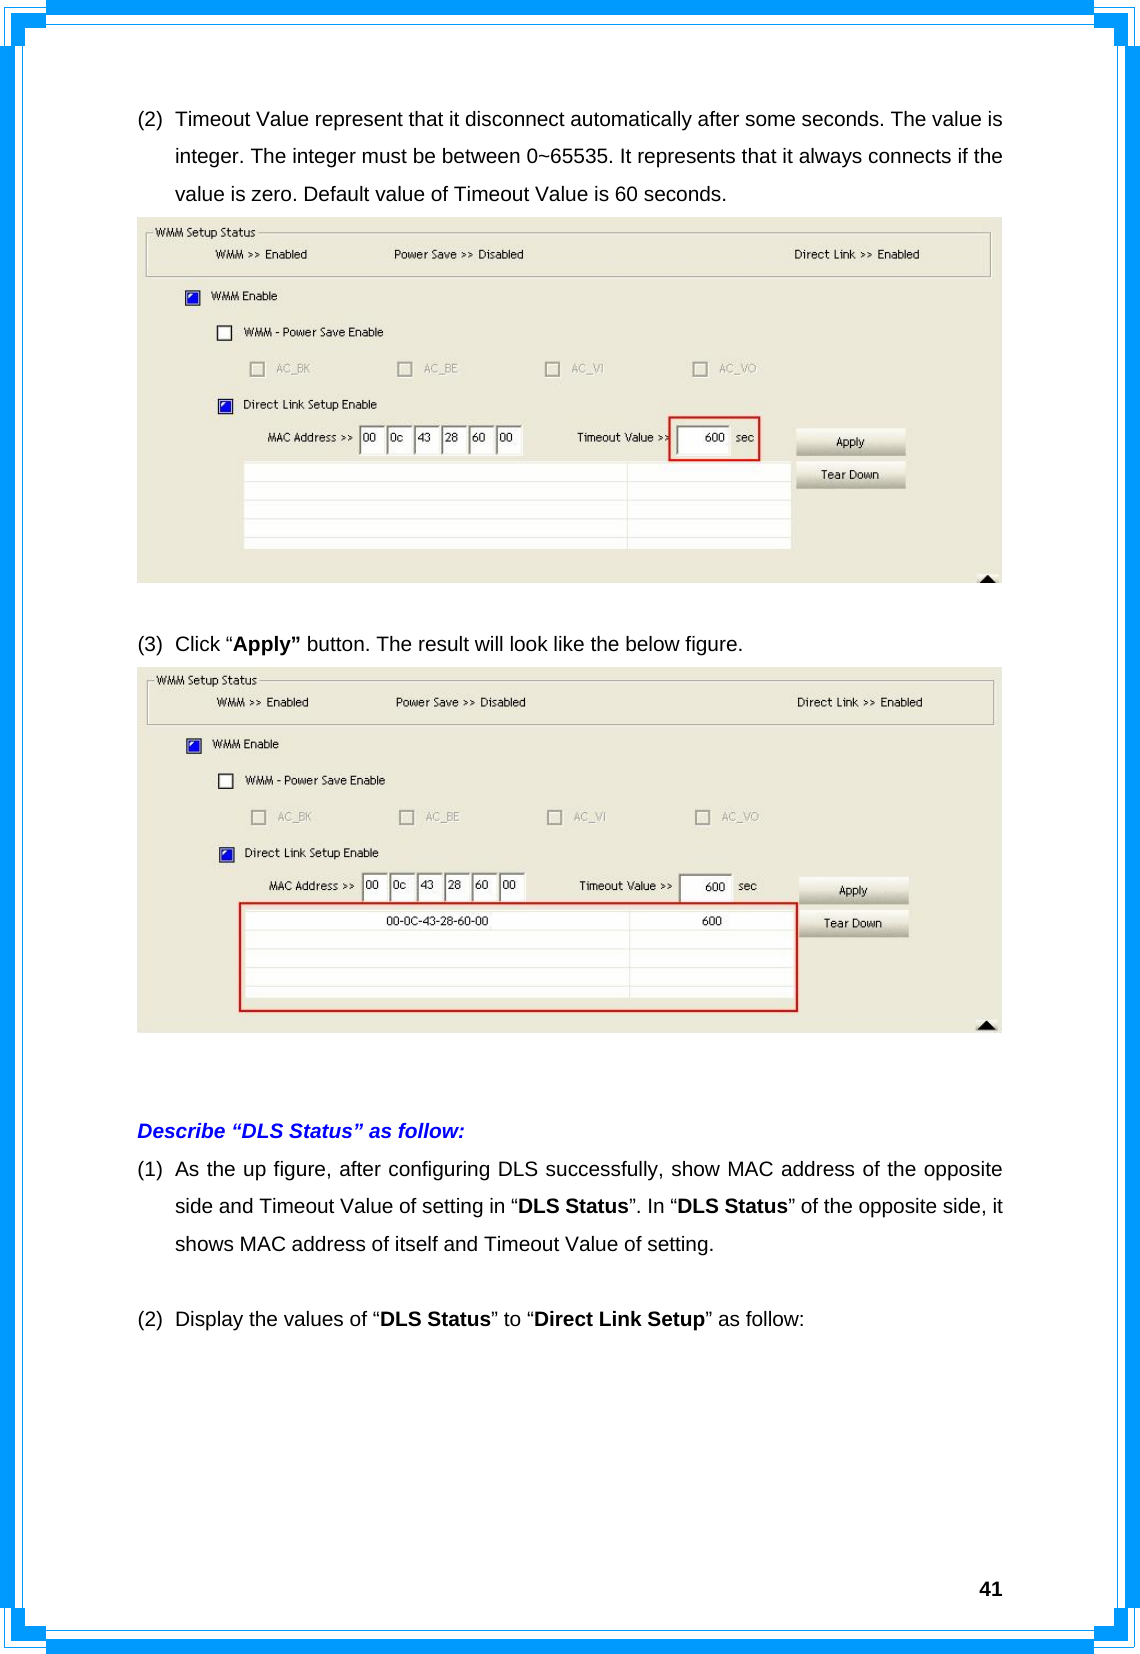
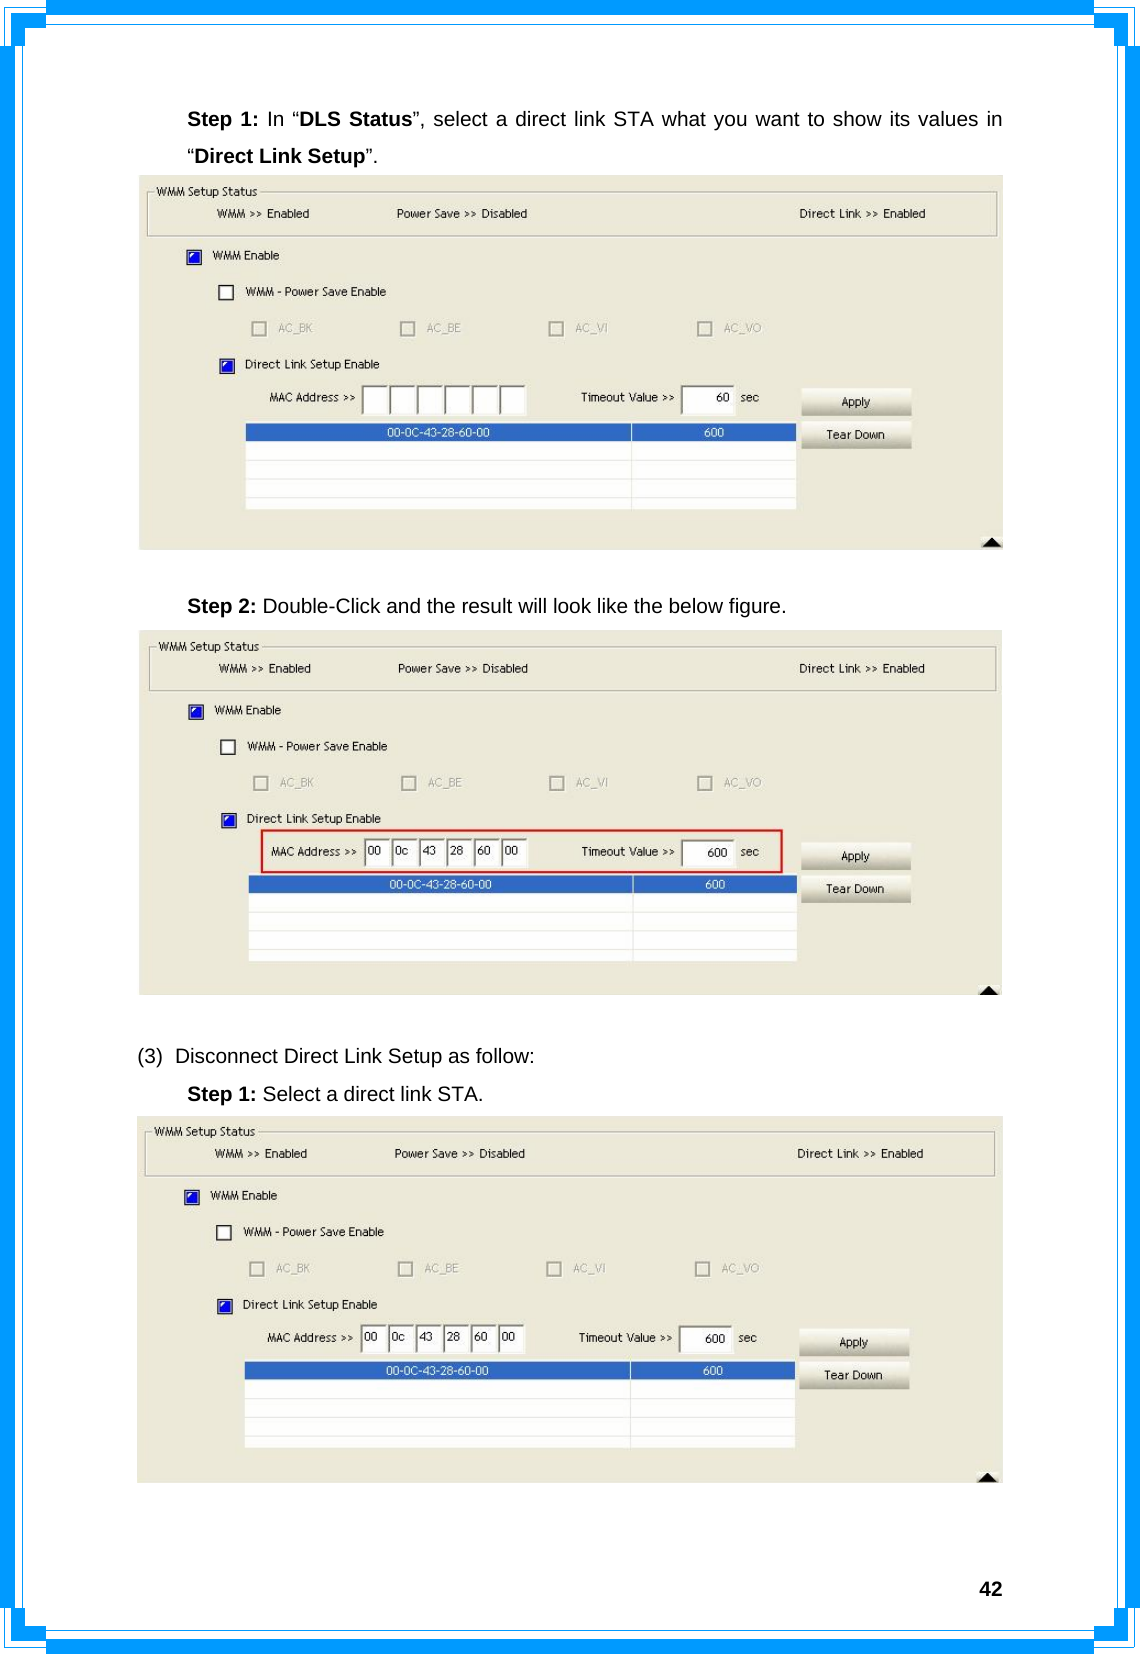
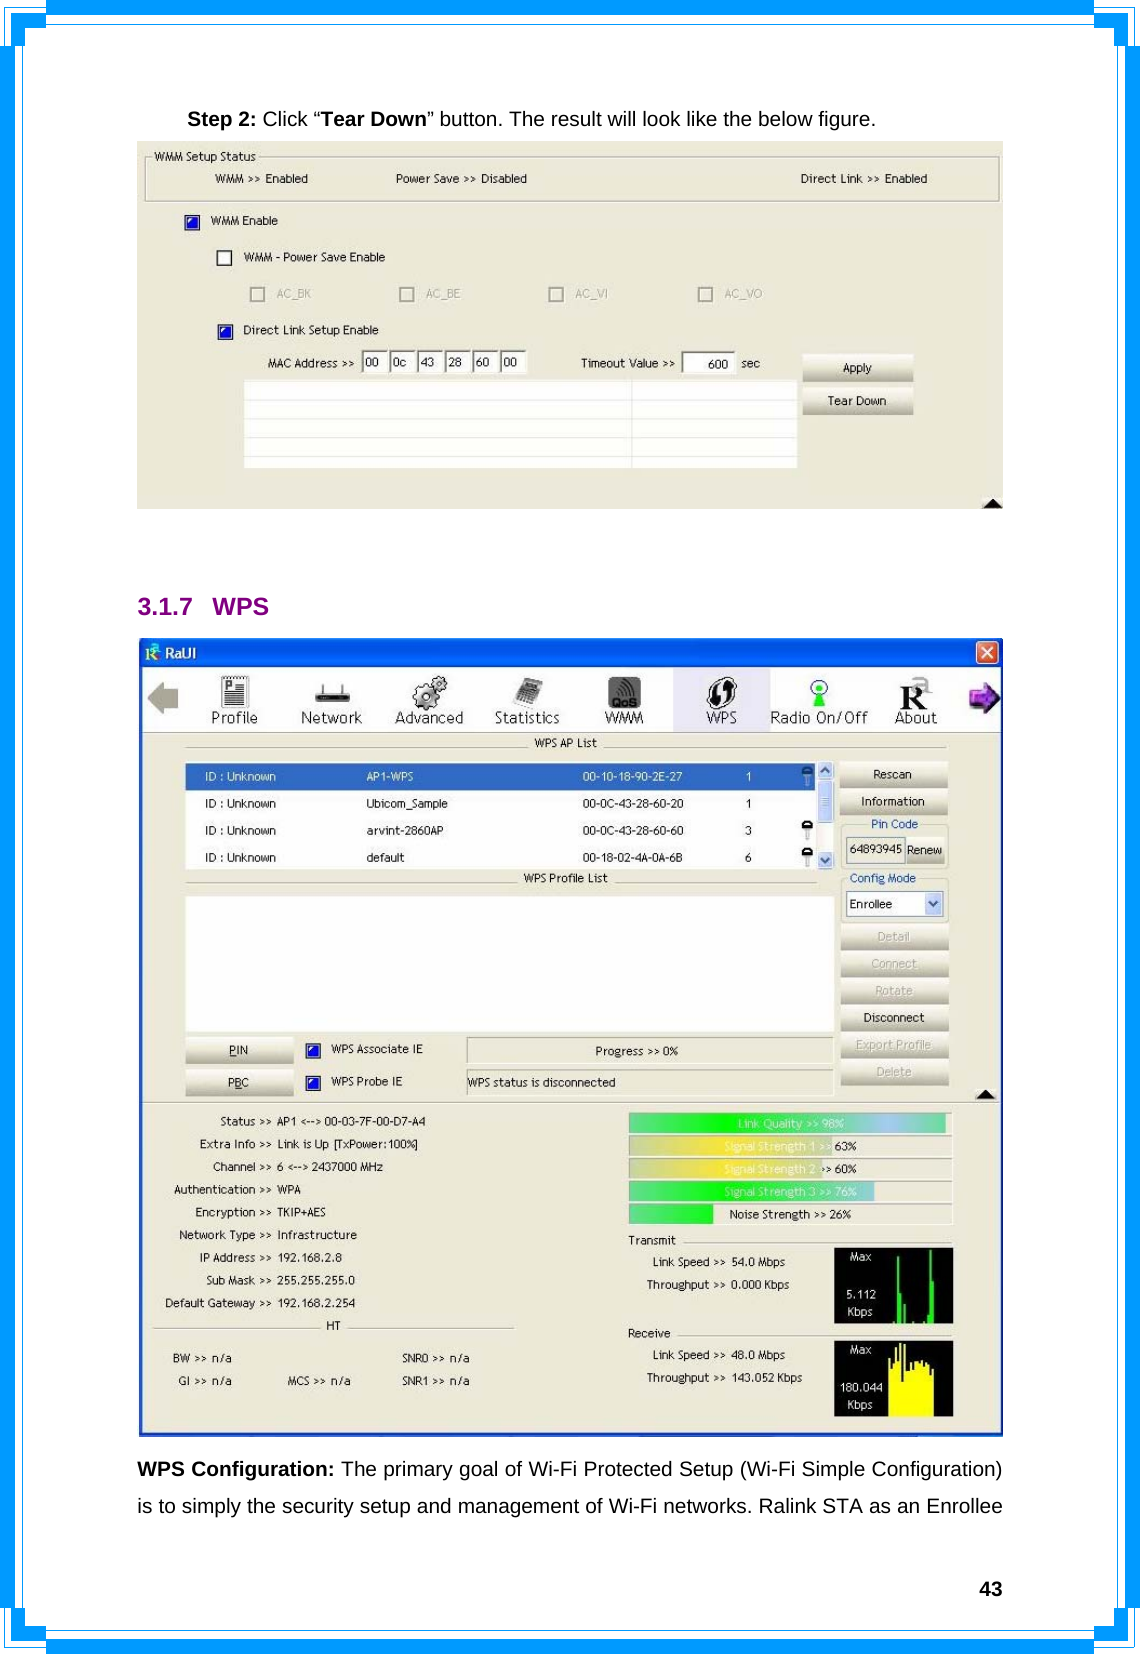
![39[WMM-Power Save Enable – Enable WMM Power Save] Step 1: Click “WMM-Power Save Enable” Step 2: Please select which ACs you want to enable. The setting of enabling WMM-Power Save is successfully. [Direct Link Setup Enable – Enable DLS (Direct Link Setup)] Step 1: Click “Direct Link Setup Enable”](https://usermanual.wiki/Ericsson-LG/WP-1000N.User-manual-2-of-4/User-Guide-1072293-Page-18.png)