Ericsson LG WP-1000N WIRELESS PCI ADAPTER User Manual 4 of 4
Ericsson-LG Co., Ltd. WIRELESS PCI ADAPTER 4 of 4
Contents
- 1. User manaul 1 of 4
- 2. User manual 2 of 4
- 3. User manual 3 of 4
- 4. User manual 4 of 4
User manual 4 of 4
66
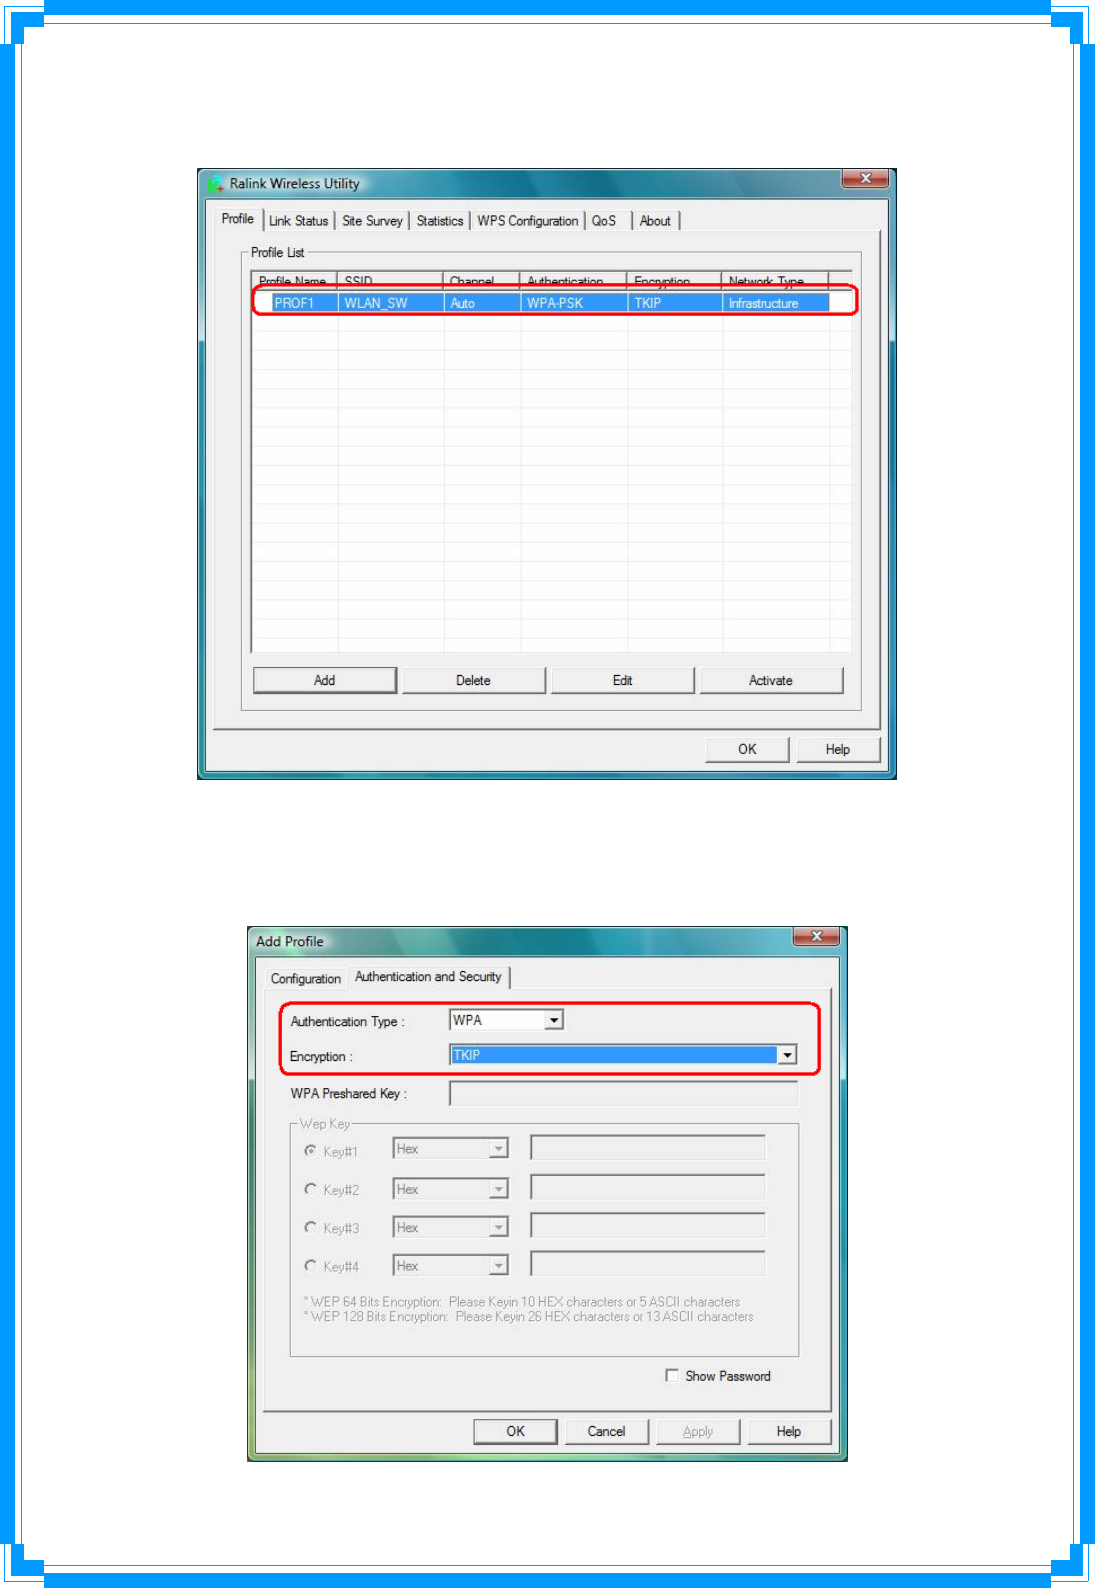
Step 4 –After the profile is saved, click the “Activate” button on Profile Page to active the
profile.
☉ Example 4:WPA/WPA2
Step 1 – Choose “WPA” or “WPA2” authentication type
Step 2 – Choose “TKIP” or “AES” encryption type
67
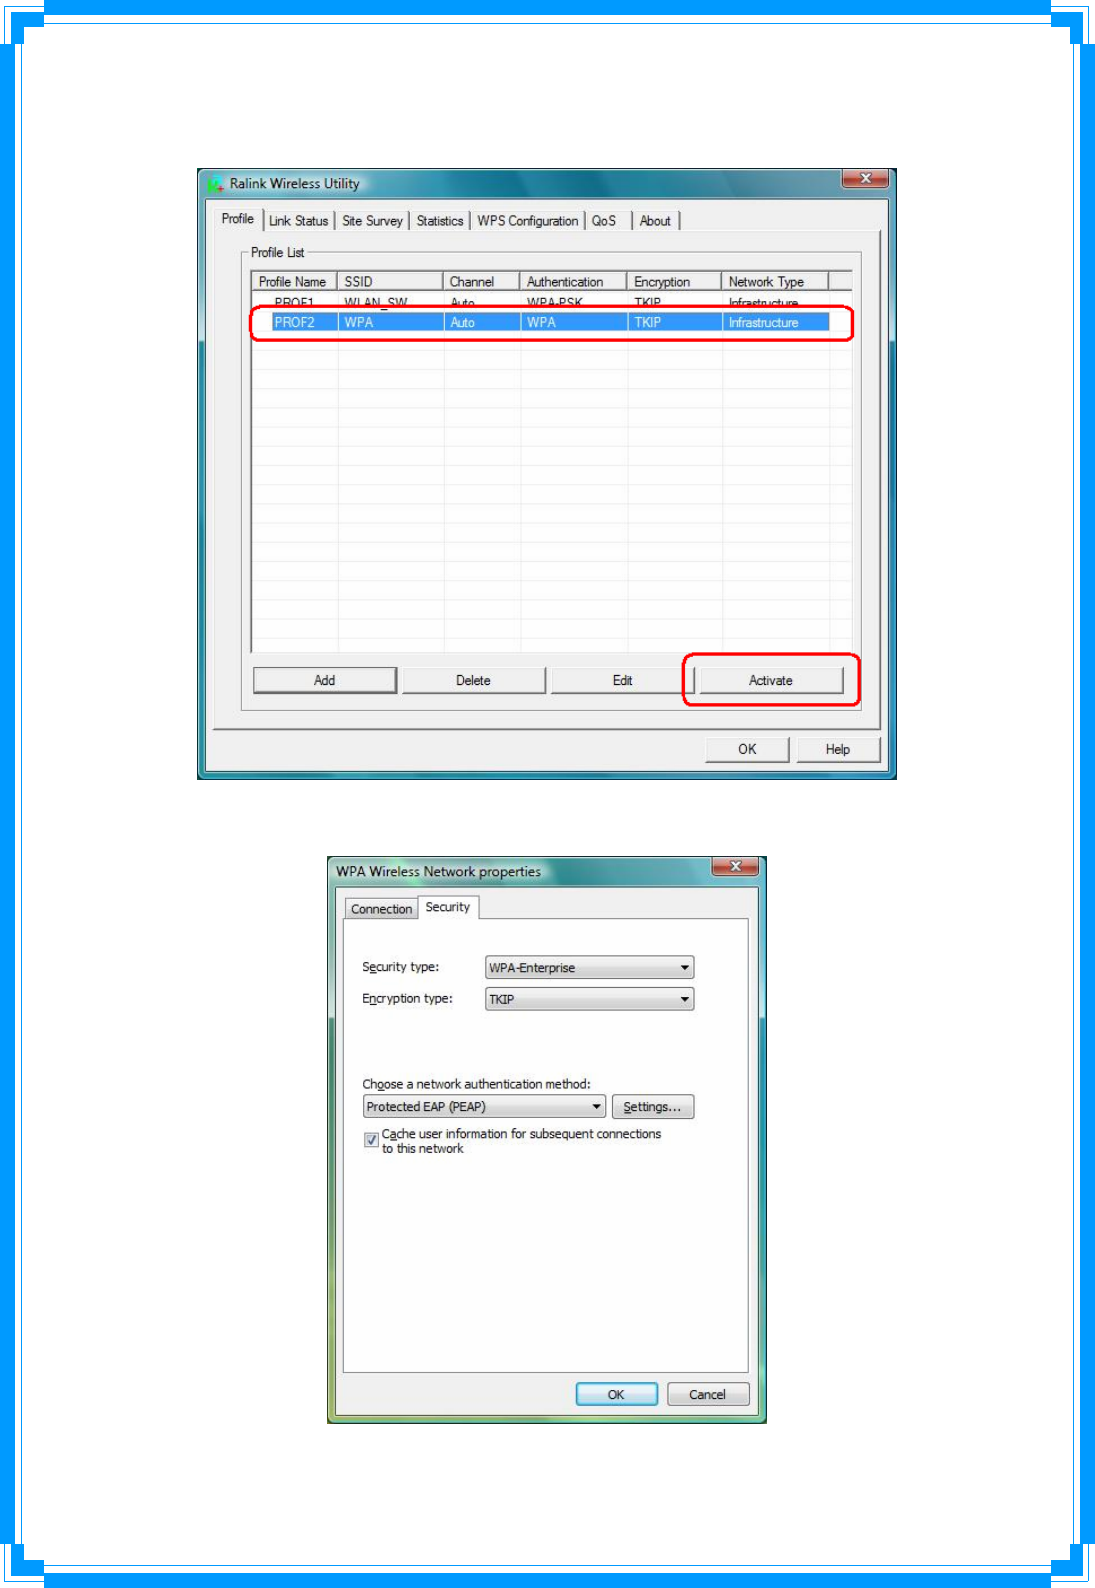
Step 3 –After the profile is saved, click the “Activate” button on Profile Page to active the
profile.
Step 4 –The Windows profile setting dialog is popped-up for user to modify.
68
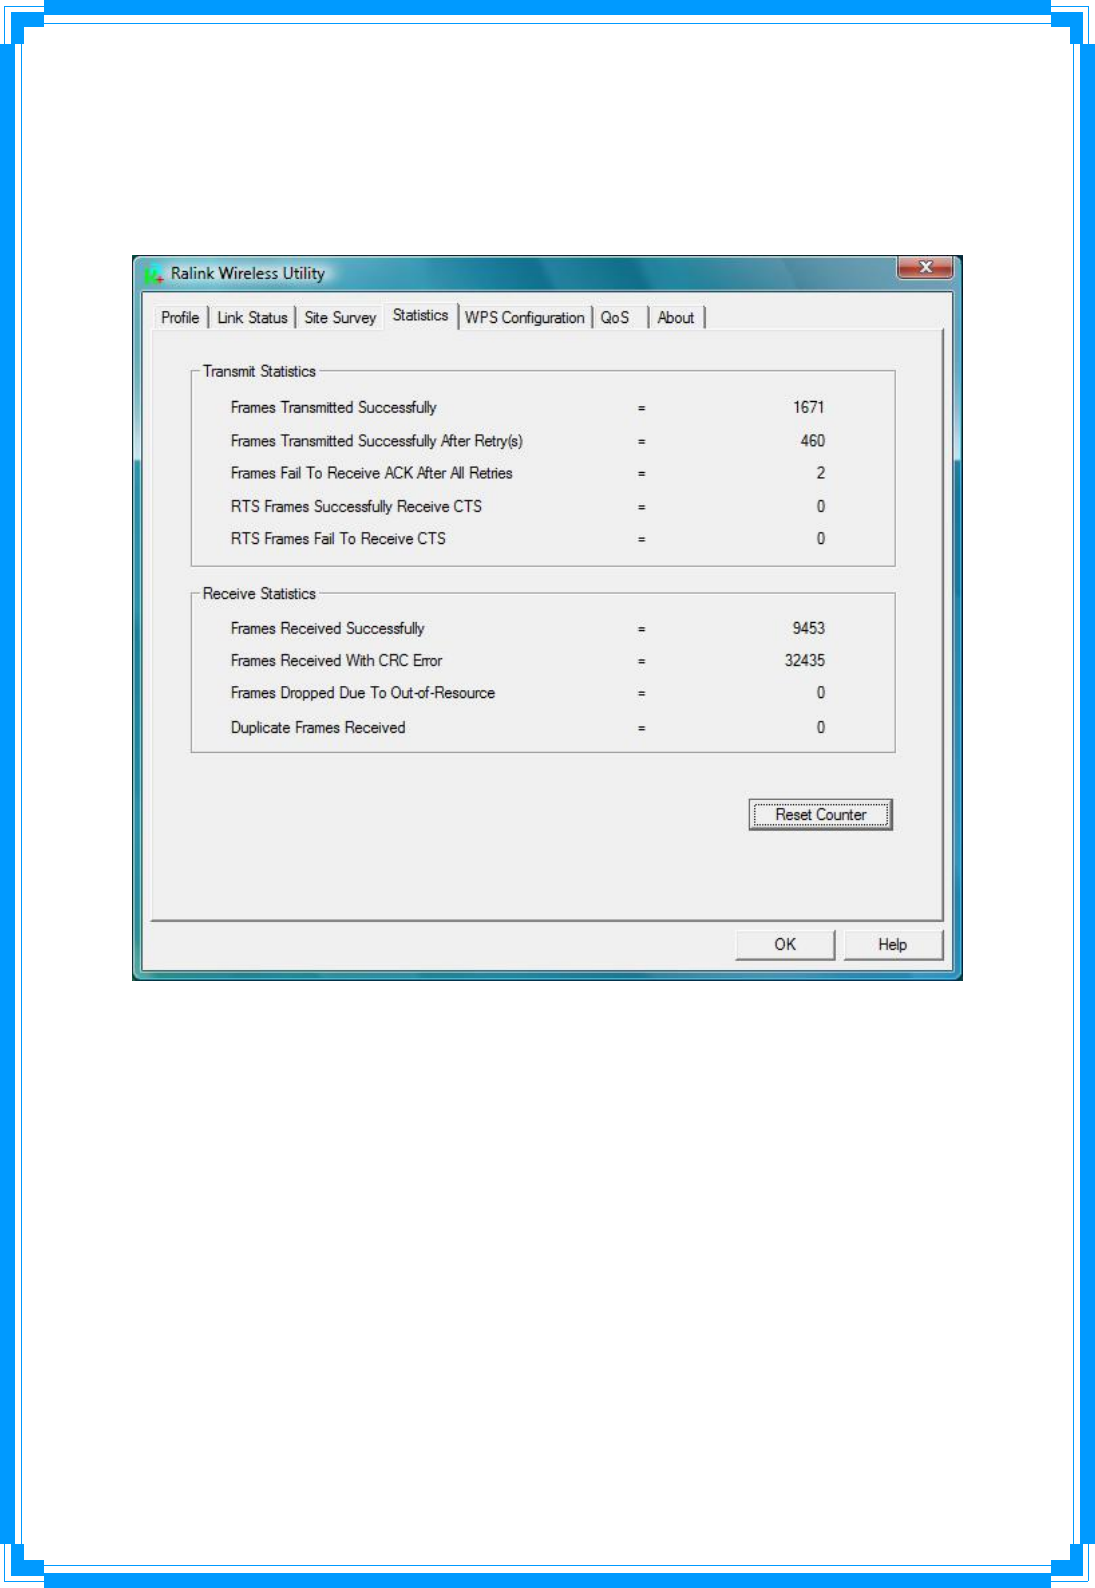
3.2.4 Statistics
Statistics page displays the detail counter information based on 802.11 MIB counters. This
page translates the MIB counters into a format easier for user to understand. You may reset
the counters to Zero by clicking “Reset Counter”.
[Transmit Statistics]
Frames Transmitted Successfully: Frames successfully sent
Frames Transmitted Successfully After Retry: Frames sent successfully with retry.
Frames Fail to Receive ACK After All Retries: Frames failed transmit after hitting retry limit.
RTS Frames Successfully Receive CTS: Successfully receive CTS after sending RTS
frames.
RTS Frames Fail To Receive CTS: Failed to receive CTS after sending RTS frames.
[Receive Statistics]
Frames Received Successfully: Frames received successfully.
Frames Received with CRC Error: Frames received with CRC error.
Frames Dropped Due to Out-of-Resource: Frames dropped due to resource issue.
Duplicate Frames Received: Duplicate received frames.
69
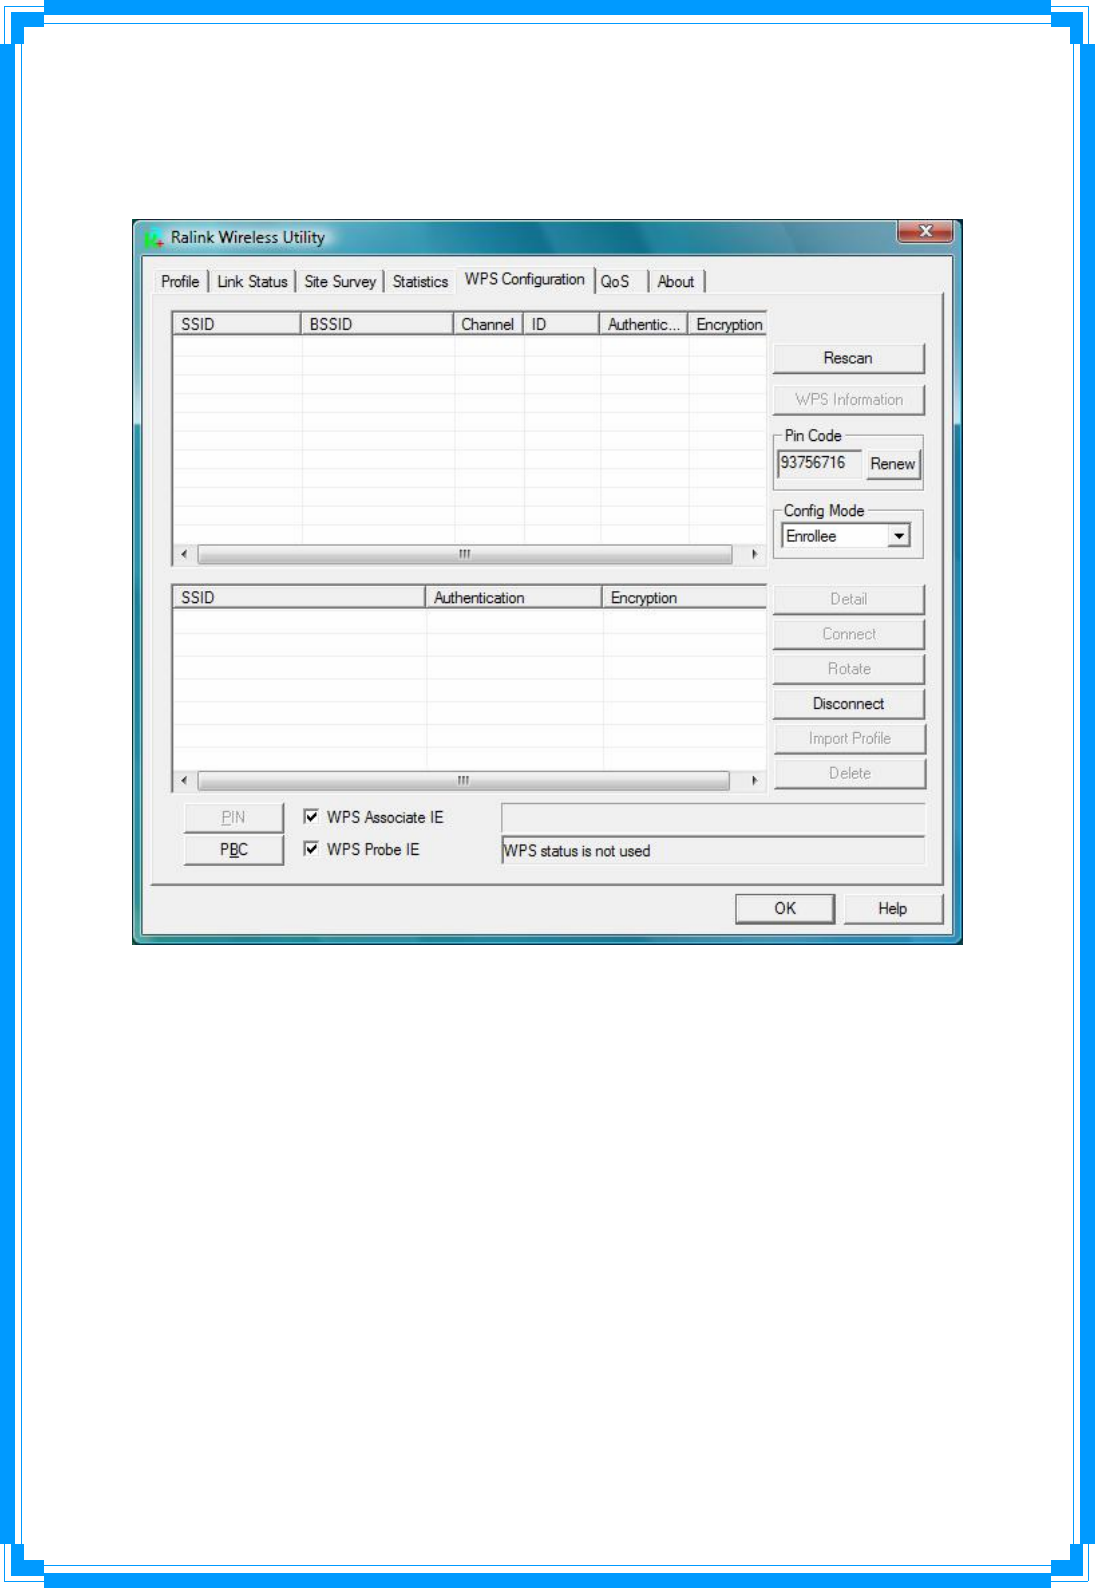
3.2.5 WPS Configuration
The primary goal of Wi-Fi Protected Setup (Wi-Fi Simple Configuration) is to simply the
security setup and management of Wi-Fi Networks.
WPS Associate IE: If the “WPS Associate IE” option is checked, station will send the
association request with WPS IE during WPS setup.
WPS Probe IE: If the “WPS Probe IE” option is checked, station will send the probe request
with WPS IE during WPS setup.
[Display WPS capable AP information]
The WPS capable AP information is listed in the upper frame, and the display AP’s characters
are SSID, BSSID, current operating channel, device password ID, authentication type, and
encryption type.
Re-Scanning: Clicking “re-scan” button performs the re-scanning action.
WPS AP Information: Clicking the WPS information” button brings up the WPS capable AP
information dialog.
Authentication Type: there are three type of supported authentication modes, and
there are Open, Shared, WPA-PSK and WPA modes.

70
Encryption Type: For Open & Shared authentication modes, the available
encryption types are None and WEP. For WPA, WPA2, WPA-PSK and WPA2-PSK
authentication modes, the available encryption types are TKIP and AES.
Config Methods: This attributes contains the config methods supported and
enabled by the selected Registrar.
Device Password ID: Device Password ID indicates the method or identifies the
specific password that the selected Registrar intends to use.
Selected Registrar: Selected Registrar indicates if the user has recently activated a
Registrar to add an Enrollee.
State: This attribute is used to indicate the current configuration state. This attribute
is either “Un-Configured” or “Configured”.
Version: This attribute is the specified WPS version.
AP Setup Locked: AP Setup Locked indicates if AP has entered a setup locked
state.
UUID-E: UUID-E is the universally unique identifier (UUID) generated by the
Enrollee.
RF-Bands: RF Bands indicate the available RF bands.
[Configure WPS Profiles]
The user can configure WPS profile with either PIN method or PBC method.
PIN Method:
Step 1 Î The Registrar enters the pin code generated by station.
Step 2 Î Click the “PIN” button.
PBC Method:
Step 1 Î Click the “PBC” button within 2 second while the Registrar clicks the
button.
[Manage WPS Profiles]
The Received WPS profiles are listed in the lower frame, and the listed WPS profile attributes
are SSID, MAC address, authentication type, and encryption type.
WPS profile detail information: Selecting a profile then clicking the “Detail” button
brings up the WPS profile detail information dialog.
Connect with WPS Profile: Clicking the “Connect” button will connect to AP with the
select WPS profile.
Rotate WPS profile: If there are more than two WPS profiles, clicking the “Rotate”
button will rotate to next profile and connect to AP with this profile. If the connection
can’t be made successfully, station will perform the WPS profile rotation repeatedly.
Disconnect from WPS AP: Clicking the “Disconnect” button will stop the WPS
71
connection.
Delete WPS profile: Clicking the “Delete” button will delete the selected WPS profile.
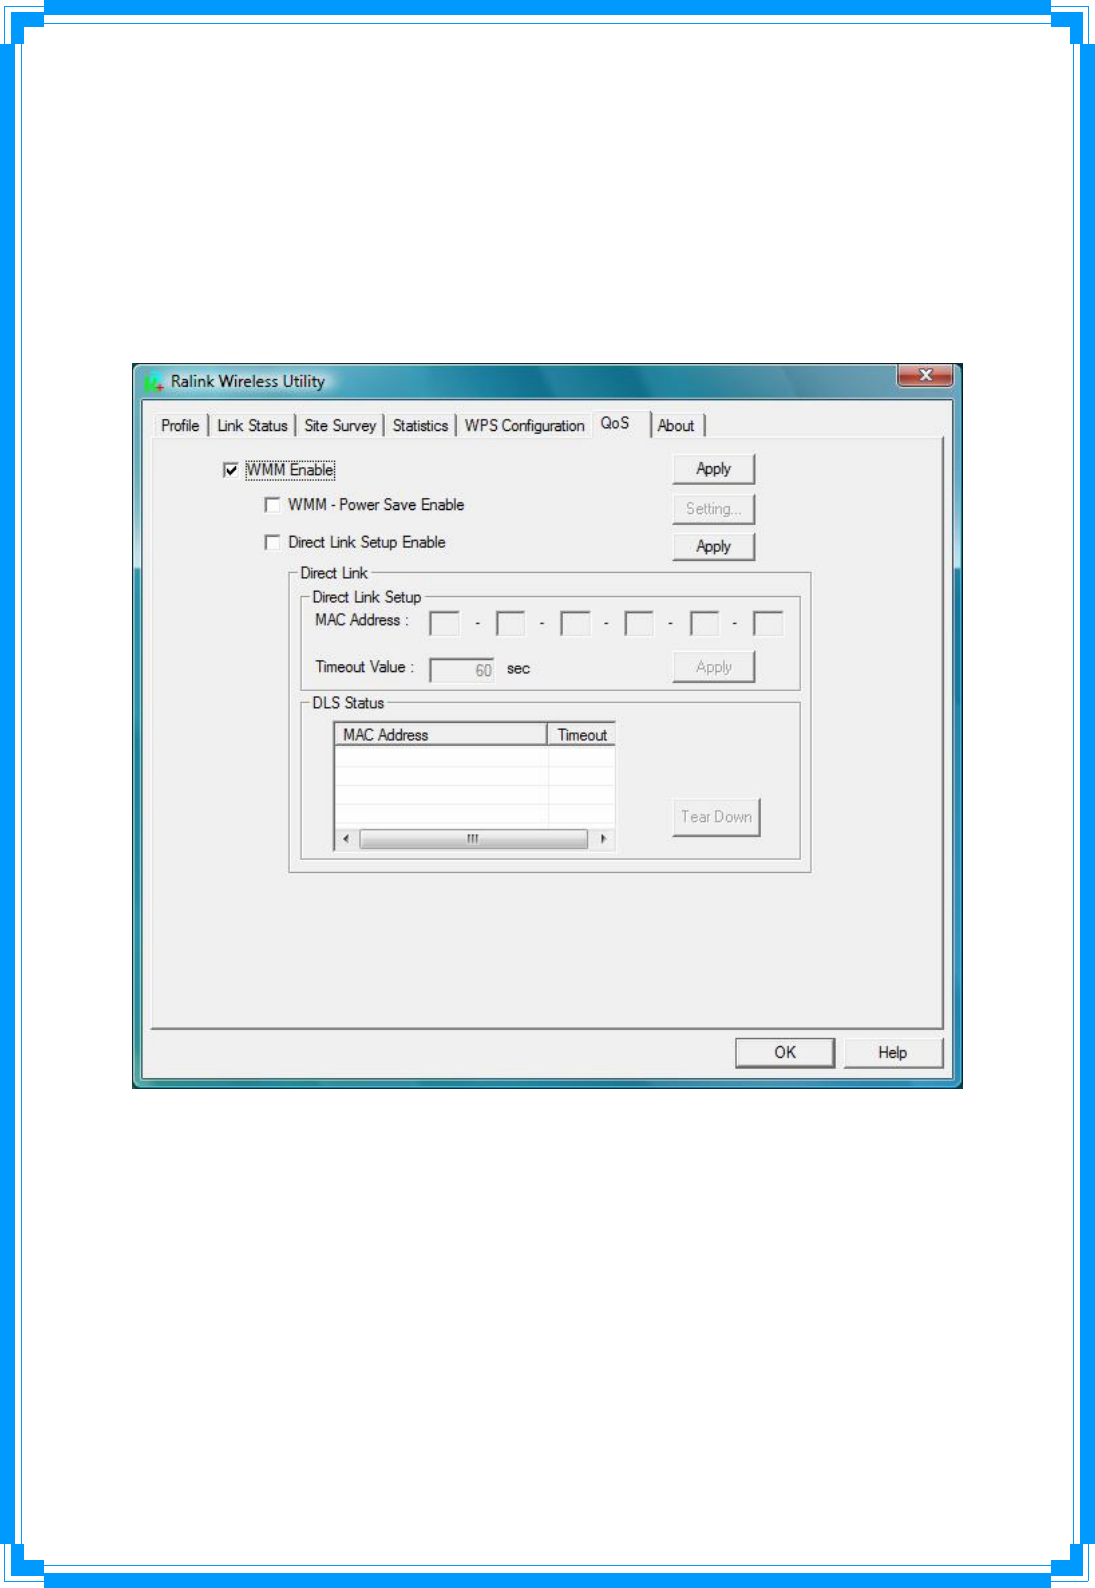
3.2.6 QoS
The QoS Page of RaConfig. It involves “WMM Enable”, “WMM – Power Save Enable” and
“DLS setup Enable”.
☉Configure to enable Wi-Fi Multi-Media
If you want to use “WMM – Power Save” or “Direct Link”, you must enable WMM. The
setting method of enabling WMM indicates as follows:
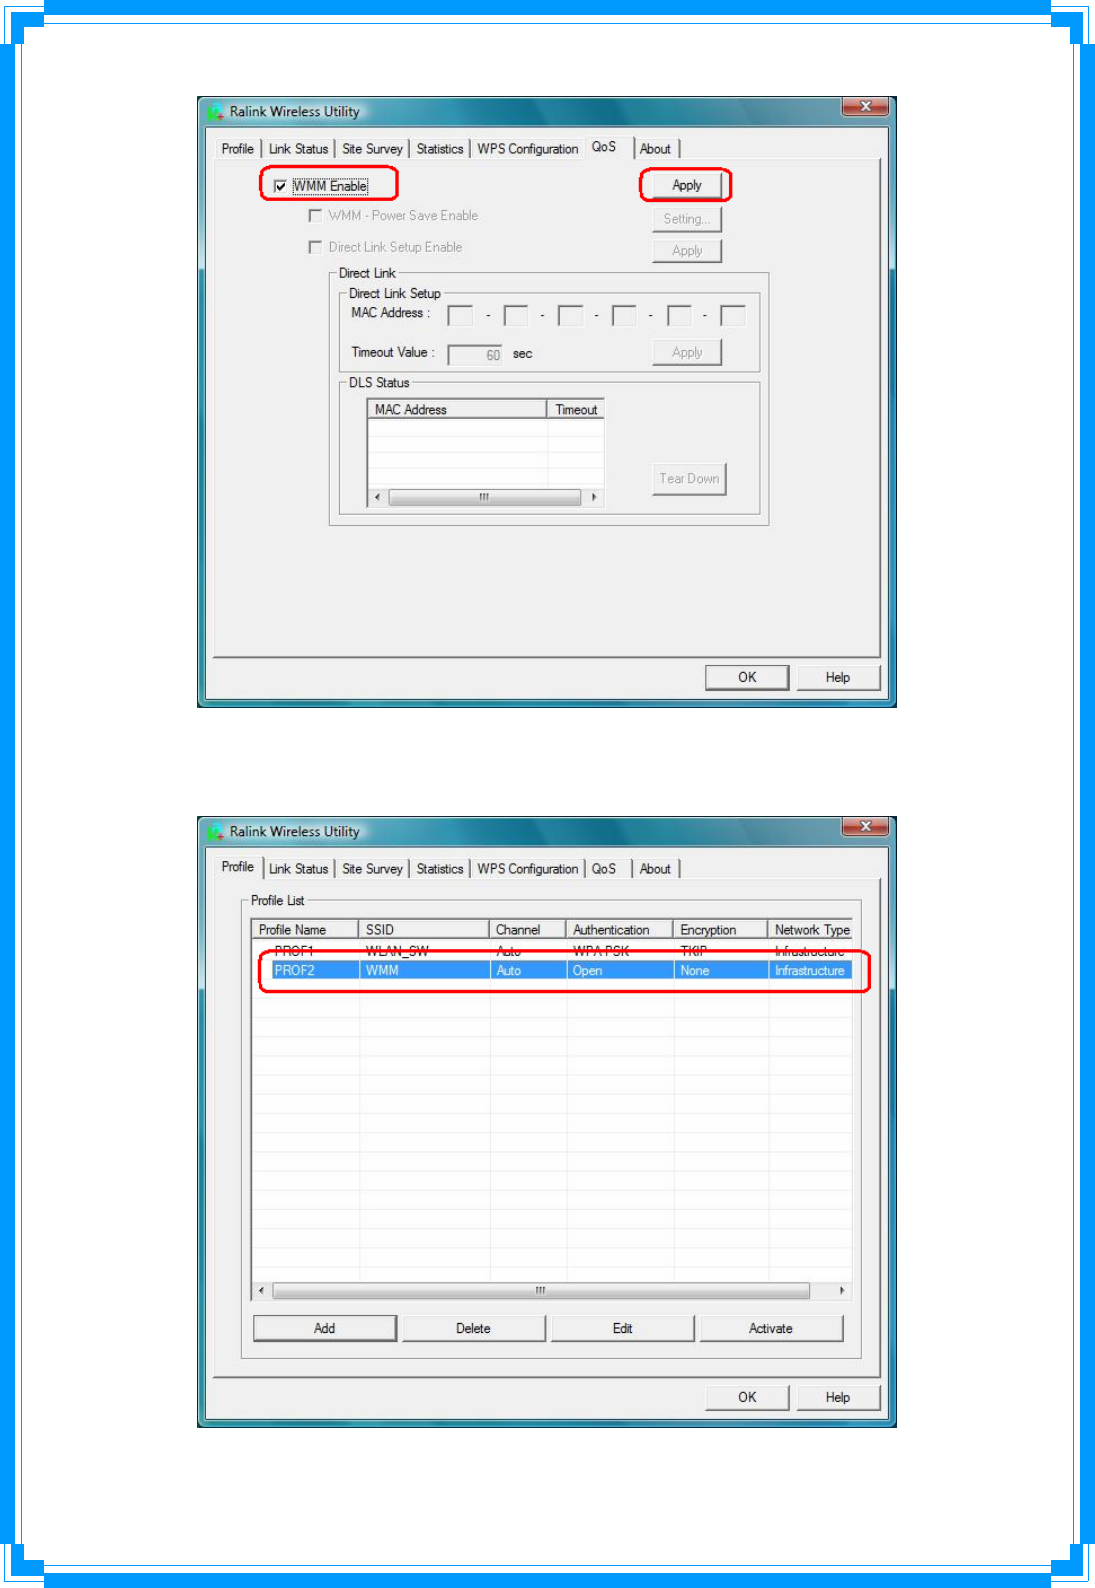
Step1: Click “WMM Enable”
Step2: Click “Apply”.
72
Step3: Change to “Site Survey Page”. And add an AP that supports WMM features
to a Profile. The result will look like the below figure in Profile page.
73
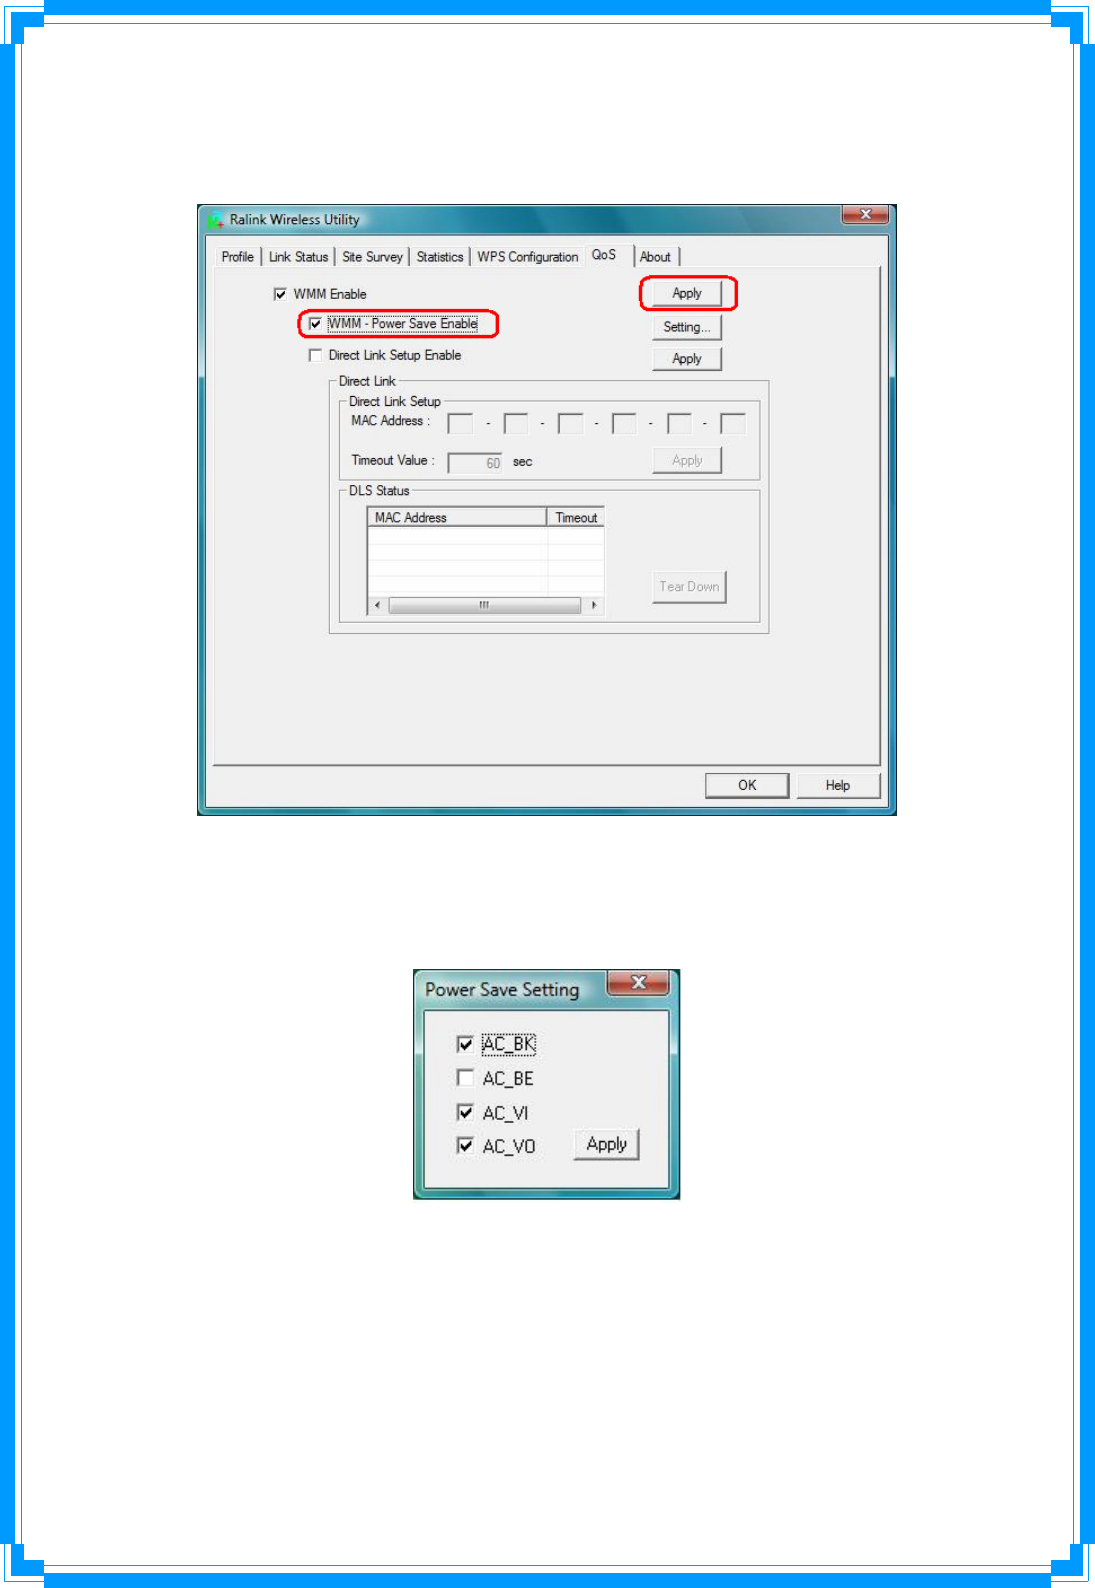
☉Enable WMM – Power Save
Step1: Click “WMM – Power Save Enable”. And Click “Setting…” button.
Step2: After clicking “Setting…” button, show “Power Save Setting” dialog. Please
select which ACs you want to enable. Then click “Apply” button. The setting of enabling
WMM – Power Save is successfully.
74
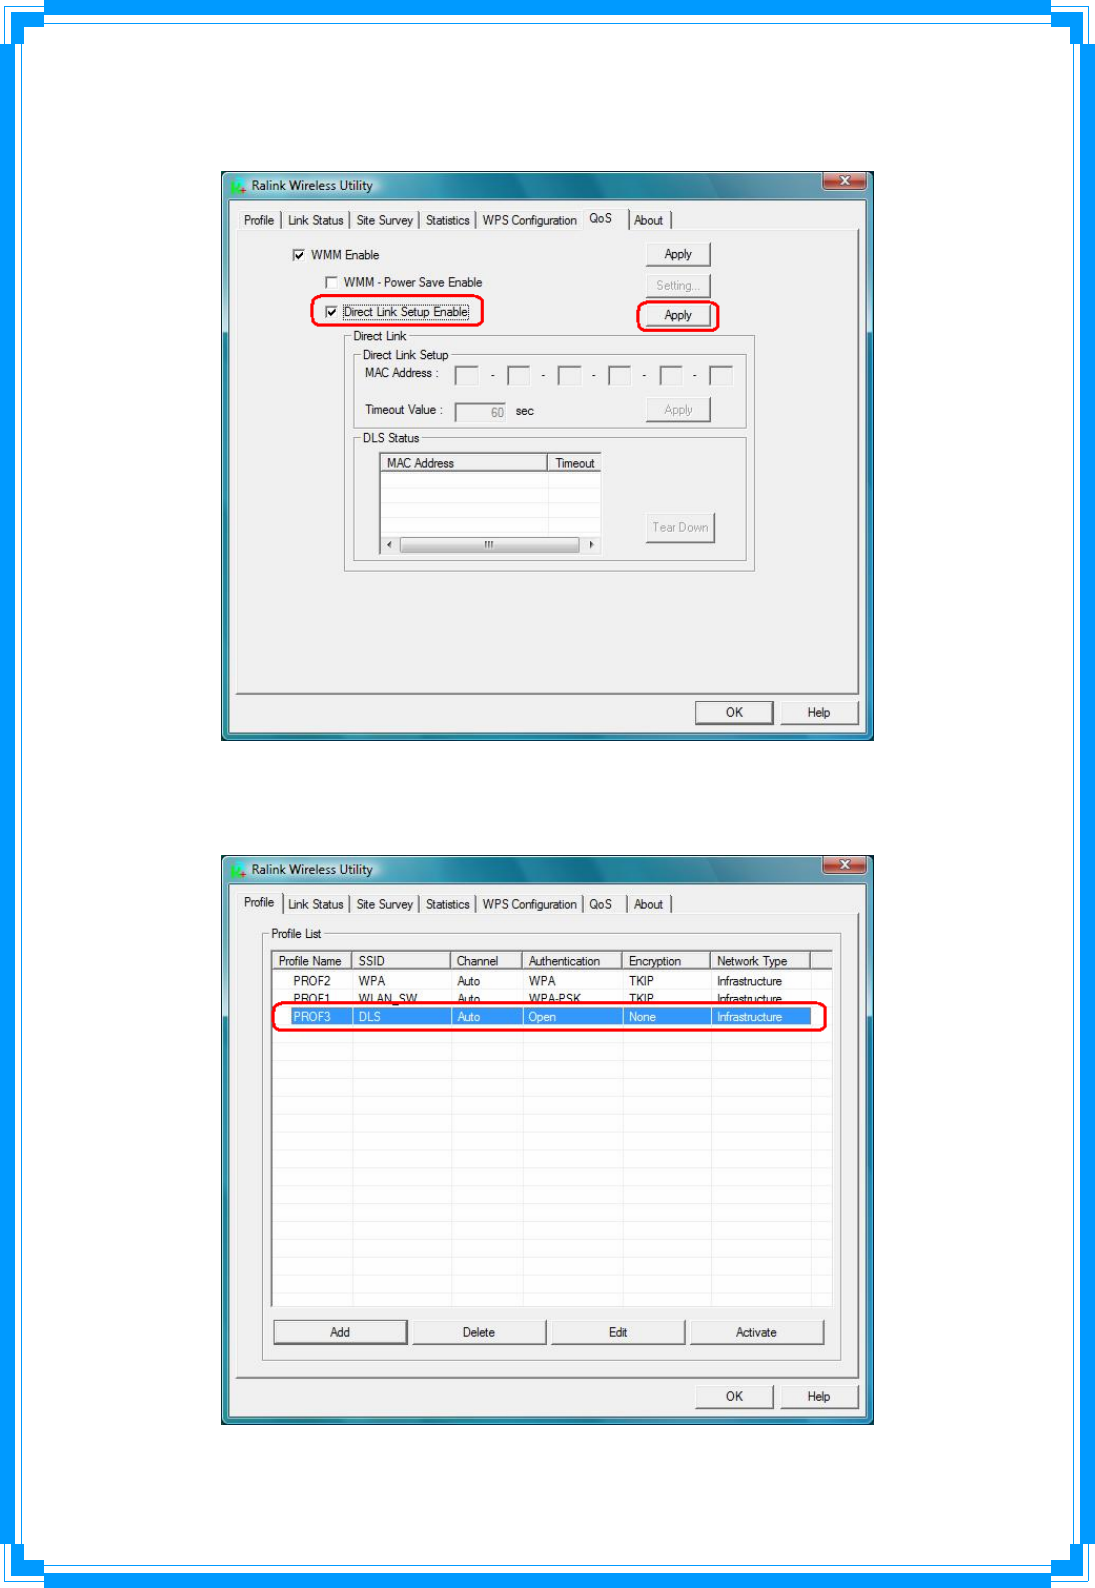
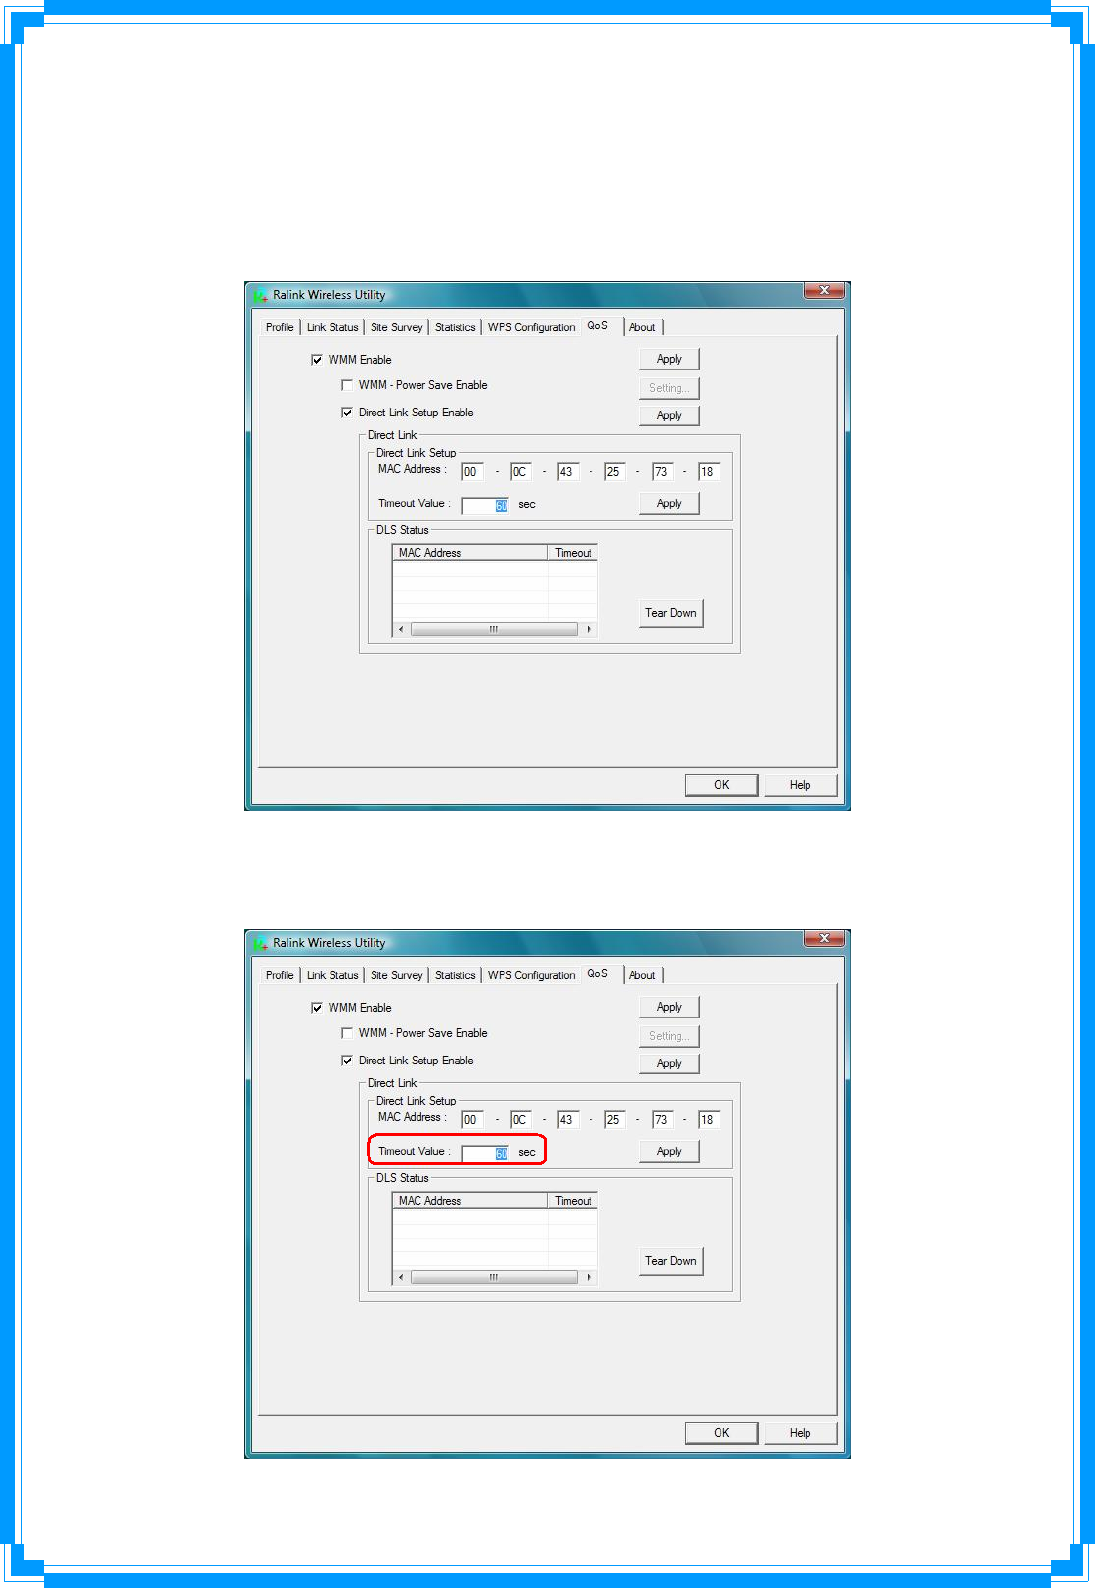
☉Enable DLS (Direct Link Setup)
Step1: Click “Direct Link Setup Enable”. And Click “Apply” button
Step2: Change to “Site Survey Page”. And add an AP that supports DLS features to a
Profile. The result will look like the below figure in Profile page.
75
The Setting of DLS indicates as follow:
1. Fill in the blanks of Direct Link with MAC Address of STA. The STA must conform to two
conditions as follow:
Step1: Connect with the same AP that support DLS features.
Step2: Have to enable DLS.
2. Timeout Value represents that it disconnect automatically after some seconds. The value
is integer. The integer must be between 0~65535. It represents that it always connects if
the value is zero. Default value of Timeout Value is 60 seconds
76
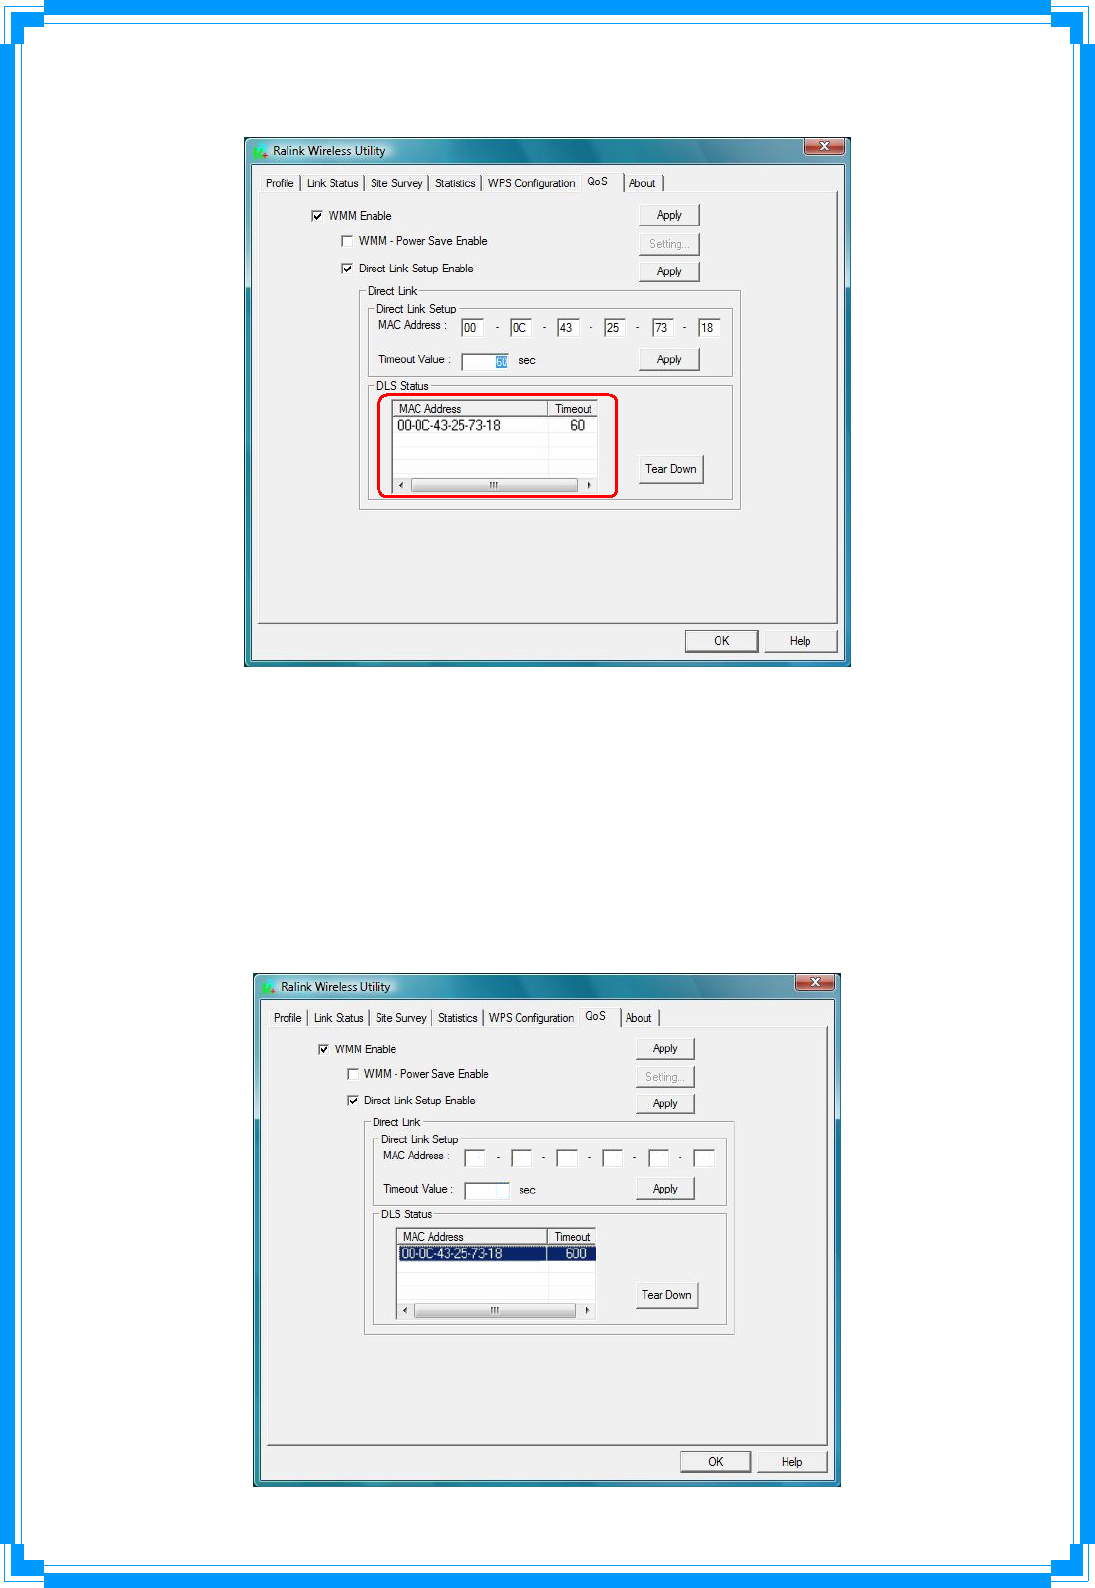
3. Click “Apply” button. The result will look like the below figure.
Describe “DLS Status” as follow:
1. As the up figure, after configuring DLS successfully, show MAC address of the opposite
side and Timeout Value of setting in “DLS Status”. In “DLS Status” of the opposite side,
it shows MAC address of myself and Timeout Value of setting.
2. Display the values of “DLS Status” to “Direct Link Setup” as follow:
Step1: In “DLS Status”, select a direct link STA what you want to show its values in “Direct
Link Setup”.
77
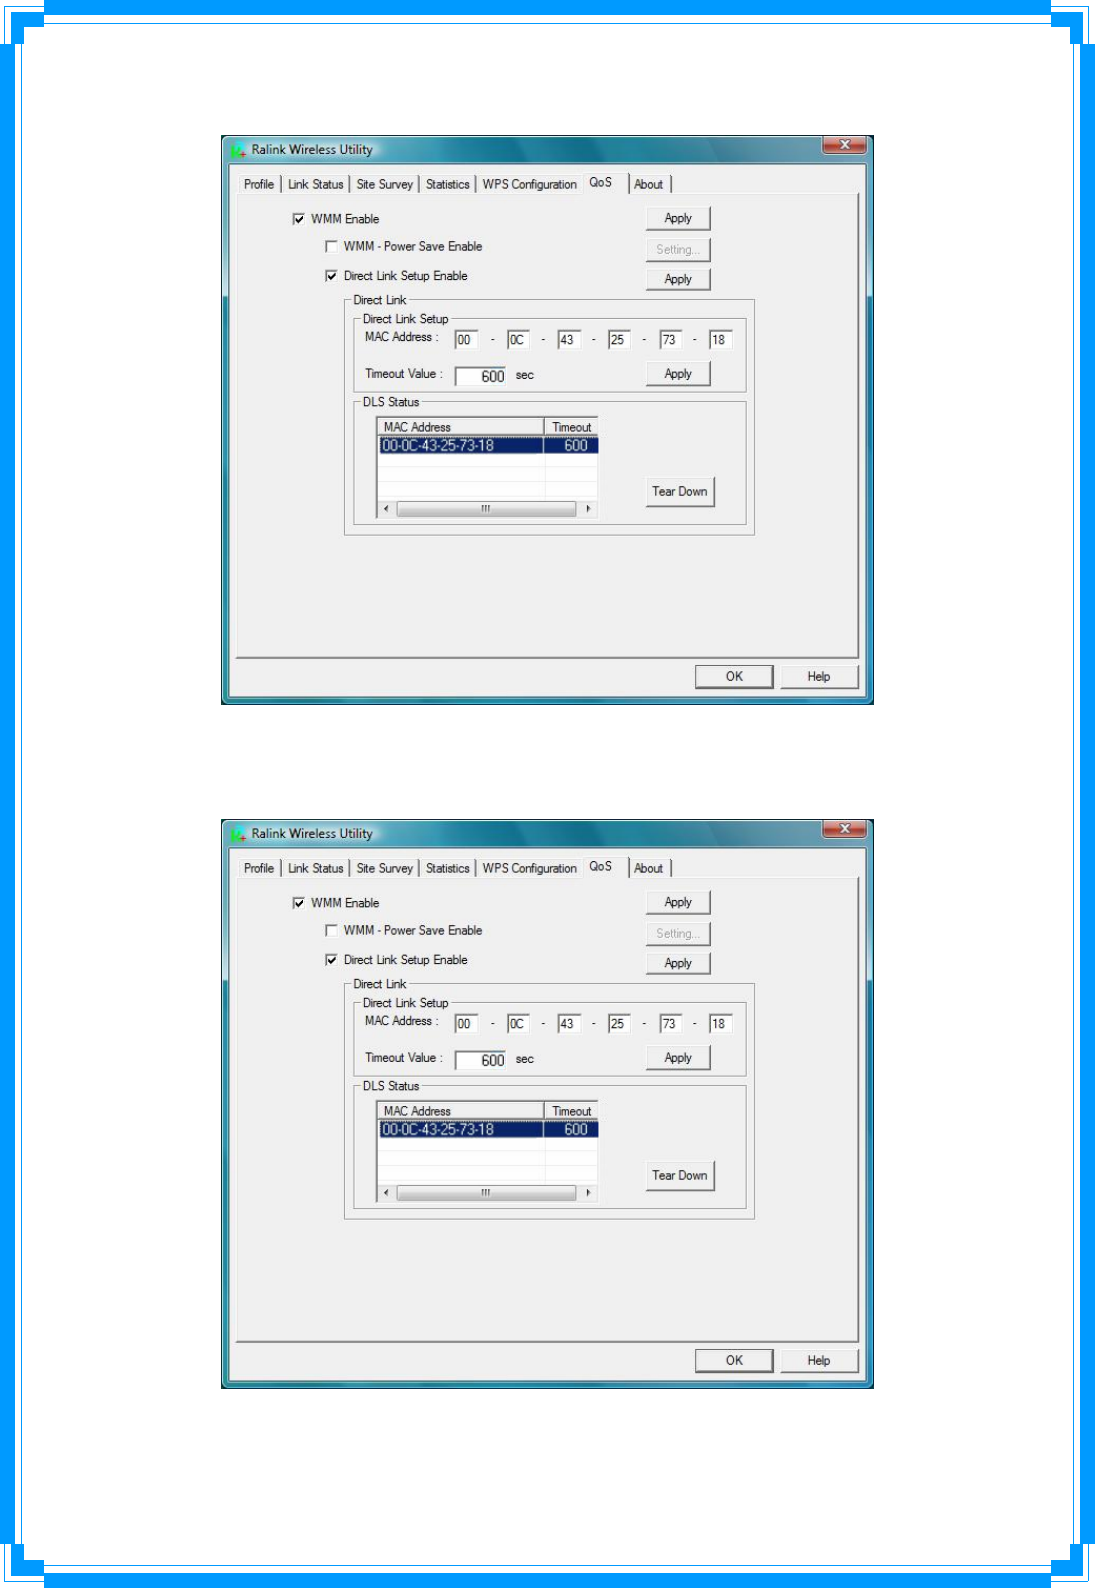
Step2: Double click. And the result will look like the below figure.
3. Disconnect Direct Link Setup as follow:
Step1: Select a direct link STA.
78
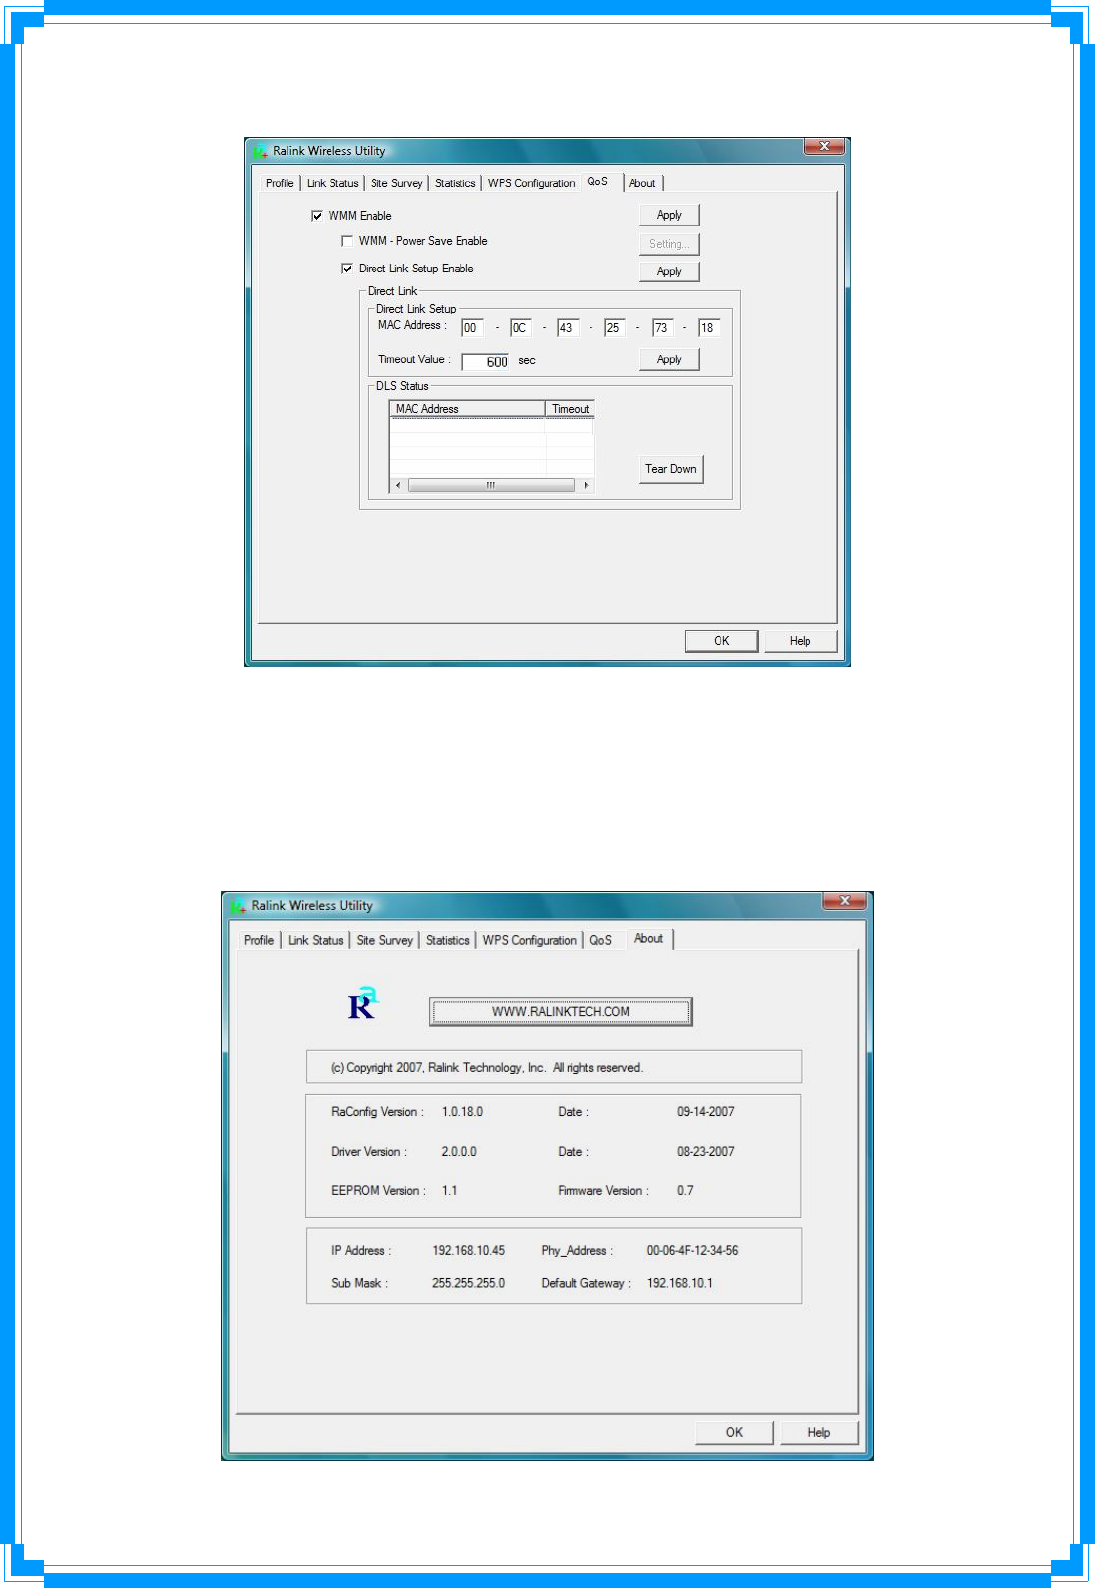
Step2: Click “Tear Down” button. The result will look like the below figure.
3.2.7 About
In the “About”, you can click the hyperlink to connect the website for the information of
the wireless chipset vendor and review basic information about the Utility such as the
RaConfig Version, Driver Version, EEPROM Version, IP Address, Sub Mask, and Default
Gateway.
79
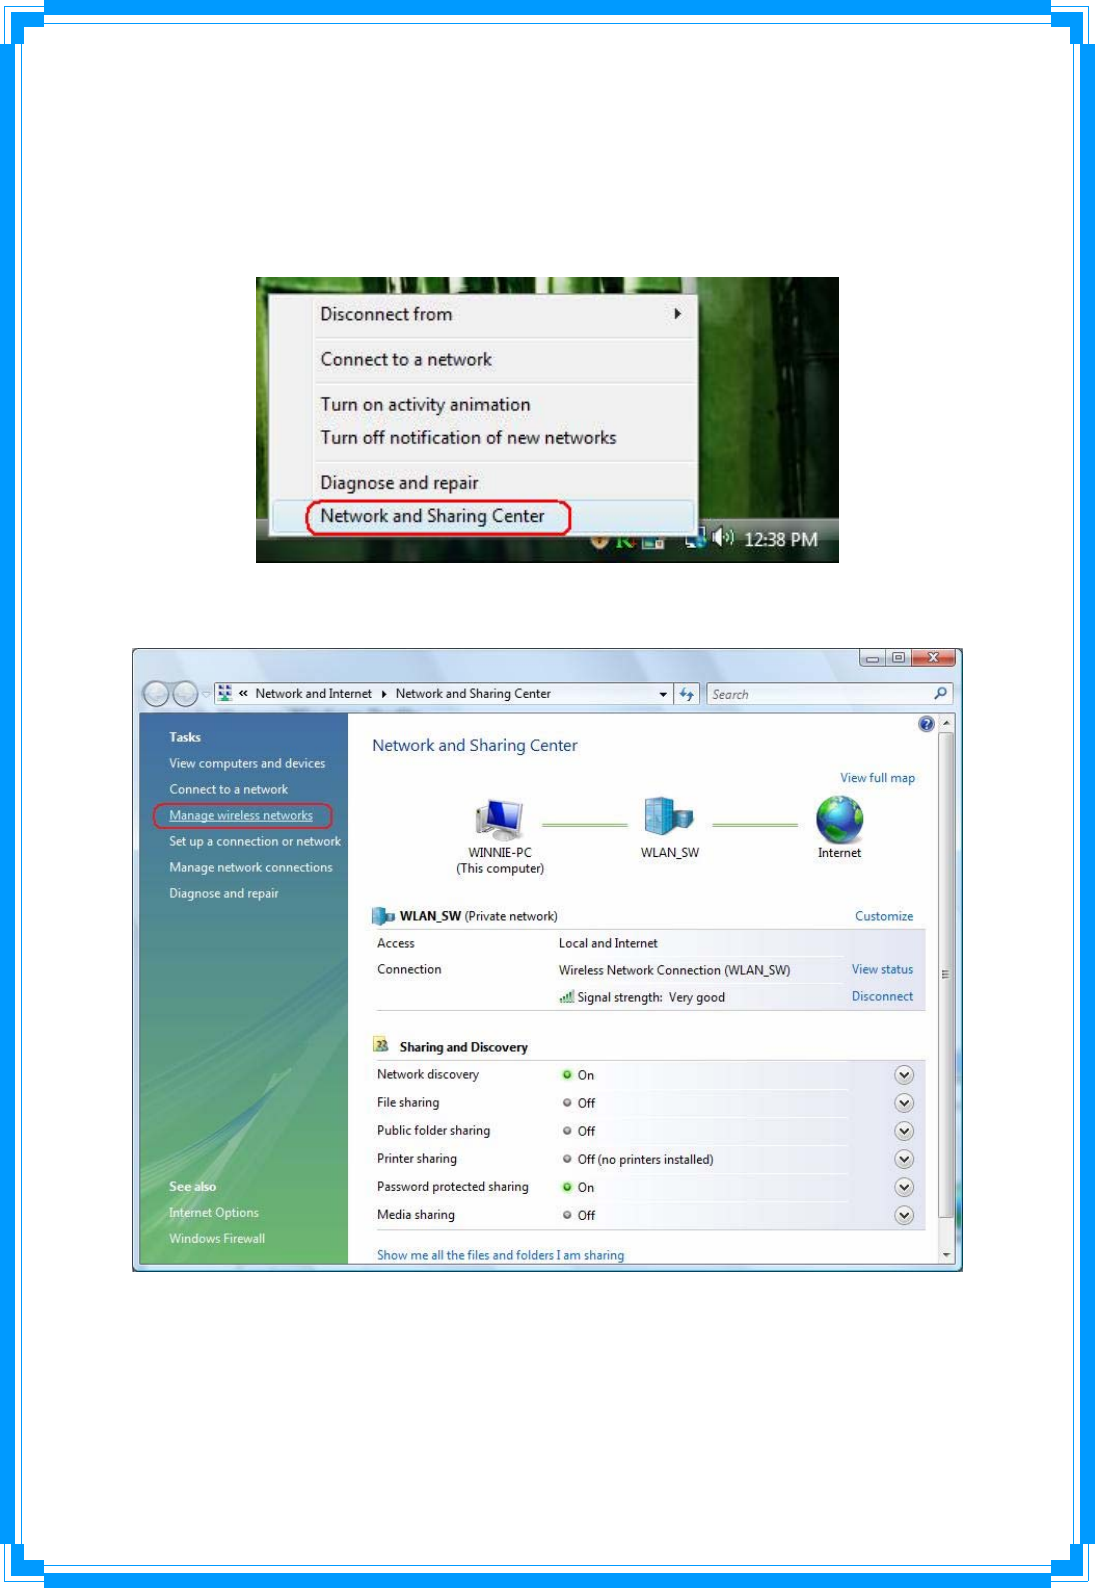
3.2.8 How to Manage Windows Profile
Windows profile manager can be reached via connection icon on the task bar or control panel.
[via Network icon]
Step 1: Right-click connection icon on the task bar, then click “Network and Sharing Center”
Step 2: Select “Manage wireless networks”
80
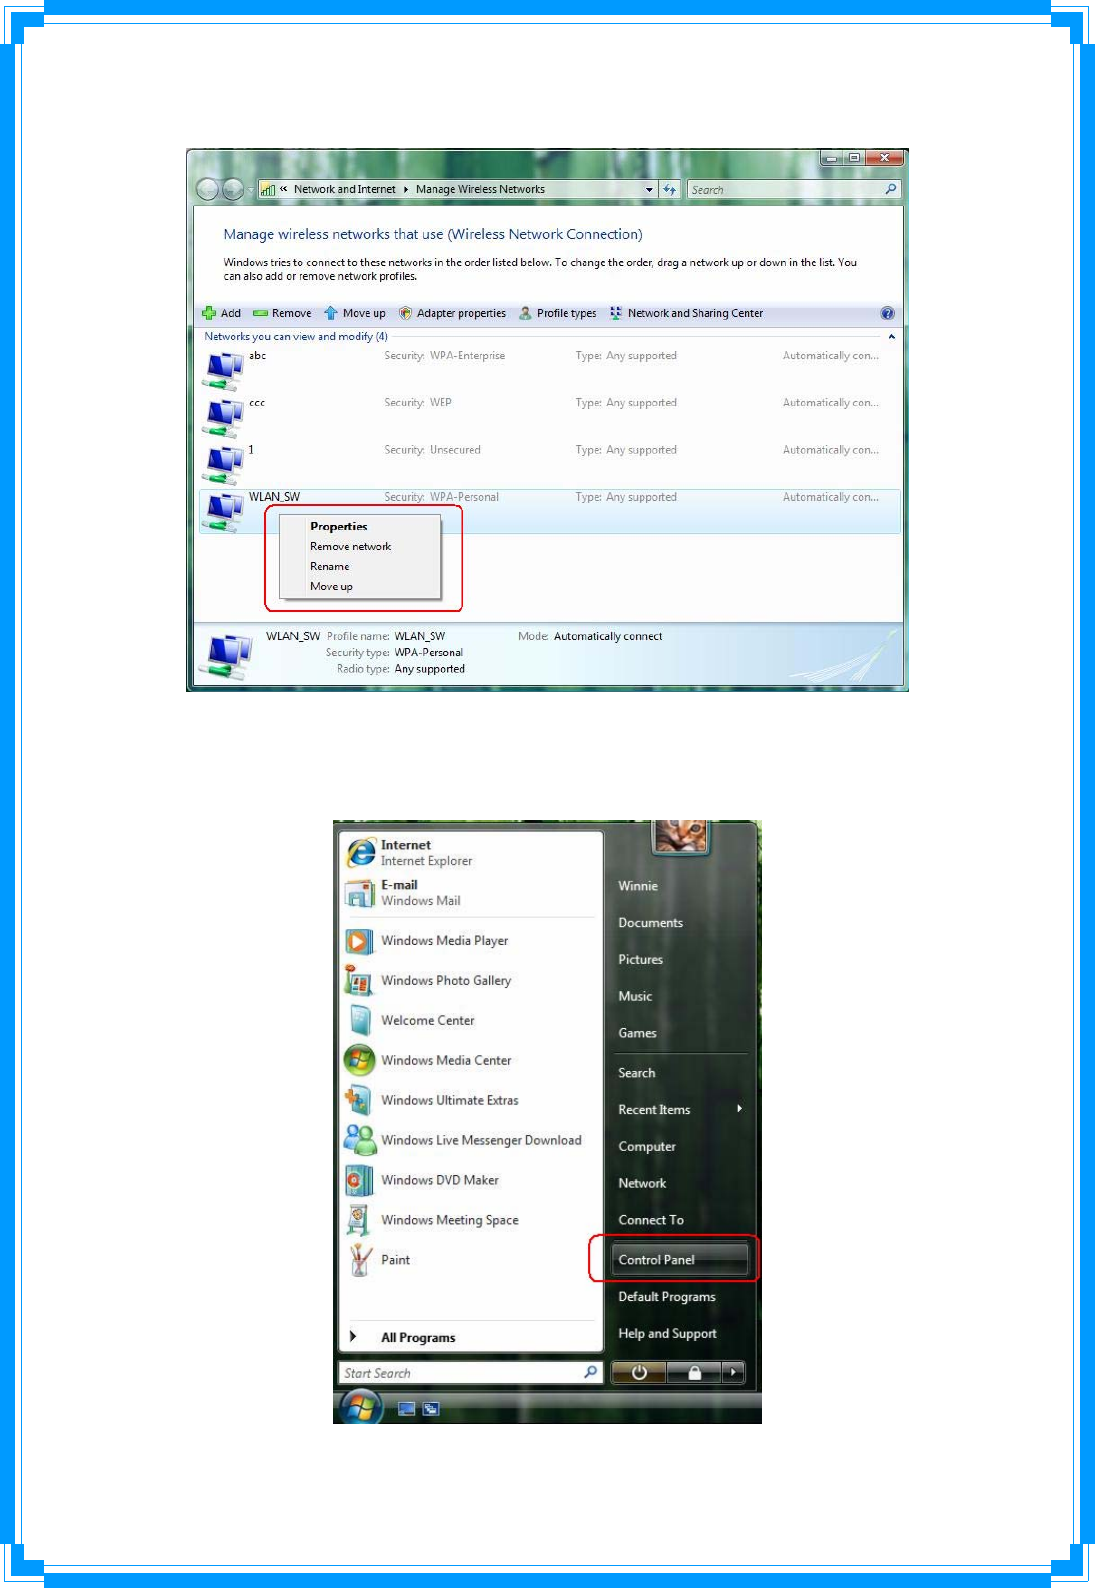
Step 3: Right-click the mouse to bring up the profile manage menu.
[via Control Panel]
Step 1: Select “Control Panel” on start menu.
81
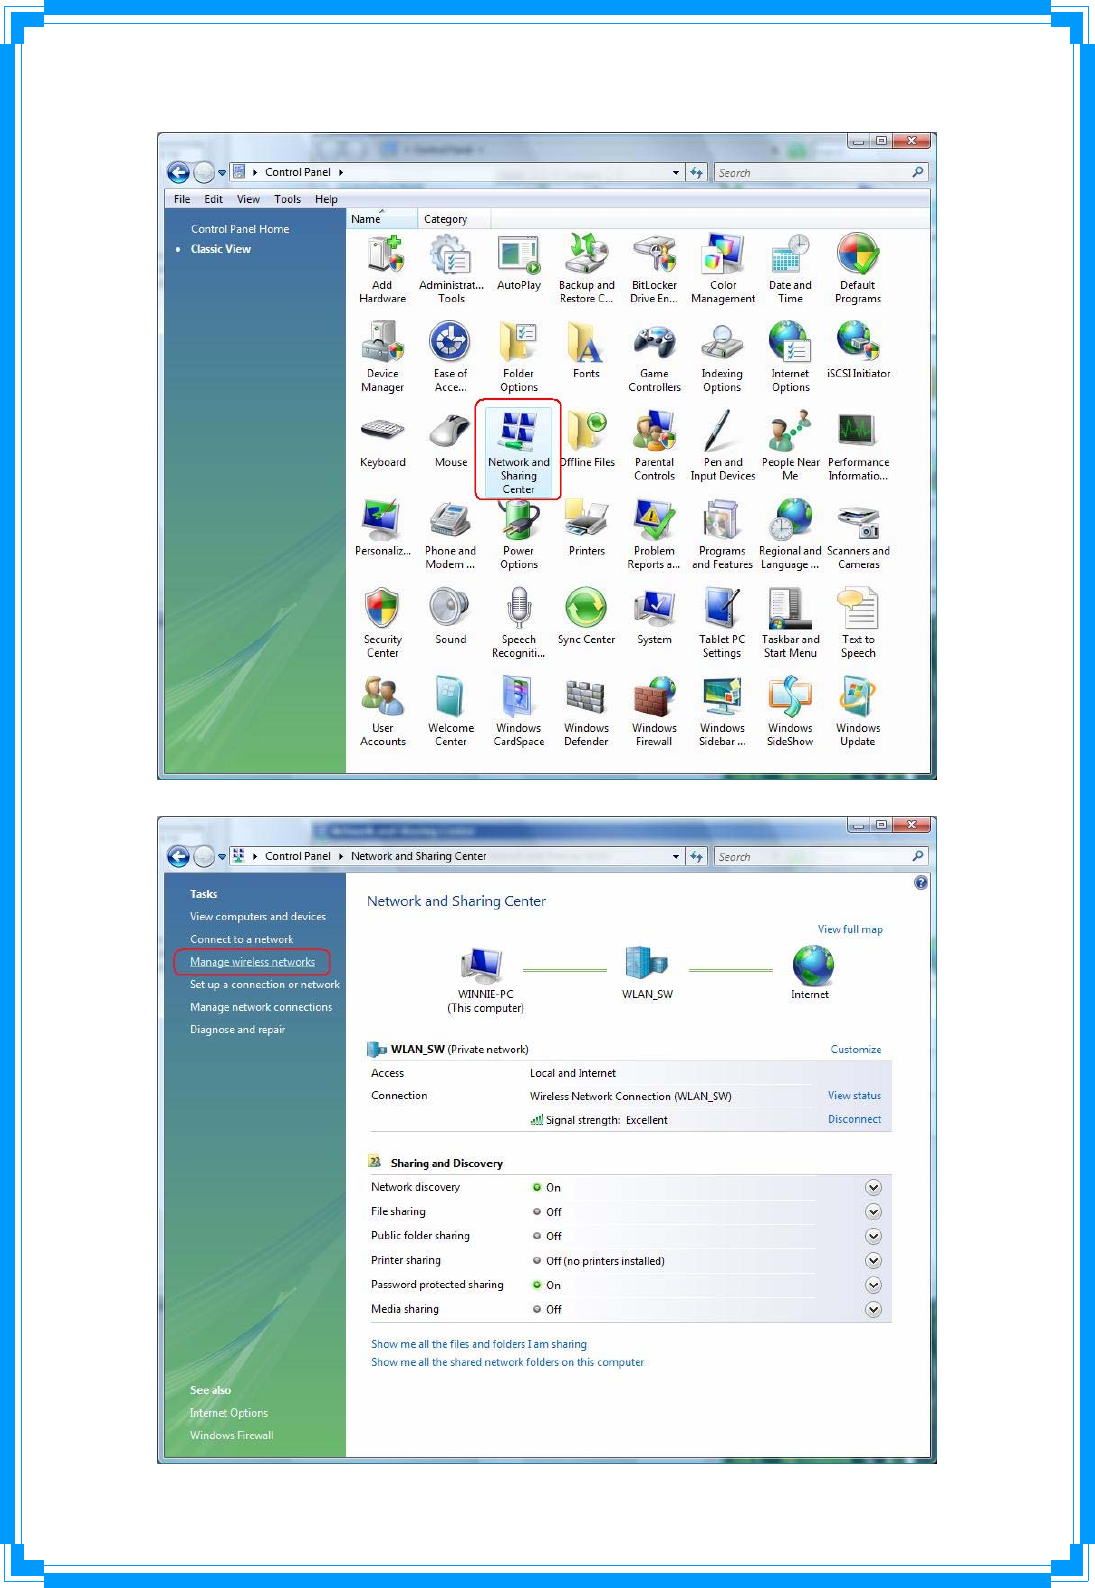
Step 2: Double-click “Network and Sharing Center” icon.
Step 3: Select “Manage Wireless network”.
82
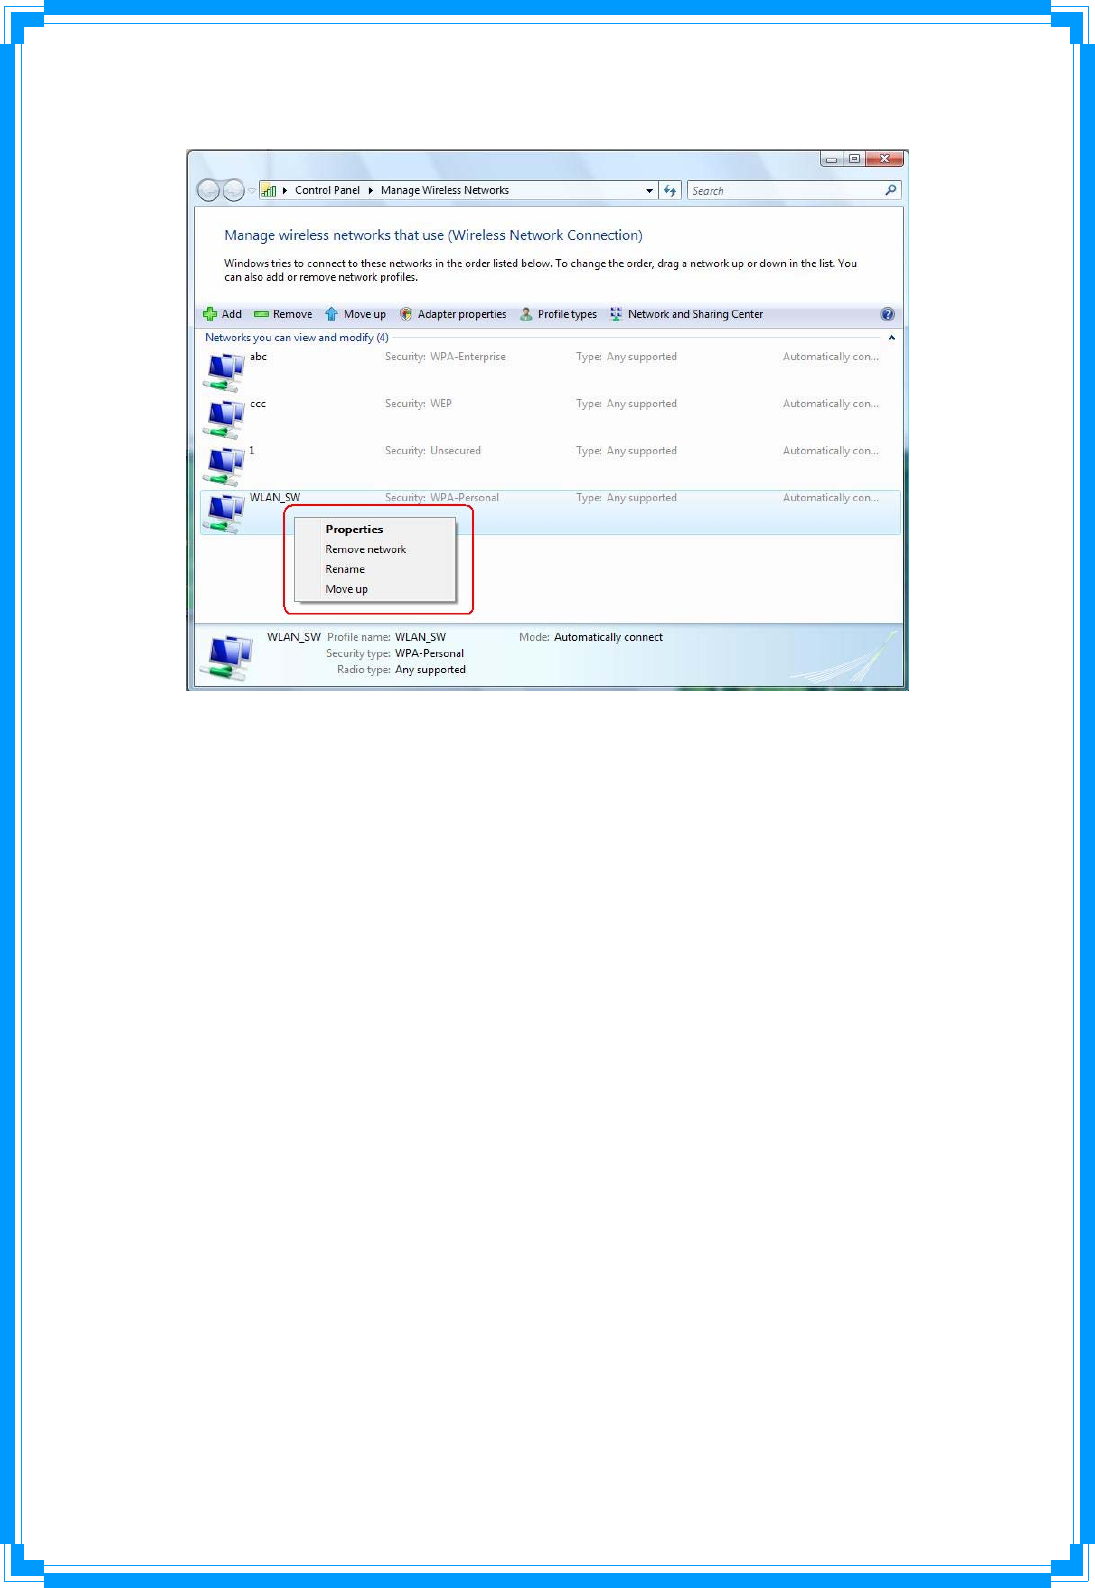
Step 4: Right-click the mouse to bring up the profile managing menu.

83
4. Troubleshooting
This chapter provides solutions to problems usually encountered during the installation and
operation of the adapter.
1. Symptom:
The LED is Off.
Possible Remedy:
Make sure the Wireless adapter is inserted properly. Otherwise, please contact your
vendor.
2. Symptom:
The LED is always on not blinking.
Possible Remedy:
Make sure that you have installed the driver from the attached CD.
3. Symptom:
The LED is blinking but the Wireless adapter icon does not appear in your icon tray.
Possible Remedy:
Make sure that you have installed the Utility from the attached CD.
4. Symptom:
The Wireless adapter is linking, but can’t share files with others.
Possible Remedy:
Make sure the File and printer-sharing function is enabled.
5. Symptom:
Slow or unstable performance.
Possible Remedy:
Try to change the channel of the communicating group or move your device closer to the
communicating device.
6. Symptom:
Can’t find the utility icon in the taskbar when plug in the Wireless adapter.
Possible Remedy:
You could enable the function by click the icon of Start Æ All Programs Æ Ralink Utility.
7. Symptom:
No wireless signal.

84
Possible Remedy:
Move the antennas of the access point or wireless router into an L shape (one vertically,
and one horizontally). Click on the Refresh button on the Site Survey screen. If the
computer still does not see the Access Point, and then try to move your Access Point
closer to the computer. Then click on the Refresh button again. If the computer still does
not see the Access Point, move all things that may cause interference with the wireless
signal.
8. Symptom:
If you still cannot get a wireless connection of the network.
Possible Remedy:
Step 1- Turn the computer off
Step 2- Turn the Access Point off
Step 3- Turn the Access Point on
Step 4- Wait 30 seconds
Step 5- Turn the computer back on
Step 6- Using the Utility reconnect to the Access Point:
Step 7- Double click on the bar graph icon in the system tray
Step 8- Select the Site Survey Link
Step 9- Highlight the SSID of your wireless network and click connect
Step 10- Click OK if all the settings are correct
9. What is the IEEE 802.11g standard?
802.11g is the new IEEE standard for high-speed wireless LAN communications that
provides for up to 54 Mbps data rate in the 2.4 GHz band. 802.11g is quickly becoming the
next mainstream wireless LAN technology for the home, office and public networks.
802.11g defines the use of the same OFDM modulation technique specified in IEEE
802.11a for the 5 GHz frequency band and applies it in the same 2.4 GHz frequency band
as IEEE 802.11b. The 802.11g standard requires backward compatibility with 802.11b.
The standard specifically calls for:
A. A new physically layer for the 802.11 Medium Access Control (MAC) in the 2.4 GHz
frequency band, know as the extended rate PHY(ERP(. The ERP adds OFDM as a
mandatory new coding scheme for 6, 12, and 24 Mbps (mandatory speeds), and 18, 36, 48,
54 Mbps (optional speeds). The ERP includes the modulation schemes found in 802.11b
including CCK for 11 and 5.5 Mbps and Barker code modulation for 2 and 1 Mbps.
B. A protection mechanism called RTS.CTS that governs how 802.11g devices and
802.11b devices interoperate.

85
10. What does IEEE 802.11 feature support?
The product supports the following IEEE 802.11 functions:
-- CSMA/CA Plus Acknowledge Protocol
-- Multi-Channel Roaming
-- Automatic Rate Selection
-- RTS/CTS Feature
-- Fragmentation
-- Power Management
11. What is Ad-Hoc?
An Ad-Hoc integrated wireless LAN is a group of computers, each has a Wireless LAN
adapter, Connected as an independent wireless LAN. Ad-Hoc wireless LAN is applicable at
a departmental scale for a branch or SOHO ope
ration.
12. What is Infrastructure?
An integrated wireless and wireless and wired LAN is called an Infrastructure configuration.
Infrastructure is applicable to enterprise scale for wireless access to central database, or
wireless application for mobile workers.
13. What is BSS ID?
A specific Ad hoc LAN is called a Basic Service Set (BSS). Computers in a BSS must be
configured with the same BSS ID.
14. What is WEP?
WEP is Wired Equivalent Privacy, a data privacy mechanism based on a 40 bit shared key
algorithm, as described in the IEEE 802.11 standard.
15. What is TKIP?
TKIP is a quick-fix method to quickly overcome the inherent weaknesses in WEP security,
especially the reuse of encryption keys. TKIP is involved in the IEEE 802.11i WLAN
security standard, and the specification might be officially released by early 2003.
16. What is AES?
AES (Advanced Encryption Standard), a chip-based security, has been developed to
ensure the highest degree of security and authenticity for digital information, wherever and
however communicated or stored, while making more efficient use if hardware and/or

86
software than previous encryption standards. It is also included in IEEE 802.11i standard.
Compare with AES, TKIP is a temporary protocol for replacing WEP security until
manufacturers implement AES at the hardware level.
17. Would the information be intercepted while transmitting on air?
WLAN features two-fold protection in security. On the hardware side, as with Direct
Sequence Spread Spectrum technology, it has the inherent security feature of scrambling.
On the software side, WLAN series offer the encryption function (WEP) to enhance security
and Access Control. Users can set it up depending upon their needs.
If you have any troubles to configure or setup this WLAN adapter, please feel free to
contact us.
Before contacting us, make sure collect following information. Submit complete detailed
information of your problem will help us to provide you accurate answers.
Model Name:
Serial Number:
PC Settings:
Other: