EverFocus Electronics EQN2201-W IP Camera User Manual
EverFocus Electronics Corp. IP Camera
User Manual

EQN2200
User’s Manual
Copyright © EverFocus Electronics Corp,
Release: Mar. 2010

EQN2200
2
Product Name: EQN2200 EverFocus Network Cameras
Model Number(s): EQN2200
Federal Communication Commission Interference Statement
This equipment has been tested and found to comply with the limits for a Class A digital device,
pursuant to Part 15 of the FCC Rules. These limits are designed to provide reasonable
protection against harmful interference when the equipment is operated in a commercial
environment. This equipment generates, uses, and can radiate radio frequency energy and, if
not installed and used in accordance with the instruction manual, may cause harmful
interference to radio communications. Operation of this equipment in a residential area is likely
to cause harmful interference in which case the user will be required to correct the interference
at his own expense.
FCC Caution: Any changes or modifications not expressly approved by the party responsible
for compliance could void the user's authority to operate this equipment.
This device complies with Part 15 of the FCC Rules. Operation is subject to the following two
conditions: (1) This device may not cause harmful interference, and (2) this device must
accept any interference received, including interference that may cause undesired operation.
This device and its antenna(s) must not be co-located or operating in conjunction with any
other antenna or transmitter.
For product available in the USA/Canada market, only channel 1~11 can be operated.
Selection of other channels is not possible.
IMPORTANT NOTE:
FCC Radiation Exposure Statement:
This equipment complies with FCC radiation exposure limits set forth for an uncontrolled
environment. This equipment should be installed and operated with minimum distance 20cm
between the radiator & your body.

EQN2200
3
EverFocus Electronics Corp.
12F, No. 79, Sec. 1, Shin-Tai Wu Rd., His-Chi,
Taipei Hsien, Taiwan, R.O.C.
EQN2200 complies with CE and FCC rules.

EQN2200
4
About this document
All the safety and operating instructions should be read and followed before the
unit is operated. This manual should be retained for future reference. The
information in this manual was current when published. The manufacturer reserves
the right to revise and improve its products. All specifications are therefore subject
to change without notice.
Safety Notices
-These limits are designed to provide reasonable protection against interference.
This equipment may generate, uses and can radiate radio frequency energy and, if
not installed and used in accordance with the instructions, may cause harmful
interference to radio communications. However, there is no guarantee that
interference will not occur in a particular installation. If this equipment does cause
harmful interference to radio or television reception, which can be determined by
turning the equipment off and on, the user is encouraged to try to correct the
interference by one or more of the following measures:
-Reorient or relocate the receiving antenna.
-Increase these separations between the equipment and receiver.
-Connect the equipment into an outlet on a circuit different from that to which the
receiver is connected.
-Consult the dealer or an experienced radio/TV technician for help.
Any changes or modifications not expressly approved by the party responsible for
compliance could void the user's authority to operate the equipment.
To reduce risk of fire or electric shock, do not expose this camera to rain or
moisture.
Do not attempt to disassemble the camera. To prevent electric shock, do not
remove screws or covers. There are no user-serviceable parts inside. Contact
qualified service personnel for maintenance. Handle the camera with care. Do not
strike or shake, as this may damage the camera.
Do not use strong or abrasive detergents when cleaning the camera body. Use
a dry cloth to clean the camera when it is dirty. When the dirt is hard to remove,

EQN2200
5
use a mild detergent and wipe gently.
Do not operate the camera beyond its specified temperature, humidity or
power source ratings. Do not use the camera in an extreme environment where high
temperature or high humidity exists. Use the camera at temperature within 0℃ ~
+40℃ / 32۫F~ 104۫F and a humidity below 90%. The input power source for this
camera is 12 VDC & 802.3af PoE.
Use only the recommended power supplies. Power supplies must comply
with the requirement of the latest version of IEC60950-1. Substitutions may
damage the unit or cause a fire or shock hazard.
Electrostatic-sensitive device. Use proper CMOS/MOSFET handing
precautions to avoid electrostatic discharge.
Installation should be performed by qualified service personnel only in
accordance with the National Electrical Code or applicable local codes.
Terms and Trademark
Ethernet, Internet Explorer, Linux, Microsoft, Windows, WWW are registered
trademarks of the respective holders. Other product names appearing in this User's
Guide may be trademarks or registered trademarks of their respective holders.
Java™ and all Java-related logos and trademarks are trademarks or registered
trademarks of Sun Microsystems, Inc. in the United States and other countries.
Support
If the unit ever needs repair service, the customer should contact the nearest
EverFocus Electronics Corp. Service Center for return authorization and shipping
instruction.
About this AC Adaptor
Specifications for AC adaptor
Power Supply: 12VDC, 1 A
Power Output: 12VDC, 1 A
Operating Temperature: 0℃ ~ 40℃ / 32۫F ~ 104۫F
External Dimensions: 56 mm x 68 mm x 101 mm / 2.24” x 2.72” x 4.04”

EQN2200
6
TABLE OF CONTENTS
1. INTRODUCTION....................................................................................................7
2. FEATURES ..............................................................................................................7
3. SPECIFICATIONS..................................................................................................8
4. ACCESSING THE CAMERA MENU ...................................................................9
5. SETTING................................................................................................................12
4.1 SYSTEM INFO ......................................................................................................12
4.1.1 Information Tab...........................................................................................12
4.1.2 Log Tab .......................................................................................................13
4.2 USER CONFIG ......................................................................................................14
4.3 NETWORK ...........................................................................................................16
4.3.1 Network.......................................................................................................16
4.3.2 DDNS..........................................................................................................19
4.3.3 Bandwidth...................................................................................................20
4.3.4 SMTP/FTP ..................................................................................................21
4.3.5 Network Alarm (reserved for PowerCon)...................................................23
4.4 VIDEO .................................................................................................................23
4.4.1 Multi Streaming ..........................................................................................24
4.4.2 Camera ........................................................................................................25
4.5 AUDIO .................................................................................................................27
4.6 USER .................................................................................................................28
4.7 EVENT...............................................................................................................29
4.7.1 Event ...........................................................................................................30
4.7.2 Motion.........................................................................................................32
4.7.3 Alarm...........................................................................................................33
4.7.4 Time Mask ..................................................................................................34
4.8 SYSTEM............................................................................................................36
4.8.1 Date/Time....................................................................................................36
4.8.2 Daylight Saving ..........................................................................................38
4.8.3 SD Card.......................................................................................................39
4.8.4 Maintenance................................................................................................41

EQN2200
7
1. INTRODUCTION
EQN22 series Q-cam is an entry-level network camera which provides competitive
price but superior image quality with up to 30fps in 720p (1280x720) resolution.
For easy and flexible installation, EQN2200 and EQN2200W offer the choice of either
a wireless or a wired connection to the network.
EQN2230 additionally features an integrated PIR sensor for detecting movement
even in the dark, and a white LED for illuminating the scene automatically at an event
or when requested by the user.
EQN22 series provides two-way audio support with built-in microphone and speaker,
allowing remote listening in on an area, as well as communication with individuals
directly or using uploaded or recorded audio clips.
2. FEATURES
Built-in H.264 and MJPEG dual stream output at 720p image size with up to
30fps.
2 mega-pixel 1/3” progressive scan CMOS sensor
Integrated fix focus wide angle lens (3.6 mm), adjustable focus
Built-in PIR sensor and White LED for motion detection (for EQN2230)
Built-in Microphone and Speaker
Digital I/O for external sensor or alarm
Basic intelligence in the camera such as schedule, motion detection, FTP upload,
email... (TBD)
Built-in network interface (10Base-T/100Base-TX) for remote monitoring by PC
Built-in 802.11b/g WLAN (EQN2200W).
Two Way Audio for built-in microphone and speaker

EQN2200
8
3. SPECIFICATIONS
MODEL EQN2200: wired interface
EQN2200W: wired and wireless interface
EQN2230: wired interface and PIR sensor, White LED
CAMERA
Pickup Device 1/3" progressive scan CMOS sensor, 2 Megapixel
Lens 4.3mm/F=1.8
Sensitivity 0.5Lux /F=1.8
VIDEO STREAMING
Video Compression H.264M-JPEG (Hisilicon platform)
Video Resolution 1600x1200 to 160x120
Frame Rate 1600x1200@10fps, 1280x960@15fps, 720p @ 30fps
AUDIO
Microphone & Speaker Built-in
Operation Mode Two-way audio
NETWORK
Interface 10Base-T/100Base-TX auto-negotiation, RJ-45 socket
Support MDI/MDI-X auto crossover function
Built-in IEEE 802.11b/g WLAN (for EQN910W)
Supported Protocols HTTP, TCP / IP, UDP, RTP, RTSP, FTP, SMTP, DHCP, DNS, DDNS, NTP
Client Limit 32 clients simultaneously (max.)
TERMINAL I/O
Alarm Input/Output 1/1
EVENT MANAGEMENT
Event Trigger Alarm Input, Manual Trigger, Motion Detection and Schedule Recording
Notification Trigger alarm output, Send mail notification, Upload video to FTP, Record
video to PC and Network alarm
BUILT IN LIGHT
Type 1 White LED
Brightness Directly in front of camera: about 8.5 lux
POWER
Power Supply 5VDC
Power Consumption 5W Max.
PHYSICAL
Weight TBD
Dimension TBD
ENVIRONMENTAL
Operating Temp. 0°C ~ 40°C / 32°F ~ 104°F
Humidity < 90% not condensing
EQN2200
9
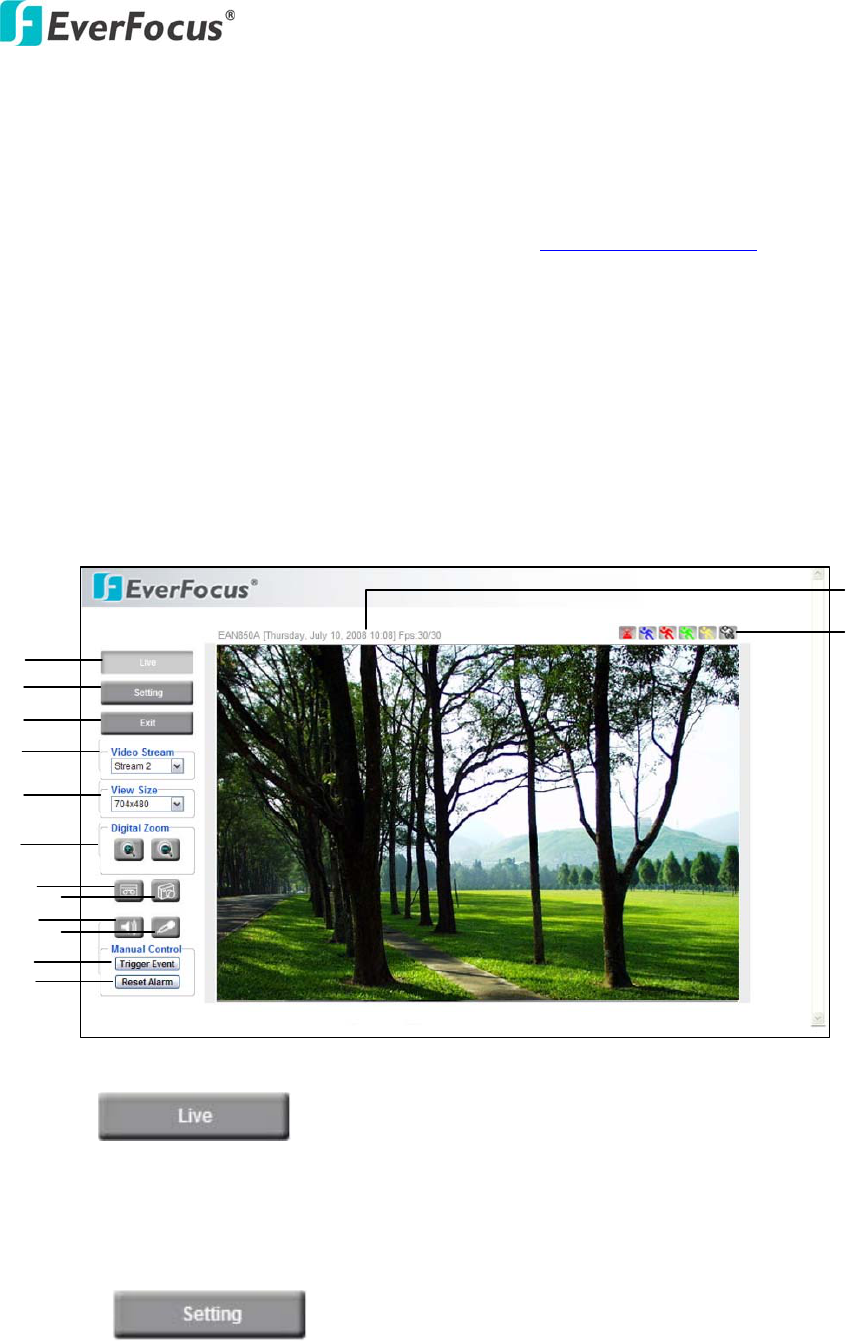
4. ACCESSING THE CAMERA MENU
Step 1.Start an Internet Explorer browser session.
Step 2. Enter the IP address or host name of the camera in the Location/Address
field of your Internet Explorer browser in the form http://nn.nn.nn.nn:port, or
http://ddnsname.everfocusddns.com. (Please refer to EQN2200 Installation
Guide for how to find the IP address by using the IP Finder)
Step 3. At the login popup window enter “Username” and “Password”. Default
Username is “user1” and default password is “11111111”.
Step 4. Click “Login” button.
Step 5. You might be required to download Active X files, which are required to
process camera video. Please click "Yes".
Step 6. Congratulations!! You should now be able to see the live image.
Callouts hard to read on figure and in list below!!!
○
1 Press button to display the "Live" page.
Double click on the image to show a full screen display, double click again or press
ESC to return to the normal display.
○
2 Press button to enter the camera Setting page. In the
Setting page, there are 8 sections: [System Info], [User Config], [Network], [Video],
[Audio], [User], [Event] and [System]. Please refer to “Section 5. SETTING” for
further information.
○
1
○
2
○
12
○
11
○
10
○
9
○
8
○
7
○
3
○
4
○
6
○
13
○
5
○
14
EQN2200
10
○
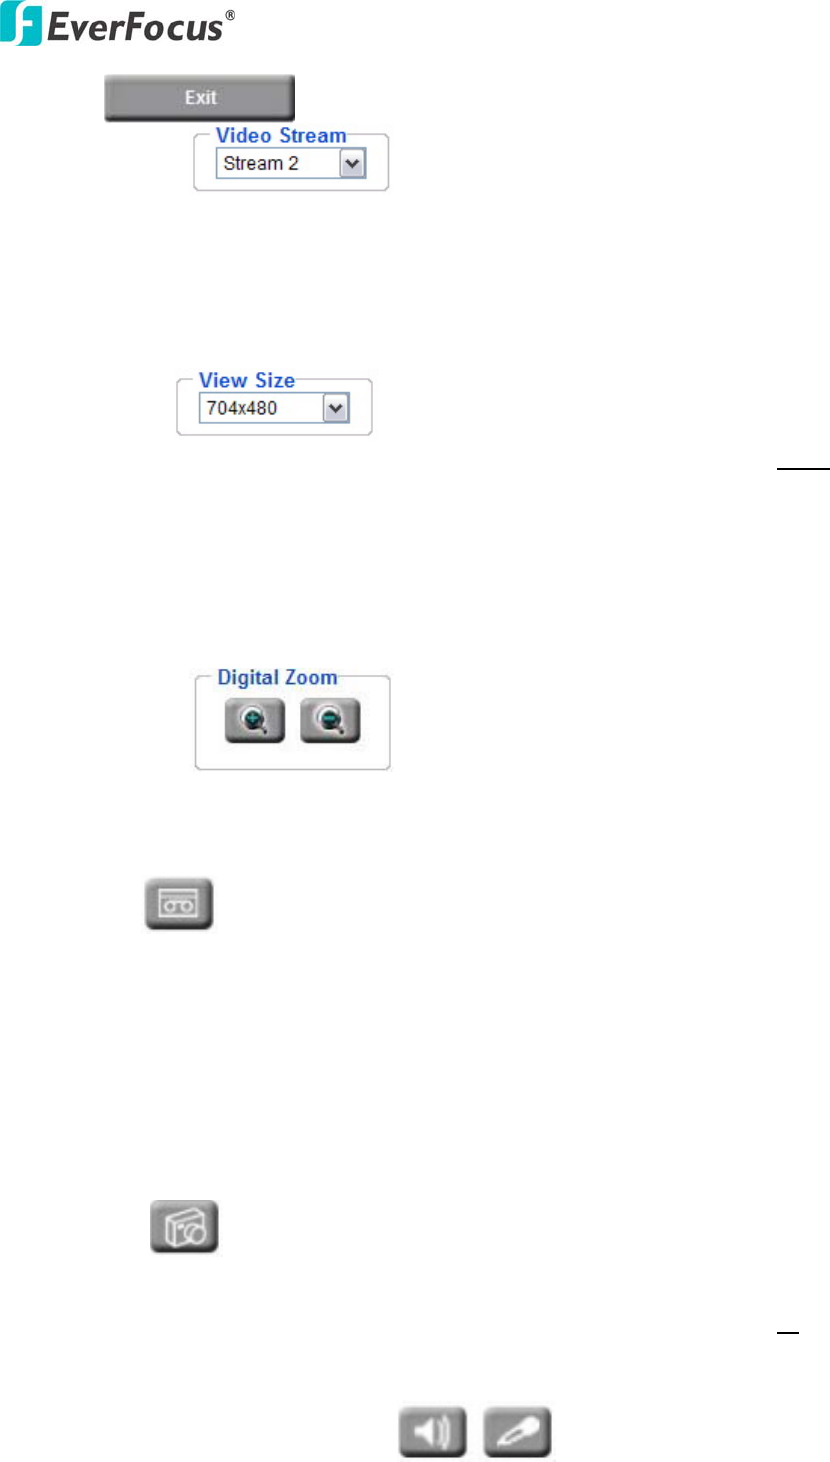
3 Press button to close the EQN2200 network page.
○
4 Video Stream
Select the desired Video Stream from Stream 1 / Stream 2, Stream 3 and Stream 4
stream must be enabled in camera Setting menu). Please refer to "Section 4.4.1 Multi
Streaming” for further information.
○
5 View Size
You can select View size to either reduce or enlarge the image to the appropriate view
size.
Select the view size for live images from:
704*480/640*480/352*240/320*240/176*120
○
6 Digital Zoom
Press “+” or “-“ button to magnify / reduce the displayed image. (max. is X10)
Clicking on a magnified image will re-center the image around that point.
○
7 Record
The record button is used to record the current video stream. The location where the
image file is saved can be specified in Setting -> User Config. Please refer to “Section
4.2 User Config” for further information.
Note: Record segment is limited to 1-10 min. If you need to do long recordings,
please use schedule recording. For more details about schedule recording, please see
“Section 4.7 Event”.
○
8 Snapshot
The Snapshot button saves a .jpg image of the video image currently being displayed.
The location where the snapshot data is saved can be specified in Setting -> User’s
Config. Please refer to “Section 4.2 User Config” for further information.
EQN2200
11
○
9 ~ ○
10 Play Audio/Transmit Audio
Click the “Play Audio” and “Transmit Audio” buttons to switch the sound off and on
for the audio input and output, respectively.
○
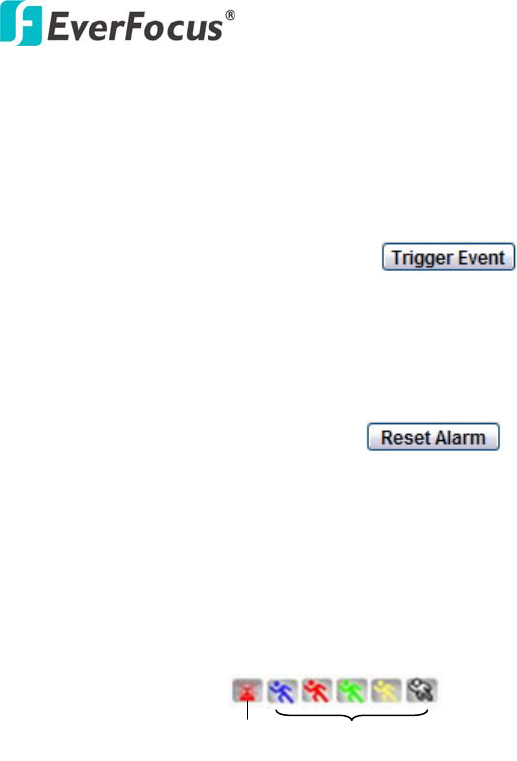
11 Manual Control – Trigger Event
Press “Trigger Event” button to trigger an event directly from the live view page, and
event actions will be initiated if they have been set up in the “Event” menu. (Please
refer to “Section 4.7.1 Event”)
○
12 Manual Control – Reset Alarm
Press “Reset Alarm” button to reset an alarm condition remotely.
○
13 Status Display
The name of the camera currently being viewed, current date/time and current frame
rate will be displayed.
○
14 Event signals
When an alarm or motion event is triggered, a signal icon will flash to alert the user.
The first icon is for alarm events and the other 5 icons are for motion events. The
motion event icons, which differ by color, correspond to the motion trigger areas set
in the Motion menu. Please refer to “Section 4.7.2 Motion” for detailed information
about Motion setup.
Motion
Alarm
EQN2200
12
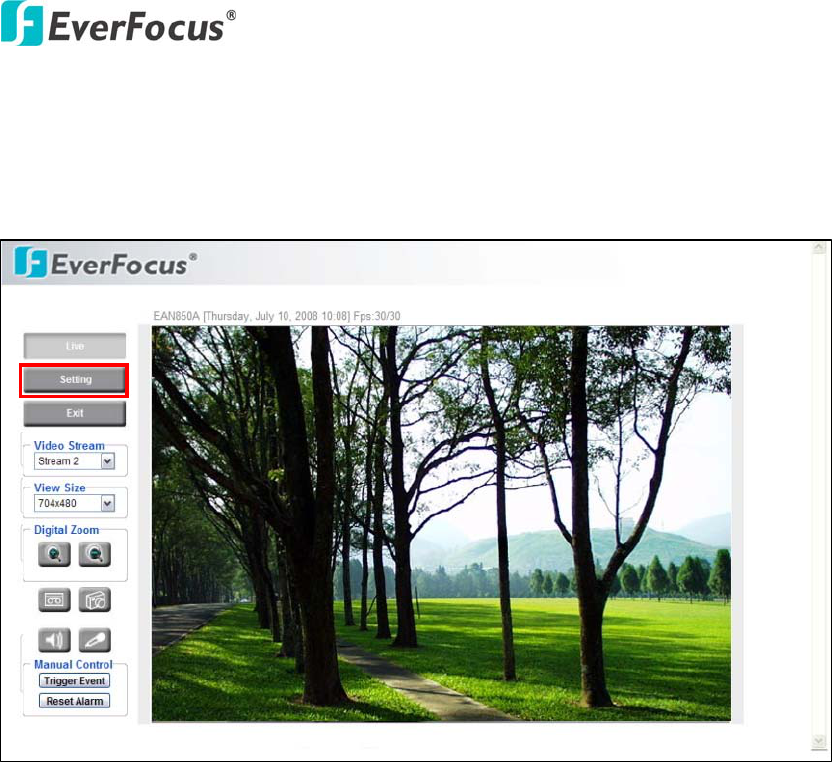
5. SETTING
Click this button to display the camera setup menu.
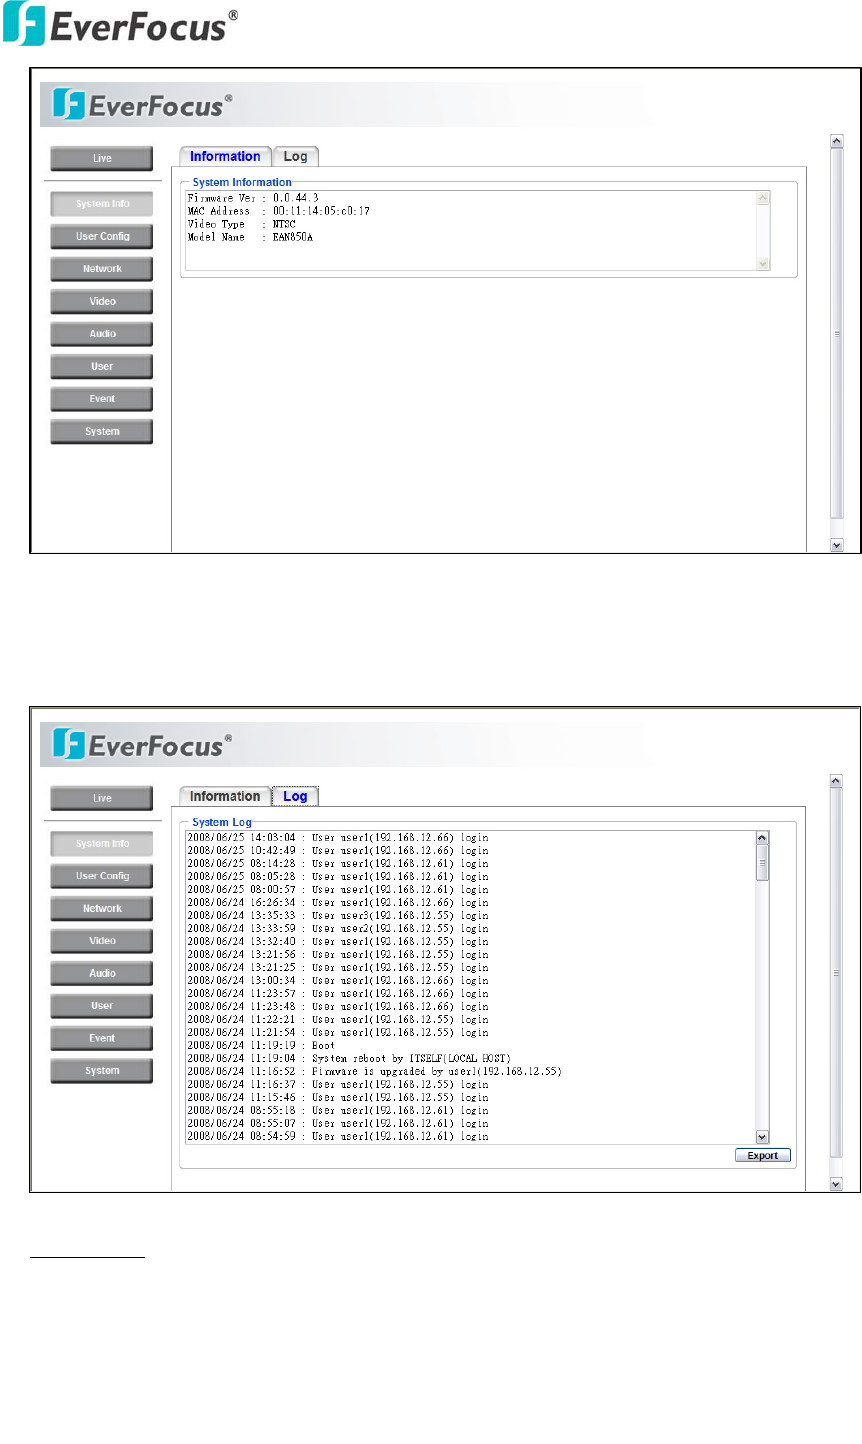
4.1 System Info
System information and system log events can be accessed on this page via 2 tabs:
[Information] tab and [Log] tab.
4.1.1 Information Tab
System Information: Firmware version, MAC address, Video Type, Model number.
(this data may not be changed in this page and is for reference only)
EQN2200
13
4.1.2 Log Tab
System Log:
Date/Time: displays date and time of the log event.
Log message: all information and event message, including login, user’s IP, reboot,
firmware upgrade, load factory default, configuration reset and event detected.
System will keep the newest 256 records.
EQN2200
14
Press button to export the system log into a “.txt” file and select the
location where the exported log file will be saved.
4.2 User Config
The configuration and operation of the Live View screen can be changed based on the
login user ID. The settings which can be customized for each of the 10 possible login
IDs are:
Text Setting
Check the box to enable display of the Machine name, Date/Time or Frame
Rate on the screen.
Text Color
Foreground Color: Select the foreground color of text to be displayed by moving
the slide bar between Red, Green and Blue until the desired color is obtained.
Position: Select the position where the text will be displayed: Upper Left / Lower
Right / Lower Left.
EQN2200
15
Press Apply to apply the setting changes or Reset to reset without saving the
changes.
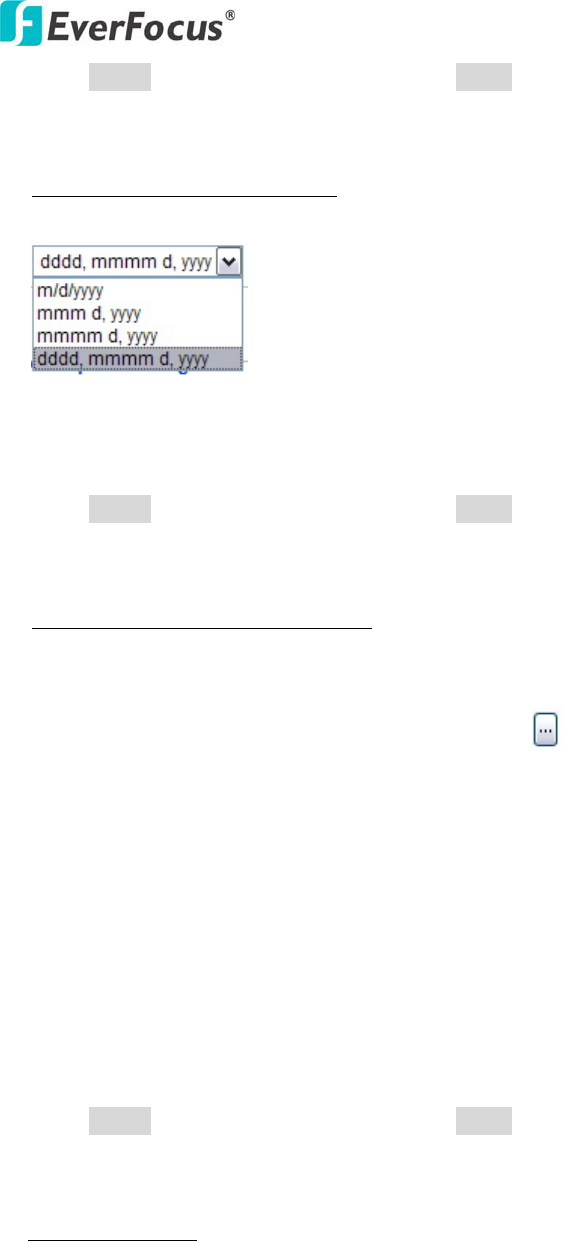
Date/Time Format Used in Text
Select Date/Time Format from the following options:
* day of week, Month, date, year
Time Format: choose between 24 Hours or 12 Hours.
Press Apply to apply the setting changes or Reset to reset without saving the
change.
Recording/Snapshot Export Setting
Enable Event Recording to PC: Allow event video recorded to users' PC if any
events have been set to record to PC.
Export folder: Select Export folder by clicking on button, then direct to the
folder to be exported.
File size: Set the limit for the size of the single recording file in minutes. When the
single recording file size exceeds the time you set, the system will create a new file
to continue recording.
Overwrite: Select “ON” for overwriting recording/snapshot file when the disk
storage capacity is full.
If the remaining hard disk capacity is less than ____ MB (enter the value you wish
to set between 50~2000), the system will stop recording or start overwriting.
Press Apply to apply the setting changes or Reset to reset without saving the
changes.
Language Setting
Language: Select the language to be displayed in web page. Default language is
English. To add a new language which is not listed in the original configuration,
press the Browse button to locate the new language file (.evb) and then click the
Load button.
EQN2200
16
Press Apply to apply the setting changes or Reset to reset without saving the
change.
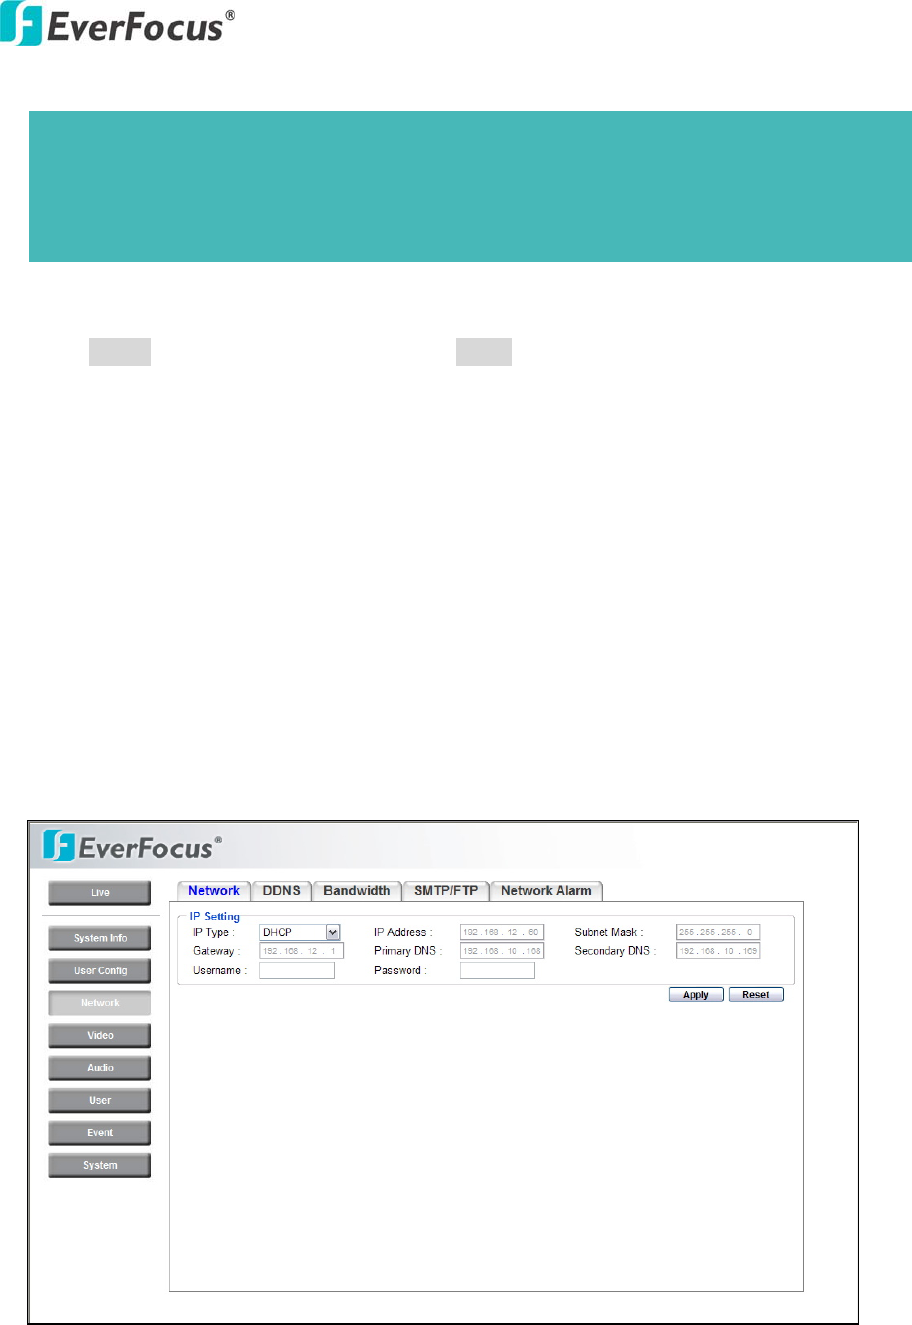
4.3 Network
The network settings and the settings relating to DDNS, Bandwidth, SMTP/FTP
and Network Alarm can be configured on this page.
The "Network setup" page has 5 tabs: [Network] tab, the [DDNS] tab, the
[Bandwidth] tab, the [SMTP/FTP] tab and the [Network alarm] tab.
4.3.1 Network
The following information is required to configure the network settings. Contact
the network administrator or your Internet service provider.
Note:
1. A maximum five languages can be in the language list.
2. Uploading a new language file will reboot the system
automatically. Please reconnect to the IP camera after reboot.

EQN2200
17
• IP Type
• IP address
• Subnet mask
• Gateway (when using the gateway server/router)
• Primary DNS, Secondary DNS (when using DNS)
IP Type
DHCP: Configure the DHCP server not to assign the same IP addresses used for
the other network cameras and PCs whose IP address is unique.
Refer to the network administrator for the settings of the server.
Default: DHCP.
Static IP: User can manually set the static IP for network connection.
PPPoE: This is for a DSL DIRECT connection application; the ISP will require a
user name and password. (That is, if a single camera is connected directly to the
DSL modem.)
IP address
When not using DHCP, enter the IP address of the camera. Avoid address conflicts;
do not enter an IP address already used for a PC or other network cameras. Every
device on an IP network must have a unique IP address.
Subnet Mask
This field is to set the netmask for your network so as the IP camera will be
recognized within the network. Example: 255.255.255.000 typical for a Class “C”
network. When DHCP is selected, the DHCP server will assign this value
automatically.
Gateway
This field is to set the gateway for your network so the IP camera will be
recognized within the network. When DHCP is selected, the DHCP server will
assign this value automatically.
Primary DNS
Note: If PPPoE is used as IP type, IP Utility software will not be able to detect
the device.

EQN2200
18
An IP address of DNS server that is provided by ISP. This address may be assigned
automatically if DHCP is used. A correct DNS IP is essential if DDNS will be
used.
Secondary DNS
If your ISP provides you an IP address secondary DNS, please set it here.
Username
Enter User name of the account (used only for PPPoE).
Password
Enter Password of the account (used only for PPPoE).
Press Apply to apply the setting changes or Reset to reset without saving the
change.
EQN2200
19
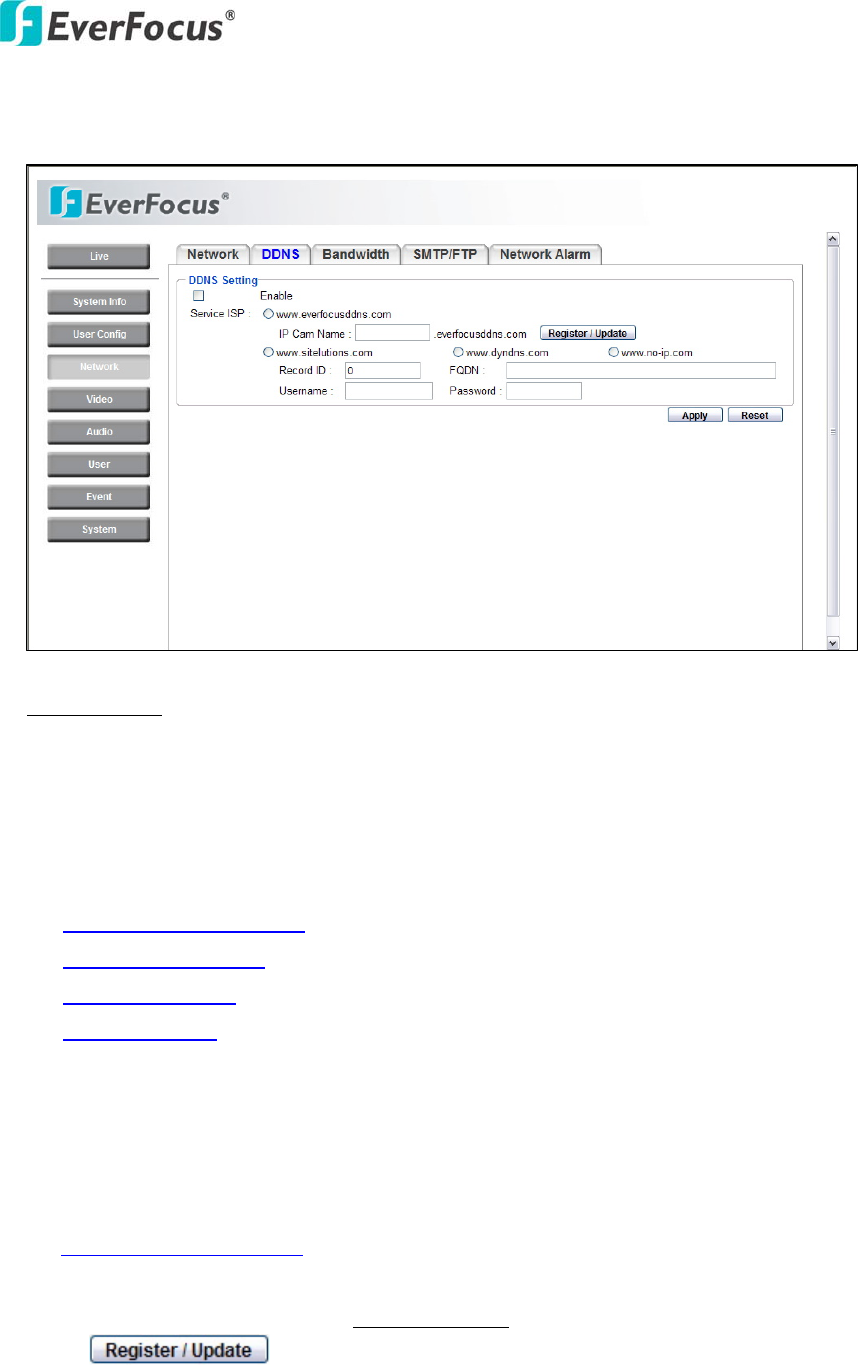
4.3.2 DDNS
DDNS setting
When accessing the camera via the Internet in a network environment where the
site IP address is obtained using DHCP, the DDNS function is necessary.
To use the DDNS function, it is necessary to connect to the dedicated DDNS
server. We support 4 DDNS server providers as follows:
○ 33www.everfocusddns.com
○ 33www.sitelutions.com
○ 33www.dyndns.com
○ www.no-ip.com
Enable: Check the box to enable DDNS setting.
Service ISP: If you choose EverFocus DDNS server, you can easily register a
DDNS name and obtain free DDNS services from EverFocus
at ”44www.everfocusddns.com”.
Enter an IP Cam Account Name: .everfocusddns.com
Press button to register or update DDNS account.
If you wish to get a domain name from another DDNS provider, it may be
EQN2200
20
necessary to configure Record ID, FQDN, Username and password and register in
advance for DDNS services. Refer to the web site for further information about the
DDNS provider.
Press Apply to apply the setting changes or Reset to reset without saving the
change.
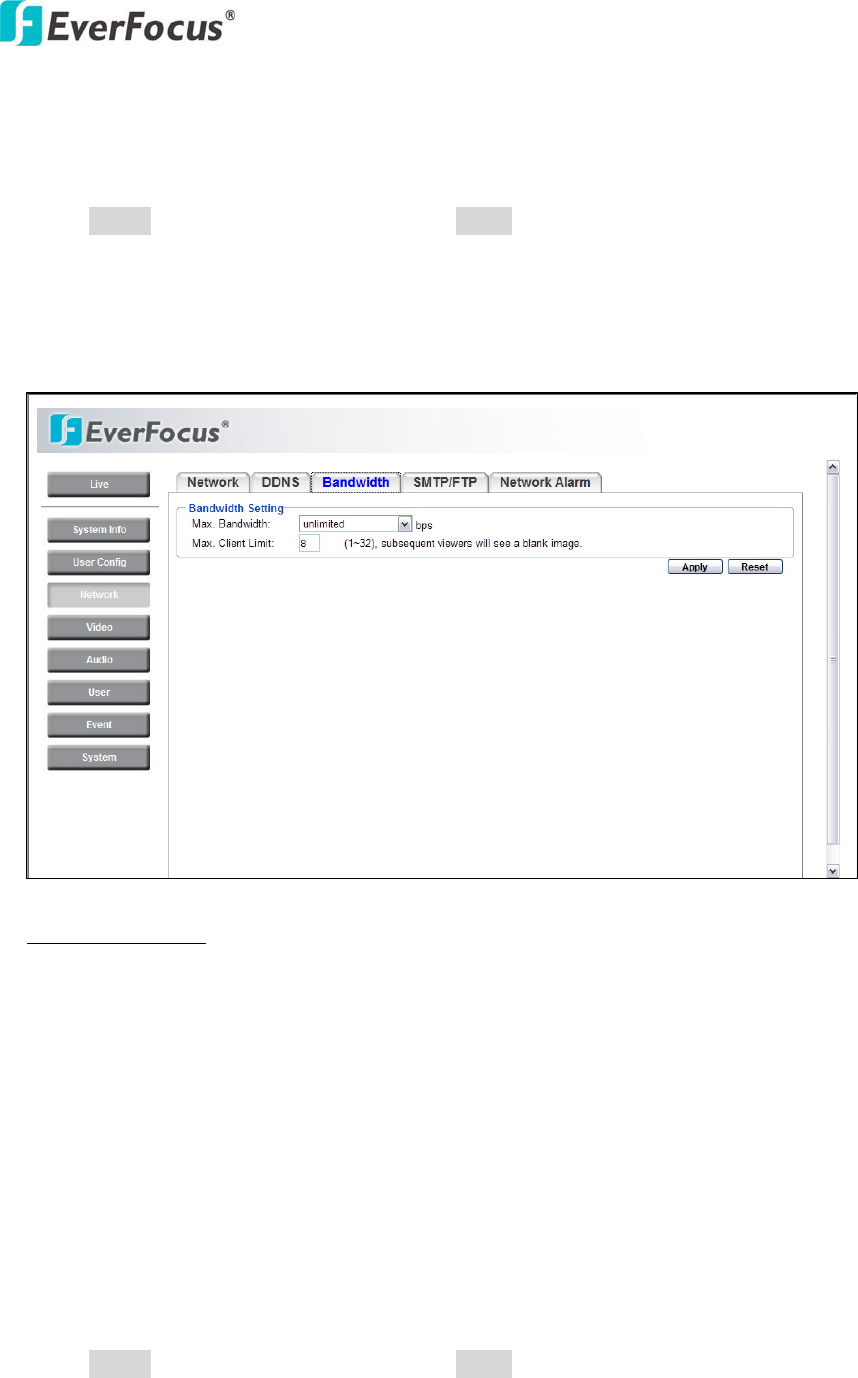
4.3.3 Bandwidth
Bandwidth Setting
Max. Bandwidth: Specify, Unlimited / 64 K/ 128 K/ 256 K / 512 K / 1M / 2M / 4M
/ 8M bps. the maximum bandwidth that the camera is allowed to use on the
network. This is a useful function when connecting the camera to busy or heavily
loaded networks, or when accessing the camera(s) over a WAN. The default setting
is Unlimited.
Max. Client Limit: enter a value here to restrict the number of clients accessing the
camera. This is useful if you need to save on bandwidth. Up to 32 clients is
allowed to see live video simultaneously. Subsequent viewers will see a blank
image.
Press Apply to apply the setting changes or Reset to reset without saving the
change.
EQN2200
21
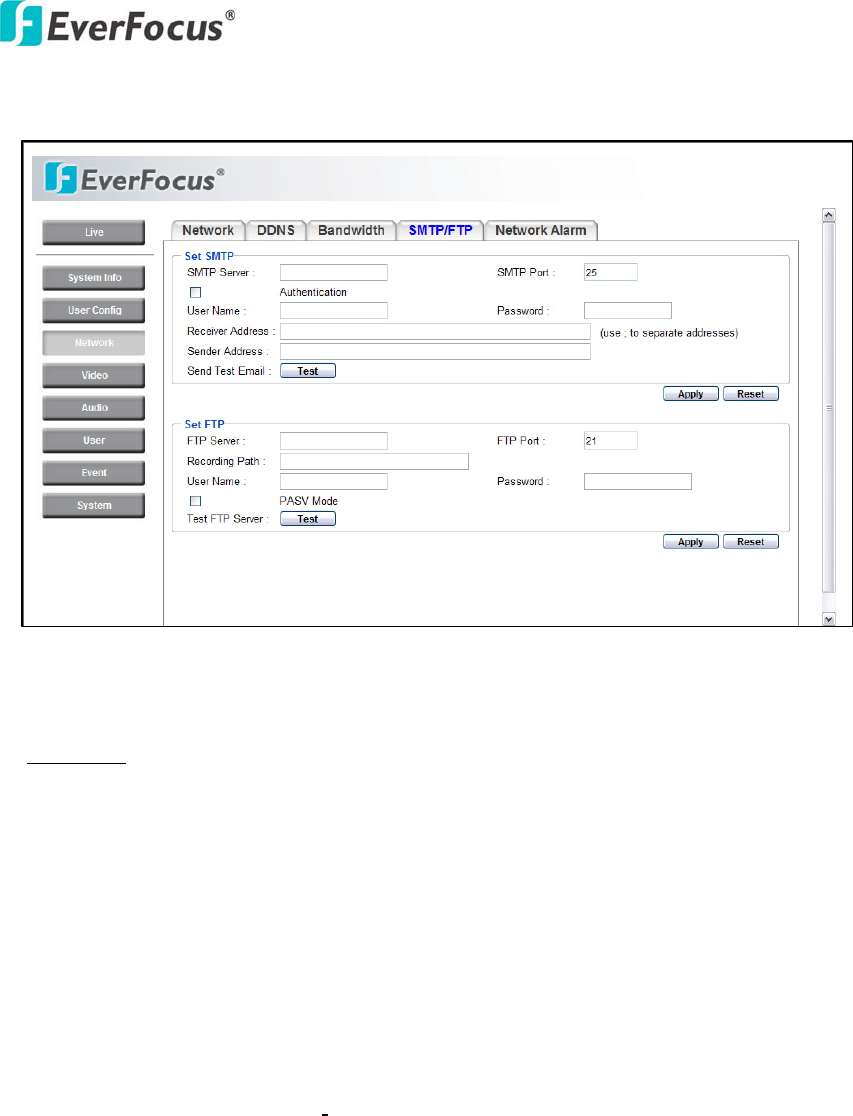
4.3.4 SMTP/FTP
Set SMTP
The settings relating to the mail server used to send the e-mail notification from the
camera to predefined addresses via SMTP can be configured.
SMTP Server: Enter the IP address or the host name of the SMTP server used to
send e-mails.
SMTP Port: Enter the port number for SMTP. Default is 25.
Authentication: Check the box, if the SMTP server requires Authentication (user/
password).
User name: Input the login user ID if the SMTP server requires Authentication.
Password: Input the password if the SMTP server requires authentication.
Receiver Address: Input the e-mail address to receive an e-mail message when the
EVENT is enabled and triggered. Please use “;” to separate address.

EQN2200
22
Sender Address: Input sender’s e-mail address, so that receiver can recognize the
sender when an event message is sent out.
Send Test Mail: Press button to send a test e-mail to the designated
address.
Set FTP
The settings relating to an FTP server to be used to receive alarm images can be
configured.
FTP Server: Enter the IP address or the host name of the FTP server.
FTP Port: Enter the port number for FTP server. Default is 21.
Recording Path: Assign the recording path.
User Name: Set FTP User name.
Password: Set FTP password.
PASV mode: Check to enable Passive mode (most sites normally require Passive
mode). If unable to establish a connection, uncheck "PASV" mode.
Test FTP Server: Press button to send a test file to the designated FTP
server.
Press Apply to apply the setting changes or Reset to reset without saving the
change.
EQN2200
23
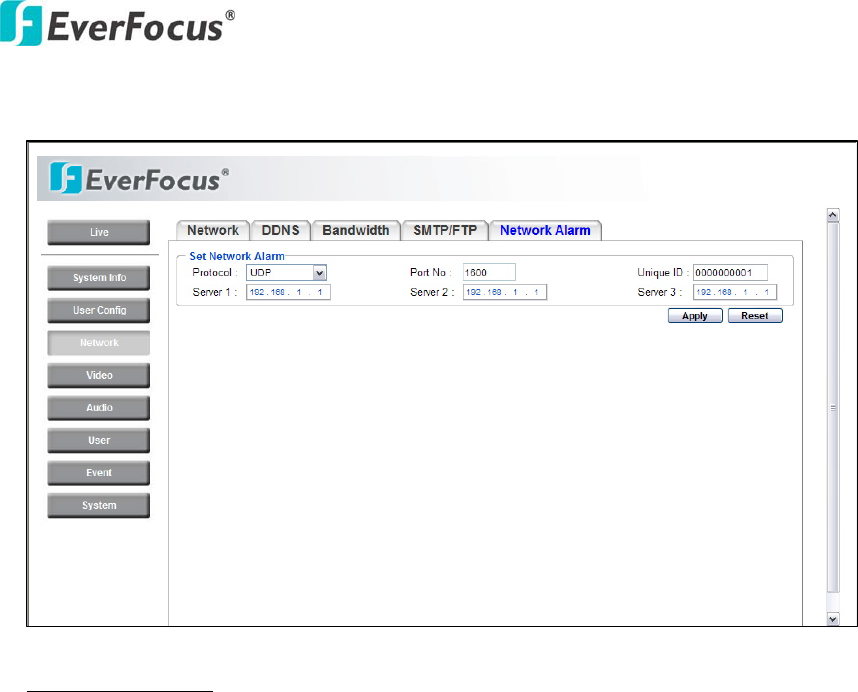
4.3.5 Network Alarm (reserved for PowerCon)
Set Network Alarm
This function is reserved for PowerCon software, for the details regarding these
settings please refer to the documentation for the PowerCon network alarm
protocol.
4.4 Video
The settings relating video such as streaming, camera OSD can be configured on
this page.
The "Video" page has 2 tabs: the [Multi-streaming] tab and the [Camera] tab.
EQN2200
24
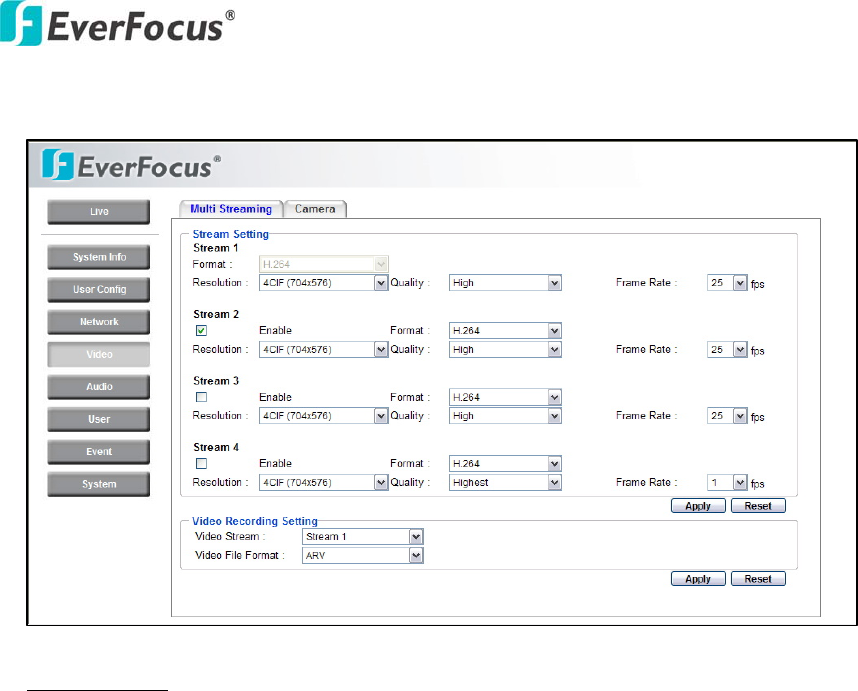
4.4.1 Multi Streaming
Stream Setting
The system can output 4 video streams simultaneously. For each of them, the user
can set compression format, resolution, quality and frame rate individually. Stream
1 is always enabled for live view.
Check “Enable” box to enable other streams.
Format: Select compression format from H.264, MPEG4 and MJPEG.
Resolution: choose from
NTSC: 4CIF (704*480) / VGA (640*480) / CIF (352*240) / QVGA (320*240) /
QCIF (176*120)
PAL: 4CIF (704*576) / VGA (640*480) / CIF (352*288) / QVGA (320*240) /
QCIF (176*144)
Quality: there are 8 levels of quality, please choose from Highest / Higher / High /
Middle / Normal / Low / Lower / Lowest. Bandwidth utilization will be in
proportion to the quality setting, with highest quality requiring highest bandwidth.
Frame Rate: select from NTSC: 1 / 3 / 5 / 15 / 30 fps, PAL: 1/ 2.5/5/12.5/25 fps
EQN2200
25
Press Apply to apply the setting changes or Reset to reset without saving the
change.
Video Recording Setting
User can set video recording by selecting one of the enabled video streams. This
will allow users to view live images while also recording video from another video
stream.
Video Stream: Select video recording stream from any enabled stream.
Video File format: Recording file will be saved as AVI or ARV, select which file
format is to be used.
Press Apply to apply the setting changes or Reset to reset without saving the
change.
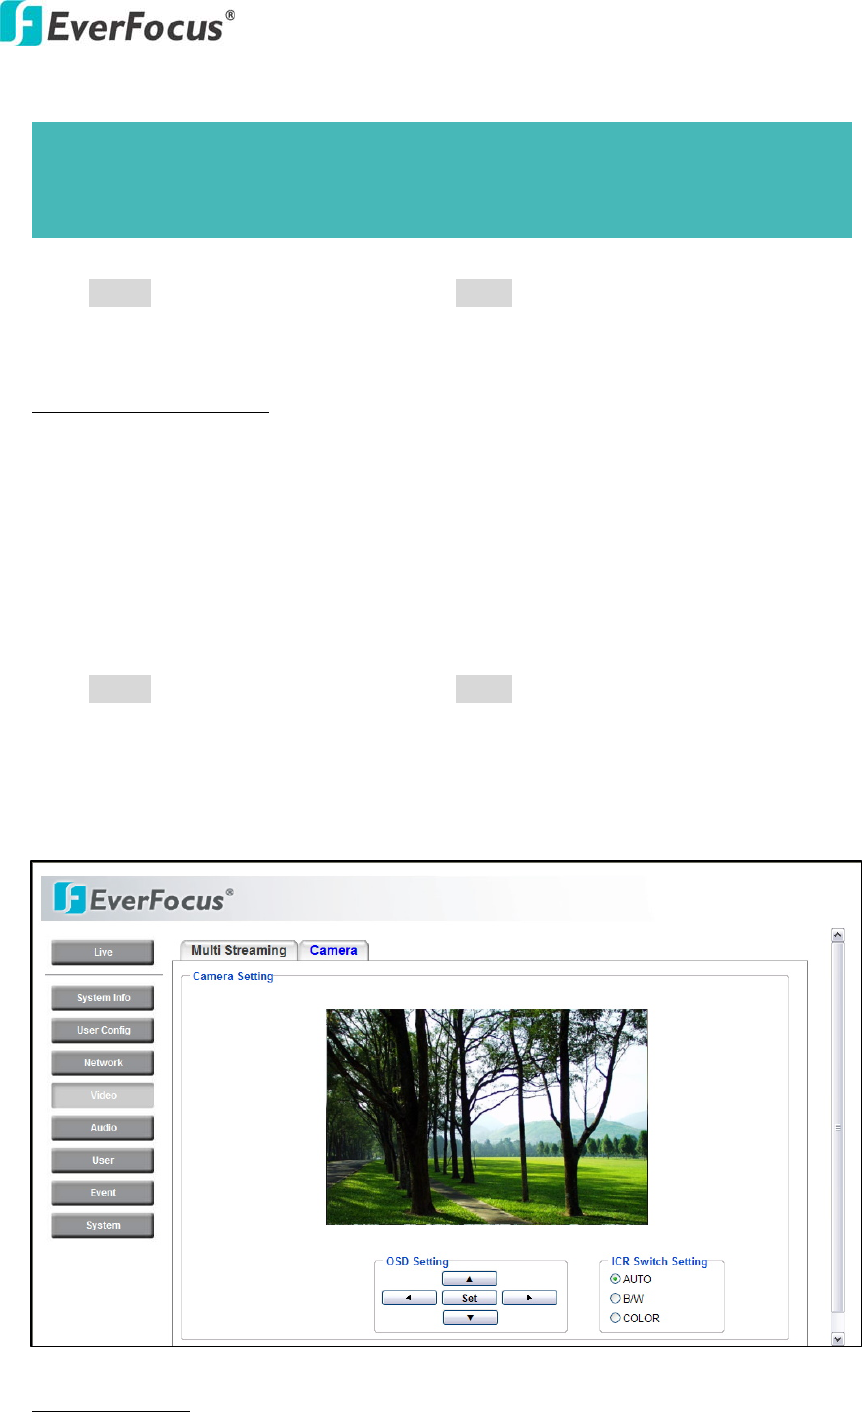
4.4.2 Camera
Camera Settings
The "Camera OSD setting" can be displayed on a video monitor and can be
Note: Total frame rate cannot exceed 60 fps.
System performance may be influenced if user enables 4 video streams
simultaneously.
EQN2200
26
configured using the operation buttons on this tab.
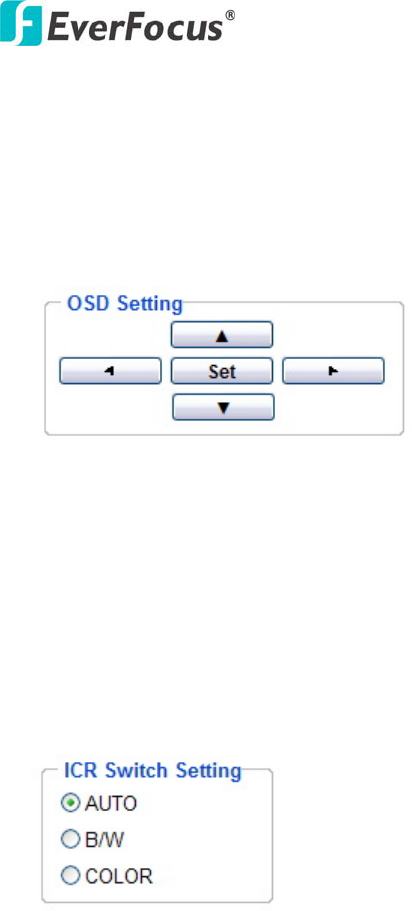
OSD setting:
Use the following buttons on the operation panel to operate the "Camera OSD
setting" remotely from a PC. (Please refer to Section 4.4.2.1 for a detailed guide to
the Camera OSD Setting menu)
[SET] button:
Click this button to select choices or to bring up the menu and submenus.
[Left] button/ [Right] button:
Click these buttons to change or select the parameters.
[Down] button/ [Up] button:
Click these buttons to move the cursor.
ICR Switch Setting:
AUTO: ICR switches automatically according to the illumination.
B/W: Select to keep B/W image.
COLOR: Select to keep color image.
EQN2200
27
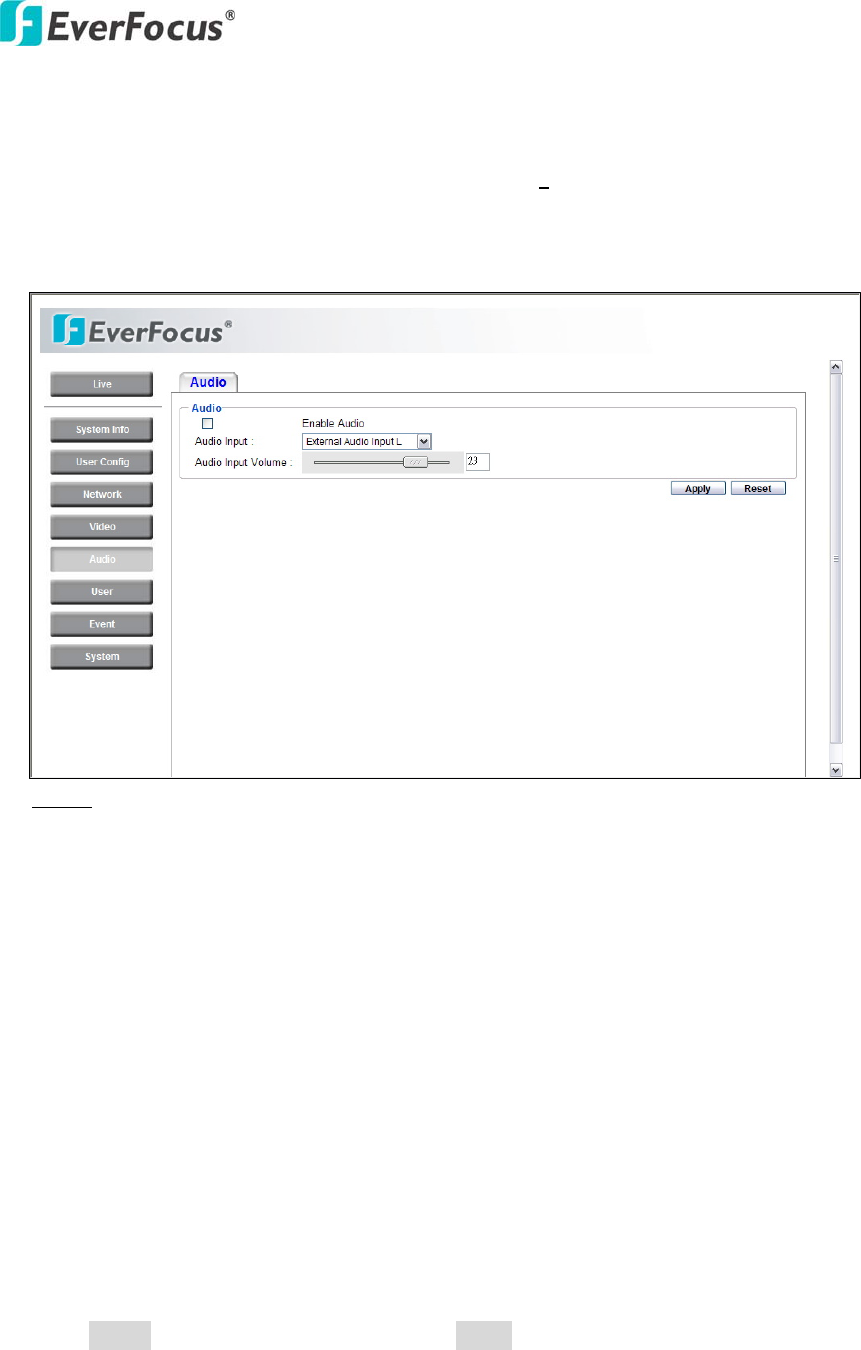
4.5 Audio
The EQN2200 camera can transmit audio to client PCs by connecting an external
source (line-in), and can play audio received from clients PCs (line-out) into
amplified speakers. This section describes how to configure the basic audio settings.
Audio
Check Enable Audio box to enable audio function.
Audio Input: Audio from an internal microphone or a line source can be connected
to the Audio connector of EQN2200. The audio source can be selected from
Internal Microphone, External Audio Input L and External Audio Input R.
Units designed for use in the US and its territories are not equipped with internal
microphones.
Audio Input volume: Adjust the Audio Input Volume for the audio input devices
connected to the camera if there are problems with the sound input being too low
or high.
Press Apply to apply the setting changes or Reset to reset without saving the
changes.
EQN2200
28
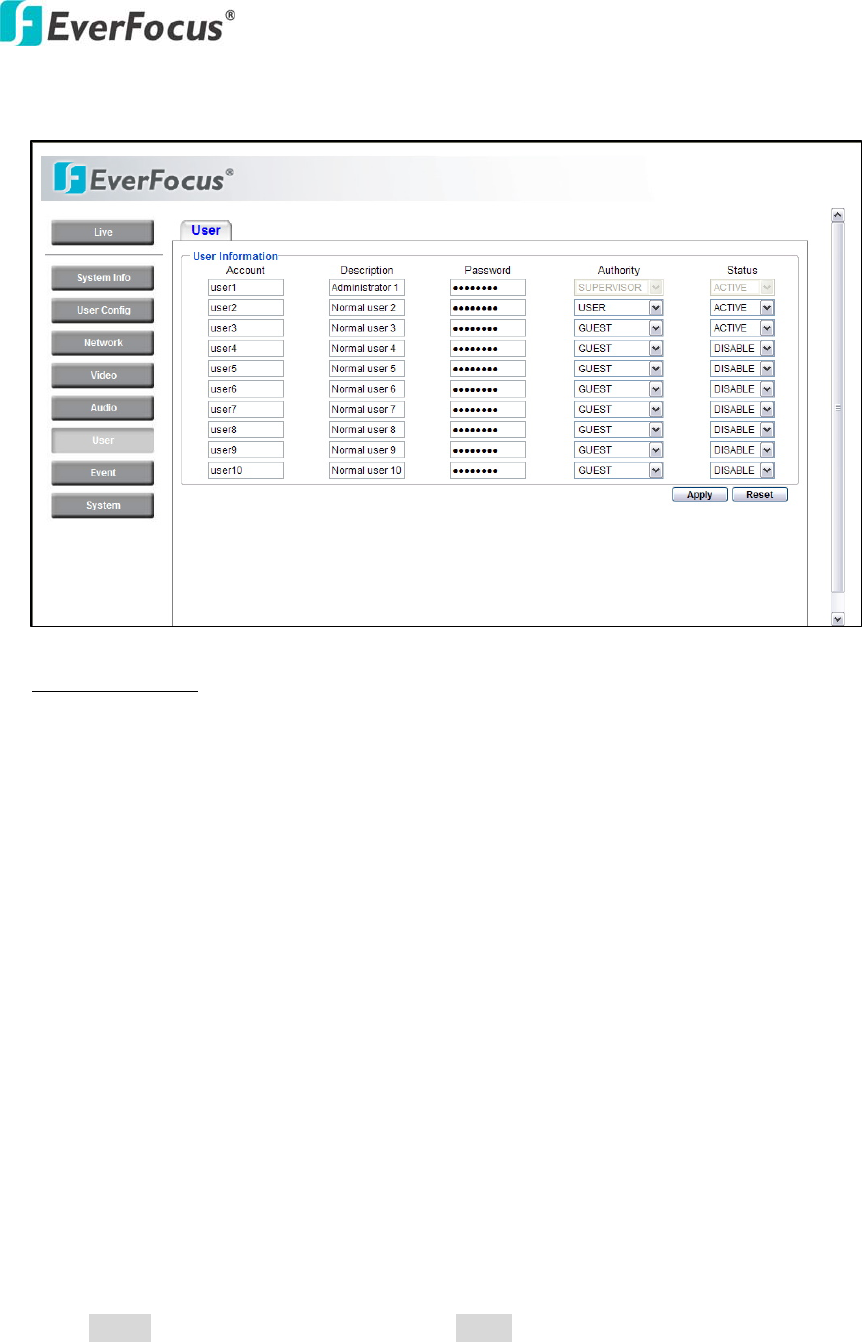
4.6 USER
User Information
Maximum 10 user IDs can be created to access the IP camera. The user
information screen displays the authorized IDs. Access levels are:
• Supervisor/Administrator –a supervisor/administrator has unrestricted access to
the Setting menus and can determine the registration of all other users. However,
an administrator is not allowed to change a supervisor’s account and password.
• User- can view the Live View page, system info, network, video, audio, and
adjust user config settings. The User level does not have access to the “user”,
“event” and “system pages”.
• Guest- the lowest level of access, which only allows access to the Live View
page.
Note: Please select Active in Status section to activate an account.
Press Apply to apply the setting changes or Reset to reset without saving the
changes.

EQN2200
29
4.7 EVENT
An event in the camera is when an Event Type is activated and causes certain actions
to be performed. The event type is the set of conditions that specifies how and when
which actions will be performed.
This table describes how to setup action types and event type.
Event Type
Action Type Alarm Input
Manual
Trigger
Motion
Detection
Schedule
Recording Pre/Post-Alarm
Trigger Alarm x x x
Send Mail notification x x x
Upload to FTP** x x x x
Record to SD Card x x x x x
Record to PC* x x x x x
Network Alarm x x x
Re-trigger x x x
N
ote: 1. * Record to PC only works when PC and IP camera are connected.
2. **Either Upload to FTP or Record to Network Storage can be selected to
record event video to remote site.
3. Up to 10 event types can be configured in the camera, and up to 3 of these
can be configured to upload images.
EQN2200
30
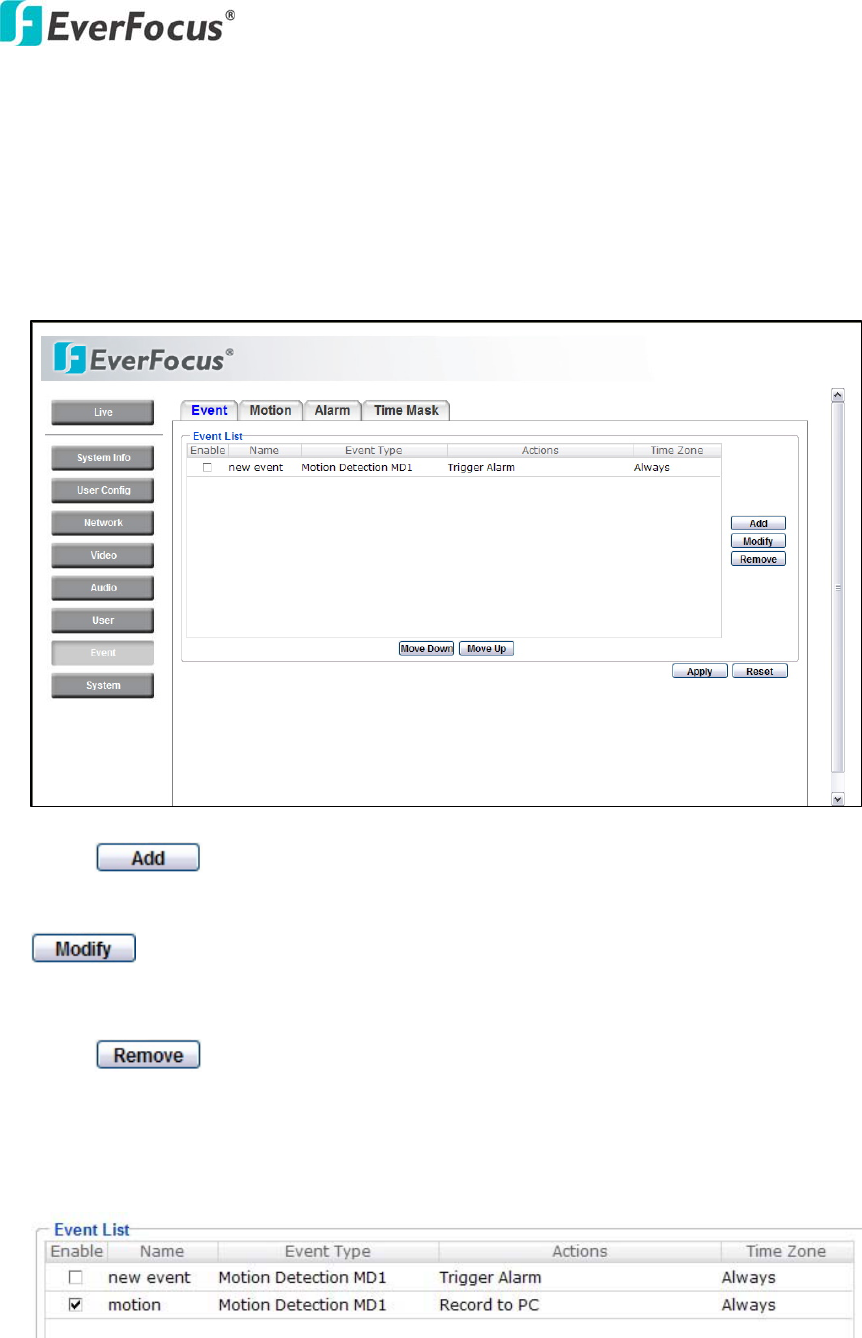
4.7.1 Event
The settings relating to event occurrences such as settings for motion, alarms and
time mask can be configured on this page.
The "Event" page has 4 tabs: [Event] tab, [Motion] tab, [Alarm] tab and [Time
Mask] tab.
Press button to add an event condition.
To modify the event list, click on the event and it will be highlighted. Press
button to modify the setting.
To remove an event from event list, click on the event and it will be highlighted.
Press button to remove the event.
Check Enable checkbox to activate event actions when the event occurs in the
specified time zone.
To change the priority of events, click on the event and it will be highlighted. Press
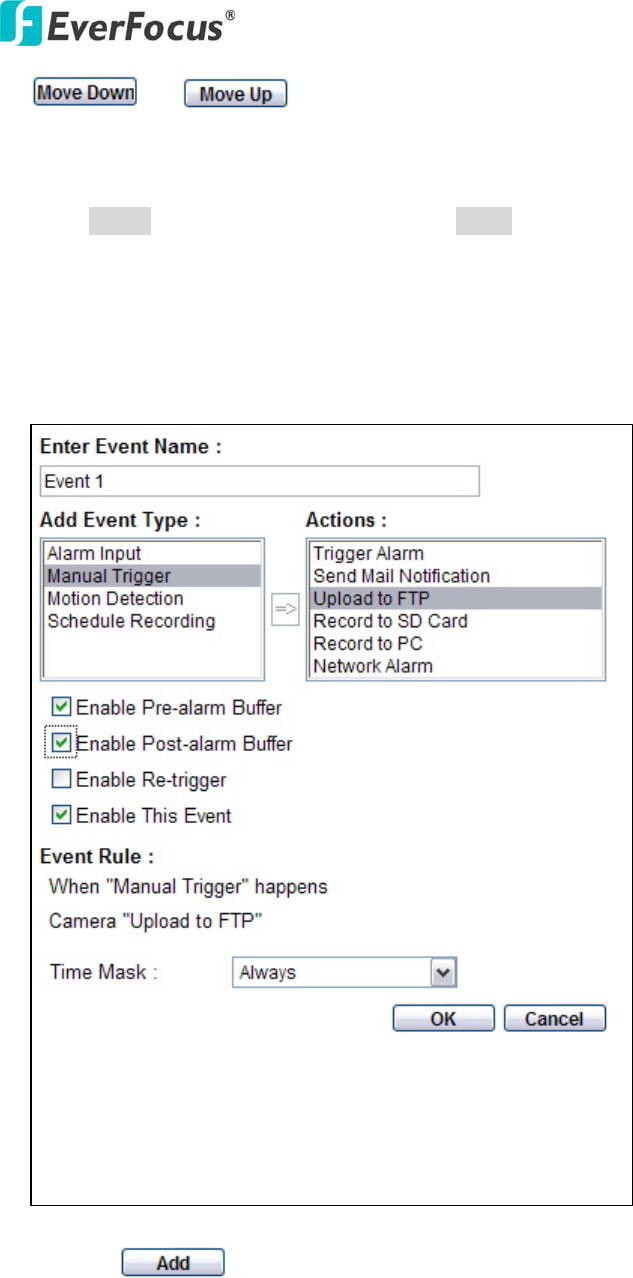
EQN2200
31
or button to change the priority of events. The event that
has highest priority will be activated first.
Press Apply to apply the setting changes or Reset to reset without saving the
change.
This example describes how to set the camera to upload images to an FTP site
when someone press Manual trigger button:
1. Click button in Event page.
2. Enter an event name for the event, e.g. Event 1
3. Select “Manual Trigger” as event type.
4. Select “Upload to FTP” as action type.
5. Check “Enable Pre-alarm Buffer” and “Enable Post-alarm Buffer”. For pre-and
EQN2200
32
post alarm buffer setting, please refer to “4.7.3 Alarm”.
6. Check “Enable This Event”.
7. Select “Always” for time mask. For detail about Time Mask, please refer to
“4.7.4 Time Mask”.
8. Click to save this event in event list.
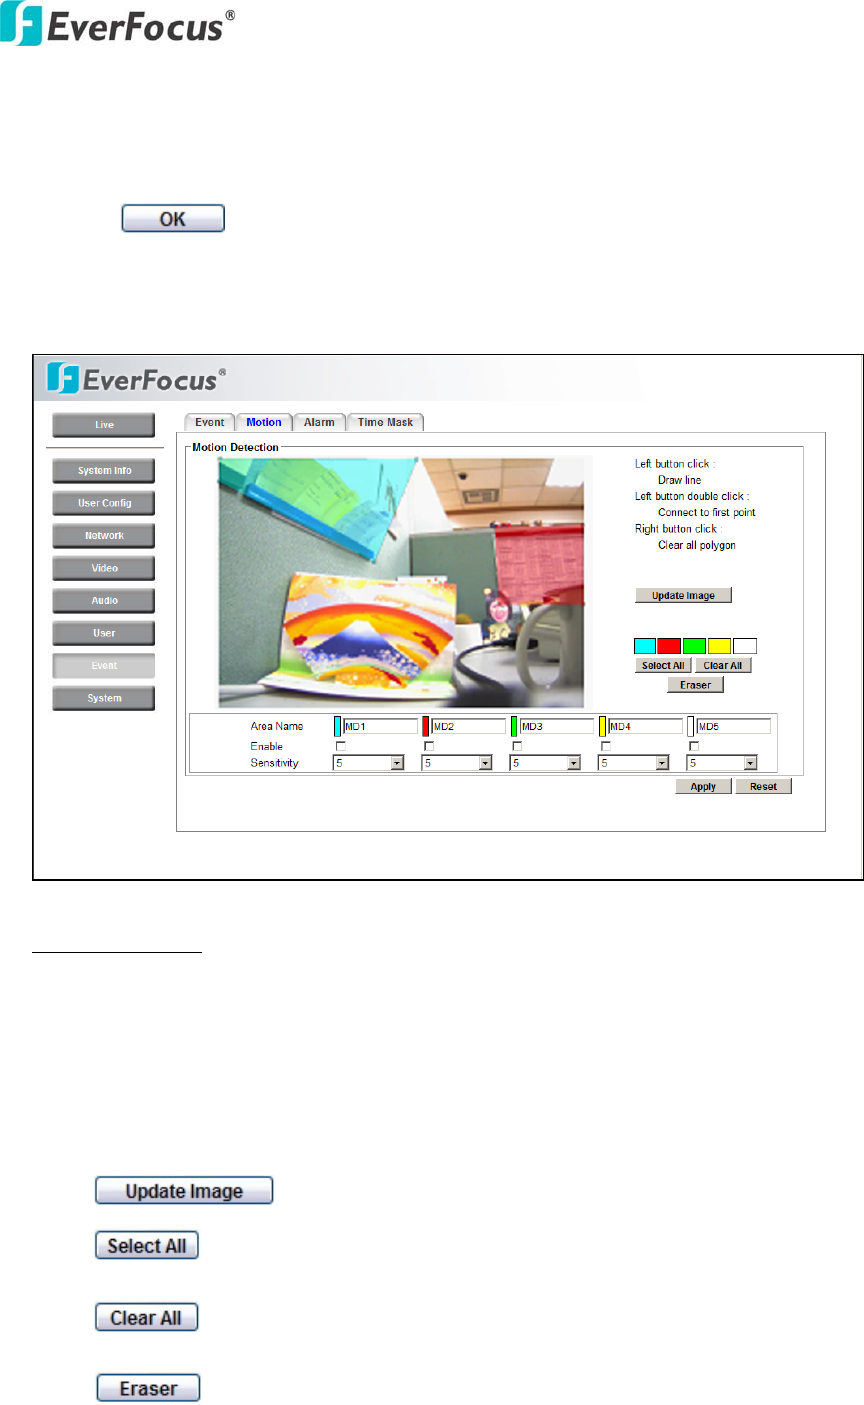
4.7.2 Motion
Motion Detection
Users can define the motion areas to be detected by left clicking the mouse to draw
lines. Every click is an end point of the line. When the detection area is formed,
double click the mouse to have all the lines connected. To remove the selection,
simply right click the mouse, the selected polygon will be deleted.
Press to update the current image.
Press to have the entire screen selected for motion detection.
Press to clear all selections.
Press and click on the polygon, to erase that polygon.
EQN2200
33
There are 5 possible motion trigger areas, which can be distinguished by 5
different colors. Check the Enable checkbox to enable event actions related to that
area.
For each area, you can set the event action in response to motion detection in that
area. Event actions can be set in “Event” section.
In addition, you can set the Sensitivity level for the motion trigger separately for
each area by selecting from 1 (low), 2, 3, 4, 5, 6, 7, 8, 9 to 10 (high).
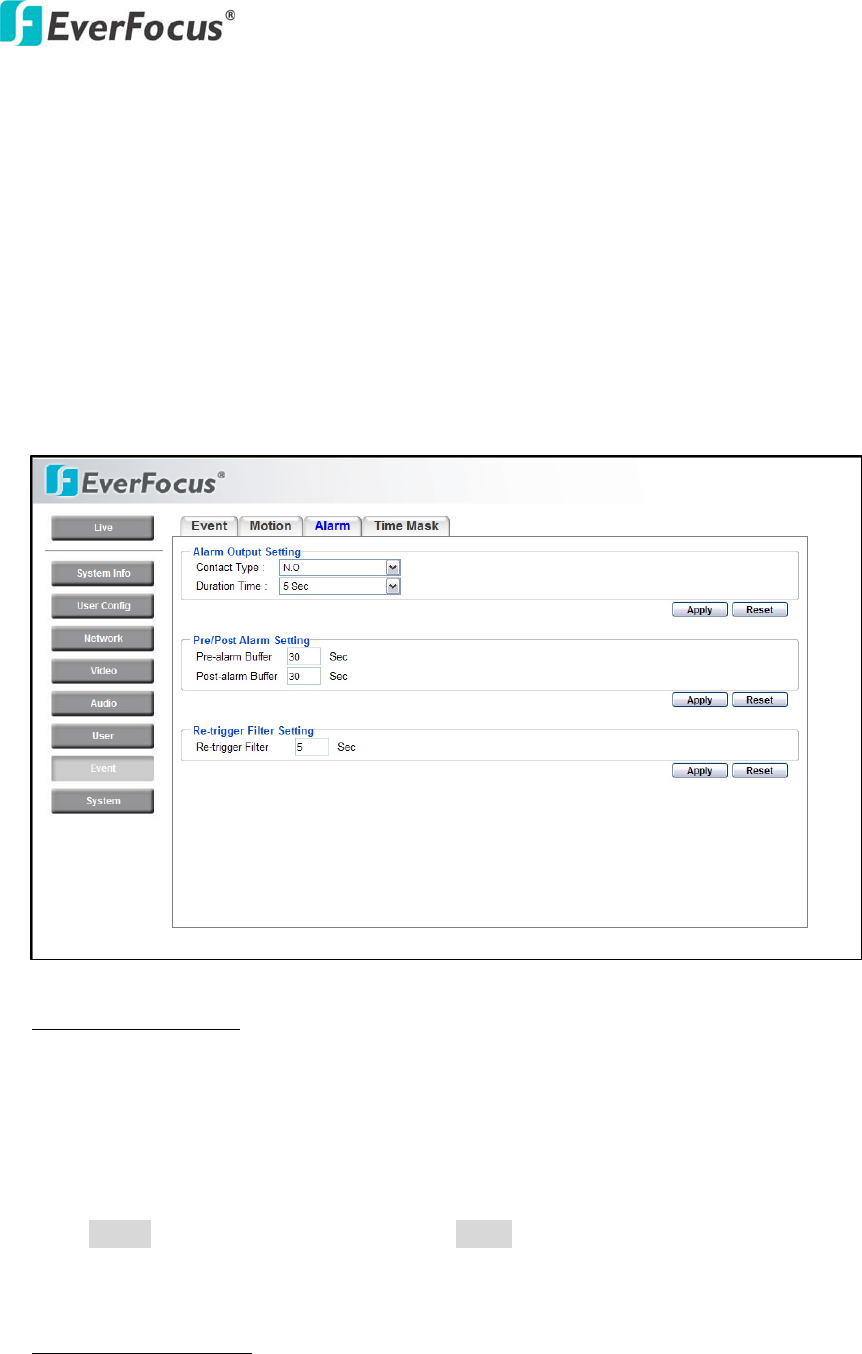
4.7.3 Alarm
Alarm Output Setting
Contact Type: Normal Close, Normal Open
Duration Time: Select duration time of alarm output from 5 sec, 10 sec, 20 sec, 30
sec, 60 sec, 2 min, 3 min and 5 min.
Press Apply to apply the setting changes or Reset to reset without saving the
change.
Pre/Post Alarm Setting
This function is used to be able to review what happened immediately before and
after a trigger, e.g. 5 seconds before or after a motion has been detected, or after

EQN2200
34
motion detection ceases.
Pre-Alarm Buffer: Image saved internally in the camera from the time immediately
preceding the trigger. Input the desired length of pre-trigger buffer time. It can be
set up to 120 seconds.
Post-Alarm Buffer: Image saved internally in the camera from the time
immediately after the trigger condition has ceased/been reset. Input the desired
length of post-trigger buffer time. It can be set up to 120 seconds.
Press Apply to apply the setting changes or Reset to reset without saving the
change.
Re-trigger Filter Setting
Re-trigger Filter: Set a re-trigger filter time, if another event is triggered during
this time, this triggered event will be ignored.
Press Apply to apply the setting changes or Reset to reset without saving the
change.
4.7.4 Time Mask

EQN2200
35
Time Mask Setting
Time mask setting allows you to schedule the times when the system will respond
to event actions.
Select Always for event action to be taken continuously.
Press button to add new time period.
Mask name: Input a mask name for the new time period.
Check the check box for the day to be scheduled: Sun, Mon, Tue, Wed, Thu, Fri &
Sat.
Set the Start time and End time for time mask by clicking Up arrow or Down
arrow. Or simply press for a full day of event action.
Press button to remove a scheduled time period.
An example on how to set weekend as time mask is as follows:
1. Click from time mask setting.
2. Enter Mask name, e.g. Weekend.
3. Check “Sun” & “Sat” boxes.
4. Select “Start time” and “End time” or “Full day”.
Press Apply to apply the setting changes or Reset to reset without saving the
change.
EQN2200
36
4.8 SYSTEM
Date/Time, Daylight Saving, SD card and Maintenance settings can be accessed on
this page.
The "System" page has 4 tabs: [Date/Time] tab, [Daylight Saving] tab, [SD card]
tab and [Maintenance] tab.
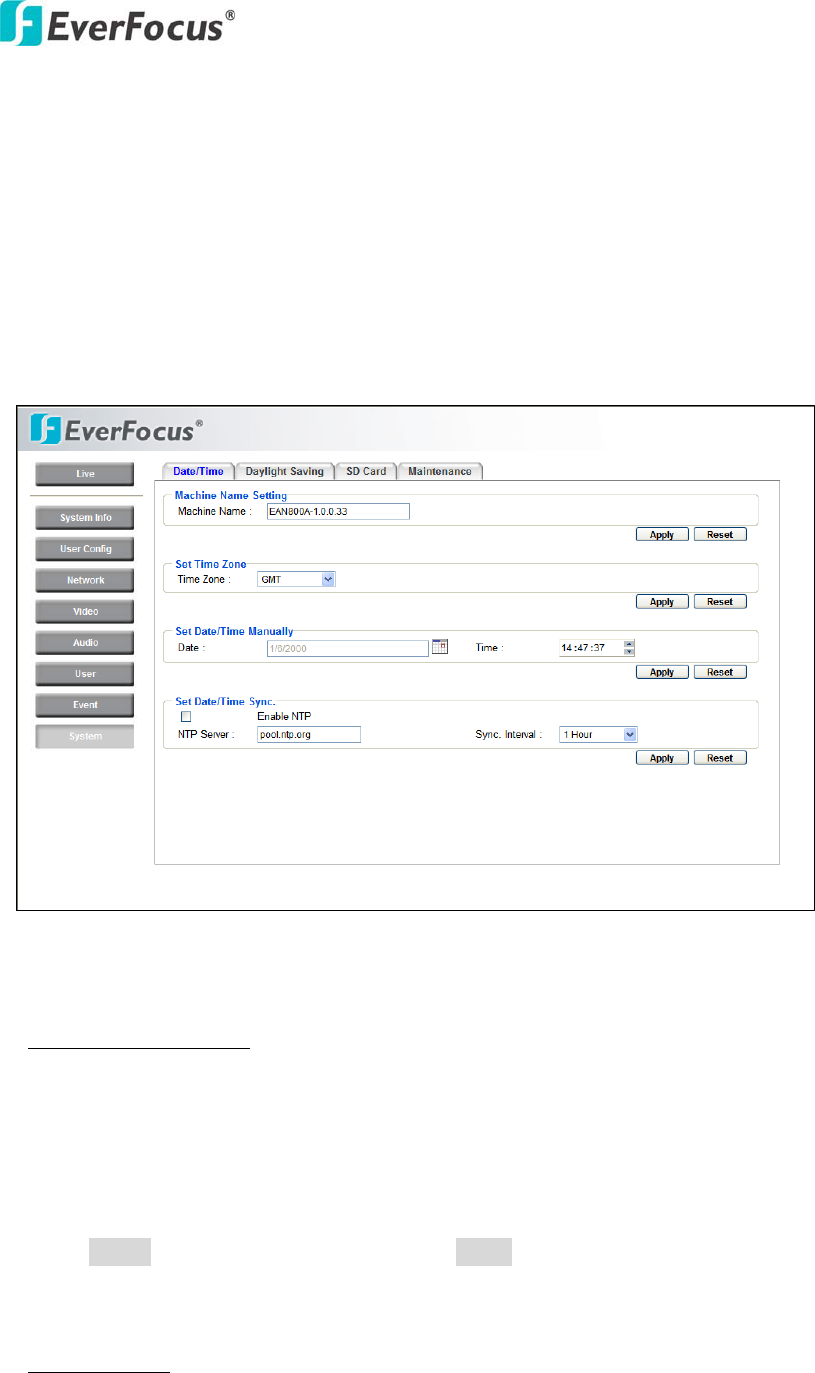
4.8.1 Date/Time
Machine Name Setting
Machine Name: Enter the name for the camera. The entered name will be
displayed in the status display area, and used to label any recoding and/or snapshot
folders created on a user’s PC.
Press Apply to apply the setting changes or Reset to reset without saving the
change.
Set Time Zone
Time Zone: Select a time zone according to where the camera is located.

EQN2200
37
Set Date/Time Manually
Date: Click the calendar and pick the date. Press << to go previous year, < to go
previous month, > to go next month and >> to go next year.
Time: Click on Hour, Minute, Seconds, am/pm; then use up arrow to increase
value and down arrow to decrease value.
Press Apply to apply the setting changes or Reset to reset without saving the
change.
Set Date/Time Sync.
Check Enable NTP checkbox to enable NTP server.
NTP server: Time automatically adjusted by synchronizing with NTP server will
be used as the standard time for the camera.
Sync. Internal: Select an interval (1 - 24 hours: in 1 hour intervals) to elapse
between synchronizations with the NTP server.
Press Apply to apply the setting changes or Reset to reset without saving the
change.
EQN2200
38
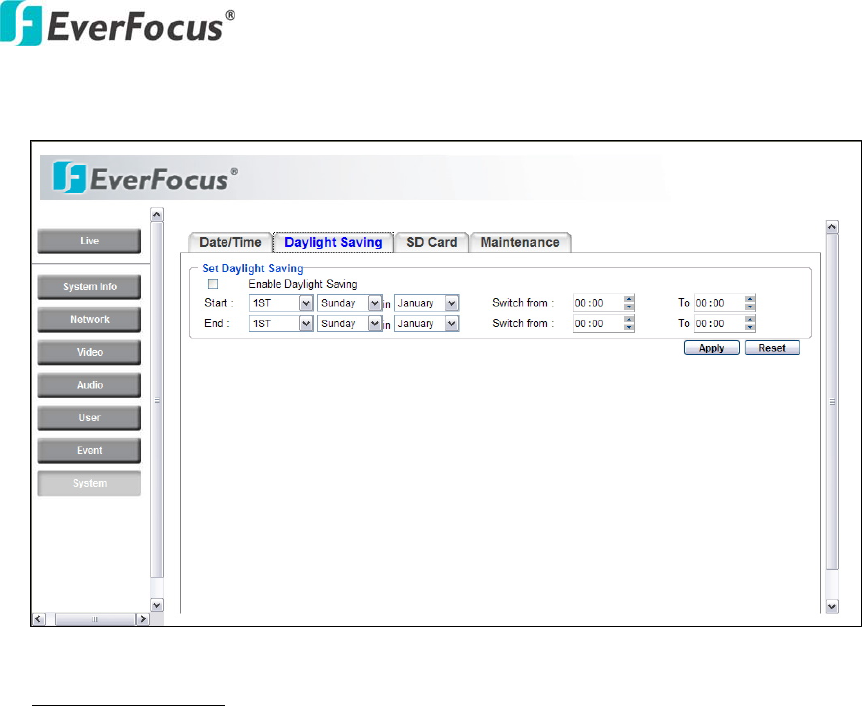
4.8.2 Daylight Saving
Set Daylight Saving
Check Enable Daylight Saving checkbox to enable daylight saving.
Set the start time for daylight saving time.
Set the start week for daylight saving time: 1st / 2nd / 3rd / 4th / Last
Set the start day of the week for daylight saving time: Sunday / Monday /
Tuesday / Wednesday / Thursday / Friday / Saturday
Set the start month for daylight saving time: January / February / March / April /
May / June / July / August / September / October / November / December.
Set the starting time for the change to daylight saving time: Choose the “From”
time and “End” time when daylight saving starts.
Set the end time from daylight saving time.
Set the end week from daylight saving time: 1st / 2nd / 3rd / 4th / Last
Set the end day of the week from daylight saving time: Sunday / Monday /
Tuesday / Wednesday / Thursday / Friday / Saturday
Set the end month from daylight saving time: January / February / March / April /
May / June / July / August / September / October / November / December.
Set the ending time for the change from daylight saving time: Choose the “From”
time and “End” time when daylight saving ends.
EQN2200
39
Press Apply to apply the setting changes or Reset to reset without saving the
change.
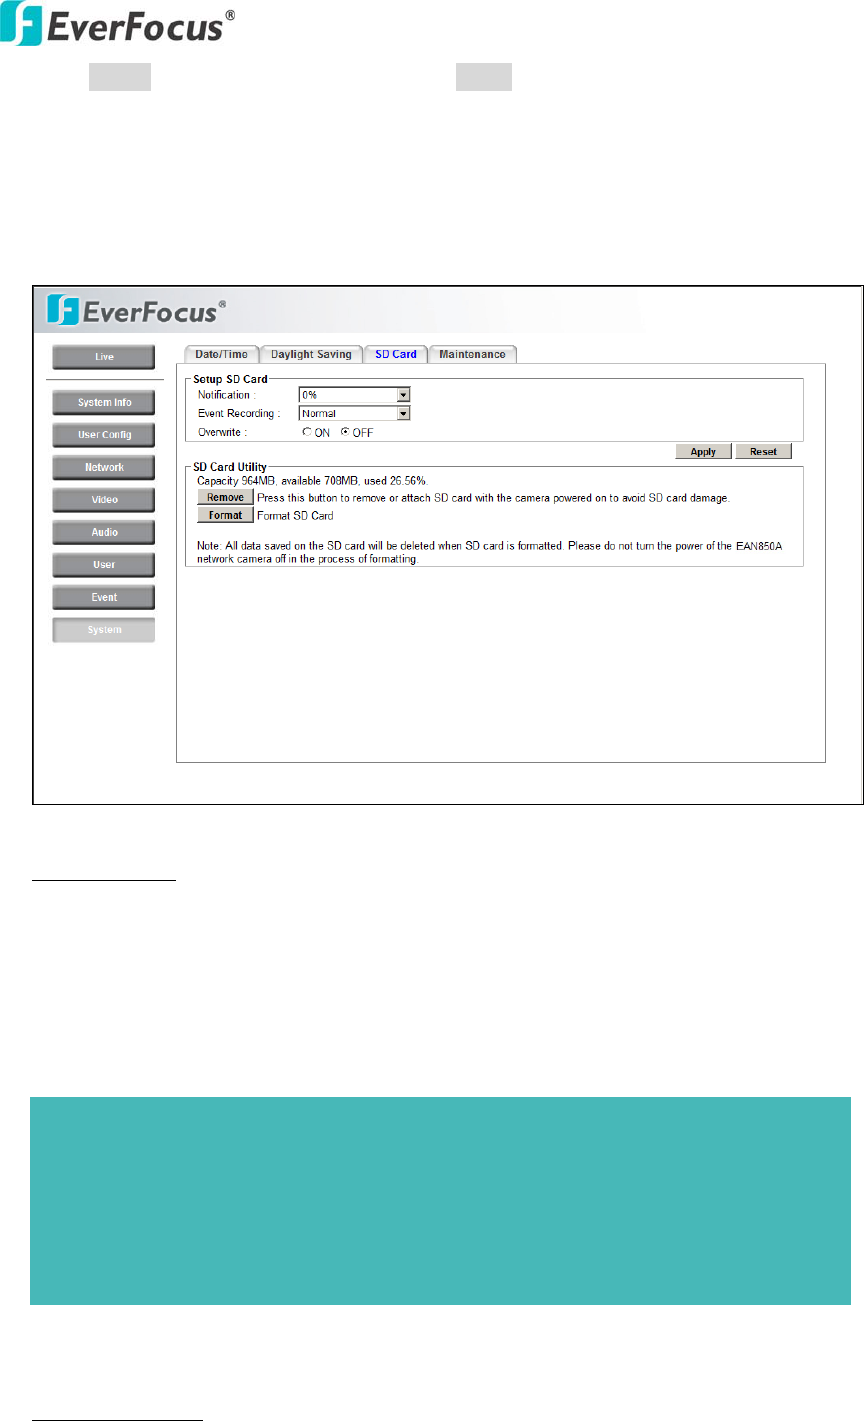
4.8.3 SD Card
Setup SD Card NEED A DIAGRAM SHOWING WHERE/HOW TO INSERT
THE CARD (it’s displaying in installation guide)
Notification: Notification will be made via e-mail when the remaining space of the
SD memory card reached the value selected from the following.
50%, 20%, 10%, 5%, 2%, 0%
Event Recording:
FTP backup only: Event video will record to the SD card when the network
Notes:
- When "50%" is selected, e-mail notification will be made each time the
remaining space reaches 50%, 20%, 10%, 5%, 2% and 0%.
- E-mail notification may not always be made at a very moment when the
remaining space of the SD memory card reaches the selected value.

EQN2200
40
connection to the FTP server is unavailable.
Normal: Follows the event action settings you have made in the “Event” menu to
record event video to the SD card.
Overwrite: Select ON for overwriting older data when the SD card memory is full.
Select OFF for not overwriting the SD card data.
Note: no recording can take place if the SD card is full and Overwrite is “Off”.
Press Apply to apply the setting changes or Reset to reset without saving the
change.
SD Card Utility
The total size and available size of the SD memory card will be displayed.
Depending on the state of the SD memory card, the information will be displayed
as follows:
Indication Description
Capacity ___ MB, available ___MB, used ___ %
Formatting the SD Card
Before formatting the SD memory card, it is necessary to press the
button.
Once the button is pressed, the button will be shown for a
user to re-insert the SD card.
Press button to format SD card.
To obtain images from the SD memory card
1. Access the SD card using the Windows command prompt or FTP client
software.
→ The window with the user name and password entry fields will be displayed.
2. Enter the user name whose access level is "1. Administrator" and its password.
→ Log in the camera. What about SUPERVISOR – will that work??
3. A directory of all saved data will be displayed. You are now ready to obtain
images from SD card.
EQN2200
41
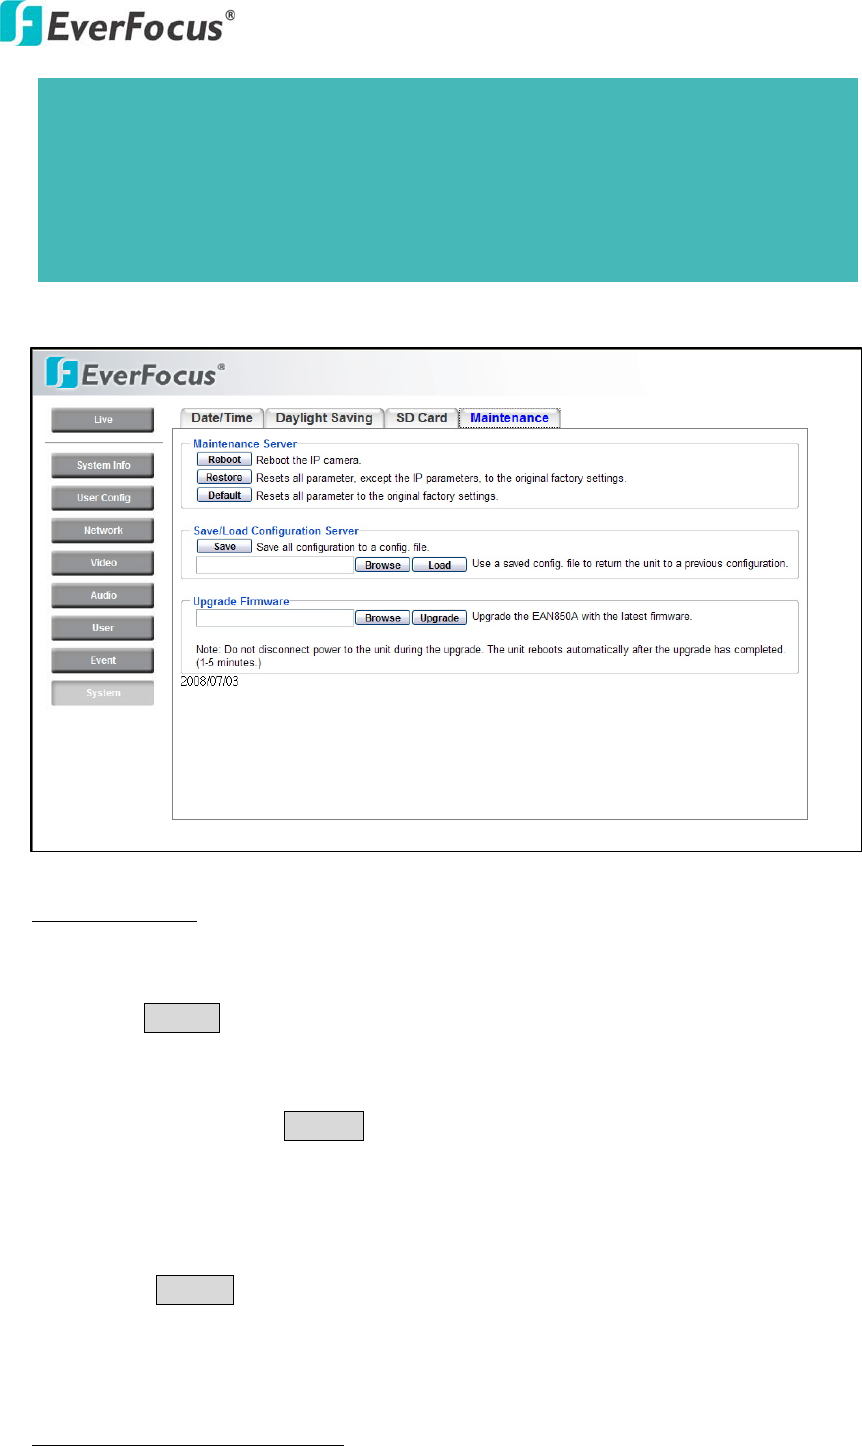
4.8.4 Maintenance
Maintenance Tab
Reboot: The unit is rebooted without changing any of the settings. Use this method
by pressing Reboot button if the unit is not behaving as expected.
Restore: The unit is restarted and most current settings are reset to the factory
default values by pressing Restore button. The only settings saved are:
IP setting
DDNS setting
Default: The Default button should be used with caution. Pressing this button will
return all of the camera's settings, including the IP address, to the factory default
values. The camera will then have to be re-installed.
Save/Load Configuration Server
Note:
- It is impossible to access the SD memory card in the process of formatting.
- All data saved on the SD memory card will be deleted when the SD memory
card is formatted.
- Do not turn the power of the camera off in the process of formatting.

EQN2200
42
To take a backup of all of the settings in the current configuration, press Save to
save the configuration to a config. file. Once saved, it is then possible to return to
the previous settings if/when desired.
To return to a previously saved configuration, press the Browse button to locate
and select the saved config. file (see above) and then click the Load button. The
settings will be restored to the previous configuration.
Upgrade Firmware
Upgrade the EQN2200 with the latest firmware.
Press the Browse button to locate the firmware file. Press the Upgrade button to
upgrade the firmware.
Note 1: Do not disconnect power to the unit during the upgrade. The unit reboots
automatically after the upgrade has completed. (1-5 minutes.)
2. During upgrade process, all event recording actions will be stopped.
They will resume after the camera is rebooted.

EQN2200
43

EQN2200
44
EverFocus Electronics Corp.