Everspring Industry Co SM122 Wireless Door/ Window Alarm User Manual FU5SM122 UserMan
Everspring Industry Co Ltd Wireless Door/ Window Alarm FU5SM122 UserMan
UserManual.wiki
>
Everspring Industry Co
>
SM122 User Manual
User Manual
Navigation menu
Upload a User Manual
Namespaces
Wiki Guide
HTML
PDF
Info
Views
User Manual
Discussion / Help
Navigation
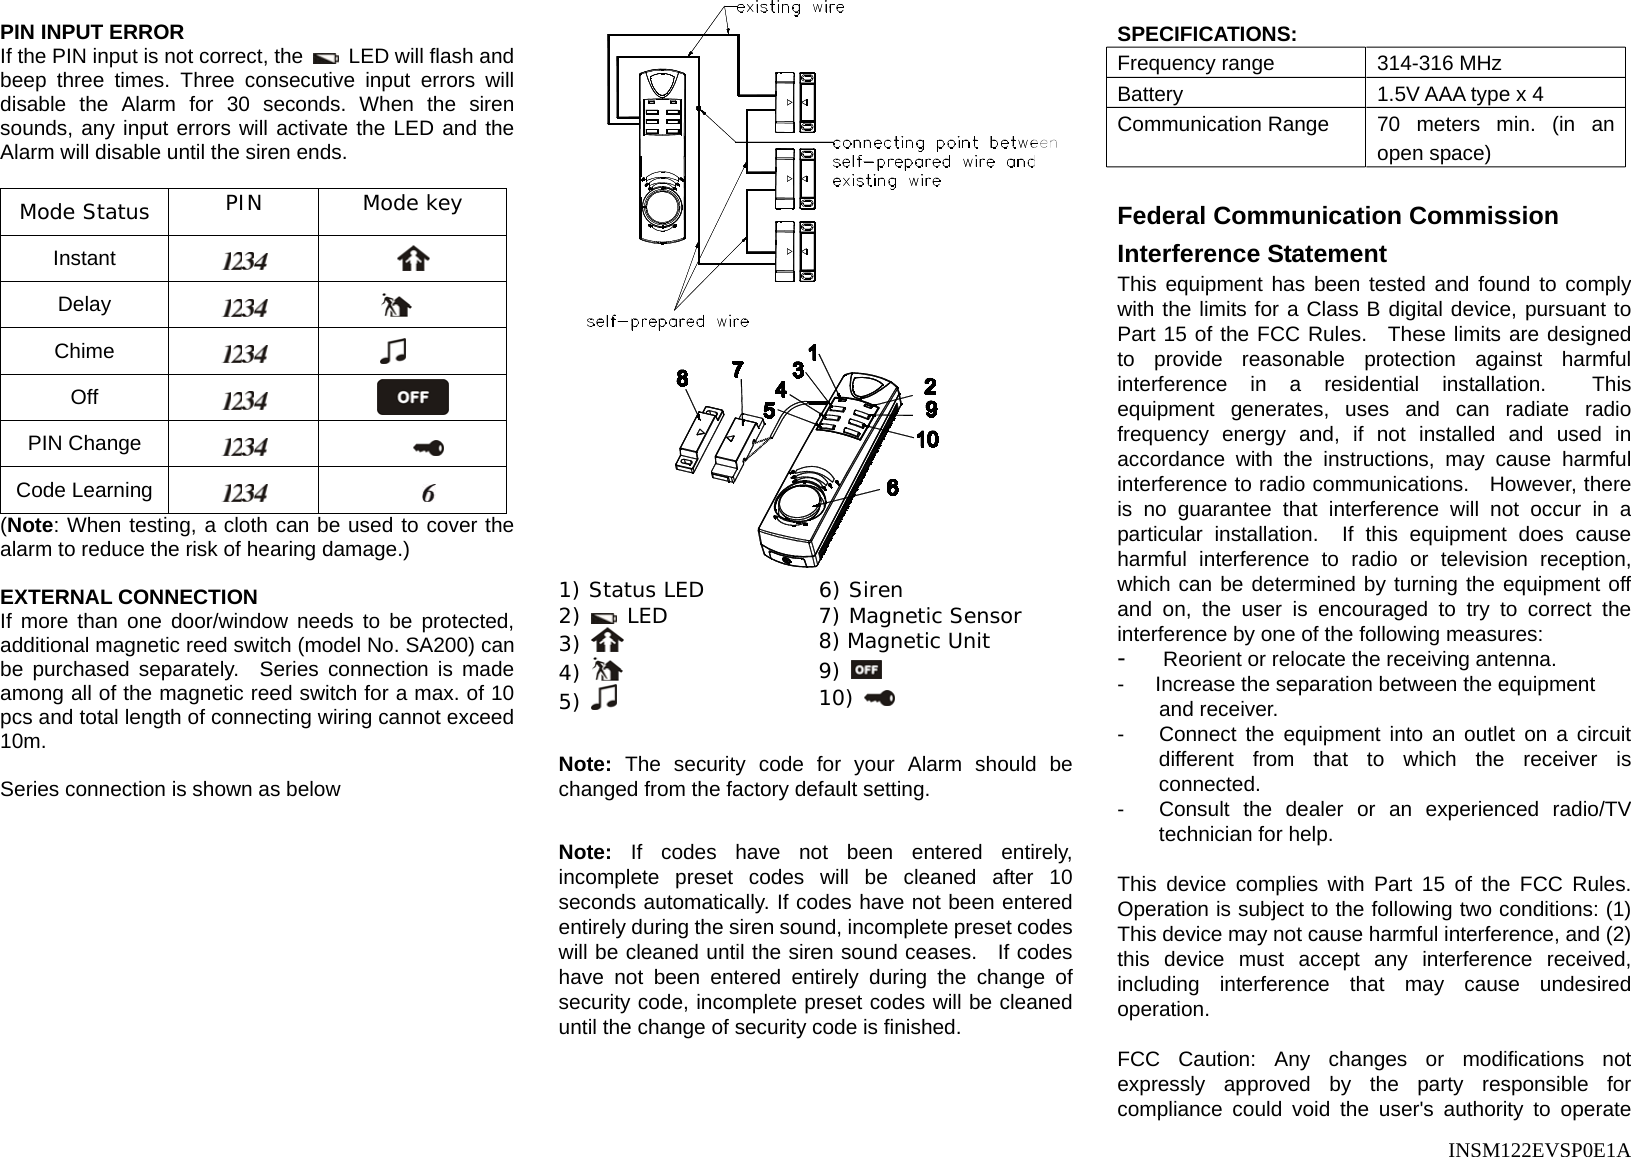
![INSM122EVSP0E1A SM122 Wireless Door/Window Alarm As a small alarm system, Wireless Door/Window Alarm can be easily placed onto an unsecured window or door by connecting it with the external hardwire magnetic. The Alarm emits a piercing 130 decibel alarm when the alarm's magnetic seal is broken. It can be used either as an alarm or an enunciator. It provides you with three different modes to adapt to your home security needs. (1) (2) (3) (4) (5) INSTALLATION 1. Remove screw at the base of compartment and slide off cover. 2. Mount the cover on the wall. 3. Insert the battery. 4. Slide on the cover to the wall and tighten the screw located at the base. 5. Mount magnetic sensor next to the siren on either the left or right side of the alarm, with less than 10mm in between. The Alarm will be triggered if the gap is 30mm or greater. STARTING UP Insert four (4) “AAA” size batteries. Average battery life for typical usage is 1 year. When all batteries are inserted, the Status LED will flash for one second to indicate that the batteries are installed properly. The Alarm will be started in the OFF mode. The four-digit security code “1234” (PIN) has been set as the default secret code. When you remove the battery, pressing any button will clean out your previous setting. (NOTE: After removing or replacing the batteries, the Alarm PIN would be automatically set back as default “1234”.) CODE LEARNING SETTING Press the PIN code and key (e.g. [1]-[2]-[3]-[4]-[ ]) to enter the code learning mode. The Alarm will transmit a radio signal to the receiver instantly. Upon completion of code learning transmission, the Alarm will skip to off mode automatically. During code learning mode, any input or activation will be ignored. ARMING THE ALARM Note: Both “Instant” and “Entry Delay” mode have a 15-second exit delay duration. To set the Instant Mode, simply press the PIN code and key (e.g. [1]-[2]-[3]-[4]-[ ]), this will result in beeping sounds and the Status LED flashing, this confirms the settings are completed. There will be a 15-second exit delay before the Alarm is armed. The delay allows time for you to leave the protected area without triggering the Alarm. The Alarm will transmit an “open” radio signal to the receiver and sound for 30 seconds and then be silent for 10 seconds; with such a 40-second cycle for 10 times, when the magnetic contact between the main unit and magnetic unit is broken. When the magnetic contact is closed again, the Alarm will transmit a “close” radio signal to the receiver. To set the Entry Delay Mode, simply press the PIN code and key (e.g. [1]-[2]-[3]-[4]-[ ]), this will result in beeping sounds and the Status LED flashing, this confirms the setting has been completed. There will be a 15-second exit delay before the Alarm is armed. The Status LED will flash for one second and a 15-second silent entry delay before the alarm goes off when the magnetic contact between the main unit and magnetic unit is broken. The Alarm will emit an “open” radio signal to the receiver and will sound for 30 seconds and then be silent for 10 seconds; with such a 40-second cycle for 10 times. When the magnetic contact is closed again, the Alarm will transmit a “close” radio signal to the receiver. To set the Chime Mode, simply press the PIN code and key ([1]-[2]-[3]-[4]-[ ]); and this will cause one chime, confirming that the setting has been completed. Two chimes can be heard when the magnetic contact between the main unit and magnetic unit is broken. An “open” and “close” radio signal will be emitted respectively when the magnetic seal is broken and closed again. DISARMING THE ALARM Disarm the Alarm by pressing PIN and key (e.g. [1]-[2]-[3]-[4]-[ ]). When the Alarm is set in the off mode, any activation or radio signal transmission will be ignored. CHANGING PIN CODE Press the PIN code and key (e.g. [1]-[2]-[3]-[4]-[ ]), this will turn on both LED and Status LED. If you do not change the Pin Code or incorrect codes were entered three times consecutively within 15 seconds, the Alarm will automatically go into Off Mode. While setting the PIN code, no radio signal will be transmitted to the receiver if the magnetic seal is broken. BATTERY LOW INDICATION When the battery is low, the LED will flash every 3 seconds until the battery dies. Low battery indication won’t be visible until the Alarm is at idle condition which means alarm activation, code input, 30-seconds disabled period, delay mode and code clearance will not be indicated.](https://usermanual.wiki/Everspring-Industry-Co/SM122/User-Guide-593281-Page-1.png)