Everspring Industry Co SP122 Wireless PIR Alarm User Manual FU5SP122 UserMan
Everspring Industry Co Ltd Wireless PIR Alarm FU5SP122 UserMan
User Mamual
1
864 UNIT:m
20
180°
TOP VIEW
6
4
0
2
8
4
6
8
1.5
SIDE VIEW
2
SIDE VIEW 204
1.5
TOP VIEW
UNIT:m
68
0
2
2
90°
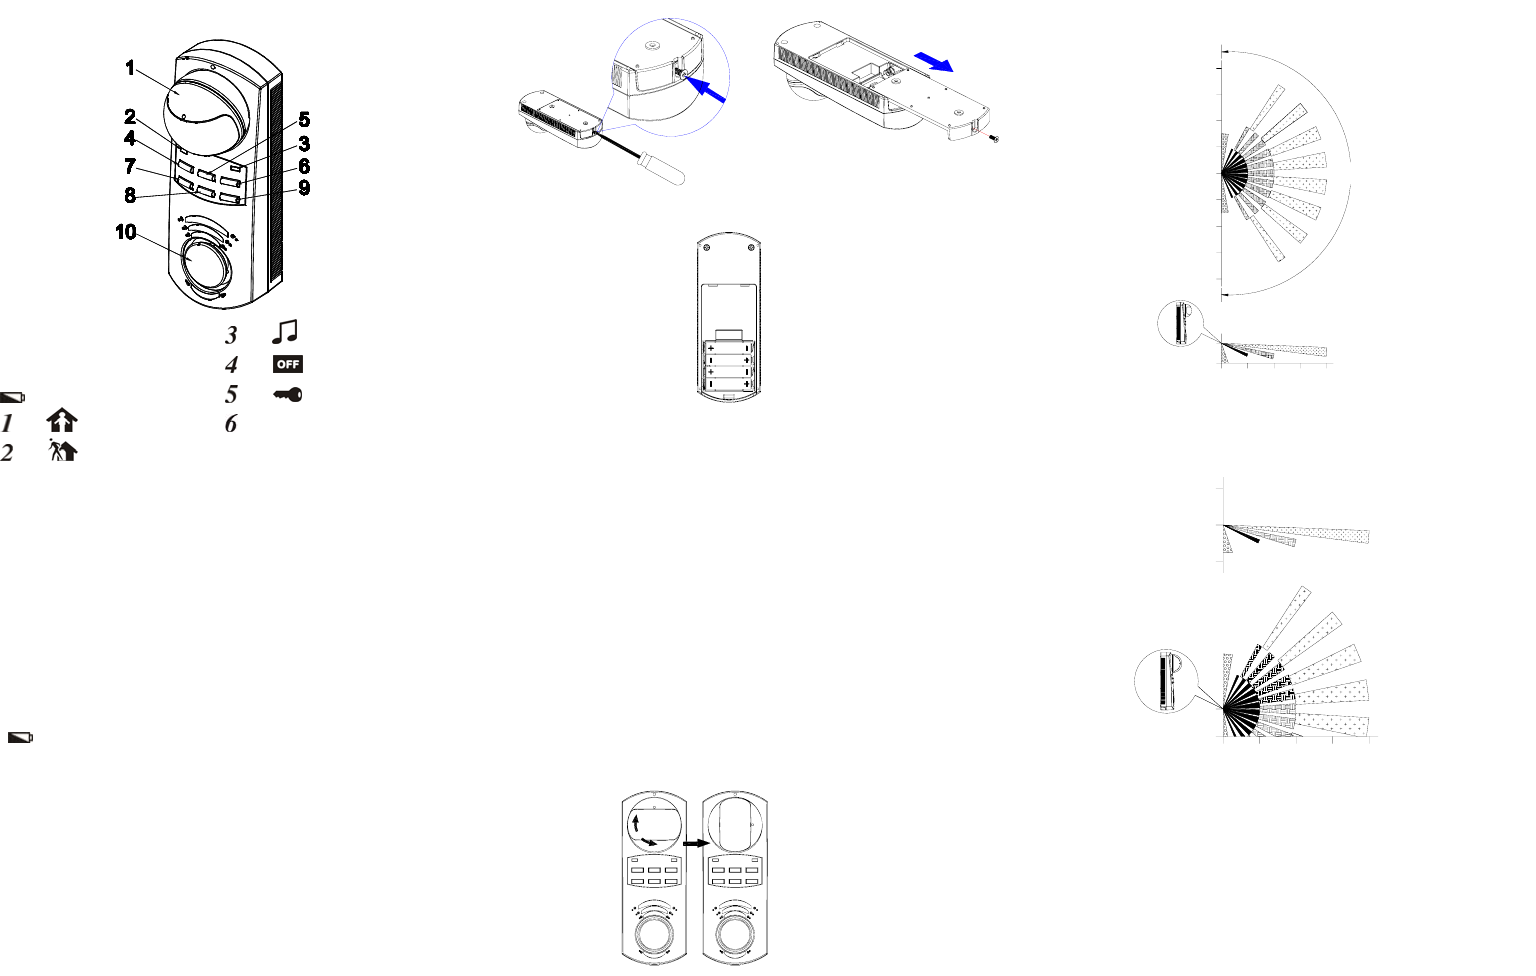
SP122 Wireless PIR Alarm
1 PIR Motion Sensor 6
2 Status LED 7
3 Low Battery LED 8
4 9
5 10 Siren
The Wireless PIR Alarm is designed to protect your
property, serving as a security system and entry
enunciator as well. Upon activation caused by
temperature fluctuation of human movement, a piercing
130 decibels alarm sound or chime alert will be emitted.
INSTALLING BATTERIES
The Wireless PIR Alarm requires 4 “AAA” batteries. If
the LED of Alarm is flashing, the batteries need to
be replaced right away, otherwise the Alarm cannot be
working properly. Average battery life for typical usage
is 1 year.
To install the batteries:
1. Remove screw at base of compartment and slide
off cover. (FIGURE 1a & 1b)
2. Insert 4 “AAA” batteries ensuring correct polarity
being put. (FIGURE 2)
FIGURE 1a & 1b
FIGURE 2
Note: Remove batteries before storing the Alarm for
extended periods. Batteries corrode over time and
may cause permanent damage to the unit. Different
types of batteries or new and used batteries should not
be mixed. Depleted batteries should be removed from
the unit and disposed of properly.
CHOOSING A MOUNTING LOCATION
The Alarm is designed to be wall mounted. Since the
PIR can be swiveled 90° rightward & leftward, plan the
detection coverage according to the below options.
(FIGURE 3)
Option 1 Option 2 FIGURE 3
Option 1
Option 2
Note: We recommend that the Option 2 is applied to
the stairway detection where visitors or intruders may
pass through.
When considering and deciding upon the mounting
position for the Alarm, the following points should be
considered to ensure trouble free operation:
2
1. Do not locate the Alarm facing a window or where it
is exposed to or facing direct sunlight. The Alarms
are not suitable for use in conservatories.
2. Do not locate the Alarm where it is exposed to
ventilators.
3. Do not locate the Alarm directly above a heat
source, (e.g. fire, radiator, boiler, etc).
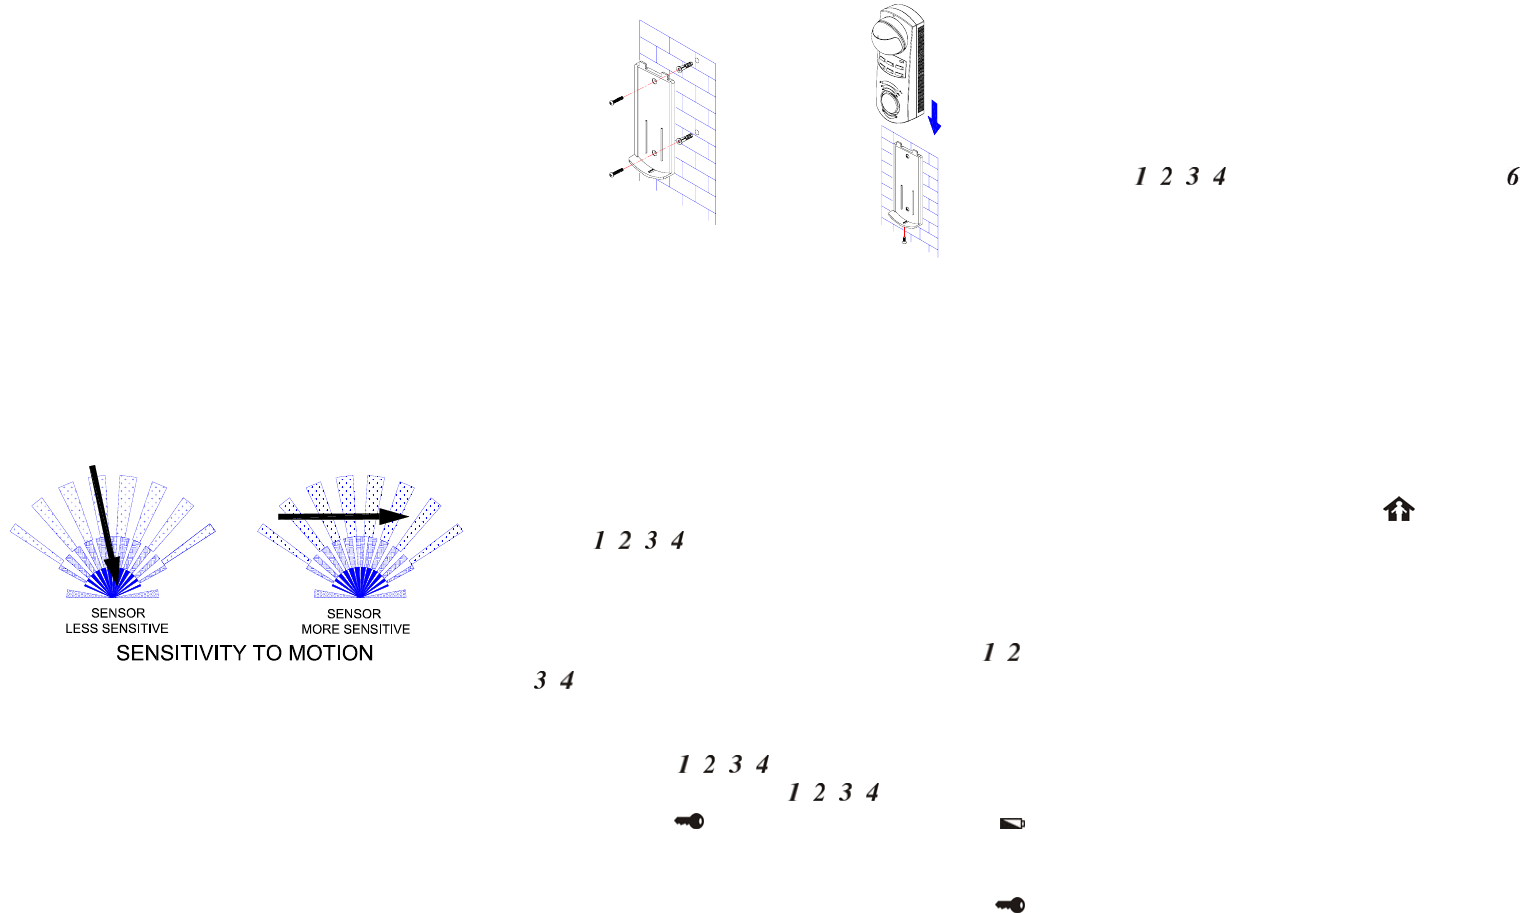
4. Where possible, mount the Alarm on the flat wall at
a 1.5m height so that the logical path of an intruder
would cut across the fan detection pattern. PIR
Alarm responds more effectively to movement
across the device than to movement directly
towards it. (FIGURE 4)
FIGURE 4
5. Ensure that the position selected for the Alarm is
within effective range of the system.
INSTALLING THE PIR ALARM
Choose desired location and fix the battery cover on the
wall using plastic wall plugs and screws provided. Place
the Alarm to the battery cover and secure with the
screw. (FIGURE 5)
FIGURE 5
STARTING UP
Upon completion of batteries insertion, the Alarm will
have 60 seconds warm-up period. During this period,
the Status LED keep flashing, any inputting or
movement of human body will be ignored. The Status
LED will be off after expiry of 60 seconds warm-up
period.
The ex-factory mode is set for “off “ and 4-digit security
code [ , , , ] has been set as the default secret
code. When you remove the battery, pressing any
button will clean out your previous setting. (Note: After
removing or replacing the batteries, the Alarm security
code would be automatically set back as default [ , ,
, ].
SETTING THE 4-DIGIT SECURITY CODE
Default setting: , , ,
For initial operation, press [ , , , ] 4-digit security
code and then mode key, the Status LED and
LED will keep illuminating.
Press your new 4-digit security code and then
mode key within 15 seconds. This 15-second period is
designed for entering the new security code. If setting
fails to be entered or incorrect codes were made for
three times consecutively within 15 seconds, the Alarm
will skip to off mode automatically.
While setting the security code, no radio signal will be
transmitted to the receiver if motion is sensed.
CODE LEARNING SETTING
Press [[ , , , ] 4-digit security code and then
mode key to enter the code learning mode. The Alarm
will transmit a radio signal to the receiver instantly.
Upon completion of code learning transmission, the
Alarm will skip to off mode automatically. During code
learning mode, any input or activation will be ignored.
ARMING THE ALARM
Both “instant” and “entry delay” mode have a
15-second exit delay duration.
1. Instant mode: Arm the Alarm by pressing your
4-digit security code and then mode key. The
Alarm will have 15-second exit delay duration
before the Alarm is armed. The delay allows time
for you to leave the protected area without
triggering the Alarm. During this 15-second delay
duration, the Alarm will bleep and Status LED will
flash as a notification. The Alarm will enter instant
mode after expiry of 15-second exit delay duration.
When motion is sensed, the Alarm will sound for 30
seconds for each activation and emit a “Start” radio
signal to the receiver simultaneously. After sending
the radio signal for 15 minutes, the Alarm will
transmit a “Stop” radio signal to the receiver.
Note: We would recommend that the Alarm mode
is set for Chime when you are at home to avoid
hearing damage resulted from frequent activation.
3
2. Entry delay mode: Arm the Alarm by pressing your
4-digit security code and then mode key. The
Alarm will have 15-second exit delay duration. The
delay allows time for you to leave the protected
area without triggering the Alarm. During this
15-second delay duration, the Alarm will bleep and
Status LED will flash as a notification. The Alarm
will enter delay mode after expiry of 15-second exit
delay duration.
Once the motion is detected, the Alarm will emit a
“Start” radio signal to the receiver and will not sound
until 15-second entry delay duration expires which
allows you to disarm the Alarm before the Alarm
sound for 30 seconds. After sending the radio signal
for 15 minutes, the Alarm will transmit a “Stop” radio
signal to the receiver.
DISARMING THE ALARM
Disarm the Alarm by pressing your 4-digit security code
and then mode key.
When the Alarm is set in the off mode, any activation or
radio frequency transmission will be ignored.
Note: To test, a cloth can be used to cover the alarm to
reduce risk of hearing damage.
ACTIVATING THE CHIME
Activate the chime by pressing your 4-digit security
code and then mode key. One chime can be heard
as a notification upon initiation. When motion is
sensed, the Alarm will emit a “Start” radio signal to the
receiver and will emit two chimes for each activation.
After sending the radio signal for 15 minutes, the Alarm
will send a “Stop” radio signal to the receiver.
DEACTIVATING THE CHIME
Deactivate the chime by pressing your 4-digit security
code and then mode key.
LED INDICATION
When entering 4-digit security code with the fifth mode
key correctly, the Alarm will respond with a long bleep
with the Status LED illuminating.
The LED will be flashing three times accompanying
three bleeps every time when codes have been entered
incorrectly.
The Alarm will be disabled for 30 seconds when
incorrect codes have been entered three times
consecutively.
The LED will be flashing when incorrect codes
have been entered during the siren sound period. If
incorrect codes have been entered three times
consecutively during the siren sound period, the Alarm
will be disabled until the siren sound ceases.
In the event of a low battery condition, LED will be
flashing every 3 seconds until the battery power
depletes. Low battery indication won’t be visible until
the Alarm is at idle condition which means PIR
activation, code input, 30-seconds disabled period,
delay mode and code clearance will not be indicated.
CARE AND MAINTENANCE
To clean the unit housing, use a soft cloth slightly
dampened with water and wipe dry. Do not use
chemical agents as this may damage and discolor the
unit.
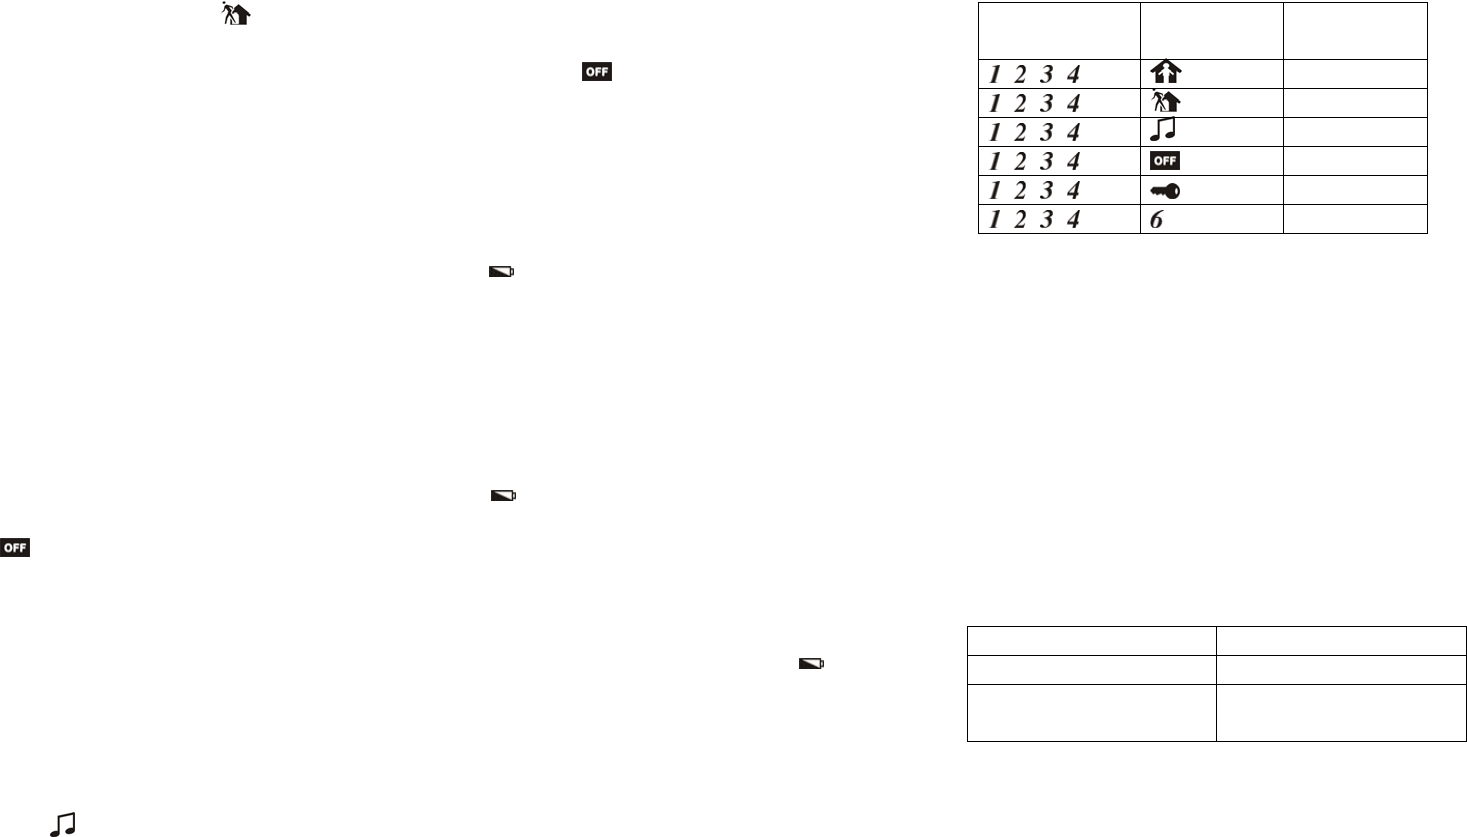
FAST INPUT GUIDELINE
Default Setting
(4-digit security code)
Mode Key Mode Status
, , , Instant
, , , Delay
, , , Chime
, , , Off
, , , Security Code
, , , Code Learning
Note: The security code for your Alarm should be
changed from the factory default setting.
Note: If codes have not been entered entirely,
incomplete preset codes will be cleaned after 10
seconds automatically. If codes have not been entered
entirely during the siren sound, incomplete preset
codes will be cleaned until the siren sound ceases. If
codes have not been entered entirely during the
change of security code, incomplete preset codes will
be cleaned until the change of security code is finished.
SPECIFICATIONS:
Frequency range 314-316 MHz
Battery 1.5V AAA type x 4
Communication Range 70 meters min. (in an
open space)
Federal Communication Commission
Interference Statement
This equipment has been tested and found to comply
with the limits for a Class B digital device, pursuant to
Part 15 of the FCC Rules. These limits are designed
to provide reasonable protection against harmful
4
interference in a residential installation. This
equipment generates, uses and can radiate radio
frequency energy and, if not installed and used in
accordance with the instructions, may cause harmful
interference to radio communications. However, there
is no guarantee that interference will not occur in a
particular installation. If this equipment does cause
harmful interference to radio or television reception,
which can be determined by turning the equipment off
and on, the user is encouraged to try to correct the
interference by one of the following measures:
- Reorient or relocate the receiving antenna.
- Increase the separation between the equipment
and receiver.
- Connect the equipment into an outlet on a circuit
different from that to which the receiver is
connected.
- Consult the dealer or an experienced radio/TV
technician for help.
This device complies with Part 15 of the FCC Rules.
Operation is subject to the following two conditions: (1)
This device may not cause harmful interference, and (2)
this device must accept any interference received,
including interference that may cause undesired
operation.
FCC Caution: Any changes or modifications not
expressly approved by the party responsible for
compliance could void the user's authority to operate
this equipment.
IMPORTANT NOTE:
FCC Radiation Exposure Statement:
This equipment complies with FCC radiation exposure
limits set forth for an uncontrolled environment. End
users must follow the specific operating instructions for
satisfying RF exposure compliance.
This transmitter must not be co-located or operating in
conjunction with any other antenna or transmitter.