Everspring Industry Co ST814 Temperature/Humidity Detector User Manual UserMan
Everspring Industry Co Ltd Temperature/Humidity Detector UserMan
UserManual.wiki
>
Everspring Industry Co
>
ST814 User Manual
UserMan
Navigation menu
Upload a User Manual
Namespaces
Wiki Guide
HTML
PDF
Info
Views
User Manual
Discussion / Help
Navigation
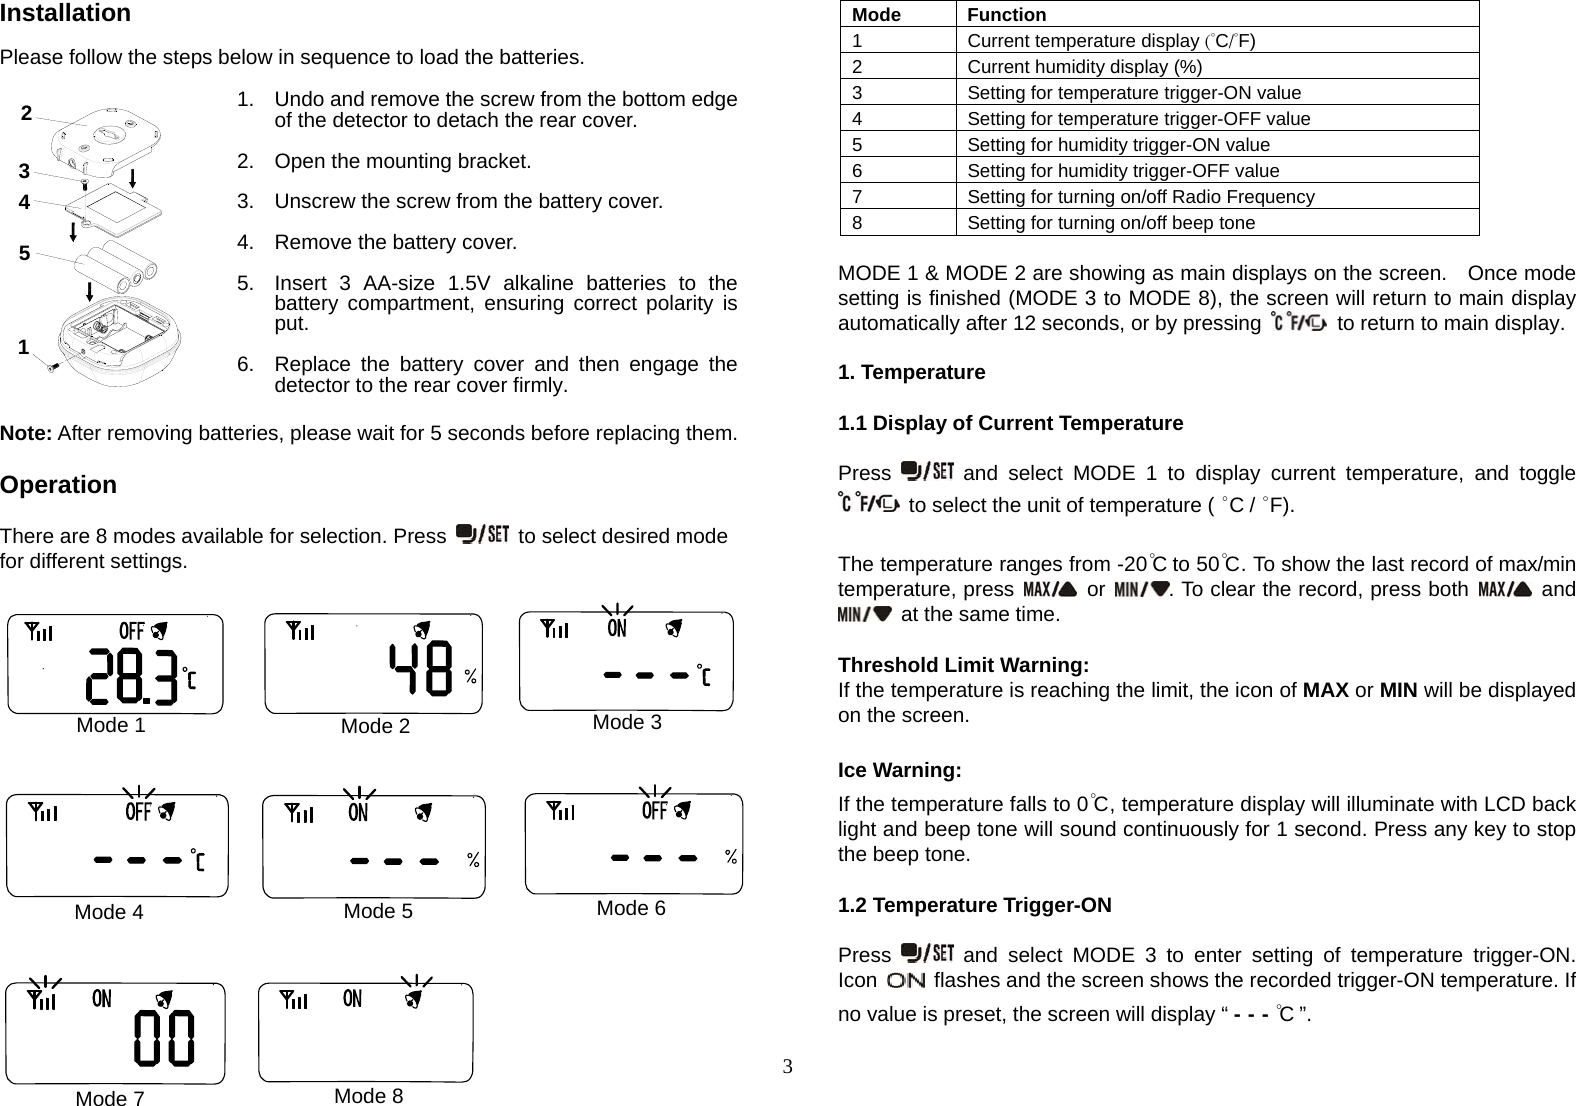
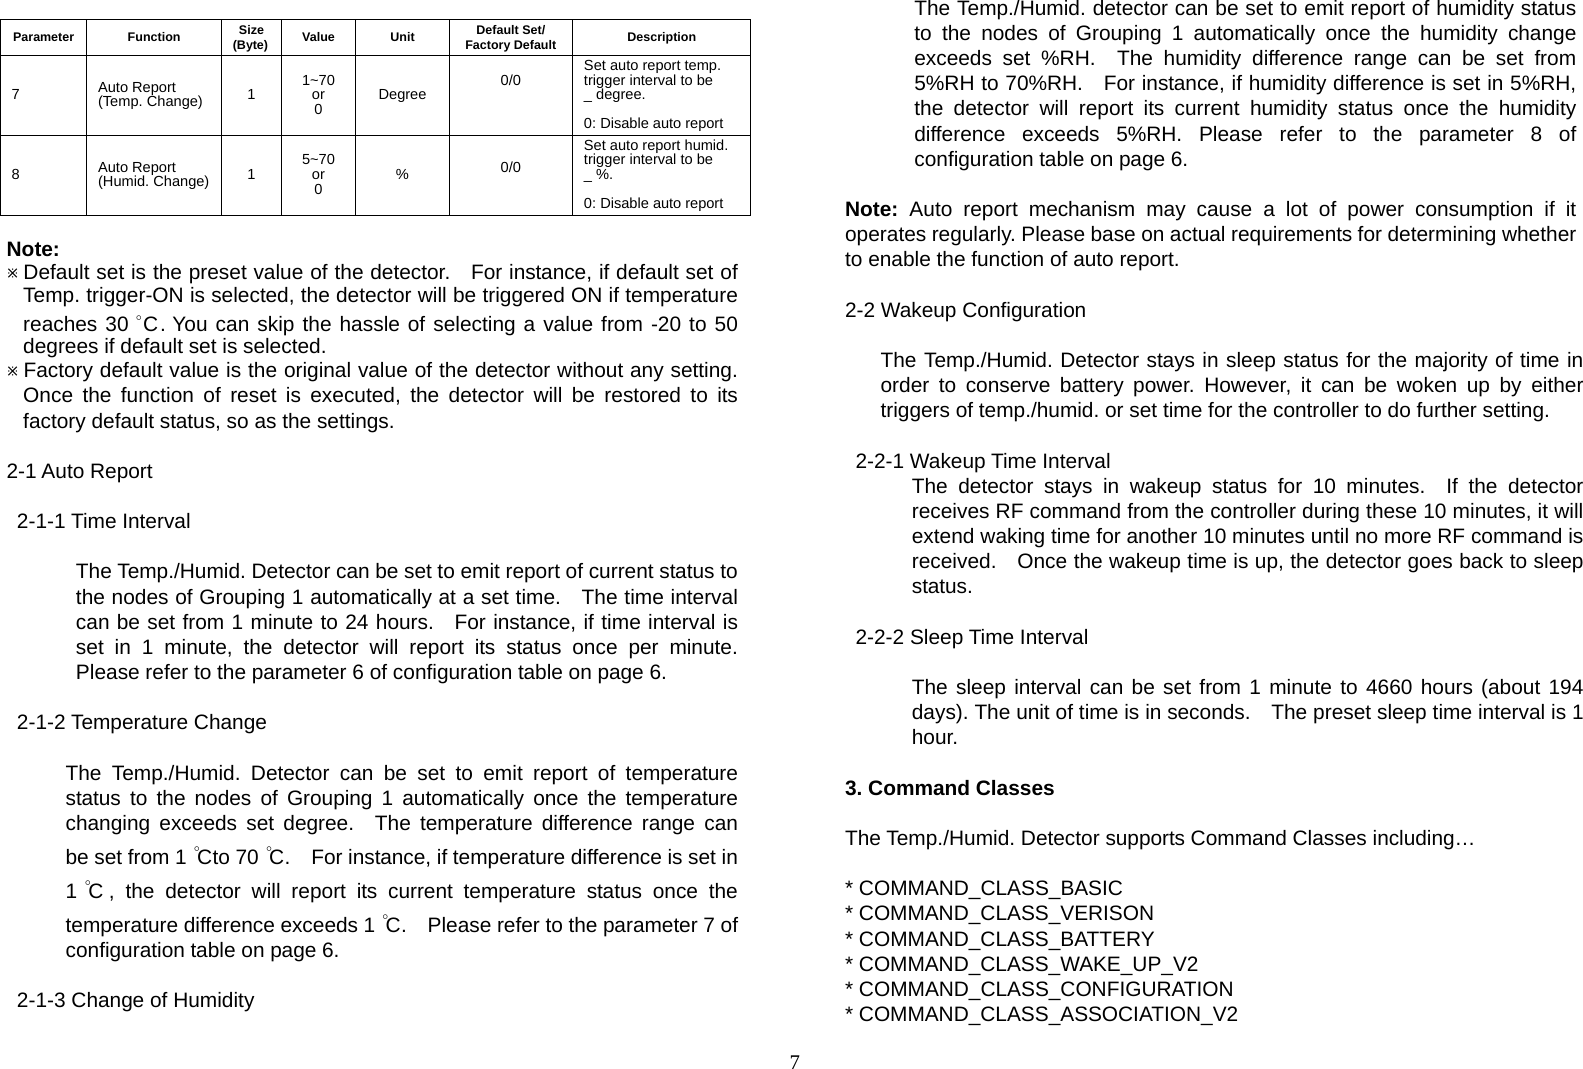
![5To adjust trigger-OFF value, press and hold for 5 seconds until a long beep is sounded. The “- - -” starts flashing. Use or button to scan through the humidity reading from 20%RH to 90%RH. Once the value is selected, press to confirm setting or press to cancel. To clear the trigger-OFF record, press both and at the same time. The record is cleared after a long beep is sounded. If the humidity reaches the preset trigger-OFF value, Temp./Humid. Detector will emits RF signal. The screen of detector returns to MODE 2 and the icon is flashing with backlight illuminates and beep tone sounds for 1 second. Press any key to stop the beep tone. Note: The humidity of trigger-ON and trigger-OFF cannot be set equal; there MUST be at least 5% difference in between. For example, if now the trigger-ON humidity is already set to be 50%, so trigger-OFF humidity can only be 45% ≦or ≧55%. (Values between 45% and 55% cannot be set.) Once the detector has been triggered, the humidity must raise up or drop down at least 5% from the preset value before it can be triggered again. For example, if the detector has been triggered on at 50%, then the temperature must be ≧55% or ≦45% before it can be re-triggered. 3. Radio Frequency This function is designed to enable or disable the sending of RF command which comprised of Z-wave protocol to the associated nodes, as Temp./Humid. Detector has been triggered on/off. Press and select MODE 7, the icon should flash. Press to turn On (enable) the function or to turn OFF (disable) the function. Note: If the RF mode is OFF, no command will be sent even the Temp./Humid. Detector has been triggered. If RF is ON and the detector has been triggered, the RF command will be sent to nodes of Grouping 2. If the RF reading is 00, it implies no node ID has been allocated by Z-Wave Controller. Please execute inclusion mode as described on page 1. 4. Beep Tone To set the beep tone, press and select MODE 8. The icon flashes. Press for ON and for OFF. If it is ON, a beep tone will be sounded whenever a button is pressed; 4 continuous beep tones will be sounded for 1 second if the detector has been triggered. Programming 1. Z-Wave’s Groups (Association Command Class Version 2) The Temp./Humid. Detector can be set to send reports to or control associated Z-Wave devices. It supports two association groups with one node support for Grouping 1 and three nodes support for Grouping 2. Grouping 1 includes POWER_APPLIED, SENSOR_MULTILEVEL _REPORT and BATTERY_REPORT_COMMAND Grouping 2 includes BASIC_SET 1-1 Grouping 1 (Max. Node = 1) 1-1-1 POWER_APPLIED command Whenever power is applied, it will send ALARM_REPORT command to the nodes of Grouping 1 to inform the devices that the detector is powered up. ALARM_REPORT Command[Command Class Alarm, Alarm Type = 0x02, Alarm Level = 0x01] 1-1-2 MULTILEVEL_SENSOR_REPORT The detector will emit SENSOR_MULTILEVEL_REPORT to inform the nodes of Grouping 1 automatically its current temperature and humidity. Refer to the section of Z-Wave’s Configuration as described on page 6 for settings of auto report configuration. 1-1-2-1 Humidity SENSOR_MULTILEVEL_REPORT [Command Class Sensor Multilevel, Sensor Multilevel Report, Sensor Type = 0 x 05 (Relative Humidity), Precision+Scale+Size = 0 x 01, Sensor Value 1 = 20-90%] Example: Sensor Value 1 = 0x23 Humidity Value = Sensor Value = 35 (%) 1-1-2-2 Temperature (Celsius)](https://usermanual.wiki/Everspring-Industry-Co/ST814/User-Guide-2105971-Page-5.png)
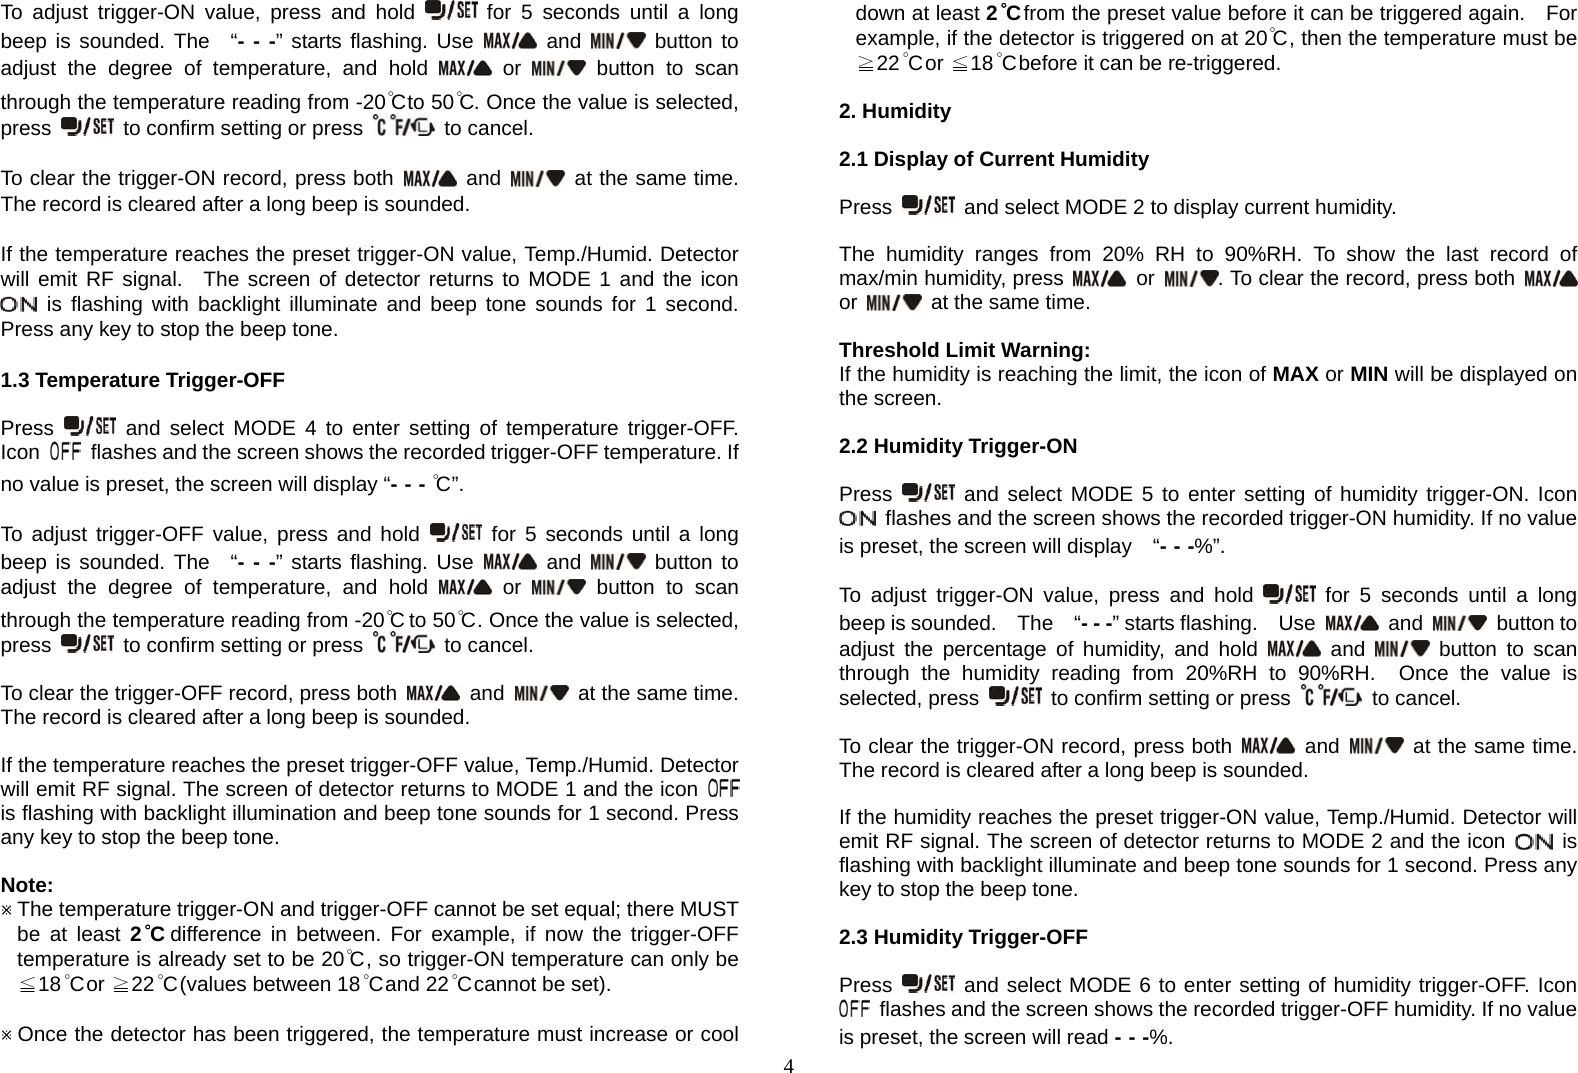
![6 SENSOR_MULTILEVEL_REPORT [Command Class Sensor Multilevel, Sensor Multilevel Report, Sensor Type = 0 x 01 (Air Temperature), Precision+Scale+Size = 0 x 22, Sensor Value 1 = (High Byte of Temperature Value), Sensor Value 2 = (Low Byte of Temperature Value)] Example: Sensor Value 1 = 0x01 Sensor Value 2 = 0x31 Temperature (C) = (Sensor Value 1*256 + Sensor Value 2)/10 = (1*256+49)/10 = 30.5 (C) 1-1-2-3 Temperature (Fahrenheit) SENSOR_MULTILEVEL_REPORT[Command Class Sensor Multilevel, Sensor Multilevel Report, Sensor Type = 0 x 01 (Air Temperature), Precision+Scale+Size = 0 x 2A, Sensor Value 1 = (High Byte of Temperature Value), Sensor Value 2 = (Low Byte of Temperature Value)] 1-1-3 Low Battery Report When the battery level of the detector drops to an unacceptable level, the icon will appear on the LCD and the detector will emit ALARM_REPORT command to the nodes of Grouping 1. ALARM_REPORT Command: [Command Class Alarm, Alarm Type = 0x01, Alarm Level = 255(0xFF)] The users can also enquire the battery status of the detector by sending BATTERY_ GET command via controller. Once the detector receives the command, it will return BATTERY_REPORT command. BATTERY_REPORT Command [Command Class Battery, Battery Report, Battery Level = 20%-100%] If it displays with a message of “Battery Level = 255 (0xFF)”, it implies that the detector is at low battery status. Please replace the batteries as soon as possible, otherwise the detector will enter Shut Down mode. Note: The detector will emit a low battery command as long as there is a device associated into Grouping 1 of Temp./Humid. Detector, even if the RF function is set to disable. 1-2 Grouping 2 (Max. Node = 3) 1-2-1 Control Other Devices (Basic Set) When the detector is triggered, it will emit BASIC_SET_COMMAND to the nodes of Grouping 2. BASIC_SET Command Trigger ON: [Command Class Basic, Basic Set, Value = 0xFF] Trigger OFF: [Command Class Basic, Basic Set, Value = 0] Please refer to the table below, configuration parameter 1, for the setting of basic set command. 2. Z-Wave’s Configuration The table below lists the configuration parameters and the value range for users to set up the detector. Parameter Function Size(Byte) Value Unit Default Set/Factory Default Description 1 Basic Set Level 1 0~99 % of Brightness(Dimmer Level)99 / 99 Set basic set value to be on (or Dim Level) /off 0: Disable 2 Temperature Trigger-ON Value 1 -20~50 or 99 Degree 30 / 99 Set temp.trigger-ON value to be _ degree. 99: Clear Temp. trigger-ON value 3 Temperature Trigger-OFF Value 1 -20~50 or 99 Degree 20 / 99 Set temp.trigger-OFF value to be _ degree. 99: Clear Temp. trigger-OFF value 4 Humidity Trigger-ON Value 1 20~90 or 99 % 50 / 99 Set humid. trigger-ON value to be _%. 99: Clear Humid. trigger-ON value 5 Humidity Triger-OFF Value 1 20~99or 99 % 40 / 99 Set humid. trigger-OFF value to be _%. 99: Clear Humid. trigger-OFF value 6 Auto Report (Time Interval) 2 1~1439 or 99 Minutes 0/0 Set auto report time interval to be _ mins 0: Disable auto report](https://usermanual.wiki/Everspring-Industry-Co/ST814/User-Guide-2105971-Page-6.png)