Evervictory Electronic PKG-RSE3 DVD ENTERTAINMENT SYSTEM User Manual
Evervictory Electronic Company Limited DVD ENTERTAINMENT SYSTEM
User Manual
DVD EMTERTAINMENT SYSTEM

PRECAUTIONS
Product Cleaning
Use a soft dry cloth for periodic cleaning of the product.
For more severe stains, please dampen the cloth with water
only. Anything else has the chance of dissolving the paint
or damaging the plastic.
Temperature
Do not operate your unit in ambient temperature above
+70°C (+158°F) or below -20°C (-4°F).
Moisture Condensation
You may notice the disc playback sound wavering due to
condensation. If this happens, remove the disc from the
player and wait about an hour for the moisture to evaporate.
Damaged Disc
Do not attempt to play cracked, warped, or damaged discs.
Playing a bad disc could severely damage the playback
mechanism.
Maintenance
If you have problems, do not attempt to repair the unit
yourself. Return it to your Alpine dealer or the nearest
Alpine Service Station for servicing.
Characteristics of LCD Panel
• After turning the system off, a slight ghost of the image
will remain temporarily. This is an effect peculiar to LCD
technology and is normal.
• Under cold temperature conditions, the screen may lose
contrast temporarily. After a short warm-up period, it will
return to normal.
• The LCD panel is manufactured using an extremely high
precision manufacturing technology. Its effective pixel
ratio is over 99.99%. This means that 0.01% of the pixels
could be either always ON or OFF.
Using Wireless Headphones
If ACC or the monitor’s power source is turned off, a loud
noise is produced through the headphones. Be sure to
remove the wireless headphones from your ears before you
turn the monitor off.
Never Attempt the Following
Do not grip or pull out the disc while it is being pulled back
into the player by the automatic reloading mechanism.
Do not attempt to insert a disc into the unit when the unit
power is off.
Inserting Discs
Your player accepts only one disc at a time for playback. Do
not attempt to load more than one disc.
Make sure the label side is facing up when you insert the
disc. Press to eject any disc that is inserted incorrectly.
Playing a disc while driving on a very bumpy road may
result in skips, but this will not scratch the disc or damage
the player.
New Discs
As a protective measure to prevent the disc from jamming,
press to eject any disc with irregular surface or inserted
incorrectly. When a new disc is inserted into the player and
ejected after initial loading, using your finger, feel around
the inside of the center hole and outside edge of the disc. If
you feel any small bumps or irregularities, this could inhibit
proper loading of the disc. To remove the bumps, rub the
inside edge of the hole and outside edge of the disc with
a ball-point pen or other such instrument, then insert the
disc again.
Center Hole
Bumps
Center Hole New
Disc
Outside
(Bumps)
Irregular Shaped Discs
Be sure to use round shaped discs only for this unit and
never use any special shaped discs.
Use of special shaped discs may cause damage to the
mechanism.
Correct Handling
Do not drop the disc while handling. Hold the disc so you
will not leave fingerprints on the surface. Do not affix tape,
paper, or gummed labels to the disc. Do not write on the
disc.
CORRECT
INCORRECT CORRECT
Dome Light Switch
Dome light switch turns on/off the dome light. When the
switch is set to Door, the dome light turns on when the door
is open
IR Transmitter and Receiver
IR transmitter sends the sound to the Headphone. IR
receiver receives the signal from the remote control.
Eject Button
Pressing Eject button unloads Disc. If the ignition key is set
to ACC or ON, a disc can be removed even when the power
is OFF.
Basic Operations
V I D E O
Disc-in slot
EJECT
Left side
ENT
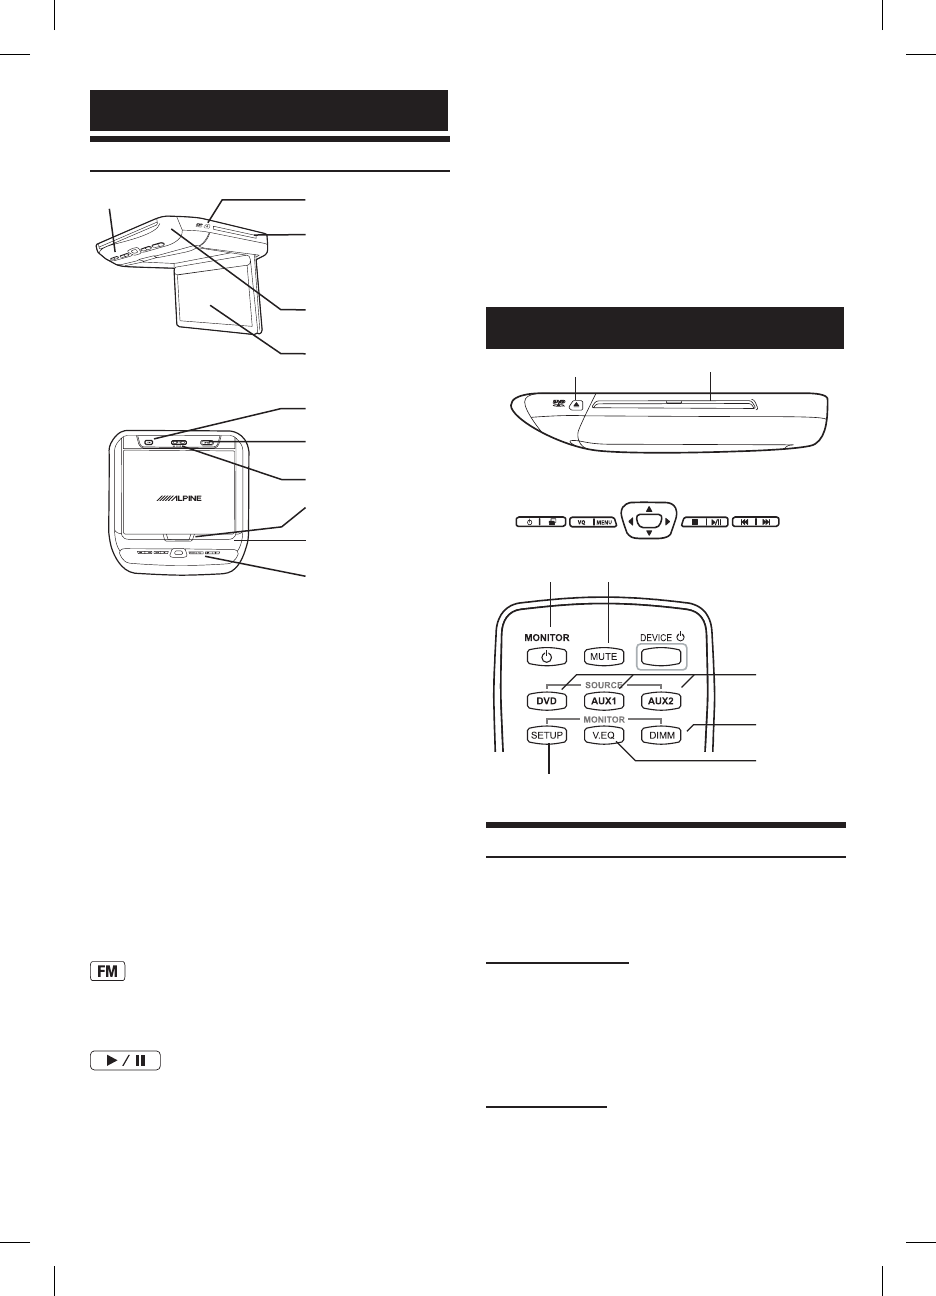
Front Control Keys
DIMMER
Visual Mode
DVD, AUX1,
AUX2
POWER MUTE
MONITOR SETUP Remote Control
Turning Power ON/OFF
The power state of the monitor is memorized when
Ignition/ACC is turned off. When Ignition/ACC is turned
back on, the monitor returns to the memorized power state
(either ON or OFF), including DVD playback position.
Front Control Keys
1 Press POWER to turn ON.
2 To turn off the power, press and hold
POWER again.
• WhilethepowerisON,pressPOWERtoactivatethe
Mutefunction.
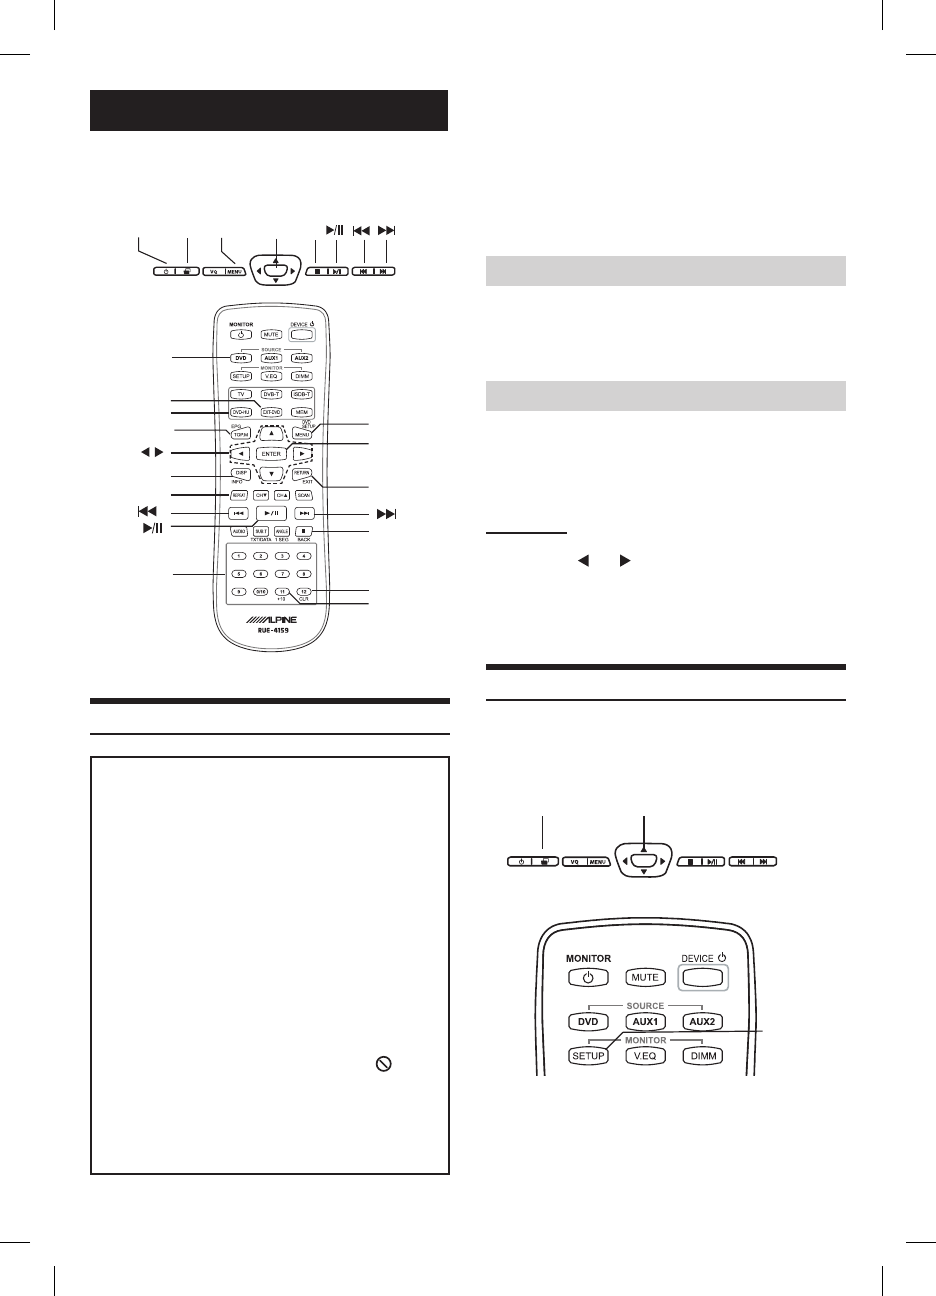
Remote Control
1 Press POWER to turn ON.
2 To turn off the power, press POWER again.
Getting Started
Overhead Monitor
Front Control Keys
White LED Dome Light
Panel Open Switch
FM Modulator
Dome Light Switch
Front Passenger
Play/Pause and Power
LCD Monitor Panel
Power Eject Button
IR Transmitter
and Receiver
Disc-In Slot
LCD Monitor Panel
This is a 10.1 inch, Wide VGA, Active Matrix LCD. In
addition, an Infrared Wireless Headphone Transmitter is
located on top of the LCD panel.
Monitor Open Button
Press Monitor Open Button to release the Monitor Panel.
The Panel will drop down slightly allowing you to fully
open to its 90 degree or greater position. To close, firmly
press the LCD Monitor Panel back up into the housing until
a click is heard.
White LED Dome Light
White LED Dome Light illuminates when Dome Light
Switch is on.
Front Control Keys
Blue, back-lit button illuminates when the overhead
monitor main power is on. DVD overhead monitor and
other devices can be controlled by using these buttons.
Front Passenger Control Buttons
: FM modulator ON/OFF switch
The monitor’s DVD sound is transmitted to the radio’s FM
Tuner, when FM button is on. The radio must be tuned to
the proper frequency. The FM transmitter function in the
System menu must be ON to use the FM modulator.
:Play/pauseandpowerswitch
The front passenger can play/pause the DVD. It also allows
turning on the unit. The unit can be turned off by pressing
and holding this switch.
• DuringACCOFForwhilethediscisbeingloaded
(“LOADING”isdisplayed),thediscwillnotbe
ejectedevenifyoupress .
Audio Mute Function
Front Control Keys
1 While the power is ON, press POWER to
activate the Mute function.
2 Press POWER again turn it OFF the Mute
function.
Remote Control
Press MUTE to turn it ON and OFF.
Adjusting the Volume
Volume can be controlled from the headphone or your own
radio volume function.
1 Turn on POWER on the headphone.
2 Adjust the volume level by turning clockwise
for louder and counter-clockwise for lower
on the headphone.
Refer to Wireless Headphone.
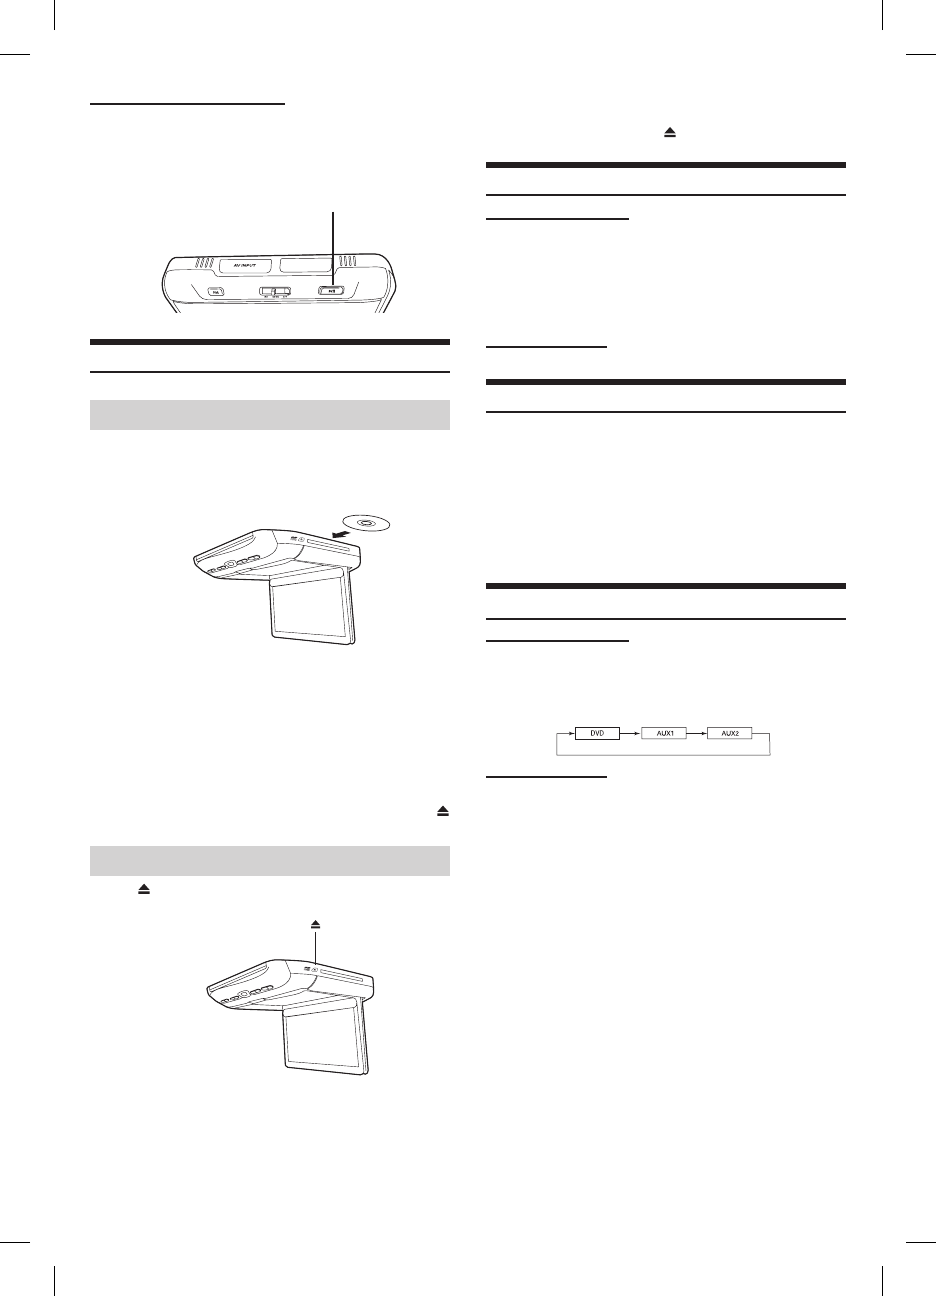
Switching the Source
Front Control Keys
1 Press SELECT to change each source.
2 Press SELECT to cycle through the different
sources.
Remote Control
Press DVD, AUX1 or AUX2 to change each
source directly.
• OSD(OnScreenDisplay)willbeturnedoff
automatically,whennotoperatingmorethan6seconds.
• ToconnectthedevicetoAUX1andAUX2.
• Whenthesourceischanged,thedeviceremembersthe
scenewhereplaybackstopped.
• Thedevicemodeoftheremotecontrolis
automaticallyshiftedtotheassigneddevice,when
AUX1orAUX2ispressed.
Front Passenger Controls
1 Press PLAY/PAUSE button to turn ON.
2 To turn off the power, press and hold PLAY/
PAUSE.
PLAY/PAUSE
Loading and Unloading Discs
Turnonthepowerbeforeloadingandunloadingdiscs.
Loading discs
Insert the disc with the label side facing upwards.
Once the disc is partially inserted, it is drawn in
automatically. Playback starts.
• IftheignitionkeyisonACCorON,adisccanbe
insertedevenwhenthepowerisOFF.
• Fortwo-sidedDVDs,playonesideofthedisctothe
end,thenunloadthedisc,turnitoverandreloadit
toplaytheotherside.
• Neverinsertmapdiscsfornavigationpurposesas
theycoulddamagetheequipment.
• Ifwrongdisc,upside-downdiscsordirtydiscshave
beeninserted,“DISCERROR”isdisplayed.Press
andejectthedisc.
Unloading discs
Press .
Be sure to remove the disc.
• Ifthediscisnotremovedwithinafewmoments,it
willbereloadedautomatically.
• IftheignitionkeyissettoACCorON,adisccan
beremovedevenwhenthepowerisOFF.After
removingthedisc,thepowerturnsOFFagain
automatically.
Insert a disc with the label side facing up.
To load discs, see “Loading and Unloading Discs”.
Playback starts.
• Thereversesideofadouble-sidedDVDwillnotbe
playedautomatically.Removethedisc,turnitover,
andreinsertit.
• Itmaytakesometimebeforeplaybackstartsafter
loadingadisc.
DVD Auto Play
Themainmoviewillplayautomaticallywithoutpressing
PlayorEnterbutton,whenDVDisinserted,ifAUTOor
SKIPmodeisselectedonDVDAutoPlayunderSystem
menu.Seeowner’smanualfordetail.
If a menu screen appears
OnDVDsandvideoCDs,menuscreensmayappear
automatically,whenDVDAutoPlayissettoNORMAL.
Performtheoperationdescribedbelowtostartplayback.
• Formanydiscs,themenuscreencanalsobe
displayedbypressingMENU.
DVD menu
Press s, t, or to select the desired item,
then press ENTER.
• Forsomediscsitispossibletoselectitemsdirectly
fromthemenuscreenusingthenumber keys(“0”
to“9”).
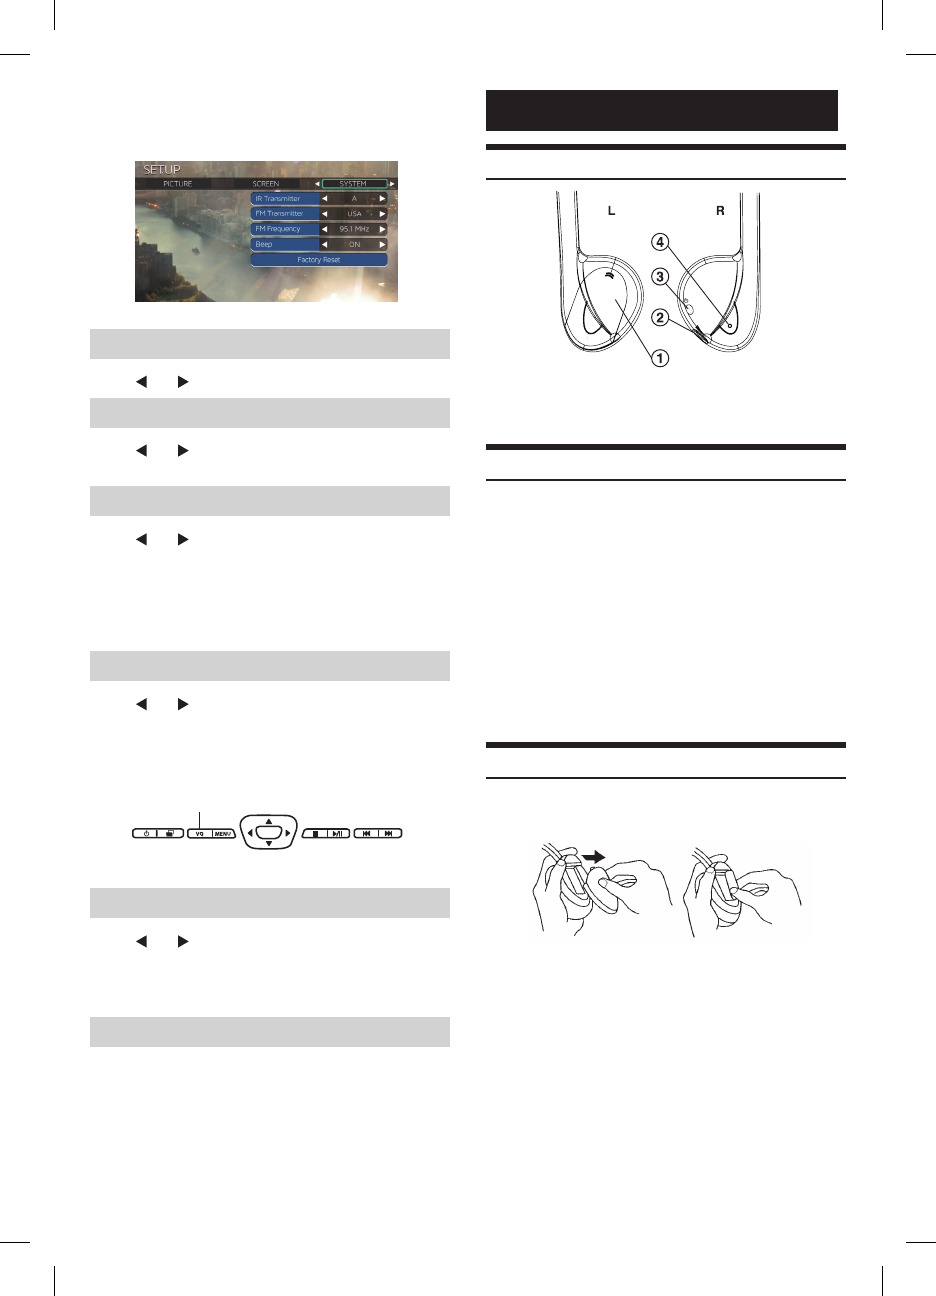
Setting System Control
IRtransmitter,FMtransmitter,FMfrequencyand,dimmer
canbeadjustedforallavailablesources.
• Oncethisadjustmentismade,allsourcesare
affected.
ENT
SELECT ENT
Front Control Keys
SETUP
Remote Control
1 Press and hold SELECT for at least 2
seconds to show the SETUP menu on
Front Control Keys. Or Press SETUP
button on Remote Control.
DVD
The instruction includes Built-In DVD, EXT-DVD,
DVD-HD. DVD player can be also used for CD/
CD-R/CD-RW.
ENT
SELECTPOWER MENU n
ENT
Front Control Keys
DISPLAY RETURN
n
REPEAT
MENU
ENTER
Number
Keys
(0 to 9)
DVD-HU
EXT-DVD
+10*1
CLEAR*2
Remote Control
DVD
st
TOP.M
Playing DVD/Video CD
Caution
Wireless Headphone (Optional)
Headphone Receivers
L
R
1) Battery Cover
2) Volume Control
3) Power Switch
4) Power Indicator LED
Operation
Read carefully to prevent damage to the
headphone or your ears:
WARNING:Beforeturningonthepower,remove
headphonesandturnthevolumedownaslowaspossible.
1) Be sure the batteries are properly installed in the
headphones.
2) Turn the headphones volume completely down
before placing it on your ears and turning on the
power.
3) Turn on the headphone power and adjust the
headphone volume to a comfortable level (You
can increase the audio source volume if needed).
Battery Installation
Place two AAA batteries into the battery compartment of
the headphone(s), making sure that the battery polarity is
correct.
2 Press SELECT/SETUP to switch
to SYSTEM setting menu from
AUDIO&SCREEN setting menu.
3 Press s or t to change each item.
Setting the IR Transmitter
Press or to select A/B/OFF. (Default: A)
Setting the FM Modulator
Press or to select FM Radio region
(OFF/USA/OTHERS). (Default: OFF)
Setting the FM Frequency
Press or to select desired FM Radio
Frequencies between 88.1 MHz to 92.1 MHz for
USA and Europe, and 88.1 MHz to 90.0 MHz for
Japan. (Default: 89.1 MHz)
• USAfrequencystepis0.2MHzandEuropeandJapan
is0.1MHz.
Setting the Dimmer
Press or to select High/Mid/Low.
(Default: AUTO)
AUTO adjusts the LCD backlight brightness
automatically by sensing the ambient light from the
luminance sensor.
ENT
Dimmer
Front Control Keys
Setting the Dimmer Low Level
Press or to select low level of Dimmer
between 0 (min.) to 15 (max.). 15 (max.) is the
same brightness level with HIGH on Dimmer
menu.
Resetting to the Factory Default
Press ENTER Key, the system changes to
Factory Default System Setting. Entire settings
include Picture, Visual EQ, Display Mode
are also reset. DVD Setup values will not be
affected.

LIMITED WARRANTY
ALPINE ELECTRONICS OF AMERICA, INC. AND ALPINE OF CANADA INC. ("Alpine"), are dedicated to quality
craftsmanship and are pleased to offer this Warranty. We suggest that you read it thoroughly. Should you have any
questions, please contact your Dealer or contact Alpine at one of the telephone numbers listed below.
●PRODUCTS COVERED:
This Warranty covers Car Audio Products and Related
Accessories ("the product"). Products purchased in the
Canada are covered only in the Canada. Products
purchased in the U.S.A. are covered only in the U.S.A.
●LENGTH OF WARRANTY:
This Warranty is in effect for one year from the date of the
fi rst consumer purchase.
●WHO IS COVERED:
This Warranty only covers the original purchaser of the
product, who must reside in the United States, Puerto
Rico or Canada.
●WHAT IS COVERED:
This Warranty covers defects in materials or workmanship
(parts and labor) in the product.
●WHAT IS NOT COVERED:
This Warranty does not cover the following:
1 Damage occurring during shipment of the product to
Alpine for repair (claims must be presented to the
carrier).
2 Damage caused by accident or abuse, including
burned voice coils caused by over-driving the
speaker (amplifi er level is turned up and driven into
distortion or clipping). Speaker mechanical failure (e.g.
punctures, tears or
rips). Cracked or damaged LCD panels. Dropped or
damaged hard drives.
3 Damage caused by negligence, misuse, improper
operation or failure to follow instructions contained in
the Owner's manual.
4 Damage caused by act of God, including without
limitation, earthquake, fi re, fl ood, storms or other acts
of nature.
Any cost or expense related to the removal or
reinstallation of the product.
5 Service performed by an unauthorized person,
company or association.
6 Any product which has the serial number defaced,
altered or removed.
7 Any product which has been adjusted, altered or
modifi ed without Alpine's consent.
8 Any product not distributed by Alpine within the United
States, Puerto Rico or Canada.
9 Any product not purchased from an Authorized Alpine
Dealer.
●HOW TO OBTAIN WARRANTY SERVICE:
1 You are responsible for delivery of the product to an
Authorized Alpine Service Center or Alpine for repair
and for payment of any initial shipping charges. Alpine
will, at its option, repair or replace the product with a
new or reconditioned product without charge. If the
repairs are covered by the warranty, and if the product
was shipped to an Authorized Alpine Service Center or
Alpine, Alpine will pay the return shipping charges.
2 You should provide a detailed description of the
problem(s) for which service is required.
3 You must supply proof of your purchase of the
product.
4 You must package the product securely to avoid
damage during shipment. To prevent lost packages
it is recommended to use a carrier that provides a
tracking service.
●HOW WE LIMIT IMPLIED WARRANTIES:
ANY IMPLIED WARRANTIES INCLUDING FITNESS FOR
USE AND MERCHANTABILITY ARE LIMITED IN
DURATION TO THE PERIOD OF THE EXPRESS
WARRANTY SET FORTH ABOVE AND NO PERSON IS
AUTHORIZED TO ASSUME FOR ALPINE ANY OTHER
LIABILITY IN CONNECTION WITH THE SALE OF THE
PRODUCT.
●HOW WE EXCLUDE CERTAIN DAMAGES:
ALPINE EXPRESSLY DISCLAIMS LIABILITY FOR
INCIDENTAL AND CONSEQUENTIAL DAMAGES
CAUSED BY THE PRODUCT. THE TERM "INCIDENTAL
DAMAGES" REFERS TO EXPENSES OF
TRANSPORTING THE PRODUCT TO THE ALPINE
SERVICE CENTER, LOSS OF THE ORIGINAL
PURCHASER'S TIME, LOSS OF THE USE OF THE
PRODUCT, BUS FARES, CAR RENTALS OR OTHERS
COSTS RELATING TO THE CARE AND CUSTODY OF
THE PRODUCT. THE TERM "CONSEQUENTIAL
DAMAGES" REFERS TO THE COST OF REPAIRING OR
REPLACING OTHER PROPERTY WHICH IS DAMAGED
WHEN THIS PRODUCT DOES NOT WORK PROPERLY.
THE REMEDIES PROVIDED UNDER THIS WARRANTY
ARE EXCLUSIVE AND IN LIEU OF ALL OTHERS.
●HOW STATE/PROVINCIAL LAW RELATES TO THE
WARRANTY:
This Warranty gives you specifi c legal rights, and you
may also have other rights which vary from state to state
and province to province. In addition, some states/
provinces do not allow limitations on how long an implied
warranty lasts, and some do not allow the exclusion or
limitation of
incidental or consequential damages. Accordingly,
limitations as to these matters contained herein may not
apply to you.
●IN CANADA ONLY:
This Warranty is not valid unless your Alpine car
audio product has been installed in your vehicle by an
Authorized Installation Center, and this warranty stamped
upon installation by the installation center.
●HOW TO CONTACT CUSTOMER SERVICE:
Should the product require service, please call the
following number for your nearest Authorized Alpine
Service Center.
CAR AUDIO 1-800-ALPINE-1 (1-800-257-4631)
NAVIGATION
1-888-NAV-HELP (1-888-628-4357)
Or visit our website at; http://www.alpine-usa.com
ALPINE ELECTRONICS OF AMERICA, INC., 19145 Gramercy Place, Torrance, California 90501, U.S.A.
ALPINE ELECTRONICS OF CANADA, INC., 777 Supertest Road, Toronto, Ontario M3J 2M9, Canada
Do not send products to these addresses.
Call the toll free telephone number or visit the website to locate a service center.
R
FCC Statement
This equipment has been tested and found to comply with the limits for a Class B digital device, pursuant to part 15 of the
FCC Rules. These limits are designed to provide reasonable protection against harmful interference in a residential
installation. This equipment generates, uses and can radiate radio frequency energy and, if not installed and used in
accordance with the instructions, may cause harmful interference to radio communications. However, there is no guarantee
that interference will not occur in a particular installation. If this equipment does cause harmful interference to radio or
television reception, which can be determined by turning the equipment off and on, the user is encouraged to try to correct
the interference by one or more of the following measures:
—Reorient or relocate the receiving antenna.
—Increase the separation between the equipment and receiver.
—Connect the equipment into an outlet on a circuit different from that to which the receiver is connected.
—Consult the dealer or an experienced radio/TV technician for help.
This device must not be co-located or operating in conjunction with any other antenna or transmitter. Operation is subject
to the following two conditions:
(1) this device may not cause harmful interference, and
(2) this device must accept any interference received, including interference that may cause undesired operation.
Caution!
The manufacturer is not responsible for any radio or TV interference caused by unauthorized modifications to this equipment.
Such modifications could void the user authority to operate the equipment.
Canada Statement
This device complies with Industry Canada licence-exempt RSS standard(s). Operation is subject to the following two
conditions: (1) this device may not cause interference, and (2) this device must accept any interference, including
interference that may cause undesired operation of the device.
Le présent appareil est conforme aux CNR d'Industrie Canada applicables aux appareils radio exempts de licence.
L'exploitation est autorisée aux deux conditions suivantes : (1) l'appareil ne doit pas produire de brouillage, et (2) l'utilisateur
de l'appareil doit accepter tout brouillage radioélectrique subi, même si le brouillage est susceptible d'en compromettre le
fonctionnement.