FKA Distributing SOLEP1195 Amps Air 2.0 User Manual Rev
FKA Distributing Co., LLC Amps Air 2.0 Rev
Contents
- 1. User Manual
- 2. User Manual Rev
User Manual Rev

Amps air
™2.0
QUICK START GUIDE
GUIDE DE DÉMARRAGE RAPIDE
WELCOME
To AMPS AIR 2.0, your new truly wireless earbuds that give you more freedom
in everything you do. They’re comfortable, have a secure t, and deliver
incredibly rich sound to your music experience.
Stash them away in their portable case to recharge. When your phone battery
gets low, the case doubles as a battery backup.
Love your AMPS AIR 2.0? Your voice matters. Write a review so we know what
you think, and share a picture with #FinallyFree @SOLREPUBLIC.
Feel the music, not the headphones.
Pour AMPS AIR 2.0, vos nouveaux écouteurs vraiment sans l qui vous
donnent plus de liberté dans tout ce que vous faites. Ils sont confortables,
ont un bon ajustement, et d’offrir une incroyable richesse sonore à votre
expérience musicale.
Stash -les dans leur boîtier portable pour recharger. Lorsque la batterie de
votre téléphone est faible, le cas se double d’ une batterie de secours.
Aimez votre AMPS AIR 2.0? Votre voix compte. Donnez votre avis nous
savons donc ce que vous pensez, et partager une photo avec #FinallyFree
@SOLREPUBLIC.
Sentez-vous la musique, pas le casque.
English .................................................................................... 4
Español ...............................................................................12
Français...............................................................................20
Deutsch ...............................................................................28
Italiano .................................................................................36
Dansk ................................................................................... 44
Magyar.................................................................................52
Polskie .................................................................................60
Pусский ............................................................................... 68
Nederlands ........................................................................76
Suomalainen ....................................................................84
Svensk .................................................................................92
ελληνικά ........................................................................... 100
Português .......................................................................108
Türk .................................................................................... 116
日本語 ..............................................................................124
Čeština ..............................................................................132
Slovenský ........................................................................ 140
Norsk .................................................................................148
한국어 ................................................................................156
.................................................................................164
繁體中文.........................................................................172
3
ﺔﻴﺑﺮﻌﻟا

4 EN
Amps Air 2.0
Bluetooth®
Devices
Amps Air Mono
Bluetooth®
Devices
Amps Air 2.0
Bluetooth®
Devices
Amps Air Mono
Bluetooth®
Devices
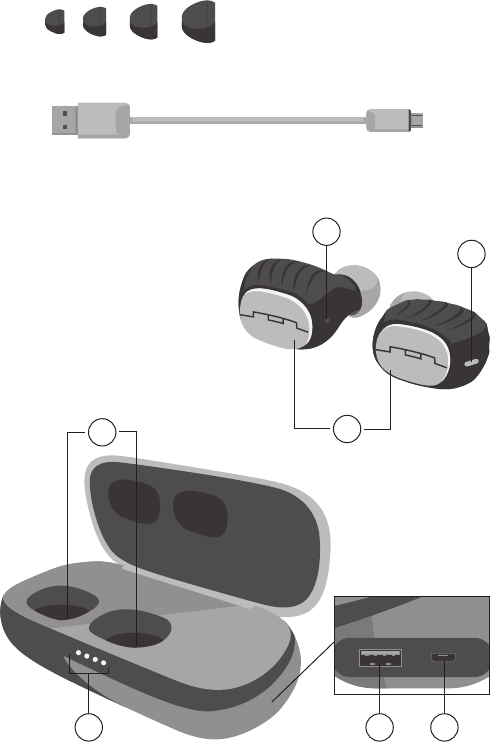
WHAT’S INSIDE
4 sizes of ear tips
USB Charge Cable
Travel Case with Backup Battery
1
2
3
4
5 7 6
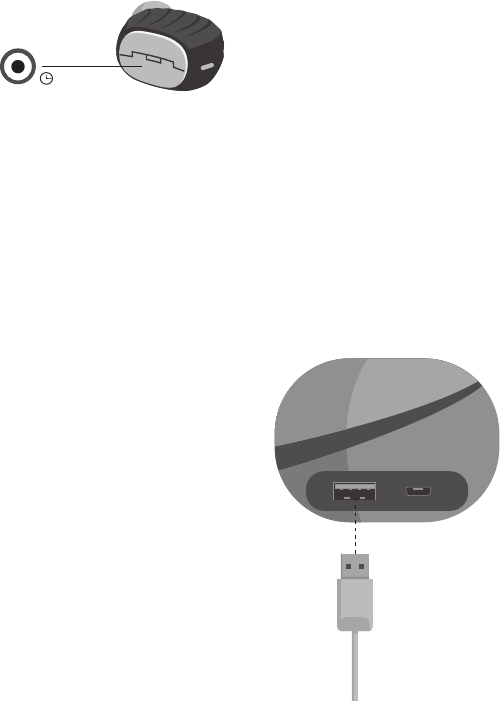
1 Multi-function button
2 Earbud status LED
3 Microphone port
4 Earbud charging contacts
5 Case battery LEDs
6 Micro USB charging port – to
charge the portable case
7 USB charging port – to
charge your smart device
NOTE
For the best t and sound, start with
the largest size ear tip and then work
your way down.
Amps Air 2.0
Bluetooth®
Devices
Amps Air Mono
Bluetooth®
Devices
Amps Air 2.0
Bluetooth®
Devices
Amps Air Mono
Bluetooth®
Devices
Amps Air 2.0
Bluetooth®
Devices
Amps Air Mono
Bluetooth®
Devices

EN 5
SETUP
CHARGING YOUR EARBUDS
To charge the earbuds, place them
into the portable case. The red LEDs
show that they are charging. When
fully charged, the LEDs turn white,
and then turn off.
CHARGING YOUR PORTABLE
CASE
Plug the small end of the USB cable
into the micro USB port, located on
the right side of the case. When all 4
LEDs are lit, it’s fully charged.
Amps Air
Bluetooth®
Devices
Amps Air Mono
Bluetooth®
Devices
Amps Air 2.0
Bluetooth®
Devices
Amps Air Mono
Bluetooth®
Devices
Amps Air 2.0
Bluetooth®
Devices
Amps Air Mono
Bluetooth®
Devices

6 EN
CONNECT BOTH EARBUDS
Connect both earbuds for stereo sound. This provides the most immersive
music experience.
STEP ONE – TURNING ON THE
EARBUDS
Your earbuds will automatically turn
on when taken out of the charging
case. If you want to turn them on
manually, you can quick press the
multi-function button once on both
earbuds.
STEP TWO – CONNECTING
THE EARBUDS TO EACH
OTHER
When you take the earbuds out of
their case, they will automatically
connect to each other. Once
successfully connected, the LED
will be solid white for 3 seconds,
then pulse once every 5 seconds
during use. If they don’t connect,
quickly double-press the SOL button
on both earbuds at the same time.
This puts them into sync mode, and
the LEDs will pulse white. Once
successfully connected, the LEDs
will turn solid white for 3 seconds,
then continue to pulse once every 5
seconds during use.
STEP THREE – CONNECTING
TO A DEVICE
Enable Bluetooth on your device.
From the Bluetooth menu, select
“Amps Air 2.0.” When the device and
Amps Air 2.0 are connected, you will
hear a tone. This means pairing is
complete.
Amps Air 2.0
Bluetooth®
Devices
Amps Air Mono
Bluetooth®
Devices
Amps Air 2.0
Bluetooth®
Devices
Amps Air Mono
Bluetooth®
Devices
x2
Amps Air 2.0
Bluetooth®
Devices
Amps Air Mono
Bluetooth®
Devices

EN 7
CONNECTING A NEW OR
REPLACEMENT EARBUD
STEP ONE – PURCHASING A
NEW EARBUD
If an earbud is lost or damaged, you
can purchase a new single earbud
(left or right) on the SOL REPUBLIC
website at www.solrepublic.com
STEP TWO – PAIRING THE
REPLACEMENT EARBUD
To pair the replacement earbud,
ensure both earbuds are fully
charged, then quickly double-press
the SOL button on both earbuds at
the same time. This puts them into
sync mode, and the LEDs will pulse
white. Once successfully connected,
the LEDs will turn solid white for
3 seconds, then continue to pulse
once every 5 seconds during use.
Your new earbud is now successfully
paired and can be used.
Amps Air 2.0
Bluetooth®
Devices
Amps Air Mono
Bluetooth®
Devices
x2
WWW.SOLREPUBLIC.COM
Amps Air
Bluetooth®
Devices
Amps Air Mono
Bluetooth®
Devices

8 EN
TURNING OFF YOUR EARBUDS
USING THE BACKUP BATTERY
Plug your device’s USB charging
cable into the travel case, and then
into your smart device. With a full
battery, your travel case can recharge
your earbuds up to 15 times, or
provide one full charge for a typical
smartphone.
To turn off your earbuds, place the
earbuds back in your case, or press
and hold the multi-function button on
the earbud for 3 seconds.
NOTE
The USB charging output rating is 5V, 1.0A.
Some devices such as tablets may not appear to
charge, or may charge slowly. Consult your device
manufacturer for requirements.
Amps Air 2.0
Bluetooth®
Devices
Amps Air Mono
Bluetooth®
Devices
3s
Amps Air 2.0
Bluetooth®
Devices
Amps Air Mono
Bluetooth®
Devices
Amps Air 2.0
Bluetooth®
Devices
Amps Air Mono
Bluetooth®
Devices

EN 9
BASICS
NOTE
Some features may work differently depending on your phone or service carrier.
YOU WANT TO
Pick up a call Press either multi-function button once
Decline a call Press and hold either multi-function button
End a call Press either multi-function button once
Take a second
incoming call Press either multi-function button once
Decline a second
incoming call Use the phone keypad
YOU WANT TO
Activate Siri Quickly double-press either multi-function button
Activate Google Quickly double-press either multi-function button
Check battery level of
earbuds Look at smartphone
Check battery level of
travel case Shake the travel case to light the LEDs
Turn off earbud Press and hold multi-function button for 3 seconds
MUSIC
CALLS
OTHER
YOU WANT TO
Play or pause Press either multi-function button once.

10 EN
LED INDICATORS
Flashing red Low battery
Solid red Charging
LED off Fully charged
1 LED ashing Low battery, 0–25%
2 LEDs, 2nd ashing Battery capacity 25–50%
3 LEDs, 3rd ashing Battery capacity 50–75%
4 LEDs, 4th ashing Battery capacity 75–99%
Pulse white Earbuds in sync mode with each other
Flashing white Earbuds in pairing mode with device
EARBUDS CHARGING IN CASE
TRAVEL CASE
EARBUDS IN USE
EN 11
TROUBLESHOOTING
Having issues with your earbuds? Try working through the steps below.
1. Turn off Bluetooth on your device
2. Take earbuds out of your case
3. Press and hold Sol Button for 3 seconds on both earbuds to turn them
off.
4. Quick press multi-function button once on earbuds to turn them on
5. Quick press multi-function button twice on both earbuds to put them into
pairing mode and reconnect to each other
6. Turn on Bluetooth on your device
7. Pair to “Amps Air 2.0”
CONTACT
Still have questions? We’ve got answers and we’re standing by. Give us a
shout, we’re here to help.
SUPPORT
The following is a set of resources to ensure you get the most out of your SOL
REPUBLIC product.
Web: SOLREPUBLIC.COM/SUPPORT
Twitter: @SOLREPUBLIC
Phone: +1.877.400.0310
Email: support@SOLREPUBLIC.com

12 ES
Amps Air 2.0
Bluetooth®
Devices
Amps Air Mono
Bluetooth®
Devices
Amps Air 2.0
Bluetooth®
Devices
Amps Air Mono
Bluetooth®
Devices
CONTENIDO DEL PRODUCTO
4 medidas de auriculares
Cable para cargar USB
Estuche de viaje con recarga de batería
1
2
3
4
5 7 6
1 Botón multifunción
2 LED de estado del auricular
3 Entrada del micrófono
4 Contacto para carga de los
auriculares
5 LED de la batería del estuche
6 Puerto de carga USB micro:
para cargar el estuche portátil
7 Puerto de carga USB: para
recargar su dispositivo
inteligente
OBSERVACIÓN
Para el ajuste más ergonómico y
el mejor sonido, pruebe primero el
tamaño más grande de auricular y
vaya de mayor a menor.
Amps Air 2.0
Bluetooth®
Devices
Amps Air Mono
Bluetooth®
Devices
Amps Air 2.0
Bluetooth®
Devices
Amps Air Mono
Bluetooth®
Devices
Amps Air 2.0
Bluetooth®
Devices
Amps Air Mono
Bluetooth®
Devices

ES 13
CONFIGURACIÓN
RECARGA DE LOS
AURICULARES
Para recargar los auriculares, basta
con meterlos en el estuche portátil.
Cuando están cargando, los pilotos
LED se iluminan en rojo. Una vez
cargados, los LED cambian a color
blanco antes de apagarse.
RECARGA DEL ESTUCHE
PORTÁTIL
Enchufe el extremo más pequeño
del cable USB en el puerto USB
micro situado en el lateral derecho
del estuche. Cuando se enciendan
los 4 pilotos LED, el estuche estará
cargado al 100%.
Amps Air 2.0
Bluetooth®
Devices
Amps Air Mono
Bluetooth®
Devices
Amps Air 2.0
Bluetooth®
Devices
Amps Air Mono
Bluetooth®
Devices
Amps Air 2.0
Bluetooth®
Devices
Amps Air Mono
Bluetooth®
Devices

Amps Air 2.0
Bluetooth®
Devices
Amps Air Mono
Bluetooth®
Devices
Amps Air 2.0
Bluetooth®
Devices
Amps Air Mono
Bluetooth®
Devices
x2
Amps Air 2.0
Bluetooth®
Devices
Amps Air Mono
Bluetooth®
Devices
PASO UNO - ENCENDER LOS
AUDÍFONOS
Sus audífonos se encenderán
automáticamente cuando se sacan
del estuche de carga. Si desea
encenderlos manualmente, puede
presionar una vez rápidamente
el botón multifunción en ambos
audífonos.
PASO DOS - CONECTAR LOS
AUDÍFONOS ENTRE SÍ
Cuando saque los audífonos
de su estuche, se conectarán
automáticamente entre sí. Una vez
que se hayan conectado, el LED se
mantendrá jo en blanco durante 3
segundos, después pulsará una vez
cada 5 segundos durante el uso. Si
no se conectan, presione dos veces
rápidamente el botón SOL en ambos
audífonos al mismo tiempo. Esto
los pone en modo sincronizado y
los LED pulsarán en color blanco.
Una vez que se hayan conectado,
los LED se mantendrán jos en
blanco durante 3 segundos, después
pulsarán una vez cada 5 segundos
durante el uso.
PASO TRES - CONECTARSE A
UN DISPOSITIVO
Habilite Bluetooth en su dispositivo.
Desde el menú Bluetooth seleccione
“Amps Air 2.0”. Cuando el dispositivo
y Amps Air 2.0 estén conectados,
escuchará un tono. Esto signica que
el acoplamiento está completo.
CONECTE AMBOS AUDÍFONOS
Conecte ambos audífonos para sonido estéreo. Esto brinda la mayor inmersión
en su experiencia.
14 ES

Amps Air 2.0
Bluetooth®
Devices
Amps Air Mono
Bluetooth®
Devices
x2
WWW.SOLREPUBLIC.COM
Amps Air
Bluetooth®
Devices
Amps Air Mono
Bluetooth®
Devices
PASO UNO – COMPRAR UN
NUEVO AUDÍFONO
Si pierde o daña un audífono, puede
comprar un nuevo audífono por pieza
(izquierdo o derecho) en el sitio web
de SOL REPUBLIC,
www.solrepublic.com
PASO DOS - ACOPLAR EL
AUDÍFONO DE REEMPLAZO
Para acoplar el audífono de
reemplazo, asegúrese de que ambos
audífonos estén cargados. Después,
presione dos veces rápidamente
el botón SOL en ambos audífonos
al mismo tiempo. Esto los pone
en modo sincronizado y los LED
pulsarán en color blanco. Una vez
que se hayan conectado, los LED se
mantendrán jos en blanco durante
3 segundos, después pulsarán una
vez cada 5 segundos durante el uso.
Su nuevo audífono se ha acoplado
correctamente y puede utilizarlo.
CONECTAR UN
AUDÍFONO NUEVO O DE
REEMPLAZO
ES 15

16 ES
APAGAR LOS AURICULARES
USO DE LA RECARGA DE BATERÍA
Enchufe un extremo del cable de
carga USB de su dispositivo en el
estuche de viaje y el otro extremo en
su dispositivo inteligente. Cuando
la batería se haya recargado por
completo, el estuche de viaje
también puede seguir recargando los
auriculares hasta 15 veces. O servir
de cargador tradicional de la batería
del móvil.
Para apagar sus auriculares, métalos
de nuevo en su estuche o pulse el
botón multifunción del auricular
y manténgalo pulsado durante 3
segundos.
OBSERVACIÓN
La potencia nominal de carga USB es de 5
V, 1,0 A. Puede que dé la impresión de que
algunos dispositivos, como las tablets, no se
están cargando o que se carguen muy despacio.
Póngase en contacto con el fabricante de su
dispositivo para más información.
Amps Air 2.0
Bluetooth®
Devices
Amps Air Mono
Bluetooth®
Devices
3s
Amps Air 2.0
Bluetooth®
Devices
Amps Air Mono
Bluetooth®
Devices
Amps Air 2.0
Bluetooth®
Devices
Amps Air Mono
Bluetooth®
Devices

ES 17
LO QUE DEBE SABER
OBSERVACIÓN
Algunas funciones pueden funcionar de manera diferente
dependiendo de su teléfono o proveedor de servicios.
SI QUIERE...
Responder a una llamada Pulse una vez cualquiera de los botones
multifunción.
Rechazar una llamada Pulse cualquiera de los botones multifunción y
manténgalo pulsado.
Finalizar una llamada Pulse una vez cualquiera de los botones
multifunción.
Responder a una segunda
llamada entrante
Pulse una vez cualquiera de los botones
multifunción.
Rechazar una segunda
llamada entrante Usar el teclado numérico del móvil
SI QUIERE...
Activar Siri Pulse brevemente dos veces cualquiera de los
botones multifunción.
Activar Google Pulse brevemente dos veces cualquiera de los
botones multifunción.
Comprobar el porcentaje
de carga de batería de los
auriculares
Examine su smartphone.
Comprobar el porcentaje
de carga del estuche de
viaje
Sacuda el estuche para que se enciendan los pilotos
LED.
Apagar el auricular Pulse el botón multifunción y manténgalo pulsado
durante 3 segundos.
MÚSICA
LLAMADAS
OTROS
SI QUIERE...
Reproducir o poner en
pausa
Pulse una vez cualquiera de los botones
multifunción.

18 ES
PILOTOS LED
Piloto rojo parpadeante Batería con poca carga
Rojo sin parpadear Cargando
Sin LED Carga completa
1 piloto LED parpadeante Batería baja: 0–25%
2 pilotos LED, el 2º
parpadea Capacidad de la batería: 25–50%
3 pilotos LED, el 3º
parpadea Capacidad de la batería: 50-75%
4 pilotos LED, el 4º
parpadea Capacidad de la batería: 75-100%
Piloto blanco parpadeante
lento Auriculares en modo sincronización uno con otro
Piloto blanco parpadeante
rápido
Auriculares en modo de acoplamiento con el
dispositivo
AURICULARES RECARGANDO EN EL ESTUCHE
ESTUCHE DE VIAJE
AURICULARES EN USO
ES 19
SOLUCIÓN DE PROBLEMAS
¿Le dan problema los auriculares? Busque la solución entre los pasos
indicados a continuación.
1. Apague el Bluetooth en su dispositivo.
2. Saque los auriculares del estuche.
3. Pulse el botón SOL en ambos auriculares durante 3 segundos para
apagarlos y manténgalo pulsado.
4. Pulse brevemente una vez el botón multifunción en los auriculares para
encenderlos.
5. Pulse brevemente dos veces el botón multifunción en ambos auriculares
para ponerlos en modo de acoplamiento y sincronizarse uno con otro.
6. Habilite el Bluetooth en su dispositivo.
7. Acóplelo a “Amps Air 2.0”.
CONTACTO
¿Aún le surgen dudas? Tenemos las respuestas y estamos a su disposición.
Llámenos; estamos aquí para ayudarle.
SOPORTE TÉCNICO
He aquí una lista de recursos de referencia para asegurarnos de que saque el
máximo partido a su producto SOL REPUBLIC.
Web: SOLREPUBLIC.COM/SUPPORT
Twitter: @SOLREPUBLIC
Phone: +1.877.400.0310
Email: support@SOLREPUBLIC.com

20 FR
Amps Air 2.0
Bluetooth®
Devices
Amps Air Mono
Bluetooth®
Devices
Amps Air 2.0
Bluetooth®
Devices
Amps Air Mono
Bluetooth®
Devices
QU’EST-CE QU’IL Y A À L’INTÉRIEUR
4 tailles d’embouts
Câble de recharge USB
Boîtier transportable avec batterie de secours intégrée
1
2
3
4
5 7 6
1 Bouton multifonction
2 Statut intra-auriculaire LED
3 Entrée du microphone
4 Contacts de charge intra-auriculaire
5 LED du LED du boîtier de la
batterie
6 Port de chargement micro
USB — pour charger le boîtier
transportable
7 Port de chargement USB — pour
recharger votre appareil intelligent
REMARQUE
Pour un meilleur ajustement et un
son amélioré, commencez de la plus
grande taille jusqu’à la plus petite.
Amps Air 2.0
Bluetooth®
Devices
Amps Air Mono
Bluetooth®
Devices
Amps Air 2.0
Bluetooth®
Devices
Amps Air Mono
Bluetooth®
Devices
Amps Air 2.0
Bluetooth®
Devices
Amps Air Mono
Bluetooth®
Devices

FR 21
CONFIGURATION
CHARGER VOS ÉCOUTEURS
Pour charger les écouteurs, placez-
les dans le boîtier transportable. Les
LED rouges indiquent que la charge
est en cours. Une fois complètement
chargée, les LED deviennent
blanches, puis s’éteignent.
CHARGER VOTRE BOÎTIER
TRANSPORTABLE
Branchez la petite extrémité du câble
USB au port micro USB situé sur
le côté droit du boîtier. Lorsque les
4 LED sont allumés, ce dernier est
complètement chargé.
Amps Air 2.0
Bluetooth®
Devices
Amps Air Mono
Bluetooth®
Devices
Amps Air 2.0
Bluetooth®
Devices
Amps Air Mono
Bluetooth®
Devices
Amps Air 2.0
Bluetooth®
Devices
Amps Air Mono
Bluetooth®
Devices

Amps Air 2.0
Bluetooth®
Devices
Amps Air Mono
Bluetooth®
Devices
Amps Air 2.0
Bluetooth®
Devices
Amps Air Mono
Bluetooth®
Devices
x2
Amps Air 2.0
Bluetooth®
Devices
Amps Air Mono
Bluetooth®
Devices
PREMIÈRE ÉTAPE -
ACTIVATION DES ÉCOUTEURS
Vos écouteurs sont
automatiquement activés lorsqu’ils
sont retirés du boîtier de chargement.
Pour les activer manuellement, vous
pouvez appuyer rapidement une fois
sur le bouton multifonction sur les
deux écouteurs.
ÉTAPE DEUX - CONNEXION
DES ÉCOUTEURS ENTRE EUX
Lorsque vous retirez les écouteurs
de leur boîtier, ils se connectent
automatiquement l’un à l’autre.
Une fois la connexion établie,
le voyant reste allumé en blanc
pendant 3 secondes et émet
ensuite une pulsion toutes les 5
secondes pendant l’utilisation. S’ils
ne se connectent pas, appuyez
rapidement deux fois sur le bouton
SOL des deux écouteurs en même
temps. Ils passent alors en mode
de synchronisation, et les LED vont
émettre des pulsions en blanc. Une
fois la connexion établie, le voyant
reste allumé en blanc pendant
3 secondes et émet ensuite une
pulsion toutes les 5 secondes
pendant l’utilisation.
ÉTAPE TROIS - CONNEXION À
UN PÉRIPHÉRIQUE
Activer Bluetooth sur votre
appareil. Dans le menu Bluetooth ,
sélectionnez l’option Amps Air 2.0.
Lorsque l’appareil et Amps Air 2.0
sont connectés, vous entendrez
une tonalité. Elle indique la n du
jumelage.
CONNECTEZ LES DEUX ÉCOUTEURS
Connectez les deux écouteurs pour obtenir un son stéréo. Votre expérience
musicale sera tellement plus immersive.
22 FR

Amps Air 2.0
Bluetooth®
Devices
Amps Air Mono
Bluetooth®
Devices
x2
WWW.SOLREPUBLIC.COM
Amps Air
Bluetooth®
Devices
Amps Air Mono
Bluetooth®
Devices
PREMIÈRE ÉTAPE - ACHET
D’UN NOUVEL ÉCOUTEUR
If an earbud is lost or damaged, you
can purchase a new single earbud
(left or right) on the SOL REPUBLIC
website at www.solrepublic.com
ÉTAPE DEUX - JUMELAGE
DE L’ÉCOUTEUR DE
REMPLACEMENT
Pour appareiller l’écouteur de
remplacement, assurez-vous
que les deux écouteurs sont
complètement chargés, et appuyez
ensuite rapidement deux fois sur
le bouton SOL des deux écouteurs
en même temps. Ils passent alors
en mode de synchronisation, et les
LED vont émettre des pulsions en
blanc. Une fois la connexion établie,
le voyant reste allumé en blanc
pendant 3 secondes et émet ensuite
une pulsion toutes les 5 secondes
pendant l’utilisation. Votre nouvel
écouteur est maintenant appareillé et
peut être utilisé.
CONNEXION D’UN
NOUVEL ÉCOUTEUR OU
REPLACEMENT D’UN
ÉCOUTEUR
FR 23

24 FR
ÉTEINDRE VOS ÉCOUTEURS
UTILISATION DE LA BATTERIE DE SECOURS
Branchez le câble de charge
USB de votre dispositif dans le
boîtier transportable, puis à votre
appareil intelligent. Si la batterie est
totalement rechargée, votre boîtier
transportable peut recharger vos
écouteurs jusqu’à 15 fois ou fournir
une charge complète pour un
smartphone.
Pour éteindre vos écouteurs,
remettez-les dans le boîtier, ou
maintenez enfoncé le bouton
multifonction sur l’écouteur pendant
3 secondes.
REMARQUE
La puissance de sortie USB est de 5 V, 1.0 A.
Certains appareils tels que les tablettes peuvent
ne pas se charger, voire se charger lentement.
Consultez le fabricant de votre dispositif pour plus
d’informations.
Amps Air 2.0
Bluetooth®
Devices
Amps Air Mono
Bluetooth®
Devices
3s
Amps Air 2.0
Bluetooth®
Devices
Amps Air Mono
Bluetooth®
Devices
Amps Air 2.0
Bluetooth®
Devices
Amps Air Mono
Bluetooth®
Devices

FR 25
PRINCIPES DE BASE
REMARQUE
Certaines caractéristiques peuvent fonctionner différemment selon votre téléphone
ou le service de transport.
VOUS VOULEZ
Répondre à un appel Appuyez sur le bouton multifonction une fois
Refuser un appel Maintenez enfoncé le bouton multifonction
Raccrocher Appuyez sur le bouton multifonction une fois
Prendre un second appel Appuyez sur le bouton multifonction une fois
Refuser un second appel Utilisez le clavier du téléphone
VOUS VOULEZ
Activer Siri Appuyez deux fois sur le bouton multifonction
Activer Google Appuyez deux vois sur le bouton multifonction
Vérier le niveau de
batterie des écouteurs Utilisez votre smartphone
Vérier le niveau de batterie
de la trousse de transport
Secouez le boîtier transportable pour allumer les
LED
Éteindre un écouteur Maintenez enfoncé le bouton multifonction pendant
3 secondes
MUSIQUE
APPELS
AUTRE
VOUS VOULEZ
Écouter ou mettre en
pause Appuyez sur le bouton multifonction une fois.

26 FR
INDICATEURS DE LED
Rouge clignotant Batterie faible
Rouge continu Chargement en cours
LED éteint Complètement chargé
1 LED clignotante Batterie faible entre 0 et 25 %
2 LED, la deuxième
clignotante Batterie entre 25 et 50 %
3 LED, la troisième
clignotante Batterie entre 50 et 75 %
4 LED, la quatrième
clignotante Batterie entre 75 et 100 %
Clignotement lent blanc Écouteurs synchronisés entre eux
Clignotement rapide blanc Écouteurs appariés avec le dispositif
ÉCOUTEURS EN CHARGE DANS LE BOÎTIER
BOÎTIER TRANSPORTABLE
ÉCOUTEURS EN COURS D’UTILISATION
FR 27
DÉPANNAGE
Vous rencontrez des problèmes avec vos écouteurs ? Essayez de réaliser les
étapes ci-dessous.
1. Éteindre le Bluetooth de votre dispositif
2. Retirer les écouteurs de leur boîtier
3. Maintenir enfoncé le bouton Sol pendant 3 secondes sur les deux
écouteurs pour les éteindre.
4. Appuyer sur le bouton multifonction une fois sur les écouteurs pour les
allumer
5. Appuyer sur le bouton multifonction à deux reprises sur les deux
écouteurs pour les mettre en mode appareillage et reconnectez-les
ensemble
6. Allumer le Bluetooth sur votre dispositif
7. Apparier avec « Amps Air 2.0 »
CONTACT
Vous avez des questions ? Nous sommes là pour les recevoir et y répondre.
Prenez contact avec nous, nous sommes là pour vous aider.
ASSISTANCE
Ce qui suit est un ensemble de ressources pour vous assurer de proter au
mieux de votre produit SOL REPUBLIC.
Web: SOLREPUBLIC.COM/SUPPORT
Twitter: @SOLREPUBLIC
Phone: +1.877.400.0310
Email: support@SOLREPUBLIC.com

28 DE
Amps Air 2.0
Bluetooth®
Devices
Amps Air Mono
Bluetooth®
Devices
Amps Air 2.0
Bluetooth®
Devices
Amps Air Mono
Bluetooth®
Devices
UND DAS IST DRIN:
Aufsätze für die Ohrhörer
in 4 Größen
USB-Ladekabel
Reise-Etui mit Ersatzbatterie
1
2
3
4
5 7 6
1 Multifunktionsknopf
2 Status-LED für die Ohrhörer
3 Mikrophon-Anschluss
4 Ladekontakte für die Ohrhörer
5 LED Etui-Batterie
6 Mikro-USB Ladeanschluss - zum
Auaden des tragbaren Etuis
7 USB Ladeanschluss - zum
Auaden Ihres Smart-Geräts
HINWEIS:
Für die beste Passform und den
besten Sound beginnen Sie mit den
größten Aufsätzen für die Ohrhörer
und probieren Sie dann immer
kleinere, bis sie thueu passen.
Amps Air 2.0
Bluetooth®
Devices
Amps Air Mono
Bluetooth®
Devices
Amps Air 2.0
Bluetooth®
Devices
Amps Air Mono
Bluetooth®
Devices
Amps Air 2.0
Bluetooth®
Devices
Amps Air Mono
Bluetooth®
Devices

DE 29
EINRICHTEN
AUFLADEN IHRER OHRHÖRER
Setzen Sie die Ohrhörer zum
Auaden in das tragbare Etui. Die
roten LED’ s zeigen an, dass geladen
wird. Wenn der Ladevorgang
beendet ist, schalten sich die LED auf
weiß und gehen dann aus.
AUFLADEN IHRES
TRAGBAREN ETUIS
Stecken Sie das kleine Ende des
USB-Kabels in den Mikro-USB-
Anschluss, der sich auf der rechten
Seite des Etuis bendet. Das Etui ist
vollständig aufgeladen, wenn alle 4
LED’s aueuchten.
Amps Air 2.0
Bluetooth®
Devices
Amps Air Mono
Bluetooth®
Devices
Amps Air 2.0
Bluetooth®
Devices
Amps Air Mono
Bluetooth®
Devices
Amps Air 2.0
Bluetooth®
Devices
Amps Air Mono
Bluetooth®
Devices

Amps Air 2.0
Bluetooth®
Devices
Amps Air Mono
Bluetooth®
Devices
Amps Air 2.0
Bluetooth®
Devices
Amps Air Mono
Bluetooth®
Devices
x2
Amps Air 2.0
Bluetooth®
Devices
Amps Air Mono
Bluetooth®
Devices
30 DE
BEIDE OHRHÖRER ANSCHLIESSEN
Für Stereoklang beide Ohrhörer anschließen. Somit wird Ihnen das intensivste
Musikerlebnis geboten. SCHRITT 1 - EINSCHALTEN
DER OHRHÖRER
Ihre Ohrhörer werden automatisch
eingeschaltet, wenn sie aus
dem Ladebehälter genommen
werden. Wenn Sie sie manuell
einschalten möchten, können Sie
den Multifunktions-Knopf an beiden
Ohrhörern schnell einmal drücken.
SCHRITT 2 - VERBINDEN DER
BEIDEN OHRHÖRER
Wenn Sie die Ohrhörer aus ihrem
Behälter nehmen, werden sie
automatisch miteinander verbunden.
Nach erfolgreicher Aufnahme der
Verbindung, leuchtet die LED drei
Sekunden lang weiß und blinkt dann
während der Benutzung einmal alle 5
Sekunden. Falls sie nicht miteinander
verbunden werden, den SOL-
Knopf an beiden Ohrhörern schnell
zweimal hintereinander gleichzeitig
drücken. Dies versetzt sie in den
Synchronmodus und die LEDS
blinken weiß. Nach erfolgreicher
Aufnahme der Verbindung leuchtet
die LED drei Sekunden lang weiß
und blinkt dann während der
Benutzung einmal alle 5 Sekunden.
SCHRITT 3 - VERBINDEN MIT
EINEM GERÄT
Die Bluetooth-Funktion Ihres Geräts
aktivieren. Im Bluetooth-Menü
„Amps Air 2.0“ auswählen. Sie
hören einen Ton, wenn das Gerät
und Amps Air 2.0 verbunden sind.
Dies bedeutet, dass die Kopplung
abgeschlossen ist.

Amps Air 2.0
Bluetooth®
Devices
Amps Air Mono
Bluetooth®
Devices
x2
WWW.SOLREPUBLIC.COM
Amps Air
Bluetooth®
Devices
Amps Air Mono
Bluetooth®
Devices
SCHRITT 1 - KAUF EINES
NEUEN OHRHÖRERS
Falls ein Ohrhörer verloren geht
oder beschädigt wird, können Sie
auf der SOL REPUBLIC-Website
unter www.solrepublic.com einen
einzelnen neuen linken oder rechten
Ohrhörer kaufen.
SCHRITT 2 - VERBINDEN DES
ERSATZOHRHÖRERS
Zum verbinden des Ersatzohrhörers
sicherstellen, dass beide Ohrhörer
vollständig aufgeladen sind. Dann
den SOL-Knopf an beiden Ohrhörern
schnell zweimal hintereinander
gleichzeitig drücken. Dies versetzt
sie in den Synchronisierungs und
die LEDS blinken weiß. Nach
erfolgreicher Aufnahme der
Verbindung, leuchtet die LED drei
Sekunden lang weiß und blinkt dann
während der Benutzung einmal alle
5 Sekunden. Ihr neuer Ohrhörer ist
jetzt erfolgreich verbinden und kann
benutzt werden.
ANSCHLIESSEN
EINES NEUEN ODER
ERSATZOHRHÖRERS
DE 31

32 DE
AUSSCHALTEN IHRER OHRHÖRER
VERWENDUNG DER ERSATZBATTERIE
Stecken Sie das USB-Ladekabel
Ihres Gerätes in das Reise-Etui und
dann in Ihr Smart-Gerät. Mit einer
Batterieladung kann Ihr Reise-Etui
Ihre Ohrhörer bis zu 15 Mal oder
ein normales Smartphone ein Mal
vollständig auaden.
Zum Ausschalten Ihrer Ohrhörer
legen Sie diese in das Etui
zurück oder halten Sie den
Multifunktionsknopf 3 Sekunden
lang gedrückt.
HINWEIS:
Die USB-Ausgangsleistung beträgt 5 V, 1,0 A. Einige
Geräte, wie Tablets können möglicherweise nicht
geladen werden oder laden nur langsam. Fragen Sie
Ihren Gerätehersteller nach den Anforderungen.
Amps Air 2.0
Bluetooth®
Devices
Amps Air Mono
Bluetooth®
Devices
3s
Amps Air 2.0
Bluetooth®
Devices
Amps Air Mono
Bluetooth®
Devices
Amps Air 2.0
Bluetooth®
Devices
Amps Air Mono
Bluetooth®
Devices

DE 33
GRUNDLAGEN
HINWEIS:
Einige Funktionen können in Abhängigkeit von Ihrem Telefon oder Dienstleistungsanbieter
abweichen.
SIE WOLLEN
Anruf annehmen Drücken Sie einmal auf einen der Multifunktions-
Knöpfe.
Anruf ablehnen
Halten Sie einen der Multifunktions-Knöpfe gedrückt
Anruf beenden Drücken Sie einmal auf einen der Multifunktions-
Knöpfe.
Annehmen eines
zweiten Anrufs
Drücken Sie einmal auf einen der Multifunktions-
Knöpfe.
Ablehnen eines zweiten
Anrufs Verwendung der Telefon-Tastatur
SIE WOLLEN
Siri aktivieren Drücken Sie einen der Multifunktions-Knöpfe
zweimal schnell hintereinander
Google aktivieren Drücken Sie einen der Multifunktions-Knöpfe
zweimal schnell hintereinander
Prüfen des Ladezustands
der Ohrhörer Sehen Sie auf Ihr Smartphone
Prüfen des Ladezustands
des Reise-Etuis
Schütteln Sie das Reise-Etui, damit die LED
aueuchten
Ausschalten des
Ohrhörers
Halten Sie den Multifunktions-Knopf 3 Sekunden
lang gedrückt.
MUSIK
ANRUFE
SONSTIGES
SIE WOLLEN
Wiedergabe oder Pause Drücken Sie einmal auf beide Multifunktions-Knöpfe.

34 DE
LED-ANZEIGEN
Rot blinkend Batterie schwach
Dauerhaft rot Auadevorgang läuft
LED Aus Vollständig aufgeladen
1 LED blinkend Batterie schwach, 0-25 %
2 LED, die zweite blinkend Batterieleistung 25-50 %
3 LED, die dritte blinkend Batterieleistung 50-75%
4 LED, die vierte blinkend Batterieleistung 75-100 %
Weiß, langsam blinkend Ohrhörer im Sync-Modus miteinander
Weiß, schnell blinkend Ohrhörer im Kopplungsmodus mit dem Gerät
OHRHÖRER IM ETUI AUFLADEN
REISE-ETUI
OHRHÖRER IN BENUTZUNG
DE 35
PROBLEMLÖSUNG
Probleme mit Ihre Ohrhörern? Versuchen Sie, das Problem mit den unten
dargestellten Schritten zu lösen.
1. Deaktivieren Sie Bluetooth auf Ihrem Gerät.
2. Nehmen Sie die Ohrhörer aus Ihrem Etui
3. Halten Sie den SOL
-Knopf an beiden Ohrhörern 3 Sekunden lang
gedrückt und schalten Sie sie damit aus.
4. Drücken Sie den Multifunktionsknopf an den Ohrhörern einmal kurz, um
sie einzuschalten
5. Drücken Sie den Multifunktions-Knopf zweimal kurz für den
Kopplungsmodus und verbinden Sie sie erneut miteinander
6. Aktivieren Bluetooth auf Ihrem Gerät.
7. Mit „Amps Air 2.0” koppeln
KONTAKT
Haben Sie weitere Fragen? Wir haben die Antworten und wir stehen Ihnen
gern zur Verfügung. Setzen Sie sich mit uns in Verbindung, wir helfen Ihnen
gern.
SUPPORT
Es folgt ein Satz von Ressourcen, um sicherzustellen, dass Sie aus Ihrem SOL
REPUBLIC das Beste herausholen.
Web: SOLREPUBLIC.COM/SUPPORT
Twitter: @SOLREPUBLIC
Phone: +1.877.400.0310
Email: support@SOLREPUBLIC.com

36 IT
Amps Air 2.0
Bluetooth®
Devices
Amps Air Mono
Bluetooth®
Devices
Amps Air 2.0
Bluetooth®
Devices
Amps Air Mono
Bluetooth®
Devices
CONTENUTO DELLA CONFEZIONE
Cuscinetti di 4 misure
Cavo di ricarica USB
Custodia di trasporto con batteria di scorta
1
2
3
4
5 7 6
1 Pulsante multifunzione
2 LED di stato auricolare
3 Porta microfono
4 Contatti per la ricarica degli
auricolari
5 LED batteria astuccio
6 Porta di ricarica micro-USB, per
ricaricare l’astuccio portatile
7 Porta di ricarica USB, per ricaricare
il dispositivo smart
NOTA
Per ottenere la stabilità e il suono
migliori, inizia dai cuscinetti più
grandi per poi passare a quelli più
piccoli no a trovare la misura giusta.
Amps Air 2.0
Bluetooth®
Devices
Amps Air Mono
Bluetooth®
Devices
Amps Air 2.0
Bluetooth®
Devices
Amps Air Mono
Bluetooth®
Devices
Amps Air 2.0
Bluetooth®
Devices
Amps Air Mono
Bluetooth®
Devices

IT 37
IMPOSTAZIONI
RICARICA DEGLI AURICOLARI
Per ricaricare gli auricolari,
posizionarli all’interno dell’astuccio
portatile. I LED rossi indicano
che la ricarica è in corso. Una
volta completata la ricarica, i LED
diventano bianchi e quindi si
spengono.
RICARICA DELL’ASTUCCIO DI
TRASPORTO
Collegare l’estremità più piccola
del cavo USB nella porta micro
USB, posizionata sul lato destro
dell’astuccio. Quando tutti i 4 LED
si saranno accesi, la ricarica sarà
completa.
Amps Air 2.0
Bluetooth®
Devices
Amps Air Mono
Bluetooth®
Devices
Amps Air 2.0
Bluetooth®
Devices
Amps Air Mono
Bluetooth®
Devices
Amps Air 2.0
Bluetooth®
Devices
Amps Air Mono
Bluetooth®
Devices

Amps Air 2.0
Bluetooth®
Devices
Amps Air Mono
Bluetooth®
Devices
Amps Air 2.0
Bluetooth®
Devices
Amps Air Mono
Bluetooth®
Devices
x2
Amps Air 2.0
Bluetooth®
Devices
Amps Air Mono
Bluetooth®
Devices
PRIMA FASE- ACCENSIONE
DEGLI AURICOLARI
Gli auricolari si accendono
automaticamente quando vengono
estratti dalla custodia di ricarica. Se si
desidera accenderli multifunzione, si
può premere il pulsante multifunzione
una volta rapidamente su entrambi gli
multifunzione.
SECONDA FASE -
CONNESSIONE DEGLI
AURICOLARI L’UNO CON
L’ALTRO
Quando gli auricolari vengono estratti
dalla custodia, essi si connettono
automaticamente l’uno con l’altro.
Quando la connessione avviene, i
LED emettono una luce costante
per 3 secondi, quindi, durante il
funzionamento emettono un impulso
luminoso ogni 5 secondi. Se la
connessione non avviene, premere
rapidamente due volte allo stesso
tempo il pulsante SOL su entrambi gli
auricolari. Con questa operazione gli
auricolari vengono messi in modalità
di sincro e i LED emettono impulsi di
luce bianca. Quando la connessione
avviene, i LED emettono una luce
costante per 3 secondi, quindi,
durante il funzionamento emettono un
impulso luminoso ogni 5 secondi.
TERZA FASE - CONNESSIONE A
UN DISPOSITIVO
Abilitare Bluetooth sul dispositivo. Dal
menu Bluetooth selezionare “Amps
Air 2.0”. Quando il dispositivo e Amps
Air 2.0 sono connessi, sarà emesso un
avviso acustico. Questo signica che
l’accoppiamento è completato.
CONNESSIONE DI ENTRAMBI GLI AURICOLARI
Connettere entrambi gli auricolari per ottenere un suono stereo. Ne risulterà la
più coinvolgente esperienza musicale.
38 IT

Amps Air 2.0
Bluetooth®
Devices
Amps Air Mono
Bluetooth®
Devices
x2
WWW.SOLREPUBLIC.COM
Amps Air
Bluetooth®
Devices
Amps Air Mono
Bluetooth®
Devices
PRIMA FASE - ACQUISTO DI
UN NUOVO AURICOLARE
Se un auricolare si perde o è
danneggiato, si può acquistare un
nuovo auricolare singolo (sinistro
o destro) sul sito web di SOL
REPUBLIC all’indirizzo
www.solrepublic.com
SECONDA FASE -
ACCOPPIAMENTO DI UN
AURICOLARE DI RICAMBIO
Per accoppiare un auricolare di
ricambio, assicurarsi che esso sia
completamente caricato, quindi
premere rapidamente due volte
il pulsante SOL allo stesso tempo
Con questa operazione gli auricolari
vengono messi in modalità di sincro
e i LED emettono impulsi di luce
bianca. Quando la connessione
avviene, i LED emettono una luce
costante per 3 secondi, quindi,
durante il funzionamento emettono
un impulso luminoso ogni 5 secondi.
Il nuovo auricolare è stato accoppiato
con successo e può essere usato.
CONNESSONE DI UN
AURICOLARE NUOVO O
DI RICAMBIO
IT 39

40 IT
SPEGNIMENTO DEGLI AURICOLARI
UTILIZZARE LA BATTERIA DI SCORTA
Collegare il cavo di ricarica USB del
dispositivo all’astuccio di trasporto
e quindi al dispositivo. A batteria
completamente carica, l’astuccio di
trasporto è in grado di ricaricare gli
auricolari no a 15 volte oppure uno
smartphone standard una volta.
Per spegnere gli auricoari,
riposizionarli all’interno della custodia
oppure tenere premuto il pulsante
multifunzione sull’auricolare per 3
secondi.
NOTA
La potenza in uscita della ricarica USB è 5V,
1.0A. Alcuni dispositivi, come i tablet, potrebbero
non ricaricarsi oppure potrebbero ricaricarsi
lentamente. Consultare il produttore del propio
dispositivo per i requisiti.
Amps Air 2.0
Bluetooth®
Devices
Amps Air Mono
Bluetooth®
Devices
3s
Amps Air 2.0
Bluetooth®
Devices
Amps Air Mono
Bluetooth®
Devices
Amps Air 2.0
Bluetooth®
Devices
Amps Air Mono
Bluetooth®
Devices

IT 41
INFORMAZIONI ESSENZIALI
NOTA
Alcune funzioni possono variare in base al dispositivo o all’operatore in uso.
VUOI
Rispondere a una
chiamata Premi uno dei pulsanti multifunzione una volta.
Riutare una chiamata Tieni premuto uno dei pulsanti multifunzione.
Concludere una chiamata Premi uno dei pulsanti multifunzione una volta.
Rispondere a una seconda
chiamata in arrivo Premi uno dei pulsanti multifunzione una volta.
Riutare una seconda
chiamata in arrivo Utilizzare la tastiera del telefono
VUOI
Attivare Siri Premi velocemente due volte uno dei pulsanti
multifunzione.
Attivare Google Premi velocemente due volte uno dei pulsanti
multifunzione.
Vericare il livello di carica
degli auricolari Guarda lo smartphone
Vericare il livello di carica
dell’astuccio di trasporto Scuoti l’astuccio di trasporto per accendere i LED
Spegnere l’auricolare Tieni premuto il pulsante multifunzione per 3
secondi.
MUSICA
CHIAMATE
ALTRO
VUOI
avviare o mettere in pausa Premi uno dei due pulsanti multifunzione una volta.

42 IT
INDICATORI LED
Rosso lampeggiante Batteria scarica
Rossa ssa In ricarica
LED spenta Unità completamente carica
1 LED lampeggiante Batteria scarica, 0-25%
2 LED, secondo
lampeggiante Capacità batteria 25-50%
3 LED, terzo lampeggiante Capacità batteria 50-75%
4 LED, quarto
lampeggiante Capacità batteria 75-100%
Bianca lampeggiante
lenta Auricolari in sincronizzazione tra loro
Bianca lampeggiante
veloce Auricolari in sincronizzazione con il dispositivo
AURICOLARI IN RICARICA ALL’INTERNO DELL’ASTUCCIO
ASTUCCIO DI TRASPORTO
AURICOLARI IN USO
IT 43
RICERCA E RISOLUZIONE DEI PROBLEMI
Problemi con gli auricolari? Prova a seguire la procedura indicata qui di
seguito.
1. Spegnere il Bluetooth sul dispositivo.
2. Estrarre gli auricolari dall’astuccio.
3. Tenere premuto il pulsante Sol per 3 secondi su entrambi gli auricolari per
spegnerli.
4. Premere il pulsante multifunzione una volta sugli auricolari per accenderli.
5. Premere il pulsante multifunzione due volte su entrambi gli auricolari per
attivare la modalità di abbinamento ripristinando il collegamento tra loro.
6. Attivare il Bluetooth sul dispositivo.
7. Effettuare l’abbinamento ad “Amps Air 2.0”
CONTATTI
Hai ancora domande? Abbiamo le risposte e siamo a tua disposizione.
Contattaci, saremo lieti di aiutarti.
SUPPORTO
Seguono le informazioni necessarie ad assicurarsi di poter sfruttare al massimo
il proprio prodotto SOL REPUBLIC.
Web: SOLREPUBLIC.COM/SUPPORT
Twitter: @SOLREPUBLIC
Phone: +1.877.400.0310
Email: support@SOLREPUBLIC.com

44 DK
Amps Air 2.0
Bluetooth®
Devices
Amps Air Mono
Bluetooth®
Devices
Amps Air 2.0
Bluetooth®
Devices
Amps Air Mono
Bluetooth®
Devices
HVAD ER DER INDENI
Øretelefoner i 4 størrelser
USB-opladerkabel
Rejseetui med backupbatteri
1
2
3
4
5 7 6
1 Multifunktionsknap
2 Statuslysdiode på øretelefon
3 Mikrofonport
4 Opladerstik til øretelefoner
5 Etuiets batterilysdioder
6 Mikro-USB-opladerport – til
opladning af etuiet
7 USB-opladerport – til opladning af
din smartphone
BEMÆRK
For at nde ud af hvilken øretelefon,
der passer dig, skal du starte med
den største af størrelserne og så gå
nedad i størrelse.
Amps Air 2.0
Bluetooth®
Devices
Amps Air Mono
Bluetooth®
Devices
Amps Air 2.0
Bluetooth®
Devices
Amps Air Mono
Bluetooth®
Devices
Amps Air 2.0
Bluetooth®
Devices
Amps Air Mono
Bluetooth®
Devices

DK 45
OPSÆTNING
OPLADNING AF DINE
ØRETELEFONER
Anbring dine øretelefoner i etuiet for
at oplade dem. De røde lysdioder
viser, at de oplades. Når de er fuldt
opladet, bliver lysdioderne hvide,
hvorefter de slukkes.
OPLADNING AF DIT ETUI
Sæt den mindste ende af USB-kablet
ind i mikro-USB-porten på højre side
af etuiet. Når alle 4 lysdioder lyser, er
det helt ladet op.
Amps Air 2.0
Bluetooth®
Devices
Amps Air Mono
Bluetooth®
Devices
Amps Air 2.0
Bluetooth®
Devices
Amps Air Mono
Bluetooth®
Devices
Amps Air 2.0
Bluetooth®
Devices
Amps Air Mono
Bluetooth®
Devices

Amps Air 2.0
Bluetooth®
Devices
Amps Air Mono
Bluetooth®
Devices
Amps Air 2.0
Bluetooth®
Devices
Amps Air Mono
Bluetooth®
Devices
x2
Amps Air 2.0
Bluetooth®
Devices
Amps Air Mono
Bluetooth®
Devices
TRIN ET – TÆND
HØRETELEFONERNE
Dine høretelefoner tændes
automatisk, når de tages ud af
opladeren. Hvis du ønsker at tænde
dem manuelt, kan du trykke hurtigt
på multifunktionsknappen én gang
på begge høretelefoner.
TRIN TO – TILSLUT
HØRETELEFONERNE TIL
HINANDEN
Når du tager høretelefonerne ud
af etuiet, oprettes der automatisk
forbindelse mellem dem. Når der
er oprettet korrekt forbindelse,
lyser lysdioden hvidt i tre sekunder
og blinker derefter en gang hvert
5. sekund under brug. Hvis der
ikke oprettes forbindelse mellem
høretelefonerne, skal du trykke
hurtigt på SOL-knappen på
begge høretelefoner samtidigt.
Dette sætter høretelefonerne
i synkroniseringstilstand og
lysdioderne blinker hvidt. Når der er
oprettet korrekt forbindelse, lyser
lysdioderne hvidt i tre sekunder,
hvorefter de fortsætter med at blinke
hvert 5. sekund under brug.
TRIN TRE – OPRET
FORBINDELSE TIL EN ENHED
Aktivér Bluetooth på din enhed.
Vælg “Amps Air 2.0” i Bluetooth-
menuen. Når enheden og Amps Air
2.0 er tilsluttet, hører du en tone.
Dette betyder, at der nu er oprettet
forbindelse.
TILSLUTNING AF BEGGE HØRETELEFONER
Tilslut begge høretelefoner for stereolyd. Dette giver den bedste
musikoplevelse.
46 DK

Amps Air 2.0
Bluetooth®
Devices
Amps Air Mono
Bluetooth®
Devices
x2
WWW.SOLREPUBLIC.COM
Amps Air
Bluetooth®
Devices
Amps Air Mono
Bluetooth®
Devices
TRIN ET – KØB EN NY
HØRETELEFON
Hvis en høretelefon er blevet tabt
eller beskadiget, kan du købe en
ny enkel høretelefon (venstre eller
højre) på SOL REPUBLICS webside
på www.solrepublic.com
TRIN TO – TILSLUT ERSTAT-
NINGSHØRETELEFONEN
For at tilslutte
erstatningshøretelefonen, skal du
sørge for, at begge høretelefoner
er fuldt opladede, og derefter
dobbelttrykke hurtigt på SOL-
knappen på begge høretelefoner
samtidigt. Dette sætter dem
i synkroniseringstilstand og
lysdioderne blinker hvidt. Når
lysdioderne er korrekt tilsluttet, lyser
de hvidt i tre sekunder, hvorefter
de fortsætter med at blinke hvert
5. sekund under brug. Din nye
høretelefon er nu tilsluttet og klar til
brug.
TILSLUTNING AF EN NY
ELLER ERSTATNING-
SHØRETELEFON
DK 47

48 DK
SLUK FOR ØRETELEFONERNE
BRUG AF BACKUPBATTERIET
Sæt din enheds USB-opladerkabel i
etuiet og dernæst i din smartphone.
Med et fuldt batteri kan dit etui
oplade dine øretelefoner i op til
15 gange eller oplade en typisk
smartphone helt én gang.
Du slukker for dine øretelefoner
ved at anbringe dem i etuiet
eller ved at trykke og holde
multifunktionsknappen på
øretelefonerne nede i 3 sekunder
BEMÆRK
USB-opladningseffekten er 5V, 1,0A. Nogle
enheder, som f.eks. tablets, vil måske ikke
se ud som om, de lader, eller de vil måske
lade langsomt. Få yderligere oplysninger hos
producenten af din enhed.
Amps Air 2.0
Bluetooth®
Devices
Amps Air Mono
Bluetooth®
Devices
3s
Amps Air 2.0
Bluetooth®
Devices
Amps Air Mono
Bluetooth®
Devices
Amps Air 2.0
Bluetooth®
Devices
Amps Air Mono
Bluetooth®
Devices

DK 49
GRUNDLÆGGENDE INFORMATION
BEMÆRK
Nogle funktioner kan virke anderledes alt efter telefon og udbyder.
DU ØNSKER AT
Tage et opkald Tryk én gang på en af multifunktionsknapperne
Afvise et opkald Tryk og hold den ene af multifunktionsknapperne
nede
Afslutte et opkald Tryk én gang på en af multifunktionsknapperne
Tage imod et andet opkald Tryk én gang på en af multifunktionsknapperne
Afvise et andet opkald Brug telefonens tastatur
DU ØNSKER AT
Aktivere Siri Tryk hurtigt to gange på den ene af
multifunktionsknapperne
Aktivere Google Tryk hurtigt to gange på den ene af
multifunktionsknapperne
Tjekke øretelefonernes
batteriniveau Se på din smartphone
Tjekke etuiets
batteriniveau Ryst etuiet for at få lys i lysdioderne
Slukke for øretelefonerne Tryk og hold multifunktionsknappen nede i 3
sekunder
MUSIK
OPKALD
ANDET
DU ØNSKER AT
Afspille eller sætte på
pause Tryk én gang på en af multifunktionsknapperne.

50 DK
INDIKATIONER FOR LYSDIODER
Blinker rødt Lavt batteri
Lyser rødt Oplader
Sluk LED Fuldt opladet
1 lysdiode blinker Lavt batteri, 0-25 %
2 lysdioder, nr. 2 blinker Batterikapacitet 25-50 %
3 lysdioder, nr. 3 blinker Batterikapacitet 50-75 %
4 lysdioder, nr. 4 blinker Batterikapacitet 75-100 %
Langsomt blinkende hvidt Øretelefoner i synkroniseringsmode med hinanden
Hurtigt blinkende hvidt Øretelefoner i pairing-mode med hinanden
ØRETELEFONER OPLADES I ETUIET
ETUI
ØRETELEFONER I BRUG
DK 51
FEJLFINDING
Har du problemer med dine øretelefoner? Prøv at følge trinene nedenfor.
1. Sluk for Bluetooth på din enhed
2. Tag øretelefonerne ud af dit etui
3. Tryk på Sol-knappen og hold den nede i 3 sekunder på begge
øretelefoner for at slukke dem
4. Tryk hurtigt én gang på multifunktionsknappen for at tænde for dem
5. Tryk hurtigt på multifunktionsknappen to gange på begge øretelefoner
for at få dem i pairing-mode og få forbindelse til hinanden igen.
6. Tænd for Bluetooth på din enhed
7. Pair øretelefonerne med “Amps Air 2.0”
KONTAKT
Har du stadig spørgsmål? Vi har svarene, og vi sidder klar til at hjælpe dig.
Kontakt os, vi er her for dig.
SUPPORT
Du kan kontakte os på følgende måder. Vi er klar til at hjælpe dig med at få det
meste ud af dit produkt fra SOL REPUBLIC.
Web: SOLREPUBLIC.COM/SUPPORT
Twitter: @SOLREPUBLIC
Phone: +1.877.400.0310
Email: support@SOLREPUBLIC.com

52 HU
Amps Air 2.0
Bluetooth®
Devices
Amps Air Mono
Bluetooth®
Devices
Amps Air 2.0
Bluetooth®
Devices
Amps Air Mono
Bluetooth®
Devices
A DOBOZ TARTALMA
4 különböző méretű fülbetét
USB-töltőkábel
Utazótok tartalék akkumulátorral
1
2
3
4
5 7 6
1 Többfunkciós gomb
2 Állapotjelző LED
3 Mikrofoncsatlakozó
4 Töltőérintkezők
5 Tok akkumulátorának LED-jei
6 Micro USB-töltőcsatlakozó –
a hordozható tok töltéséhez
7 USB-töltőcsatlakozó – a
mobileszközök töltéséhez
MEGJEGYZÉS
A legjobb illeszkedésért és
hangzásért kezdje a legnagyobb
fülbetéttel, majd próbálja ki a sorban
kisebbeket, amíg meg nem találja az
Ön számára ideális méretet.
Amps Air 2.0
Bluetooth®
Devices
Amps Air Mono
Bluetooth®
Devices
Amps Air 2.0
Bluetooth®
Devices
Amps Air Mono
Bluetooth®
Devices
Amps Air 2.0
Bluetooth®
Devices
Amps Air Mono
Bluetooth®
Devices

HU 53
BEÁLLÍTÁS
A FÜLHALLGATÓ FELTÖLTÉSE
A füllhallgatót a feltöltés érdekében
helyezze a hordozható tokba. A
piros LED-ek jelzik, hogy a töltés
folyamatban van. A teljes feltöltést
követően a LED-ek előbb fehér
színre váltanak, majd kikapcsolnak.
A HORDOZHATÓ TOK TÖLTÉSE
Csatlakoztassa az USB-kábel kisebb
végét a micro USB-porthoz, amely
a tok jobb oldalán található. Amikor
mind a 4 LED világít, a feltöltés kész.
Amps Air 2.0
Bluetooth®
Devices
Amps Air Mono
Bluetooth®
Devices
Amps Air 2.0
Bluetooth®
Devices
Amps Air Mono
Bluetooth®
Devices
Amps Air 2.0
Bluetooth®
Devices
Amps Air Mono
Bluetooth®
Devices

Amps Air 2.0
Bluetooth®
Devices
Amps Air Mono
Bluetooth®
Devices
Amps Air 2.0
Bluetooth®
Devices
Amps Air Mono
Bluetooth®
Devices
x2
Amps Air 2.0
Bluetooth®
Devices
Amps Air Mono
Bluetooth®
Devices
54 HU
CSATLAKOZTASSA MINDKÉT FÜLHALLGATÓT
A sztereó hangzás érdekében mindkét fülhallgatót csatlakoztassa. Így élvezheti
legteljesebben a zenét.
ELSŐ LÉPÉS – A
FÜLHALLGATÓ
BEKAPCSOLÁSA
A fülhallgató automatikusan
bekapcsol, amikor kiveszi a
töltőtokból. Ha manuálisan szeretné
bekapcsolni, nyomja meg egyszer
gyorsan a multifunkciós gombot
mindkét fülhallgatón.
MÁSODIK LÉPÉS – A
FÜLHALLGATÓK EGYMÁSHOZ
CSATLAKOZTATÁSA
Amikor kiveszi a fülhallgatókat
a tokból, azok automatikusan
csatlakoznak egymáshoz.
Miután sikeresen csatlakoztak,
a LED folyamatos fehér fénnyel
világít 3 másodpercig, majd 5
másodpercenként villog a használat
során. Ha nem csatlakoznak, nyomja
le kétszer gyorsan az SOL gombot
mindkét fülhallgatón egyszerre. Ezzel
szinkronizálási üzemmódba kerülnek,
és a LED-ek fehéren villognak.
Miután sikeresen csatlakoztak, a
LED-ek folyamatos fehér fénnyel
világítanak 3 másodpercig, majd
5 másodpercenként villognak a
használat során.
HARMADIK LÉPÉS –
CSATLAKOZTATÁS A
LEJÁTSZÓESZKÖZHÖZ
Engedélyezze a Bluetooth funkciót
az eszközén. A Bluetooth menüből
válassza az „Amps Air 2.0” opciót.
Amikor az eszköz és az Amps Air
2.0 csatlakozott, hangjelzést fog
hallani. Ez azt jelenti, hogy a párosítás
befejeződött.

Amps Air 2.0
Bluetooth®
Devices
Amps Air Mono
Bluetooth®
Devices
x2
WWW.SOLREPUBLIC.COM
Amps Air
Bluetooth®
Devices
Amps Air Mono
Bluetooth®
Devices
ELSŐ LÉPÉS – ÚJ
FÜLHALLGATÓ VÁSÁRLÁSA
Ha egy fülhallgató elveszett vagy
megsérült, vásárolhat új, egyetlen
(bal vagy jobb) fülhallgatót az
SOL REPUBLIC webhelyen:
www.solrepublic.com
MÁSODIK LÉPÉS – CSERE
FÜLHALLGATÓ PÁROSÍTÁSA
A csere fülhallgató párosításához
győződjön meg arról, hogy mindkét
fülhallgató teljesen feltöltődött,
majd nyomja le kétszer gyorsan az
SOL gombot mindkét fülhallgatón
egyszerre. Ezzel szinkronizálási
üzemmódba kerülnek, és a
LED-ek fehéren villognak. Miután
sikeresen csatlakoztak, a LED-
ek folyamatos fehér fénnyel
világítanak 3 másodpercig,
majd 5 másodpercenként
villognak a használat során. Az új
fülhallgatójának párosítása sikeresen
befejeződött és az használható.
ÚJ VAGY CSERE
FÜLHALLGATÓ
CSATLAKOZTATÁSA
HU 55
56 HU
A FÜLHALLGATÓ KIKAPCSOLÁSA
A TARTALÉK AKKUMULÁTOR HASZNÁLATA
Csatlakoztassa az eszköz USB-
töltőkábelét a hordozható tokhoz,
majd az eszközhöz. Teljesen feltöltött
akkumulátorral a fülhallgató akár 15-
ször, egy átlagos okostelefon pedig
egyszer tölthető újra.
A fülhallgató kikapcsolásához
helyezze vissza a fülhallgatókat
a tokba, vagy tartsa lenyomva
a multifunkciós gombot 3
másodpercig.
MEGJEGYZÉS
Az USB töltés kimenő teljesítménye: 5V, 1.0A.
Egyes eszközöknél, például a táblagépeknél
előfordulhat, hogy a készülék nem vagy csak
nagyon lassan töltődik. Forduljon az eszköz
gyártójához.
Amps Air 2.0
Bluetooth®
Devices
Amps Air Mono
Bluetooth®
Devices
3s
Amps Air 2.0
Bluetooth®
Devices
Amps Air Mono
Bluetooth®
Devices
Amps Air 2.0
Bluetooth®
Devices
Amps Air Mono
Bluetooth®
Devices

HU 57
ALAPOK
MEGJEGYZÉS
Egyes funkciók a szolgáltatótól függően eltérően működhetnek.
MŰVELET
Hívásfogadás Nyomja meg egyszer bármelyik multifunkciós
gombot.
Hívás elutasítása Nyomja meg és tartsa lenyomva bármelyik
multifunkciós gombot.
Hívás befejezése Nyomja meg egyszer bármelyik multifunkciós
gombot.
Második bejövő hívás
fogadása
Nyomja meg egyszer bármelyik multifunkciós
gombot.
Második bejövő hívás
elutasítása Használja a telefon billentyűzetét.
MŰVELET
Siri aktiválása Gyorsan nyomja meg kétszer bármelyik
multifunkciós gombot.
Google aktiválása Gyorsan nyomja meg kétszer bármelyik
multifunkciós gombot.
Fülhallgatók töltöttségi
szintjének ellenőrzése Az okostelefonon olvasható le.
Hordozható tok töltöttségi
szintjének ellenőrzése Rázza meg a tokot, hogy kigyulladjanak a LED-ek.
Fülhallgató kikapcsolása Tartsa 3 másodpercig lenyomva a multifunkciós
gombot.
ZENE
HÍVÁSOK
EGYEBEK
MŰVELET
Lejátszás vagy szünet Nyomja meg egyszer bármelyik multifunkciós
gombot.

58 HU
LED-EK
Villogó piros Alacsony töltöttség
Egyenletes piros Töltés
LED ki Teljesen feltöltve
1 LED villog Alacsony töltöttség, 0–25%
2 LED, a 2. villog 25–50%-os töltöttség
3 LED, a 3. villog 50-75%-os töltöttség
4 LED, a 4. villog 75-100%-os töltöttség
Lassan villogó fehér A fülhallgatók szinkronizálnak egymással.
Gyorsan villogó fehér A fülhallgatók eszközzel való párosítása zajlik.
TOKBAN TÖLTŐDŐ FÜLHALLGATÓK
HORDOZHATÓ TOK
A FÜLHALLGATÓ HASZNÁLATA KÖZBEN
HU 59
HIBAELHÁRÍTÁS
Problémát tapasztalt? Próbálkozzon az alábbi lépésekkel.
1. Kapcsolja ki a Bluetooth funkciót az eszközön
2. Vegye ki a fülhallgatókat a tokból
3. Nyomja meg és tartsa lenyomva a Sol gombot 3 másodpercig mindkét
fülhallgatón a kikapcsoláshoz.
4. Gyorsan nyomja meg egyszer a multifunkciós gombot a fülhallgatókon a
bekapcsoláshoz.
5. Gyorsan nyomja meg kétszer a multifunkciós gombot mindkét
fülhallgatón a párosítási mód és a kapcsolódás elindításához.
6. Kapcsolja be a Bluetooth funkciót az eszközön
7. Végezze el az „Amps Air 2.0” párosítását
KAPCSOLAT
További kérdései vannak? Bármikor szívesen állunk rendelkezésére. Vegye fel
velünk a kapcsolatot, és segítünk megoldani a problémát.
TÁMOGATÁS
Az alábbi anyagok segítenek abban, hogy a legtöbbet hozhassa ki SOL
REPUBLIC termékéből.
Web: SOLREPUBLIC.COM/SUPPORT
Twitter: @SOLREPUBLIC
Phone: +1.877.400.0310
Email: support@SOLREPUBLIC.com

60 PL
Amps Air 2.0
Bluetooth®
Devices
Amps Air Mono
Bluetooth®
Devices
Amps Air 2.0
Bluetooth®
Devices
Amps Air Mono
Bluetooth®
Devices
ZAWARTOŚĆ PUDEŁKA
Końcówki do słuchawek w 4 rozmiarach
Przewód zasilający USB
Etui podróżne mogące również pełnić funkcję powerbanku
1
2
3
4
5 7 6
1 Przycisk wielofunkcyjny
2 Dioda LED stanu słuchawek
3 Gniazdo mikrofonu
4 Złącza do ładowania słuchawek
5 Diody LED etui
6 Gniazdo ładowania micro USB –
do ładowania przenośnego etui
7 Gniazdo ładowania USB –
do ładowania urządzenia
zewnętrznego
UWAGA
Żeby jak najlepiej dopasować
słuchawki i osiągnąć jak najlepszy
dźwięk, zalecamy rozpocząć
dopasowywanie końcówek od
największego rozmiaru.
Amps Air 2.0
Bluetooth®
Devices
Amps Air Mono
Bluetooth®
Devices
Amps Air 2.0
Bluetooth®
Devices
Amps Air Mono
Bluetooth®
Devices
Amps Air 2.0
Bluetooth®
Devices
Amps Air Mono
Bluetooth®
Devices

PL 61
KONFIGURACJA
ŁADOWANIE SŁUCHAWEK
DOUSZNYCH
Żeby naładować słuchawki, umieść
je w przenośnym etui. Świecąca na
czerwono dioda LED wskazuje, że
słuchawki się ładują. Po zakończeniu
ładowania zaświeci się biała dioda
LED, a następnie się wyłączy.
ŁADOWANIE PRZENOŚNEGO
ETUI
Podłącz mniejszą końcówkę
kabla USB do portu micro USB
znajdującego się po prawej stronie
etui. Gdy zaświecą się 4 diody LED,
urządzenie jest w pełni naładowane.
Amps Air 2.0
Bluetooth®
Devices
Amps Air Mono
Bluetooth®
Devices
Amps Air 2.0
Bluetooth®
Devices
Amps Air Mono
Bluetooth®
Devices
Amps Air 2.0
Bluetooth®
Devices
Amps Air Mono
Bluetooth®
Devices

Amps Air 2.0
Bluetooth®
Devices
Amps Air Mono
Bluetooth®
Devices
Amps Air 2.0
Bluetooth®
Devices
Amps Air Mono
Bluetooth®
Devices
x2
Amps Air 2.0
Bluetooth®
Devices
Amps Air Mono
Bluetooth®
Devices
KROK PIERWSZY –
WŁĄCZANIE SŁUCHAWEK
DOUSZNYCH
Słuchawki włączają się
automatycznie po ich wyjęciu z
ładowarki. Aby włączyć słuchawki
douszne manualnie, możesz szybko
nacisnąć znajdujący się na nich
wielofunkcyjny przycisk.
KROK DRUGI – ŁĄCZENIE
SŁUCHAWEK DOUSZNYCH
Po wyjęciu słuchawek dousznych z
opakowania, połączą się one ze sobą
automatycznie. Po ich pomyślnym
połączeniu białe światło diody LED
zapali się na 3 sekundy, a następnie,
w trakcie użytkowania będzie migać
co 5 sekund. Jeśli słuchawki nie
połączą, szybko dwukrotnie naciśnij
przycisk SOL na obu słuchawkach
jednocześnie. W ten sposób przejdą
one w tryb synchronizacji, a dioda
LED zacznie migać na biało. Po ich
pomyślnym połączeniu białe światło
diod LED zapali się na 3 sekundy,
a następnie, w trakcie użytkowania
będzie migać co 5 sekund.
KROK TRZECI – PODŁĄCZENIE
DO URZĄDZENIA
Włącz Bluetooth na swoim
urządzeniu. Z menu Bluetooth
wybierz opcję „Amps Air 2.0” Kiedy
urządzenie połączy się z Amps
Air 2.0, usłyszysz potwierdzenie
dźwiękowe. Oznacza to, że
nawiązywanie połączenia zostało
zakończone.
PODŁĄCZANIE OBU SŁUCHAWEK DOUSZNYCH
W celu uzyskania dźwięku stereofonicznego, podłącz obie słuchawki. Zapewni
to najbardziej dogłębne doświadczenie przy słuchaniu muzyki.
62 PL

Amps Air 2.0
Bluetooth®
Devices
Amps Air Mono
Bluetooth®
Devices
x2
WWW.SOLREPUBLIC.COM
Amps Air
Bluetooth®
Devices
Amps Air Mono
Bluetooth®
Devices
KROK PIERWSZY – ZAKUP
NOWEJ SŁUCHAWKI
DOUSZNEJ
W przypadku zgubienia lub
uszkodzenia słuchawki, można kupić
pojedynczą słuchawkę douszną
(lewą lub prawą) w witrynie
SOL REPUBLIC pod adresem
www.solrepublic.com
KROK DRUGI – PAROWANIE
WYMIENIONEJ SŁUCHAWKI
Aby nawiązać połączenie z zapasową
słuchawką douszną, należy upewnić
się, że obie słuchawki są w pełni
naładowane, następnie szybko
dwukrotnie nacisnąć przycisk SOL
na obu słuchawkach jednocześnie.
W ten sposób przejdą one w tryb
synchronizacji, a dioda LED zacznie
migać na biało. Po ich pomyślnym
połączeniu białe światło diod LED
zapali się na 3 sekundy, a następnie,
w trakcie użytkowania będzie
migać co 5 sekund. Po pomyślnym
nawiązaniu połączenia nowa
słuchawka douszna jest teraz gotowa
do użytku.
PODŁĄCZANIE NOWEJ
LUB ZAPASOWEJ
SŁUCHAWKI DOUSZNEJ
PL 63

64 PL
WYŁĄCZANIE SŁUCHAWEK
KORZYSTANIE Z FUNKCJI POWERBANKU
Podłącz swoje urządzenie do
przenośnego etui za pomocą
przewodu zasilającego USB. W
pełni naładowane etui umożliwia
naładowanie słuchawek do 15 razy
lub jednorazowe pełne naładowanie
typowego smartfonu.
Żeby wyłączyć słuchawki, umieść
je w etui lub naciśnij przycisk
wielofunkcyjny na słuchawce i
przytrzymaj go przez 3 sekundy.
UWAGA
Parametry znamionowe ładowania przez USB:
5 V / 1,0 A. W wypadku niektórych urządzeń
(np. tabletów) można odnieść wrażenie, że się
nie ładują lub że ładują się powoli. Sprawdź
wymagania swojego urządzenia.
Amps Air 2.0
Bluetooth®
Devices
Amps Air Mono
Bluetooth®
Devices
3s
Amps Air 2.0
Bluetooth®
Devices
Amps Air Mono
Bluetooth®
Devices
Amps Air 2.0
Bluetooth®
Devices
Amps Air Mono
Bluetooth®
Devices

PL 65
PODSTAWOWE FUNKCJE
UWAGA
Pewne funkcje mogą się różnić w zależności od telefonu lub dostawcy usług.
CZYNNOŚĆ
Odbieranie połączeń Jednokrotnie naciśnij któryś z przycisków
wielofunkcyjnych.
Odrzucanie połączeń Jednokrotnie naciśnij i przytrzymaj któryś z
przycisków wielofunkcyjnych.
Kończenie połączeń Jednokrotnie naciśnij któryś z przycisków
wielofunkcyjnych.
Odbieranie drugiego
połączenia przychodzącego
Jednokrotnie naciśnij któryś z przycisków
wielofunkcyjnych.
Odrzucanie drugiego
połączenia przychodzącego
Skorzystaj z klawiatury telefonu
CZYNNOŚĆ
Uruchomienie Siri Szybko dwukrotnie naciśnij któryś z przycisków
wielofunkcyjnych.
Uruchomienie Google Szybko dwukrotnie naciśnij któryś z przycisków
wielofunkcyjnych.
Sprawdzenie stanu baterii
słuchawek Sprawdź na telefonie.
Sprawdzenie stanu baterii
przenośnego etui Potrząśnij etui, żeby zaświeciły się diody LED.
Wyłączenie słuchawki Naciśnij przycisk wielofunkcyjny i przytrzymaj go
przez 3 sekundy
MUZYKA
POŁĄCZENIA
INNE
CZYNNOŚĆ
Odtwarzanie lub pauza Jednokrotnie naciśnij któryś z przycisków
wielofunkcyjnych.

66 PL
WSKAŹNIKI LED
Miganie na czerwono Niski stan baterii
Świecenie na czerwono Trwa ładowanie
LED wyłączony Ładowanie zakończone
1 migająca dioda LED Niski stan baterii: 0–25%
2 diody LED, druga
migająca Pojemność baterii: 25–50%
3 diody LED, trzecia
migająca Pojemność baterii: 50–75%
4 diody LED, czwarta
migająca Pojemność baterii: 75–100%
Wolno miga na biało Słuchawki są w trybie synchronizacji
Szybko miga na biało Słuchawki są w trybie parowania z urządzeniem
PODCZAS ŁADOWANIA SŁUCHAWEK W ETUI
ETUI PODRÓŻNE
PODCZAS KORZYSTANIA ZE SŁUCHAWEK
PL 67
WYKRYWANIE I USUWANIE USTEREK
Masz problem ze słuchawkami?Wypróbuj poniższe rozwiązania.
1. Wyłącz funkcję Bluetooth w urządzeniu.
2. Wyjmij słuchawki z etui.
3. Żeby wyłączyć słuchawki, naciśnij i przytrzymaj przez 3 sekundy przyciski
Sol na obu słuchawkach jednocześnie.
4. Żeby uruchomić słuchawki, szybko jednokrotnie naciśnij przyciski
wielofunkcyjne.
5. Żeby uruchomić tryb parowania i ponownie połączyć słuchawki ze sobą,
szybko dwukrotnie naciśnij przyciski wielofunkcyjne.
6. Uruchom funkcję Bluetooth w urządzeniu.
7. Sparuj urządzenie z Amps Air 2.0.
DANE KONTAKTOWE
Wciąż masz pytania? My mamy odpowiedzi i jesteśmy gotowi ich udzielić.
Skontaktuj się z nami, jesteśmy tu po to, żeby Ci pomóc.
WSPARCIE
Poniżej znajdziesz informacje, które umożliwią Ci maksymalne wykorzystanie
funkcjonalności Twojego produktu SOL REPUBLIC.
Web: SOLREPUBLIC.COM/SUPPORT
Twitter: @SOLREPUBLIC
Phone: +1.877.400.0310
Email: support@SOLREPUBLIC.com
68 RU
Amps Air 2.0
Bluetooth®
Devices
Amps Air Mono
Bluetooth®
Devices
Amps Air 2.0
Bluetooth®
Devices
Amps Air Mono
Bluetooth®
Devices
СОДЕРЖИМОЕ КОМПЛЕКТА
Наконечники-вкладыши
4-х размеров
Кабель USB для зарядки
Дорожный футляр с запасной батареей
1
2
3
4
5 7 6
1 Многофункциональная кнопка
2 Индикатор состояния вкладыша
3 Разъем для микрофона
4 Контакты для зарядки
вкладышей
5 Индикаторы батареи футляра
6 Порт Micro USB для зарядки
портативного футляра
7 Порт USB для зарядки
интеллектуального устройства
ПРИМЕЧАНИЕ
Чтобы добиться точного
соответствия размера и наилучшего
качества звука, начните с
самого большого вкладыша и
последовательно переходите к
меньшим размерам.
Amps Air 2.0
Bluetooth®
Devices
Amps Air Mono
Bluetooth®
Devices
Amps Air 2.0
Bluetooth®
Devices
Amps Air Mono
Bluetooth®
Devices
Amps Air 2.0
Bluetooth®
Devices
Amps Air Mono
Bluetooth®
Devices

RU 69
НАСТРОЙКА
ЗАРЯДКА НАУШНИКОВ
Чтобы зарядить наушники,
вставьте их в портативный
футляр. Во время зарядки
индикаторы зажигаются красным
светом. При полной зарядке
индикаторы меняют цвет на
белый, а затем гаснут.
ЗАРЯДКА ПОРТАТИВНОГО
ФУТЛЯРА
Вставьте маленький разъем
кабеля USB в порт micro USB,
расположенный на правой
стороне футляра. При полной
зарядке должны гореть
все четыре светодиодных
индикатора.
Amps Air 2.0
Bluetooth®
Devices
Amps Air Mono
Bluetooth®
Devices
Amps Air 2.0
Bluetooth®
Devices
Amps Air Mono
Bluetooth®
Devices
Amps Air 2.0
Bluetooth®
Devices
Amps Air Mono
Bluetooth®
Devices

Amps Air 2.0
Bluetooth®
Devices
Amps Air Mono
Bluetooth®
Devices
Amps Air 2.0
Bluetooth®
Devices
Amps Air Mono
Bluetooth®
Devices
x2
Amps Air 2.0
Bluetooth®
Devices
Amps Air Mono
Bluetooth®
Devices
70 RU
ПОДКЛЮЧИТЕ ОБА НАУШНИКА
Для стереозвучания подключите оба наушника. Объемный, реалистичный
звук подарит вам эффект присутствия на живом концерте.
ЭТАП 1: ВКЛЮЧЕНИЕ
НАУШНИКОВ
Наушники автоматически
включаются, как только вы
достаете их из зарядного
чехла. Чтобы включить их
вручную, достаточно быстрого
однократного нажатия
многофункциональной кнопки на
обоих наушниках.
ЭТАП 2: ПОДКЛЮЧЕНИЕ
НАУШНИКОВ ДРУГ К ДРУГУ
Наушники автоматически
подключаются друг к другу
при извлечении из чехла.
После успешного подключения
белые светодиоды загорятся
на 3 секунды, а затем при
использовании будут мигать
каждые 5 секунд. Если наушники
не подключатся автоматически,
дважды быстро нажмите кнопку
«SOL» на обоих наушниках
одновременно. Это переведет
их в режим синхронизации;
белые светодиоды начнут мигать.
После успешного подключения
белые светодиоды загорятся
на 3 секунды, а затем при
использовании будут мигать
каждые 5 секунд.
ЭТАП 3: ПОДКЛЮЧЕНИЕ К
УСТРОЙСТВУ
Включите Bluetooth на устройстве.
В меню «Bluetooth» выберите
пункт «Amps Air 2.0». После
подключения Amps Air 2.0 к
устройству вы услышите звуковой
сигнал. Это означает, что процесс
сопряжения завершен.

Amps Air 2.0
Bluetooth®
Devices
Amps Air Mono
Bluetooth®
Devices
x2
WWW.SOLREPUBLIC.COM
Amps Air
Bluetooth®
Devices
Amps Air Mono
Bluetooth®
Devices
ЭТАП 1: ПОКУПКА НОВОГО
НАУШНИКА
В случае потери или
повреждения наушника вы
можете приобрести новый (левый
или правый) на веб-сайте
SOL REPUBLIC по адресу
www.solrepublic.com.
ЭТАП 2: СОПРЯЖЕНИЕ
ЗАМЕНЕННОГО НАУШНИКА
Для сопряжения замененного
наушника убедитесь, что оба
наушника полностью заряжены, и
дважды быстро нажмите кнопку
«SOL» на обоих наушниках
одновременно. Это переведет
их в режим синхронизации;
белые светодиоды начнут мигать.
После успешного подключения
белые светодиоды загорятся
на 3 секунды, а затем при
использовании будут мигать
каждые 5 секунд. Новый наушник
успешно сопряжен и готов к
использованию
ПОДКЛЮЧЕНИЕ НОВОГО
ИЛИ ЗАМЕНЕННОГО
НАУШНИКА
RU 71

72 RU
ВЫКЛЮЧЕНИЕ НАУШНИКОВ
ИСПОЛЬЗОВАНИЕ ЗАПАСНОЙ БАТАРЕИ
Подсоедините зарядный
кабель USB своего устройства к
дорожному футляру, а затем — к
интеллектуальному устройству.
Полный заряд батареи футляра
обеспечивает до 15 зарядок
наушников или одну полную
зарядку стандартного смартфона.
Чтобы выключить наушники,
вставьте их обратно в
футляр или нажмите на
многофункциональную кнопку
на наушнике и удерживайте ее
нажатой в течение 3 секунд.
ПРИМЕЧАНИЕ
Номинальные параметры выходного сигнала
USB — 5 В, 1,0 А. Некоторые устройства,
например, планшеты, могут не проявлять
признаков зарядки или заряжаться
медленно. Обратитесь к изготовителю
устройства за информацией о технических
требованиях.
Amps Air 2.0
Bluetooth®
Devices
Amps Air Mono
Bluetooth®
Devices
3s
Amps Air 2.0
Bluetooth®
Devices
Amps Air Mono
Bluetooth®
Devices
Amps Air 2.0
Bluetooth®
Devices
Amps Air Mono
Bluetooth®
Devices

RU 73
ОСНОВНЫЕ ОПЕРАЦИИ
ПРИМЕЧАНИЕ
Некоторые функции могут работать по-другому в зависимости от используемого
телефона и провайдера телефонной связи.
ВЫ ХОТИТЕ
Принять вызов Нажмите один раз на любую из
многофункциональных кнопок.
Отклонить вызов Нажмите на любую из многофункциональных
кнопок и удерживайте ее нажатой.
Завершить вызов Нажмите один раз на любую из
многофункциональных кнопок.
Принять второй
входящий вызов
Нажмите один раз на любую из
многофункциональных кнопок.
Отклонить второй
входящий вызов Используйте клавиатуру телефона
ВЫ ХОТИТЕ
Включить Siri Быстро нажмите дважды на любую из
многофункциональных кнопок
Включить Google Быстро нажмите дважды на любую из
многофункциональных кнопок
Проверить уровень заряда
батарей наушников Посмотрите на смартфон
Проверить уровень
заряда батарей
дорожного футляра
Встряхните футляр так, чтобы загорелись
световые индикаторы
Выключить наушник Нажмите на многофункциональную кнопку и
удерживайте ее нажатой в течение 3 секунд
МУЗЫКА
ТЕЛЕФОННЫЕ ВЫЗОВЫ
ПРОЧЕЕ
ВЫ ХОТИТЕ
Начать или остановить
воспроизведение
Нажмите один раз на любую из
многофункциональных кнопок.

74 RU
СВЕТОДИОДНЫЕ ИНДИКАТОРЫ
Мигающий красный свет Низкий уровень заряда батареи
Постоянный красный
свет Батарея заряжается
LED выкл Батарея полностью заряжена
1 индикатор мигает Низкий заряд батареи, 0–25 %
Включены 2 индикатора,
2-й мигает Батарея заряжена на 25–50 %
Включены 3 индикатора,
3-й мигает Батарея заряжена на 50–75 %
Включены 4 индикатора,
4-й мигает Батарея заряжена на 75–100 %
Медленно мигающий
белый свет
Наушники в режиме синхронизации друг с другом
Быстро мигающий
белый свет Наушники в режиме согласования с устройством
ПРИ ЗАРЯДКЕ НАУШНИКОВ В ФУТЛЯРЕ
НА ДОРОЖНОМ ФУТЛЯРЕ
ПРИ ИСПОЛЬЗОВАНИИ НАУШНИКОВ
RU 75
ДИАГНОСТИКА НЕИСПРАВНОСТЕЙ
Вы испытываете затруднения с использованием наушников?
Попробуйте сделать следующее.
1. Выключите функцию Bluetooth на вашем устройстве
2. Выньте наушники из футляра
3. Выключите оба наушника, нажав на их кнопки Sol и удерживая их
нажатыми в течение 3 секунд.
4. Включите наушники быстрым однократным нажатием на их
многофункциональные кнопки
5. Переключите наушники в режим синхронизации и установления
соединения между ними быстрым двукратным нажатием на
многофункциональные кнопки обоих наушников
6. Включите функцию Bluetooth на вашем устройстве
7. Проведите согласование с «Amps Air 2.0»
КОНТАКТНАЯ ИНФОРМАЦИЯ
У вас остались вопросы? Мы можем и всегда готовы на них ответить.
Свяжитесь с нами, и мы вам поможем.
ПОДДЕРЖКА
Ниже перечислены ресурсы, которые помогут вам наиболее
полноценно использовать ваше изделие SOL REPUBLIC.
Web: SOLREPUBLIC.COM/SUPPORT
Twitter: @SOLREPUBLIC
Phone: +1.877.400.0310
Email: support@SOLREPUBLIC.com

76 NL
Amps Air 2.0
Bluetooth®
Devices
Amps Air Mono
Bluetooth®
Devices
Amps Air 2.0
Bluetooth®
Devices
Amps Air Mono
Bluetooth®
Devices
WAT ZIT ERIN
Oordopjes in 4 maten
USB-oplaadkabel
Reishoes met reservebatterij
1
2
3
4
5 7 6
1 Multifunctionele knop
2 Ledlamp voor oordopstatus
3 Microfoonpoort
4 Laadcontacten van oordopje
5 Ledlampen van de batterij van de
hoes
6 Micro-USB-laadpoort – om de
draagbare hoes op te laden
7 USB-laadpoort – om uw “smart”-
apparaat op te laden
OPMERKING
Voor de beste pasvorm en het beste
geluid begint u met het oordopje
in de grootste maat. Indien dit niet
past, gaat u voor een maat kleiner,
enzovoort.
Amps Air 2.0
Bluetooth®
Devices
Amps Air Mono
Bluetooth®
Devices
Amps Air 2.0
Bluetooth®
Devices
Amps Air Mono
Bluetooth®
Devices
Amps Air 2.0
Bluetooth®
Devices
Amps Air Mono
Bluetooth®
Devices

NL 77
INSTELLEN
UW OORDOPJES OPLADEN
Om de oordopjes op te laden plaatst
u ze in de draagbare hoes. De rode
ledlampen geven aan dat ze worden
opgeladen. Als ze volledig zijn
opgeladen, lichten de ledlampen wit
op, en gaan ze uit.
UW DRAAGBARE HOES
OPLADEN
Steek het kleine uiteinde van de
USB-kabel in de micro-USB-poort
aan de rechterkant van de hoes. Als
alle 4 de ledlampen oplichten, is de
hoes opgeladen.
Amps Air 2.0
Bluetooth®
Devices
Amps Air Mono
Bluetooth®
Devices
Amps Air 2.0
Bluetooth®
Devices
Amps Air Mono
Bluetooth®
Devices
Amps Air 2.0
Bluetooth®
Devices
Amps Air Mono
Bluetooth®
Devices

Amps Air 2.0
Bluetooth®
Devices
Amps Air Mono
Bluetooth®
Devices
Amps Air 2.0
Bluetooth®
Devices
Amps Air Mono
Bluetooth®
Devices
x2
Amps Air 2.0
Bluetooth®
Devices
Amps Air Mono
Bluetooth®
Devices
STAP EEN - DE OORDOPJES
INSCHAKELEN
Uw oordopjes worden automatisch
ingeschakeld wanneer ze uit de
oplader worden verwijderd. Als u ze
handmatig wilt inschakelen, kunt u op
beide oordopjes de multifunctionele
knop kort één keer indrukken.
STAP TWEE - DE OORDOPJES
MET ELKAAR VERBINDEN
Als u de oordopjes uit hun omhulsel
neemt, worden ze automatisch
met elkaar verbonden. Zodra de
oordopjes succesvol zijn verbonden,
blijft de LED gedurende 3 seconden
ononderbroken wit en zal vervolgens
tijdens gebruik elke 5 seconden
knipperen. Als ze niet verbinden, de
SOL-knop op beide oordopjes kort
en gelijktijdig tweemaal indrukken.
Dit plaatst hen in de synchronisatie
modus en de LEDs zullen wit
knipperen. Zodra de oordopjes
succesvol zijn verbonden, zal
de LED gedurende 3 seconden
ononderbroken wit worden en
vervolgens tijdens gebruik elke 5
seconden blijven knipperen.
STAP DRIE - VERBINDEN MET
EEN APPARAAT
Activeer Bluetooth op uw apparaat.
Selecteer “Amps Air 2.0” vanuit
het Bluetooth-menu.Wanneer
het apparaat en Amps Air 2.0 zijn
verbonden, hoort u een toon. Dit
betekent dat het koppelen is voltooid.
BEIDE OORDOPJES VERBINDEN
Verbind beide oordopjes voor stereogeluid. Dit levert de meest
overweldigende muziekbeleving.
78 NL

Amps Air 2.0
Bluetooth®
Devices
Amps Air Mono
Bluetooth®
Devices
x2
WWW.SOLREPUBLIC.COM
Amps Air
Bluetooth®
Devices
Amps Air Mono
Bluetooth®
Devices
STAP EEN - EEN NIEUW
OORDOPJE KOPEN
Indien een oordopje verloren of
beschadigd is, kunt u een nieuw
individueel oordopje (links of rechts)
kopen op de SOL REPUBLIC
website op www.solrepublic.com
STAP TWEE - HET
VERVANGENDE OORDOPJE
KOPPELEN
Om het vervangende oordopje te
koppelen moet u ervoor zorgen
dat beide oordopjes volledig zijn
opgeladen, vervolgens de SOL-
knop op beide oordopjes kort en
gelijktijdig tweemaal indrukken.
Dit plaatst hen in de synchronisatie
modus en de LEDs zullen wit
knipperen. Zodra de oordopjes
succesvol zijn verbonden, zal
de LED gedurende 3 seconden
ononderbroken wit worden en
vervolgens tijdens gebruik elke 5
seconden blijven knipperen. Uw
nieuwe oordopje is nu succesvol
gekoppeld en kan worden gebruikt.
VERBINDEN VAN EEN
NIEUW OF VERVANGEND
OORDOPJE
NL 79

80 NL
UW OORDOPJES UITZETTEN
DE RESERVEBATTERIJ GERUIKEN
Steek de USB-oplaadkabel van
uw apparaat in de reishoes en dan
in uw “smart”-apparaat. Met een
volle batterij kan uw reishoes uw
oordopjes max. 15 keer opladen, of
biedt hij één volledige lading voor
een normale smartphone.
Om uw oordopjes uit te zetten plaatst
u de oordopjes terug in de hoes of
houdt u de multifunctionele knop op
het oordopje gedurende 3 seconden
ingedrukt.
OPMERKING
Het oplaaduitgangsvermogen van de USB is 5V,
1.0A. Sommige apparaten, zoals tablets, kunnen
eruitzien alsof ze niet worden opgeladen, of
worden langzaam opgeladen. Neem contact op
met de fabrikant van uw apparaat voor de eisen.
Amps Air 2.0
Bluetooth®
Devices
Amps Air Mono
Bluetooth®
Devices
3s
Amps Air 2.0
Bluetooth®
Devices
Amps Air Mono
Bluetooth®
Devices
Amps Air 2.0
Bluetooth®
Devices
Amps Air Mono
Bluetooth®
Devices

NL 81
BASICS
OPMERKING
Sommige functies kunnen anders werken, afhankelijk van uw telefoon of serviceprovider.
U WIL
T
Een oproep aannemen Druk eenmaal op één van de twee multifunctionele
knoppen
Een oproep weigeren Houd één van de twee multifunctionele knoppen
ingedrukt
Een oproep beëindigen Druk eenmaal op één van de twee multifunctionele
knoppen
Een tweede inkomende
oproep aannemen
Druk eenmaal op één van de twee multifunctionele
knoppen
Een tweede inkomende
oproep weigeren Gebruik het telefoontoetsenbord
U WIL
T
Siri activeren Druk snel tweemaal op één van de twee
multifunctionele knoppen
Google activeren Druk snel tweemaal op één van de twee
multifunctionele knoppen
Het batterijniveau van de
oordopjes controleren Kijk naar de smartphone
Het batterijniveau van de
reishoes controleren
Schud de reishoes heen en weer om de ledlampen
te laten branden
Het oordopje uitzetten Houd de multifunctionele knop gedurende 3
seconden ingedrukt
MUZIEK
OPROEPEN
OVERIGE
U WILT
Afspelen of pauzeren Druk eenmaal op één van de twee multifunctionele
knoppen.

82 NL
LEDINDICATOREN
Rood knipperend Batterij bijna leeg
Constant rood Aan het opladen
LED uit Volledig opgeladen
1 ledlamp knippert Batterij bijna leeg, 0–25%
2 ledlampen, 2e knippert Batterijniveau 25–50%
3 ledlampen, 3e knippert Batterijniveau 50-75%
4 ledlampen, 4e knippert Batterijniveau 75-100%
Langzaam wit knipperend Oordopjes in synchronisatiemodus met elkaar
Snel wit knipperend Oordopjes in koppelmodus met het apparaat
OORDOPJES IN HOES OPLADEN
REISHOES
OORDOPJES IN GEBRUIK
NL 83
PROBLEMEN OPLOSSEN
Problemen met uw oordopjes? Volg de onderstaande stappen.
1. Schakel Bluetooth uit op uw apparaat
2. Haal de oordopjes uit uw hoes
3. Houd de Sol-knop gedurende 3 seconden ingedrukt op beide oordopjes
om ze uit te zetten.
4. Druk snel eenmaal op de multifunctionele knop op de oordopjes om ze
aan te zetten.
5. Druk snel tweemaal op de multifunctionele knop op beide oordopjes om
ze in koppelmodus te zetten en opnieuw met elkaar te verbinden
6. Zet Bluetooth aan op uw apparaat
7. Koppel met “Amps Air 2.0”
CONTACT
Nog vragen? Wij hebben de antwoorden en helpen u graag. Neem contact
met ons op, we zijn er om u te helpen.
ONDERSTEUNING
Hieronder vindt u een set hulpmiddelen om ervoor te zorgen dat u het
meeste uit uw product van SOL REPUBLIC haalt.
Web: SOLREPUBLIC.COM/SUPPORT
Twitter: @SOLREPUBLIC
Phone: +1.877.400.0310
Email: support@SOLREPUBLIC.com
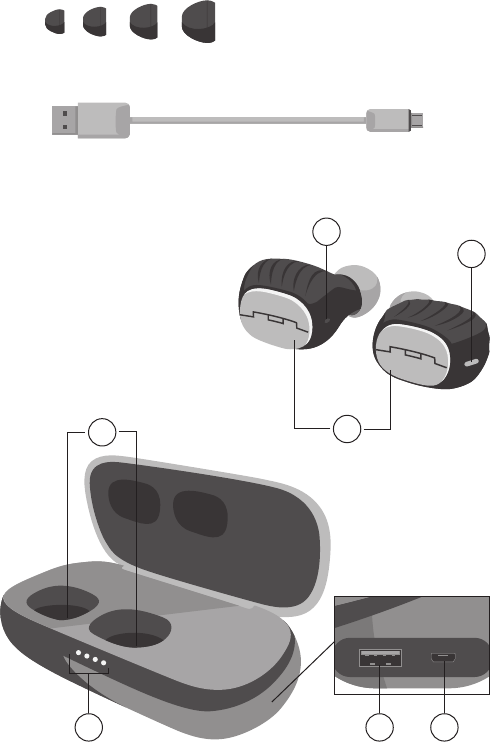
84 FI
Amps Air 2.0
Bluetooth®
Devices
Amps Air Mono
Bluetooth®
Devices
Amps Air 2.0
Bluetooth®
Devices
Amps Air Mono
Bluetooth®
Devices
SISÄLTÖ
Neljänkokoiset kärjet
USB-latausjohto
Vara-akullinen kuljetuskotelo
1
2
3
4
5 7 6
1 Monitoimipainike
2 Kuulokkeen tilavalo
3 Mikrofoniportti
4 Kuulokkeiden latauskoskettimet
5 Kotelon akkuvalot
6 Micro USB -latausliitin –
kannettavan kotelon lataukseen
7 USB-latausliitin – älylaitteesi
lataukseen
HUOMAA
Parhaan sovituksen ja äänenlaadun
saat aloittamalla suurimmasta
kärjestä ja, jos se ei sovi, kokeilemalla
sitten seuraavaksi pienempiä.
Amps Air 2.0
Bluetooth®
Devices
Amps Air Mono
Bluetooth®
Devices
Amps Air 2.0
Bluetooth®
Devices
Amps Air Mono
Bluetooth®
Devices
Amps Air 2.0
Bluetooth®
Devices
Amps Air Mono
Bluetooth®
Devices

FI 85
KÄYTTÖÖNOTTO
KUULOKKEIDEN LATAAMINEN
Lataa kuulokkeet laittamalla ne
kannettavaan koteloon. Punaiset
merkkivalot osoittavat, että ne
latautuvat. Kun ne ovat latautuneet
täyteen, merkkivalot muuttuvat
valkoisiksi ja sammuvat.
KANNETTAVAN KOTELON
LATAAMINEN
Kytke USB-johdon pieni pää micro
USB -liittimeen, joka sijaitsee kotelon
oikealla puolella. Kun kaikki 4 valoa
palavat, se on ladattu täyteen.
Amps Air 2.0
Bluetooth®
Devices
Amps Air Mono
Bluetooth®
Devices
Amps Air 2.0
Bluetooth®
Devices
Amps Air Mono
Bluetooth®
Devices
Amps Air 2.0
Bluetooth®
Devices
Amps Air Mono
Bluetooth®
Devices
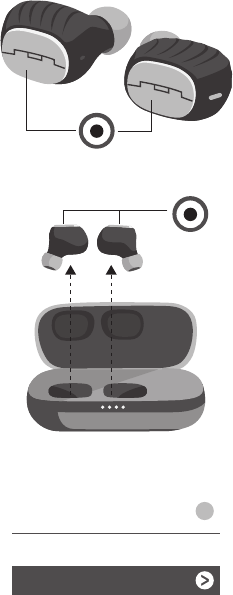
Amps Air 2.0
Bluetooth®
Devices
Amps Air Mono
Bluetooth®
Devices
Amps Air 2.0
Bluetooth®
Devices
Amps Air Mono
Bluetooth®
Devices
x2
Amps Air 2.0
Bluetooth®
Devices
Amps Air Mono
Bluetooth®
Devices
VAIHE 1 – KYTKE VIRTA
NAPPIKUULOKKEISIIN
Virta kytkeytyy kuulokkeisiisi
automaattisesti, kun otat ne
pois latauskotelosta. Jos haluat
kytkeä virran manuaalisesti, voit
painaa molempien kuulokkeiden
monitoimintonäppäintä lyhyesti
kerran.
VAIHE 2 –
NAPPIKUULOKKEIDEN
LIITTÄMINEN TOISIINSA
Kun otat kuulokkeet pois kotelosta,
ne kytkeytyvät automaattisesti
toisiinsa. Kun yhteys on muodostettu,
valkoinen LED-valo palaa tasaisesti
kolmen sekunnin ajan. Sen jälkeen
se välkkyy joka viides sekunti käytön
ajan. Jos kuulokkeet eivät kytkeydy
toisiinsa, paina SOL-painiketta
lyhyesti kaksi kertaa kummassakin
kuulokkeessa samanaikaisesti. Näin
ne menevät synkronointitilaan, ja
valkoiset LED-valot alkavat välkkyä.
Kun yhteys on muodostettu, valkoiset
LED-valot palavat tasaisesti kolmen
sekunnin ajan. Sen jälkeen ne
jatkavat välkkymistä joka viides
sekunti käytön ajan.
VAIHE 3 – KYTKEMINEN
LAITTEESEEN
Aktivoi Bluetooth laitteessasi.
Valitse Bluetooth-valikosta ”Amps
Air 2.0”. Kun laite ja Amps Air 2.0
-kuulokkeet on kytketty toisiinsa,
kuulet äänimerkin. Se tarkoittaa, että
pariliitos onnistui.
KYTKE MOLEMMAT NAPPIKUULOKKEET
Kytke molemmat kuulokkeet stereoäänen aikaansaamiseksi. Näin saat
mahdollisimman immersiivisen musiikkikokemuksen.
86 FI

Amps Air 2.0
Bluetooth®
Devices
Amps Air Mono
Bluetooth®
Devices
x2
WWW.SOLREPUBLIC.COM
Amps Air
Bluetooth®
Devices
Amps Air Mono
Bluetooth®
Devices
VAIHE 1 – UUDEN
NAPPIKUULOKKEEN
OSTAMINEN
Jos kuuloke häviää tai vahingoittuu,
voit ostaa uuden kuulokkeen (oikean
tai vasemman) SOL REPUBLIC
-verkkosivulta osoitteesta
www.solrepublic.com
VAIHE 2 – PARILIITOS UUDEN
NAPPIKUULOKKEEN KANSSA
Kun haluat muodostaa pariliitoksen
kuulokkeiden välillä, varmista, että
molemmissa kuulokkeissa on täysi
lataus. Paina sitten SOL-painiketta
lyhyesti kaksi kertaa kummassakin
kuulokkeessa samanaikaisesti. Näin
ne menevät synkronointitilaan, ja
valkoiset LED-valot alkavat välkkyä.
Kun yhteys on muodostettu, valkoiset
LED-valot palavat tasaisesti kolmen
sekunnin ajan. Sen jälkeen ne
jatkavat välkkymistä joka viides
sekunti käytön ajan. Pariliitos
onnistui, ja uusi kuulokkeesi on
valmis käyttöön.
UUDEN
NAPPIKUULOKKEEN
KYTKEMINEN
FI 87

88 FI
KUULOKKEIDEN SAMMUTTAMINEN
VARA-AKUN KÄYTTÖ
Kytke laitteen USB-latausjohto
kuljetuskoteloon ja sitten
älylaitteeseesi. Kun kuljetuskotelon
akku on täynnä, sillä voi ladata
kuulokkeet jopa 15 kertaa tai
tyypillisen älypuhelimen kerran.
Sammuta kuulokkeet panemalla
ne takaisin koteloon tai painamalla
kuulokkeen monitoimipainiketta 3
sekuntia.
HUOMAA
USB-latauksen nimellisteho on 5 V ja 1,0 A.
Eräät laitteet, kuten tabletit, eivät ehkä vaikuta
latautuvan tai latautuvat hitaasti. Kysy laitteen
valmistajalta latausvaatimuksista.
Amps Air 2.0
Bluetooth®
Devices
Amps Air Mono
Bluetooth®
Devices
3s
Amps Air 2.0
Bluetooth®
Devices
Amps Air Mono
Bluetooth®
Devices
Amps Air 2.0
Bluetooth®
Devices
Amps Air Mono
Bluetooth®
Devices

FI 89
PERUSASIAT
HUOMAA
Eräät ominaisuudet saattavat toimia eri tavalla puhelimesta tai palvelun operaattorista riippuen.
HALUAT
Vastata puheluun Paina jompaakumpaa monitoimipainiketta kerran
Hylätä puhelun Paina jompaakumpaa monitoimipainiketta pitkään
Lopettaa puhelun Paina jompaakumpaa monitoimipainiketta kerran
Vastata toiseen saapuvaan
puheluun Paina jompaakumpaa monitoimipainiketta kerran
Hylätä toisen saapuvan
puhelun Käyttää puhelimen näppäimistöä
HALUAT
Aktivoida Sirin Painaise jompaakumpaa monitoimipainiketta kaksi
kertaa
Aktivoida Googlen Painaise jompaakumpaa monitoimipainiketta kaksi
kertaa
Tarkistaa kuulokkeiden
latauksen Katso älypuhelinta
Tarkistaa kuljetuskotelon
latauksen Ravista kuljetuskoteloa, jolloin merkkivalot syttyvät
Sammuttaa kuulokkeen Paina monitoimipainiketta 3 sekuntia
MUSIIKKI
PUHELUT
MUU
HALUAT
Soittaa tai keskeyttää Paina jompaakumpaa monitoimipainiketta kerran.

90 FI
MERKKIVALOT
Vilkkuva punainen Akku vähissä
Tasainen punainen Latautuu
LED pois päältä Täyteen ladattu
1 valo vilkkuu Akku vähissä, 0–25 %
2 valoa, toinen vilkkuu Akun lataus 25–50 %
3 valoa, kolmas vilkkuu Akun lataus 50–75 %
4 valoa, neljäs vilkkuu Akun lataus 75–100 %
Hitaasti vilkkuva valkoinen Kuulokkeet synkronoituvat toisiinsa
Nopeasti vilkkuva
valkoinen Kuulokkeet yhdistyvät laitteen pariksi
KUULOKKEIDEN LATAUTUESSA KOTELOSSA
KULJETUSKOTELO
KUULOKKEET KÄYTÖSSÄ
FI 91
VIANETSINTÄ
Esiintyykö kuulokkeiden käytössä ongelmia? Käy läpi seuraavat vaiheet.
1. Sammuta laitteen Bluetooth
2. Ota kuulokkeet kotelosta
3. Paina kummankin kuulokkeen Sol-painiketta 3 sekuntia, jotta ne
sammuvat.
4. Painaise kummankin kuulokkeen monitoimipainiketta kerran, jotta ne
tulevat päälle
5. Painaise kummankin kuulokkeen monitoimipainiketta kahdesti, jotta ne
yhdistyvät toisiinsa
6. Pane laitteen Bluetooth päälle
7. Yhdistä “Amps Air 2.0” laitepariksi
OTA YHTEYTTÄ
Onko vieläkin kysyttävää? Me osaamme vastata ja olemme valmiina. Puhu
meille, sillä haluamme auttaa.
TUKI
Seuraavat resurssit varmistavat, että saat SOL REPUBLIC -tuotteestasi
eniten irti.
Web: SOLREPUBLIC.COM/SUPPORT
Twitter: @SOLREPUBLIC
Phone: +1.877.400.0310
Email: support@SOLREPUBLIC.com

92 SV
Amps Air 2.0
Bluetooth®
Devices
Amps Air Mono
Bluetooth®
Devices
Amps Air 2.0
Bluetooth®
Devices
Amps Air Mono
Bluetooth®
Devices
VAD INGÅR
4 storlekar örontippar
USB-laddningssladd
Reseask med batteribackup
1
2
3
4
5 7 6
1 Flerfunktionsknapp
2 Hörlurarnas status-LED
3 Mikrofonport
4 Hörlurarnas laddningskontakter
5 Askens batteri-LED:er
6 Laddningsport för mikro-USB –
för att ladda den portabla asken
7 USB-laddningsport – för att ladda
din smarta enhet
OBS!
För bästa passform och ljud, börja
med den största storleken örontipp
och jobba dig nedåt.
Amps Air 2.0
Bluetooth®
Devices
Amps Air Mono
Bluetooth®
Devices
Amps Air 2.0
Bluetooth®
Devices
Amps Air Mono
Bluetooth®
Devices
Amps Air 2.0
Bluetooth®
Devices
Amps Air Mono
Bluetooth®
Devices

SV 93
UPPSTÄLLNING
LADDA DINA HÖRLURAR
För att ladda dina hörlurar, placera
dem i den portabla asken. De röda
LED:erna visar att de laddas. När de
är helt laddade kommer LED:erna att
bli vita, och sedan stängs de av.
LADDNING AV DIN PORTABLA
ASK
Sätt i den lilla änden av USB-sladden
i mikro-USB-porten som sitter
på höger sida av asken. När alla 4
LED:erna lyser, är den fulladdad.
Amps Air 2.0
Bluetooth®
Devices
Amps Air Mono
Bluetooth®
Devices
Amps Air 2.0
Bluetooth®
Devices
Amps Air Mono
Bluetooth®
Devices
Amps Air 2.0
Bluetooth®
Devices
Amps Air Mono
Bluetooth®
Devices

Amps Air 2.0
Bluetooth®
Devices
Amps Air Mono
Bluetooth®
Devices
Amps Air 2.0
Bluetooth®
Devices
Amps Air Mono
Bluetooth®
Devices
x2
Amps Air 2.0
Bluetooth®
Devices
Amps Air Mono
Bluetooth®
Devices
STEG ETT – AKTIVERING AV
ÖRONSNÄCKORNA
Dina öronsnäckorn kommer
automatiskt att aktiveras när du tar
ur dem ur laddningsasken. Om du
vill aktivera dem manuellt så kan du
snabbtrycka på erfunktionsknappen
en gång på båda öronsnäckorna.
STEG TVÅ – ANSLUT
ÖRONSNÄCKORNA TILL
VARANDRA
När du tar ut öronsnäckorna ur
asken, kommer de automatiskt att
ansluta sig till varandra. När de har
parats kommer LED-lampan att
lysa vit under 3 sekunder, sedan
pulsa en gång var 5:e sekund under
användning. Om de inte ansluter,
snabbtryck på SOL-knappen på
båda öronsnäckorna samtidigt. Detta
sätter dem i synkläge och LED:erna
kommer att blinka vita. När de har
parats kommer LED-lampan att lysa
vit under 3 sekunder, sedan fortsätta
att pulsa en gång var 5:e sekund
under användning.
STEG TRE – ANSLUT TILL EN
ENHET
Aktivera Bluetooth på din enhet. Från
Bluetooth-menyn, välj ”Amps Air
2.0”. När enheten och Amps Air 2.0
är anslutna kommer du att höra en
ton. Detta betyder att parningen har
lyckats.
ANSLUT BÅDA ÖRONSNÄCKORNA
Anslut båda öronsnäckorna för stereoljud. Detta ger den djupaste
musikupplevelsen.
94 SV

Amps Air 2.0
Bluetooth®
Devices
Amps Air Mono
Bluetooth®
Devices
x2
WWW.SOLREPUBLIC.COM
Amps Air
Bluetooth®
Devices
Amps Air Mono
Bluetooth®
Devices
STEG ETT – KÖPA EN NY
ÖRONSNÄCKA
Om en öronsnäcka tappas bort
eller skadas kan du köpa en ny
enkelöronsnäcka (vänster eller
höger) på SOL REPUBLIC:s
hemsida www.solrepublic.com
STEG TVÅ – PARA
ERSÄTTNINGSÖRONSNÄCKAN
För att para ersättningsöronsnäckan,
se till att båda öronsnäckorna är
fulladdade, dubbeltryck sedan
snabbt på SOL-knappen på båda
öronsnäckorna samtidigt. Detta
sätter dem i synkläge och LED:erna
kommer att blinka vita. När de har
anslutits kommer LED-lampan att
lysa vit under 3 sekunder, sedan
fortsätta att pulsa en gång var 5:e
sekund under användning. Din nya
öronsnäcka har nu parats och kan
användas.
ANSLUTNING
AV EN NY ELLER
ERSÄTTNINGSÖRON-
SNÄCKA
SV 95

96 SV
STÄNGA AV DINA HÖRLURAR
ANVÄNDA BACKUPBATTERIET
Anslut din enhets USB-
laddningssladd till reseasken, och
sedan in i din smarta enhet. Med ett
fullt batteri kan din reseask ladda dina
hörlurar upp till 15 gånger, eller ge en
full laddning för en typisk smartmobil.
För att stänga av dina hörlurar,
placera hörlurarna tillbaka
i din ask, eller tryck och håll
erfunktionsknappen på hörluren
under 3 sekunder.
OBS!
USB-laddningsuttagets märkning är 5V, 1,0A.
En del enheter såsom handdatorer kan se ut att
inte laddas, eller laddas långsamt. Konsultera din
enhets tillverkare för krav.
Amps Air 2.0
Bluetooth®
Devices
Amps Air Mono
Bluetooth®
Devices
3s
Amps Air 2.0
Bluetooth®
Devices
Amps Air Mono
Bluetooth®
Devices
Amps Air 2.0
Bluetooth®
Devices
Amps Air Mono
Bluetooth®
Devices

SV 97
GRUND
OBS!
En del funktioner kan fungera olika beroende på din mobil eller tjänsteoperatör.
DU VILL
Ta ett samtal Tryck valfri erfunktionsknapp en gång
Avböj ett samtal Tryck och håll valfri erfunktionsknapp
Avsluta ett samtal Tryck valfri erfunktionsknapp en gång
Ta emot ett andra
inkommande samtal Tryck valfri erfunktionsknapp en gång
Avböj ett andra
inkommande samtal Använd mobilens tangentbord
DU VILL
Aktivera Siri Dubbeltryck snabbt på valfri erfunktionsknapp
Aktivera Google Dubbeltryck snabbt på valfri erfunktionsknapp
Kolla hörlurarnas
batterinivå Titta på smartmobilen
Kolla reseaskens
batterinivå Skaka reseasken för att lysa upp LED:erna
Stäng av hörlur Tryck och håll erfunktionsknappen under 3
sekunder
MUSIK
SAMTAL
ANNAT
DU VILL
Spela eller pausa Tryck på valfri erfunktionsknapp en gång.

98 SV
LED-INDIKATORER
Blinkar röd Lågt batteri
Fast röd Laddar
LED av Fullt laddad
1 LED blinkar Lågt batteri, 0-25 %
2 LED:er, 2:a blinkar Batterikapacitet 25-50 %
3 LED:er, 3:e blinkar Batterikapacitet 50-75 %
4 LED:er, 4:e blinkar Batterikapacitet 75-100 %
Sakta blinkande vit Hörlurar i synkläge med varandra
Snabbt blinkande vit Hörlurar i parningsläge med enhet
HÖRLURAR LADDAS I ASKEN
RESEASK
HÖRLURAR I ANVÄNDNING
SV 99
FELSÖKNING
Har du problem med dina hörlurar? Prova att gå igenom stegen nedan.
1. Stäng av Bluetooth på din enhet
2. Ta ur hörlurarna från din ask
3. Tryck och håll Sol-knappen under 3 sekunder på båda hörlurarna för att
stänga av dem.
4. Tryck snabbt på erfunktionsknappen en gång på hörlurarna för att
aktivera dem
5. Tryck snabbt på erfunktionsknappen två gånger på båda hörlurarna för
att placera dem i parningsläge och återansluta dem till varandra
6. Aktivera Bluetooth på din enhet
7. Para till ”Amps Air 2.0”
KONTAKT
Har du fortfarande frågor? Vi har svar och vi är redo. Säg bara till, vi är här för
att hjälpa till.
SUPPORT
Det följande är resurser för att säkra att du får ut det mesta av din SOL
REPUBLIC-produkt.
Web: SOLREPUBLIC.COM/SUPPORT
Twitter: @SOLREPUBLIC
Phone: +1.877.400.0310
Email: support@SOLREPUBLIC.com

100 EL
Amps Air 2.0
Bluetooth®
Devices
Amps Air Mono
Bluetooth®
Devices
Amps Air 2.0
Bluetooth®
Devices
Amps Air Mono
Bluetooth®
Devices
ΤΙ ΠΕΡΙΛΑΜΒΑΝΕΤΑΙ
4 μεγέθη προσαρμογέων για τα αυτιά
Καλώδιο φόρτισης USB
Θήκη ταξιδιού με εφεδρική μπαταρία
1
2
3
4
5 7 6
1 Κουμπί πολλών λειτουργιών
2 LED κατάστασης ακουστικών
3 Θύρα μικροφώνου
4 Επαφές φόρτισης ακουστικών
5 LED μπαταρίας στη θήκη
6 Θύρα φόρτισης micro USB – για
φόρτιση της φορητής θήκης
7 Θύρα φόρτισης USB – για φόρτιση
της έξυπνης συσκευής σας
ΣΗΜΕΙΩΣΗ
Για καλύτερη προσαρμογή και
καλύτερο ήχο, ξεκινήστε από τον
προσαρμογέα για τα αυτιά με το
μεγαλύτερο μέγεθος και δοκιμάστε
τους υπόλοιπους διαδοχικά,
μειώνοντας το μέγεθος κάθε φορά.
Amps Air 2.0
Bluetooth®
Devices
Amps Air Mono
Bluetooth®
Devices
Amps Air 2.0
Bluetooth®
Devices
Amps Air Mono
Bluetooth®
Devices
Amps Air 2.0
Bluetooth®
Devices
Amps Air Mono
Bluetooth®
Devices

EL 101
ΡΥΘΜΙΣΗ
ΦΟΡΤΙΣΗ ΤΩΝ ΑΚΟΥΣΤΙΚΩΝ
ΣΑΣ
Για να φορτίσετε τα ακουστικά
σας, τοποθετήστε τα μέσα στη
φορητή θήκη. Οι κόκκινες ενδείξεις
LED δείχνουν ότι φορτίζουν. Όταν
φορτίσουν πλήρως, οι ενδείξεις LED
γίνονται λευκές και, στη συνέχεια,
σβήνουν.
ΦΟΡΤΙΣΗ ΤΗΣ ΦΟΡΗΤΗΣ ΘΗΚΗΣ
Συνδέστε το μικρότερο βύσμα του
καλωδίου USB στη θύρα micro
USB, που βρίσκεται στη δεξιά
πλευρά της θήκης. Όταν ανάβουν
και οι 4 ενδείξεις LED, έχει φορτίσει
πλήρως.
Amps Air 2.0
Bluetooth®
Devices
Amps Air Mono
Bluetooth®
Devices
Amps Air 2.0
Bluetooth®
Devices
Amps Air Mono
Bluetooth®
Devices
Amps Air 2.0
Bluetooth®
Devices
Amps Air Mono
Bluetooth®
Devices

Amps Air 2.0
Bluetooth®
Devices
Amps Air Mono
Bluetooth®
Devices
Amps Air 2.0
Bluetooth®
Devices
Amps Air Mono
Bluetooth®
Devices
x2
Amps Air 2.0
Bluetooth®
Devices
Amps Air Mono
Bluetooth®
Devices
102 EL
ΣΥΝΔΕΣTΕ ΚΑΙ ΤΑ ΔΥΟ ΑΚΟΥΣΤΙΚΑ
Συνδέστε και τα δύο ακουστικά για στερεοφωνικό ήχο. Αυτό προσφέρει την
πιο συναρπαστική μουσική εμπειρία.
ΠΡΩΤΟ ΒΗΜΑ - ΕΝΕΡΓΟΠΟΙΗΣΗ
ΤΩΝ ΑΚΟΥΣΤΙΚΩΝ
Τα ακουστικά θα ενεργοποιηθούν
αυτόματα όταν αφαιρεθούν από τη
θήκη φόρτισης. Εάν θέλετε να τα
ενεργοποιήσετε χειροκίνητα, πιέστε
γρήγορα το κουμπί πολλαπλών
λειτουργιών μία φορά και στα δύο
ακουστικά.
ΔΕΥΤΕΡΟ ΒΗΜΑ - ΣΥΝΔΕΣΗ ΤΩΝ
ΑΚΟΥΣΤΙΚΩΝ ΜΕΤΑΞΥ ΤΟΥΣ
Όταν βγάλετε τα ακουστικά από
την θήκη τους, θα συνδεθούν
αυτόματα μεταξύ τους. Μόλις
συνδεθούν επιτυχώς, η ένδειξη LED
θα ανάψει σταθερά με λευκό χρώμα
για 3 δευτερόλεπτα, κατόπιν θα
αναβοσβήνει κάθε 5 δευτερόλεπτα
κατά τη χρήση τους. Εάν δεν
συνδεθούν, πιέστε γρήγορα το
κουμπί SOL και στα δύο ακουστικά
ταυτόχρονα. Αυτό τα θέτει σε
λειτουργία συγχρονισμού και οι
ενδείξεις LED θα αναβοσβήσουν
με λευκό χρώμα. Αφού συνδεθούν
επιτυχώς, οι ενδείξεις LED θα
γίνουν σταθερά λευκές για 3
δευτερόλεπτα και θα συνεχίσουν
να αναβοσβήνουν κάθε 5
δευτερόλεπτα κατά τη χρήση τους.
ΤΡΙΤΟ ΒΗΜΑ - ΣΥΝΔΕΣΗ ΣΕ ΜΙΑ
ΣΥΣΚΕΥΗ
Ενεργοποιήστε το Bluetooth
στη συσκευή σας. Από το μενού
Bluetooth, επιλέξτε «Amps Air 2.0».
Όταν συνδεθεί η συσκευή και το
Amps Air 2.0, θα ακούσετε έναν
ήχο. Αυτό σημαίνει ότι η σύζευξη
ολοκληρώθηκε.

Amps Air 2.0
Bluetooth®
Devices
Amps Air Mono
Bluetooth®
Devices
x2
WWW.SOLREPUBLIC.COM
Amps Air
Bluetooth®
Devices
Amps Air Mono
Bluetooth®
Devices
ΠΡΩΤΟ ΒΗΜΑ - ΑΓΟΡΑ ΕΝΟΣ
ΝΕΟΥ ΑΚΟΥΣΤΙΚΟΥ
Εάν ένα ακουστικό χαθεί ή υποστεί
ζημιά, μπορείτε να αγοράσετε ένα
καινούριο μεμονωμένο ακουστικό
(αριστερό ή δεξί) από τον ιστότοπο
της SOL REPUBLIC στο
www.solrepublic.com
ΔΕΥΤΕΡΟ ΒΗΜΑ - ΣΥΝΔΕΣΗ ΤΟΥ
ΑΝΤΑΛΛΑΚΤΙΚΟΥ ΑΚΟΥΣΤΙΚΟΥ
Για τη σύζευξη του ανταλλακτικού
ακουστικού, βεβαιωθείτε ότι και
τα δύο ακουστικά είναι πλήρως
φορτισμένα και κατόπιν πιέστε
γρήγορα δύο φορές το κουμπί SOL
και στα δύο ακουστικά ταυτόχρονα.
Αυτό τα θέτει σε λειτουργία
συγχρονισμού και οι ενδείξεις
LED θα αναβοσβήσουν με λευκό
χρώμα. Αφού συνδεθούν επιτυχώς,
οι ενδείξεις LED θα γίνουν σταθερά
λευκές για 3 δευτερόλεπτα και θα
συνεχίσουν να αναβοσβήνουν κάθε
5 δευτερόλεπτα κατά τη χρήση
τους. Το καινούργιο ακουστικό σας
τώρα είναι σωστά συζευγμένο και
μπορεί να χρησιμοποιηθεί.
ΣΥΝΔΕΣΗ ΕΝΟΣ
ΝΕΟΥ ΑΚΟΥΣΤΙΚΟΥ
ΗΑΝΤΙΚΑΤΑΣΤΑΣΗ ΕΝΟΣ
ΑΚΟΥΣΤΙΚΟΥ
EL 103

104 EL
ΑΠΕΝΕΡΓΟΠΟΙΗΣΗ ΤΩΝ ΑΚΟΥΣΤΙΚΩΝ
ΧΡΗΣΗ ΤΗΣ ΕΦΕΔΡΙΚΗΣ ΜΠΑΤΑΡΙΑΣ
Συνδέστε το καλώδιο φόρτισης
της συσκευής σας USB στη θήκη
ταξιδιού και, στη συνέχεια, στην
έξυπνη συσκευή σας. Με πλήρη
μπαταρία, η θήκη ταξιδιού μπορεί
να επαναφορτίσει τα ακουστικά
σας έως 15 φορές ή να παρέχει
μια πλήρη φόρτιση για ένα τυπικό
smartphone.
Για να απενεργοποιήσετε τα
ακουστικά σας, ξαναβάλτε τα
ακουστικά στη θήκη τους ή
πατήστε παρατεταμένα το κουμπί
πολλών λειτουργιών στο ακουστικό
για 3 δευτερόλεπτα.
ΣΗΜΕΙΩΣΗ
Τα χαρακτηριστικά εξόδου φόρτισης είναι 5
V, 1,0 A. Ορισμένες συσκευές, όπως tablets,
μπορεί να φαίνεται ότι δεν φορτίζουν καθόλου
ή να φορτίζουν αργά. Για τις απαιτήσεις,
συμβουλευθείτε τον κατασκευαστή της
συσκευής σας.
Amps Air 2.0
Bluetooth®
Devices
Amps Air Mono
Bluetooth®
Devices
3s
Amps Air 2.0
Bluetooth®
Devices
Amps Air Mono
Bluetooth®
Devices
Amps Air 2.0
Bluetooth®
Devices
Amps Air Mono
Bluetooth®
Devices

EL 105
ΒΑΣΙΚΗ ΧΡΗΣΗ
ΣΗΜΕΙΩΣΗ
Ορισμένες λειτουργίες ίσως να δουλεύουν διαφορετικά, ανάλογα με το τηλέφωνό σας ή
τον πάροχο τηλεφωνίας σας.
ΘΕΛΕΤΕ ΝΑ ΚΑΝΕΤΕ
Απάντηση κλήσης Πατήστε το κουμπί πολλών λειτουργιών
οποιουδήποτε ακουστικού μία φορά
Απόρριψη κλήσης Πατήστε παρατεταμένα το κουμπί πολλών
λειτουργιών οποιουδήποτε ακουστικού
Τερματισμός μιας κλήσης Πατήστε το κουμπί πολλών λειτουργιών
οποιουδήποτε ακουστικού μία φορά
Απάντηση δεύτερης
εισερχόμενης κλήσης
Πατήστε το κουμπί πολλών λειτουργιών
οποιουδήποτε ακουστικού μία φορά
Απόρριψη δεύτερης
εισερχόμενης κλήσης Χρησιμοποιήστε το πληκτρολόγιο του τηλεφώνου
ΘΕΛΕΤΕ ΝΑ ΚΑΝΕΤΕ
Ενεργοποίηση Siri Πατήστε γρήγορα δύο φορές το κουμπί πολλών
λειτουργιών οποιουδήποτε ακουστικού
Ενεργοποίηση Google Πατήστε γρήγορα δύο φορές το κουμπί πολλών
λειτουργιών οποιουδήποτε ακουστικού
Έλεγχος του επιπέδου
μπαταρίας των ακουστικών
Κοιτάξτε το smartphone
Έλεγχος του επιπέδου
μπαταρίας της θήκης
ταξιδιού
Ανακινήστε τη θήκη ταξιδιού για να ανάψουν οι
ενδείξεις LED
Απενεργοποίηση του
ακουστικού
Πατήστε και κρατήστε πατημένο το κουμπί πολλών
λειτουργιών για 3 δευτερόλεπτα
ΜΟΥΣΙΚΗ
ΚΛΗΣΕΙΣ
ΑΛΛΕΣ ΛΕΙΤΟΥΡΓΙΕΣ
ΘΕΛΕΤΕ ΝΑ ΚΑΝΕΤΕ
Αναπαραγωγή ή παύση Πατήστε το κουμπί πολλών λειτουργιών
οποιουδήποτε ακουστικού μία φορά.

106 EL
ΕΝΔΕΙΞΕΙΣ LED
Αναβοσβήνουν με κόκκινο
χρώμα Ειδοποίηση
Ανάβουν σταθερά με
κόκκινο χρώμα Φόρτιση
LED Σβηστή Πλήρης φόρτιση
1 LED αναβοσβήνει Χαμηλή μπαταρία, 0–25%
2 LED, το 2ο αναβοσβήνει Χωρητικότητα μπαταρίας 25–50%
3 LED, το 3ο αναβοσβήνει Χωρητικότητα μπαταρίας 50-75%
4 LED, το 4ο αναβοσβήνει Χωρητικότητα μπαταρίας 75-100%
Αναβοσβήνουν αργά με
λευκό χρώμα Ακουστικά συγχρονισμένα μεταξύ τους
Αναβοσβήνουν γρήγορα
με λευκό χρώμα Ακουστικά σε σύζευξη με τη συσκευή
ΦΟΡΤΙΣΗ ΑΚΟΥΣΤΙΚΩΝ ΣΤΗ ΘΗΚΗ
ΘΗΚΗ ΤΑΞΙΔΙΟΥ
ΑΚΟΥΣΤΙΚΑ ΣΕ ΧΡΗΣΗ
EL 107
ΑΝΤΙΜΕΤΩΠΙΣΗ ΠΡΟΒΛΗΜΑΤΩΝ
Έχετε θέματα με τα ακουστικά σας; Δοκιμάστε να ακολουθήσετε τα
παρακάτω βήματα.
1. Απενεργοποιήστε το Bluetooth στη συσκευή σας
2. Αφαιρέστε τα ακουστικά από τη θήκη
3. Πατήστε παρατεταμένα το κουμπί Sol για 3 δευτερόλεπτα και στα δύο
ακουστικά, για να τα απενεργοποιήσετε.
4. Πατήστε σύντομα μια φορά το κουμπί πολλών λειτουργιών στα
ακουστικά για να τα ενεργοποιήσετε
5. Πατήστε σύντομα δύο φορές το κουμπί πολλών λειτουργιών και
στα δύο ακουστικά για να μπουν σε λειτουργία σύζευξης και να
επανασυνδεθούν μεταξύ τους
6. Ενεργοποιήστε το Bluetooth στη συσκευή σας
7. Κάντε σύζευξη με το “Amps Air 2.0”
ΕΠΙΚΟΙΝΩΝΙΑ
Έχετε άλλες απορίες; Έχουμε τις απαντήσεις και είμαστε στη διάθεσή σας.
Ενημερώστε μας και θα σας βοηθήσουμε.
ΥΠΟΣΤΗΡΙΞΗ
Ακολουθεί μια σειρά πόρων, για να εξασφαλίσετε ότι εκμεταλλεύεστε το
προϊόν σας SOL REPUBLIC στο έπακρο.
Web: SOLREPUBLIC.COM/SUPPORT
Twitter: @SOLREPUBLIC
Phone: +1.877.400.0310
Email: support@SOLREPUBLIC.com

108 PT
Amps Air 2.0
Bluetooth®
Devices
Amps Air Mono
Bluetooth®
Devices
Amps Air 2.0
Bluetooth®
Devices
Amps Air Mono
Bluetooth®
Devices
O QUE ESTÁ LÁ DENTRO
4 tamanhos de pontas de ouvido
Cabo de carregamento USB
Caixa de Viagem com Bateria de Apoio
1
2
3
4
5 7 6
1 Botão multi-funções
2 LED de estado do auricular
3 Porta do microfone
4 Contactos de carregamento do
auricular
5 LED do compartimento da bateria
6 Porta de carregamento micro USB –
para carregar a caixa portátil
7 Porta de carregamento USB – para
carregar o seu dispositivo inteligente
NOTA
Para um melhor encaixe e som,
comece coma ponta de ouvido
de tamanho maior e depois vá
diminuindo.
Amps Air 2.0
Bluetooth®
Devices
Amps Air Mono
Bluetooth®
Devices
Amps Air 2.0
Bluetooth®
Devices
Amps Air Mono
Bluetooth®
Devices
Amps Air 2.0
Bluetooth®
Devices
Amps Air Mono
Bluetooth®
Devices

PT 109
CONFIGURAÇÃO
CARREGAR OS SEUS
AURICULARES
Para carregar os auriculares,
coloque-os na caixa portátil. Os
LED vermelhos mostram que estão
a carregar. Depois de totalmente
carregados, os LED cam brancos e
desligam.
CARREGAR A SUA CAIXA
PORTÁTIL
Ligue a extremidade pequena do
cabo USB na porta micro USB,
localizada no lado direito da caixa.
Quando todos os 4 LED estão
acesos, está totalmente carregado.
Amps Air 2.0
Bluetooth®
Devices
Amps Air Mono
Bluetooth®
Devices
Amps Air 2.0
Bluetooth®
Devices
Amps Air Mono
Bluetooth®
Devices
Amps Air 2.0
Bluetooth®
Devices
Amps Air Mono
Bluetooth®
Devices

Amps Air 2.0
Bluetooth®
Devices
Amps Air Mono
Bluetooth®
Devices
Amps Air 2.0
Bluetooth®
Devices
Amps Air Mono
Bluetooth®
Devices
x2
Amps Air 2.0
Bluetooth®
Devices
Amps Air Mono
Bluetooth®
Devices
PRIMEIRA ETAPA – LIGANDO
OS FONES DE OUVIDO
Seus fones de ouvido serão ligados
automaticamente assim que você
os tirar do case de carregamento.
Caso queira ligá-los manualmente,
pressione o botão multifuncional
uma única vez em ambos os fones.
SEGUNDA ETAPA – CONECTAR
UM FONE DE OUVIDO AO
OUTRO
Ao tirar os fones do case, eles
se conectarão um com o outro
automaticamente. Assim que a
conexão for realizada com sucesso,
o LED cará branco por 3 segundos
e depois piscará uma vez a cada 5
segundos durante o uso. Caso a
conexão não seja feita, pressione
duas vezes rapidamente o botão
SOL nos dois fones ao mesmo
tempo. Isto os colocará em modo
de sincronização e os LEDs carão
brancos e piscarão. Assim que a
conexão for realizada com sucesso,
os LEDs carão brancos por 3
segundos e depois piscarão uma vez
a cada 5 segundos durante o uso.
ETAPA TRÊS – CONEXÃO COM
UM DISPOSITIVO
Ative o Bluetooth no seu dispositivo.
No menu do Bluetooth, selecione
“Amps Air 2.0”. Assim que o
dispositivo e o Amps Air 2.0 forem
conectados, você ouvirá um som.
Isso signica que o emparelhamento
está concluído.
CONECTE OS DOIS FONES DE OUVIDO
Conecte os dois fones de ouvido para ouvir em modo estéreo. Isto fará com
que a experiência musical seja mais imersiva.
110 PT

Amps Air 2.0
Bluetooth®
Devices
Amps Air Mono
Bluetooth®
Devices
x2
WWW.SOLREPUBLIC.COM
Amps Air
Bluetooth®
Devices
Amps Air Mono
Bluetooth®
Devices
PRIMEIRA ETAPA –
ADQUIRINDO UM NOVO FONE
DE OUVIDO
Se um fone for perdido ou danicado,
você pode comprar um novo fone
individual (esquerdo ou direito) no
site da SOL REPUBLIC em
www.solrepublic.com
SEGUNDA ETAPA – PAREANDO
O FONE DE OUVIDO DE
REPOSIÇÃO
Para parear o fone de reposição,
certique-se de que ambos os fones
estejam completamente carregados,
em seguida, pressione duas vezes
rapidamente o botão SOL nos dois
fones ao mesmo tempo. Isto os
colocará em modo de sincronização
e os LEDs carão brancos e piscarão.
Assim que a conexão for realizada
com sucesso, os LEDs carão
brancos por 3 segundos e depois
piscarão uma vez a cada 5 segundos
durante o uso. Seu novo fone de
ouvido está pareado e já pode ser
usado.
CONECTANDO UM FONE
DE OUVIDO NOVO OU
DE REPOSIÇÃO
PT 111

112 PT
DESLIGAR OS SEUS AURICULARES
UTILIZAR A BATERIA DE APOIO
Ligue o cabo de carregamento
USB do seu dispositivo na caixa
de viagem e depois no seu
dispositivo inteligente. Com um
abateria completa, a sua caixa de
carregamento pode recarregar os
seus auriculares até 15 vezes ou
pode fornecer um carregamento
normal para um smartphone.
Para desligar os seus auriculares,
coloque-os novamente na sua
caixa, ou pressione e mantenha
pressionando o botão multi-funções
no auricular durante três segundos.
NOTA
A tensão de saída nominal de carregamento
USB é 5V, 1.0A. Alguns dispositivos como
tablets podem não carregar ou podem carregar
lentamente. Consulte o fabricante do seu
dispositivo para saber os requisitos.
Amps Air 2.0
Bluetooth®
Devices
Amps Air Mono
Bluetooth®
Devices
3s
Amps Air 2.0
Bluetooth®
Devices
Amps Air Mono
Bluetooth®
Devices
Amps Air 2.0
Bluetooth®
Devices
Amps Air Mono
Bluetooth®
Devices

PT 113
BÁSICO
NOTA
Algumas funções podem trabalhar de forma diferente, dependendo do seu telefone
ou operadora.
PRETENDE
Atender uma chamada Pressione qualquer botão multi-funções uma vez
Rejeitar uma chamada Pressionar e manter pressionado o botão multi-
funções
Terminar uma chamada Pressione qualquer botão multi-funções uma vez
Atender uma segunda
chamada Pressione qualquer botão multi-funções uma vez
Rejeitar uma segunda
chamada Utilizar o teclado do telefone
PRETENDE
Ativar Siri Pressione duas vezes qualquer dos botões multi-
funções
Ativar Google Pressione duas vezes qualquer dos botões multi-
funções
Verique o nível de bateria
dos auriculares Olhe para o smartphone
Verique o nível de bateria
da caixa de viagem Agite a caixa de viagem para iluminar os LED
Desligue o auricular Pressione e mantenha pressionado o botão multi-
funções durante 3 segundos
MÚSICA
LIGA
OUTRO
PRETENDE
Reproduzir ou pausa Pressione qualquer dos botões multi-funções uma
vez.

114 PT
INDICADORES LED
A piscar a vermelho Carga fraca
Vermelho xo A carregar
LED apagada Carga completa
1 LED a piscar Bateria fraca, 0–25%
2 LED, segundo a piscar Capacidade da bateria 25–50%
3 LED, 3.º a piscar Capacidade da bateria 50-75%
4 LED, 4.º a piscar Capacidade da bateria 75-100%
Branco intermitente lento Auriculares no modo sync um com o outro
Branco intermitente rápido Auriculares no modo de emparelhamento com o
dispositivo
AURICULARES A CARREGAR NA CAIXA
CAIXA DE VIAGEM
AURICULARES EM UTILIZAÇÃO
PT 115
RESOLUÇÃO DE PROBLEMAS
A ter problemas com os seus auriculares? Tente executar os passos abaixo.
1. Desligue o bluetooth no seu dispositivo
2. Retire os auriculares da sua caixa
3. Pressione e mantenha pressionado o botão Sol durante 3 segundos em
ambos os auriculares para os desligar.
4. Pressione rapidamente o botão multi-funções uma vez nos auriculares
para os ligar
5. Pressione rapidamente o botão multi-funções duas vezes para os colocar
no modo de emparelhamento e voltar a ligar um ao outro
6. Ligue o Bluetooth do seu dispositivo
7. Emparelho com o “Amps Air 2.0”
CONTACTO
Ainda tem perguntas? Temos as respostas e estamos à sua espera. Fala
connosco. Nós podemos ajudar.
SUPORTE
O seguinte é um conjunto de recursos para assegurar que obtém o máximo
do seu produto SOL REPUBLIC.
Web: SOLREPUBLIC.COM/SUPPORT
Twitter: @SOLREPUBLIC
Phone: +1.877.400.0310
Email: support@SOLREPUBLIC.com

116 TR
Amps Air 2.0
Bluetooth®
Devices
Amps Air Mono
Bluetooth®
Devices
Amps Air 2.0
Bluetooth®
Devices
Amps Air Mono
Bluetooth®
Devices
İÇİNDEKİLER
4 boyutta kulaklık ucu
USB Şarj Kablosu
Yedek Pilli Seyahat Kutusu
1
2
3
4
5 7 6
1 Çok fonksiyonlu düğme
2 Kulaklık ucu durum LED ışığı
3 Mikrofon bağlantı noktası
4 Kulaklık ucu şarj temas noktaları
5 Kutu pil LED ışıkları
6 Mikro USB şarj bağlantı noktası –
taşınabilir kutuyu şarj etmek için
7 USB şarj bağlantı noktası – akıllı
cihazınızı şarj etmek için
NOT
En iyi uyum ve ses için en büyük
boyutla başlayın ve ardından küçük
boyuta doğru devam edin.
Amps Air 2.0
Bluetooth®
Devices
Amps Air Mono
Bluetooth®
Devices
Amps Air 2.0
Bluetooth®
Devices
Amps Air Mono
Bluetooth®
Devices
Amps Air 2.0
Bluetooth®
Devices
Amps Air Mono
Bluetooth®
Devices

TR 117
KURULUM
KULAKLIK UÇLARINIZI ŞARJ
ETME
Kulaklık uçlarınızı şarj etmek
için taşınabilir kutuya yerleştirin.
Kırmızı LED ışıkları şarj olduğunu
gösterecektir. Tam şarj olduğunda
LED ışıkları beyaz renge dönüşecek
ve ardından kapanacaktır.
TAŞINABİLİR KUTUNUZU ŞARJ
ETME
USB kablosunun küçük ucunu
kutunun sağ tarafında bulunan mikro
USB bağlantı noktasına takın. 4 LED
ışığının tamamı yandığında tamamen
şarj olmuş demektir.
Amps Air 2.0
Bluetooth®
Devices
Amps Air Mono
Bluetooth®
Devices
Amps Air 2.0
Bluetooth®
Devices
Amps Air Mono
Bluetooth®
Devices
Amps Air 2.0
Bluetooth®
Devices
Amps Air Mono
Bluetooth®
Devices

Amps Air 2.0
Bluetooth®
Devices
Amps Air Mono
Bluetooth®
Devices
Amps Air 2.0
Bluetooth®
Devices
Amps Air Mono
Bluetooth®
Devices
x2
Amps Air 2.0
Bluetooth®
Devices
Amps Air Mono
Bluetooth®
Devices
BİRİNCİ ADIM -
KULAKLIKLARIN AÇILMASI
Şarj kılıfından çıkarıldığı anda
kulaklıklarınız otomatik olarak
açılacaktır. Kulaklıkları manuel olarak
açmak isterseniz her iki kulaklığın
üzerinde bulunan çok fonksiyonlu
düğmeye bir defa hızlı basabilirsiniz.
İKİNCİ ADIM - KULAKLIKLARIN
BİRBİRİNE BAĞLANMASI
Kulaklıkları kılıfından çıkardığınız
zaman birbirine otomatik olarak
bağlanacaktır. Başarılı şekilde
bağlantı sağlandığında LED, 3 saniye
boyunca beyaz ışık verir ardından
kullanıldığı süre boyunca 5 saniyede
bir yanıp söner. Bağlantı kurulmazsa
her iki kulaklığın üzerinde bulunan
SOL düğmesine aynı anda hızlıca
iki defa basın. Bu işlem kulaklıkları
senkronize eder ve LED’ler beyaz
yanıp sönmeye başlar. Başarılı
şekilde bağlantı sağlandığında
LED’ler 3 saniye boyunca beyaza
döner ardından kullanıldığı süre
boyunca 5 saniyede bir yanıp
sönmeye devam eder.
ÜÇÜNCÜ ADIM - BİR CİHAZA
BAĞLAMA
Cihazınızdaki Bluetooth’u devreye
sokun. Bluetooth menüsünden
“Amps Air 2.0” öğesini seçin. Cihaz
ile Amps Air 2.0 arasında bağlantı
kurulduğunda bir ses duyacaksınız.
Bu, eşleşmenin tamamlandığı
anlamına gelir.
İKİ KULAKLIĞI BİRLİKTE BAĞLAYIN
Stereo ses için iki kulaklığı birlikte bağlayın. Bu sayede kendinizi dinlediğiniz
müziğin içinde hissedeceksiniz.
118 TR
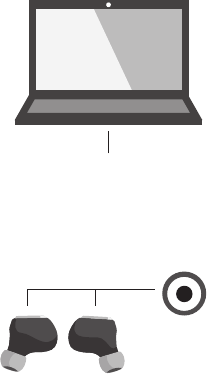
Amps Air 2.0
Bluetooth®
Devices
Amps Air Mono
Bluetooth®
Devices
x2
WWW.SOLREPUBLIC.COM
Amps Air
Bluetooth®
Devices
Amps Air Mono
Bluetooth®
Devices
BİRİNCİ ADIM - YENİ BİR
KULAKLIK SATIN ALINMASI
Kulaklığınız kaybolduysa veya hasar
gördüyse SOL REPUBLIC web
sitesinden yeni bir kulaklık (sol veya
sağ) satın alabilirsiniz, web adresi:
www.solrepublic.com
İKİNCİ ADIM - YEDEK
KULAKLIĞIN EŞLEŞTİRİLMESİ
Yedek kulaklığı eşleştirebilmek
için her iki kulaklığın da tam olarak
şarj edilmiş olduğundan emin
olun, daha sonra her iki kulaklığın
üzerinde bulunan SOL düğmesine
aynı anda hızlıca iki defa basın. Bu
işlem kulaklıkları senkronize eder
ve LED’ler beyaz yanıp sönmeye
başlar. Başarılı şekilde bağlantı
sağlandığında LED’ler 3 saniye
boyunca beyaza döner ardından
kullanıldığı süre boyunca 5 saniyede
bir yanıp sönmeye devam eder. Yeni
kulaklığınız başarıyla eşleştirilmiş ve
kullanılabilir hale gelmiştir.
YENİ VEYA YEDEK
BİR KULAKLIĞIN
BAĞLANMASI
TR 119

120 TR
KULAKLIK UÇLARINIZI KAPATMA
YEDEK PİLİ KULLANMA
Cihazınızın USB şarj kablosunu
seyahat kutusuna ve ardından akıllı
cihazınıza takın. Tam şarjlı pille
seyahat kutunuz kulaklık uçlarını en
fazla 15 defa veya normal bir akıllı
telefonu bir defa tam şarj edebilir.
Kulaklık uçlarınızı kapatmak için
kulaklık uçlarını tekrar kutunuza
geri yerleştirin veya çoklu fonksiyon
düğmesini 3 saniye boyunca basın ve
basılı tutun.
NOT
USB şarj çıkış nominal değeri 5V 1,0A. Tabletler
gibi bazı cihazlar şarj ediyor görünmeyebilir
veya yavaş şarj edebilir. Gereksinimler için cihaz
üreticinize danışın.
Amps Air 2.0
Bluetooth®
Devices
Amps Air Mono
Bluetooth®
Devices
3s
Amps Air 2.0
Bluetooth®
Devices
Amps Air Mono
Bluetooth®
Devices
Amps Air 2.0
Bluetooth®
Devices
Amps Air Mono
Bluetooth®
Devices

TR 121
TEMEL BİLGİLER
NOT
Telefon veya hizmet operatörünüze bağlı olarak bazı özellikler farklı çalışabilir.
YAPMAK İSTEDİĞİNİZ
Bir arama al Çoklu fonksiyon düğmelerinden birine bir defa basın
Arama reddet
Çoklu fonksiyon düğmelerinden birine basın ve basılı
tutun
Arama sonlandır Çoklu fonksiyon düğmelerinden birine bir defa basın
İkinci bir arama al Çoklu fonksiyon düğmelerinden birine bir defa basın
İkinci bir aramayı reddet Telefon tuş takımını kullanın
YAPMAK İSTEDİĞİNİZ
Siri'yi Etkinleştir Hızlıca çoklu fonksiyon düğmelerinden birine iki defa
basın
Google'ı Etkinleştir Hızlıca çoklu fonksiyon düğmelerinden birine iki defa
basın
Kulaklık uçlarının pil
düzeyini kontrol et Akıllı telefona bakın
Seyahat kutusunun pil
düzeyini kontrol et
LED ışıklarının yanması için seyahat kutusunu sallayın
Kulaklık ucunu kapatma Çoklu fonksiyon düğmesine 3 saniye boyunca basın
ve basılı tutun
MÜZİK
ARAMALAR
DİĞER
YAPMAK İSTEDİĞİNİZ
Oynat veya duraklat Çoklu fonksiyon düğmelerinden birine bir defa basın.

122 TR
LED GÖSTERGELERİ
Yanıp sönen kırmızı Düşük pil
Sabit kırmızı Şarj oluyor
LED Kapalı Şarj oldu
1 LED ışığı yanıp sönüyor Düşük pil, %0-25
2 LED ışığı, 2. yanıp
sönüyor Pil kapasitesi %25-50 düzeyinde
3 LED ışığı, 3. yanıp
sönüyor Pil kapasitesi %50-75 düzeyinde
4 LED ışığı, 4. yanıp
sönüyor Pil kapasitesi %75-100 düzeyinde
Yavaş yanıp sönen beyaz Kulaklık uçları birbiriyle senkronize modda
Hızlı yanıp sönen beyaz Kulaklık uçları cihazla eşleştirme modunda
KULAKLIK UÇLARINI KUTUDA ŞARJ ETME
SEYAHAT KUTUSU
KULLANIMDAKİ KULAKLIK UÇLARI
TR 123
SORUN GİDERME
Kulaklık uçlarınızla sorun mu yaşıyorsunuz? Aşağıdaki adımları uygulamayı
deneyin.
1. Cihazınızda Bluetooth özelliğini kapatın
2. Kulaklık uçlarını kutunuzdan çıkartın
3. Kapatmak için her iki kulaklık ucunda Sol Düğmesine 3 saniye boyunca
basın ve basılı tutun.
4. Açmak için hızlıca kulaklık uçlarındaki çoklu fonksiyon düğmesine bir defa
basın
5. Eşleştirme modu girmeleri ve birbirine tekrar bağlanmaları için her iki
kulaklık ucundaki çoklu fonksiyon düğmesine iki defa basın
6. Cihazınızda Bluetooth özelliğini açın
7. “Amps Air 2.0” öğesiyle eşleştirin
İLETİŞİM
Hala sorularınız mı var? Cevaplamaya hazır bekliyoruz. Bize ses vermeniz
yeter, yardımcı olmaktan memnuniyet duyacağız.
DESTEK
Aşağıda SOL REPUBLIC ürününüzden en iyi şekilde faydalanmanızı
sağlayacak kaynak seti yer almaktadır.
Web: SOLREPUBLIC.COM/SUPPORT
Twitter: @SOLREPUBLIC
Phone: +1.877.400.0310
Email: support@SOLREPUBLIC.com

124 JA
Amps Air 2.0
Bluetooth®
Devices
Amps Air Mono
Bluetooth®
Devices
Amps Air 2.0
Bluetooth®
Devices
Amps Air Mono
Bluetooth®
Devices
同梱品
イヤホン(4 サイズ)
USB 充電ケーブル
バックアップバッテリーつきトラベ ルケース
1
2
3
4
5 7 6
1 マルチ機能ボタン
2 イヤホンステータスLED
3 マイク用 ポ ート
4 イヤホン充電接触器
5 ケースバッテリーLED
6 Micro USB 充電ポート – ポ
ータブルケースの充電用
7 Micro USB 充電ポート – ス
マートデバイスの充電用
注
自分にぴったりな最高のフィットと
サウンドを見つけるためには、大
き目のサイズのイヤーチップから
試してみてください。
Amps Air 2.0
Bluetooth®
Devices
Amps Air Mono
Bluetooth®
Devices
Amps Air 2.0
Bluetooth®
Devices
Amps Air Mono
Bluetooth®
Devices
Amps Air 2.0
Bluetooth®
Devices
Amps Air Mono
Bluetooth®
Devices

JA 125
設定
イヤホンの充電
イヤホンを充電するには、ポータ
ブルケースに収納します。 赤い
LEDが点灯し、充電中であること
を表示します。 フル充電された
ら、LEDは白に代わり、次にオフに
なります。
ポータブルケースの充電
USBケーブルの小さな方の端子を
ケースの右側についているMicro
USBポートに挿入します。 4 つの
LEDすべてが点灯したら、フル充電
の完了です。
Amps Air 2.0
Bluetooth®
Devices
Amps Air Mono
Bluetooth®
Devices
Amps Air 2.0
Bluetooth®
Devices
Amps Air Mono
Bluetooth®
Devices
Amps Air 2.0
Bluetooth®
Devices
Amps Air Mono
Bluetooth®
Devices

Amps Air 2.0
Bluetooth®
Devices
Amps Air Mono
Bluetooth®
Devices
Amps Air 2.0
Bluetooth®
Devices
Amps Air Mono
Bluetooth®
Devices
x2
Amps Air 2.0
Bluetooth®
Devices
Amps Air Mono
Bluetooth®
Devices
ステップ1 - イヤーバッズをオン
にする
イヤーバッズを充電ケースから取
り出すと自動的にオンになります。
手動でオンにする場合は、両方の
イヤーバッズのマルチ機能ボタン
を す ば やく押し ま す。
ステップ2 - イヤーバッズを相互接
続する
イヤーバッズをケースから取り出
すと、自動的に相互接続します。正
しく接続すると白色のLEDが3秒間
点灯し、以後使用中は5秒おきに点
滅します。接続しない場合は両方
のイヤーバッズのSOLボタンを同
時に二回押します。これにより同期
モードになり、白色のLEDが点滅し
ます。正しく接続すると白色のLED
が3秒間点灯し、以後使用中は5秒
おきに点滅します。
ステップ3 - デバイスに接続する
お使いのデバイスのブルートゥー
ス機能を有効にします。ブルートゥ
ースのメニューから「Amps Air 2.0
」を選択します。デバイスとAmps
Air 2.0 が接続するとトーンが聞こ
えます。これで ペアリングが完了し
ました 。
両方のイヤーバッズをつなげる
両方のイヤーバッズを接続してステレオサウンドにします。これにより臨
場感に満ちたサウンドが体験できます。
126 JA

Amps Air 2.0
Bluetooth®
Devices
Amps Air Mono
Bluetooth®
Devices
x2
WWW.SOLREPUBLIC.COM
Amps Air
Bluetooth®
Devices
Amps Air Mono
Bluetooth®
Devices
ステップ1 - 新しいイヤーバッズを
購 入 する
イヤーバッズを紛失したり損傷
した場合は、単一の新しいイヤ
ーバッズを(左右どちらでも)SOL
REPUBLIC ウェブサイトwww.
solrepublic.comからご購入いた
だけます。
ステップ2 - 交換用イヤーバッズを
ペアリング する
交換用イヤーバッズをペアリング
するには、両方のイヤーバッズが
完全に充電されていることを確認
してから、両方のイヤーバッズの
SOLボタンを同時に二回押します。
これにより同 期 モードになり、白
色のLEDが点滅します。正しく接続
すると白色のLEDが3秒間点灯し、
以後使用中は5秒おきに点滅しま
す。新しいイヤーバッズ が正しくペ
アリング され 、使 用 できるように な
りまし た 。
新しいイヤーバッズまたは
交換用イヤーバッズを接続
する
JA 127

128 JA
イヤホンをオフにする
バックアップ バッテリー の 使 用
デバイスのUSB充電ケーブルをト
ラベルケースにつなぎ、スマートデ
バイスに接続します。フルに充電さ
れている場合には、トラベルケース
でイヤホンを15回まで充電できま
す。または標準的なスマートフォン
をフル充電することができます。
イヤホンをオフにするには、イヤホ
ンけをケースに収納します。または
イヤホン上のマルチ機能ボタンを
3秒間長押しします。
注
USB 充電出力定格は 5V、1.0Aです。 タブレット
などの一部のデバイスは充電できないか、充
電が非常に遅くなる場合があります。 使用要
件についてはデバイスの製造メーカーにお問
い合わせください。
Amps Air 2.0
Bluetooth®
Devices
Amps Air Mono
Bluetooth®
Devices
3s
Amps Air 2.0
Bluetooth®
Devices
Amps Air Mono
Bluetooth®
Devices
Amps Air 2.0
Bluetooth®
Devices
Amps Air Mono
Bluetooth®
Devices

JA 129
基本
注
一部の機能は電話やサービス事業者によって異なる場合があります
使用方法
着信を受ける いずれかのマルチ機能ボタンを一度押す
着信を拒否する いずれかのマルチ機能ボタンを長押しする
通話を終了する いずれかのマルチ機能ボタンを一度押す
2番目の通話を受ける いずれかのマルチ機能ボタンを一度押す
2番目の通話を拒否する 電話のキーパッドを使用する
使用方法
Siriをアクティベートする いずれかのマルチ機能ボタンをすばやく二度
押す
Googleをアクティベー
トする
いずれかのマルチ機能ボタンをすばやく二度
押す
イヤホンのバッテリーレ
ベルを確認する ス マ ートフォン を 見る
トラベルケースのバッテ
リーレベルを確認する トラベルケースをシェイクしLEDを点灯させる
イヤホンをオフにする いずれかのマルチ機能ボタンを3秒間長押しする
音楽
通話
その他
使用方法
再生または一時停止 いずれかのマルチ機能ボタンを一度押す

130 JA
LEDインジケータ
赤の点滅 バッテリー低
点 灯( 赤 ) 充電中
LEDが消灯 フル充電完了
LED 1 点滅 バッテリー低(0–25%)
LED 2、 2番目の点滅 バッテリー容量(25–50%)
LED 3、3番目の点滅 バッテリー容量(50–75%)
LED 4、4番目の点滅 バッテリー容量(75–100%)
白色点滅(低速) イヤホンは同期モード中
白色点滅(高速) イヤホンはデバイスとペアリング中
充電中のイヤホン
トラベルケース
使用中のイヤホン

JA 131
トラブ ル シュー ティング
イヤホンで問題が発生した場合。 以下のステップをお試しください。
1. デバイスでBluetoothをオフにする
2. イヤホンをケースから取り外す
3. 両方のイヤホンでSol ボタンを3秒間長押しして電源をオフにする
4. 両方のイヤホンでマルチ機能ボタンを一度押してオンにします
5. 両方のイヤホンでマルチ機能ボタンを 2回 すばやく押して、ペアリ
ングモードにし、両方を再度接続する
6. デバイスでBluetoothをオンにします
7. 「Amps Air 2.0」とペアリング
お問い合わせ
<19>ご質問ですか? ご質問はお気軽に。 なんでもお聞きください。お
手伝いいたします。
サ ポ ート
以下はSOL REPUBLIC製品を最大限有効にお使いいただくためのリソ
ー ス で す 。
Web: solrepublic.jp
Phone: 050-3388-6838
Email: tinfo@kanjitsu.com
R 211-180606

132 CZ
Amps Air 2.0
Bluetooth®
Devices
Amps Air Mono
Bluetooth®
Devices
Amps Air 2.0
Bluetooth®
Devices
Amps Air Mono
Bluetooth®
Devices
OBSAH KRABICE
4 velikosti špuntů
Nabíjecí USB kabel
Cestovní pouzdro se záložní baterií
1
2
3
4
5 7 6
1 Multifunkční tlačítko
2 Indikátor LED stavu sluchátek
3 Port mikrofonu
4 Nabíjecí kontakty sluchátek
5 Indikátory LED na přihrádce
baterie
6 Port nabíjení micro USB – pro
nabíjení přenosného pouzdra
7 Port nabíjení USB – pro nabíjení
vašeho chytrého přístroje
POZNÁMKA
Pro dosažení optimálního usazení
a zvuku začněte se špunty největší
velikosti a potom je zmenšujte.
Amps Air 2.0
Bluetooth®
Devices
Amps Air Mono
Bluetooth®
Devices
Amps Air 2.0
Bluetooth®
Devices
Amps Air Mono
Bluetooth®
Devices
Amps Air 2.0
Bluetooth®
Devices
Amps Air Mono
Bluetooth®
Devices

CZ 133
UVEDENÍ DO PROVOZU
NABÍJENÍ SLUCHÁTEK
Sluchátka se nabíjejí vložením do
přenosného pouzdra. Nabíjení
sluchátek signalizují červené
indikátory LED. Po úplném nabití
indikátory LED svítí bíle a potom
zhasnou.
NABÍJENÍ PŘENOSNÉHO
POUZDRA
Připojte malý konec kabelu USB k
portu micro USB na pravé straně
pouzdra. Když svítí všechny 4
indikátory 4 LED, pouzdro je zcela
nabité.
Amps Air 2.0
Bluetooth®
Devices
Amps Air Mono
Bluetooth®
Devices
Amps Air 2.0
Bluetooth®
Devices
Amps Air Mono
Bluetooth®
Devices
Amps Air 2.0
Bluetooth®
Devices
Amps Air Mono
Bluetooth®
Devices

Amps Air 2.0
Bluetooth®
Devices
Amps Air Mono
Bluetooth®
Devices
Amps Air 2.0
Bluetooth®
Devices
Amps Air Mono
Bluetooth®
Devices
x2
Amps Air 2.0
Bluetooth®
Devices
Amps Air Mono
Bluetooth®
Devices
KROK ČÍSLO JEDNA –
ZAPNUTÍ SLUCHÁTEK
Sluchátka se automaticky zapnou
při vyjmutí z nabíjecího pouzdra.
Chcete-li je zapnout rychle, můžete
jednou stisknout multifunkční tlačítko
na obou sluchátkách.
KROK ČÍSLO DVA –
PROPOJENÍ SLUCHÁTEK
NAVZÁJEM
Když vytáhněte sluchátka z pouzdra,
automaticky se navzájem propojí.
Po úspěšném připojení rozsvítí
se kontrolka LED na 3 sekundy
a poté bude bíle blikat každých 5
sekund během používání. Pokud se
nepropojí, stiskněte rychle zároveň
tlačítko SOL na obou sluchátkách. To
je uvede do režimu synchronizace
a kontrolky LED diody budou blikat
bíle. Po úspěšném propojení se
kontrolka LED rozsvítí bíle na 3
sekundy a poté bude blikat kažých 5
sekund.
KROK ČÍSLO TŘI – PŘIPOJENÍ
K ZAŘÍENÍ
Na zařízení aktivuje Bluetooth. V
nabídce Bluetooth vyberte „Amps Air
2.0”. Když se zařízení připojí na Amps
Air 2.0, uslyšíte tón. To znamená, že
připojení je dokončeno.
PŘIPOJENÍ OBOU SLUCHÁTEK
Připojte obě sluchátka na stereo zvuk. Dosáhnete tím nejpříjemnější hudební
zážitek.
134 CZ

Amps Air 2.0
Bluetooth®
Devices
Amps Air Mono
Bluetooth®
Devices
x2
WWW.SOLREPUBLIC.COM
Amps Air
Bluetooth®
Devices
Amps Air Mono
Bluetooth®
Devices
KROK ČÍSLO JEDNA – KOUPĚ
NOVÉHO SLUCHÁTKA
Pokud se sluchátko ztratí nebo
poškodí, můžete si na internetových
stránkách SOL REPUBLIC zakoupit
nové samostatné sluchátko (levé
nebo pravé) na adrese
www.solrepublic.com
KROK ČÍSLO DVA – PŘIPOJENÍ
NÁHRADNÍHO SLUCHÁTKA
Chcete-li propojit náhradní sluchátko,
zkontroluje, zda jsou obě sluchátka
plně nabitá, a pak rychle stiskněte
dvakrát tlačítko SOL současně na
obou sluchátkách. To je uvede do
režimu synchronizace a kontrolky
LED diody budou blikat bíle. Po
úspěšném propojení se kontrolka
LED rozsvítí bíle na 3 sekundy a poté
bude blikat kažých 5 sekund během
používání. Náhradní sluchátko je
tím úspěšně propojeno a může se
používat.
PŘIPOJENÍ NOVÉHO
NEBO NÁHRADNÍHO
SLUCHÁTKA
CZ 135

136 CZ
VYPNUTÍ SLUCHÁTEK
POUŽÍVÁNÍ ZÁLOŽNÍ BATERIE
Připojte nabíjecí kabel USB zařízení
k cestovnímu pouzdru a potom k
vašemu chytrému zařízení. Když je
baterie plně nabitá, lze z cestovního
pouzdra nabít sluchátka až 15krát
nebo jednou zcela nabít běžný chytrý
telefon.
Chcete-li sluchátka vypnout, vložte je
do pouzdra nebo stiskněte a podržte
multifunkční tlačítko na sluchátkách
po dobu 3 sekund.
POZNÁMKA
Výstupní charakteristika nabíjení USB je 5 V, 1,0
A. Některá zařízení, například tablety, nemusí
signalizovat nabíjení nebo se mohou nabíjet
pomalu. Požádejte výrobce zařízení o informace
o požadavcích.
Amps Air 2.0
Bluetooth®
Devices
Amps Air Mono
Bluetooth®
Devices
3s
Amps Air 2.0
Bluetooth®
Devices
Amps Air Mono
Bluetooth®
Devices
Amps Air 2.0
Bluetooth®
Devices
Amps Air Mono
Bluetooth®
Devices

CZ 137
ZÁKLADY
POZNÁMKA
Některé funkce mohou fungovat odlišně v závislosti na konkrétním telefonu nebo operátorovi.
CHCETE
Přijmout volání Stiskněte jednou některé multifunkční tlačítko
Odmítnout volání Stiskněte a podržte některé multifunkční tlačítko
Ukončit volání Stiskněte jednou některé multifunkční tlačítko
Přijmout druhé příchozí
volání Stiskněte jednou některé multifunkční tlačítko
Odmítnout druhé příchozí
volání Použít klávesnici telefonu
HUDBA
VOLÁNÍ
JINÉ
CHCETE
Přehrát nebo pozastavit Stiskněte jednou některé multifunkční tlačítko.
CHCETE
Aktivovat Siri
Rychle dvakrát stiskněte některé multifunkční tlačítko
Aktivovat Google
Rychle dvakrát stiskněte některé multifunkční tlačítko
Zkontrolovat stav baterie
sluchátek Podívejte se na chytrý telefon
Zkontrolovat stav baterie
cestovního pouzdra
Zatřeste cestovním pouzdrem, aby se rozsvítily
indikátory LED
Vypnout sluchátko Stiskněte a podržte multifunkční tlačítko po dobu 3
sekund

138 CZ
INDIKÁTORY LED
Bliká červeně Nízká úroveň nabití baterie
Svítí červeně Nabíjení
LED nesvítí Plně nabito
Bliká 1 indikátor LED Nízký stav baterie, 0–25 %
2 indikátory LED, 2. bliká Kapacita baterie 25–50 %
3 indikátory LED, 3. bliká Kapacita baterie 50-75 %
4 indikátory LED, 4. bliká Kapacita baterie 75-100 %
Bliká pomalu bíle Sluchátka se nacházejí v režimu vzájemné
synchronizace
Bliká rychle bíle Sluchátka se nacházejí v režimu párování se
zařízením
NABÍJENÍ SLUCHÁTEK V POUZDRU
CESTOVNÍ POUZDRO
SLUCHÁTKA SE POUŽÍVAJÍ
CZ 139
ŘEŠENÍ POTÍŽÍ
Máte potíže se sluchátky? Vyzkoušejte následující kroky.
1. Vypněte funkci Bluetooth ve vašem zařízení
2. Vyjměte sluchátka z pouzdra
3. Vypněte sluchátka stisknutím a podržením tlačítka Sol 3 sekundy na obou
sluchátkách.
4. Zapněte sluchátka jedním rychlým stisknutím multifunkčního tlačítka na
sluchátkách
5. Rychlým stisknutím multifunkčního tlačítka dvakrát na obou sluchátkách
je přepněte do režimu párování a znovu je navzájem propojte
6. Zapněte funkci Bluetooth ve vašem zařízení
7. Spárujte s „Amps Air 2.0“
KONTAKT
Máte další dotazy? Máme pro vás odpovědi a jsme vám po ruce. Dejte nám
vědět, abychom vám mohli pomoci.
PODPORA
Následující kontakty vám pomohou maximálně využít váš produkt SOL
REPUBLIC.
Web: SOLREPUBLIC.COM/SUPPORT
Twitter: @SOLREPUBLIC
Phone: +1.877.400.0310
Email: support@SOLREPUBLIC.com

140 SK
Amps Air 2.0
Bluetooth®
Devices
Amps Air Mono
Bluetooth®
Devices
Amps Air 2.0
Bluetooth®
Devices
Amps Air Mono
Bluetooth®
Devices
ČO JE VO VNÚTRI
4 veľkosti ušných zátok
Nabíjací USB kábel
Cestovné puzdro so záložnou batérie
1
2
3
4
5 7 6
1 Multifunkčné tlačidlo
2 LED si stavom štupľových slúchadiel
3 Zásuvka pre mikrofón
4 Nabíjacie kontakty štupľových
slúchadiel
5 LED batérie v puzdre
6 Nabíjací port mikro USB – na
nabíjanie prenosného puzdra
7 Nabíjací port USB – na nabíjanie
vášho inteligentného zariadenia
POZNÁMKA
Najvhodnejšiu veľkosť a zvuk
skúšajte od najväčších ušných zátok
a postupujte k menším.
Amps Air 2.0
Bluetooth®
Devices
Amps Air Mono
Bluetooth®
Devices
Amps Air 2.0
Bluetooth®
Devices
Amps Air Mono
Bluetooth®
Devices
Amps Air 2.0
Bluetooth®
Devices
Amps Air Mono
Bluetooth®
Devices

SK 141
NASTAVOVANIE
NABÍJAIE VAŠICH
ŠTUPĽOVÝCH SLÚCHADIEL
Štupľové slúchadlá nabite ich
vložením do prenosného puzdra. Ich
nabíjanie signalizuje červená LED
dióda. Po ukončení nabíjania sa farba
LED zmení na bielu a potom zhasne.
NABÍJANIE PRENOSNÉHO
PUZDRA
Malý koniec kábla USB zasuňte do
portu mikro USB, ktorý sa nachádza
na pravej strane puzdra. Po úplnom
nabití svietia všetky 4 LED.
Amps Air 2.0
Bluetooth®
Devices
Amps Air Mono
Bluetooth®
Devices
Amps Air 2.0
Bluetooth®
Devices
Amps Air Mono
Bluetooth®
Devices
Amps Air 2.0
Bluetooth®
Devices
Amps Air Mono
Bluetooth®
Devices

Amps Air 2.0
Bluetooth®
Devices
Amps Air Mono
Bluetooth®
Devices
Amps Air 2.0
Bluetooth®
Devices
Amps Air Mono
Bluetooth®
Devices
x2
Amps Air 2.0
Bluetooth®
Devices
Amps Air Mono
Bluetooth®
Devices
KROK ČÍSLO JEDNA –
ZAPNUTIE SLÚCHADIEL
Slúchadlá sa automaticky zapnú pri
vybratí z nabíjacieho puzdra. Ak ich
chcete zapnúť rýchlo, môžete raz
stlačiť multifunkčné tlačidlo na oboch
slúchadlách.
KROK ČÍSLO DVA –
PREPOJENÍIE SLÚCHADIEL
NAVZÁJOM
Keď vytiahnite slúchadla z puzdra,
automaticky sa navzájom prepoja.
Po úspešnom pripojení sa rozsvieti
kontrolka LED nabielo na 3 sekundy
a potom bude bielo blikať každých
5 sekúnd počas používania.
Ak sa neprepoja, stlačte rýchlo
zároveň tlačidlo SOL na oboch
slúchadlách. To ich uvedie do režimu
synchronizácie a kontrolky LED budú
blikať bielo. Po úspešnom prepojení
sa kontrolka LED rozsvieti nabielo
na 3 sekundy a potom bude blikať
kažých 5 sekúnd.
KROK ČÍSLO TRI – PRIPOJENIE
NA ZARIADENIE
Na zariadení aktivuje Bluetooth. V
ponuke Bluetooth vyberte „Amps
Air 2.0“. Keď sa zariadenie pripojí
na Amps Air 2.0, bude počuť tón.
To znamená, že pripojenie je
dokončené.
PRIPOJENIE OBOCH SLÚCHADIEL
Pripojte obe slúchadlá na stereo zvuk. Dosiahnete tým najpríjemnejší hudobný
zážitok.
142 SK

Amps Air 2.0
Bluetooth®
Devices
Amps Air Mono
Bluetooth®
Devices
x2
WWW.SOLREPUBLIC.COM
Amps Air
Bluetooth®
Devices
Amps Air Mono
Bluetooth®
Devices
KROK ČÍSLO JEDNA – NÁKUP
NOVÉHO SLÚCHADLA
Ak sa slúchadlo stratí alebo poškodí,
môžete si na internetových stránkach
SOL REPUBLIC zakúpiť nové
samostatné slúchadlo (ľavé alebo
pravé) na adrese
www.solrepublic.com
KROK ČÍSLO DVA –
PRIPOJENIE NÁHRADNÉHO
SLÚCHADLA
Ak chcete pripojiť náhradnú
sluchátko, skontrolujte, či sú obe
slúchadlá plne nabité, a potom stlačte
súčasne tlačidlo SOL dvakrát na
oboch slúchadlách. Aktivujte sa tým
režim synchronizácie a kontrolky
LED diódy budú blikať biele. Po
úspešnom prepojení sa kontrolka
LED rozsvieti biele na 3 sekundy
a potom bude blikat každých 5
sekúnd počas používania. Náhradné
slúchadlo je úspešne pripojené a
môže sa používať.
PRIPOJENIE NOVÉHO
ALEBO NÁHRADNÉHO
SLÚCHADLA
SK 143

144 SK
VYPNUTIE ŠTUPĽOVÝCH SLÚCHADIEL
POUŽITIE ZÁLOŽNEJ BATÉRIE
Nabíjací kábel zariadenia USB
zasuňte do cestovného puzdra a
potom do inteligentného zariadenia.
S plne nabitou batériou dokáže vaše
cestovné puzdro dobiť štupľové
slúchadlá až 15 krát alebo plne nabiť
bežný smartfón.
Štupľové slúchadlá vypnete
ich uložením späť do puzdra
alebo stlačením a podržaním
multifunkčného tlačidla a jeho
podržaním na 3 sekundy.
POZNÁMKA
Nabíjací výstup USB má hodnoty 5 V a 1,0 A.
Niektoré zariadenia, ako sú tablety, sa možno
nepodarí nabiť alebo sa budú nabíjať len pomaly.
Požiadavky na nabíjanie si zistite u výrobcu svojho
zariadenia.
Amps Air 2.0
Bluetooth®
Devices
Amps Air Mono
Bluetooth®
Devices
3s
Amps Air 2.0
Bluetooth®
Devices
Amps Air Mono
Bluetooth®
Devices
Amps Air 2.0
Bluetooth®
Devices
Amps Air Mono
Bluetooth®
Devices

SK 145
ZÁKLADY
POZNÁMKA
Niektoré funkcie môžu fungovať inak v závislosti od vášho telefónu alebo poskytovateľa služieb.
CHCETE
Prijať hovor Raz stlačte niektoré multifunkčné tlačidlo
Odmietnuť hovor Stlačte jedno z multifunkčných tlačidiel a podržte ho
Ukončiť hovor Raz stlačte niektoré multifunkčné tlačidlo
Prijať druhý prichádzajúci
hovor Raz stlačte niektoré multifunkčné tlačidlo
Odmietnuť druhý
prichádzajúci hovor Použiť klávesnicu telefónu
CHCETE
Aktivovať Siri Dvakrát rýchle stlačiť niektoré multifunkčné tlačidlo
Aktivovať Google Dvakrát rýchle stlačiť niektoré multifunkčné tlačidlo
Skontrolovať stav batérie
štupľových slúchadiel Pozrite sa na smartfón
Skontrolovať stav batérie
cestovného puzdra Potrasením cestovného puzdra sa rozsvietia LED
Vypnúť štupľové slúchadlo Stlačte multifunkčné tlačidlo a podržte ho stlačené
3 sekundy
HUDBA
TELEFONOVANIE
INÉ
CHCETE
Prehrať/Pozastaviť Raz stlačte multifunkčné tlačidlo.

146 SK
INDIKÁTORY LED
Bliká červená Slabá batéria
Svieti červená Nabíja sa
LED nesvieti Úplne nabité
1 LED bliká Slabá batéria, 0 – 25 %
2 LED, 2. bliká Kapacita batérie 25 – 50 %
3 LED, 3. bliká Kapacita batérie 50 – 75 %
4 LED, 4. bliká Kapacita batérie 75 – 100 %
Pomaly blikajúca biela Prebieha vzájomná synchronizácia štupľových
slúchadiel
Rýchle blikajúca biela Štupľové slúchadlá sú v režime párovania so
zariadením
NABÍJANIE ŠTUPĽOVÝCH SLÚCHADIEL V PUZDRE
CESTOVNÉ PUZDRO
ŠTUPĽOVÉ SLÚCHADLÁ SA POUŽÍVAJÚ
SK 147
RIEŠENIE PROBLÉMOV
Máte problémy so svojimi štupľovými slúchadlami? Skúste ich vyriešiť podľa
týchto krokov.
1. Vypnite Bluetooth na svojom zariadení
2. Štupľové slúchadlá vytiahnite z puzdra
3. Na 3 sekundy stlačte tlačidlo Sol na oboch štupľových slúchadlách, čím
ich vypnete.
4. Štupľové slúchadlá zapnite krátkym stlačením multifunkčného tlačidla
5. Dvojitým krátkym stlačením multifunkčného tlačidla na oboch štupľových
slúchadlách ich prepnite do režimu párovania a navzájom ich prepojte
6. Zapnite Bluetooth na svojom zariadení
7. Spárujte ho s „Amps Air 2.0“
KONTAKT
Mate nejaké ďalšie otázky? My máme odpovede a sme v pohotovosti. Ozvite
sa nám, sme tu pre vás.
PODPORA
Nižšie je uvedený súbor zdrojov na zabezpečenie, aby ste od produktu SOL
REPUBLIC získali maximum.
Web: SOLREPUBLIC.COM/SUPPORT
Twitter: @SOLREPUBLIC
Phone: +1.877.400.0310
Email: support@SOLREPUBLIC.com

148 NO
Amps Air 2.0
Bluetooth®
Devices
Amps Air Mono
Bluetooth®
Devices
Amps Air 2.0
Bluetooth®
Devices
Amps Air Mono
Bluetooth®
Devices
HVA FØLGER MED
Fire sett med propper i forskjellige størrelser
USB-ladekabel
Reiseetui med backup-batteri
1
2
3
4
5 7 6
1 Flerfunksjonsknapp
2 Lysdioder som viser ørepluggenes status
3 Mikrofoninngang
4 Ladekontakter
5 Batteriindikasjon via lysdioder
på etuiet
6 Mikro-USB-ladeinngang – for
lading av etuiet
7 USB-ladeinngang – for lading av
smartenheten
LEGG MERKE TIL
For best mulig passform og lyd, start
med den største proppstørrelsen og
jobb deg nedover.
Amps Air 2.0
Bluetooth®
Devices
Amps Air Mono
Bluetooth®
Devices
Amps Air 2.0
Bluetooth®
Devices
Amps Air Mono
Bluetooth®
Devices
Amps Air 2.0
Bluetooth®
Devices
Amps Air Mono
Bluetooth®
Devices
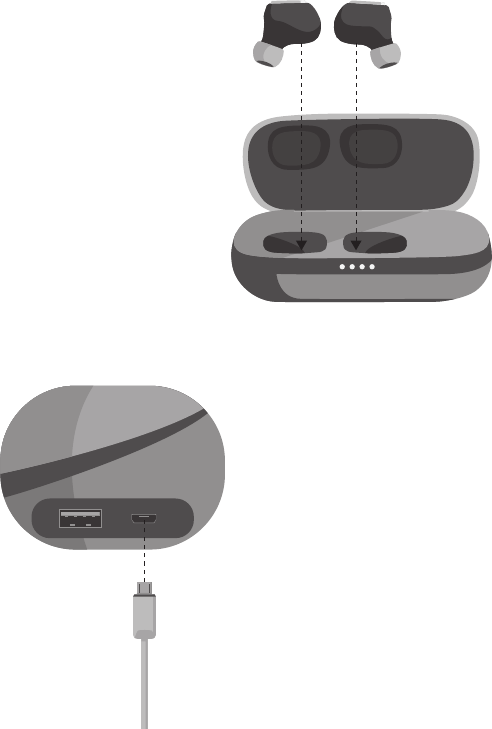
NO 149
KONFIGURASJON
Å LADE ØREPLUGGENE
For å lade øreproppene legger du
dem i det bærbare etuiet. Røde
lysdioder indikerer at lading pågår.
Lysdiodene lyser hvitt når ladingen er
ferdig, deretter slukkes de.
Å LADE REISEETUIET
Plugg den lille enden av USB-
kabelen inn i mikro-USB-inngangen,
som er plassert på høyre side av
etuiet. Når alle re lysdiodene er tent
er ladingen fullført.
Amps Air 2.0
Bluetooth®
Devices
Amps Air Mono
Bluetooth®
Devices
Amps Air 2.0
Bluetooth®
Devices
Amps Air Mono
Bluetooth®
Devices
Amps Air 2.0
Bluetooth®
Devices
Amps Air Mono
Bluetooth®
Devices

Amps Air 2.0
Bluetooth®
Devices
Amps Air Mono
Bluetooth®
Devices
Amps Air 2.0
Bluetooth®
Devices
Amps Air Mono
Bluetooth®
Devices
x2
Amps Air 2.0
Bluetooth®
Devices
Amps Air Mono
Bluetooth®
Devices
TRINN ÉN – SLÅ PÅ
ØREPROPPENE
Øreproppene slås på automatisk
når de tas ut av ladedekselet.
Hvis du vil slå dem på manuelt,
kan du trykke raskt én gang på
erfunksjonsknappen på begge
ørepropper.
TRINN TO – KOBLE
ØREPROPPENE TIL
HVERANDRE
Når du tar øreproppene ut av
dekselet, kobles de til hverandre
automatisk. Etter at de er koblet til
hverandre, vil LED-lampene lyse
hvitt i tre sekunder, og deretter
blinke én gang hvert femte sekund
under bruk. Hvis de ikke kobles
til hverandre, dobbelttrykker du
raskt på SOL-knappen på begge
ørepropper samtidig. Nå går de til
synkroniseringsmodus, og LED-
lampene blinker hvitt. Etter at de er
koblet til hverandre, vil LED-lampene
lyse hvitt i tre sekunder, og deretter
fortsette å blinke én gang hvert femte
sekund under bruk.
TRINN TRE – KOBLE TIL EN
ENHET
Aktiver Bluetooth på enheten.
Velg «Amps Air 2.0» på Bluetooth-
menyen. Når enheten og Amps
Air 2.0 er koblet til hverandre, vil
du høre et lydsignal. Dette betyr at
sammenkoblingen er fullført.
KOBLE TIL BEGGE ØREPROPPER
Koble til begge ørepropper for å høre stereolyd. Dette gir den dypeste
musikkopplevelsen.
150 NO

Amps Air 2.0
Bluetooth®
Devices
Amps Air Mono
Bluetooth®
Devices
x2
WWW.SOLREPUBLIC.COM
Amps Air
Bluetooth®
Devices
Amps Air Mono
Bluetooth®
Devices
TRINN ÉN – KJØPE NY
ØREPROPP
Hvis du mister en ørepropp eller den
blir skadet, kan du kjøpe én enkelt
ny ørepropp (venstre eller høyre) på
SOL REPUBLICs nettsted:
www.solrepublic.com
TRINN TO – KOBLE DEN NYE
ØREPROPPEN SAMMEN MED
DEN GAMLE
Før du kobler den nye øreproppen
sammen med den gamle, må du påse
at begge ørepropper er fullt ladet.
Dobbelttrykk raskt på SOL-knappen
på begge ørepropper samtidig. Nå
går de til synkroniseringsmodus, og
LED-lampene blinker hvitt. Etter at
de er koblet til hverandre, vil LED-
lampene lyse hvitt i tre sekunder, og
deretter fortsette å blinke én gang
hvert femte sekund under bruk. Den
nye øreproppen er nå sammenkoblet
med den gamle og kan brukes.
KOBLE TIL EN NY
ØREPROPP
NO 151

152 NO
Å SLÅ AV ØREPROPPENE
Å BRUKE BACKUP-BATTERIET
Koble enhetens USB-ladekabel
til reiseetuiet og deretter inn i
smartenheten. Med et fullt batteri kan
etuiet lade øreproppene opp til 15
ganger, eller det kan lade en vanlig
smarttelefon helt opp én gang.
For å slå av øreproppene plasserer
du dem tilbake i etuiet, eller trykk og
hold nede erfunksjonsknappen på
øreproppen i 3 sekunder.
LEGG MERKE TIL
Utgangseffekten til USB-ladingen er 5V, 1,0A.
Noen enheter, for eksempel nettbrett, kan det
se ut som om ikke lader i det hele tatt eller lades
sakte. Ta kontakt med produsenten av enheten for
spesikasjoner.
Amps Air 2.0
Bluetooth®
Devices
Amps Air Mono
Bluetooth®
Devices
3s
Amps Air 2.0
Bluetooth®
Devices
Amps Air Mono
Bluetooth®
Devices
Amps Air 2.0
Bluetooth®
Devices
Amps Air Mono
Bluetooth®
Devices

NO 153
DET GRUNNLEGGENDE
LEGG MERKE TIL
Noen funksjoner kan fungere annerledes avhengig av telefonen eller operatøren.
DU ØNSKER
Svare et anrop Trykk på en av erfunksjonsknappene én gang
Avvise et anrop Trykk på og hold nede en av erfunksjonsknappene
Avslutte et anrop Trykk på en av erfunksjonsknappene én gang
Motta innkommende
anrop nummer to Trykk på en av erfunksjonsknappene én gang
Avvise innkommende
anrop nummer to Bruk telefontastaturet
DU ØNSKER
Aktivere Siri Dobbeltrykk på en av erfunksjonsknappene
Aktivere Google Dobbeltrykk på en av erfunksjonsknappene
Kontrollere batterinivået til
ørepluggene Se på smarttelefonen
Kontrollere batterinivået til
reiseetuiet Rist på reiseetuiet for å tenne lysdiodene
Slå av ørepluggene Trykk og hold nede erfunksjonsknappen i 3
sekunder.
MUSIKK
ANROP
ANNET
DU ØNSKER
Play eller pause Trykk på en av erfunksjonsknappene én gang.

154 NO
LYSDIODER
Blinkende rødt Lavt batteri
Rødt lys Lader
LED av Fullt oppladet
1 blinkende lysdiode Lavt batteri, 0–25 %
2 lysdioder, diode nummer
to blinker Batterikapasitet 25-50 %
3 lysdioder, diode nummer
tre blinker Batterikapasitet 50-75 %
4 lysdioder, diode nummer
re blinker Batterikapasitet 75-100 %
Sakte blinkende hvitt lys Ørepluggene er i synkroniseringsmodus med
hverandre
Hurtig blinkende hvitt lys Ørepluggene er i sammenkoblingsmodus med
enheten
LADING AV ØREPLUGGENE I ETUIET
REISEETUI
ØREPLUGGER UNDER BRUK
NO 155
FEILSØKING
Opplever du problemer med ørepluggene? Prøv å jobb deg gjennom
trinnene nedenfor.
1. Slå av Bluetooth på enheten
2. Ta ørepluggene ut av etuiet
3. Trykk på og hold nede Sol-knappen i 3 sekunder på begge ørepluggene
for å slå dem av.
4. Trykk hurtig på erfunksjonsknappen én gang på ørepluggene for å slå
dem på
5. Trykk hurtig på erfunksjonsknappen to ganger på begge ørepluggene
for å sette dem i sammenkoblingsmodus og koble dem til hverandre
igjen.
6. Slå på Bluetooth på enheten
7. Sammenkoble med “Amps Air 2.0”
KONTAKT
Har du fremdeles spørsmål? Vi har svarene og står klare. Ta kontakt, vi er her
for å hjelpe.
BRUKERSTØTTE
Vedlagt er ressurser for å sikre at du får mest mulig ut av ditt SOL REPUBLIC-
produkt.
Web: SOLREPUBLIC.COM/SUPPORT
Twitter: @SOLREPUBLIC
Phone: +1.877.400.0310
Email: support@SOLREPUBLIC.com

156 KO
Amps Air 2.0
Bluetooth®
Devices
Amps Air Mono
Bluetooth®
Devices
Amps Air 2.0
Bluetooth®
Devices
Amps Air Mono
Bluetooth®
Devices
구성품
4가지 사이즈
이어팁
USB 충전 케이블
휴대용 충전 케이스 및 보조 배터리
1
2
3
4
5 7 6
1 멀티 기능 버튼
2 이어버드 상태 표시 LED
3 마이크 포트
4 이어버드 충전부
5 케이스 배터리 LED
6 Micro USB 충전 포트
(휴대용 충전 케이스 충전용)
7 USB 충전 포트(휴대폰 등 스마트
디바이스 충전용)
주의
최적화된 사이즈와 사운드를
찾으려면, 가장 큰 사이즈의
이어팁부터 순서대로
사용해보세요.
Amps Air 2.0
Bluetooth®
Devices
Amps Air Mono
Bluetooth®
Devices
Amps Air 2.0
Bluetooth®
Devices
Amps Air Mono
Bluetooth®
Devices
Amps Air 2.0
Bluetooth®
Devices
Amps Air Mono
Bluetooth®
Devices

KO 157
설정
이어버드 충전하기
휴대용 충전 케이스에 이어버드를
넣으면 충전이 시작됩니다. 충전 중일
때는 LED가 빨간색으로 표시됩니다.
이어버드가 완전히 충전되면 LED가
흰색으로 표시된 다음 꺼집니다.
휴대용 충전 케이스 충전하기
USB 케이블의 작은 끝부분을 케이스
오른쪽에 있는 Micro USB 포트에
연결합니다. 휴대용 충전 케이스가
완전히 충전되면 LED 4개가 전부
켜집니다.
Amps Air 2.0
Bluetooth®
Devices
Amps Air Mono
Bluetooth®
Devices
Amps Air 2.0
Bluetooth®
Devices
Amps Air Mono
Bluetooth®
Devices
Amps Air 2.0
Bluetooth®
Devices
Amps Air Mono
Bluetooth®
Devices

Amps Air 2.0
Bluetooth®
Devices
Amps Air Mono
Bluetooth®
Devices
Amps Air 2.0
Bluetooth®
Devices
Amps Air Mono
Bluetooth®
Devices
x2
Amps Air 2.0
Bluetooth®
Devices
Amps Air Mono
Bluetooth®
Devices
단계 1 - 이어버드 켜기
충전 케이스에서 이어버드를 꺼내면
이어버드가 자동으로 켜집니다.
수동으로 켜고 싶을 경우에는 이어버드
양쪽의 다기능 버튼을 한 번 빠르게
누르면 됩니다.
단계 2 - 이어버드 상호 연결
케이스에서 이어버드를 꺼내면
이어버드가 자동으로 상호 연결됩니다.
성공적으로 연결되면 LED가 3초 동안
흰색으로 켜진 다음 사용 중에 5초에
한 번씩 깜박입니다. 연결이 안 되면
이어버드 양쪽의 SOL 버튼을 동시에
빠르게 두 번 누르십시오. 그러면
이어버드가 동기화 모드가 되고 LED
가 흰색으로 깜박입니다. 성공적으로
연결되면 LED가 3초 동안 흰색으로
켜진 다음 사용 중에 5초에 한 번씩
계속 깜박입니다.
단계 3 - 장치에 연결
장치의 Bluetooth를 활성화합니다.
Bluetooth 메뉴에서 “Amps Air 2.0”
를 선택합니다. 장치와 Amps Air2.0
가 연결되면 신호음이 들립니다. 이는
페어링이 완료되었음을 의미합니다.
이어버드 양쪽 연결
스테레오 사운드용 이어버드 양쪽을 연결하십시오. 그러면 가장 몰입도 높게
음악을 청취할 수 있습니다.
158 KO

Amps Air 2.0
Bluetooth®
Devices
Amps Air Mono
Bluetooth®
Devices
x2
WWW.SOLREPUBLIC.COM
Amps Air
Bluetooth®
Devices
Amps Air Mono
Bluetooth®
Devices
단계 1 - 신형 이어버드 구입
이어버드 분실이나 손상 시에는 SOL
REPUBLIC 웹사이트
www.solrepublic.com에서 이어버드
한쪽(왼쪽 또는 오른쪽)을 신형으로
구입할 수 있습니다.
단계 2 - 교체형 이어버드 페어링
교체형 이어버드를 페어링하려면
이어버드 양쪽을 완전히 충전시킨 다음
이어버드 양쪽의 SOL 버튼을 동시에
빠르게 두 번 누르십시오. 그러면
이어버드가 동기화 모드가 되고 LED
가 흰색으로 깜박입니다. 성공적으로
연결되면 LED가 3초 동안 흰색으로
켜진 다음 사용 중에 5초에 한 번씩
계속 깜박입니다. 신형 이어버드가
이제 성공적으로 페어링되었으며
사용할 수 있습니다.
신형 또는 교체형 이어버드 연결
KO 159

160 KO
이어버드 전원 끄기
보조 배터리 사용하기
디바이스의 USB 충전 케이블을 휴대용
충전 케이스에 연결한 다음 스마트
디바이스에 연결합니다.
휴대용 충전 케이스 배터리가 완전히
충전되어 있으면 이어버드를 최대
15회 충전할 수 있으며, 일반적인
스마트폰의 경우 한 번 완전 충전할 수
있습니다.
이어버드 전원을 끄려면 이어버드를
다시 케이스에 넣습니다. 이어버드의
멀티 기능 버튼을 3초 동안 길게
눌러도 전원을 끌 수 있습니다.
주의
USB 충전 출력 정격은 5V, 1.0A입니다.
태블릿 등의 디바이스는 거의 충전되지
않거나 천천히 충전될 수 있습니다. 해당
요구사항에 대해서는 디바이스 제조사에
문의하십시오.
Amps Air 2.0
Bluetooth®
Devices
Amps Air Mono
Bluetooth®
Devices
3s
Amps Air 2.0
Bluetooth®
Devices
Amps Air Mono
Bluetooth®
Devices
Amps Air 2.0
Bluetooth®
Devices
Amps Air Mono
Bluetooth®
Devices

KO 161
기본 사항
주의
휴대폰이나 서비스 공급자에 따라 일부 기능은 다르게 작동될 수 있습니다.
사용하려는 기능
전화 받기 한쪽 이어버드의 멀티 기능 버튼을 한 번 누릅니다.
전화 거절하기 한쪽 이어버드의 멀티 기능 버튼을 길게 누릅니다.
통화 종료하기 한쪽 이어버드의 멀티 기능 버튼을 한 번 누릅니다.
통화 중 수신 전화 받기 한쪽 이어버드의 멀티 기능 버튼을 한 번 누릅니다.
통화 중 수신 전화 거절하기 휴대폰 키패드를 사용합니다.
사용하려는 기능
Siri 실행하기 한쪽 이어버드의 멀티 기능 버튼을 빠르게 두 번
누릅니다.
Google 실행하기 한쪽 이어버드의 멀티 기능 버튼을 빠르게 두 번
누릅니다.
이어버드 배터리 잔량
확인하기 스마트폰에서 확인합니다.
휴대용 충전 케이스 배터리
잔량 확인하기 휴대용 충전 케이스를 흔들어 LED를 켭니다.
이어버드 전원 끄기 멀티 기능 버튼을 3초 동안 길게 누릅니다.
음악
전화
기타 기능
사용하려는 기능
재생 및 일시 정지 한쪽 이어버드의 멀티 기능 버튼을 한 번 누릅니다.

162 KO
LED 표시기
빨간색 깜빡임 배터리 부족
빨간색 충전 중
LED 꺼짐 완전히 충전됨
LED 1개 깜빡임 배터리 부족 0~25%
LED 2개가 켜지고,
두 번째 LED 깜빡임 배터리 용량 25~50%
LED 3개가 켜지고,
세 번째 LED 깜빡임 배터리 용량 50~75%
LED 4개가 켜지고,
네 번째 LED 깜빡임 배터리 용량 75~100%
느린 흰색 깜빡임 양쪽 이어버드가 싱크 모드로 연결된
상태입니다.
빠른 흰색 깜빡임 이어버드와 디바이스가 페어링 모드입니다.
휴대용 충전 케이스를 충전 중일 때
휴대용 충전 케이스
이어버드를 사용 중일 때
KO 163
문제 해결
이어버드에 문제가 있습니까? 다음 단계를 수행하여 문제를 해결해보세요.
1. 디바이스에서 블루투스를 끕니다.
2. 케이스에서 이어버드를 꺼냅니다.
3. 양쪽 이어버드의 Sol 버튼을 3초 동안 길게 눌러 전원을 끕니다.
4. 양쪽 이어버드의 멀티 기능 버튼을 빠르게 한 번 눌러 전원을 켭니다.
5. 양쪽 이어버드의 멀티 기능 버튼을 빠르게 두 번 눌러 페어링 모드를
실행한 다음 이어버드를 다시 연결합니다.
6. 디바이스에서 블루투스를 켭니다.
7. Amps Air 2.0 에 페어링합니다.
문의하기
아직 궁금한 점이 있으신가요? 언제든지 답변을 드릴 수 있도록 대기하고
있습니다. 무엇이든 도움을 드리겠습니다.
고객 지원
다음은 SOL REPUBLIC 제품을 활용할 수 있도록 도움을 드릴 리소스
목록입니다.
Web: SOLREPUBLIC.COM/SUPPORT
Twitter: @SOLREPUBLIC
Phone: +1.877.400.0310
Email: support@SOLREPUBLIC.com
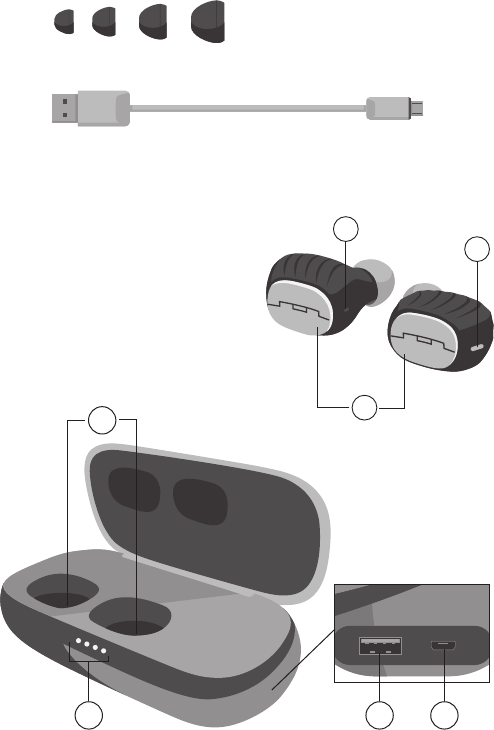
164
Amps Air 2.0
Bluetooth®
Devices
Amps Air Mono
Bluetooth®
Devices
Amps Air 2.0
Bluetooth®
Devices
Amps Air Mono
Bluetooth®
Devices
Amps Air 2.0
Bluetooth®
Devices
Amps Air Mono
Bluetooth®
Devices
Amps Air 2.0
Bluetooth®
Devices
Amps Air Mono
Bluetooth®
Devices
Amps Air 2.0
Bluetooth®
Devices
Amps Air Mono
Bluetooth®
Devices
USB

165
Amps Air
Bluetooth®
Devices
Amps Air Mono
Bluetooth®
Devices
Amps Air 2.0
Bluetooth®
Devices
Amps Air Mono
Bluetooth®
Devices
Amps Air 2.0
Bluetooth®
Devices
Amps Air Mono
Bluetooth®
Devices

-
.
.
-
Amps Air 2.0
Bluetooth®
Devices
Amps Air Mono
Bluetooth®
Devices
Amps Air 2.0
Bluetooth®
Devices
Amps Air Mono
Bluetooth®
Devices
x
Amps Air 2.0
Bluetooth®
Devices
Amps Air Mono
Bluetooth®
Devices
166
-

-
-
Amps Air 2.0
Bluetooth®
Devices
Amps Air Mono
Bluetooth®
Devices
x
WWW.SOLREPUBLIC.COM
Amps Air
Bluetooth®
Devices
Amps Air Mono
Bluetooth®
Devices
167

Amps Air 2.0
Bluetooth®
Devices
Amps Air Mono
Bluetooth®
Devices
Amps Air 2.0
Bluetooth®
Devices
Amps Air Mono
Bluetooth®
Devices
Amps Air 2.0
Bluetooth®
Devices
Amps Air Mono
Bluetooth®
Devices
168

Siri
Google
.
169

-
-
-
-
170
.
.
.
. Sol
.
.
.
.SOL REPUBLIC
SOLREPUBLIC.COM/SUPPORT Twitter: @SOLREPUBLIC:
Phone: +
support@SOLREPUBLIC.com :
171

第172頁
Amps Air 2.0
Bluetooth®
Devices
Amps Air Mono
Bluetooth®
Devices
Amps Air 2.0
Bluetooth®
Devices
Amps Air Mono
Bluetooth®
Devices
4個不同大小的耳機套
USB充電線
— 充電旅行隨身盒
1
2
3
4
5 7 6
1 多功能按键
2 耳機狀態LED燈
3 麥克風接口
4 耳機充電接頭
5 隨身盒電池LED燈
6 Micro USB充電口 — 隨身盒充電
7 USB充電埠口— 智能耳機充電
備註
為使耳機最舒適緊貼及播出最佳
音色,請從最大的耳機套開始逐
個試用至適合為止。
Amps Air 2.0
Bluetooth®
Devices
Amps Air Mono
Bluetooth®
Devices
Amps Air 2.0
Bluetooth®
Devices
Amps Air Mono
Bluetooth®
Devices
Amps Air 2.0
Bluetooth®
Devices
Amps Air Mono
Bluetooth®
Devices

第173頁
安裝
耳機充電
將耳機放在隨身盒內充電。紅色
LED燈亮起,顯示正在充電。充電
完成後,LED灯会直接熄灭。
隨身盒充電
將USB電線細小的一端入隨身盒
右邊的micro USB接口。4個LED
燈全部亮起,表示充電完成。
Amps Air
Bluetooth®
Devices
Amps Air Mono
Bluetooth®
Devices
Amps Air 2.0
Bluetooth®
Devices
Amps Air Mono
Bluetooth®
Devices
Amps Air 2.0
Bluetooth®
Devices
Amps Air Mono
Bluetooth®
Devices

第174頁
連接左右耳機
連接左右耳機,達到雙聲道效果。這能提供最身歷其境的音樂體驗。
第一步 — 啟動耳機
從充電盒中取出後,耳機會自動
啟動。如迅速按一下其中一邊或
兩邊耳機的多功能按鍵,便能以
手動方式啟動耳機。
第二步 — 連接左右耳機
從盒中取出耳機後,耳機會自動
互相連接。連接成功後,LED燈會
亮起白燈3秒鐘,然後在使用期間
每隔5秒閃一次。如果連接失敗,
請同時迅速按兩下左右耳機的多
功能按键。這會使兩邊耳機進入
同步模式,同時LED燈會以白色間
歇閃動。連接成功後,LED燈會
轉為白色及亮起3秒鐘,然
後在使用期間每隔5秒閃一次。
第三步 — 與裝置進行連接
啟動耳機的藍牙功能。在藍牙功
能表中選取「Amps Air 2.0」。
耳機與Amps Air 2.0連接後,會
發出聲音。這表示配對完成。
Amps Air 2.0
Bluetooth®
Devices
Amps Air Mono
Bluetooth®
Devices
Amps Air 2.0
Bluetooth®
Devices
Amps Air Mono
Bluetooth®
Devices
x2
Amps Air 2.0
Bluetooth®
Devices
Amps Air Mono
Bluetooth®
Devices

第175頁
連接新的或替換的耳機
第一步 — 購買新的耳機
如果一個耳機遺失或受損,可
以到SOL REPUBLIC網站 www.
solrepublic.com 購買一個耳機
(左邊或右邊)替換。
第二步 — 改變耳機配對模式
改變耳機配對模式,請替兩邊耳
機充滿電,然後同時迅速按兩下
左右耳機的SOL按鍵。這會使兩
邊耳機進入同步模式,同時LED
燈會以白色間歇閃動。連接成功
後,LED燈會連續亮起3秒鐘,
然後間歇閃動。此時耳機已配對
好,可以使用。
Amps Air 2.0
Bluetooth®
Devices
Amps Air Mono
Bluetooth®
Devices
x2
WWW.SOLREPUBLIC.COM
Amps Air
Bluetooth®
Devices
Amps Air Mono
Bluetooth®
Devices

第176頁
關掉耳機
使用後備電池
先將智能耳機的USB充電線一端
插入旅行隨身盒,然後把另一端
放於智能裝置。如果旅行隨身盒
的電池充滿電,能讓耳機重新充
電多至15次,或者一般智能電話
充滿一次電。
將耳機放回盒內,或按住耳機的
多功能按鍵3秒鐘,便能關掉耳
機。
備註
USB充電額定輸出功率為5V、1.0A。一些 裝
置例如平板電腦,也許看起來沒有在充電,
或充電速度很慢。請向製造商洽詢裝置的充
電要求。
Amps Air 2.0
Bluetooth®
Devices
Amps Air Mono
Bluetooth®
Devices
3s
Amps Air 2.0
Bluetooth®
Devices
Amps Air Mono
Bluetooth®
Devices
Amps Air 2.0
Bluetooth®
Devices
Amps Air Mono
Bluetooth®
Devices

第177頁
備註:視電話或服務供應商而定,一些功能的使用方式也許會有不同之處。
功能
接聽電話 按一下任何一邊的多功能按鍵
拒絕接聽電話 按住任何一邊的多功能按鍵
結束通話 按一下任何一邊的多功能按鍵
接聽第二個來電 按一下任何一邊的多功能按鍵
拒絕接聽第二個來電 使用電話鍵盤
功能
啟動Siri 迅速按兩下任何一邊的多功能按鍵
啟動Google 迅速按兩下任何一邊的多功能按鍵
檢查耳機的電池電量 連接智能電話
檢查行隨身盒的電池
電量 搖晃隨身盒,令LED燈亮起
關掉耳機 按住多功能按鍵3秒鐘
音樂
電話
其他
功能
播放或暫停 按一下任何一邊的多功能按鍵

第178頁
LED顯示燈
紅燈閃動 電池低電量
紅燈亮起 正在充電
LED燈關掉 充電完成
1個LED燈在閃動 電池低電量 0-25%
2個LED燈,第2個在
閃動 電池電量 25-50%
3個LED燈,第3個在
閃動 電池電量 50-75%
4個LED燈,第4個在
閃動 電池電量 75-99%
白燈間歇閃動 兩邊耳機處於同步模式
白燈閃動 耳機與裝置處於配對模式
耳機在盒內充電
旅行隨身盒
耳機正在使用
第179頁
疑難排解
耳機出了問題?請嘗試用下列步驟解決。
1. 關掉裝置的藍牙功能
2. 將耳機從盒中取出
3. 按住兩邊耳機的SOL按鍵3秒鐘,關掉耳機
4. 迅速按一下耳機的多功能按鍵,啟動耳機
5. 迅速按兩下兩邊耳機的多功能按鍵,令耳機進入配對模式及重新互
相連接
6. 啟動裝置的藍牙功能
7. 與「Amps Air 2.0」配對
聯絡
仍有疑問?我們隨時準備為您解答。歡迎和我們聯絡,我們樂於提供
協助。
支援
以下資源能協助使用SOL REPUBLIC的產品功能。
台灣代理商網頁:www.igogopsort.com
180
WARRANTY – US & CANADA
SOL REPUBLIC warrants this product free
from defect in material and workmanship for a
period of 1 year from the date of purchase. This
warranty does not cover damage caused by
misuse or abuse; accident; the attachment of any
unauthorized accessory; alteration to the product;
or any other conditions whatsoever that are
beyond the control of SOL REPUBLIC.
GARANTIE
SOL REPUBLIC garantit ce produit contre tout
défaut de matière et de fabrication pendant 2
ans à compter de la date d’achat. Cette garantie
ne couvre pas tout dommage occasionné par
un usage incorrect ou abusif, un accident, le
raccordement de tout accessoire non autorisé,
la modication du produit ou par toute autre
situation, de quelque nature qu’elle soit,
indépendante de SOL REPUBLIC.
Distributed in Canada by/Distribue par HOMEDICS
GROUP CANADA 6460 Kennedy Road, Unit C
Mississauga, ON L5T 2X4 Tel: 888.225.7378.
Email: cservice@homedicsgroup.ca
WARRANTY – UK & EUROPE
SOL REPUBLIC warrants this product free from
defect in material and workmanship for a period of
2 years from the date of purchase. This warranty
does not cover damage caused by misuse or abuse;
accident; the attachment of any unauthorized
accessory; alteration to the product; or any other
conditions whatsoever that are beyond the control
of SOL REPUBLIC. Distributed in the EU by FKA
Brands Ltd., Somerhill Business Park, Five Oak
Green Road, TONBRIDGE, Kent TN11 0GP. UK.
Tel: 020 7862 6099.
Email: support@SOLREPUBLIC.co.uk
WARRANTY – AUSTRALIA (ONE
YEAR LIMITED WARRANTY)
We or us means HoMedics Australia Pty Ltd ACN
31 103 985 717 and our contact details are set
out at the end of this warranty; You means the
purchaser or the original end-user of the Goods.
You may be a domestic user or a professional
user; Supplier means the authorised distributor
or retailer of the Goods that sold you the Goods in
Australia and New Zealand; and Goods means the
product or equipment which was accompanied
by this warranty and purchased in Australia and
New Zealand.
For Australia:
Our Goods come with guarantees that cannot be
excluded under the Australian Consumer Law.
You are entitled, subject to the provisions of the
Australian Consumer Law, to a replacement or
refund for a major failure and for compensation for
any other reasonably foreseeable loss or damage.
You are also entitled, subject to the provisions
of the Australian Consumer Law, to have the
Goods repaired or replaced if the goods fail to
be of acceptable quality and the failure does not
amount to a major failure. This is not a complete
statement of your legal rights as a consumer.
For New Zealand:
Our Goods come with guarantees that cannot
be excluded under the Consumer Guarantees
Act 1993. This guarantee applies in addition to
the conditions and guarantees implied by that
legislation.
The Warranty
HoMedics sells its products with the intent that
they are free of defects in manufacture and
workmanship under normal use and service. In
the unlikely event that your HoMedics product
proves to be faulty within 1 year from the date of
purchase due to workmanship or materials only,
we will replace it at our own expense, subject to
the terms and conditions of this guarantee. The
warranty period is limited to 3 months from the
date of purchase for products used commercially/
professionally.
Terms and Conditions:
In addition to the rights and remedies that you
have under the Australian Consumer Law,
Consumer Guarantees Act of New Zealand or any
other applicable law and without excluding such
rights and remedies warranty against defects:
The Goods are designed to withstand the rigors
of normal household use and are manufactured
to the highest standards using the highest quality
components. Whilst unlikely, if, during the rst 12
months (3 months commercial use) from their
date of purchase from the Supplier (Warranty
Period), the Goods prove defective by reason of
improper workmanship or materials and none
of your statutory rights or remedies apply, we
will replace the Goods, subject to the terms and
conditions of this warranty.
We do not have to replace the Goods under
this Additional Warranty if the Goods have been
damaged due to misuse or abuse, accident,
the attachment of any unauthorised accessory,
alteration to the product, improper installation,
unauthorised repairs or modications, improper
use of electrical/power supply, loss of power,
malfunction or damage of an operating part from
failure to provide manufacturer’s recommended
maintenance, transportation damage, theft,
181
neglect, vandalism, environmental conditions or
any other conditions whatsoever that are beyond
the control of HoMedics.
This Warranty does not extend to the purchase
of used, repaired or second-hand products or to
products not imported or supplied by HoMedics
Australia Pty Ltd, including but not limited to those
sold on offshore internet auction sites.
This Warranty extends only to consumers and
does not extend to Suppliers.
Even when we do not have to replace the Goods,
we may decide to do so anyway. In some cases,
we may decide to substitute the Goods with a
similar alternative product of our choosing. All
such decisions are at our absolute discretion.
All such replaced or substituted Goods continue
to receive the benet of this Additional Warranty
for the time remaining on the original Warranty
Period (or three months, whichever is the
longest).
This Additional Warranty does not cover items
damaged by normal wear and tear including
but not limited to chips, scratches, abrasions,
discolouration and other minor defects, where the
damage has negligible effect on the operation or
performance of the Goods.
This Additional Warranty is limited to replacement
or substitution only. As far as the law permits, we
will not be liable for any loss or damage caused
to property or persons arising from any cause
whatsoever and shall have no liability for any
incidental, consequential or special damages.
This warranty is only valid and enforceable in
Australia and New Zealand.
Making a Claim:
In order to claim under this Warranty you must
return the Goods to the Supplier (place of
purchase) for replacement. If this is not possible,
please contact our customer service department
by email: cservice@homedics.com.au or at the
address below.
All returned Goods must be accompanied by
satisfactory proof of purchase which clearly
indicates the name and address of the Supplier,
the date and place of purchase and identies
product. It is best to provide an original, legible and
unmodied receipt or sales invoice.
You must bear any expense for return of the
Goods or otherwise associated with making your
claim under this Additional Warranty.
Distributed in Australia by HOMEDICS
AUSTRALIA PTY LTD, 14 Kingsley Close,
Rowville, Victoria 3178. Distributed in New
Zealand by Phoenix Distribution NZ Ltd, 7B Orbit
Drive, Albany / North Shore 0757, Auckland,
New Zealand
GARANTÍA
SOL REPUBLIC garantiza que este producto
está libre de defectos de material y mano de obra
durante un periodo de 2 años a partir de la fecha
de compra. Esta garantía no cubre los daños
causados por el mal uso o abuso, accidentes,
acoplamiento de accesorios no autorizados,
cualquier alteración al producto, u otras condiciones
ajenas al control de SOL REPUBLIC.
HERSTELLERGARANTIE
FKA Brands Ltd. verkauft seine SOL REPUBLIC
Produkte mit dem Ziel, dass diese frei von Mängeln
und technischen Defekten sind. FKA Brands Ltd.
gewährt auf seine SOL REPUBLIC- Produkte
eine 2-jährige Herstellergarantie auf neue
Produkte ab dem Kaufdatum. Diese Garantie
gilt nicht für Schäden durch unsachgemäßen
Gebrauch oder Missbrauch sowie bei Anbringung
von unzulässigem Zubehör sowie bei selbst
vorgenommenen Änderungen am Produkt. Ein
Garantieanspruch ist für gebraucht gekaufte
Produkte ausgeschlossen Die Garantie gilt für
Produkte, die für den bestimmungsgemäßen
Gebrauch innerhalb der EU und Großbritannien
hergestellt worden sind. FKA Brands Ltd. und seine
angeschlossenen Gesellschaften haften nicht für
Neben-, Folgeschäden. Im Garantiefall wenden
Sie sich bitte unter Vorlage des Kaufbeleges an
FKA Brands Ltd., Somerhill Business Park, Five
Oak Green Road, Tonbridge, Kent TN11 0GP oder
kontaktieren unseren Kundenservice per Email
support@SOLREPUBLIC.de bzw.
Telefonisch unter 0049 (0) 23 4978 49039.
Unabhängig von dieser Garantie haben Sie
selbstverständlich die vollen gesetzlichen
Gewährleistungsrechte gegenüber dem Verkäufer.
Im Gewährleistungsfall wenden Sie sich bitte mit
dem entsprechenden Kaufbeleg an den Verkäufer.
GARANZIA
FKA Brands Ltd. garantisce il presente prodotto
contro difetti di materiale e lavorazione per
un periodo di 2 anni dalla data di acquisto. La
presente garanzia non copre eventuali danni
causati dall’utilizzo improprio del prodotto, da
eventi accidentali, dall’uso di accessori non
omologati, da alterazioni apportate al prodotto o
da altre condizioni al di fuori del controllo di SOL
REPUBLIC. Email: support@SOLREPUBLIC.it
182
To prevent possible hearing damage, do not listen
at high volume levels for long periods.
Con el n de evitar lesiones auditivas, se aconseja
no escuchar a un volumen excesivamente alto
durante un periodo prolongado.
An d’éviter tout dommage auditif possible, ne
pas écouter à un volume sonore élevé pendant
une période prolongée.
Um mögliche Hörschäden zu vermeiden, stellen
Sie die Lautstärke nicht über einen längeren
Zeitraum sehr hoch ein.
Per evitare possibili danni all’udito, non ascoltare
audio a livelli elevati di volume per lunghi periodi
WEEE EXPLANATION
This marking indicates that this product should
not be disposed with other household wastes
throughout the EU. To prevent possible harm
to the environment or human health from
uncontrolled waste disposal, recycle it responsibly
to promote the sustainable reuse of material
resources. To return your used device, please use
the return and collection systems or contact the
retailer where the product was purchased. They
can take this product for environmental safe
recycling.
DECLARACIÓN DE LA DIRECTIVA
DE RESIDUOS DE APARATOS
ELÉCTRICOS Y ELECTRÓNICOS (WEEE)
Este símbolo indica que este artículo no se debe
tirar a la basura con otros residuos domésticos en
ningún lugar de la UE. A n de prevenir los efectos
perjudiciales que la eliminación sin control de los
residuos puede tener sobre el medio ambiente
o la salud de las personas, le rogamos que los
recicle de forma responsable para fomentar la
reutilización sostenible de los recursos
materiales. Para devolver su dispositivo usado,
utilice los sistemas de devolución y recogida o
póngase en contacto con la empresa a la que le
compró el artículo, la cual lo podrá recoger para
que se recicle de forma segura para el medio
ambiente.
EXPLICATION WEEE
Le symbole indique que le produit ne doit pas être
éliminé avec les autres déchets ménagers dans
toute l’Union Européenne. L’élimination
incontrôlée des déchets pouvant porter préjudice
à l’environnement ou à la santé humaine, veuillez le
recycler de façon responsable. Vous favoriserez ainsi
la réutilisation durable des ressources matérielles.
Pour renvoyer votre appareil usagé, prière d’utiliser
le système de renvoi et collection ou contacter le
revendeur où le produit a été acheté. Ils peuvent se
débarrasser de ce produit an qu’il soir recyclé
tout en respectant l’environnement.
WEEE ERKLÄRUNG
Diese Kennzeichnung weist darauf hin, dass
dieses Produkt innerhalb der EU nicht mit
anderem Hausmüll entsorgt werden soll.
Damit durch unkontrollierte Abfallentsorgung
verursachte mögliche Umwelt- oder
Gesundheitsschäden verhindert werden
können, entsorgen Sie dieses Produkt bitte
ordnungsgemäß und fördern Sie damit eine
nachhaltige Wiederverwendung der
Rohstoffe. Verwenden Sie zur Rückgabe Ihres
benutzten Geräts bitte für die Entsorgung
eingerichtete Rückgabe- und Sammelsysteme
oder wenden Sie sich an den Händler, bei dem
Sie das Produkt kauften. Auf diese Weise kann
ein sicheres und umweltfreundliches Recycling
gewährleistet werden.
SPIEGAZIONE DIRETTIVA RAEE
Questo simbolo indica che il prodotto non
deve essere smaltito assieme agli altri riuti
domestici in tutti i Paesi dell’Unione Europea. Al
ne di evitare un eventuale danno ambientale e
alla salute umana derivante dallo smaltimento dei
riuti non controllato, riciclare il prodotto in
maniera responsabile per promuovere il
riutilizzo sostenibile delle risorse materiali. Per
la restituzione del dispositivo usato, utilizzare gli
appositi sistemi di restituzione e raccolta oppure
contattare il rivenditore presso cui il prodotto
è stato acquistato, che norme di sicurezza
ambientale.
WEEE FORKLARING
183
Denne afmærkning angiver, at dette produkt ikke
må bortskaffes med andet husholdningsaffald
inden for EU. For at forhindre mulig
skade for miljøet eller menneskers sundhed på
grund af ukontrolleret affaldsbortskaffelse, skal
det genanvendes på ansvarlig vis for at fremme
den bæredygtige genanvendelse af materielle
ressourcer. Gør brug af returnerings- og
indsamlingssystemer eller kontakt den
detailhandler, hvor produktet blev købt, for at
returnere det brugte produkt. Disse kan
videresende produktet til miljøsikker
genanvendelse.
VYSVĚTLENÍ OEEZ
Tato značka udává, že výrobek nesmí být na území
EU vyhazován s běžným domácím odpadem. Pro
prevenci možného znečištění životního prostředí
a újmě na zdraví osob nekontrolovaným odpadem
recyklujte výrobek odpovědným způsobem, který
podporuje obnovitelné použití surovin. Pokud
chcete použitý výrobek vrátit, využijte prosím
sběrného systému nebo se obraťte na prodejce,
od kterého jste výrobek zakoupili. Ti mohou
výrobek recyklovat způsobem bezpečným pro
životní prostředí.
WEEE-MAGYARÁZAT
Ez a jelölés azt jelzi, hogy ezt a terméket az Európai
Unióban nem szabad a háztartási hulladék közé
dobni. Az ellenőrizetlen hulladékkezelésből
származó környezeti vagy egészségügyi kár
elkerülése végett, és a tárgyi készletek fenntartható
kezelése jegyében felelősségteljesen hasznosítsa
újra. A használt eszköz visszaküldéséhez kérjük,
használja a visszaküldő és gyűjtő rendszereket,
vagy lépjen kapcsolatba azzal a forgalmazóval,
ahonnan a készüléket vásárolta. A terméket
ezek a szolgáltatók környezetvédelmileg biztos
újrahasznosító helyre viszik.
OBJAŚNIENIE WEEE
Ten znak wskazuje, że na obszarze UE przyrządu
nie wolno pozbywać się wyrzucając do śmieci
domowych. Aby chronić środowisko i zdrowie,
którym zagraża nieodpowiednia utylizacja
odpadów, przyrząd należy recyklingować, aby
umożliwić odzysk materiałów, z których został
wykonany. Aby dokonać zwrotu zużytego
przyrządu, należy skorzystać z programów
zwrotu i odbioru lub skontaktować punkt zakupu
urządzenia. Produkt zostanie odebrany do
bezpiecznego dla środowiska recyklingu.
WEEE POPIS
Tento symbol znamená, že výrobok by sa v
rámci celej EU nemá vyhadzovať do domáceho
odpadu. Aby nedošlo k možnému znečisteniu
životného prostredie alebo poškodeniu zdravia
v dôsledku nekontrolovaného odpadu, je
potrebné pristupovať k recyklovaniu zodpovedne
a propagovať tak opätovné použitie zdrojových
materiálov. Ak chcete výrobok vrátiť, postupujte
podľa systému na vrátenie a zber alebo
kontaktujte predajcu, kde ste výrobok kúpili.
Výrobok od vás prevezmú a bezpečne ho
recyklujú.
ПОЯСНЕНИЕ WEEE
Данная маркировка означает, что в странах
Европы не допускается утилизировать
прибор вместе с другими бытовыми
отходами. Чтобы не нанести ущерба
окружающей среде и здоровью населения
в результате неверной утилизации отходов,
прибор следует сдать на переработку, чтобы
обеспечить экологичное повторное
использование материальных ресурсов.
Верните бывший в употреблении прибор
через систему возврата и сбора отходов
или свяжитесь с предприятием розничной
торговли, где вы приобрели прибор.
Там вы сможете сдать этот продукт для
экологически безопасной переработки.
UITLEG OVER AEEA
Deze markering geeft aan dat dit product binnen
de EU niet met ander huisvuil mag worden
weggeworpen. Om eventuele schade aan
het milieu of de menselijke gezondheid door
het ongecontroleerd wegwerpen van afval te
voorkomen, dient dit apparaat op verantwoorde
wijze gerecycled te worden om duurzaam
hergebruik van materiaalbronnen te bevorderen.
Wilt u het gebruikte apparaat retourneren, gebruik
dan de retour- en ophaalsystemen of neem
contact op met de winkelier waar het product
gekocht is. Deze zal het product voor milieuveilige
recycling accepteren.
WEEE FORKLARING
Denne merkingen indikerer at innen EU skal dette
produktet ikke kastes sammen med annet
husholdningssøppel. For å forebygge
mulig skade på miljøet eller menneskelig helse
forårsaket av ukontrollert avfallstømming, skal
produktet gjenvinnes ansvarlig for å støtte holdbar
gjenbruk av materialressurser. For å returnere den
brukte anordningen, vennligst bruk retur- og
hentesystemet, eller ta kontakt med detaljisten
hvor produktet ble kjøpt. De kan sørge for
miljøvennlig gjenvinning av produktet.
WEEE-SELITYS
Tämä merkki tarkoittaa, että tätä tuotetta ei
saa hävittää muiden talousjätteiden mukana
missään EU-maassa. Kontrolloimattomasta
jätteiden hävittämisestä mahdollisesti aiheutuvien
ympäristöhaittojen tai terveysvaarojen
estämiseksi hävitä tämä tuote vastuullisesti

184
edistääksesi materiaalivarojen uudelleenkäyttöä.
Palauta käytetty laite käyttäen palautus- ja
noutojärjestelmää tai ota yhteyttä laitteen
myyneeseen liikkeeseen. He voivat kierrättää
tämän tuotteen ympäristöturvallisesti.
WEEE-FÖRKLARING
Denna markering indikerar att denna produkt inte
får avyttras med annat hushållsavfall inom EU. För
att förhindra möjlig skada på miljö eller person
från okontrollerat avfallsavyttrande, återvinn
på ansvarsfullt vis för att främja det fortsatta
återanvändandet av materialresurser. För att
returnera din använda enhet, använd retur och
insamlingssystemen eller kontakta återförsäljaren
där produkten köptes. De kan se till att produkten
återvinns på ett miljösäkert vis.
ΕΠΕΞΉΓΗΣΗ ΑΗΗΕ
Αυτή η σήμανση επισημαίνει ότι αυτό το προϊόν
δεν πρέπει να απορρίπτεται με άλλα οικιακά
απόβλητα σε όλη την ΕΕ. Για να μην προκληθεί
ζημιά στο περιβάλλον ή στην υγεία λόγω
μη ελεγχόμενης απόρριψης αποβλήτων,
ανακυκλώστε το υπεύθυνα, προάγοντας τη
βιώσιμη επαναχρησιμοποίηση των υλικών
πόρων. Για να επιστρέψετε τη χρησιμοποιημένη
συσκευή, χρησιμοποιήστε τα συστήματα
επιστροφής και συλλογής ή επικοινωνήστε με
το κατάστημα από το οποίο αγοράσατε το
προϊόν. Οι υπεύθυνοι μπορούν να παραλάβουν
αυτό το προϊόν για ασφαλή για το
περιβάλλον ανακύκλωσή του.
EXPLICAÇÃO WEEE
Esta marcação indica que o produto não deve ser
eliminado juntamente com outros resíduos
domésticos em toda a UE. Para impedir possíveis
danos ambientais ou à saúde humana resultantes
de uma eliminação não controlada dos resíduos,
este produto deverá ser reciclado de forma
responsável de modo a promover a reutilização
sustentável dos recursos materiais. Para fazer a
devolução do seu dispositivo usado, queira por
favor utilizar os sistemas de devolução e recolha
ou contactar a loja onde adquiriu o produto. A
loja poderá entregar este produto para que seja
reciclado de forma segura em termos ambientais.
WEEE AÇIKLAMASI
Bu işaret bu ürünün AB genelinde diğer ev
atıklarıyla birlikte atılmaması gerektiğini belirtir.
Kontrolsüz atığın çevre veya insan sağlığına olası
zararları engellemek için sorumlu bir şekilde
geri dönüştürülmesini ve malzeme kaynaklarının
sürdürebilir şekilde yeniden kullanılmasını
sağlayın. Kullanılmış aygıtınızı iade etmek için
lütfen iade sistemlerini kullanın veya ürünü
satın aldığınız perakende satış noktasıyla görüşün.
Kendileri bu ürünü çevreye zarar vermeyecek
şekilde geri dönüştürülmek üzere gerekli yere
gönderebilirler.
BATTERY DIRECTIVE
This symbol indicates that batteries must not
be disposed of in the domestic waste as they
contain substances which can be damaging to
the environment and health. Please dispose of
batteries in designated collection points.
DIRECTIVA RELATIVA A LAS PILAS
Este símbolo indica que las pilas no se
deben eliminar con la basura doméstica ya
que contienen sustancias que pueden ser
perjudiciales para el medio ambiente y la salud.
Deshágase de las pilas en los puntos de recogida
que existen para ese n.
DIRECTIVE RELATIVE AUX PILES ET AUX
ACCUMULATEURS
Ce symbole indique que les piles et les
accumulateurs ne doivent pas être jetés avec
les déchets ménagers car ils contiennent des
substances pouvant être préjudiciables pour la
santé humaine et l’environnement. Veuillez utiliser
les points de collecte mis à disposition pour vous
débarrasser des piles et accumulateurs usagés.
Avertissement : Toujours insérer les piles
correctement concernant les polarités
(+ et -) marquées sur la pile et l’équipement. Ne
pas laisser les enfants effectuer de remplacement
de pile sans la surveillance d’un adulte. Maintenir
les piles hors de portée des enfants. En cas
d’ingestion d’un élément ou d’une pile, il convient
que la personne concernée consulte rapidement
un médecin. Ne pas mettre au rebut les piles
dans le feu. Ne pas charger les piles. Ne pas
court-circuiter les piles. Il convient d’enlever
immédiatement les piles mortes de l’équipement
et de les mettre convenablement au rebut. Ne pas
déformer les piles. Information à conserver avec
la notice. Ne pas mélanger des piles anciennes
et neuves ou des piles de différents types ou
marques. Enlever les piles de l’équipement s’il
ne doit pas être utilisé pendant une période de
temps prolongée, sauf si l’on prévoit des cas
d’urgence. Ne pas chauffer les piles. Ne pas forcer
la décharge des piles.
BATTERIE RICHTLINIE
Dieses Symbol weist darauf hin, dass die Batterien
nicht mit dem gewöhnlichen Hausmüll entsorgt
werden dürfen, da sie Stoffe enthalten, die sich
auf Umwelt und Gesundheit schädlich auswirken
können. Entsorgen Sie die Batterien bitte an den
185
hierfür vorgesehenen Sammelstellen.
DIRETTIVA RELATIVA ALLE BATTERIE
Questo simbolo indica che le batterie devono
essere smaltite separatamente dai riuti domestici
poiché contengono sostanze potenzialmente
nocive per l’ambiente e la salute umana. Smaltire
le batterie negli appositi centri di raccolta.
BATTERIDIREKTIV
Dette symbol indikerer, at batterier ikke må
bortskaffes med husholdningsaffald, da de
indeholder stoffer, der kan være miljø- og
helbredsskadelige. Bortskaf venligst batterier på
udpegede indsamlingssteder.
ELEMEKRE VONATKOZÓ IRÁNYELV
Ez a szimbólum azt jelzi, hogy az elemek nem
dobhatók háztartási hulladék közé, mivel olyan
anyagokat tartalmaznak, amelyek károsak
lehetnek a környezetre és az egészségre. Kérjük,
vigye a használt elemeket a kijelölt gyűjtőhelyre.
DYREKTYWA DOT. BATERII
Ten symbol oznacza, że baterii nie można
wyrzucać wraz z odpadami domowymi, ponieważ
baterie zawierają substancje, które mogą być
szkodliwe dla środowiska oraz zdrowia. Baterie
należy dostarczyć do wyznaczonych punktów
zbiórki.
POKYNY OHĽADNE BATÉRIE
Tento znak znamená, že batérie sa nesmú
likvidovať spolu s domácim odpadom, pretože
obsahujú látky, ktoré môžu znečistiť životné
prostredie alebo poškodiť zdravie. Batérie
likvidujte v strediskách určených pre zber odpadu.
ИНСТРУКЦИИ К БАТАРЕЯМ
Данный символ означает, что батареи не
следует утилизировать совместно с бытовым
мусором, поскольку они содержат вещества,
способные нанести вред окружающей среде и
здоровью. Утилизируйте батареи в специально
предназначенных для этого приемных пунктах.
RICHTLIJN INZAKE BATTERIJEN
Dit symbool betekent dat batterijen niet met het
huisvuil weggeworpen mogen worden, omdat ze
stoffen bevatten die schadelijk kunnen zijn voor
het milieu en de gezondheid. Lever batterijen op
een aangewezen inzamelpunt in.
BATTERIDIREKTIV
Dette symbolet indikerer at batteriene ikke må
kastes sammen med vanlig husholdningsavfall da
de inneholder substanser som kan skade miljøet
og helsen. Vær vennlig å kaste batterier i angitte
oppsamlingspunkter.
BATTERIFÖRESKRIFT
Denna symbol indikerar att batterier inte får
avyttras bland hushållssopor eftersom de
innehåller substanser som kan skada miljön och
hälsan. Avyttra batterier endast vid designerade
insamlingspunkter.
ΟΔΗΓΙΑ ΓΙΑ ΤΙΣ ΜΠΑΤΑΡΙΕΣ
Το σύμβολο αυτό υποδεικνύει ότι οι μπαταρίες
δεν πρέπει να απορρίπτονται μαζί με οικιακά
απορρίμματα, καθώς περιέχουν ουσίες που
μπορεί να είναι επιβλαβείς για το περιβάλλον
και την υγεία. Απορρίπτετε τις μπαταρίες στα
καθορισμένα σημεία συλλογής.
INSTRUÇÕES RELATIVAMENTE ÀS PILHAS
Este símbolo indica que as pilhas não podem ser
eliminadas juntamente com o lixo doméstico,
dado que contêm substâncias que podem ser
prejudiciais para o meio ambiente e a saúde.
As pilhas devem ser eliminadas nos pontos de
recolha designados.
PIL DIREKTIFI
Bu sembol, çevreye ve sağlığa karşı zararlı
olabilen maddeler içerebileceği için pillerin ev
atığıyla atılmaması gerektiği gösterir. lütfen, pilleri
belirtilen toplama noktalarına atın.
FCC WARNING:
This device complies with FCC radiation exposure
limits set forth for an uncontrolled environment.
This device complies with Part 15 of the FCC
Rules. Operation is subject to the following two
conditions: (1) this device may not cause harmful
interference, and (2) this device must accept any
interference received, including interference that
may cause undesired operation.
Any Changes or modications not expressly
approved by the party responsible for compliance
could void the user’s authority to operate the
equipment.
Note: This equipment has been tested and found
to comply with the limits for a Class B digital
device, pursuant to part 15 of the FCC Rules.
These limits are designed to provide reasonable
protection against harmful interference in a
residential installation. This equipment generates,
uses and can radiate radio frequency energy
and, if not installed and used in accordance with
the instructions, may cause harmful interference
to radio communications. However, there is no
guarantee that interference will not occur in a
particular installation. If this equipment does
cause harmful interference to radio or television
reception, which can be determined by turning the
equipment off and on, the user is encouraged to
try to correct the interference by one or more of
the following measures:
—Reorient or relocate the receiving antenna.
—Increase the separation between the equipment
186
and receiver.
—Connect the equipment into an outlet on a
circuit different from that to which the receiver is
connected.
—Consult the dealer or an experienced radio/TV
technician for help.
FCC Radiation Exposure Statement:
This equipment complies with FCC radiation
exposure limits set forth for an uncontrolled envi-
ronment. This transmitter must not be co-located
or operating in conjunction with any other antenna
or transmitter.
ISEDC WARNING
This device complies with Innovation, Science, and
Economic Development Canada license-exempt
RSS standard(s). Operation is subject to the
following two conditions: (1) this device may not
cause interference, and (2) this device must ac-
cept any interference, including interference that
may cause undesired operation of the device.
Le présent appareil est conforme aux CNR d’
Innovation, Sciences et Développement économ-
ique Canada applicables aux appareils radio ex-
empts de licence. L’exploitation est autorisée aux
deux conditions suivantes : (1) l’appareil nedoit
pas produire de brouillage, et (2) l’utilisateur de
l’appareil doit accepter tout brouillage radioélec-
trique subi, même si le brouillage est susceptible
d’en compromettre le fonctionnement.
ISEDC RADIATION EXPOSURE
STATEMENT:
The device is compliance with RF exposure guide-
lines, users can obtain Canadian information on
RF exposure and compliance. Le présent appareil
est conforme Après examen de ce matériel aux
conformité ou aux limites d’intensité de champ
RF,les utilisateurs peuvent sur l’exposition aux
radiofréquences et la conformité and compliance
d’acquérirles informations correspondantes.
DECLARATION OF CONFORMITY
EN
Hereby, FKA Brands Ltd., declares that this radio
equipment is in compliance with the essential
requirements and other relevant provisions of Directive
2014/53/EU. A copy of the Declaration of Conformity
can be obtained from
www.solrepublic.co.uk/declaration-of-conformity
IT
Con la presente, FKA Brands Ltd., dichiara che
l’apparecchiatura radio in oggetto è conforme ai
requisiti essenziali e ad altre disposizioni pertinenti della
Direttiva 2014/53/EU. È possibile richiedere una copia
della Dichiarazione di conformità scrivendo all’indirizzo
www.solrepublic.co.uk/declaration-of-conformity
DE
Hiermit erklärt die FKA Brands Ltd., dass dieses
Funkgerät in Übereinstimmung mit den wesentlichen
Anforderungen und anderen entsprechenden
Bestimmungen der Richtlinie 2014/53/EU geliefert
wird. Eine Kopie der Konformitätserklärung ist über
www.solrepublic.co.uk/declaration-of-conformity
FR
FKA Brands Ltd. déclare par la présente que cet
équipement radio est conforme aux exigences
essentielles et autres dispositions pertinentes de la
Directive 2014/53/EU. Pour obtenir un exemplaire de
la Déclaration de conformité, s’adresser à
www.solrepublic.co.uk/declaration-of-conformity
ES
Por la presente, FKA Brands Ltd. declara que este
dispositivo de radio está en conformidad con los
requisitos esenciales y otras disposiciones relevantes
de la directiva 2014/53/EU. Si desea una copia de
la declaración de conformidad, solicítela a www.
solrepublic.co.uk/declaration-of-conformity
PT
Desta forma, o FKA Brands Ltd., declara que este
equipamento de rádio está em conformidade com
os requisitos essenciais outras provisões relevantes
da Diretiva 2014/53/EU. É possível obter uma cópia
da Declaração de Conformidade através do www.
solrepublic.co.uk/declaration-of-conformity
NL
Hierbij verklaart FKA Brands Ltd. dat deze
radioapparatuur voldoet aan de essentiële vereisten en
andere relevante voorschriften van Directive 2014/53/
EU. Een kopie van de conformiteitsverklaring kan
worden verkregen via
www.solrepublic.co.uk/declaration-of-conformity
HU
A FKA Brands Ltd.. kijelenti, hogy ez a
rádióberendezés eleget tesz a 2014/53/EU irányelv
szükséges követelményeinek és egyéb vonatkozó
rendelkezéseinek. A Megfelelőségi nyilatkozat
másolatát a
www.solrepublic.co.uk/declaration-of-conformity
CZ
Společnost FKA Brands Ltd. tímto prohlašuje, že toto
rádiové vybavení je ve shodě se základními požadavky a
dalšími relevantními ustanoveními směrnice 2014/53/
EU. Kopii prohlášení o shodě získáte na adrese
www.solrepublic.co.uk/declaration-of-conformity
SK
Spoločnosť FKA Brands Ltd. týmto vyhlasuje, že
toto rádiové zariadenie je v súlade so základnými
požiadavkami a ďalšími relevantnými ustanoveniami
Smernice 2014/53/EÚ. Kópiu vyhlásenia o zhode
získate na adrese
www.solrepublic.co.uk/declaration-of-conformity
PL
Niniejszym rma FKA Brands Ltd. oświadcza, że to
urządzenie radiowe jest zgodne z podstawowymi
wymaganiami oraz innymi właściwymi postanowieniami
Dyrektywy 2014/53/EU. Kopię Deklaracji zgodności
można uzyskać pod
www.solrepublic.co.uk/declaration-of-conformity
TR
İş bu vesileyle, FKA Brands Ltd., bu telsiz ekipmanının
2014/53/EU Yönergesinin temel gereksinimleri ve
diğer ilgili hükümleriyle uyumlu olduğunu beyan eder.
Uygunluk Beyanı’nın bir kopyası
www.solrepublic.co.uk/declaration-of-conformity
RU
Компания FKA Brands Ltd. настоящим
подтверждает соответствие данного
радиооборудования основным требованиям и
другим применимым положениям Директивы
2014/53/EU. Копия Декларации соответствия
можно получить по электронному адресу:
www.solrepublic.co.uk/declaration-of-conformity
NO
FKA Brands Ltd., erklærer herved at dette radioutstyret
samsvarer med nødvendige krav og andre relevante
forholdsregler i direktiv 2014/53/EU. En kopi av
konformitetserklæringen er tilgjengelig fra
www.solrepublic.co.uk/declaration-of-conformity
DK
FKA Brands Ltd. erklærer hermed, at dette radioudstyr
efterlever de essentielle krav og andre relevante
bestemmelser i Direktiv 2014/53/EU. En kopi af
Overensstemmelseserklæringen kan fås hos
www.solrepublic.co.uk/declaration-of-conformity
SV
Härmed deklarerar FKA Brands Ltd. att denna
radioutrustning är förenlig med nödvändiga krav och
andra relevanta bestämmelser i direktivet 2014/53/
EU. En kopia av förenlighetsdeklarationen kan erhållas
från
www.solrepublic.co.uk/declaration-of-conformity
FI
FKA Brands Ltd. vakuuttaa, että tämä radiolaite on
direktiivin 2014/53/EU vaatimusten ja muiden siihen
liittyvien säädösten mukainen. Kopion vaatimust-
enmukaisuusvakuutuksesta voi tilata lähettämällä
sähköpostia osoitteeseen
www.solrepublic.co.uk/declaration-of-conformity
EL
Με το παρόν, η FKA Brands Ltd. δηλώνει ότι αυτός
ο ασύρματος εξοπλισμός συμμορφώνεται με
τις ουσιώδεις απαιτήσεις και τις άλλες σχετικές
προβλέψεις της Οδηγίας 2014/53/EU. Μπορείτε
να αποκτήσετε ένα αντίγραφο της Δήλωσης
Συμμόρφωσης αν επικοινωνήσετε με τη διεύθυνση
www.solrepublic.co.uk/declaration-of-conformity
.FKA Brands Ltd
.2014/53/EU
www.solrepublic.co.uk/declaration-of-conformity
WARNING: Batteries (battery pack or batteries
installed) shall not be exposed to excessive heat such
as sunshine, re or the like.
ADVERTENCIA: Las pilas (batería o pilas instaladas)
no se deben exponer a una fuente de calor excesivo,
como la luz solar, el fuego o similar.
AVERTISSEMENT : Les batteries (la batterie ou les
piles installées) ne doivent pas être exposées à une
chaleur excessive (soleil, feu ou autre).
WARNHINWEIS: Batterien (Akkus oder eingebaute
Batterien) dürfen nicht übermäßiger Wärme, wie
direkter Sonneneinstrahlung, Feuer oder dergleichen
ausgesetzt werden.
AVVERTENZA: Non esporre le batterie (alimentatore
o batterie installate) a calore eccessivo, come ad
esempio luce solare, fuoco o simili fonti di calore.
ADVARSEL: Batterier (batteripakke eller isatte
batterier) må ikke udsættes for kraftig varme såsom
solskin, ild eller lignende.
VAROVÁNÍ: Baterie (nainstalovaná sada baterií nebo
baterie) nesmí být vystaveny nadměrnému teplu,
například slunečnímu záření, ohni a podobně.
FIGYELEM: Az akkumulátort (akkumulátorok
vagy beépített akkumulátor) nem szabad túlzott
hőhatásnak, például napsütésnek, tűznek vagy hasonló
hatásnak kitenni.
187

188
OSTRZEŻENIE! Baterii (zestawu baterii lub
dostarczonych baterii przez producenta) nie należy
wystawiać na działanie nadmiernego ciepła, takiego
jak promienie słoneczne, pożar lub podobne źródła
ciepła.
VAROVANIE: Batérie (balenie batérií alebo
nainštalované batérie) nesmú byť vystavené nadmernému
teplu, napríklad slnečnému žiareniu, ohňu a podobne.
ВНИМАНИЕ! Не допускайте воздействия на
батареи (батарейный отсек или установленные
батареи) источников избыточного нагрева: прямых
солнечных лучей, огня и т. п.
VAROVANIE: Batérie (balenie batérií alebo
nainštalované batérie) nesmú byť vystavené nadmernému
teplu, napríklad slnečnému žiareniu, ohňu a podobne.
WAARSCHUWING! Batterijen (accu of
geïnstalleerde batterijen) mogen niet worden
blootgesteld aan overmatige warmte, zoals zonlicht,
vuur of soortgelijke dingen.
ADVARSEL: Batterier (batteripakke eller installerte
batterier) skal ikke utsettes for sterk varme, slik som
solskinn, brann eller lignende.
VAROITUS: Akkuja (akkuyksikkö tai asennetut
akut) ei saa altistaa liialliselle kuumuudelle, kuten
auringonvalo, tulipalo, tms.
VARNING: Batterier (nätandel eller installerade
batterier) inte får utsättas för överdriven värme såsom
solsken, eld eller liknande.
ΠΡΟΕΙΔΟΠΟΙΗΣΗ: Οι μπαταρίες (κλειστή
μπαταρία ή εγκατεστημένες μπαταρίες) δεν πρέπει
να εκτίθενται σε υπερβολική θερμότητα, όπως
απευθείας ηλιακό φως, φωτιά ή όμοιες συνθήκες.
ADVERTÊNCIA: As pilhas (fonte de alimentação
ou pilhas instaladas) não devem ser sujeitas a calor
excessivo, designadamente através de exposição ao
sol, fogo ou outras fontes de calor semelhantes.
UYARI: Piller (pil paketi ya da takılı piller) güneş
ışığı, ateş ya da benzeri aşırı ısı kaynaklarına maruz
bırakılmamalıdır.
RESOLUÇÃO 506
Este equipamento opera em caráter secundário, isto
é, não tem direito a proteção contra interferência
prejudicial, mesmo de estações do mesmo tipo, e não
pode causar interferência a sistemas operando em
caráter primário.
인증받은자의 상호: (주)디엠에이씨인터
내셔널
제품명/모델명:특정소출력무선기기(무선데
이타통신시스템용무선기기)/
SOL
-EP1195
제조자및제조국가: FKA Distributing Co.,LLC/
China
인증번호: R-CRI-DMV-SOL-EP1195
제품명 (Product name): Amps Air 2.0
모델명 (Model): SOL-EP1195
무선방식 (Operation Frequency): Bluetooth
(2402 – 2480 MHz)
채널 (Radio Channel): 79channels
무선채널 (Bluetooth Mode): BT :4.0
출력 (Output Power): 0.05mW/WHz
변조형식 (Modulation Type):GFSK,
π/4-DQPSK, 8DPSK
전원 (Power Supply): 3.7 V
NCC Warning Message
低功率電波輻射性電機管理辦法
第十二條 經型式認證合格之低功率射頻電
機,非經許可,公司、商號或使
用者均不得擅自變更頻 率、加大功率或變更
原設計之特性及功能。
第十四條 低功率射頻電機之使用不得影響飛
航安全及干擾合法通信;經發
現有干擾現象時,應改 善至無干擾時方得
繼續使用。
前項合法通信,指依電信法規定作業之無線
電通信。
低功率射頻電機 須忍受合法通信或工業、科
學及醫療用電波輻射性電機設
備之干擾。
【技術規格】
輸出功率: 3mW
阻抗: 2*16Ω
靈敏度: 91dB ±3dB&1KHZ
頻率範圍:20Hz-20kHz
藍牙版本:藍牙4.0
電池形態與容量:鋰聚合物 60mAh
訊號頻率:2.402GHz‐ 2.480GHz
電池使用時間:3小時
電池充電時間:1.5 小時
Micro USB port: Input 5V/2A
USB port: Output 5V/1A
[充電說明]
充電時請由Micro USB port 輸入5VDC, 1A
電源。
(本產品不附賣電源供應器,請另外選購。)
189
FOR CUSTOMER SERVICE INQUIRIES, PLEASE EMAIL
SUPPORT@SOLREPUBLIC.COM
DESIGNED IN SAN FRANCISCO, CA. PATENTS PENDING.
©2014-2018 SR HOMEDICS, LLC. ALL RIGHTS RESERVED.
SOL REPUBLIC AND THE SOL REPUBLIC LOGO ARE
TRADEMARKS OF SR HOMEDICS, LLC.
POUR JOINDRE LE SERVICE À LA CLIENTÈLE, VEUILLEZ ENVOYER UN
E-MAIL À SUPPORT@SOLREPUBLIC.COM
CONÇU À SAN FRANCISCO, EN CALIFORNIE. BREVETS EN ATTENTE
©2014-2018 SR HOMEDICS, LLC. TOUS DROITS
RÉSERVÉS. SOL REPUBLIC ET LE LOGO SOL REPUBLIC
SONT DES MARQUES DÉPOSÉES DE SR HOMEDICS, LLC.
OPERATING FREQUENCY BANDS: 2402 – 2480MHZ
MAX POWER TRANSMITTED: 3.65DBM FOR BT, 5.50DBM FOR BLE
名稱: 藍牙耳機+行動電源
型號: SOL
-EP1195
AMPS AIR is a trademark of SR Homedics, LLC. Due to continuous product
improvements, the picture on the package may differ slightly from the actual
product. For Australia, the included warranty complies with regulation 90 of the
Competition and Consumer Regulations 2010. The Bluetooth® word mark and
logos are registered trademarks owned by Bluetooth SIG, Inc. and any use of such
marks by SOL REPUBLIC is under license.
Conçu à San Francisco, CA. Brevets en instance. © 2018 SR Homedics, LLC. Tous
droits réservés. SOL REPUBLIC le et logo SOL REPUBLIC, sont des marques de
commerce de SR Homedics, LLC. AMPS AIR est le marques de commerce de SR
Homedics, LLC. Images du produit peuvent varier du produit réel. Pour l’Australie,
la garantie fournie est conforme à la réglementation 90 de la concurrence et des
consommateurs Règlement 2010. La marque Bluetooth® et les logos sont des
marques déposées appartenant à Bluetooth SIG, Inc. et toute utilisation de ces
marques par SOL REPUBLIC est sous licence.
SUPPORT@SOLREPUBLIC.COM
EC
E
C
© 2018 SOL REPUBLIC
Model: SOL-EP1195
QS-SOLEP1195
02375/I/POSTEL/2007
2211
Complies with
IMDA Standards
[Daler’s Licence NO.]
According to the FCC Regulation and Guidance(KDB Publication 784748 D01 v09r01),
as the earbuds are too small for the FCC ID to be printed,
the FCC ID will be moved to user's manual and power bank.
FCC ID: TG3-SOLEP1195
IC: 20834-SOLEP1195